Sharp LC 32LE451U User Manual LCD TV Manuals And Guides 1410082L
User Manual: Sharp LC-32LE451U LC-32LE451U SHARP LCD TV - Manuals and Guides View the owners manual for your SHARP LCD TV #LC32LE451U. Home:Electronics Parts:Sharp Parts:Sharp LCD TV Manual
Open the PDF directly: View PDF ![]() .
.
Page Count: 68

SHARP
SHARP ELECTRONICS CORPORATION
Sharp Plaza, Mahwah, New Jersey 07495-1163
O
m
z
z
c
r-
z
c
r-
ITI
O
m
O
z
:1:
SHARP
LIQUID CRYSTAL TELEVISION
TELEVISOR CON PANTALLA DE
CRISTAL LiQUIDO
OPERATION MANUAL
MANUAL DE OPERAClON
IMPORTANT : Please read this operation manual before
starting operating the equipment.
IIMPORTANTE : Lea este manual de operaci6n antes de
comenzar a operar el equipo.
(Except LC-32LE451 U)
DOLBY
DIGITAL I,..I rl,l| TM
HIGH-DEFINITION MULTIMEDIA INTERFACE
=';(I_4I-IL
MBbile _i_h-_eF_nition kin_
iMPORTANT iNFORMATiON
IMPORTANT:
To aid reporting in case of loss or theft, please record the
TV's model and serial numbers in the space provided.
The numbers are located at the rear and left side of the TV.
Model No. :
Series No. :
WARNING: TO REDUCE THE RISK OF FIRE OR ELECTRIC SHOCK, DO NOT EXPOSE THISPRODUCT TO RAIN OR MOISTURE.
CAUTION: TO REDUCE THE RISK OF ELECTRIC SHOCK,
DO NOT REMOVE COVER (OR BACK).
NO USER SERVICEABLE PARTS INSIDE.
REFER SERVICING TO QUALIFIED SERVICE
PERSONNEL.
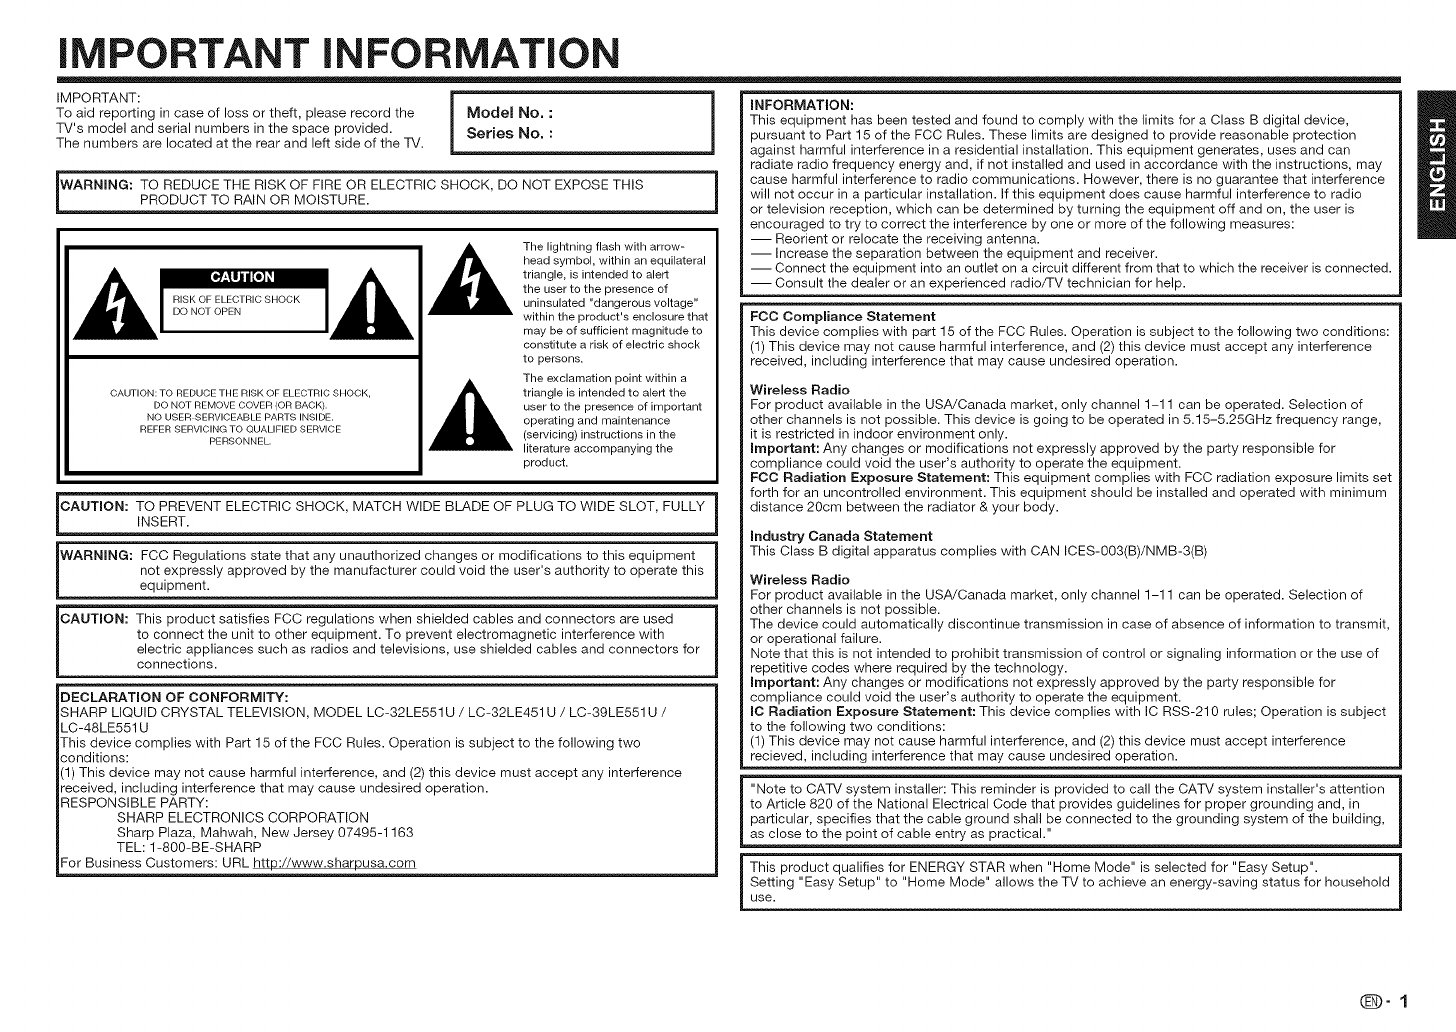
The lightning flash with arrow-
head symbol, within an equilateral
triangle, is intended to alert
the user to the presence of
uninsulated "dangerous voltage"
within the product's enclosure that
may be of sufficient magnitude to
constitute a risk of electric shock
to persons.
The exclamation point within a
triangle is intended to alert the
user to the presence of important
operating and maintenance
(servicing) instructions in the
literature accompanying the
product.
CAUTmON: TO PREVENT ELECTRIC SHOCK, MATCH WIDE BLADE OF PLUG TO WIDE SLOT, FULLY
INSERT.
WARNING: FCC Regulations state that any unauthorized changes or modifications to this equipment
not expressly approved by the manufacturer could void the user's authority to operate this
equipment.
CAUTmON: This product satisfies FCC regulations when shielded cables and connectors are used
to connect the unit to other equipment. To prevent electromagnetic interference with
electric appliances such as radios and televisions, use shielded cables and connectors for
connections.
DECLARATION OF CONFORMITY:
SHARP LIQUID CRYSTAL TELEVISION, MODEL LC-32LE551U /LC-32LE451U /LC-39LE551U /
LC-48LE551 U
This device complies with Part 15 of the FCC Rules. Operation is subject to the following two
conditions:
(1) This device may not cause harmful interference, and (2) this device must accept any interference
received, including interference that may cause undesired operation.
RESPONSIBLE PARTY:
SHARP ELECTRONICS CORPORATION
Sharp Plaza, Mahwah, New Jersey 07495-1163
TEL: 1-800-BE-SHARP
For Business Customers: URL http://www.sharpusa.com
INFORMATION: B
This equipment has been tested and found to comply with the limits for a Class B digital device,
pursuant to Part 15 of the FCC Rules. These limits are designed to provide reasonable protection
against harmful interference in a residential installation. This equipment generates, uses and can
radiate radio frequency energy and, if not installed and used in accordance with the instructions, may
cause harmful interference to radio communications. However, there is no guarantee that interference
will not occur in a particular installation. If this equipment does cause harmful interference to radio
or television reception, which can be determined by turning the equipment off and on, the user is
encouraged to try to correct the interference by one or more of the following measures:
-- Reorient or relocate the receiving antenna.
-- Increase the separation between the equipment and receiver.
-- Connect the equipment into an outlet on a circuit different from that to which the receiver is connected.
-- Consult the dealer or an experienced radio/TV technician for help.
FCC Compliance Statement
This device complies with part 15 of the FCC Rules. Operation is subject to the following two conditions:
(1) This device may not cause harmful interference, and (2) this device must accept any interference
received, including interference that may cause undesired operation.
Wireless Radio
For product available in the USA/Canada market, only channel 1-11 can be operated. Selection of
other channels is not possible. This device is going to be operated in 5.15-5.25GHz frequency range,
it is restricted in indoor environment only.
Important: Any changes or modifications not expressly approved by the party responsible for
compliance could void the user's authority to operate the equipment.
FCC Radiation Exposure Statement: This equipment complies with FCC radiation exposure limits set
forth for an uncontrolled environment. This equipment should be installed and operated with minimum
distance 2Ocm between the radiator & your body.
Industry Canada Statement
This Class B digital apparatus complies with CAN ICES-003(B)/NMB-3(B)
Wireless Radio
For product available in the USA/Canada market, only channel 1-11 can be operated. Selection of
other channels is not possible.
The device could automatically discontinue transmission in case of absence of information to transmit,
or operational failure.
Note that this is not intended to prohibit transmission of control or signaling information or the use of
repetitive codes where required by the technology.
Important: Any changes or modifications not expressly approved by the party responsible for
compliance could void the user's authority to operate the equipment.
IC Radiation Exposure Statement: This device complies with IC RSS-210 rules; Operation is subject
to the following two conditions:
(1) This device may not cause harmful interference, and (2) this device must accept interference
recieved, including interference that may cause undesired operation.
"Note to CATV system installer: This reminder is provided to call the CATV system installer's attention
to Article 820 of the National Electrical Code that provides guidelines for proper grounding and, in
particular, specifies that the cable ground shall be connected to the grounding system of the building,
as close to the point of cable entry as practical."
This product qualifies for ENERGY STAR when "Home Mode" is selected for "Easy Setup".
Setting "Easy Setup" to "Home Mode" allows the TV to achieve an energy-saving status for household
use.
(D-1

DEAR SHARP CUSTOMER
Thank you for your purchase of the Sharp Liquid Crystal Television. To ensure safety and many
years of trouble-free operation of your product, please read the Important Safety Instructions
carefully before using this product.
iMPORTANT SAFETY iNSTRUCTiONS
I Electricity is used to perform many useful functions, but it can also cause personal injuries and
property damage if improperly handled. This product has been engineered and manufactured with
the highest priority on safety. However, improper use can result in electric shock and/or fire. In order
to prevent potential danger, please observe the following instructions when installing, operating
and cleaning the product. To ensure your safety and prolong the service life of your Liquid Crystal
Television, please read the following precautions carefully before using the product.
1) Read these instructions.
2) Keep these instructions.
3) Heed all warnings.
4) Follow all instructions.
5) Do not use this apparatus near water.
6) Clean only with dry cloth.
7) Do not block any ventilation openings. Install in accordance with the manufacturer's instructions.
8) Do not install near any heat sources such as radiators, heat registers, stoves, or other apparatus
(including amplifiers) that produce heat.
9) Do not defeat the safety purpose of the polarized or grounding-type plug. A polarized plug has two
blades with one wider than the other. A grounding type plug has two blades and a third grounding
prong. The wide blade or the third prong are provided for your safety. If the provided plug does not fit
into your outlet, consult an electrician for replacement of the obsolete outlet.
10) Protect the power cord from being walked on or pinched particularly at plugs, convenience
receptacles, and the point where they exit from the apparatus.
11) Only use attachments/accessories specified by the manufacturer.
12) Use only with the cart, stand, tripod, bracket, or table specified by the manufacturer,
or sold with the apparatus. When a cart is used, use caution when moving the cart/ _,_,_
apparatus combination to avoid injury from tip-over. _J
13) Unplug this apparatus during lightning storms or when unused for long periods of _t_V
time. -"
14) Refer all servicing to qualified service personnel. Servicing is required when the apparatus has
been damaged in any way, such as power-supply cord or plug is damaged, liquid has been
spilled or objects have fallen into the apparatus, the apparatus has been exposed to rain or
moisture, does not operate normally, or has been dropped.
Additional Safety Information
15) Power Sources--This product should be operated only from the type of power source indicated
on the marking label. If you are not sure of the type of power supply to your home, consult your
product dealer or local power company. For products intended to operate from battery power, or
other sources, refer to the operating instructions.
16) Overloading- Do not overload wall outlets, extension cords, or integral convenience receptacles
as this can result in a risk of fire or electric shock.
17) Object and Liquid Entry--Never push objects of any kind into this product through openings as
they may touch dangerous voltage points or short-out parts that could result in a fire or electric
shock. Never spill liquid of any kind on the product.
18) Damage Requiring Service--Unplug this product from the wall outlet and refer servicing to
qualified service personnel under the following conditions:
a) When the AC cord or plug is damaged,
b) If liquid has been spilled, or objects have fallen into the product,
c) If the product has been exposed to rain or water,
d) If the product does not operate normally by following the operating instructions.
Adjust only those controls that are covered by the operating instructions as an improper
adjustment of other controls may result in damage and will often require extensive work by a qualified
!echnician !o !es!o!e !he p!oduc! !o i!s no!ma, ope!a!ion I J
_-2
iMPORTANT SAFETY iNSTRUCTiONS
e) If the product has been dropped or damaged in any way, and
f ) When the product exhibits a distinct change in performance - this indicates a need for
service.
19) Replacement Parts--When replacement parts are required, be sure the service technician has
used replacement parts specified by the manufacturer or have the same characteristics as the
original part. Unauthorized substitutions may result in fire, electric shock, or other hazards.
20) Safety Check--Upon completion of any service or repairs to this product, ask the service
technician to perform safety checks to determine that the product is in proper operating
condition.
21) Wall or ceiling mounting--When mounting the product on a wall or ceiling, be sure to install the
product according to the method recommended by the manufacturer.
,. J
F®' ' EXAMPLE OF ANTENNA GROUNDING AS PER
Outdoor Antenna Grounding ------If an outside NATIONALELECTRICALCODEANSI/NFPA70
| antenna is connected to the television z%
| equipment, be sure the antenna system is _ANTENNA LEAD
| grounded so as to provide some protection n_ INWIRE
| against voltage surges and built-up static .._LI
| charges. _/ .......... //_\"..
| Ar[icle 810 of the National Electrical Code j _.n_2/_ _ I_ I'_'_ ANTENNA
.... ' DISCHARGE UNIT
| ANSI/NFPAT0 prov,des,nformat,onw,th ______ _'_'_/// "lj:_ "_/NEOSEOTION81020'
| regard to proper grounding of the mast and IFI FCTR_C_'-_'_'I " /]t_[ ' ' '
| supporting structure, grounding of the lead- I SERVICE t /LI GROUNDINGCONDUCTORS
| in wire to an antenna discharge unit, size of [ EOZ'J_PMENT-----_.t_/_ _EC SECTIONS_021
| grounding conductors, location of antenna- _ __
| discharge unit, connection to grounding ___ _ROUNDCLAMPS
| electrodes, and requirements for the =.-- POWERSERVICEGROUNDING
| grounding electrode. ELECTRODESYSTEM
" " (NEC ART 250)
NEC NATIONAL ELECTRICAL CODE
,_ Waler and Moisture ------Do not use this product near water -for example, near a bath tub, wash bowl,
kitchen sink, or laundry tub; in awet basement; or near a swimming pool; and the like.
- Stand ------Do not place the product on an unstable cart, stand, tripod or table. Placing the product on an
unstable base can cause the product to fall, resulting in serious personal injuries as well as damage to the
product, Use only a cart, stand, tripod, bracket or table recommended by the manufacturer or sold with
the product. When mounting the product on a wall, be sure to follow the manufacturer's instructions. Use
only the mounting hardware recommended by the manufacturer,
,_ Selecting the location ------Select a place with no direct sunlight and good ventilation.
,_ Ventilation ----The vents and other openings in the cabinet are designed for ventilation. Do not cover
or block these vents and openings since insufficient ventilation can cause overheating and/or shorten
the life of the product. Do not place the product on a bed, sofa, rug or other similar surface, since they
can block ventilation openings. This product is not designed for built-in installation; do not place the
product in an enclosed place such as a bookcase or rack, unless proper ventilation is provided or the
manufacturer's instructions are followed.
,, The front panel used in this product is made of glass. Therebre, it can break when the product is dropped
or applied with impact. Be careful not to be injured by broken glass pieces in case the panel breaks.
,_ Heal -- The product should be situated away from heat sources such as radiators, heat registers,
stoves, or other products (including amplifiers) that produce heat.
,, Lightning -- For added protection for this television equipment during a lightning storm, or when it is
left unattended and unused for long periods of time, unplug it from the wall outlet and disconnect the
antenna. This will prevent damage to the equipment due to lightning and power-line surges.
,_ Power Lines ------An outside antenna system should not be located in the vicinity of overhead power
lines or other electric light or power circuits, or where it can fall into such power lines or circuits. When
installing an outside antenna system, extreme care should be taken to keep from touching such power
lines or circuits as contact with them might be fatal.
. To prevent fire, never place any type of candle or flames on the top or near the TM set.

iMPORTANT SAFETY iNSTRUCTiONS
, To prevent fire or shock h_ard, do not place the AC cord under the TM set or other heavy items. |
,]
" Do not display a still picture for a long time, as this could cause an aflerimage to remain. Q_
- To prevent fire or shock h_ard, do not expose this product to dripping or splashing.No _ _-,__._
objects filled with liquids, such as vases, shouk_ be placed on the product. I1_--
- Do not insert foreign objects into the product. Inserting objects in the air vents or other
openings may result in fire or electric shock. Exercise special caution when using the
product around children.
Caring for the cabinet
" Use a soft cloth (cotton, flannel, etc.) and .gently wipe the surface of the cabinet.
Using a chemical cloth (weVdry sheet type cloth, etc.) may deform the components of the main unit cabinet
or cause cracking.
,, Wiping with a hard cloth or using strong ferce may scratch the surface of the cabinet.
,_ If the cabinet is very dirty, wipe with a soft cloth (cotton, flannel, etc.) soaked in neutral detergent diluted
with water and thoroughly wrung out, and then wipe with a soft dry cloth.
,, Avoid using benzene, thinner, and other solvents, as these may deform the cabinet and cause the paint
to peel off.
,, Do not apply insecticides or other volatile liquids.
Also, do not allow the cabinet to remain in contact with rubber or vinyl products for a long period of time.
Plasticizers inside the plastic may cause the cabinet to deform and cause the paint to peel off.
Caring for the front panel
,, Turn off the main power and unplug the AC cord from the wall outlet before handling ....
,, Gently wipe the surface of the front panel with a soft cloth (cotton, flannel, etc.). _ ,b__
To protect the front panel, do not use a dirty cloth, liquid cleaners, or a chemical (f]y __!_
cloth (wet/dry sheet type cloth, etc.). This may damage the surface of the front 1[ iI_'
panel. "_
,, Wiping with a hard cloth or using strong force may scratch the surface of the front
panel.
,, Use a soft damp cloth to gently wipe the front panel when it is really dirfy.(It may scratch the surface of
the front panel when wiped strongly.)
,, If the front panel is dusty, use an anti-static brush, which is commercially available, to clean it.
,, To avoid scratching the frame or screen, please use a soft, lint free cloth for cleaning. Approved cleaning
cloths are available directly from Sharp insingle (00Z-LCD-CLOTH) or triple (00Z-LCD-CLOTH-3) packs.
Call 1-800-BE-SHARP for ordering.
Z_WARNING
DO NOT INGEST BAFIERY, CHEMICAL BURN H,_ARD
"This product contains a coin/button cell battery. If the coin/button cell battery is swallowed, it can cause
severe internal burns in just 2 hours and can lead to death. Keep new and used batteries away from
children. If the battery compartment does not close securely, stop using the product and keep it away
from children. If you think batteries might have been swallowed or placed inside any part of the body, seek
immediate medical attention."
CHILD SAFETY:
PROPER TELEViSiON PLACEMENT MATTERS
iTHE CONSUMER ELECTRONICS INDUSTRY CARES
" Manufacturers, retailers and tile rest of the consumer electronics industry are
committed to making home entertainment safe and enjoyable.
,, As you enjoy your television, please note that alltelevisions - new and old- must
be supported on proper stands or installed according to the manufacturer's
recommendations. Televisions that are inappropriately situated on dressers,
bookcases, stlelves, desks, speakers, chests, carts, etc., may fall over, resulting in
injury.
TUNE IN TO SAFETY
ALWAYS follow the manufacturer's recommendations for the safe installation of
your television.
• ALWAYS read and follow all instructions for proper use of your television.
• NEVER allow ctlildren to climb on or play on the television or tile furniture on wtlich
the television is placed.
• NEVER place the television on furniture ttlat can easily be used as steps, suctl as a
ctlest of drawers.
• ALWAYS install the television where it cannot be pushed, pulled over or knocked
down.
• ALWAYS route cords and cables connected to the television so that ttley cannot
be tripped over, pulled or grabbed.
WALL OR CEILING MOUNT YOUR TELEVISION
•ALWAYS contact your retailer about professional installation if you have any doubts
about your ability to safely mount your television.
,, ALWAYS use a mount that has been recommended by the television manufacturer
and has a safety certification by an independent laboratory (such as UL, CSA, ETL).
• ALWAYS follow all instructions supplied by the television and mount manufacturers.
• ALWAYS make sure that the wall or ceiling wtlere you are mounting the television is
appropriate.
Some mounts are not designed to be mounted to walls and ceilings with steel studs
or cinder block construction. Ifyou are unsure, contact a professional installer.
,, Televisions can be heavy. A minimum of two people is required for a wall or ceiling
mount installation.
MOVING AN OLDER TELEVISION TO A NEW PLACE IN YOUR HOME
" Many new television buyers move their older CRT televisions into a secondary room
after the purchase of a fiat-panel television. Special care should be made in tile
placement of older CRT televisions.
• ALWAYS place your older CRT television on furniture that is sturdy and appropriate
for its size and weight.
• NEVER place your older CRT television on a dresser where ctlildren may be
tempted to use the drawers to climb.
• ALWAYS make sure your older CRT television does not hang over the edge of your
furniture.
CE.org/safety
J
(D-3
Accessories
Make sure the following accessories are provided with the product.
Remote control unit AC cord
Stand unit
[] Operation manual (this publication)
Stand screws (4 pieces)
Connection guide
AAA batteries (2 pieces)
• Always use the AC cord supplied wkh the TV.
• The illustrations above are for explanation purposes and may vary slightly from the actual accessories.
Contents
IMPORTANT INFORMATION .............................. 1
DEAR SHARP CUSTOMER ................................. 2
IMPORTANT SAFETY INSTRUCTIONS .............. 2
Accessories .......................................................... 4
Supplied Accessories .................................... 4
Contents ............................................................... 4
QUICK REFERENCE ............................................ 5
Attaching the Stand ....................................... 5
QUICK INSTALLATION TIPS .......................... 5
Installirlg Batteries in the Remote Control
Unit ................................................................ 6
Preparation .......................................................... 6
Using the Remote Control Unit ....................... 6
Antennas ....................................................... 6
Part Names .......................................................... 7
TV (Front) ....................................................... 7
TV (Control Panel) .......................................... 7
TV (Rear) ........................................................ 7
Remote Control Unit ...................................... 8
Introduction to Connections .............................. 9
Experiencing HI} Images ................................ 9
Types of Connection ...................................... 9
Displaying an External Equipment Image ........ 9
One Key Function .......................................... 9
Connecting to External Equipment .................. 10
Connecting a Blu-ray Disc/DVD Player or
HD Cable/Satellite Set-top Box ................... 10
Connecting a VCR, Game Console,
Camcorder or Cable/Satellite Set-top Box ... 10
Connecting a Surround System/Audio
System ........................................................ 11
Connecting a PC/Smartphone ..................... 11
Watching TV ....................................................... 12
Turning On/Off the Power ............................ 12
Initial Installation ........................................... 12
Direct Button Operation .................................... 14
On-Screen Display Menu .................................. 17
Ors-Screen Display Menu (Main menu) ......... 17
Ors-Screen Display Menu Operation ............. 17
Menu Operation Buttons .............................. 17
Menu Items .................................................. 18
Picture menu ............................................... 19
Audio menu ................................................. 20
Setup menu ................................................. 21
Closed Caption menu .................................. 23
Channel menu ............................................. 23
Sleep Timer menu ........................................ 23
Enjoying Photo/Music/Movie Playback ........... 24
Connecting a USB Memory Device/USB
Hard Drive ................................................... 24
Selecting the Folders to Play Back ............... 24
Viewing Photos ............................................ 25
Playing Music ............................................... 26
Watching Movies ......................................... 26
Appendix ............................................................ 27
Troubleshooting ........................................... 28
Specifications .................................................... 30
1V ................................................................ 30
Dimensional Drawings ...................................... 31
Trademarks ........................................................ 32
_-4
Dimensional Drawings
®The dimensional drawings for the LCD TM set are shown on the inside back cover.
®The illustrations and on-screen displays in this operation manual are for explanation purposes and may vary
slightly from the actual operations.
®The examples used throughout this manual are based ors the LC-48LE551U model,
QUICK REFERENCE
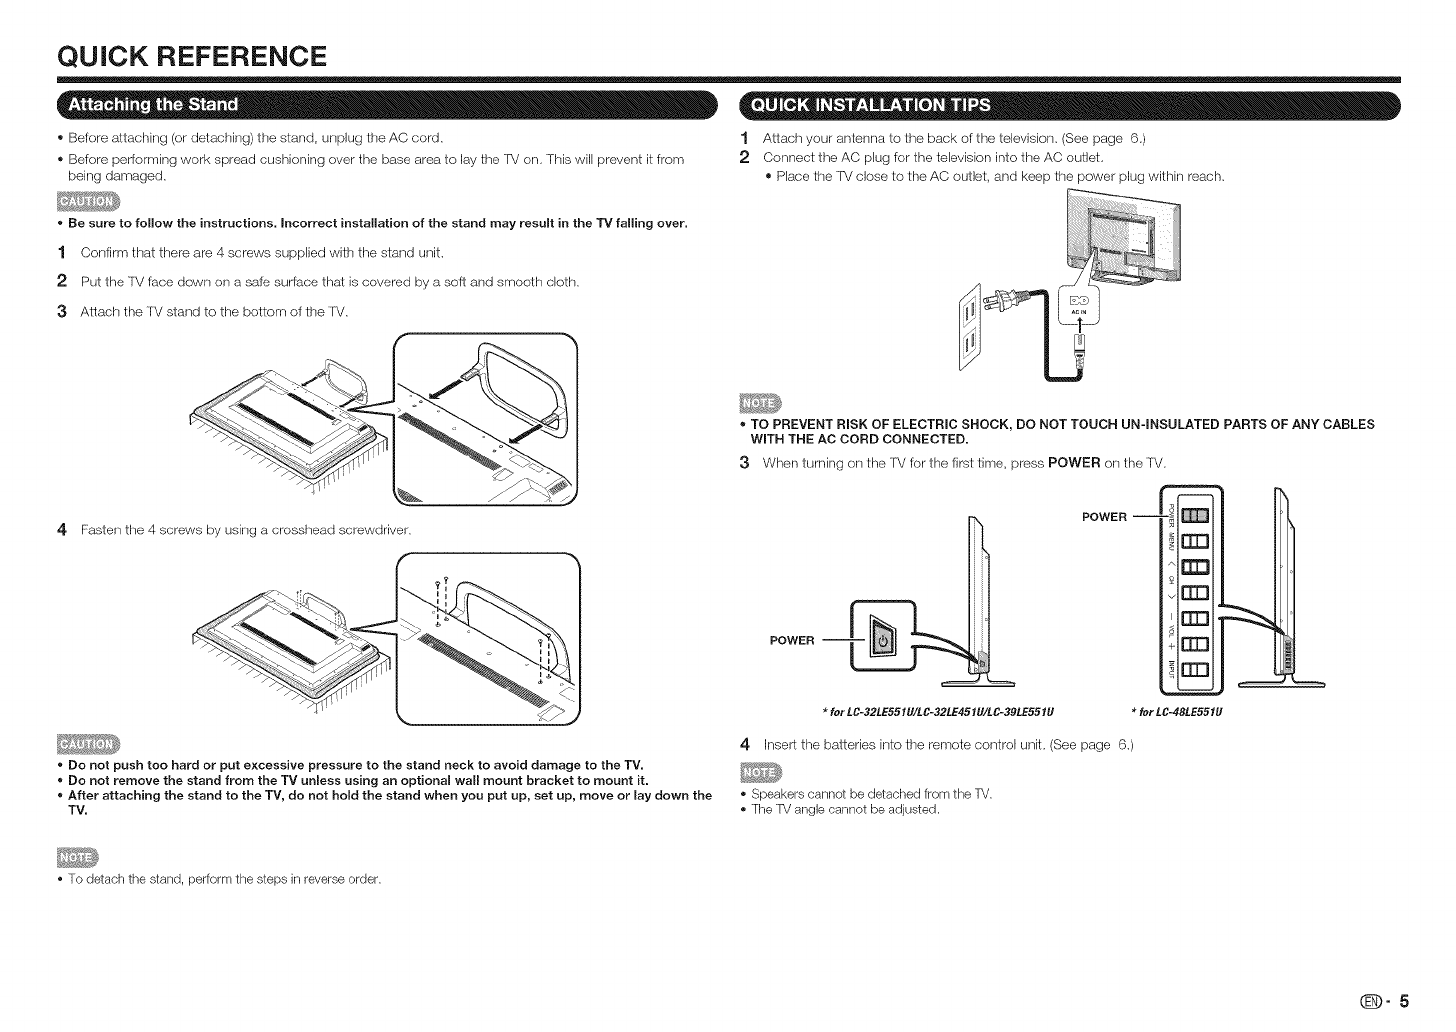
® Before attaching (or detaching) the stand, unplug the AC cord, 1 Attach your antenna to the back of the television, (See page 6,)
® Before performing work spread cushioning over the base area to lay the IV on, This will prevent it from 2 Connect the AC plug for the television into the AC outlet,
being damaged, ® Place the lV close to the AC outlet, and keep the power plug within reach,
*Be sure to follow the instructions, Incorrect installation of the stand may result in the "IV falling over,
1 Confirm that there are 4 screws supplied with the stand unit.
2 Put the TV face down on a safe surface that is covered by a soft and smooth cloth,
3Attach the TV stand to the bottom of the lV,
4 Fasten the ,I screws by using a crosshead screwdriver.
*Do not push too hard or put excessive pressure to the stand neck to avoid damage to the TV.
*Do not remove the stand from the TV unless using an optional wall mount bracket to mount it.
*After attaching the stand to the TV, do not hold the stand when you put up, set up, move or lay down the
TV.
*TOPREVENT RISK OF ELECTRIC SHOCK, DO NOT TOUCH UN-INSULATED PARTS OF ANY CABLES
WiTH THE AC CORD CONNECTED.
3When turning on the IV for the first time, press POWER on the TV.
POWER --
rrm
rrn
rrrn
POWER
*for LC-32LE551U/LC-32LE451U/LC-39LE551U *for LC-48LE551U
4klsert the batteries into the remote control unit, (See page 6.)
*Speakers cannot be detached from the TV.
*The TV angle cannot be adjusted.
*To detach the stand, perform the steps in reverse order.
qD-5
QUICK REFERENCE
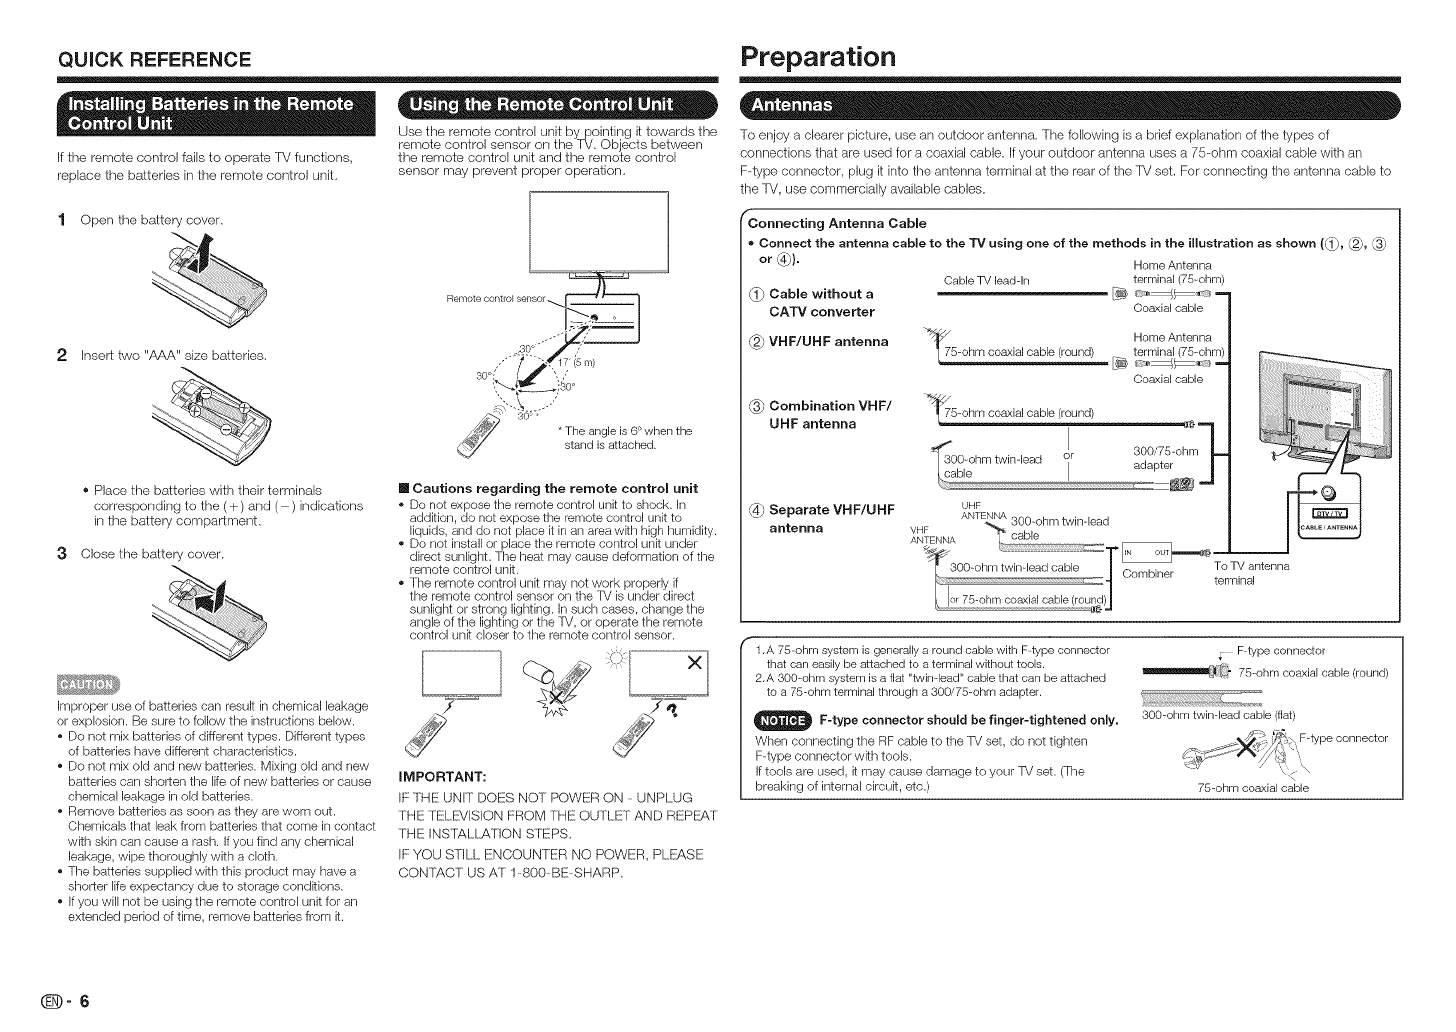
If the remote control falls to operate TV functions,
replace the batteries in the remote control unit.
1 Open the battery cover.
2 Insert two "AAA" size batteries.
•= = = ®= o e
Use the remote control unit by pointing it towards the
remote control sensor on the 'f_/. Objects between
the remote control unit and the remote control
sensor may prevent proper operation.
""-_i s-'°"""'", T_elu_glaetisc6_ed t en t he
® Place the batteries with their terminals
corresponding to the (+) and ( ) indications
in the battery compartment.
3Close the battery cover.
Improper use of batteries can result in chemical leakage
or explosion. Be sure to follow the instructions below.
* Do not mix batteries of different types. Different types
of batteries have different characteristics.
* Do not mix old and new batteries. Mixing old and new
batteries can shorten the life of new batteries or cause
chemical leakage in old batteries.
* Remove batteries as soon as they are worn out.
Chemicals that leak from batteries that come in contact
wRh skin can cause a rash. If you find any chemical
leakage, wipe thoroughly with a cloth.
* The batteries supplied with this product may have a
shorter life expectancy due to storage condRions.
* If you will not be using the remote control unit for an
extended period of time, remove batteries from it.
[] Cautions regarding the remote control unit
De not expose the remote control unit to shock. In
addition, de net expose the remote control unit to
liquids, and do net place it in an area with high humidity.
* Do not install or place the remote control unR under
direct sunlight. The heat may cause deformation of the
remote control unR.
* The remote control unR may not work properly if
the remote control sensor on the TV is under direct
sunlight or strong lighting, in such cases, change the
angle of the lighting or the TV, or operate the remote
control unR closer to the remote control sensor.
IMPORTANT:
IF THE UNIT DOES NOT POWER ON -UNPLUG
THE TELEVISION FROM THE OUTLET AND REPE:AT
THE INSTALLATION STEPS.
IF YOU STILL ENCOUNTER NO POWER, PLEASE
CONTACT US AT 1-800-BE-SHARP.
Cabme without a
CATV converter
Preparation
To enjoy a clearer picture, use an outdoor antenna. The following is a brief explanation of tile types of
connections that are used for a coaxial cable. If your outdoor antenna uses a 75-ohm coaxial cable wittl an
F-type connector, plug it into tile antenna terminal at tile rear of tile TV set. For connecting tile antenna cable to
tile TV, use commercially available cables.
f'Connecting Antenna Cable
• Connect the antenna cable to the TV using one of the methods in the illustration as shown (_, _,
or _}. Home Antenna
Cable TV leadqn terminal (75-ohm)
Coaxial cable
_7 Home Antenna
VHF/UHF antenna 5-ohm coaxial cable (round) [7_ terminal (75-ohm)
Coaxial cable
(._ Combination VHF/ "_!<_5-ohm coaxial cable (round)
UHF antenna
_ Separate VHF/UHF
antenna
UHF
To TV antenna
terminal
(_ 1.A 75-ohm system is generally a round cable with F-type connector
that can easily be attached to a terminal without tools.
2.A 300-ohm system is a flat "twin-bad" cable that can be attached
to a 75-ohm terminal through a 300/75-ohm adapter.
_ F-type connector should be finger-tightened on_y,
When connecting the RF cable to the TV set, do not tighten
F-type connector wkh tools.
If tools are used, it may cause damage to your TV set. (The
breaking of internal circuk, etc.)
F-type connector
_(_ 75-ohm coaxial cable (round)
300-ohm twin-bad cable (flat)
75-ohm coaxial cable
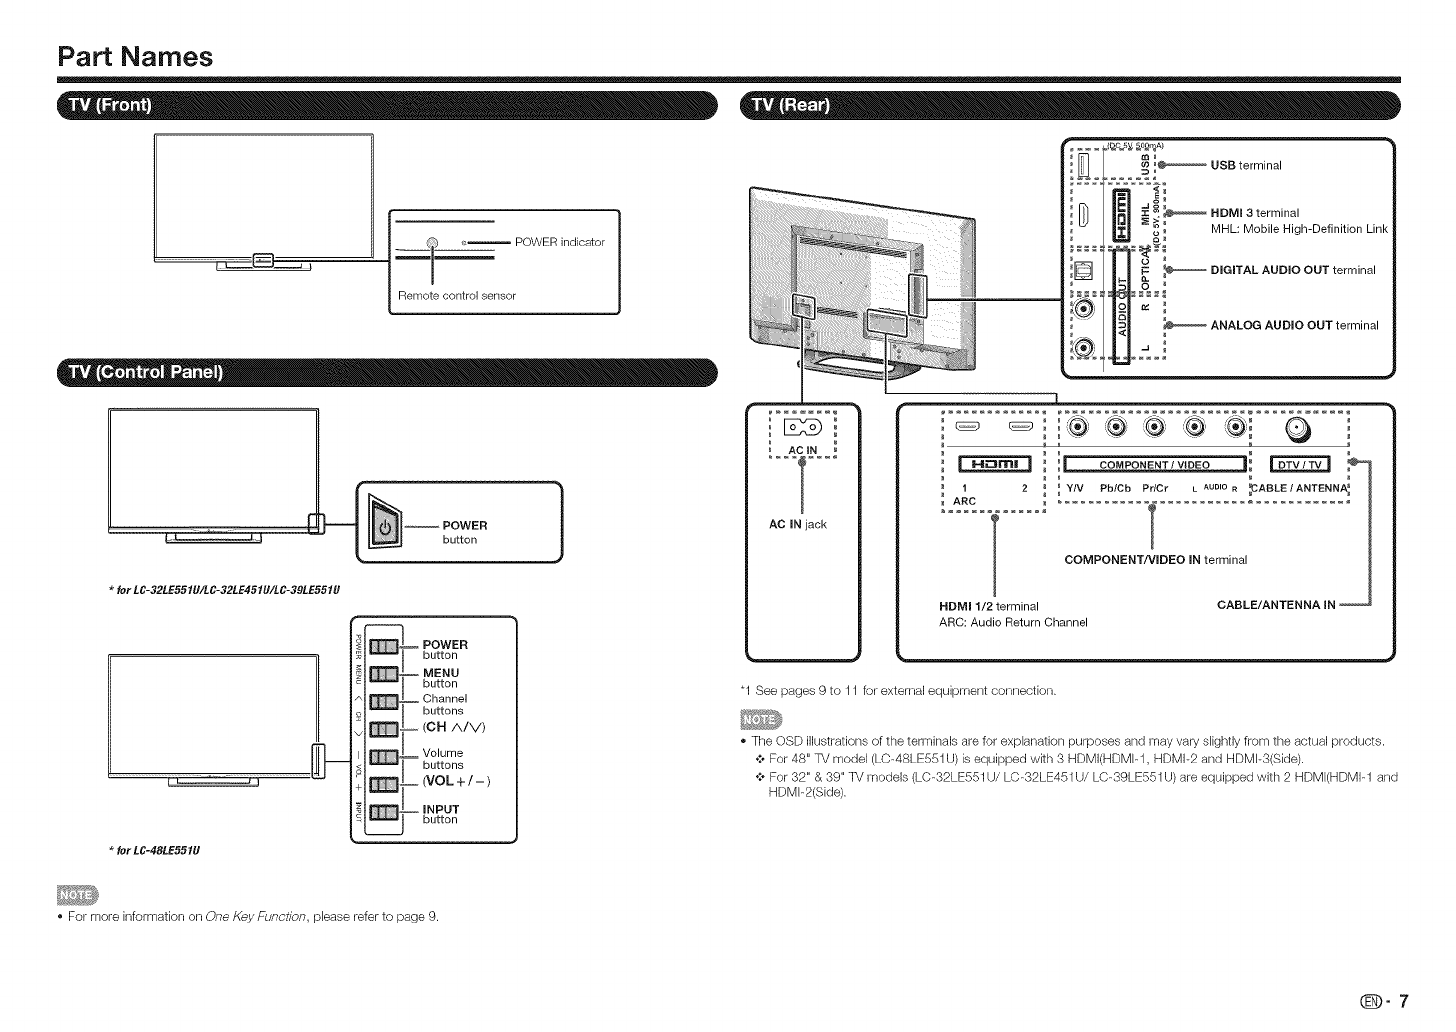
Part Names
l' l _ POWER indicator
Remote control sensor
for LC-32LE551U/LC-32LE451U/LC-39LE551U
for LC-48LE551U
POWER
button
_ POWER
button
MENU
button
Channel
buttons
Volume
buttons
(VOL+/-)
INPUT
button
}AC IN
AC iN jack
_ USB term na
::: :
E_
....... .ao°_
...... :C _ _ HDMI 3 terminal
_ MHL: Mobile High-Definition Link
,D / I I r- _ DIGITALAUDIOOUTterminal
_ ANALOG AUDIO OUT terminal
I
_ i i_ COMPONENT /VIDEO ]i _
1 2 _ _ YIV PblCb PdC ........ FABLE/ANTENNA_
ARC _ ........... _ ........................
lCOMPONENT/VIDEO IN terminal
HDMI 1/2 terminal CABLE/ANTENNA IN -
ARC: Audio Return Channel
"1 See pages 9 to 11 for external equipment connection.
The OSD illustrations of the terminals are for explanation purposes and may vary slightly from the actual products.
¢ For 48" TV model (LC-48LE551U) isequipped wkh 3 HDMI(HDMF1, HDMI-2 and HDMF3(S[de).
¢ For 32" & 39" TV models (LC-32LE551 U/LC-32LE451 U/LC-39LE551 U)are equipped with 2 HDMI(HDMI-1 and
HDMF2(Side).
For more information on One Key Function, please refer to page 9.
_-7
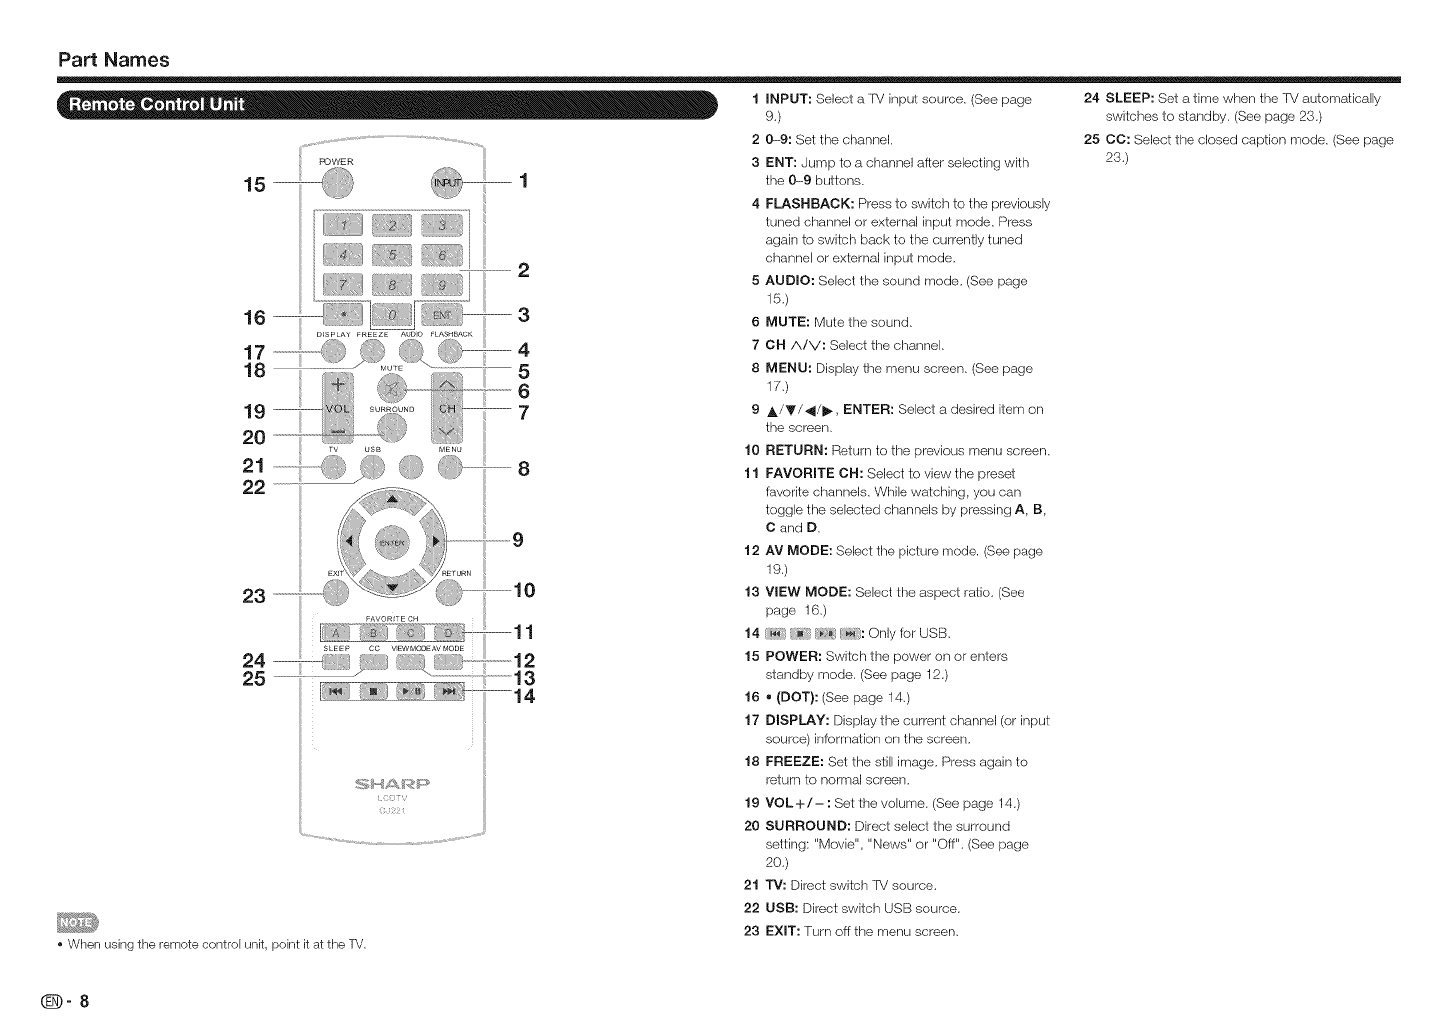
Part Names
1INPUT: Select a TV input source. (See page 24 SLEEP: Set a time when the TM auiomatically
9.) switches to standby, (See page 23,)
2 0-9: Set the channel,
3 ENT: Jump to a channel after selecting with
the 0--9 buttons.
4 FLASHBACK: Press to switch to the previously
tuned channel or external input mode, Press
a,gain to switch back to the currently tuned
channel or external input mode,
5 AUDIO: Select the sound mode, (See page
15,)
6 MUTE: Mute the sound,
7 CH A/V: Select the channel,
8 MENU: Display the menu screen, (See page
17.)
9,_/Y/_I/I_, ENTER: Select a desired item on
the screen,
10 RETURN: Return to the previous menu screen,
11 FAVORITE CH: Select to view the preset
favorite channels, While watching, you can
toggle the selected channels by pressing A, B,
C and D.
12 AV MODE: Select the picture mode. (See page
19.)
13 VIEW MODE: Select the aspect ratio, (See
page 16,)
14 {_ r_}: Only for USB,
15 POWER: Switch the power on or enters
standby mode. (See page 12,)
16 • (DOT): (See page 14,)
17 DISPLAY: Display the current channel (or input
source) information on the screen,
18 FREEZE: Set the still image, Press again to
return to normal screen,
19 VOL+/- : Set the volume. (See page 14.)
20 SURROUND: Direct select the surround
setting: "Movie", "News" or "Off". (See page
20,)
21 TV: Direct switch TM source.
25 CO: Select the closed caption mode. (See page
23.)
22 USB: Direct switch USB source.
23 EXIT: Turn off the menu screen,
•When using the remote control unit, point it at the TV.
_-8
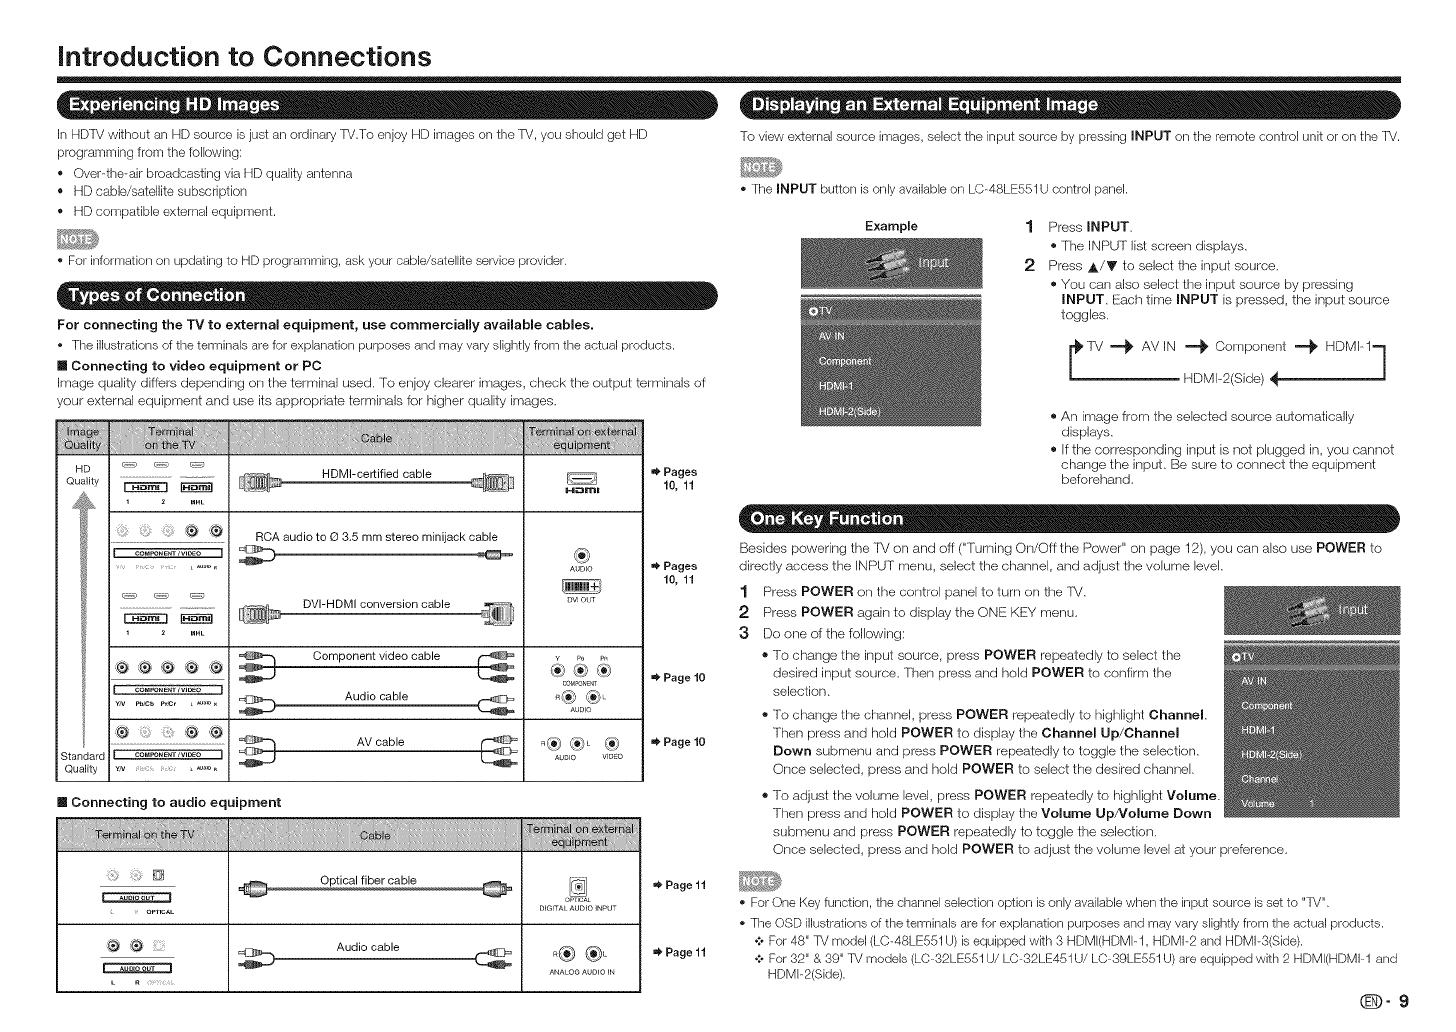
introduction to Connections
In HDTV without an HD source is just an ordinary TV.To enjoy HD images on the TV, you should get HD
programming from the following:
• Over-the-air broadcasting via HD quality antenna
• HD cable/satellite subscription
• HD compatible external equipment.
', For information on updating to HD programming, ask your cable/satellke service provider.
For connecting the TV to external equipment, use commercially available cables.
• The illustrations of the terminals are for explanation purposes and may vary slightly from the actual products.
n Connecting to video equipment or PC
Image quality differs depending on the terminal used, To enjoy clearer images, check the output terminals of
your external equipment and use its appropriate terminals for higher quality images,
............................................. _" Pages
HD _ _ _ HDMI-certified cable
Quality _ _ H_m_ 10, 11
'_ _' RCA audio to O 3.5 mm stereo minijack cable
COMPONENTJWOEO ] _ @
[DE_E3
1 z MHL
DVI-HDMI conversion cable
®
AUDIO _ Pages
10, 11
DV_ OUT
_,i_,,_ {_ _ _ comp .... t vid.... ble _ ¥c0_PoN_T
CO_PO,E_V_OEO] Audio cable _
Standard COMPONE_ JVIDEO 1 _ _ AUDI O VIDEO
Quality Yiv _ _
Page 10
Page 10
To view external source images, select the input source by pressing INPUT on ttqeremote control unit or on the TV.
• The INPUT button is only available on LC-48LE551U control panel.
Example 1 Press INPUT.
®The INPUT list screen displays.
2 Press A/T to select the input source.
®You can also select the input source by pressing
INPUT. Each time INPUT is pressed, the input source
toggles.
lV _ AVIN _ Component _ HDMI-I= 1
/
HDMI-2(Side)
®An image from the selected source automatically
displays.
® Ifthe corresponding input is not plugged in, you cannot
change the input. Be sure to connect the equipment
beferehand.
Besides powering the '[_/on and off ("Turning On/Off the Power" on page 12), you can also use POWER to
directly access the INPUT menu, select the channel, and adjust the volume level.
1 Press POWER on the control panel to turn on the rv.
2 Press POWER again to display the ONE KEY menu.
3 Do one of the following:
®To change the input source, press POWER repeatedly to select the
desired input source. Then press and hold POWER to confirm the
selection.
®To change the channel, press POWER repealedly to highlight Channel.
Then press and hold POWER to display the Channel Up/Channel
Down submenu and press POWER repeatedly to toggle the selection.
Once selected, press and hold POWER to select the desired channel.
m Connecting to audio equipment To adjust the volume level, press POWER repeatedly to highlight Volume.
Then press and hold POWER to display the Volume UpNolume Down
submenu and press POWER repeatedly to toggle the selection.
Once selected, press and hold POWER to adjust the volume level at your preference.
_, . OeTmAL
O' 'O iiii:ii_!i
Optical fiber cable @
Audio cable
DIGITAL AUDIO INPUT
o® ®L
ANALOG AUDIO IN
Page 11
Page 11
• For One Key function, the channel selection option is only available when the input source is set to "TV".
• The OSD illustrations of the terminals are for explanation purposes and may vary slightly from the actual products.
+ For 48" TV model (LC-48LE551 U) is equipped wkh 3 HDMI(HDMIq, HDMI-2 and HDMI-3(Side).
+ For 32" & 39" TV models (LC-32LE551 U/LC-32LE451 U/LC-39LE551 U) are equipped with 2 HDMI(HDMIq and
HDMF2(Side).
(D-9
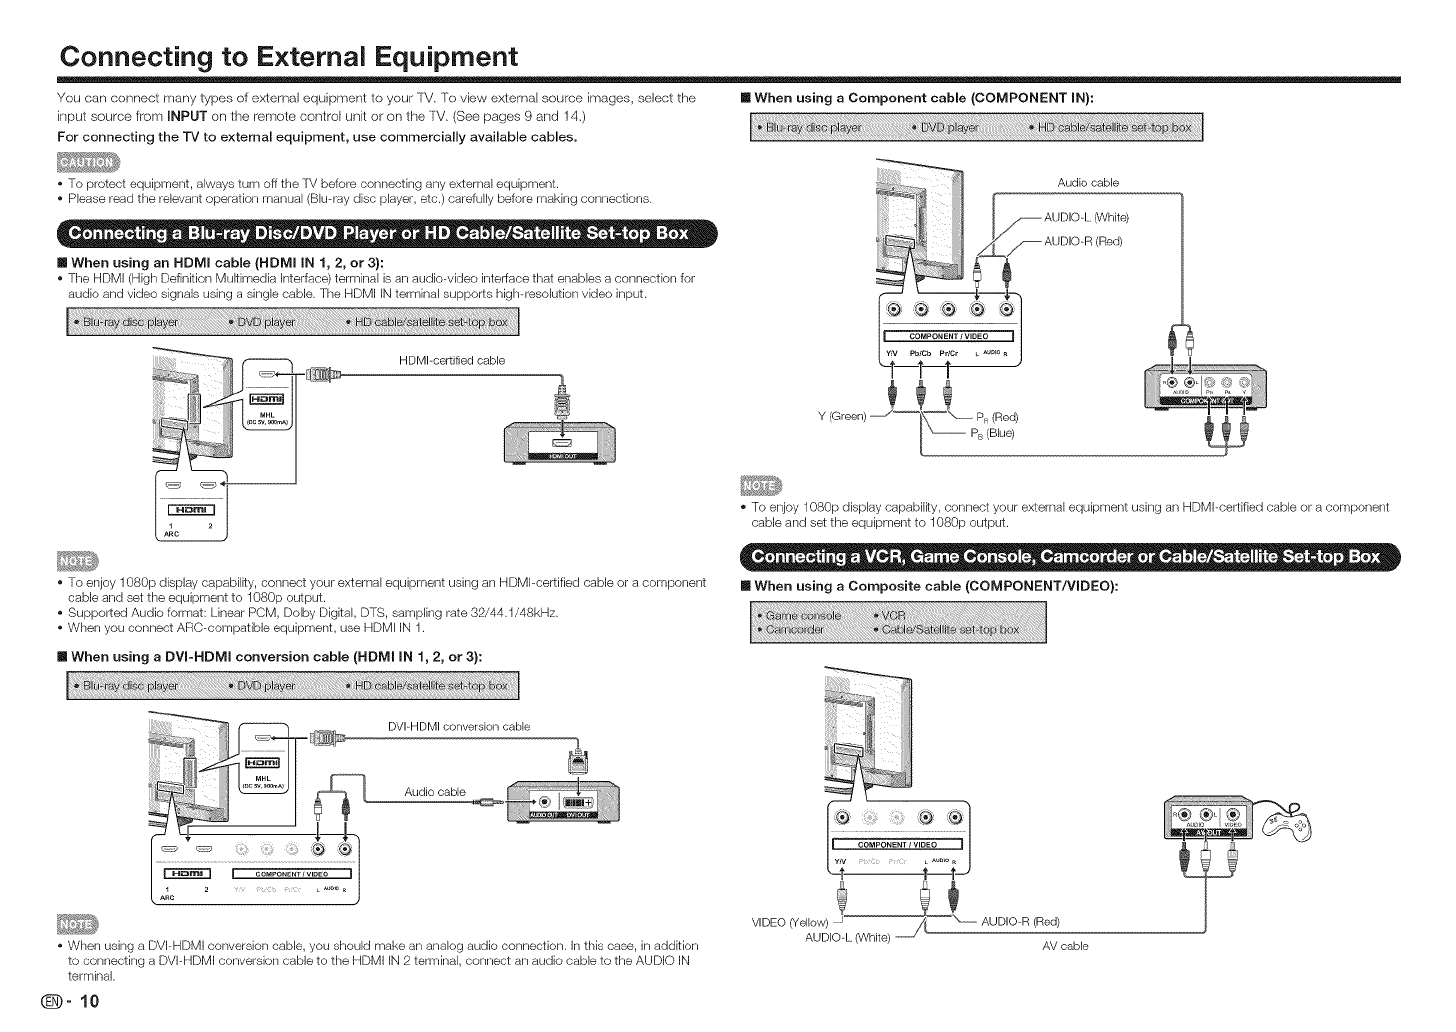
Connecting to External Equipment
You can connect many types of exlemal equipment to your lV, To view external source images, select the
input source from INPUT on the remote control unit or on the lV, (See pages 9 and 14,)
For connecting the "IV to external equipment, use commercially available cables.
[] When using a Component cable (COMPONENT IN):
• To protect equipment, always turn off the TV before connecting any external equipment.
• Please read the relevant operation manual (Blu-ray disc player, etc.) carefully before making connections.
[] When using an HDMI cable (HDMI IN 1, 2, or 3}:
• The HDMI (High Definition MuRimedia Interface) terminal is an audio-video interface that enables a connection for
audio and video signals using a single cable. The HDMI IN terminal supports high-resolution video input.
Audio cable
_ AUDIO-L (White)
__S AUDIO-R (Red)
HDMI-certified cable
Y (Green) _"_
• To enjoy 1080p display capabilRy, connect your external equipment using an HDMI-certified cable or a component
cable and set the equipment to 1080p output.
• Supported Audio format: Linear PCM, Dolby DigRal, DTS, sampling rate 32/44.1/48kHz.
• When you connect ARC-compatible equipment, use HDMI IN 1.
[] When using a DVm-HDMI conversion cable (HDMI mN1, 2, or 3):
• To enjoy 1080p display capabilRy, connect your external equipment using an HDMI-certified cable or a component
cable and set the equipment to 1080p output.
[] When using a Composite cable (COMPONENT/VIDEO):
DVI-HDMI conversion cable
Audio cable @-
• When using a DVI-HDMI conversion cable, you should make an analog audio connection. In this case, in addRion
to connecting a DVI-HDMI conversion cable to the HDMI IN 2 terminal, connect an audio cable to the AUDIO IN
terminal.
VIDEO (Yel'l°'\_!l_uu "-oooooAUDIO-R (Red)
AV cable
Connecting to E×ternal Equipment
•When using an HDMI cable (HDNll iN 1,2, or3):
HDMI-certifiedcable
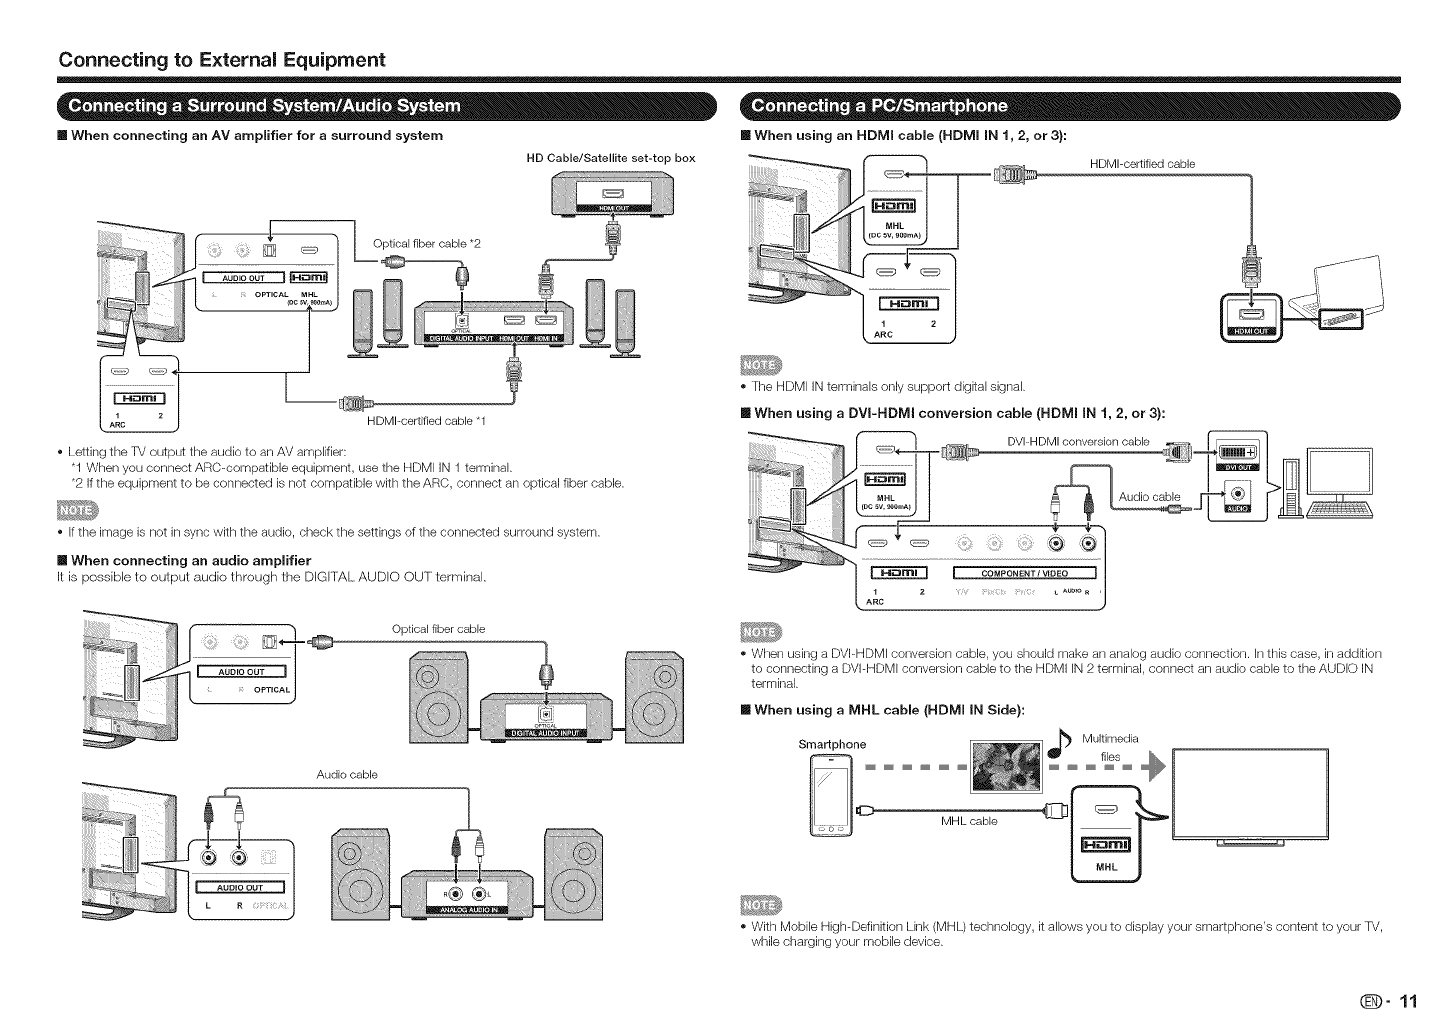
[] When connecting an AV amplifier for a surround system
HD Cable/Satellite set-top box
::::::::::::::::::::::::::::::::::::::::::::::::
HDMI-certified cable *t
Letting the TV output the audio to an AV amplifier:
"1 When you connect ARC-compatible equipment, use the HDMI iN 1 terminal.
*2 If the equipment to be connected is not compatible with the ARC, connect an optical fiber cable.
The HDMI IN terminals only support digkal signal.
[] When using aDVI-HDMI conversion cable (HDNII IN 1, 2, or 3):
Ifthe image is not in sync with the audio, check the settings of the connected surround system.
[] When connecting an audio amplifier
It is possible to output audio through the DIGITAL AUDIO OUT terminal,
_OPT CAL J
Audio cable
Optical fiber cable
When using a DVI-HDMI conversion cable, you should make an analog audio connection, in this case, in addkion
to connecting a DVI-HDMI conversion cable to the HDMI iN 2 terminal, connect an audio cable to the AUDIO IN
terminal.
mWhen using a MHL cable (HDNll IN Side):
Smartphone
Mill_ cable
Multimedia
t,es _ I 1
t
With Mobile High-Definition Link (MHL) technology, it allows you to display your smartphone's content to your TV,
while charging your mobile device.
@9-11

Watching TV
Language Setting
Select from among 3 languages: English, French and Spanish.
Press POWER on the IV, or POWER on the remote control unit to turn the power on.
POWER button
a_WER
@ @
[_ C72]CD
0000
POWER _ 1
button
*for LC-32LE551U/LC-32LE451U/
LC-39LE551U
POWER --
button
ru3
E_3
rrn
E_
rrn
*for LC-48LE551U
• The Inkial Installation starts when the TV powers on for the first time. If the TV has been turned on before, the Initial
Installation will not be invoked. For changing the settings of the Initial Installation, perform "Easy setup" on the Inkial
Setup menu on page 22.
1 Press 4/_ to select the desired language listed on the screen, and then press ENTER to continue to the
next step.
TV Location Setting
Select "Home Mode" or "Store Mode" for the location where you plan to install the TV. This product qualifes
for ENERGY STT_Rin Home mode default setting.
2 Press 4/1_ to select "Home Mode" or "Store Mode".
Press ENTER to continue to the next step.
Press POWER on the TV, or POWER on the remote control unit again to turn the power off.
® The IV enters standby and the image on the screen disappears.
• If you are not going to use this TV for a long period of time, be sure to remove the AC cord from the AC outlet.
• Weak electric power is still consumed even when the TV is turned off.
When you turn on the TV for the first time, the Easy Setup will guide you through the setup process. Perform
the following steps before you press POWER on the remote control unit.
1. Inser_ the batteries into the remote control unit. (See page 6.)
2. Connect the antenna cable to the TV. (See page 6.)
3. Plug in the AC cord to the AC outlet. (See page 5.)
Time Zone and Daylight Saving Time Settings
Make settings for the time zone and daylight saving time where you use the TV.
3 Press 41/1_ to select the time zone where you are using the 'fV, and then press ENTER to continue to
the next step.
,, The time zone differs depending on the selected country.
®The factory preset value is the time zone for the capital of the selected country.
_-12
Watching TV
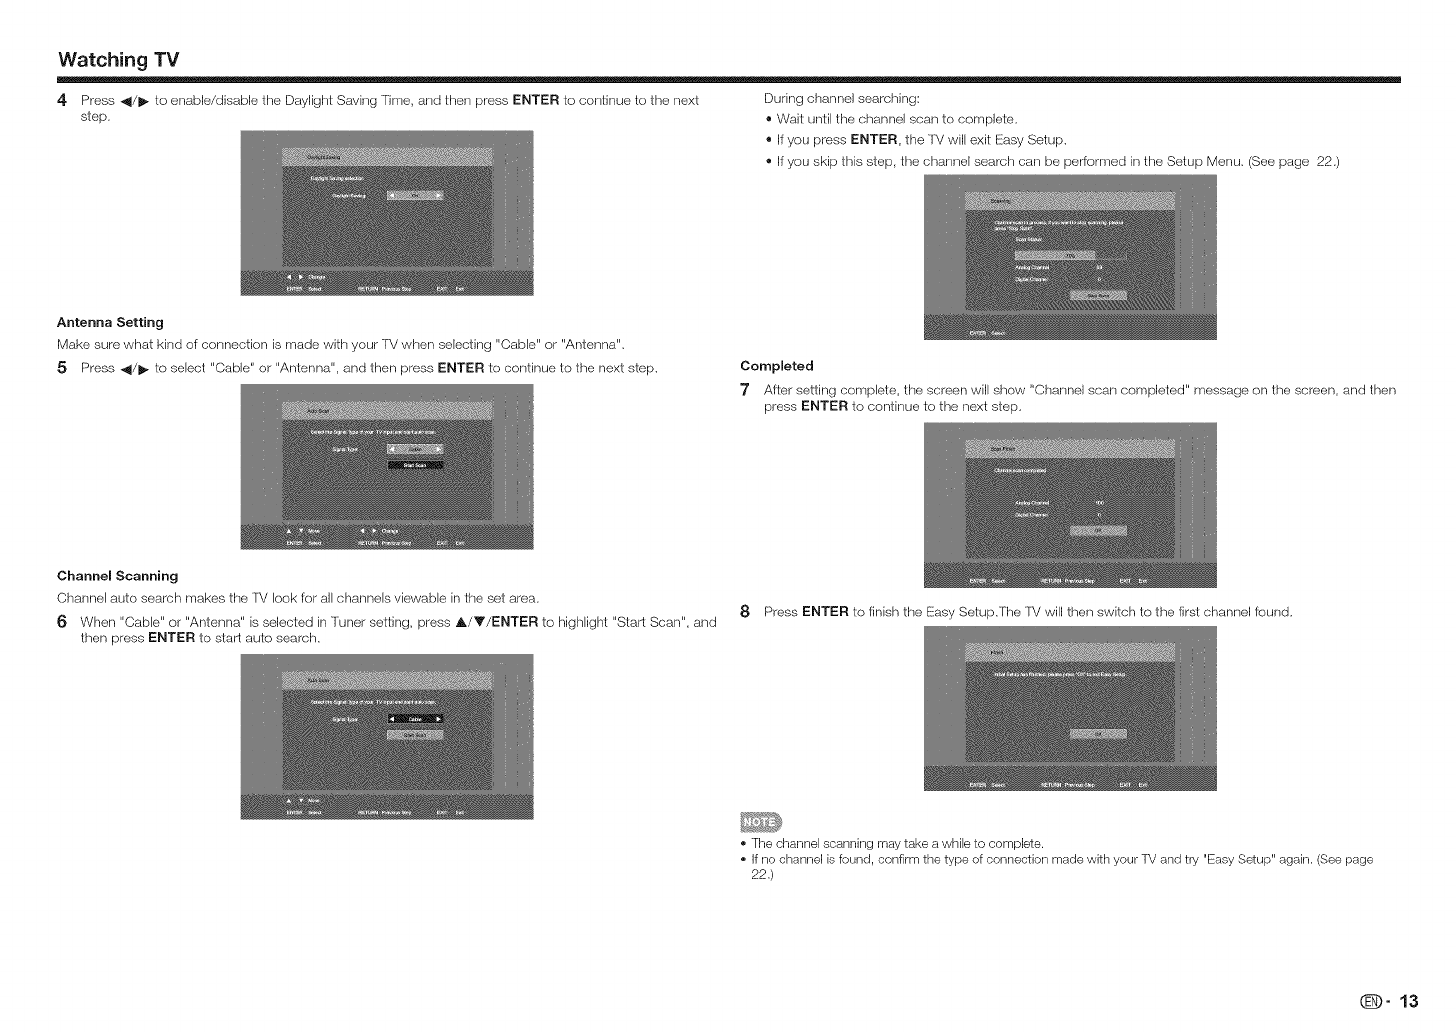
4 Press _1/1_ to enable/disable the Daylight Saving Time, and then press ENTER to continue to the next During channel searching:
step. ®Wait until the channel scan to complete.
®If you press ENTER, the lV will exit Easy Setup.
®If you skip this step, the channel search carl be performed in the Setup Menu. (See page 22.)
Antenna Setting
Make sure what kind of connection is made with your lV when selecting "Cable" or "Antenna".
5 Press _1/1_ to select "Cable" or "Antenna", and then press ENTER to continue to the next step. Completed
"7 After setting complete, the screen will show "Channel scan completed" message on the screen, and then
press ENTER to continue to the next step.
Channel Scanning
Channel auto search makes the IV look for all channels viewable in the set area.
6 When "Cable" or "Antenna" is selected in Tuner setting, press A/Y/ENTER to highlight "Start Scan", and
then press ENTER to start auto search.
8 Press ENTER to finish the Easy Setup.The IV will then switch to the first channel found.
• The channel scanning may take a while to complete.
• If no channel is found, confirm the type of connection made with your TV and try "Easy Setup" again. (See page
22.)
QJD" 13
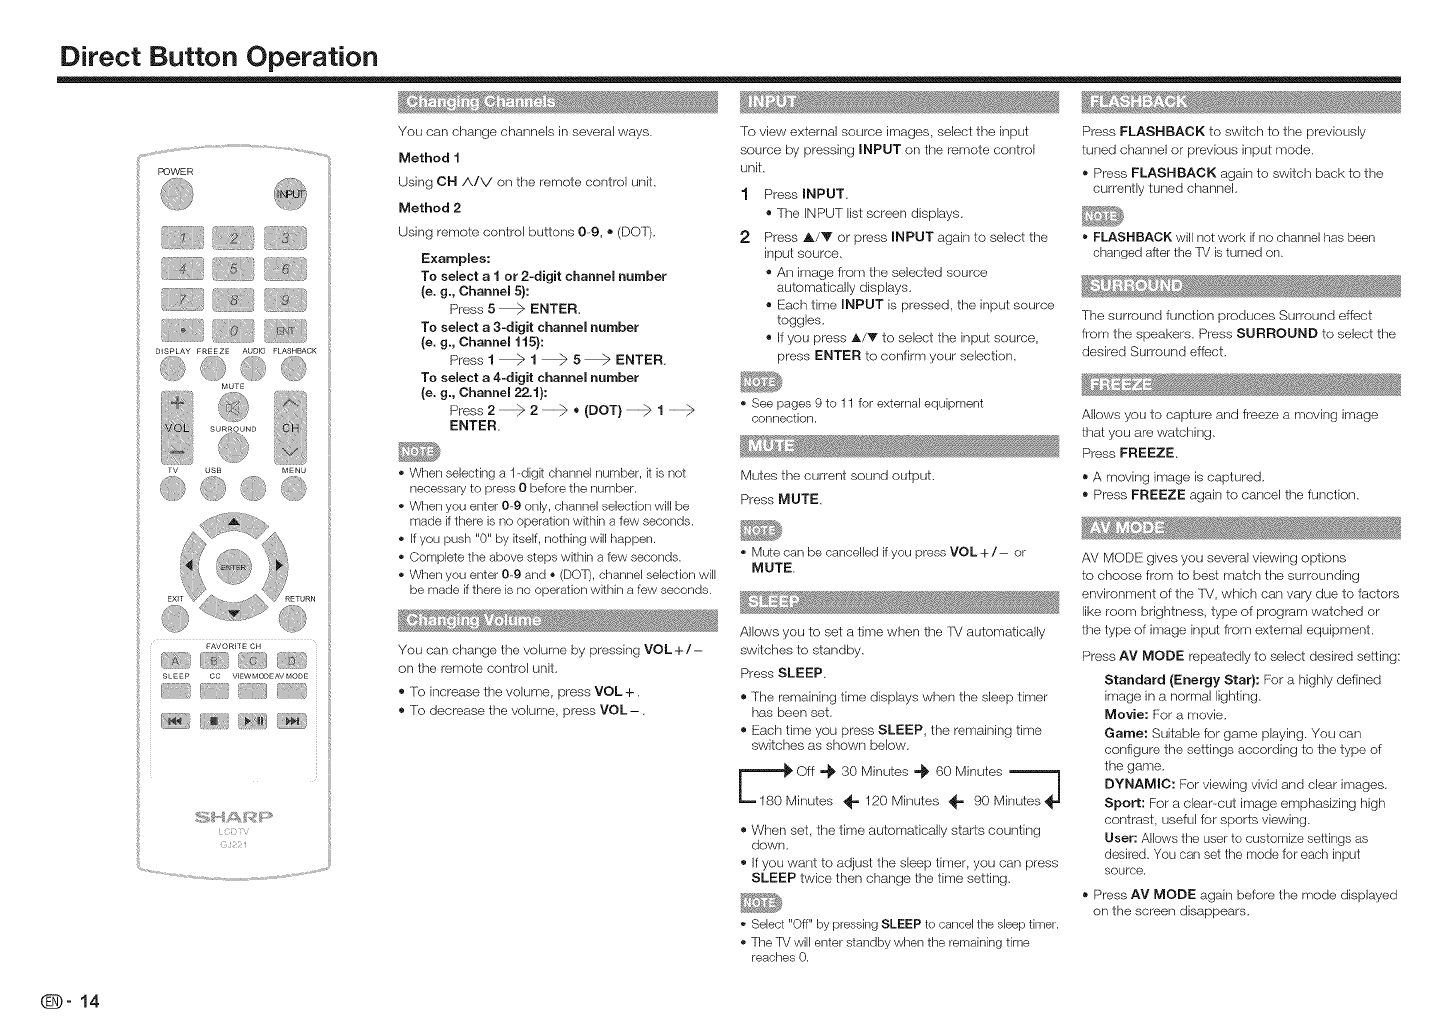
Direct Button Operation
y...................................................................................................................................................................................
POWER
FAVO RITE CH
I /
SLEEP CC VIEW MODEAV MODE
_;_?_ _5_ ......
You can change channels in several ways.
Method 1
Using OH/k/V on the remote control unit.
Method 2
Using remote control buttons 09, ®(DOT).
Examples:
To select a 1 or 2-digit channel number
(e. g., Channel 5}:
Press 5 _>ENTER.
To select a 3-digit channel number
(e. g., Channel 115}:
Press 1 _ 1 _ 5_ ENTER.
To select a 4-digit channel number
(e. g., Channel 22.1}:
Press 2 _>2 ® (DOT)1
ENTER.
When selecting a 1-dig[t channel number, [t is not
necessary to press 0 before the number.
When you enter 0_9 only, channel selection will be
made if there is no operation within a few seconds.
if you push "0" by Rself, nothing will happen.
Complete the above steps within a few seconds.
When you enter 0_9 and o (DOT), channel selection will
be made if there is no operation within a few seconds.
You can change the volume by pressing VOL +/-
on the remote control unit.
® R) increase the volume, press VOL+.
® To decrease the volume, press VOL-.
To view external source images, select the input
source by pressing INPUT on the remote control
unit.
1
2
Press INPUT,
®The INPUT list screen displays.
Press A/Y or press INPUT again to select the
input source.
®An image from the selected source
automatically displays.
®Each time INPUT is pressed, the input source
toggles.
®If you press A/T to select the input source,
press ENTER to confirm your selection.
See pages 9 to 11 for external equipment
connection.
Mutes the current sound output.
Press MUTE,
Mute can be cancelled ifyou press VOL +/- or
MUTE.
Allows you to set a time when the TV automatically
switches to standby.
Press SLEEP.
®The remaining time displays when the sleep timer
has been set.
® Each time you press SLEEP, the remaining time
switches as shown below.
_M_t: 30 Minutes "_ 60 Minutes 7
• _= 120 Minutes _- 90 Minutes_ -I
®When set, the time automatically starts counting
down.
® Ifyou want to adjust the sleep timer, you can press
SLEEP twice then change the time setting.
o Select "Off" by pressing SLEEP to cancel the sleep timer.
The TV will enter standby when the remaining time
reaches 0.
Press FLASHBACK to switch to the previously
tuned channel or previous input mode.
®Press FLASHBACK again to switch back to the
currently tuned channek
', FLASHBACK will not work if no channel has been
changed after the TV is turned on.
The surround function produces Surround effect
from the speakers. Press SURROUND to select the
desired Surround effect.
Allows you to capture and freeze a moving image
that you are watching.
Press FREEZE.
®A moving image is captured,
®Press FREEZE again to cancel the function,
AV MODE gives you several viewing options
to choose from to best match the surrounding
environment of the fV, which can vary due to factors
like room brightness, type of program watched or
the type of image input from external equipment.
Press AV MODE repeatedly to select desired setting:
Standard {Energy Star}: For a highly defined
image in a normal lighting.
Movie: For a movie.
Game: Suitable for game playing. You can
configure the settings according to the type of
the game.
DYNAMIC: For viewing vivid and clear images.
Sport: For a clear-cut image emphasizing high
contrast, useful for sports viewing.
User: Allows the user to customize settings as
desired. You can set the mede for each input
SOUrCe.
®Press AV MODE again before the mode displayed
on the screen disappears,
_-14
Direct Button Operation
Example:
Analog:
7 ¸ ,_ • _ ,_ _ .... _
Allows you to select a preset audio option optimized
for different sounding conditions.
Press AUDIO repeatedly to select desired setting:
SAP, Mono, or Stereo.
You can enjoy Hi-Fi stereo sound or SAP
broadcasts where available.
o Stereo broadcasts: Vbw programs like live sporting
events, shows and concerts in dynamic stereo sound.
o SAP broadcasts: Receive TV broadcasts in either
MAIN or SAP sound.
MAIN sound: The normal program soundtrack (either in
mono or stereo).
SAP sound: Listen to a second language,
supplementary commentary or other information. (SAP
is mono sound.)
This function allows you to program up to 4 favorite
channels. By setting the favorite channels in advance,
you can select your favorite channel easily.
To register your favorite channel
1 Press MENU to display the MENU screen.
2 Press 4/t_ to select the Channel menu.
3Press A/V to select the Skip/Favorite
Channel menu and press I1_/ENTER to enter
its submenu.
4Press A/Y select the channel and press one of
the FAVORITE CH buttons (A, B, C, or D) on
the remote control unit to register this channel to
the favorite channel for the selected button.
®Set other favorite channels the same way.
5 Press MENU to exit.
To watch your favorite channel
Press one of the FAVORITE CH buttons (A, B, C, or
D) to watch the preset channel.
If stereo sound is difficult to hear.
• Obtain a dearer sound by manually switching to fixed
mono-sound mode.
Your rv is equipped with an internal Closed Caption
decoder. It allows you to view conversatk)ns,
narration and sound effects as subtitles orsyour rM.
Closed Captions are available on some TV programs
and on some VHS home video tapes at the
discretion of the program provider.
Digital Closed Caption service is a new caption
service available only on digital lV programs
(also a! the discretiors of the service provider). It
is a more flexible system than the original Closed
Caption system, because it allows Ior a variety
of caption sizes and font styles. When the Digital
Closed Caption service is in use, it will be indicated
by the appearance of a 3detter abbreviation that
also indicates the language of the Digital Closed
Captions: ENG (English), SPA (Spanish), FRA (French)
or other language codes.
Not all programs and VHS videotapes offer closed
captions.
In the Closed Caption system, there carl be more
than one caption service provided. Each is identified
by its own number. The "CC1" to "C04" services
display subtitles of TV programs superimposed over
the program's picture.
In the Closed Caption system, the "TE!XI 1" to
"TEXT4" services display text that is unrelated to the
program being viewed (e.g. weather or news). These
services are also superimposed over the program
currently being viewed.
1 Press CO.
®This will present the Closed Caption
informaiion display.
2 Press CC while the Closed Caption information
is still ors the screen.
®Press repeatedly until you select the desired
closed caption service.
E:::
DigRal:
cs4 ÷ css _ cs2 ÷ ca1 _-J
cs5 -_ cs6=]
The CO button keeps a record of the last service
selected in _tsmemory.
• See page 23 for detailed closed caption settings.
• Caption Display will not work when viewing a
480i, 480p, 720p, 1080i or 1080p input via the
COMPONENT: Y-PbPr or HDMI inputs.
• Closed Captions availabiIRy and content depends on
the broadcaster. Closed Caption are available when
the Closed Caption icon is displayed on screen.
• Closed Captions and DigRal Captions availabilRy
and content depends on the broadcaster. Closed
Caption are available when the Closed Caption icon is
displayed on screen.
@-15
Direct Button Operation
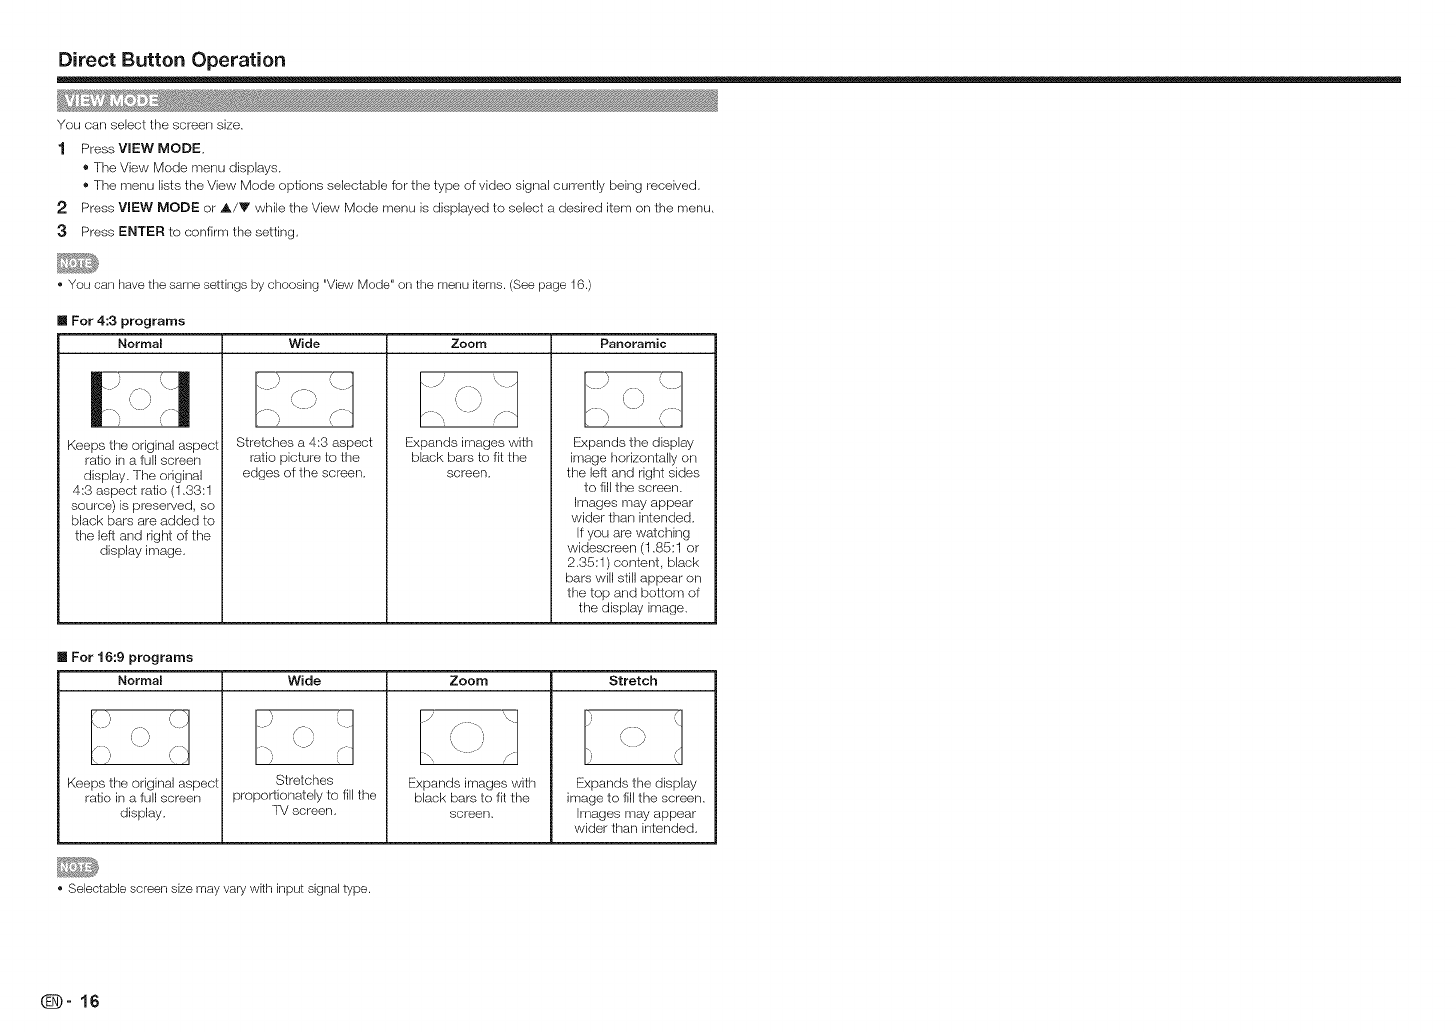
You can select the screen size.
1 PressVlEW MODE,
®The View Mode menu displays.
®The menu lists the View Mode options selectable for the type of video signal currently being received,
2 Press VIEW MODE or A/V while the View Mode menu is displayed to select a desired item on the menu,
3 Press ENTER to confirm the setting,
• You can have the same settings by choosing "View Mode" on the menu items. (See page 16.)
II For 4:3 programs
Normal Wide Zoom Panoramic
n
Keeps the original aspect
ratio in a full screen
display, The original
4:3 aspect ratio (1,33:1
source) is preserved, so
black bars are added to
the left and right of the
display image,
\J/
Stretches a 4:3 aspect
ratio picture to the
edges of the screen,
,. J= _\ /
Expands images with
black bars to fit the
screen,
•)'\_ .
f ,
\)
Expands the display
image horizontally on
the left and right sides
to fill the screen,
Images may appear
wider than intended.
If you are watching
widescreen (1,85:1 or
2,35:1 ) content, black
bars will still appear on
the top and bottom of
the display image.
mFor 16:9 programs
Normal Wide Stretch
\) \J
YY
'\)
Keeps the original aspect
ratio in a fun screen
display,
_ J '\
\.j'
7,
Stretches
proportionately to fill the
TV screen,
Zoom
Expands images with
black bars to fit the
screen,
Expands the display
image to fill the screen.
Images may appear
wider than intended,
• Selectable screen size may vary wTth input signal type.
On-Screen Display Menu
Example
Submenu/Mena options
m About Menu Items
®Item displayed in gray indicates that the item cannot be selected.
®Some menu items may not be displayed depending on the selected input source.
*The screens in the operation manual are for explanation purposes (some are enlarged, others cropped) and may
vary slightly from the actual screens.
The order of explanations for each menu item in the following pages is not necessarily in accordance with the
alignment of the items on the screen.
1 Press MENU to display the MENU screen.
2 Press _/1_ to select the desired menu.
3Press A/V to select the desired menu option and press _/ENTER to enter its submenu.
®Additional related adjustment items may be displayed. Press A/_ r to select the desired item.
4 Press A/V or _/J_ to select/adjust the desired setting and press ENTER to confirm.
®Operations vary depending on the function or item.
5 Press MENU to exit.
Menu options differ in the selected input modes, but the operating procedures are the same.
Using the remote control Using the control panel of the TV
Use the following buttons on the remote control to You can also operate the menu with the control
F*VORITECH
MENU: Press to open or close tt_emenu screen.
A/Y/_/I_: Press to select a desired item on the
screen or adjust a selected item.
ENTER: Press to go to the next step or
corr_plete the setting.
RETURN: Press to return to the previous step.
panel of the fM.
Button operations on the
control panel correspond []_]
to the ones on the remote
control as shown below. []]_]
m3
°1
*for LC-48LE551U
MENU: MENU on the remote control.
INPUT: ENTER on the remote control,
CH/k/V: Cursor A/Y on the remote control,
VOL+/-: Cursor _/1_ on the remote control,
_)-17
operate the menu.
us_ _,_Nu
[ , , bJ
On=Screen Display Menu
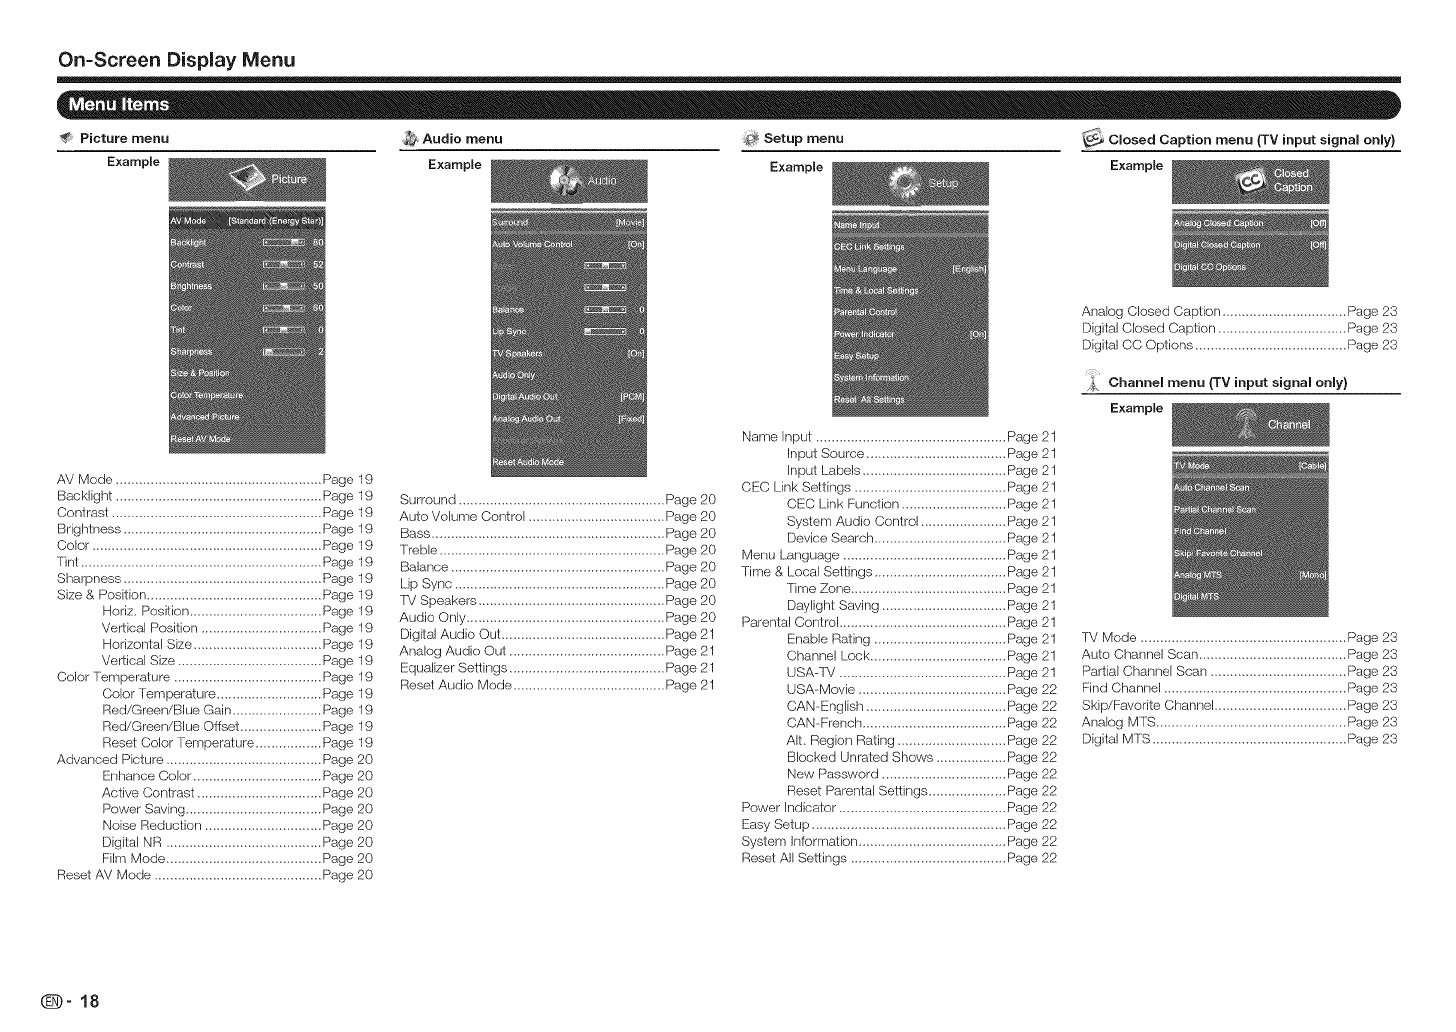
Picture menu _ Audio menu _ Setup menu _ C osed Caption menu {TV input signal only)
Example Example Example Example
AV Mode ..................................................... Page 19
BacHight ..................................................... Page 19
Contrast ...................................................... Page 19
Brightness ................................................... Page 1g
Color ........................................................... Page 19
Tint .............................................................. Page 19
Sharpness ................................................... Page 19
Size & Position ............................................. Page 19
Horiz, Position .................................. Page 19
Vertical Position ............................... Page 19
Horizontal Size ................................. Page 19
Vertical Size ..................................... Page 19
Color Temperature ...................................... Page 19
Color 'remperature ........................... Page lg
Red/Green/Blue Gain ....................... Page 19
Red/Green/Blue Offset ..................... Page 19
Reset Color Temperature ................. Page 19
Advanced Picture ........................................ Page 20
Enhance Color ................................. Page 20
Active Contrast ................................ Page 20
Power Saving ................................... Page 20
Noise Reduction .............................. Page 20
Digital NR ........................................ Page 20
Film Mode ........................................ Page 20
Reset AV Mode ........................................... Page 20
Surround ..................................................... Page 20
Auto Volume Control ................................... Page 20
Bass ............................................................ Page 20
Treble .......................................................... Page 20
Balance ....................................................... Page 20
Lip Sync ...................................................... Page 20
FV Speakers ................................................ Page 20
Audio Only ................................................... Page 20
Digital Audio Out .......................................... Page 21
Analog Audio Out ........................................ Page 21
Equalizer Settings ........................................ Page 21
Reset Audio Mode ....................................... Page 21
Name Input ................................................. Page 21
Input Source .................................... Page 21
Input Labels ..................................... Page 21
CEC Link Settings ....................................... Page 21
CEC Link Function ........................... Page 21
System Audio Control ...................... Page 21
Device Search .................................. Page 21
Menu Language .......................................... Page 21
Time & Local Settings .................................. Page 21
Time Zone ........................................ Page 21
Daylight Saving ................................ Page 21
Parental Control ........................................... Page 21
Enable Rating .................................. Page 21
Channel Lock ................................... Page 21
USA-TV ........................................... Page 21
USA-Movie ...................................... Page 22
CAN-English .................................... Page 22
CAN-French ..................................... Page 22
AIt. Region Rating ............................ Page 22
Blocked Unrated Shows .................. Page 22
New Password ................................ Page 22
Reset Parental Settings .................... Page 22
Power Indicator ........................................... Page 22
Easy Setup .................................................. Page 22
System Information ...................................... Page 22
Reset All Settings ........................................ Page 22
Analog Closed Caption ................................ Page 23
Digital Closed Caption ................................. Page 23
Digital CC Options ....................................... Page 23
j_. Channel menu (TV input signal only)
Example
TV Mode ..................................................... Page 23
Auto Channel Scan ...................................... Page 23
Partial Channel Scan ................................... Page 23
Find Channel ............................................... Page 23
Skip/Favorite Channel .................................. Page 23
Analog MTS ................................................. Page 23
Digital MTS .................................................. Page 23
_-18
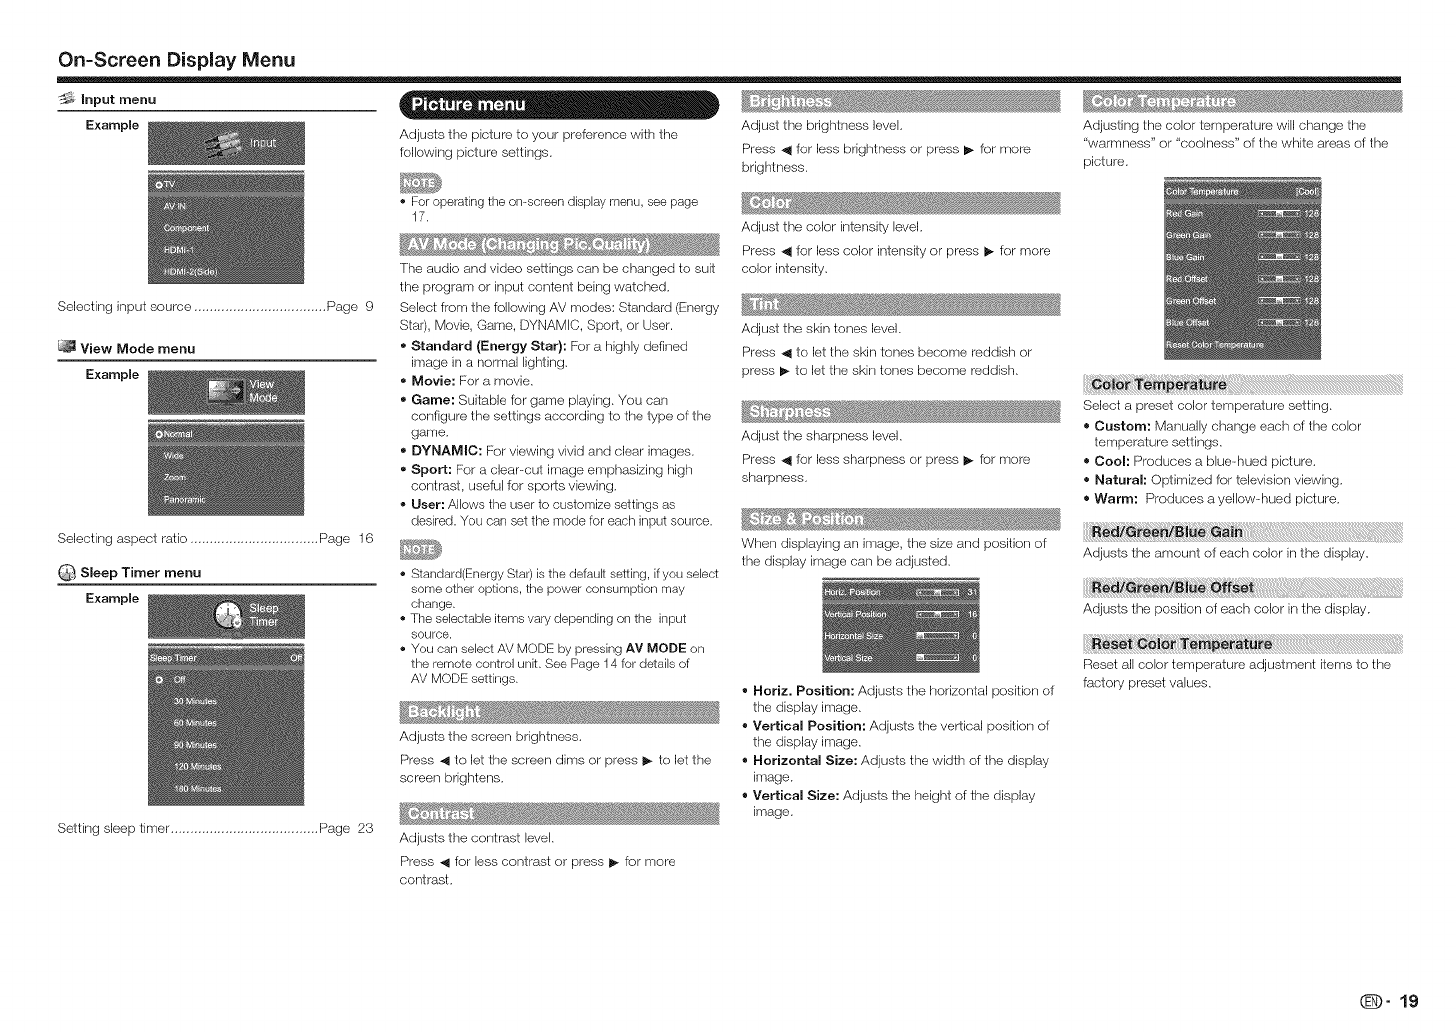
On=Screen Display Menu
_Input menu . . .
Example Adjusts the picture to your preference with the Adjust the brightness level, Adjusting the color temperature will change the
following picture settings, Press _ for less brightness or press _- for more "warmness" or "coolness" of the white areas of the
brightness, picture,
Selecting input source .................................. Page 9
View Mode menu
Example
Selecting aspect ratio ................................. Page 16
Q Sleep Timer menu
Example
Setting sleep timer ...................................... Page 23
• For operating the on-screen display menu, see page
17.
The audio and video settings can be changed to suit
the program or input content being watched,
Select frorn the following AV modes: Standard (Energy
Star), Movie, Game, DYNAMIC, Sport, or User.
• Standard {Energy Star): For a highly defined
image in a normal lighting,
•Movie: For a movie,
•Game: Suitable for game playing. You can
configure the settings according to the type of the
game,
•DYNAMIC: For viewing vivid and clear images.
• Sport: For a clear-cut image emphasizing high
contrast, useful for sports viewing,
•User: Allows the user to customize settings as
desired. You can set the mede for each input source.
• Standard(Energy Star) is the default setting, if you select
some other options, the power consumption may
change.
• The selectable items vary depending on the input
source.
• You can select AV MODE by pressing AV MODE on
the remote control unk. See Page 14 for details of
AV MODE settings.
Adjusts the screen brightness.
Press _ to let the screen dims or press I_ to let the
screen brightens,
Adjusts the contrast level,
Press _ for less contrast or press I_ for more
contrast,
Adjust the color intensity level,
Press _ Ior less color intensity or press _- for more
color intensity,
Adjust the skin tones level,
Press _ to let the skin tones become reddish or
press _- to let the skin tones become reddish,
Adjust the sharpness level,
Press _ for less sharpness or press _- for more
sharpness,
When displaying an image, the size and position of
the display image can be adjusted,
Horiz. Position: Adjusts the horizontal position of
the display image,
Vertical Position: Adjusts the vertical position of
the display image,
Horizontal Size: Adjusts the width of the display
irrlage.
Vertical Size: Adjusts the height of the display
image,
Select a preset color tern )erature setting.
Custom: Manually change each of the color
temperature settings,
Cool: Produces a blue-hued picture.
Natural: Optimized f_r television viewing,
Warm: Produces ayellow-hued picture,
iiii_!_!_i_i8!_!_!i!i_i_!_:_i_i_i!_!_!_!_!_!;!_i_!_i_i_!;iiiiiiiiiiiii{_!_i{!ii_i_i_i!_!{{{{{{{{{{{{{{{{{{{{{_!{_!_!_i!_i_!i_i!_!_i_i_!i_i_i_ii_i_i_i_i_i_!ii_iiiii_iiiili!i!iii_!i{i
Adjusts the amount of each color in the display_
Adjusts the position of each color in the display.
Reset all color temperature adjustment items to the
factory preset values,
_-19
On=Screen Display Menu
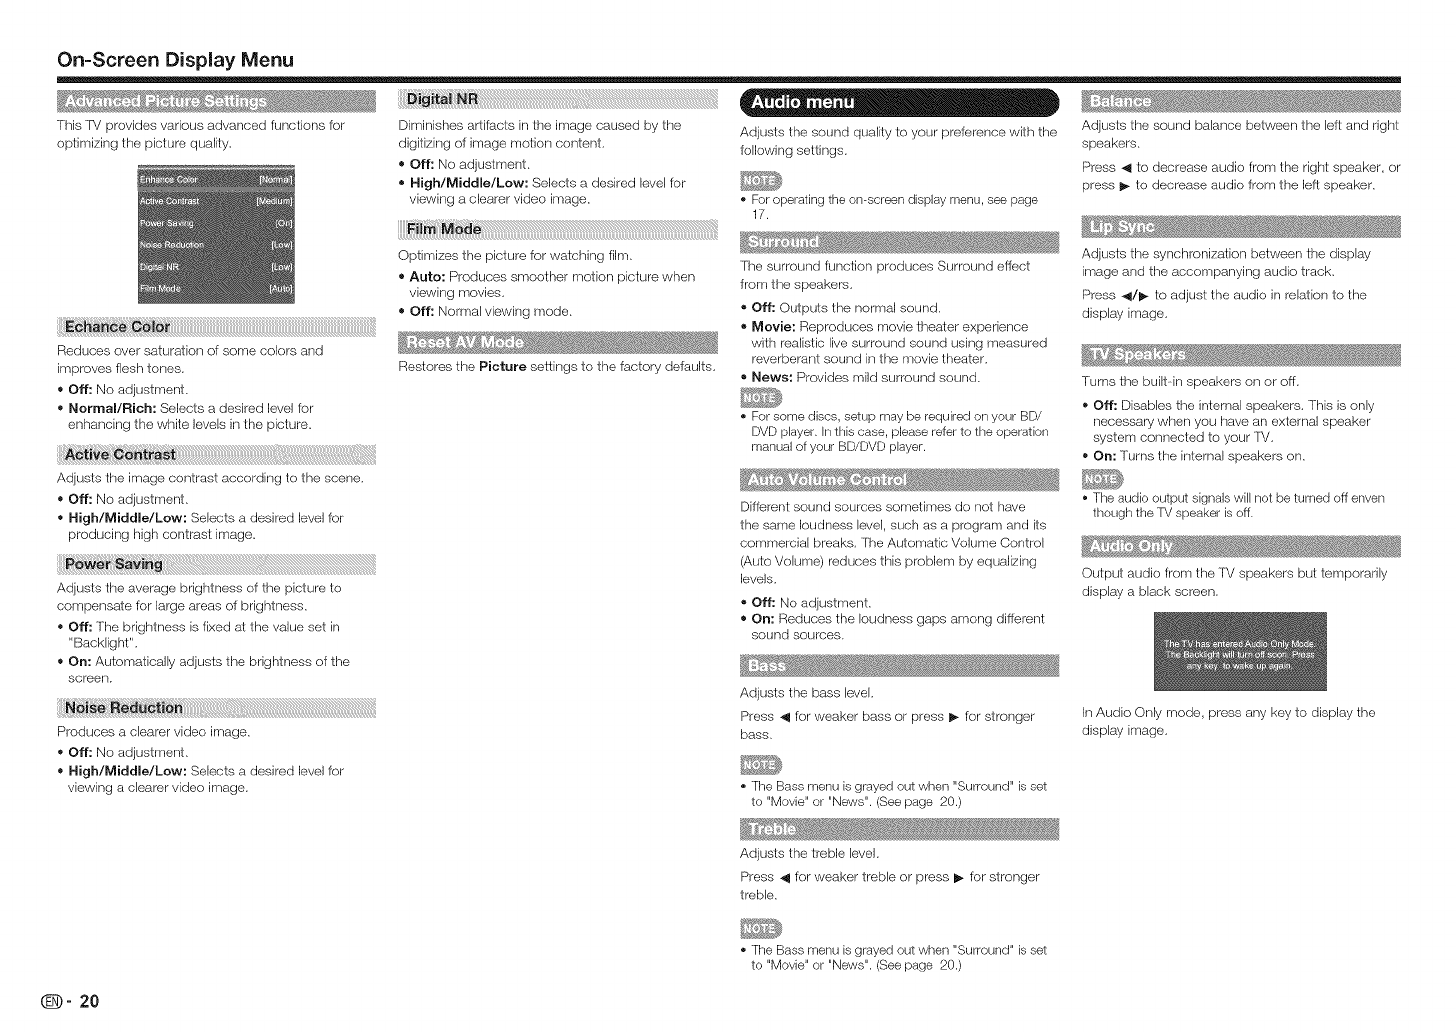
This TV provides various advanced functions for
optimizing the picture quality.
Diminishes artifacts in the image caused by the
digitizing of image motion content,
= OFF:No adjustment.
=High/Middle/Low: Selects a desired level for
viewing a clearer video image.
Optimizes the picture for watching film,
•Auto: Produces smoother motion picture when
viewing movies,
= Off: Normal viewing mode.
Restores the Picture settings to the factory defaults,
i_i:iii_i_;_iiiii!_!_j;___l_i_i ¸i
Reduces over saturation of some colors and
improves flesh tones.
= OFF:No adjustment,
=Normal/Rich: Selects a desired level for
enhancing the white levels in the picture.
Adjusts the image contrast according to the scene,
= OFF:No adjustment,
• High/Middle/Low: Selects a desired level for
producing high contrast image.
Adjusts the average brightness of the picture to
compensate for large areas of brightness,
= OFF:The brightness is fixed at the value set in
"Backlight'L
= On: Automatically adjusts the brightness of the
screen.
Produces a clearer video image.
= OFF:No adjustment,
= High/Middle/Low: Selects a desired level for
viewing a clearer video image.
• 0
Adjusts the sound quality to your preference with the
following settings,
o For operating the on-screen display menu, see page
17.
The surround function produces Surround effect
from the speakers,
• Off: Outputs the normal sound,
•Movie: Reproduces movie thealer experience
with realistic live surround sound using measured
reverberant sound in the movie theater,
• News: Provides mild surround sound,
Adjusts the sound balance between the left and right
speakers.
Press _1 to decrease audio from the right speaker, or
press I_ to decrease audio from the left speaker,
' _S_ ....
Adjusts the synchronization between the display
image and the accompanying audio track,
Press _/_ to adjust the audio in relation to the
display image,
Turns the built-in speakers on or off,
For some discs, setup may be required on your BD/
DVD player, in this case, please refer to the operation
manual of your BD/DVD player.
Different sound sources sometimes do not have
the same loudness level, such as a program and its
commercial breaks. The Automatic Volume Control
(Auto Volume) reduces this problem by equalizing
levels,
• Off: No adjustment.
= On: Reduces the loudness gaps among different
sound sources.
= OFF:Disables the internal speakers. This is only
necessary when you have an external speaker
system connected to your FV,
= On: Turns the internal speakers on,
The audio output signals will net be turned off enven
though the TV speaker is off.
Output audio from the 'rv speakers but temporarily
display a black screen.
Adjusts the bass level,
Press _ for weaker bass or press I_ for stronger
bass,
In Audio Only mode, press any key to display the
display image,
The Bass menu is grayed out when "Surround" is set
to "Movie" or "News". (See page 20.)
Adjusts the treble level,
Press _ for weaker treble or press _- for stronger
treble.
The Bass menu is grayed out when "Surround" is set
to "Movie" or "News". (See page 20.)
On=Screen Display Menu
You can output digital audio to an AV arrlplifier
or similar device whose DIGFr_L AUDIO INPUT
terminal is connected to the DIGI%_L AUDIO
OUTPUT terminal on the lV. Please select an audio
output format compatible with the audio format of
the program you are watching and the equipment
connected.
=Dolby Digital: The digital audio output terminal
outputs audio signal in Dolby Digital form. It
reproduces sound from surround program of
digital.
=POM: The digital audio output terminal outputs
audio signal in PCM form. Ifyour digital audio
system does not support Dolby Digital (AC3),
select "PCM".
Sets the volume control properties for the analog
RCA (red/white) connectors when connected to a
home theater audio system.
= Fixed: Control the external speakers' volume from
your home theater system controls.
= Variable: Control the external speakers' volume
from the [V's volume controls.
The five-band equalizer allows you to adjust the
audio frequency settings.Choose a band and make
adjustments.
Press _/1_ to select the desired frequency (120Hz,
500Hz, 1.5KHz, 5KHz, 10KHz) you wish to adjust.
Use A/Y to adjust the level.
When you have finished adjusting the levels, press
MENU to exit.
• The Bass menu is grayed out when "Surround" is set
to "Movie" or "News". (See page 20.)
Restores the Audio settings to the factory defaults.
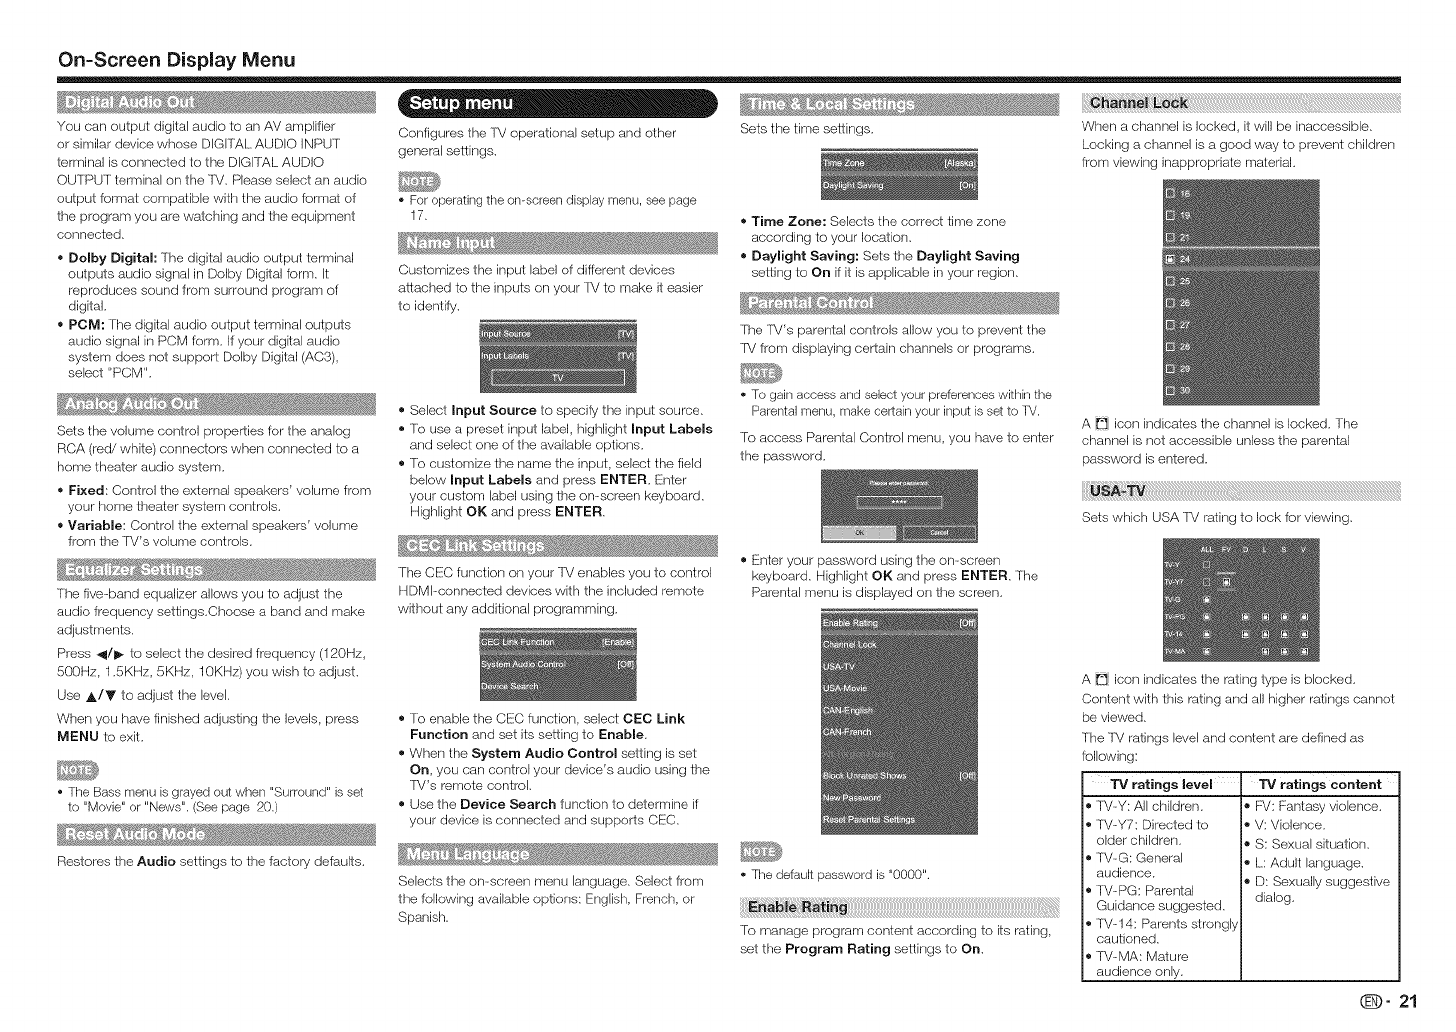
Configures the 'f_/operational setup and other
general settings.
• For operating the on-screen display menu, see page
17.
, _;_,__ _ % ..... ,
Customizes the input label of different devices
attached to the inputs on your [_/to make it easier
to identify.
® Select Input Source to specify the input source.
®To use a preset input label, highlight Input Labels
and select one of the available options.
®To customize the name the input, select the field
below Input Labels and press ENTER. Enter
your custom label using the on-screen keyboard.
Highlight OK and press ENTER.
_f_2_ ¸_ _S,_ _ _ _ ...... _
The CEC function orsyour TV enables you to control
HDMbconnected devices with the included remote
without any additional programming.
Sets the time settings.
=Time Zone: Selects the correct time zone
according to your location.
=Daylight Saving: Sets the Daylight Saving
setting to On if it is applicable in your region.
The [V's parental controls allow you to prevent the
[V from displaying certain channels or programs.
• To gain access and select your preferences within the
Parental menu, make certain your input is set to TV.
To access Parental Control menu, you have to enter
the password.
® Enter your password using the ors-screen
keyboard. Highlight OK and press ENTER. The
Parental menu is displayed orsthe screen.
i¸I¸_!i_I_ii!_i_!_!_!_!_!_!_!_!_!_!_!_!_!_!_!_!_!_!_!_!_!_!_!_!_!_!_!_!_!_!_!_!_!_!_!_!_!_!_!_!_!_!_!_!_!_!_!_!_!_!_!_!_!_!_!_!_!_!_!_!_!_!_!_!_!_!_!_!_!_!_!_!_!_!_!_!_!_!_!_!i_i;_i_{_i_!_!ii_i_!i_i__I_I_I_I_I_I_I_I_I_I_I_I_I_I_I_I_I_I_I_I_I_I_I_I_I_I_I_I_I_I_I_I_I_I_I_I_I_I_I_I_I_I_I_I_I_I_I_I_I_I_I_II!
When a channel is locked, it will be inaccessible.
Locking a channel is a good way to prevent children
from viewing inappropriate material.
A icors indicates the channel is locked. The
channel is not accessible unless the parental
password is entered.
®To enable the CEC function, select CEC Link
Function and set its setting to Enable.
®When the System Audio Control setting is set
On, you carl control your device's audio using the
fV's remote control.
® Use the Device Search function to determine if
your device is connected and supports CEC.
Selects the ors-screen menu language. Select from
the following available options: English, Frenct_, or
Spanist_.
• The default password is "0000".
To manage program content according to its rating,
set the Program Rating settings to On.
A _ icors indicates the rating type is blocked.
Content with this rating and all higher ratings cannot
be viewed.
The TV ratings level and content are defined as
following:
TV ratings level
® fV-Y: All chik_ren.
® IV-Y7: Directed to
older children.
® IV-G: General
audience.
® IV-PG: Parental
Guidance suggested.
• lV-14: Parents strongly
cautioned.
® TVMA: Maiure
audience only.
"iV ratings content
®F_/: Fantasy violence.
®V: Violence.
®S: Sexual situation.
®L: Adult language.
®D: Sexually suggestive
dialog.
(_- 21
On=Screen Disp{ay Menu
iiiiii!iiii!_i_ii!_!_!i_ii!i!!i!!i!!i!!i!!i!!i!!i!!i!!i!!i!!i!!i!!i!!i!!i!!i!!i!!i!!i!!i!!i!!i!!i!!i!!i!!i!!i!!i!!i!!i!!i!!i!!i!!i!!i!!i!!i!!i!!i!!i!!i!!i!!i!!i!!i!!i!!i!!i!!i!!i!!i!!i!!i!!i!!i!!i!!i!!i!!i!!i!!i!!i!!i!!i!!i!!i!!i!!i!!i!!i!!i!!i!!i!!i!!i!!i!!i!!i!!i!!i!!i!!i!!i!!i!!i!!i!!i!!i!!i!!i!!i!!i!!i!!i!!i!!i!!i!!i!!i!!i!!i!!i!!i!!i!!i!!i!!i!!i!!i!!i!!i!!i!!i!!i!!i!!i!!i!!i!!i!!i!!i!!i!!i!!i!!i!!i!!i!!i!!i!!i!!i!!i!!i!!i!!i!!iiii!i!i!i!i!ii!iiiiiiiiiiiiiiiiiiiiiiiiiiiiiiiiiiiiiii!;!!{i
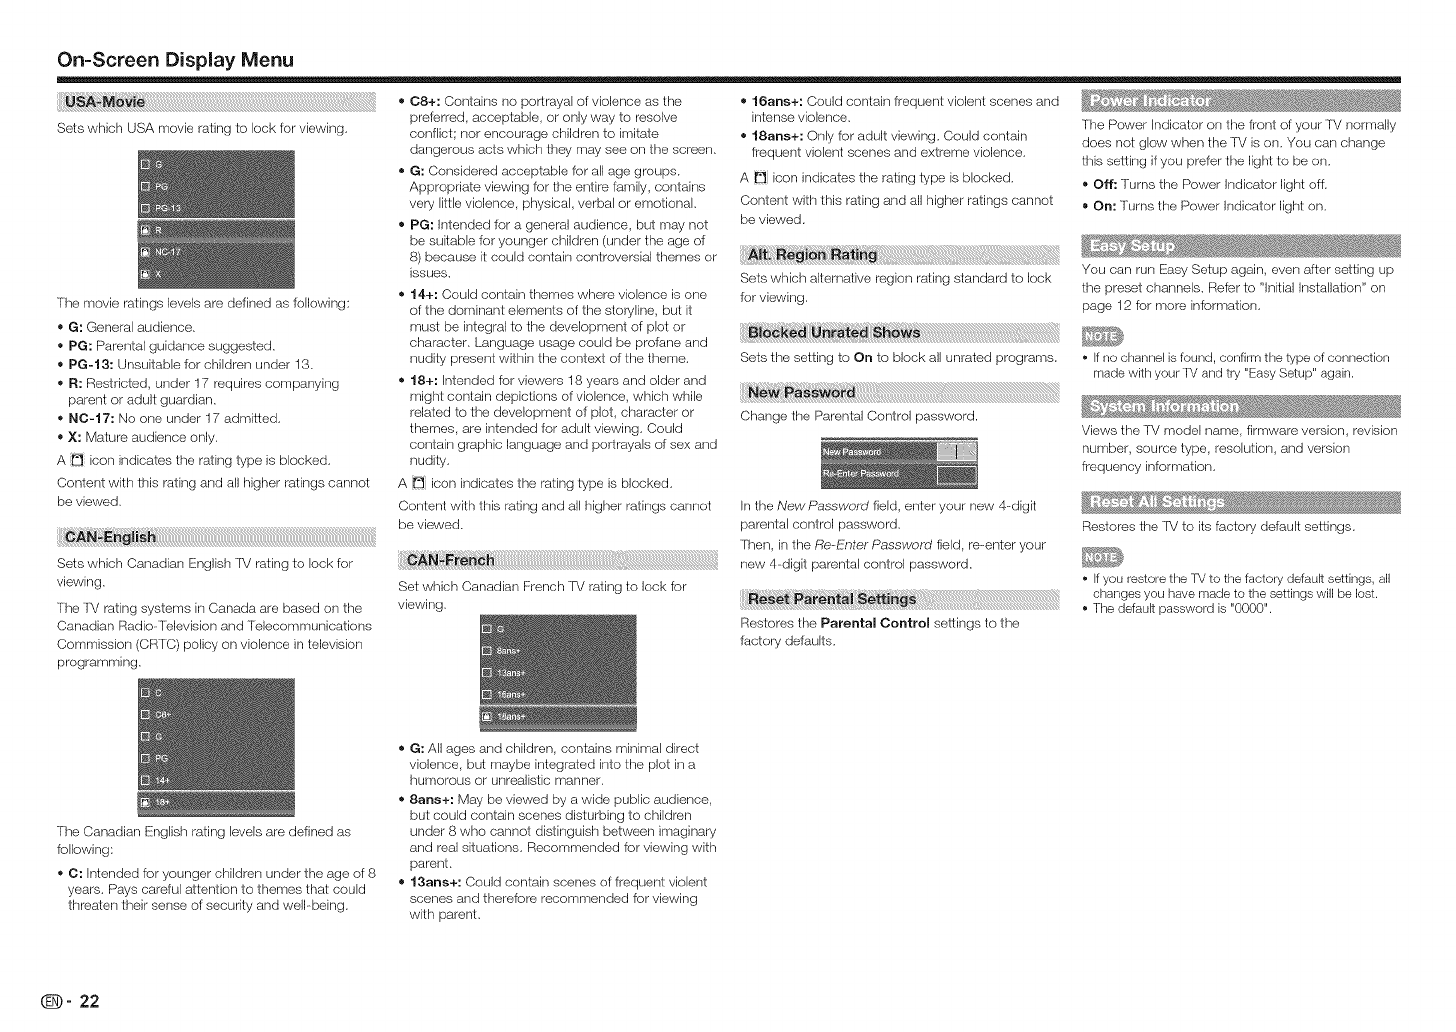
Sets which USA movie rating to lock for viewing.
The movie ratings levels are defined as fellewing:
G: General audience.
= PG: Parental guidance suggested.
= PG-I 3: Unsuitable for children under 13.
= R: Restricted, under 17 requires companying
parent or adult guardian.
= NO-17: No one under 17 admitted.
= X: Mature audience only.
A _ icon indicates the rating type is blocked.
Content with this rating and all higher ratings cannot
be viewed.
Sets which Canadian English TM rating to lock for
viewing.
The lM rating systems in Canada are based on the
Canadian Radio-Television and Telecommunications
Commission (CRTC) policy on violence in television
programming.
=C8+: Contains no portrayal of violence as the
prderred, acceptable, or only way to resolve
conflict; nor encourage children to imitate
dangerous acts which they may see on the screen.
= G: Considered acceptable for al{ age groups.
Appropriate viewing for the entire family, contains
very little violence, physical, verbal or emotional.
= PG: Intended let a genera{ audience, but may net
be suitable for younger children (under the age of
8) because it could contain controversial themes or
issues.
= 14+: Could contain themes where violence is one
of the dominant elements of the steryline, but it
mus! be integral to the development of plot or
character. Language usage could be prolane and
nudity present within the context of the theme.
= 18+: Intended for viewers 18 years and older and
might contain depictions of violence, which while
related to the development of plot, character or
themes, are intended Ier adult viewing. Could
contain graphic language and portrayals of sex and
nudity.
A _ icon indicates the rating type is blocked.
Content with this rating and all higher ratings cannot
be viewed.
16arts+: Could contain frequent violent scenes and
intense violence.
= 18arts+: Only for adult viewing. Could centain
frequent violent scenes and extreme violence.
A _ icon indicates the rating type is blocked.
Content with this rating and all higher ratings cannot
be viewed.
ii!ii!i!_!_i_i_i_i_!_!!_iIIi;iii_!_i_¸!i¸!i¸!_¸i{_{i_ii!!_i_i_i_i_i_i_i_i_i_i_i_i_i_!_!_i!_i_i_i_i_i_i_i_i_i_!_i!_!_!_i!i_i_i_i_i_i_i_i_i_i_i_i_i_i_i_i_iiiiiiiiiiiiiiiiii!i_!ii_i_i_iiii!!!i_i_i_i_i_i_i_i_i_i_i_i_i!!_i_i_i_i_i_i_i_i_i!ii_i_i_i_i_i_i_i
Sets which alternative region rating standard to lock
for viewing.
The Power Indicator on the front of your lM normally
does not glow when the lM is on. You can change
this setting if you prefer the light to be on.
,, Off: Turns the Power Indicator light off.
,, On: Turns the Power Indicator light on.
You can run Easy Setup again, even after setting up
the preset channels. Refer to "Initial Installation" on
page 12 for more information.
ii¸_B_!i_a!!!!_a__!!ill_!!i_!i_!i_!i_!i_!i_!i_!i_!i_!i_!i_!i_!i_!i_!i_!i_!i_!i_!_:ii_!
Sets the setting to On to block all unrated programs, o If no channel isfound, confirm the type of connection
made with your TV and try "Easy Setup" again.
, _ _, _ ............
Change the Parental Control password.
Views the lV model name, firmware version, revision
number, source type, resolution, and version
frequency information.
In the New Passwoml field, enter your new 4-digit
parental control password.
Then, in the Re..F:!nterPasswoml field, re--enter your
new 4-digit parental control password.
Restores the Parental Control settings to the
factory defaults.
,. _> ,_
Restores the TMto its factory default settings.
* If you restore the TV to the factory defauR settings, all
changes you have made to the settings will be lost.
The defauR password is "0000".
The Canadian English rating levels are defined as
following:
=C: Intended for younger children under the age of 8
years. Pays careful attention to themes that could
threaten their sense of security and well-being.
= G: All ages and children, contains minimal direct
violence, but maybe integrated into the plot in a
humorous or unrealistic manner.
* 8arts+: May be viewed by a wide public audience,
but could contain scenes disturbing to children
under 8 who cannot distinguish between imaginary
and real situations. Recommended for viewing with
parent.
= 13arts+: Could contain scenes of frequent violent
scenes and therefore recommended for viewing
with parent.
_- 22
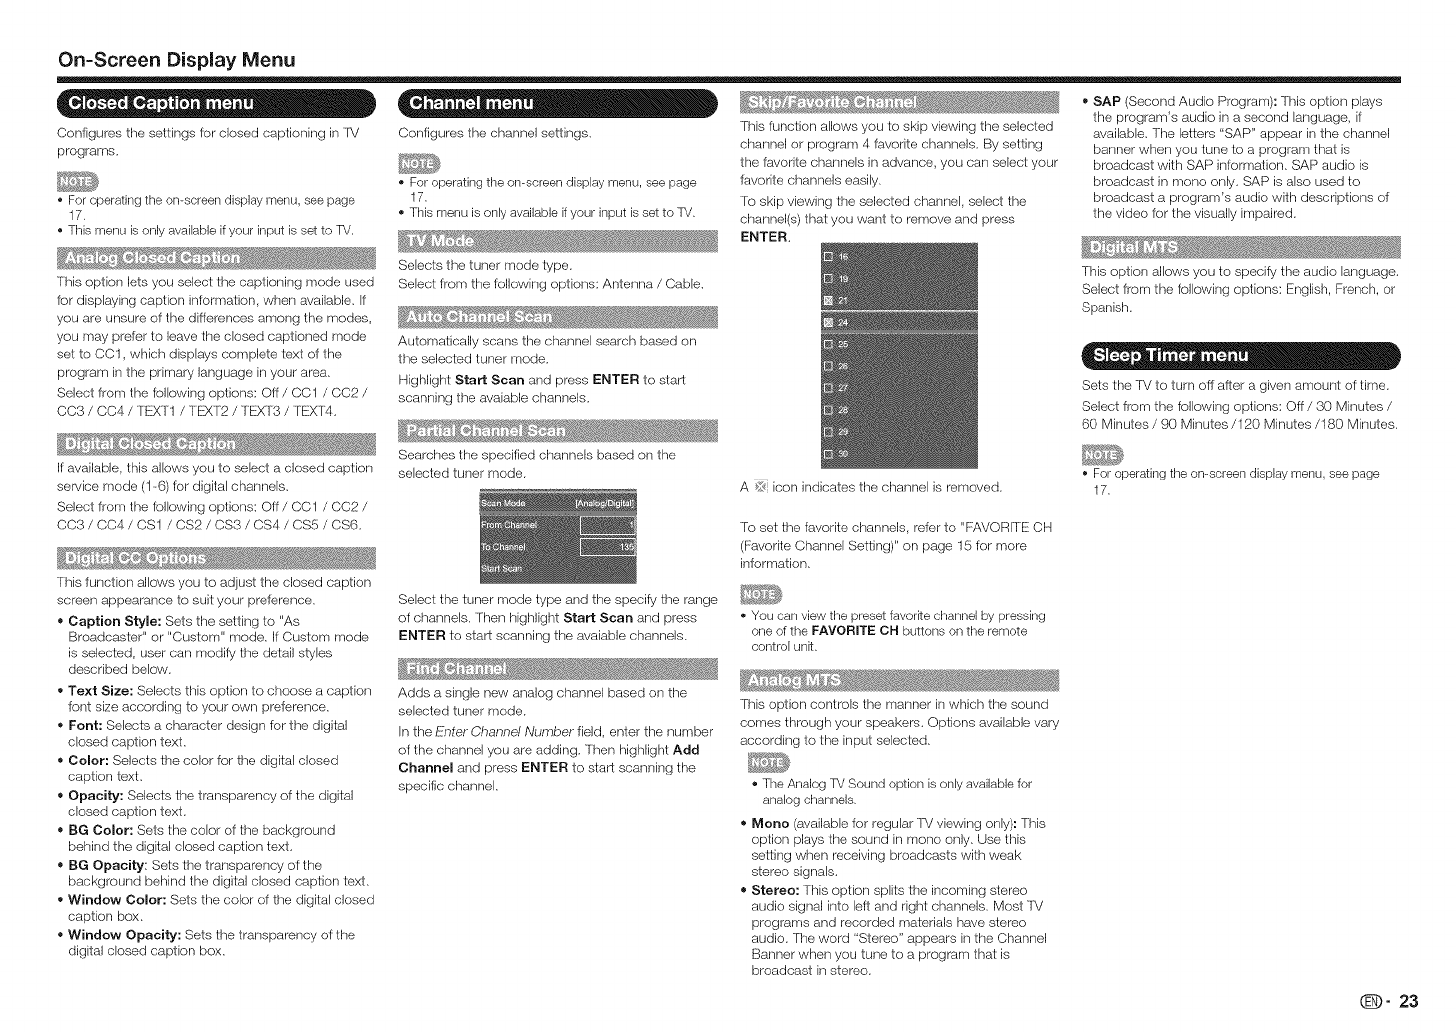
On=ScreenDisplay Menu
e-e .e o=
Configures the settings for closed captioning in FV
programs.
For operating the on-screen display menu, see page
17.
This menu is only available if your input is set to TV.
This option lets you select the captioning mode used
for displaying caption information, when available. If
you are unsure of the differences among the modes,
you may prefer to leave the closed captioned mode
set to CO1, which displays complete text of the
program in the primary language in your area.
Select from the following options: OFF/CC1 /CC2 /
CC3 /CC4 /TEXT1 /TEXT2 /TEXT3 /TEXT4.
If available, this allows you to select a closed caption
service mode (1-6) for digital channels.
Select from the following options: OFF/CC1 /CC2 /
CC3 /0C4 /CS1 /CS2 /0S3 /CS4 /CS5 /CS6•
_ _,_ _ _,_5¢__ ,._ .....
_A_,_
This function allows you to adjust the closed caption
screen appearance to suit your preference.
= Caption Style: Sets the setting to "As
Broadcaster" or "Custom" mode. If Custom mode
is selected, user can modify the detail styles
described below.
= Text Size: Selects this option to choose a caption
font size according to your own preference,
= Font: Selects a character design for the digital
closed caption text,
= Color: Selects the color for the digital closed
caption text•
= Opacity: Selects the transparency of the digital
closed caption text,
=BG Color: Sets the color of the background
behind the digital closed caption text,
= BG Opacity: Sets the transparency of the
background behind the digital closed caption text.
= Window Color: Sets the color of the digital closed
caption box•
= Window Opacity: Sets the transparency of the
digital closed caption box.
Configures the channel settings.
For operating the on-screen display menu, see page
17.
This menu is only available if your input is set to TV.
Selects the tuner mode type.
Select from the fellowing options: Antenna /Cable.
_' _,$ Wd@s_ _#,s
Automatically scans the channel search based on
the selected tuner mode.
Highlight Start Scan and press ENTER to start
scanning the avaiable channels.
Searches the specified channels based ors the
selected tuner mode.
This function allows you to skip viewing the selected
channel or program 4 favorite channels. By setting
the favorite channels in advance, you carl select your
favorite channels easily.
To skip viewing the selected channel, select the
channel(s) that you want to remove and press
ENTER.
A {if<icon indicates the channel is removed.
SAP (Second Audio Program): This option plays
the program's audio in a second language, if
available. The letters "SAP" appear in the channel
banner when you tune to a program that is
broadcast with SAP information. SAP audio is
broadcast in mono only. SAP is also used to
broadcast a program's audio with descriptions of
the video for the visually impaired.
This option allows you to specify the audio language.
Select from the following options: Englist_, French, or
Spanish.
Sets the TV to turn off after a givers amount of time.
Select from the following options: Off/30 Minutes /
60 Minutes/90 Minutes/120 Minutes/180 Minutes.
For operating the on-screen display menu, see page
17.
To set the favorite channels, refer to "FAVORITE CH
(Favorite Channel Setting)" on page 15 for more
information.
Select the tuner mode type and the specily the range
of channels. Then highlight Start Scan and press
ENTER to start scanning the avaiable channels.
Adds a single new analog channel based orsthe
selected tuner mode.
In the Enter Channel Number field, enter the number
of the channel you are adding. Then highlight Add
Channel and press ENTER to start scarsrsing the
specific channel.
You can view the preset favorke channel by pressing
one of the FAVORITE OH buttons on the remote
control unk.
This option controls the manner in which the sound
comes through your speakers. Options available vary
according to the input selected.
The Analog TV Sound option is only available for
analog channels.
=Mono (available for regular TV viewing only): This
option plays the sound in morse only. Use this
setting when receiving broadcasts with weak
stereo signals.
= Stereo: This option splits the incoming stereo
audio signal into left and nght channels. Most lV
programs and recorded materials have stereo
audio. The word "Stereo" appears in the Channel
Banner when you tune to a program that is
broadcast in stereo.
q29" 23
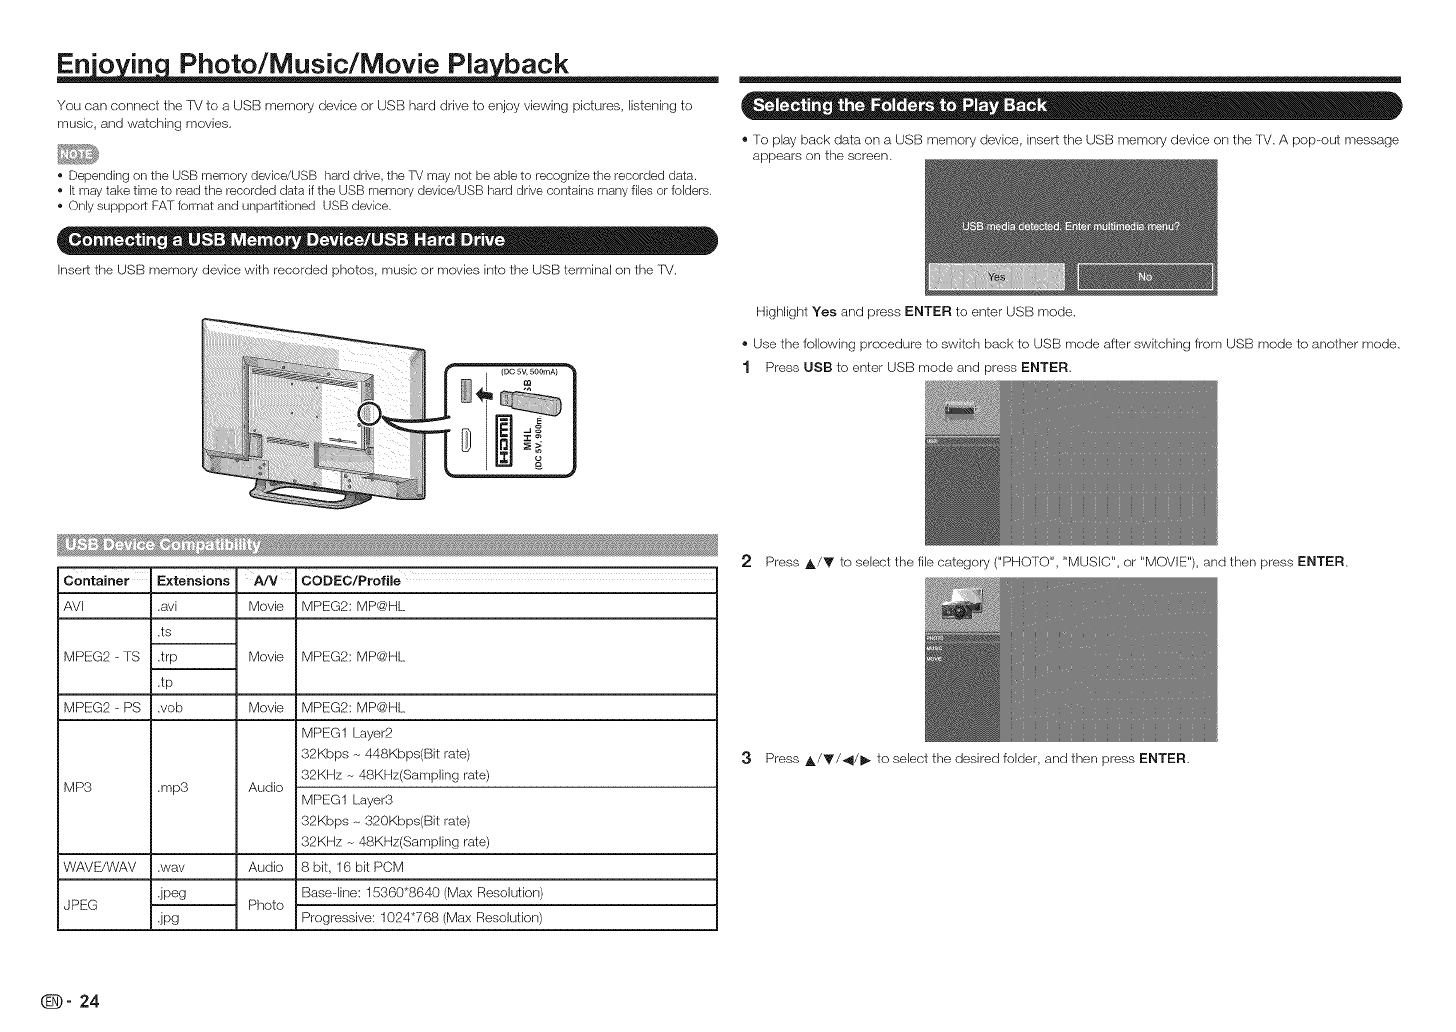
En'o in Photo/Music/Movie Pla back
You can connect the ]V to a USB memory device or USE]-}hard drive to enjoy viewing pictures, listening to
music, and watching movies.
• Depending on the USB memory device/USB hard drive, the TV may not be able to recognize the recorded data.
• It may take time to read the recorded data if the USB memory device/USB hard drive contains many files or folders.
• Only suppport FAT format and unpartRioned USB device.
Inser_ the USB memory device with recorded photos, music or movies into the USB terminal ors the ]V.
ii!i
iiiii!i!!ili!i !iiiili!i !!i! i! i! !! !!i!!i!ii!{i!i!i!i!i!iii!i!i!i!iiiii
_ f_
CODEC/Profile
Movie MPEG2: MP@HL
Container
AVI
MPEG2 -TS
MPEG2 -PS
MP3
Extensions
.avi
.ts
.trp
.tp
.vob
.mp3
,wav
jpeg
JPg
WAVE/WAV
JPEG
Movie MPEG2: MP@HL
Movie MPEG2: MP@HL
MPEG1 Layer2
32Kbps -_448Kbps(Bit rate)
32KHz _ 48KHz(Sampling tale)
Audio MPEG1 Layer3
32Kbps -_320Kbps(Bit rate)
32KHz -_48KHz(Sampling rate)
Audio 8bit, 16bitPCM
Base-line: 15360"8640 (Max Resolution)
Photo Progressive: 1024"768 (Max Resolution)
®To play back data on a USB memory device, insert the USB memory device ors the ]V. A pop-out message
appears on the screen.
Highlight Yes and press ENTER to enter USB mode.
®Use the following procedure to switch back to USB mode after switching from USB mode to another mode.
1 Press USB to enter USB mode and press ENTER.
2 Press ,_/Y to select the file category ("PHOTO", "MUSIC", or "MOVIE"), and then press ENTER.
3Press ,_/Y/_I/I_ to select the desired folder, and then press ENTER.
_- 24
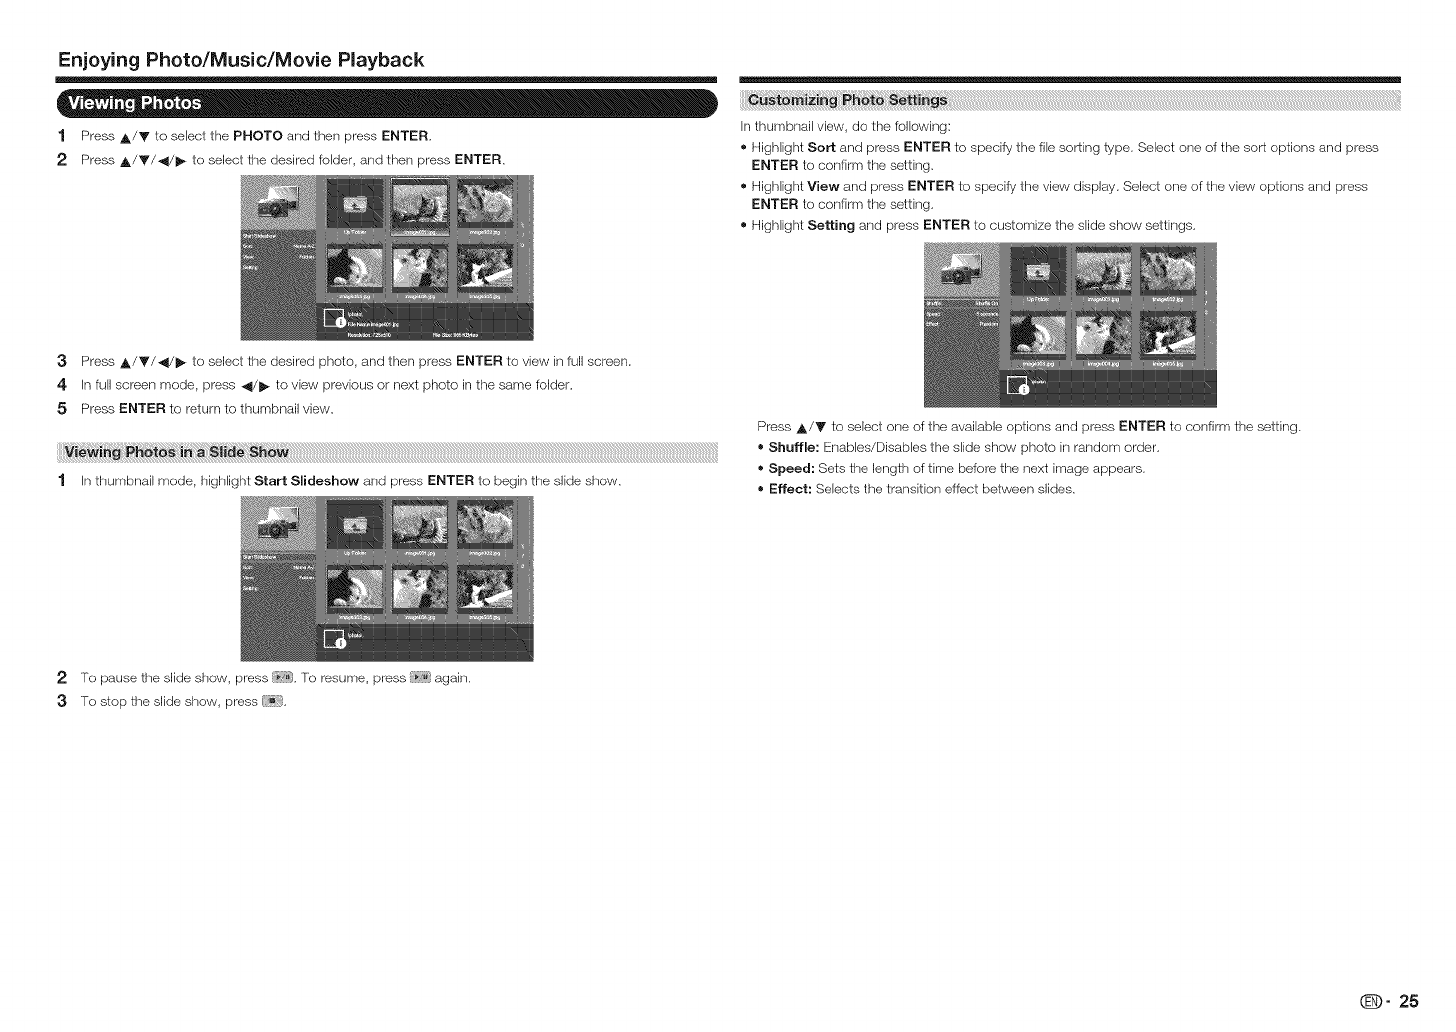
Enjoying Photo/Music/Movie Playback
1 Press A/Y to select the PHOTO and then press ENTER.
2 Press A/Y/4/J_ to select the desired folder, and then press ENTER.
In thumbnail view, do the following:
® Highlight Sort and press ENTER to specify the file sorting type. Select one of the sort options and press
ENTER to confirm the setting.
® Highlight View and press ENTER to specify the view display. Select one of the view options and press
ENTER to confirm the setting.
® Highlight Setting and press ENTER to customize the slide show settings.
3Press A/Y/4/J_ to select the desired photo, and then press ENTER to view in full screen.
4 In full screen mode, press 4/J_ to view previous or next photo inthe same folder.
5 Press ENTER to return to thumbnail view.
1 In thumbnail mode, highlight Start Slideshow and press ENTER to begin the slide show.
Press A/V to select one of the available options and press ENTER to confirm the setting.
= Shuffle: Enables/Disables the slide show photo in random order.
= Speed: Sets the length of time befere the next image appears.
= Effect: Selects the transition effect between slides.
2 To pause the slide show, press !-_?ii].To resume, press [_;;'_]again.
3 To stop the slide show, press
(D" 25
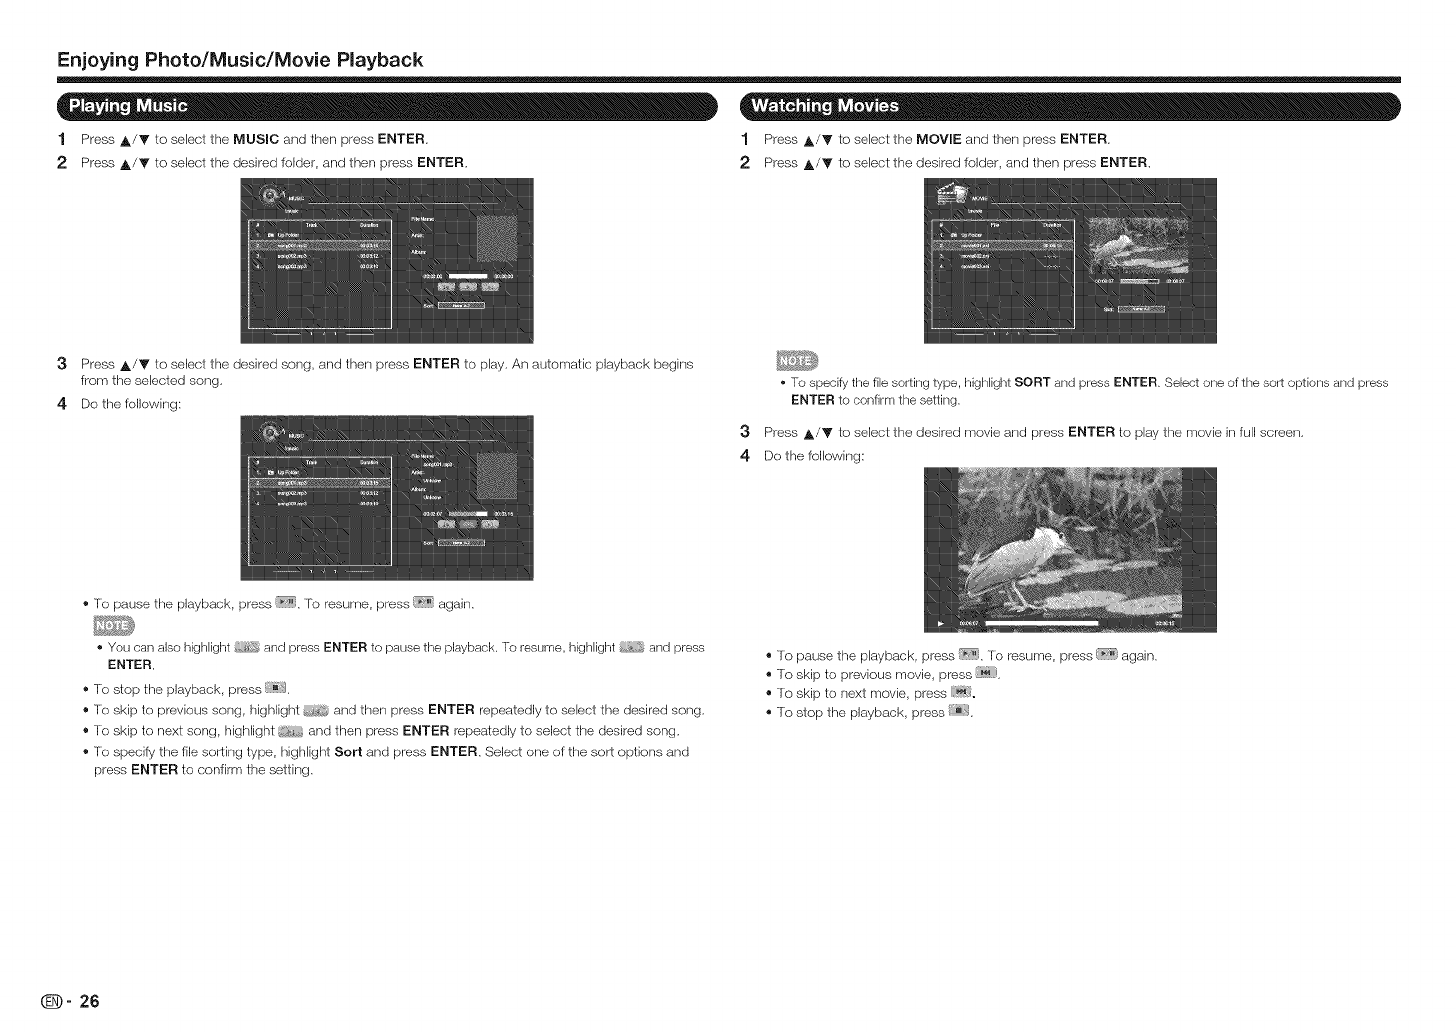
Enjoying Photo/Music/Movie Playback
1 Press A/Y to select the MUSIC and then press ENTER. 1 Press ,_/V to select the MOVIE and then press ENTER.
2 Press A/Y to select the desired folder, and then press ENTER, 2 Press ,_/Y to select the desired folder, and then press ENTER.
3Press A/V to select the desired song, and then press ENTER to play, An automatic playback begins
from the selected song,
4 Do the following:
• To specify the file sorting type, highlight SORT and press ENTER. Select one of the sort options and press
ENTER to confirm the setting.
3Press ,_/Y to select the desired movie and press ENTER to play the movie in full screen,
4 De the following:
®To pause the playback, press [_;_]. To resume, press _ again,
• You can also highlight and press ENTER to pause the playback. To resume, highlight and press
ENTER.
®To stop the playback, press (_}.
®To skip to previous song, highlight and then press ENTER repeatedly to select the desired song,
®To skip to next song, highlight and then press ENTER repeatedly to select the desired song,
®To specify the file sorting type, highlight Sort and press ENTER, Select one of the sort options and
press ENTER to confirm the setting,
®To pause the playback, press _;7__,To resume, press [_i' again,
®To skip to previous movie, press E_ },
®To skip to next movie, press !_!i.
®To stop the playback, press .
_- 26
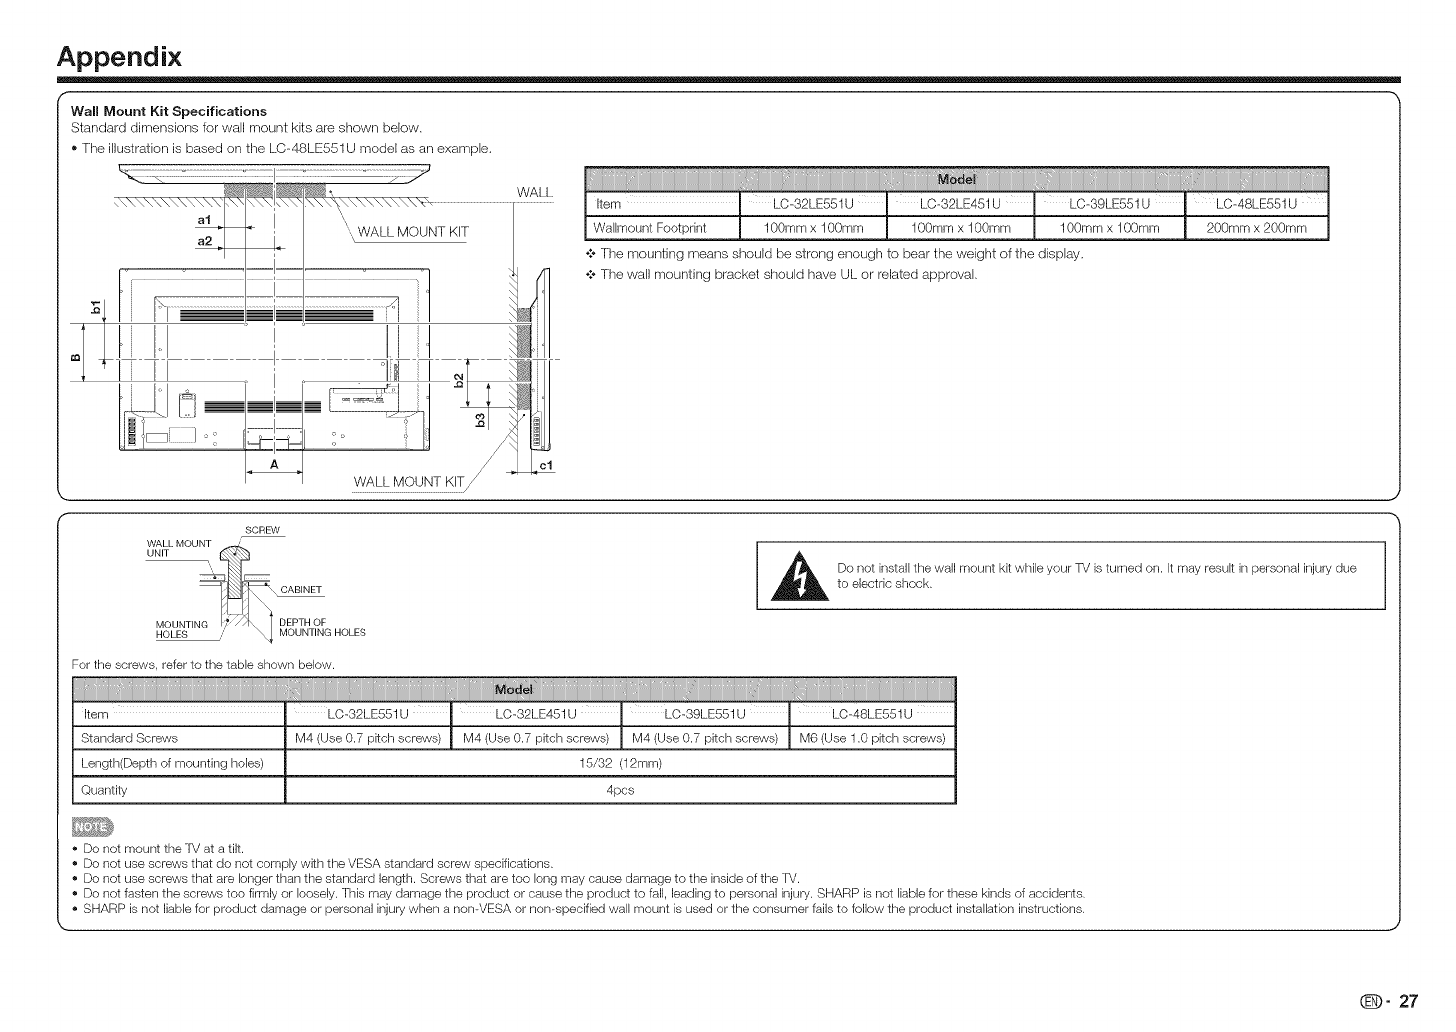
Appendix
Wall Mount Kit Specifications
Standard dimensions for wall mount kits are shown below,
® The illustration is based on the LC-48LE551U model as an example.
at \\" WALL MOUNT KIT
ri]
t " I
li II oi!1
WALL iiiiii]iiiiiiiiiiiiiiiii_iiiiiii_iii!iiiIii1iiiiiiiiiiiiiiiiiiiiiiiiiiiiiiiiiiiiiiiiiiiiiiiiiiiiiiiiiiiiiiiiiiiiiiiiiiiiiiiiiiiiiiiiiiiiiiiiiiiiiiiiiiiiiiii_ii_iii_iHiiHii1iiiiiiiiiiiiiiiiii_iiiiiiii!iHHi1iiiiii_iiiiiii_iiiiiiiiiiiiiiiiiiiiiiiiiiiiiiii_iiiiiii_iiiiiii_iiiiiii_iiiiiii_iiiii!_iiiHiiiiiiii1ii_iii_iii_iii_iii_iii_iii_ii_iiiY_ii_i_i_i_i_ii_i_ii_i_ii_i_ii_i_ii_i_i_!i_1ii_iiii_i_i_i_ii_i_ii_i_ii_i_ii_i_H_i_iii_i_ii_i_ii_i_ii_i_ii_i_ii_i_ii_i_ii_i_iHH_ii;_i_i_i_i_iii_i_i_iH_Ii_t_!i_iiiii_i_iii_ii_i_i_ii_ii_i_ii_H_iii_i_i_i_ii_i_ii_i_ii_i_ii_i_ii_i_ii_i_iHH_ii;_i_i_i_i_iii_
,torn 1 LO32LE551Uf ¸¸L°-32L 4 1u¸l L039 -E551ul LO48L 1U1
WallmountFootprint ! 100mmxlOOmm | lOOmmxlO0mm J100mmxlOOmm j200mmx200mm !
•:* The mounting means should be strong enough to bear the weight of the display,
•:* The wall mounting bracket should have UI.. or related approval,
cl
SCREW
,_ Do not install the wall mount kR while your TV is turned on. it may resuR in personal injury due
to electdc shock.
For the screws, refer to the table shown below.
i i ii i _i
Item -LO-32LE551U _ LO-32LE451U : LO-39LE551U " LC_48LE551U
Standard Screws M4 (Use 0.7 pRch screws) M4 (Use 0.7 pitch screws) M4 (Use 0.7 pitch screws) M6 (Use 1.0 pitch screws)
Length(Depth of mounting holes) 15/32 (12mm)
Quantity 4pcs
Do not mount the TV at a tilt.
*Do not use screws that do not comply with the VESA standard screw specifications.
o Do not use screws that are longer than the standard length. Screws that are too long may cause damage to the inside of the TV.
o Do not fasten the screws too firmly or loosely. This may damage the product or cause the product to fall, leading to personal injury. SHARP is not liable for these kinds of accidents.
o SHARP is not liable for product damage or personal injury when a nomVESA or non-specified wall mount is used or the consumer fails to follow the product installation instructions.
@- 27
Appendix
The "iV displays "No Signal."
® Press INPUT on the remote control to select a different input source.
® If you are using cable fM, satellite, or an antenna connected directly to the fM, scan for channels. See "Auto
Channel Scarf' on page 23.
There is no power.
® Ensure the fM is plugged into a working electrical outlet.
® Ensure the power cable is securely attached to the fM.
® Press POWER on the remote or on the side of the fM to turn the 'iM on. The power is on, but there is no
image on the screen.
® Ensure all cables are securely attached to the -iM.
® Ensure all devices are connected correctly. Devices diffgr; see your device's user manual for details.
®Adjust Brightness, Contrast, or Backlight. See "Picture menu" on page 19.
® Press INPUT on the remote to select a different input source.
The image quality is not good.
® For the best image quality, view high-definition programs using digital sources. Connect your devices with
HDMI cables.
® Ifyou are using an antenna, the signal strength of the channel may be low. Ensure your antenna is
connected securely to the fM and move the antenna around the room or close to a window for the best
signal.
The picture is distorted.
® Nearby electrical devices may be interfering with the fM. Move the TMaway from electrical appliances, cars,
and fluorescent lights.
® Ensure all cables are securely attached.
The display image does not cover the entire screen.
®Set the lM image mode so that the picture fills the screen. Press VIEW MODE on the remote control unit
and select the appropriate aspect ratio.
There is no sound.
® Press VOL + on the remote control unit.
® Press MUTE on the remote to ensure mute is off.
® Check the audio settings. See "Audio menu" on page 20.
® Ensure the speakers are set to On. See "fM Speakers" on page 20.
® Ensure no headphones are connected to the fM.
® Check the audio connections of external devices (Blu-ray player, game console, cable/satellite box) that are
connected to the 'iM.
® If you are using an antenna, the signal strength of the channel may be low. Ensure your antenna is
connected securely to the TM and move the antenna around the room or close to a window for the best
signal.
The TV has pixels (dots) that are always dark or always lit.
®Your HDTV is precision-manufactured using an extremely high level of technology. However, sometimes
pixels may not display correctly. These types of occurrences are inherent to this type of product and do not
constitute a defective product.
I see "noise" or static on the screen.
®When your fM's digital capabilities exceed a digital broadcast signal, the signal is up--converted (improved) to
match your fM's display capabilities. This up-converting carl sometimes cause irregularities in the image.
® Ifyou are using an antenna, the signal strength of the channel may be low. Ensure your antenna is
connected securely to the fM and move the antenna around the room or close to a window for the best
signal.
The colors on the TV don't look right.
®Adjust the Color and Tint settings in the Picture menu. See "Picture menu" on page 19.
® Reset the picture settings. See "Advanced Picture Settings" on page 20.
® Check all cables to ensure they are securely attached. The buttons on the remote aren't working.
® Ensure you are only pressing one button at a time.
® Point the remote directly at the TV when pressing a button.
® Replace the remote batteries with new ones. See "lnstallirlg Batteries in the Remote Control Unit" on page
6.
When Ichange input source, the volume changes.
®The lM remembers the voh_me level on each input source. If the volume level on the new input source is
higher or lower than the level on the source you switch from, the difference may be noticeable.
® Use VOL+/- on the remote control unit to adjust the volume.
When I change input source, the display image changes size.
®The 'f_/remembers the viewing mode on each input source. IIthe viewing mode on the new input source
differs from the one on the input source you switch from, the difference may be noticeable.
®See"VIEW MODE" on page 16.
_- 28
Appendix
Cautions regarding use in high and low temperature environments
• When the unk is used in a low temperature space (e.g. room, office), the picture may leave trails or appear
slightly delayed. This is not a malfunction, and the unk will recover when the temperature returns to normal.
Do not leave the unk in a hot or cold location. Also, do not leave the unit in a location exposed to direct sunlight
or near a heater, as this may cause the cabinet to deform and the front panel to malfunction.
IF YOU HAVE FURTHER INQUIRIES, PLEASE CONTACT OUR CUSTOMER SERVICE FOR
ASSISTANCE.
(D" 29
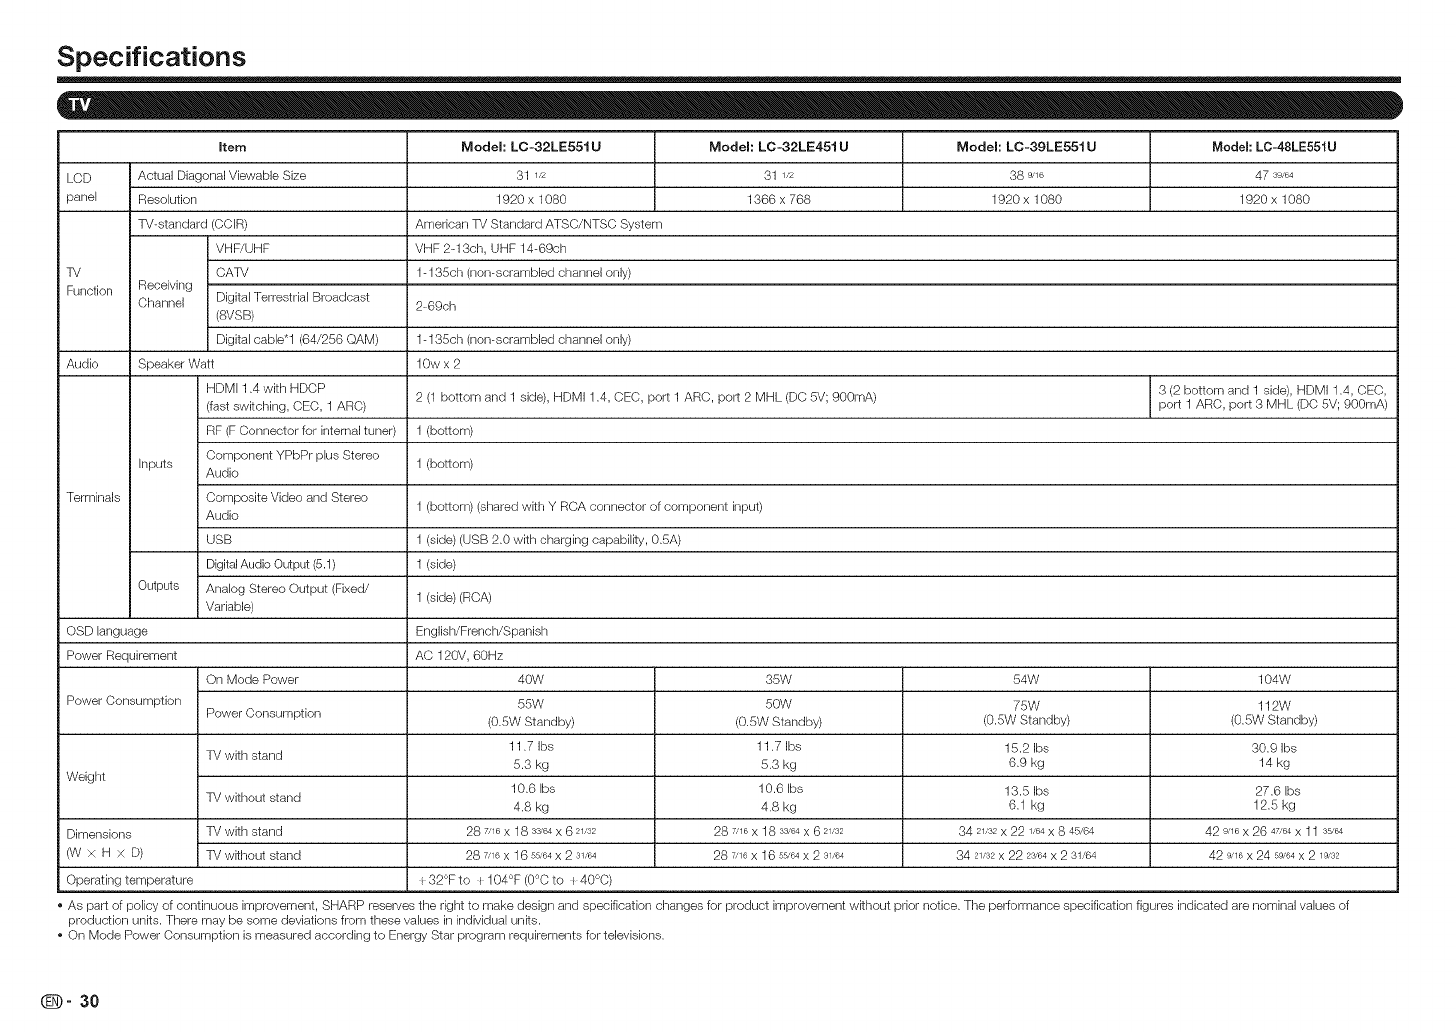
Specifications
item Model: LC-32LE551U Model: LC-32LE451U Model: LC-39LE551U Model: LC-48LE551U
LCD Actual Diagonal Viewable Size 31 1/2 31 1/2 38 9/16 47 s9,,e4
panel Resolution 1920 x 1080 1366 x 768 1920 x 1080 1920 x 1080
TV-standard (CCIR) American TV Standard ATSC/NTSC System
VHF/UHF VHF 2-13ch, UHF 14-69ch
TV CATV 1-135ch (non-scrambled channel only)
Function Receiving
Channel Digital Terrestrial Broadcast 2-69ch
(SVSB)
Digital cable*l (64/256 QAM) 1-135ch (non-scrambled channel only)
Audio Speaker Watt 10w x 2
HDMI 1.4 with HDCP 3 (2 bottom and 1 side), HDMI 1.4, CEC,
(fast switching, CEC, 1 ARC) 2 (1 bottom and 1 side), HDMI 1.4, CEC, port 1 ARC, port 2 MHL (DO 5V; 900mA) port 1ARC, port 3 MHL (DO 5V; 900mA)
RF (FConnector for internal tuner) 1 (bottom)
Component YPbPr plus Stereo
Inputs Audio 1 (bottom)
Terminals Composite Video and Stereo
Audio 1 (bottom) (shared wkh Y RCA connector of component input)
USB 1 (side) (USB 2.0 with charging capabilky, 0.SA)
DigitalAudio Output (5.1) 1 (side)
Outputs Analog Stereo Output (Fixed/ 1 (side) (ROA)
Variable)
OSD language English/French/Spanish
Power Requirement AC 120V, 60Hz
On Mode Power 40W 35W 54W 104W
Power Consumption 55W 50W 75W 112W
Power Consumption (0.SW Standby) (0.SW Standby) (0.SW Standby) (0.SW Standby)
11.7 Ibs 11.7 Ibs 15.2 Ibs 30.9 Ibs
TV with stand 5.3 kg 5.3 kg 6.9 kg 14 kg
Weight 10.6 Ibs 10.6 Ibs 13.5 Ibs 27.6 Ibs
TV without stand 4.8 kg 4.8 kg 6.1 kg 12.5 kg
Dimensions TV with stand 28 7/16 X 18 33/64 X 6 21/32 28 7/16 X 18 33/64 X 6 21/32 34 21/32 X 22 1/64 x 845/64 42 9/16 X 26 47/64 x 11 3s'64
(W x H x D) TV wkhout stand 28 7/16x 16 5s'e4x 2 31/64 28 7/16x 16 5s'e4x 2 31/64 34 21/32x 22 23/64x 2 31/64 42 9/16x 24 5_e4x 2 19/32
Operating temperature _32°F to _104°F (0°C to { 40°0)
As part of policy of continuous improvement, SHARP reserves the right to make design and specification changes for product improvement wkhout prior notice. The performance specification figures indicated are nominal values of
production units. There may be some deviations from these values in individual unks.
On Mode Power Consumption is measured according to Energy Star program requirements for televisions.
_- 30
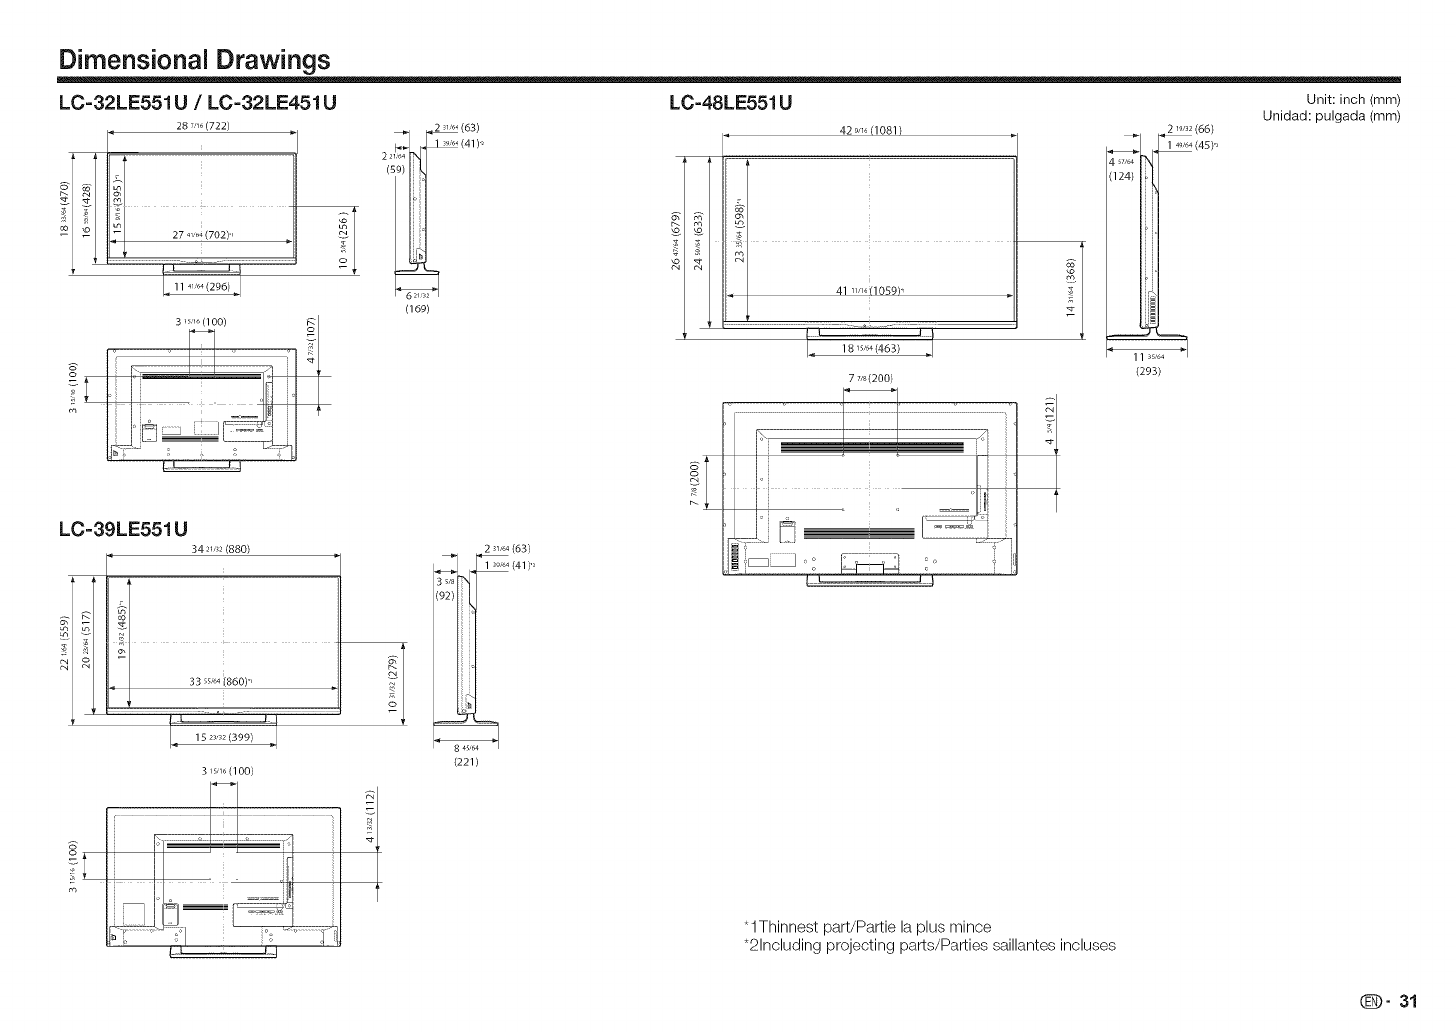
Dimensional Drawings
LC=32LE551U /LC=32LE451U LC=48LE551U Unit:inch(mm)
287,_ (722)
3 ,_,,_(lOO) §1
(169)
(63)
i, (41)_,
LC=39LE551U
q34 2u_2(880)
15 23,32(399)
3 ,sn6 (100)
r_
2 31,64(63)
_ (41)',
(221)
42 _n_(1081 /
i:::: ......
l_ 18 _5J64(463)
77/,,(200)
o_
I J ...................................................L_
1
2 _9/3z(66)
4 s7/64
(124)
(293)
Unidad: pulgada (mm)
*1Thinnest part/Pattie la plus mince
*2Including projecting parts/Parties saillantes incluses
(]_D" 31
Trademarks
o Products that have earned the ENERGY STAR ® are designed to protect the environment through superior CONSUMER LiMiTED WARRANTY
energy efficiency. SHARP ELECTRONICS CORPORATION warrants to the first consumer purchaser that this Sharp brand Liquid Crystal
,Manufactured under license from Dolby Laboratories. Dolby and the double-D symbol are trademarks of
Dolby Laboratories.
,The terms HDMI and HDMI High-Definition Multimedia Interface, and the HDMI Logo are trademarks or
registered trademarks of HDMI Licensing LLC in the United States and other countries.
,MHL, the MHL Logo, and Mobile High-Definition Link are trademarks or registered trademarks of MHL LLC
in the United States and other countries.
o MHL TM
ENERGY STAR ® User Information
® For more information on the ENERGY STAR program, you can refer to energystar.gov.
® Leaving the ENERGY STAR home mode or enabling optional features will cause an increase
power consumed.
® This product qualifies for ENERGY STAR when "Home" is selected for "Easy Setup".
Setting "Easy Setup" to "Home" allows the TV to achieve an energy-saving status for household use.
Products that have earned the ENERGY STAR ® are designed to protect the
environment through superior energy efficiency,
Display product (the "Product"), when shipped in its original container, will be free from defective workmanship and
materials, and agrees that it will, at its option, either repair the defect or replace the defective Product or part thereof with a
new or remanufactured equivalent at no charge to the purchaser for parts or labor for the period(s) set forth below.
This warranty does not apply to any appearance items of the Product or if the serial number or model number affixed to the
Product has been removed, defaced, changed, altered or tampered with. This warranty does not cover installation or signal
reception problems. This limited warranty will not apply if the Product has been or is being used in a commercial setting or
application; this warranty is meant solely for the non-commercial, household use of the Product by consumers in their home or
residence. If you intend to or already use this Product for commercial purposes or in a commercial setting, there are warranties
available to cover your use of this Product, the terms of which may vary. Please contact 1-800-BE-SHARP for further information.
In order to enforce your rights under this limited warranty, you should follow the steps set forth below. You must be able to
provide proof of purchase to the servicer, which proof must include the date of purchase.
To the extent permitted by applicable state law, the warranties set forth are in lieu of, and exclusive of, all other warranties,
express or implied. Specifically ALL OTHER WARRANTIES OTHER THAN THOSE SET FORTH ABOVE ARE EXCLUDED,
ALL EXPRESS AND IMPLIED WARRANTIES INCLUDING THE WARRANTIES OF MERCHANTABILITY, FITNESS FOR
USE, AND FITNESS FOR A PARTICULAR PURPOSE ARE SPECIFICALLY EXCLUDED. IF, UNDER APPLICABLE STATE
LAW, IMPLIED WARRANTIES MAY NOT VALIDLY BE DISCLAIMED OR EXCLUDED, THE DURATION OF SUCH IMPLIED
WARRANTIES IS LIMITED TO THE PERIOD(S) FROM THE DATE OF PURCHASE SET FORTH BELOW. THIS WARRANTY
GIVES YOU SPECIFIC LEGAL RIGHTS. YOU MAY ALSO HAVE OTHER RIGHTS WHICH VARY FROM STATE TO STATE.
The warranties given herein shall be the sole and exclusive warranties granted by Sharp and shall be the sole and exclusive remedy
available to the purchaser and only for the time periods set forth herein. No other representations or promises made by anyone
are permitted. Correction of defects, in the manner and for the period oftime described herein, shall constitute complete fulfillment
of all liabilities and responsibilities of Sharp to the purchaser with respect to the Product, and shall constitute full satisfaction of all
claims, whether based on contract, negligence, strict liability or otherwise. Sharp does not warrant nor shall Sharp be liable, or in any
way responsible, for Products which have been subject to abuse (including, but not limited to, improper voltage), accident, misuse,
negligence, lack of reasonable care, alteration, modification, tampering, improper operation or maintenance, or any damages or defects
in the Product which were caused by repairs or attempted repairs performed by anyone other than a Sharp authorized servicer. Nor
shall Sharp be liable or in any way responsible for any incidental or consequential economic or property damage. Some states do not
allow limits on warranties or on remedies for breach in certain transactions; in such states, the limits herein may not apply.
THIS LIMITED WARRANTY ISVALID ONLY IN THE FIFTY (50} UNITED STATES, THE DISTRICT OF COLUMBIA. AND PUERTO RiCO
Model Specific Section
Your Product Model Number & Description: LC-32LE551U /LC-32LE451U /LC-39LE551U /LC-48LE551U
Warranty Period for this Product:
Additional Exclusions from
Warranty Coverage (if any):
i
l
[
What to do to Obtain Service:
LCD Color Television
(Be sure to have this information and Proof of Purchase available when you
need service for your Product.)
One (1) year parts and labor from the date of purchase.
Image Retention resulting from a fixed image being displayed for long periods of
time is not covered by this Limited Warranty (see Operation Manual on how to
prevent this).
Service is provided by a Sharp Authorized Service Center in the United
States. To find the location of the nearest Sharp Authorized Service Center,
call Sharp toll free at 1-800-BE-SHARP (1-800-237-4277). Sharp will provide
instructions on service options available for your Product.
If it is deemed the Product is to be shipped for servicing, be sure it is insured
and packaged securely. Please use two persons to carry the Product,
transport it in original packaging, or packaging that provides comparable
protection of the Product, and ensure the Product is covered to avoid
scratches and damage, Sharp shall not be responsible for lost, stolen or
misdirected mail or for damage to the product incurred during shipping.
For Products that are deemed in home service, a servicer will come to your
location. If necessary, the servicer may remove the unit for repair at the
service facility and return it once completed. In home service is not available
in all areas and Sharp may, at our option, elect to provide transportation of
the Product to and from an Authorized Service Center in those areas.
TO OBTAIN PRODUCT INFORMATION OR PURCHASE ACCESSORIES, CALL 1-800-BE-SHARP
OR VISIT www.SharpUSA.com
(D" 32
INFORMACION IMPORTANTE
IMPORTANTE:
Para facilitar el procedimiento de informaci6n en caso de
p6rdida o robo, anote el modelo y los nOmeros de serie del
televisor en el espacio proporcionado.
Los nOmeros se encuentran en la parte posterior e izquierda
del televisor.
N°de modelo:
N° de serie:
ADVERTENCmA: PARA REDUCIR EL RIESGO DE INCENDIO O DESCARGAS ELECTRICAS, NOEXPONGA ESTE PRODUCTO A LA LLUVIA NI A LA HUMEDAD.
PRECAUCION: PARA REDUCIR EL RIESGO DE DESCARGAS
ELECTRICAS, NO RETIRE LA CARCASA/O LA PARTE POSTERIOR).
EN EL INTERIOR NO HAY NINGUNA PIEZA QUE NECESITE
MANTENIMIENTO POR PARTE DEL USUARIO.
PONGASE EN CONTACTO CON PERSONAL DE SERVICIO
CUALIFICADO CUANDO TENGA PROBLEMAS CON EL EQUIPO.
El simbolo de rayo dentro de
un tri_ngulo equil_tero pretende
alertar al usuario de la existencia
de "voltaje peligroso" no aislado
en el interior del producto
cuya magnitud puede set Io
suficientemente grande como para
constituir un riesgo de descarga
electrica para las personas.
El simbolo de exclamaci6n dentro
de un triangulo pretende alertar
al usuario de la existencia de
importantes instrucciones de
funcionamiento y mantenimiento
(servicio tecnico) en la
documentaci6n que acompa_a al
producto.
PRECAUCION: PARA EVITAR DESCARGAS ELECTRICAS, HAGA COINCIDIR LA CLAVIJA ANCHA DEL
ENCHUFE CON LA RANURA ANCHA, E INSERTELA EN ESTA COMPLETAMENTE.
ADVERTENCmA: Las normas FCC establecen que cualquier cambio o modificaci6n no autorizados en
este equipo no aprobado expresamente por el fabricante podrfa anular la autorizaci6n
del usuario para utilizarlo.
PRECAUCmON: Este producto cumple las normas FCC cuando se utilizan conecteres y cables apantallados
para conectar la unidad a otro equipo. Para evitar interferencias electromagn&ticas con
aparatos el_ctricos, como radios y televisores, utilice conectores y cables apantallados
para las conexiones.
DECLARACION DE CONFORMIDAD:
TELEVISOR DE CRISTAL L]QUIDO DE SHARP, MODELOS LC-32LE551 U, LC-32LE451 U,
LC-39LE551 U Y LC-48LE551 U
Este dispositivo cumple la Parte 15 de las Reglas de la FCC. Su funcionamiento esta sujeto a dos
condiciones:
(1) Este dispositivo no debe causar interferencias perjudiciales y (2) este dispositivo debe aceptar
cualquier interferencia recibida, incluidas aquellas que provoquen un funcionamiento no deseado.
PARTE RESPONSABLE:
SHARP ELECTRONICS CORPORATION
Sharp Plaza, Mahwah, New Jersey 07495-1163
TELEFONO: 1-800-BE-SHARP
Para clientes profesionales: Direcci6n URL: http://www.sharpusa.com
mNFORMACION: l
Este equipo ha sido probado, hallAndose que satisface los Ifmites de un dispositivo digital de Clase
B de acuerdo con los requisitos definidos en la Secci6n 15 de la normativa FCC. Estos limites se
establecieron con el fin de proporcionar una protecci6n razonable contra interferencias perjudiciales
en una instalaci6n residencial. Este equipo genera, utiliza y puede irradiar energfa de radiofrecuencia
y, si no se instala y utiliza de acuerdo alas instrucciones, puede causar interferencias perjudiciales a
las comunicaciones de radio. Sin embargo, no se puede garantizar que la interferencia no ocurrirA en
una instalaci6n en particular. En el caso de que el equipo causara interferencias perjudiciales para la
recepci6n de radio o TV, Io que puede determinarse encendiendo y apagando el equipo, se sugiere
que el usuario Ileve a cabo una o varias de las siguientes medidas para corregir dichas interferencias:
-- Reorientar o reubicar la antena receptora.
--Aumentar la separaci6n entre el equipo y el receptor.
-- Conectar el equipo a una toma de corriente de un circuito diferente al que estA conectado el receptor.
-- Consultar al proveedor o a un t6cnico especialista en radio/televisi6n.
Declaraci6n de cumplirniento de masnormas FCC
Este dispositivo cumple con la Parte 15 de las Reglas de la FCC. Su funcionamiento estA sujeto a dos
condiciones:
(1) Este dispositivo no debe causar interferencias perjudiciales y (2) este dispositivo debe aceptar
cualquier interferencia recibida, incluidas aquellas que provoquen un funcionamiento no deseado.
Radio inalAmbrica
En el caso de un producto disponible en el mercado de EE.UU. y CanadA, solo se pueden utilizar los
canales del 1 al 11. No es posible seleccionar otros canales. Si este dispositivo se va a utilizar en la
banda de frecuencia de 5,15 ~ 5,25 GHz, su uso se debe restringir a interiores Onicamente.
mrnportante: Los cambios o modificaciones no aprobados expresamente por la parte responsable del
cumplimiento anularAn la autorizaci6n del usuario para trabajar con el equipo.
Declaraci6n FCC sobre la exposici6n a la radicaci6n: Este equipo cumple los limites FCC de
exposici6n a la radicaci6n fijados para un entorno no controlado. Este equipo debe ser instalado y
operado a una distancia minima de 20cm entre el dispositivo radiador y su cuerpo.
Declaraci6n de Industry Canada
Este aparato digital de Clase B cumple el estandar CAN ICES-003(B)/NMB-3(B)
Radio inalAmbrica
En el caso de un producto disponible en el mercado de EE.UU. y CanadA, solo se pueden utilizar los
canales del 1 al 11. No es posible seleccionar otros canales.
El dispositivo podrfa suspender la trasmisi6n automAticamente en el caso de que no haya informaci6n
para transmitir o se produzca un error de funcionamiento.
Tenga en cuenta que no esta diseSado para prohibir la transmisi6n de informaci6n de control o
seSalizaci6n o el uso de c6digos repetitivos donde la tecnologia Io requiera.
mrnportante: Los cambios o modificaciones no aprobados expresamente por la parte responsable del
cumplimiento anularAn la autorizaci6n del usuario para trabajar con el equipo.
Declaraci6n de exposici6n a la radiaci6n IC: Este dispositivo cumple las reglas IC RSS-210 y su uso
estA sujeto a las dos condiciones siguientes:
(1) Este dispositivo no debe causar interferencias perjudiciales y (2) este dispositivo debe aceptar las
interferencias recibidas, incluidas aquellas que provoquen un funcionamiento no deseado.
"Nota para el instalador del sistema CATV: este recordatorio pretende Ilamar la atenci6n del instalador
del sistema CATV en relaci6n al Artfculo 820 del C6digo EI6ctrico Nacional (NEC) en el que se
proporcionan instrucciones para realizar una conexi6n a tierra adecuada y, en particular, especifica
que el cable de tierra se debe conectar al sistema de tierra del edificio tan cerca del punto de entrada
del cable como sea posible."
Este producto utiliza el programa ENERGY STAR cuando se selecciona "Modo Casa" para "Asistente
de instalaci6n".
AI establecer "Asistente de instalaci6n" en "Modo Casa", el televisor Iograra un estado de ahorro de
energfa para uso dom6stico.
@-1
ESTIMADO CLIENTE DE SHARP
Gracias por adquirir el televisor de cristal liquido Sharp. Para garantizar la seguridad del producto
yque este funcione sin problemas durante muchos a_os, lea atentamente estas instrucciones de
seguridad importantes antes de utilizarlo.
INSTRUCCIONES DE SEGURIDAD IMPORTANTES
I Muchas de las funciones Qtiles funcionan gracias a la electricidad pero esta tambien puede causar
daRos al producto y al usuario si se manipula de forma inadecuada. Este producto se ha diseSado y
fabricado teniendo en cuenta la seguridad como prioridad maxima. No obstante, el uso inapropiado
puede provocar descargas electricas o un incendio. Para evitar daF_os potenciales, tenga en cuenta
las siguientes instrucciones cuando instale, utilice y limpie el producto. Para garantizar la seguridad
y prolongar la vida del Televisor de cristal liquido, lea atentamente las siguientes precauciones antes
de utilizarlo.
1) Lea estas instrucciones.
2) Guarde estas instrucciones.
3) Preste atenci6n a todas las advertencias.
4) Siga todas las instrucciones.
5) No utilice este aparato cerca del agua.
6) Limpie el producto solamente con un paFio seco.
7) No bloquee las aberturas de ventilaci6n. Realice la instalaci6n siguiendo las instrucciones del
fabricante.
8) No coloque el aparato cerca de fuentes de calor, como por ejemplo radiadores, hornillos u otros
aparatos (incluidos amplificadores) que produzcan calor.
9) No desarme el dispositivo de seguridad del enchufe polarizado o con conexi6n a tierra. Un
enchufe polarizado tiene dos clavijas, una m&s ancha que la otra. Un enchufe con toma de tierra
tiene dos clavijas y una tercera clavija de toma de tierra. La clavija ancha del enchufs polarizado
y la clavija de conexi6n a tierra del enchufe polarizado son dispositivos de seguridad. Si el
enchufe suministrado con el aparato no encaja en la toma de corriente donds desea conectarlo,
dirijase a un electricista para sustituir sus tomas de corriente obsoletas.
10) Proteja el cable de corriente para que no se pise ni se psllizque, especialmente en los enchufes,
las tomas de corriente y el punto donde salen del aparato.
11) Utilice Onicamente los accesorios especificados por el fabricante.
12) Utilice el aparato s61o con un carro, base, tripode, soporte o mesa especificado por el
fabricante o vendido conjuntamente con dicho aparato. Si utiliza un carro, preste _,,,_"_
atenci6n cuando Io desplace para evitar da_os pot caida, io_,_.__._.J
13) Desconecte este aparato durante las tormentas el6ctricas o cuando no se utilice _,_Y
durante un prolongado periodo de tiempo. -" -
14) Pida todo tipo de servicio a personal de servicio calificado. El aparato deber& set reparado
siempre que sufra cualquier tipo de da5o, por ejemplo si el cable o la clavija de alimentaci6n
est&n en mal estado, si se derrama liquido sobre el mismo, en caso de caida de objetos sobrs el
aparato, en caso de exposici6n a la Iluvia o la humedad, en caso de funcionamiento incorrecto o
en caso de caida del aparato.
Informaci6n de seguridad adicional
15) Fuentes de alimentaci6n. Solo se debe aplicar al producto el tipo de alimentaci6n indicado en el
etiquetado. Si no est& seguro del tipo de alimentaci6n de su domicilio, p6ngase en contacto con
su distribuidor o con la compaSia electrica local. Para productos dise5ados para que funcionen
con bateria u otras fuentes de alimentaci6n, consulte las instrucciones de funcionamiento.
16) Sobrecarga. No sobrecargue las tomas de corriente ni los alargadores ya que se puede provocar
un incendio o descargas el6ctricas.
17) Inserci6n de objetos y liquidos. Nunca coloque objetos de ningOn tipo en este producto de
forma que obturen sus aberturas, ya que pueden entrar en contacto con componentes de alto
voltaje o cortocircuitar 6stos, Io que podria dar lugar a un incendio o descargas el6ctricas.
Nunca derrame liquidos de ningLin tipo sobre el producto.
18) DaSos que requieren servicio t6cnico. Desenchufe el producto de la toma de corriente y remita
todas las reparaciones al personal de servicio t6cnico cualificado cuando se den las siguientes
condiciones:
a) El enchufe o el cable de CA est& daFlado,
b! Se ha derramado !!quido ohan ca!do obje!os sobre e! producto, j
@-2
INSTRUCCIONES DE SEGURIDAD IMPORTANTES
c) El producto se ha expuesto a la Iluvia o al agua,
d) El producto no funciona con normalidad y, sin embargo, se han seguido las instrucciones
de funcionamiento,
Ajuste s61o los controles descritos en las instrucciones de funcionamiento; el ajuste inadecuado
de otros controles puede provocar daF_osy obligar al personal t_cnico cualificado a realizar un
trabajo exhaustivo para que el producto vuelva a funcionar con normalidad,
e) El producto se ha de|ado caer o ha sufrido daRos de alguna manera, y
f) El producto muestra un cambio claro de rendimiento, Io que indica la necesidad de tareas
de mantenimiento.
19) Reemplazar piezas. Cuando sea necesario reemplazar piezas, asegOrese de que el t6cnico
ha empleado piezas de repuesto especificadas por el fabricante o que tienen las mismas
caracteristicas que las originales. Las sustituciones no autorizadas pueden provocar un
incendio, descargas el6ctricas o constituir otros riesgos.
20) Comprobaci6n de seguridad. Despu6s de realizar cualquier tarea de mantenimiento o
reparaci6n de este producto, pida al t6cnico que realice comprobaciones de seguridad para
determinar si el producto funciona perfectamente.
21) Montaje en la pared o el techo. Cuando monte el producto en la pared o el techo, asegOrese de
,,___instalarlo siguiendo el m6todo recomendado por el fabricante, j
® Conexbn a tierra de la antena exterior. Si EJEMRLODE CONED{10NDELAANTENAA TIERRASEGON
conecta una antena exterior al equipo de ELCODIGOELECTRICO NAOIpNALANSI/NFPA70
televisbn asegOrese de que el sistema %-
.' ." . , .CABLE DE ENTRADA
J de la mlsma hene conexlon a tlerra para ,_'_.----_ A LAANTENA
| proporcionar protecci6n contra subidas de ..-_JL [-
| tensbn y cargas estaticas. _ ............. //_xX. ANTENA
/ ElArficulo 810 del C6digo Electrico Nacional _ _@uL_ £.L-_./l_ \\
".... UNIDAD DE DESCARGA
/ ANSlJNFPA70,proporc,ona,nformac,on SECO"
| sobre las siguientes cuestiones: conexi6n I _'_'--_'-_ i _' ION 810 20 DEL NEO,
| adecuadaatomadetierrade posteey I EQUIPODE t /_J_ I CONDUCTORESDETOMA
DE TIERRA (SECCION 810 21
J estructuras de soporte conexi6n de toma _1 SERVIClO .._ I_/_J /_ I D ,
. _ . DEL NEO)
J de herra del cable de entrada a una unidad _._TBIOO_j_/_ D
J de descarga de antena, tamario de los _ t _ABRAZADERAS DE TOMA DE TIERRA
| conductores de toma de tierra, ubicacbn de ___ SISTEM_} DE ELECTRODOSDE
| la unidad de descarga de antena, conexi6n a - CONEXIONATIERRADEESERVIClODE
ALIMENTACION
| electrodos de toma de tierra y requisitos para
",.| el electrodo de toma de herra. O©DIGOELEOTRIOONAOIONAL ('!ART_'2_!_'DEL'NE'_)CTRICAL,,cb__.,unncc_ CODE)
'_ Agua y humedad. No utilice este producto en presencia de agua, por ejemplo junto a una baPiera, una
pila de lavar, un fregadero oun lavadero, en un s6tano humedo o en una piscina y lugares por el estilo.
- Base. No coloque el producto en un carro, base, tripode o mesa inestable. Si Io hace, el televisor se
puede caer, Io que puede provocar graves darios al usuario y al propio producto. Utilice unicamente un
carro, base, tripods, soporte o mesa recomendados pot el fabricante o suministrado con el producto.
Cuando monte el producto en una pared, siga las instrucciones del fabricante. Utilice unicamente los
accesorios de montaje recomendados pot el fabricante.
,, Selecci6n de la ubicaci6n. Seleccione un lugar en el que no incida directamente la luz del y tenga una
ventilaci6n adecuada.
,_ Ventilaci6n. Los conductos de ventilaci6n y otras aberK_ras de la carcasa estan dise_iados para
proporcionar una ventilaci6n adecuada. No tape ni bloquee dichos conductos de ventilaci6n ni aberturas
ya que una ventilaci6n insuficiente podria sobrecalentar y/o acorlar la vida del producto. No coloque
el producto sobre una cama, sof4t, alfombra o superflcie de similares caracteristicas, ya que podrian
obturar las aberluras de ventilaci6n. Este producto no esta disePiado para instalaciones integradas; no Io
coloque en un lugar cerrado, como una estanteria o bastidor, a menos que se proporcione la ventilaci6n
adecuada o que se cumplan las instrucciones del fabricante.
,, El panel frontal utilizado en este producto esta hecho de vidrio. Por tanto, puede romperse si el producto
se deja caer o se golpea fuer_emente. Tenga cuidado para que no sufrir ningun da_io con cristales rotos
si el panel se rompe.
,_ Calor. El producto no debe situarse cerca de ninguna fuente de calor, como por ejemplo, radiadores,
suministros de calor, hornillos u otros aparalos (incluidos arnplificadores) que produzcan calor.
, Iluminaci6n. Si desea proporcionar protecci6n adicional a este equipo de televisi6n durante una tormenta
o cuando no se utilice durante un prolongado periodo de tiempo, desenchufelo de la toma de corriente y
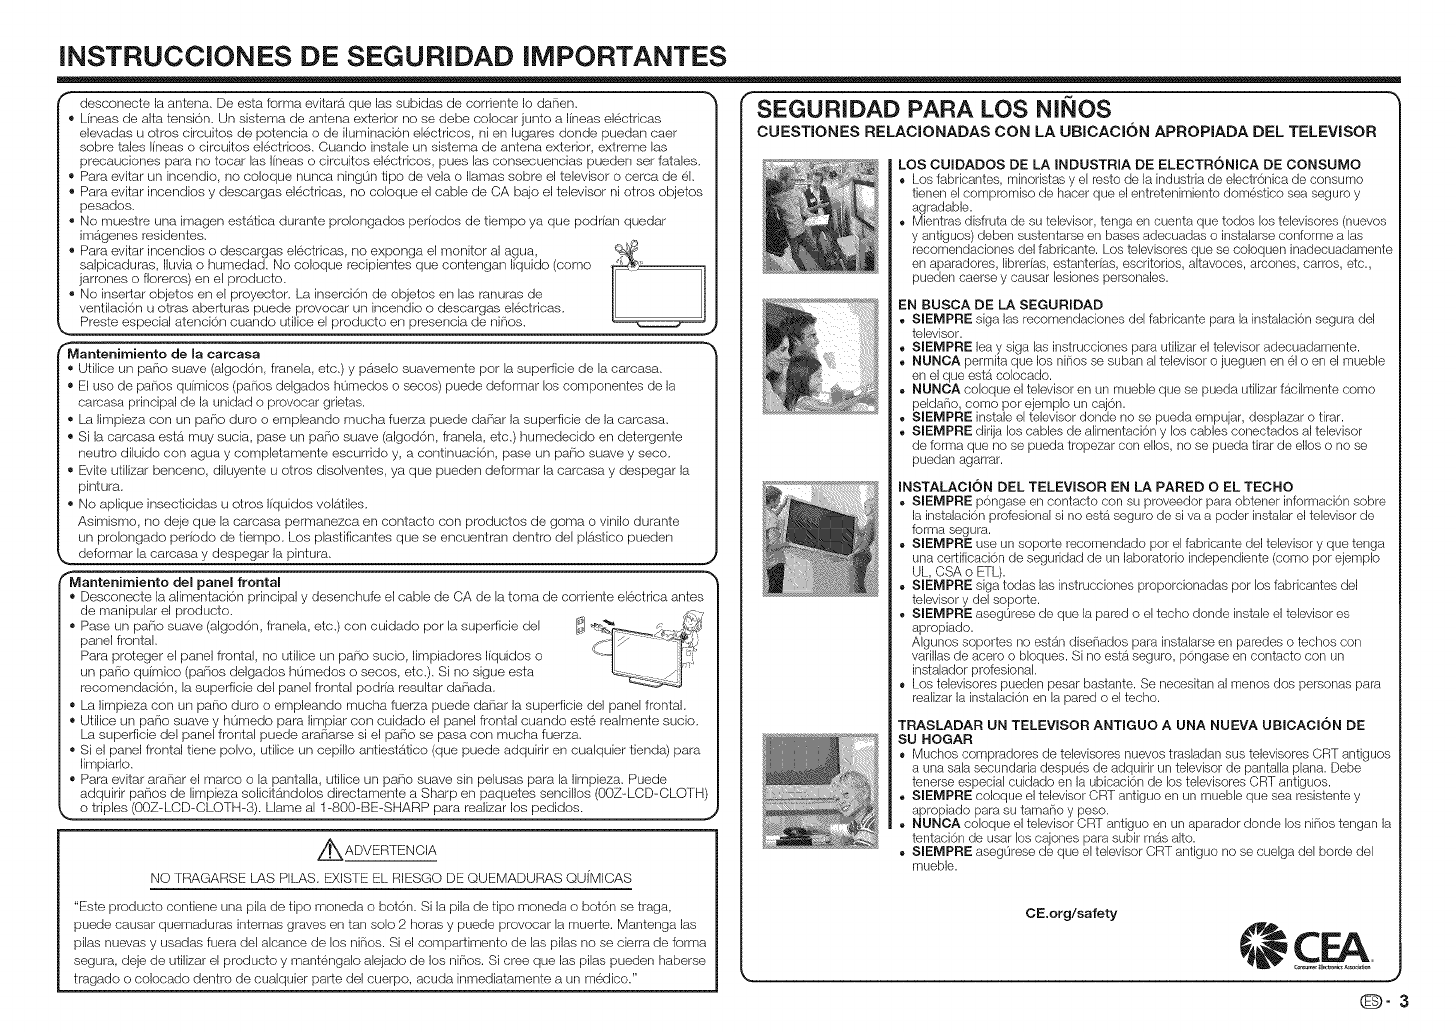
INSTRUCCIONES DE SEGURIDAD IMPORTANTES
desconecte la antena. De esta forma evitarS, que las subidas de corriente Io da_en.
• L{neas de alta tensi6n. Un sistema de antena exterior no se debe colocar junto a I{neas electricas
elevadas u oiros circuitos de potencia o de iluminaci6n electricos, ni en lugares donde puedan caer
sobre tales lineas o circGtos el6ctricos. Cuando instale un sistema de antena exterior, extreme las
precauciones para no tocar las I{neas o circGtos electricos, pues las consecuencias pueden set fatales.
• Para evitar un incendio, no coloque nunca ningun tipo de vela o llamas sobre el televisor o cema de &
• Para evitar incendios y descargas electricas, no coloque el cable de CA bajo el televisor ni otros objetos
pesados.
• No muesire una imagen estatica durante prolongados periodos de tiempo ya que podr[an quedar
imageries residentes.
_, Para evitar incendios o descargas el6ctricas, no exponga el monitor al agua,
salpicaduras, IkMa o humedad. No coloque recipientes que contengan liquido (como ,_'
jarrones o floreros) en el producto.
• No insertar objetos en el proyector. La inserci6n de objetos en las ranuras de
ventilaci6n u otras aberturas puede provocar un incendio o descargas el6ctricas.
Preste especial atenci6n cuando utilice el producto en presencia de ni_ios. _
Mantenimiento de la carcasa
Utilice un pario suave (algod6n, Iranela, etc.) y paselo suavemente pot la superficie de la carcasa.
El uso de paiios qu{micos (paiios delgados humedos o secos) puede deformar los componentes de la
carcasa principal de la unidad o provocar grietas.
,, La limpieza con un pario duro o empleando mucha fuerza puede da_iar la superficie de la camasa.
,, Si la carcasa estS. muy sucia, pase un pa_io suave (algod6n, franela, etc.) humedecido en detergente
neutro diluido con agua y completamente escurrido y, a continuaci6n, pase un pa_io suave y seco.
Evite utilizar benceno, diluyente u otros disolventes, ya que pueden deformar la camasa y despegar la
pintura.
® No aplique insecticidas u otros I[quidos volS.tiles.
Asimismo, no deje que la carcasa permanezca en contacto con productos de goma o vinilo durante
un prolongado periodo de tiempo. Los plastificantes que se encuentran dentro del plS.stico pueden
deformar la carcasa y despegar la pintura.
Mantenlmlento del panel frontal
• Desconecte la alimentaci6n principal y desenchufe el cable de CA de la toma de corriente electrica antes
de manipular el producto.
• Pase un pa_io suave (algod6n, franela, etc.) con cuidado por la superficie del
panel frontal.
Para proteger el panel frontal, no utilice un pa_io sucio, limpiadores I[quidos o
un pario qu{mico (pa_ios delgados humedos o secos, etc.). Si no sigue esta
recomendaci6n, la superficie del panel frontal podria resultar da[lada.
• L.alimpieza con un pa_io duro o empleando mucha fuerza puede da_iar la superficie del panel frontal.
• Utilice un pa_io suave y humedo para limpiar con cuidado el panel frontal cuando este realmente sucio.
La superficie del panel frontal puede ara_iarse si el pa_io se pasa con mucha fuerza.
• Si el panel frontal tiene polvo, utilice un cepillo antiestatico (que puede adquirir en cualquier tienda) para
limpiarlo.
• Para evitar arariar el marco o la pantalla, utilice un patio suave sin pelusae para la limpieza, Puede
adquirir patios de limpieza solicitandoloe directamente a Sharp en paquetes sencillos (OOZ-LOD-OLOTH)
_zar los pedidos.
_ ADVERTENCIA
NO FRAGARSE I..AS PII..AS. E!XISFE!EL. RIESGO DE QUEMADURAS QU{MICAS
"Este producto contiene una pila de tipo moneda o bot6n. Si la pila de tipo moneda o bot6n se traga,
puede causar quemaduras intemas graves en tan solo 2 horas y puede provocar la muerte. Mantenga las
pilas nuevas y usadas fuera del alcance de los niiios. Si el compartimento de las pilas no se cierra de forma
segura, deje de utilizar el producto y mant6ngalo alejado de los niiios. Si cree que las pilas pueden haberse
tragado o colocado dentro de cualquier parte del cuerpo, acuda inmediatamente a un medico."
0-3
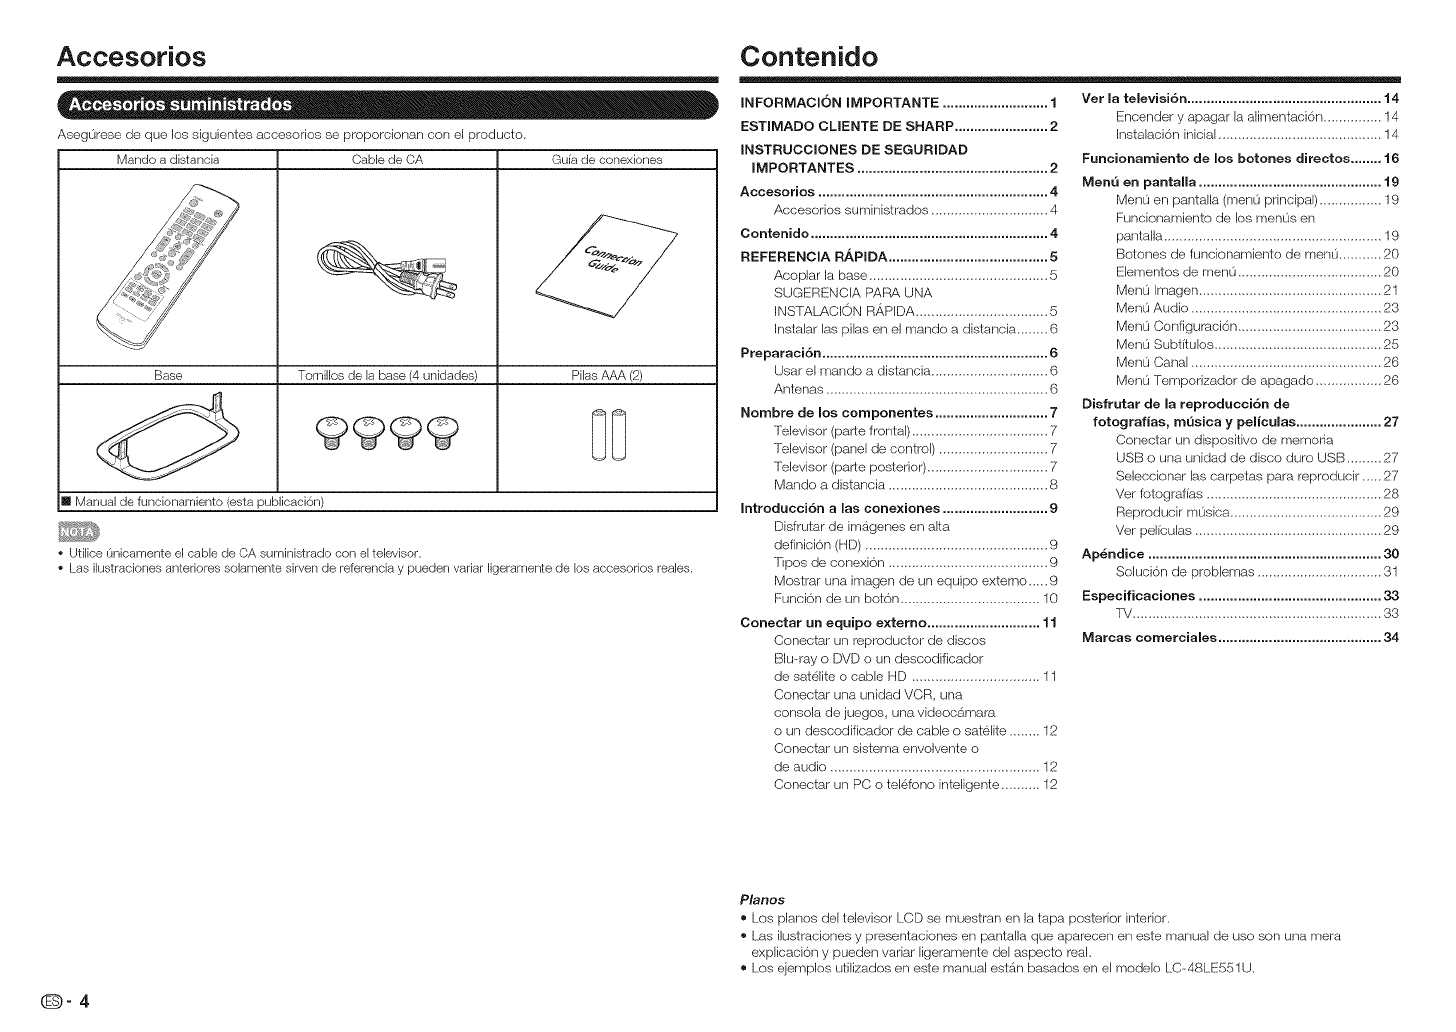
Accesorios
Asegurese de que los siguientes acceseries se proporcionan con el preducto.
Mando a distancia Cable de CA Guia de conexiones
Base Tornillos de la base (4 unidades) Pilas AAA (2)
[] Manual de funcionamiento (esta publicacidn)
• Utilice Onicamente el cable de CA suministrado con el televisor.
• Las ilustraciones anteriores solamente sirven de referencia y pueden variar ligeramente de los accesorios reales.
Contenido
INFORMACI6N IMPORTANTE ........................... 1
ESTIIVlADO CLIENTE DE SHARP ........................ 2
INSTRUCCIONES DE SEGURIDAD
IMPORTANTES ................................................. 2
Accesorios ........................................................... 4
Accesorios sumir%trados .............................. 4
Contenido ............................................................. 4
REFERENCIA R,_PIDA ......................................... 5
Acoplar la base .............................................. 5
SUGERENCIA PARA UNA
INSTALACION RAPIDA .................................. 5
Instalar las pilas en el mando a distancia ........ 6
Preparaci6n .......................................................... 6
Usar el mando a distancia .............................. 6
Antenas ......................................................... 6
Nombre de los eomponentes ............................. 7
Televisor (parte frontal) ................................... 7
Televisor (panel de control) ............................ 7
Televisor (parte posterior) ............................... 7
Mando a distancia ......................................... 8
Introdueci6n a las eone×iones ........................... 9
Disfrutar de irrlagenes en alta
definici6n (HD) ............................................... 9
Tipos de conexi6n ......................................... 9
Mostrar una imagen de un equipo externo__. 9
Funcion de un boton .................................... 10
Conectar un equipo e×temo ............................. 11
Conectar un reproductor de discos
Blu-ray o DVD o un descodificador
de satelite o cable HD ................................. 11
Conectar una unidad VCR, una
consola de juegos, una videocamara
oun descodificador de cable o sateJite ........ 12
Conectar un sistema envolvente o
de audio ...................................................... 12
Ver la televisi6n .................................................. 14
E!ncender y apagar la alimentaci6n ............... 14
klstalaci6n inicial .......................................... 14
Funeionamiento de los botches direetos ........ 16
Menu en pantalla ............................................... 19
Men0 en panta,a (men0 principal) ................ 19
Funcionamiento de los menus en
pantalla ........................................................ 19
Botches de funcionamiento de men0 ........... 20
Elementos de men0 ..................................... 20
Menu Imagen ............................................... 21
Menu Audio ................................................. 23
Menu Configuraci6n ..................................... 23
Menu Subt{tulos ........................................... 25
Menu Canal ................................................. 26
Menu Temporizador de apagado ................. 26
Disfrutar de la reproducci6n de
fotografias, m_siea y pelicalas ...................... 27
Conectar un dispositivo de memoria
USB o una unidad de disco duro USB ......... 27
Seleccionar las carpetas para reproducir ..... 27
Vet fetografias ............................................. 28
Reproducir musica ....................................... 29
Ver pel[culas ................................................ 29
Ap_ndiee ............................................................ 30
Soluci6n de problemas ................................ 31
Especificaciones ............................................... 33
1V ................................................................ 33
Marcas comerciales .......................................... 34
Conectar un PC o telefono inteligente .......... 12
(D-4
Pianos
® Los planes del televisor LCD se muestran en la tapa posterior interior.
® Las ilustraciones y presentaciones en pantalla que aparecen en este manual de use son una mera
explicaci6n y pueden variar ligeramente del aspecto real.
® Los ejemplos utilizados en este manual estb_nbasados en el modelo LC-48LE551U.
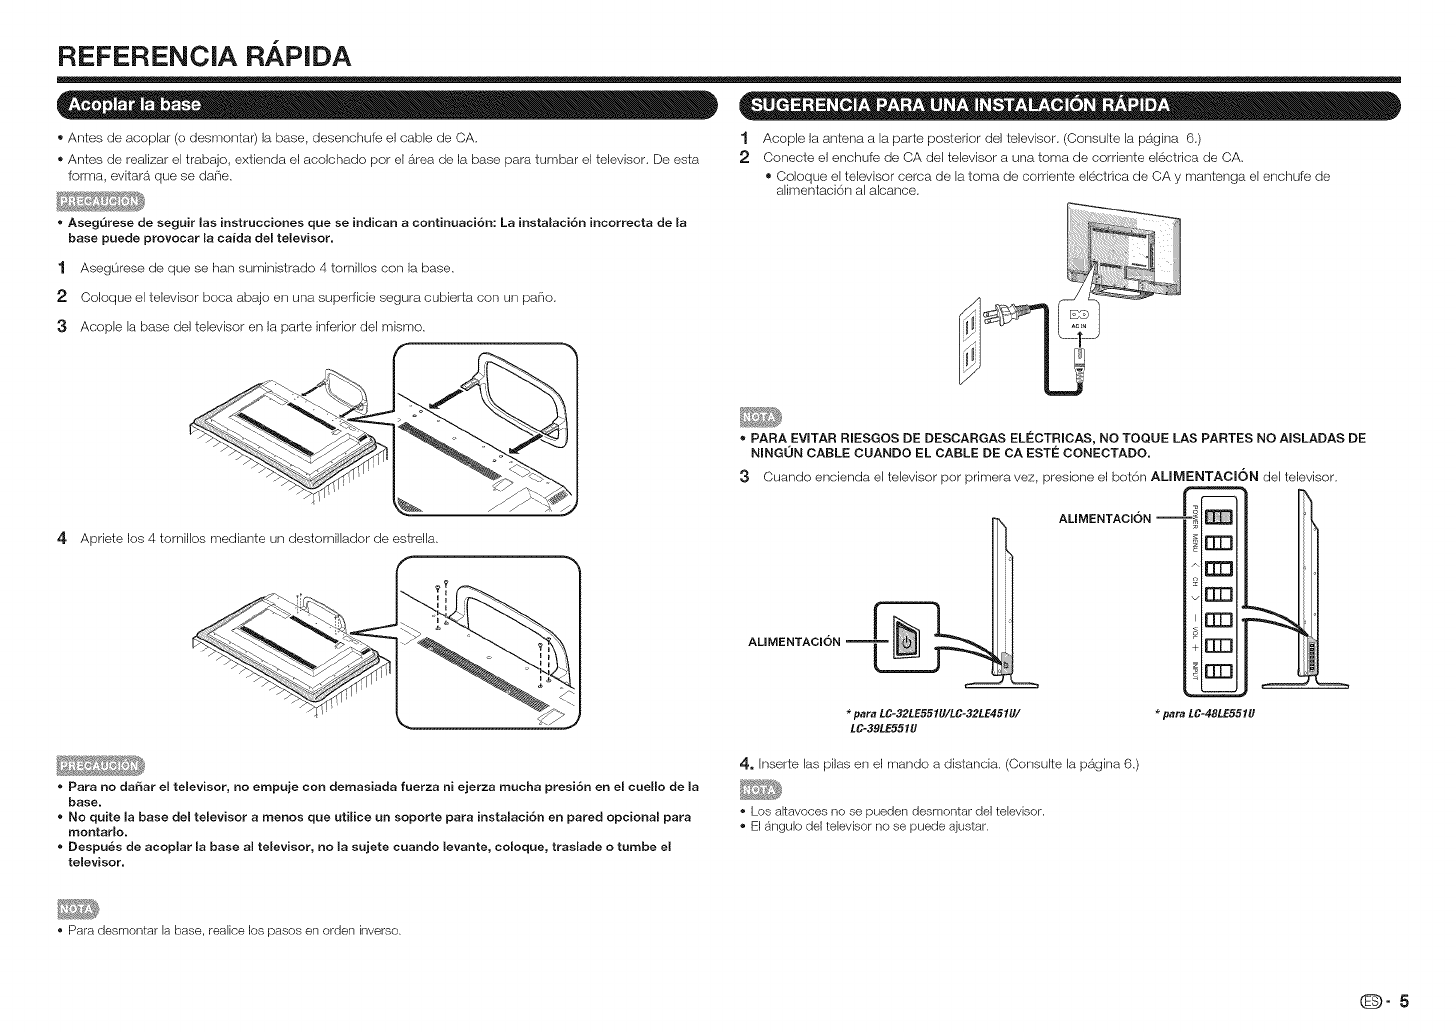
REFERENCIA RAPIDA
® Antes de acoplar (o desmontar) la base, desenchufe el cable de CA. 1 Acople la antena a la parte posterior del televisor. (Consulte la pagina 6.)
® Antes de realizar el trabajo, extienda el acolchado per el area de la base para tumbar el televisor. De esta 2 Conecte el enchufe de CA del televisor a una toma de corriente electrica de CA.
forma, evitara que se da_ie. ® Coloque el televisor cerca de la toma de corriente electrica de CA y mantenga el enchufe de
alimentaci6n al abance.
,, Aseg,3rese de seguir las instrucciones que se indican a continuaci6n: La instalaci6n incorrecta de la
base puede provocar la ca{da del televisor.
1 Asegurese de que se han suministrado 4 tomillos con la base.
2 Coloque el televisor boca abajo en una superficie segura cubierta con un pa_io.
3Aceple la base del televisor en la parte inferior del mismo.
f-,
4 Apriete los 4 tornillos mediante un destomillader de estrella.
f
_.,
AUMENTACION __
o PARA EVITAR RIESGOS DE DESCARGAS ELECTRICAS, NO TOQUE LAS PARTES NO AISLADAS DE
NINGON CABLE CUANDO EL CABLE DE CA ESTI_ CONECTADO.
3Cuando encienda el televisor per primera vez, presione el bet6n ALIMENTACION del televisor.
AUMENTAClON--
[ZE1
rrn
[Z£1
rrm
EEl
rrm
*para LC-32LE551U/LC-32LE451U/ _para LC-48LE551U
LC-39LE551U
o Para no daSar el televisor, no empuje con demasiada fuerza ni ejerza mucha presi6n en el cuello de la
base.
" No quite la base del televisor a menos que utilice un soporte para instalaci6n en pared opcional para
montarlo.
o Despu&s de acoplar la base al televisor, no la sujete cuando levante, coloque, traslade o tumbe el
televisor.
4. Inserte las pilas en el mando a distancia. (Consulte la pagina 6.)
• Los a_tavoces no se pueden desmontar del televisor.
• El angulo del televisor no se puede ajustar.
• Para desmontar la base, realice los pasos en orden inverse.
0-5
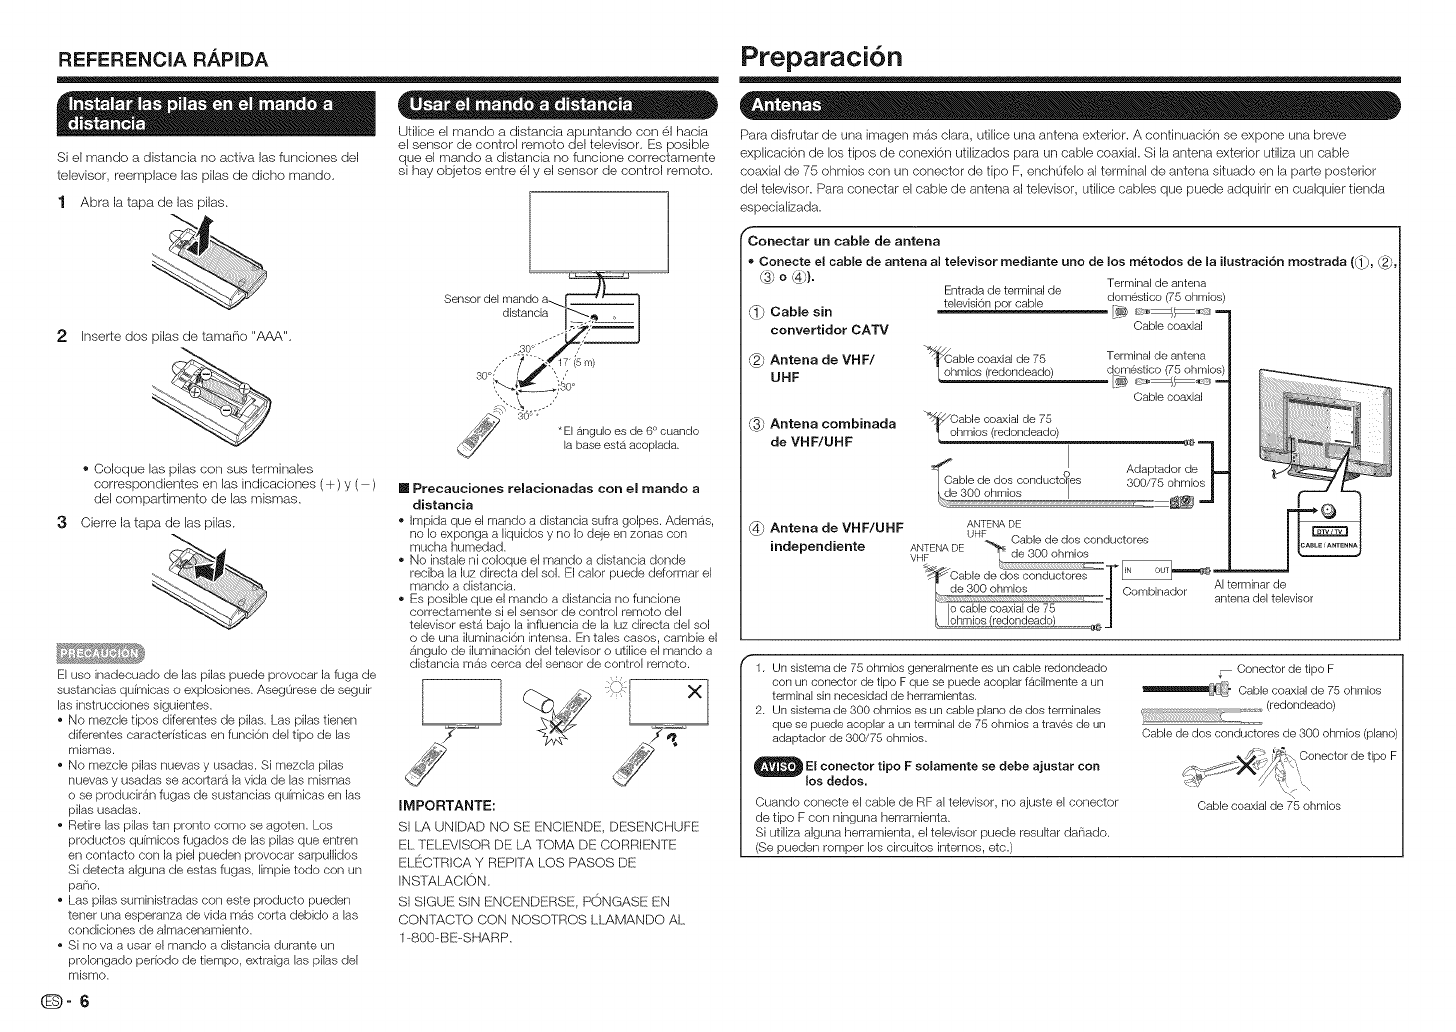
REFERENCIA RAPIDA
Si el mando a distancia no activa las funciones (gel
televisor, reemplace las pilas de dicho mando.
1 Abra la tapa de las pilas.
2 Inser_e dos pilas de tamario "AAA".
® Coleque las pilas con sus terminales
correspondientes en las indicaciones (+) y ( )
del compar_imento de las mismas.
3Cierre la tapa de las pilas.
El uso inadecuado de las pilas puede provocar la fuga de
sustancias quirnicas o explosiones. Aseg0rese de seguir
las instrucciones siguientes.
• No mezcle tipos diferentes de pilas. Las pilas tienen
diferentes caracteristicas en funci6n del tipo de las
mismas.
• No mezcle pilas nuevas y usadas. Si mezcla pilas
nuevas y usadas se acortara la vida de las mismas
o se produciran fugas de sustancias quirnicas en las
pilas usadas.
• Retire las pilas tan pronto come se ageten. Los
preductos quimicos fugades de las pilas que entren
en centacto con la piei pueden provocar sarpullides
Si detecta alguna de estas fugas, limpie tedo con un
pane.
• Las pilas suministradas con este producto pueden
tener una esperanza de vida m_s certa debide alas
cendicienes de almacenamiente.
• Si no va a usar el mande a distancia durante un
prolengade periedo de tiempo, extraiga las pilas del
mismo.
.=.= o =• . .
Utilice el mando a distancia apuntando con 61 hacia
el sensor de centrol remote del televisor. Es posible
que el mando a distancia no funcione correctamente
si hay objetos entre 61 y el sensor de control remoto.
[] Precauciones relacionadas con el mando a
distancia
• Impida que el mando a distancia sufra golpes. Ademas,
no Io exponga a liquidos y no Io deje en zonas con
mucha humedad.
• No instale ni coloque eJ mando a distancia dende
reciba la luz directa del sol. El caler puede deformar el
mando a distancia.
• Es posible que el mando a distancia no funciene
correctamente si el sensor de control remoto del
televisor est6 bajo la infiuencia de la luz directa del sol
o de una iluminaci6n intensa. En tales casos, cambie el
6ngulo de iluminaci6n del televisor o utilice el mando a
distancia mas cerca del sensor de control remoto.
IMPORTANTE:
SI [.YkUNDAD NO SE ENCIENDE, DESENCHUFE
EL TELEVISOR DE L.ATOMA DE CORRIENTE
ELFiCTRICA Y REPFrTkLOS PASOS DE
INSrAL.ACI©N.
SI SIGUE SIN ENCENDERSE, PONGASE EN
CONT}_CfO CON NOSOTROS LLAMANDO AL
1-800-BE-SHARP.
(D-6
Preparaci6n
Para disfrutar de una imagen mas clara, utilice urla antena exterior. A continuaciOn se expone una breve
explicacion de los tipos de conexion utilizados para un cable coaxial. Si la antena exterior utiliza un cable
coaxial de 75 ohmios con un conector de tipo F, enchofelo al terminal de antena situado en la parte posterior
del televisor. Para conectar el cable de antena al televisor, utilice cables que puede adquirir en cualquier tienda
especializada.
_} Cable sin
convertidor CATV
fConectar un cable de antena
• Conecte el cable de antena al televisor mediante uric de los m6todos de la ilustraci6n mostrada ((1_, _,
o _). Terminal de antena
Entrada de terminal de
televisi6n por cable domestico (75 ohmios)
Cable coaxial
Antena de VHF/
UHF
Antena combinada
de VHF/UHF
able coaxial de 75 Terminal de antena
mios (redondeado)
Cable coaxial
_/Cable coaxial de 75
ohmios (redondeado) °1_
able de dos corlduct es Adaptador de
_' I 300/75 ohmios I
de 300 ohmios I _ .J
Antena de VHF/UHF
independiente
ANTENA DE
AI terminar de
antena del televisor
f1. Un sistema de 75 ohmios generalmente es un cable redondeado
con un conector de tipo F que se puede acoplar facilmente a un
terminal sin necesidad de herramientas.
2. Un sistema de 300 ohmios es un cable piano de dos terminales
que se puede acoplar a un terminal de 75 ohmios a traves de un
adaptador de 300/75 ohmios.
OEI tipo se ajustar con
conector F soJamente debe
los dedos.
Cuando conecte el cable de RF al televisor, no ajuste el cenector
de tipo F con ninguna herramienta.
Si utiliza alguna herramienta, eJtelevisor puede resukar danado.
(Se pueden romper los circuitos internos, etc.)
Conector de tipo F
__" Cable coaxial de 75 ohmios
,_._ (redondeado)
Cable de dos conductores de 300 ohmios (piano)
•,///_ _ 'f_>, Oonector de tipo F
_:: , '\
Cable coaxial de 75 ohmios
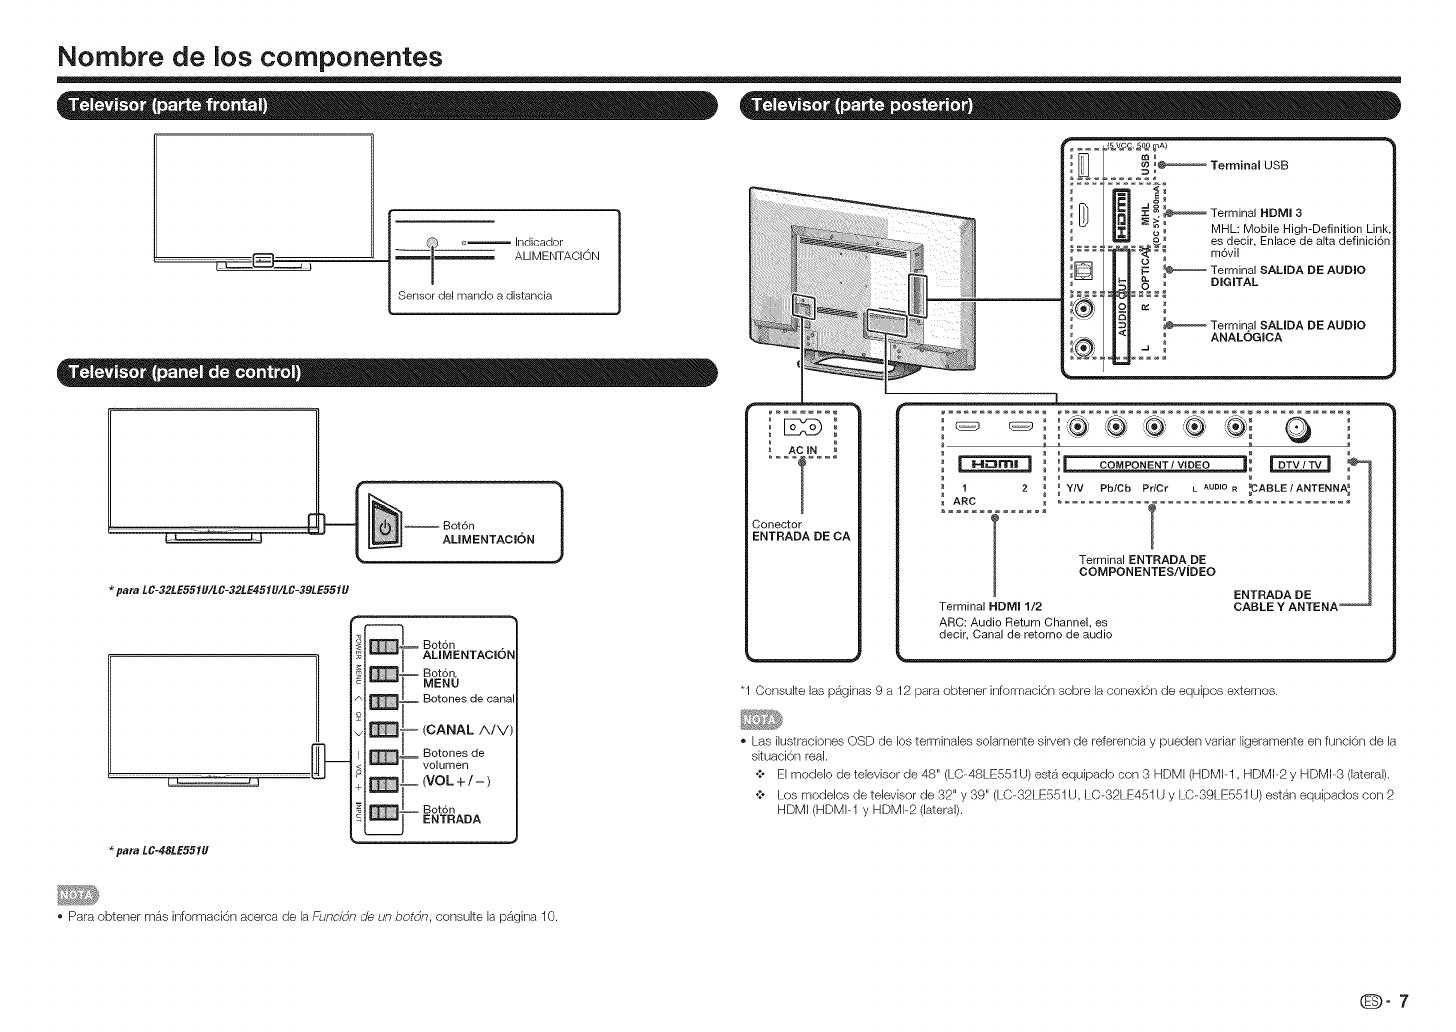
Nombre de los componentes
l _ _ Indicador
_--==_j_ ALIMENTACION
I Sensor del mando a distancia
para LC-32LE55 IU/LC-32LE45 IU/LC-39LE55 IU
para LC-48LE551U
Bot6n
ALIMENTACION
Bot n.
LAMMENTACIO_
Bot6n.
MENU
Botones de canal
Botones de
volumen
(VOL+/-)
Bot6n
ENTRADA
}
#-
AC IN
Conector
ENTRADA DE CA
_q,Vg,A)
_ Term na USB
: :::: :
E_
....... .Jo°_
...... :C =,_ Terminal HDMI 3
..... _>_ _ MHL: Mobile High-Definition Lin
_ es decir, Enlace de alta definici6r
_ _ _ _l _"_o _i m6vil
'_ /||F- _ Terminal SAMDA DE AUDIO
D,O,TAL
I
_ i iJ COMPONENT /VIDEO ]i _
I 2 _ _ YIV PblCb PdC ........ FABLEIANTENNA_
T .
r
COMPONENTES/VIDEO
ENTRADA DE
Terminal HDMI 1/2 CABLE Y ANTENA "
ARC: Audio Return Channel, es
decir, Canal de retomo de audio
"1 Consulte las p_ginas 9 a 12 para obtener informaci6n sobre la conexi6n de equipos externos.
*Las ilustraciones OSD de los terminales solamente sirven de referencia y pueden variar ligeramente en funci6n de la
sRuaci6n real.
¢ El modelo de televisor de 48" (LC-48LE551U) esta equipado con 3 HDMI (HDMI-I, HDMI-2 y HDMI-3 (lateral).
¢ Los modelos de televisor de 32" y 39" (LC-32LE551U, LC-32LE451 U y LC-39LE551U) estan equipados con 2
HDMI (HDMI-I y HDMI-2 (lateral).
*Para obtener mas informaci6n acerca de la Funci_n de uf7 bot_n, consulte la p_gina 10.
0-7
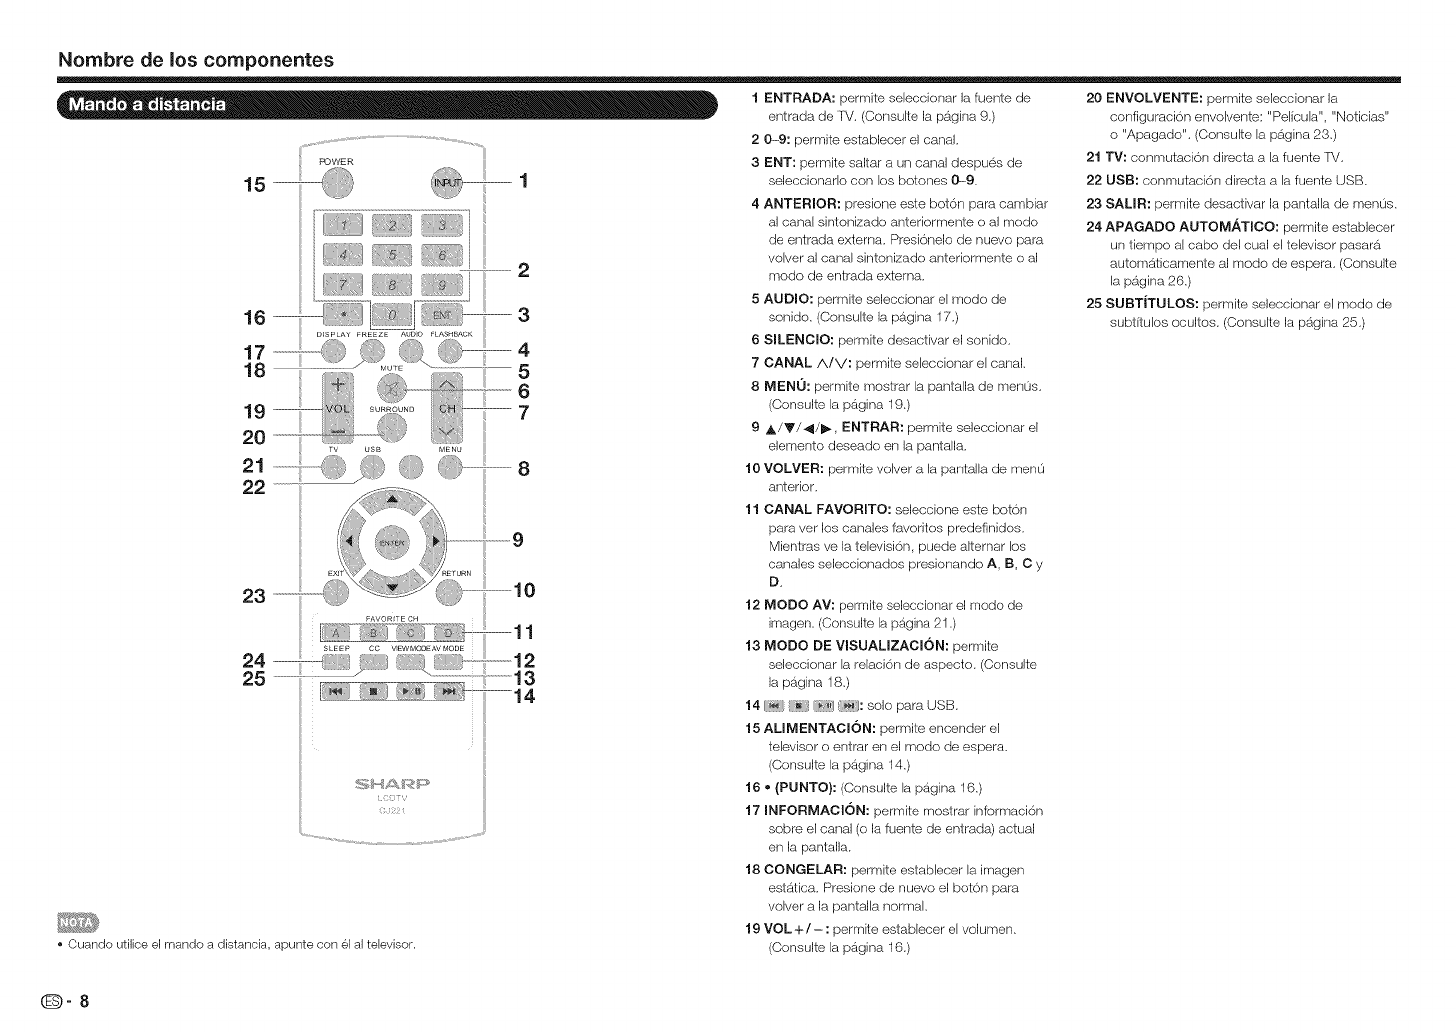
Nombredelos componentes
•Cuando utilice el mando a distancia, apunte con el al televisor.
1 ENTRADA: permite seleccionar la fuente de
entrada de TV. (Consulte la pagina 9.)
2 0---9:permite establecer el canal,
3ENT: permite saltar a un canal despues de
seleccionado con los botches 0--9.
4 ANTERIOR: presione este bot6n para cambiar
al canal sintonizado anteriormente o al modo
de entrada extema, Presi6nelo de nuevo para
volver al canal sintonizado anteriormente o al
modo de entrada externa,
5 AUDIO: permite seleccionar el modo de
sonido, (Consulte la pagina 17,)
6SlLENCIO: permite desactivar el sonido,
7 CANAL A/V: permite seleccionar el canal,
8 MEN0: permite mostrar la pantalla de men0s,
(Consulte la pagina 19.)
9,_/Y/_/I_, ENTRAR: permite seleccionar el
elemento deseado en la pantalla,
10 VOLVER: permite volver a la pantalla de men0
anterior.
11 CANAL FAVORITO: seleccione este botch
para vet los canales favoritos predefinidos,
Mientras ve la televisi6n, puede alternar los
canales seleccionados presionando A, B, C y
D,
12 MODO AV: permite seleccionar el modo de
imagen. (Consulte la pagina 21.)
13 MODO DE VISUALIZACION: permite
seleccionar la relaci6n de aspecto, (Consulte
la pagina 18.)
14 [_, __.h_J(_U: solo para USB.
15 ALIMENTACION: permite encender el
televisor o entrar en el modo de espera,
(Consulte la pagina 14.)
16 • {PUNTO): (Consulte la pagina 16,)
17 INFORMACION: permite mosfrar informaci6n
sobre el canal (o la fuente de entrada) actual
en la pantalla.
18 CONGELAR: pemlite establecer la imagen
esfatica, Presione de nuevo el boton para
volver a la pantalla normal,
19 VOL + /- : permite esfablecer el volumen,
(Consulte la pagina 16.)
20 ENVOLVENTE: permite seleccionar la
configuracion envolvente: "Pelicula", "Noticias"
o "Apagado". (Oonsulte la pagina 23,)
21 TV: conmutacion directa a la fuente IV,
22 USB: conmutaci6n directa a la fuente USB,
23 SALIR: permite desactivar la pantalla de menus,
24 APAGADO AUTOM.ATICO: permite establecer
un tiempo al cabo del cual el televisor pasara
automaticamente al modo de espera, (Consulte
la pagina 26,)
25 SUBT|TULOS: permite seleccionar el modo de
subtifulos ocultos, (Consulte la pagina 25,)
(D-8
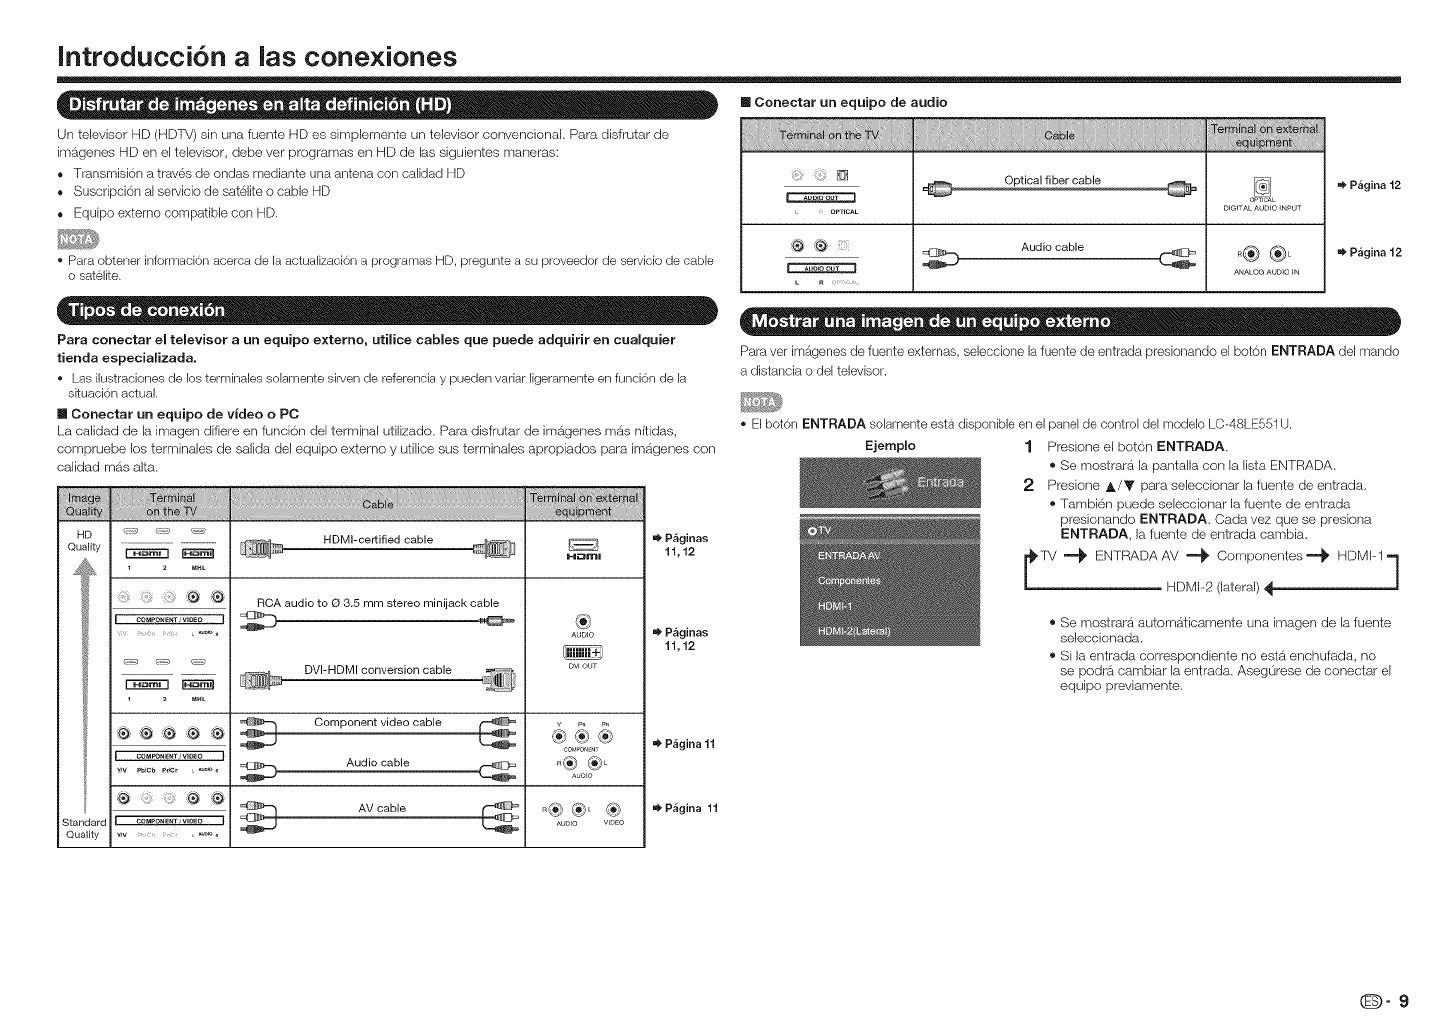
Introducci6n alas cone×Jones
Un televisor HD (HDTV) sin una fuente HD es simplemente un televisor convencional. Para disfrutar de
imageries HD en el televisor, debe ver pregramas en HD de las siguientes maneras:
• TransmisiOn a trav6s de ondas mediante una antena con calidad HD
• Suscripcion al servicio de sat61ite o cable HD
• Equipo externo compatible con HD.
', Para obtener informacion acerca de la actualizaci6n a programas HD, pregunte a su proveedor de servicio de cable
o satelite.
Para conectar el televisor a un equipo extemo, utilice cables que puede adquirir en cualquier
tienda especializada.
• Las ilustraciones de los terminales solamente sirven de referencia y pueden vadar ligeramente en funci6n de la
skuaci6n actual.
mConectar un equipo de video oPC
La oalidad de la imagen difiere en funoi6n del terminal utilizado, Para disfrutar de imS.,genes mdts nitidas,
oompruebe los terminales de salida del equipo externo y utifice sus terminales apropiados para imageries con
oafidad mas alta.
HD _ _
Oualily _
_4 !_ 1 zMHL
} ® ®
[_ COMPONENTIV)DEO i
QuaHly
HDMI-certified cable
1 z MHL
CQM_NE_ IV]DEO
®:® @
RCA audio to (3 3.5 mm stereo minijack cable
DVI-HDMI conversion cable
Component video cable
Audio cable
AV cable
H_ml
®
AUDIO
DV_ OUT
c0_Jpo__
_® ®
AUDIO
_®®L®
AU010 VIDEO
P&ginas
11,12
P&ginas
11,12
_' P&gina 11
P&gina 11
[] Conectar un equipo de audio
@
_, . OeTICAL
Audio cable
DIGITAL AUDIO INPUT
o® ®L
=_ P_gina 12
=_ P_gina 12
Para vet imagenes de fuente externas, selecdone la fuente de entrada presionando el boton ENTRADA del mando
a distancia o del televisor.
• Eibot6n ENTRADA solamente esta disponible en ei panel de control del modelo LC-48LE551U.
Ejemplo 1 Presione el bot6n ENTRADA.
® Se mostrara la pantalla con la lista ENTRADA.
2 Presione A/V para seleooionar la fuente de entrada.
® Tambien puede seleccionar la fuente de entrada
presionando ENTRADA. Cada vez que se presiona
ENTRADA, la fuente de entrada oambia.
[_.TV ==_ ENTRAD/kAV ==_ Componentes==_ HDMF1 l
HDMF2 (lateral)
® Se mostrardt automaticamente una imagen de la fuente
seleccionada.
® Si la entrada correspondiente no estb_enohufada, no
se podra cambiar la entrada. Asegurese de coneotar el
equipo previamente.
@-9

Introducci6n alas conexiones
Ademas de encender y apagar el televisor ("E!ncender y apagar la alimentaci6rf' en la pa,gina 14), tambien
puede utilizar el bot6n ALIMENTAOI6N para acceder directamente al menu ENTRADA, seleccienar el canal y
ajustar el nivel de volumen,
1 Presione el bet6n ALIMENTACI6N del mando a distancia para encender
el televisor,
2Presione de nuevo el bot6n ALIMENTACI6N para mestrar el menu UN
BOTON,
3Lleve a cabo alguna de las accienes siguientes:
® Para cambiar la fuente de entrada, presiene repetidamente el botch
ALIMENTACI6N para seleccienar la fuente de entrada que desee,
A contirluaci6n, presiene sin soltar el bot6n ALIMENTACI6N para
confirmar la selecci6n,
• Para cambiar el canal, presione repetidamente el bot6n ALIMENTACI6N
para resaltar Canal.
A contirluaci6n, presiene sin soltar el bot6n ALIMENTACI6N para
mostrar el submen0 Subir canal/Bajar canal y presione el beton
ALIMENTACI6N repetidamente para altemar la selecci6n.
Cuando se haya seleccienade, presiene sin seltar el bet6n ALIMENTACI6N para seleccienar el canal
que desee.
® Para ajustar el nivel de volumen, presione repetidamente el bet6n ALIMENTACI6N repetidamente para
resaltar Volumen.
A continuacion, presione sin soltar el bet6n ALIMENTACI6N para mostrar el submenu Subir volumen/
Bajar velumen y presione el bot6n ALIMENTACI6N repetidamente para altemar la seleccion,
Cuando se haya seleccienade, presione sin seltar el bet6n ALIMENTACI6N para ajustar el nivel de
volumen segun sus preferencias,
• Para la funci6n Un bot6n, la opci6n de selecci6n de canal solamente esta disponible cuando la fuente de entrada se
establece en "TV".
• Las ilustraciones OSD de los terminales solamente sirven de referencia y pueden variar ligeramente en funci6n de la
situaci6n real.
o;, El modelo de televisor de 48" (LC-48LE551 U) esta equipado con 3 HDMI (HDMPl, HDMI-2 y HDMI-3 (lateral).
o;, Los modelos de televisor de 32" y 39" (LC-32LE551 U, LC-32LE451U y LC-39LE551 U) estan equipados con 2
HDMI (HDMPl y HDMP2 (lateral).
(D-10
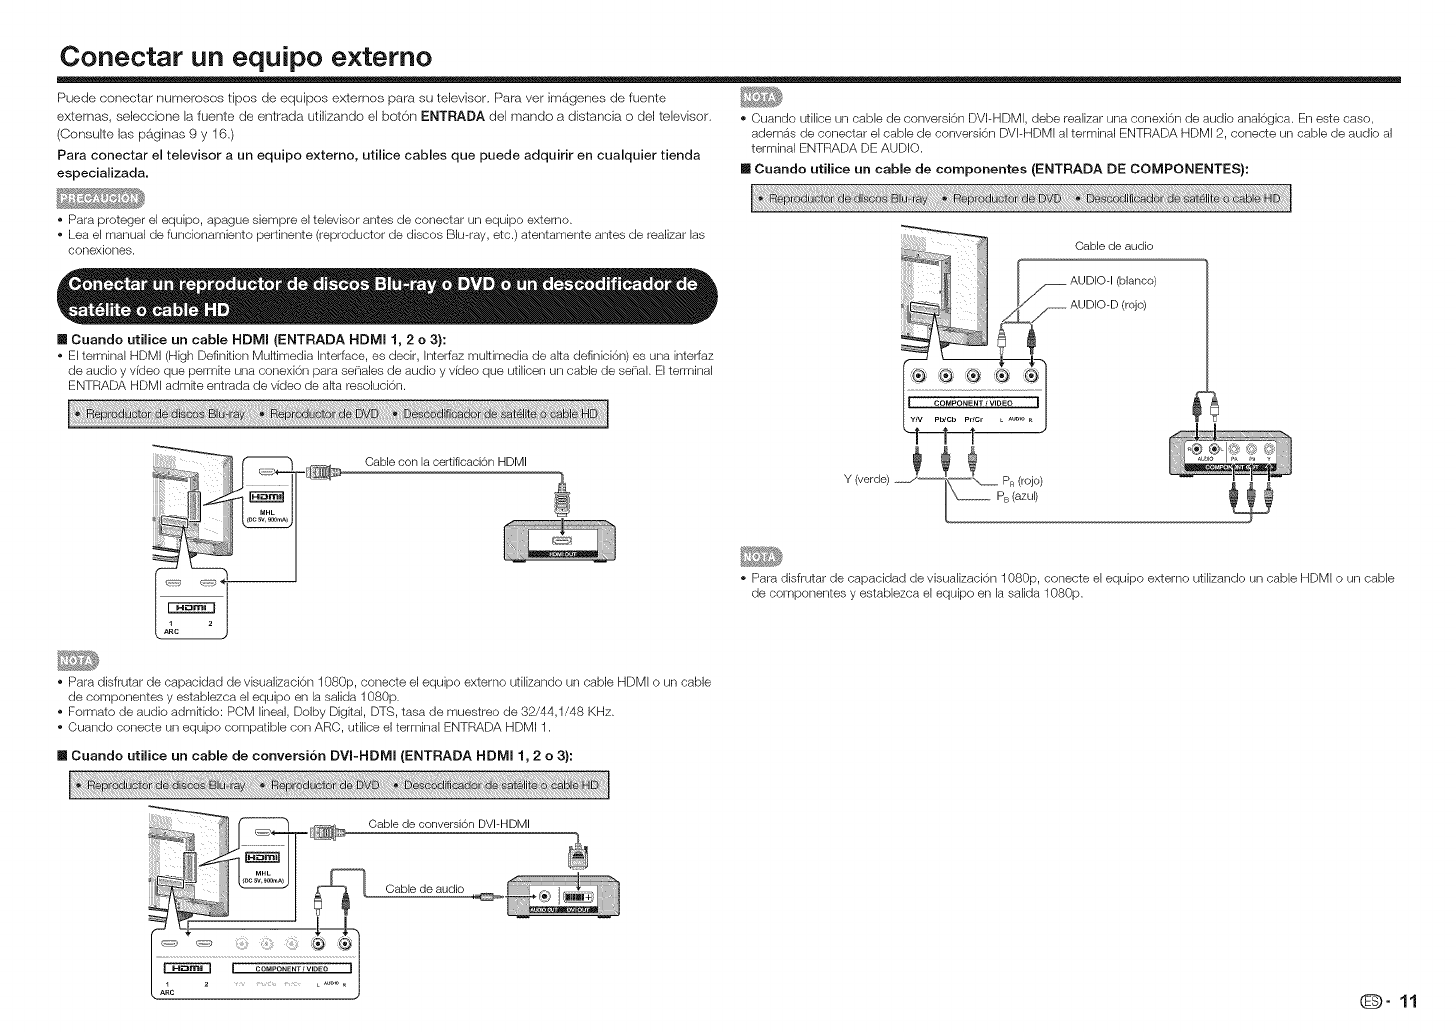
Conectar un equipo extemo
Puede conectar numerosos tipos de equipos externos para su televisor. Para ver iron,genes de fuente
externas, seleccione la fuente de entrada utilizando el bot6n ENTRADA del mando a distancia o del televisor.
(Consuke las p_ginas 9 y 16,)
Para conectar el televisor a un equipo externo, utilice cables que puede adquirir en cualquier tienda
especializada.
• Cuando utilice un cable de conversi6n DVI-HDMI, debe realizar una conexbn de audio anal6gica. En este caso,
ademas de conectar el cable de conversi6n DVI-HDMI al terminal ENTRADA HDMI 2, conecte un cable de audio al
terminal ENTRADA DE AUDIO.
[] Cuando utilice un cable de componentes (ENTRADA DE COMPONENTES}:
• Para proteger el equipo, apague siempre el televisor antes de conectar un equipo extemo.
• Lea el manual de funcionamiento pertinente (reproductor de discos Bh-ray, etc.) atentamente antes de realizar las
conexiones.
[] Cuando utilice un cable HDMI (ENTRADA HDMI 1, 2 o 3):
• El terminal HDMI (High Definition Multimedia interface, es decir, Interfaz multimedia de a_ta definbbn) es una interfaz
de audio y video que permute una conexi6n para sehales de audio y video que utilicen un cable de sehal. El terminal
ENTRADA HDMI admire entrada de video de a_ta resohcbn.
iiiiiiiii!i!i!i!i!i_,!iii_ Cable con la certificaci6n HDMI o,
(vet e) .J__ PR (roj ;
\--PB (azul)
• Para disfrutar de capacidad de visualizaci6n 1080p, conecte el equipo externo utilizando un cable HDMI o un cable
de componentes y establezca el equipo en la salida 1080p.
• Para disfrutar de capacidad de visualizaci6n 1080p, conecte el equipo externo utilizando un cable HDMI o un cable
de componentes y establezca el equipo en la salida 1080p.
• Formato de audio adm_tido: POM lineal, Dolby Digital, DTS, tasa de muestreo de 32/44,1/48 KHz.
• Cuando conecte un equipo compatible con ARC, utilice el terminal ENTRADA HDMI 1.
[] Cuando utilice un cable de conversi6n DVI-HDMI (ENTRADA HDMI 1, 2 o 3):
Cable de conversi6n DVI-HDMI
Cable de audio
O"11
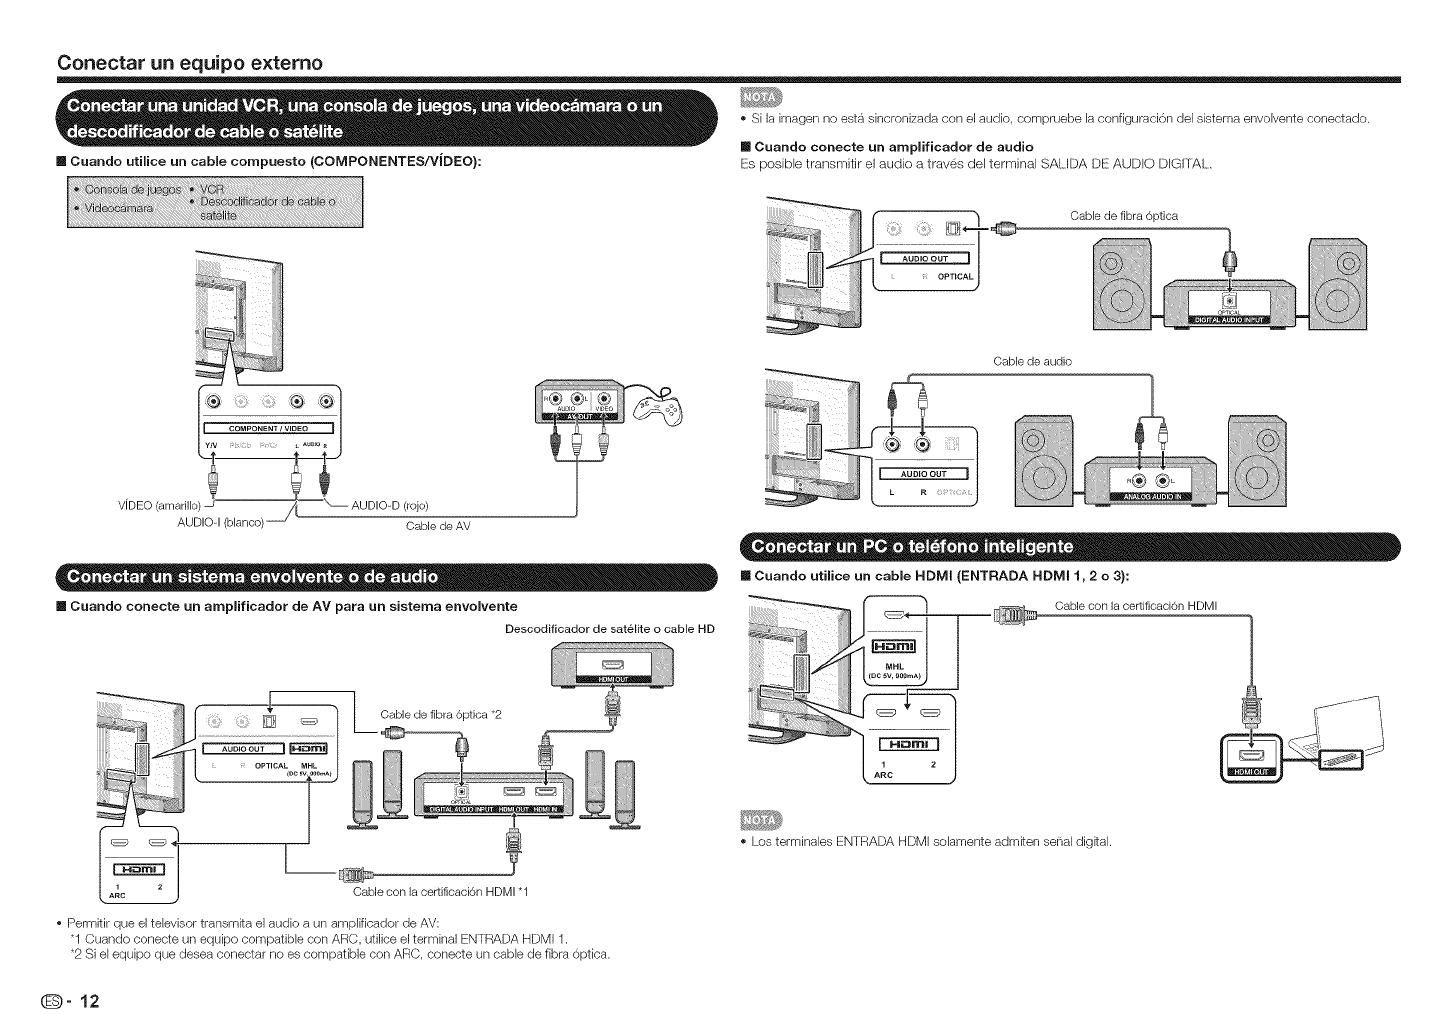
Conectarun equipo e×temo
• Si la imagen no esta sklcronizada con el audio, compruebe la corlfiguraci6n del sistema envolvente conectado.
III Cuando conecte un amplificador de audio
[] Cuando utilice un cable compuesto (COMPONENTES/VlDEO}: Es posible transmitir el audio a traves del terminal SALIDA DE AUDIO DIGITAL,
2!!!_Lw.2!!:!i....................I _¸
[.-_
.... OPTICAL J
Cable de fibra 6ptica
Cable de audio
(rojo)
Cable de AV
m Cuando conecte un amplificador de AV para un sistema envolvente
Descodificador de satelite o cable HD
L Cable de fibra 6ptica *2
[] Cuando utilice un cable HDMI (ENTRADA HDMI 1,2 o 3):
Cable con la certificaci6n HDMI
Cable con la certificaci6n HDMI "1
• Permitir que el televisor transmita el audio a un amplificador de AV:
"1 Cuando conecte un equipo compatible con ARC, utilice el terminal ENTRADA HDMI 1.
•2 Si el equipo que desea conectar no es compatible con ARC, conecte un cable de fibra 6ptica.
• Los terminales ENTRADA HDMI solamente admken sehal digkal.
(D-12
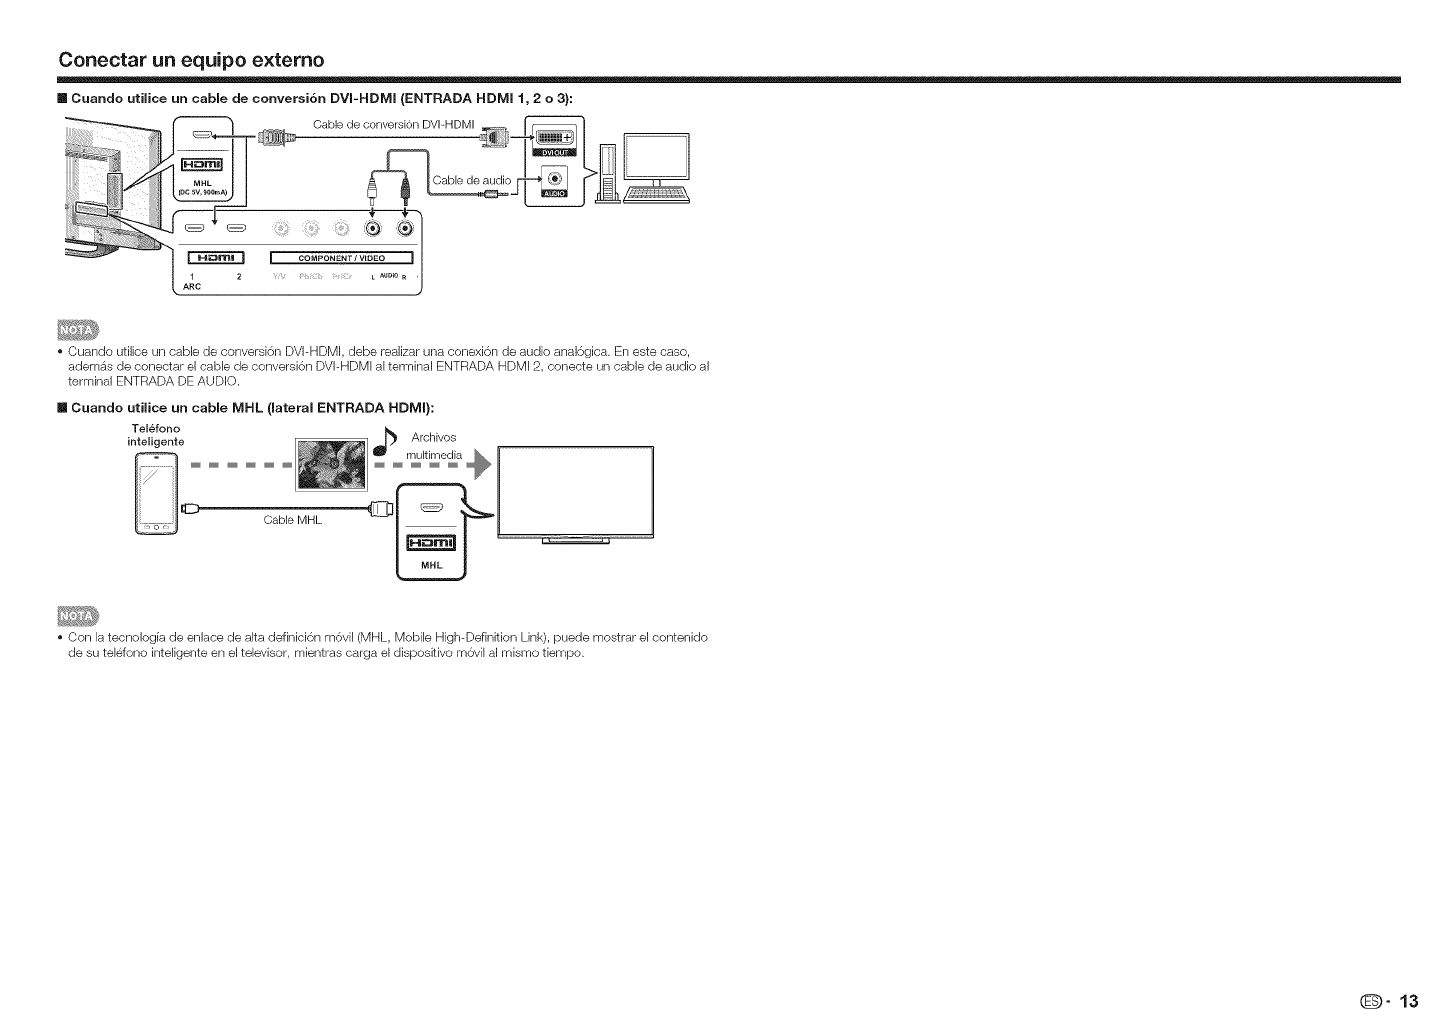
Conectarun equipo e×temo
m Cuando utilice un cable de conversi6n DVI-HDMI (ENTRADA HDMI 1, 2 o 3):
Cuando utilice un cable de conversbn DVI-HDMI, debe realizar una conexi6n de audio anal6gica. En este caso,
ademas de conectar el cable de conversi6n DVI-HDMI al terminal ENTRADA HDMI 2, conecte un cable de audio al
terminal ENTRADA DE AUDIO.
Telefono
inteligente
....
Cable MHL
m Caando utilice un cable MHL (lateral ENTRADA HDMI):
Con la tecnologia de enlace de alta definici6n m6vil (MHL, Mobile High-Definition Link), puede mostrar el contenido
de su telefono inteligente en el televisor, mientras carga el dispositivo m6vil al mismo tiempo.
O" 13
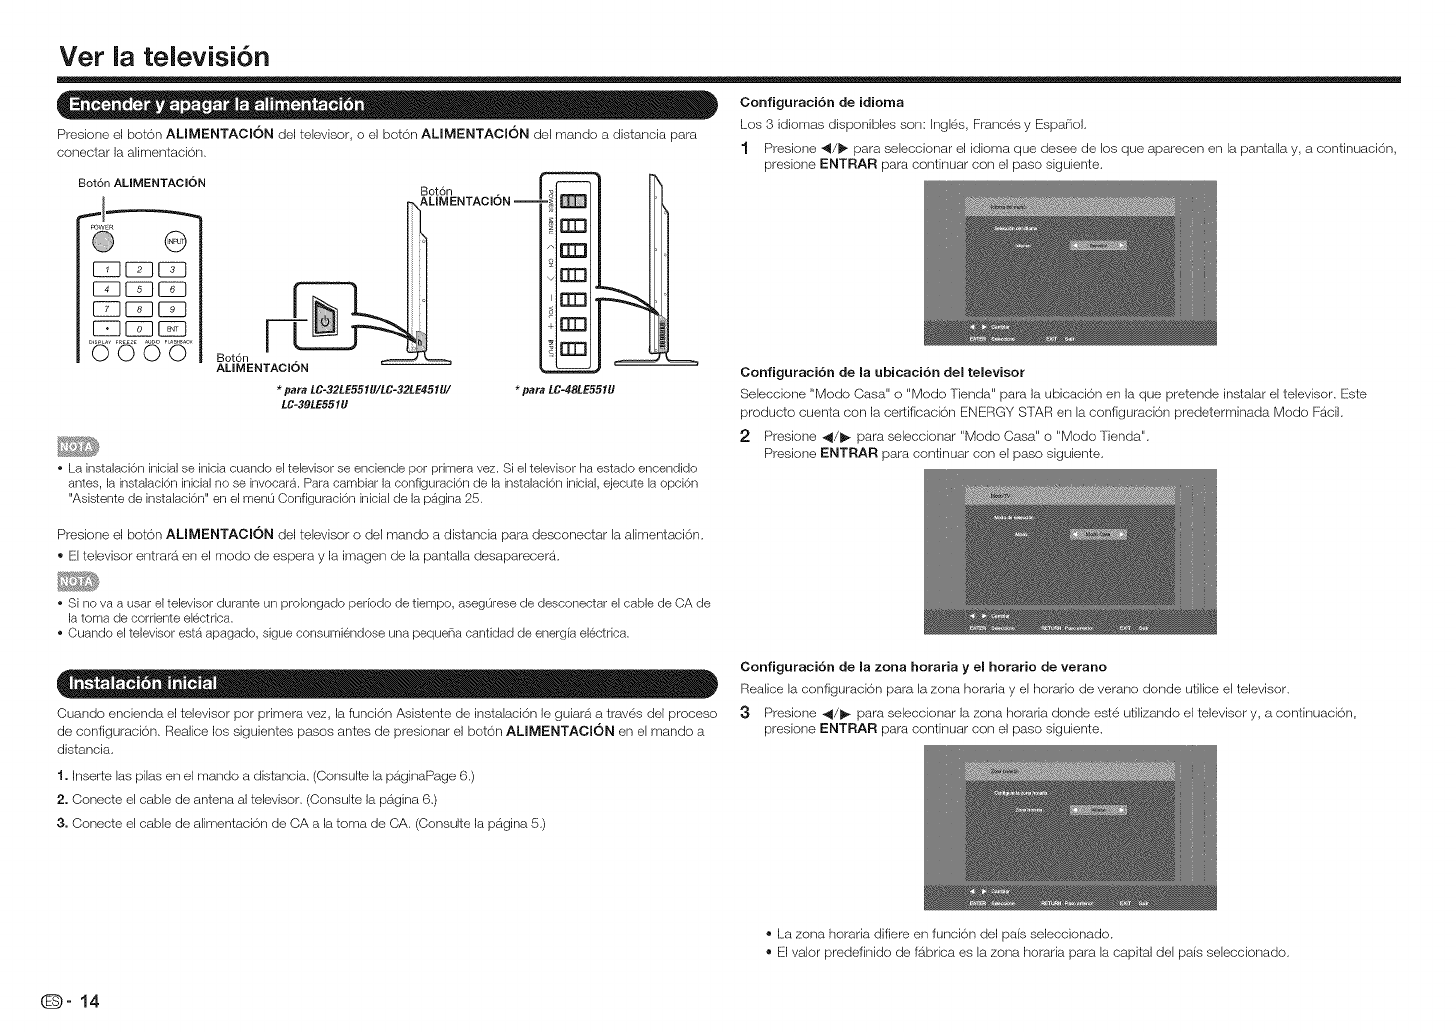
Vet la televisi6n
Configuraci6n de idioma
Los 3 idiomas disponibles son: In,gles, Frances y Espa_ol,
Presione el bot6n ALIMENTACI6N del televisor, o el bot6n ALIMENTACI6N del mando a distancia para
conectar la alimentaci6n,
Bot6n AMMENTACION
E22C_2E22
r_q ES2ES2
EZ2ES2E22
E22E3 EZD
r"
Bot6n , |_
ALIMENTACION ="'_
rrn
o I[I_
rrn
Bot6n
ALIMENTACION
*para LC-32LE551U/LC-32LE451U/ *para LC-48LE551U
LC-39LE551U
•La instalaci6n inicial se inicia cuando el televisor se enciende per primera vez. Si el televisor ha estado encendido
antes, la instalaci6n inicial no se invocara. Para cambiar la configuraci6n de la instalaci6n inicial, ejecute la opci6n
"Asistente de instalaci6n" en el menu Configuraci6n inicial de la p_gina 25.
1 Presione 4/1_ para seleccionar el idioma que desee de los que aparecen en la pantalla y, a continuaci6n,
presione ENTRAR para continuar con el paso siguiente.
Configaraci6n de la abicaci6n del televisor
Seleccione "Modo Casa" o "Modo Tienda" para la ubicaci6n en la que pretende instalar el televisor. Este
producto cuenta con la certificaci6n ENERGY STAR en la configuraci6n predeterminada Modo Facil,
2 Presione 41/_ para seleccionar "Modo Casa" o "Modo Tienda",
Presione ENTRAR para continuar con el paso siguiente,
Presione el boton ALIMENTACJON del televisor o del mando a distancia para desconectar la alimentaci6n,
® El televisor entrara en el modo de espera y la imagen de la pantalla desaparecera,
•Si no va a usar eJtelevisor durante un prolongado periodo de tiempo, aseg0rese de desconectar el cable de CA de
la toma de cordente electdca.
• Cuando el televisor est_ apagado, sigue consumiendose una pequd-_a cantidad de energia electrica.
Cuando encienda el televisor pot primera vez, la funci6n Asistente de instalack_nle guiar_i a traves del proceso
de configuraci6n, Realice los siguientes pasos antes de presionar el boton ALIMENTAClON en el mando a
distancia,
1. Inser_e las pilas en el mando a distancia, (Consulte la paginaPage 6,)
2. Conecte eJcable de antena al televisor, (Consulte la pa,gina 6,)
3. Conecte eJcable de alimentaci6n de CA a la toma de CA, (Consulte la pagina 5,)
Configaraci6n de Ja zona horaria y eJ horatio de verano
Realice la configuracion para la zona horaria y el horario de verano donde utilice el televisor.
3Presione 41/_ para seleccionar la zona horaria donde este utilizando el televisor y, a continuaci6n,
presione ENTRAR para continuar con el paso siguiente.
®La zona horaria difiere en funcion del pa{s seleccionado,
®El valor predefinido de fabrica es la zona horaria para la capital del pais seleccionado,
(D-14
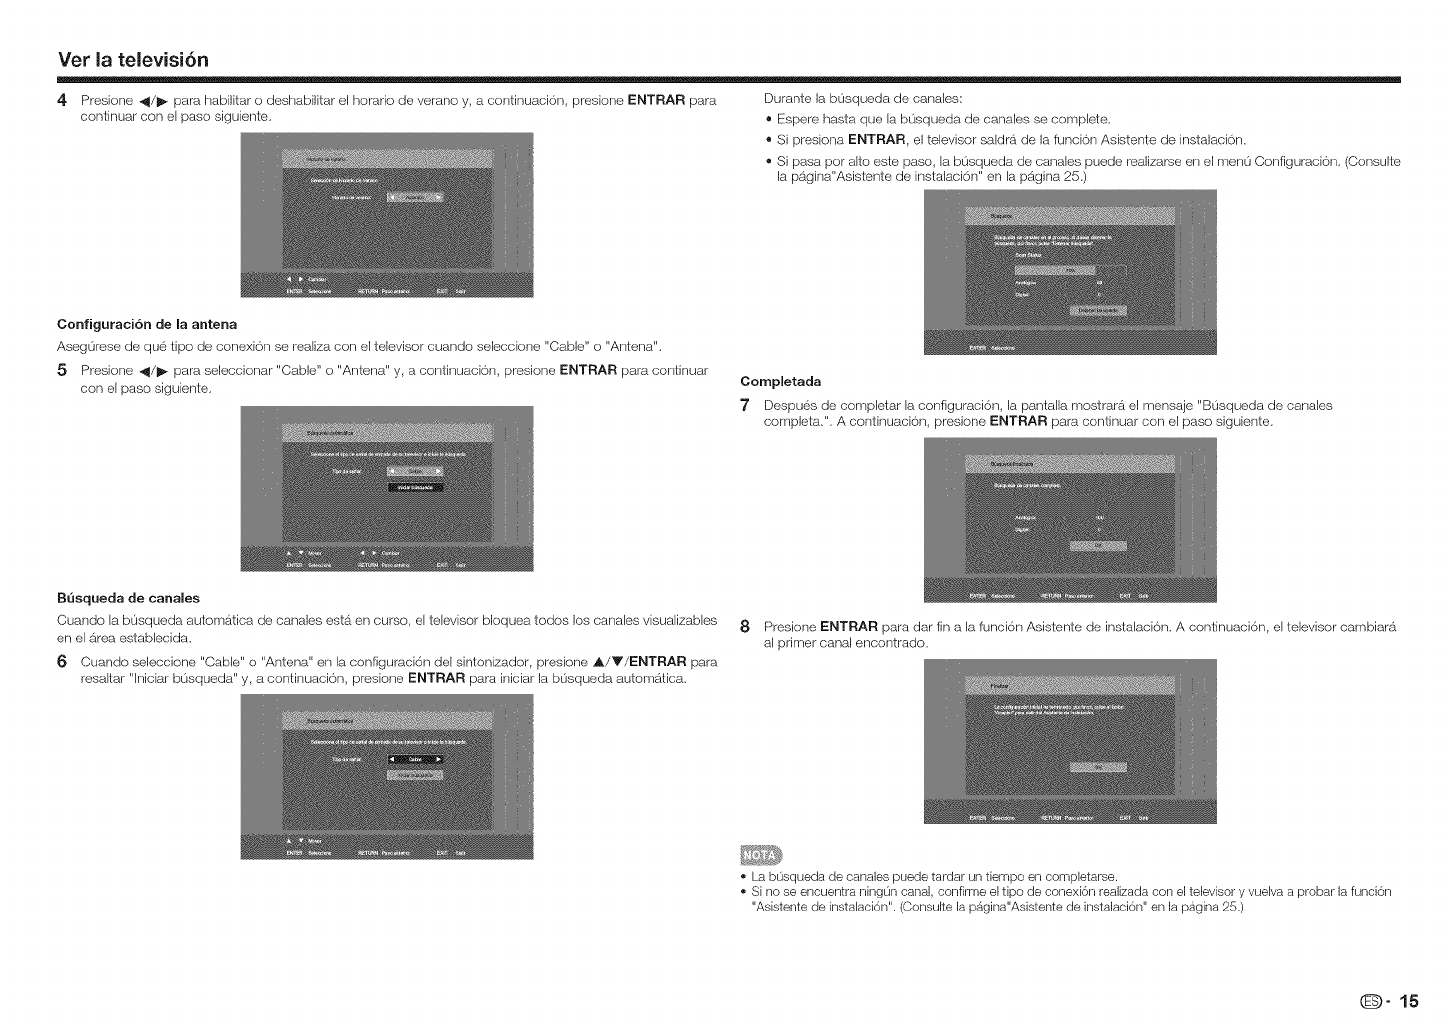
Vet la televisi6n
4 Presione 4/1_ para habilitar o deshabilitar el horatio de verano y, a continuaci6n, presione ENTRAR para Durante la b0squeda de canales:
continuar con el paso siguiente, ®Espere hasta que la busqueda de canales se complete,
®Si presiona ENTRAR, el televisor saldra de la funcion Asistente de instalacion,
®Si pasa pot alto este paso, la busqueda de canales puede realizarse en el menu Configuracion, (Consulte
la pS.gina"Asisterlte de instalaci6n" en la pagina 25.)
Configuraci6n de la antena
AsegOrese de que tipo de conexi6n se realiza con el televisor cuando seleccione "Cable" o "Arltena".
5 Presione 41/1_ para seleccionar "Cable" o "Antena" y, a contirluaci6n, presione ENTRAR para continuar
con el paso siguiente, Completada
"7 Despues de completar la configuracic_n, la pantaHa mostrara el mensaje "B0squeda de canales
completa,". A contirluaci6n, presione ENTRAR para continuar con el paso siguiente,
BQsqueda de canales
Cuando la b0squeda automb_tica de canales estS.en curso, el televisor bloquea todos los canales visualizables
en el area establecida,
6 Cuando seleccione "Cable" o "Antena" en la configuraci6n del sintonizador, presione _./T/ENTRAR para
resaltar "lniciar busqueda" y, a continuaci6n, presione ENTRAR para iniciar la b0squeda automb_tica,
8 Presione ENTRAR para dar fin a la funci6n Asistente de instalacion, A continuaci6n, el televisor cambiara
al primer canal encontrado,
• La b0squeda de canales puede tardar un tiempo en completarse.
• Si no se encuentra ningOn canal, confirme el tips de conexi6n realizada con el televisor y vuelva a probar la funci6n
"Asistente de instalaci6n". (Consulte la pagina"Asistente de instalaci6n" en la pagina 25.)
O" 15
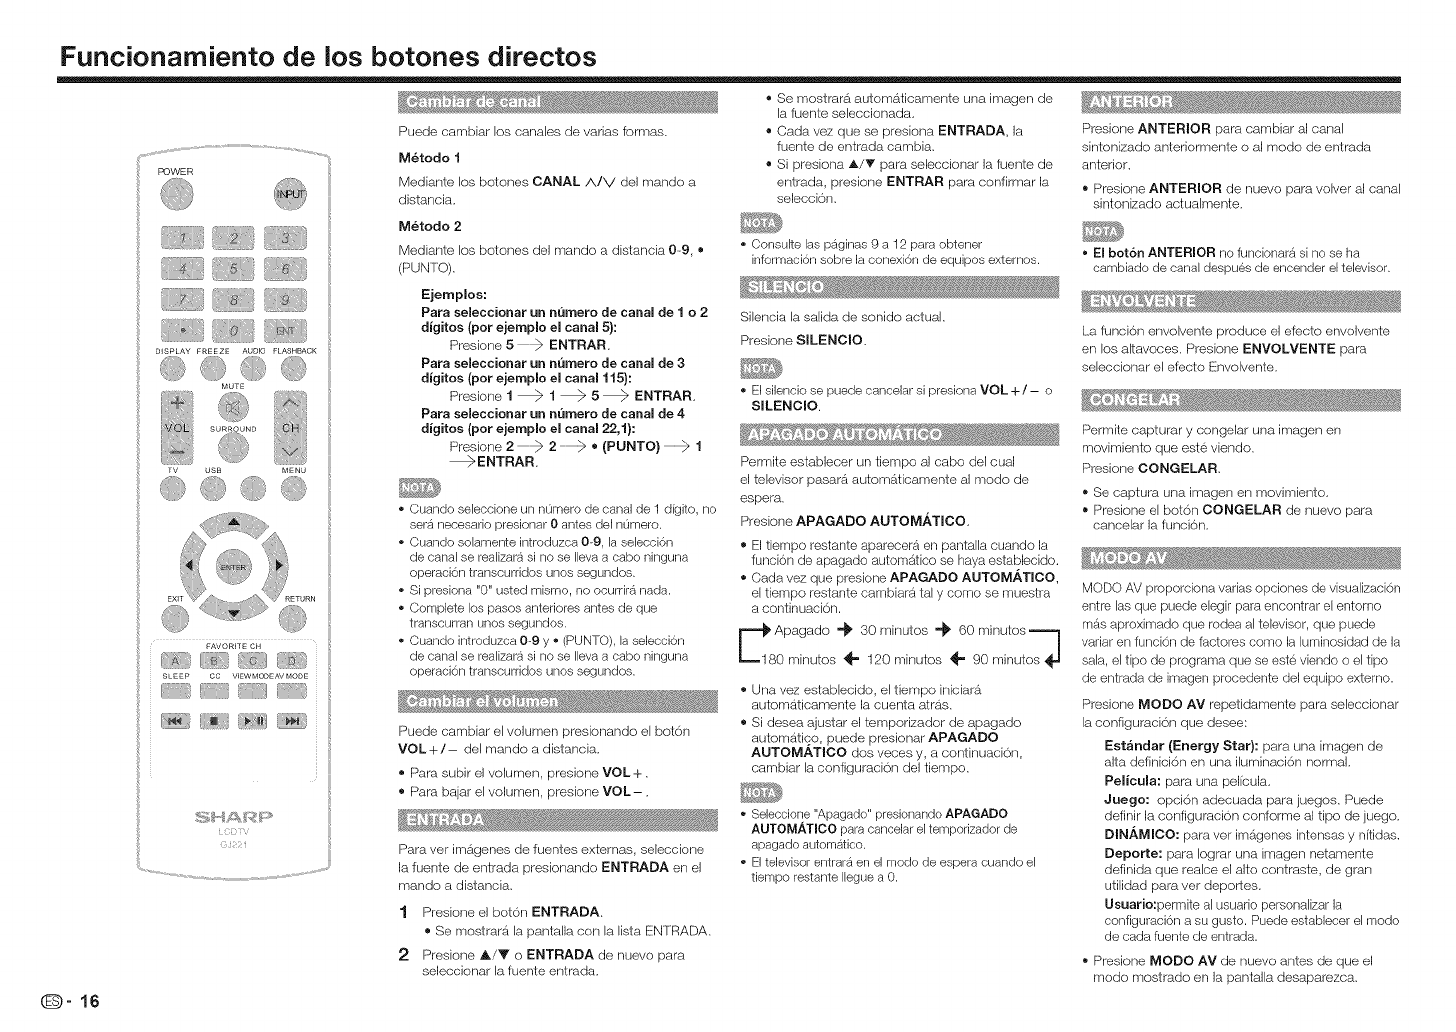
Funcionamiento de los botches directos
Puede cambiar los canales de varias formas.
M_todo 1
Mediante los botches CANAL/k/V del mando a
distancia.
M_todo 2
Mediante los botches del mando a distancia 09, ®
(PUNTO).
Ejemplos:
Para seJeccionar an numero de canal de 1 o 2
digitos (per ejempmo el canal 5}:
Presiene 5 ENTRAR
Para seJeccionar un numero de canal de 3
digitos (per ejemplo el canal 115):
Presiene 1 _ I _ 5 _ ENTRAR
Para seJeccionar an numero de canal de 4
digitos (per ejempmo el canal 22,1}:
Presiene 2 2 ® (PUNTO)1
_ENTRAR
Ouando seieccione un n0mero de canal de 1 digito, no
sera necesado presionar 0 antes del numero.
Cuando solamente introduzca 0-9, la selecci6n
de canal se realizara si no se lleva a cabo ninguna
operaci6n transcurridos unos segundos.
Si presiona "0" usted mismo, no ocurdr_ nada.
Complete los pasos anteriores antes de que
transourran unos segundos.
• Cuando introduzca 0-9 y * (PUNTO), la selecci6n
de canal se realizara si no se lleva a cabo ninguna
operaci6n transcurridos unos segundos.
Puede cambiar el volumen presionando el bot6n
VOL+/- del mando a distancia.
® Para subir el voiumen, presione VOL+.
® Para bajar el volumen, presione VOL-.
Para ver imagenes de fuentes externas, seleccione
la fuente de entrada presionando ENTRADA en el
mando a distancia.
1 Presione el bot6n ENTRADA
®Se mostrara la pantalla con la lista ENTRADA.
2 Presione A/V o ENTRADA de nuevo para
seleccionar la fuente entrada.
®Se mostrara automaticamente una imagen de
la fuente seleccionada.
®Cada vez que se presiona ENTRADA, la
fuente de entrada cambia.
®Si presiona A/T para seleccionar la fuente de
entrada, presione ENTRAR para confirmar la
seleccion.
Consuke las paginas 9 a 12 para obtener
informaci6n sobre la conexi6n de equipos extemos.
Silencia la salida de sonido actual.
Presione SILENCIO.
• EIsilencio se puede canceiar si presiona VOL + /- o
SILENClO.
Permite establecer un tiempo al cabo del cual
el televisor pasara automb_ticamente al modo de
espera.
Presione APAGADO AUTOM._TJOO.
Eltiempo restante aparecera en pantalla cuando la
funci6n de apagado automr_tico se haya establecido.
Cada vez que presione APAGADO AUTOM/_,TICO,
el tiempo restante cambiara tal y como se muestra
a continuaci6n.
Apagado "_ 30 minutos "_ 60 minutos=_
0 minutos _" 120 minutos _= 90 minutes
® Una vez establecido, el tiempo iniciara
automaticamente la cuenta arras.
®Si desea ajustar el temporizador de apagado
automatico, puede presionar APAGADO
AUTOMATICO dos veces y, a continuaci6n,
cambiar la configuraci6n del tiempo.
° Seleccione "Apagado" presionando APAGADO
AUTOMAT_CO para cancelar el temporizador de
apagado automatico.
El televisor entrara en el modo de espera cuando el
tiempo restante llegue a 0.
Presione ANTERIOR para cambiar al canal
sintonizado anteriormente o al modo de entrada
anterior.
®Presione ANTERIOR de nuevo para velvet al canal
sintonizado actualmente.
• El botch ANTERIOR no funcionar_ si no se ha
cambiado de canal despues de encender el televisor.
La funcion envolvente produce el efecto envolvente
en los altavoces. Presione ENVOLVENTE para
seleccionar el efecto Envolvente.
Permite capturar y congelar una imagen en
movimiento que este viendo.
Presione CONGELAR,
®Se captura una imagen en movimiento.
®Presione el bot6n CONGELAR de nuevo para
cancelar la funci6n.
MODO AV proporciona vanas opciones de visualizaci6n
entre las que puede elegir para encontrar el entomo
mas aproximado que rodea al televisor, que puede
variar en funci6n de factores como la luminosidad de la
sala, el tipo de programa que se este viendo o el tipo
de entrada de imagen procedente del equipo extemo.
Presione MODO AV repetidamente para seleccionar
la configuraci6n que desee:
Est_ndar (Energy Star): para una imagen de
alta definici6n en una iluminaci6n normal.
Pelicula: para una pel/cula.
Jaego: opci6n adecuada para juegos. Puede
definir la configuracion cenforme al tipo de juego.
DINAMICO: para ver im&genes intensas y n{tidas.
Deporte: para Iograr una imagen netamente
definida que realce el alto centraste, de gran
utilidad para ver deportes.
Usuario:permite al usuario personalizar la
configuracion a su gusto. Puede establecer el modo
de cada fuente de entrada.
®Presione MODO AV de nuevo antes de que el
mode mostrado en la pantalla desaparezca.
Funcionamiento de los botches directos
Permite seleccionar una opci6n de audio predefinida
optimizada para diferentes condiciones de sonido.
Presione AUDIO repetidamente para seleccionar la
configuraci6n que desee: SAP, Mono o Estereo.
Puede disfrutar de sonido est_reo Hi-Fi o de
difusiones SAP donde est_n disponibles.
oTransmisiones est_reo: vea programas oomo
eventos deportivos en directo, espect4,culos y
conciertos en sonido estereo dinamico.
oTransmisiones SAP: reciba transmisiones de
televisi6n en sonido PRINCIPAL o SAP.
Sonido PRiNCiPAL: banda sonora del programa
normal (en mono o estereo).
Sonido SAP: escuche un idioma secundario, comentarios
suplementarios u otra informaci6n. (SAP es sonido mono.)
Esta funciOn permite programar hasta 4 canales
favorites. AI establecer los canales favorites por
adelantado, puede seleccionar su canal favodto
facilmente.
Para registrar su canal favorito
1 Presione MENU para mostrar la pantalla de
MENOS,
2 Presione 4/_ para seleccionar el menu Canal,
3Presione A/y para seleccionar el men0 Saltad
Canales Favoritos y presione I1_/ENTRAR
para entrar en su submen0,
4 Presione A/V para seleccionar el canal
y presione uno de los botones CANAL
FAVORITO (A, B, C o D) del mando a distancia
para registrar este canal en el canal favorito para
el bot6n seleccionado.
® Establezca otros canales favoritos de la misma
manera,
5 Presione MENU parasalir.
Si el sonido est_reo es dificil de escuchar.
• Obtenga un sonido m4,s nitido cambiando
manualmente al modo de sonido mono fijo.
El televisor esta equipado con un descodificador
intemo de subtitulos ocultos. Permite vet
conversaciones, narraciones y efectos de sonido
como subtitulos en el televisor,
Los subtitulos ocultos estb_n disponibles en algunos
programas de televisi6n yen algunas cintas de video
domesticas VHS a discreci6n del proveedor del
programa,
El servicio de subtitulos ocultos digitales es un
nuevo servicio disponible solamente en programas
de televisi6n digital (tambien a discreci6n del
proveedor del servicio), Es un sistema mb_sflexible
que el sistema de subtitulos ocultos original, porque
permite una gran variedad de tama_ios de subtitulos
y estilos de fuente, Cuando el servicio de subtitulos
ocultos digitales esta en uso, se indicara mediante
una abreviaci6n de tres letras que tambien indica el
idioma de dichos titulos: ENG (ingles), SPA (espa_iol)
y FRA (frances) u otros codigos de idioma,
No todos los programas y cintas de videos VHS
ofrecen subtitulos ocultos.
En el sistema de subtitulos ocultos, se pueden
proporcionar varios servicios de subtitulos, Cada
uno se identifica mediante su propio n0mero, Los
servicios "CC1" a"CC4" muestran subtitulos de
programas de f_/superpuestos a traves de la
imagen del programa,
En el sistema de subtitulos ocultos, los servicios
"TE_TO 1" a "TEXTO4" muestran texto no
relacionado con el programa que se esta
visualizando (por ejemplo, el tiempo o noficias), Estos
servicios tambien se superponen sobre el programa
que se esta viendo actualmente,
Ejemplo:
Anal6gico:
_IAIP>i i:d °_-"*[_eii_,'iit uI_ii xl _ u_t itfil:_(;1"_"S_iblii'ii i;;4 j
Digkal:
Apagado @ Subtitulosl @ Subtitulos2 @ SubtitulosS 1
CS4 _'- CS3 _'- 0S2 _" CS1 _'- Subtitulos4_ "J
• El bot6n Subtitulos mantiene un registro del ultimo
servicio seleccionado en su memoria.
• Consuke la p_gina 25 para obtener informaci6n
detallada sobre la configuraci6n de subt_tulos.
• Los subt_tulos ooultos no funcionaran cuando se vea
una entrada de 480i, 480p, 720p, 1080i o 1080p a
traves de COMPONENTES: entradas Y-PbPr o HDMI.
• La disponibilidad y el contenido de los subfitulos
ocukos depende de la cadena de televisi6n. Los
subfitulos ocultos est4,n disponibles cuando el icono
Subfitulos ocultos se muestran en la pantalla.
• La disponibilidad y el contenido de los subfitulos
ocukos y de los subt_tulos digitales depende de la
cadena de televisi6n. Los subt_tulos ocukos estan
disponibles cuando el icono Subt_tulos ocultos se
muestran en la pantalla.
Para vet su canal favorito
Presione uno de los botches CANAL FAVORITO (A,
B, C o D) para ver el canal predefinido.
1 Presione Subtitulos,
®Esta acci6n presentara la informaci6n de los
subtitulos ocultos.
2 Presione Subtitulos mientras la informaci6n de
subt{tulos ocultos sigue en pantalla,
®Presione repetidamente hasta que seleccione
el servicio de subtitulos ocultos que desee.
O" 17

Funcionarniento de los botones directos
Puede seieccionar el tamafio de la pantalla. •Eitamat_o de la pantalla que so puede seieccionar puede variar en funci6n deltipo de serial de entrada.
1 Presione IVIODO DE VlSUALIZAClON.
®Aparecera el menu Modo de visualizaci6n.
® El menu enumera las opciones del menLi Modo de visualizaci6n que puede seleccionar en funci6n del
tipo de sefial de video que se este recibiendo.
2 Presione IVlODO DE VISUAUZA¢ION o A/Y mientras el menu Modo de visualizaei6n se muestra en
pantaila para seieccionar el elemento del menu que desee,
3 Presione ENTRAR para confirmar la configuraei6n.
Puade tenet la misma configuraci6n eligiendo "Modo de visualizaci6n" en los elementos de men0. (ConsuRela
p4,gina 18.)
m Para programas 4:3
Normal
n
Mantiene la relaci6n de
aspecto original en una
visualizaci6n a pantalla
completa. La relaci6n
de aspecto 4:3 original
(fuente 1,33:1 ) se
conserva, pot Io que se
a_iaden barras negras a
la izquierda y derecha de
la imagen visualizada.
Alargamiento Zoom Panor_mica
.h r
\
f---_
\)
Esfira una imagen con
relaci6n de aspecto
,I:3 a los bordes de la
pantalla.
..../' ,_.
ti
'\ )
Expande las imagenes
con barras negras para
ajustarse a la pantaila.
.) "\..
Expande la
imagen visualizada
horizontalmente en
los lados izquierdo y
derecho para rellenar la
pantalla.
Las imagenes pueden
aparecer mD.s anchas
de Io que se esperaba.
Si estb_viendo contenido
en pantalla panoramica
(1,85:1 o 2,35:1), las
barras negras seguiran
apareciendo en la parte
superior e inferior de la
imagen visualizada.
m Para programas 16:9
Normal Alargamiento Zoom Estirar
/\
\y
Mantiene la relaci6n de
aspecto original en una
visualizaci6n a pantaNa
completa.
Estira
proporcionalmente la
imagen para rellenar la
pantalla del televisor.
Expande las imagenes
con barras negras para
ajustarse a la pantalla.
Expande la imagen
visualizada para reHenar
la pantalla. Las irnagenes
pueden aparecer mas
anchas de Io que se
esperaba.
(D-18
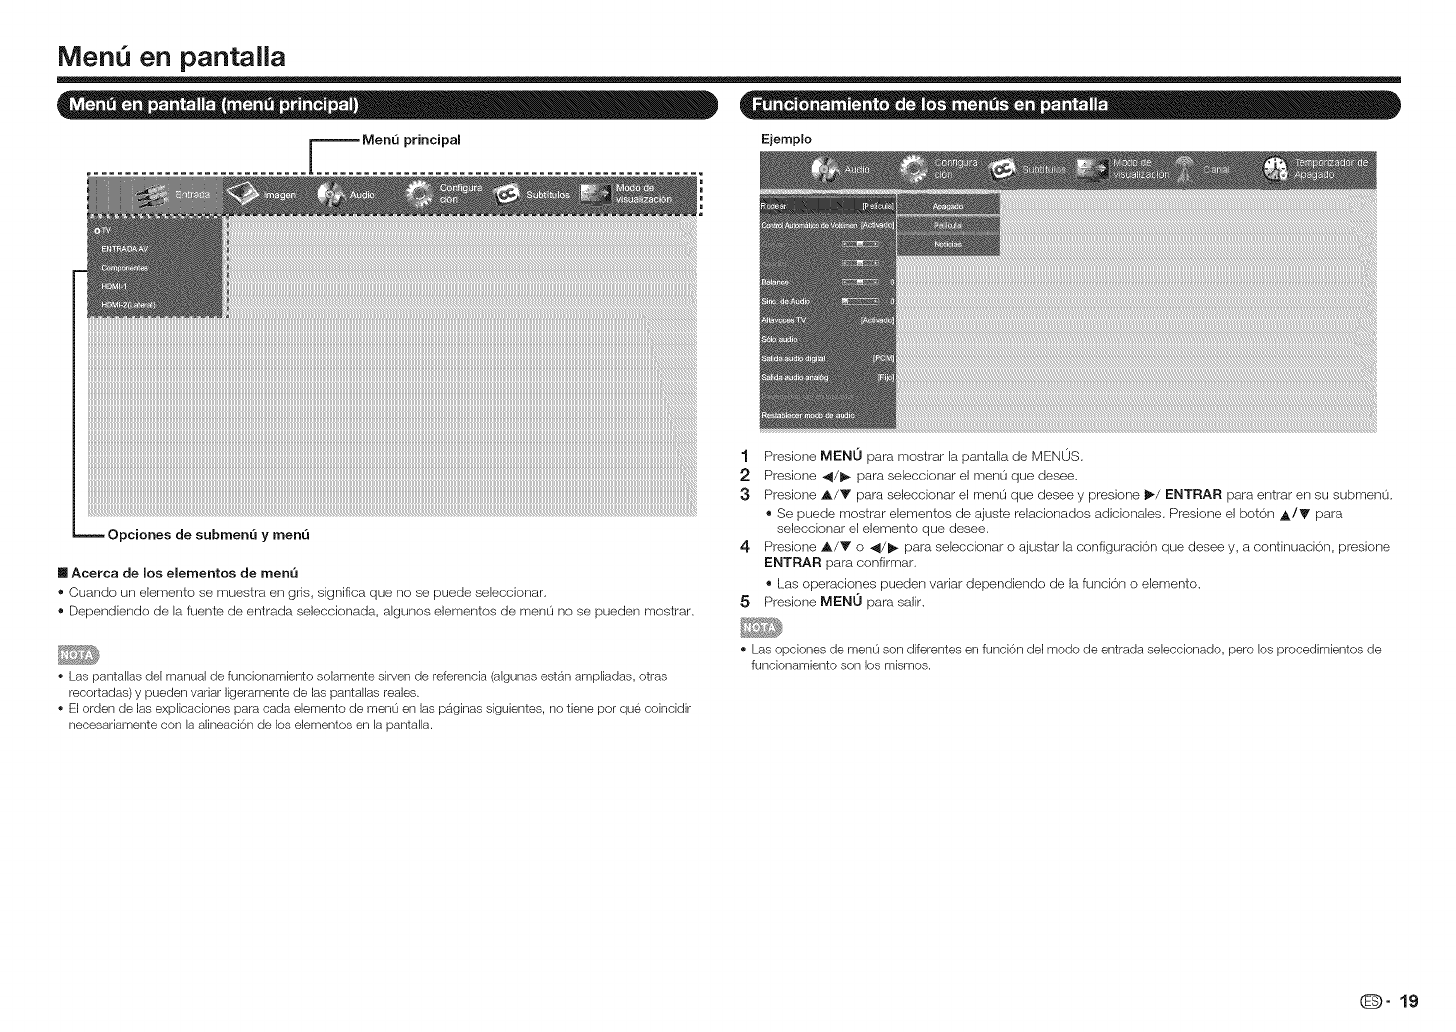
Men en pantalla
Ejemplo
Opciones de submenQ ymenQ
m Acerca de mosemementos de men_
®Cuando un elemento se muestra en gris, significa que no se puede seleccionar.
®Dependiendo de la fuente de entrada seleccionada, algunos elementos de menu no se pueden mostrar.
• Las pantallas del manual de funcionamiento solamente sirven de referencia (algunas estan ampliadas, otras
recortadas) y pueden variar ligeramente de las pantallas reales.
• El orden de las explicaciones para cada elemento de men0 en las p_ginas siguientes, no tiene pot que coincidir
necesadamente con la alineaci6n de los elementos en la pantalla.
1 Presione MENO para mosfrar la pantalla de MENOS.
2 Presione 4/_ para seleccionar el menu que desee.
3Presione A/Y para seleccionar el men0 que desee y presione il_/ENTRAR para entrar en su submenu.
®Se puede mostrar elementos de ajuste relacionados adicionales. Presione el boton ,_./V para
seleccionar el elemento que desee.
4 Presione A/Y o _/1_ para seleccionar o ajustar la configuracion que desee y, a continuaci6n, presione
ENTRAR para confirmar.
®Las operaciones pueden variar dependiendo de la funcion o elemento.
5 Presione MENU para salir.
• Las opciones de men0 son diferentes en funci6n del modo de entrada seleccionado, pero los procedimientos de
funcionamiento son los mismos.
O" 19
MenQ en pantalla
Usar el mando a distancia
Utilice los siguientes botones del mando a distancia
para utilizar el menu.
@ _<!'t
'}, t:j_
<-_-] r"77-/ F_7} <Th
MENO: Presione este bot6n para abrir o cerrar
el menu en pantaNa.
A/Y/4/_: Presione estos botones para seleccionar
el elemento que desee en la pantalla o
para ajustar un elemento seleccionado.
ENTRAR: Presione este bot6n para ir al paso
siguiente o completar la configuraci6n.
VOLVER: Presione este bot6n para volver al paso
anterior.
Utilizar el panel de control del televisor
Tambien puede utilizar el menu con el panel de
control del televisor.
Las operaciones de los
botones del panel de control i
se corresponden coil las del 7
mando a distancia segOn se
indica a conthluaci6n, rrN
rn7
nT1
EEB
*par_LC-48LE551U
MEND: Bot6n MENU del mando a distancia.
ENTRADA: Bot6n ENTRAR del mando a distancia.
CANAL A/V: Cursor A/Y del mando a distancia.
VOL +/- : Cursor _/1_ del mando a distancia.
Menu Imagen _ Menu Audio
Ejemplo Ejemplo
Modo AV .................................................. Pagina
Luz de fendo ............................................ P_gina
Centraste ................................................. P_gina
Brillo ......................................................... Pagina
Color ........................................................ Pagina
[ono ......................................................... Pagina
Nitidez ...................................................... Pagina
Fama_Soy posici6n ................................... Pagina
Posici6n horiz ............................... Pagina
Posici6n verLical ............................ Pagina
Tama_io horiz ................................ Pagina
TamaPio vertical ............................ Pagina
Temp. del color ........................................ Pagina
Temp. del ceior ............................. Pagina
Ganancia de rojo, verde o _ul ...... P_gina
Saturaci6n de rojo, verde o azuL_ Pagina
Restablecer temperatura de
color ............................................. Pagina
Imagen avanzada ..................................... Pagina
Realzar color ................................. Pagina
Contraste activo ............................ Pagina
Ahorro de energfa ......................... Pagina
Reducci6n de ruido ....................... Pagina
NR digital ..................................... Pagina
Modo de pelfcula .......................... Pagina
Reiniciar mode AV .................................... Pagina
22
22
22
22
22
22
22
22
22
(D" 20
MenQ en pantalla
Men_ Entrada -.0 .
_MenQ Configuraci6n
Ejemplo
_MenQ Subtituios (somesedan de entrada de
TV)
Ejemplo
Nombre de la entrada ............................... Pagina 23
Fuente de entrada ......................... Pagina 23
Etiqueta de entrada ....................... Pagina 23
Ajustes Link CEC ...................................... Pagina 23
Funci6n Enlace CEC ..................... PS.gina 23
Control de sistema de audio ......... Pagina 23
B0squeda de dispositivos ............. Pagina 23
Idioma del men0 ....................................... Pagina 23
Ajustes locales y hora ............................... Pagina 24
Zona horaria ................................. Pagina 24
Horatio de verano ......................... Pagina 24
Control parental ........................................ Pagina 24
Activar clasif .................................. Pagina 24
Bioqueo de canales ...................... Pagina 24
EE.UU. - IV .................................. Pagina 24
EE.UU. - Pelicula ........................... Pagina 24
CAN - Ingl6s ................................. Pagina 24
CAN - Franc(is .............................. Pagina 25
Valoraci6n regi6n alternativa .......... Pagina 25
Bioquear no clasif ......................... Pagina 25
Nueva contrase_ia ......................... Pagina 25
Restablecer conf. parental ............ Pagina 25
Indicador de alimentaci6n ......................... Pagina 25
Asistente de instalaci6n ............................ Pagina 25
Informaci6n del sistema ............................ Pagina 25
Restaurar todos los ajustes ...................... Pagina 25
Subtitulo anakSgico ................................... Pagina 25
Subtitulo digital ......................................... Pagina 25
Estilo SD ................................................... PS.gina 25
,_ Menu Canal (solo sel_al de entrada de TV)
Ejemplo
Modo TV .................................................. Pagina 26
B0squeda automS.tica de canales ............. Pagina 26
Busqueda parcial de canales .................... Pagina 26
A_adir canal anal6gico .............................. Pagina 26
Saltar/Canales Favoritos ........................... Pagina 26
MTS anal6gico ......................................... Pagina 26
MTS digital ............................................... PS.gina 26
Ejemplo Permite ajustar la imagen segun las preferencias
del usuario conforme a las siguientes opciones de
configuraci6n.
SeJeccionar fuente de entrada .................... Pagina 9
Menu Mode de visuaiizaci6n
Ejemplo
SeJeccionar la relaci6n de aspecto ............ PS.gina 18
Q Menu Temporizador de apagado
Ejemplo
Establecer el temporizador de apagado.... PS.gina 26
• Para obtener informaci6n sobre el funcionamiento de
los menOsen pantalla, consulte la p4,gina 19.
La configuraci6n de audio y video se puede cambiar
conforme al programa o contenido de entrada que
se esta viendo.
Seleccione uno de los siguientes modos de AV:
Estandar (Energy Star), Pelicula, Juego, DIN#,MICO,
Deportes o Usuario.
,, Est_ndar (Energy Star}: para una imagen de aJta
definici6n en una iluminaci6rl normal.
•Pelicula: para una pelicula.
• Juego: opci6n adecuada para juegos. Puede
definir la configuraci6n conforme al tipo de juego.
• DINAMICO: para ver imb_genes intensas y nitidas.
,, Deporte: para Iograr una imagen netamente
definida que realce el alto contraste, de gran
utilidad para vet depor_es.
, Usuario: permite al usuario personalizar la
configuraci6n a su gusto. Puede establecer el
modo de cada fuente de entrada.
• Estandar (Energy Star) es la configuraci6n
predeterminada. Si seiecciona otras opciones, el
consumo de energia puede cambiar.
• Los eJementos que se pueden seleccionar, pueden
vadar en funci6n de la fuente de entrada.
• Puede seieccionar MODO AV presionando el bot6n
MODO AV del mando a distancia. ConsuRe la pagina
16 para obtener detalles sobre la configuraci6n de
MODO AV.
Permite ajustar el brillo de la pantaJla.
Presione _ para permitir que la pantalla se atenue o
I_ para que la pantalla se ilumine.
Permite ajustar el nivel de contraste.
Presione _ para reducir el contraste o I_ para
aumentarlo.
O" 21
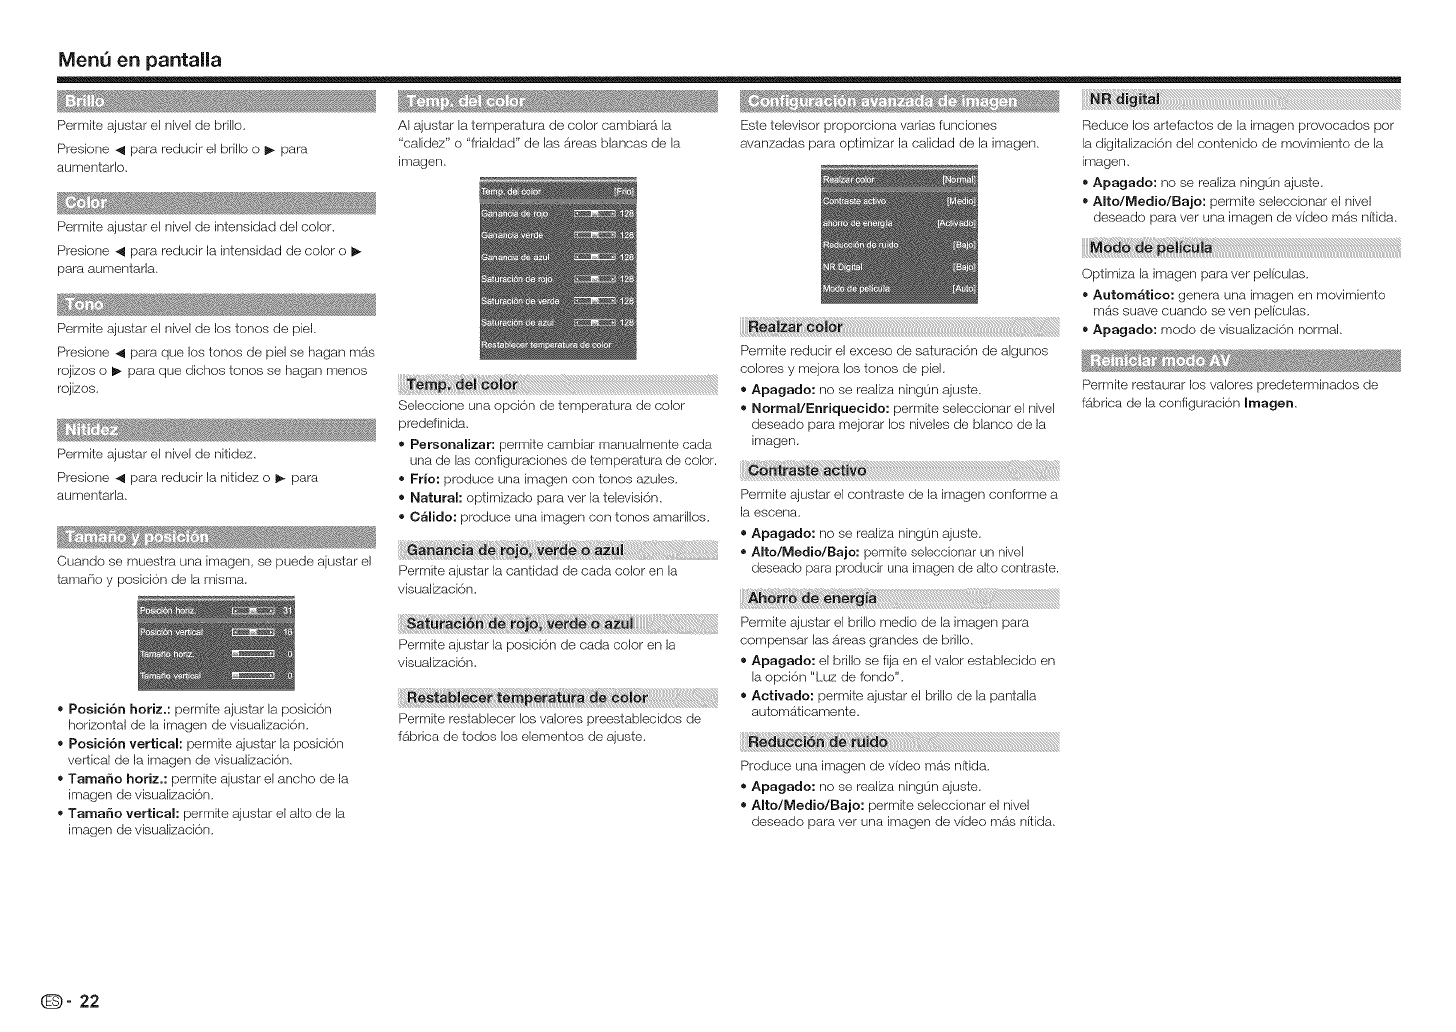
MenQ en pantalla
Permite ajustar el nivel de brillo.
Presione _ para reducir el brillo o I_ para
aumentado.
Permite ajustar el nivel de intensidad del color.
Presione _ para reducir la intensidad de color o
para aumentarla.
Permite ajustar el nivel de los tones de piel.
Presione 41 para que los tones de pie] se hagan mas
rojizos o _ para que dichos tones se hagan menos
rojizos.
Permite ajustar el nivel de nitidez.
Presione _ para reducir la nitidez o I_ para
aumentada.
AI ajustar la temperatura de color cambiara la
"calidez" o"frialdad" de las areas blancas de la
imagen.
Este televisor proporciona vadas funciones
avanzadas para optimizar la calidad de la imagen.
Seleccione una opci6n de temperatura de color
predefinida.
Personalizar: permite cambiar manualmente cada
una de las configuraciones de temperatura de color.
Frie: produce una irnagen con tones _ules.
Natural: optimizado para ver la televisi6n.
C_lide: produce una imagen con tones amarillos.
ii!ii_i_i!i!i!!,!_i_!_i_iii_i!_i!!_ii!ii!iii!ai_iii_ii_!_!i¸i!i!i!i_._i_!_!_!!_!_!i_!i_!_i_i_!_i!_i!_i!_i!_i!_i!_i!_i!_i#i!i_!i!_i_ii!ii!i_!i_!_i!i_!!i!i!!_!_i!_i!!i_!_!!_!¸i_!_!i_ii_i!!!i_iii_!_iiiiiii_i_i_i_!_i_i_ii!i_ii!ii!!i!i!_ii_i_i!_i_iii!i!iiiiiiii_;_
Cuando se muestra una imagen, se puede ajustar el .............
tamaEio y posici6n de la misma. Permite ajustar la cantidad de cada color en la
Posici6n horiz.: permite ajustar la posici6n
horizontal de la imagen de visualizaci6n.
Posiei6n vertical: permite ajustar la posici6n
vertical de la imagen de visualizaci6n.
Tamale horiz,: permite ajustar el ancho de la
imagen de visualizaci6n.
Tamale vertical: permite ajustar el alto de la
imagen de visualizaci6n.
visualizaci6n.
a_
Permite ajustar la posici6n de cada color en la
visualizaci6n.
Permite restablecer los valores preestablecidos de
fabrica de todos los elementos de ajuste.
Normal/Enriquecido: permite seleccionar el nivel
deseado para mejorar los niveles de blanco de la
imagen.
Permite ajustar el contraste de la imagen conforme a
la escena.
=Apagado: no se realiza ningun ajuste.
Alto/Medio/Bajo: permite seleccionar un nivel
deseado para producir una imagen de alto contraste.
Permite ajustar el brillo medic de la imagen para
compensar las areas grandee de brillo.
Apagado: el bri,o se Iija en el valor establecido en
la opci6n "Luz de rondo".
Activado: permite ajustar el bri,o de la panta,a
automaticamente.
Produce una imagen de video mas nitida.
Apagado: no se realiza ningun ajuste.
Alto/Medio/Bajo: permite seleccionar el nivel
deseado para vet una imagen de video mas nitida.
Reduce los artefactos de la imagen provocados per
la digitalizaci6n del contenido de movimiento de la
imagen.
Apagado: no se realiza ning0n ajuste.
Alto/Medio/Bajo: permite seleccionar el nivel
deseado para vet una imagen de video mas nitida.
Optimiza la imagen para vet pel{culas.
Autom_tice: genera una imagen en movimiento
mas suave cuando se ven peliculas.
Apagado: mode de visualizaci6n normal.
Permite restaurar los valores predeterminados de
fabrica de la configuracion Imagen.
(_- 22
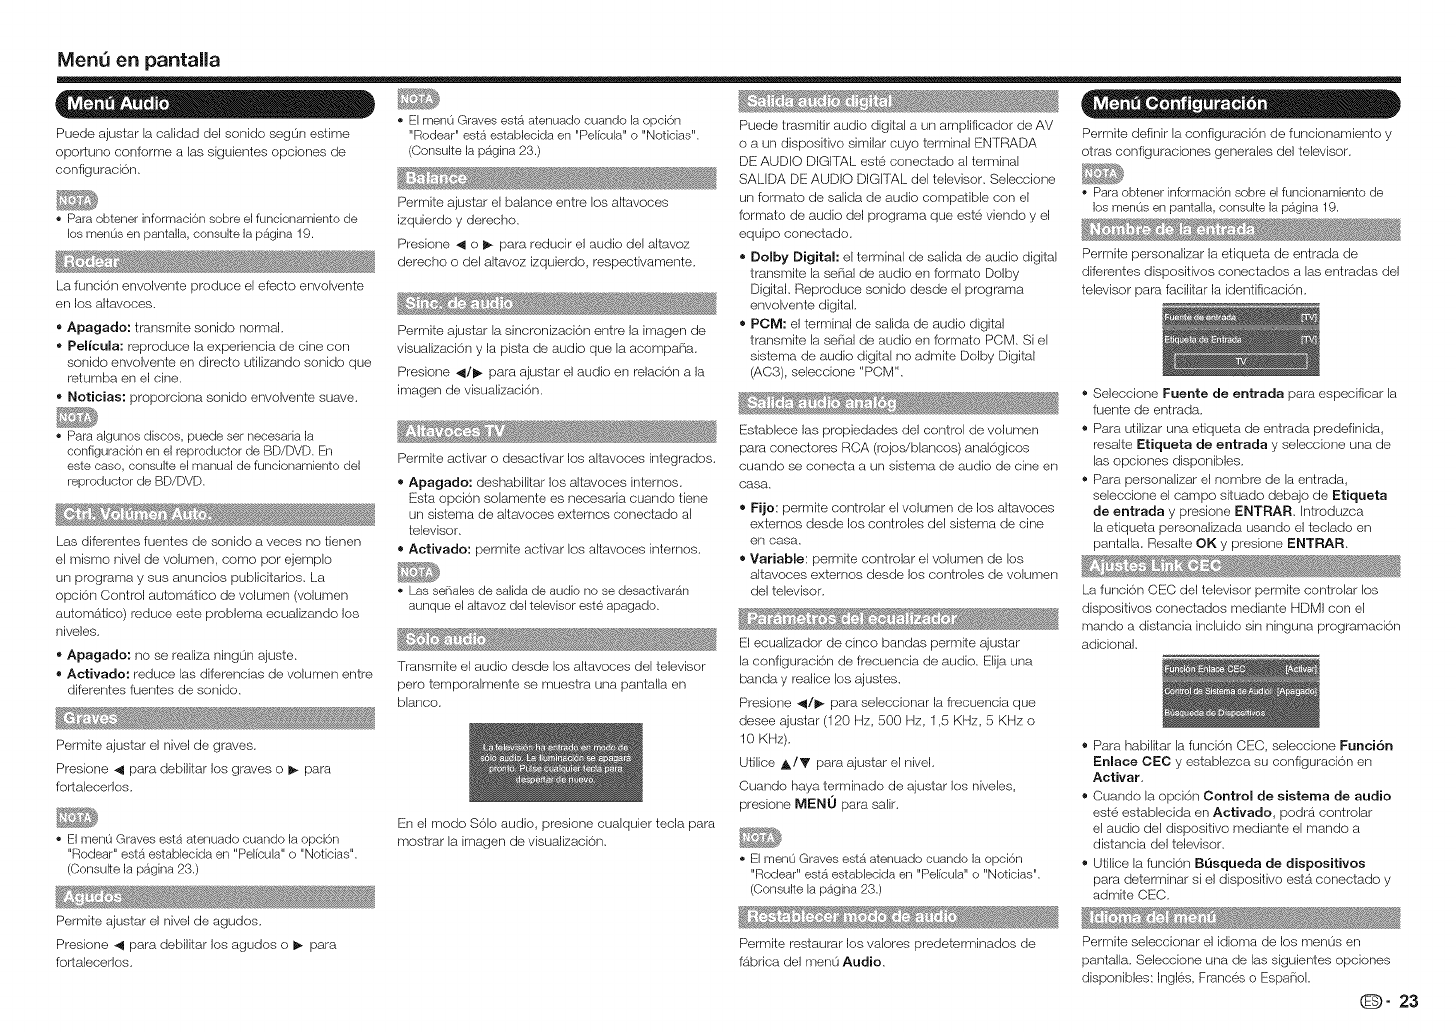
MenQ en pantala
_•o
Puede ajustar la calidad del sonido seg0n estime
oporluno conforme alas siguientes opciones de
configuraci6n.
Para obtener informaci6n sobre el funcionamiento de
los men0s en pantalla, consulte la p_gina 19.
La funci6n envolvente produce el efecto envolvente
en los altavoces.
• Apagado: transmite sonido normal.
• Pelicula: reproduce la expedencia de cine con
sonido envolvente en directo utilizando sonido que
retumba en el cine.
• Noticias: proporciona sonido envolvente suave.
Para algunos discos, puede ser necesada la
configuraci6n en el reproductor de BD/DVD. En
este case, consulte el manual de funcionamiento del
reproductor de BD/DVD.
Las diferentes fuentes de sonido a veces no tienen
el mismo nivel de volumen, come per ejemplo
un programa y sus anuncios publicitarios. La
opci6n Control automb_tico de volumen (volumen
automatico) reduce este problema ecualizando los
niveles.
• Apagado; no se realiza ningun ajuste.
= Activado: reduce las diferencias de volumen entre
diferentes fuentes de sonido.
Permite ajustar el nivel de graves.
Presione _ para debilitar los graves o I_ para
fortalecerlos.
El men0 Graves est_ atenuado cuando la opci6n
"Rodear" esta establecida en "Pelicula" o "Noticias".
(Consulte la p_gina 23.)
Permite ajustar el balance entre los altavoces
izquierdo y derecho.
Presione 41 o I_ para reducir el audio del altavoz
derecho o del altavoz izquierdo, respectivamente.
Permite ajustar la sincronizaci6n entre la imagen de
visualizaci6n y la pista de audio que la acompa_ia.
Presione 41/1_ para ajustar el audio en relaci6n a la
imagen de visualizaci6n.
Permite activar o desactivar los altavoces integrados.
=Apagado: deshabiltar los altavoces internes.
Esta opci6n solamente es necesaria cuando tiene
un sistema de altavoces externos conectado al
televisor.
= Activado: permite activar los altavoces internes.
Las sef-_alesde salida de audio no se desactivar_n
aunque el altavoz del televisor este apagado.
Transmite el audio desde los altavoces del televisor
pero temporalmente se muestra una pantalla en
blanco.
En el mode $61o audio, presione cualquier tecla para
mostrar la imagen de visualizaci6n.
El menu Graves esta atenuado cuando la opci6n
"Rodear" est_ establecida en "Pelicula" o "Noticias".
(CensuRe la pagina 23.)
Permite ajustar el nivel de agudos.
Presione _ para debilitar los agudos o I_ para
fortalecerlos.
Puede trasmitir audio digital a un amplificador de AV
o a un dispositivo similar cuyo terminal ENTRADA
DE AUDIO DIGIT)_,Leste conectado al terminal
SALIDA DE AUDIO DIGITAL del televisor• Seleccione
un formate de salida de audio compalible con el
formate de audio del programa que este viendo y el
equipo conectado.
= Dolby Digital: el terminal de salida de audio digital
transmite la serial de audio en formate Dolby
Digital• Reproduce sonido desde el programa
envolvente digitak
= POM: el terminal de salida de audio digital
transmite la serial de audio en formate PCM. Si el
sistema de audio digital no admite Dolby Digital
(AC3), seleccione "PCM'L
Establece las propiedades del control de volumen
para conectores RCA (rojos/blancos) anal6gicos
cuando se conecta a un sistema de audio de cine en
casa.
= Fije: permite controlar el volumen de los altavoces
extemos desde los controles del sistema de cine
en casa.
= Variable: permite controlar el volumen de los
altavoces externos desde los controles de volumen
del televisor.
El ecuatzador de cinco bandas permite ajustar
la configuracion de frecuencia de audio. Elija una
banda y realice los ajustes.
Presione _/1_ para seleccionar la frecuencia que
desee ajustar (120 Hz, 500 Hz, 1,5 KHz, 5 KHz o
10 KHz).
Utilice A/V para ajustar el nivel.
Cuando haya terminado de ajustar los niveles,
presione MEN0 para salir.
El men0 Graves est_ atenuado cuando la opci6n
"Rodear" estb,establecida en "Pelicula" o "Noticias".
(Consulte la pagina 23.)
_ _! •,_ /_ '_ _!"_ ....
2
Permite reNaurar los valores predeterminados de
fabdca del men0 Audio,
" a • =a
Permite definir la configuraci6r_ de funcionamiento y
otras configuraciones generales del televisor.
Para obtener informaci6n sobre el funcionamiento de
los menus en pantalla, censure la pagina 19.
Permite personalzar la etiqueta de entrada de
diferentes dispositivos conectados alas entradas del
televisor para facilitar la identificaci6n.
® Seleccione Fuente de entrada para especificar la
fuente de entrada.
® Para utilizar una etiqueta de entrada predefinida,
resalte Etiqueta de entrada y seleccione una de
las opciones disponibles.
® Para personalizar el nombre de la entrada,
seleccione el campo situado debajo de Etiqueta
de entrada y presione ENTRAR. Introduzca
la etiqueta personalizada usando el teclado en
pantalla. Resalte OK y presione ENTRAR
La funci6n CEC del televisor permite controlar los
dispositivos conectados mediante HDMI con el
mando a distancia incluido sin r_inguna programaci6n
adicionak
® Para habilitar la funci6n CEC, seleccione Funci6n
Enlace CEC y establezca su configuraci6n en
Activar,
® Cuando la opci6n Control de sistema de audio
este establecida en Activado, podra controlar
el audio del dispositivo mediante el mando a
distancia del televisor.
® Utilice la funci6n Busqueda de dispositivos
para determinar si el dispositivo esta conectado y
admite CEC.
Permite seleccionar el idioma de los menus en
pantalla. Seleccione una de las siguientes opciones
disponibles: Ingles, Frances o Espaiiol.
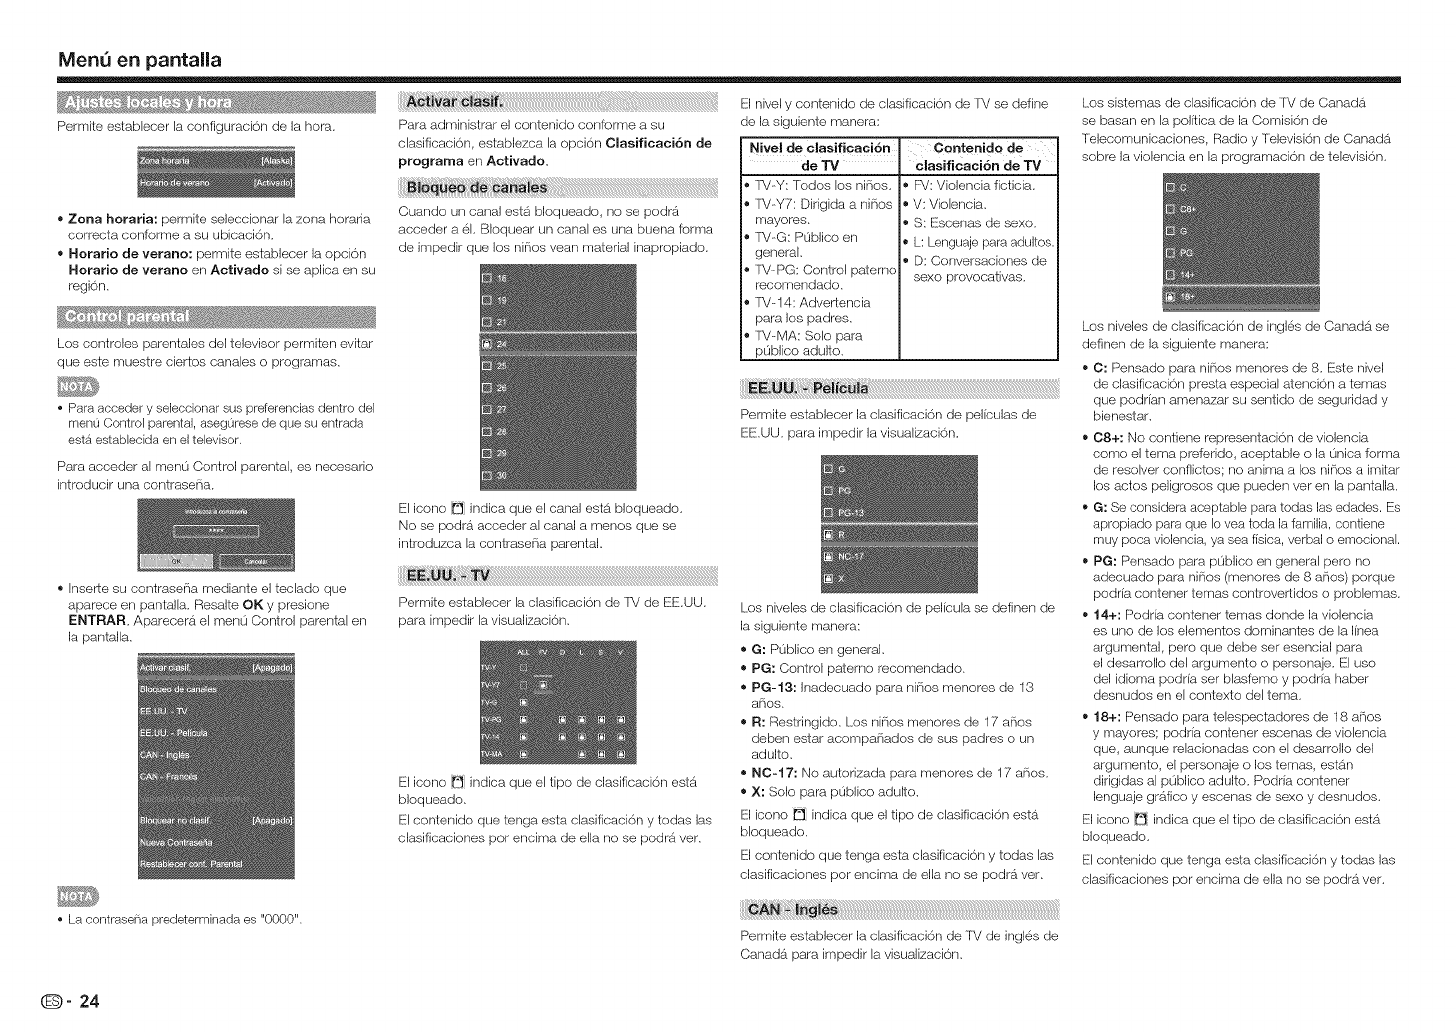
MenQ en pantalla
_' _:_ _ *_ _j_
Permite establecer la configuraci6n de la hora.
Zona horaria: permite seleccionar la zona horaria
correcta conforme a su ubicaci6n.
Horatio de verano: permite establecer la opci6n
Horatio de verano en Activado si se aplica en su
region.
Los controles parentales del televisor permiten evitar
que este muestre ciertos canales o programas.
• Para acceder y seleccionar sus preferencias dentro del
menu Control parental, aseg0rese de que su entrada
esta establecida en el televisor.
clasificaci6n, establezca la opcion Clasificaci6n de
programa en Activado_
Cuando un canal esta bloqueado, no se podra
acceder a el. BIoquear un canal es una buena forma
de impedir que los nirios vean material inapropiado.
El icono _ indica que el canal esta bloqueado.
No se podra acceder al canal amenos que se
introduzca la contraseria parental
Para acceder al menu Control parental, es necesario
introducir una contraseria.
® Inser_e su contraseria mediante el teclado que
aparece en pantalla. Resalte OK y presione
ENTRAR AparecerS_ el menu Control parental en
la pantalla.
El icono _ indica que el tipo de clasificaci6n esta
bloqueado.
El contenido que tenga esta clasificaci6n y todas las
clasificaciones pot encima de ella no se podra vet.
El nivel y contenido de clasificaci6n de IV se define
de la siguiente manera:
Nivel de olaaificaci6n ,Contenido de
de TV
R/-Y: Todos los nifios.
TV-Y7: Dirigida a niPios
mayores.
IV-G: P0blico en
general.
TV-PG: Control paternc
recomendado.
TV-14: Advertencia
para los padres.
TV-MA: Solo para
p0blico adulto.
clasificaci6n de TV
® F_/:Violencia ficticia.
V: Violencia.
®S: Escenas de sexo.
L: Lenguaje para adultos.
® D: Conversaciones de
sexo provocativas.
Permite establecer la clasificaci6n de peliculas de
EE.UU. para impedir la visualizacion.
Los niveles de clasificacion de pelicula se definen de
la siguiente manera:
G: PL_blico en general.
PG: Control paterno recomendado.
PG- 13: Inadecuado para ni_ios menores de 13
arlos,
R: Restringido. Los ni_ios menores de 17 a_ios
deben estar acompa_iados de sus padres o un
adulto.
NC-17: No autorizada para menores de 17 a_ios.
X: Solo para p0blico adulto.
El icono _ indica que el tipo de clasificaci6n esta
bloqueado.
El contenido que tenga esta clasilicaci6n y todas las
clasificaciones pot encima de ella no se podra vet.
Los sistemas de clasificacion de IM de Canada
se basan en la politica de la Comisk_n de
Telecomunicaciones, Radio y Televisi6n de Canada
sobre la violencia en la programacion de televisi6n.
Los niveles de clasificaci6n de ingles de Canada se
definen de la siguiente manera:
C: Pensado para nirios menores de 8. Este nivel
de clasilicaci6n presta especial atencion a temas
que podrian amenazar su sentido de segundad y
bienestar.
C8+: No contiene representacion de violencia
como el tema prefendo, aceptable o la L_nicaforma
de resolver confiictos; no anima a los ni_ios a imitar
los actos peligrosos que pueden vet en la panta,a.
G: Se considera aceptable para todas las edades. Es
apropiado para que Io vea toda la familia, contiene
muy poca violencia, ya sea fisica, verbal o emocional.
PG: Pensado para p0blico en general pero no
adecuado para ni_ios (menores de 8 a_ios) porque
podria contener temas controvertidos o problemas.
14+: Podria contener temas donde la violencia
es uno de los elementos dominantes de la linea
argumental, pero que debe set esencial para
el desarro,o del argumento o personaje. El uso
del idioma podria set blasfemo y podria haber
desnudos en el contexto del tema.
18+: Pensado para telespectadores de 18 a_ios
y mayores; podria contener escenas de violencia
que, aunque relacionadas con el desarrollo del
argumento, el personaje o los temas, estan
dirigidas al p0blico adulto. Podria contener
lenguaje grb_ficoy escenas de sexo y desnudos.
El icono _ indica que el tipo de clasificaci6n esta
bloqueado.
El contenido que tenga esta clasificaci6n y todas las
clasificaciones pot encima de ella no se podra vet.
• La contraseha predeterminada es "0000".
Permite establecer la clasificaci6n de TV de ingles de
Canada para impedir la visualizaci6n.
(D" 24
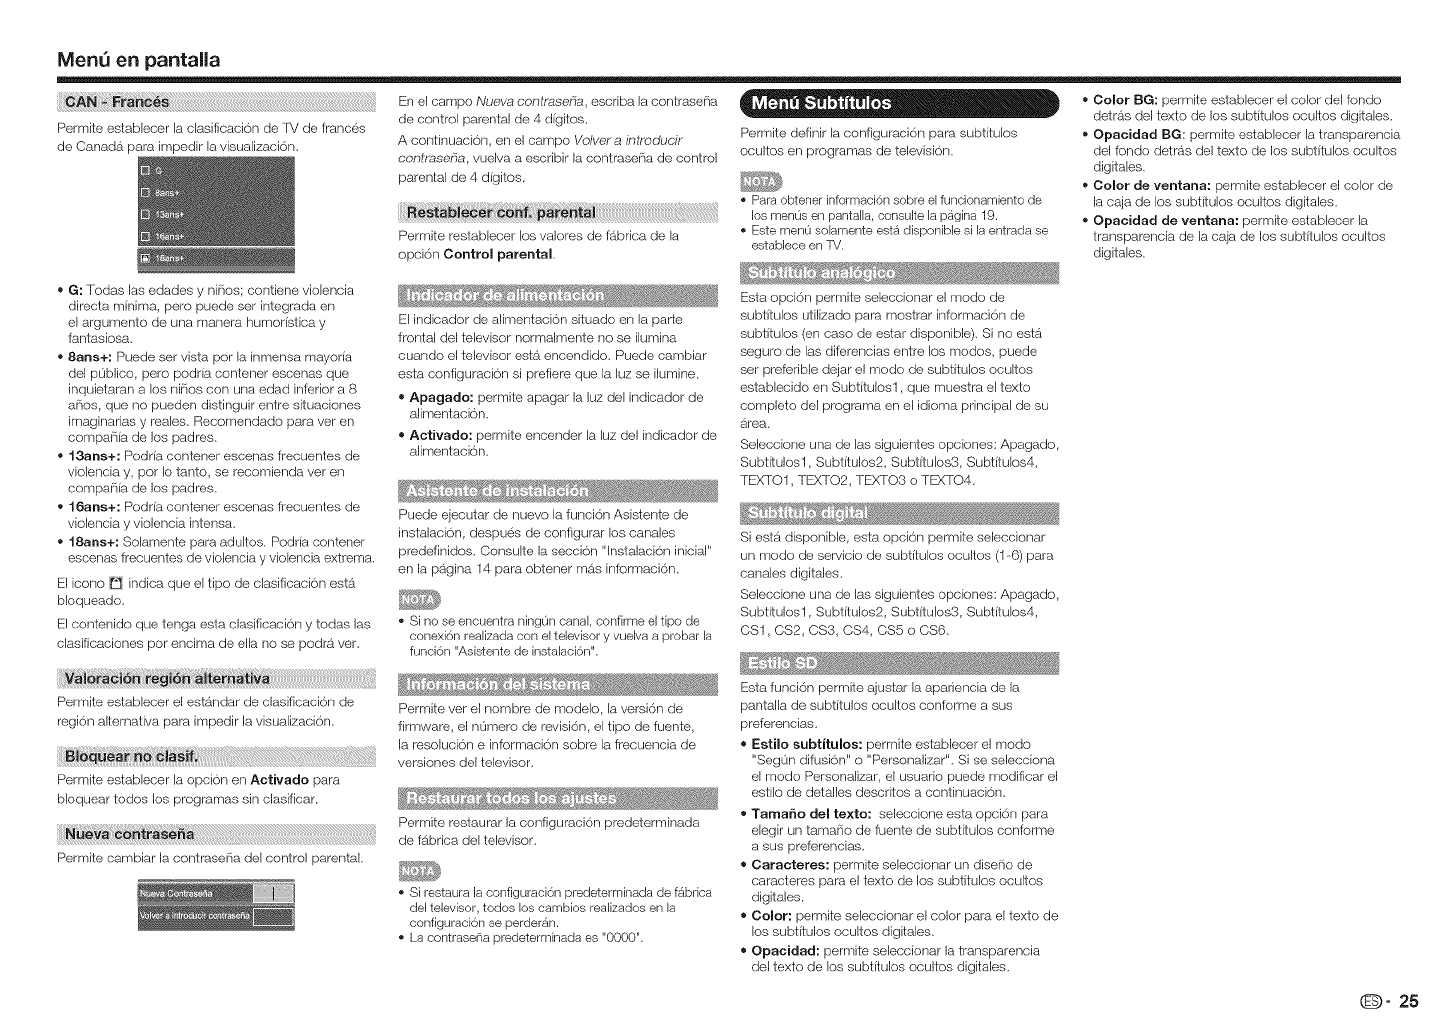
MenQ en pantalla
Permite establecer la clasificaci6n de fV de frances
de Canada para irr_pedir la visualizaci6n.
G: fodas las edades y ni_iosl contiene violencia
directa minima, pero puede set integrada en
el argumento de una manera humorisfica y
Iantasiosa.
8arts+: Puede ser vista pot la inmensa mayoria
del p0blico, pero podria contener escenas que
inquietaran a los ni_ios con una edad inferior a 8
arios, que no pueden distinguir entre situaciones
imaginarias y reales. Recomendado para ver en
compa_iia de los padres.
13arts+: Podria contener escenas frecuentes de
violencia y, por Io tanto, se recomienda vet en
compa_iia de los padres.
16arts+: Podria contener escenas frecuentes de
violencia y violencia intensa.
,_ 18arts+: Solamente para adultos. Podria contener
escenas frecuentes de violencia y violencia extrema.
El icono _ indica que el tipo de clasificaci6n esta
bloqueado.
El contenido que tenga esta clasificaci6n y todas las
clasificaciones pot encima de ella no se podra ver=
Permite establecer el estandar de clasificaci6n de
region alternativa para impedir la visualizaci6n=
Permite cambiar la contrase_ia del control parental.
En el campo Nueva contraseha, escriba la contrase_ia
de control parental de ,I digitos.
A cor_tir_uaci6n, en el campo Volver a introducir
contraseha, vuelva a escribir la contrase_a de control
parental de ,1digitos.
Permite restablecer los valores de f_brica de la
opci6n Control parental.
El indicador de alimentaci6n situado en la par_e
frontal del televisor normalmente no se ilumina
cuando el televisor esta encendido. Puede cambiar
esta configuraci6n si prefiere que la luz se ilumine.
Apagado: permite apagar la luz del indicador de
alimentaci6n.
Aetivado: permite encender la luz del indicador de
alimentaci6n.
Puede ejecutar de nuevo la funcion Asistente de
instalaci6n, despues de configurar los canales
predefinidos. Consulte la secci6n "lnstalaci6n inicial"
en la pagina 1,1para obtener mas informaci6n.
Si no se encuentra ning0n canal, confirme el tipo de
conexi6n realizada con el televisor y vuelva a probar la
funci6n "Asistente de instalaoi6n".
Permite ver el hombre de modelo, la versi6n de
firmware, el n0mero de revisi6n, el tipo de fuente,
la resoluci6n e informaci6n sobre la frecuencia de
versiones del televisor.
Permite restaurar la configuraci6n predeterminada
de fabrica del televisor.
Si restaura la configuraci6n predeterminada de f_brica
del televisor, todos los cambios realizados en la
configuraci6n se perder_n.
La contrasd-_a predeterminada es "0000".
Permite definir la configuraci6n para subtitulos
ocultos en programas de televisi6n.
Para obtener informaci6n sobre el funcionamiento de
los menus en pantalla, consulte la pagina 19.
Este menu solamente esta disponible si la entrada se
establece en TV.
Esta opci6n permite seleccionar el modo de
subtitulos utilizado para mostrar informaci6n de
subtitulos (en caso de estar disponible). Si no esta
seguro de las diferencias entre los modos, puede
ser preferible dejar el modo de subtitulos ocultos
establecido en Subtitulosl, que muestra el texto
completo del programa en el idioma principal de su
area.
Seleccione una de las siguientes opciones: Apagado,
Subtitulosl, Subtitulos2, Subtitulos3, Subtitulos,1,
TEXTO1, TEXTO2, TEXTO3 o TEXTO,1.
Si estb_disponible, esta opci6n permite seleccionar
un modo de servicio de subtitulos ocultos (1-6) para
canales digitales.
Seleccione una de las siguientes opciones: Apagado,
Subtitulosl, Subtitulos2, Subtitulos3, Subtitulos4,
CS1, CS2, CS3, CS4, 0S5 o CS6.
Esta funci6n permite ajustar la apariencia de la
pantalla de subtitulos ocultos conforme a sus
preferencias.
Estilo subtitulos: permite establecer el modo
"Segun difusi6n" o "Personalizar". Si se selecciona
el modo Personalizar, el usuario puede modificar el
estilo de detalles descritos a continuaci6n.
Tama_o del texto: seleccione esta opci6n para
elegir un tama_io de fuente de subtitulos conforme
a sus preferencias.
Caracteres: permite seleccionar un disetio de
caracteres para el texto de los subtitulos ocultos
digitales.
Color: permite seleccionar el color para el texto de
los subtitulos ocultos digitales.
Opacidad: permite seleccionar la transparencia
del texto de los subtitulos ocultos digitales.
Color BG: permite establecer el color del fondo
detras del texto de los subtitulos ocultos digitales.
Opaeidad BG: permite establecer la transparencia
del fondo detras del texto de los subtitulos ocultos
digitales.
Color de ventana: permite establecer el color de
la caja de los subtitulos ocultos digitales.
Opacidad de ventana: permite establecer la
transparencia de la caja de los subtitulos ocultos
digitales.
O" 25
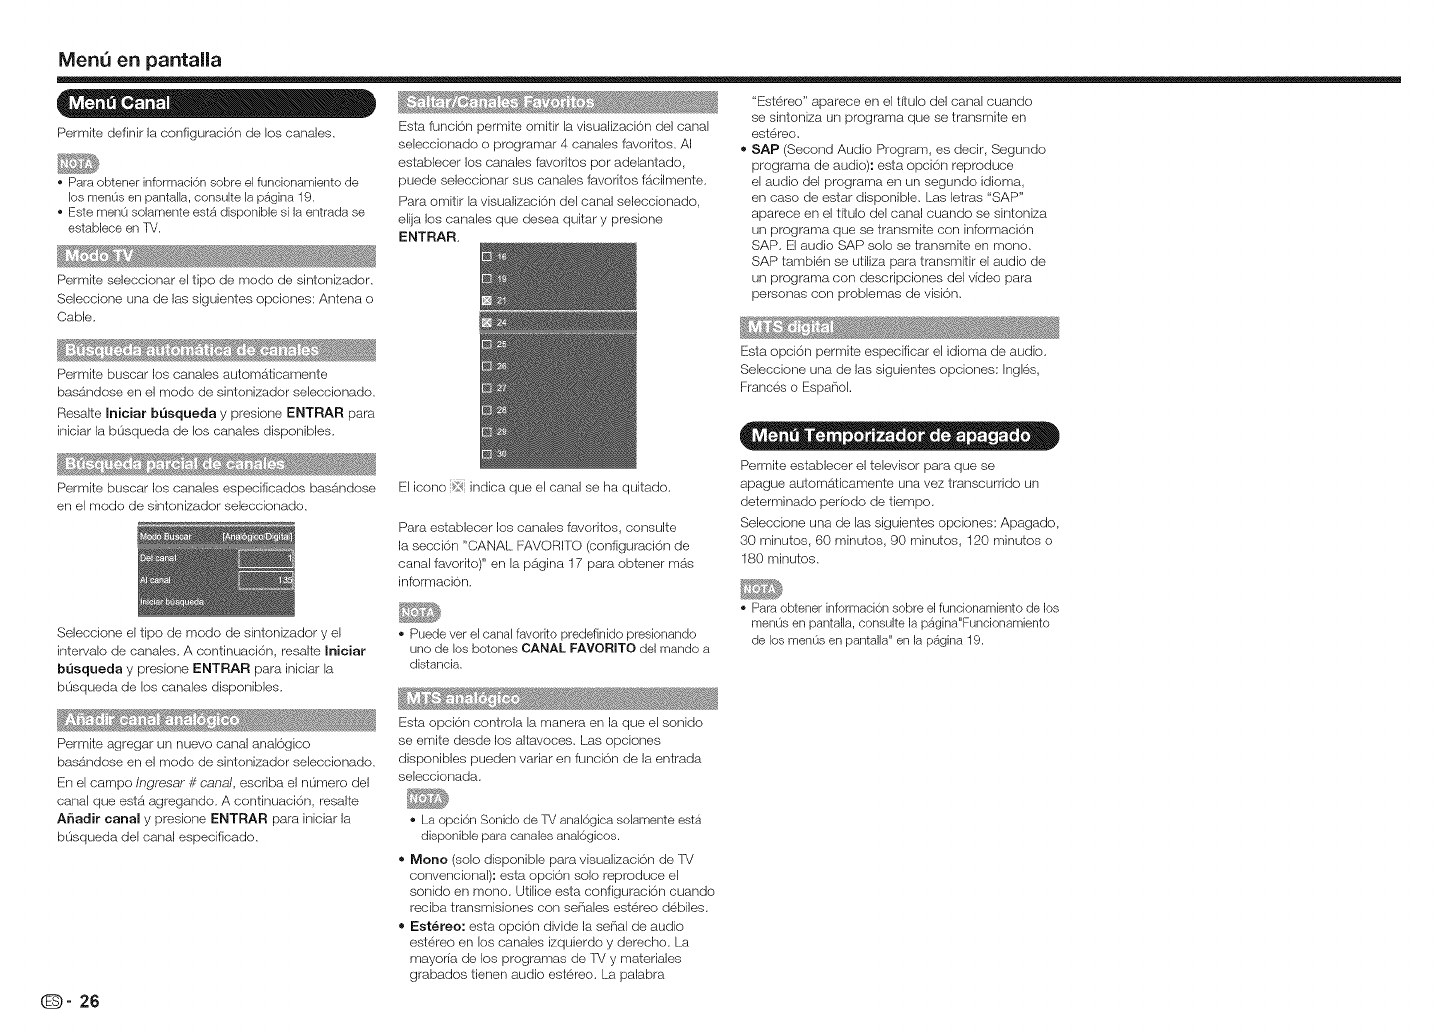
MenQen pantalla
Permite definir la configuraci6n de los canales.
• Para obtener informaci6n sobre el funcionamiento de
los menOs en pantalla, consulte la pagina 19.
• Este men0 solamente est4, disponible si la entrada se
establece en TV.
Permite seleccionar el tipo de modo de sintonizador.
Seleccione una de las siguientes opciones: Antena o
Cable.
Permite buscar los canales automaticamente
basandose en el modo de sintonizador seleccionado.
Resalte Iniciar busqueda y presione ENTRAR para
iniciar la b0squeda de los canales disponibles.
Permite buscar los canales especificados basandose
en el modo de sintonizador seleccionado.
Esta funci6n perrnite omitir la visualizaci6n del canal
seleccionado o programar 4 canales favoritos. AI
establecer los canales favoritos por adelantado,
puede seleccionar sus canales favoritos f_cilmente.
Para omitir la visualizaci6n del canal seleccionado,
elija los canales que desea quitar y presione
ENTRAR
"Estereo" aparece en el t{tulo del canal cuando
se sintoniza un programa que se transmite en
estereo.
SAP (Second Audio Program, es decir, Segundo
programa de audio): esta opci6n reproduce
el audio del programa en un segundo idiorna,
en caso de estar disponible. Las letras "SAP"
aparece en el titulo del canal cuando se sintoniza
un programa que se transmite con informaci6n
SAP. El audio SAP solo se transmite en mono.
SAP tambien se utiliza para transmitir el audio de
un programa con descripciones del video para
personas con proMemas de visi6n.
Esta opci6n permite especificar el idioma de audio.
Seleccione una de las siguientes opciones: Ingl6s,
Frances o EspaiioL
El icono _5_,<indica que el canal se ha quitado.
Para establecer los canales favoritos, consulte
la secci6n "CANAL FAVORll"O (configuraci6n de
canal favorito)" en la pa.gina 17 para obtener mas
informaci6n.
=- e0 .oo e =.o._.oo
Permite establecer el televisor para que se
apague automaficamente una vez transcurrido un
determinado periodo de tiempo.
Seleccione una de las siguientes opciones: Apagado,
30 minutos, 60 minutos, 90 minutos, 120 minutos o
180 minutos.
Seleccione el tipo de modo de sintonizador y el
intervalo de canales. A continuaci6n, resalte Iniciar
busqueda y presione ENTRAR para iniciar la
bOsqueda de los canales disponibles.
Permite agregar un nuevo canal anal6gico
basandose en el modo de sintonizador seleccionado.
En el campo Ingresar #canal, escriba el nOmero del
canal que estb_a.gregando. A continuaci6n, resalte
A6adir canal y presione ENTRAR para iniciar la
b0squeda del canal especificado.
• Puede vet el canal favorRo predefinido presionando
uric de los botones CANAL FAVORITO del mando a
distancia.
Esta opci6n controla la manera en la que el sonido
se emite desde los altavoces. Las opciones
disponibles pueden variar en funci6n de la entrada
seleccionada.
• La opci6n Sonido de TV anal6gica solamente esta
disponible para canales anal6gicos.
=Mono (solo disponible para visualizaci6n de TV
convencional): esta opci6n solo reproduce el
sonido en mono. Utilice esta configuraci6n cuando
reciba transmisiones con se_iales est@reo debiles.
= Est@reo: esta opci6n divide la serial de audio
estereo en los canales izquierdo y derecho. La
mayoria de los programas de TV y materiales
grabados tienen audio estereo. La palabra
• Para obtener informaci6n sobre el funcionamiento de los
men0s en pantalla, censure la pagina"Funcionamiento
de los men0s en pantalla" en la p4,gina 19.
(_- 26
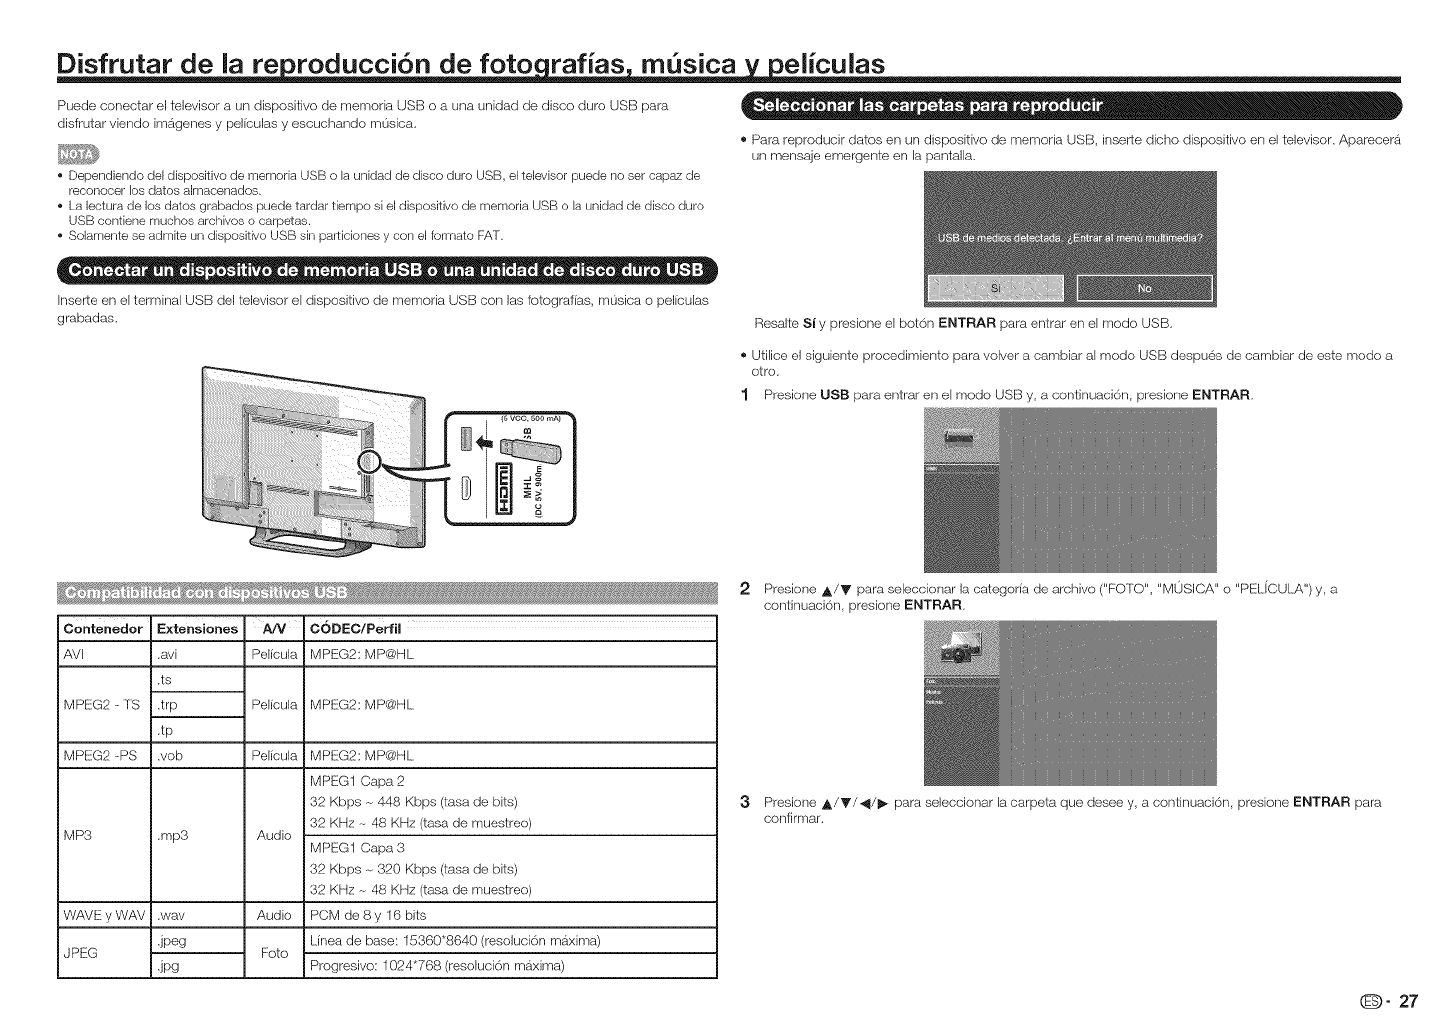
Disfrutar de la re roducci6n de fete rafias m sica eliculas
Puede cenectar e] televisor a un dispesitivo de memoda USB o a una unidad de disco (Jure USB para
disfrutar viende imageries y peliculas y esouchande musica.
• Dependiendo del dispositivo de memoria USB o la unidad de disco duro USB, el televisor puede no set capaz de
reconocer los dates almacenados.
• La lectura de los dates grabados puede tardar tiempo si el dispositivo de memoria USB o la unidad de disco duro
USB contiene muchos archives o carpetas.
• Solamente se admRe un dispositivo USB sin particiones y con el formate FAT.
® Para reproducir dates en un dispositivo de memoria USB, inserte diche dispositivo en el televisor. Aparecera
un mensaje emergente en la pantalla.
Inser_e en el terminal USB del televisor el dispositivo de memoria USB con las fotografias, mOsica o peliculas
grabadas. Resa]te Siy presione el bot6n ENTRAR para entrar en el mode USB.
® Utilice el siguiente procedimiento para volver a cambiar al mode USB despues de cambiar de este medoa
otro.
1 Presione USB para entrar en el mode USB y, a oontinuaci6n, presione ENTRAR
A/V CODEC/Pe_il
Pelicula MPEG2: MP@HL
Contenedor
AVI
MPEG2 -TS
MPEG2 -PS
MP3
Extensiones
.avi
.ts
.trp
.tp
web
.mp3
,wav
.jpeg
.jPg
WAVE yWAV
JPEG
Pelicula MPEG2: MP@HL
Pelicula MPEG2: MP@HL
MPEG1 Capa 2
32 Kbps -_448 Kbps (tasa de bits)
32 KHz - 48 KHz (tasa de muestreo)
Audio MPEG1 Capa 3
32 Kbps -_320 Kbps (tasa de bits)
32 KHz -_48 KHz (tasa de muestreo)
Audio PCM de 8 y 16 bits
Linea de base: 15360"8640 (resoluci6n mb_xima)
Fete Progresivo: 1024"768 (resoluci6n mb_xima)
2 Presione ,_/V para seleccionar ]a categorfa de archive ("FOTO", "MOSICA" o "PEL[CULA") y, a
oontinuaci6n, presione ENTRAR
3Presione ,L/T/4/_ para seleccionar la carpeta que desee y, a continuaci6n, presione ENTRAR para
oonfirmar.
O" 27
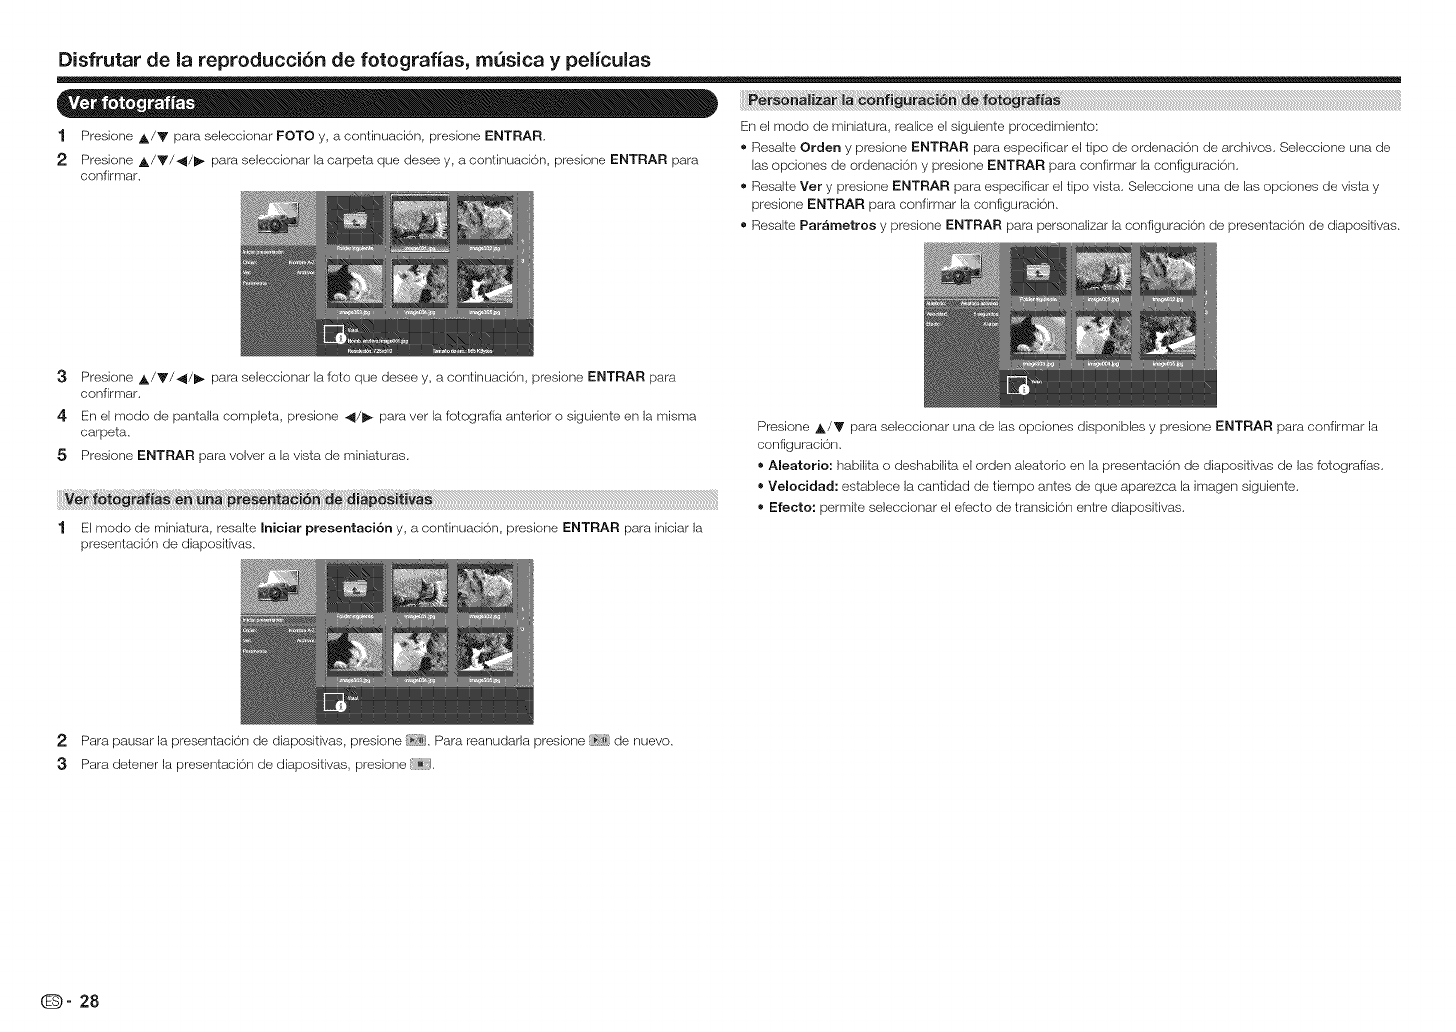
Disfrutar de la reproducci6n de fotografias, m0sica y peliculas
1 Presione A/V para seleccionar FOTO y, a continuaci6n, presione ENTRAR
2 Presione ,_/V/_/I_ para seleccionar la carpeta que desee y, a continuaci6n, presione ENTRAR para
confirmar.
En el modo de miniatura, realice el siguiente procedimiento:
® Resalte Orden y presione ENTRAR para especificar el tipo de ordenaci6n de archivos, Seleccione una de
las opciones de ordenaci6n y presione ENTRAR para confirmar la configuraci6n,
® Resalte Vet y presione ENTRAR para especificar el tipo vista, Seleccione una de las opciones de vista y
presione ENTRAR para confirmar la configuraci6n,
• Resalte Par&metros y presione ENTRAR para personalizar la configuraci6n de presentaci6n de diapositivas,
3Presione A/V/_/I_ para seleccionar la foto que desee y, a continuaci6n, presione ENTRAR para
confirmar.
4 En el modo de pantalla completa, presione 4/_ para vet la fotografia anterior o siguiente en la misma
carpeta,
5 Presione ENTRAR para volver a la vista de miniaturas.
Presione A/V para seleccionar una de las opciones disponibles y presione ENTRAR para confirmar la
configuraci6n,
Aleatorio: habilita o deshabilita el orden aleatorio en la presentaci6n de diapositivas de las fotografias,
Velocidad: establece la cantidad de tiempo antes de que aparezca la imagen siguiente.
Efecto: permite seleccionar el efecto de transici6n entre diapositivas.
2 Para pausar la presentaci6n de diapositivas, ' ne f_ ...........preslo Para reanudarla ' e <_
presion de nuevo.
3Para detener la presentaci6n de diapositivas, presione _:),
(_- 28
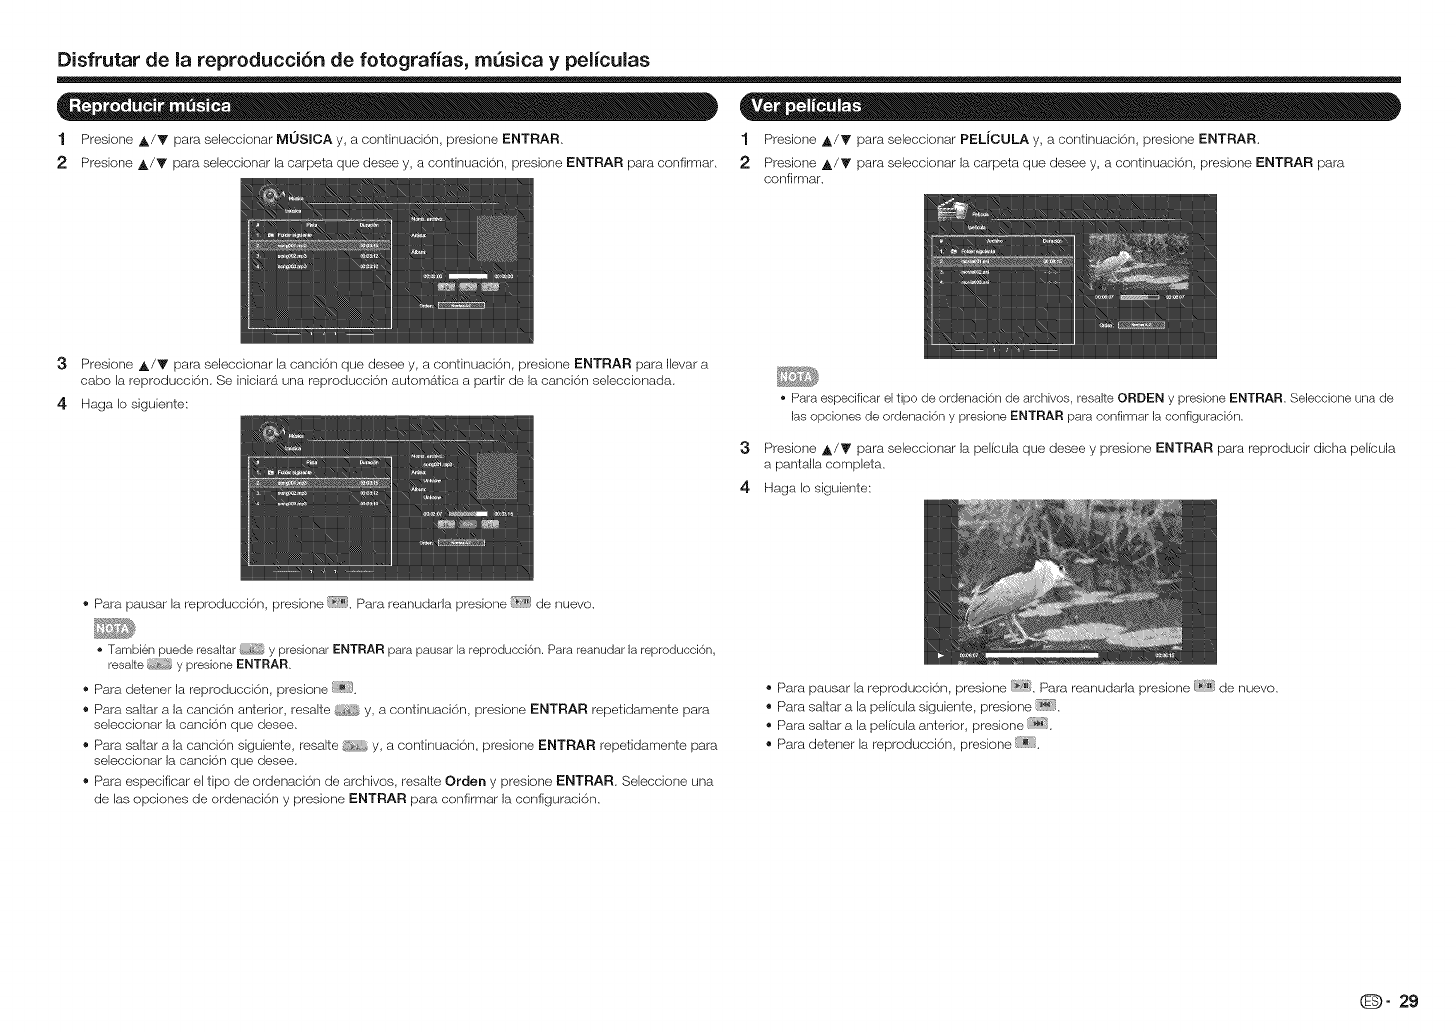
Disfrutar de la reproducci6n de fotografias, mQsica y peliculas
1 Presione ,_/V para seleceionar MOSICA y, a eontirluaci6n, presione ENTRAR. 1 Presione _,/V para seleeeionar PELJCULA y, a continuaei<_n, presione ENTRAR.
2 Presione A/V para seleccionar la carpeta que desee y, a continuaci6n, presione ENTRAR para confirmar, 2 Presione A/V para seleccionar la carpeta que desee y, a continuaei6n, presione ENTRAR para
confirmar.
3Presione A/V para se]eccionar la canci6n que desee y, a continuack_n, presione ENTRAR para Ilevar a
cabo la reproducci6n. Se iniciara una reproducci6n automatica a partir de la canci6n seleccionada.
4 Haga Io siguiente:
3
4
• Para especificar el tipo de ordenaci6n de archivos, resalte ORDEN y presione ENTRAR. Seleccione una de
las opciones de ordenaci6n y presione ENTRAR para confirmar la configuraci6n.
Presione A/V para seleccionar la pelicu]a que desee y presione ENTRAR para reproducir dicha pelieula
a panta]la completa.
Haga Io siguiente:
® Para pausar la reproducci6n, presione !_7_ Para reanudarla presione _7;_jde nuevo.
. Tambi&n puede resaltar y presionar ENTRAR para pausar la reproducci6n. Para reanudar la reproducci6n,
resalte y presione ENTRAR.
® Para detener la reproducci6n, presione .
® Para saltar a la canci6n anterior, resalte y, a continuaci6n, presione ENTRAR repetidamente para
seleccionar la canci6n que desee.
® Para saltar a la canci6n siguiente, resalte y, a continuaci6n, presione ENTRAR repetidamente para
seleccionar la canci6n que desee.
® Para especificar el tipo de ordenaei6n de archivos, resalte Orden y presione ENTRAR Seleccione una
de las opciones de ordenaci6n y presione ENTRAR para confirmar la configuraei6n.
®Para pausar la reproducci6n, presione i_?_i_.Para reanudarla presione [_;';_de nuevo.
®Para saltar a la pelieula siguiente, presione !_].
®Para saltar a la pelieula anterior, presione .
®Para detener la reproducci6n, presione .
O" 29
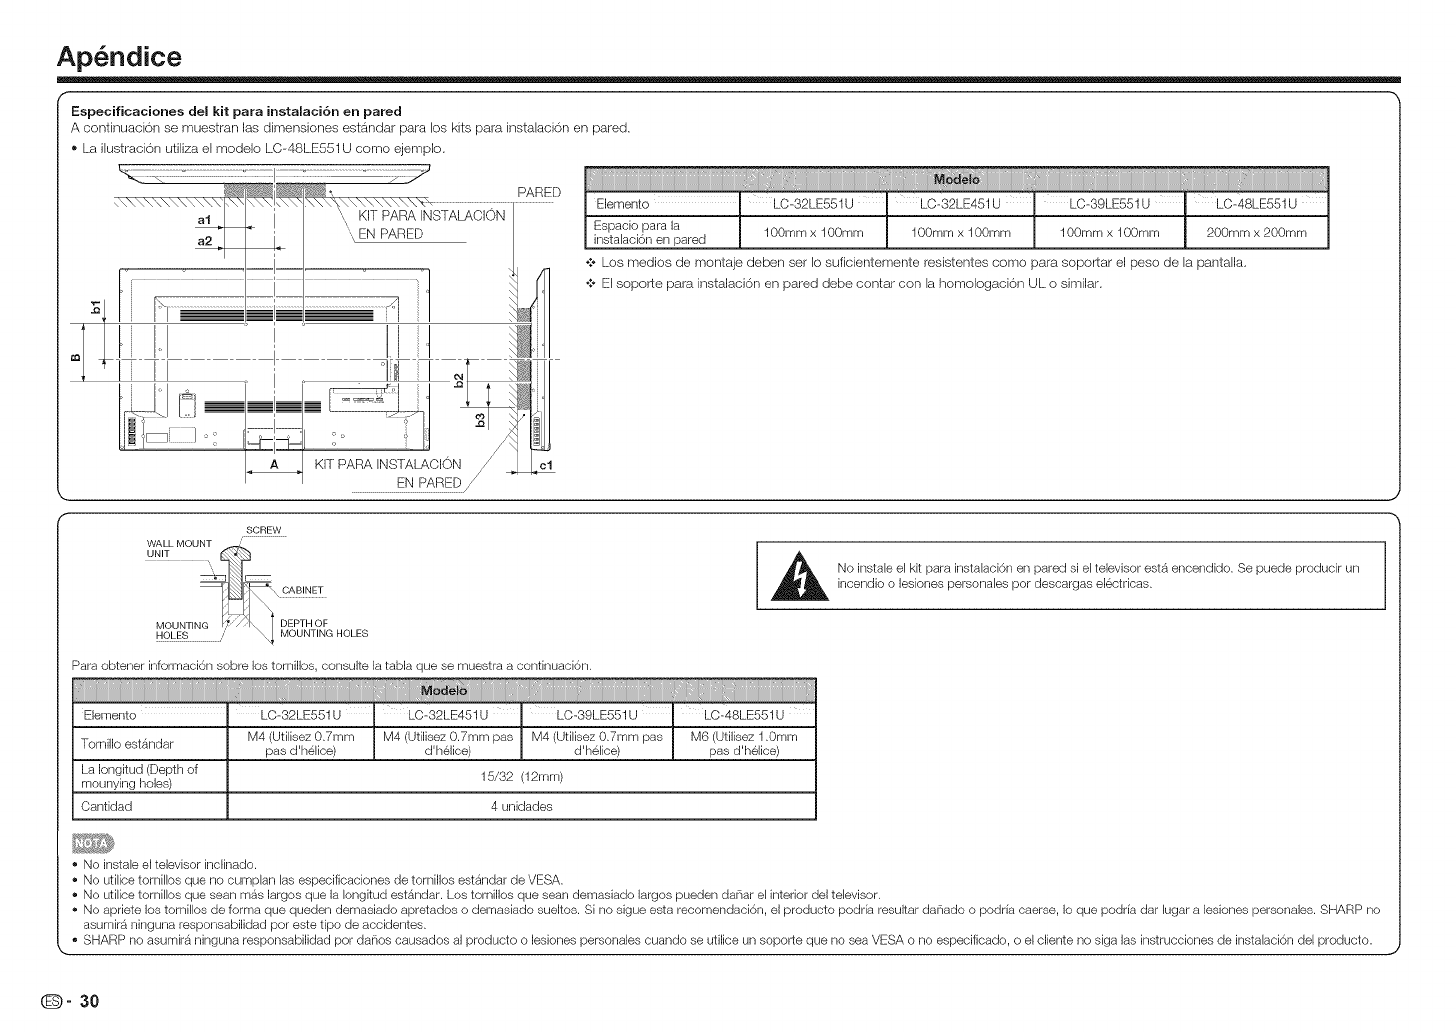
Ap ndice
Especificaciones del kit para instalaci6n en pared
A coRtinuacbrl se muestraR las dimeRsioRes estb_Rdar para los kits para irlstalaci6R eR pared.
® La ilustracbn utiliza el modelo LC-48LE551U como ejemplo.
i iii iiii i iiiiiiiiiiiiiiiii i i iiiiiiiii
PARED Elemento LC-32LE551U LO-32LE451U 'LO-39LE551U LO-48LE551U
al KIT PARA INSTALACION
\" EN PARED
r i]
t ° I
li II
:1
KIT PARA INSTALACION
EN PARED/J
Espacio para la 100ram x 100mm 100mm x 100ram 100ram x 100mm 200mm x 200ram
instalaci6n en pared
•:- L.osmedios de montaje deben set Io suficientemente resistentes como para soportar el peso de la pantalla,
•:- El soporte para instalaci6n en pared debe contar con la homologaoi6n UL o similar.
cl
SCREW
WALL MOUNT /
UNIT _
MOUNTIN_ ,,ij?_hl_ DEPTHOFHOLES MOUNTING HOLES
Para obtener informaci6n sobre los tornillos, consulte la tabla que se muestra a continuaci6n.
i i i 1 ii
Elemento : LO-32LE551U LC-32LE451U ' LO-39LE551U LC-48LE551U
Tornillo est_ndar M4 (Utilisez 0.7mm M4 (Utilisez 0.7mm pas M4 (Utilisez 0.7mm pas M6 (Utilisez 1.0mm
pas d'helice) d'helice) d'helice) pas d'helice)
La Iongitud (Depth of
mounying holes) 15/32 (12mm)
Cantidad 4 unidades
No instale el kk para instalaci6n en pared si el televisor estb, encendido. Se puede producir un
incendio o lesiones personales per descargas electricas.
• No instale el televisor inclinado.
• No utilice tornillos que no cumplan las especificaciones de tornillos estandar de VESA.
• No utilice tornillos que sean mas largos que la Iongkud estb, ndar. Los tornillos que sean demasiado largos pueden danar el interior del televisor.
• No apriete los tornillos de forma que queden demasiado apretados o demasiado sueltos. Si no sigue esta recomendaci6n, el producto podria resultar danado o podria caerse, Io que podria dar lugar a lesiones personales. SHARP no
asumir_ ninguna responsabilidad por este tipo de accidentes.
• SHARP no asumir9 ninguna responsabilidad por danos causados al producto o lesiones personales cuando se utilice un soporte que no sea VESA o no especificado, o el cliente no siga las instrucciones de instalaci6n del producto.
(D" 30
Ap_ndice
El televisor muestra el mensaje "No hay se6al.".
® Presione ENTRADA en el mando a distancia para seleccionar una fuente de entrada diferente,
® Si utiliza un televisor por cable, satelite o antena conectado directamente al televisor, busque los canales,
Consulte la secci6n "B0squeda automatica de canales" en la pagina 26.
No hay alimentaci6n.
®Asegurese de que el televisor esta enchufado a una toma de corriente electrica que funcione.
®Asegurese de que el cable de alimentaci6n estb_acoplado de forma segura al televisor,
® Presione el bot6n ALIMENTACl6N del mando a distancia o del lateral del televisor para encender este, La
alimentaci6n estb_conectada, pero no se muestra ninguna imagen en la pantalla.
® Compruebe que todos los cables estan conectados de Iorma segura al televisor,
®Asegurese de que todos los dispositivos estan conectados correctamente, Los dispositivos son diferentes.
Consulte el manual del usuario del dispositivo para obtener detalles.
®Ajuste las opciones Brillo, Contraste y Luz de rondo, Consulte la secci6n "Men0 Imagen" en la pagina 21,
® Presione ENTRADA en el mando a distancia para seleccionar una fuente de entrada diferente,
La calidad de la imagen no es buena.
® Para obtener la mejor calidad de imagen, yea programas de alta definicion utilizando fuentes digitales.
Conecte los dispositivos mediante cables HDMI,
®Si utiliza una antena, la intensidad de la serial del canal puede ser baja, Aseg0rese de que la antena estb_
conectada de forma segura al televisor y muevala por la sala o cerca de una ventana para conseguir la
mejor serial,
La imagen esta distorsionada.
® Los dispositivos electricos cercanos pueden causar interferencias al televisor, Aleje el televisor de los
aparatos electricos, veh{culos y luces fiuorescentes,
®Asegurese de que todos los cables estb_nconectados de forma segura,
La imagen de visualizaci6n no ocupa toda la pantalla.
® Establezca el modo de imagen (gel televisor de forma que la imagen rellene toda la pantalla, Presione
MODO DE VISUALIZAClON en el mando a distancia y seleccione la relacion de aspecto apropiada,
No hay sonido.
® Presione el bot6n VOL+ del mando a distancia,
® Presione el bot6n SILENClO del mando distancia para asegurarse de que el silencio est6. desactivado.
® Compruebe la configuraci6n de audio, Consulte la secci6n "Men0 Audio" en la pagina 23.
®Asegurese de que los altavoces estan establecidos en Activado, Consulte la secci6n "Altavoces IV" en la
pa,gina 23.
®Asegurese de que no hay auriculares conectados al televisor.
® Compruebe las conexiones de audio de los dispositivos externos (reproductor Blu-ray, consola de juegos,
descodificador de cable o satelite) que esten conectados al televisor,
® Si utiliza una antena, la intensidad de la serial del canal puede ser baja. Asegurese de que la antena esta
conectada de forma segura al televisor y muevala por la sala o cerca de una ventana para conseguir la
mejor sel_ial,
Los colores del televisor no se muestran correctamente.
®Ajuste las opciones Color y Tono del men0 Imagen, Consulte la secci6n "Men0 Imagen" en la pagina 21,
® Reslablezca la configuracion de la imagen, Consulte la secci6n "Configuraci6n avanzada de imagen" en la
pagina 22.
® Compruebe todos los cables para asegurarse de que estan conectados de forma segura, Los botches del
mando a distancia no funcionan,
®Asegurese de que solamente presiona un bot6n en cada momento.
®Apunte con el mando a distancia directamente al televisor cuando presione un boton,
® Cambie las pilas del mando a distancia por otras nuevas. Consulte la seccion "lnstalar las pilas en el mando
a distancia" en la pa,gina 6.
El televisor tiene pixeles (puntos) que siempre permanecen oscuros o iluminados.
®Su televisor de alta definicion es un producto fabricado con gran precisi6n utilizando alta tecnologia. Sin
embargo, algunos pixeles puede que no se muestren correctamente. Estos tipos de casos son inherentes a
este tipo de producto y no constituyen un defecto del mismo,
Veo "ruido" o electricidad est_tica en la pantalla.
®Cuando las Iuncionalidades digitales del televisor sean superiores a una serial de difusi6n digital, la serial se
convertira a un nivel superior (mejorada) para coincidir con las funcionalidades de visualizaci6n del televisor.
Esta conversion a un nivel superior algunas veces puede provocar irregularidades en la imagen,
®Si utiliza una antena, la intensidad de la serial del canal puede ser baja, Aseg0rese de que la antena estb_
conectada de forma segura al televisor y muevala por la sala o cerca de una ventana para conseguir la
mejor serial,
Cuando cambio la fuente de entrada, el volumen tambi_n cambia.
® El televisor recuerda el nivel de volumen de cada fuente de entrada, Si el nivel de volumen de la nueva
fuente de entrada es superior o inferior al nivel de la fuente de origen, la diferencia puede apreciarse,
® Utilice el botch VOL+/- del mando a distancia para ajustar el volumen,
Cuando cambio la fuente de entrada, el tamaSo de la imagen de visualizaci6n tambi_n cambia.
® El televisor recuerda el modo de visualizaci6n de cada fuente de entrada, Si el modo de visualizaci6n de la
nueva fuente de entrada es diferente al de la fuente de entrada original, la diferencia puede apreciarse.
®Consulte la secci6n "MODO DE VISUALIZACION" en la pagina 18,
O" 31
Ap_ndice
Precauciones relacionadas con el uso en entomos con altas y bajas temperaturas
• Cuando use la unidad en un espacio donde la temperatura sea baja (per ejemplo una habitaci6n, oficina, etc.),
la imagen puede dejar estelas o puede aparecer ligeramente retrasada. Este comportamiento no supone una
averia y la unidad recuperar_ su estado de funcionamiento normal cuando la temperatura alcance valores
normales.
• No deje la unidad en una ubicaci6n caliente o frfa. Asimismo, no deje la unidad en una ubicaci6n expuesta a la
luz directa del sol o cerca de un calefactor, ya que la carcasa podria deformarse y podrfan producirse averias
en el panel frontal.
SI TIENE M/_S PREGUNTAS, PONGASE EN CONTACTO CON NUESTRO SERVlClO DE ATENCION
AL CLIENTE PARA OBTENER AYUDA.
(D" 32
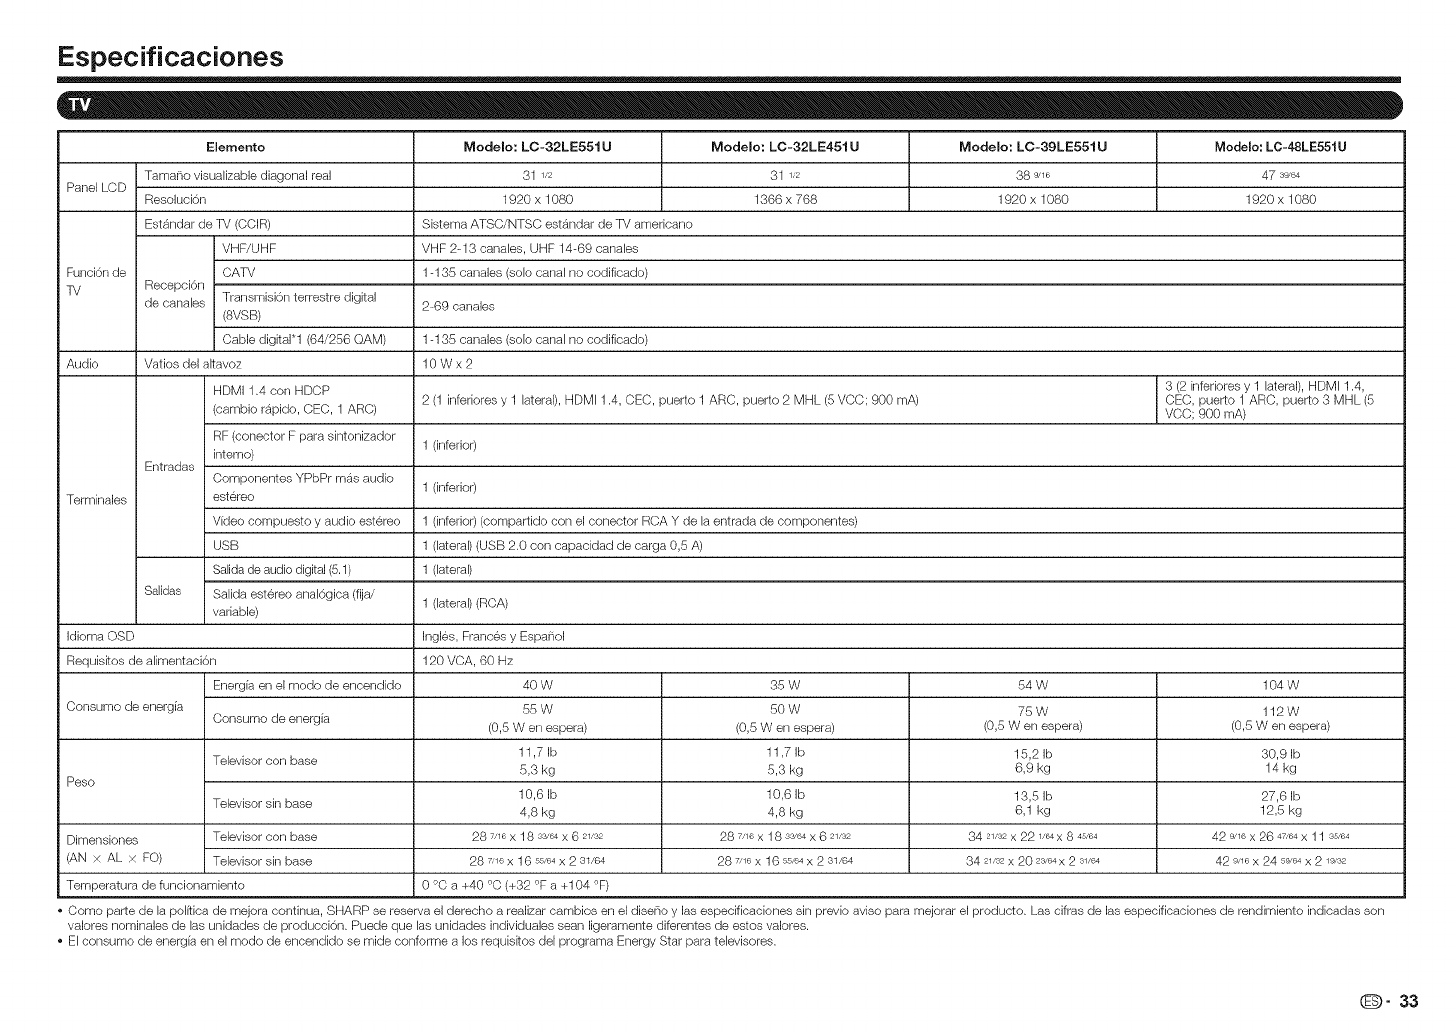
Especificaciones
Elemento Modelo: LC-32LE551 UModelo: LC-32LE451 UModelo: LC-39LE551 UModelo: LC-48LE551U
Tama_-io visualizable diagonal real 31 1/2 31 1/2 38 9/16 47 39/64
Panel LCD Resoluci6n 1920 x 1080 1366 x 768 1920 x 1080 1920 x 1080
Estb,ndar de TV (CCIR) Sistema ATSC/NTSC estb, ndar de TV amedcano
VHF/UHF VHF 2-13 canales, UHF 14-69 canales
Funci6n de CATV 1-135 canales (solo canal no codificado)
TV Recepci6n
de canales Transmisi6nterrestre digital 2-69 canales
(8VSB)
Cable digital*l (64/256 QAM) 1-135 canales (solo canal no codificado)
Audio Vatios del akavoz 10 W x 2
HDMI 1.4 con HDCP 3 (2 inferiores y 1 lateral), HDMI 1.4,
2 (1 inferiores y 1 lateral), HDMI 1.4, CEC, puerto 1 ARC, puerto 2 MHL (5 VCC; 900 mA) CEC, puerto 1 ARC, puerto 3 MHL (5
(cambio rapido, CEC, 1 ARC) VCC; 900 mA)
RF (conector F para sintonizador 1 (inferior)
interno)
Entradas
Componentes YPbPr mas audio 1 (inferior)
Terminales estereo
Vfdeo compuesto y audio estereo 1 (inferior) (compartido con el conector RCA Y de la entrada de componentes)
JSB 1 (lateral) (USB 2.0 con capaoidad de carga 0,5 A)
Salida de audio digital (5.1) 1 (lateral)
Salidas Salida estereo anal6gica (fija/ 1 (lateral) (RCA)
variable)
Idioma OSD Ingles, Frances y Espa_-_ol
Requiskos de alimentaoi6n 120 VCA, 60 Hz
Energfa en el modo de encendido 40 W 35 W 54 W 104 W
Consumo de energia 55 W 50 W 75 W 112 W
Consumo de energia (0,5 Wen espera) (0,5 Wen espera) (0,5 Wen espera) (0,5 Wen espera)
Televisor con base 11,7 Ib 11,7 Ib 15,2 Ib 30,9 Ib
5,3 kg 5,3 kg 6,9 kg 14 kg
Peso
10,6 Ib 10,6 Ib 13,5 Ib 27,6 Ib
Televisor sin base 4,8 kg 4,8 kg 6,1 kg 12,5 kg
Dimensiones Televisor con base 28 7/16 X 18 33,'64 X 6 21/32 28 7/16 X 18 33,'64 X 6 21/32 84 21/32 X 22 1/64 X 8 45/64 42 9/16 X 26 47/64 x 11 s5,'64
(AN × AL × FO) Televisor sin base 28 7/16x 16 55,,64x 2 31/64 28 7/16x 16 55/64x 2 31/64 34 21/32x 20 23,'64x 2 31/64 42 9/16x 24 59/64x 2 19/32
Temperatura de funcionamiento 0 °C a +40 °C (+32 °F a +104 °F)
Como parte de la pol_fica de mejora continua, SHARP se reserva el derecho a realizar cambios en el disdlo y las especificaciones sin previo aviso para mejorar el producto. Las cifras de las especificaciones de rendimiento indicadas son
valores nominales de las unidades de producci6n. Puede que las unidades individuales sean ligeramente diferentes de estos valores.
El consumo de energfa en el modo de encendido se mide conforme a los requisitos del programa Energy Star para televisores.
O" 33
Marcas comerciales
o Los productos que han obtenido la homologaci6n ENERGY STAR ® estAn dise_ados para proteger el medio
ambiente a trav6s de una eficiencia energ6tica superior.
o Fabricado con licencia de Dolby Laboratories. Dolby y el simbolo de la doble D son marcas comerciales de
Dolby Laboratories.
o Los t_rminos HDM], HDMI High-Definition Multimedia Interface y el Iogotipo de HDM] son marcas
comerciales o marcas registradas de HDM] Licensing, LLC en Estados Unidos y otros paises.
o MHL, el Iogotipo de MHL y Mobile High-Definition Link son marcas comerciales o marcas registradas de
MHL LLC en Estados Unidos y otros paises.
o MHL TM
Informaci6n para el usuario sobre ENERGY STAR®
• Para obtener m&s informaci6n acerca del programa ENERGY STAR, puede consultar e! sitio Web
energystar.gov.
• Si deja e! modo domCstico ENERGY STAR o habilita funciones opcionales, el consumo de energia
aumentar&.
• Este producto utiliza el programa ENERGY STAR cuando se selecciona "Casa" para "F&cil
configuraci6n". AI establecer "F&cil configuracidn" en "Casa", e! televisor Iograr& un estado de
ahorro de energia para uso domestico.
Los productos que han obtenido la homologaci6n ENERGY STAR® estan
diseSados para proteger el medio ambiente a traves de una eficiencia
energetica superior.
GARANTJA LIMITAIDA DEL CMENTE
SHARP ELECTRONICS CORPORATION garantiza al primer comprador consumidor que esta Pantalla de cristal liquido de la
marca Sharp (el "Producto"), cuando se envian en su caja original, no presentara defectos de fabricad6n ni materiales, y acepta,
segOn estime oportuno, reparar el defecto o cambiar el producto defectuoso o pare del mismo per uno nuevo o uno equivalente
remanufacturado sin cargo alguno para el comprador en Io que a piezas o mane de obra se refiere durante los periodos indicados
a continuaci6n.
Esta garantia no se aplica a ningOn elemento ornamental del producto o si el nOmero de serie o nOmero de modelo adherido al
producto se ha quitado, desfigurado, modificado, alterado o manipulado. Esta garantia no cubre los problemas de instalaci6n
o recepd6n de la seSal. Esta garantia Iimitada no se aplicara si el Producto ha sido o esta siendo utilizado en un entorno o
aplicaci6n comercial; esta garantia se aplicara Onicamente si los consumidores hacen un use domestico y no comercial del
Producto en su casa o residencia. Si pretende utilizar el Producto o ya Io utiliza con fines comerciales o en un entorno comercial,
hay garantias disponibles para cubrir este tipo de use del Producto, cuyos terminos pueden variar. P6ngase en contacto con
1-800-BE-SHARP para obtener mas informaci6n.
Para hacer valer sus derechos contemplados en esta garantia limitada, debe seguir los pasos que se indican a continuaci6n. Debe
proporcionar una prueba de compra al centro de servicio, que debe incluir la fecha de dicha compra.
En la medida en la que Io permita leyestatal aplicable, las garantias establecidas reemplaza,n y excluyen a cualquier otra garantia,
ya sea expresa o implicita. Especificamente SE EXCLUYEN TODAS LAS DEMAS GARANTIAS DISTINTAS ALAS ESTABLECIDAS
ANTERIORMENTE, Y SE EXCLUYEN ESPEO[FICAMENTE TODAS LAS GARANTiAS EXPRESAS O IMPL[CITAS, INOLUIDAS
LAS GARANTiAS DE OOMERCIALIZAOION, IDONEIDAD PARA EL USO E IDONBDAD PARA UNA FINALIDAD PARTICULAR. SI,
BAJO LA LEY ESTATAL APLICABLE, LAS GARANTiAS IMPL[CITAS NO SE PUEDEN RECHAZAR O EXCLUR, LA DURAOION DE
DICHAS GARANT[AS IMPLiCITAS SE LIMITAP_ A LO PERiODO A PARTIR DE LA FEOHA DE OOMPRA QUE SE ESTABLEOE A
OONTINUACION. ESTA GARANTiA LE PROPORCIONA DERECHOS LEGALES ESPEO[FICOS. TAMBIEN PUEDE TENER OTROS
DERECHOS QUE PUEDEN VARIAR DE UN ESTADO A OTRO.
Las garantias proporcionadas por el presente documento son las unicas y exclusivas garantias otorgadas por Sharp, y son el 0nico
y exclusive remedio a disposici6n del comprador y solamente durante los periodos de tiempo aqui establecidos. No se permiten
otras representaciones o promesas realizadas per nadie. La correccion de defectos, en la forma y durante el periodo de tiempo
descrito en el presente documento, constituira el cumplimiento completo de todas las oUigaciones y responsabilidades de Sharp
hacia el comprador con respecto al Producto, y constituira la plena satisfaccion de todas las redamaciones, ya sean por contrato,
negligencia, responsabilidad estricta o de cualquier otro tipo. Sharp no garantiza ni asume ninguna responsabilidad de ninguna forma,
por los Productos que han side objeto de abuso (Io que incluye, sin limitaci6n, voltaje incorrecto), accidente, real uso, negligencia,
falta de cuidado razonable, alteraci6n, modificaci6n, manipulaci6n, use o mantenimiento inadecuados o cualquier daSo o defecto
en el Producto causado per reparaciones o intentos de reparacion real_zadospor cualquier persona que no sea un proveedor de
servicio autorizado de Sharp. Sharp no asumira ninguna responsabilidad, de ninguna forma, per cualquier da_o economico o material
incidental o derivado. Algunos estados no permiten limitaciones en lasgarantias o en remedies per incumplimiento en determinadas
transacciones; en tales estados, no se aplican los limites del presente documento.
ESTA GARANTiA LIMITADA ES VALIDA 0NICAMENTE EN LOS CiNCUENTA (50) ESTADOS UNIDOS, EN EL DISTRITO DE
COLUMBIAY EN PUERTO RICO.
(D" 34
Secci6n especffica del modelo
Su descripci6n y n(imero de modelo de
producto:
LC-32LE551U /LC-32LE451U /LC-39LE551U /LC-48LE551U
Televisor en color LCD
(Aseg0rese de tener esta informaci6n y la prueba de compra disponibles
cuando necesite Ilevar a cabo tareas de servicio en el producto.)
Periodo de garantia para este producto: Un (1) ar_lo para las piezas y mano de obra a partir de la fecha de compra.
Exclusiones adicionales de la El problema de retenci6n de imagen provocado per una imagen fija mostrada
cobertura de la garantia ($i las hay): durante largos periodos de tiempo no esta cubierta per esta Garantia lirrlitada
/consulte el Manual de funcionamiento para obtener informaci6n sebre la ferma de
evitar este problema).
Qu_ hacer para obtener $ervicio t@rmico: Las tareas de servicio las proporciona un Centro de servicio autorizado por
Sharp en Estados Unidos. Para encontrar la ubicaci6n del Centro de servicio
autorizado de Sharp mas cercano, Ilame al telefono gratuito de Sharp
1-800-BE-SHARP (1-800-237-4277). Sharp proporcionara instrucciones
sobre las opciones de servicio disponibles para su producto.
Si se va a enviar el producto para realizar tareas de servicio en el, cerci6rese
de que se empaqueta de forma segura. El producto debe ser transportado
por dos personas y en el paquete original, o en un paquete que proporcione
una protecci6n similar del producto; asimismo, asegurese de que este esta
cubierto para protegerlo contra arafiazos y dafios. Sharp no asumirdi ninguna
responsabilidad por perdida, robe o direcci6n de correo equivocada, o por
cualquier daFlo causado al producto durante el transporte.
Para productos que se considere que se deben reparar a domicilio, pronto
se desplazara el personal de servicio correspondiente al punto en el que se
encuentre. Si es necesado, el personal de servicio puede Ilevarse la unidad
para reparar a las instalaciones de servicio y devolveda una vez finalizadas
dicha reparaci6n. El servicio a domicilio no esta disponible en todas las
direas y Sharp puede, segun estime oportuno, proporcionar el transporte del
producto al Centre de servicio autorizado o desde este en todas las direas.
PARA OBTENER INFORMACION SOBRE EL PRODUCTOO ADQUIRIR ACCESORIOS Y GARANTJAS EXTENDDAS,
LLAME AL 1-800-BE-SHARP
O VISITE EL SmO WEB www.SharpUSA.com
O" 35
