Sharp NAR0068 GSM/UMTS Phone with Bluetooth User Manual Sharp STX2
Sharp Corporation Slide GSM/UMTS Phone with Bluetooth Sharp STX2
Sharp >
Manual

T
A
BLE
OF
CONTENTS
CHAPTER
1.
BEFORE
USING YOUR
A
T&T
ST
X
-2
P
A
CKA
GE
CONTENTS
............................................................................................
8
HANDSET
DESCRIPTION
........................................................................................
9
THE
FUNCTION
KEY
S
........................................................................................................
10
DISPLA
Y
INDICA
TORS
........................................................................................................
11
B
A
TTER
Y
USA
GE
.................................................................................................
14
B
A
TTER
Y
INST
ALLATION
....................................................................................................
14
B
A
TTER
Y
REMO
v
AL
...........................................................................................................
14
B
A
TTER
Y
CHARGING
.........................................................................................................
15
USING
A
T&T
SIM
CARD
.......................................................................................
16
INSER
TING
THE
A
T&T
SIM
CARD
.......................................................................................
16
REMO
vING
THE
A
T&T
SIM
CARD
......................................................................................
16
USING
microSD
CARD
.........................................................................................
17
INSER
TING
THE
microSD
CARD
.........................................................................................
17
REMO
v
ING
THE
microSD
CARD
........................................................................................
17
USING
QWER
TY
KEYP
AD
....................................................................................
18
BLOC
K
ING
ANTENNA
WHILE
MA
K
ING
A
CALL
...................................................
20
CORRECT/INCORRECT
FINGER
POSITION
.........................................................................
20
B
A
TTER
Y
HANDLING
INFORMATION
...................................................................
21
IEEE
ST
AND
ARD
FOR
RECHARGEABLE
B
A
TTERIES
FOR
CELLULAR
TELEPHONES
..............
21
CHAPTER
2.
BASIC OPER
A
TION
TURNING
THE
PHONE
ON/OFF
............................................................................
24
T
OUCH
SCREEN
LOC
K
MODE
..............................................................................
24
USING
SHORTCUT
K
EY
........................................................................................
24
IDLE
SCREEN
.......................................................................................................
25
USING
THE
T
OUCHSCREEN
.................................................................................
25
MENU
SUMMAR
Y
...............................................................................................
27
9-UP
CENTER
MENU
.........................................................................................................
27
9-UP
LEFT
MENU
..............................................................................................................
27
9-UP
RIGHT
MENU
............................................................................................................
28
LANDSCAPE
MODE
MENU
................................................................................................
29
BASIC
FUNCTIONS
..............................................................................................
30
MAKING
A
CALL
................................................................................................................
30
ANSWERING
CALLS
..........................................................................................................
31
1

T
ABLE
OF
CONTENTS
WAIT/P
A
USE
FEA
TURE
......................................................................................................
31
3-WA
Y
CALLING
................................................................................................................
32
CALLER
ID
FUNCTION
.......................................................................................................
32
CALL
WAITING
FUNCTION
................................................................................................
32
ADJUSTING
v
OLUME
........................................................................................................
33
MA
K
ING
AN
INTERNA
TIONAL
CALL
..................................................................................
33
DURING
A
CALL
..................................................................................................
34
MUTE
(UNMUTE)
..............................................................................................................
34
SPEAKERPHONE
................................................................................................................
34
RECENT
CALLS
..................................................................................................................
34
FIND
NAME
......................................................................................................................
.34
MESSA
GING
......................................................................................................................
35
BLUET
OO
TH
.......................................................................................................................
35
MA
K
ING
AN
EMERGENCY
CALL
.........................................................................
36
911
IN
LOC
K
MODE
..........................................................................................................
36
911
USING
ANY
A
v
AILABLE
SY
STEM
................................................................................
36
vIDEO
SHARE
......................................................................................................
37
ST
AR
T
A
vIDEO
SHARE
CALL
.............................................................................................
37
A
CCEPT
A
vIDEO
SHARE
CALL
..........................................................................................
37
END
A
vIDEO
SHARE
CALL
................................................................................................
38
CHAPTER
3.
MEMOR
Y
FUNCTION
ST
ORING
A
PHONE
NUMBER
..............................................................................
40
ENTERING
LETTERS
,
NUMBERS
&
SYMBOLS
.......................................................
42
USING
QWERTY
K
EYBO
ARD
..............................................................................................
43
ST
AND
ARD
INPUT
MODE
..................................................................................................
44
NUMERIC
MODE
...............................................................................................................
44
SYMBOL
MODE
.................................................................................................................
45
EMO
TICON
MODE
.............................................................................................................
45
MA
K
ING
A
CALL
THROUGH
THE
CONT
A
CT
LIST
..................................................
46
ONE-TOUCH
DIALING
.......................................................................................................
46
CHAPTER
4. ST
X
-2 TIPS
&
TRICkS
STX-2
TIPS
&
TRICKS
.............................................................................................
48
NA
vIGA
TING
&
T
OUCH
SCREEN
TIPS
................................................................................
48
MESSA
GING
TIPS
..............................................................................................................
48
2

T
A
BLE
OF
CONTENTS
BROWSING
TIPS
................................................................................................................
49
MUSIC
TIPS
.......................................................................................................................
49
CAMERA
TIPS
....................................................................................................................
50
GENERAL
TIPS
...................................................................................................................
51
CHAPTER
5.
MENU
FUNCTION
A
T&T
Tv
..............................................................................................................
54
A
T&T
Tv
............................................................................................................................
54
MESSA
GING
........................................................................................................
55
CREA
TE
NEW
MESSA
GE
....................................................................................................
55
INBOX
...............................................................................................................................
56
OUTBO
X
............................................................................................................................
57
SENT
.................................................................................................................................
58
DRAFTS
.............................................................................................................................
58
IM
.....................................................................................................................................
59
EMAIL
...............................................................................................................................
61
v
OICE
MAIL
......................................................................................................................
62
A
T&T
SOCIAL
NET
...............................................................................................
63
A
T&T
SOCIAL
NET
.............................................................................................................
63
MOBILE
WEB
.......................................................................................................
64
MEDIA
NET
HOME
............................................................................................................
64
F
A
v
ORITES
........................................................................................................................
64
ENTER
URL
........................................................................................................................
65
HIST
OR
Y
............................................................................................................................
65
SETTINGS
..........................................................................................................................
66
APP
CENTER
........................................................................................................
67
SHOP
RINGT
ONES
.............................................................................................................
67
SHOP
GAMES
....................................................................................................................
67
SHOP
GRAPHICS
...............................................................................................................
67
SHOP
MUL
TIMEDIA
...........................................................................................................
67
SHOP
APPLICA
TIONS
.........................................................................................................
68
SHOP
vIDEO
......................................................................................................................
68
MEDIA
NET
HOME
............................................................................................................
68
MYLOC
K
ER
.........................................................................................................
69
MYLOC
K
ER
.......................................................................................................................
69
A
T&T
GPS
............................................................................................................
70
3

T
ABLE
OF
CONTENTS
A
T&T
NA
vIGA
T
OR
.............................................................................................................
70
WHERE
..............................................................................................................................
71
ALLSPOR
T
GPS
..................................................................................................................
71
YP
MOBILE
..........................................................................................................
72
FIND
.
MAP
.
SA
vE.
GO
.........................................................................................................
72
ADDRESS
BOOK
..................................................................................................
73
FIND
NAME
.......................................................................................................................
73
ADD
NEW
..........................................................................................................................
79
MOBILE
EMAIL
....................................................................................................
81
MOBILE
EMAIL
..................................................................................................................
81
IM
.......................................................................................................................
82
IM
.....................................................................................................................................
82
PICDIAL
...............................................................................................................
84
PICDIAL
.............................................................................................................................
84
A
T&T
MUSIC
.......................................................................................................
85
MUSIC
PLA
YER
..................................................................................................................
85
MUSIC
ID
..........................................................................................................................
86
A
T&T
RADIO
......................................................................................................................
86
MOBIvJ
.............................................................................................................................
87
MA
K
E
UR
T
ONES
...............................................................................................................
87
MOBILE
vIDEO
....................................................................................................
88
CELLULAR
vIDEO
OPTIONS
...............................................................................................
88
MY
STUFF
...........................................................................................................
89
ONLINE
LOC
K
ER
................................................................................................................
89
RINGT
ONES
&
A
UDIO
........................................................................................................
89
IMA
GES
.............................................................................................................................
90
vIDEOS
..............................................................................................................................
91
O
THER
FILES
......................................................................................................................
92
GAMES
................................................................................................................
93
GAMES
..............................................................................................................................
93
APPLICATIONS
....................................................................................................
94
MOBILE
B
AN
K
ING
.............................................................................................................
94
LOOPT
...............................................................................................................................
95
MA
K
E
UR
T
ONES
...............................................................................................................
95
MY
CAST
WEA
THER
..........................................................................................................
95
FUNSCREENZ
....................................................................................................................
95
4

T
A
BLE
OF
CONTENTS
RECENT
HISTOR
Y
................................................................................................
96
RECENT
HIST
OR
Y
..............................................................................................................
96
SETTINGS
............................................................................................................
97
DISPLA
Y
............................................................................................................................
97
D
A
TE
&
TIME
.....................................................................................................................
99
PHONE
............................................................................................................................
100
CALL
................................................................................................................................
103
SECURITY
........................................................................................................................
107
APPLICA
TIONS
................................................................................................................
110
XT9
SETTINGS
.................................................................................................................
112
SOFTWARE
UPD
A
TE
........................................................................................................
113
vIDEO
SHARE
..................................................................................................................
114
MY
A
CCOUNT
...................................................................................................
115
MY
A
CCOUNT
.................................................................................................................
115
T
OOLS
...............................................................................................................
116
T
O
DO
.............................................................................................................................
116
WORLD
TIME
...................................................................................................................
116
NO
TEP
AD
........................................................................................................................
117
UNIT
CONvER
TER
...........................................................................................................
118
v
OICE
MEMO
..................................................................................................................
118
ST
OPWA
TCH
....................................................................................................................
119
CALENDAR
........................................................................................................
120
CALENDAR
......................................................................................................................
120
ALARM
CLOC
K
..................................................................................................
122
ALARM
CLOC
K
................................................................................................................
122
CALCULA
T
OR
....................................................................................................
123
CALCULA
T
OR
..................................................................................................................
123
TIP
CALCULA
T
OR
............................................................................................................
123
SOUND
PROFILE
................................................................................................
124
SOUND
PROFILE
..............................................................................................................
124
BLUET
OO
TH
......................................................................................................
125
BLUET
OO
TH
.....................................................................................................................
125
CAMERA
...........................................................................................................
128
CAMERA
.........................................................................................................................
128
CAMCODER
....................................................................................................................
129
5

T
ABLE
OF
CONTENTS
CHAPTER
6.
PC
CONNECTIvITY
PC
C
ONNECTI
v
ITY
............................................................................................
132
SET
UP
BLUET
OO
TH
MODE
FOR
THE
STX-2
......................................................................
132
P
AIRING
THE
STX-2
WITH
A
PC
........................................................................................
132
MA
K
ING
DIAL-UP
NETWOR
K
ING
....................................................................................
133
P
AIRING
A
BLUET
OO
TH
HEADSET
T
O
THE
STX-2
..............................................................
134
MA
K
ING
DIAL-UP
NETWOR
K
ING
vIA
USB
......................................................................
135
MUSIC
SYNC
...................................................................................................................
136
MASS
ST
ORA
GE
DEvICE
..................................................................................................
137
CHAPTER
7.
SAFETY
INFORM
A
TION
SAFETY
..............................................................................................................
140
WARRANTY
.......................................................................................................
166
6

CHAPTER
1
BEFORE
USING
YOUR
A
T&T
STX-
2
C
HAPTE
R
1
.
BE
FORE
U
SI
NG
Y
OU
R
A
T&T
STX
-
T
his
chapter
provides
important
information
about
your
A
T&T
STX-2
handset
including:
P
ackage
Contents
Handset
Description
Battery
Usage
Using
A
T&T
SIM
Card
Using
microSD
Card
Using
QWERTY
K
eypad
Blocking
Antenna
while
Making
a
Call
Battery
Handling
Information
7
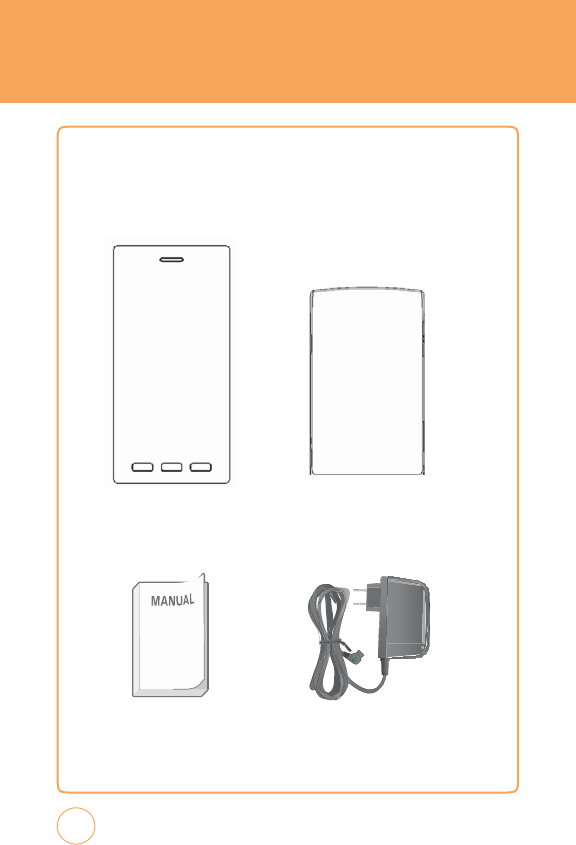
P
AC
k
AGE
CONTENTS
T
his
package
should
include
all
items pictured
below
.
If
any
are
missing
or
different,
immediately
contact
the
retailer
where
you
purchased
the
phone
.
Handset Standard
Battery
Manual
AC
Charger
8
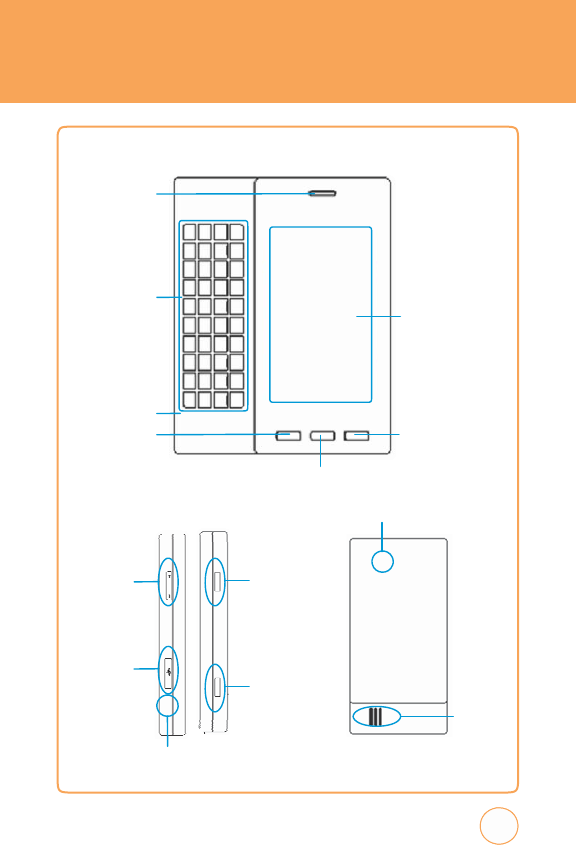
HANDSET
DESCRIPTION
Earpiece
QWER
TY
k
eypad
Main
Display
with
T
ouch
Screen
Micr
ophone
SEND
k
ey
Power/END
k
ey
Shortcut
k
ey
Camera
Lens
v
olume
Up/Down
k
eys
Hold/Scr
een
Lock
Mode
k
ey
Data
Cable
o
r
Charge
r
slot
Camera
k
ey
Exter
nal
Speaker
Ear
Jack
9
HANDSET
DESCRIPTION
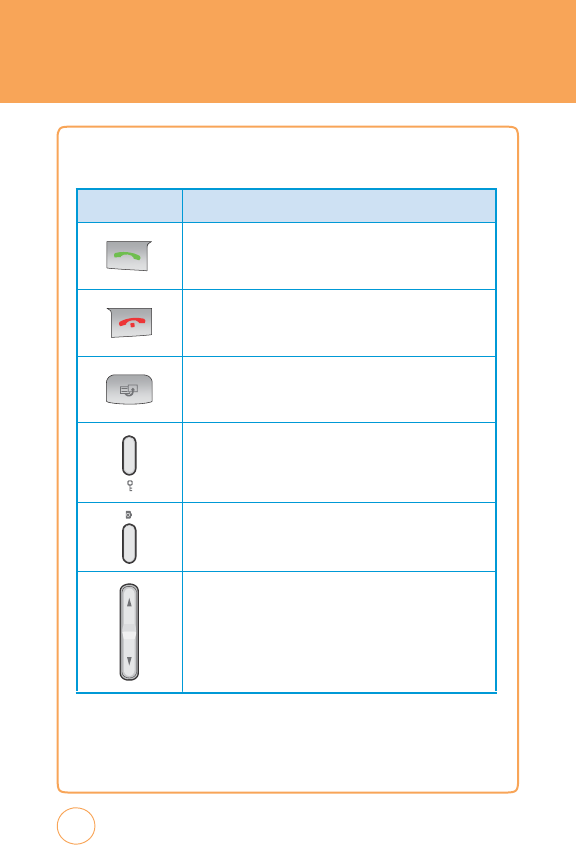
THE
FUNCTION
k
EYS
10
k
E
Y
D
e
sc
r
i
pt
ions
Send
k
ey
Press
to
mak
e
or
receive
a
call
or
in
idle
mode
,
press
to
access
the
All
calls
list.
Power/End
k
ey
Press
and
hold
to
turn
the
phone
on/off
.
Press
to
terminate
a
call
or
to
return
to
idle
mode
.
Shortcut
k
ey
Press
to
launch
the
Quick
List
such
as
Main
Menu,
Call,
Messaging,
Browser
,
Music
Player
.
Screen
Lock
Mode
k
ey
Short
press
to
screen
lock
mode
the
phone
.
Camera
k
ey
Press
and
Hold
to
launch
the
camera
application
in
Idle
or
main
menu
screen.
Side
v
olume
k
ey
Allows
you
to
adjust
the
ringer
volume
in
standby
mode
or
adjust
the
voice
volume
during
a
call.
T
he
volume
k
ey
can
also
be
used
to
scroll
up
or
down
to
navigate
through
the
different
menu
options.
Press
to
mute
the
incoming
call
ringer.
HANDSET
DESCRIPTION
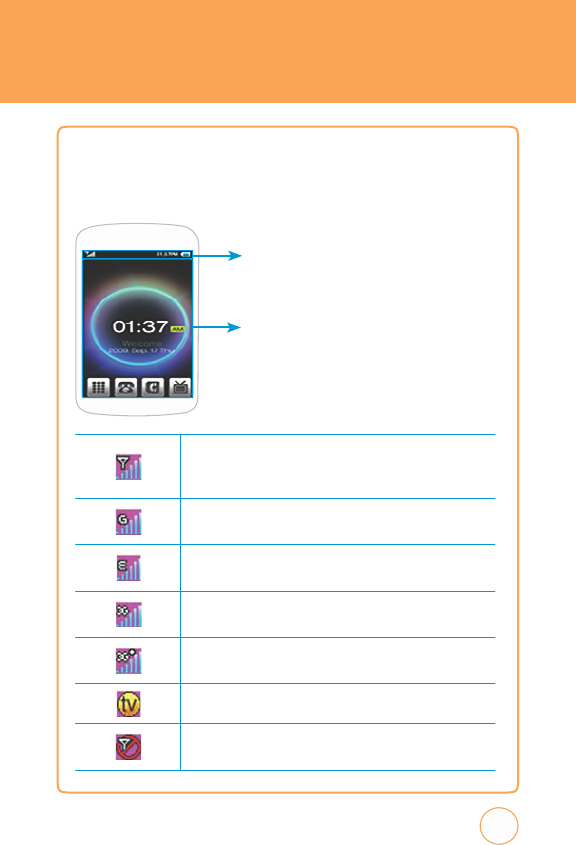
DISPL
A
Y
INDIC
A
TORS
T
he
idle
mode
display
appears
when
you
are
not
on
a
call
or
using
the
menu.
Y
ou
must
be
in
idle
mode
to
dial
a
phone
number
.
Display
Indicators
Displays
various
icons
.
Text
&
Graphic
Ar
ea
3G
+
service
is
av
ailable.
11
Signal
Strength
Current
signal
strength:
the
more
lines
,
the
stronger
the
signal.
GPRS
Signal
Strength
GPRS
service
is
av
ailable.
EDGE
Signal
Strength
Edge
service
is
av
ailable.
3G
Signal
Strength
3G
service
is
av
ailable.
3G
+
Signal
Strength
Orange
T
v
No
service
Indicates
the
phone
cannot
receive
a
signal
from
the
system.

HANDSET
DESCRIPTION
12
Battery
Battery
charging
level
—
the
more
blocks
,
the
stronger
the
charge
.
Battery
char
ging
Indicates
the
battery
is
charging.
Missed
call
Data
call
Calling
Calling+
Data
call
TTY
Indicates
your
STX-2
is
active
in
TTY
mode
.
Alarm
on
Appears
when
an
alarm
is
set.
Scheduler
on
Appears
when
a
Scheduler
event
is
set.
Pr
ofile
Icon
Status
Indicates
General,
Meeting,
Car
,
Headset
or
Outdoor
mode
is
active
.
Silent
All
Phone
is
set
to
Silent
-
no
sound
will
be
made
to
notify
you
of
incoming
calls
or
messages
.
Speaker
phone
v
ibrate
All
Phone
will
vibrate
to
notify
you
of
an
incoming
call.
HANDSET
DESCRIPTION
13
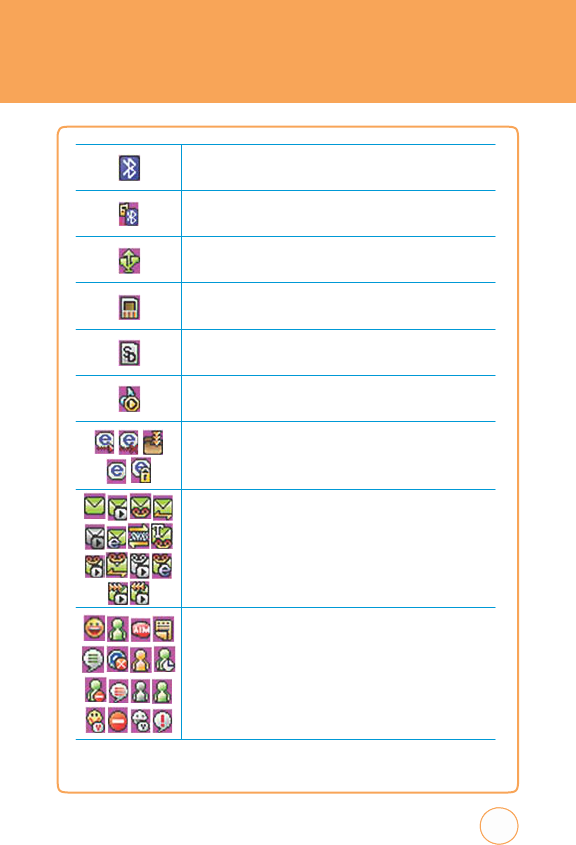
Bluetooth
on
Indicates
Bluetooth
mode
is
active
.
Bluetooth
connected
Indicates
Bluetooth
Connected.
USB
connected
Indicates
USB
Connected.
Exter
nal
memory
Indicates
a
microSD
card
is
inserted.
SD
car
d
Indicates
a
SD
card
is
inserted.
Music
player
Indicates
Music
player
is
active
.
W
AP
Icons
indicate
T
rying
to
connect
WAP
,
T
rying
to
disconnect
WAP
,
Downloading,
WAP
connected,
Secure
WAP
connected
Message
Icon
Status
Icons
indicate
T
ext
message
,
MMS
message
,
v
oice
mail,
WAP
push,
MMS
noti,
Email,
O
T
A,
text
message+voice
,
MMS
message+voice
,
WAP
push+voice,
MMS
noti+voice
,
Email+voice,
MMS
sending,
MMS
retrieving
Y
ou’re
also
notified
by
a
visual
and
audible
alert.
IM
Icons
indicate
Y
ahoo
IM,
MSN
IM,
AIM
IM,
A
OL
Aw
ay
,
A
OL
Message
,
A
OL
Offline,
A
OL
Online
,
Windows
Live
Aw
ay
,
Windows
Live
Busy
,
Windows
Live
New
Message
,
Windows
Live
Offline,
Windows
Live
Online
,
Y
ahoo
Av
ailable,
Y
ahoo
Busy
,
Y
ahoo
Invisible,
Y
ahoo
Message
B
A
TTER
Y
USAGE
B
A
TTE
R
Y
INS
T
A
LL
A
TION
1.
Mak
e
sure
that
your
device
is
turned
off
,
and
then
remove
the
back
cover
.
2.
Align
the
battery’
s
exposed
copper
contacts
with
the
battery
connectors
inside
the
battery
compartment.
3.
Insert
the
contact’
s
side
of
the
battery
first
and
then
gently
push
the
battery
into
place
.
4.
Replace
the
back
cover
.
B
A
TTER
Y
REMO
v
AL
1.
Mak
e
sure
that
your
device
is
turned
off
,
and
then
remove
the
back
cover
.
2.
Lift
the
protruding
grip
at
the
bottom
right
side
of
the
battery
to
remove
the
battery.
Note
14
If
the
battery
is
not
correctly
placed
in
the
compartment,
the
handset
will
not
turn
on and/o
r
the battery
may detach
during
use
.

B
A
TTER
Y
USAGE
B
A
TTE
R
YCHARGING
POWER
CONNECTION
1.
Plug
the
A
C
Charger
into
a
standard
outlet.
2
.
T
o
access
the
charging
port
located
on
the
left
side
of
your
STX-2,
as
seen
on
page
9,
open
the
flap
and
plug
the
other
end
of
the
A
C
Charger
into
the
charging
port.
T
he
battery
must
be
installed
onto
the
phone
to
work
properly.
3.
T
he
clearly
mark
ed,
USB
icon
on
the
A
C
Charger
adapter
should
alw
ays
be
face-up
on
the
same
side
as
the
display
screen
when
it
is
inserted
into
the
STX-2
phone
.
See
the
diagram
below
for
proper
positioning
and
insertion
of
the
A
C
Charger
adapter
into
the
phone
.
Y
ou
should
never
force
the
A
C
Charger
adapter
into
the
phone
.
Note
charging
status
screen.
Y
ou
cannot
operate
the
phone
until
it
is
powered
on.
15
•
When
you
charge
the battery
with
the
phone powered
off
,you
will
see
a
•
T
he
battery
is
not
charged
at
the
time
of
purchase
.
•
Fully
charge
the
battery
before
use
.
•
It
is
more
efficient
to
charge
the
battery
with
the
handset
powered
off
.
•
T
he
battery
must
be
connected
to
the
phone
in
order
to
charge
it
.
•
Battery
operating
time
gradually
decreases
over
time
.
•
If
the
battery
fails
to
perform
normally
,
you
may
need
to
replace
the
battery
.
Please
refer
to
the
Manufacturer's
W
arranty
on
page
166
for
further
information.

USING
A
T&T
SIM
CARD
I
NSE
R
TING THE
A
T&T
SIM
CARD
Y
ou’ll
alw
ays
need
an
A
T&T
SIM
card
to
use
your
mobile
phone
.
T
his
contains
important
information
about
your
mobile
phone
and
network.
T
he
message
“Insert
SIM“
appears
when
the
A
T&T
SIM
card
is
not
installed.
Please
tak
e
care
of
your
A
T&T
SIM
card
and
don’t
k
eep
it
near
magnetic
and
electronic
devices
as
this
can
interfere
with
data
storage
and
network
operations.
1.
Mak
e
sure
that
your
device
is
turned
off
,
and
then
remove
the
back
cover
.
2.
Lift
the
battery
out
of
the
device
.
3.
Locate
the
SIM
card
slot,
then
insert
the
SIM
card
with
its
gold
contacts
facing
down
and
its
cut-off
corner
facing
out
the
card
slot.
4.
Slide
the
SIM
card
completely
into
the
slot.
5.
Replace
the
back
cover
.
REMO
v
ING
THE
A
T&T
SIM
CARD
1.
Mak
e
sure
that
your
device
is
turned
off
,
and
then
remove
the
back
cover
.
2.
Lift
the
battery
out
of
the
device
.
3.
Press
down
the
tab
in
front
of
the
SIM
card
slot
opening
with
finger.
4.
Slide
the
SIM
card
out
from
the
slot
with
finger.
16

USING microSD CARD
I
NSE
R
TING THE microSD
CAR
D
T
he
microSD
card
stores
sounds
,
images
,
photos
and
videos
,
music,
and
other
files.
T
o
install
your
microSD
card:
1.
Mak
e
sure
that
your
device
is
turned
off
,
and
then
remove
the
back
cover
.
2.
Locate
the
microSD
card
slot
on
the
upper
part
of
the
exposed
right
panel.
3.
Insert
the
microSD
card
into
the
slot
with
its
gold
contacts
facing
down
until
it
clicks
into
place
.
4.
Replace
the
back
cover
.
REMO
v
ING
THE
microSD
CAR
D
T
o
remove
the
microSD
card:
1.
Mak
e
sure
that
your
device
is
turned
off
,
and
then
remove
the
back
cover
.
2.
Press
it
to
eject
it
from
the
slot.
Note
17
Memory
cards
with
over
32
GB
of
storage
capacity
will
not
work
with
this
phone
.
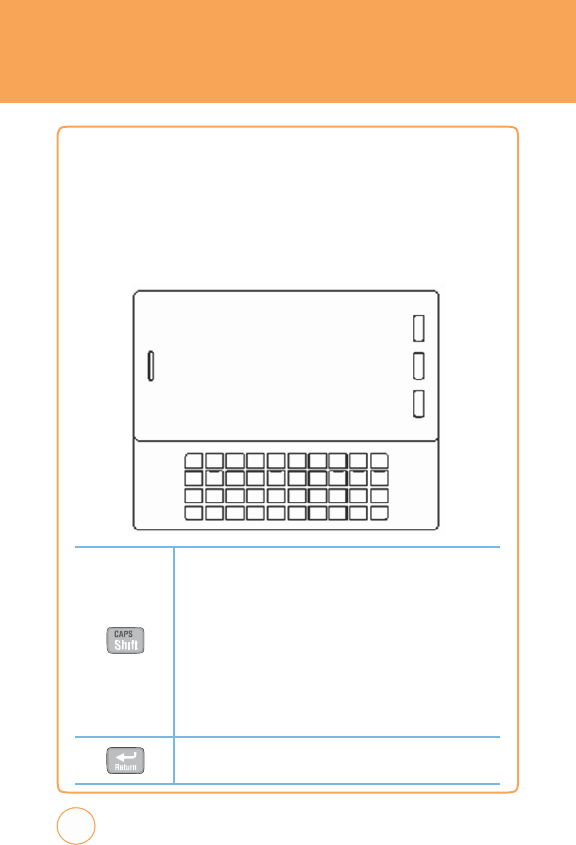
USING
QWER
TY
k
E
Y
P
A
D
Y
ou
r
STX-2
features
a
specifically
designed
QWE
R
TY
k
eyboard
that
provides
a
superior
typing
experience
for
easy
and
comfortable
text
w
riting
for
SMS
or
e-mail
messages
,
notes
and
other
functions.
Y
ou
can
use
all
of
the
phone
functions
with
the
k
eyboard
either
closed
or
open.
When
you
open
the
k
eyboard
you
have
the
extra
benefit
of
a
full
messaging
k
eyboard.
18
Caps/Shift
k
ey
T
o
type
upper
-case
letters,
hold
down
the
Caps/Shift
k
ey
and
then
press
one
or
more
letter
k
eys
.
T
o
type
upper
-case
letters
continuously,
use
the
CAPS-LOCK
mode
.
T
o
change
to
the
CAPS-
LOCK
mode
,
press
the
FN
K
ey
then
the
Caps/Shift
K
ey
.
Once
the
CAPS-LOCK
mode
is
set,
you
can
type
upper
-case
letters
only.
T
o
deactivate,
press
the
FN
K
ey
then
the
Caps/Shift
K
ey
.
T
o
type
an
upper
-case
letter
for
the
first
letter
of
a
word
only,
simply
press
the
Caps/Shift
k
ey
once
.
T
hen,
the
first
letter
you
type
will
be
upper
case
while
the
rest
will
be
lower
-case
.
Retur
n
k
ey
Press
the
Enter
k
ey
to
insert
a
line
break.
USING
QWER
TY
k
E
Y
P
A
D
o
r
y
number
while
the
rest
will
be
normal
letters.
T
o
access
other
special
19
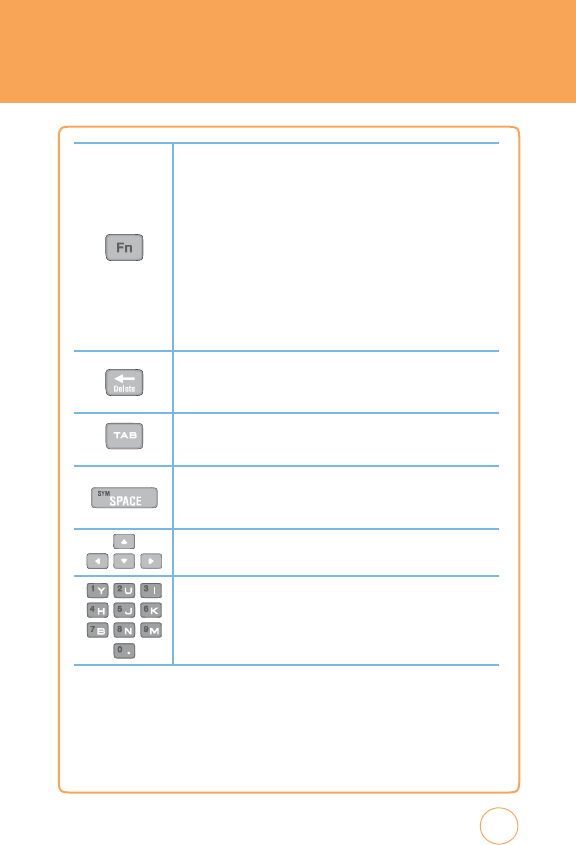
Fn
k
ey
T
o
type
the
special
character
or
numbers
that
appear
in
orange
on
the
k
eys
,
press
the
applicable
k
ey
while
holding
down
the
FN
k
ey
.
T
type
special
characters
or
numbers
consecutively
,
use
the
FN-LOCK
mode
.
T
o
change
to
the
FN-LOCK
mode
,
double-tap
the
FN
k
ey
.
Y
ou
can
type
special
characters
or
numbers
only
in
this
mode
.
T
o
deactivate,
double-tap
the
FN
k
ey
again.
T
o
type
a
special
characte
or
number
for
the
first
letter
of
a
word
only,
simply
press
the
FN
k
e
once
.
T
hen,
the
first
letter
you
type
will
be
a
special
character
or
number
while
the
rest
will
be
normal
letters.
T
o
access
other
characters
that
do
not
appear
on
the
k
eyboard,
press
FN
+
Space
.
Delete
k
ey
Press
the
Delete
K
ey
to
delete
a
character
to
the
left
of
the
text
cursor
.
Press
and
hold
to
delete
the
entire
entry.
T
AB
k
ey
Press
the
T
AB
K
ey
to
easily
navigate
between
multiple
windows
.
Sym/Space
k
ey
Press
the
Space
K
ey
to
type
a
blank
space
.
Press
the
FN
K
ey
+
Space
K
ey
,
to
open
the
Symbol
P
ad.
#
?
Arr
ow
k
ey
Press
the
arrow
k
eys
for
directional
movement.
Numeric
k
ey
Press
the
FN
K
ey
+
Corresponding
K
ey
to
enter
the
number
.
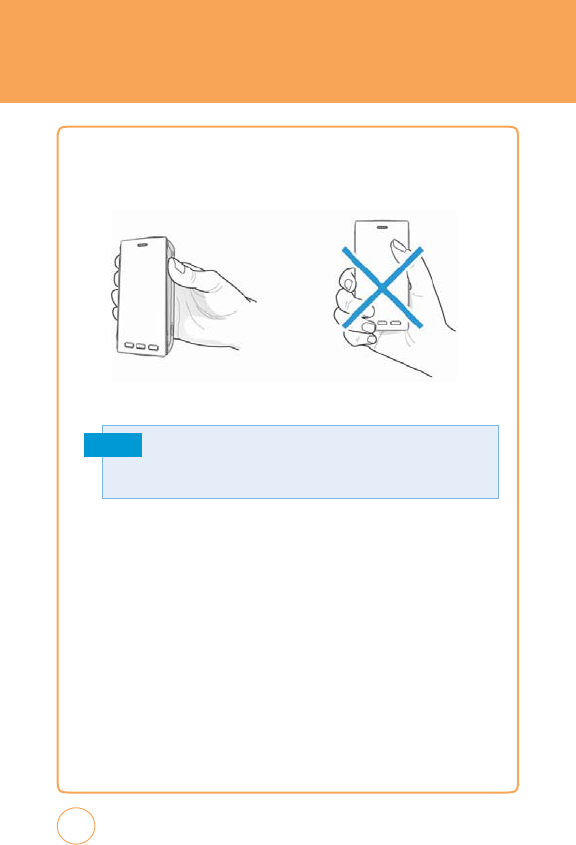
BLOC
k
ING
A
NTENNA
WHILE
MA
k
ING
A
CALL
CORRECT/INCORRECT
FINGER
POSITION
CORRECT
FINGER
POSITION INCORRECT
FINGER
POSITION
Note
20
Y
our
STX-2
is
equipped
with
an
intenna.
F
or
optimal
call
quality
,
hold
the
phone by
the gripped
edges
on the
side
and
avoid touching the
top
and
bottom
of
the
phone
.

B
A
TTER
YHANDLING
INFORM
A
TION
IEEE
S
T
ANDARD FOR
R
ECHARGEABLE
B
A
TTERIES
FOR
C
ELLULAR
T
ELEPHONES
•
Do
not
disassemble
or
open,
crush,
bend
or
deform,
puncture,
or
shred.
•
Do
not
modify
or
remanufacture,
attempt
to
insert
foreign
objects
into
the
battery,
immerse
or
expose
to
w
ater
or
other
liquids,
or
expose
to
fire
,
explosion,
or
other
hazard.
•
Only
use
the
battery
for
the
system
for
which
it
w
as
specified.
•
Only
use
the
battery
with
a
charging
system
that
has
been
qualified
with
the
system
per
this
standard.
Use
of
an
unqualified
battery
or
charger
may
present
a
risk
of
fire
,
explosion,
leakage
,
or
other
hazard.
•
Do
not
short
circuit
a
battery
or
allow
metallic
or
conductive
objects
to
contact
the
battery
terminals.
•
Replace
the
battery
only
with
another
battery
that
has
been
qualified
with
the
system
per
this
standard.
Use
of
an
unqualified
battery
may
present
a
risk
of
fire
,
explosion,
leakage
,
or
other
hazard.
•
Promptly
dispose
of
used
batteries
in
accordance
with
local
regulations.
•
Battery
usage
by
children
should
be
supervised.
•
Provide
an
explanation
of
security
implementation,
per
10.2.1.
•
Avoid
dropping
the
phone
or
battery.
If
the
phone
or
battery
is
dropped,
especially
on
a
hard
surface
,
and
the
user
suspects
damage
,
tak
e
it
to
a
service
center
for
inspection.
•
Improper
battery
use
may
result
in
a
fire
,
explosion,
or
other
hazard.
21

MEMO
22

CHAPTER
2
BASIC
OPER
A
TION
C
HAPTE
R2.
BASIC
OPE
R
A
TION
T
his
chapter
addresses
and
explains
the
basic
features
of
your
STX-2
including:
T
urning the
Phone
On/Of
f
T
ouch
Screen
Lock
Mode
Using
Shortcut
K
ey
Idle
Screen
Using
the
T
ouchscreen
Menu
Summary
Basic
Functions
During
a
Call
Making
an
Emergency
Call
v
ideo
Share
23

BASIC
OPER
A
TION
TURNING
THE PHONE
ON/OFF
1.
T
o
turn
on
the
phone
,
press
and
hold
the
P
ower/END
K
ey
for
a
few
seconds
until
the
A
T&T
animation
appears
and
the
melody
begins
to
play
at
same
time
.
2.
T
o
turn
off
the
power,
press
and
hold
the
P
ower/END
K
ey
for
a
few
seconds
.
3.
P
ower
off
A
T&T
animation
appears
and
the
melody
begins
to
play
at
same
time
.
T
OUCH
SCREEN
L
OC
k
M
ODE
Pressing
the
Side
Look
K
ey
temporarily
turns
off
the
display
and
locks
your
device
.
Y
ou
will
still
be
able
to
receive
messages
and
calls
while
your
device
is
in
Lock
Mode.
T
o
w
ak
e
up
your
device
,
press
and
hold
the
Side
Look
K
ey
.
Or
,
simply
open
the
QWERTY
k
eyboard.
Note
USING
S
HOR
TCUT
kEY
T
he
Shortcut
K
ey
allows
you
to
quickly
access
frequently
used
programs
and
functions
including
the
Call,
Browser
,
Messaging,
MyLocker
,
Main
Menu
and
Home
Idle.
24
Y
our
device
automatically
goes
into
lock
mode
when
you
leave
it
idle
afte
r
1
minute
.
T
o
change
this
time
go
to
Menu
icon
,
Drag
Leftw
ard
then
tap
Settings
icon
and
select
Display
>
Auto
Lock
,
select
the
time
you
prefer
and
tap
Save
on
your
touch
screen.

BASIC
OPER
A
TION
IDLE
SCREEN
F
rom
the
Idle
screen,
you
can
access
Main
Menu,
Call,
Address
Book
and
A
T&T
T
v
.
F
rom
the
Landscape
mode
screen,
you
can
access
Inbox,
A
T&TSocial
Net,
E-mail,
IM,
Browser
,
Address
Book
and
More.
U
SING
THE
TOUCHSCREEN
C
AUTIONS
FOR
TOUCH
k
EYS
•
Mak
e
sure
your
hands
are
clean
and
dry
.
•
Y
ou
do
not
need
to
press
hard
on
the
touch
k
eys
to
mak
e
them
work.
Do
not
subject
the
product
to
severe
impact,
as
this
may
damage
the
touch
k
ey
sensors
.
•
Use
the
tip
of
your
finger
to
press
exactly
on
the
touch
k
ey
you
w
ant,
being
careful
not
to
touch
the
k
eys
for
other
functions.
•
T
ouch
k
eys
may
not
work
normally
if
a
mobile
phone
case
or
plastic
cover
is
covering
them.
Also
,
touch
k
eys
may
not
work
if
you
are
wearing
gloves
.
•
K
eep
metal
and
other
conductive
materials
aw
ay
from
the
surface
of
the
touch
k
eys
,
as
contact
with
them
may
result
in
an
error.
TO
OPEN
A
SCREEN
MENU
ITEM:
1.
T
ap
any
application
or
sub
menu
item.
25

BASIC
OPER
A
TION
TO
USE
THE
SCROLL
BAR:
1.
T
ap
and
hold
the
scroll
bar
and
drag
up
or
down.
On
some
screens
such
as
webpages
,
you
can
also
scroll
side
to
side
.
TOUCH
S
CREEN
S
CROLLING
1.
Y
ou
may
touch
and
drag
text
on
the
screen
up
or
down
in
the
direction
you
w
ant
to
move
it,
or
use
your
finger
to
quickly
flick
the
text
in
the
direction
you
w
ant
it
to
move
.
TO
RETURN TO THE
PRE
v
IOUS
SCREEN
:
1.
T
ap
the
Return
button
.
M
A
k
ING
A
C
ALL
WITH
THE
SCREEN
DIAL
BUTTON
1.
Simply
touch
the
screen
dial
button
with
your
finger
to
enter
the
phone
number
then
tap
Call
or
press
the
SEND
K
ey
.
TO
RETURN TO THE IDLE
SCREEN
:
1.
Press
the
P
ower/END
K
ey
multiple
times
to
close
all
the
running
application
to
return
to
IDLE
screen.
26

MENU SUMMA
R
Y
4.1.3.
Albums
4.1.4.
Artists
4.1.5.
Playlists
4.1.6.
Genres
4.1.7.
Settings
4.2.
Music
ID2
4.3.
A
T&T
Radio
4.4.
Mobi
v
J
4.5.
Mak
e
UR
T
ones
5.
Mobile
v
ideo
6.
My
Stuff
6.1.
Online
Lock
er
6.2.
Ringtones/Audio
6.3.
Images
6.4.
v
ideos
6.5.
Other
F
iles
7.
Games
7.1.
T
etris
7.2.
Uno
7.3.
P
acMan
7.4.
Dinner
Dash
Flo
on
the
Go
7.5.
Luxor
Quest
8.
Applications
8.1.
Browser
8.1.1.
MEdia
Net
Home
8.1.2.
F
avorites
8.1.3.
Enter
URL
8.1.4.
History
8.1.5.
Settings
8.2.
Mobile
Banking
8.3.
Loopt
8.4.
My
Cast
W
eather
8.5.
FunScreenz
9-Up
Center Menu
1.
A
T&T
T
v
2.
Messaging
2.1.
Create
New
Message
2.2.
Inbox
2.3.
Outbox
2.4.
Sent
2.5.
Drafts
2.6.
IM
2.7.
E-mail
2.8.
v
oice
Mail
3.
A
T&T
Social
Net
4.
Mobile
W
eb
5.
App
Center
6.
MyLocker
7.
A
T&T
GPS
7.1.
A
T&T
Navigator
7.2.
Where
7.3.
AllSport
GPS
8.
YPmobile
9.
Address
Book
9-Up
Left
Menu
1.
Mobile
Email
2.
IM
3.
PicDial
4.
A
T&T
Music
4.1.
Music
Player
4.1.1.
Now
Playing
4.1.2.
All
Music
27

MENU
SUMMA
R
Y
1.4.5.
Call
W
aiting
1.4.6.
Caller
ID
1.4.7.
Call
Barring
1.4.8.
TTY
1.5.
Security
1.5.1.
Phone
Lock
1.5.2.
PIN
Code
Request
1.5.3.
Change
Phone
P
assword
1.5.4.
Change
PIN
Code
1.5.5.
FDN
1.5.6.
Master
Reset
1.5.7.
Master
Clear
1.6.
Applications
1.6.1.
Messaging
Settings
1.6.2.
Browser
Settings
1.6.3.
Address
Book
Settings
1.6.4.
Camera
Settings
1.7.
XT9
Settings
1.7.1.
W
ord
Prediction
1.7.2.
Spell
Correction
1.7.3.
W
ord
Completion
1.8.
Softw
are
Update
1.8.1.
Continue
Update
1.8.2.
Check
for
Update
1.9.
v
ideo
Share
1.9.1.
Alerts
1.9.2.
Auto
Record
1.9.3.
Service
2.
My
Account
3.
T
ools
3.1.
T
o
Do
3.2.
W
orld
T
ime
3.3.
Notepad
9.
Recent
Histor
y
9.1.
All
Calls
9.2.
Received
Calls
9.3.
Dialed
Calls
9.4.
Missed
Calls
9-Up
Right
Menu
1.
Settings
1.1.
Display
1.1.1.
W
allpaper
1.1.2.
Style
1.1.3.
Greeting
Banner
1.1.4.
Backlight
1.1.5.
T
heme
1.1.6.
Auto
Lock
1.2.
Date
&
T
ime
1.2.1.
T
ime
Zone
Update
1.2.2.
Date
F
ormat
1.2.3.
T
ime
F
ormat
1.3.
Phone
1.3.1.
Language
1.3.2.
Network
Selecting
1.3.3.
Network
Profile
1.3.4.
Headset
T
ype
1.3.5.
USB
Connection
Mode
1.3.6.
Memory
Meter
1.3.7.
Phone
Information
1.4.
Call
1.4.1.
Answer
Mode
1.4.2.
Auto
Redial
1.4.3.
Minute
Minder
1.4.4.
Call
F
orw
arding
28

MENU SUMMA
R
Y
3.4.
Unit
Converter
3.5.
v
oice
Memo
3.6.
Stopwatch
4.
Calendar
5.
Alarm
Clock
6.
Calculator
6.1.
Calculator
6.2.
T
ip
Calculator
7.
Sound
Profile
7.1.
General
7.2.
Outdoor
7.3.
Meeting
7.4.
Headset
7.5.
Flight
8.
Bluetooth
8.1.
Bluetooth
8.2.
Search
Device
8.3.
P
aired
Device
List
8.4.
My
Phone’
s
v
isibility
8.5.
My
Phone’
s
Name
8.6.
Supported
Services
9.
Camera
9.1.
Camera
9.2.
Camcorder
L
ANDSCAPE
M
ODE
M
ENU
1.
Inbox
2.
A
T&T
Social
Net
3.
Email
4.
IM
5
.
Mobile
W
eb
6.
Address
Book
7.
More
7.1.
Call
7.2.
A
T&T
T
v
7.3.
A
T&T
Social
Net
7.4.
Mobile
Web
7.5.
App
Center
7.6.
MyLocker
7.7.
A
T&T
GPS
7.8.
YP
Mobile
7.9.
PicDial
7.10.
A
T&T
Music
7.11.
Mobile
v
ideo
7.12.
My
Stuff
7.13.
Games
7.14.
Applications
7.15.
Recent
History
7.16.
Settings
7.17.
My
Account
7.18.
T
ools
7.19.
Calendar
7.20.
Alarm
Clock
7.21.
Calculator
7.22.
Sound
Profile
7.23.
Bluetooth
7.24.
Camera
29

BASIC
FUNCTIONS
MA
k
ING
A
CALL
M
A
k
E
A
CALL
FROM
DIALP
AD
1.
In
Idle
mode
,
tap
the
Call
icon
.
2.
On
the
Phone
k
eypad,
simply
touch
the
number
k
ey
with
your
finger
to
enter
the
phone
number
.
If
you
tap
a
wrong
number
,
tap
Clear
to
erase
a
number
.
T
o
erase
the
entire
number
,
press
and
hold
Clear
.
3.
T
ap
Call
on
your
device
to
place
the
call
or
press
the
SEND
K
ey
.
M
A
k
E
A
CALL
FROM
PHONE
BOO
k
1.
In
Idle
mode
,
tap
the
Address
Book
icon
.
Y
our
Phone
Book
list
appears
.
2.
T
ap
and
hold
scroll
bar
and
drag
up
or
down
with
your
finger.
3.
T
ap
the
desired
contact
in
the
Phone
Book
list,
then
tap
the
phone
number
that
you
w
ant
to
call.
4.
T
o
place
the
call,
tap
Call
or
press
the
SEND
K
ey
.
M
A
k
E
A
CALL
FROM
C
ALL
H
ISTORY
1.
In
Idle
mode
,
press
the
SEND
K
ey
.
2.
Y
ou
can
select
to
view
different
types
of
calls
including:
All
Calls
,
Received
Calls
,
Dialed
Calls
and
Missed
Calls
.
3.
Select
the
desired
contact
or
phone
number
,
then
tap
Call
or
press
the
SEND
K
ey
.
30

BASIC
FUNCTIONS
ANSWERING
CALLS
1.
When
your
STX-2
rings
or
vibrates
,
tap
Answer
or
press
the
SEND
K
ey
to
answer
the
incoming
call.
(Depending
on
your
phone’
s
settings,
you
may
also
answer
incoming
calls
by
opening
the
phone
or
by
pressing
any
digit
k
ey
.)
W
AIT
/
P
AUSE
FE
A
TURE
P
auses
are
used
for
automated
systems
(i.e
.,
v
oicemail,
calling
cards).
Insert
a
pause
after
a
phone
number
then
enter
another
group
of
numbers
.
T
he
second
set
of
numbers
is
dialed
automatically
after
the
pause
.
T
his
feature
is
useful
for
dialing
into
systems
that
require
a
code
.
1
.
T
o
insert
a
w
ait/pause
,
enter
a
phone
number
then
press
and
hold the
*
button
until
“T“
appears
,
or
press
and
hold
the
#
button
until
“P“
appears
.
2
.
T
ap
Call
or
press
the
SEND
K
ey
to
dial.
31
•
T
yp
e
“P
“
:
When
you
call
automated
systems
(lik
e
banking
services),
you
are
often
required
to
enter
a
password
or
account
number
.
Instead
of
manually
entering
the
numbers
each
time
.
•
T
yp
e
“T“
:
A
two
second
pause
stops
the
calling
sequence
for
two
seconds
and
then
automatically
sends
the
remaining
digits
.
T
o
ignore
incoming
calls
,
tap
Ignore
or
press
the
P
ower/END
K
ey
.
BASIC
FUNCTIONS
3-
W
A
Y
CALLING
With
3-W
ay
Calling,
you
can
talk
to
two
people
at
the
same
time
.
When
using
this
feature,
the
normal
airtime
rates
will
be
applied
for
each
of
the
two
calls
.
1.
Enter
the
number
you
wish
to
call
then
tap
Call
or
press
the
SEND
Ke
y
.
2.
Once
you
have
established
the
connection,
enter
the
second
number
you
wish
to
call
then
tap
Call
or
press
the
SEND
K
ey
.
3.
When
you’re
connected
to
the
second
party,
tap
3-W
ay
call
icon
again
to
begin
your
3-W
ay
call.
CALLER
ID
FUNCTION
Identifies
caller
by
displaying
their
phone
number
.
If
the
caller’
s
name
and
number
are
already
stored
in
your
phone
book,
their
name
will
appear
.
Note
CALL
W
AITING
FUNCTION
Notifies
you
of
an
incoming
call
when
you
are
already
on
a
call
by
sounding
a
beep
tone
and
displaying
the
caller’
s
phone
number
.
1.
T
o
answer
another
call
while
on
the
phone
,
tap
Call
or
press
the
SEND
K
ey
.
T
his
places
the
first
call
on
hold.
T
o
switch
back
to
the
first
caller
,
tap
Call
or
press
the
SEND
K
ey
again.
32
T
his
is
a
system
dependent
feature.
Please
contact
your
service
provider
for
detail
s
.

BASIC
FUNCTIONS
Note
ADJUSTING
v
OLUME
Adjusts
the
volume
of
the
ringer,
k
ey
beep
and
earpiece
.
1.
In
idle
mode
,
press
the
Side
v
olume
K
ey
up
or
down.
Choose
from
“General“,
“Outdoor“,
“Meeting“,
“
v
ibrate“,
“Silent“or
“Level
1
~
Level
7“.
Note
M
A
kING
A
N
INTERN
A
TIONAL
CALL
1.
Press
and
hold
0
K
ey
on
the
Phone
k
eypad
until
the
“+“
sign
appears
.
T
he
“+“
replaces
the
international
prefix
of
the
country
that
you
are
calling.
2.
Enter
the
full
phone
number
you
w
ant
to
dial,
then
tap
Call
or
press
the
SEND
K
ey
.
33
•
T
o
adjust
the
conversation
phone
volume,
you
must
do
it
during
a
call.
Adjusting the volume
at
anothe
r
time
will
affect the
ring, notification,
and
Music
sound
levels
.
•
When
you
activate
V
ibrate
mode
,
sound
will
automatically
be
muted
and
your
device
will
vibrate
when
an
incoming
call
is
received.
Call
W
aiting
is
a
system
dependent
feature.
Please
contact
your
service
pro
v
ider
for
detail
s
.

DURING
A
CALL
MUTE
(UNMUTE)
If
you
press
Mute
during
a
call,
the
person
you
are
speaking
with
cannot
hear
you
or
any
sounds
from
your
side
of
the
conversation.
However
,
you
can
still
hear
them.
T
o
activate
Mute
during
a
call,
tap
Mute
.
SPEA
k
ERPHONE
T
o
activate
speak
erphone
during
a
call:
1.
T
o
activate
the
speak
erphone
while
in
answering
or
calling
modes
,
tap
SPK
On
(Speak
erphone
On/Off).
RECENT
CALLS
T
o
view
your
Recent
Call
List
during
a
call:
1.
T
ap
Options
,
then
tap
Recent
Calls
.
FIND
NAME
T
o
select
a
phone
number
in
your
internal
Contact
List:
1.
T
ap
Options
,
then
tap
F
ind
Name
.
34
•
T
o
deactivate,
tap
Unmute.
•
T
he
phone
will
automatically
unmute
in
“Emergency
Call“
or
“Callback
Mode“.

DURING
A
CALL
MESSAGING
T
o
send
a
text
message
during
a
call:
1.
T
ap
Options
,
then
tap
Messaging
.
BLUETOOTH
T
o
connect
to
a
Bluetooth-enabled
device
,
such
as
a
wireless
headset
(sold
separately):
1.
T
ap
Options
,
then
tap
Bluetooth.
35

MA
k
ING
AN
EMERGENCY
CALL
T
he
911
feature
puts the
phone
in
the
Emergency
Call
Mode when
you
dial
the
preprogrammed
emergency
number
911.
It
also
operates
in
Lock
Mode
and
outside
the
service
area.
911
IN
LOC
k
MODE
T
he
911
call
service
is
av
ailable
even
in
Lock
Mode.
1.
Enter
“911“,
then
tap
Call
.
2.
T
he
call
connects
.
3.
When
the
call
ends
,
the
phone
returns
to
Lock
Mode.
911
USING
A
N
Y
A
v
A
ILABLE
SYSTEM
1.
Enter
“911“,
then
tap
Call
.
2.
T
he
call
connects
.
3.
T
he
phone
maintains
Emergency
Mode
and
the
phone
can
receive
an
incoming
call
from
any
av
ailable
system.
However
,
it
can’t
mak
e
a
call.
Note
36
T
he
911
call
does
not
appear
in
the
Emergency
call
list.

vIDEO
S
HARE
Share
events
the moment they
happen.
v
ideo
Share
allows
you
to
stream
one-w
ay
live
or
pre-recorded
video
while
on
a
mobile-to-mobile
voice
call.
v
ideo
Share
is
a
one-w
ay
video,
two-w
ay
audio
connection.
Only
the
sender
is
charged.
S
T
A
R
T
A
vIDEO
S
HARE CALL
1.
Mak
e
a
normal
voice
call.
2.
Once
the
call
is
connected,
if
v
ideo
Share
is
av
ailable,
the
v
ideo
Share
button
becomes
av
ailable
on
each
device
.
T
he
button
will
only
become
av
ailable
if
both
parties
are
in
3G
coverage
and
have
a
v
ideo
Share
feature.
3.
T
ap
the
v
ideo
Share
button
to
invite
the
called
party
to
view
video
from
your
device
.
4.
Y
our
device
will
initiate
the
video
and
send
an
invitation
to
the
connected
party
to
accept
the
video
stream.
A
CCEPT
A
vIDEO
S
HARE CALL
1.
When
receiving
a
v
ideo
Share
invitation,
the
name
or
number
of
the
person
initiating
the
call
will
appear
on
the
screen
with
the
prompt
“…w
ants
to
share
video
with
you”.
2.
T
ap
Ye
s
and
the
v
ideo
Share
session
will
begin
automatically.
37
vIDEO
S
HARE
E
ND
A
vIDEO
S
HARE
C
A
LL
1.
T
o
end
a
v
ideo
Share
session
and
continue
the
voice
call,
tap
the
v
ideo
icon
and
continue
talking.
2.
T
o
end
both
the
v
ideo
Share
session
and
the
voice
call,
tap
the
END
button
.
Note
Note
38
v
ideo
Share
is
a
one
w
ay
video
and
two
w
ay
audio
connection
between
two
v
ideo
Share
devices
.Both
devices
must
be
provisioned
fo
r
v
ideo
Share
and
be
in
3G
service
areas
(a
3G
icon
must
appear
by
the
signal
bars
prior
to
a
call
being
placed).
Only
the
person
who
initiated
the
v
ideo
Share
is
charged.
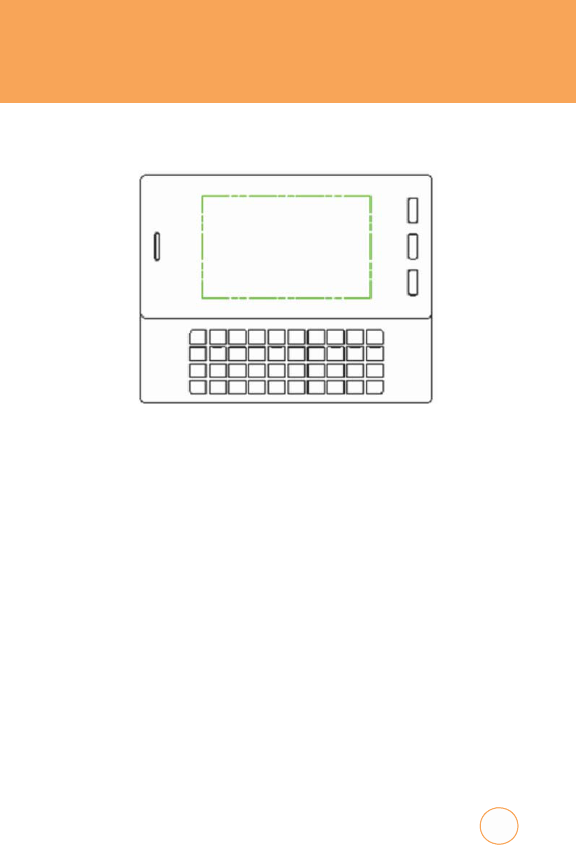
CHAPTER
3
MEMOR
Y
FUNCTION
C
HAPTE
R
3
.
M
E
MOR
Y
F
U
NCTION
T
his
chapter
addresses
memory
functions
including:
Storing
a
Phone
Numbe
r
Entering
Letters
,
Numbers
&
Symbols
Making
a
Call
T
hrough
the
Contact
List
39

STORING
A
PHONE
NUMBER
T
he
phone
book
stores
up
to
500
entrie
s
.
1.
In
Idle
mode
,
tap
the
Call
icon
.
2.
F
rom
the
Phone
Screen,
enter
the
phone
number
,
then
tap
Options
>
Save
Contact
.
3.
T
ap
“Phone
(“New
Entry“
or
“Existing
Entry“)“
or
“SIM
(“New
Entry“
or
“Existing
Entry“)“.
4.
If
“Existing
Entry“
is
selected,
your
contact
list
is
displayed.
Choose
the
entry
to
add
the
number
,
then
tap
Done
.
Select
the
type
of
numb
e
you
are
adding
from
the
icon
list.
T
ap
Save
.
T
ap
primary
phone
number
,
then
tap
Done
to
save
contact.
5.
If
“New
Entry“
is
selected,
the
New
entry
icon
list
appears
.
T
ap
to
choose
the
type
of
number
you
are
adding.
Enter
a
name
by
tapping
the
“F
irst
Name“
and
“Last
Name“
fields.
T
o
change
the
input
mode
,
tap
Options
.
T
ap
to
enter
information
in
other
fields
for
the
contact,
including
“Mobile“,
“No
Group“
and
“Ringtone“.
40
•
Phone
n
umb
er:
T
o
insert
another
phone
number
for
the
contact,
enter
the
phone
number
.
T
ap
to
select
type
(Mobile
,
Home
,
Office
,
P
ager
,
Home
F
AX,
Office
F
AX,
Etc
Number)
of
phone
number
.
•
G
roup:
T
o
set
a
group
for
the
contact,
highlight
the
Group
Name
.
T
ap
to
select
“No
Group“,
“Business“,
“F
amily“
or
“F
riends“.
•
Ri
ngtone
:
T
o
set
a
ringtone
for
the
contact,
highlight
a
Ringtone
.
T
ap
to
select
“
A
T&T
Ringtone“,
“Basic
Ringtone
1
~
Basic
Ringtone
3“,
“Sky
lounge“,
“Rainforest“,
“F
ighters“,
“Love“,
“Funny
guy“
or
“Happiness“.

STORING
A
PHONE
NUMBER
6
.
T
o
store
the
entry
in
your
contact
list,
tap
Save
.
41
T
ap
Options
the
Add
Optional
F
ield
to
access
the
following
options:
•
Mobi
le
•
Home
•
O
f
fice
•
P
ager
•
E
tc
Numb
er
•
Home
F
A
X
•
O
f
fice
F
A
X
•
E-mai
l
•
U
RL
•
Ins
t
ant
Message
•
Pic
tu
r
e
•
Bi
r
th
day
•
C
omp
any
•
Job
Title
•
A
dd
r
ess
•
Memo
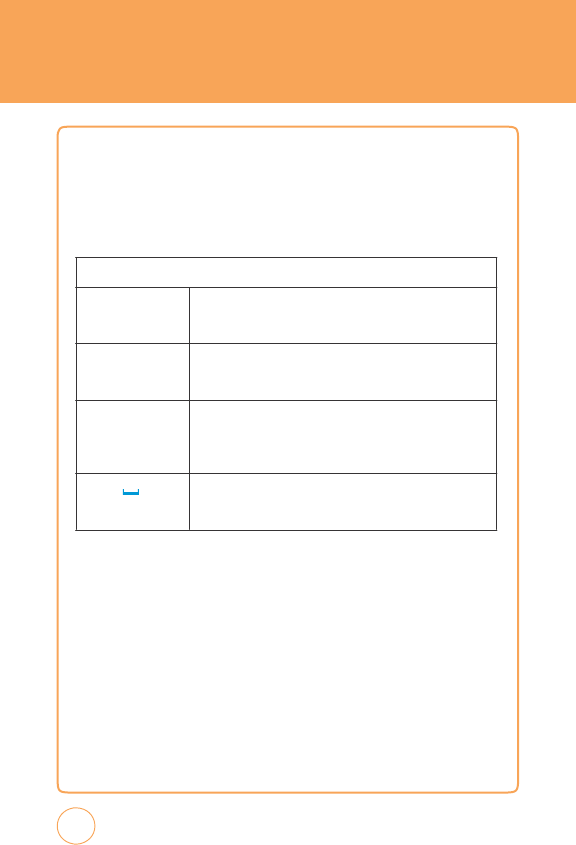
ENTERING
LETTERS,
NUMBERS
&
SYMBOLS
T
he
input
mode
will
automatically
be
acti
v
ated when
it
is
necessary
to
enter
letters
and
numbers
.
T
here
are
4
av
ailable
modes:
Alphabet
mode
(Abc/ABC),
Numeric
mode
(123),
Symbol
mode
(Symbols)
and
Emoticon
mode
(Emoticon).
T
he
input
mode
indicator
appears
on
the
lower
portion
of
the
display
when
letters
and
numbers
are
entered.
42
Using
the
touch
scr
een
keypad:
T
ap
Options
T
o
change
the
entry
mode
-
[Abc]
[123]
[Symbols]
[Emoticon]
T
ap
Del
T
ap
to
delete
a
character
.
T
ap
and
hold
to
delete
the
entire
entry.
T
ap
abc
icon
T
ap
to
select
a
letter
case
of
the
standard
text
input.
[Abc],
[ABC]
and
[abc]
indicate
the
standard
text
input.
T
ap
to
change
mode
.
T
ap
icon
T
ap
to
accept
a
word
and
add
a
space
.
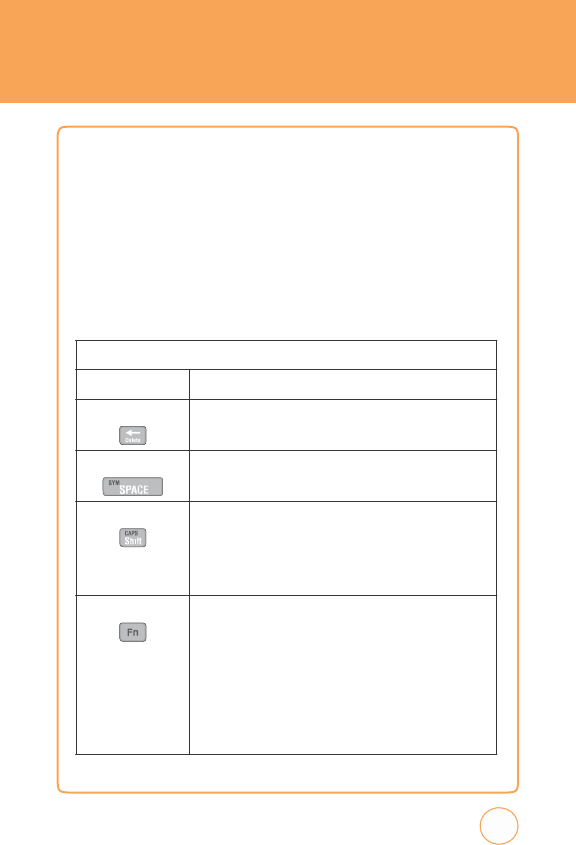
ENTERING
LETTERS,
NUMBERS
&
SYMBOLS
USING
QWE
R
TY
k
EYBOARD
Y
our
device
has
a
specifically
designed
QWERTY
k
eyboard
that
provides
a
superior
typing
experience
on
a
small
handheld
for
easy
and
comfortable
input.
Y
ou
can
use
all
of
the
handset
functions
with
the
k
eyboard
either
closed
or
open.
When
you
open
the
k
eyboard
you
have
the
extra
benefit
of
a
full
messaging
k
eyboard.
T
he
handheld
includes
a
fully-functional
QWERTY
k
eyboard
you
can
use
to
compose
text
for
email
messages
,
notes
,
and
so
on.
43
Using
the
QWERTY
K
eypad:
T
ap
Options
T
o
change
the
entry
mode
-
[Symbols]
[Emoticon]
Press
Delete
K
ey
Press
to
delete
a
character
.
Press
and
hold
to
delete
the
entire
entry.
Press
SYM
K
ey
Press
the
Space
k
ey
to
type
a
blank
space
.
Press
CAP
K
ey
T
o
type
upper
-case
letters,
hold
down
the
CAP
k
ey
and
then
press
one
or
more
letter
k
eys
.
T
o
return
to
typing
lower
-case
letters,
press
and
release
the
CAP
k
ey
and
then
press
a
letter
k
ey
.
Press
FN
K
ey
T
o
type
the
number
or
symbol
printed
in
orange
at
the
top
of
a
k
ey
,
hold
down
the
orange-colored
FN
k
ey
and
then
press
one
or
more
letter
k
eys
.
T
o
return
to
typing
letters,
press
and
release
the
FN
k
ey
and
then
press
a
letter
k
ey
.
T
o
write
in
number
or
symbol
printed
in
orange
at
the
top
of
a
k
ey
only,
press
the
FN
k
ey
twice
.

ENTERING
LETTERS,
NUMBERS
&
SYMBOLS
Note
S
T
ANDARD
INPUT
MODE
Use
the
QWERTY
k
eyboard
to
enter
letters,
numbers
and
characters
.
1.
Enter
letters
using
the
k
eypad.
T
o
change
the
input
mode
,
tap
Options
.
2.
T
o
enter
a
space
,
press
SYM
K
ey
.
T
he
cursor
will
automatically
move
to
the
next
column.
3.
Repeat
until
letters
are
entered.
4.
T
o
delete
one
letter
,
press
Delete
K
ey
.
T
o
delete
the
entire
entry,
press
and
hold
Delete
K
ey
.
NUMERIC MODE
T
o
enter
numbers:
1.
Press
the
FN
K
ey
.
2.
T
o
enter
a
number
,
press
its
corresponding
digit
k
ey
.
T
o
enter
numbers
consecutively
,
double-press
the
FN
K
ey
.
44
F
or
best
performance
in
low-light
environments
,
your
handset
includes
a
backlight feature
that
can
illuminate both
the
display and
the
k
eyboard
so
you
can
k
eep
reading
and
typing.

ENTERING
LETTERS,
NUMBERS
&
SYMBOLS
SYMBOL
MODE
T
o
enter
symbols:
1.
T
ap
Options
>
Symbols
.
2.
T
ap
the
/
k
eys
to
locate
the
symbol
you
w
ant
to
enter
then
press
Done
.
EMOTICON
MODE
T
o
enter
Emoticons:
1.
T
ap
Options
>
Emoticon
.
2.
T
ap
the
/
k
eys
to
locate
the
Emoticon
you
w
ant
to
enter
then
press
Done
.
45
MA
k
ING
A
CALL
THROUGH
THE
CON
T
ACT
LIST
ONE-TOUCH
DIALING
Ideal
for
frequently
dialed
numbers
,
this
feature
allows
entries
in
your
contact
list
to
be
dialed
via
the
k
eypad
with
only
one
k
ey
press
.
ONE-TOUCH DIALING
2-9:
Press
and
hold
the
corresponding
memory
number
for
more
than
1
second.
Note
46
•
If
no
phone
number
is
stored
in
the
location
entered,
“Empty
Speed
Dial
Assign
Now?“
will
appea
r
on the
screen.
•
Location
1
is
reserved
for
voicemail.
Location
2-9
are
unassigned.
T
o
assign
a
speed
dial
location,
please
see
page
76.

CHAPTER
4
STX-2
TIPS
&
TRIC
k
S
C
HAPTE
R
4
.
STX-2 TIPS
&
TRI
C
kS
STX-2
T
ips
&
T
rick
s
47

STX-2
TIPS
&
TRIC
k
S
N
A
v
IG
A
TING
&
T
OUCH
S
CREEN TIPS
•
F
or
optimal
touch
screen
performance
,
use
the
tip
of
your
finger
to
touch
the
center
of
a
touch
k
ey
.
A
light
tap
will
do.
(Do
not
use
a
foreign
object
or
your
fingernail
on
the
screen.)
•
Press
and
drag
your
finger
up
or
down
to
scroll.
A
beep
will
sound
when
you’ve
reached
the
top
or
bottom
of
a
menu.
T
o
return
to
the
previous
screen
tap
the
B
A
CK
icon
.
•
When
scrolling
on
the
text
screen,
touch
and
drag
the
text
on
the
screen
up
or
down
in
the
direction
you
w
ant
to
move
it,
or
use
your
finger
to
quickly
flick
the
text
in
the
direction
you
w
ant
it
to
move
.
Y
ou
can
also
navigate
through
text
and
applications
using
the
up
and
down
arrows
on
your
QWERTY
k
eyboard.
•
Y
ou
may
also
scroll
thru
the
text
screen
by
pressing
the
V
olume
Up/
Down
k
ey
on
the
side
of
your
STX-2.
T
his
allows
for
a
page
scroll.
M
ESSAGING
TIPS
•
T
o
access
the
mobile
web
from
idle
mode
,
tap
the
Menu
icon
then
tap
Messaging
icon
and
select
Create
New
Message
.
Input
your
message
,
then
T
ap
To
,
input
the
phone
number
then
tap
Send
.
Y
ou
may
also
switch
back
and
forth
by
pressing
the
T
AB
k
ey
on
your
k
eyboard.
•
T
o
add
media
to
your
message
,
tap
Add
Media,
and
select
from
an
Image
,
v
ideo
or
Audio.
48

STX-2
TIPS
&
TRIC
k
S
B
ROWSING TIPS
•
T
o
access
the
mobile
web
from
idle
mode
,
tap
the
Menu
icon
then
tap
Mobile
Web
icon
and
select
Media
Net
Home
.
•
T
o
personalize
your
Media
Net
home
page
,
from
the
MEdia
Net
home
page
,
tap
EDIT
(next
to
“My
Links”).
T
ap
the
content
you
would
lik
e
added,
moved,
or
deleted
from
your
MEdia
Net
home
page
.
•
T
o
increase
o
r
decrease
the
size
o
f
the
onscreen
text,
T
ap
select
your
viewing
size
.
and
M
USIC
TIPS
•
T
o
listen
to
music
on
your
device
,
insert
your
microSD™
card
(gold
contacts
facing
up
tow
ards
the
screen)
with
music
saved
on
it
into
the
slot
at
the
upper
part
of
the
exposed
right
panel
of
the
phone
.
F
rom
idle
mode
,
tap
the
Menu
icon
,
Drag
Rightw
ard
then
tap
A
T&T
Music
and
select
Music
Player
from
the
list,
then
choose
your
song.
•
T
o
adjust
the
volume,
press
the
v
olume
Up/Down
Keys
located
on
the
upper
left
side
of
your
STX-2.
49
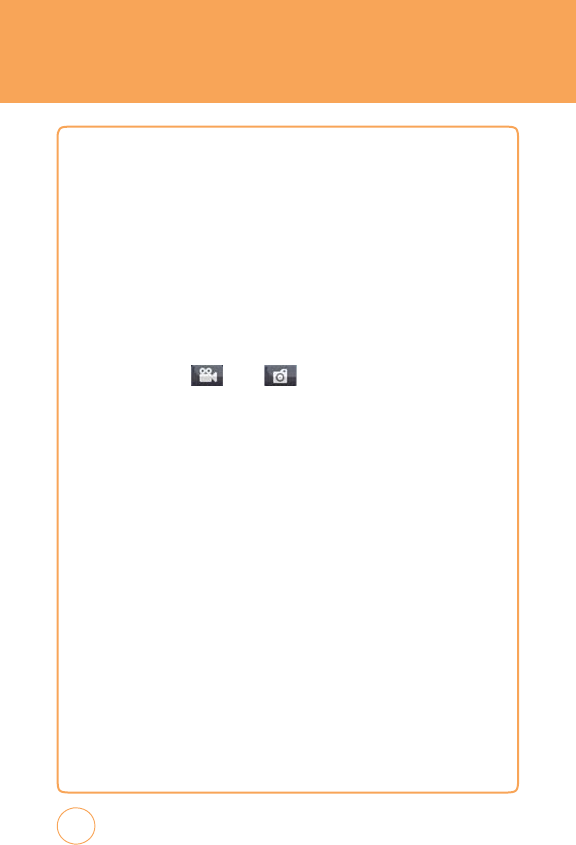
STX-2
TIPS
&
TRIC
k
S
C
AMERA
TIPS
•
T
o
tak
e
a
picture,
press
and
hold
the
Side
Camera
K
ey
or,
in
Idle
mode
,
tap
the
Menu
icon
,
Drag
Leftw
ard
and
select
Camera
>
Camera
.
Rotate
the
phone
horizontally.
Press
the
Side
Camera
K
ey
to
tak
e
the
picture.
•
T
o
record
video,
in
Idle
mode
,
tap
the
Menu
icon
,
Drag
Leftw
ard
and
select
Camera
>
Camcorder
.
Rotate
the
phone
horizontally.
Press
the
Side
Camera
K
ey
to
start/stop
recording.
•
F
or
quick
access
to
camcorder
from
camera
screen
(or
vice
versa)
tap
the
top
right
icon
–
or
–
.
•
T
o
adjust
the
brightness
,
use
the
controls
on
the
lower
right
bottom
of
the
display
.
•
T
o
zoom
in
or
out
of
a
photo
,
tap
the
T
icon
or
the
W
icon
that
appears
i
the
lower
left
corner
of
the
display
.
T
he
zoom
function
will
only
work
on
the
camera
if
the
resolution
is
set
to
640
X
480
or
320
X
240,
and
on
the
camcorder
if
the
resolution
is
set
to
176
X
144.
•
T
o
send
a
picture
or
video
via
message
after
taking
it,
tap
the
Envelope
icon
that
appears
in
the
middle
of
the
bottom
of
the
display
50

STX-2
TIPS
&
TRIC
k
S
GENERAL
TIPS
•
T
o
turn
your
STX-2
on/off
,
press
the
P
ower/END
K
ey
.
•
Quickly
pressing
the
Side
Lock
K
ey
temporarily
turns
off
the
display
and
locks
your
device
.
Unlock
the
device
by
press
and
hold
the
Side
Lock
K
ey
.
Or
,
simply
open
the
QWERTY
k
eyboard.
•
T
o
personalize
your
STX-2,
in
idle
mode
,
tap
the
Menu
icon
then
tap
App
Center
icon
.
F
rom
here
,
you
can
shop
for
and
download
ringtones,
games
,
graphics
,
multimedia
files,
applications
and
videos
.
•
T
o
access
turn-by-turn
voice
and
onscreen
driving
directions,
in
idle
mode
,
tap
the
Menu
icon
then
tap
A
T&T
GPS
icon
.
T
ap
A
T&T
Navigator
then
follow
the
on-screen
directions.
•
T
o
stay
organized
and
on
schedule
with
time-saving
tools
including
a
calendar
,
alarm
clock
and
calculator,
tap
the
Menu
icon
,
Drag
Leftw
ard
then
tap
Calendar
icon
or
Alarm
Clock
icon
or
Calculator
icon
.
•
T
o
w
atch
news
,
sports
,
weather
and
entertainment
clips
on
the
go,
tap
the
Menu
icon
,
Drag
Rightw
ard
then
tap
Mobile
v
ideo
icon
.
Y
ou
are
the
n
tak
en
to
your
default
Cellular
v
ideo
homepage
.
51

MEMO
52

CHAPTER
5
MENU
FUNCTION
C
HAPTE
R
5
.
M
E
N
U
F
U
NCTION
T
his
chapter
addresses
accessing
the
menu
and
using
its
functions
and
features
to
customize
your
STX-2.
A
T&T
T
v
Messaging
A
T&T
Social
Net
Mobile
WEB
AP
P
Center MyLocke
r
A
T&T
GPS
YP
Mobile
Address
Book
Mobile
Email
IM
PicDial
A
T&T
Music
Mobile
v
ideo
My
Stuff
Games
Applications
Recent
History
Settings
My
Account
T
ools
Calendar
Alarm
Clock
Calculator
Sound
Profile
Bluetooth
Camera
53
A
T&T
T
v
A
T&T
T
v
T
he
A
T&T
Mobile
T
v
(Mobile
T
v
)
service
allows
you
to
w
atch
an
exciting
lineup
of
live,
simulcast
or
time-shifted
full-length
episodes
of
entertainment,
news
,
sports
,
and
kids'
programming
from
some
of
the
most
popular
networks,
including
CBS
Mobile
,
CNBC,
CNN
Mobile
Live
,
Comedy
Central,
Crackle
,
ESPN
Mobile
T
v
,
FO
X
Mobile
,
FO
X
News
,
MSNBC,
MT
v
,
NBC
2Go
,
and
Nickelodeon.
Subscribe
to
and
start
w
atching
your
favorite
programs
immediately.
T
he
Program
Guide
is
simple
to
use
and
navigate,
allowing
you
to
change
from
one
channel
to
the
next
quickly
and
easily
.
F
or
more
information
about
A
T&T
Mobile
T
v
,
visit
http://www
.att.com/mobiletv
.
1.
In
Idle
mode
,
tap
the
Menu
icon
then
tap
A
T&T
T
v
icon
.
Note
54
•
Y
ou
must
be
in
an
A
T&T
Mobile
TV
coverage
area
to
subscribe
.
•
Programming and
networ
k
coverage area
is
subject
to
change
.
Mobile
T
v
services
may
require
separate
subscription
and
activ
ation
fees
.
Contact
A
T&T
for
details.

M
ESSAGING
C
RE
A
TE
N
EW
M
ESSAGE
T
o
send
a
new
message:
1.
In
Idle
mode
,
tap
the
Menu
icon
then
tap
Messaging
icon
and
select
Create
New
Message
.
2.
Input
your
message
.
3.
T
ap
To
,
input
the
phone
number
.
55
F
rom
the
Message
screen,
tap
Options
to
choose
from:
•
S
y
mb
ols:
Allows
you
to
enter
symbols
.
•
E
moticon
:
Allows
you
to
enter
emoticons
.
•
A
dd
C
ont
ac
t
s:
Allows
you
to
insert
contact
information
into
the
message
.
•
A
dd
Format:
Allows
you
to
access
the
T
ext
T
emplates
,
Subject,
vCard
and
vCalendar
.
•
Defau
lt
Sl
ide
Du
ration
:
Enter
the
slide
duration
time
.
(1~30sec)
•
Save
as
Draf
t
s:
T
o
save
a
message
to
“Drafts“
folder.
•
Send
i
ng
Set
ti
ngs:
-
Priorit
y:
Select
“High“,
“Normal“
or
“Low“.
-
V
alid
it
y
Perio
d
:
Select
“1
Hour“,
“2
Hours“,
“1
Day“,
“1
W
eek“
or
“Maximum“.
-
Del
iver
y
Rep
or
t:
Select
“On“
or
“Off“.
-
Read
Rep
or
t:
Select
“On“
or
“Off“.
T
he
“Priority“
and
“
v
alidity
P
eriod“
menus
only
appear
when
you
create
MMS
message
.
•
A
dd
Sl
ide
:
Allows
you
to
add
a
slide
to
your
message
.
•
Pr
eview:
T
o
preview
a
created
MMS
massage
.
T
he
“Default
Slide
Duration“,
“Save
as
Drafts“
and
“Preview“
menus
only
appear
when
you
create
MMS
message
.
F
rom
the
Message
screen,
tap
Add
Media
to
add
an
Image
,
v
ideo
or
Audio
file
to
your
message:

M
ESSAGING
4
.
T
o
send
message
,
tap
Send
.
I
NBOX
T
he
Inbox
manages
received
messages
.
1.
Slide
open
the
QWERTY
k
eyboard.
T
ap
the
Inbox
icon
.
2
.
T
ap
a
message
.
T
he
message
is
displayed.
T
o
reply
to
the
message
,
tap
Reply
,
to
delete
it,
tap
Delete
.
56
F
rom
the
Inbox
screen,
tap
Options
to
choose
from:
•
Delete
Read
messages:
Delete
all
Read
messages
.
•
Sele
c
t&delete
:
“Delete
Selected
message?“
>
Y
es
or
No
.
•
Delete
al
l
:
“Delete
all
Messages
?“will
appear
.
T
ap
Ye
s
or
No
.
F
rom
the
To
screen,
tap
Options
to
choose
from:
•
Re
cent
Message
:
Look
up
a
number
from
your
recent
message
list.
•
Re
cent
Cal
ls:
Look
up
a
number
from
your
recent
call
list.
•
Change
to
T
o
:
T
ap
to
access
the
“T
o“
field.
•
Change
to
CC
:
T
ap
to
access
the
“CC“
field.
•
Change
to
BC
C
:
T
ap
to
access
the
“BCC“
field.
•
Send
i
ng
Set
ti
ngs:
-
Priorit
y:
Select
“High“,
“Normal“
or
“Low“.
-
V
alid
it
y
Perio
d
:
Select
“1
Hour“,
“2
Hours“,
“1
Day“,
“1
W
eek“
or
“Maximum“.
-
Del
iver
y
Rep
or
t:
Select
“On“
or
“Off“.
-
Read
Rep
or
t:
Select
“On“
or
“Off“.
T
he
“Priority“
and
“
v
alidity
P
eriod“
menus
only
appear
when
you
create
MMS
message
.
•
Pr
eview:
T
o
preview
a
created
MMS
massage
.
Y
ou
may
also
add
a
number
from
your
address
book
by
tapping
Contacts
and
looking
up
a
phone
number
from
your
Contact
List.
T
he
“Sending
Settings“
and
“Preview“
menus
only
appear
when
you
create
messages
.

M
ESSAGING
OUTBOX
T
o
manage
Outbox
messages:
1.
In
Idle
mode
,
tap
the
Menu
icon
then
tap
Messaging
icon
and
select
Outbox.
2.
T
o
delete
a
message
,
tap
Options
.
T
ap
Select
&
Delete
or
Delete
All
>
Ye
s
or
No
.
3.
T
ap
a
message
.
T
he
message
is
displayed.
4
.
T
o
resend
message
,
tap
Resend
.
57
F
rom
the
Outbox
screen,
tap
Options
to
choose
from:
•
Play:
T
o
play
Outbox
MMS
message
.
•
E
d
it:
Change
the
recipient’
s
number
or
a
message
.
•
Information
:
T
o
show
Outbox
message
information.
•
E
rror
S
t
atus:
T
o
show
send
Error
message
information.
T
he
“Play“,
“Error
Status“
and
“Information“
menus
only
appear
when
you
receive
MMS
message
.
F
rom
the
Inbox
screen,
tap
Options
to
choose
from:
•
Reply:
Replies
to
the
message
.
•
For
war
d
:
Send
the
message
to
another
person.
•
Save
cont
ac
t:
Save
the
phone
number
in
contacts
.
•
Extrac
t
dat
a:
Extract
phone
number
,
e-mail,
URL
included
in
the
message
.
•
Save
item
:
Select
to
save
a
graphic,
sound
or
other
object
included
in
MMS
.
•
Information
:
T
o
show
received
message
information.
T
he
“Reply“,
“Save
item“,
and
“Information“
menus
only
appear
when
you
i
MMS

M
ESSAGING
S
ENT
T
o
manage
Sent
messages:
1.
In
Idle
mode
,
tap
the
Menu
icon
then
tap
Messaging
icon
and
select
Sent
.
2.
T
o
delete
a
message
,
tap
Options
.
T
ap
Select
&
Delete
or
Delete
All
>
Ye
s
or
No
.
3.
T
ap
a
message
.
T
he
message
is
displayed.
T
o
forw
ard
the
message
to
another
recipient,
tap
F
orw
ard
.
T
o
delete
the
message
,
tap
Delete
.
D
RAFTS
T
o
manage
Drafts
messages:
1.
In
Idle
mode
,
tap
the
Menu
icon
then
tap
Messaging
icon
and
select
Drafts
.
2.
T
o
delete
a
message
,
tap
Options
.
T
ap
Select
&
Delete
or
Delete
All
>
Ye
s
or
No
.
3.
T
ap
a
message
.
T
he
message
is
displayed.
58
F
rom
the
Sent
screen,
tap
Options
to
choose
from:
•
Information
:
T
o
show
sent
message
information.
•
For
war
d
:
Send
the
message
to
another
person.

M
ESSAGING
4
.
T
o
send
message
,
tap
Send
.
IM
IM
allows
you
to
use
your
AIM,
Windows
Live
and
Y
ahoo!
Messenger
on
your
STX-2.
Y
ou
can
exchange
messages
with
your
friends
and
check
their
online
status
while
you're
aw
ay
from
the
computer.
S
ET
U
P
IM
1.
Slide
open
the
QWERTY
k
eyboard.
T
ap
the
IM
icon
.
2.
T
ap
the
IM
community
service
you
w
ant
to
use
.
59
F
rom
the
Drafts
screen,
tap
Options
to
choose
from:
•
S
y
mb
ols:
Allows
you
to
enter
symbols
.
•
E
moticon
:
Allows
you
to
enter
emoticons
.
•
A
dd
C
ont
ac
t
s:
Allows
you
to
insert
contact
information
into
the
message
.
•
A
dd
Format:
Allows
you
to
access
the
T
ext
T
emplates
,
Subject,
vCard
and
vCalendar
.
•
Defau
lt
Sl
ide
Du
ration
:
Enter
the
slide
duration
time
.
(1~30sec)
•
Save
as
Draf
t
s:
T
o
save
a
message
to
“Drafts“
folder.
•
Send
i
ng
Set
ti
ngs:
-
Priorit
y:
Select
“High“,
“Normal“
or
“Low“.
-
V
alid
it
y
Perio
d
:
Select
“1
Hour“,
“2
Hours“,
“1
Day“,
“1
W
eek“
or
“Maximum“.
-
Del
iver
y
Rep
or
t:
Select
“On“
or
“Off“.
-
Read
Rep
or
t:
Select
“On“
or
“Off“.
T
he
“Priority“
and
“
v
alidity
P
eriod“
menus
only
appear
when
you
create
MMS
message
.
•
A
dd
Sl
ide
:
Allows
you
to
add
a
slide
to
your
message
.
•
Pr
eview:
T
o
preview
a
created
MMS
massage
.
F
rom
the
Drafts
screen,
tap
Add
Media
to
allows
you
to
insert
images
,
videos
and/or
audio
to
your
message
.

M
ESSAGING
S
IGN
I
N
1.
T
ap
and
type
your
existing
ID
.
2.
T
ap
the
password
field
and
type
your
password.
3.
T
ap
Sign
In.
4.
A
list
of
contacts
appear
on
the
screen.
5.
T
ap
Options
to
change
your
status
or
add
a
contact.
Y
ou
can
sign
in
multiple
communities.
6.
T
o
sign
into
another
community,
tap
Home
and
tap
the
other
IM
community
service
you
w
ant
to
use
.
7.
T
ap
and
type
your
existing
ID
.
8.
T
ap
the
password
field
and
type
your
password.
S
END
IM
1.
Select
a
contact
who
you
w
ant
to
send
IM.
2.
T
ap
Options
>
Send
IM
.
3.
T
ype
your
message
in
the
input
field,
then
tap
Send
.
4.
T
ap
Options
to
insert
emoticon
or
quick
text.
60

M
ESSAGING
RECEI
v
E
IM
1.
Select
a
conversation
that
you
w
ant
to
join.
2.
T
ap
Options
>
Open
.
Once
you’re
signed
in,
you
can
receive
an
IM
even
if
you
are
not
in
the
IM
menu.
S
IGN OUT
1.
T
ap
the
IM
community
service
you
w
ant
to
sign
out
of
.
2.
T
ap
Options
>
Sign
Out.
E
MAIL
Email
allows
you
to
access
your
Y
ahoo!
Mail,
A
OL
Mail,
AIM
Mail,
Windows
Live
Hotmail,
A
T&T
Y
ahoo!,
BellSouth
and
Other
provider’
s
accounts
on
your
STX-2.
S
ET
U
P
E
MAIL
1.
Slide
open
the
QWERTY
k
eyboard.
T
ap
the
Email
icon
.
2.
T
ap
the
email
provider
you
w
ant
to
use
.
S
IGN
I
N
1.
T
ap
and
type
your
existing
email
ID
.
2.
T
ap
the
password
field
and
type
your
password.
3.
T
ap
Sign
In.
4.
Y
ou
can
choose
Inbox,
Drafts
,
Sent
and
T
rash
.
61

M
ESSAGING
5.
T
ap
Options
to
select
Read,
Delete
or
Compose
New.
OPENING
AN
E
MAIL
1.
T
ap
Read
after
highlighting
the
email
subject
line
you
w
ant
to
open
by
scrolling
the
bar
.
2.
Once
the
email
opens
,
tap
Options
to
“
Reply
“
,
“
F
orw
ard
“
,
“
Delete
“
.
D
ELETING
A
N
E
MAIL
1.
T
ap
the
email
you
w
ant
to
delete
by
scrolling
the
bar
.
2.
T
ap
Options
>
Delete
vOICE
MAIL
v
oicemail
allows
callers
to
leave
voice
messages
in
your
voice
mailbox,
and
lets
you
review,
play
,
and
delete
your
voice
messages
any
time
you
are
in
your
Carrier’
s
network
coverage
area.
1.
In
Idle
mode
,
push
Shortcut
K
ey
and
select
Messaging
icon
and
select
v
oice
Mail
or
tap
the
Menu
icon
then
tap
Messaging
icon
and
select
v
oice
Mail
.
Or
,
from
the
phone
screen,
tap
and
hold
the
1
icon
.
62

A
T&T
SOCIAL
NET
A
T&T
SOCIAL
NET
Allows
you
to
access
your
favorite
social
networks
such
as
F
acebook,
T
witter
,
Myspace
,
and
the
News
.
1.
Slide
open
the
QWERTY
k
eyboard.
T
ap
the
A
T&T
Social
Net
icon
.
63

MOBILE
WEB
ME
DIA
N
ET
HOME
MEdia
Net
is
one
of
the
services
provided
by
A
T&T
and
it
gives
you
access
to
all
the
cool
things
you
can
do
with
your
wireless
phone
.
Once
connected,
the
homepage
is
displayed.
T
he
content
depends
on
the
service
provider.
With
MEdia
Net
you
can
access
your
local
weather,
news
&
entertainment,
sports
scores
,
tones
,
games
,
apps
,
and
so
much
more
.
F
A
v
ORITES
While
navigating
through
either
the
Internet
or
the
MEdia
Net
pages
,
you
can
bookmark
a
site
to
quickly
and
easily
access
it
at
a
future
time
.
T
he
URL
addresses
of
the
bookmark
ed
sites
are
stored
in
the
F
avorites
folder,
wherein
you
can
either
use
the
6-preset
URL
addresses
or
store
your
own
favorite
URL
addresses
.
1.
Slide
open
the
QWERTY
k
eyboard.
T
ap
the
Browser
icon
and
select
F
avorites
.
2.
T
ap
a
bookmark
item
on
the
F
avorite
list.
T
he
preset
URLs
consist
of:
64
•
My
Account
•
Chat
•
New
s
•
Sp
or
t
s
•
W
eather
•
Cel
l
u
lar
Vide
o

MOBILE
WEB
3.
T
ap
Go
to
launch
the
website.
E
NTER
URL
1.
Slide
open
the
QWERTY
k
eyboard.
T
ap
the
Browser
icon
and
select
Enter
URL
.
2.
Enter
the
URL
address
using
the
k
eypad.
T
o
change
the
input
mode
,
tap
Options
.
T
he
following
modes
are
av
ailable:
3.
T
ap
Go
to
go
there
directly.
H
ISTORY
T
he
History
list
provides
you
with
a
list
of
the
most
recently
visited
web
sites
.
T
hese
entries
can
be
used
to
return
to
previously
unmark
ed
web
pages
.
1.
Slide
open
the
QWERTY
k
eyboard.
T
ap
the
Browser
icon
and
select
History
.
2.
T
ap
a
website
on
the
History
list.
65
•
S
y
mb
ols:
Allows
you
to
enter
symbols
.
T
ap
Options
to
access
the
following
options:
•
Send
:
Send
the
URL
address
via
text
message
.
T
ap
Options
to
access
the
following
options:
•
A
dd
Folder:
Allows
you
to
add
a
new
folder
to
your
F
avorites
List.
•
A
dd
F
avorite
:
Allows
you
to
add
a
new
URL
address
to
your
F
avorites
List.
•
Delete
Al
l
:
“
All
Items
will
be
deleted.
Delete
all?“
will
be
display
>
Y
es
or
N
o.

MOBILE
WEB
3.
T
o
clear
the
History
,
tap
Delete
All
.
“
All
Items
will
be
deleted.
Delete
all?“
will
appear
.
T
ap
Ye
s
or
No
.
S
ETTINGS
1.
Slide
open
the
QWERTY
k
eyboard.
T
ap
the
Browser
icon
and
select
Settings
.
Select
from
the
following
options:
66
•
Hel
p:
Displays
the
browser
version
and
copyright
information
about
the
browser.
•
Cer
tific
ates:
Accesses
certificate
information
from
your
STX-2.
•
Pr
efer
ences:
Changes
the
settings
for
the
web
browser
to
suit
your
preference
.
•
Clear
Cache
:
Clear
the
cache
.
•
Clear
C
o
okies:
Clears
saved
cookies
.
•
Clear
H
is
tor
y:
Clear
the
list
of
recently
visited
URLs
.
•
Clear
Auto
-
complete
:
Clear
automatically
fills
in
character
for
browser
recognized
words.

A
PP
CENTER
T
he
App
Cente
r
topics
covered
in
this
section
are
shopping
fo
r
Ringtones
,
Games
,
Graphics
,
Multimedia,
Applications,
T
hemes
,
v
ideos
and
MEdia
Net
Home
the
MEdia
Home
site
.
S
HOP
RINGTONES
T
his
menu
option
connects
to
A
T&T’
s
ringtone
download
site
.
1.
In
Idle
mode
,
tap
the
Menu
icon
then
tap
App
Center
icon
and
select
Shop
Ringtones
.
S
HOP
G
AMES
T
his
menu
option
connects
to
A
T&T’
s
game
download
site
.
T
his
allows
users
to
download
the
various
games
by
connecting
to
the
Internet.
Downloaded
games
appear
in
your
Games
folder.
1.
In
Idle
mode
,
tap
the
Menu
icon
then
tap
App
Center
icon
and
select
Shop
Games
.
S
HOP
G
RAPHICS
T
his
menu
option
connects
to
A
T&T’
s
graphic
download
site
,
where
you
can
shop
for
graphic
images
.
Downloaded
graphics
appear
in
your
Graphics
folder.
1.
In
Idle
mode
,
tap
the
Menu
icon
then
tap
App
Center
icon
and
select
Shop
Graphics
.
S
HOP
M
U
L
TIMEDIA
T
his
allows
you
to
connect
to
A
T&T’
s
multimedia
download
site
where
you
can
shop
for
multimedia
(video)
files.
Downloaded
files
appear
in
your
v
ideos
folder.
67

APP
CENTER
1.
In
Idle
mode
,
tap
the
Menu
icon
then
tap
App
Center
icon
and
select
Shop
Multimedia
.
S
HOP
A
PPLIC
A
TIONS
T
his
allows
you
to
connect
to
A
T&T’
s
application
download
site
where
you
can
shop
for
applications.
Downloaded
files
appear
in
your
Applications
folder.
1.
In
Idle
mode
,
tap
the
Menu
icon
then
tap
App
Center
icon
and
select
Shop
Applications.
S
HOP
vIDEO
T
his
allows
you
to
connect
to
A
T&T’
s
video
download
site
where
you
can
shop
for
videos
.
Downloaded
videos
appear
in
your
My
Stuff
folder.
1.
In
Idle
mode
,
tap
the
Menu
icon
then
tap
App
Center
icon
and
select
Shop
v
ideo.
ME
DIA
N
ET
HOME
T
he
MEdia
Net
Home
menu
option
allows
you
to
quickly
access
your
MEdia
Net
homepage
using
the
built-in
browser.
T
his
page
gives
you
quick
access
to
information
such
as
local
weather,
sports
scores
,
horoscope
information
and
quick
links
to
the
previously
mentioned
shopping
sites
.
1.
In
Idle
mode
,
tap
the
Menu
icon
then
tap
App
Center
icon
and
select
MEdia
Net
Home
.
68

MYLOC
k
ER
MYLOC
k
ER
1.
In
Idle
mode
,
tap
the
Menu
icon
then
tap
MyLocker
icon
.
69

A
T&T
GPS
A
T&T
N
A
v
IG
A
TOR
A
T&T
Navigator,
with
GPS
enabled
directions,
is
the
fastest
w
ay
to
get
where
you
are
going
-
whether
across
town
or
across
the
country.
Y
ou
can
alw
ays
find
your
w
ay
with
turn-by-turn
voice
and
on-screen
directions.
F
ind
whatever
you
need
on
the
road,
including
restaurants
,
and
business
listings.
Get
where
you’re
going
faster!
Save
your
favorite
locations,
get
traffic
updates
,
and
one-click
re-routing.
1.
In
Idle
mode
,
tap
the
Menu
icon
then
tap
A
T&T
GPS
icon
.
2.
Select
A
T&T
Navigator.
3.
Select
the
Drive
T
o
option.
4.
Select
the
address
option
and
choose
the
T
ype
it
option.
5.
Enter
the
address
for
your
desired
destination
and
select
Done
.
A
T&T
GPS
Navigator™
will
v
alidate
the
address
and
generate
your
route.
GPS
works
on
a
separate
satellite
signal
than
you
r
wireless
carrie
r
.
F
o
r
best
results
when
using
GPS
services:
•
Be
outdoors
and
have
a
clear
view
of
the
sky
.
Hold
the
phone
without
blocking
the
antenna.
•
Start
A
T&T
GPS
and
select
a
Drive
T
o
route
before
driving
to
acquire
the
initial
GPS
signal.
•
K
eep
the
device
turned
on
to
optimize
subsequent
uses
of
GPS
.
•
In
some
cases
,
acquiring
the
initial
position
may
tak
e
up
to
2-3
minutes.
70

A
T&T GPS
WHERE
WHERE™
is
a
downloadable
mobile
application
that
uses
your
curr
ent
location
(obtained
via
the
built-in
GPS)
to
help
you
find
places
of
interest,
things
to
do,
and
local
information
while
you’re
on
the
go.
1.
In
Idle
mode
,
tap
the
Menu
icon
then
tap
A
T&T
GPS
icon
.
2.
Select
Where
.
A
LL
SPOR
T
GPS
T
he
AllSport
GPS
application
turns
your
phone
into
a
GPS
trainer
for
biking,
running,
w
alking
and
other
sports
activities.
It
provides
you
with
a
complete
solution
for
tracking
and
improving
your
performance
.
Y
ou
can
record
time
,
speed,
calories
burned
and
distance
traveled;
view
speed
and
elev
ation
profiles;
analyze
your
trips
on
the
web
with
statistics,
maps
and
graphs;
and
more!
Start
AllSport
GPS
,
enter
your
login
and
other
settings,
and
select
an
activity
from
the
main
menu
(e
.g.
Running).
When
the
phone
has
acquired
the
GPS
signal,
press
Start
and
begin
your
work
out!
While
working
out,
you
can
see
your
distance
,
time
,
pace
(or
speed),
and
calories
burned
displayed
dynamically
on
the
phone
.
At
the
end
of
your
workout,
press
Stop
.
T
he
application
will
automatically
upload
the
workout
data
to
your
web
account
for
analysis
.
Y
ou
can
also
immediately
review
your
workout
on
the
phone
.
1.
In
Idle
mode
,
tap
the
Menu
icon
then
tap
A
T&T
GPS
icon
.
2.
Select
AllSport
GPS
.
71

YP
M
OBILE
F
IND
.
M
A
P.
S
A
v
E
.
G
O.
Selecting
YELLOWP
A
GES
.COM
Mobile
from
the
Games
&
Apps
sub
menu
launches
a
preinstalled
jav
a
application.
T
he
Y
ellowpages
Mobile
application
provides
quick
and
ready
access
to
businesses
,
map
locations,
and
storage
of
your
favorite
searches
(My
Place).
T
his
application
allows
you
to
tap
into
local
businesses
,
locations,
and
events
,
connecting
you
to
your
search
in
real-time.
1.
In
Idle
mode
,
tap
the
Menu
icon
then
tap
YP
Mobile
icon
.
72

A
DDRESS
B
OO
k
Stores
up
to
500
entrie
s
,
each
o
f
which
can be assigned
to
a
grou
p
.
Entries
can
be
retrieved
by
name
or
group.
1.
In
Idle
mode
,
tap
the
Menu
icon
then
tap
Address
Book
icon
.
FIND
NAME
Retrieves
an
entry
by
name
and
calls
the
primary
number
by
simply
pressing
the
SEND
K
ey
.
Y
ou
can
review
all
the
entries
stored
in
your
contacts
list
or
quickly
find
an
entry
by
entering
a
name
or
its
character
string.
1.
T
he
list
of
names
in
your
contacts
is
displayed
alphabetically.
2.
Enter
a
name
or
scroll
through
the
list.
If
more
than
one
contact
is
listed,
highlight
the
contact
you
w
ant.
3.
T
ap
the
contact.
T
he
contact
information
is
displayed.
4.
T
o
edit
the
contact
information,
tap
Edit
.
T
he
Edit
Contact
screen
will
appear
with
the
selected
contact
information
shown.
See
page
40
for
“Storing
a
Phone
Number“.
5.
T
o
save
the
entry,
tap
Save
.
T
o
return
to
the
previous
page
,
tap
the
B
A
CK
icon
at
the
top
of
the
page
.
6.
T
ap
Options
to
access
the
following
options:
•
Group
List
•
Speed
Dial
List
•
Copy
to
•
Delete
Contact
•
Service
Dial
Number
•
My
Number
73

A
DDRESS
B
OO
k
•
Settings
G
ROUP
L
IST
T
his
menu
allows
you
to
manage
group
information.
By
default,
there
are
4
existing
groups:
“No
Group
,“
“Business
,“
“F
amily“
and
“F
riends
.“
Y
ou
can
also
configure
a
ring
tone
for
a
group
so
that
the
group
ring
tone
sounds
when
a
call
from
a
specific
contact
address
within
that
group
arrives
and
there
is
no
ring
tone
configured
for
the
specific
contact
address
.
A
maximum
of
20
groups
is
allowed.
1.
In
Idle
mode
,
tap
the
Menu
icon
then
tap
Address
Book
icon
>
Options
>
Group
List
.
Add
ne
w
g
r
oup
1.
T
ap
Add
New
to
add
a
new
group
name
.
T
ap
Phone
or
SIM
.
2.
Input
a
new
group
name
.
3.
T
o
save
a
new
group,
tap
Save
.
Setting
a
ringer
type
for
a
gr
oup
1.
Select
an
existing
group
name
.
2.
T
ap
Options
>
Set
Group
Ringtone
.
3.
T
ap
“
A
T&T
Ringtone“,
Basic
Ringtone
1
~
Basic
Ringtone
3“,
“Sky
lounge“,
“Rainforest“,
“F
ighters“,
“Love“,
“Funny
guy“
or
“Happiness“.
4.
T
ap
Save
.
74

A
DDRESS
B
OO
k
Change
g
r
oup
name
1.
Select
the
group
you
w
ant
to
rename
.
Only
new
groups
you
added
can
be
changed.
2.
T
ap
Options
>
Rename
Group
.
3.
Input
a
new
group
name
.
4.
T
o
change
the
name
,
tap
Save
.
Select
&
Delete
1.
Select
an
existing
group
name
.
(Except
No
Group)
2.
T
ap
Options
>
Select
&
Delete
.
3.
T
ap
the
contact
you
w
ant
to
delete
,
tap
Check
or
Uncheck
.
Or
,
tap
All
.
3.
T
ap
Done
,
then“Delete?“
will
appear
.
T
ap
Ye
s
or
No
.
Delete
gr
oup
1.
Select
an
existing
group
name
.
Only
new
groups
you
added
can
be
changed.
2.
T
ap
Options
>
Delete
Group
.
3.
“Delete
Group“
will
appear
.
T
ap
Ye
s
or
No
.
75
A
DDRESS
B
OO
k
S
PEED
D
IAL
L
IST
T
his
menu
allows
you
to
configure
the
speed
dial
numbers
.
Y
ou
can
select
a
number
from
2
to
9
as
a
speed
dial.
Y
ou
can
configure
speed
dial
numbers
for
any
of
the
8
numbers
for
a
specific
contact
address
so
that
a
contact
address
may
have
multiple
speed
dial
numbers
.
1.
In
Idle
mode
,
tap
the
Menu
icon
then
tap
Address
Book
icon
>
Options
>
Speed
Dial
List
.
2.
T
o
assign
a
phone
number
to
a
location,
select
the
location.
Note
3.
T
ap
a
name
from
your
contact
list.
If
the
contact
has
more
than
1
number
saved,
tap
the
correct
number
for
the
Speed
Dial
location
is
shown.
4.
Y
ou
will
see
the
contact
name
next
to
the
Speed
Dial
location
number
in
the
Speed
Dial
lists.
5.
T
o
reset
the
speed
dial
locations,
tap
Reset
All
.
“Reset
all
speed
dial?“
will
appear
.
T
ap
Ye
s
or
No
.
6.
T
ap
the
speed
dial
#
location.
T
o
call
the
contact,
tap
Call
.
T
o
change
the
speed
dial
location,
tap
Switch
,
then
tap
the
new
speed
dial
location.
T
o
reset
a
specific
speed
dial
location,
tap
Reset
.
76
“Empty“
appears
if
the
location
is
av
ailable.

A
DDRESS
B
OO
k
C
OPY TO
T
his
menu
allows
you
to
copy
all
of
the
information
from
your
SIM
card
to
your
handset
and
vice
versa.
If
a
name
is
duplicated
during
the
copying
operation,
the
information
is
also
duplicated.
Options
include:
1.
In
Idle
mode
,
tap
the
Menu
icon
then
tap
Address
Book
icon
>
Options
>
Copy
to
.
2.
T
ap
“Phone
->
SIM“
or
“SIM
->
Phone“.
3.
T
ap
the
contact
you
w
ant
to
copy
,
tap
Check
or
Uncheck
.
Or
,
tap
All
.
4.
T
o
copy
all
phone
number
,
tap
Copy
.
5.
“Copy
selected
contacts?“
will
appear
.
T
ap
Ye
s
or
No
.
D
ELETE
C
ONT
ACTS
T
o
delete
an
entry:
1.
In
Idle
mode
,
tap
the
Menu
icon
then
tap
Address
Book
icon
>
Options
>
Delete
Contacts
.
2.
T
ap
the
contact
you
w
ant
to
delete
,
tap
Check
or
Uncheck
.
Or
,
tap
All
.
3.
T
o
delete
all
phone
numbers
,
tap
Delete
.
77
•
Phone
to
SI
M
:
Y
ou
can
copy
the
entry
from
the
handset
memory
to
the
SIM
card
(not
all
the
data
will
be
copied).
•
SI
M
to
Phone
:
Y
ou
can
copy
the
entry
from
the
SIM
card
to
the
phone
memory
.

A
DDRESS
B
OO
k
4
.
“Delete
selected
contacts?“
will
appear
.
T
ap
Ye
s
or
No
.
S
ER
v
ICE
D
IAL
N
UMBER
Y
ou
can
view
the
list
of
Service
Dialing
Numbers
(SDN)
assigned
by
your
network
provider.
Such
numbers
could
include
the
emergency
,
directory
assistance
and
voice
mail
numbers
.
1.
In
Idle
mode
,
tap
the
Menu
icon
then
tap
Address
Book
icon
>
Options
>
Service
Dial
Number
.
2.
Scroll
through
the
av
ailable
numbers
.
M
Y
N
UMBER
Displays
and
edit
your
phone
number
.
1.
In
Idle
mode
,
tap
the
Menu
icon
then
tap
Address
Book
icon
>
Options
>
My
Number
.
Y
our
phone
number
will
appear
next
to
1.
2.
T
ap
2
(empty)
,
3
(empty)
or
4
(empty)
.
Enter
the
additional
information,
then
tap
Save
.
3.
T
o
return
to
the
previous
page
,
tap
the
B
A
CK
icon
at
the
top
of
the
page
.
T
he
Name
or
Data
you
enter
now
will
appear
instead
of
2
(empty)
,
3
(empty)
or
4
(empty)
.
A
DDRESS
S
ETTINGS
T
o
select
your
address
settings:
1.
In
Idle
mode
,
tap
the
Menu
icon
then
tap
Address
Book
icon
>
Options
>
Address
Settings
.
78

A
DDRESS
B
OO
k
ADD
NEW
Adds
a
new
entry.
1.
T
ap
Add
New,
then
tap
Phone
or
SIM
.
2.
When
adding
a
new
contact
to
your
address
book
you
may
choose
to
save
the
information
in
either
the
Phone
or
SIM
memory
.
Saving
a
contact
in
the
Phone
location
allows
you
to
add
additional
fields
such
as
number
type
(mobile,
home
,
office,
etc.),
email,
picture,
etc.
Please
note,
some
of
these
options
may
not
be
av
ailable
when
storing
on
the
SIM,
such
as
adding
a
picture
or
ringtone.
3.
F
ill
in
the
fields
as
they
are
selected.
79
Phone
Book
fields(Phone):
•
Name
:
Enter
name
>
Done
.
•
Phone
Numb
er:
Input
the
number
>
OK
.
•
No
G
roup:
T
ap
“No
Group“,
“Business“,
“F
amily“
or
“F
riends“
.
T
ap
Add
New.
>
Input
the
new
group
name
>
SA
v
E
.
T
ap
Options
to
access
the
following
options:
•
Save
Lo
c
ation
:
T
ap
“
Alw
ays
Ask“,
“Phone“
or
“SIM“
then
tap
Save
.
•
View:
T
ap
“
All“,
“Phone“
or
“SIM“
then
tap
Save
.
•
Memor
y
S
t
atus:
Displays
the
current
status
of
the
phone
memory
and
the
SIM
card.
•
SI
M
Numb
er
T
yp
e
:
T
ap
Add.
Input
the
new
number
then
tap
Save
.
•
Change
H
idden
k
ey:
Input
the
new
hidden
k
ey
.
(T
his
is
used
to
Lock
your
SIM
Card
address
book.
T
he
default
hidden
k
ey
code
is
“00000000”.
Please
contact
A
T&T
Customer
Service
for
your
Hidden
K
ey
code
.)
A
DDRESS
B
OO
k
4
.
T
o
save
the
entry,
tap
Save
.
T
o
return
to
the
previous
page
,
tap
the
B
A
CK
icon
at
the
top
of
the
screen.
Note
80
Phone
Book
fields(SIM):
•
Name
:
Enter
first
name
>
Done
.
•
Phone
Numb
er:
Input
the
number
>
OK
.
T
ap
Options
to
access
the
following
options:
Add
Optional
F
ield,
Delete
Optional
F
ield,
Save
as
Hidden
Entry
See
page
40
for
more
detailed
information
about
storing
a
number
.
•
Ri
ngtone
:
T
ap
“
A
T&T
Ringtone“,
Basic
Ringtone
1
~
Basic
Ringtone
3“,
“Sky
lounge“,
“Rainforest“,
“F
ighters“,
“Love“,
“Funny
guy“
or
“Happiness“
>
Save
.
T
ap
Options
to
access
the
following
options:
Add
Optional
F
ield,
Delete
Optional
F
ield

M
OBILE
E
MAIL
MOBILE
EMAIL
Allows
you
to
access
your
Y
ahoo!
Mail,
A
OL
Mail,
AIM
Mail,
Windows
Live
Hotmail,
A
T&T
Y
ahoo!,
BellSouth
and
Other
provider’
s
accounts
on
your
STX-2.
1.
In
Idle
mode
,
tap
the
Menu
icon
,
Drag
Rightw
ard
then
tap
Mobile
Email
icon
.
81

IM
IM
IM
allows
you
to
use
your
AIM,
Windows
Live
and
Y
ahoo!
Messenger
on
your
STX-2.
Y
ou
can
exchange
messages
with
your
friends
and
check
their
online
status
while
you're
aw
ay
from
the
computer.
S
ET
U
P
IM
1.
Slide
open
the
QWERTY
k
eyboard.
T
ap
the
IM
icon
.
2.
T
ap
the
IM
community
service
you
w
ant
to
use
.
S
IGN
I
N
1.
T
ap
and
type
your
existing
ID
.
2.
T
ap
the
password
field
and
type
your
password.
3.
T
ap
Sign
In.
4.
A
list
of
contacts
appear
on
the
screen.
5.
T
ap
Options
to
change
your
status
or
add
a
contact.
Y
ou
can
sign
in
multiple
communities.
6.
T
o
sign
into
another
community,
tap
Home
and
tap
the
other
IM
community
service
you
w
ant
to
use
.
7.
T
ap
and
type
your
existing
ID
.
8.
T
ap
the
password
field
and
type
your
password.
82

IM
S
END
IM
1.
Select
a
contact
who
you
w
ant
to
send
IM.
2.
T
ap
Options
>
Send
IM
.
3.
T
ype
your
message
in
the
input
field,
then
tap
Send
.
4.
T
ap
Options
to
insert
emoticon
or
quick
text.
RECEI
v
E
IM
1.
Select
a
conversation
that
you
w
ant
to
join.
2.
T
ap
Options
>
Open
.
Once
you’re
signed
in,
you
can
receive
an
IM
even
if
you
are
not
in
the
IM
menu.
S
IGN OUT
1.
T
ap
the
IM
community
service
you
w
ant
to
sign
out
of
.
2.
T
ap
Options
>
Sign
Out.
83

PICDIAL
PICDIAL
F
or
Windows
Mobile
.
W
e
didn't
invent
Caller
ID
,
we
just
made
it
social.
Automatically
see
your
friends'
F
acebook/MySpace
profile
pics/status
every
time
they
call!
Oh
yeah,
and
when
your
friends
update
their
profile
pics
,
it
automatically
updates
on
your
phone;
pretty
cool
huh?
PicDial
also
gives
you
a
“
F
avorites
Screen,
“
a
grid
w/
friends
profile
pics
and
their
most
recent
status
updates
.
1.)
Check
us
out
at
picdial.com
to
learn
more
2.)
Download
PicDial
to
your
phone
3.)
Go
through
the
setup
wizard
and
be
sure
to
remember
your
username/password
that
is
sent
to
you
through
text
after
the
download.
T
he
username/password
are
required
to
log
into
our
website
and
give
you
access
to
your
address
book
for
an
easy
w
ay
to
associate
profile
pics
with
your
friends
.
4.)
W
e
recommend
that
you
go
to
picdial.
com
and
visit
the
supported
phone
section.
Select
your
phone
to
see
if
there
are
any
settings
you
need
to
change
to
get
the
most
out
of
PicDial.
5.)
Y
ou
may
notice
some
of
your
friends
have
pics
on
your
F
avorite
Screen
and
some
do
not.
Log
into
our
website
or
select
a
contact
from
the
F
avorite
Screen
to
search
for
their
profile
picture
by
entering
their
name
and/or
e-mail
address
.
6.)
If
you
w
ant
to
update
your
picture/
status
message
,
you
can
do
so
through
the
“
Menu
“
option.
T
o
invite
more
friends
to
join
PicDial,
go
to
the
“
Menu
“
option
and
select
“
Invite
F
riends
.
“
Enjoy!!!
1.
In
Idle
mode
,
tap
the
Menu
icon
,
Drag
Rightw
ard
then
tap
PicDial
icon
.
84

A
T&T
M
USIC
M
USIC
P
L
A
YER
T
he
built
in
Music
Player
is
an
application
that
can
play
music
files.
T
he
music
player
supports
files
with
extensions
AA
C,
AAC+,
eAA
C+,
MP3,
WMA,
3GP
,
MP4(Audio
only),
and
M4A.
Launching
the
Music
Player
allows
you
to
navigate
within
your
Music
Player
folders
and
select
playback
material.
1.
In
Idle
mode
,
tap
the
Menu
icon
,
Drag
Rightw
ard
then
tap
A
T&T
Music
icon
and
select
Music
Player
.
Menu
options
include:
Note
85
Copyrights
of
music
files
may
be
protected
by
copyright
and
intellectual
property laws.
T
herefo
r
e
,
it
may
be
required
to
obtain
necessary
permissions
or
licenses
before
you
can
reproduce
or
copy
the
materials. I
n
some
countries
,
national
law
prohibits
copying
of
copyrighted materials
for
personal
archive
as
well.
Prior
to
downloading
or
copying
the
files,
please
ensure
that
you
adhere
to
the
applicable
laws
and
laws
of
corresponding
countries
or
regions
regarding
the
T
erms
of
Use
of
materials.
•
Now
Playing
:
Opens
the
current
play
list.
•
Al
l
M
usic
:
v
iew
all
the
music
stored
on
your
STX-2
and/or
memory
card.
•
Al
bums
:
v
iew
all
your
music
by
album.
•
Ar
tis
t
s:
v
iew
all
your
music
by
artist.
•
Playl
is
t
s
:
Create
your
own
playlists
by
choosing
songs
from
the
All
Songs
menu
list.
•
Gen
r
es:
v
iew
all
your
music
by
genres
.
•
Set
ti
ngs
-
Play
Via:
T
ap
“Phone“
or
“Bluetooth“.
-
Sh
uf
f
le
:
T
ap
“On“
or
“Off“.
-
Rep
eat:
T
ap
“
All“,
“One“
or
“Off“.
-
E
q
ual
izer:
T
ap
“Off“,
“Flat“,
“Band“,
“Dance“,
“Fullbass“,
“Fullbass_
T
reble“,
“Full_T
reble“,
“Laptop“,
“Large_Hall“,
“Live“,
“Party“,
“P
op“,
“Reggae“,
“Rock“,
“Ska“,
“Soft“,
“Soft_Rock“
or
“T
echno“.

A
T&T
M
USIC
M
USIC
ID
MusicID
is
an
application
which
uses
the
onboard
microphone
to
analyze
a
song
sample
and
then
compare
it
to
a
remote
database
of
songs
.
Once
the
application
completes
the
analysis
of
the
song
sample
,
it
then
provides
you
with
the
name
of
the
song,
artist
and
album
art
as
well
as
opportunities
to
buy
related
content.
1.
In
Idle
mode
,
tap
the
Menu
icon
,
Drag
Rightw
ard
then
tap
A
T&T
Music
icon
and
select
Music
ID2
.
2.
F
ollow
the
on-screen
prompts.
Menu
options
include:
A
T&T
RADIO
Selecting
A
T&T
Radio
,
launches
a
preinstalled
jav
a
application.
T
he
application
allows
the
user
to
listen
to
dozens
of
channels
of
digital
radio
on
your
mobile
phone
.
Get
unlimited
access
to
commercial-free
music,
the
latest
Hip
Hop
,
R&B
,
Rock,
J
azz,
Country
anywhere
you
go.
1.
In
Idle
mode
,
tap
the
Menu
icon
,
Drag
Rightw
ard
then
tap
A
T&T
Music
icon
and
select
A
T&T
Radio
.
86
•
I
D
s
ong
!
:
Allows
you
to
find
out
information
of
unknown
music
by
sending
the
sound
of
the
unknown
music
to
the
web.
If
the
web
identifies
the
song,
it
returns
with
relev
ant
information
of
the
song.
•
Manage
I
Ds:
Once
a
song
has
been
identified
through
the
MusicID
,
you
can
see
the
list
of
songs
in
this
folder.
•
Help
me
out:
Information
for
how
to
use
this
jav
a
application.
•
Ex
it:
Ends
the
application
and
exits
.
A
T&T
M
USIC
MOBI
v
J
Selecting
Mobi
v
J
from
the
A
T&T
Music
sub
menu
launches
a
browser
which
tak
es
you
directly
into
the
Music
v
ideo
section
of
Mobile
v
ideo.
F
rom
this
menu,
you
will
have
access
to
music
videos
from
the
latest
artist
as
well
as
programming
from
A
T&T
,
MT
v
,
v
HI
and
CMT
among
others
.
Simply
click
on
a
video
and
begin
w
atching!
Note
1.
In
Idle
mode
,
tap
the
Menu
icon
,
Drag
Rightw
ard
then
tap
A
T&T
Music
icon
and
select
Mobi
v
J
.
MA
k
E
UR
TONES
Mak
e-UR-T
ones
allows
you
to
create
your
own
custom
ringtones
from
your
favorite
songs
.
Y
ou
can
shop
from
a
catalog
of
thousands
of
popular
songs
including
today's
top
hits
and
timeless
classics
.
Mak
e-UR-T
ones
is
easy
to
use
and
av
ailable
directly
on
your
phone
.
Simply
choose
a
song
by
searching
our
large
catalog
or
browsing
by
genres
.
Next,
choose
the
beginning
and
end
of
the
ringtone
with
Mak
e-UR-T
ones'
easy-to-use
w
aveform
editor
.
Users
can
listen
to
the
song
while
editing
as
well
as
preview
the
ringtone
before
downloading.
1.
In
Idle
mode
,
tap
the
Menu
icon
,
Drag
Rightw
ard
then
tap
A
T&T
Music
icon
and
select
Mak
e
UR
T
ones
.
87
Additional
charges
may
incur
when
downloading
music
video
contents
.
Contact you
r
service
provide
r
fo
r
furthe
r
information.

MOBILE
v
IDEO
Y
ou
r
STX-2
is
equipped
with
a
browse
r
which
allows
you
to
access
the
Internet
and
upload
media
files
directly
to
your
phone
.
T
hese
media
files
display
using
the
built-in
Media
Player
.
Accessing
the
browser
is
data
intensive
and
additional
charges
may
apply.
M
v
brings
you
quick,
on-demand
access
to
news
,
sports
,
weather
and
entertainment
video
clips
.
Catch
up
on
T
v’
s
hottest
shows
,
funniest
comedians
,
biggest
headlines
and
latest
sports
scores
.
Y
ou
can
even
personalize
your
homepage
for
quick
access
to
your
favorites.
In
addition,
the
M
v
service
automatically
streams
localized
weather
information
to
your
personalized
“News
&
W
eather“
page
each
and
every
day
.
1.
In
Idle
mode
,
tap
the
Menu
icon
,
Drag
Rightw
ard
then
tap
Mobile
v
ideo
icon
.
Y
ou
are
then
tak
en
to
your
default
Mobile
v
ideo
homepage
.
2.
Highlight
the
desired
media
clip
or
select
from
one
of
the
av
ailable
categories
and
tap
the
screen.
C
ELLULAR
vIDEO
OPTIONS
1.
In
Idle
mode
,
tap
the
Menu
icon
,
Drag
Rightw
ard
then
tap
Mobile
v
ideo
icon
and
tap
the
screen.
88

MY
STUFF
ONLINE
LOC
k
ER
1.
In
Idle
mode
,
tap
the
Menu
icon
,
Drag
Rightw
ard
then
tap
My
Stuff
icon
and
select
Online
Lock
er
.
RINGTONES
&
A
UDIO
1.
In
Idle
mode
,
tap
the
Menu
icon
,
Drag
Rightw
ard
then
tap
My
Stuff
icon
and
select
Ringtones
&
Audio.
2.
T
ap
Phone
or
SD
Card
.
Note
3.
T
ap
A
T&T
Ringtone
,
Basic
Ringtone
1~3
,
Sky
lounge,
Rainforest
,
F
ighters,
Love
,
Funny
guy
and
Happiness
.
4
.
T
o
play
,
tap
Play
.
5.
T
o
delete
a
ringtone
or
audio
file
,
tap
Delete
,
“Delete
item?“
will
appear
.
T
ap
Ye
s
or
No
.
Only
ringtones
you
have
downloaded
or
recorded
sounds
can
be
deleted.
89
T
ap
Options
to
access
the
following
options:
•
Send
Via:
Send
a
Multimedia
message
or
using
Bluetooth.
•
A
ssig
n
:
Select
“Incoming
Call“
or
“
Alarm
T
one“.
•
Rename
:
T
o
rename
a
selected
ringtone
or
audio.
When
accessing
ringtones
or
audio
files
from
your
SD
card,
the
file
must
be
placed
in
the Audio folde
r
unde
r
Media on
you
r
card.
T
ap
Options
to
access
the
following
options:
•
C
opy
to
S
D
Car
d
:
T
o
copy
the
selected
ringtone
or
audio.
•
Move
to
S
D
Car
d
:
T
o
move
the
selected
ringtone
or
audio.
•
Delete
M
u
lti
med
ia:
T
o
delete
a
selected
ringtone
or
audio.

MY
STUFF
I
MAGES
1.
In
Idle
mode
,
tap
the
Menu
icon
,
Drag
Rightw
ard
then
tap
My
Stuff
icon
and
select
Images
.
2.
T
ap
Phone
or
SD
Card
.
3.
T
ap
A
T&T
Globe
,
Cloud
,
W
ater
Button
,
Spring
,
W
aterdrops
on
T
he
Window
,
Silk
,
White
Rose
,
Skyline
,
Bridge
or
Sandy
Beach
.
4.
T
o
preview
an
image
,
tap
Preview
.
5.
T
o
delete
an
image
,
tap
Delete
.
“Delete
item?“
will
appear
.
T
ap
Ye
s
or
No
.
Only
images
you
have
downloaded
or
tak
en
pictures
can
be
deleted.
90
T
ap
Options
to
access
the
following
options:
•
Send
Via:
Send
a
Multimedia
message
,
Mobile
Share
or
using
Bluetooth.
•
A
ssig
n
to
W
al
l
p
aper:
T
o
set
w
allpaper
image
.
•
Rename
:
T
o
rename
a
selected
image
.
T
ap
Options
to
access
the
following
options:
•
Send
Via
Mobi
le
Shar
e
:
T
o
upload
the
selected
image
to
Mobile
Share
server
.
•
C
opy
to
S
D
Car
d
:
T
o
copy
the
selected
image
.
•
Move
to
S
D
Car
d
:
T
o
move
the
selected
image
.
•
Delete
M
u
lti
med
ia:
T
o
delete
a
selected
image
.

MY
STUFF
vIDEOS
1.
In
Idle
mode
,
tap
the
Menu
icon
,
Drag
Rightw
ard
then
tap
My
Stuff
icon
and
select
v
ideos
.
2.
T
ap
Phone
or
SD
Card
.
3.
T
ap
the
video
you
w
ant
to
view
.
4.
T
ap
Play
,
to
play
a
video.
5.
T
o
delete
a
video,
tap
Delete
.
“Delete
item?“
will
appear
.
T
ap
Ye
s
or
No
.
91
T
ap
Options
to
access
the
following
options:
•
Send
Via:
Send
a
Multimedia
message
,
Mobile
Share
or
using
Bluetooth.
•
Rename
:
T
o
rename
a
selected
video
clip.
T
ap
Options
to
access
the
following
options:
•
Send
Via
Mobi
le
Shar
e
:
T
o
upload
the
selected
video
clip
to
Mobile
Share
server
.
•
C
opy
to
S
D
Car
d
:
T
o
copy
the
selected
video
clip.
•
Move
to
S
D
Car
d
:
T
o
move
the
selected
video
clip.
•
Delete
M
u
lti
med
ia:
T
o
delete
a
selected
video
clip.

MY
STUFF
OTHER
FILES
T
his
feature
provide
additional
storage
of
other
miscellaneous
file
types
that
may
not
fit
into
any
of
the
previous
categories
.
1.
In
Idle
mode
,
tap
the
Menu
icon
,
Drag
Rightw
ard
then
tap
My
Stuff
icon
and
select
Other
F
iles
.
92

GAMES
G
AMES
T
he
Games
menu
option
allows
you
to
access
games
that
are
on
the
phone
and
also
shop
for
games
using
AppCenter
.
Y
ou
can
download
new
games
and
then
save
them
to
the
Games
folder.
1.
In
Idle
mode
,
tap
the
Menu
icon
,
Drag
Rightw
ard
then
tap
Games
icon
.
2.
T
ap
the
game
you
w
ant
to
play
then
follow
the
on-screen
directions.
93

APPLIC
A
TIONS
M
OBILE
B
A
N
k
ING
Mobile
Banking
is
an
application
that
allows
you
to
quickly
and
easily
access
your
financial
accounts
.
Y
ou
can
check
account
balances
,
view
and
pay
bills
and
review
your
transactions
.
1.
Access
your
bank's
Online
Banking
site
and
enroll
in
Mobile
Banking.
2.
Download
the
Mobile
Banking
application
to
phone
.
Y
ou
will
receive
a
text
message
shortly
to
complete
the
download.
3.
T
ap
the
link
in
the
message
to
download.
4.
In
Idle
mode
,
tap
the
Menu
icon
,
Drag
Rightw
ard
then
tap
Applications
icon
and
select
Mobie
Banking
.
5.
Enter
the
Initiation
Code
,
provided
during
your
bank
enrollment,
into
the
required
field.
6.
Establish
a
six-digit
PIN
to
unlock
the
application.
T
his
is
your
personal
code
providing
you
future
access
to
the
Mobile
Banking
application.
94

A
PPLIC
A
TIONS
LOOPT
T
ap
in
to
your
social
scene
with
Loopt,
the
ultimate
social
networking
tool.
See
where
your
friends
are
and
what
they're
doing
through
detailed,
interactive
maps
on
your
cell
phone
.
Stay
connected
-
share
your
location,
photos,
or
comments
with
your
friends
,
favorite
web
communities,
social
networks,
or
blogs
.
F
ind
new
nearby
places
and
events
,
recommended
by
your
friends
.
Mak
e
it
public
or
k
eep
it
priv
ate,
you
decide
.
1.
In
Idle
mode
,
tap
the
Menu
icon
,
Drag
Rightw
ard
then
tap
Applications
icon
and
select
Loopt.
M
Y
C
AST
W
E
A
THER
T
his
is
a
user
-friendly
application
which
runs
on
your
mobile
phone
giving
you
access
to
all
the
weather
information
you
need.
Y
ou
can
check
current
and
predicted
National
W
eather
Service
data
for
your
immediate
location,
your
travel
destination,
or
virtually
anywhere
else
in
the
continental
U
.S
.
1.
In
Idle
mode
,
tap
the
Menu
icon
,
Drag
Rightw
ard
then
tap
Applications
icon
and
select
My
Cast
W
eather
.
FUNSCREENZ
1.
In
Idle
mode
,
tap
the
Menu
icon
,
Drag
Rightw
ard
then
tap
Applications
icon
and
select
FunScreenz
.
95

RECENT
HISTORY
RECENT
HISTORY
1.
In
Idle
mode
,
tap
the
Menu
icon
,
Drag
Rightw
ard
then
tap
Recent
History
icon
.
2.
T
ap
All
Calls
,
Received
Calls
,
Dialed
Calls
or
Missed
Calls
.
3.
T
ap
the
call
log
you
w
ant
to
view
.
4.
T
o
delete
a
call
log,
tap
Delete
.
“Delete
Call
log?“
will
appear
.
T
ap
Ye
s
or
No
.
96
T
ap
Options
to
access
the
following
options:
•
Cal
l
Timer:
Shows
the
total
length
of
time
for
Last
call,
Received
Calls
,
Dialed
Calls
,
All
Calls
and
Life
T
ime.
•
Dat
a
C
ounter:
Shows
the
total
length
of
time
for
All
Data
Calls
,
Sent
Data
Calls
or
Received
Data
Calls
.
•
Sele
c
t
&
delete
:
“Delete
Selected
Items?“
>
Y
es
or
No
.
•
Delete
al
l
:
“Delete
all
logs
?“will
appear
.
T
ap
Ye
s
or
No
.

SETTINGS
D
ISPLA
Y
W
ALLP
APER
Allows
you
to
choose
the
kind
of
background
to
be
displayed
on
the
phone
.
1.
In
Idle
mode
,
tap
the
Menu
icon
,
Drag
Leftw
ard
then
tap
Settings
icon
and
select
Display
>
W
allpaper.
2.
T
ap
Phone
or
SD
Card
.
3.
T
ap
“
A
T&T
Globe
~
Sandy
Beach“.
If
you
have
tak
en
any
pictures
and
saved
them
to
your
device
,
they
will
appear
here
as
well.
4.
T
ap
Save
.
S
TYLE
Allows
you
to
choose
how
the
Idle
screen
will
appear
.
1.
In
Idle
mode
,
tap
the
Menu
icon
,
Drag
Leftw
ard
then
tap
Settings
icon
and
select
Display
>
Style
.
2.
Scroll
through
the
styles
by
tapping
<
or
>
.
3.
T
ap
OK
.
G
REETING
B
ANNER
T
he
greeting
is
your
personal
label
for
your
STX-2.
It
appears
on
the
main
screen
along
the
top
of
the
display
.
1.
In
Idle
mode
,
tap
the
Menu
icon
,
Drag
Leftw
ard
then
tap
Settings
icon
and
select
Display
>
Greeting
Banner
.
97

SETTINGS
2
.
T
ap
“On“
or
“Off“.
3.
If
you
select
“On“,
the
current
greeting
text
is
displayed.
T
ap
Del
to
delete
the
greeting,
then
enter
your
new
greeting.
T
ap
Options
to
change
the
input
mode
.
4.
T
ap
Save
.
B
AC
k
LIGHT
T
urn
on
the
backlight
on
the
display
and
k
eypad
for
easy
viewing
in
dark
places
.
DISPL
A
Y
1.
In
Idle
mode
,
tap
the
Menu
icon
,
Drag
Leftw
ard
then
tap
Settings
icon
and
select
Display
>
Backlight
>
Display
.
2.
T
ap
“10
secs“,
“15
secs“,
“30
secs“,
“1
min“
or
“3mins“.
3.
T
ap
Save
.
kEYP
AD
1.
In
Idle
mode
,
tap
the
Menu
icon
,
Drag
Leftw
ard
then
tap
Settings
icon
and
select
Display
>
Backlight
>
K
eypad
.
2.
T
ap
“10
secs“,
“15
secs“,
“30
secs“
or
“
Alw
ays
off“.
3.
T
ap
Save
.
THEME
1.
In
Idle
mode
,
tap
the
Menu
icon
,
Drag
Leftw
ard
then
tap
Settings
icon
and
select
Display
>
T
heme
.
98

SETTINGS
2
.
T
ap
“Gray“
or
“Blue“.
3.
T
ap
Save
.
A
UTO
L
OC
k
1.
In
Idle
mode
,
tap
the
Menu
icon
,
Drag
Leftw
ard
then
tap
Settings
icon
and
select
Display
>
Auto
Lock
.
2.
T
ap
“Off“,
“1
min“,
“2
mins“
or
“5
mins“.
3.
T
ap
Save
.
D
A
TE
&
T
IME
Allows
you
to
change
the
date
and
time
settings.
T
IME
Z
ONE
U
PD
A
TE
Select
Auto
Update
to
set
the
phone
to
automatically
update
the
time
and
date
according
to
the
current
local
time
zone
.
Select
Manually
to
update
the
information
(T
ime,
Date
,
Daylight
Saving)
yourself
.
1.
In
Idle
mode
,
tap
the
Menu
icon
,
Drag
Leftw
ard
then
tap
Settings
icon
and
select
Date
&
T
ime
>
T
ime
Zone
Update
.
2.
T
ap
“
Auto
Update“
or
“Manually
Update“.
3.
T
ap
Save
.
D
A
TE
F
ORMAT
T
o
select
a
date
format:
1.
In
Idle
mode
,
tap
the
Menu
icon
,
Drag
Leftw
ard
then
tap
Settings
icon
and
select
Date
&
T
ime
>
Date
F
ormat
.
99

SETTINGS
2
.
T
ap
“F
ri
F
eb
22“,
“F
eb
22
F
ri“,
“F
ri
F
eb
.22.1980“
or
“1980.F
eb
.22
F
ri“.
3.
T
ap
Save
.
T
IME
F
ORMAT
T
o
select
a
time
format:
1.
In
Idle
mode
,
tap
the
Menu
icon
,
Drag
Leftw
ard
then
tap
Settings
icon
and
select
Date
&
T
ime
>
T
ime
F
ormat
.
2.
T
ap
“12
Hour“
or
“24
Hour“.
3.
T
ap
Save
.
PHONE
L
ANGUAGE
Selects
the
language
in
which
letters
are
displayed
on
the
screen.
1.
In
Idle
mode
,
tap
the
Menu
icon
,
Drag
Leftw
ard
then
tap
Settings
icon
and
select
Phone
>
Language
.
2.
T
ap
“English“
or
“Spanish“.
3.
T
ap
Save
.
NETWOR
k
SELECTING
1.
In
Idle
mode
,
tap
the
Menu
icon
,
Drag
Leftw
ard
then
tap
Settings
icon
and
select
Phone
>
Network
Selecting
.
2.
T
ap
“
Automatic”
or
“Manually”.
100

SETTINGS
3.
T
ap
Save
.
N
ETWOR
k
P
ROFILE
T
o
set
the
network
profile
.
1.
In
Idle
mode
,
tap
the
Menu
icon
,
Drag
Leftw
ard
then
tap
Settings
icon
and
select
Phone
>
Network
Profile
.
2.
T
ap
one
of
these
options:
MEdia
Net,
v
ideo
Share
3.
T
o
delete
all
network
profile
,
tap
Delete
All
.
“Delete
All?“
will
appear
.
T
ap
Ye
s
or
No
.
4.
T
ap
Add
to
add
a
new
network
profile
.
5.
T
ap
Save
.
H
EADSET
T
YPE
1.
In
Idle
mode
,
tap
the
Menu
icon
,
Drag
Leftw
ard
then
tap
Settings
icon
and
select
Phone
>
Headset
T
ype
.
2.
T
ap
“Mono“
or
“Stereo“.
3.
T
ap
Save
.
101
•
Title
:
Enter
a
profile
title
name
.
•
Auth
T
yp
e
:
Select
the
type
of
authentication
used
for
this
WAP
connection:
None
,
Normal,
or
Secure
.
•
Us
er
Name
:
Enter
the
User
Name
access
name
.
•
P
ass
wor
d
:
Set
the
connection
protocol
used
by
the
WAP
browser:
WAP
,
HTTP
,
or
Other
.
•
APN
:
Set
the
connection
protocol
used
by
the
WAP
browser:
w
ap
or
il

SETTINGS
USB
C
ONNECTION
M
ODE
T
o
set
the
USB
connection
mode:
1.
In
Idle
mode
,
tap
the
Menu
icon
,
Drag
Leftw
ard
then
tap
Settings
icon
and
select
Phone
>
USB
Connection
Mode.
2.
T
ap
“Music
Sync“,
“Mass
Storage“
or
“Data
Service“.
3.
T
ap
Save
.
M
EMORY
M
ETER
T
o
view
your
STX-2’
s
memory
meter:
1.
In
Idle
mode
,
tap
the
Menu
icon
,
Drag
Leftw
ard
then
tap
Settings
icon
and
select
Phone
>
Memory
Meter
.
2.
T
ap
“Phone“
or
“SD
Card“.
3.
Y
our
STX-2’
s
Games
&
Apps
,
Music
&
Ringtones
,
Graphics
&
v
ideos
and
MMS
informat
ion
are
displaye
d.
4.
If
you
are
sure
you
w
ant
to
format
the
microSD
Card,
tap
F
ormat
.
“F
ormatting
will
erase
all
data.
F
ormat
now?“
will
be
display
.
T
ap
Ye
s
or
No
.
Note
102
T
he
formatting
procedure
erases
all
the
data
on
the
microSD
card,
after
which
the files
CANN
O
T
be
retrieved.
T
oprevent the
loss
of
important
data,
please
check
the
contents
before
you
format
the
card.

SETTINGS
PHONE
I
NFORM
A
TION
Displays
your
STX-2’
s
information:
1.
In
Idle
mode
,
tap
the
Menu
icon
,
Drag
Leftw
ard
then
tap
Settings
icon
and
select
Phone
>
Phone
Information
.
2.
Y
our
STX-2’
s
My
Mobile
Number
,
IMEI,
S/W
v
er
,
H/W
v
er
,
Config
v
ersion,
Network
band,
Manufacturer,
Model
and
JA
v
A
Information
are
displayed.
C
ALL
A
NSWER
M
ODE
T
his
feature
allows
you
to
select
the
answer
mode
.
1.
In
Idle
mode
,
tap
the
Menu
icon
,
Drag
Leftw
ard
then
tap
Settings
icon
and
select
Call
>
Answer
Mode.
2.
T
ap
“
Any
K
ey“
or
“T
alk
K
ey“.
3.
T
ap
Save
.
A
UTO
R
EDIAL
Automatically
redials
a
phone
number
after
a
set
time
interv
al.
1.
In
Idle
mode
,
tap
the
Menu
icon
,
Drag
Leftw
ard
then
tap
Settings
icon
and
select
Call
>
Auto
Redial
.
2.
T
ap
“On“
or
“Off“.
3.
T
ap
Save
.
103
•
A
ny
k
ey:
Press
any
k
ey
to
answer
an
incoming
call.
•
T
al
k
k
ey:
Press
talk
k
ey
to
answer
a
call.

SETTINGS
M
INUTE
M
INDER
T
his
option
allows
you
to
specify
whether
the
phone
will
beep
every
minute
during
an
outgoing
call
to
k
eep
you
informed
of
the
length
of
the
call.
1.
In
Idle
mode
,
tap
the
Menu
icon
,
Drag
Leftw
ard
then
tap
Settings
icon
and
select
Call
>
Minute
Minder
.
2.
T
ap
“On“
or
“Off“.
3.
T
ap
Save
.
C
ALL
F
ORWARDING
When
this
network
service
is
activated,
you
can
direct
your
incoming
calls
to
another
number
,
for
example
,
to
your
voice
mailbox
number
.
F
or
details,
contact
your
service
provider.
Select
one
of
the
divert
options,
for
example
,
select
Busy
to
divert
voice
calls
when
your
number
is
busy
or
when
you
reject
incoming
calls
.
1.
In
Idle
mode
,
tap
the
Menu
icon
,
Drag
Leftw
ard
then
tap
Settings
icon
and
select
Call
>
Call
F
orw
arding.
2.
T
ap
Unconditional,
If
Busy
,
If
Not
Reply
or
If
Not
Reachable
.
3.
T
ap
Deactiv
ate
All
to
cancel
all
active
Call
F
orw
arding
options.
104
•
Ac
tivate
:
T
o
activate
Call
F
orw
arding
and
enter
a
forw
arding
number
.
•
Deac
tivate
:
T
o
deactivate
Call
F
orw
arding.
•
Che
ck
S
t
atus:
T
o
check
if
the
function
is
active
or
not.

SETTINGS
C
ALL
WAITING
Call
W
aiting
will
notify
you
of
a
new
incoming
call
while
you
have
a
call
i
progress
.
1.
In
Idle
mode
,
tap
the
Menu
icon
,
Drag
Leftw
ard
then
tap
Settings
icon
and
select
Call
>
Call
W
aiting
.
2.
T
ap
All
Calls
,
v
oice
Call
or
Data
Call
.
C
ALLER
ID
T
o
select
if
your
phone
number
will
appear
when
making
a
call:
1.
In
Idle
mode
,
tap
the
Menu
icon
,
Drag
Leftw
ard
then
tap
Settings
icon
and
select
Call
>
Caller
ID
.
2.
T
ap
Show
My
Number
,
Hide
My
Number
,
Network
or
Check
Status
.
C
ALL
B
ARRING
T
o
block
select
types
of
calls:
1.
In
Idle
mode
,
tap
the
Menu
icon
,
Drag
Leftw
ard
then
tap
Settings
icon
and
select
Call
>
Call
Barring
.
2.
T
ap
All
Outgoing,
Outgoing
Int’l
,
Except
Home
,
All
Incoming,
Incoming
Roaming
.
105
•
Show
My
Numb
er:
Caller
ID
appears
.
•
H
ide
My
Numb
er:
Caller
ID
does
not
appear
.
•
Net
work:
Caller
ID
is
dependent
on
Network
Setting.
•
Che
ck
S
t
atus:
T
o
check
the
Network
Setting
Status
.
•
Ac
tivate
:
T
o
activate
call
w
aiting.
•
Deac
tivate
:
T
o
deactivate
call
w
aiting.
•
Che
ck
S
t
atus:
T
o
check
if
the
function
is
active
or
not.

SETTINGS
T
ap
Deactiv
ate
All
to
cancel
all
active
Call
Barring
options
or
Change
P
assword
to
change
your
password.
TTY
Allows
you
to
attach
a
TTY
device
enabling
you
to
communicate
with
parties
also
using
a
TTY
device
.
A
phone
with
TTY
support
is
able
to
translate
typed
characters
to
voice
.
v
oice
can
also
be
translated
into
characters
and
then
displayed
on
the
TTY
.
1.
In
Idle
mode
,
tap
the
Menu
icon
,
Drag
Leftw
ard
then
tap
Settings
icon
and
select
Call
>
TTY
.
2.
T
ap
“TTY
Full“,
“TTY
+
T
alk“,
“TTY
+
Hear“
or
“TTY
Off“:
3.
T
ap
Save
.
106
•
TT
Y
F
u
ll
:
Users
who
cannot
talk
and
hear
send
and
receive
a
text
message
through
TTY
equipment.
•
TT
Y
+
T
al
k:
Users
who
can
talk
but
cannot
hear
receive
a
text
message
an
d
send
voice
messages
through
TTY
equipment.
•
TT
Y
+
Hear:
Users
who
can
hear
but
cannot
talk
send
a
text
message
and
receive
voice
messages
through
TTY
equipment.
•
TT
Y
O
f
f:
Normal
users
send
and
receive
without
TTY
equipment.
•
Ac
tivate
:
T
o
activate
call
barring.
•
Deac
tivate
:
T
o
deactivate
call
barring.
•
Che
ck
S
t
atus:
T
o
check
if
the
function
is
active
or
not.

SETTINGS
S
ECURITY
Prevents
others
from
using
the
phone
without
permission
and
allows
access
to
security
features
only
after
inputting
a
password.
PHONE
L
OC
k
T
urn
on
the
lock
to
prevent
the
phone
from
being
used
without
entering
the
password
first.
1.
In
Idle
mode
,
tap
the
Menu
icon
,
Drag
Leftw
ard
then
tap
Settings
icon
and
select
Security
>
Phone
Lock
.
2.
T
ap
“On“
or
“Off“.
3.
T
ap
Save
.
4.
When
locking
the
device
for
the
first
time
,
enter
”0000“
to
lock.
See
the
following
page
for
instructions
on
how
to
change
your
password.
PIN
C
ODE
R
EQUEST
FOR
YOUR
SIM
C
ARD
When
the
PIN
code
request
feature
is
set
to
“On“,
you
must
enter
your
PIN
each
time
you
switch
the
phone
on.
Consequently
,
any
person
who
does
not
have
your
PIN
cannot
use
your
STX-2
without
your
approval.
1.
In
Idle
mode
,
tap
the
Menu
icon
,
Drag
Leftw
ard
then
tap
Settings
icon
and
select
Security
>
PIN
Code
Request
.
2.
T
ap
“On“
or
“Off“.
3.
T
ap
Save
.
4.
See
the
following
page
for
instructions
on
how
to
change
your
PIN
password.
107
Please
contact
A
T&T
Customer
Service
for
your
SIM
PIN
code
.

SETTINGS
C
HANGE
PHONE P
A
SSWORD
T
o
change
your
password:
1.
In
Idle
mode
,
tap
the
Menu
icon
,
Drag
Leftw
ard
then
tap
Settings
icon
and
select
Security
>
Change
Phone
P
assword
.
2.
Enter
your
New
P
assword
>
Done
,
then
enter
your
v
erify
P
assword
>
Done
.
Enter
your
Current
P
assword
>
Done
.
C
HANGE
PIN
C
ODE
FOR
YOUR
SIM
C
A
RD
T
o
change
your
PIN
code:
1.
In
Idle
mode
,
tap
the
Menu
icon
,
Drag
Leftw
ard
then
tap
Settings
icon
and
select
Security
>
Change
PIN
Code
.
2.
T
ap
PIN1
or
PIN2
.
FDN
T
his
allows
you
to
restrict
your
outgoing
calls
to
selected
phone
numbe
r
if
this
function
is
supported
by
your
SIM
card.
T
he
PIN2
code
is
required.
1.
In
Idle
mode
,
tap
the
Menu
icon
,
Drag
Leftw
ard
then
tap
Settings
icon
and
select
Security
>
FDN
.
2.
T
ap
FDN
or
FDN
List
.
108
•
F
DN
:
T
ap
“On“
or
“Off“
>
Save
.
•
F
DN
Lis
t:
T
ap
Add
New.
Enter
a
“Name“
and
“Phone
number“
>
Save
.
T
ap
Options
to
access
the
following
options:
Add
Contacts
,
Recent
Calls
•
F
DN
On
:
Y
ou
can
only
call
phone
numbers
stored
in
the
FDN
List.
Y
ou
must
enter
your
PIN2.
•
F
DN
O
f
f:
Y
ou
can
call
any
number
.

SETTINGS
M
ASTER
R
ESET
P
erforming
a
Master
Reset
restores
the
settings
(e
.g.:
Audio,
Display
,
Language
,
Date
&
T
ime,
Bluetooth
Settings)
stored
in
the
handset
memory
to
default
v
alues
.
1.
In
Idle
mode
,
tap
the
Menu
icon
,
Drag
Leftw
ard
then
tap
Settings
icon
and
select
Security
>
Master
Reset
.
2.
“Intialize
all
settings
to
default
value
.
Proceed?“
will
appear
.
T
ap
Ye
s
or
No
.
M
ASTER
C
LEAR
P
erforming
a
Master
Clear
deletes
downloaded/user
created
contents
(e
.g.:
images
,
videos)
from
your
device
and
the
External
Memory
card.
1.
In
Idle
mode
,
tap
the
Menu
icon
,
Drag
Leftw
ard
then
tap
Settings
icon
and
select
Security
>
Master
Clear
.
2.
“Master
Clear
deletes
all
data
and
contents
.
Proceed?“
will
appear
.
T
ap
Ye
s
or
No
.
Note
109
All
data
will
be
lost
when
using
this
funtion.
•
Hands
et
-
Deletes
all
downloaded/user
created
Images
,
v
ideos
&
Sounds
from
the
Handset
Memory.
-
Restores
P
ersonal
Information
stored
in
the
handset
memory
(e
.g.:
address
book,
messages
,
tasks
,
alarm,
Scheduler)
to
default
v
alues
.
-
Restores
the
settings
stored
in
the
handset
memory
to
default
v
alues
.
•
Memor
y
Car
d
:
Deletes
all
contents
from
the
External
Memory
Card.

SETTINGS
A
PPLIC
A
TIONS
M
ESSAGING
S
ETTINGS
T
o
select
your
message
settings:
1.
In
Idle
mode
,
tap
the
Menu
icon
,
Drag
Leftw
ard
then
tap
Settings
icon
and
select
Applications
>
Messaging
Settings
.
110
•
T
ex
t
Message
-
Message
Center
Numb
er:
If
you
w
ant
to
send
a
text
message
,
you
can
get
the
address
of
the
SMS
center
by
using
this
menu.
-
E
mai
l
Gateway:
Y
ou
can
send
the
text
message
to
an
Email
Address
via
this
gatew
ay
.
-
T
ex
t
T
emplates:
v
iew
and
edit
the
template
messages
or
create
new
messages
.
•
M
u
lti
med
ia
Message
-
Defau
lt
Sl
ide
Du
ration
:
T
ap
“2
sec.“,
“5
sec.“
or
“10
sec.“
>
Save
.
-
Priorit
y:
T
ap
“High“,
“Normal“
or
“Low“
>
Save
.
-
V
alid
it
y
Perio
d
:
T
ap
“1
Hour“,
“2
Hours“,
“1
Day“,
“1
W
eek“
or
“Maximum“
>
Save
.
-
Automatic
Dow
n
load
:
T
ap
“On“
or
“Off“
>
Save
.
-
Send
Del
iver
y
Re
cei
p
t:
T
ap
“On“
or
“Off“
>
Save
.
-
Send
Read
Re
cei
p
t:
T
ap
“On“
or
“Off“
>
Save
.
-
Message
Center:
T
ap
“Name“,
“MMSC
URL“,
“MMSC
PRO
XY“,
MMSC
POR
T“
or
“Network
Profile“.
T
ap
Add
to
set
a
new
Message
Center
.
Enter
the
Message
Center
informations
>
Save
.
•
V
oicemai
l
:
T
o
change
user
voice
mail
number
.
•
Auto
E
rase
:
T
ap
“On“
or
“Off“
>
Save
.

SETTINGS
B
ROWSER
S
ETTINGS
T
o
view
and/or
edit
your
Browser
settings:
1.
In
Idle
mode
,
tap
the
Menu
icon
,
Drag
Leftw
ard
then
tap
Settings
icon
and
select
Applications
>
Browser
Settings
.
2.
T
ap
MEdia
Net
>
Activate.
Selects
a
connection
profile
to
be
used
when
connecting
to
the
Internet.
3.
T
o
create
a
new
connection,
tap
Add.
A
DDRESS
B
OO
k
S
ETTINGS
T
o
select
your
Address
Book
settings:
1.
In
Idle
mode
,
tap
the
Menu
icon
,
Drag
Leftw
ard
then
tap
Settings
icon
and
select
Applications
>
Address
Book
Settings
.
111
•
Account
Name
:
Enter
a
account
name
.
•
Homep
age
:
Enter
the
URL
address
of
the
page
to
be
used
as
your
homepage
.
•
Pro
xy
A
dd
r
ess:
Set
the
proxy
server
address
.
•
Por
t
Numb
er:
Set
the
proxy
server
port.
•
Net
work
Profi
le
:
Select
a
network
profile
to
be
used
when
connecting
to
the
internet.
•
Save
:
Save
edited
connection
profile
.
•
Ac
tivate
:
Activate
currently
connection
profile
.
•
Delete
:
Delete
connection
profile
.

SETTINGS
C
AMERA
S
ETTINGS
1.
In
Idle
mode
,
tap
the
Menu
icon
,
Drag
Leftw
ard
then
tap
Settings
icon
and
select
Applications
>
Camera
Settings
.
XT9
S
ETTINGS
XT9
is
a
predictive
text
input
mode
which
displays
a
word
candidate
list
as
you
enter
the
first
few
characters
so
you
just
select
the
word
that
you
w
ant.
1.
In
Idle
mode
,
tap
the
Menu
icon
,
Drag
Leftw
ard
then
tap
Settings
icon
and
select
XT9
Settings
.
2.
T
ap
“
W
ord
Prediction
“,
“
Spell
Correction
“
or
“
W
ord
Completion
“.
112
•
Camera
-
Res
ol
ution
:
T
ap
“1280
x
960“,
“640
x
480“
or
“320
x
240“
>
Save
.
-
Qual
it
y:
T
ap
“Economy“,
“Normal“
or
“F
ine“
>
Save
.
-
Save
to
:
T
ap
“Phone
Memory“
or
“SD
Card“
>
Save
.
•
Camcor
der
-
Res
ol
ution
:
T
ap
“320
x
240“
or
“176
x
144“
>
Save
.
-
Qual
it
y:
T
ap
“Economy“,
“Normal“
or
“F
ine“
>
Save
.
-
Save
to
:
T
ap
“Phone
Memory“
or
“SD
Card“
>
Save
.
•
Save
Lo
c
ation
:
T
ap
“
Alw
ays
Ask“,
“Phone“
or
“SIM“
>
Save
.
•
View:
T
ap
“
All“,
“Phone“
or
“SIM“
>
Save
.
•
Memor
y
S
t
atus:
Check
the
current
status
of
the
external
memory
card
in
this
menu.
•
SI
M
Numb
er
T
yp
e
:
T
ap
Add.
Input
the
new
number
then
tap
Save
.
•
Change
H
idden
k
ey:
Input
the
new
hidden
k
ey
.
(T
he
default
hidden
k
ey
code
is
“00000000”.
Please
contact
A
T&T
Customer
Service
for
your
Hidden
K
ey
code
.
).

SETTINGS
3.
T
ap
“On“
or
“Off“.
4.
T
ap
Save
.
S
OFTW
ARE
U
PD
A
TE
T
his
menu
is
used
to
resume
a
postponed
softw
are
update.
If
new
softw
are
exists
,
the
A
T&T
server
notifies
devices
using
a
WAP
push
message
.
Before
updating
new
softw
are
after
downloading
it
from
the
A
T&T
server
,
you
can
decide
whether
you
would
lik
e
to
postpone
the
operation.
Reminder
times
can
be
set
to
30
minutes,
1
hour,
and
4
hours
.
When
the
time
is
up,
you
will
be
prompted
again
or
you
can
resume
the
postponed
operation
using
this
menu
at
any
time
.
1.
In
Idle
mode
,
tap
the
Menu
icon
,
Drag
Leftw
ard
then
tap
Settings
icon
and
select
Softw
are
Update
.
113
•
C
onti
n
ue
Up
date
:
T
his
menu
is
used
to
resume
a
postponed
softw
are
update.
•
Che
ck
for
Up
date
:
“Check
the
A
T&T
server
for
a
new
softw
are
update?
T
he
softw
are
update
process
will
not
delete
any
personal
data
on
your
STX-2.“
will
appear
.
T
ap
OK
or
No
.
•
W
or
d
Pre
d
ic
tion
:
T
o
predictive
text
input
mode
which
displays
a
word
candidate
list
as
you
enter
the
first
few
characters
so
you
just
select
the
word
that
you
w
ant.
•
Sp
el
l
C
orr
e
c
tion
:
Lets
you
correct
typographical
errors
by
selecting
from
a
list
of
possible
words
that
reflect
the
characters
of
the
k
eys
you
have
tapped
as
well
as
characters
of
nearby
ke
y
s.
•
W
or
d
C
ompletion
:
Lets
you
select
from
a
list
of
possible
words
based
on
the
k
eys
that
you
have
tapped
and
on
the
words
av
ailable
in
the
dictionary.

SETTINGS
v
IDEO
SHARE
T
he
v
ideo
Share
feature
allows
you
to
share
live
or
recorded
video
during
a
voice
call.
1.
In
Idle
mode
,
tap
the
Menu
icon
,
Drag
Leftw
ard
then
tap
Settings
icon
and
select
v
ideo
Share
.
2.
T
ap
“
Alerts
“,
“
Auto
Record
“
or
“
Service
“.
3.
T
ap
“On“
or
“Off“.
4.
T
ap
Save
.
114
•
Aler
t
s:
Allows
you
to
turn
On
or
Off
the
v
ideo
Share
Alerts
which
displays
a
message
and
a
tone.
•
Auto
Recor
d
:
Allows
you
to
turn
On
or
Off
the
Auto
Record
which
records
the
v
ideo
Share
call.
•
Service
:
Allows
you
to
turn
the
v
ideo
Share
Service
On
or
Off.

MY
A
CCOUNT
MY
ACCOUNT
1.
In
Idle
mode
,
tap
the
Menu
icon
,
Drag
Leftw
ard
then
tap
My
Account
icon
.
115

TOOLS
TO
D
O
T
his
feature
allows
you
to
save
and
manage
a
to
do
list.
1.
In
Idle
mode
,
tap
the
Menu
icon
,
Drag
Leftw
ard
then
tap
T
ools
icon
and
select
T
o
Do
.
2.
T
ap
Add
to
set
a
new
T
o
Do
item.
Enter
the
following
fields:
3.
T
ap
Save
.
WORLD
T
IME
T
he
W
orld
T
ime
function
provides
time
information
on
major
cities
worldwide
.
1.
In
Idle
mode
,
tap
the
Menu
icon
,
Drag
Leftw
ard
then
tap
T
ools
icon
and
select
W
orld
T
ime.
2.
T
ap
Set
,
then
tap
/
to
choose
a
city.
T
ap
Country
&
City
,
to
view
city
list.
116
•
D
S
T
:
Specifies
whether
the
current
time
of
the
selected
place
is
adjusted
to
Daylight
Savings
T
ime.
T
ap
Options
to
access
the
following
options:
•
Sele
c
t
&
Delete
:
“Delete
Selected
Items?“
>
Y
es
or
No
.
•
Delete
Al
l
:
“Delete
all
T
o
Do?“will
appear
.
T
ap
Ye
s
or
No
.
•
Title
:
Enter
the
title
>
Save
.
•
Due
Date
:
T
ap
to
choose
a
date
in
the
Scheduler
.
•
Summar
y:
Enter
the
summary
>
Save
.
•
Priorit
y:
T
ap
“High“,
“Normal“,
“Low“
>
Save
.
•
S
t
atus:
T
a
p
“In
Progress“,
“Completed“
>
Save
.

TOOLS
3.
T
ap
Done
.
4.
T
ap
Delete
All
to
delete
world
time
.
“Delete
all
Items?“
will
appear
.
T
ap
Y
es
or
No
.
N
OTEP
AD
T
o
access
the
notepad:
1.
In
Idle
mode
,
tap
the
Menu
icon
,
Drag
Leftw
ard
then
tap
T
ools
icon
and
select
Notepad.
ADD
MEMO
1.
T
ap
Add
to
add
a
new
memo
.
2.
Input
the
memo
then
tap
Save
.
3.
T
ap
Delete
All
to
delete
the
memos
.
“Delete
All?“
will
appear
.
T
ap
Ye
s
or
No
.
v
IEW
MEMO
1.
T
he
list
of
all
memos
,
in
saved
order
is
displayed.
2.
T
ap
a
memo
.
EDIT
MEMO
1.
T
he
list
of
all
memos
,
in
saved
order
is
displayed.
2.
T
ap
a
memo
.
3.
T
ap
Edit
to
edit
the
memo
>
Save
.
117

TOOLS
D
ELETE
MEMO
1.
T
he
list
of
all
memos
,
in
saved
order
is
displayed.
2.
T
ap
a
memo
.
3.
T
ap
Delete
.
“Delete
this
memo?“
will
appear
.
T
ap
Ye
s
or
No
.
UNIT
C
ON
v
ER
TER
T
his
function
converts
any
measurement
into
a
unit
you
w
ant.
T
here
are
5
types
of
units
that
can
be
converted:
Distance
,
Area,
v
olume,
mass
and
T
emperature
.
1.
In
Idle
mode
,
tap
the
Menu
icon
,
Drag
Leftw
ard
then
tap
T
ools
icon
and
select
Unit
Converter
.
2
.
T
ap
Reset
.
vOICE
M
EMO
v
oice
Memo
allows
you
to
record
a
reminder
message
that
can
be
up
to
4
minutes.
T
o
record
a
memo:
1.
In
Idle
mode
,
tap
the
Menu
icon
,
Drag
Leftw
ard
then
tap
T
ools
icon
and
select
v
oice
Memo.
2.
T
o
record
a
voice
memo
,
tap
Start
.
T
o
pause/resume
a
voice
memo
,
tap
P
ause
/
Resume
.
118
•
U
n
it:
T
ap
“Distance“,
“
Area“,
“
v
olume“,
“Mass“
or
“T
emperature“
>
Done
.
•
In
put:
T
ap
“mm“,
“cm“,
“m“,
“km“,
“in“,
“ft“,
“yd“
or
“mi“
>
Done
.
•
Out
put:
T
ap
“mm“,
“cm“,
“m“,
“km“,
“in“,
“ft“,
“yd“
or
“mi“
>
Done
.

TOOLS
3.
T
o
stop
recording
a
voice
memo
,
tap
Stop
>
Save
.
S
TOP
W
A
TCH
Y
ou
can
simultaneously
time
up
to
10
different
events
.
1.
In
Idle
mode
,
tap
the
Menu
icon
,
Drag
Leftw
ard
then
tap
T
ools
icon
and
select
Stopwatch.
2.
T
o
measure
a
time
period:
119
•
T
o
start,
tap
Start
.
•
T
o
stop
the
timing,
tap
Stop
.
T
o
continue
timing,
tap
Continue
.
•
T
ap
Lap
to
save
the
time
at
one
instance
.
Y
ou
can
show
up
to
10
times.
•
T
o
stop
the
stopw
atch,
tap
Stop
.
•
T
o
review
the
results
,
scroll
through
the
list.
•
T
o
reset
it,
tap
Reset
.
•
Save
:
T
he
saved
memo
appears
in
the
My
Stuff
folder.
(
Menu
icon
>
Drag
Rightw
ard
>
My
Stuff
>
Ringtones
&
Audio
)
•
Save
&
Send
Ms
g
:
T
o
save
and
send
the
memo
in
a
message
.
•
Cancel
:
T
o
cancel
voice
memo
.

CALENDAR
C
ALENDAR
Sets
an
event
and
reminds
you
of
that
event.
1.
In
Idle
mode
,
tap
the
Menu
icon
,
Drag
Leftw
ard
then
tap
Calendar
icon
.
ADD
NEW
E
v
ENT
1.
T
ap
to
choose
a
date
in
the
Scheduler
.
T
ap
Add
to
add
an
event
to
the
Scheduler
.
2
.
T
ap
Save
.
3.
T
he
date
of
the
event
will
be
mark
ed
on
your
Calendar
.
v
IEW
ADDED
S
CHEDULER
1.
T
ap
/
to
select
a
date
in
the
Calendar
,
then
tap
to
view
th
e
event
for
that
day
.
2.
T
ap
Add
to
add
an
event
to
the
Scheduler
.
120
•
Title
:
Enter
the
event
title
>
Save
.
•
S
t
ar
t
:
Enter
the
start
date
>
Done
.
•
Time
:
Enter
the
time
.
T
ap
AM
/
PM
>
Done
.
•
E
nd
:
Enter
the
end
date
>
Done
.
•
Time
:
Enter
the
time
.
T
ap
AM
/
PM
>
Done
.
•
Summar
y:
Enter
the
Summary
>
Save
.
•
Lo
c
ation
:
Enter
the
location
>
Save
.
•
Alarm
:
T
ap
“Off“,
“On
T
ime“,
“15
Min
Before
.“,
“1Hour
Before
.“,
“1Day
Before
.“,
“2Days
Before
.“,
“1
W
eek
Before
.“
>
Save
.
•
Rep
eat:
T
ap
“Once“,
“Daily“,
“Mon
to
F
ri“,
“Mon
to
Sat“,
“W
eekly“,
“Monthly“,
“
Annually“
>
Save
.

CALENDAR
3.
T
ap
event
to
see
the
details
for
the
event.
4.
T
ap
Edit
to
edit
the
event,
then
tap
Save
to
save
the
event.
5.
T
ap
Delete
to
delete
event
in
the
Scheduler
.
“Delete
Schedule?“
will
appear
.
T
ap
Ye
s
or
No
.
T
OD
A
Y
S
CHEDULER
T
o
view
the
T
oday
Scheduler:
1.
T
ap
T
oday
.
121
T
ap
Options
to
access
the
following
options:
•
Sele
c
t
&
Delete
:
“Delete
Selected
Items?“
will
appear
.
T
ap
Ye
s
or
No
.
•
Delete
Al
l
:
“Delete
all
Items?
“
will
appear
.
T
ap
Ye
s
or
No
.

ALARM
CLOC
k
A
LARM
C
LO
C
k
T
he
alarm
function
allows
you
to
set
up
multiple
separate
alarms
.
Y
ou
can
also
set
the
time
,
repetition
interv
al
and
alarm
sound.
1.
In
Idle
mode
,
tap
the
Menu
icon
,
Drag
Leftw
ard
then
tap
Alarm
Clock
icon
.
2.
T
ap
Add
to
set
a
new
alarm.
3.
T
ap
Save
.
4.
T
o
delete
all
the
alarms
,
tap
Delete
All
.
“Delete
all
Items?“
will
appear
.
T
ap
Ye
s
or
No
.
122
•
Set:
T
ap
“On“
or
“Off“
>
Done
.
•
Time
:
Enter
the
time
.
T
ap
AM
/
PM
>
Done
.
•
Rep
eat:
T
ap
“Once“,
“Mon
to
F
ri“,
“Mon
to
Sat“,
“Sat
to
Sun“
or
“Daily“
>
Done
.
•
Sno
oze
:
T
ap
“5
min“,
“10
min“,
“15
min“
or
“20
min“
>
Done
.
•
Ri
ngtone
:
T
ap
a
ringtone
for
the
alarm
sound.

CALCUL
A
TOR
C
ALCUL
A
TOR
T
he
calculator
allows
you
to
perform
general
mathematical
functions,
such
as
addition,
subtraction,
multiplication
and
division.
1.
In
Idle
mode
,
tap
the
Menu
icon
,
Drag
Leftw
ard
then
tap
Calculator
icon
and
select
Calculator
.
2.
Enter
the
numbers
to
get
the
value
you
w
ant.
T
o
cancel
a
calculation,
tap
C
.
T
o
clear
the
display
,
tap
0
k
ey
.
T
IP
C
ALCUL
A
TOR
T
his
feature
allows
you
to
quickly
and
easily
calculate
the
tip
amount
based
on
the
total
bill
as
well
as
the
split
of
the
total
bill
based
on
the
number
of
people
.
1.
In
Idle
mode
,
tap
the
Menu
icon
,
Drag
Leftw
ard
then
tap
Calculator
icon
and
select
T
ip
Calculator
.
2.
T
ap
Bill
,
enter
the
amount
of
the
bill
then
tap
Done
.
3.
T
ap
T
ips
,
enter
the
percentage
of
the
tip
,
then
tap
Done
.
4.
T
ap
P
ersons
,
enter
the
number
of
people
splitting
the
bill,
then
tap
Done
.
5.
T
he
amount
that
each
person
pays
appears
in
the
Each
P
ays
field.
123

SOUND
PROFILE
SOUND
P
ROFILE
1.
In
Idle
mode
,
tap
the
Menu
icon
,
Drag
Leftw
ard
then
tap
Sound
Profile
icon
.
2.
T
ap
General
,
Outdoor,
Meeting
or
Headset
.
3.
T
ap
Flight.
T
his
allows
you
to
use
only
the
phone’
s
features
that
do
not
require
the
use
of
the
wireless
network
when
you
are
in
an
airplane
or
in
places
where
the
wireless
network
is
prevented.
If
you
set
the
flight
mode
on,
the
icon
will
be
displayed
on
the
screen
instead
of
the
network
signal
icon.
T
ap
On
or
Off
>
Save
124
•
On
:
Y
ou
cannot
mak
e
(or
receive)
any
calls
,
including
emergency
calls
,
or
use
other
features
that
require
network
coverage
.
•
O
f
f:
Y
ou
can
deactivate
the
flight
mode
and
restart
your
handset
to
access
the
network.
•
Cal
l
Aler
t
T
yp
e
:
T
ap
Ring,
v
ibrate,
Ring
&
v
ibrate,
Ring
After
v
ibrate
or
Silence
>
Save
.
•
Ri
ng
T
one
:
T
ap
Phone
or
SD
Card
.
T
ap
A
T&T
Ringtone
,
Basic
Ringtone
1
~
Basic
Ringtone
3,
Sky
lounge,
Rainforest,
F
ighters,
Love
,
Funny
guy
,
Happiness
>
Save
.
•
Ri
ng
V
ol
ume
:
T
ap
Off
or
v
olume
1
~
v
olume
7
>
Save
.
•
Message
Aler
t
T
yp
e
:
T
ap
Ring
Once
,
v
ibrate,
Ring
&
v
ibrate
or
Silent
>
Save
.
•
Message
T
one
:
T
ap
T
one
1,
T
one
2,
Others
or
Off
>
Save
.
•
k
eyp
ad
&
T
ouch
V
ol
ume
:
T
ap
Off
or
v
olume
1
~
v
olume
7
>
Save
.
•
M
u
lti
med
ia
V
ol
ume
:
T
ap
Off
or
v
olume
1
~
v
olume
7
>
Save
.

BLUETOOTH
B
LUETOOTH
Y
our
STX-2
has
built-in
Bluetooth
wireless
technology,
which
mak
es
it
possible
for
you
to
connect
your
STX-2
wirelessly
to
a
hands
free
device
,
PC
or
PD
A.
Only
one
of
the
devices
registered
in
your
STX-2
can
be
connected
at
a
time
.
(T
o
mak
e
a
connection
to
the
same
type
of
device
or
change
Bluetooth
preferences
,
disconnect
the
existing
device
first.)
Y
ou
can
have
a
conversation
via
a
cordless
Bluetooth
hands-free
phone
or
browse
the
Internet,
wirelessly
connected
via
a
mobile
phone
.
MobiT
v
or
XMRadio
is
supported
through
Only
Stereo
Bluetooth,
A2DP
Music
Playing
is
av
ailable.
W
e
recommend
that
your
STX-2
and
the
Bluetooth
device
you
are
communicating
with
be
no
more
than
10
meters
apart.
T
he
connection
may
be
improved
if
there
are
no
solid
objects
in
between
your
STX-2
and
the
other
Bluetooth
device
.
Note
B
LUETOOTH
1.
In
Idle
mode
,
tap
the
Menu
icon
,
Drag
Leftw
ard
then
tap
Bluetooth
icon
and
select
Bluetooth.
2.
T
ap
“
On
“
or
“
Off
“.
125
F
ile
transfer
of
ringtones,
images
,
etc.
from
device
to
device
is
not
permitted.

BLUETOOTH
S
EARCH
D
E
v
ICE
Searches
for
Bluetooth
devices
in
possible
range
.
1.
In
Idle
mode
,
tap
the
Menu
icon
,
Drag
Leftw
ard
then
tap
Bluetooth
icon
and
select
Search
Device
.
P
AIRED
D
E
v
ICE
L
IST
T
his
function
allows
you
to
view
the
list
of
all
devices
that
are
paired
with
your
STX-2
at
once
.
1.
In
Idle
mode
,
tap
the
Menu
icon
,
Drag
Leftw
ard
then
tap
Bluetooth
icon
and
select
P
aired
Device
List
.
M
Y
PHONE’
S
vISIBILITY
Selecting
“On“
exposes
your
STX-2
to
other
Bluetooth
devices
.
Selecting
Hide
shows
your
STX-2
only
to
already
paired
devices
.
1.
In
Idle
mode
,
tap
the
Menu
icon
,
Drag
Leftw
ard
then
tap
Bluetooth
icon
and
select
My
Phone’
s
v
isibility
.
2.
T
ap
“On“
or
“Off“.
M
Y
PHONE’
S
N
AME
Allows
you
to
change
the
handset’
s
name
that
can
be
seen
by
other
Bluetooth
devices
.
1.
In
Idle
mode
,
tap
the
Menu
icon
,
Drag
Leftw
ard
then
tap
Bluetooth
icon
and
select
My
Phone’
s
Name
.
2.
Input
your
device
name
.
3.
T
ap
Save
.
126

BLUETOOTH
S
UPPORTED
S
ER
v
ICES
Shows
you
all
services
that
your
device
supports
.
1.
In
Idle
mode
,
tap
the
Menu
icon
,
Drag
Leftw
ard
then
tap
Bluetooth
icon
and
select
Supported
Services
.
2.
T
ap
“Headset“,
“Stereo
Headset“,
“Handsfree“,
“Dial
up
Networking“,
“
A/
v
Remote
Control“
or
“Serial
P
ort“.
127

CAMERA
CAMERA
T
aking
pictures
with
your
STX-2’
s
built-in
camera
is
as
simple
as
choosing
a
subject,
pointing
the
lens
and
pressing
a
button.
1.
In
Idle
mode
,
tap
the
Menu
icon
,
Drag
Leftw
ard
then
tap
Camera
icon
and
select
Camera
or
press
and
hold
Camera
K
ey
.
2.
P
oint
the
camera
lens
at
your
subject.
Y
ou
can
check
the
picture
framing
through
the
display
screen.
3.
Press
the
Camera
K
ey
to
tak
e
the
picture.
4.
After
taking
the
picture
it
will
be
displayed.
T
o
save
the
picture,
press
the
Camera
icon
at
the
bottom
left
of
the
screen.
T
o
tak
e
another
picture
without
saving
the
picture
you
just
took,
press
the
T
rash
Can
icon
at
the
bottom
right
of
the
screen.
T
o
send
the
picture
to
someone
,
press
the
Envelope
icon
or
Mobile
Share
icon
in
the
middle
of
the
bottom
of
the
screen.
128
T
ap
Options
to
choose
from:
•
View
Photos:
T
he
list
of
the
photos
in
the
currently
selected
memory
appears
.
•
Self
Timer:
T
o
select
self
timer
“
0ff
“
,
“
5secs
“
or
“
10secs
“
.
•
W
h
ite
B
alance
:
Allows
you
to
select
the
white
balance
mode
to
adjust
the
color
balance
of
photos.
Adjust
by
tapping
the
/
and
selecting
from
“
Fluorescent
“
,
“
Daylight
“
,
“
Cloudy
“
,
“
Automatic
“
or
“
Incandescent
“.
•
Image
E
f
fe
c
t:
T
ap
/
to
select
from
“
Gray
“
,
“
Negative
“
,
“
Sepia
“
or
“
No
Effect
“
.
•
F
un
F
rame
:
Highlight
a
fun
frame
from
the
list.
•
Res
ol
ution
:
T
o
select
resolution
“
1280x960
“
,
“
640x480
“
,
“
320x240
“
.
•
Qual
it
y:
T
o
select
Quality
“Economy
“
,
“
Normal
“
or
“
F
ine
“
.
•
Save
to
:
T
o
select
save
to
“Phone
Memory“,
“SD
Card“
.

CAMERA
CAMCODER
T
aking
video
with
your
STX-2’
s
built-in
camera
is
as
simple
as
choosing
a
subject,
pointing
the
lens
and
pressing
a
button.
1.
In
Idle
mode
,
tap
the
Menu
icon
,
Drag
Leftw
ard
then
tap
Camera
icon
and
select
Camcorder
.
2
.
Press
the
Side
Camera
K
ey
to
tak
e
the
camcorder
.
3.
T
o
stop
recording,
press
the
Side
Camera
K
ey
.
T
o
P
ause/Resume
recording,
tap
P
ause/Resume
.
4.
After
taking
the
camcorder
it
will
be
displayed.
T
o
save
the
video,
tap
v
ideo
icon
at
the
bottom
left
of
the
screen.
T
o
tak
e
another
video
without
saving
the
video
you
just
took,
tap
the
T
rash
Can
icon
at
the
bottom
right
of
the
screen.
T
o
send
the
video
to
someone
,
tap
the
Envelope
icon
in
the
middle
of
the
bottom
of
the
screen.
129
T
ap
Options
to
choose
from:
•
View
Vide
os:
T
he
list
of
the
videos
in
the
currently
selected
memory
appears
.
•
Image
E
f
fe
c
t:
T
ap
/
to
select
from
“Gray“,
“Negative“,
“Sepia“
or
“No
Effect“.
•
Res
ol
ution
:
T
o
select
resolution
“320x240“
or
“176x144“.
•
Qual
it
y:
T
o
select
Quality
“Economy“,
“Normal“
or
“Fine“.
•
Save
to
:
T
o
select
save
to
“Phone
Memory“
or
“SD
Card“
.

MEMO
130

CHAPTER
6
PC
C
ONNECTI
v
ITY
C
HAPTE
R6.
PC
C
ON
N
E
CTIVIT
Y
PC
Connectivity
131

PC
C
ONNECTI
v
ITY
SET
UP
B
LUETOOTH
MODE
FOR
THE
STX-2
TURNING ON
B
LUETOOTH
T
o
enable
Bluetooth:
1.
In
Idle
mode
,
tap
the
Menu
icon
,
Drag
Leftw
ard
then
tap
Bluetooth
icon
and
select
Bluetooth
>
Select
Bluetooth
On/Off
.
2.
Select
On
.
Y
ou
can
see
the
Bluetooth
icon
at
the
top
of
the
screen.
M
A
k
ING THE
STX-2
v
ISIBLE
TO
A
PC
T
his
step
enables
your
PC
to
find
the
STX-2
when
searching
for
Bluetooth
devices
.
1.
In
Idle
mode
,
tap
the
Menu
icon
,
Drag
Leftw
ard
then
tap
Bluetooth
icon
and
select
Bluetooth.
2.
Select
“My
Phone’
s
v
isibility
On/Off“.
3.
Select
On
.
P
AIRING
THE
STX-2
WITH
A
PC
T
o
pair
your
device
with
a
PC:
1.
If
your
PC
supports
Bluetooth,
you
can
find
the
Bluetooth
icon
in
the
tray
icons
.
2.
Click
the
right
button
of
your
mouse
on
the
Bluetooth
icon.
3.
Select
“Bluetooth
Settings“.
132

PC
C
ONNECTI
v
ITY
4
.
On
the
“Bluetooth
Settings“
window
,
click
“New
Connection“
to
start
“
Add
New
Connection
Wizard“.
5.
Click
the
“Next“
button
on
the
“
Add
New
Connection
Wizard“
window
to
search
for
the
Bluetooth
device
.
6.
After
searching,
“STX-2“
or
the
name
you
assigned
to
your
device
will
appear
.
7.
Select
“STX-2“
and
click
the
“Next“
button.
8.
Enter
the
PIN
number
then
click
“OK“
button.
9.
Click
the
“Y
es“
button.
10.
Enter
the
same
PIN
number
you
entered
in
step
8.
11.
Click
the
“Next“
button,
if
you
do
not
need
to
set
additional
modem
settings.
12.
P
airing
is
complete
and
the
New
modem
will
be
installed.
13.
“
Add
New
Connection
Wizard“
will
use
Dial
Up
Networking
to
automatically
configure
the
STX-2.
Enter
the
Dial
Up
name
and
the
connection
number
*99#.
M
A
k
ING
DIAL
-
UP
NETWOR
k
ING
F
irst,
connect
STX-2
to
PC
using
Data
service
mode
.
1.
On
your
PC,
select
Start
>
All
Programs
>
Accessories
>
Communications
>
Network
connections
2.
In
network
connection
window
,
right
click
on
New
Connection
Wizard.
133

PC
C
ONNECTI
v
ITY
3.
F
ollow
the
instructions
in
the
dialog
boxes
.
Select
UTStarcom
USB
modem.
T
o
view
the
option,
your
device
should
be
connected
to
the
PC.
If
device
is
not
connected
correctly
,
the
above
option
will
be
skipped
to
the
following
screen.
In
case
this
option
is
skipped,
you
can
change
this
option
in
the
start
up
screen
using
the
properties
button
described
in
step
#6.
4.
T
he
new
icon
for
A
TT
dial-up
connection
will
appear
.
5.
Double
click
the
A
TT
icon
to
the
start
dial-up
connection.
A
user
name
and
password
is
not
required.
6.
Click
the
properties
button
to
select
the
current
configuration.
T
he
UTStarcom
modem
should
be
selected.
7.
Dial
Up
Networking
set-up
is
complete
.
8.
T
he
DUN
icon
is
located
on
the
“Bluetooth
Settings“
window
or
the
properties
of
“My
Network
Places“.
9.
T
o
access
Data
service(DUN),
click
the
DUN
icon.
P
AIRING
A
B
LUETOOTH
H
EADSET
TO
THE
STX-2
1.
T
urn
on
Bluetooth
on
your
STX-2.
2.
Change
your
Bluetooth
headset
to
connection
mode
.
T
his
will
v
ary
by
manufacturer.
3.
Once
connected,
select
‘Search
Device’
on
the
Bluetooth
menu.
134

PC
C
ONNECTI
v
ITY
4
.
After
searching,
a
list
of
Bluetooth
devices
will
appear
.
5.
Select
your
headset.
6.
Enter
“P
ass
Code“
for
the
headset,
which
may
be
found
in
the
user
manual
for
the
headset.
M
A
k
ING
DIAL
-
UP
NETWOR
k
ING
v
IA
USB
Y
our
device
can
be
used
as
a
network
device
for
Internet
sharing.
Y
ou
can
share
files
with
a
computer
or
use
an
Internet
connection,
etc.
1.
Before
you
connect
the
device
,
set
your
device
to
Data
Service
Mode.
T
o
do
this,
tap
the
Menu
icon
,
Drag
Leftw
ard
then
tap
Settings
icon
and
select
Phone
>
USB
Connection
Mode
>
Data
Service
>
Save
.
2.
Connect
your
STX-2
to
your
PC
with
a
USB
cable
.
3.
Execute
the
Dial
up
application
you
created.
4.
Click
“Properties“
for
modem
setting.
5.
“UTStarcom
USB
Modem“
will
appear
.
Check
it
as
modem.
6.
Enter
*99#.
7.
Click
“OK“.
8.
Click
“Dial“
to
connect.
“User
name“
and
“P
assword“
are
not
used
for
a
UMTS
connection.
135

PC
C
ONNECTI
v
ITY
MUSIC
SYNC
T
he
phone
communicates
with
a
computer
via
ActiveSync.
Note
1.
Before
you
connect
the
device
,
set
your
device
to
Music
Sync
Mode.
T
o
do
this
tap
the
Menu
icon
,
Drag
Leftw
ard
then
tap
Settings
icon
and
select
Phone
>
USB
Connection
Mode
>
Music
Sync
>
Save
.
2.
Connect
the
STX-2
to
your
PC
with
a
USB
cable
.
3.
Close
ActiveSync
®
(it
will
automatically
open
when
you
connect
your
device).
4.
Open
Windows
Media
®
Player
on
your
PC.
5.
Click
“Media
Library“,
then
highlight
the
music
you
w
ant
to
copy
.
6.
Right-click
on
it,
then
click
“
Add
to
Playlist“.
7.
Click
“Sync
List“
(T
he
songs
will
appear
in
the
“Sync
List“
pane
on
the
right).
8.
Click
“Start
Sync“.
136
T
o
tr
ansfer
music
to
your
device
,
you
will
need:
•
Microsoft
®
ActiveSync
®
installed on
you
r
PC.
•
Windows
Media
®
Player
10
(or
higher)
installed
on
your
PC.
Y
ou
can
download
this
at:
http://www
.microsoft.com/mediaplayer.
•
Y
ou
will
need
a
microSD
card
to
use
Music
Sync.
If
you
attempt
to
connect
to
Music
Sync
without
a
card,
"SD
not
found,
cannot
access
to
Music
Sync"
will
appear
.
PC
C
ONNECTI
v
ITY
MASS
STORAGE
DE
v
ICE
Y
our
device
can
be
used
as
an
external
memory
device
.
1.
Before
you
connect
the
device
,
set
your
device
to
Mass
Storage
Mode.
T
o
do
this,
tap
the
Menu
icon
,
Drag
Leftw
ard
then
tap
Settings
icon
and
select
Phone
>
USB
Connection
Mode
>
Mass
Storage
>
Save
.
Note
2
.
Connect
the
STX-2
to
your
PC
with
a
USB
cable
.
3.
It
is
ready
when
“F
ound
New
Hardw
are
USB
Modem“
appears
on
the
screen.
4.
Select
“My
Computer“
on
the
PC.
5.
T
he
phone’
s
memory
card
will
be
listed
under
“Devices
with
Remov
able
Storage“
in
the
same
location
as
an
optical
drive.
6.
F
ile
explorer
will
open
in
a
new
window
.
7.
Drag
and
drop
the
desired
files
content
from
the
PC
window
to
the
“Storage
Card“
window
.
8.
Disconnect
the
device
from
the
cable
.
137
Y
ou
will
need
a
microSD
card
to
use
Mass
Storage
.
If
you
attempt
to
connect
to
Mass Storage
via
USB
without
a
card,
"SD
not
found,
cannot
access
to
Mass
Storage"
will
appear
.

MEMO
138
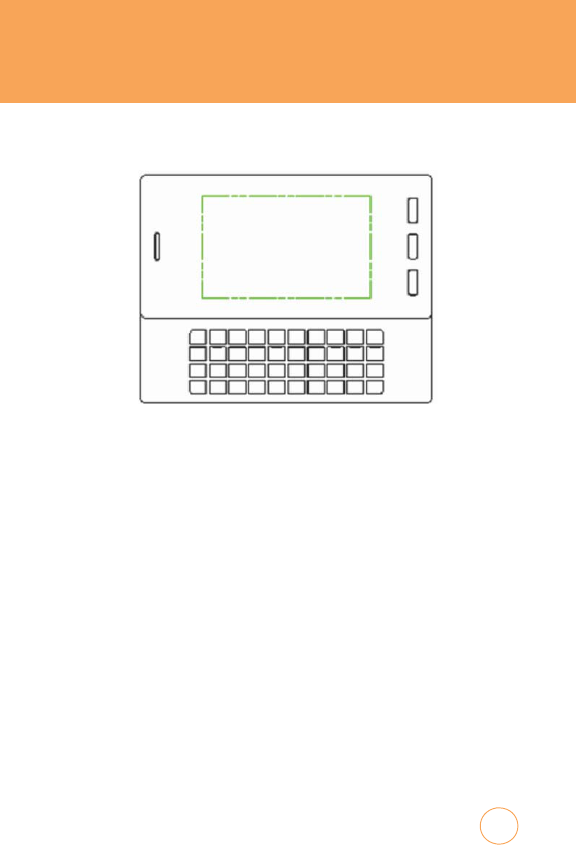
CHAPTER
7
SAFETY
INFORM
A
TION
C
HAPTE
R
7
.
S
AF
ET
Y
I
N
FORM
A
TION
Read
this
information
before
using
your
handheld
portable
Cellular
T
elephone
.
Safety
W
arranty
139

SAFETY
SAFETY
INFORM
A
TION
FOR
WIRELESS
HANDHELD
PHONES
Read
This
Information
Befor
e
Using
Y
our
Handheld
Portable
Cellular
Telephone
DRI
v
ING
SAFETY
T
alking
on
the
phone
while
driving
is
extremely
dangerous
and
is
illegal
i
n
some
states
.
Remember
,
safety
comes
first.
Check
the
laws
and
regulations
on
the
use
of
phones
in
the
areas
where
you
drive.
Alw
ays
obey
them.If
you
must
use
your
STX-2
while
driving,
please:
•
Give
full
attention
to
driving.
Driving
safely
is
your
first
responsibility.
•
Use
hands-free
operation
and/or
one-touch,
speed
dialing,
and
auto
answer
modes
.
•
Pull
off
the
road
and
park
before
making
or
answering
a
call.
An
air
bag
inflates
with
great
force
.
DO
NO
T
place
objects
,
including
either
installed
or
portable
wireless
equipment,
in
the
area
over
the
air
bag
or
in
the
air
bag
deployment
area.
If
in-vehicle
wireless
equipment
is
improperly
installed
and
the
air
bag
inflates,
serious
injury
could
result.
WARNING!:
F
ailure
to
follow
these
instructions
could
lead
to
serious
personal
injury
and
possible
property
damage
.
140

SAFETY
ELECTRONIC DE
v
ICES
Y
our
wireless
handheld
portable
telephone
is
a
low
power
radio
transmitter
and
receiver
.
When
it
is
ON
,
it
receives
and
also
sends
out
radio
frequency
(RF)
signals
.
Most
modern
electronic
equipment
is
shielded
from
RF
energy
.
However
,
certain
electronic
equipment
may
not
be
shielded
against
the
RF
signals
from
your
wireless
phone
.
T
herefore
,
use
of
your
STX-2
must
be
restricted
in
certain
situations.
PACEMA
k
ERS
T
he
Health
Industry
Manufacturers
Association
recommends
that
a
minimum
separation
of
six
(6“)
inches
be
maintained
between
a
handheld
wireless
phone
and
a
pacemaker
to
avoid
potential
interference
with
the
pacemaker
.
T
hese
recommendations
are
consistent
with
the
independent
research
byand
recommendations
of
Wireless
T
echnology
Research.
Never
come
closer
than
six
(6)
inches
to
a
person
with
a
heart
pacemaker
implant
when
using
your
STX-2.
Doing
so
could
result
in
interference
with
the
function
of
the
pacemaker
.
P
ersons
with
pacemak
ers:
•
AL
WA
Y
S
k
eep
the
phone
more
than
six
inches
from
your
pacemaker
when
the
phone
is
turned
on.
•
Do
not
carry
the
phone
in
a
breast
pock
et.
•
Use
the
ear
opposite
the
pacemaker
to
minimize
the
potential
for
interference
.
•
If
you
have
any
reason
to
suspect
that
interference
is
taking
p
lace
,
turn
your
STX-2
OFF
immediately.
141

SAFETY
HEARING
AIDS
Some
digital
wireless
phones
may
interfere
with
some
hearing
aids
.
In
the
event
of
such
interference
,
you
may
w
ant
to
consult
your
service
provider
(or
call
the
customer
service
line
to
discuss
alternatives).
OTHER
MEDICAL DE
v
ICES
If
you
use
any
other
personal
medical
device
,
consult
the
manufacturer
o
your
device
to
determine
if
they
are
adequately
shielded
from
external
RF
energy
.
Y
our
physician
may
be
able
to
assist
you
in
obtaining
this
information.
HOSPIT
ALS
A
ND
HEA
L
TH
CARE
F
A
CILITIES
T
urn
your
STX-2
OFF
in
health
care
facilities
when
any
regulations
posted
in
these
areas
instruct
you
to
do
so
.
Hospitals
or
healthcare
facilities
may
be
using
equipment
that
could
be
sensitive
to
external
RF
energy
.
v
EHICLES
RF
signals
may
affect
improperly
installed
or
inadequately
shielded
electronic
systems
in
motor
vehicles
.
Check
with
the
manufacturer
or
its
representative
regarding
your
vehicle
.
Y
ou
should
also
consult
the
manufacturer
of
any
equipment
that
has
been
added
to
your
vehicle
.
POSTED
F
ACILITIES
T
urn
your
STX-2
OFF
where
posted
notices
so
require
.
142

SAFETY
AIRCRAFT
FCC
regulations
prohibit
using
your
STX-2
while
in
the
air
.
T
urn
your
phone
OFF
before
boarding
an
aircraft.
Alw
ays
request
and
obtain
prior
consent
and
approval
of
an
authorized
airline
representative
before
using
your
phone
aboard
an
aircraft.
Alw
ays
follow
the
instructions
of
the
airline
representative
whenever
using
your
phone
aboard
an
aircraft,
t
prevent
any
possible
interference
with
airborne
electronic
equipment.
BLASTING
AREAS
T
o
avoid
interfering
with
blasting
operations,
turn
your
STX-2
OFF
when
in
a
“blasting
area“
or
in
areas
posted
“T
urn
off
two-w
ay
radio“.
Obey
all
signs
and
instructions.
POTENTIALL
Y
EXPLOSI
v
E
A
TMOSPHERES
T
urn
your
STX-2
OFF
when
in
any
area
with
a
potentially
explosive
atmosphere
and
obey
all
signs
and
instructions.
Sparks
in
such
areas
could
cause
an
explosion
or
fire
resulting
in
bodily
injury
or
even
death.
Areas
with
a
potentially
explosive
atmosphere
are
often,
but
not
alw
ays
,
clearly
mark
ed.
T
hey
include
fueling
areas
such
as
gas
stations:
below
deck
on
boats:
fuel
or
chemical
transfer
or
storage
facilities:
vehicles
using
liquefied
petroleum
gas
(such
as
propane
or
butane):
areas
where
the
air
contains
chemicals
or
particles
,
such
as
grain,
dust,
or
metal
powders:
and
any
other
area
where
you
would
normally
be
advised
to
turn
off
your
vehicle’
s
engine
.
143

SAFETY
SAFETY
INFORM
A
TION
FOR
FCC
RF
EXPOSURE
War
ning!
Read
this
information
befor
e
using
your
STX-2.
In
August
1996
the
F
ederal
Communications
Commission
(FCC)
of
the
United
States
with
its
action
in
Report
and
Order
FCC
96-326
adopted
an
updated
safety
standard
for
human
exposure
to
radio
frequency
electromagnetic
energy
emitted
by
FCC
regulated
transmitters.
T
hose
guidelines
are
consistent
with
the
safety
standard
previously
set
by
both
U
.S
.
and
international
standards
bodies
.
T
he
design
of
this
phone
complies
with
the
FCC
guidelines
and
these
international
standards
.
BODY
-WORN
OPER
A
TION
his
device
w
as
tested
for
typical
body-worn
operations
with
the
back
of
he
phone
k
ept
2.0
cm
from
the
body
.
T
o
maintain
compliance
with
FCC
RF
exposure
requirements
,
use
only
belt-clips,
holsters
or
similar
accessories
that
maintain
a
2.0
cm
separation
distance
between
the
user’
s
body
and
the
back
of
the
phone
,
including
the
antenna.
T
he
use
of
belt-clips,
holsters
and
similar
accessories
should
not
contain
metallic
components
in
its
assembly
.
T
he
use
of
accessories
that
do
not
satisfy
these
requirements
may
not
comply
with
FCC
RF
exposure
requirements
,
and
should
be
avoided.
F
or
more
information
about
RF
exposure
,
please
visit
the
FCC
website
at
www
.fcc.gov
.
144

SAFETY
SAR
INFORM
A
TION
THIS
MODEL
PHONE
MEETS
THE
GO
v
ERNMENT’S
REQUIREMENTS
FOR
EXPOSURE
TO
RADIO
W
A
v
ES.
Y
our
wireless
phone
is
a
radio
transmitter
and
receiver
.
It
is
designed
and
manufactured
not
to
exceed
the
emission
limits
for
exposure
to
radiofrequency
(RF)
energy
set
by
the
F
ederal
Communications
Commission
of
the
U
.S
.
Government.
T
hese
limits
are
part
of
comprehensive
guidelines
and
establish
permitted
levels
of
RF
energy
for
the
general
population.
T
he
guidelines
are
based
on
standards
that
were
developed
by
independent
scientific
organizations
through
periodic
and
thorough
ev
aluation
of
scientific
studies
.
T
he
standards
include
a
substantial
safety
margin
designed
to
assure
the
safety
of
all
persons
,
regardless
of
age
and
health.
T
he
exposure
standard
for
wireless
mobile
phones
employs
a
unit
of
measurement
known
as
the
Specific
Absorption
Rate
,
or
SAR.
T
he
SAR
limit
set
by
the
FCC
is
1.6
W/kg.
*
T
ests
for
SAR
are
conducted
with
the
phone
transmitting
at
its
highest
certified
power
level
in
all
tested
frequency
bands
.
Although
the
SAR
is
determined
at
the
highest
certified
power
level,
the
actual
SAR
level
of
the
phone
while
operating
can
be
well
below
the
maximum
value
.
T
his
is
because
the
phone
is
designed
to
operate
at
multiple
power
levels
so
as
to
use
only
the
power
required
t
o
reach
the
network.
In
general,
the
closer
you
are
to
a
wireless
base
station
antenna,
the
lower
the
power
output.
Before
a
phone
model
is
av
ailable
for
sale
to
the
public,
it
must
be
tested
and
certified
to
the
FCC
that
it
does
not
exceed
the
limit
established
by
the
government
adopted
requirement
for
safe
exposure
.
145

SAFETY
T
he
tests
are
performed
in
positions
and
locations
(e
.g.,
at
the
ea
r
and
worn
on
the
body)
as
required
by
the
FCC
for
each
model.
T
he
highest
SAR
value
(GSM850
)
for
this
model
phone
when
tested
for
use
at
the
ear
is
0.468
W/kg
and
when
worn
on
the
body
,
as
described
in
this
user
guide,
is
1.18W/kg
.
(Body-worn
measurements
differ
among
phone
models
,
depending
upon
av
ailable
accessories
and
FCC
requirements).
While
there
may
be
differences
between
the
SAR
levels
of
various
phones
and
at
various
positions,
they
all
meet
the
government
requirement
for
safe
exposure
.
T
he
FCC
has
granted
an
Equipment
Authorization
for
this
model
phone
with
all
reported
SAR
levels
ev
aluated
as
in
compliance
with
the
FCC
RF
exposure
guidelines
.
SAR
information
on
this
model
phone
is
on
file
with
the
FCC
and
can
be
found
under
the
Display
Grant
section
of
http:/
/
www
.fcc.gov/oet/fccid
after
searching
on
APYNAR0068
Additional
information
on
Specific
Absorption
Rates
(SAR)
can
be
found
on
the
Cellular
T
elecommunications
&
Internet
Association
(CTIA)
website
at
http://www
.phonefacts
.net.
*
In
the
United
States
and
Canada,
the
SAR
limit
for
mobile
phones
used
by
the
public
is
1.6
w
atts/kg
(W/kg)
averaged
over
one
gram
of
tissue
.
T
he
standard
incorporates
a
substantial
margin
of
safety
to
give
additional
protection
for
the
public
and
to
account
for
any
v
ariations
in
measurements
.
146
He
ad
Bo
dy
GSM
850
0.468
W/kg
1.18W/kg
GSM
1900
0.365W/kg
0.433
W/kg
WCDMA
850
0.294
W/kg
0.407
W/kg
WCDMA
1900
0.455
W/kg
0.
289
W/kg

SAFETY
FDA
CONSUMER UPD
A
TE
U.S.
Food
and
Drug
Administration
Cell
Phone
Facts
Consumer
Information
on
Wireless
Phones
1
.
W
hat
ki
nds
of
phones
ar
e
the
su
bje
c
t
of
th
is
update
?
T
he
term
“wireless
phone“
refers
here
to
handheld
wireless
phones
with
built-in
antennas
,
often
called
“cell,“
“mobile
,“
or
“PCS“
phones
.
T
hese
types
of
wireless
phones
can
expose
the
user
to
measurable
radiofrequency
energy
(RF)
because
of
the
short
distance
between
the
phone
and
the
user’
s
head.
T
hese
RF
exposures
are
limited
by
F
ederal
Communications
Commission
safety
guidelines
that
were
developed
with
the
advice
of
FD
A
and
other
federal
health
and
safety
agencies
.
When
the
phone
is
located
at
greater
distances
from
the
user
,
the
exposure
to
RF
is
drastically
lower
because
a
person’
s
RF
exposure
decreases
rapidly
with
increasing
distance
from
the
source
.
T
he
so-called
“cordless
phones
,“
which
have
a
base
unit
connected
to
the
telephone
wiring
in
a
house
,
typically
operate
at
far
lower
power
levels
,
and
thus
produce
RF
exposures
well
within
the
FCC’
s
compliance
limits
.
2.
Do
w
i
r
eless
phones
p
os
e
a
health
hazar
d
?
T
he
av
ailable
scientific
evidence
does
not
show
that
any
health
problems
are
associated
with
using
wireless
phones
.
T
here
is
no
proof
,
however,
that
wireless
phones
are
absolutely
safe
.
Wireless
phones
emit
low
levels
of
radiofrequency
energy
(RF)
in
the
microw
ave
range
while
being
used.
T
hey
also
emit
very
low
levels
of
RF
when
in
the
standby
mode
.
Whereas
high
levels
of
RF
can
produce
health
effects
(by
heating
tissue),
exposure
to
low
level
RF
that
does
not
produce
heating
effects
causes
no
known
adverse
health
effects
.
147

SAFETY
Many
studies
o
f
low
level
RF
exposures
have
not
found
any
biological
effects
.
Some
studies
have
suggested
that
some
biological
effects
may
occur
,
but
such
findings
have
not
been
confirmed
by
additional
research.
In
some
cases
,
other
researchers
have
had
difficulty
in
reproducing
those
studies
,
or
in
determining
the
reasons
for
inconsistent
results
.
3
.
W
hat
is
F
D
A
’s
role
concern
i
ng
the
s
afet
y
of
w
i
r
eless
phones
?
Under
the
law
,
FD
A
does
not
review
the
safety
of
radiation-emitting
consumer
products
such
as
wireless
phones
before
they
can
be
sold,
as
it
does
with
new
drugs
or
medical
devices
.
However
,
the
agency
has
authority
to
tak
e
action
if
wireless
phones
are
shown
to
emit
radiofrequency
energy
(RF)
at
a
level
that
is
hazardous
to
the
user
.
In
s
uch
a
case
,
FD
A
could
require
the
manufacturers
of
wireless
phones
to
notify
users
of
the
health
hazard
and
to
repair,
replace
or
recall
the
phones
so
that
the
hazard
no
longer
exists
.
Although
the
existing
scientific
data
do
not
justify
FD
A
regulatory
actions
,
FD
A
has
urged
the
wireless
phone
industry
to
tak
e
a
number
of
steps
,
including
the
following:
•
Support
needed
research
into
possible
biological
effects
of
RF
of
the
type
emitted
by
wireless
phones:
•
Design
wireless
phones
in
a
w
ay
that
minimizes
any
RF
exposure
to
the
user
that
is
not
necessary
for
device
function:
and
•
Cooperate
in
providing
users
of
wireless
phones
with
the
best
p
ossible
information
on
possible
effects
of
wireless
phone
use
on
human
health
FD
A
belongs
to
an
interagency
working
group
of
the
federal
agencies
that
have
responsibility
for
different
aspects
of
RF
safety
to
ensure
coordinated
efforts
at
the
federal
level.
T
he
following
agencies
belong
to
this
working
group:
148

SAFETY
•
National
Institute fo
r
Occupational
Safety
and Health
•
Environmental
Protection
Agency
•
F
ederal
Communications
Commission
•
Occupational
Safety
and
Health
Administration
•
National
T
elecommunications
and
Information
Administration
T
he
National
Institutes
of
Health
participates
in
some
interagency
working
group
activities,
as
well.
FD
A
shares
regulatory
responsibilities
for
wireless
phones
with
the
F
ederal
Communications
Commission
(FCC).
All
phones
that
are
sold
in
the
United
States
must
comply
with
FCC
safety
guidelines
that
limit
RF
exposure
.
FCC
relies
on
FD
A
and
other
health
agencies
for
safety
questions
about
wireless
phones
.
FCC
also
regulates
the
base
stations
that
the
wireless
phone
networks
rely
upon.
While
these
base
stations
operate
at
higher
power
than
do
the
wireless
phones
themselves
,
the
RF
exposures
that
people
get
fro
these
base
stations
are
typically
thousands
of
times
lower
than
those
they
can
get
from
wireless
phones
.
Base
stations
are
thus
not
the prima
r
subject
of
the
safety
questions
discussed
in
this
document.
4
.
W
hat
ar
e
the
r
esu
lt
s
of
the
r
es
ear
ch
done
al
r
ead
y
?
T
he
research
done
thus
far
has
produced
conflicting
results
,
and
many
studies
have
suffered
from
flaws
in
their
research
methods
.
Animal
experiments
investigating
the
effects
of
radiofrequency
energy
(RF)
exposures
characteristic
of
wireless
phones
have
yielded
conflicting
results
that
often
cannot
be
repeated
in
other
laboratories.
A
few
animal
studies
,
however,
have
suggested
that
low
levels
of
RF
could
accelerate
the
development
of
cancer
in
laboratory
animals
.
149

SAFETY
Howeve
r
,
many
o
f
the
studies
that
showed
increased
tumo
r
development
used
animals
that
had
been
genetically
engineered
or
treated
with
cancer
-causing
chemicals
so
as
to
be
pre-disposed
to
develop
cancer
in
the
absence
of
RF
exposure
.Other
studies
exposed
the
animals
to
RF
for
up
to
22
hours
per
day
.
T
hese
conditions
are
not
similar
to
the
conditions
under
which
people
use
wireless
phones
,
so
we
don’t
know
with
certainty
what
the
results
of
such
studies
mean
for
human
health.
T
hree
large
epidemiology
studies
have
been
published
since
December
2000.
Between
them,
the
studies
investigated
any
possible
association
between
the
use
of
wireless
phones
and
primary
brain
cancer
,
glioma,
meningioma,
or
acoustic
neuroma,
tumors
of
the
brain
or
saliv
ary
gland,
leuk
emia,
or
other
cancers
.
None
of
the
studies
demonstrated
the
existence
of
any
harmful
health
effects
from
wireless
phone
RF
exposures
.
However
,
none
of
the
studies
can
answer
questions
about
long-term
exposures
,
since
the
average
period
of
phone
use
in
these
studies
w
as
around
three
years
.
5
.
W
hat
r
es
ear
ch
is
ne
e
de
d
to
de
cide
w
hether
RF
ex
p
osu
r
e
from
w
i
r
eless
phones
p
os
es
a
health
risk
?
A
combination
of
laboratory
studies
and
epidemiological
studies
of
people
actually
using
wireless
phones
would
provide
some
of
the
data
that
are
needed.
Lifetime
animal
exposure
studies
could
be
completed
in
a
few
years
.
However
,
very
large
numbers
of
animals
would
be
needed
to
provide
reliable
proof
of
a
cancer
promoting
effect
if
one
exists
.
Epidemiological
studies
can
provide
data
that
is
directly
applicable
to
human
populations,
but
10
or
more
years’
follow-up
may
be
needed
to
provide
answers
about
some
health
effects
,
such
as
cancer
.
T
his
is
because
the
interv
al
between
the
time
of
exposure
to
a
cancer
-causing
agent
and
the
time
tumors
develop
-
if
they
do
-
may
be
many
,
many
years
.
150

SAFETY
T
he
interpretation
o
f
epidemiological
studies
is
hampered by
difficulties
in
measuring
actual
RF
exposure
during
day-to-day
use
of
wireless
phones
.
Many
factors
affect
this
measurement,
such
as
the
angle
at
which
the
phone
is
held,
or
which
model
of
phone
is
used.
6.
W
hat
is
F
D
A
doing
to
fi
nd
out
mor
e
ab
out
the
p
ossi
ble
health
effe
c
t
s
of
w
i
r
eless
phone
RF
?
FD
A
is
working
with
the
U
.S
.
National
T
oxicology
Program
and
with
groups
of
investigators
around
the
world
to
ensure
that
high
priority
animal
studies
are
conducted
to
address
important
questions
about
the
effects
of
exposure
to
radiofrequency
energy
(RF).
FD
A
has
been
a
leading
participant
in
the
W
orld
Health
Organization
International
Electromagnetic
F
ields
(EMF)
Project
since
its
inception
in
1996.
An
influential
result
of
this
work
has
been
the
development
of
a
detailed
agenda
of
research
needs
that
has
driven
the
establishment
of
new
research
programs
around
the
world.
T
he
Project
has
also
helped
develop
a
series
of
public
information
documents
on
EMF
issues
.
FD
A
and
the
Cellular
T
elecommunications
&
Internet
Association
(CTIA)
have
a
formal
Cooperative
Research
and
Development
Agreement
(CRAD
A)
to
doresearch
on
wireless
phone
safety
.
FD
A
provides
the
scientific
oversight,
obtaining
input
from
experts
in
government,
industry,
and
academic
organizations.
CTIA-funded
research
is
conducted
through
contracts
to
independent
investigators.
T
he
initial
research
will
include
both
laboratory
studies
and
studies
of
wireless
phone
users
.
T
he
CRAD
A
will
also
include
a
broad
assessment
of
additional
research
needs
in
the
context
of
the
latest
research
developments
around
the
world.
151

SAFETY
7
.
W
hat
s
tep
s
c
an
I
t
ak
e
to
r
e
d
uce
my
ex
p
osu
r
e
to
rad
iofr
e
q
uenc
y
ener
gy
from
my
w
i
r
eless
phone
?
If
there
is
a
risk
from
these
products--and
at
this
point
we
do
not
know
that
there
is--it
is
probably
very
small.
But
if
you
are
concerned
about
avoiding
even
potential
risks
,
you
can
tak
e
a
few
simple
steps
to
minimize
your
exposure
to
radiofrequency
energy
(RF).
Since
time
is
a
k
ey
factor
in
how
much
exposure
a
person
receives
,
reducing
the
amount
of
time
spent
using
a
wireless
phone
will
reduce
RF
exposure
.
•
If
you
must
conduct
extended
conversations
by
wireless
phone
every
day
,
you
could
place
more
distance
between
your
body
and
the
source
of
the
RF
,
since
the
exposure
level
drops
off
dramatically
with
distance
.
F
or
example
,
you
could
use
a
headset
and
carry
the
wireless
phone
aw
ay
from
your
body
or
use
a
wireless
phone
connected
to
a
remote
antenna
Again,
the
scientific
data
do
not
demonstrate
that
wireless
phones
are
harmful.
But
if
you
are
concerned
about
the
RF
exposure
from
these
products
,
you
can
use
measures
lik
e
those
described
above
to
reduce
your
RF
exposure
from
wireless
phone
use
.
8.
W
hat
ab
out
ch
i
ld
r
en
usi
ng
w
i
r
eless
phones
?
T
he
scientific
evidence
does
not
show
a
danger
to
users
of
wireless
phones
,
including
children
and
teenagers
.
If
you
w
ant
to
tak
e
steps
to
lower
exposure
to
radiofrequency
energy
(RF),
the
measures
described
above
would
apply
to
children
and
teenagers
using
wireless
phones
.
Reducing
the
time
of
wireless
phone
use
and
increasing
the
distance
between
the
user
and
the
RF
source
will
reduce
RF
exposure
.
Some
groups
sponsored
by
other
national
governments
have
advised
that
children
be
discouraged
from
using
wireless
phones
at
all.
152

SAFETY
F
o
r
example
,
the government
in
the United Kingdom
distributed
leaflets
containing
such
a
recommendation
in
December
2000.
T
hey
noted
that
no
evidence
exists
that
using
a
wireless
phone
causes
brain
tumors
or
other
ill
effects
.
T
heir
recommendation
to
limit
wireless
phone
use
by
children
w
as
strictly
precautionary:
it
w
as
not
based
on
scientific
evidence
that
any
health
hazard
exists
.
9
.
Do
hands
-
fr
ee
kit
s
for
w
i
r
eless
phones
r
e
d
uce
risk
s
from
ex
p
osu
r
e
to
RF
em
issions
?
Since
there
are
no
known
risks
from
exposure
to
RF
emissions
from
wireless
phones
,
there
is
no
reason
to
believe
that
hands-free
kits
reduce
risks
.
Hands-free
kits
can
be
used
with
wireless
phones
for
convenience
and
comfort.
T
hese
systems
reduce
the
absorption
of
RF
energy
in
the
head
because
the
phone
,
which
is
the
source
of
the
RF
emissions
,
will
not
be
placed
against
the
head.
On
the
other
hand,
if
the
phone
is
mounted
against
the
w
aist
or
other
part
of
the
body
during
use
,
then
that
part
of
the
body
will
absorb
more
RF
energy
.
Wireless
phones
mark
eted
in
the
U
.S
.
are
required
to
meet
safety
requirements
regardless
of
whether
they
are
used
against
the
head
or
against
the
body
.
Either
configuration
should
result
in
compliance
with
the
safety
limit.
10
.
Do
w
i
r
eless
phone
access
ories
that
clai
m
to
sh
ield
the
head
from
RF
rad
iation
work
?
Since
there
are
no
known
risks
from
exposure
to
RF
emissions
from
wirelessphones
,
there
is
no
reason
to
believe
that
accessories
that
claim
t
o
shield
the
head
from
those
emissions
reduce
risks
.
Some
products
that
claim
to
shield
the
user
from
RF
absorption
use
special
phone
cases
,
while
others
involve
nothing
more
than
a
metallic
accessory
attached
to
the
phone
.
153

SAFETY
Studies
have
shown
that
these
products generally
do
not work
as
advertised.
Unlik
e
“hand-free“
kits
,
these
so-called
“shields“
may
interfere
with
proper
operation
of
the
phone
.
T
he
phone
may
be
forced
to
boost
its
power
to
compensate
,
leading
to
an
increase
in
RF
absorption.
In
F
ebruary
2002,
the
F
ederal
trade
Commission
(FTC)
charged
two
companies
that
sold
devices
that
claimed
to
protect
wireless
phone
users
from
radiation
with
making
false
and
unsubstantiated
claims
.
According
to
FTC,
these
defendants
lack
ed
a
reasonable
basis
to
substantiate
their
claim.
11
.
W
hat
ab
out
w
i
r
eless
phone
i
nterfer
ence
w
ith
med
ic
al
e
q
u
i
pment
?
Radiofrequency
energy
(RF)
from
wireless
phones
can
interact
with
some
electronic
devices
.
F
or
this
reason,
FD
A
helped
develop
a
detailed
test
method
to
measure
electromagnetic
interference
(EMI)
of
implanted
cardiac
pacemak
ers
and
defibrillators
from
wireless
telephones
.
T
his
test
method
is
now
part
of
a
standard
sponsored
by
the
Association
for
the
Adv
ancement
of
Medical
instrumentation
(AAMI).
T
he
final
draft,
a
joint
effort
by
FD
A,
medical
device
manufacturers
,
and
many
other
groups
,
w
as
completed
in
late
2000.
T
his
standard
will
allow
manufacturers
to
ensure
that
cardiac
pacemak
ers
and
defibrillators
are
safe
from
wireless
phone
EMI.
FD
A
has
tested
hearing
aids
for
interference
from
handheld
wireless
phones
and
helped
develop
a
voluntary
standard
sponsored
by
the
Institute
of
Electrical
and
Electronic
Engineers
(IEEE).
T
his
standard
specifies
test
methods
and
performance
requirements
for
hearing
aids
and
wireless
phones
so
that
that
no
interference
occurs
when
a
person
uses
a
“compatible“
phone
and
a
“compatible“
hearing
aid
at
the
same
time
.
T
his
standard
w
as
approved
by
the
IEEE
in
2000.
154

S
A
FETY
FD
A
continues
to
monito
r
the
use
o
f
wireless phones
fo
r
possible
interactions
with
other
medical
devices
.
Should
harmful
interference
be
found
to
occur
,
FD
A
will
conduct
testing
to
assess
the
interference
and
work
to
resolve
the
problem.
Updated
July
29,
2003
F
or
more
information,
please
visit
the
FD
A
website
at
http://www
.fda.
gov/cellphones
.
EMERGENCY
CALLS
Never
rely
solely
upon
your
wireless
phone
for
essential
communications
(e
.g.,
medical
emergencies),
if
it
can
be
avoided,
since
a
wireless
phone
requires
a
complex
combination
of
radio
signals
,
relay
stations
and
landli
n
networks
for
its
operation.
Consequently
,
emergency
calls
may
not
alw
ays
be
possible
under
all
conditions
on
all
wireless
phone
systems
.
Y
our
wireless
phone
,
however,
may
sometimes
be
the
only
av
ailable
means
of
communication
at
the
scene
of
an
accident.
When
making
an
emergency
call,
alw
ays
give
the
recipient
all
necessary
information
as
accurately
as
possible
.
Never
terminate
an
emergency
call
until
you
have
received
clearance
to
do
so
.
FCC
ENHANCED 911
(E911)
RULES
Backgr
ound
T
he
F
ederal
Communications
Commission
(FCC)
requires
wireless carrie
to
transmit
specific
latitude
and
longitude
location
(Automatic
Locatio
n
Identification
=
ALI)
information
as
well
as
“911“
calls
to
Public
Safety
Answering
P
oints
(PSAPs)
to
identify
the
location
of
the
caller
in
case
o
f
emergency
.
155

SAFETY
Generall
y
,
the
rules
require
that
carriers
identify
an
E911
calle
r
’
s
location
within
50
meters
of
the
actual
location
for
67
percent
of
calls
and
within
150
meters
of
the
actual
location
for
95
percent
of
calls
.
STX-2’
s
ALI
Capability
T
he
STX-2
is
an
ALI-capable
phone
equipped
with
a
GPS
(Global
P
ositioning
System)
receiver
supporting
a
satellite-based
GPS
ALI-
capable
network
to
comply
with
the
FCC’
s
ALI
requirements
.
T
he
network
compliance
with
the
above
FCC
requirements
is
dependent
on:
(a)
the
use
of
digital
technology
by
the
wireless
network:
(b)
GPS
satellite
signals
being
able
to
reach
the
handset
(such
transmissions
do
n
o
alw
ays
work
indoors
,
for
example)
:
and
(c)
handset
signals
reaching
wireless
“base
stations“
(atmospheric
and
environmental
conditions
may
cause
v
ariations
in
handset
receiving
signal
strength).
Also
the
transmission
of
the
ALI
information
is
subject,
in
part,
to
system
constraints
within
the
wireless
network
to
which
the
E911
signal
is
transmitted
and
over
which
UT
Starcom
has
no
control.
F
inally
,
customers
are
advised
that
the
STX-2’
s
ALI
capability
is
to
be
used
for
E911
purposes
only.
T
his
feature
allows
you
to
place
an
emergency
call
even
if
your
phone
is
in
“Phone
Lock“
or
“Restrict“
mode
when
you
dial
the
preprogrammed
emergency
number
,
911,
#911,
or
*911.
It
also
operates
in
out-of-
service
areas
.
T
he
phone
maintains
the
emergency
mode
until
you
press
the
P
ower/END
K
ey
after
disconnecting
an
emergency
call.
In
emergency
call
mode
,
the
phone
can
receive
an
incoming
call
from
any
av
ailable
system.
156

SAFETY
T
o
call
“911“
in
“Phone
Lock“
o
r
“Restrict“
mode
.
1.
In
Idle
mode
,
tap
Call
icon
,
tap
“
9
K
ey
“,
“
1
K
ey
“,
“
1
K
ey
“.
2.
T
ap
Call
or
the
SEND
K
ey
.
“911“
and
“Emergency“
will
appear
on
the
screen.
COMPLIANCE
WITH
OTHER FCC
REGUL
A
TIONS
OPERA
TING
PROCEDURES
Never
violate
any
of
the
following
Rules
and
Regulations
of
the
FCC
when
using
your
Cellular
Phone
.
Such
violations
are
punishable
by
fine
,
imprisonment
or
both.
•
Never
use
obscene
,
indecent,
or
profane
language
.
•
Never
use
your
Cellular
Phone
to
send
false
distress
calls
.
•
Never
wiretap
or
otherwise
intercept
a
phone
call,
unless
you
have
first
obtained
the
consent
of
the
parties
participating
in
the
call.
•
Never
mak
e
any
anonymous
calls
to
annoy
,
harass
,
or
molest
other
people
.
•
Never
charge
another
account
without
authorization,
to
avoid
payment
for
service
.
•
Never
willfully
or
maliciously
interfere
with
any
other
radio
communications.
•
Never
refuse
to
yield
the
line
when
informed
that
it
is
needed
for
an
Emergency
Call.
Also
,
never
tak
e
over
a
line
by
stating
falsely
that
it
is
needed
for
an
emergency
.
157

SAFETY
GENERAL SAFETY
PRECAUTIONS
Y
our
Handheld
P
ortable
T
elephone
is
a
high
quality
piece
of
equipment.
Before
operating,
read
all
instructions
and
cautionary
markings
on
the
product,
battery
and
adapter/charger
.
F
ailure
to
follow
the
directions
below
could
result
in
serious
bodily
injury
and/or
property
damage
due
to
battery
liquid
leakage
,
fire
or
rupture.
•
DO
NO
T
use
or
store
this
equipment
in
a
place
where
it
will
be
exposed
to
high
temperatures
,
such
as
near
an
open
flame
or
heat-emitting
equipment.
•
DO
NO
T
drop
your
device
or
subject
it
to
severe
shock.
When
not
using,
lay
down
the
unit
to
avoid
possible
damage
due
to
instability
.
•
DO
NO
T
expose
this
equipment
to
rain
or
spilled
beverages
.
•
DO
NO
T
use
unauthorized
accessories
.
•
DO
NO
T
disassemble
the
phone
or
its
accessories
.
If
service
or
repair
is
required,
return
unit
to
an
authorized
P
ersonal
Communications
Devices
cellular
service
center
.
If
unit
is
disassembled,
the
risk
of
electric
shock
or
fire
may
result.
158

SAFETY
ANTENNA
ANTENNA
SAFETY
Use
only
the
supplied
or
an
approved
replacement
antenna. Unauthoriz
e
antennas
,
modifications,
or
attachments
could
impair
call
quality
,
damag
the
phone
,
or
result
in
violation
of
FCC
regulations.
Please
contact
your
local
dealer
for
replacement
antenna.
Do
not
use
the
phone
with
a
damaged
antenna.
If
a
damaged
antenna
comes
into
contact
with
the
skin,
a
minor
burn
may
result.
Please
conta
c
your
local
dealer
for
replacement
antenna.
B
A
TTE
R
Y
BA
TTER
Y
SAFETY
Y
our
device
uses
a
removable
and
rechargeable
lithium
ion
battery.
Please
contact
customer
service
for
assistance
should
you
need
a
replacement
battery.
DO
’
s
•
Only
use
the
battery
and
charger
approved
by
the
manufacturer.
•
Only
use
the
battery
for
its
original
purpose
.
•
T
ry
to
k
eep
batteries
in
a
temperature
between
41°F
(5°C)
and
95°F
(35°C).
•
If
the
battery
is
stored
in
temperatures
above
or
below
the
recommended
range
,
give
it
time
to
w
arm
up
or
cool
down
before
using.
159

SAFETY
•
Completely
drain the battery
before recharging.
It
may
ta
k
e
one
to
four
days
to
completely
drain.
•
Store
the
discharged
battery
in
a
cool,
dark,
and
dry
place
.
•
Purchase
a
new
battery
when
its
operating
time
gradually
decrea
ses
after
fully
charging.
•
Properly
dispose
of
the
battery
according
to
local
regulation
s
.
DON’
T
s
•
Don’t
attempt
to
disassemble
the
battery
–
it
is
a
sealed
unit
with
no
serviceable
parts
.
•
Don’t
expose
the
battery
terminals
to
any
other
metal
object
(e
.g.,
by
carrying
it
in
your
pock
et
or
purse
with
other
metallic
objects
such
as
coins
,
clips
and
pens).
T
his
can
short
circuit
and
critically
damage
the
battery.
•
Don’t
leave
the
battery
in
hot
or
cold
temps
.
Otherwise
,
it
could
significantly
reduce
the
capacity
and
lifetime
of
the
battery.
•
Don’t
dispose
of
the
battery
into
a
fire
.
Lithium
ion
batteries
are
recyclable
.
When
you
replace
your
built-in
battery,
please
request
the
repair
center
to
recycle
the
battery
in
accordance
with
RBRC
standards
.
When
disposing
of
the
battery
by
yourself
,
please
call
RBRC
at
(800)
822-8837
for
proper
disposal
tips.
Never
touch
any
fluid
that
might
leak
from
the
built-in
battery.
Such
liquid
when
in
contact
with
the
eyes
or
skin,
could
cause
injury
to
the
s
k
or
eyes
.
Should
the
liquid
come
into
contact
with
the
eyes
,
irrigate
the
eyes
thoroughly
with
clean
w
ater
and
immediately
seek
medical
attention.
In
the
event
the
liquid
comes
into
contact
with
the
skin
or
clothing,
w
ash
it
aw
ay
immediately
with
clean
w
ater.
160

SAFETY
ADAPTER/CHARGER
CHARGER
T
he
charger
designed
by
P
ersonal
Communications
Devices
for
this
unit
requires
the
use
of
a
standard
120
v
A
C
power
source
for
its
operation.
•
Never
attempt
to
disassemble
or
repair
a
charger
.
•
Never
use
a
charger
if
it
has
a
damaged
or
worn
power
cord
or
p
lug.
Alw
ays
contact
a
P
ersonal
Communications
Devices
authorized
service
center
,
if
repair
or
replacement
is
required.
•
Never
alter
the
A
C
cord
or
plug
on
your
charger
.
If
the
plug
will
not
fit
into
the
av
ailable
outlet,
have
a
proper
outlet
installed
by
a
qualified
electrician.
•
Never
allow
any
liquids
or
w
ater
to
spill
on
the
charger
when
it
is
connected
to
an
A
C
power
source
.
Alw
ays
use
the
authorized
P
ersonal
Communications
Devices
charger
to
avoid
any
risk
of
bodily
injury
or
damage
to
your
cellular
phone
or
battery.
•
Never
attempt
to
connect
or
disconnect
the
charger
with
wet
han
ds
.
Alw
ays
unplug
the
charger
from
the
power
source
before
attempting
any
cleaning.
Alw
ays
use
a
soft
cloth
dampened
with
w
ater
to
clean
the
equipment,
after
it
has
been
unplugged.
Handling
the
cord
on
this
product
or
cords
associated
with
accessories
sold
with
this
product,
will
expose
you
to
lead,
a
chemical
known
to
the
State
of
California
to
cause
birth
defects
or
other
reproductive
harm.
W
as
hands
after
handling.
Alw
ays
disconnect
the
charger
from
the power
source
when
it
is
not
in
use
.
161

SAFETY
GAMES
SEIZURES/BLAC
k
OUTS
War
ning
A
very
small
percentage
of
individuals
may
experience
epileptic
seizures
when
exposed
to
certain
light
patterns
or
flashing
lights
.
Exposure
to
certain
patterns
or
backgrounds
on
a
computer
screen,
or
while
playing
video
games
,
may
induce
an
epileptic
seizure
in
these
individuals.
Certain
conditions
may
induce
previously
undetected
epileptic
symptoms
even
in
persons
who
have
no
history
of
prior
seizures
or
epilepsy
.
If
you,
or
anyone
in
your
family
,
have
an
epileptic
condition,
consult
your
physician
prior
to
playing.
If
you
experience
any
of
the
following
symptoms
while
playing
a
video
or
computer
game
--
dizziness
,
altered
vision,
eye
or
muscle
twitches,
loss
of
aw
areness
,
disorientation,
any
involuntary
movement,
or
convulsions
--
IMMEDIA
TEL
Y
discontinue
use
and
consult
your
physician
before
resuming
play
.
162

SAFETY
Repetitive
Motion
Injuries
When
you
play
games
on
your
phone
,
you
may
experience
occasional
discomfort
in
your
hands
,
arms
,
shoulders
,
neck,
or
other
parts
of
your
body
.
F
ollow
these
instructions
to
avoid
problems
such
as
tendonitis
,
carpal
tunnel
syndrome
,
or
other
musculosk
eletal
disorders:
•
T
ak
e
a
minimum
15-minute
break
every
hour
of
game
playing.
•
If
your
hands
,
wrists,
or
arms
become
tired
or
sore
while
playing,
stop
and
rest
for
several
hours
before
playing
again.
•
If
you
continue
to
have
sore
hands
,
wrists,
or
arms
during
or
after
play
,
stop
playing
and
see
a
doctor.
RECYCLE
YOUR
CELL
PHONE!
Carriers
mark
eting
this
cell
phone
have
an
in-store
phone
tak
e-back
program.
Consumers
can
drop
off
their
used
wireless
devices
to
specified
carrier
retail
outlets
for
recycling
purposes
.
F
or
a
list
of
carrier
members
and
collection
sites
,
visit
the
cellular
industry’
s
recycling
websit
e
www
.recyclewirelessphones.com
.
T
o
mail
in
your
old
wireless
device
to
P
ersonal
Communications
Devices
for
recycling
purposes
,
simply
package
your
old
wireless
device
and
any
accessories
(including
discharged
batteries)
in
appropriate
shipping
materials
and
mail
to:
F
or
Recycling
P
ersonal
Communications
Devices
LL
555
Wireless
Blvd.
Hauppauge
,
NY
11788
Wireless
phones
also
can
be
donated
to
the
Wireless
F
oundation’
s
DONA
TE
A
PHONE
®
CALL
T
O
PRO
TECT
®
campaign.
T
his
charitable
cause
collects
wireless
phones
to
benefit
victims
of
domestic
violence
.
All
donated
phones
are
tax
deductible.
Y
ou
may
mail
the
phone
to:
CALL
T
O
PRO
TECT
,
2555
Bishop
Circle
,
West
Dexter
,
MI
48130.
163

SAFETY
-OR-
Drop
the
phone
off
at
a
local
collection
center
.
F
or
a
list
of
collection
centers
,
visit
www
.wirelessfoundation.org/CalltoProtect/dropoff.cfm
Before
returning
any
wireless
device
for
recycling
purposes
,
please
remember
to
terminate
your
service
on
the
device
,
clear
the
device
of
any
stored
information
and
remove
the
device’
s
SIM
card,
if
it
has
one
(please
contact
your
wireless
provider
to
find
out
if
your
device
contains
a
SIM
card
and
for
assistance
on
how
to
remove
it).
FCC
COMPLIANCE
INFORM
A
TION
T
his
device
complies
with
P
art
15
of
FCC
Rules
.Operation
is
subject
to
the
following
two
conditions:
(1)
T
his
device
may
not
cause
harmful
interference
,
and
(2)
T
his
device
must
accept
any
interference
received.
Including
interference
that
may
cause
undesired
operation.
I
NFORM
A
TION TO
U
SER
T
his
equipment
has
been
tested
and
found
to
comply
with
the
limits
for
a
Class
B
digital
device
,
pursuant
to
part
15
of
the
FCC
Rules
.
T
hese
limits
are
designed
to
provide
reasonable
protection
against
harmful
interference
in
a
residential
installation.
T
his
equipment
generates
,
uses
and
can
radiate
radio
frequency
energy
and,
if
not
installed
and
used
in
accordance
with
the
instructions,
may
cause
harmful
interference
to
radio
communications.
However
,
there
is
no
guarantee
that
interference
will
not
occur
in
a
particular
installation.
164

SAFETY
If
this
equipment
does
cause
harmful
interference
to
radio o
r
television
reception,
which
can
be
determined
by
turning
the
equipment
off
and
on,
the
user
is
encouraged
to
try
to
correct
the
interference
by
one
or
more
of
the
following
measures:
-
Reorient
or
relocate
the
receiving
antenna.
-
Increase
the
separation
between
the
equipment
and
receiver
.
-
Connect
the
equipment
into
an
outlet
on
a
circuit
different
from
that
to
which
the
receiver
is
connected.
-
Consult
the
dealer
or
an
experienced
radio/
tv
technician
for
help.
CA
UTION:
T
he
user
who
mak
es
changes
or
modifications
to
the
unit
without
the
express
approval
by
the
manufacturer
will
void
user
authority
to
operate
the
equipment.
165

W
ARRANT
Y
MANUF
ACTURER’S
W
A
RRANTY
12
MONTH
LIMITED
W
ARRANTY
P
ersonal
Communications
Devices
,
LLC.
(the
Company)
w
arrants
to
the
original
retail
purchaser
of
this
handheld
portable
cellular
telephone,
that
should
this
product
or
any
part
thereof
during
normal
consumer
usage
and
conditions,
be
proven
defective
in
material
or
workmanship
that
results
in
product
failure
within
the
first
twelve
(12)
month
period
from
the
date
of
purchase
,
such
defect(s)
will
be
repaired
or
replaced
(with
new
or
rebuilt
parts)
at
the
Company’
s
option,
without
charge
for
parts
or
labor
directly
related
to
the
defect(s).
T
he
antenna,
k
eypad,
display
,
rechargeable
battery
and
battery
charger
,
if
included,
are
similarly
w
arranted
for
twelve
(12)
months
from
date
of
purchase
.
T
his
W
arranty
extends
only
to
consumers
who
purchase
the
product
in
the
United
States
or
Canada
and
it
is
not
transferable
or
assignable
.
T
his
W
arranty
does
not
apply
to:
(a)
Product
subjected
to
abnormal
use
or
conditions,
accident,
mishandling,
neglect,
unauthorized
alteration,
misuse
,
improper
installation
or
repair
or
improper
storage;
(b)
Product
whose
mechanical
serial
number
or
electronic
serial
number
has
been
removed,
altered
or
defaced.
(c)
Damage
from
exposure
to
moisture,
humidity
,
excessive
temperatures
o
extreme
environmental
conditions;
(d)
Damage
resulting
from
connection
to
,
or
use
of
any
accessory
or
other
product
not
approved
or
authorized
by
the
Company;
(e)
Defects
in
appearance
,
cosmetic,
decorative
or
structural
items
such
as
framing
and
non-operative
parts;
166

W
A
RRANT
Y
(f)
Product
damaged
from
external
causes
such
as
fi
r
e
,
flooding,
dirt,
sand,
weather
conditions,
battery
leakage
,
blown
fuse
,
theft
or
improper
usage
of
any
electrical
source
.
T
he
Company
disclaims
liability
for
remov
al
or
reinstallation
of
the produ
c
for
geographic
coverage
,
for
inadequate
signal
reception
by
the antenna
o
for
communications
range
or
operation
of
the
cellular
system
as
a
whole
.
When
sending
your
wireless
device
to
P
ersonal
Communications
Devices
for
repair
or
service
,
please
note
that
any
personal
data
or
softw
are
stored
on
the
device
may
be
inadvertently
erased
or
altered.
T
herefore
,
we
strongly
recommend
you
mak
e
a
back
up
copy
of
all
data
and
softw
are
contained
on
your
device
before
submitting
it
for
repair
or
service
.
T
his
includes
all
contact
lists,
downloads
(i.e
.
third-party
softw
are
applications,
ringtones,
games
and
graphics)
and
any
other data
added
to
your
device
.
In
addition,
if
your
wireless
device
utilizes
a SIM
or
Multimedia
card,
please
remove
the
card
before
submitting
the
device
and
store
for
later
use
when
your
device
is
returned,
P
ersonal
Communications
Devices
is
not
responsible
for
and
does
not
guarantee
restoration
of
any
third-party
softw
are
,
personal
information
or
memory
data
contained
in,
stored
on,
or
integrated
with
any
wireless
device
,
whether
under
w
arranty
or
not,
returned
to
P
ersonal
Communications
Devices
for
repair
or
service
.
167

W
ARRANT
Y
T
o
obtain
repairs
o
r
replacement
within
the
terms
o
f
this
W
arrant
y
,the
product
should
be
delivered
with
proof
of
W
arranty
coverage
(e
.g.
dated
b
ill
of
sale),
the
consumer’
s
return
address
,
daytime
phone
number
and/ or
fax
number
and
complete
description
of
the
problem,
transportation
prepaid,
to
the
Company
at
the
address
shown
below
or
to
the
place
o
f
purchase
for
repair
or
replacement
processing.
In
addition,
for
reference
to
an
authorized
W
arranty
station
in
your
area,
you
may
telephone
in
the
United
States
(800)
229-1235,
and
in
Canada
(800)
465-9672
(in
Ontario
call
416-695-3060).
THE
EXTENT
OF
THE
COMPANY’S
LIABILITY
UNDER
THIS
WARRANTY
IS
LIMITED
T
O
THE
REP
AIR
OR
REPLA
CEMENT
PRO
v
IDED
ABO
v
E
AND
,
IN
NO
E
v
ENT
,
SHALL
THE
COMPANY’S
LAIBILITY
EXCEED
THE
PURCHASE
PRICE
P
AID
BY
PURCHASER
FOR
THE
PRODUCT
.
ANY
IMPLIED
WARRANTIES
,
INCLUDING
ANY
IMPLIED
WARRANTY
OF
MERCHANTABILITY
OR
FITNESS
FOR
A
P
AR
TICULAR
PURPOSE,
SHALL
BE
LIMITED
T
O
THE
DURATION
OF
THIS
WRITTEN
WARRANTY
.
ANY
A
CTION
FOR
BREACH
OF
ANY
WARRANTY
MUST
BE
BROUGHT
WITHIN
A
PERIOD
OF
18
MONTHS
FROM
D
A
TE
OF
ORIGINAL
PURCHASE.
IN
NO
CASE
SHALL
THE
COMP
ANY
BE
LIABLE
FOR
AN
SPECIAL
CONSEQUENTIAL
OR
INCIDENTAL
D
AMA
GES
FOR
BREACH
OF
THIS
OR
ANY
O
THER
WARRANTY
,
EXPRESS
OR
IMPLIED
,
WHA
TSOE
v
ER.
THE
COMP
ANY
SHALL
NO
T
BE
LIABLE
FOR
THE
DELA
Y
IN
RENDERING
SER
v
ICE
UNDER
THIS
WARRANTY
OR
LOSS
OF
USE
DURING
THE
TIME
THE
PRODUCT
IS
BEING
REP
AIRED
OR
REPLACED
.
No
person
or
representative
is
authorized
to
assume
for
the
Company
any
liability
other
than
expressed
herein
in
connection
with
the
sale
of
this
product.
168

W
A
RRANT
Y
Some
states
o
r
provinces
do
not allow limitations
on
how
long
an
implied
w
arranty
lasts
or
the
exclusion
or
limitation
of
incidental
or
consequential
damage
so
the
above
limitation
or
exclusions
may
not
apply
to
you.
T
his
W
arranty
gives
you
specific
legal
rights,
and
you
may
also
have
other
rights,
which
v
ary
from
state
to
state
or
province
to
province
.
IN
USA:
P
ersonal
Communications
Devices
,
LLC.
555
Wireless
Blvd.
Hauppauge
,
NY
11788
(800)
229-1235
IN
CANAD
A:
PCD
Communications
Canada
Ltd.
5535
Eglinton
Avenue
West
Suite
#234
T
oronto
,
ON
M9C
5K5
(800)
465-9672
169