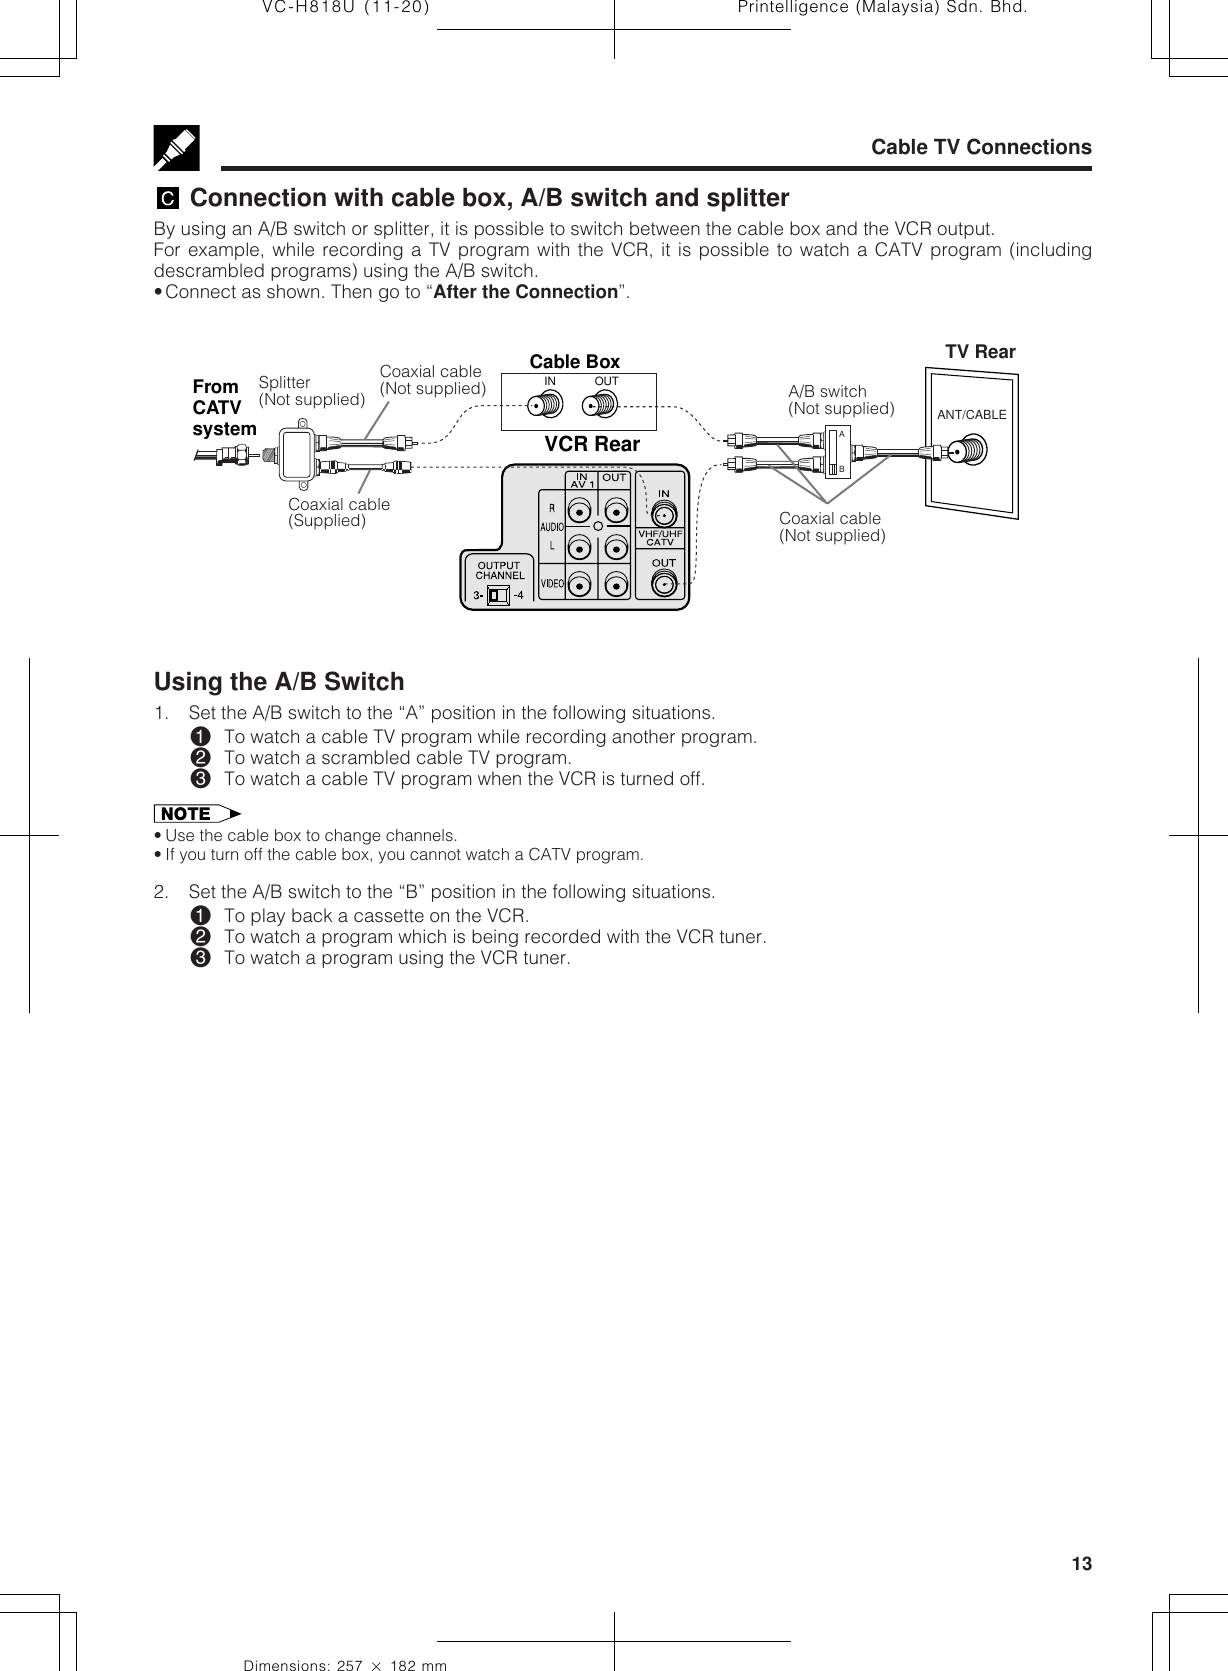
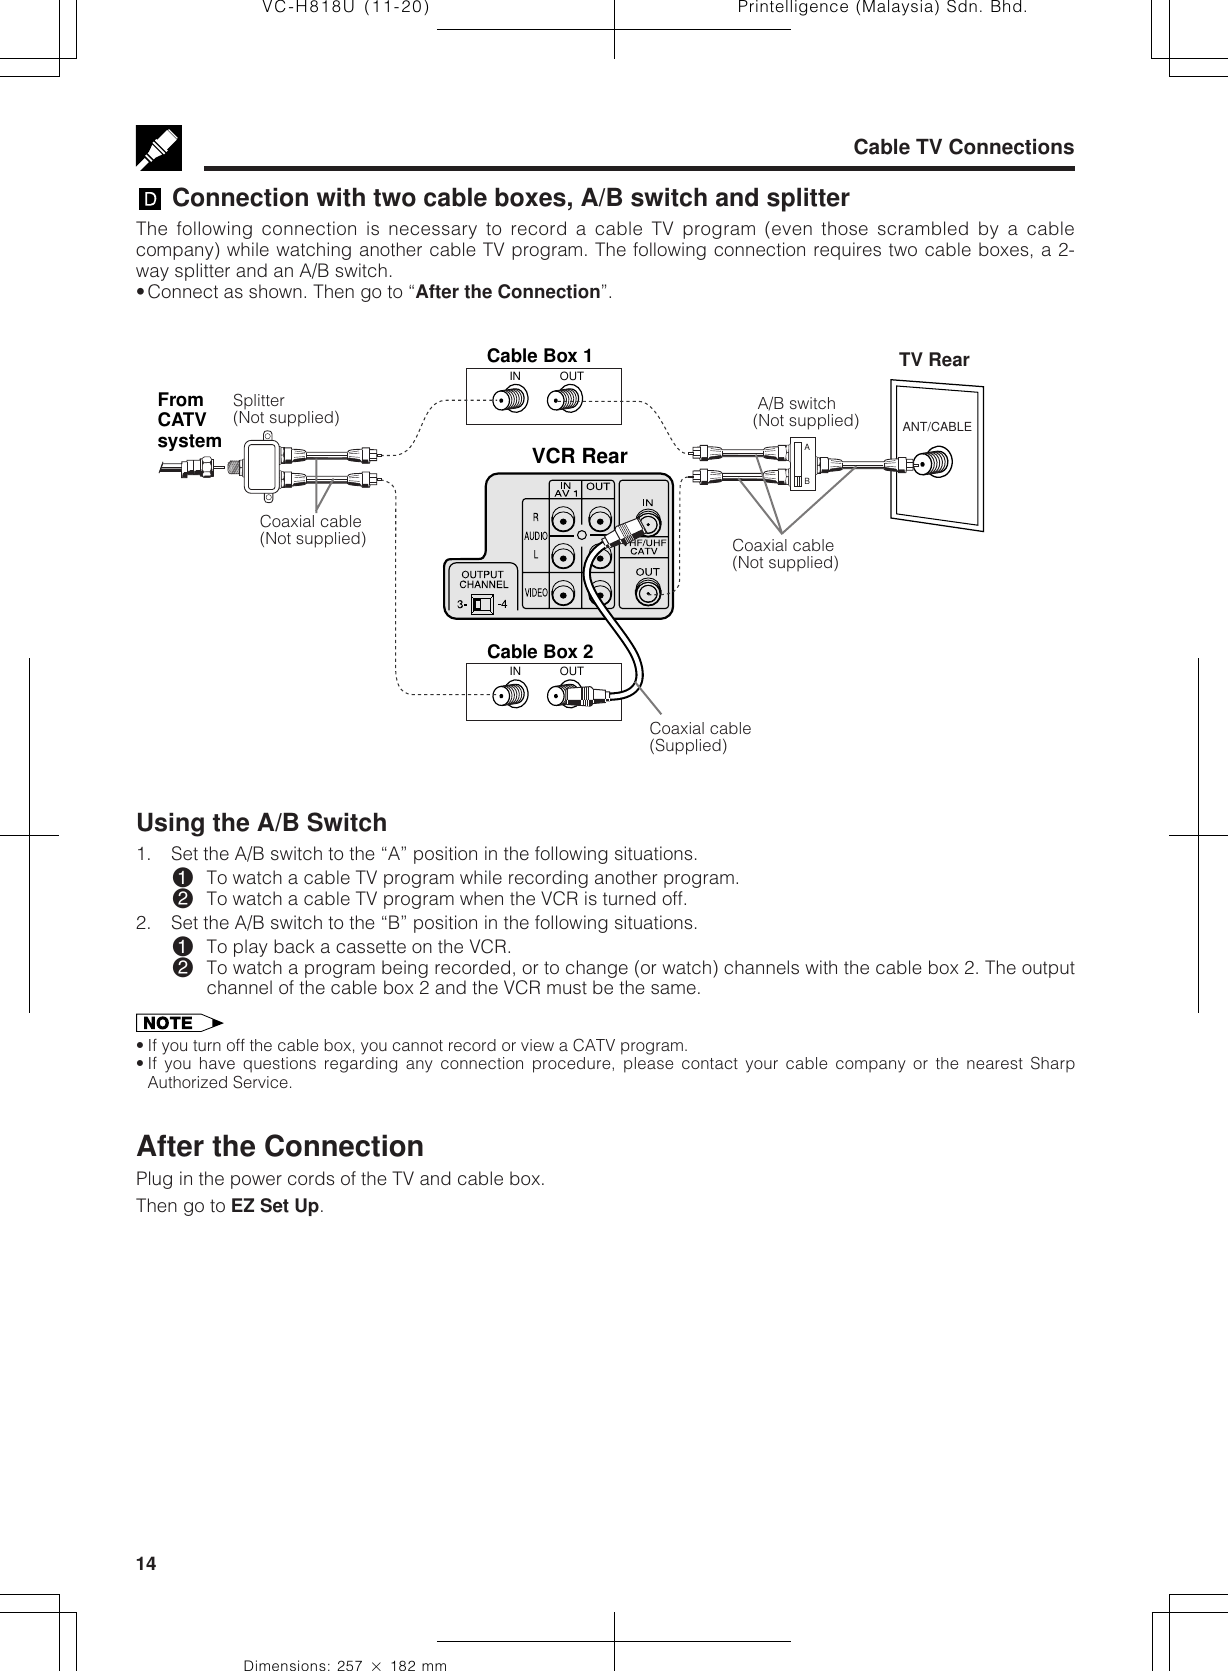
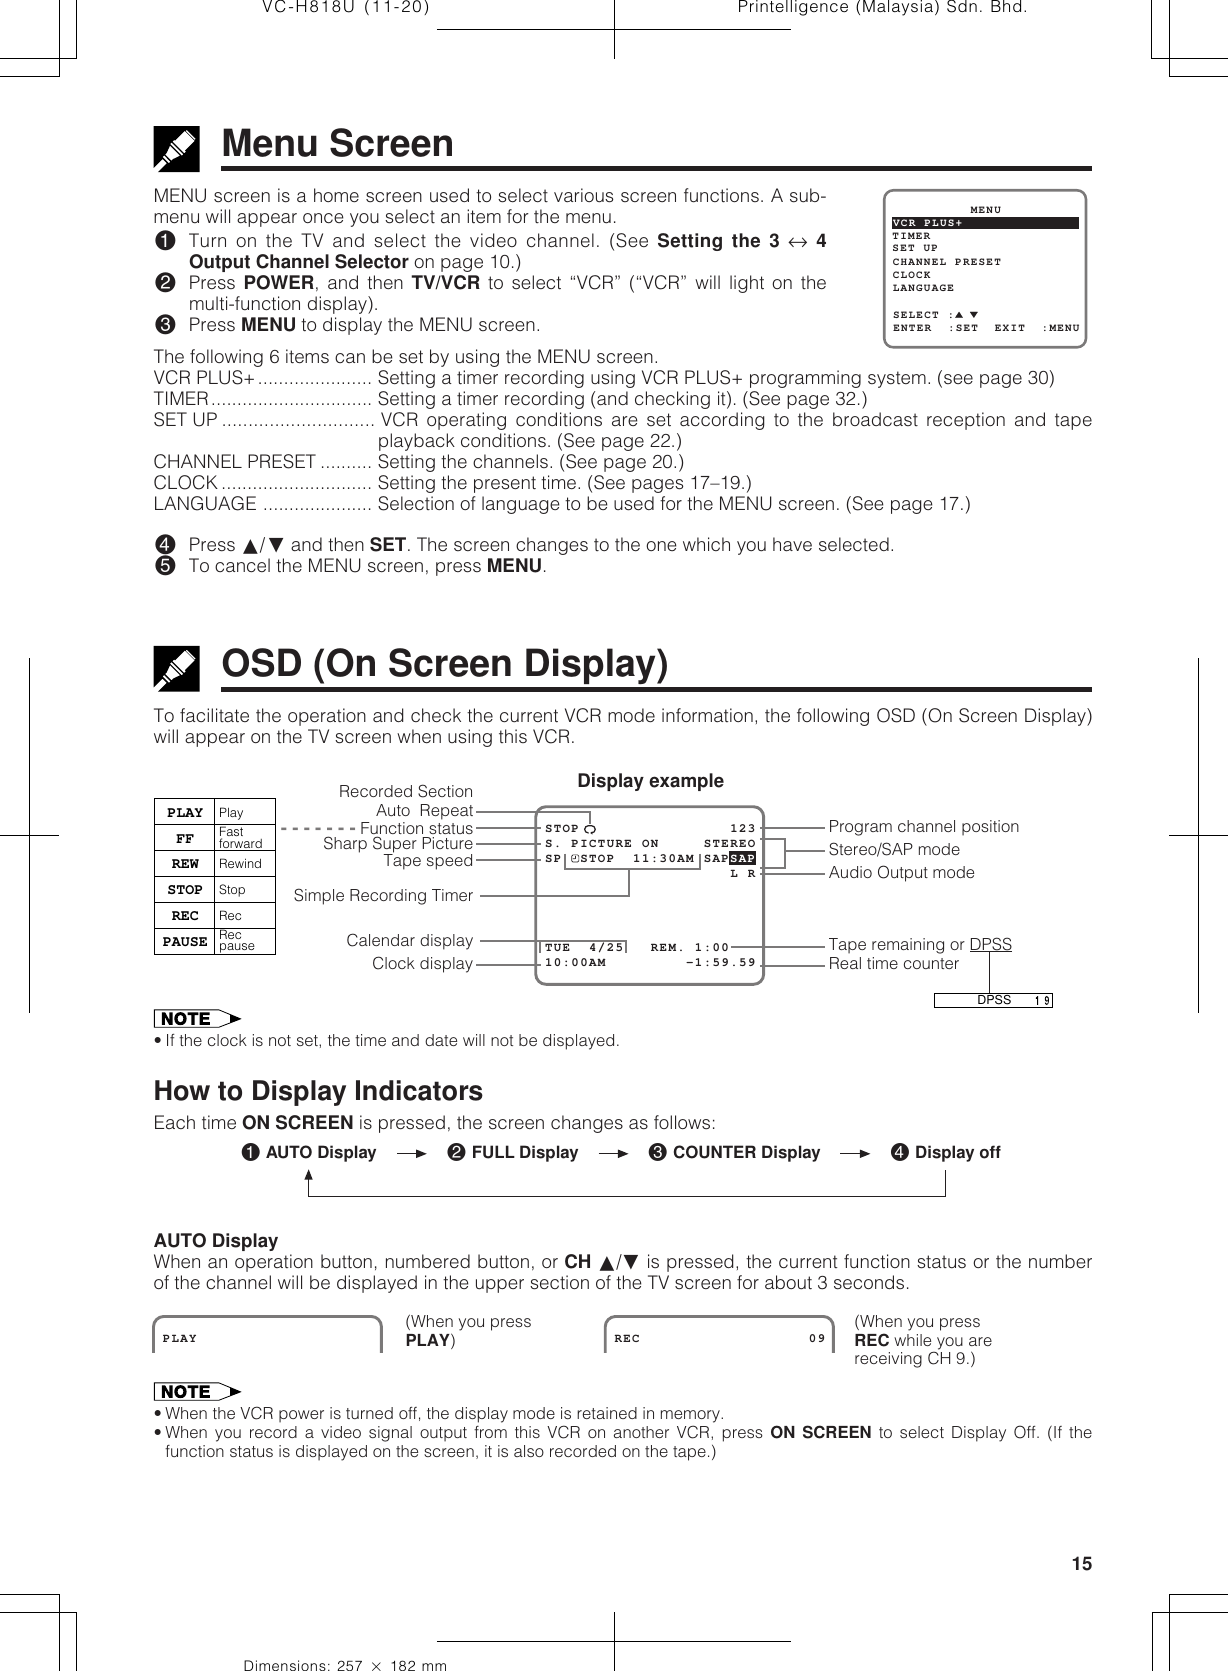
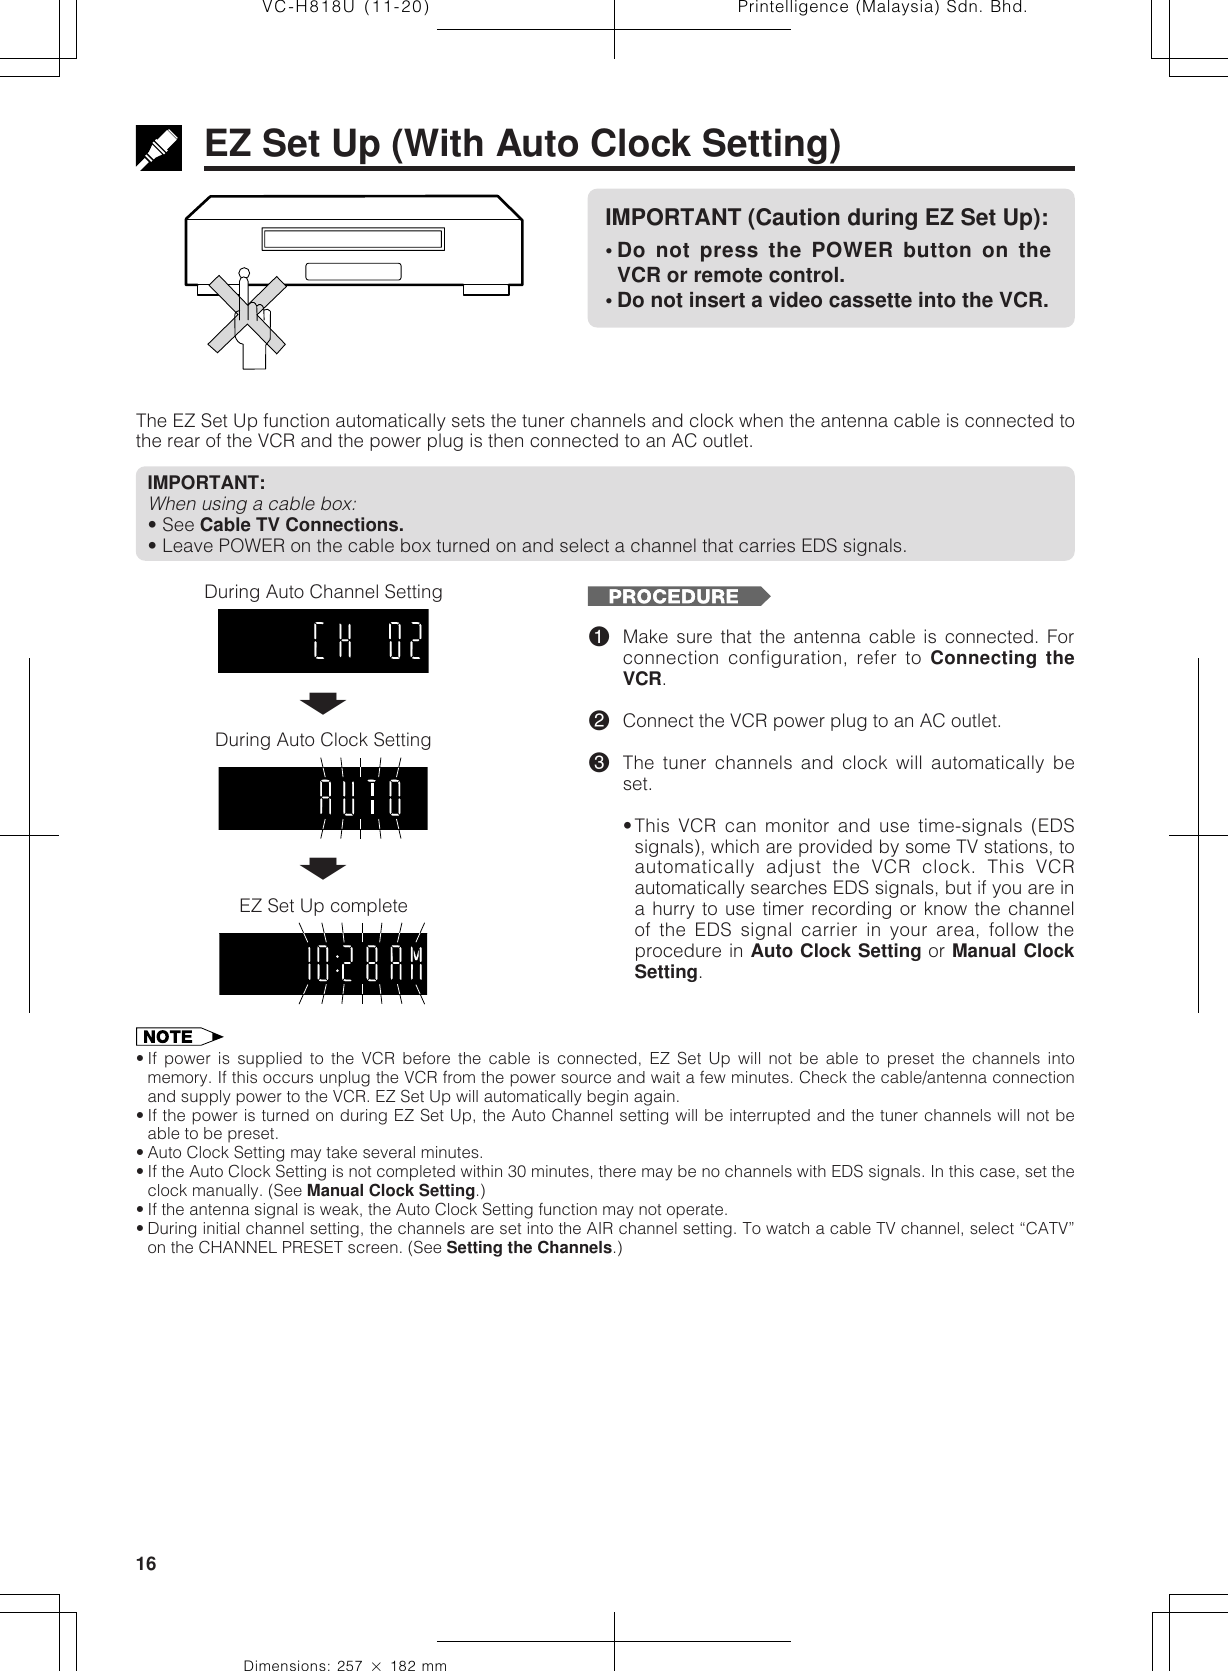
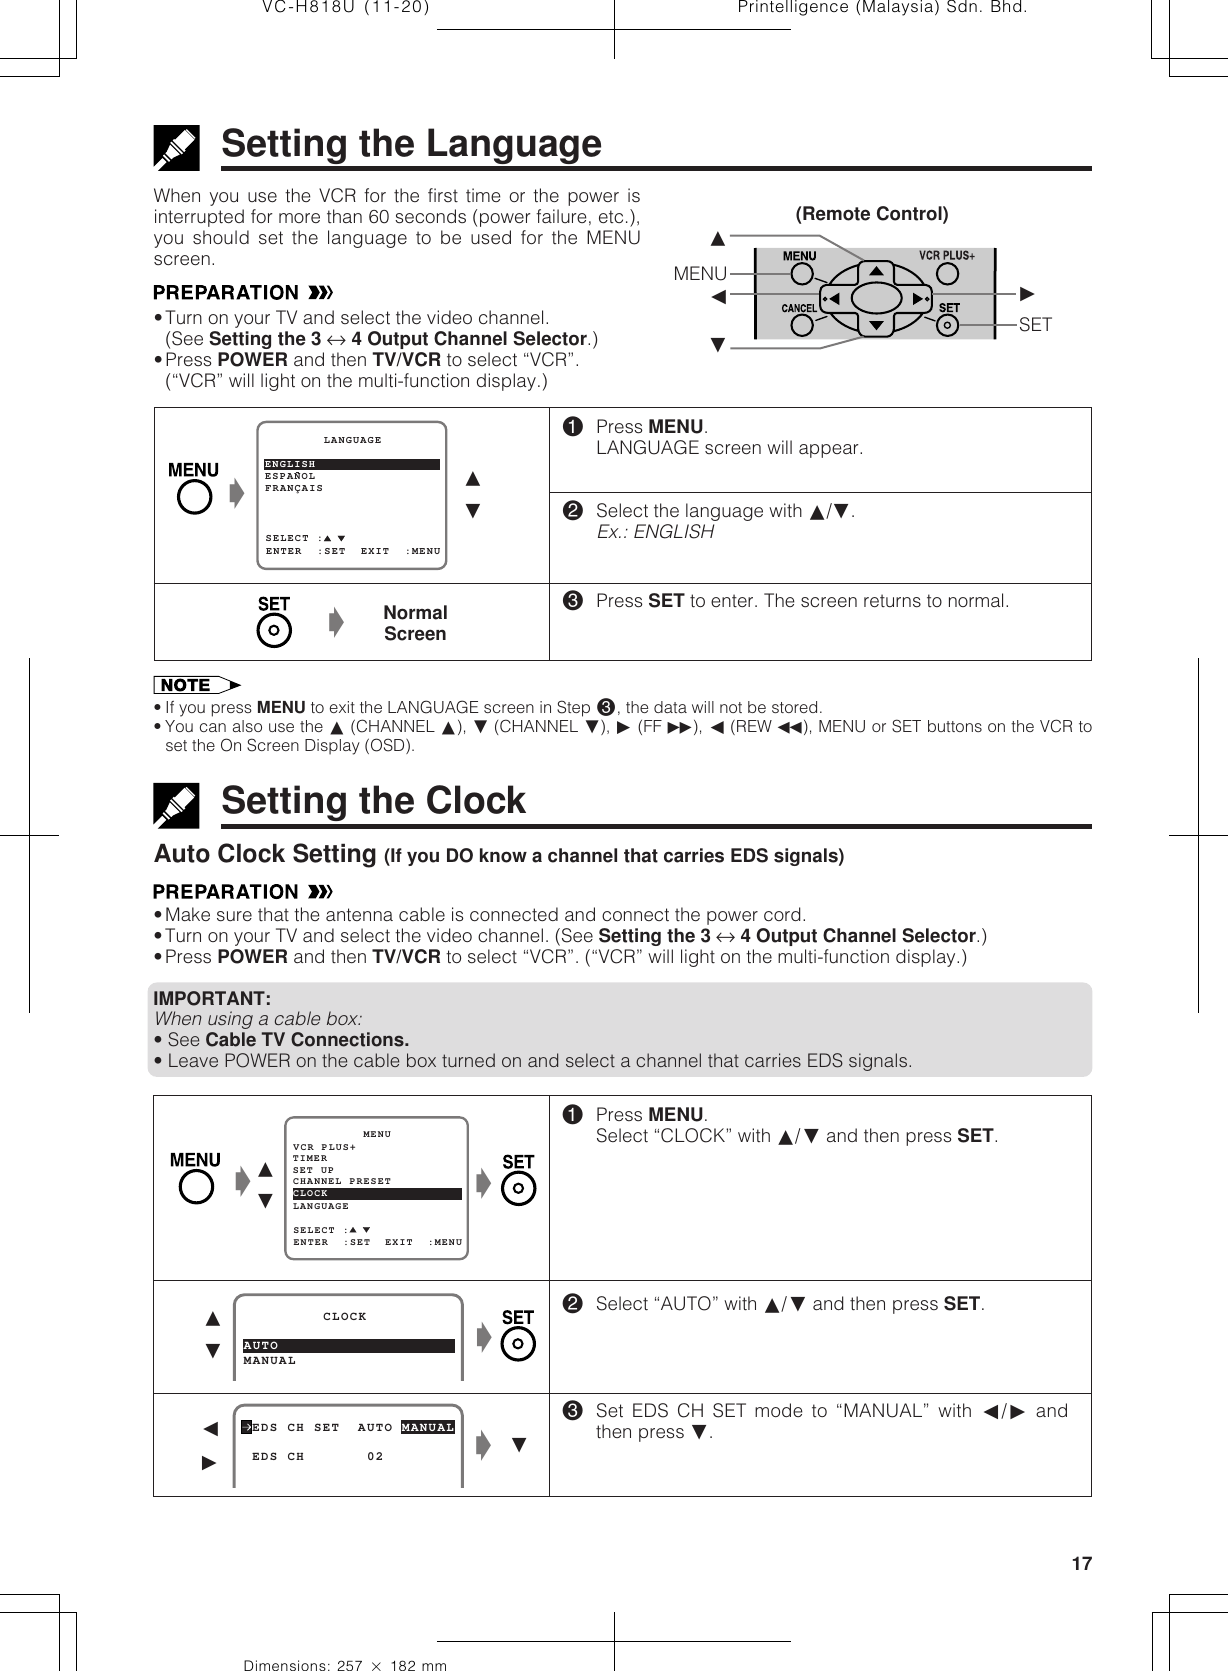
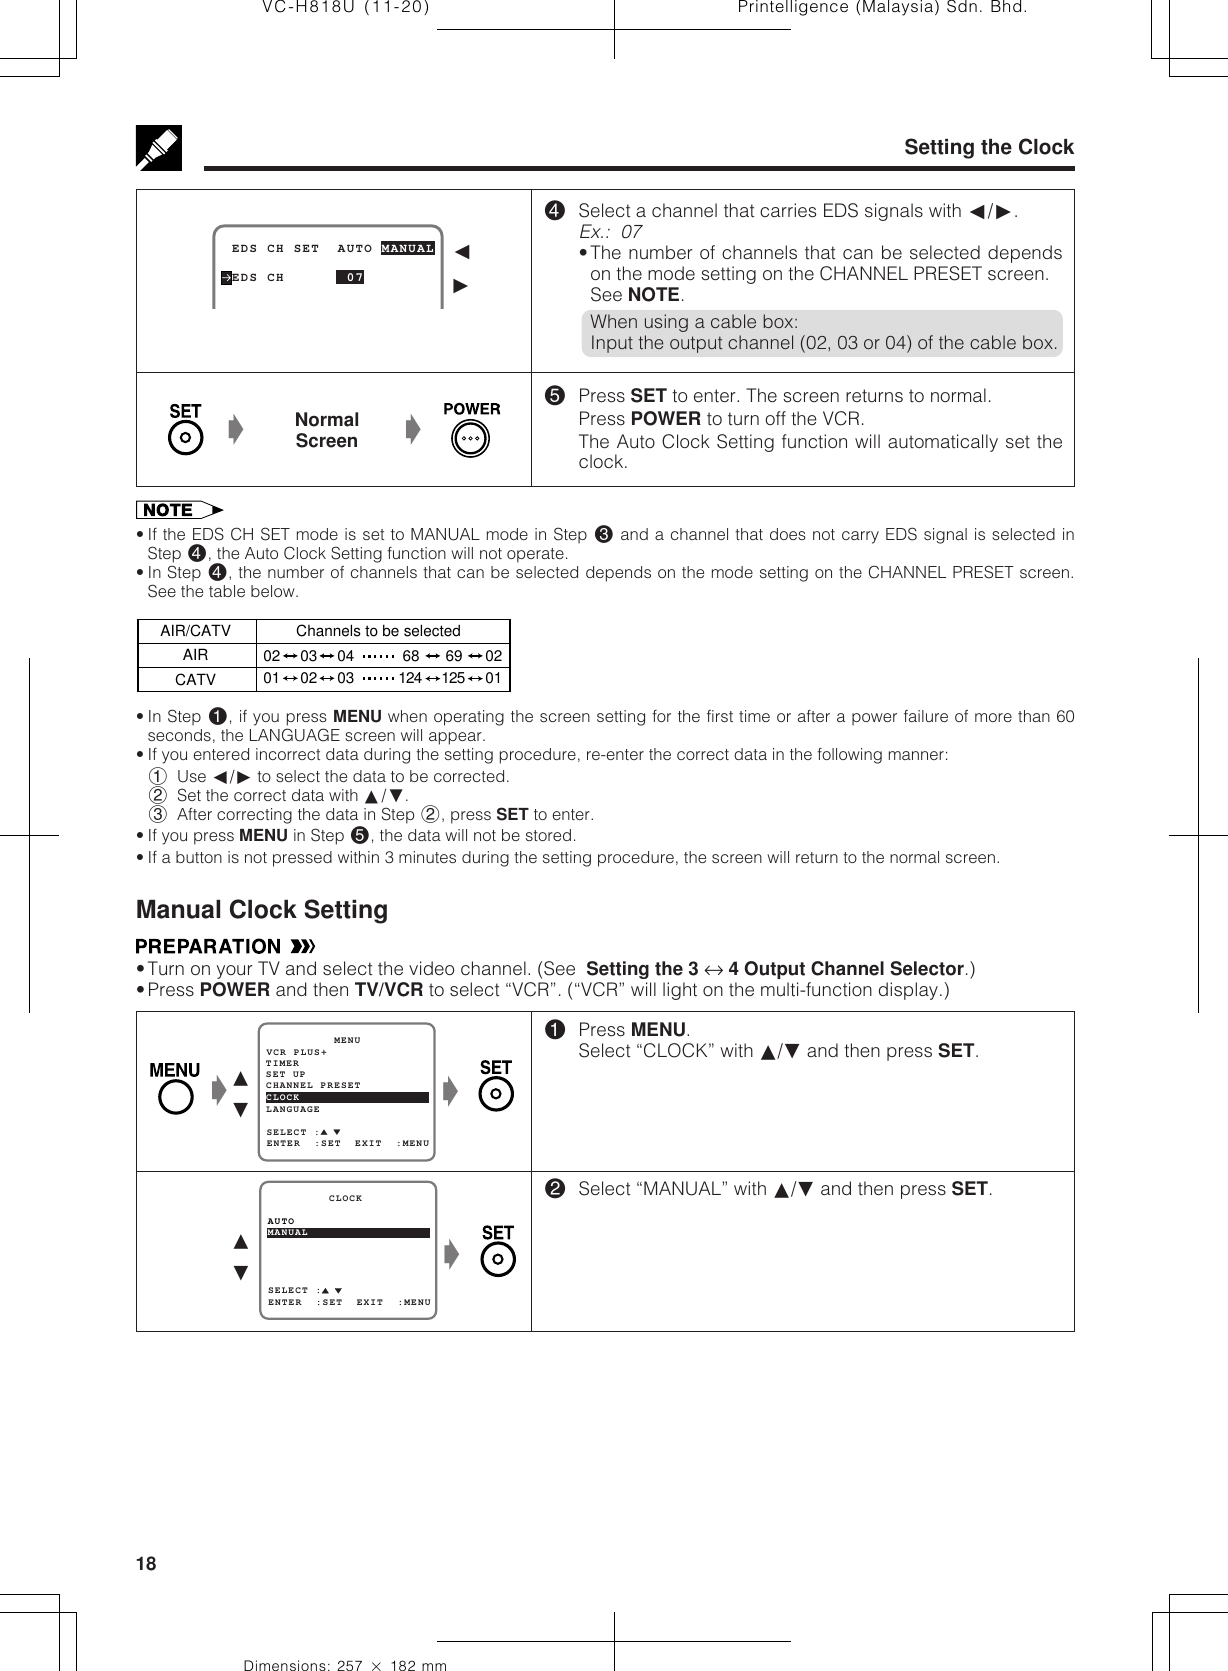
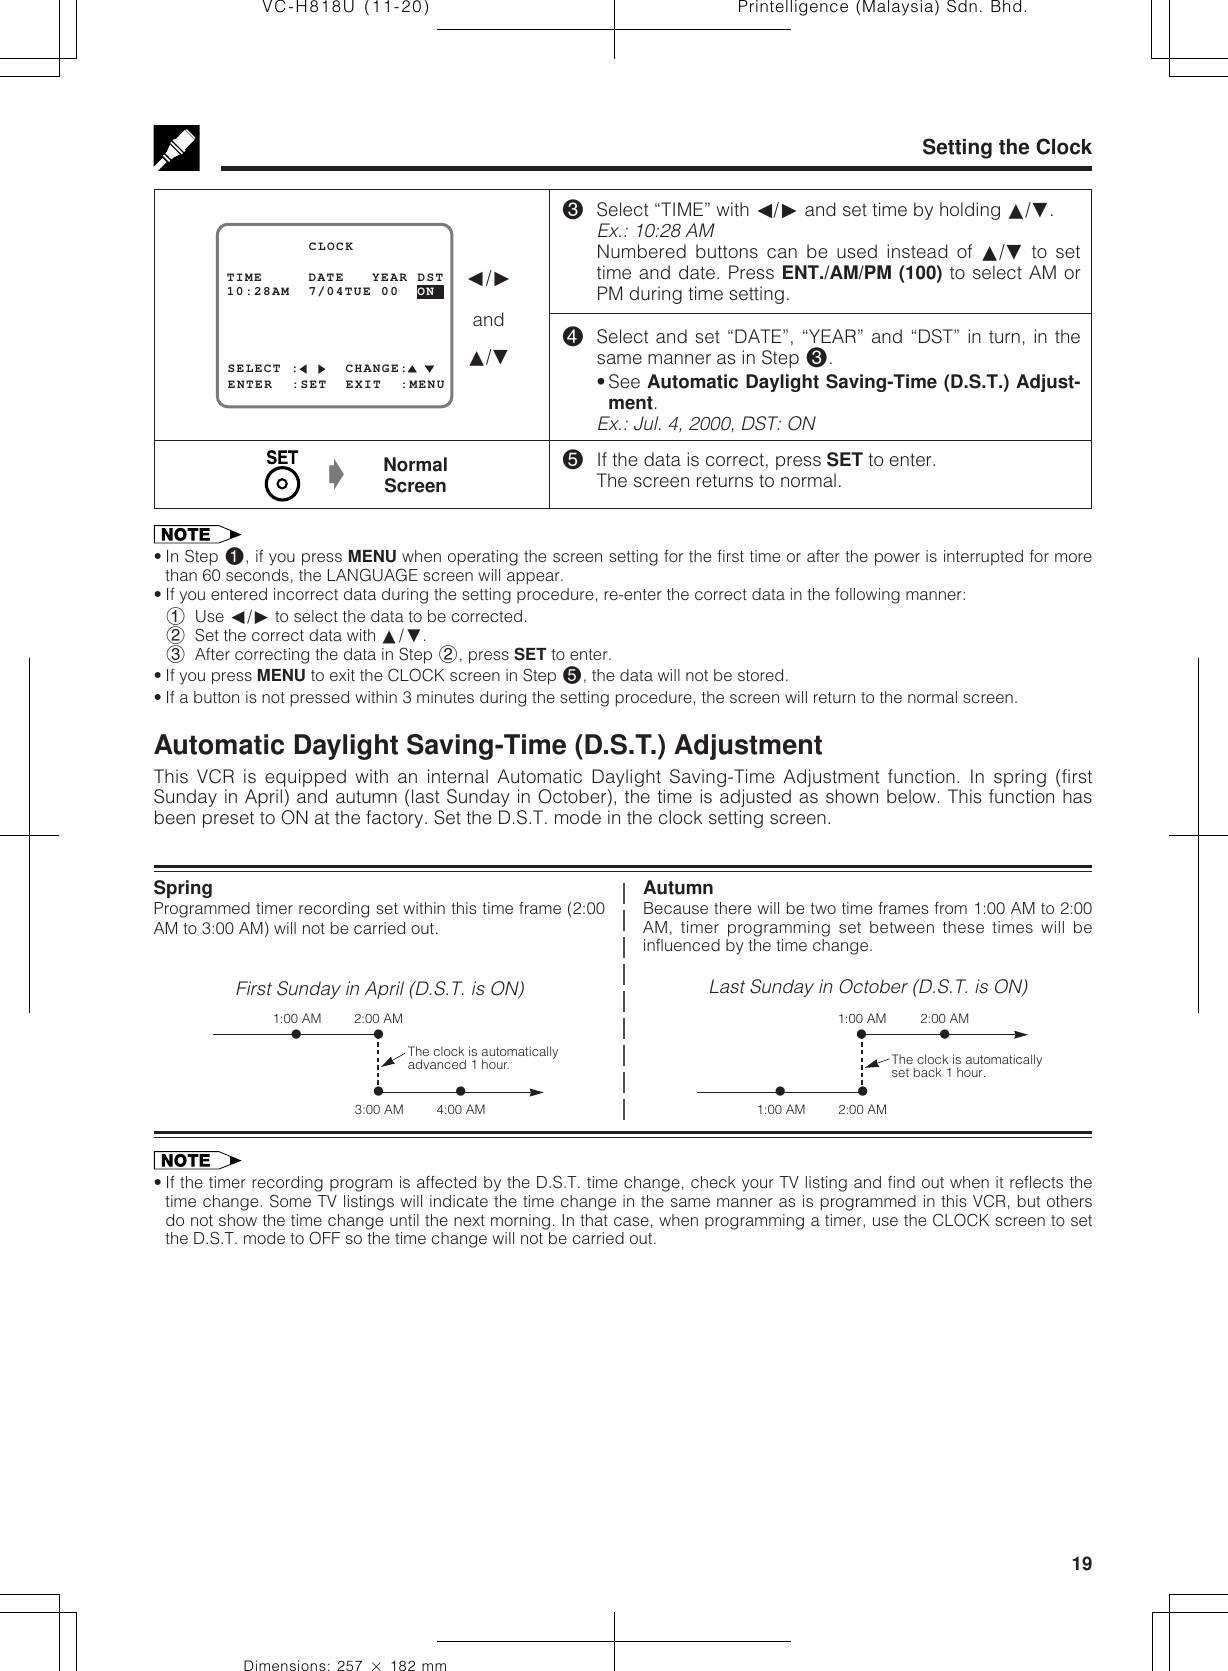
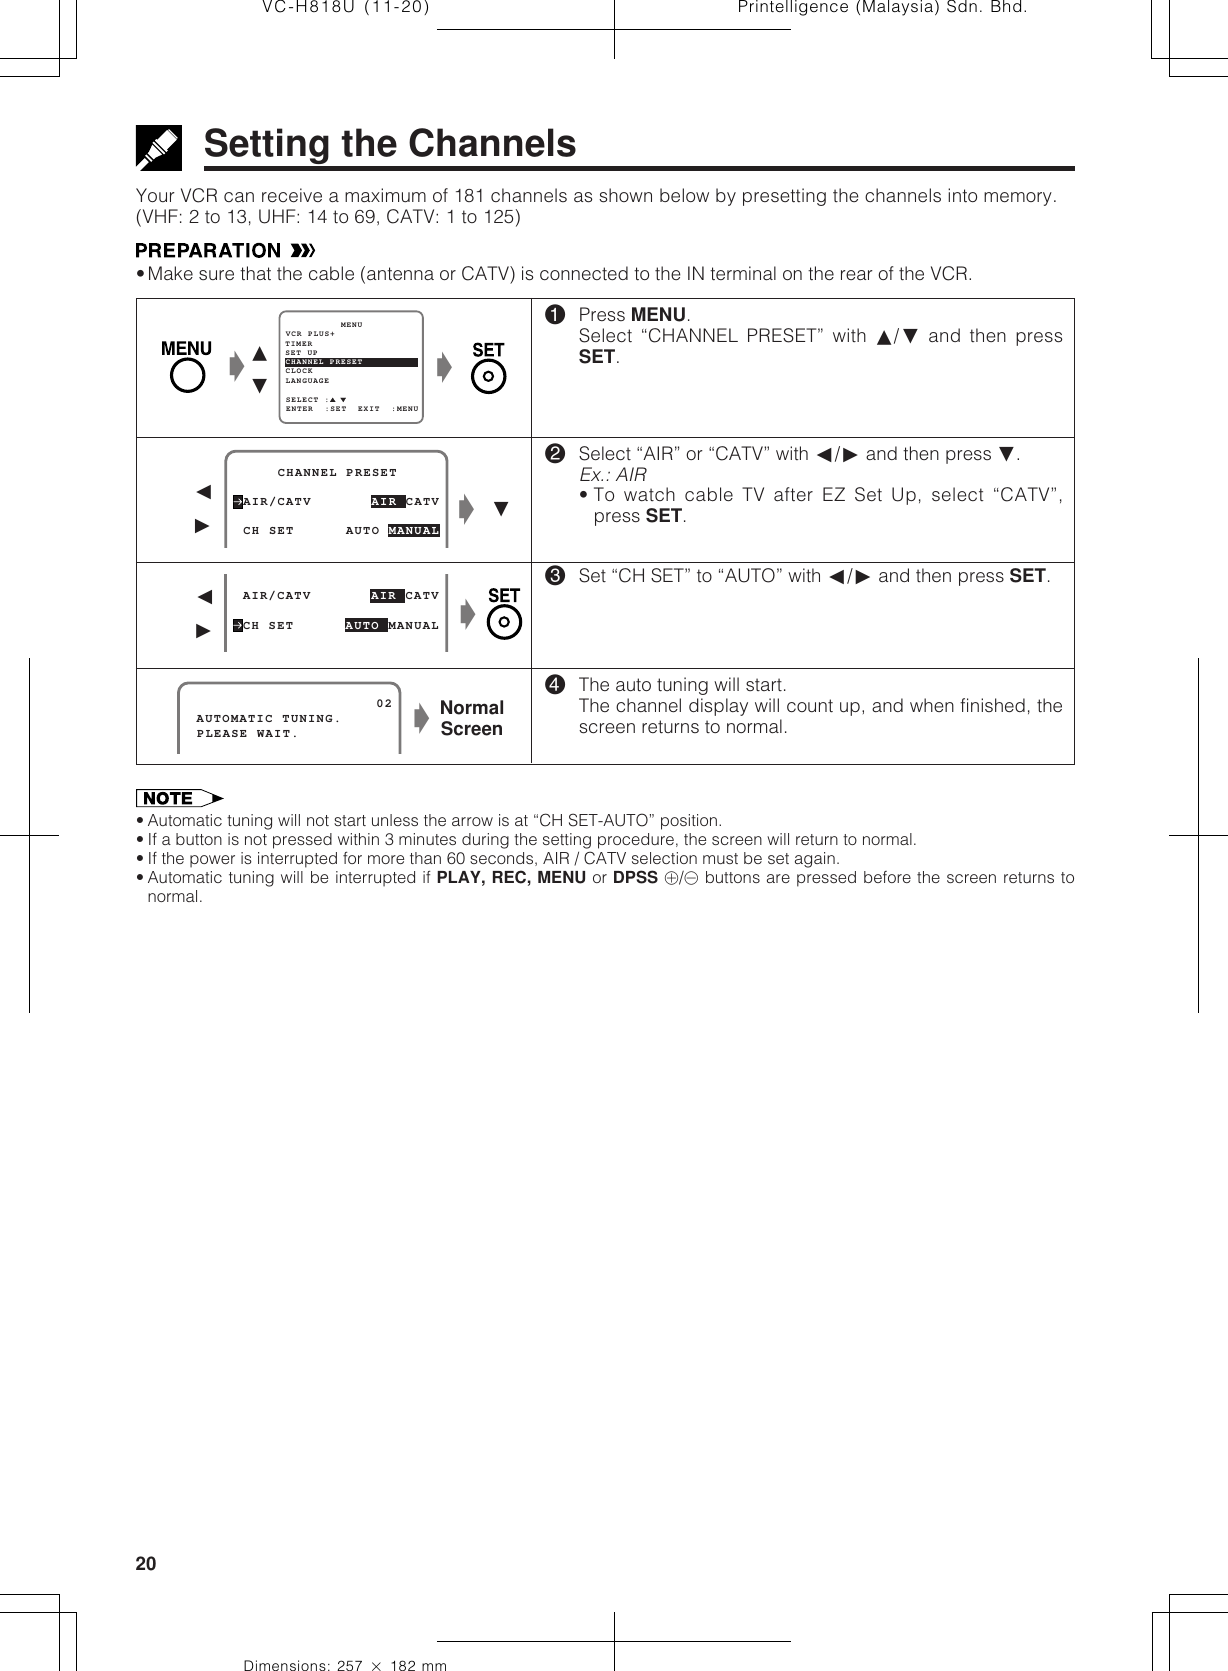
Sharp TCG039 User Manual VC H818U 01 10
Sharp Corporation VC H818U 01 10
UserManual.wiki
>
Sharp
>
TCG039 User Manual
Operation manual
Navigation menu
Upload a User Manual
Namespaces
Wiki Guide
HTML
PDF
Info
Views
User Manual
Discussion / Help
Navigation
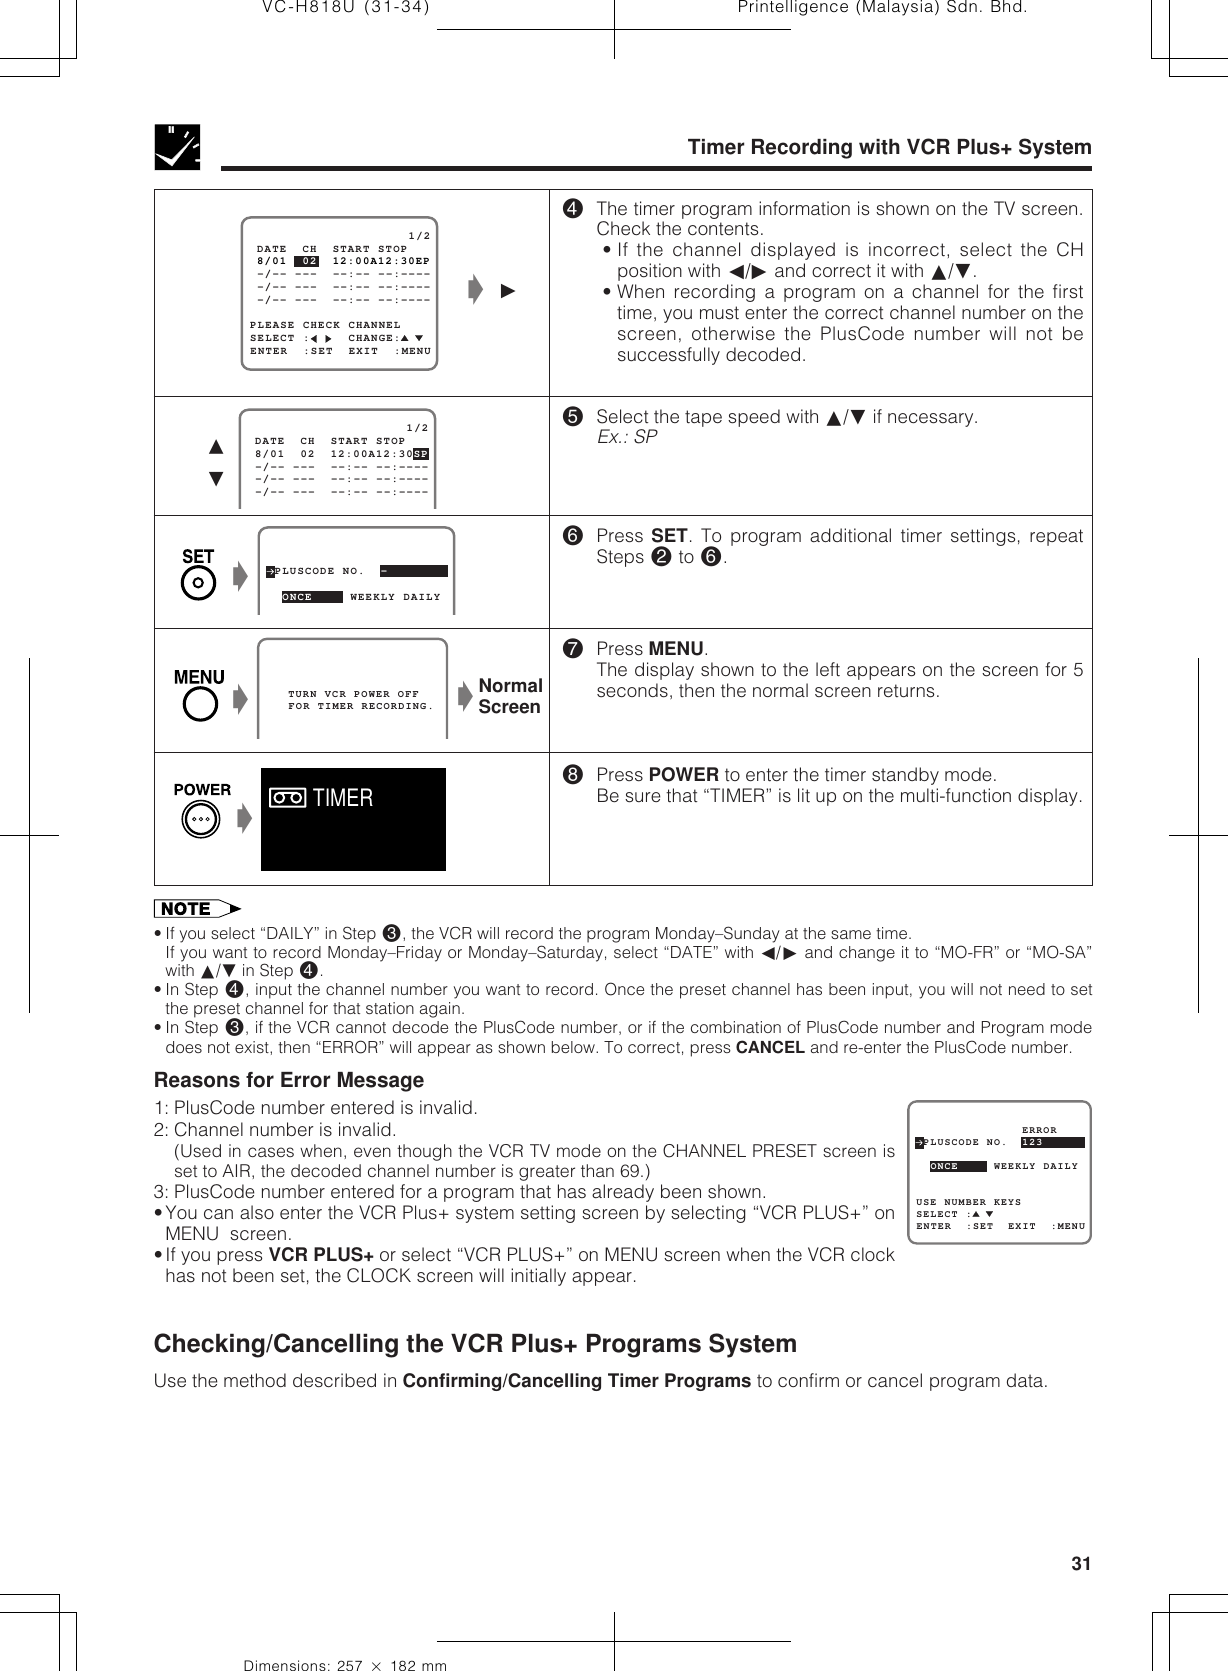
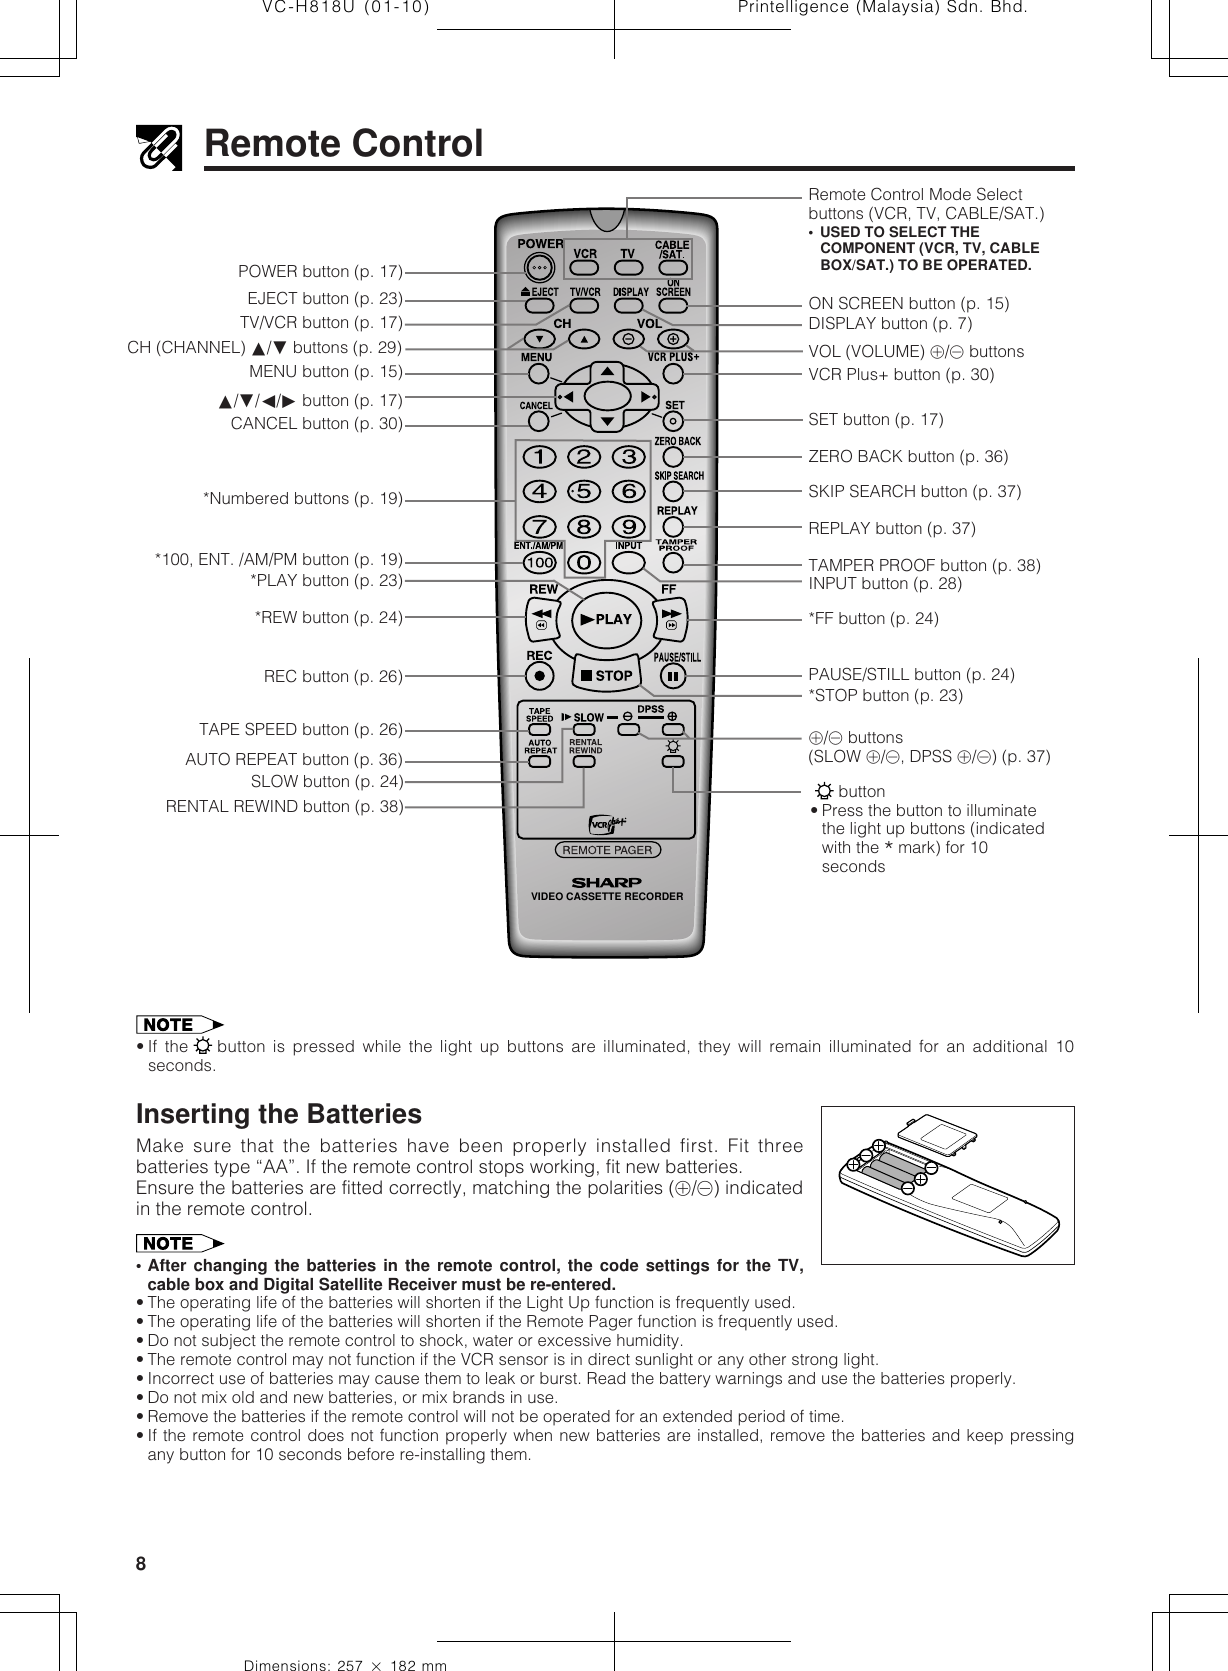
![1Dimensions: 257 ן 182 mmPrintelligence (Malaysia) Sdn. Bhd.VC-H818U (01-10)VIDEO CASSETTE RECORDEROPERATION MANUALPlease read this operation manual carefullybefore using the VCR.GeneralInformation Setting Up BasicOperations SpecialFunctions HelpfulHintsRecordingMODELVC-H818U[IMPORTANT] / [IMPORTANTE]EZ SET UP (AUTO CHANNEL /CLOCK SET UP)EZ SET UP (PROGRAMACIÓN AUTOMÁTICA DE CANAL/PUESTA EN HORA DEL RELOJ)!Connect Antenna/Cableto VCR first.En primer lugar conectela antena/el cable a lavideograbadora.@Then, plug into ACPower Outlet.A continuación,enchúfelos altomacorriente de CA.#Do not press the POWERbutton until completion ofEZ SET UP.No pulse el botón deALIMENTACIÓN(POWER) hasta haberterminado la EZ SET UP.$EZ SET UP complete.EZ SET UP completo.Detail: Please see page 16Detalle: véase la página 16Current time will be displayedand flashing.La hora actual apareceráparpadeando en el visor.](https://usermanual.wiki/Sharp/TCG039/User-Guide-76892-Page-1.png)
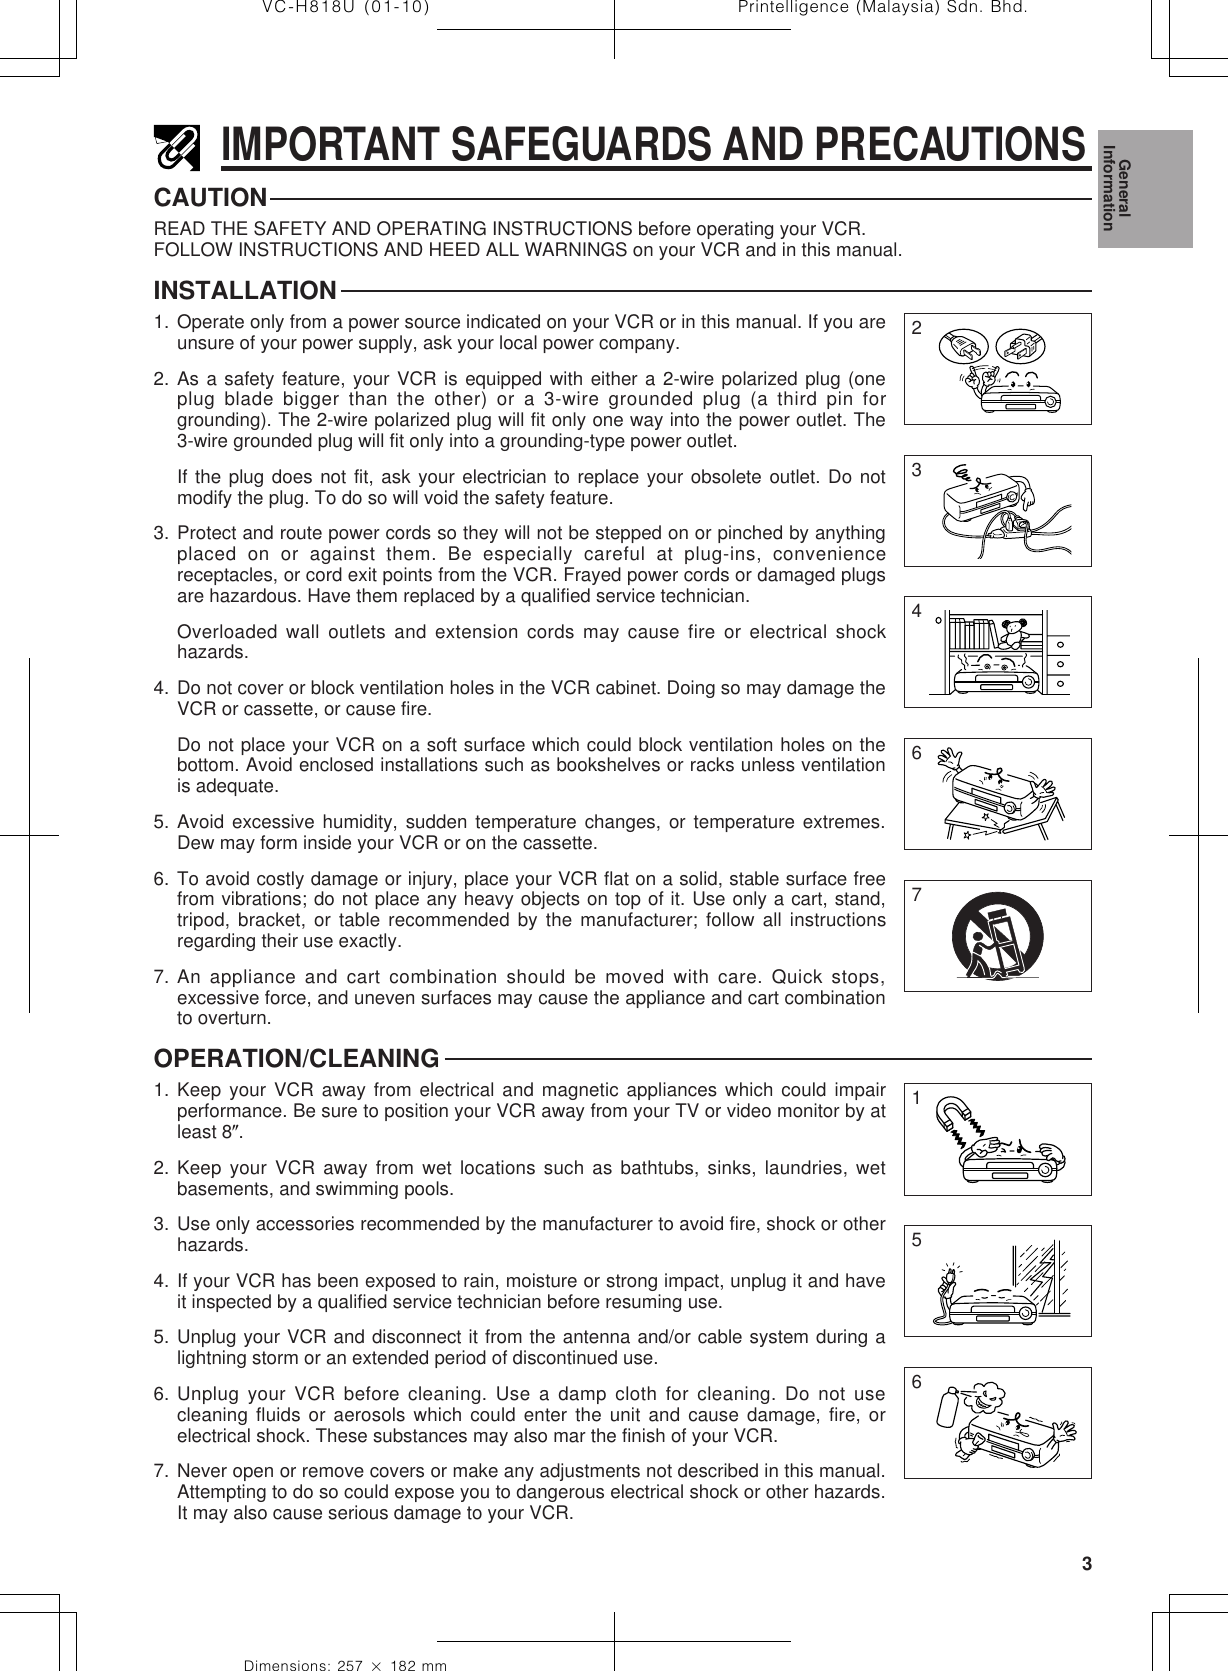
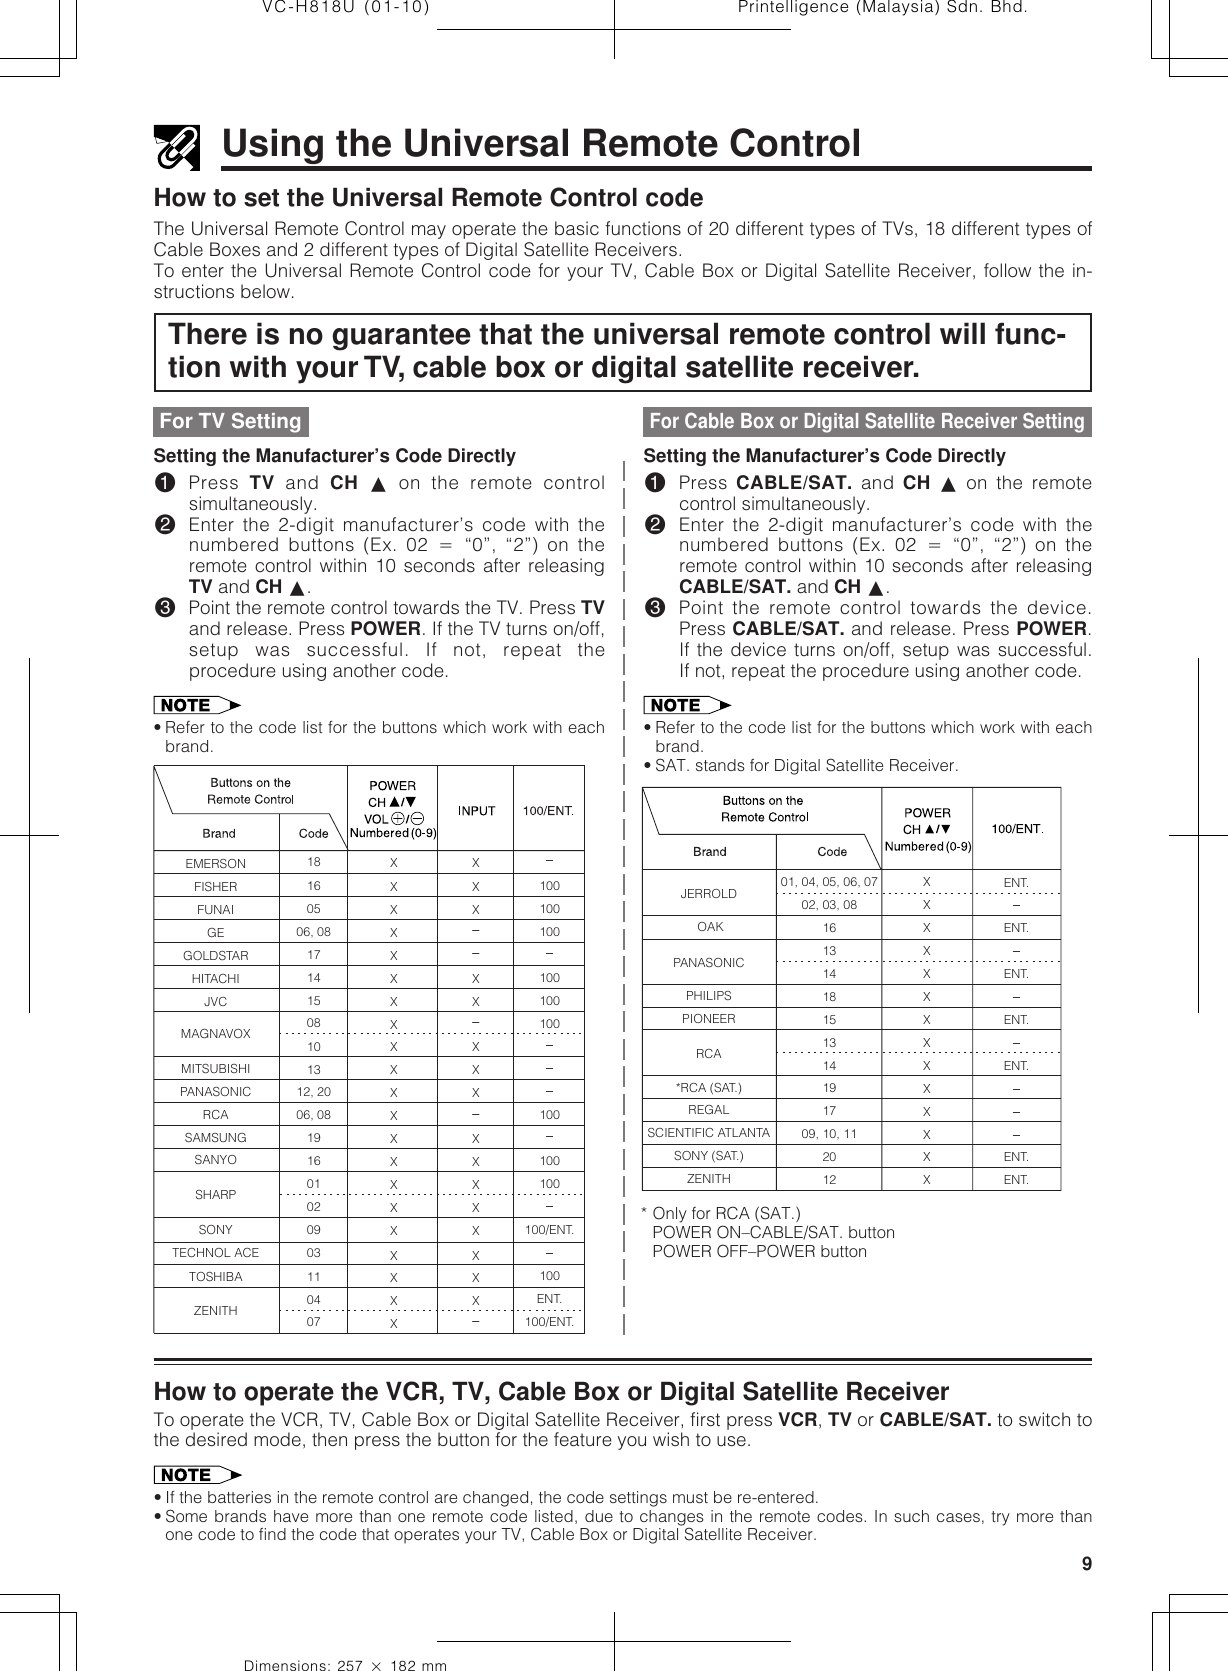
![Printelligence (Malaysia) Sdn. Bhd.6VC-H818U (01-10)Dimensions: 257 ן 182 mmFeaturesCommon Features• Hi-Fi Stereo Sound• Built-in MTS (Multi-channel TV Sound) Decoder— Lets you record stereo or SAP (Separate AudioProgram) broadcasts.•*The VCR Plus+ Programming System• 400 Times Rewind Speed to Fast Forward andRewind.• EZ Set Up — VCR tuner channels and clock areautomatically set for both Air and Cable channels.• S-VHS Quasi PlaybackNotes for S-VHS tape• Playing back with S-VHS high quality picture is notavailable.• Picture noise or distortion may appear on the screenduring playback in the SLOW or STILL mode.• S-VHS recording is not available.• Double-Azimuth 4-Heads•19µ Clear Picture System (in EP mode) — Forenhanced picture quality in EP (Extended Play)mode.• System for Better Resolution and Color Re-production• Multi-Language (English/Spanish/French) OSD(On Screen Display) with Menu Screen Guidance— On-screen setting and recording instructions.• 181-channel PLL Quartz Synthesized RandomAccess Tuner with Automatic Channel Setting• Quick Start with Full Loading Mechanism• 1-Year, 8-Event Programmable Timer• Simple Recording Timer• Universal Remote Control— Operates the VCR and basic functions of variousTVs, Cable Boxes, and some Digital Satellite Re-ceivers.• Sharp Super Picture — Enhances picture qualityduring playback.• 60 seconds Timer Backup• Field-Still/Variable Slow/Frame Advance• Real-Time Counter — Displays accurate tape timein hours, minutes and seconds.• Automatic Daylight Saving-Time (D.S.T.) Ad-justment — Automatically adjusts VCR clock todaylight saving-time.Be sure that thefollowingaccessories areall included withyour VCR.AccessoriesRound coaxial cable(75 Ohm, 1 m [3-1/4 ft.])QCNW-0262AJZZorQCNW-0298AJZZorQCNW-0322AJZZorQCNW-8115AJZZ• Blue Screen Noise Elimination• Auto Tracking Control System — Automaticallyadjusts tracking during playback.• Digital Program Search System (DPSS) — Quicklylocates the beginning of a specific recording.• Skip Search — Quickly operates a forward videosearch in 30 second intervals, then resumes play-back.• Instant Replay — Quickly operates a reverse videosearch in 20 second intervals, then resumesplayback.• Exact Rec — Automatically change from SP(Standard Play) mode to EP (Extended Play) modeto prevent termination of recording.• Tape Remaining — Display the remaining amountof tape.• One-Touch Rental Rewind — Perform stop,rewind, eject the tape then turn off the powerautomatically.• Auto Zero Back — Quickly finds “0:00.00” pointand stops there.• Recorded Section Auto Repeat — Continuallyplays back a recorded section of the tape.• Full Automatic Playback• Tamper Proof — Prevents accidental change of theoperation mode.• Up to 8 Hours of Recording and Playback (withT-160 cassette)• Automatic Head Cleaning System — Cleans theVCR video heads each time you insert and eject atape.• Built-in Front AV Jacks — For easy connection ofaudio/video equipment such as the Sharp Viewcam.• Universal Remote Control with light up buttons— Equipped with the light up buttons for easyoperation in the dark— Remote Pager function* VCR Plus+® and PlusCode® are registeredtrademarks of Gemstar Development Corporation.The VCR Plus+® system is manufactured underlicense from Gemstar Development Corporation.AA batteries forthe remote control unitVIDEO CASSETTE RECORDERRemote control unitRRMCG1240AJSA](https://usermanual.wiki/Sharp/TCG039/User-Guide-76892-Page-6.png)
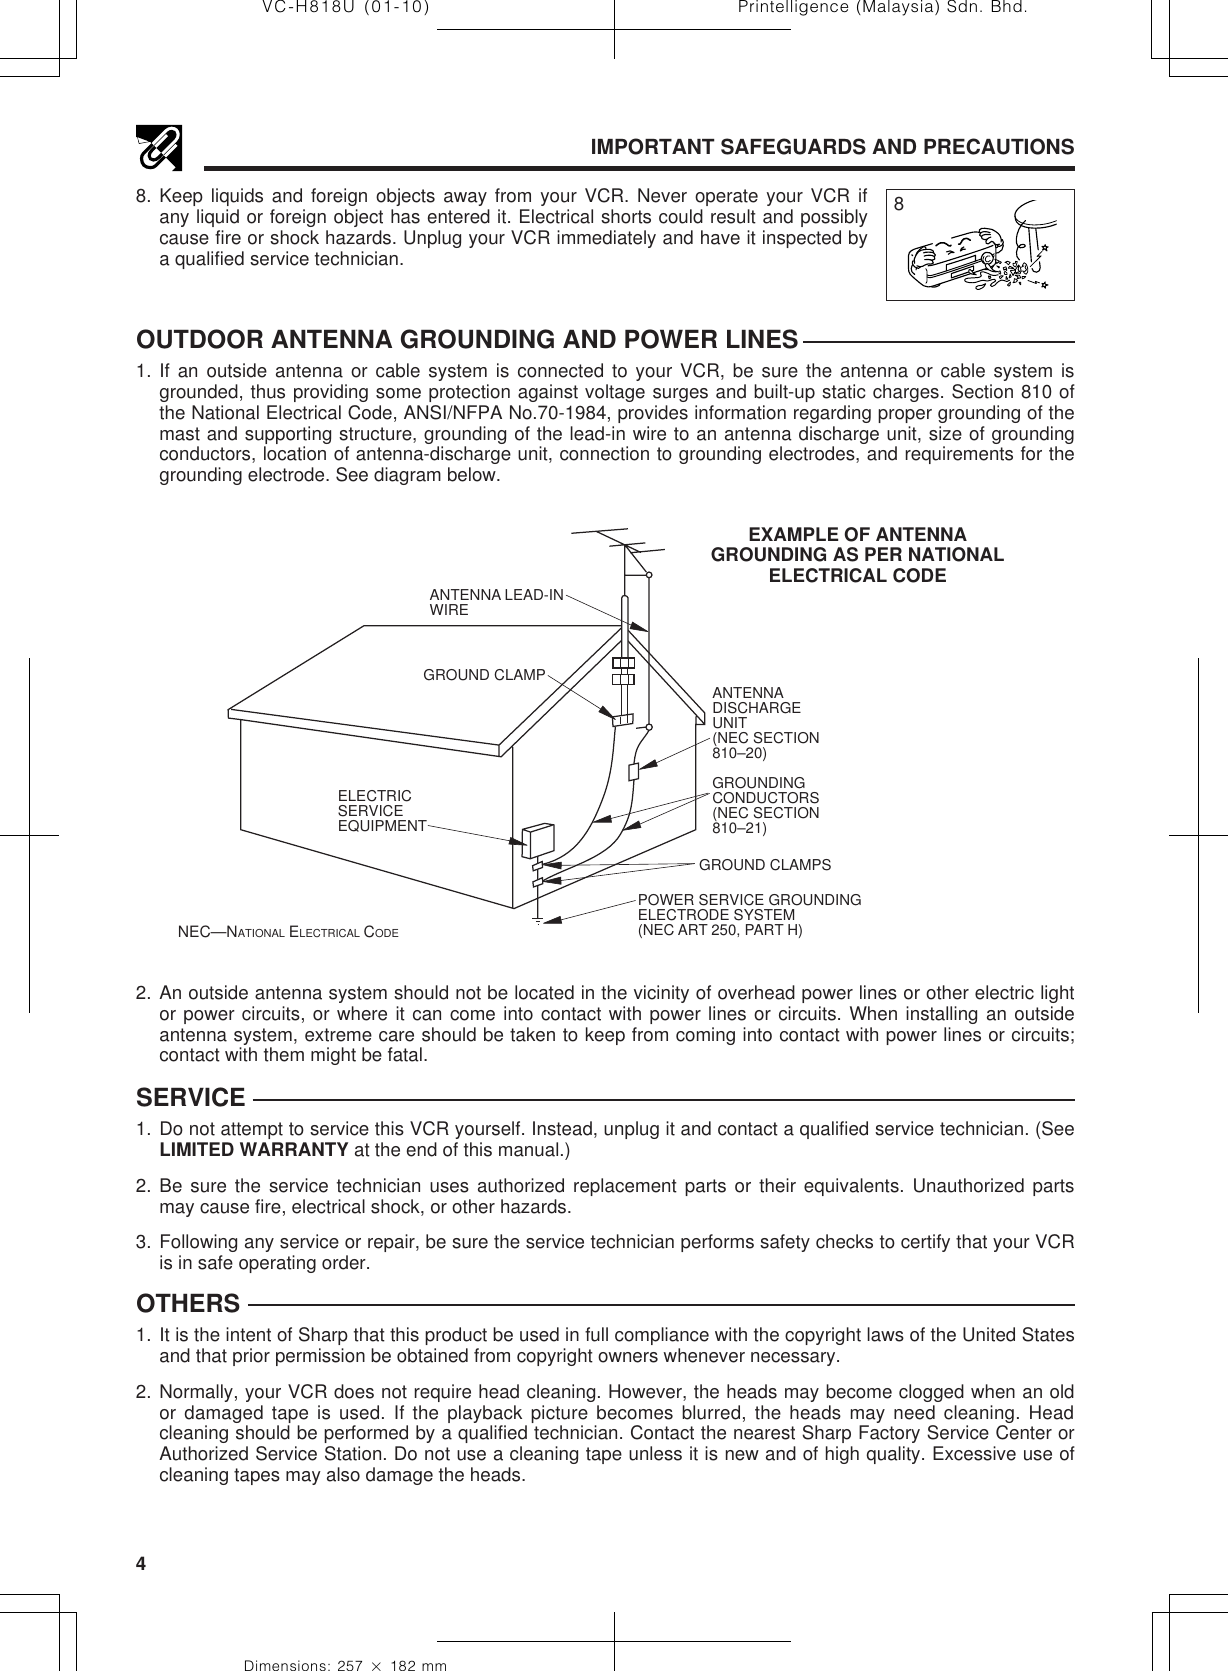
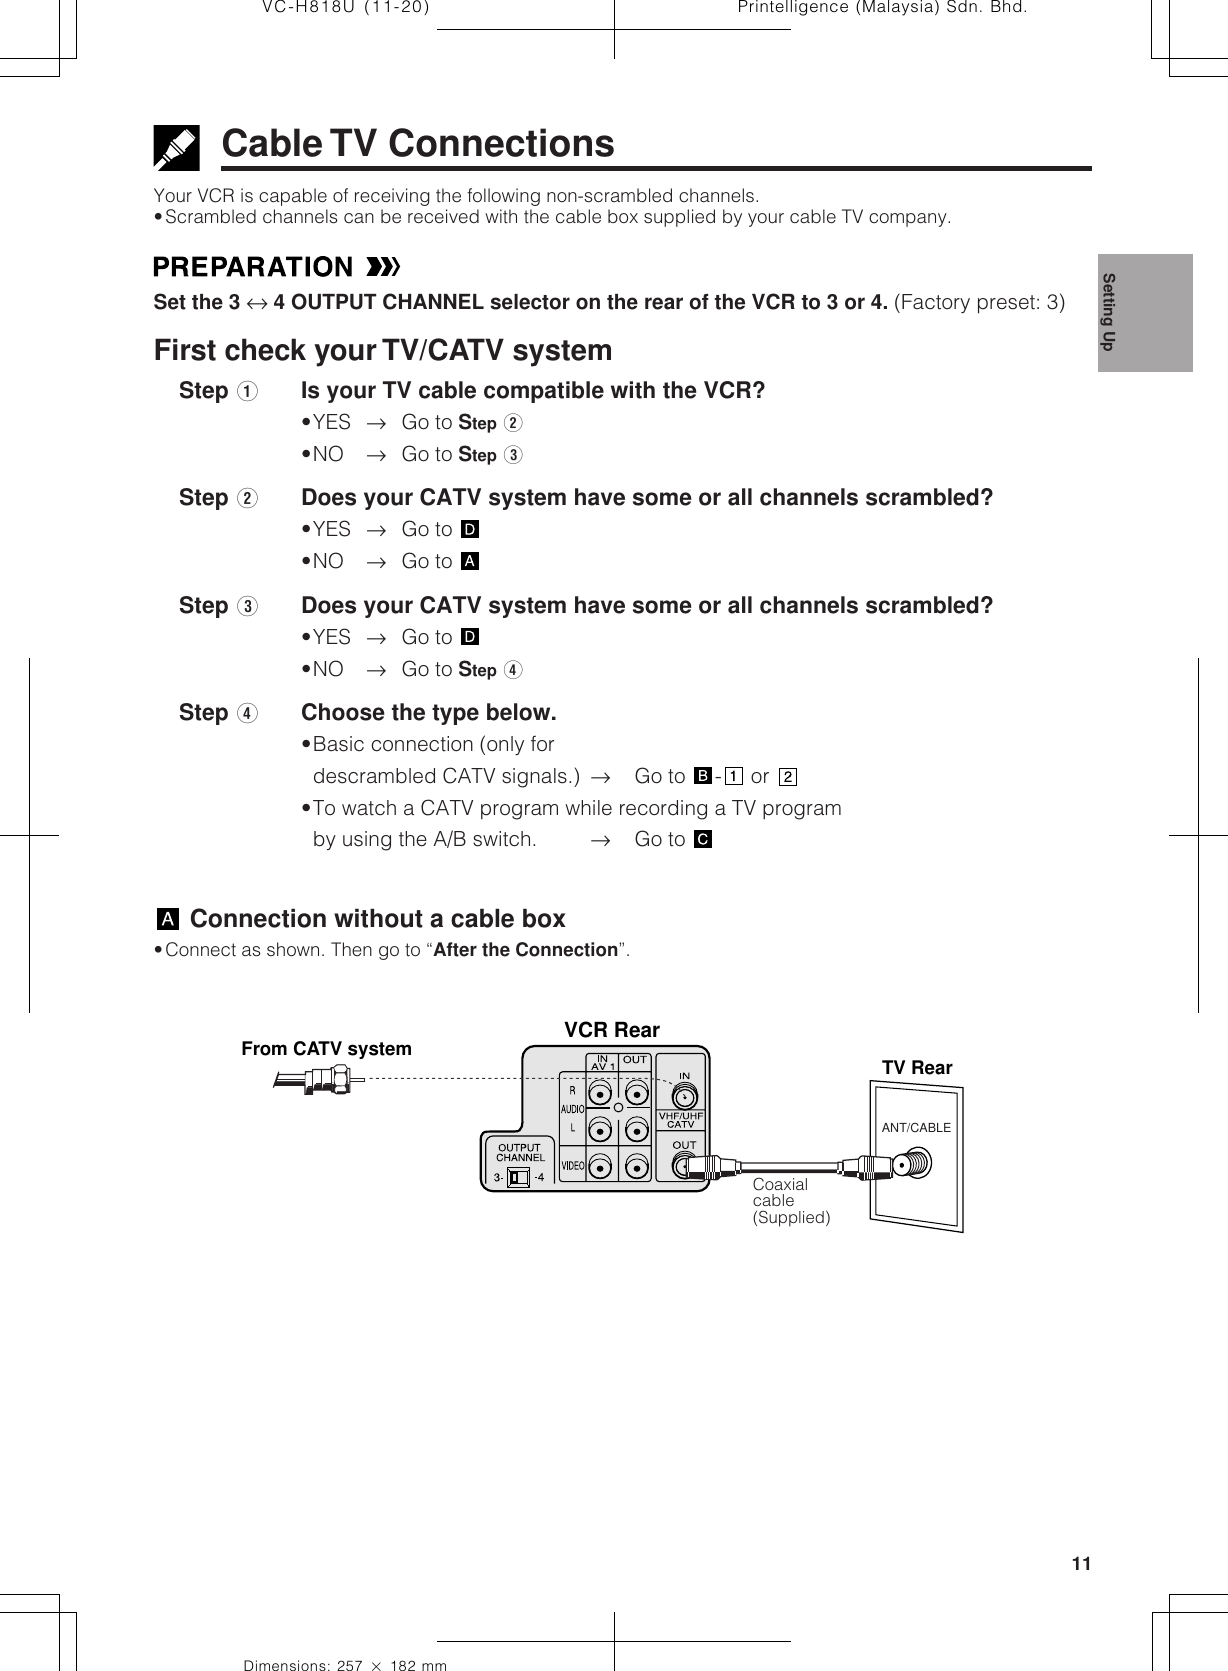
![7Dimensions: 257 ן 182 mmPrintelligence (Malaysia) Sdn. Bhd.VC-H818U (01-10)POWER button(When pressed to turn on the VCR, some indicatorson the Multi-Function display light up, and the Multi-Function display brightens. When the power is turned off,the Multi-Function display dims.)Major Components of Your VCR[Front]Multi-Function Display (explained throughout the operation instructions)Cassette compartment (see Playback/Recording)Basic function controls(see Playback/Recording)TIMERRECVCRSPEPDisplay Symbol Function StatusStopPlayFast forwardRewindCassette-inVideo Search, Slow, Still, Frame AdvanceTamper ProofActive Unit inVCR modeRecordVCRDisplay Symbol Function StatusRECRECRec Pause• The display will return to the original mode (counter or clock display) 3 seconds after theVCR enters the operation mode.[Rear]3 ↔ 4 OUTPUT CHANNEL selector (see Setting the 3 ↔ 4 Output Channel Selector)Connection terminals (see Tape Dubbing)Connection terminals (see Connecting the VCR andCable TV Connections)• Tape counter is displayed during playback, fast forward or rewind operation.• When the power is turned off, the clock is displayed and the Multi-Function display becomes darker.!Channel setting @Tape counter #ClockWhen the power is on, each time DISPLAY is pressed,the Multi-Function display changes as follows:](https://usermanual.wiki/Sharp/TCG039/User-Guide-76892-Page-7.png)

![21Dimensions: 257 ן 182 mmPrintelligence (Malaysia) Sdn. Bhd.VC-H818U (21-24) ß /©Adding Channel Memory/Erasing Channel MemoryUse this function to manually add or erase channels to/from the memory.Setting the ChannelsSET UP MENUENTER :SET EXIT :MENUCHANNEL PRESETSELECT :CLOCKLANGUAGETIMERVCR PLUS+Ł∂ƒŁ!Select the channel to be added with the numbered buttons and the channel to be erased withthe CH ∂/ƒ or numbered buttons.@Press MENU. Select “CHANNEL PRESET” with ∂/ƒ andpress SET.#Select “CH SET” with ∂/ƒ and then select “MANUAL”with ß/©. Then press SET.$Select “ADD” if you want to add the channel memory or“ERASE” if you want to erase the channel memory withß/©.%Press MENU to return to the normal screen. AIR/CATV AIR CATV CHANNEL PRESET CH SET AUTO MANUAL∂ƒß©ŁCHANNEL SELECT : ADD 03ADD/ERASE : EXIT :MENU[ADD][ERASE] ERASE 03NormalScreenŁ• If the power is interrupted for more than 60 seconds, the channel memory may be erased. If this happens, reset thechannels again and reset AIR/CATV selection.• If a button is not pressed within 3 minutes during the setting procedure, the screen will return to normal.](https://usermanual.wiki/Sharp/TCG039/User-Guide-76892-Page-21.png)
![Printelligence (Malaysia) Sdn. Bhd.22VC-H818U (21-24)Dimensions: 257 ן 182 mmMODE SELECTIONMode SelectionYou can use the SET UP–selection screen to select the mode for basic features.•Turn on the TV and select the video channel. Press POWER and then TV/VCR to select “VCR” (“VCR” will lighton the multi-function display).!Press MENU.@Select “SET UP” with ∂/ƒ and then press SET.#Set AUTO REPEAT mode to ON or OFF with ß/©. Thenpress ƒ.(See Recorded Section Auto Repeat.)$Set BLUE SCREEN mode to ON or OFF with ß/©. Thenpress ƒ.(See Blue Screen Noise Elimination.)%Set EXACT REC mode to ON or OFF with ß/©. Thenpress ƒ.(See Exact Rec.)^Set SAP (Separate Audio Program) mode to ON or OFFwith ß/©. Then press ƒ.(See Recording MTS (Multi-channel TV sound)Broadcasts.)&Set AUDIO OUTPUT mode to MONO, LR, L or R withß/©.(See Audio Output Mode.)*Press SET to enter.The screen returns to normal.ƒSELECT : CHANGE: BLUE SCREEN ON OFF AUTO REPEAT ON OFFENTER :SET EXIT :MENU EXACT REC ON OFF AUDIO OUTPUT SAP ON OFF MONO LR L RSET UP MENUENTER :SET EXIT :MENUCHANNEL PRESETSELECT :CLOCKLANGUAGETIMERVCR PLUS+ BLUE SCREEN ON OFF AUTO REPEAT ON OFF EXACT REC ON OFF AUDIO OUTPUT SAP ON OFF MONO LR L R BLUE SCREEN ON OFF AUTO REPEAT ON OFF EXACT REC ON OFF AUDIO OUTPUT SAP ON OFF MONO LR L R BLUE SCREEN ON OFF AUTO REPEAT ON OFF EXACT REC ON OFF AUDIO OUTPUT SAP ON OFF MONO LR L R∂ƒŁŁŁƒŁß©ƒŁß©ß©[AUTO REPEAT][BLUE SCREEN][SAP][AUDIO OUTPUT]ß©NormalScreenŁ• If you press MENU to exit the mode selection screen in Step *, the data will not be stored. Be sure to press SET to storethe data.• SAP is used for bilingual broadcasting. Check your local broadcast station or cable company. BLUE SCREEN ON OFF AUTO REPEAT ON OFF EXACT REC ON OFF AUDIO OUTPUT SAP ON OFF MONO LR L RŁß©[EXACT REC]ƒ](https://usermanual.wiki/Sharp/TCG039/User-Guide-76892-Page-22.png)

![27Dimensions: 257 ן 182 mmPrintelligence (Malaysia) Sdn. Bhd.VC-H818U (25-30)Recording a TV ProgramRecording Hi-Fi Stereo SoundYour VCR records AUDIO signals on two types of audio tracks.Hi-Fi:Using specialized rotary heads, audio signals are recorded on the video track in FM format.Multi-sound broadcasts (Stereo or SAP [Separate Audio Program]) are recorded on two channels.Linear:All audio signals are recorded in mono on the linear audio track.• Video cassettes recorded on a non-Hi-Fi VCR can also be played back. However, if the audio signals are recorded on twolinear channels, stereo programs will be played back in monaural and SAP (Separate Audio Program) will be played backwith both the MAIN and SAP audio mixed together.• Video cassettes recorded on this VCR can be played back on a non-Hi-Fi VCR. However, only the linear track will be playedback.Recording MTS (Multi-channel TV Sound) BroadcastsYour VCR can record stereo or SAP (Separate AudioProgram) broadcasts, where available.If the broadcast is in stereo, the VCR automaticallyrecords the stereo sound in dynamic Hi-Fi. If the broad-cast is in SAP, you can record both the MAIN and theSAP sound by using the SET UP–selection screen to setthe SAP mode to ON. If the broadcast is in stereo/SAP,you can record either the SAP sound by using the SETUP–selection screen to set the SAP mode to ON, or stereosound by setting the SAP mode to OFF. (See ModeSelection.)MTS/SAP RECORDING* The monitor output listed in the table showsthat the audio output mode is in the Hi-Fiם mode.*Monitor Output RecordingBroad-cast Re-ceivedSAPMode Posi-tion L-Speaker R-Speaker Hi-FiL-CH Hi-FiR-CH LinearTrackStereoSAPStereo/SAPOFFOFFOFFONONONLRLRMAINMAINMAINSAPLRL + R SAPLLMAINMAINLL + RRRMAINSAPRSAPMAINSAPL + RSAPL + RL + ROn the TV screen 33STEREOSAPSAP L RShown while receivingSAP broadcast.Shown while receivingstereo broadcast.Shown when SAPmode is on.Monitor Output When Receiving a SAP BroadcastWhen receiving a SAP broadcast, if the SAP position is set to ON, change the audio output mode to selectMonitor Output (MAIN or SAP) with the SET UP–selection screen.(See Mode Selection.)When enjoying a TV program with MAIN sound:Select on the SET UP–selection screen.(See Audio Output Mode.)When enjoying a TV program with SAP sound:Select or on the SET UP–selection screen.(See Audio Output Mode.)Recording](https://usermanual.wiki/Sharp/TCG039/User-Guide-76892-Page-27.png)
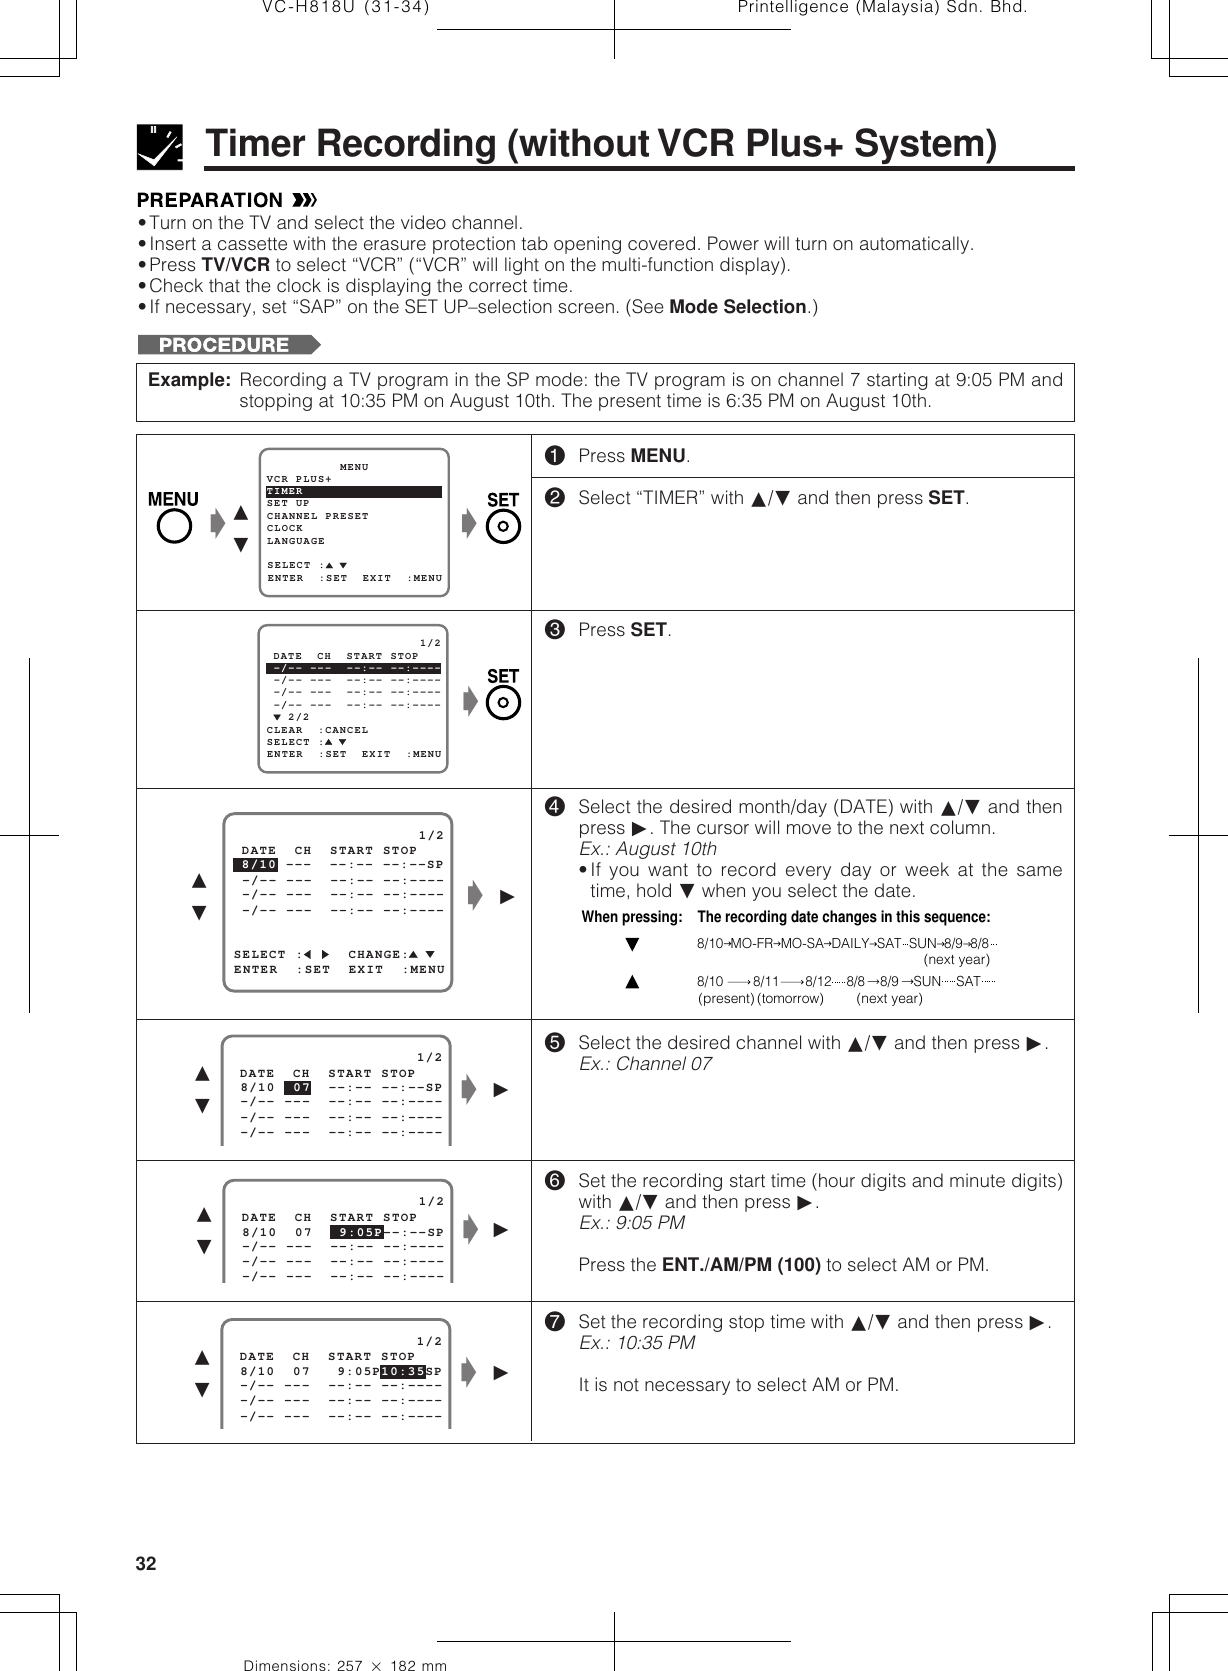
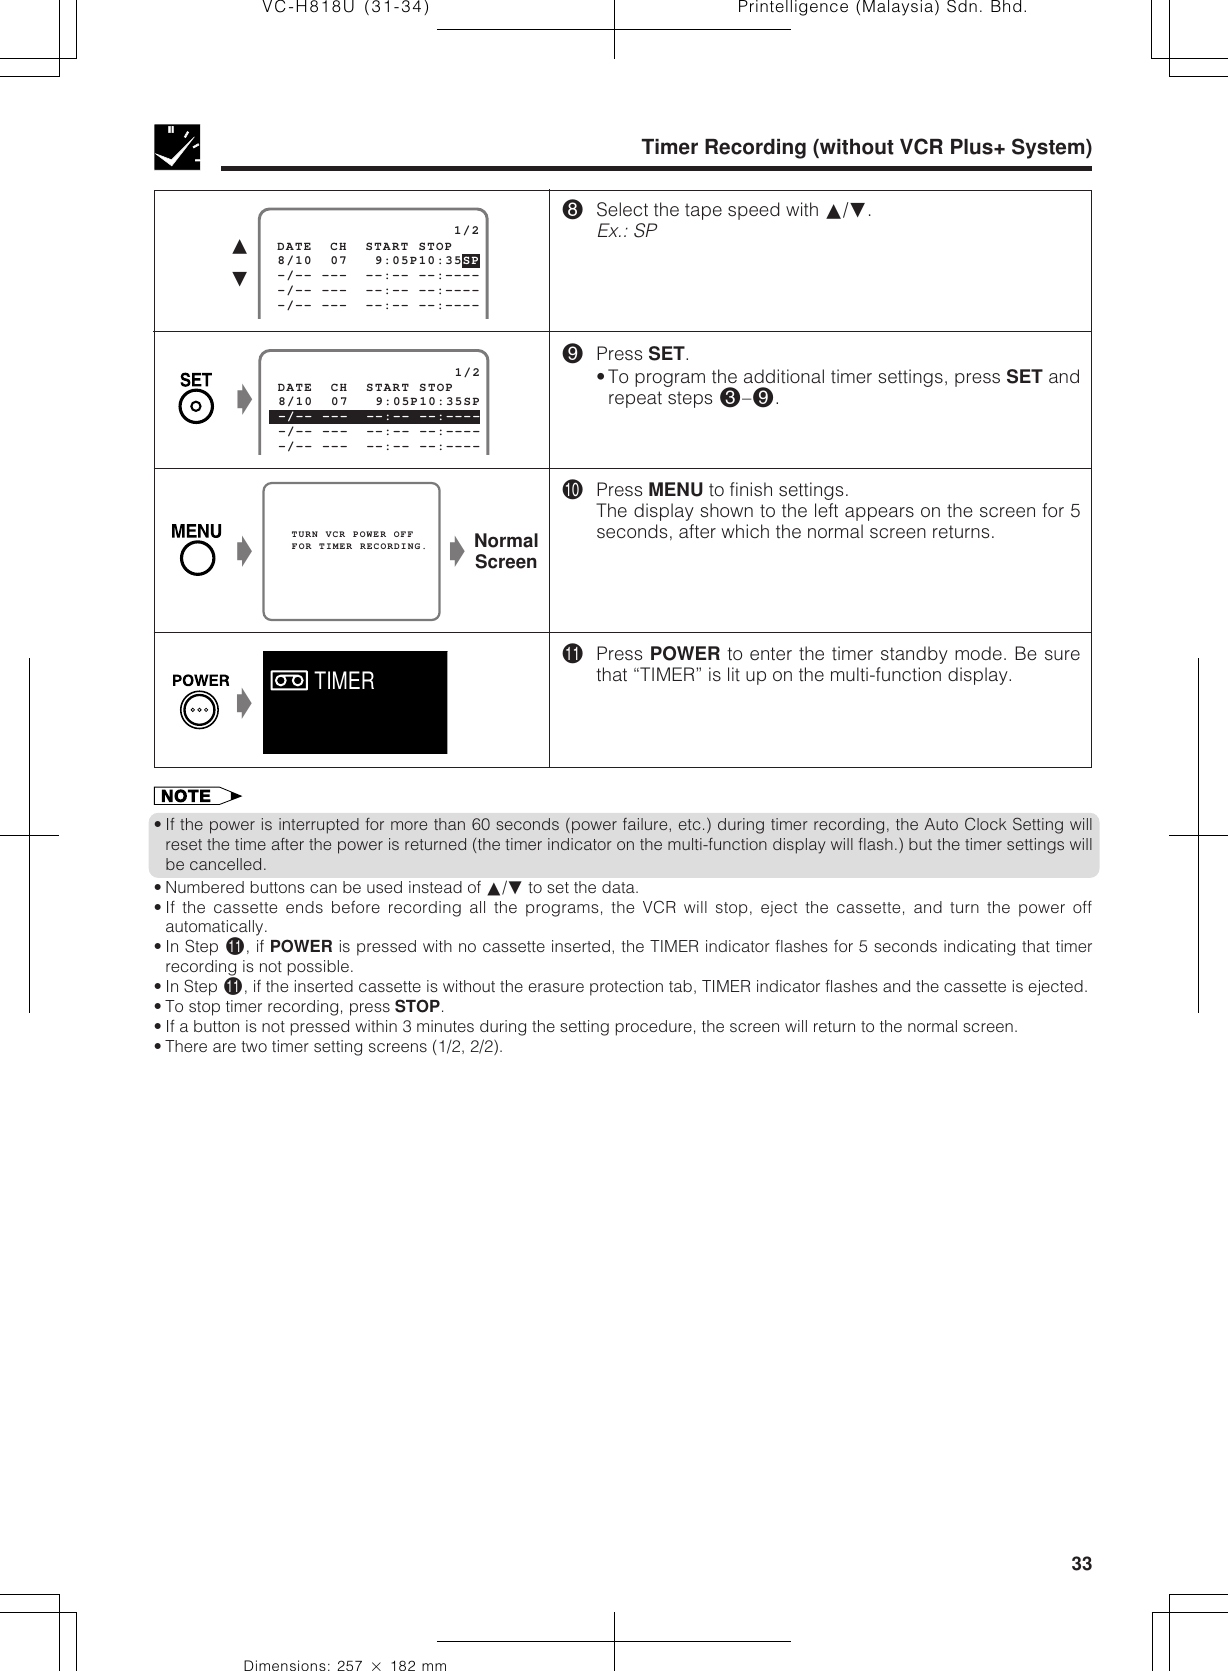
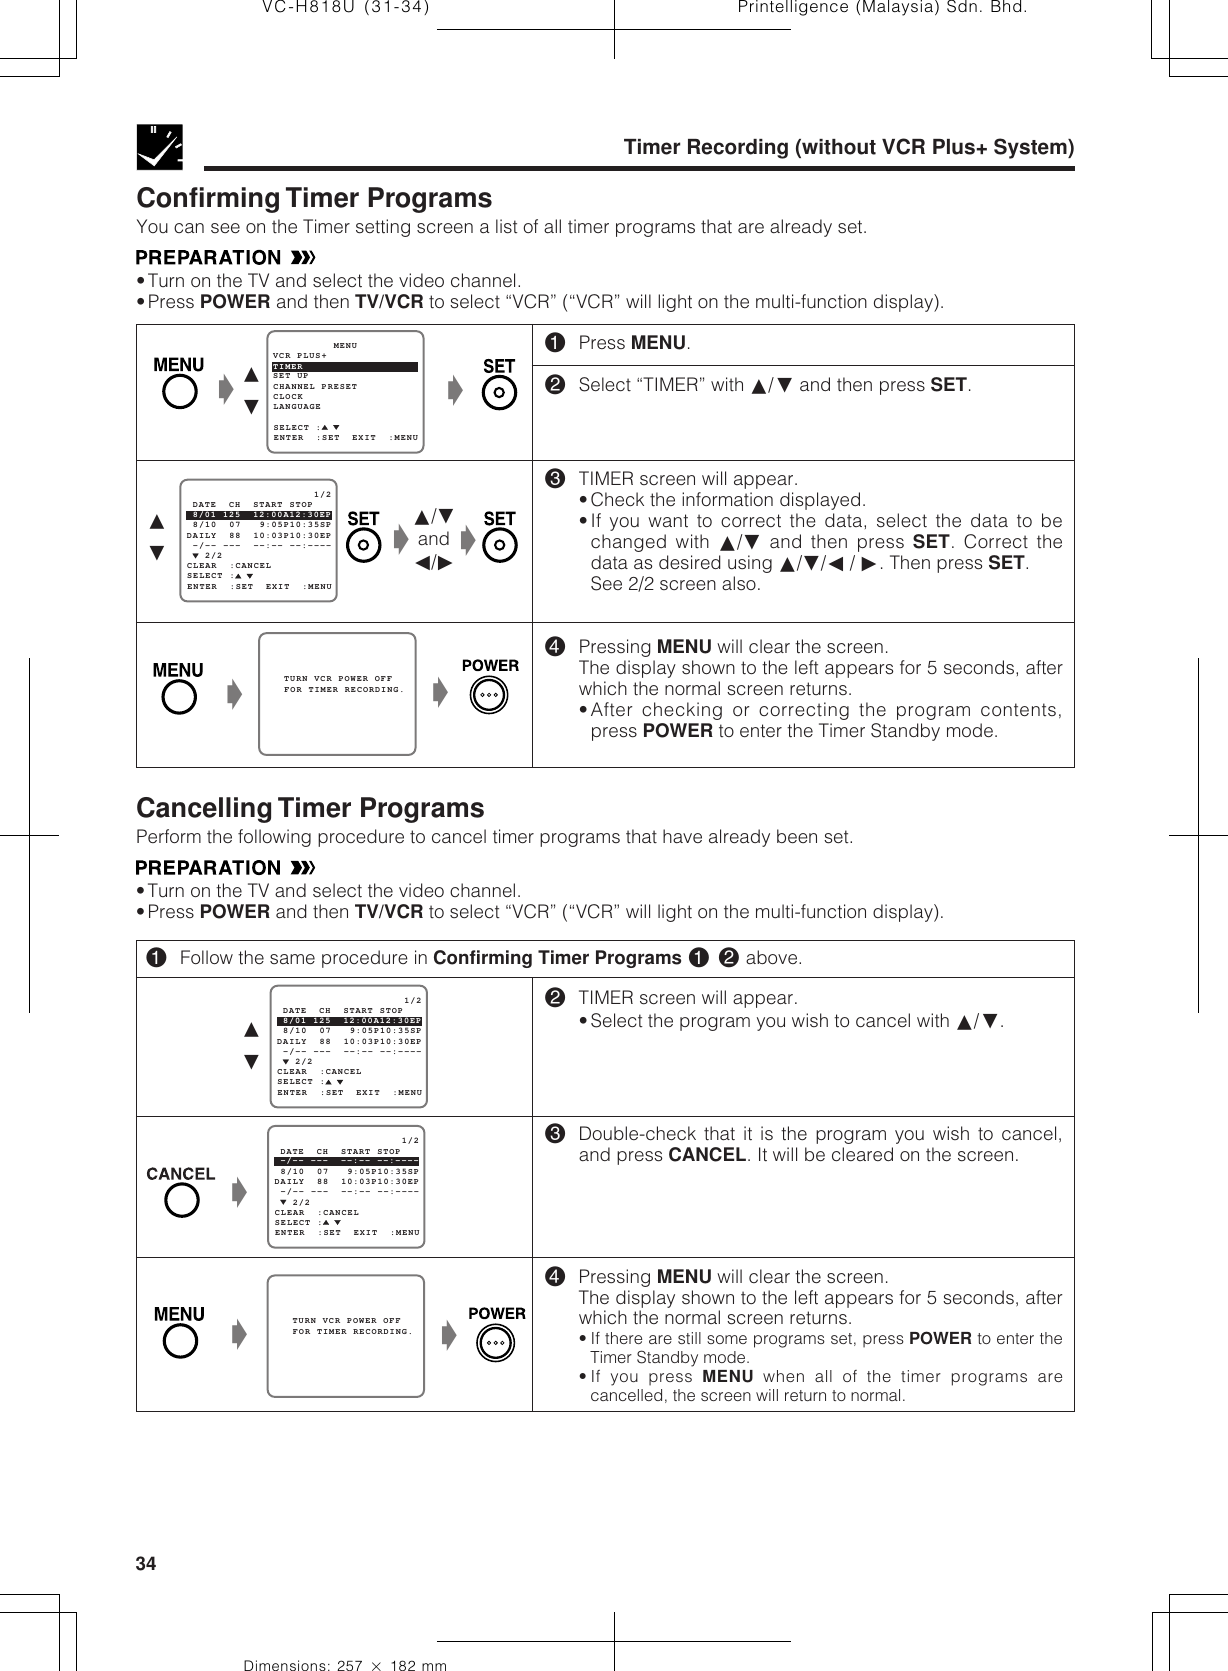
![Printelligence (Malaysia) Sdn. Bhd.30VC-H818U (25-30)Dimensions: 257 ן 182 mmProcedure for Setting a Timer with the VCR Plus+ System•Turn on the TV and select the video channel.•Insert a cassette with the erasure protection tab opening covered. Power will turn on automatically.•Press TV/VCR to select “VCR” (“VCR” will light on the multi-function display).•Check that the clock is displaying the correct time.•If necessary, set “SAP” on the SET UP-selection screen. (See Mode Selection.)Timer Recording with VCR Plus+ System*The VCR Plus+ Programming SystemThe VCR Plusם Programming System allows you to program your VCR for timer recording simply by inputtingthe PlusCode Programming number.The PlusCode numbers are listed in most newspaper, TV Guide®, and local cable TV listings. Simply by in-putting this PlusCode number, you can program your VCR for timer recording, eliminating the need to inputprogram start time, stop time, channel, date, and other information necessary for timer recording.• If PlusCode numbers are not published in the listings for your area, they are sure to be introduced in the near future, soplease contact your local newspaper or cable TV station for further details.• *VCR Plusם® and PlusCode® are registered trademarks of Gemstar Development Corporation. The VCR Plusם system ismanufactured under license from Gemstar Development Corporation.!Press VCR PLUS+.The VCR PLUS+ system setting screen will appear.@Enter the PlusCode number shown in your TV listings withthe numbered buttons.Ex.: PlusCode number is 882• If you make a mistake in entering the numbers, pressCANCEL to erase the PlusCode numbers one by one,then re-enter the correct PlusCode numbers.#If you want to record only once, press SET and go toStep␣ $.Otherwise, press ƒ and select “WEEKLY” or “DAILY” withß/©. Then press SET to enter.• ONCE: To record only once.• WEEKLY: To record every week at the same time.• DAILY: To record everyday at the same time.[ONCE][WEEKLY/DAILY]ŁStep $ PLUSCODE NO. -USE NUMBER KEYS ONCE WEEKLY DAILY SELECT :ENTER :SET EXIT :MENUŁ PLUSCODE NO. 882 ONCE WEEKLY DAILYSELECT : CHANGE:ENTER :SET EXIT :MENUƒŁß© PLUSCODE NO. 882USE NUMBER KEYS ONCE WEEKLY DAILYSELECT :ENTER :SET EXIT :MENU](https://usermanual.wiki/Sharp/TCG039/User-Guide-76892-Page-30.png)