ShenZhen Megastek Electronics MDKYGPS201612 GPS ankle tracker User Manual
ShenZhen Megastek Electronics Co. Ltd. GPS ankle tracker
User Manual
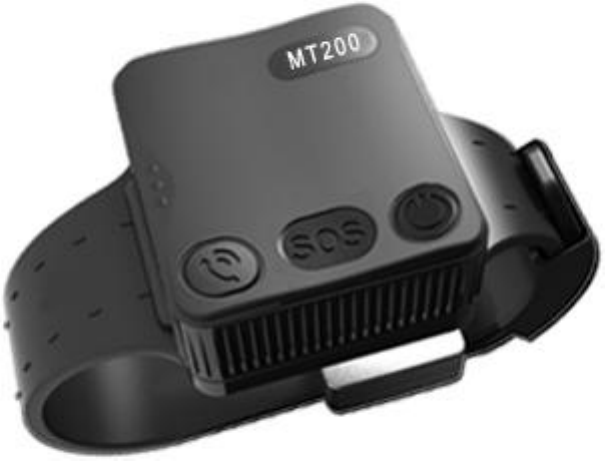
MT200-GPS Positioning tracker
User Manual
content
1. Product Overview and Appearance Introduction 3
Product specifications 3
button 3
Function indicator light 4
the belt 4
Accessories 5
2.First use 5
How to use the belt 5
Charge 7
turn on/off 7
Parameters set up 8
3.Instruction and function applications 8
1. Change password 8
2. Authorized number 9
3. Monitoring function 10
4. Two-way communication 10
5. SOS emergency calling 11
6. Real time tracking 11
7. Tracking regularly by GPRS 11
8. GPRS data logger 12
9. Geo-fence 12
10. Time zone setting 13
11. Low battery alarm and Power on/off automatically 14
12. Timing turn on/off tracker 14
13. Belt on/off alarm 14
14. Leave the home alarm 14
4.Problems & Diagnostics 16
1. Product Overview and Appearance Introduction
The GPS Tracker has the advantages of waterproof IP67, low power
consumption, Long Standby Time(22-24 days) and easy to use. apply to correct
the crowd.
Product specifications
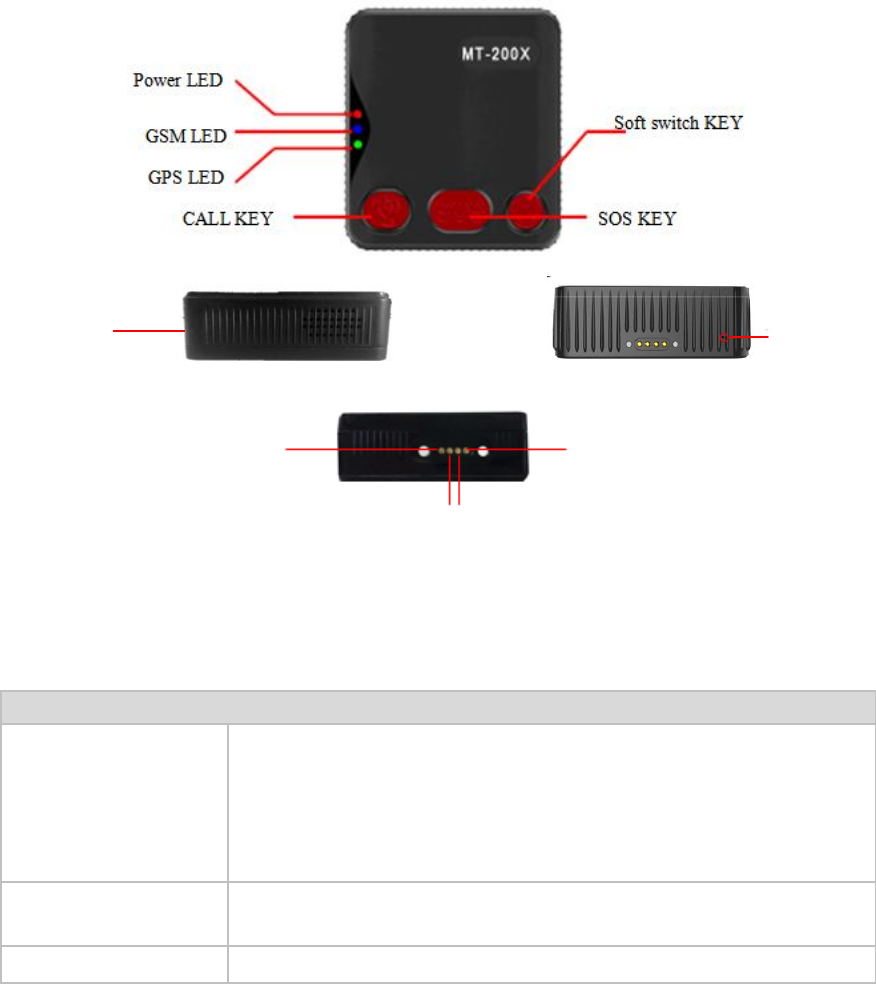
button
Button
Soft switch key 1. Press for 1s to determine the low power, When the green
light, the battery power is less than 15%;
2. When the short press blue light and green light at the
same time, when the battery power at 15% -100%.
3. Press for 5s, vibration, turn on.
CALL key Press for 1s to pick up a call,press for 3s to call to an
authorized number (vibration touch for calling)
SOS key Press it for 3s to send an alarm SMS with coordinates
MIC
Speaker
5V
TX DX
GND
Function indicator light
Red/yellow – Power indication
The red light is always on Power charging
The green light is always on Power charging finished
Blue – GSM indication
0.3s on and 0.3s off GSM module is initializing or calling in
Always on GSM network is not registered
1s on and 3s off GSM network is registered
0.1s on and 3s off GSM network is registered and connected to the server by GPRS
Always off GSM in power save mode
Green – GPS indication
0.3s on and 0.3s off GPS module is initializing or waiting for the SOS button press to
confirm the calling in number as the authorized number
Always on Button being pressed
1s on and 3s off GPS module is working normally but hasn't fixed position
0.1s on and 3s off GPS module is working normally and has fixed position
Always off GPS module stops working
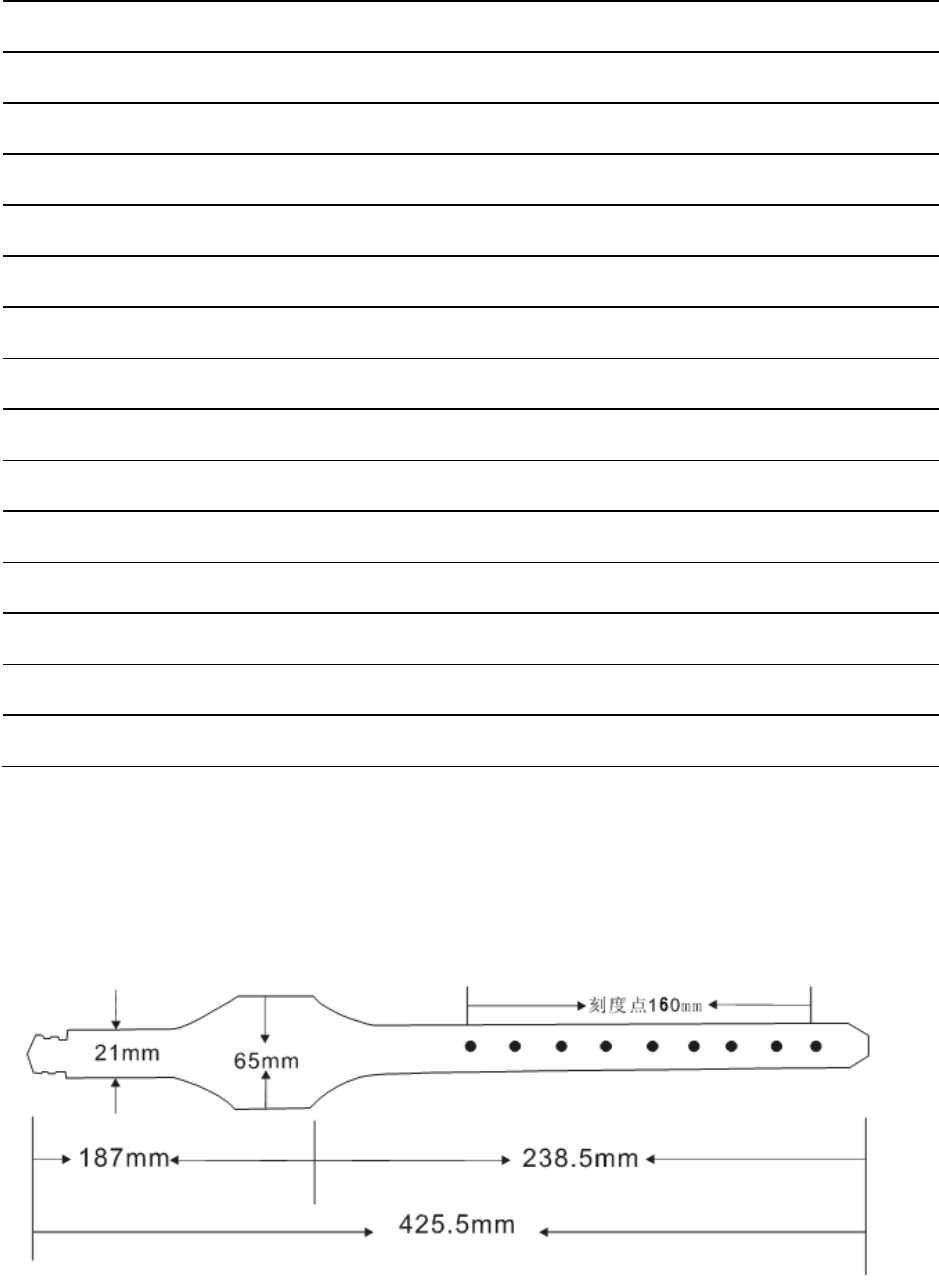
the belt
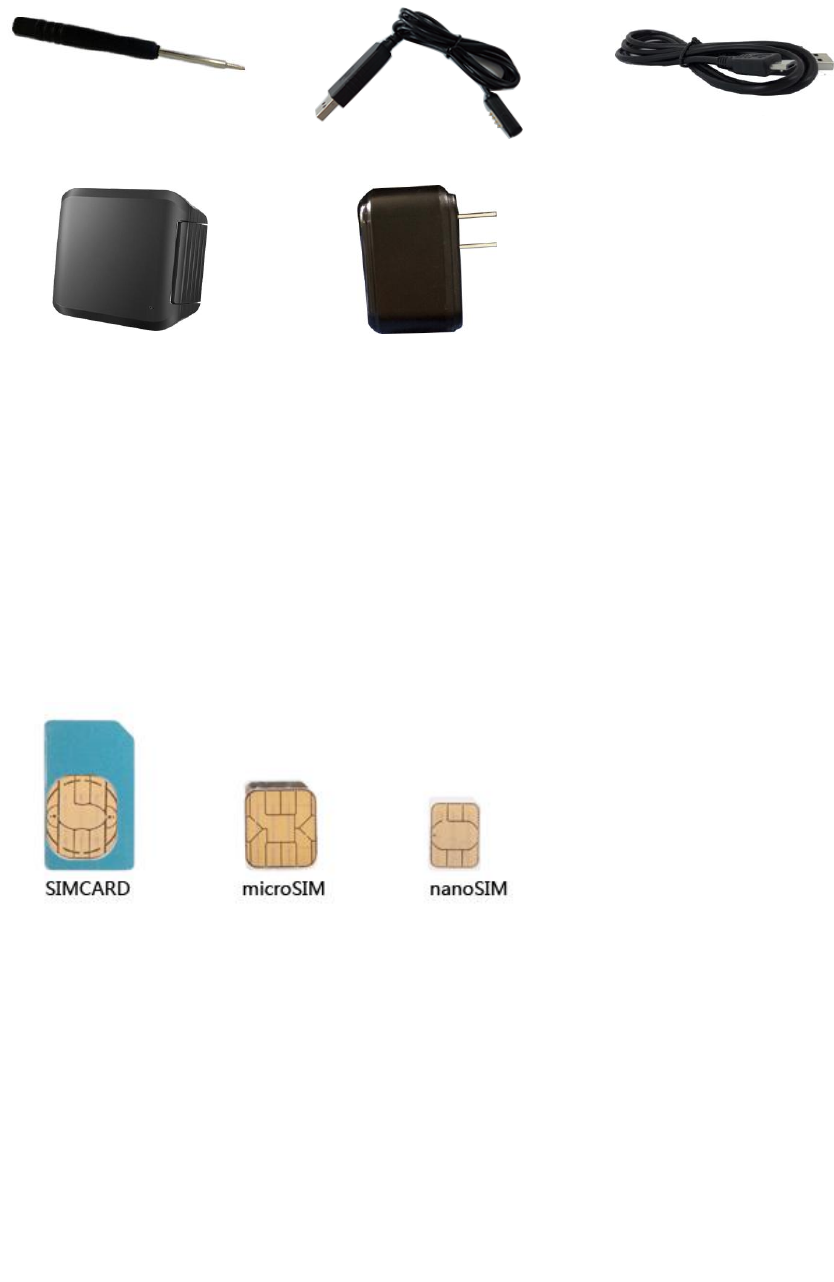
Accessories
Screw driver Charge cable micro Charge cable
Power Bank AC adapter
2 .First use
How to use the belt
——Install the card requirements
Ensure that your tracker has a working SIM card.
√
Please make sure SIM card has enough credit.
Please make sure that the SIM is not locked and do not require a password
to operate.
Please make sure the SIM card is supporting caller ID display.
——Install the card steps:
❶ ❷
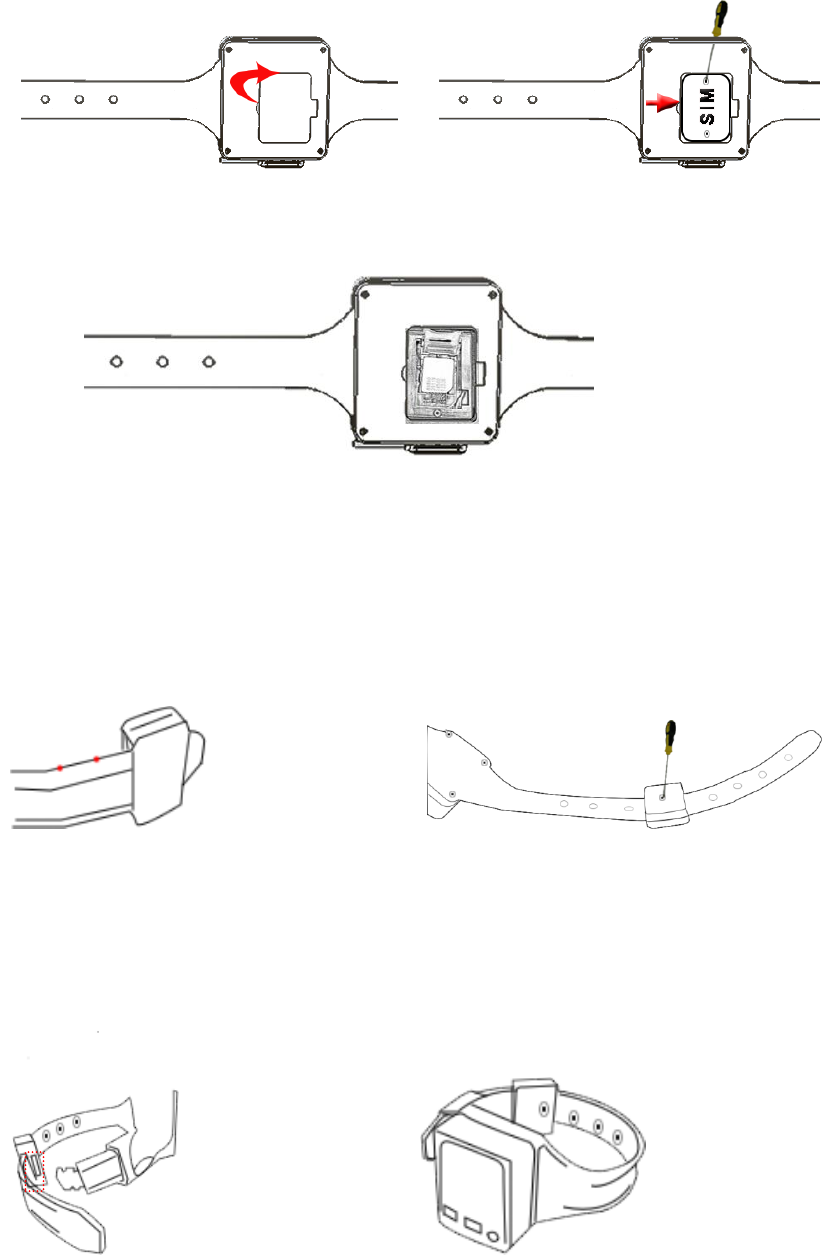
1、 open the Rubber back cover 2、Open the SIM card cover with a screwdriver
❸
3、Open the metal cover of the card slot, insert the SD card and SIM card, and fasten
the metal card cover
4、Install the SIM card cover and lock the screw
——adjust to suitable size and fixed the belt.
❶ ❷
1、 Select the suitable size point 2、Screwdriver fixed lock head
!!!Note: When the lock edge must be aligned with the size point, The screw can come
into contact with the wrist strap
❸ ❹
3、Insert the plug into the lock 4、Complete installation
——unlock the belt.
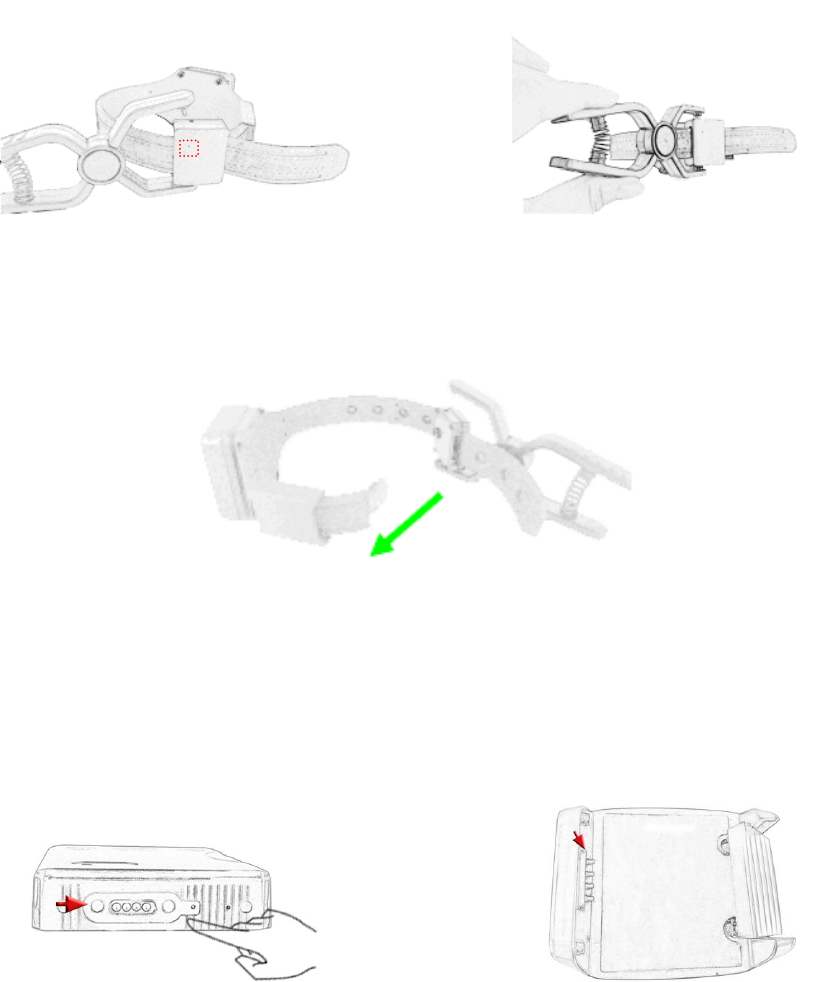
❶ ❷
1、The key is aligned with the locking hole 2、press it on firmly.
❸
3、opens the lock
Charge
.Power bank charging
1、Tracker charging interface 2、Rechargeable contacts are
connected to the charging interface
of the tracker and The mobile
power supply is mounted on the
tracker.
turn on/off
1、power on
When you pull the switch that is after the SIM metal card cover, the machine can
be powered on
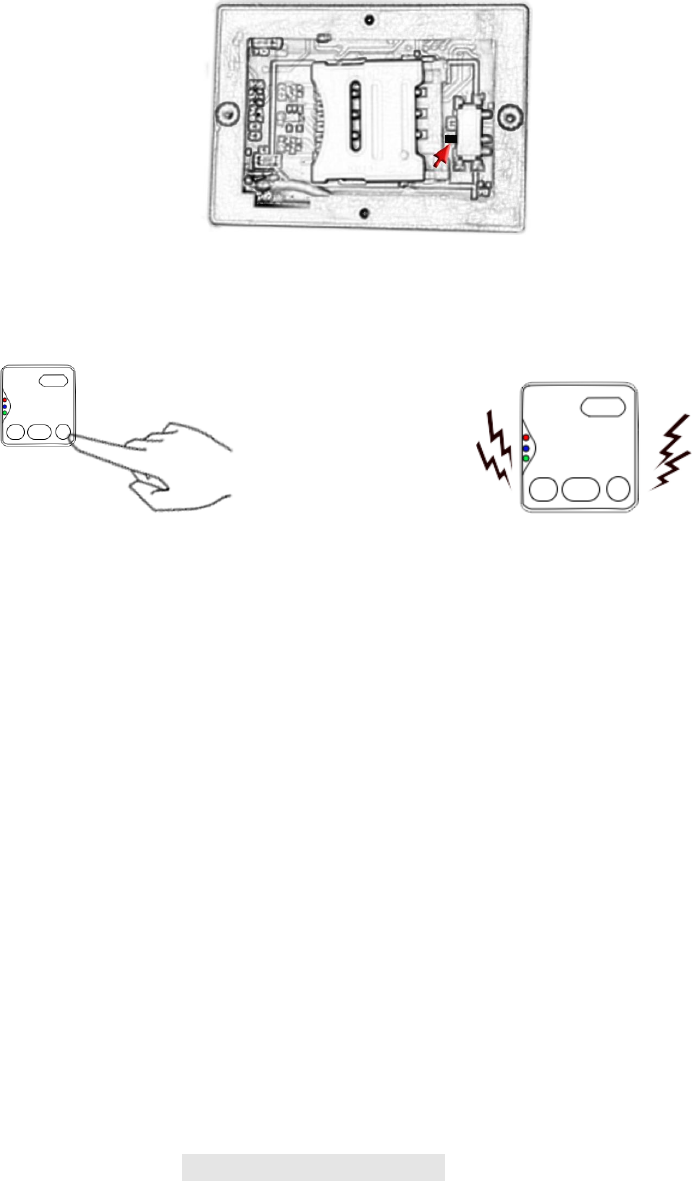
2、soft switch button to turn on
❶ ❷
1、Press soft key for 3 seconds 2、Turn on or off after vibration
!!!Note: The tracker can be turned off when the wrist strap is disconnected
Parameters set up
Tracker supports APP setup software by smart phone or by sending command
via SMS or by pc. After setup, please turn the tracker on and positioning in an
open environment, please do it every time after turn the tracker on.
3.Instruction and function applications
1. Change password
Description: change user’s password
SMS Command:$SMS,******;W001,######;!
SMS Command explain:$SMS,default password;W001,new password;!
Explain:
******: user password, the range of 6 digits, default password is 000000
######: new password, the range of 6 digits.

Note: please switch to the English input method when you input a command by
smart phone; tracker will only accept commands from a user with the correct
password. Command will be ignored if with wrong password.
Example:
$SMS,000000;W001,123456;!
Read password:$SMS,000000;R001;!
Clear password:$SMS,000000;C001;!
2. Authorized number
Set the authorized number by SMS
Description: Set authorized phone number and its related functions
SMS Command:$SMS,000000;W010,NO.,Phone Number,ABC;!
Explain:
NO. authorized number’s serial number range of: 1~3
Phone Number authorized number range of: 0~19 characters
A when the parameter ‘A’ is 0, it means disable Geo-fence alarm,
otherwise it means enable Geo-fence alarm. Default is 0
range of: 0~1
B when the parameter ‘B’ is 0, it means disable monitoring
function, otherwise it means enable monitoring function. Default
is 0
range of: 0~1
C when the parameter ‘C’ is 0, it means disable SOS emergency
calling function, otherwise it means enable SOS emergency
calling function. Default is 0
range of: 0~1
For example:Set the 1st authorized number is 13800000000 and enable
monitoring function.
$SMS,000000;W010,1,13800000000,010;!

Read authorized No.1 and it’s related authority: $SMS,000000;R010,1;!
Clear authorized No.1 and it’s related authority: $SMS,000000;C010,1;!
Read all authorized number: $SMS,000000;R010;!
Clear all authorized number: $SMS,000000;C010;!
Easy authorized phone no. setup by calling
Tracker only supports three authorized numbers; we can set the authorized
number by phone call if there are not set authorized number fully (this function
only supports to set the authorized number, not included its related functions).
Set as follows:
1、 Any non-authorized number calls to the tracker over than 10 seconds, the
tracker will hang up the line automatically and the yellow light will blink for
30 seconds.
2、During these 30 seconds, press SOS button less than 3 seconds, and then
successfully set this call-in number as a new authorized number and send an
SMS to this number to inform the setting is OK.
3. Monitoring function
If enable monitoring function, when the authorized number call to the tracker, it
will answer the call automatically and shut down the speaker and the
background voice of the tracker will be listened.
Note: Please make sure the SIM card installed supports displaying caller ID
when you want to enable this function.
4. Two-way communication
The first method:
If you turn the monitoring function off when set authorized number, use this
authorized number call to tracker, bell will ring, at this time, press the CALL

button (less than 3s) to answer the phone call, so you can speak each other.
The Second methods:
If the authorization number was set with the CALL function, Press SOS button
for 3 seconds or longer, the device will make a call to authorized numbers one by
one and it will stop to make a call if call is answered.
5. SOS emergency calling
Press SOS button for 3 seconds or longer, tracker will send SOS alarm SMS to all
authorized numbers.
6. Real time tracking
The tracker will reply a location SMS if there is any authorized number makes a
phone call to it.
7. Tracking regularly by GPRS
Description: Enable this function
SMS Command:
$SMS,000000;W002,APN,Username,Password;W003,IP,Port;W005,X;W009,Y;!
Explain:
APN:
Access point name of
network
range of: 0~29 characters
Username: accesses port’ user name range of: 0~29 characters
Password: Accesses port’s password range of: 0~29 characters
IP: server’ IP address range of: 0~29 characters
Port: server’s port range of: 0~65535
X: GPRS upload interval range of: 0~65535, default is 0, unit is 30
seconds
Example: if X is 2, and 2*30s=60s, so it
means the GPRS upload interval is 60
seconds.
Y:
GPRS upload mode
range of: 0~2
0:means disable GPRS function,
1:means upload by TCP,
2:means upload by UDP
default is 0
Example:$SMS,000000;W002, cmnet,;W003,192.168.1.1,8088;W005,1;W009,1;!
Read tracking regulary by GPRS:
$SMS,000000;R002;R003;R005;R009;!
Clear tracking regulary by GPRS:
$SMS,000000;C002;C003;C005;C009;!
8. GPRS data logger
Tracker has build in 8M bytes memory for GPRS data save.
1、When GPRS interval tracking can not upload to server, data will be
automatically stored in the memory
2、After that, once the GPRS reconnected, tracker will send the data to server
again.
Note: real time data will be sent first, the priority of the stored data is low.
9. Geo-fence
Description:Two ways to set the Geo-fence:
1、When you know the exact latitude and longitude , the longitude and latitude
can be filled in command directly.
2、tracker will get the newest position automatically to be fence center if there
is no available GPS position.
After set the Geo-fence:

when the tracker moves in/out the preset geo-fence, it will send a SMS alarm to
the authorized phone number (enable the Geo-fence function when you set the
authorized number), and if GPRS is connected, tracker will send this alarm data
to server via GPRS.
SMS Command:$SMS,000000;W018,NO.,name,lat,lng,radius;!
explain:
NO. serial number of geo-fence, range of: 1 to 5
name name of geo-fence, range of: 0-9 characters
lat center’s latitude, range of: -90.00000000~90.00000000, unit: degrees
lng center’s longitude, range of:-180.00000000~180.00000000, unit: degrees
radius geo-fence’s radius, range of: 0.0~1.79E+308, unit: meters
Note: The geo-fence is a perfect circle based on the preset radius and centre.
Example:
$SMS,000000;W018,1,school,22.12345,114.12345,10.50;!
$SMS,000000;W018,1,home,,,10.50;!
1、Read Geo-fence: $SMS,000000;R018,1;!
2、Clear Geo-fence: $SMS,000000;C018,1;!
3、Clear all Geo-fence: $SMS,000000;C018;!
10. Time zone setting
SMS Command:$SMS,000000;W020,X;!
Description: Set the SMS time zone
Explain:
X: time zone’s value, range of:-720~780, default: 0, unit: minutes
For example:
$SMS,000000;W020,480;!
1 hour is equal to 60 minutes, and Beijing is GMT+8, 60*8=480(parameter), so
this command means 480 is the time zone in Beijing.
Read time zone:$SMS,000000;R020;!
Clear time zone:$SMS,000000;C020;!
11. Low battery alarm and Power on/off automatically
1、When the battery level is lower than 15%, it will send SMS to all authorized
numbers or send alarm data to server.
2、Tracker will be off automatically if the battery level is 0%.
3、during charging, tracker will automatically switch on when battery level is
higher than 15%, and send a warning SMS to all authorized number.
12. Timing turn on/off tracker
Description: set the time of turn on/off
SMS Command:$SMS,000000;W038,on time,off time;!
explain:
name description explain
on time Turn on time Range of:00:00~23:59,default:00:00。
off time Turn off time Range of:00:00~23:59,default:00:00。
Example:$SMS,000000;W038,08:00,20:00;! Turn on time:08:00,turn off time:20:00。
13. Belt on/off alarm
-- After connected with the belt, tracker will send warning to all of the
authorized phone numbers and send alarm data to service;
-- After unconnected with the belt or belt has been cut, tracker will send warning
to all of the authorized phone numbers and send alarm data to service.
Note: after connected with the belt, tracker only can be turned on and can not
be turned off.
14. Leave the home alarm
The Home Base unit has been in a wireless transmission mode.
If the home base unit has been searched, the tracker send " A list of the
names of the home base unit " to the platform .
When the home base unit have been detected, the tracker GPRS is turned
off
Description: 1,2,3 represents three different trackers. The gray area is a wireless transmission
range of the Home Base unit.

4.Problems & Diagnostics
Cannot switch on
Possibility Solution
Power switch operation’s problem Make sure press the power switch for 5 seconds or longer
Low battery Charging for 2.5 – 3 hours
Not reply SMS
Possibility Solution
Blue light is always on Make sure tracker can receive the strong GSM signal
Check SIM card installation, insert again if necessary
Replace a new SIM if necessary
GSM network is busy Wait for SMS. Sometimes GSM networks are slow during peak time
or when they have equipment problems.
Password or SMS format is wrong Double check password or SMS format, password and format must
be right
Not enough SIM balance Replace SIM card or check balance value
Low battery Please do charging
green light is 1s on and 1s off
Possibility Solution
The tracker has already blocked the GPS signal Move the tracker to open area w/o any tall building,
tree and heavy raining. Those can shield GPS signal
GPS signal is weak Place the GPS internal antenna face to the sky
Low battery Please do charging
No GPRS connection
Possibility Solution
SIM card cannot supports GPRS function Enable SIM’s GPRS function
GPRS function is disabled Enable the GPRS function
Incorrect IP or Port Double check IP and Port and make sure they are correct,
then restart the tracker
GSM signal is weak Move the tracker to a place with strong GSM signal
FCC Warning
Note: This equipment has been tested and found to comply with the limits for a Class B digital
device, pursuant to part 15 of the FCC Rules. These limits are designed to provide reasonable
protection against harmful interference in a residential installation. This equipment generates uses
and can radiate radio frequency energy and, if not installed and used in accordance with the
instructions, may cause harmful interference to radio communications. However, there is no
guarantee that interference will not occur in a particular installation. If this equipment does cause
harmful interference to radio or television reception, which can be determined by turning the
equipment off and on, the user is encouraged to try to correct the interference by one or more of
the following measures:
-Reorient or relocate the receiving antenna.
-Increase the separation between the equipment and receiver.
-Connect the equipment into an outlet on a circuit different from that to which the receiver is
connected.
-Consult the dealer or an experienced radio/TV technician for help.
This GPS ankle tracker
meets the government's requirements for exposure to radio waves. The
guidelines are based on standards that were developed by independent scientific organizations
through periodic and thorough evaluation of scientific studies. The standards include a substantial
safety margin designed to assure the safety of all persons regardless of age or health.
FCC RF Exposure Information and Statement The SAR limit of USA (FCC) is 1.6 W/kg averaged
over one gram of tissue. Device types: MT200
(FCC ID:
2AKMDMDKYGPS201612) has also
been tested against this SAR limit. The highest SAR value reported under this standard during
product certifi 352
0.493W/kg. This device was tested for typical body-worn operations with the back of the handset
ody and the back of the
handset. The use of belt clips, holsters and similar accessories should not contain metallic
components in its assembly. The use of accessories that do not satisfy these requirements may not
comply with FCC RF exposure requirements,
and should be avoided.
kept 0 cm from the body. To maintain compliance with FCC RF exposure requirements, use
accessories that maintain a 0 cm separation distance between the user's b
cation for use GSM850 is 0. W/kg and SAR value when use for GSM 1900 is
Any Changes or modifications not expressly approved by the party responsible for compliance could void the
user's authority to operate the equipment.