ShenZhen Megastek Electronics MT-70 GPS Personal Tracker User Manual GPS
ShenZhen Megastek Electronics Co. Ltd. GPS Personal Tracker GPS
User Manual
GPS
Vehicle and personal location tracker
_______________________________________
___
User manual

1
Contents
1. ................................................................................................................................................... 2 Product overview
2. ................................................................................................................................................... 3 Safety instruction
3. ................................................................................................................................. 3 Specification and parameters
4. ........................................................................................................................................................ 4 Getting started
4.1 Hardware and accessories..............................................................................................................................4
4.2 View............................................................................................................................................................... 5
4.3 ....................................................................................................................................5 Function key and port
4.4 First use..........................................................................................................................................................7
5. ................................................................................................................................................... 7 Change password
6. ................................................................................................................................................ 8 Authorized number
6.1 Set the authorized number by SMS................................................................................................................8
6.2 Easy authorized phone no. setup by calling...................................................................................................8
6.3 Monitoring function....................................................................................................................................... 9
6.4 Two-way communication...............................................................................................................................9
6.5 Real time tracking..........................................................................................................................................9
7. .......................................................................................................................................... 9 SOS emergency calling
8. .................................................................................................................................. 9 Tracking regularly by GPRS
9. ................................................................................................................................................. 10 GPRS data logger
10. ................................................................................................................................................. 10 Auto APN setting
11. .............................................................................................................................. 10 Three kinds of tracking mode
12. ............................................................................................................................................................. 11 Geo-fence
13. ................................................................................................................................................. 11 Time zone setting
14. ................................................................................................................................................ 12 Low battery alarm
15. .......................................................................................................................... 12 LED indication for battery level
16. .................................................................................................................................. 12 Power on/off automatically
17. ........................................................................................................................................................ 12 Timer Switch
18. ............................................................................................................................................ 12 APP for smart phone
19. ................................................................................................................ 13 GPS tracking and monitoring platform
20. ...................................................................................................................................... 14 Problems & Diagnostics

2
1. Product overview
Welcome to purchasing our product!
The vehicle and personal location tracker has the advantages of low power, 15 days standby
without charging, small size, easy to use and supports two-way communication. It is specially
applies for elderly/kid tracking, personnel management, assert tracking, vehicle positioning,
etc.
Tracker has built-in terminals of GPS (global positioning system) module and GSM
communication module, which used for getting location data and send it to authorized phone
number via SMS, and tracking through free maps Google Earth or Google Map; If your mobile
phone is smart phone and opened with GPRS service, it is more convenient to see location of
the tracker on smart phone by setting the SMS location format to be Google Link. At the
same time, the GPRS data can be sent to the Internet server, which can realize the checking,
monitoring and managing of the tracker on computer.
The tracker supports three working modes: personal mode, smart mode, vehicle mode.
Please use personal mode if you want to tracking up to 15 hours standby time in an empty
environment
Please use smart mode if you want to track less than 14 hours or in crowded environment
(with many building around)
Please use vehicle mode when it working in the car, connect MINI USB cable with tracker
and the car so it can track long time and keep in mind that it is better to hide it on a place
with good GPS signal (example: under the windshield)
The tracker supports the following features:
◆Easy authorized phone number setup by calling
◆Real time tracking
◆Two-way communication
◆Remote monitoring
◆SOS emergency calling
◆Tracking regularly by GPRS
◆GPRS data logger
◆Auto APN setting
◆3 kinds of tracking mode

3
◆Geo-fence
◆Time-zone setting
◆Low battery alarm
◆LED indication for battery level
◆Auto power on/off
2. Safety instruction
Read these simple guidelines. Not following them may damage to the tracker, put you in
danger or break the law.
Switch on safely
Do not switch the tracker on when mobile phone use is prohibited or when
it may cause interference or danger.
Switch off in hospitals Follow any restrictions. Switch the tracker off near medical equipment.
Switch off in aircraft Follow any restrictions. Wireless trackers can cause interference in aircraft.
Switch off when refueling Do not use the tracker when at a refueling point. Do not use near fuels or
chemicals.
Switch off near blasting Follow any restrictions. Do not use the tracker when blasting is in progress.
Qualified service Only qualified personnel can repair the tracker.
Water resistance The tracker is not fully water resistant. Keep it dry. Use waterproof-case if
necessary.
3. Specification and parameters
Items Specification
Charging Voltage DC 4.5-5.5V/1000 mA (Mini USB)
Internal Battery Rechargeable and replaceable 1000 mAh battery(3.7V)
Dimension 86 mm X 44 mm X 22 mm
Weight 65g (with battery)
Operating
Temperature -20 ~ +55 °C
Humidity 5% to 95% Non-condensing
GSM Module Quad Band GSM 850/900/1800/1900 MHz
GPS Chipset Newest Ublox chipset
GPS Sensitivity -160 Db
4
GPS Frequency L1, 1575.42 MHz
C/A Code 1.023 MHz chip rate
Channels 50 Channels
Position Accuracy <10 M, 2D RMS
Velocity Accuracy 0.1 M/S
Time Accuracy Satellite time: 1 microsecond time synchronization
Update Time Average 0.1 second
Hot Start up Average 1 second
Warm Start up Average 3 second
Cold Start up Average 27 second
Max. Altitude 18,000m (Max. 60,000 ft)
Max. Speed 500 m/s (Max. 1000 knots)
Max. Acceleration less than 4g
Operation time 15 days of Standby time in personal mode; 15 hours in vehicle mode
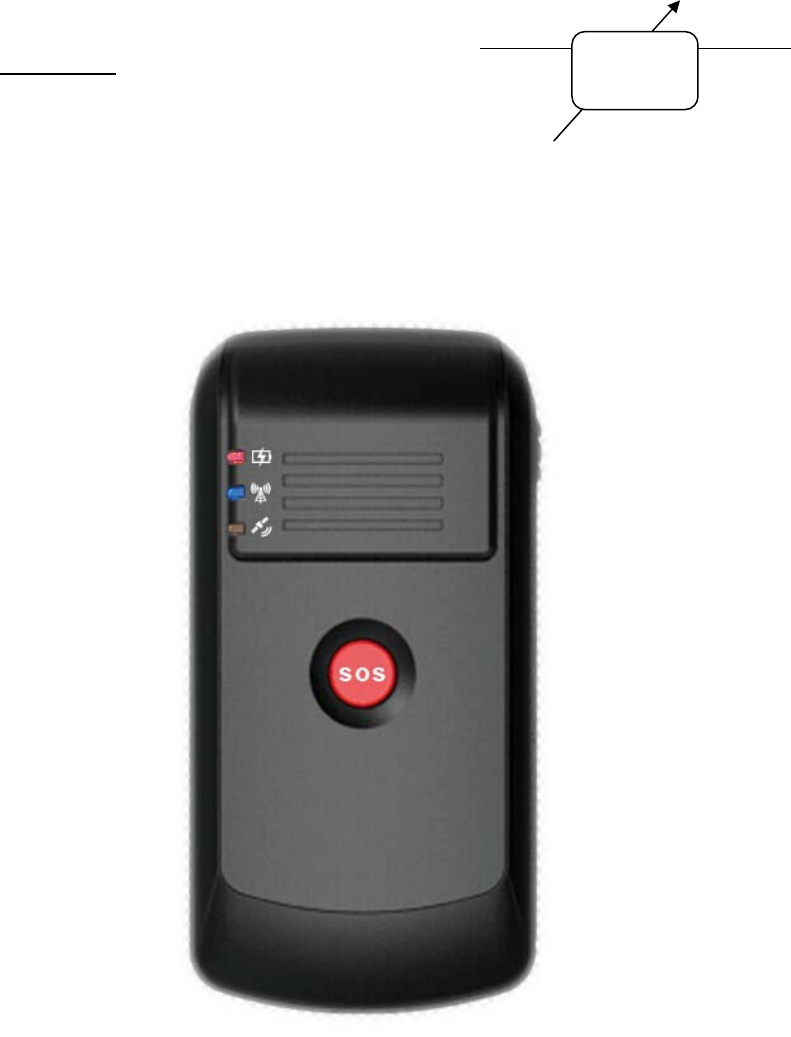
LED 3 lights for showing states of power, GPS, GSM
Button 2 buttons: 1 SOS button, 1 battery status button
4. Getting started
This section will describe how to set the tracker.
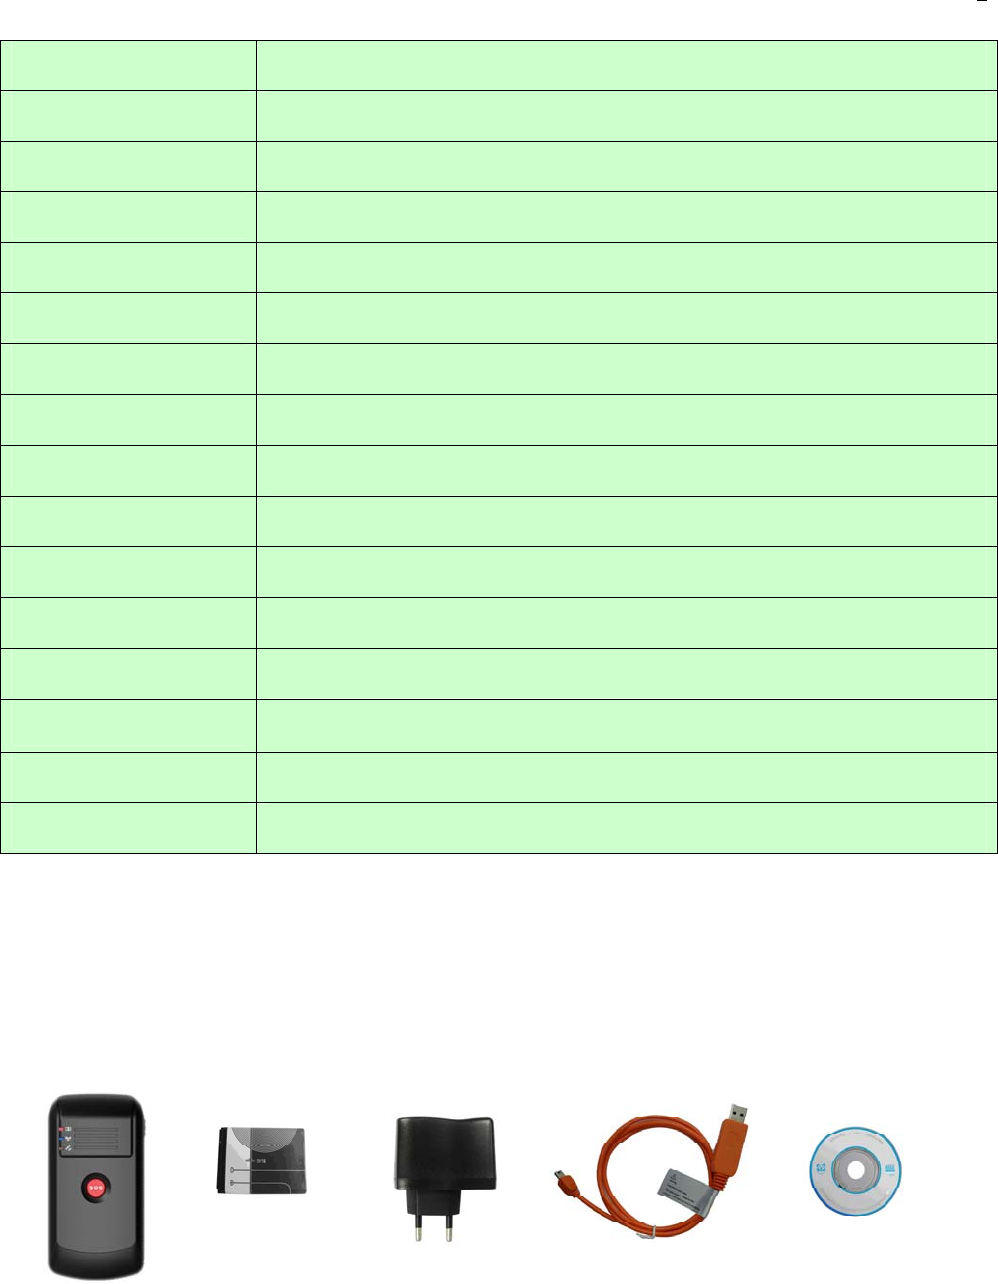
4.1 Hardware and accessories
Lithium battery AC adapter
T
erminal
USB cable
CD
5
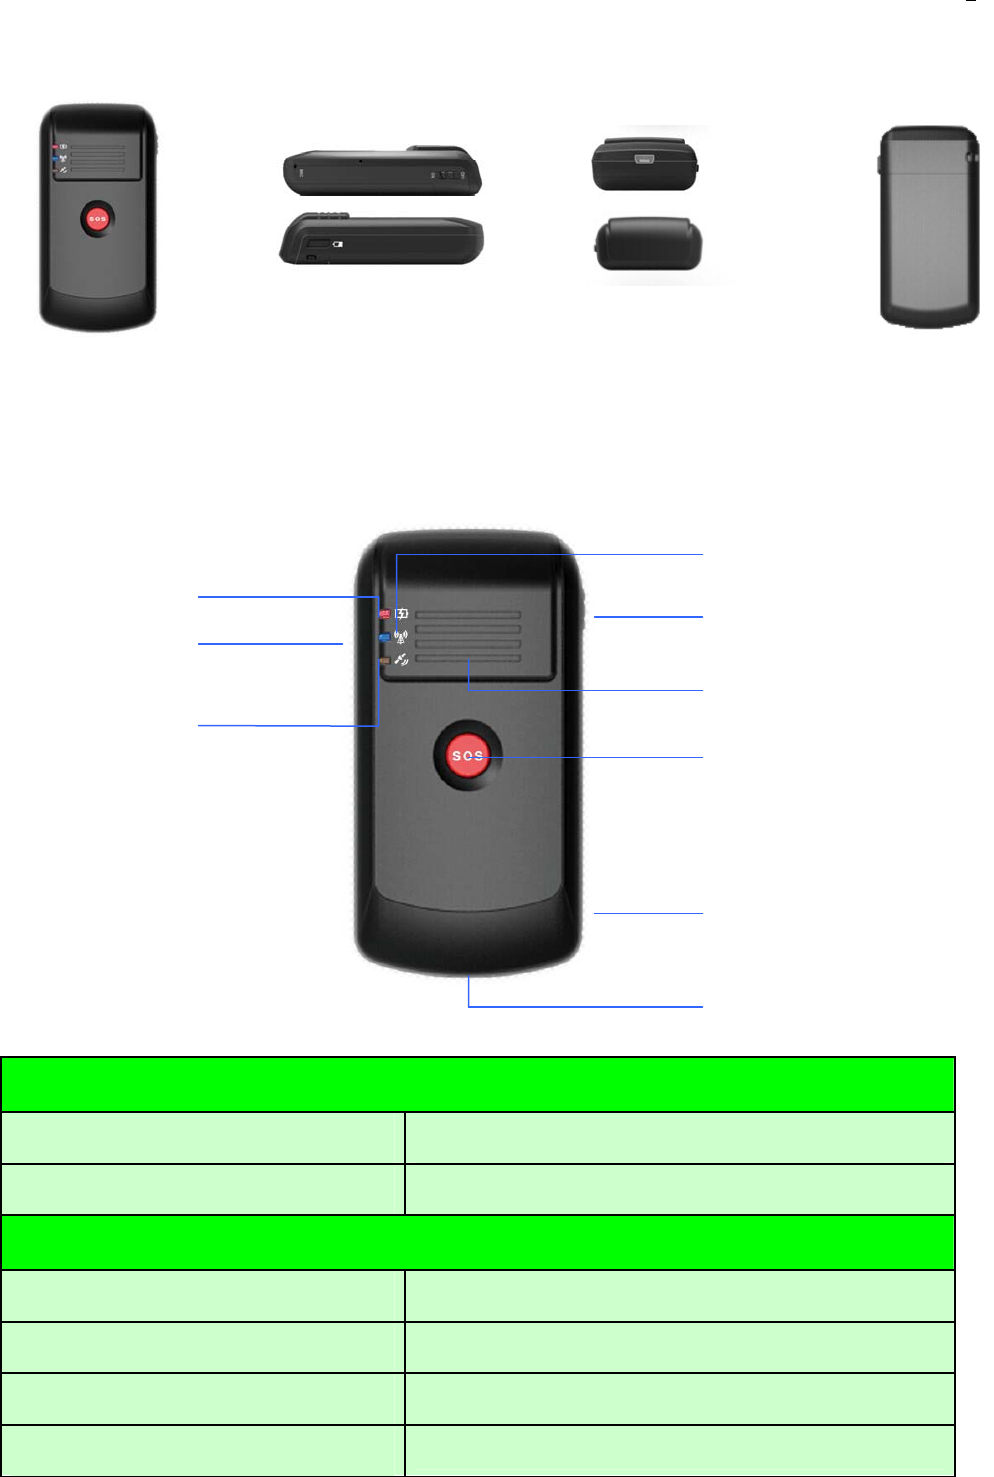
4.2 View
Front view Side view
Back view
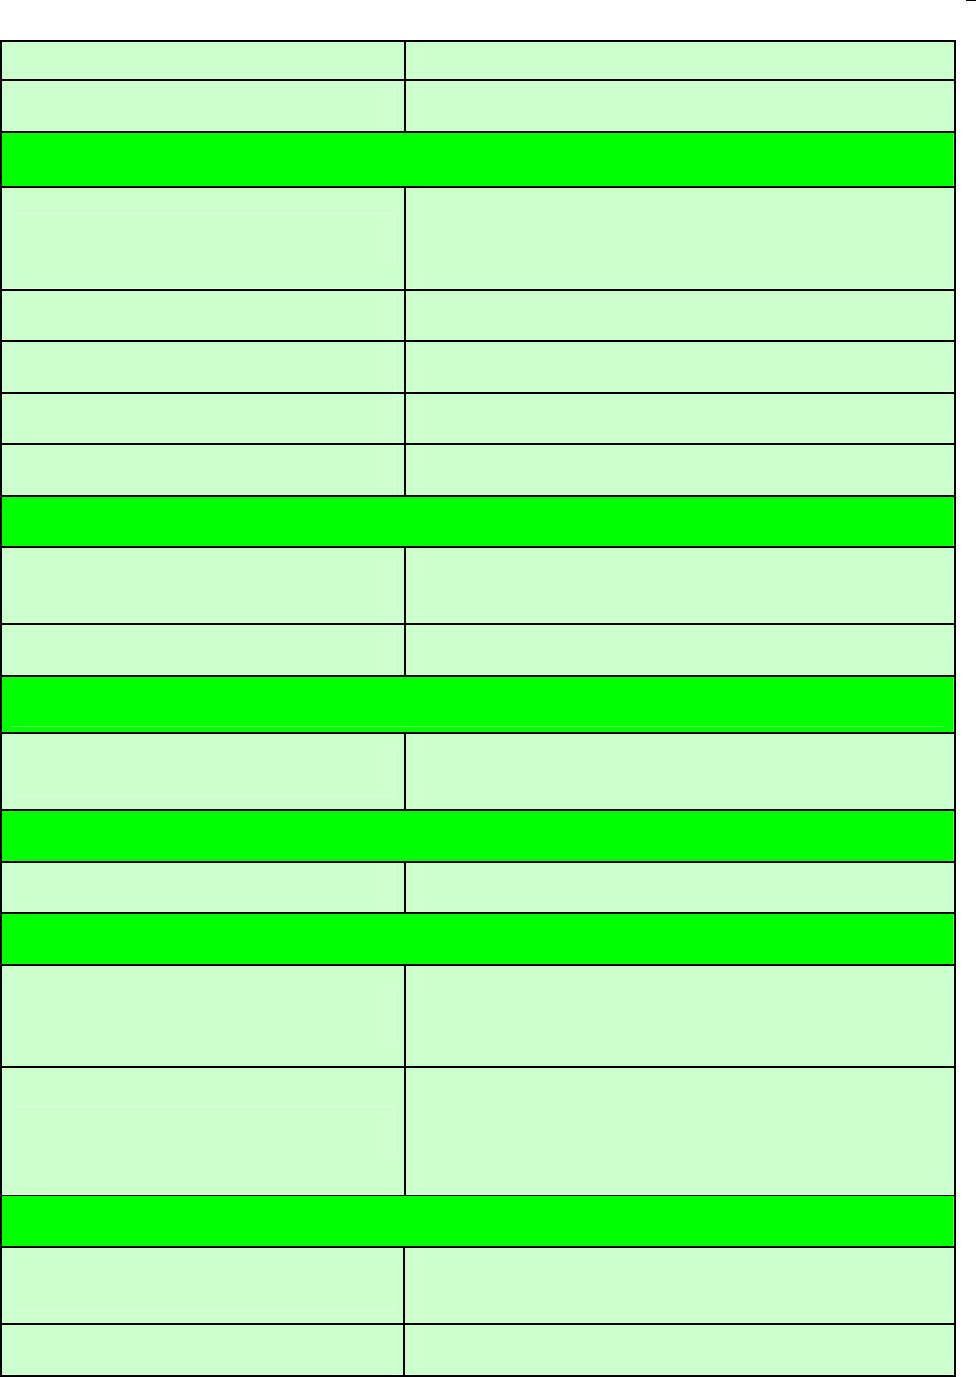
4.3 Function key and port
GSM LED
Power switch
Power LED
Battery checking button
and Hang rope hole
GPS LED
Speaker
SOS button
Microphone
Mini USB port
Red – Power indication
Always On Power charging
Always OFF Power charging completed or no connection
Blue – GSM indication
0.3S On and 0.3S Off GSM module is initializing or calling in
Always On GSM module cannot be registered
1S On and 3S Off GSM module is registered
0.1S On and 3 S Off GSM module is registered network and GPRS
6
function works well
Always Off GSM in power save mode
Yellow – GPS indication
0.3S On and 0.3S Off GPS module is initializing or waiting for the SOS
button press to confirm the calling in number as
the authorization number
Always On While Pressing Button
1S On and 3S Off GPS module is working but hasn't fixed position
0.1S On and 3S Off GPS module is working and fixed position
Always Off GPS module is not working
Buzzer
Getting 2 times beep sound Press for 3 seconds on SOS button or press for 5
seconds on battery checking button
Getting 5 times beep sound Low battery
Vibration motor (built-in)
Vibration motor is shaking twice Press for 3 seconds on SOS button or press for 5
seconds on battery checking button or low battery
Switch
Power switch Turn on /off tracker
Buttons
SOS Button Press SOS button for 3 seconds so tracker will send
an emergency message to the authorized number
and dial the authorized number
Battery Checking Button
Press this button and if all the lights are on, means
tracker has full battery; or if there only one(just
the yellow light) is on, said the tracker’s power less
than 15%(low battery)
Others
Mini USB port Charging, software upgrade and setup parameter
by computer
Hang rope hole Wear a hang rope

7
4.4 First use
Please read this manual before using the tracker.
4.4.1 Ensure that your tracker has a working SIM card installed.
- Tracker supports Micro SIM card and standard SIM card (please according actual situation to
judge).
- Check the SIM card has not run out of credit money (Test the SIM card in a phone to make
sure it can send and receive SMS).
- Check the lock code of the SIM card is turned off.
- If you require the function of sending an SMS location report to the authorized phone
number when it makes a call to the tracker, please make sure the SIM card installed
supports displaying caller ID.
4.4.2 Use AC adapter charge for at least 3 hours or charge via USB port with computer.
- During charging, please turn the tracker off (otherwise it will make the charging time
longer). During charging, the Red Led is always on and after recharged, Red Led is al
ways off.
4.4.3 Slide up the power switch to ON (switch on) and set the parameter. If set the parameter
via SMS, please make sure the GSM is registered before sending SMS. And then positioning
in an empty environment, please do it every time after turn the tracker on. (Advantages: 1.
renew machine for time, it is advantageous to the LBS location; 2. more power saving).
5. Change password
SMS Command: $SMS,******;W001,######;!
Description: change user’s password
Explain:
******: user password, the range of 6 digits, default password is 000000.
(Note: please switch to English input method when you editing command by phone; Device
will only accept commands from a user with the correct password. Command will be ignored
if with wrong password.)
######: new password, the range of 6 digits.
Example:
$SMS,000000;W001,123456;!

8
Read password:
$SMS,000000;R001;!
Clear password:
$SMS,000000;C001;!
6. Authorized number
6.1 Set the authorized number by SMS
SMS Command: $SMS,000000;W010,NO.,Phone Number,ABC;!
Description: Set authorized number and related functions.
Explain:
NO.: authorized number’s serial number, range of: 1~3.
Phone Number: authorized number, range of: 0~19 characters.
A: switch for Geo-fence function, range of: 0~1(0 means disable this function, 1 means
enable this function), default is 0.
B: switch for monitoring function, range of: 0~1(0 means disable this function, 1 means
enable this function), default is 0.
C: switch for SOS emergency calling, range of: 0~1(0 means disable this function, 1 means
enable this function), default is 0.
For example:
Set the 1st authorized number is 13800000000 and just enable monitoring function.
$SMS,000000;W010,1,13800000000,010;!
Read authorized No.1 and it’s related authority:
$SMS,000000;R010,1;!
Clear authorized No.1 and it’s related authority:
$SMS,000000;C010,1;!
Read all authorized number:
$SMS,000000;R010;!
Clear all authorized number:
$SMS,000000;C010;!
6.2 Easy authorized phone no. setup by calling
Tracker only supports three authorized numbers. We can set the authorized number by phone
call if authorized number is not full (Disable all functions).
Set as follows:
Any non-authorization number calls to the tracker over than 10 seconds, the tracker will cut
off the line automatically and the Yellow Led will blink for 30 seconds. During this 30 second
blinking, press SOS button less than 3 seconds, and then it set this call in number as a new

9
authorization number and send SMS to that number to confirm the setting OK.
6.3 Monitoring function
If enable this function, when the authorization number call in to the device, it will connect to
the call and shut down the speaker, then the background voice of the device will be listened.
(Note: Please make sure the SIM card installed supports displaying caller ID.)
6.4 Two-way communication
If you turn the monitoring function off when set authorized number, use this authorized
number call to tracker, bell will ring, at this time, press the SOS button (less than 3s) to
answer the phone call, so you can speak each other.
Press SOS button also can make a phone call to authorized number (see “SOS emergency
calling”).
6.5 Real time tracking
The tracker will reply a location message by SMS if any authorized number makes a phone call
to it.
7. SOS emergency calling
Press SOS button for 3 seconds or longer, the device will send SOS alarm to all authorization
numbers by SMS. If the authorization number was set with the SOS emergency calling
function, the device will make a call to authorized numbers one by one and it will stop to make
a call if call is answered.
8. Tracking regularly by GPRS
SMS Command:
$SMS,000000;W002,APN,Username,Password;W003,IP,Port;W004,ID;W005,X;W009,Y;!
Description: Enable this function.
Explain:
APN: server access port’s name, range of: 0~29 characters.
Username: access port’ user name, range of: 0~29 characters.
Password: access port’s password, range of: 0~29 characters.
IP: server’ IP address, range of: 0~29 characters.
Port: server’s port, range of: 0~65535.
ID: tracker ID, range of: 0~15 characters.
X: GPRS upload interval, range of: 0~65535, default is 0, unit is 30 seconds.

10
(example: if X is 2 means 2*30 and interval as 60 seconds)
Y: GPRS upload mode, range of: 0~2, default is 0.
(0 means disable GPRS function, 1 means TCP connect, 2 means UDP connect)
Example:
$SMS,000000;W002, cmnet,,;W003,192.168.1.1,8088;W005,1;W009,1;!
Read tracking regulary by GPRS:
$SMS,000000;R002;R003;R005;R009;!
Clear tracking regulary by GPRS:
$SMS,000000;C002;C003;C005;C009;!
9. GPRS data logger
Tracker has build in 8M bytes memory for GPRS data save, when GPRS interval tracking can
not upload to server, data will automatically stored in the memory. After that, once the GPRS
connected, tracker will send the data to server again.
(Note: real time data will be sending first, the priority of the stored data is low.)
10. Auto APN setting
The APN list can be configured before delivery (default is China APN). When insert SIM card,
tracker will automatically acquire APN in the APN list. If user already set APN, then the tracker
will not acquire APN automatically.
11. Three kinds of tracking mode
SMS Command: $SMS,000000;W016,X;!
Description: there are three kinds of mode: personal mode, smart mode, vehicle mode.
Explain:
X: tracker’s work mode. Range of: 0~2 (0 means personal mode, 1 means smart mode, 2
means vehicle mode). Default: 1.
Personal mode: When there are new data or alarms, GPS turns on the positioning
function automatically. No matter the positioning succeeds or fails, GPS turns off the
positioning function automatically, and upload new data or send out alert message.
Smart mode: GPS always turn on when device is move; otherwise only when there are
new data or alarms, GPS turns on the positioning function automatically. No matter the
positioning succeeds or fails, GPS turns off the positioning function automatically, and
upload new data or send out alert message.
Vehicle mode: GPS always turn on whether tracker move or not.
Example:
$SMS,000000;W016,1;!

11
Read device mode:
$SMS,000000;W016,1;!
Clear device mode:
$SMS,000000;W016,1;!
12. Geo-fence
SMS Command: $SMS,000000;W018,NO.,name,lat,lng,radius;!
Description: tracker will get the newest position automatically to be fence center if there is no
available GPS position. Turn geo-fence alarm on, when the tracker moves in/out the preset
geo-fence, it will send a SMS alarm to the authorized phone number (enable the Geo-fence
function when you set the authorized number), and if GPRS is connected, tracker will send this
alarm data to server via GPRS.
Explain:
NO.: the serial number for geo-fence must be 1 to 5.
name: name of geo-fence, range of: 0-9 characters.
lat: center latitude, range of: -90.00000000~90.00000000, unit: degrees.
lng: center longitude, range of:-180.00000000~180.00000000, unit: degrees.
Radius: geo-fence radius, range of: 0.0~1.79E+308, unit: meters.
(Note: according to Preset longitude and latitude as the center of the circle, with the preset
radius, we can define a circle.)
Example:
$SMS,000000;W018,1,school,22.12345,114.12345,100;!
$SMS,000000;W018,1,home,,,100;!
Read Geo-fence:
$SMS,000000;R018,1;!
Clear Geo-fence:
$SMS,000000;C018,1;!
Clear all Geo-fence:
$SMS,000000;C018;!
13. Time zone setting
SMS Command:$SMS,000000;W020,X;!
Description: Set the SMS time zone
Explain:
X: time zone’s value, range of:-720~780, default: 0, unit:minutes.
(Example: 1 hour = 60 minutes, time zone+ 8 = 480 minutes)
For example:

12
$SMS,000000;W020,480;!
Read time zone:
$SMS,000000;R020;!
Clear time zone:
$SMS,000000;C020;!
14. Low battery alarm
When the battery level is lower than 15%, it will send SMS to all authorization numbers or
send alarm data to server.
15. LED indication for battery level
We can judge the battery level by LED indication when pressing the battery checking button.
If there are three lights on (means the power level range is 50%~100%), or two lights on
(means the power level range is 15%~49%), or just one light on (means the power level
range is 0%~14%).
16. Power on/off automatically
Tracker will be off automatically if the power level is 0%; during charging, tracker will
automatically be switch on when power level is higher than 15%, and send a ‘Power ON’
warming message to each authorized number.
17. Timer Switch
SMS Command:$SMS,000000;W038,on time,off time;!
Description: set the timer switch
Explain:
on time: timing boot time, range of:00:00~23:59,default: 00:00.
off time: timing shutdown time, range of:00:00~23:59,default: 00:00.
For example: $SMS,000000;W038,08:00,20:00;! This command means to boot up at 08:00
and shutdown at 20:00.
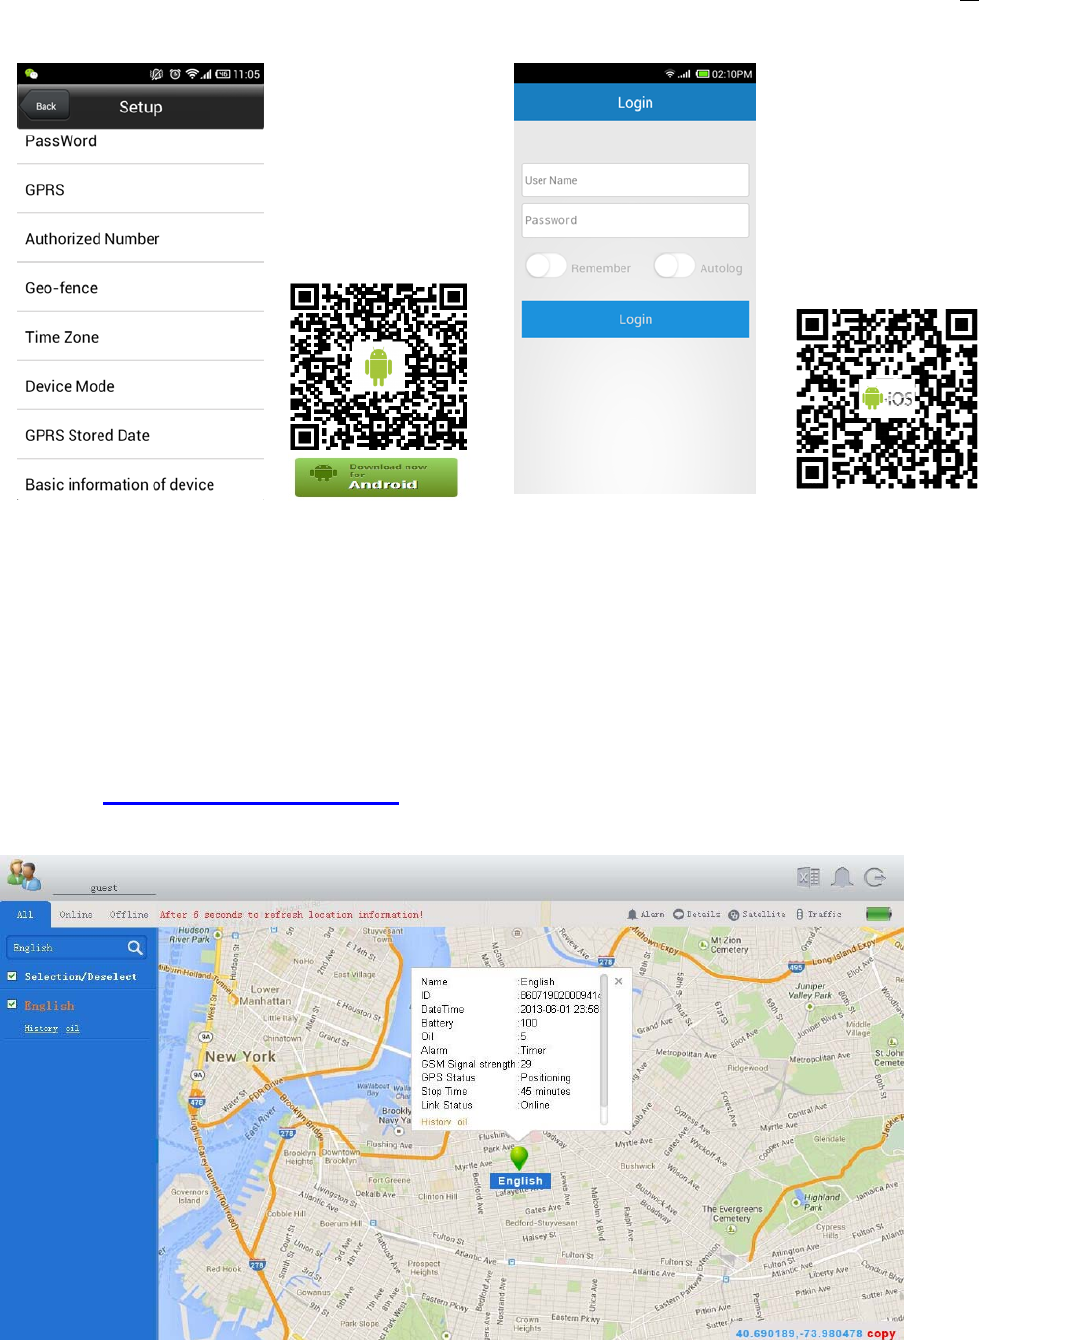
18. APP for smart phone

14
20. Problems & Diagnostics
Cannot Switch On
Possibility Solution
Power switch operation’s problem Slide to the ON side
Low battery Charging for 2.5 – 3 hours
Not Sending SMS
Possibility Solution
Blue LED always On
Make sure tracker can receive the strong GSM signal
Check SIM card installation, insert again if necessary
Replace a new SIM if necessary
GSM connection congested Wait for SMS. Some GSM networks slow down during
peak time or when they have equipment problems.
Wrong password and SMS format Double check password or SMS format, password and
format must be right
Not enough SIM balance Replace SIM or Check balance value
Low battery Charging tracker
Yellow Led 1S On and 1S Off
Possibility Solution
Tracker’s position has been covered Place the tracker to open area w/o any tall building, tree
and heavy raining. Those can be as shielding to the GPS
signal
GPS signal is weak Place the GPS internal antenna face to the sky
Low battery Charging tracker
No GPRS connection
Possibility Solution
SIM cannot support GPRS Enable SIM’s GPRS function
GPRS function is disabled Enable the GPRS function
Incorrect IP and Port Double check IP and Port, then restart the tracker
GSM signal is weak Move the tracker to a place with strong GSM signal
FCC Statement
This equipment has been tested and found to comply with the limits for a Class B digital device,
pursuant to part 15 of the FCC rules. These limits are designed to provide reasonable protection
against harmful interference in a residential installation. This equipment generates, uses and can
radiate radio frequency energy and, if not installed and used in accordance with the instructions,
may cause harmful interference to radio communications. However, there is no guarantee that
interference will not occur in a particular installation. If this equipment does cause harmful
interference to radio or television reception, which can be determined by turning the equipment off
and on, the user is encouraged to try to correct the interference by one or more of the following
measures:
‐Reorient or relocate the receiving antenna.
‐Increase the separation between the equipment and receiver.
‐Connect the equipment into an outlet on a circuit different from that to which the receiver is
connected.
‐Consult the dealer or an experienced radio/TV technician for help.
To assure continued compliance, any changes or modifications not expressly approved by the
party.
Responsible for compliance could void the user’s authority to operate this equipment. (Exampleuse
only shielded interface cables when connecting to computer or peripheral devices).
This device complies with part 15 of the FCC Rules. Operation is subject to the condition that this
device does not cause harmful interference.
The SAR limit adopted by USA and Canada is 1.6 watts/kilogram (W/kg) averaged over one gram
of tissue. The highest SAR value reported to the Federal Communications Commission (FCC) and
the Industry Canada (IC) for this device type when it is properly worn on the body is 1.197W/
kg(SAR1‐g). The device complies with the RF specifications when the device is used at adistance
of 0 mm from your body. Ensure that the device accessories such as a device case and adevice
holster are not composed of metal components. Keep your device 0 mm away from your body to
meet the requirement earlier mentioned.
This device was tested for typical body‐worn operations. To comply with RF exposure
requirements, a minimum separation distance of 0 mm must be maintained the user’s body ,
including the antenna. Third‐party belt‐clips, holsters, and similar accessories used by this
device should not contain any metallic components. Body‐worn accessories that do not meet
these requirements may not comply with RF exposure requirements and should be avoided. Use
only the supplied or an approved antenna.