Sicel Technologies DVS-R-100 Dosimetry Verification System User Manual 934 00553 00
Sicel Technologies, Inc. Dosimetry Verification System 934 00553 00
Contents
- 1. Users Manual Part I
- 2. Users Manual Part II
Users Manual Part II
DVS Dose Verification System
36
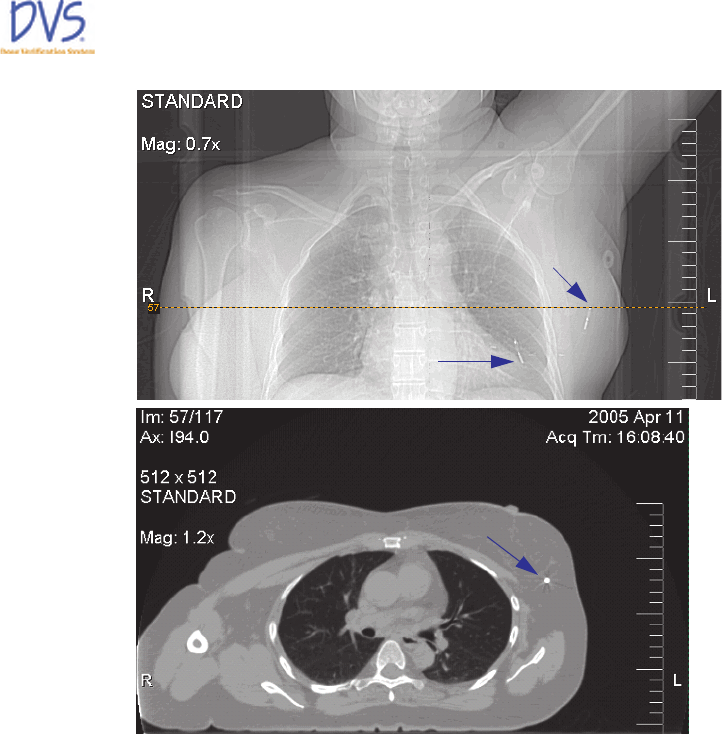
Figure 28 — CT Scout and Transverse Images
1. Login to the Plan and Review Software.
2. Click Patient Information.
3. Click Add.
4. In the Patient Data Entry dialog box, enter the patient
information:
a. Enter the patient number.
b. Enter the patient’s name.
c. Enter the physician’s name (this is generally the attending
radiation oncologist).
5. Click Add Dosimeter to assign the implanted dosimeters to the
patient.
a. Scan the dosimeter’s bar code. The bar code contains the
dosimeter’s serial number and calibration information.
Sensitive Volume
Antenna “Flare” End
Sensitive Volume Point
Dose Location
934-00553-00.book Page 36 Friday, June 16, 2006 8:07 AM

DVS Dose Verification System
37
Quick Start Instructions
b. Enter the implant location for each dosimeter from the
transfer labels.
6. Click Add Plan and add the patient’s plan information:
a. Enter the name of each plan, and the number of fractions
for each plan.
b. Enter the predicted dose at each dosimeter (point dose)
from the planning CTs. Note that this must be in cGy (not
MU). The dose fractions usually range from 150-250 cGy.
Values outside this range result in the following error
message:
This predicted dose is outside the typical range of 150 to
250 cGy. Are you sure you want to use this value?
Note: After implantation, additional plans may be added, such as a
boost plan.
4.4 Step 4 – Measure Radiation Pre-dose and Post-dose Values Using The
DVS Reader
1. Login to the Reader.
2. Press Scan patient.
3. Select the patient from the list and press Next.
4. Select the current plan and fraction for the patient and press
Next.
5. Read the dosimeters’ pre-dose values.
a. Hold the Reader Wand up to the patient.
b. Press then release the button on the Reader Wand.
c. Hold the Reader Wand near the patient’s treatment area
until the Reader scans and reads all the dosimeters.
6. Proceed with radiation therapy.
7. Press Next on the reader to display the POST-Dose Reading
screen.
8. Read the dosimeters’ post-dose values within 10 minutes of
treatment:
a. Hold the Reader Wand up to the patient.
b. Press then release the button on the Reader Wand.
c. Hold the Reader Wand near the patient’s treatment area
until the Reader scans and reads all the dosimeters again.
934-00553-00.book Page 37 Friday, June 16, 2006 8:07 AM
DVS Dose Verification System
38
9. Press Next and enter any notes related to the therapy on the
Treatment Notes screen.
10. Press Save to save the readings to the Dosimetry Database.
5USING THE PLAN AND REVIEW SOFTWARE
The Plan and Review Software is used to:
• Enter patient, dosimeter, and plan information
• Review results from the patient’s dosimeters
• Maintain the authorized user list
• Setup system options
5.1 Logging into the DVS Plan and Review Software
To log into the Plan and Review Software:
1. Click the DVS Plan and Review icon on the Desktop or select
Start>Programs>DVS>DVS Plan and Review. The DVS
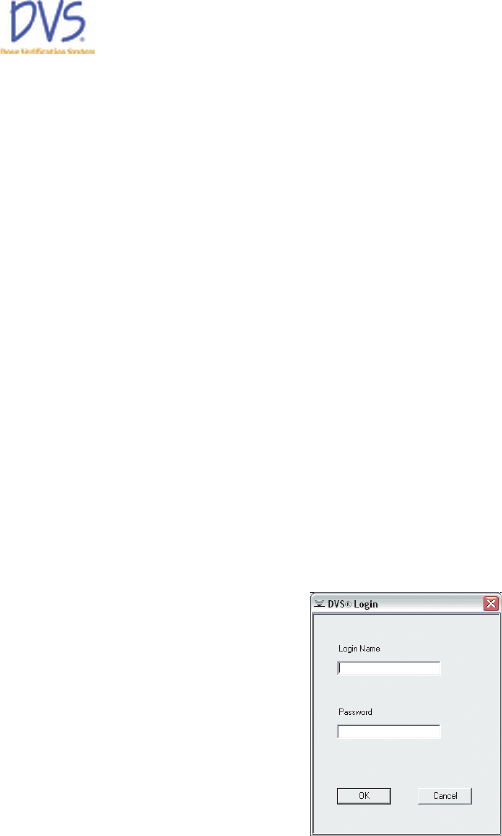
Login dialog box appears (Figure 29).
Figure 29 — DVS Login
2. Enter the Login Name and Password that were assigned to you
by the DVS Administrator.
3. Click OK.
5.2 DVS Main Menu Overview
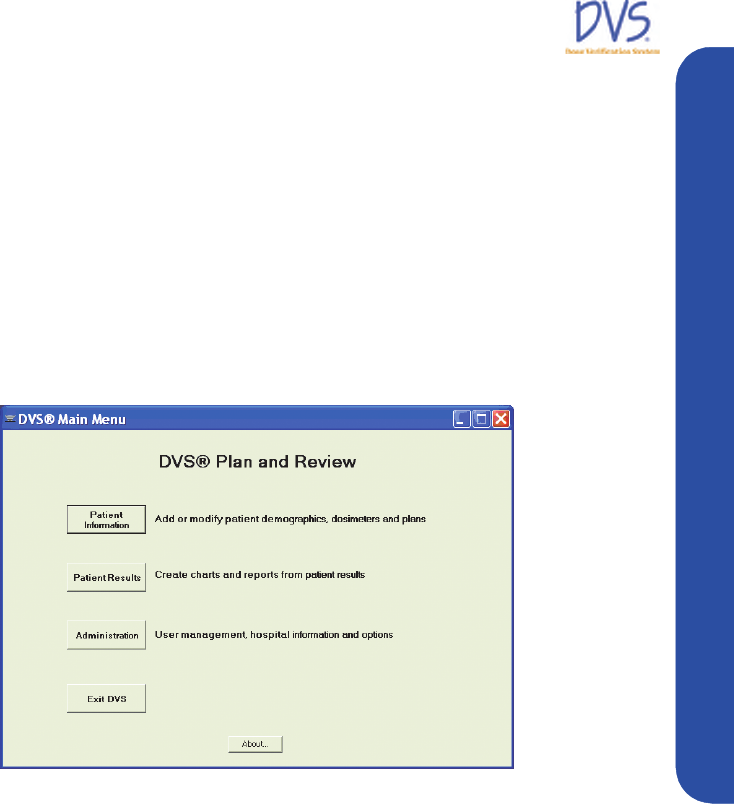
The DVS Main Menu contains five buttons as shown in Figure 30:
•Patient Information – Enter or edit patient, dosimeter, and
plan information (see section 5.3 Working With Patient
Information on page 39)
934-00553-00.book Page 38 Friday, June 16, 2006 8:07 AM
DVS Dose Verification System
39
Using the Plan and Review Software
•Patient Results – View charts and reports for the patient’s
dosimeter results (section 4 Quick Start Instructions on page
33)
•Administration – Maintain the list of authorized users, and set
DVS options (see section 5.5 DVS System Administration on
page 53)
•Exit DVS – Exit the Plan and Review Software
•About… – Show software version and copyright information
Note: Depending on the user’s authorization level, some of these
buttons may be disabled. For more information, see Adding and
Editing DVS Users on page 53.
Figure 30 — DVS Main Menu
5.3 Working With Patient Information
From the DVS Main Menu, click Patient Information to perform
the following tasks:
• Adding, Editing and Viewing Patients
• Entering Patient, Dosimeter, and Plan Information
• Entering Patient and Physician Information
• Entering Plans
• Entering Dosimeters
• Changing or Deleting Dosimeters
• Working with Measurement Fractions and Skipped Fractions
• Changing Information for a Fraction
934-00553-00.book Page 39 Friday, June 16, 2006 8:07 AM
DVS Dose Verification System
40
Adding, Editing, and Viewing Patients
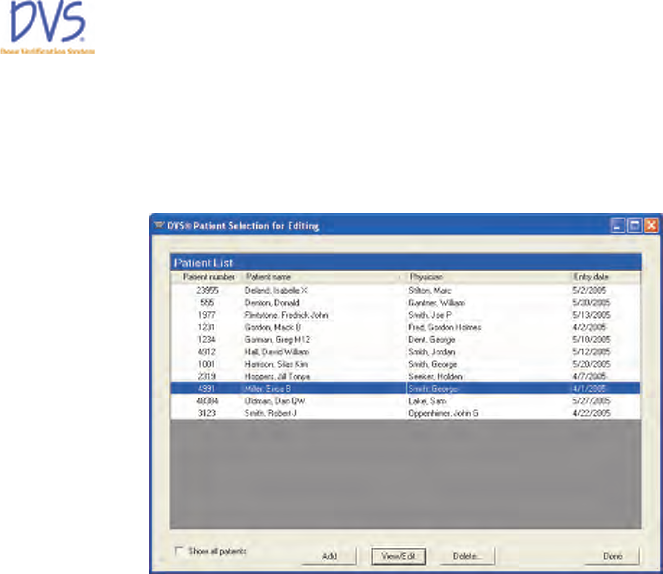
To add, edit or view patients, click Patient Information on the
DVS Main Menu. The Patient Selection for Editing window
appears (Figure 31).
Figure 31 — Patient Selection for Editing
By default, the patient list displays only the patients that are marked
to be shown in the DVS Reader. This makes it easier to manage a
large list of patients. To list all the patients in the Dosimetry
Database, select the Show all patients check box. From this
window, you can perform the following tasks:
•To add a new patient, click Add. The Patient Data Entry
window appears. You can enter the new patient’s information
using this window.
•To delete a patient from the list, select the patient in the list
and click Delete. Patients who have dosimeters with
measurements cannot be deleted. To remove a patient from the
list, clear the Patient shown on Reader check box in the
Patient Data Entry window.
•To edit a patient’s information, select the patient in the list
and click View/Edit. The Patient Data Entry window appears.
You can enter the new patient’s information using this window.
•To return to the Main Menu, click Done.
For more information about the Patient Data Entry window, see
Entering Patient, Dosimeter, and Plan Information on page 41.
934-00553-00.book Page 40 Friday, June 16, 2006 8:07 AM
DVS Dose Verification System
41
Using the Plan and Review Software
Entering Patient, Dosimeter, and Plan Information
To edit patient, dosimeter, and plan information, click Add or
View/Edit on the Patient Selection for Editing window to display
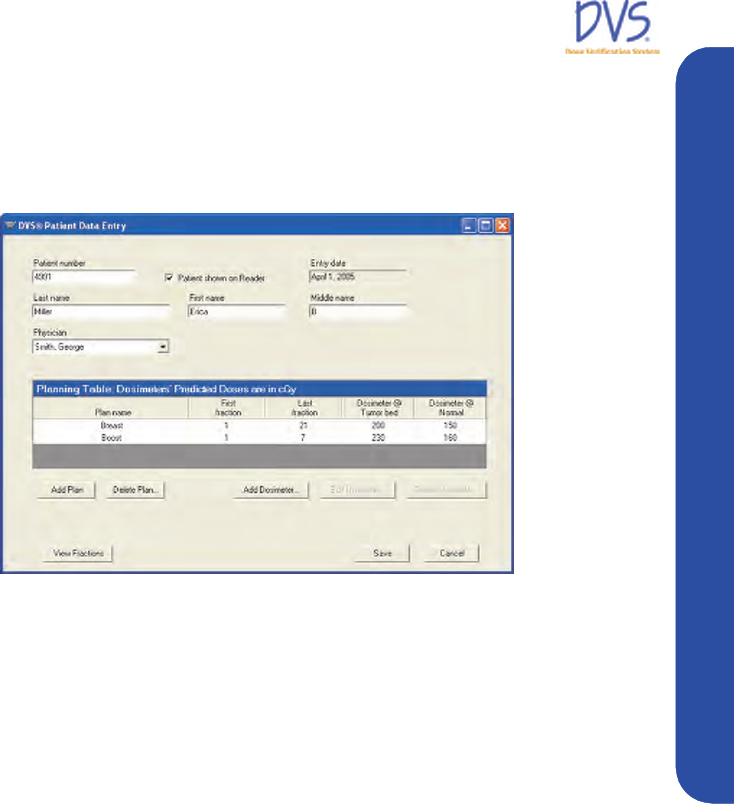
the Patient Data Entry window (Figure 32).
Figure 32 — Patient Data Entry
From the Patient Selection for Editing window, you can perform
the following tasks:
• Entering Patient and Physician Information
• Entering Plans
• Entering Dosimeters
• Changing or Deleting Dosimeters
• Working with Measurement Fractions and Skipped Fractions
• Changing Information for a Fraction
Entering Patient and Physician Information
The top of the Patient Data Entry window has the following fields
for entering patient demographic information:
•Patient number – (required) This must contain a unique
patient number or identifier
•Patient shown on Reader – Select this check box to display
the patient on the Select Patient screen on the DVS Reader. For
patients that are no longer active, clear this check box.
934-00553-00.book Page 41 Friday, June 16, 2006 8:07 AM
DVS Dose Verification System
42
•Entry date – (read-only) Displays the date the patient was
entered.
•Last name – (required) Enter the patient’s last name
•First name – Enter the patient’s first name.
•Middle name – Enter the patient’s middle name
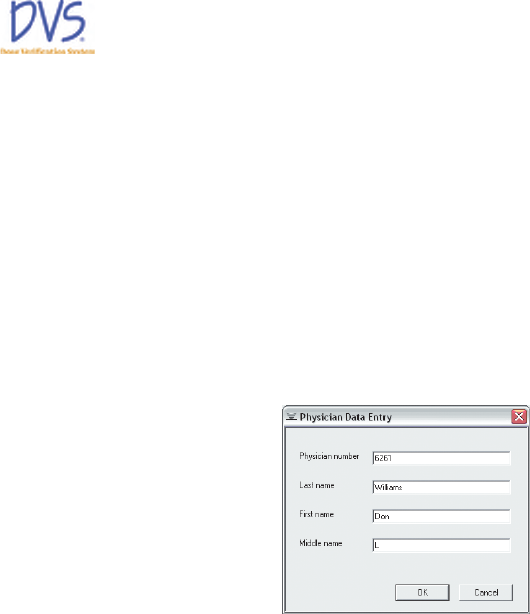
•Physician – Select a physician from the list. If you want to add
a new physician, select Add Physician from the top of the list.
The Physician Data Entry dialog box appears (Figure 33).
Enter the physician’s name and unique physician number. Each
field must be filled out. If there is not a unique number that
identifies the physician, enter their name or other identifier.
Figure 33 — Physician Data Entry
When finished making changes, click Save to save the data entered
in this window and its dialog boxes. Click Cancel to discard all
changes made for the current patient.
Entering Plans
Use the planning table on the Patient Data Entry window to enter
the patient’s plan information. Each row in the planning table
contains a plan for the patient. Each plan is made of a series of
treatment fractions each at the same dose level.
To add a new plan:
1. Click Add Plan and edit the new row that appears.
2. Set the following items for each plan:
•Plan name – The name to use for the plan
•First fraction – The number of the first fraction. This is
typically 1, but can is any number greater than zero, and
less than or equal to the Last fraction.
•Last fraction – The number of the last fraction. This must
be greater than or equal to the First fraction.
934-00553-00.book Page 42 Friday, June 16, 2006 8:07 AM
DVS Dose Verification System
43
Using the Plan and Review Software
If dosimeters have been assigned to the patient, additional columns
appear in the table, one for each dosimeter. For more information
about assigning dosimeters to a patient, see Entering Dosimeters on
page 43.
To delete a plan:
1. Select the row to delete.
2. Click Delete Plan.
Entering Dosimeters
Dosimeters assigned to the patient are shown in the planning table
on the Patient Data Entry window.
To add a new dosimeter:
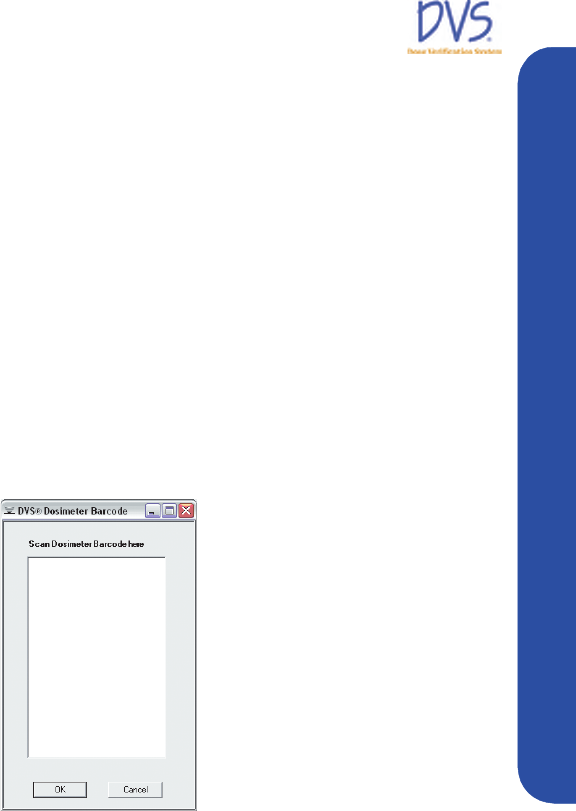
1. Click Add Dosimeter. A dialog box for entering the
dosimeter’s bar coded calibration values appears (Figure 34).
Figure 34 — Dosimeter Barcode
2. Use the bar code scanner to read the 2D bar code from the
transfer label for the dosimeter. The button on the bar code
scanner must remain pressed while the barcode is scanning. An
audible beep will indicate when the barcode has been read. The
data from the bar code label is entered into this dialog box.
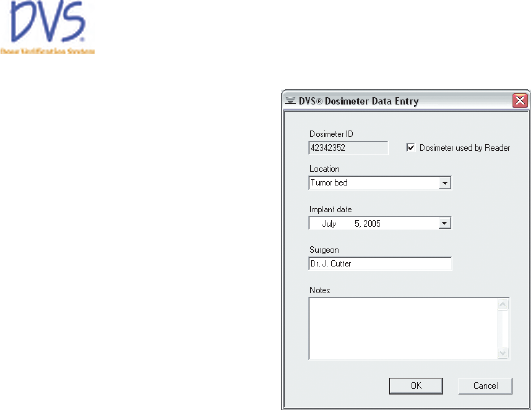
3. When completed, click OK. The Dosimeter Data Entry dialog
box appears (Figure 35).
934-00553-00.book Page 43 Friday, June 16, 2006 8:07 AM
DVS Dose Verification System
44
Figure 35 — Dosimeter Data Entry
4. Enter the following information about the dosimeter:
•Dosimeter ID – (Read-only) Displays the serial number of
the dosimeter.
•Location – Select a location name for the dosimeter from
the pull-down menu. If you want to create a new location,
just type it into this field.
•Implant date – (Optional) Select the implant date of the
dosimeter. The default is today’s date.
•Surgeon – (Optional) Enter the surgeon’s name.
•Notes – (Optional) Enter notes about the dosimeter
•Dosimeter used by Reader – To have the DVS Reader
scan for this dosimeter, select this check box. To prevent
the Reader from scanning for this dosimeter, clear this
check box.
5. Click OK to save the dosimeter information. The planning
table is updated with a new column for the dosimeter. The
Location that was entered in the Dosimeter Data Entry dialog
box appears in the new column’s heading.
Changing or Deleting Dosimeters
Dosimeters assigned to the patient are shown in the planning table
on the Patient Data Entry dialog box.
To edit dosimeter information
1. Put the cursor in the Dosimeters column.
934-00553-00.book Page 44 Friday, June 16, 2006 8:07 AM
DVS Dose Verification System
45
Using the Plan and Review Software
2. Click Edit Dosimeter. The Dosimeter Data Entry dialog box
appears (Figure 35).
3. Change the information in this dialog box.
4. Click OK to save the information.
To delete a dosimeter:
1. Put the cursor in the Dosimeters column.
2. Click Delete Dosimeter.
Note: Dosimeters with measurements cannot be deleted. Click Edit
Dosimeter to display the Dosimeter Data Entry dialog box. Clear
the Dosimeter used by Reader check box.
Working with Measurement Fractions and Skipped Fractions
As measurements are collected from a patient’s dosimeters, you can
make changes to the information collected on the DVS Reader’s
Treatment Notes screen, and you can add, edit, or delete skipped
fractions.
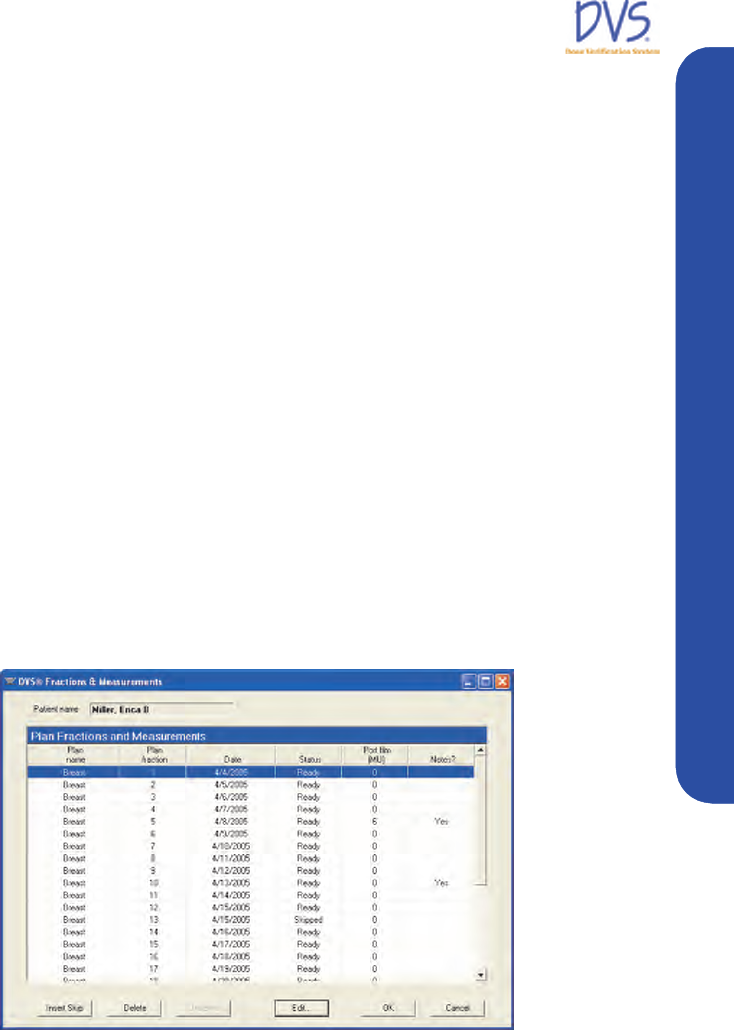
On the Patient Data Entry window, click View Fractions to
display the Fractions & Measurements windows. This window
lists the planned fractions and the measurements made for each
fraction (Figure 36).
Figure 36 — Fractions & Measurements
The columns in the Fractions & Measurements window are
defined as follows:
•Plan name – The plan’s name from the planning table.
934-00553-00.book Page 45 Friday, June 16, 2006 8:07 AM

DVS Dose Verification System
46
•Plan fraction – The plan’s fraction number.
•Date – The measurement date.
•Status – The measurement status for the plan and fraction:
•Ready – A normal measurement was taken.
•Skipped – No measurement was taken, but treatment was
given.
•Deleted – The measurement is marked as deleted; it is not
associated with a plan and fraction.
• [Blank] – No measurement or treatment has been
performed yet.
•Port film (MU) – The number of monitor units from port films
taken during the measurement.
•Notes? – Whether any notes check boxes were selected for the
measurement. Ye s means there are notes. Blank means there are
no notes.
Deleting a Fraction
To mark a measurement fraction as deleted so it is not associated
with a plan and fraction, perform the following steps:
1. Select the measurement.
2. Click Delete. The measurement is not actually deleted, but will
not be used to calculate total dose administered.
To restore a deleted measurement:
1. Select the fraction.
2. Click Undelete.
Inserting Skipped Fractions
Skipped fractions are used to record when treatment was given, but
measurements from the DVS Dosimeters were not made or
completed.
To insert a skipped fraction:
1. Select the row with the plan and fraction that was missed.
2. Click Insert Skip. This associates a skipped fraction with the
selected plan and fraction.
To remove a skipped fraction:
1. Select the row with the skipped fraction.
2. Click Delete.
934-00553-00.book Page 46 Friday, June 16, 2006 8:07 AM
DVS Dose Verification System
47
Using the Plan and Review Software
Changing Information for a Fraction
From the Fractions & Measurements window, you can change the
notes or the port film monitor units for a fraction:
1. Select the fraction to edit.
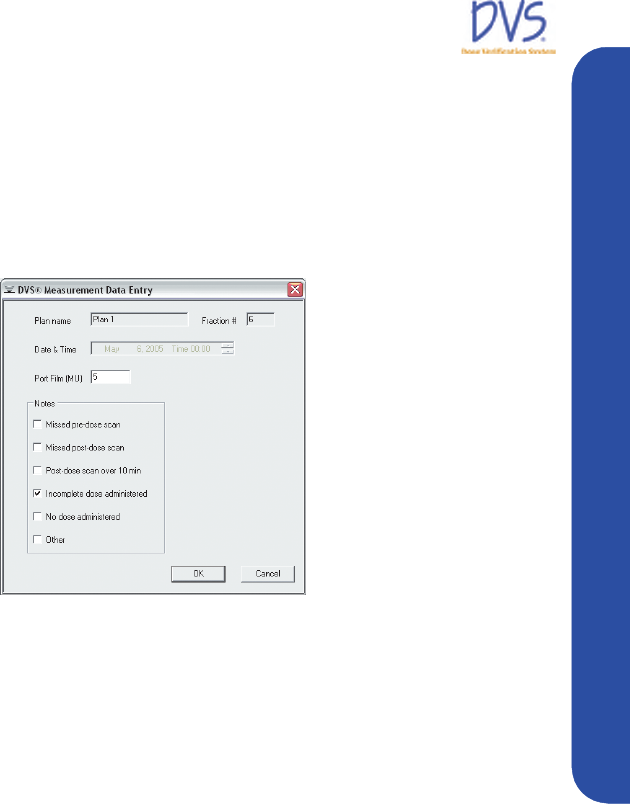
2. Click Edit to display the Measurement Data Entry dialog box
(Figure 37).
Figure 37 — Measurement Data Entry
3. Edit the following information in the Measurement Data
Entry dialog box:
•Plan name – (read-only) The plan name of the selected
fraction
•Fraction # – (read-only) The plan’s fraction number
•Date & Time – (read-only, except for Skipped fractions)
The date and time of the measurement. For Skipped
fractions, this can be changed; however, the date and time
must stay between the fraction before and after the current
fraction. This is needed to keep the measurement fractions
in the proper order.
•Port Film (MU) – The number of monitor units from Port
films taken during this measurement
•Notes – This group-box contains check boxes that record
the notes entered by the user
4. Click OK to save the changes made in this dialog box. To
discard the changes, click Cancel.
934-00553-00.book Page 47 Friday, June 16, 2006 8:07 AM
DVS Dose Verification System
48
5.4 Viewing Patient Results
From the Main Menu, click Patient Results to perform the
following tasks:
• Displaying a List of Patient Results
• Viewing Results Charts
• Viewing Results Reports
Displaying a List of Patient Results
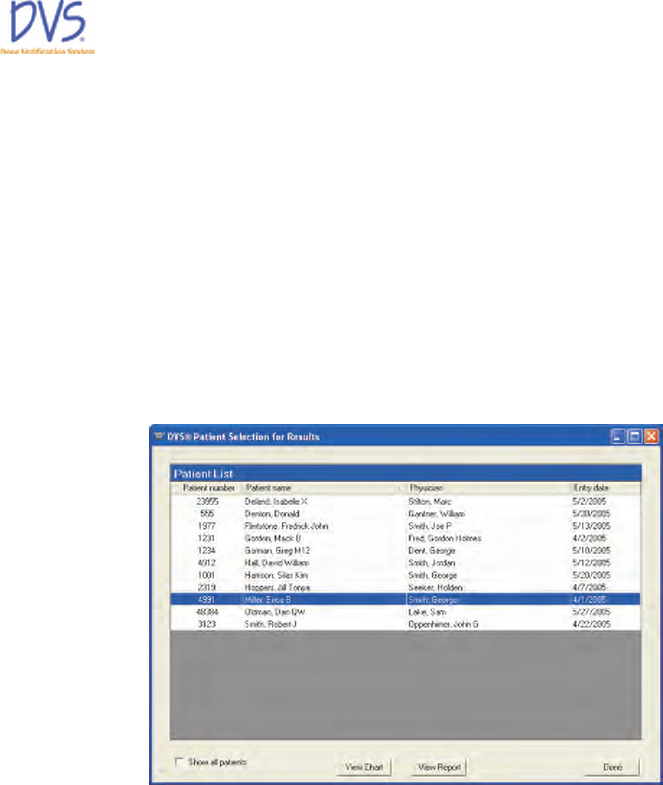
To view patient results, click Patient Results on the DVS Main
Menu. The Patient Selection for Results window appears
(Figure 38).
Figure 38 — Patient Selection for Results
By default, the patient list displays only the patients that are marked
to be shown in the DVS Reader. This makes it easier to manage a
large list of patients. To list all the patients in the Dosimetry
Database, select the Show all patients check box. From this
window, you can perform the following tasks:
•To view a chart showing the dose measurements from a
patient’s dosimeters, select the patient and click View Chart
to display the Results Chart screen. For more information, see
Viewing Results Charts on page 49.
•To view a report showing the dose measurements from a
patient’s dosimeters, select the patient and click View Report
934-00553-00.book Page 48 Friday, June 16, 2006 8:07 AM
DVS Dose Verification System
49
Using the Plan and Review Software
to display the Results Report screen. For more information,
see Viewing Results Reports on page 51.
•To return to the Main Menu, click Done.
Viewing Results Charts
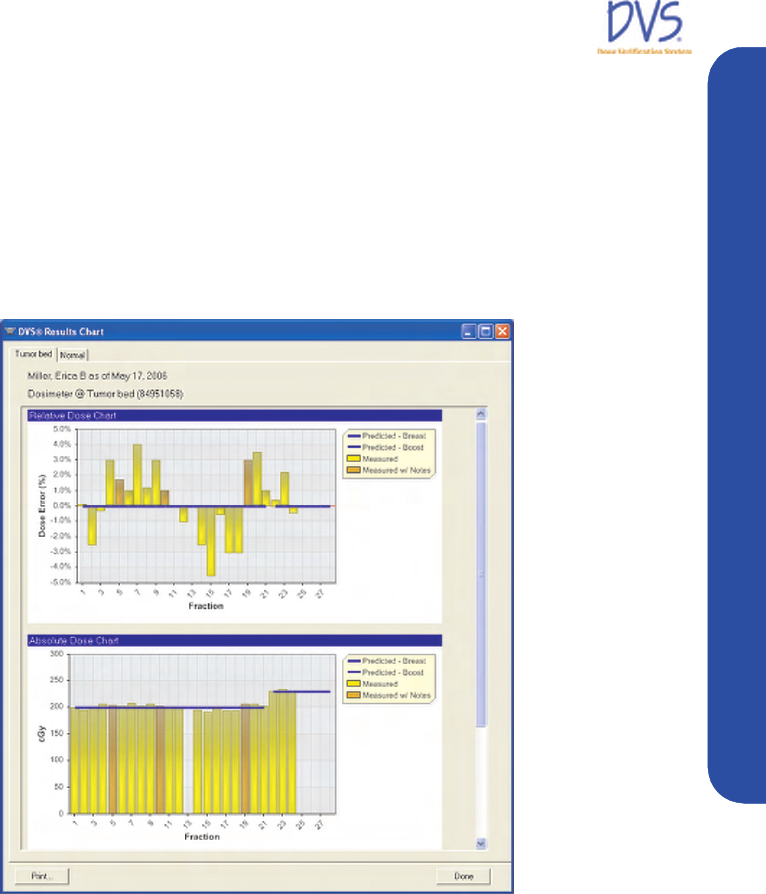
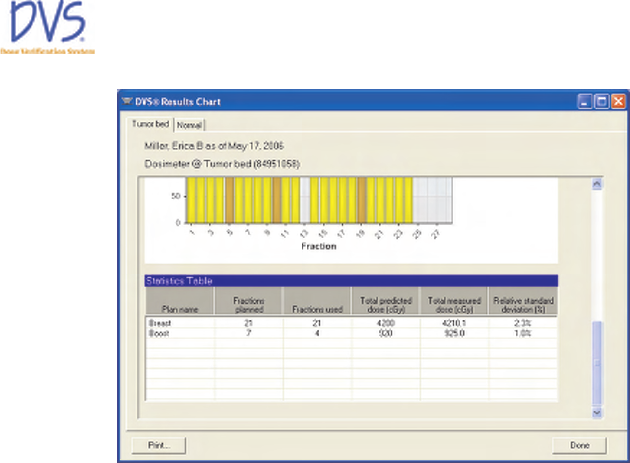
The Results Chart window summarizes a patient’s dosimeter
measurements. There are two charts and a statistics table shown for
each dosimeter (Figure 39 and Figure 40).
Figure 39 — Results Charts
934-00553-00.book Page 49 Friday, June 16, 2006 8:07 AM
DVS Dose Verification System
50
Figure 40 — Statistics Table
Dosimeter results are displayed in a tab labeled with the dosimeter
location.
The first chart is the Relative Dose Chart. This shows the
difference between each measured dose and its predicted dose as a
percentage. The value shown for each bar is the measured dose
relative to the predicted dose.
The second chart is the Absolute Dose Chart. This shows the
measured doses (in cGy) as gold bars, and the predicted doses as
blue lines. Each plan is shown as a separate blue line.
In the charts, the brown bars identify measurements where either a
port film was taken or notes were entered by the user.
For each of the charts, the mouse can be positioned over a bar to
show more information about the measurement:
• The value of the measurement
• The date of the measurement
• Who made the measurement
• The monitor units from port films that were taken
• Any notes selected during the measurement process
No bars are shown for skipped fractions or fractions where a
dosimeter value could not be read. Positioning the mouse over these
empty spaces will show if it was a skipped fraction or a
measurement error.
934-00553-00.book Page 50 Friday, June 16, 2006 8:07 AM

DVS Dose Verification System
51
Using the Plan and Review Software
The Statistics Table shows summary statistics for each of the
patient’s plans. The columns are as follows:
•Plan name – The name of the plan
•Fractions planned – The number of fractions in the plan
•Fractions used – The number of dose fractions administered so
far
•Total predicted dose (cGy) – The expected dose administered
for the number of fractions displayed in the Fractions used
column
•Total measured dose (cGy) – The measured dose for the
number of fractions displayed in the Fractions used column.
For skipped fractions or fractions with measurement errors, the
predicted dose is used instead.
•Relative standard deviation (%) – The standard deviation of
the measurements divided by the average of the measurements.
For skipped fractions or fractions with measurement errors, the
predicted dose is used instead.
To print the charts for a patient, click Print. One page is printed for
each dosimeter.
Viewing Results Reports
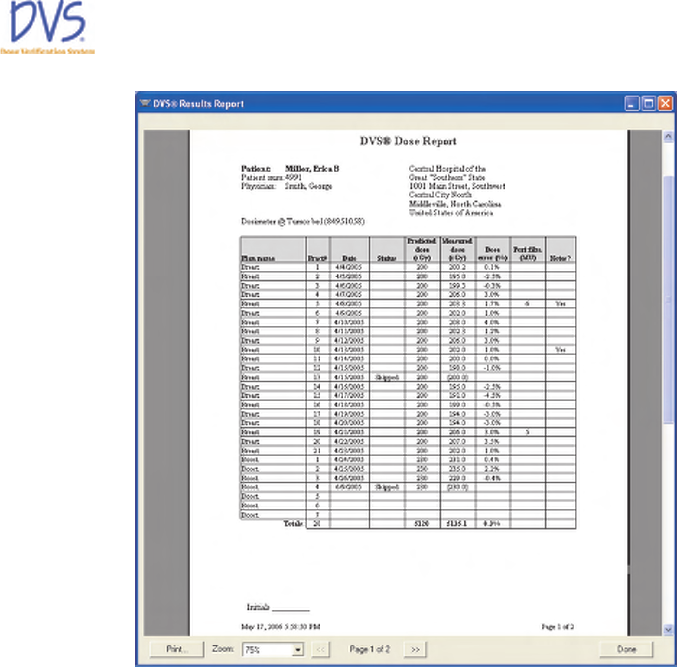
The Results Report window summarizes a patient’s dosimeter
measurements in a report format (Figure 41).
934-00553-00.book Page 51 Friday, June 16, 2006 8:07 AM
DVS Dose Verification System
52
Figure 41 — Results Report
The report is similar to the Fractions & Measurements screen (see
Working with Measurement Fractions and Skipped Fractions on
page 45). However, the report also shows the dose values from each
dosimeter. The measurement for each dosimeter is shown in a
separate table. The columns in the tables are as follows:
•Plan name – The plan’s name from the planning table.
•Fract # – The plan’s fraction number.
•Date – The measurement date.
•Status – The measurement status for the plan and fraction. It is
one of:
• [Blank] – A normal measurement was taken.
•Skipped – No measurement was taken, but treatment was
given.
934-00553-00.book Page 52 Friday, June 16, 2006 8:07 AM

DVS Dose Verification System
53
Using the Plan and Review Software
•Deleted – The measurement is marked as deleted; it is not
associated with a plan and fraction.
•Error – An error occurred when taking the measurement
from this dosimeter.
•Predicted dose (cGy) – The dose from the planning table.
•Measured dose (cGy) – The measured dose.
•Dose error (%) – The difference between the Measured dose
and the Predicted dose, divided by the Predicted dose.
•Port film (MU) – The number of monitor units from port films
taken during the measurement.
•Notes? – Whether any notes check boxes were selected for the
measurement. Yes means there are notes. Blank means there are
no notes.
The size of the displayed report can be changed with the Zoom
selection. This does not affect the printed report.
To display the next page of the report, click >>. To display the
previous page, click <<.
To print the report, click Print.
5.5 DVS System Administration
From the Main Menu, click System Administration to display the
Administration screen. This screen contains three tabs:
•Users – This tab contains the list of authorized users.
•Options – This tab contains options for the DVS system.
•Database – This tab contains the database connection
information.
From these tabs, you can perform the following tasks:
• Adding and Editing DVS Users
• Changing Institutional Information and System Options
• Changing the Database Connections
• Backing up and Restoring the DVS Database
Adding and Editing DVS Users
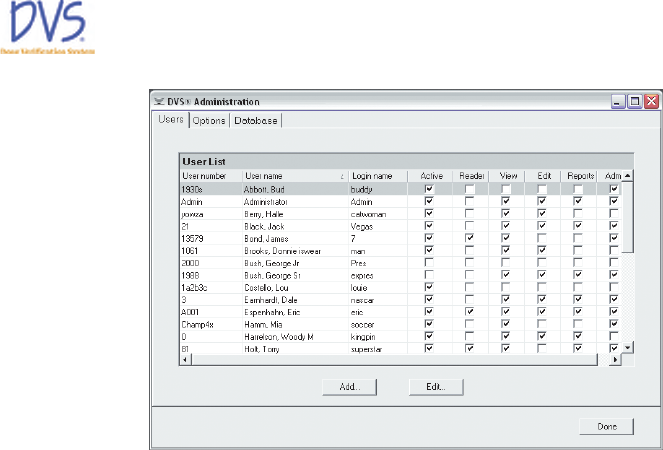
The Users tab displays the list of authorized users (Figure 42).
934-00553-00.book Page 53 Friday, June 16, 2006 8:07 AM
DVS Dose Verification System
54
Figure 42 — Users
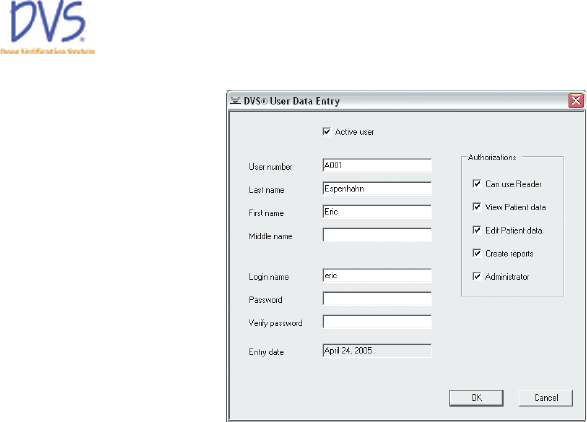
Each person who uses the DVS Plan and Review Software and the
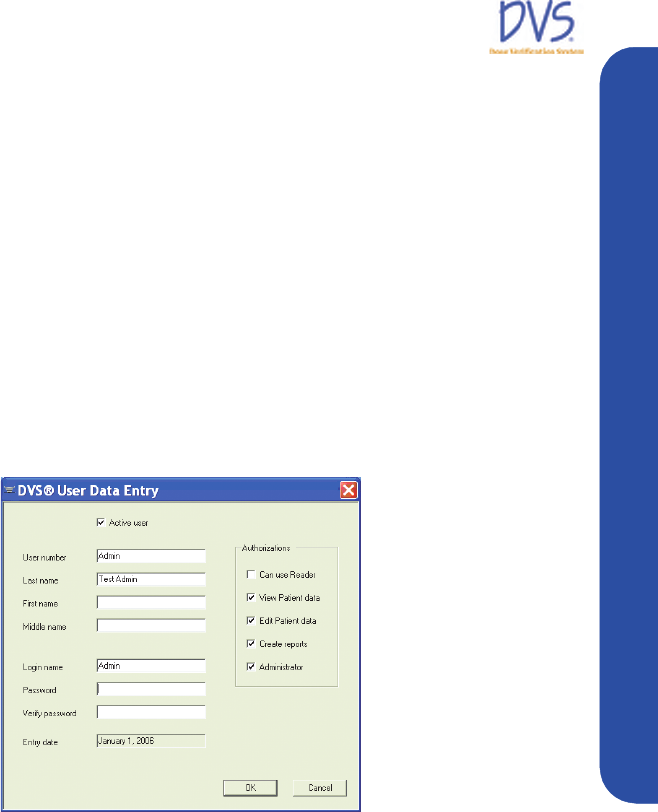
DVS Reader, must have a login name and password. To add a new
user, click Add. This displays the User Data Entry window
(Figure 43). The fields in this window are as follows:
•Active user – Select this check box to let the user log in. Clear
this check box to disable this user.
•User number – (Required) Enter a unique user number or
identifier.
•Last name – (Required) Enter the user’s last name.
•First name – Enter the user’s first name.
•Middle name – Enter the user’s middle name.
•Login name – (Required) Enter the user’s login name for the
Plan and Review Software.
•Password – (Required) Enter the user’s password.
•Verify password – (Required) Enter the user’s password for
verification.
•Entry date – (Read-only) Enter the date when the user was
added.
•Can use Reader – Select this check box to allow the user to log
in and use the DVS Reader. Clear this check box to prevent this
user from appearing in the user list on the Reader.
•View Patient data – Select this check box to allow the user to
select the Patient Information button and view the screens
934-00553-00.book Page 54 Friday, June 16, 2006 8:07 AM
DVS Dose Verification System
55
Using the Plan and Review Software
that it contains. Clear this check box to disable the Patient
Information button for this user.
•Edit Patient data – Select this check box to allow the user to
edit patient information. If this check box is selected, then the
View Patient Data check box is selected also. Clear this check
box to prevent the user from changing any patient information.
•Create reports – Select this check box to allow the user to
select the Patient Results button and view the charts and
reports. Clear this check box to disable the Patient Results
button.
•Administrator – Select this check box to allow the user to
select the Administration button and perform administrative
functions. Clear this check box to disable the Administration
button.
Figure 43 — User Data Entry
To edit an existing user, select the user in the list and click Edit.
This displays the User Data Entry window with the user’s
information.
To return to the Main Menu, click Done.
Changing Institutional Information and System Options
The Options tab contains information that is typically setup once
when the DVS system is installed (Figure 44).
934-00553-00.book Page 55 Friday, June 16, 2006 8:07 AM
DVS Dose Verification System
56
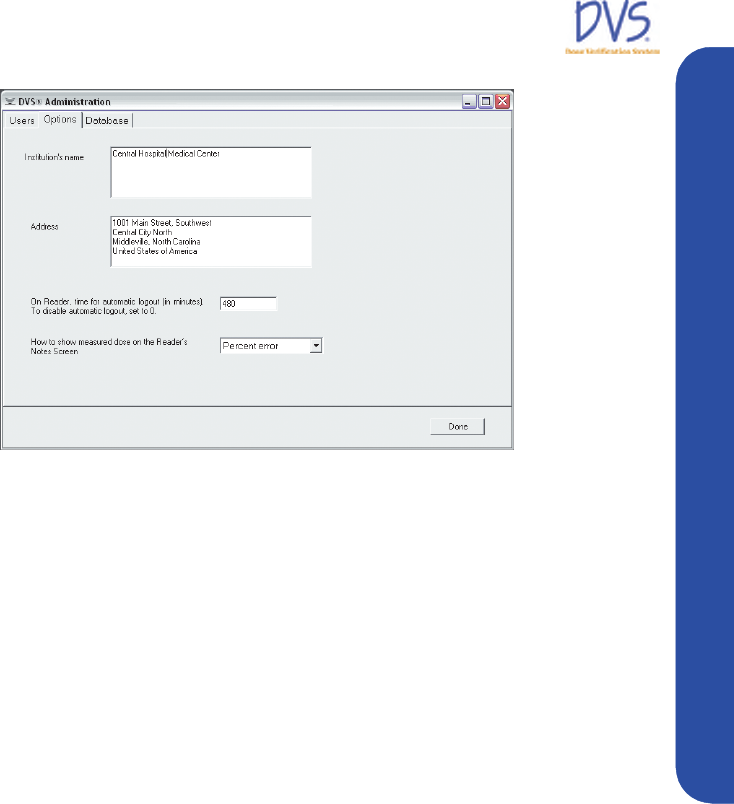
Figure 44 — Options
The Options tab contains the following fields:
•Institution’s name – The name of the institution to print on the
charts and reports
•Address – The address printed on the charts and report
•On Reader, time for automatic logout – This is the number of
minutes of idle time to allow before automatically logging out
of the DVS Reader
•How to show the measured dose on the Reader’s Notes
Screen –The user can choose from three options to the dose on
the Reader:
•None – Do not show the measured dose on the Reader
•Percent error – Show the measure dose as a percentage
relative to the predicted dose
•Absolute dose – Show the measured dose in cGy
Changing the Database Connections
The Database tab contains the connection information to the
Dosimetry Database. Contact your DVS administrator to get the
settings for this tab (Figure 45).
934-00553-00.book Page 56 Friday, June 16, 2006 8:07 AM
DVS Dose Verification System
57
Using the Plan and Review Software
Figure 45 — Database
Backing up and Restoring the DVS Database
To back up or restore the DVS Database, perform the following
steps:
1. Click the DVS Plan and Review icon on the Desktop or select
Start>Programs>DVS>DVS Plan and Review. The DVS
Main Menu and DVS Login dialog box appears.
2. In the DVS Login dialog box, enter the Admin login name and
password.
3. Click OK. The Main Menu of the DVS Plan and Review
Software appears.
4. Click Administration.
5. Click the Database tab.
6. To back up the database:
a. Click Backup Database.
b. In the Backup DVS Database dialog box, select a location
to save the backup file.
c. Click Save. The database backup file is saved using the
current date and time in the file name. For example: DVS
DB Backup 20Apr2006 15.20.32.bak
d. When the database is successfully backed up, a message
box appears. Click OK.
934-00553-00.book Page 57 Friday, June 16, 2006 8:07 AM

DVS Dose Verification System
58
7. To restore a database:
a. Click Restore Database.
b. In the Restore DVS Database dialog box, select the
backup file you want to restore. DVS Database files are
saved using the current date and time in the file name. For
example: DVS DB Backup 20Apr2006 15.20.32.bak
c. Click Open.
8. Click Done.
6USING THE DVS READER
Use the DVS Reader to perform the following tasks:
• Powering on the DVS Reader
• Login to the DVS Reader
•Test a Dosimeter
• Select a Patient
• Select a Plan/Fraction
• Take a Pre-Dose Reading
• Take a Post-Dose Reading
• Enter Treatment Notes
In order to use the DVS Reader, the patient, dosimeter, and plan
information must have been entered using the Plan and Review
Software.
6.1 Power On the DVS Reader
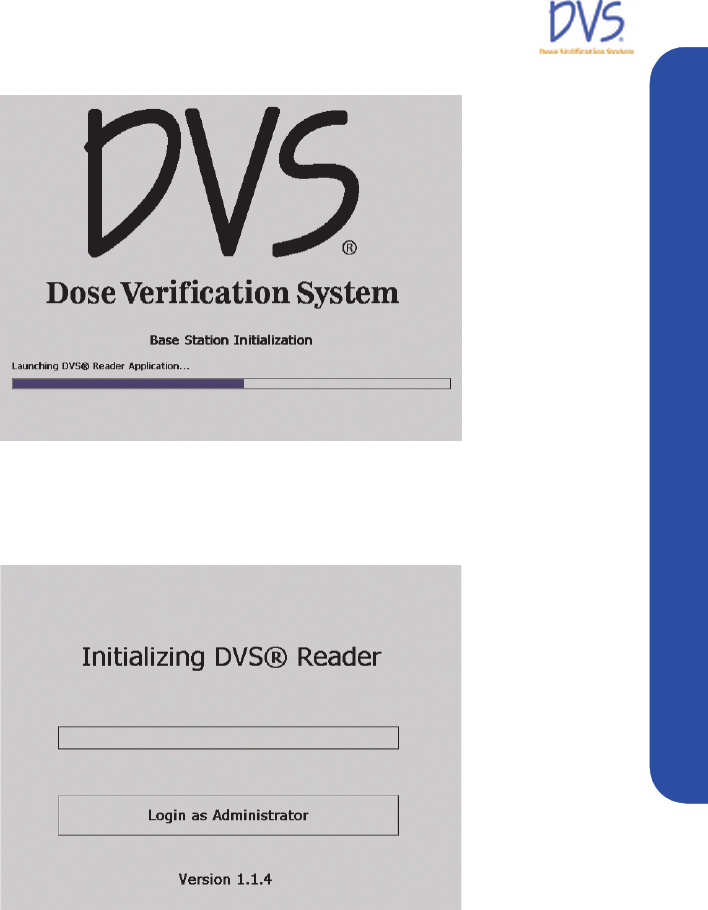
1. Power on the Reader. The Power On screen appears briefly.
934-00553-00.book Page 58 Friday, June 16, 2006 8:07 AM
DVS Dose Verification System
59
Using the DVS Reader
Figure 46 — Power On
The Initializing DVS Reader screen appears indicating that the
Reader is starting up (Figure 47).
Figure 47 — Initializing DVS Reader
The Reader performs tests to verify the connection to the Dosimetry
Database, software compatibility, and that the Reader Wand is
functioning.
If you need to set up the DVS Dosimetry Database, you can login
using the Administrator Login screen by clicking Login as
Administrator. You need to get the Administrator password-of-
the-day from Technical Support. All other users should wait until
initialization is complete and the DVS Reader Login appears.
934-00553-00.book Page 59 Friday, June 16, 2006 8:07 AM
DVS Dose Verification System
60
Note: If there are any errors, see section 8 Troubleshooting on page
70 for a resolution.
6.2 Login to the DVS Reader
To login to the DVS Reader, perform the following steps:
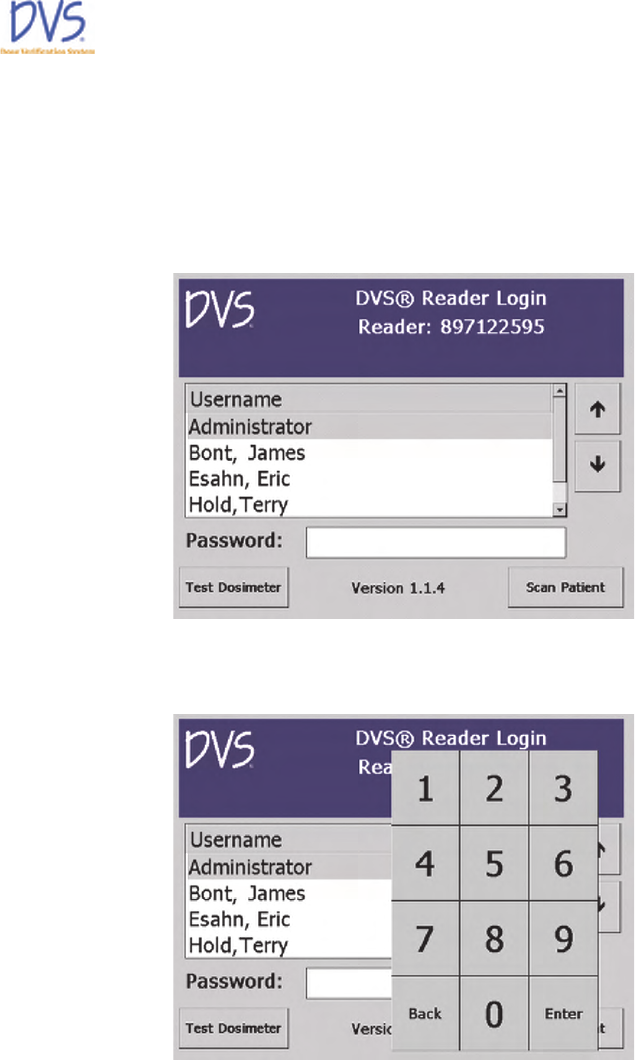
1. Select a username from the list (Figure 48).
Figure 48 — Reader Login
Tap the Password field and a numeric keypad appears.
Figure 49 — Keypad
2. Enter the password using the touch-screen keypad and then
press Enter on the keypad.
934-00553-00.book Page 60 Friday, June 16, 2006 8:07 AM
DVS Dose Verification System
61
Using the DVS Reader
3. Choose whether you want to test a dosimeter or scan a patient:
•Press Test Do s im eter to test a dosimeter’s functionality
before implantation.
•Press Scan Patient to begin the process of reading a
patient’s dose.
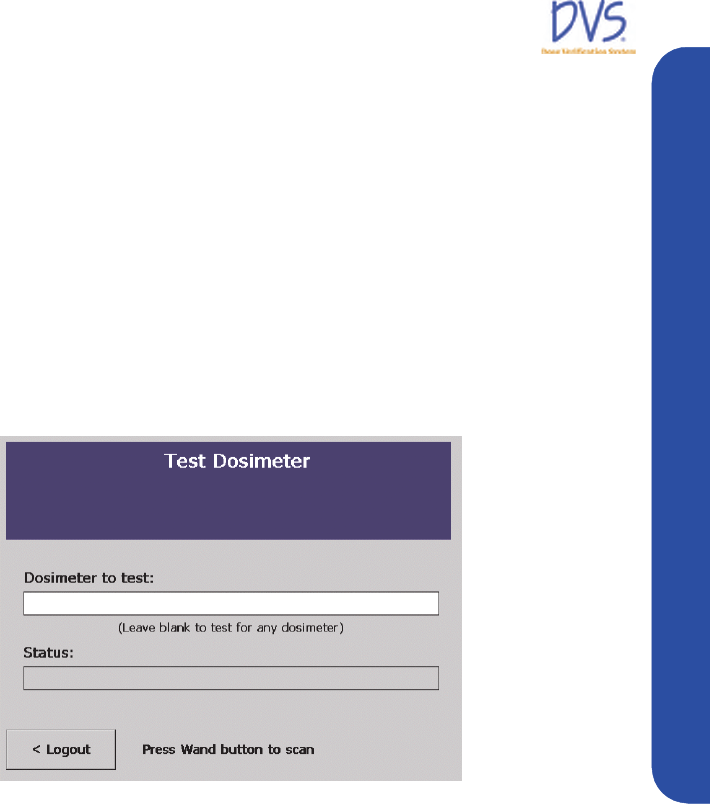
6.3 Test a Dosimeter
Dosimeters may be tested prior to implant to assure functionality or
to verify dosimeters that have already been implanted. The
dosimeter may be tested by either entering the dosimeter’s serial
number or scanning using the Reader Wand, or by simply scanning
using the Reader Wand without entering a serial number.
Figure 50 — Test Dosimeter
If there are two or more dosimeters in the read range, then you need
to enter each dosimeter’s serial number one at a time. If you do not
enter a dosimeter’s serial number, then only one dosimeter is
allowed in the read range volume. If there is only one dosimeter in
the read range, make sure the Dosimeter to test field is blank so the
Reader searches for any dosimeter.
•To read a dosimeter without knowing its serial number,
leave the Dosimeter to test field blank (Figure 50), then hold
the dosimeter near the Reader Wand and press the button on the
Reader Wand. The Reader searches for any available
dosimeters within the read range.
934-00553-00.book Page 61 Friday, June 16, 2006 8:07 AM

DVS Dose Verification System
62
•To scan for a specific dosimeter, tap the Dosimeter to test
field and a numeric keypad appears. Enter the dosimeter
number in the field and press Enter. Next, hold the dosimeter
near the Reader Wand and press the button on the Reader
Wand.
If the dosimeter is functional, a message appears indicating that the
dosimeter was found. For example:
Dosimeter 456789 was found.
If the dosimeter could not be read, an error message appears:
No Dosimeter found.
When finished testing, press Logout and the Reader returns to the
Login Screen.
6.4 Scan a Patient
To scan a patient, log in to the DVS Reader and press Scan Patient.
The scan patient screens are set up like a wizard. You can move
forward and backward through the series of screens by pressing
Next or Back.
The workflow for scanning a patient is as follows:
• Select a Patient
• Select a Plan/Fraction
• Take a PRE-Dose Reading
• Dose the Patient
• Take a POST-Dose Reading
• Enter Treatment Notes
Select a Patient
To select a patient:
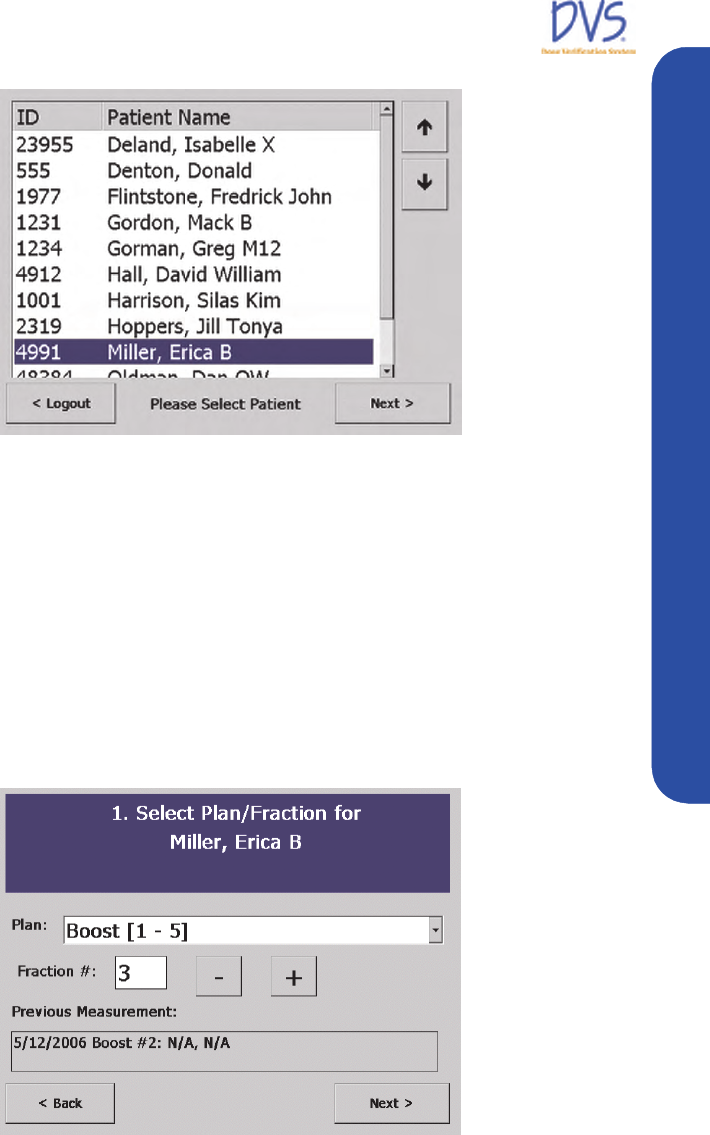
1. Press Scan Patient on the Login Screen. The Select Patient
screen appears (Figure 51). Patient names appear in
alphabetical order. To find a patient, tap the up and down
arrows on the right side of the screen to move between pages of
patients.
934-00553-00.book Page 62 Friday, June 16, 2006 8:07 AM
DVS Dose Verification System
63
Using the DVS Reader
Figure 51 — Select Patient
2. Select the patient to be scanned by pressing the patient’s name
on the touch screen, then press Next.
Press Logout and the system returns to the Login Screen.
Select a Plan/Fraction
After a patient is selected and the patient data is retrieved from the
database, the Select Plan screen appears for the selected patient
(Figure 52).
Important: Always verify that the correct patient is being treated
by verifying the name at the top of the screen.
Figure 52 — Select Plan
934-00553-00.book Page 63 Friday, June 16, 2006 8:07 AM

DVS Dose Verification System
64
The Select Plan/Fraction screen displays the current plan,
treatment fraction, and previous dose measurements. If more than
one plan was set up for the patient, you can select a new plan by
tapping the Plan pull-down menu and selecting the new plan. If the
fraction needs to be changed, press the – button or the + button to
decrease or increase the fraction number. You can also tap the
Fraction field and enter the fraction number using the keypad.
Note: You cannot use a fraction that is not part of the patient’s plan,
use a fraction that has been skipped, or re-use a fraction that already
has measurements.
If the selected plan and fraction number is advanced beyond the
initial value, then the following message appears:
Are you sure you wish to add Skip Fraction(s)?
This is a reminder that one or more skipped fractions will be added
to the Dosimetry Database. These skipped fractions serve as
markers that measurements were not made for some of the planned
fractions. Press the OK button to accept the skipped fractions. Press
the Cancel button to return to the Select Plan screen and choose
another plan or fraction.
Later, the skipped fractions can be edited using the Plan and
Review Software. For information about skipped fractions in the
Plan and Review Software, see Working with Measurement
Fractions and Skipped Fractions on page 45.
When the correct plan and fraction are selected, press Next to go to
the PRE-Dose screen.
To cancel the treatment at this point, press Back and to return to the
Select Patient screen where you can press Logout.
Take a PRE-Dose Reading
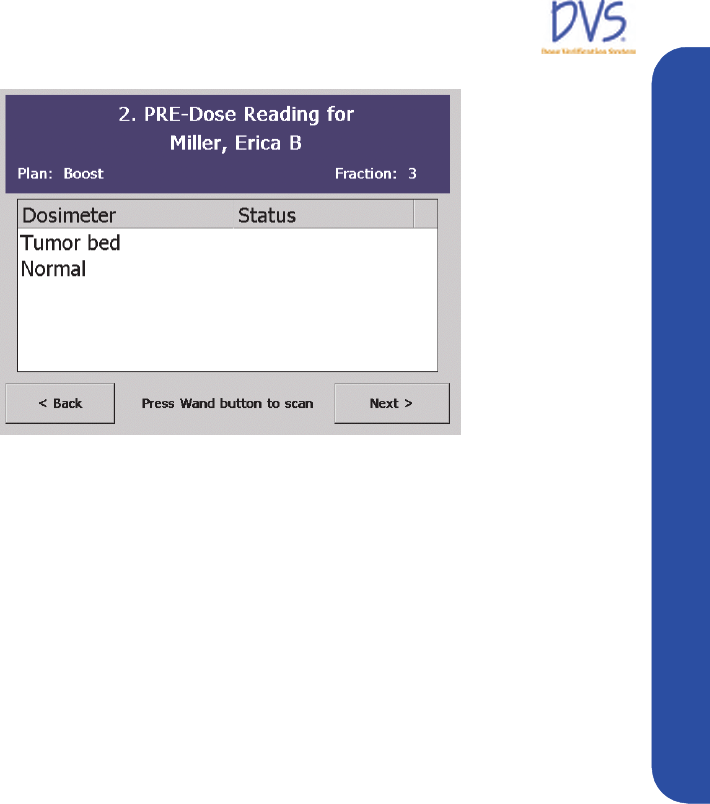
The PRE-Dose screen is used to scan the patient’s dosimeters
before being treated (Figure 53). If the plan and fraction are correct,
position the Reader Wand next to the patient where the dosimeters
are implanted. Press the button on the Reader Wand to activate the
Reader Wand.
934-00553-00.book Page 64 Friday, June 16, 2006 8:07 AM
DVS Dose Verification System
65
Using the DVS Reader
Figure 53 — PRE-Dose
As the Reader Wand begins scanning for the dosimeters, the blue
lights on the Reader Wand will blink indicating that it is searching
for the dosimeters. On the PRE-Dose screen, the following
message appears next to each dosimeter as it is read:
Scanning…XX%
where XX% is the percentage of the data from the dosimeter that
has been read.
When each dosimeter has been completely read, the Status for the
dosimeter changes to Complete. When all of the dosimeters have
been found, the light on the Reader Wand stops blinking. Press
Next to go on to POST-Dose screen.
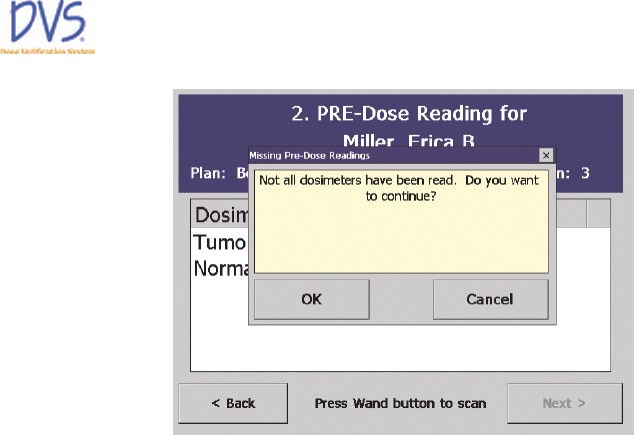
All Dosimeters Not Read
If all dosimeters were not read during the pre-dose operation, the
following message appears:
Not all dosimeters have been read. Do you want to
continue?
934-00553-00.book Page 65 Friday, June 16, 2006 8:07 AM
DVS Dose Verification System
66
Figure 54 — Dosimeters Not Read
Press OK to skip the dosimeters that were not read and go on to
POST-Dose screen. However, if no dosimeters have been read
(none are Complete), the Treatment Notes screen appears instead
of the POST-Dose screen. Press Cancel to cancel the operation and
stay on the PRE-Dose screen.
Discard Readings
If you want to discard the readings just made, press Back and the
following message appears:
Do you want to discard these Pre-dose readings?
Press OK to discard the pre-dose readings and return to the Select
Plan screen. Press Cancel to cancel the operation and stay on the
PRE-Dose screen.
Dose the Patient
When the pre-dose operation is complete, the patient is ready for
radiotherapy. Treat the patient as usual. Within ten (10) minutes of
completing radiation therapy, scan the patient again to obtain a
post-dose reading (Optimal post-dose reading is 2.5 minutes
following irradiation).
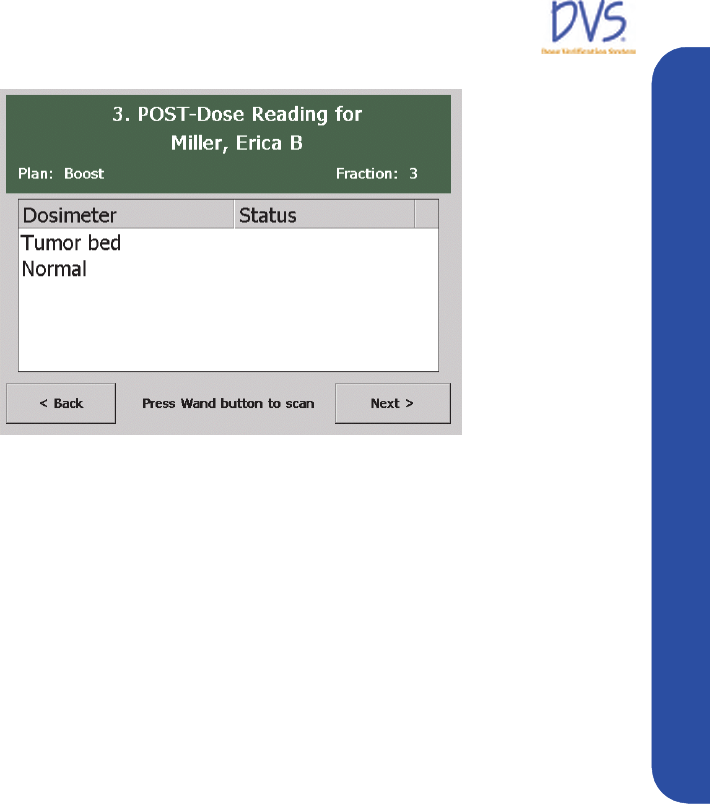
Take a POST-Dose Reading
The POST-Dose screen is used to scan the patient’s dosimeters
after being treated (Figure 55).
934-00553-00.book Page 66 Friday, June 16, 2006 8:07 AM
DVS Dose Verification System
67
Using the DVS Reader
Figure 55 — POST-Dose
Position the Reader Wand next to the patient where the dosimeters
are implanted. Press the button on the Reader Wand to activate the
Reader Wand. As the Reader Wand begins scanning for the
dosimeters, the lights on the Reader Wand blink indicating that it is
looking for the dosimeters. On the POST-Dose screen, the
following message appears:
Scanning…XX%
When each dosimeter has been completely read, the Status for the
dosimeter changes to Complete. When all of the dosimeters have
been found, the light on the Reader Wand stops blinking. Press
Next to display the Treatment Notes screen.
All Dosimeters Not Read
If all dosimeters were not read during the post-dose operation, the
following message appears:
Not all dosimeters have been read. Do you want to
continue?
Press OK to skip the dosimeters that were not read and go on to the
Treatment Notes screen. Press Cancel to cancel the operation and
stay on the POST-Dose screen.
Discard Readings
If you want to discard the readings just made, press the Back button
and the following message appears:
Do you want to discard these Post-dose readings?
934-00553-00.book Page 67 Friday, June 16, 2006 8:07 AM
DVS Dose Verification System
68
Press OK to discard the post-dose readings and return to the PRE-
Dose screen. Press Cancel to cancel the operation and stay on the
POST-Dose screen.
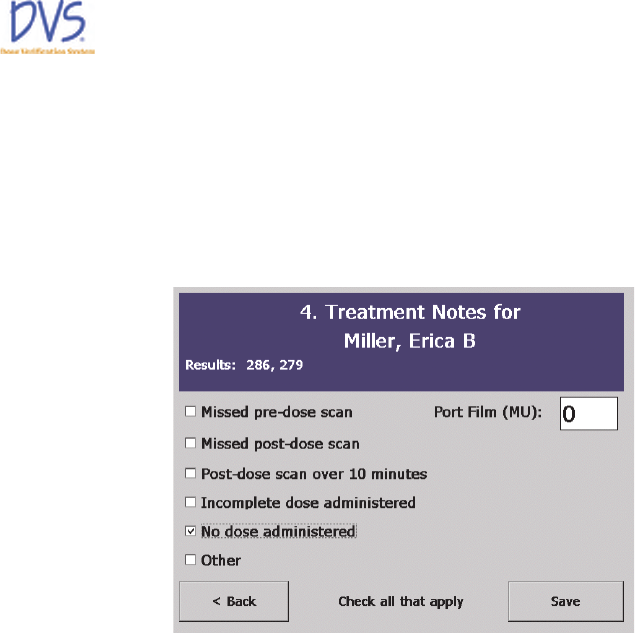
Enter Treatment Notes
Use the Treatment Notes screen to record information about the
treatment session (Figure 56).
Figure 56 — Treatment Notes
Select any of the check boxes in this screen, or enter the number of
monitor units (MU) from a port film that the patient received. To
enter the number of monitor units, tap the Port Film field to display
the keypad. The port film’s monitor units will not be incorporated
into the calculated daily or cumulative dose.
When you have completed this screen, press Save. A dialog box
asks if you want to save the results. Press OK to save the results, or
Cancel to stay on the Treatment Notes screen.
After the data is saved, the Select Patient screen appears again, so
you can start scanning the next patient.
934-00553-00.book Page 68 Friday, June 16, 2006 8:07 AM

DVS Dose Verification System
69
Imaging and Therapeutic Compatibility
7IMAGING AND THERAPEUTIC COMPATIBILITY
The following table provides guidance on the interactions of an
implanted dosimeter with various imaging and therapeutic
modalities:
Imaging/
Therapeutic
Modality
Compatible Potential Issues Resolution
X-Ray
Photography
(10-100kV)
Ye s
The dosimeter is radio-
opaque and will appear
on X-Ray images.
1. Dosimeter obstructs
region of interest.
2. For fluoroscopic
procedures, Dosimeter
will accumulate dose –
reducing total dose
range.
1. Use alternate X-Ray
views.
2. Complete anticipated
fluoroscopic procedures
prior to implantation if
possible.
Computed
Tomography (CT)
Ye s
The dosimeter is radio-
opaque and will appear
on CT images.
The dosimeter contains
metal components and can
cause streak artifacts in
transverse CT images.
Use metal artifact reduction
(MAR) software to remove/
reduce artifacts if necessary.
Mammography Yes
The dosimeter is radio-
opaque and will appear
on mammograms.
The dosimeter may
obstruct region of interest.
Use additional views during
screening, use digitized
scans and computer aided
detection for increased
sensitivity, and/or use
ultrasound.
Nuclear Imaging
(PET and Bone
Scan)
Yes The dosimeter could cause
some attenuation of “hot-
spots” in the nuclear
image.
Use artifact reduction
algorithms or tomography if
a region of interest is
obstructed by the dosimeter.
Magnetic
Resonance Imaging
(MRI)
MR Conditional The dosimeter will cause a
“flare” or image artifact in
the MRI image in all
directions around the
dosimeter.
Perform any necessary MR
imaging prior to
implantation. Subsequent
imaging may require
removal of the DVS
dosimeters.
Ultrasound Yes The dosimeter obstructs
region of interest.
Use additional views during
screening.
Shortwave or
Microwave
Diathermy
No Heating of metal may
cause tissue damage and
loss of functionality.
Contraindicated
Therapeutic
Ultrasound
No Heating of metal or
mechanical stress may
cause tissue damage and
loss of functionality.
Contraindicated
934-00553-00.book Page 69 Friday, June 16, 2006 8:07 AM

DVS Dose Verification System
70
8TROUBLESHOOTING
This section provides a list of common issues and error messages
and the steps you can take to resolve them.
• Troubleshooting the DVS Server System Software Setup
• DVS Reader not operational
• Unable to obtain a pre-dose or post-dose reading
• DVS Reader error messages
• Plan and Review Software error messages
8.1 Troubleshooting the DVS Server System Software Setup
If the window below appears more than two or three times while
installing the DVS Dosimetry Database Server, close it and click
Stop on the DVS Server System Software Setup window. Click
Setup Server Components to restart the setup program. If this
problem continues, remove ALL components from system, reboot
the computer, and restart the setup program.
8.2 DVS Reader Not Operational
Check that the power cord is fully seated in the electrical outlet and
in the back of the Reader Base Station.
8.3 Unable to Obtain a Pre-Dose or Post-Dose Reading
1. Check that the Reader Wand is connected to the Base Station.
2. Make sure metal objects are clear of the patient and Reader
Wand.
3. Re-position the Reader Wand to another area near the
implanted Dosimeters.
4. Hold the reader steady over the area with the implanted
Dosimeters.
8.4 DVS Reader Error Messages
The error messages displayed by the Reader are listed in this
section in alphabetical order.
934-00553-00.book Page 70 Friday, June 16, 2006 8:07 AM

DVS Dose Verification System
71
Troubleshooting
Cannot access the Dosimetry Database. Please check
connections, or contact your IT Department, then press OK to
try again.
If you encounter this error, perform the following
troubleshooting steps:
• Make sure the LAN (local area network) cable is firmly
connected to the Reader.
• Make sure that the Windows XP Firewall is turned OFF on
the database server computer or create an exception to
allow access to the computer over Port 80 (HTTP).
• Make sure the computer with the Dosimetry Database is
running and is connected to the LAN.
• Contact the IT Department to make sure they did not
change the setup of the Dosimetry Database.
To have the Reader try the operation again, press the OK
button.
If the problem remains, turn off the Reader then wait 15
seconds and turn it on again. Try the operation again. If the
problem remains, contact the manufacturer.
Cannot communicate with the Wand. Please refer to the
trouble-shooting guide, and then press OK to try again.
If you encounter this error, make sure that the Reader Wand’s
green power-on light is lit. If it is not, then make sure the Wand
cable is firmly connected to the back of the Base Station.
To have the Reader try the operation again, press the OK
button.
If the problem remains, turn off the Reader then wait 15
seconds and turn it on again. Try the operation again. If the
problem remains, contact the manufacturer.
The data for this Patient is invalid. Please select another
patient.
This message means that the patient’s data was likely changed
without using the DVS Software. Contact your DVS
Administrator to resolve this problem.
934-00553-00.book Page 71 Friday, June 16, 2006 8:07 AM

DVS Dose Verification System
72
The Dosimetry Database has changed. Contact Technical
Support.
This message means that the Dosimetry Database was likely
changed without using the DVS Software. Contact your DVS
Administrator to resolve this problem.
The dosimetry database is not compatible with this Reader.
Please correct and press OK to try again.
Verify that all software upgrades needed for the Reader, the
Dosimetry Database, and the Plan and Review Software have
been implemented. Then press the OK button to try this
operation again.
This patient has no more Fractions. Please verify that the Plans
are correct.
This message means that all the planned fractions for this
patient have been used. That is, each planned fraction has
dosimeter measurement data.
To collect more dosimeter measurements, more fractions must
be added to the patient’s Planning Table (see Entering Plans
on page 42).
This Plan & Fraction # cannot be found. Please select another.
This message means that the selected plan and fraction number
are not in the patient’s Planning Table.
You can either select another plan and fraction # that is in the
Planning Table, or add more fractions to the patient’s
Planning Table (see Entering Plans on page 42).
This Plan & Fraction # has already been used. Please select
another.
This message means that the selected plan and fraction number
have dosimeter measurement data already.
You can either select another plan and fraction number that is in
the Planning Table, or add more fractions to the patient’s
Planning Table (see Entering Plans on page 42).
934-00553-00.book Page 72 Friday, June 16, 2006 8:07 AM

DVS Dose Verification System
73
Troubleshooting
Wand field current <current> A is outside the acceptable range.
Place the Wand in its Base, then press OK to try again.
If you encounter this error, perform the following
troubleshooting steps:
• Check the connection of the Reader Wand cable to the back
of the Base Station.
• Make sure the Reader Wand is not near any metal objects.
It is recommended that the Wand is placed in the Base
Station during initialization.
To have the Reader try the operation again, press the OK
button.
If the problem remains, turn off the Reader then wait 15
seconds and turn it on again. Try the operation again. If the
problem remains, contact the manufacturer.
Wand not operating properly. Place the Wand in its Base, then
press OK to try again.
If you encounter this error, perform the following
troubleshooting steps:
• Check the connection of the Reader Wand cable to the back
of the Base Station.
• Make sure the Reader Wand is not near any metal objects.
It is recommended that the Reader Wand is placed in the
Base Station during initialization.
To have the Reader try the operation again, press the OK
button.
If the problem remains, turn off the Reader then wait 15
seconds and turn it on again. Try the operation again. If the
problem remains, contact the manufacturer.
Wand resonant frequency <freq> kHz is outside the acceptable
range. Place the Wand in its Base, then press OK to try again.
If you encounter this error, perform the following
troubleshooting steps:
• Check the connection of the Reader Wand cable to the back
of the Base Station.
934-00553-00.book Page 73 Friday, June 16, 2006 8:07 AM

DVS Dose Verification System
74
• Make sure the Reader Wand is not near any metal objects.
It is recommended that the Reader Wand is placed in the
Base Station during initialization.
To have the Reader try the operation again, press the OK
button.
If the problem remains, turn off the Reader then wait 15
seconds and turn it on again. Try the operation again. If the
problem remains, contact the manufacturer.
8.5 Plan and Review Software Error Messages
The error messages displayed by the Plan and Review Software are
listed in this section in alphabetical order.
A Patient cannot have more than 8 Dosimeters.
The limit on the number of dosimeters assigned to a patient is
eight. Delete a dosimeter to add a new one.
A Patient cannot have more than 8 plans.
The limit on the number of plans for a patient is eight. Delete a
plan to add a new one.
Barcode misread. Please scan the Dosimeter barcode again.
The verification check of the dosimeter checksum data failed.
Try to read the dosimeter’s bar code again.
Cannot access the database. Do you want to attempt to connect
again?
This message may appear when the Plan and Review Software
starts and a connection to the Dosimetry Database cannot be
made. To try to connect again, press the Yes button. If the
problem continues, perform the following steps:
• Make sure the LAN (local area network) cable is firmly
connected to the Reader.
• Make sure the computer with the Dosimetry Database is
running and is connected to the LAN.
934-00553-00.book Page 74 Friday, June 16, 2006 8:07 AM

DVS Dose Verification System
75
Troubleshooting
• Contact the IT Department to make sure they did not
change the setup of the Dosimetry Database.
To try the operation again, press the OK button. If the problem
remains, contact your DVS Administrator or the IT
Department.
Cannot access the database. Please check connections, or
contact your I.T. Department, then press OK to try again.
If you encounter this error, perform the following steps:
• Make sure the LAN (local area network) cable is firmly
connected to the Reader.
• Make sure the computer with the Dosimetry Database is
running and is connected to the LAN.
• Contact the IT Department to make sure they did not
change the setup of the Dosimetry Database.
To try the operation again, press the OK button. If the problem
remains, contact your DVS Administrator or the IT
Department.
Cannot delete a patient with Dosimeter measurements.
Patients who have dosimeters with measurements cannot be
deleted. Instead, open the Patient Data Entry window for the
patient and clear the Patient shown on Reader check box (see
Entering Patient, Dosimeter, and Plan Information on page 41).
Cannot delete this Dosimeter because it has measurement data.
Dosimeters with measurements cannot be deleted. Instead,
Instead, open the Dosimeter Data Entry dialog box for the
dosimeter and clear the Dosimeter used by Reader check box
(see Entering Dosimeters on page 43).
Cannot insert a Skipped measurement here.
A skipped fraction cannot be within two minutes of the most
recent fraction. Try to add the skipped fraction between two
other factions in the list.
934-00553-00.book Page 75 Friday, June 16, 2006 8:07 AM

DVS Dose Verification System
76
Cannot save Database settings to the registry.
This message means that you do not have permission to write to
the registry on the computer. Contact your system administrator
to correct this problem.
Checksum error reading <table>. This data cannot be loaded.
This message means that the Dosimetry Database was changed
without using the DVS Software. Contact your DVS
Administrator to resolve this problem.
In plan ‘<plan>’, the Last fraction # cannot be less than the
First fraction #.
The last fraction number must be greater than or equal to the
first fraction number. Make the last fraction number greater to
correct this problem.
Login name <login name> is already assigned to User ‘<user
name>’. Please correct before saving this User’s data.
The Login name entered is already used by another person.
Enter a different Login name for this user.
More than 100 Patients cannot be shown on the Reader. Please
reduce the number of Patients shown on the Reader before
adding more Patients.
At most, 100 patients at a time can be shown on the DVS
Reader. The patients shown on the Reader are those with the
Patient shown on Reader check box selected.
To correct this problem, clear the Patient shown on Reader
check box for inactive patients.
Password fields do not match. Please enter Passwords again.
When setting up a new user, the fields Password and Verify
password must be the same. Type the same password into these
two fields again and press OK.
934-00553-00.book Page 76 Friday, June 16, 2006 8:07 AM

DVS Dose Verification System
77
Troubleshooting
Password must be at least 4 digits long.
Make sure the user’s password is at least four digits long.
Patient number <patient num> is already assigned to patient
<patient>. Please correct before saving this patient’s data.
The Patient number entered is already used by another patient.
Enter a different Patient number for this patient.
Physician number <physician num> is already assigned to
Physician ‘<physician>’. Please correct before saving this
Physician’s data.
The Physician number entered is already used by another
physician. Enter a different Physician number for this
physician.
Plan/Fraction ‘<plan name, fraction #>’ is duplicated. Please
correct before saving the plans.
In the Planning Table, the displayed plan and fraction # are
listed more than once. Remove this duplication from the
Planning Table.
The dosimetry database is not compatible with this software.
Verify that all software upgrades needed for the Reader, the
Dosimetry Database, and the Plan and Review Software have
been implemented. Then press the OK button to try this
operation again.
There are <x> more measurements than planned fractions for
this Patient. Please adjust the plans/fractions so that all the
measurements will have a planned fraction.
This message means that there are not enough planned fractions
for all the measurements made so far. Each dosimeter
measurement needs to have a planned fraction that it is
associated with. Adjust the number of fractions in the Planning
Ta bl e to correct this problem.
934-00553-00.book Page 77 Friday, June 16, 2006 8:07 AM

DVS Dose Verification System
78
There cannot be more than 99 total fractions. Please correct
before saving the plans.
There are more than 99 planned fractions in the Planning
Table. Reduce the number of fractions to correct this problem.
There is nothing to view because no measurements have been
made from this Patient’s Dosimeters.
The Fractions & Measurement window cannot be used until
at least one dosimeter measurement has been taken for the
patient.
This Dosimeter is already assigned to patient ‘<patient name>’.
Please use another Dosimeter.
Each dosimeter can only be assigned to one patient. The
dosimeter scanned is already assigned to another patient. Either
delete the dosimeter from the other patient or select another
dosimeter for this patient.
This record was updated by someone else during this editing
session. Please reload this data and make the changes again.
This message means that someone else changed the same data
(for example, patient or user) that you were editing. Press the
Cancel button to discard your changes, and then make the
changes again.
Since this patient has either no plans or no dosimeters, he/she
will not be shown on the DVS Reader.
In order to scan a patient’s dosimeters using the DVS Reader,
there must be both plans and dosimeters assigned to the patient.
If one or the other of these is not assigned yet, the patient
cannot be used by the Reader. This message is a notice that the
Plan and Review Software will clear the Patient shown on
Reader check box, so the patient will not appear in the
Reader’s patient list.
934-00553-00.book Page 78 Friday, June 16, 2006 8:07 AM

DVS Dose Verification System
79
Maintenance and Technical Support
User number <user num> is already assigned to User ‘<user
name>’. Please correct before saving this User’s data.
The user number entered is already being used by another
person. Enter a different user number for this person.
9MAINTENANCE AND TECHNICAL SUPPORT
9.1 Dosimeter Maintenance
Dosimeters are provided sterile. Following expiration dosimeters
should be discarded. DO NOT SEND DOSIMETERS TO A RE-
PROCESSING FACILITY FOR RE-STERILIZATION OR RE-
STERILIZE THEM USING A HOSPITAL OR LABORATORY
STERILIZER. This may result in damage to the dosimeter.
9.2 Disinfecting the Reader Wand
Disinfect or cover the surface of the Reader Wand if direct contact
with skin is required to obtain a reading or following any
occurrence of direct contact. Disinfect by wiping the contact
surface of the Reader Wand with a standard isopropyl alcohol-
based disinfectant.
9.3 Technical Support
For Technical Support, contact
Sicel Technologies, Inc.
Telephone: 1-888-DVS-6697 (1-888-387-6697)
E-mail: helpdesk@siceltech.com.
934-00553-00.book Page 79 Friday, June 16, 2006 8:07 AM
DVS Dose Verification System
80
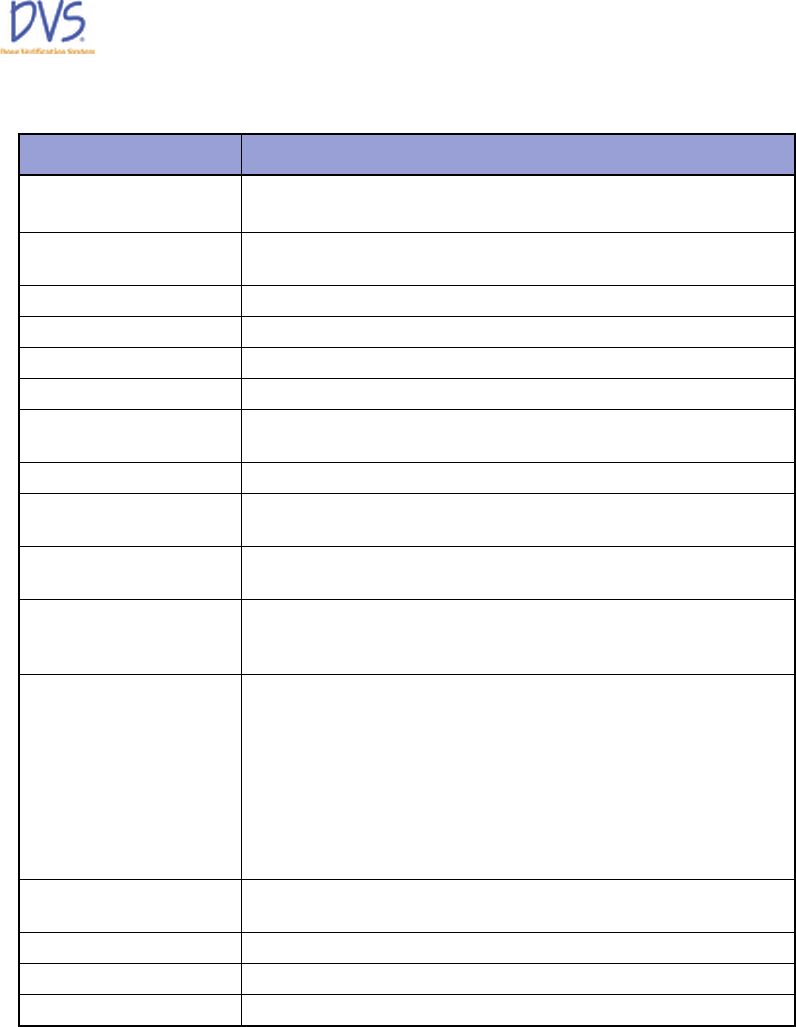
10 SPECIFICATIONS
Parameter Rating
Calibration Factory calibrated using Co60; no additional calibration required; ADCL
accuracy verification performed on each lot
Implant Depth 3-12 cm
12 cm maximum from any one skin surface
Implant Distance At least 1 cm distance between each dosimeter
Energy Range 6 to 18 MV Photon
Dose Range 80 Gy maximum
Dose Fractions 150 to 250 cGy
Dose Accuracy ±5% (2σ) for 150-250 cGy fractions
(Dosimeter axis is placed roughly parallel to the body axis)
Shelf Life (Dosimeter) See Expiration Date printed on package
Time to Read Dosimeter Up to 10 minutes following radiation therapy. Optimal read time is 2 to 3
minutes following irradiation.
Power 100V to 240V~, 50 to 60 Hz
1A @ 120V~
Inputs/Outputs 1-Ethernet port
1-Wand Cable Assembly Connection
1-USB Connection (For Field Service Use Only)
Operating Conditions Dosimeter
Dosimeter is optimized for use in vivo at temperatures ranging from 34°C
to 40°C. Dosimeter performance at room temperature has not been
characterized.
Reader
Temperature: 10°C-40°C (50 -104°F).
Humidity at 10% to 95%, non-condensing
Storage Conditions Temperature -18°C to 55°C
Humidity at 10% to 95%, non-condensing
Fuse 250V 5 AMP Type T or 250V 5 Amp Type 3AG
Classification Class I, Type B Applied Part
Mode of Operation Continuous Operation
934-00553-00.book Page 80 Friday, June 16, 2006 8:07 AM