Sicel Technologies DVS-R-200 Low Frequency RFID User Manual
Sicel Technologies, Inc. Low Frequency RFID
Contents
- 1. Installation Manual
- 2. User Manual
User Manual

DVS®
operator manual
Technology

DVS® DOSE VERIFICATION SYSTEM
Operator Manual
Caution: Federal Law restricts the use of this device to sale by or on the order of a physician.

DVS Dose Verification System
© 2006–2007 Sicel Technologies®, Inc. All rights reserved.
Sicel Technologies® is a registered trademark of Sicel Technologies, Inc.
DVS™ is a product and registered trademark of Sicel Technologies®, Inc. in the United States.
SmartMarker® is a registered trademark of Sicel Technologies®, Inc. in the United States.
Part Number: 934-00553-00 rev. 08
Model #: DVS-R-200
FCCID: TS9-DVS-R-200
This device complies with Part 15 of the FCC Rules. Operation is subject to the following
two conditions: (1) this device may not cause harmful interference, and (2) this device
must accept any interference received, including interference that may cause undesired
operation.
Warning: This system is intended for use by healthcare professionals only. This system
may cause radio interference or may disrupt the operation of nearby equipment. It may
be necessary to take mitigation measures, such as re-orienting or relocating the DVS-R-
200 or shielding the location.
Note: For Qualified Service Personnel Only.
This product is covered by one or more issued or pending U.S. patents including one or
more of the following:
U.S. Patent Nos. 6,047,214; 6,345,203; 6,263,247; 6,402,689; 6,963,770; 6,963,771;
7,010,340, and 7,011,814.

TABLE OF CONTENTS
1 Welcome ................................................................................... 1
1.1 Product Description ..................................................................... 2
1.2 Intended Use ................................................................................ 2
1.3 Contraindications, Warnings, Cautions, and Notes ..................... 2
Contraindications .................................................................. 3
Warnings .............................................................................. 3
Cautions ................................................................................ 4
Notes ..................................................................................... 5
1.4 Symbols ....................................................................................... 5
1.5 Glossary of Terms ....................................................................... 7
1.6 Statement of Compliance ............................................................. 7
Changes or Modifications to the System .............................. 8
1.7 Essential Performance ................................................................. 8
1.7 Equipment Supplied .................................................................... 8
1.8 User Equipment Requirements (Not Supplied) ............................. 9
2 Dose Verification System Overview ...................................... 10
2.1 DVS Dosimeter ......................................................................... 11
2.2 DVS Reader System .................................................................. 12
2.3 DVS Software ............................................................................ 13
2.4 Bar Code Scanner ...................................................................... 13
2.5 DVS Insertion Tool ................................................................... 13
3 System Configuration ............................................................. 14
3.1 Configuring the DVS Software After Installation ..................... 14
Setting up the Database Connection ................................... 14
Editing the Admin User ...................................................... 16
Entering Institution Information and System Options ........ 19
3.2 Setting Up the DVS Reader ....................................................... 20
Choose a Location .............................................................. 20
Make the Connections ........................................................ 20
Barcode Scanner Connections ............................................ 21
Power on the Reader ........................................................... 21
Connect to the DVS Dosimetry Database .......................... 21
4 Quick Start Instructions .......................................................... 25
4.1 Step 1 - Test Dosimeters ............................................................ 25
4.2 Step 2 – Implant Dosimeters and Record Implant Information . 26
4.3 Step 3 – Enter Patient Information Into the Plan and Review
Software ............................................................................................ 27
4.4 Step 4 – Measure Radiation Pre-dose and Post-dose Values
Using The DVS Reader .................................................................... 29
Table of Contents

DVS Dose Verification System
ii
5 Using the Plan and Review Software...................................... 31
5.1 Logging into the DVS Plan and Review Software .................... 31
5.2 DVS Main Menu Overview ....................................................... 32
5.3 Working With Patient Information ............................................ 33
Adding, Editing, and Viewing Patients .............................. 33
Entering Patient, Dosimeter, and Plan Information ............ 34
Entering Patient and Physician Information ....................... 35
Entering Dosimeters ........................................................... 36
Entering Plans ..................................................................... 39
Changing or Deleting Dosimeters ...................................... 39
Working with Measurement Fractions and Skipped
Fractions ............................................................................. 41
Deleting a Fraction ............................................................. 42
Inserting Skipped Fractions ................................................ 42
Changing Information for a Fraction .................................. 43
5.4 Viewing Patient Results ............................................................. 44
Displaying a List of Patient Results ................................... 44
Viewing Results Charts ...................................................... 45
Viewing Results Reports .................................................... 48
5.5 DVS System Administration ..................................................... 50
Adding and Editing DVS Users .......................................... 50
Changing Institutional Information and System Options ... 52
Changing the Database Connections .................................. 53
Backing up and Restoring the DVS Database .................... 54
6 Using the DVS Reader ............................................................ 56
6.1 Power On the DVS Reader and Power Off ................................ 56
6.2 Log in to the DVS Reader ......................................................... 57
6.3 Test a Dosimeter ........................................................................ 59
6.4 Scan a Patient ............................................................................ 62
Select a Patient ................................................................... 62
Select a Plan/Fraction ......................................................... 63
Take a PRE-Dose Reading ................................................. 64
Dose the Patient .................................................................. 66
Take a POST-Dose Reading ............................................... 67
Enter Treatment Notes ........................................................ 68
7 Troubleshooting ...................................................................... 70
7.1 Troubleshooting the DVS Server System Software Setup ......... 70
7.2 DVS Reader Not Operational .................................................... 70
7.3 Unable to Obtain a Pre-Dose or Post-Dose Reading ................. 70
7.4 DVS Reader Error Messages ..................................................... 71
7.5 Plan and Review Software Error Messages ............................... 75

DVS Dose Verification System
iii
8 Maintenance and Technical Support ....................................... 81
8.1 Reader Maintenance .................................................................. 81
8.2 Database Maintenance ............................................................... 81
8.3 Dosimeter Maintenance ............................................................. 81
8.4 Cleaning the Reader Wand and Reader Base Station ................ 81
8.5 Technical Support and Product Service ..................................... 82
8.6 Disposal and Recycling ............................................................. 83
9 Specifications .......................................................................... 84
Table of Contents

DVS Dose Verification System
iv

1
1 WELCOME
The Dose Verification System Operator Manual includes
information about the setup and use of the DVS® (Dose
Verification System). The intended users of this manual are
radiation oncologists, medical physicists, dosimetrists, radiation
therapists, and other personnel that may be assisting in the setup
and use of DVS.
This manual is organized into the following sections:
Section 1 Welcome – provides a brief overview of the product, a
list of indications, cautions and warnings, and summaries of the
conventions, symbols and terms used in the Operator Manual and
the device.
Section 2 Dose Verification System Overview – provides a
detailed description of the components of DVS and how it is used.
Section 3 System Configuration – provides instructions for
installing and configuring the DVS Software and setting up the
DVS Reader.
Section 4 Quick Start Instructions – provides an overview of the
workflow for testing, implanting, and scanning the DVS
dosimeters.
Section 5 Using the Plan and Review Software – provides the
instructions for using the Plan and Review Software to enter
patient, dosimeter, and plan information and review patient results.
Section 6 Using the DVS Reader – provides the instructions for
using the DVS Reader to test dosimeters and scan patients.
Section 7 Troubleshooting – provides guidance if you encounter
issues or errors while using DVS.
Section 8 Maintenance and Technical Support – provides
information on maintaining DVS and getting technical support.
Section 9 Specifications – provides the technical specification for
the DVS system.
Welcome

DVS Dose Verification System
2
1.1 Product Description
DVS provides an oncologist with information about the actual
radiation dose delivered to a patient’s tissues and organs, and it
provides charts and statistics for comparing the actual dose to the
prescribed dose. DVS uses an implantable dosimeter and an
external reading system to determine the absorbed dose near a
tumor within a patient. DVS provides the oncologist with dose
information that may be used in conjunction with other clinical
information to make decisions regarding treatment plans or to
identify the need for further investigation. The DVS Dosimeter is
able to be visualized and used as a radio-opaque treatment area
marker in IGRT (Image Guided Radiation Therapy) using
ultrasound, kV planar images, kV CBCT (Cone Beam Computed
Tomography), and MV CT/CBCT.
1.2 Intended Use
DVS is intended for use in radiation therapy to verify treatment
planning and radiation dose to tissue and organs in or near the
irradiated areas of a patient.
1.3 Contraindications, Warnings, Cautions, and Notes
See Dosimeter Instructions for Use. The following section explains
the warnings, cautions and notes for DVS.
The terms Warning, Caution, and Note have specific meanings
throughout this manual:
• A Warning advises against actions or situations that could
result in personal injury or death.
• A Caution advises against actions or situations that could
damage equipment or produce inaccurate or invalid data.
• A Note provides useful information regarding the
operation or function of the system.

DVS Dose Verification System
3
Contraindications
• The Reader Wand may not be used on patients who are
already implanted with other electronic devices such as
pacemakers, or insulin pumps. The impact of the
potential electronic interference is unknown.
• Do not allow patients with a DVS Dosimeter to receive
the following treatments: shortwave diathermy,
microwave or therapeutic ultrasound. These could
result in serious injury.
Warnings
The DVS system is not intended to specify adjustments to
dose.
Dose measurement data obtained using the DVS system
should be used in conjunction with existing planning and
delivery tools to verify delivered dose rather than as a stand
alone tool for determining dose adjustments.
• Electric Shock Hazard – Do not remove the covers of
the Reader or Reader Wand assemblies. Do not open
the case or touch the internal parts. The DVS Reader
and Reader Wand contain no user serviceable internal
parts. Contact the local representative for technical
support and return information.
• Electric Shock Hazard – The Dose Verification System
is grounded with a three-conductor cable and three-
prong plug. Insert the power cable only into a properly
grounded three-contact outlet.
• Electric Shock Hazard – Do not use in wet
environment. May result in electrocution.
• Only use the manufacturer-supplied power cord.
• Replace fuse only with same type and rating: 2 AMP,
250V Time-Lag Fuse. Failure to replace the fuse with
the same type and rating may pose a fire hazard.
Welcome

DVS Dose Verification System
4
• The DVS system is not suitable for use in the presence
of a flammable anesthetic mixture with air or with
oxygen or nitrous oxide.
• Be sure that the cables do not pose a trip hazard.
• The Reader Wand is not for use in direct contact with
the patient – especially near wounds. Contact with
gowns or other clothing is acceptable. The Reader
Wand is not intended to be sterile. Clean the Reader
Wand after direct skin contact using isopropyl alcohol-
based disinfectants.
Cautions
• Proper use of this system depends on careful reading of
all instructions and labels.
• Do not use cellular phones or hand held two-way
radios in close proximity to the DVS Reader.
• Keep CRTs at least 3 feet from the DVS Reader to
prevent the DVS Reader from interfering with the
CRT image. Interference from the CRTs may result in
reduced read range.
• Turn OFF the system power before connecting or
disconnecting any system components or accessories.
Connecting components with power applied may cause
damage to the connectors or connecting circuitry.
• If the dosimeter is tested prior to implantation, (1) do
not remove the dosimeter from its package as this will
compromise sterility and (2) do not place the
dosimeters near metal.
• Do not use a dosimeter near implanted metal objects.
Read range may be compromised.
• Do not store dosimeters near stray radiation.
• Enter the predicted dose in cGy, not monitor units.
Entry in monitor units will cause a false error in the
planned vs. actual dose report.
DVS Dose Verification System
5
• The DVS Reader Wand should not be used within 1-2
feet of large metal objects. Using the Reader Wand
close to large metal objects has the potential to reduce
the read range of the Reader Wand.
• Do not conduct the pre-dose or post-dose reading while
the patient is on a metal table. If the treatment table is
metal, conduct the pre-dose reading before the patient
is placed on the table and the post-dose reading after
the patient is removed from the table. A metal table or
other metal objects will interfere with the functioning
of the DVS Reader Wand.
• Take the post-dose reading within 10 minutes after the
end of therapy. Readings taken beyond 10 minutes
decrease dose accuracy.
• Do not implant the dosimeter deeper than 12 cm or less
than 3 cm from the surface of the skin. Implanting
deeper than 12 cm may result in the inability of the
Reader to communicate with the implanted dosimeter.
Implanting at least 3 cm deep ensures adequate build-
up and minimizes potential for mechanical damage.
Notes
The dosimeter is factory calibrated and does not require calibration
during use.
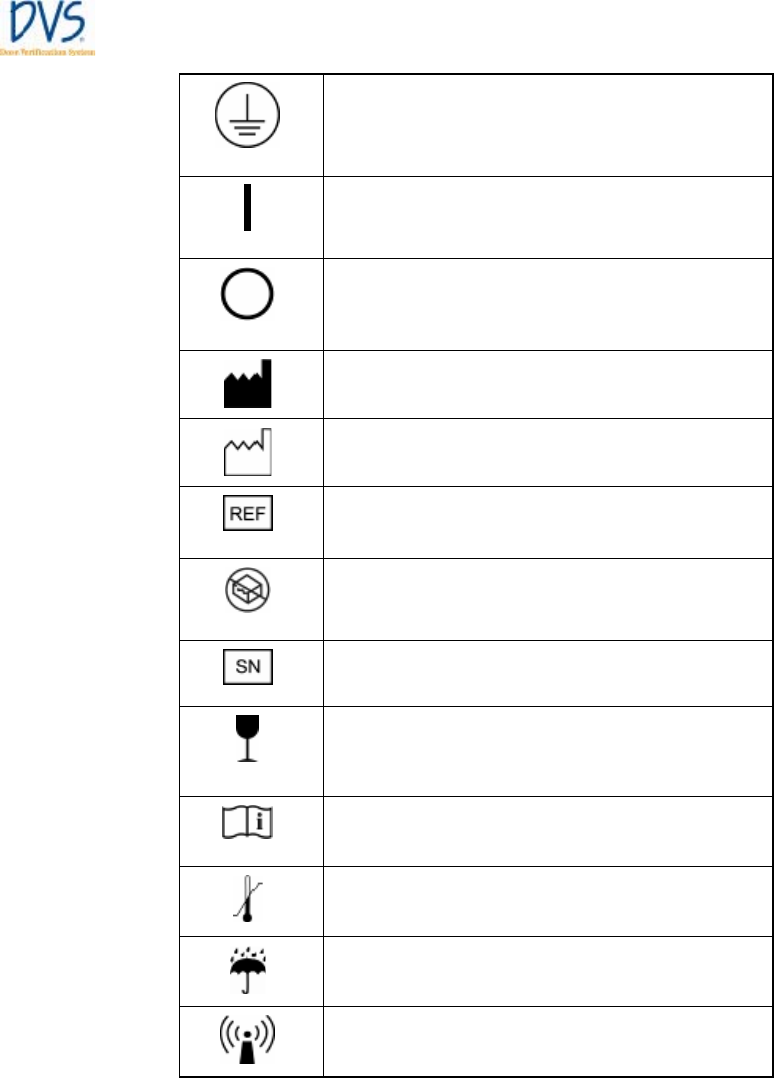
1.4 Symbols
SYMBOL DESCRIPTION
Indicates an attention to users to consult accompanying
documents (Dosimeter Instructions for Use) for more
information on the device.
Type B Equipment
Welcome
DVS Dose Verification System
6
Protective earth (ground)
ON
OFF
Manufacturer
Date of Manufacture (YYYY-MM-DD or YYYY-MM)
Catalog Number
Do not use if package is damaged.
Serial Number
Fragile, handle with care.
Consult Instructions for Use.
Temperature Limitation
Keep dry.
Non-ionizing radiation

DVS Dose Verification System
7
1.5 Glossary of Terms
Base Station – The main part of the DVS Reader, which contains
the touch-screen display for operating the Reader.
cGy – Centi-Gray (hundredths of a Gray (Gy)) unit of radiation
CT – Computed Tomography
Dosimetry Database – The database used by the DVS system for
storing patient, dosimeter, planning, and result information.
Fraction – One radiation treatment session. A treatment plan is
made of one or more fractions.
Isodose Curve – The plot of the radiation dose plan showing lines
of equal radiation dose in cGy.
Insertion Tool – Used for percutaneous and intraoperative implant
procedures.
Plan – Dosimetric representation of a prescribed radiation
treatment course.
Predicted Dose – The dose, in cGy, expected at a dosimeter for a
treatment session.
Reader – The DVS Reader system, which is composed of the Base
Station and the Reader Wand.
Reader Wand – The hand-held part of the DVS Reader that
contains the electronics to read the dose measurement from a
dosimeter.
1.6 Statement of Compliance
DVS has been tested and complies with the following standards:
• IEC/EN/UL 60601-1
• CSA C22.2 No. 601-1-M90
• IEC/EN/UL 60601-1-2
• FCC 47 CFR Part 15 - Subpart C
• RTT&E Directive, 1999/5/EC
Welcome

DVS Dose Verification System
8
Note: This equipment has been tested and found to comply with
the limits for a Class A digital device, pursuant to Part 15 of the
FCC Rules. These limits are designed to provide reasonable
protection against harmful interference when the equipment is
operated in a commercial environment. This equipment generates,
uses, and can radiate radio frequency energy and, if not installed
and used in accordance with the instruction manual, may cause
harmful interference to radio communications. Operation of this
equipment in a residential area is likely to cause harmful
interference in which case the user will be required to correct the
interference at the user’s own expense.
Changes or Modifications to the System
Changes or modifications to the DVS system not expressly
approved by Sicel Technologies could void the user's authority to
operate the equipment.
1.7 Essential Performance
The Essential Performance of the DVS System is:
• Interpretation (dose calibration algorithm) of dosimeter data
for accurate dose response storage/display
• error free data transmission (dosimeter to database)
• mechanical integrity during normal use for protection from
electrical hazards
• maintenance of the integrity of the protective earth con-
nection
1.7 Equipment Supplied
• Reader Base Station
• Reader Wand
• Ethernet cord

DVS Dose Verification System
9
• Power cord - (see Specifications section for appropriate power
cord information)
• Bar Code Scanner
1.8 User Equipment Requirements (Not Supplied)
The following equipment and software are required to use DVS:
• Personal Computer with LAN or network access for DVS
Dosimetry Database
• Operating System Requirements:
• Windows XP Professional, Windows Vista Business, or
later
The equipment must be certified for the Application and in
accordance with National, State, or Local codes.
Accessory equipment connected to the analog and digital interfac-
es must be certified according to the respective IEC standards (i.e.
IEC 60950 for data processing equipment and IEC 60601-1 for
medical equipment). Furthermore all configurations shall comply
with the system standard IEC 60601-1-1.
Everybody who connects additional equipment to the signal input
part or signal output part configures a medical system, and is there-
fore responsible that the system complies with the requirements of
IEC 60601-1-1. If in doubt, consult the technical services depart-
ment or your local representative.
Welcome

DVS Dose Verification System
10
2 DOSE VERIFICATION SYSTEM OVERVIEW
The Dose Verification System consists of five components:
• DVS Dosimeter
• DVS Insertion Tool
• DVS Reader
• DVS Software (Plan and Review Software and Dosimetry
Database)
• Bar Code Scanner
The implantable dosimeter measures in vivo dose from photon
beam radiation therapy. The dosimeter uses a semiconductor
device called a MOSFET (metal oxide semiconductor field effect
transistor) to measure radiation. Radiation within the human
therapeutic dose range causes a shift in the threshold voltage of the
MOSFET. By measuring the threshold voltage before and after
radiation dose therapy, the dose fraction can be calculated.
Cumulative dose can be calculated by tabulating the radiation dose
measured at each fraction.
To measure absorbed dose, a pre-dose and post-dose reading must
be taken. The pre-dose reading is taken before the radiation
treatment and the post-dose reading is taken after the radiation
treatment. The pre-dose and post-dose threshold voltage readings
are then used to calculate the daily dose fraction that is reported for
each treatment session. The daily fractional dose values are stored
in the Dosimetry Database and are added together to calculate a
cumulative dose.
The dosimeter is powered by the Reader Wand utilizing
electromagnetic energy and does not contain a battery. The
dosimeter derives all power from the Reader-generated
electromagnetic field. The dosimeter modulates the
electromagnetic field to send the digitized threshold voltage
readings back to the Reader.
DVS Dose Verification System
11
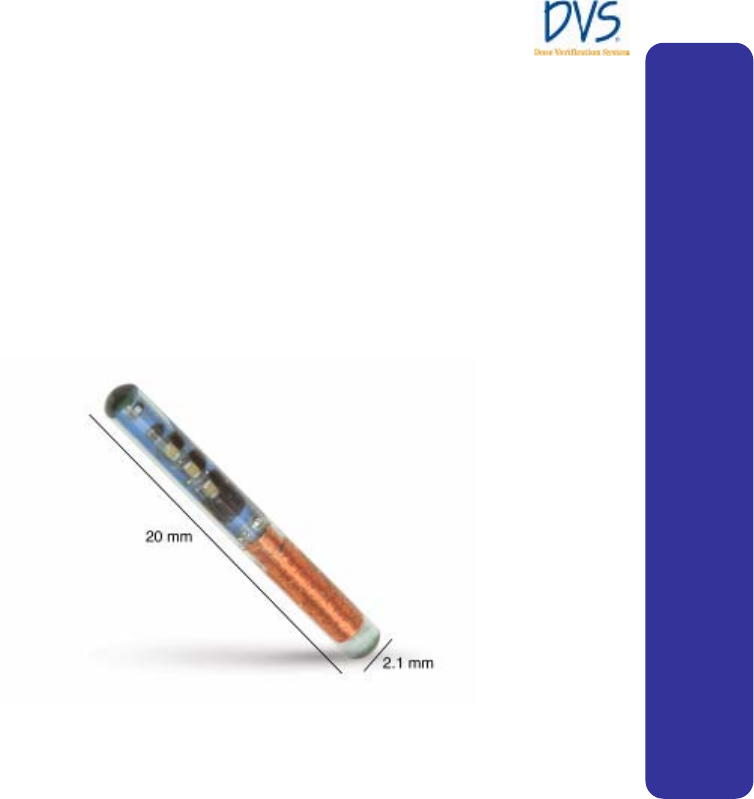
2.1 DVS Dosimeter
The dosimeter is powered telemetrically and measures the
radiation using two MOSFETs. The MOSFETs are hermetically
sealed in a biocompatible glass capsule. The dosimeter is covered
by a polyester surgical mesh for handling, suturing, or fixating the
dosimeter in vivo. The dosimeter is subsequently sterilized with
ethylene oxide. In the tissue, the dosimeter provides a radio-
opaque image that registers on a dose planning computed
tomography (CT) scan. The measured dose data can be compared
with the prescribed dose plan.
Figure 1 — DVS Dosimeter
Each dosimeter is factory calibrated by correlating to a NIST-
traceable ion chamber. The calibration information for each
dosimeter is included in a bar code on pre-printed calibration
labels.
Dosimeters are provided in sterile packages. The expiration date
printed on the dosimeter package is the date when the dosimeter is
no longer considered sterile. Electrical functionality of the
dosimeter is not affected by the sterility expiration.
Dose Verification System Overview
DVS Dose Verification System
12
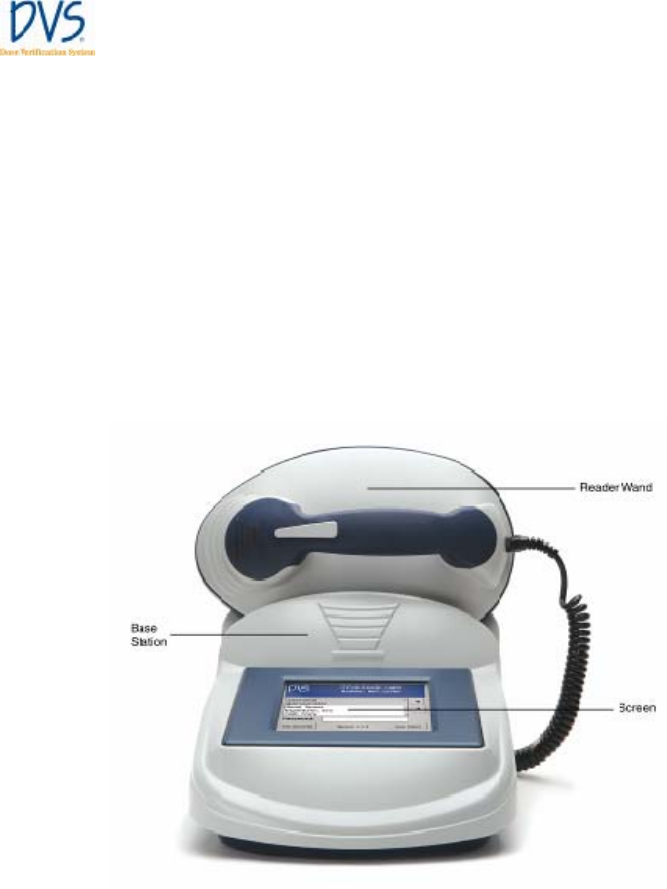
2.2 DVS Reader System
The DVS Reader system is used to take the pre-dose and post-dose
readings from the dosimeter during each treatment session. The
DVS Reader system consists of a Reader Wand and a Base Station
(Figure 2 — DVS Reader). The Base Station includes a touch
screen to view instructions and enter data. The Reader Wand sits in
the cradle of the Base Station and is removed for reading a
patient’s radiation dose. The highlighted end of the Reader Wand
under the LED indicators is the active reading area.
The DVS Reader can be used on a table top or on a pole mounted
to the wall. The pole should be 1.25” in diameter and able to
support 25 pounds.
Figure 2 — DVS Reader
DVS Dose Verification System
13
2.3 DVS Software
The DVS Software consists of Plan and Review Software and a
Dosimetry Database. The Plan And Review Software is used to
enter patient treatment information and to access patient data for
viewing and reporting. The Dosimetry Database is a centralized
database to which the Plan and Review Software and the DVS
Reader connect through a local area network (LAN) connection.
All patient information and dosimeter measurements are stored in
the database. A bar code scanner is used to enter calibration
information for the dosimeter. Up to 25 users can simultaneously
access the database.
2.4 Bar Code Scanner
The bar code scanner is used to read the dosimeter serial number
and calibration values from a 2D bar code into the Dosimetry
Database. The 2D bar code is packaged with each dosimeter so it is
easy to scan the calibration values into the DVS system. The bar
code scanner does not require any external power.
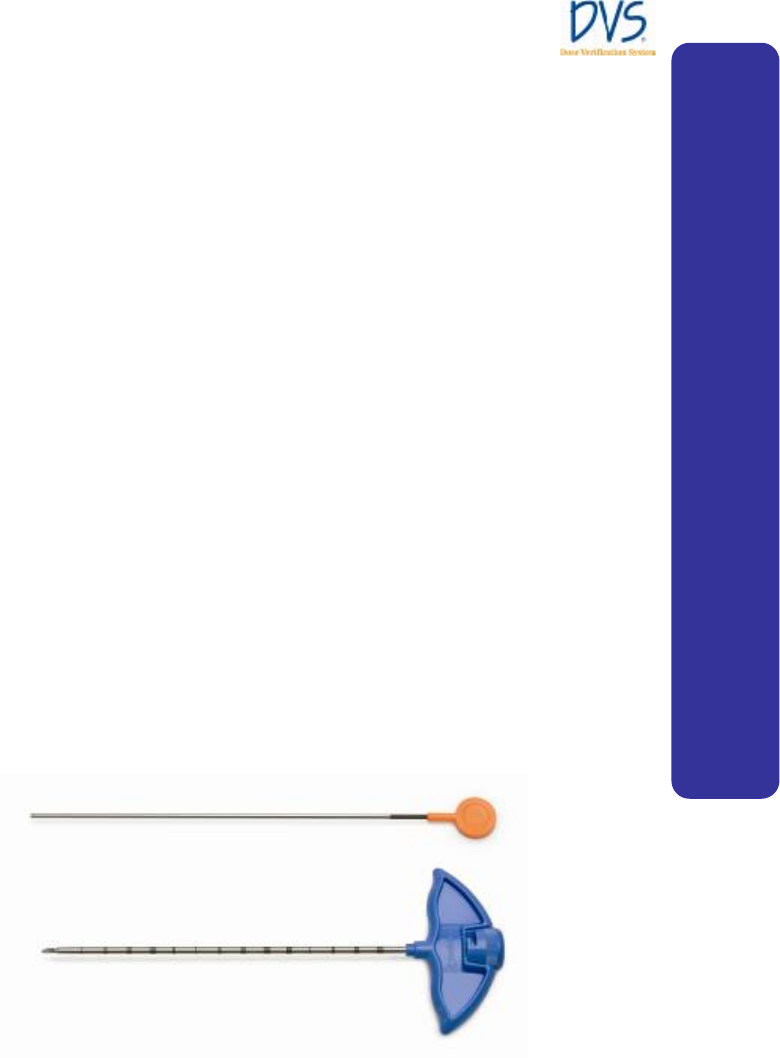
2.5 DVS Insertion Tool
The Insertion Tool is an 11 (eleven) gauge needle similar in design
to a bone biopsy needle. It is used for percutaneous and
intraoperative implant procedures and consists of a cannula, trocar,
and plunger.
Figure 3 — Insertion Tool
Dose Verification System Overview

DVS Dose Verification System
14
3 SYSTEM CONFIGURATION
The Dose Verification System has three main components that you
need to setup:
• DVS Plan and Review Software
• DVS Dosimetry Database Server
• DVS Reader
Refer to the Installation and Set Up Guide, 934-00553-02, for
installing and setting up the DVS Software and Reader.
3.1 Configuring the DVS Software After Installation
After you have installed the DVS Plan and Review Software and
the DVS Dosimetry Database, you need to configure the DVS
system. Configuration steps include the following:
• Setting up the Database Connection (only required if the Plan
and Review Software is installed on a different computer than
the database server)
• Editing the Admin User
• Entering Institution Information and Preferences
Setting up the Database Connection
If you installed the Plan and Review Software on a different
computer than the DVS Dosimetry Database Server, you must set
up the connection to the database. If the Plan and Review Software
is only installed on the same computer as the DVS Dosimetry
Database Server, skip this section and perform the steps in Editing
the Admin User and Entering Institution Information and
Preferences.
On the computer (or computers) where the Plan and Review
Software is installed without the database server, perform the
following steps:
DVS Dose Verification System
15
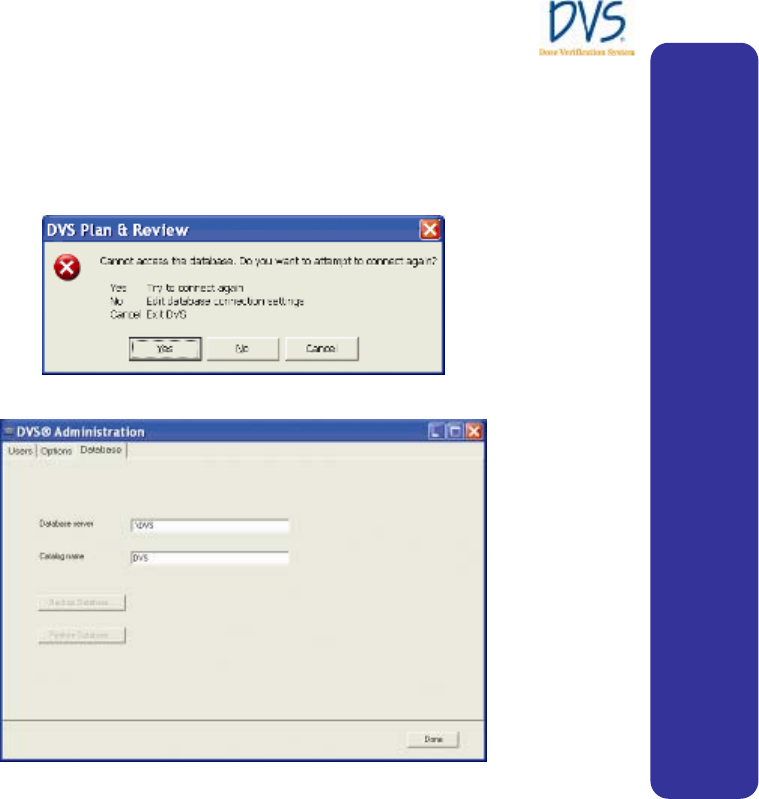
1. Double click the DVS Plan and Review icon on the Desktop
or select Start>Programs>DVS>DVS Plan and Review.
This application will launch and attempt to connect to the DVS
database. If it cannot connect after a 30 second pause, the
following error dialog box appears.
2. Click No. The DVS Administration window appears.
Figure 4 — DVS Administration
3. Click the Database tab.
4. Enter the name of the SQL Server instance with the DVS
Dosimetry Database in the Database Server field. For
example:
<servername>\DVS
System Configuration
DVS Dose Verification System
16
By default, the Database Server field is set to .\DVS which
indicates that the DVS Database is installed locally on the
same computer as the Plan and Review Software. If the DVS
Database is located elsewhere on a different computer, the
name of that computer will be <servername>.
5. Click Done. If the application connects successfully, the DVS
Login dialog box appears. If the application connection is
unsuccessful, the error dialog box appears and steps 2-5 should
be repeated with the correct information.
Editing the Admin User
By default, an Admin login name with no password is setup in the
DVS system so that you can log in to the DVS Software initially.
After installation, you should login using the Admin login and set
the Admin user password, user information, and authorizations.
To edit the Admin user, perform the following steps:
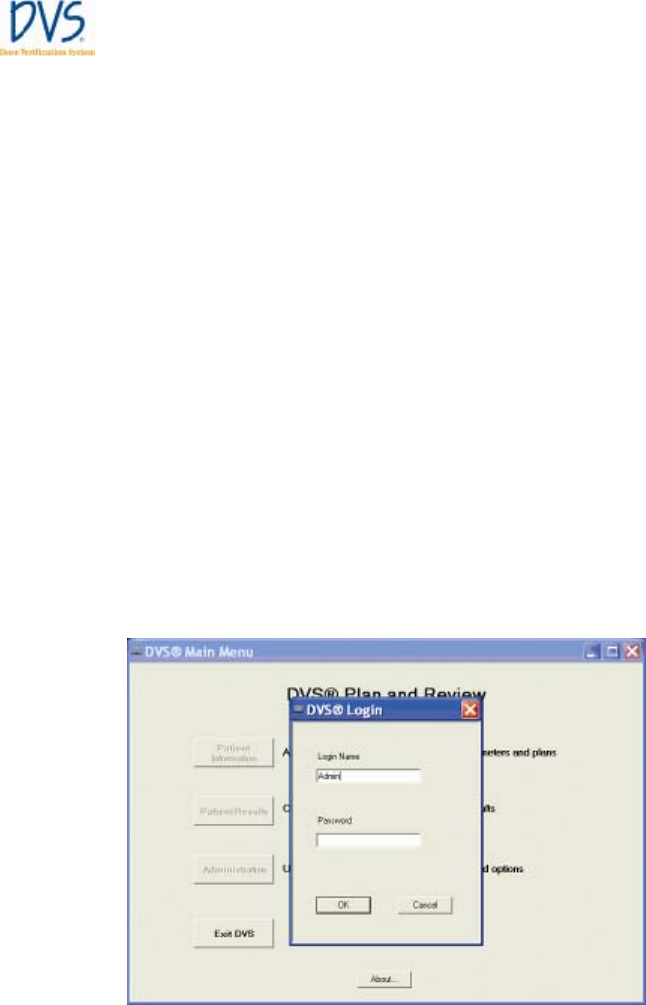
1. Double click the DVS Plan and Review icon on the Desktop
or select Start>Programs>DVS>DVS Plan and Review. The
DVS Main Menu and DVS Login dialog box appears.
Figure 5 — DVS Login
2. In the Login field, enter Admin (case sensitive) and leave the
Password field blank.
DVS Dose Verification System
17
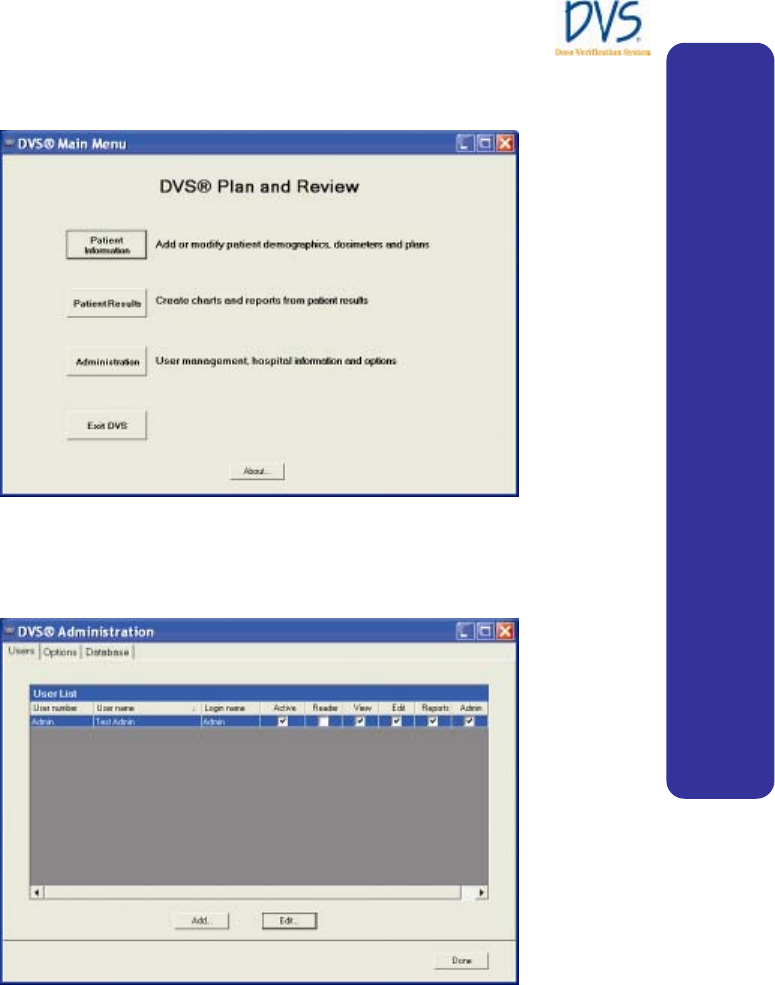
3. Click OK. The DVS Main Menu for the DVS Plan and
Review Software appears.
Figure 6 — DVS Main Menu
4. Click Administration to display the DVS Administration
window.
Figure 7 — DVS Administration
5. Click the Users tab.
System Configuration
DVS Dose Verification System
18
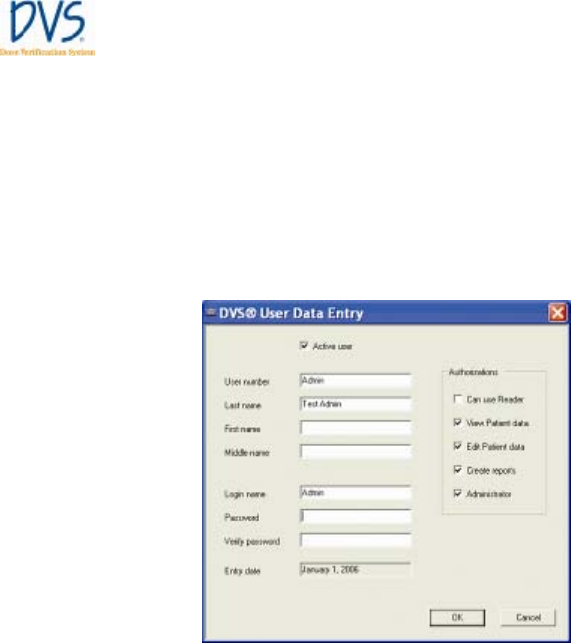
6. Select the Admin user from the User List and click Edit.
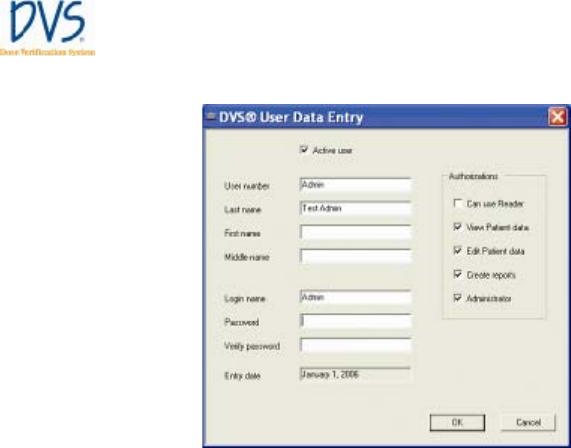
Figure 8 — User Data Entry
7. In the User Data Entry dialog box, edit the user information,
password, and authorizations.
• Password - must be numeric (0-9) and at least 4 digits
long. Be sure to set a secure password for the default
Admin user.
• Authorizations – select the tasks you want the user to be
able to perform. The Admin user should only have
Administrator authorization. Administrator authorizations
let the user access the Administration dialog box.
8. When you are finished editing the user, click OK to close the
dialog box and return to the Users tab.
9. Click Done.

DVS Dose Verification System
19
Entering Institution Information and System Options
To enter institution information and set the options for DVS,
perform the following steps:
1. Double click the DVS Plan and Review icon on the Desktop
or select Start>Programs>DVS>DVS Plan and Review. The
DVS Main Menu and DVS Login dialog box appears.
2. In the DVS Login dialog box, enter the Admin login name and
password.
3. Click OK. The DVS Main Menu for the DVS Plan and
Review Software appears.
4. Click Administration.
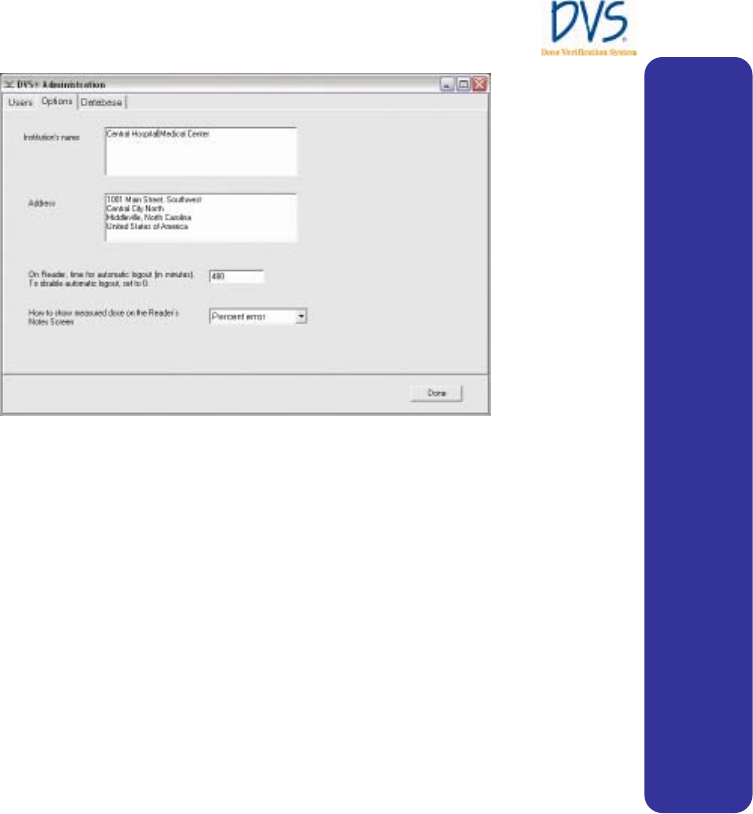
5. Click the Options tab.
Figure 9 — Options
6. Enter the Institution Name and Address.
7. Enter the time in minutes after which you want the DVS
Reader to automatically logout. To disable automatic logout,
set the value to 0 (zero).
System Configuration

DVS Dose Verification System
20
8. Select how you want to display measured doses on the DVS
Reader Notes screen:
• None
• Percent Error
• Absolute Dose
9. Click Done when finished.
3.2 Setting Up the DVS Reader
To set up the DVS Reader, perform the following steps:
• Choose a Location
• Make the Connections
• Power on the Reader
• Connect to the DVS Dosimetry Database
Choose a Location
Find a location for the DVS Reader in or near the treatment room.
The DVS Reader can be placed on a counter top or attached to a
pole mounted to the wall. The pole should be 1.25” in diameter
and able to support 25 pounds.
Choose a place that is:
• Near an electrical outlet
• Near a local area network (LAN) connection
• Not in the radiation path of the linear accelerator
Make the Connections
DVS Reader Base Station Connections are three connections to the
Reader Base Station that you must make:
• Reader Wand - Connect the Reader Wand cable to the back of
the Reader Base Station. Turn the connector 1/4-turn to lock it
in place.

DVS Dose Verification System
21
• Ethernet Cable - Connect the Ethernet cable to the back of the
base station and then to a LAN connection in the room.
• Power cord - Connect the power cord to the back of the base
station and then to the wall outlet.
Note: The USB connection on the back of the Base Station is for
field service.
Barcode Scanner Connections
Connect one end of the USB cable into the end of the barcode
scanner. Press the cord in firmly to assure a proper connection.
Plug the opposite end of the cable into a USB port on a computer
containing the DVS Plan and Review software application.
To test the barcode scanner, depress the trigger. A red line should
appear. If the redline doesn’t appear, check the connection between
the cable and barcode scanner.
Power on the Reader
To power on the Reader, use the switch on the back of the base
station near the power cord. The Power On screen may take one to
two minutes to appear.
Connect to the DVS Dosimetry Database
After powering on the Reader, you need to set up the connection to
the DVS Dosimetry Database.
1. Contact Sicel technical support, and get the Administrator
password-of-the-day.
System Configuration
DVS Dose Verification System
22
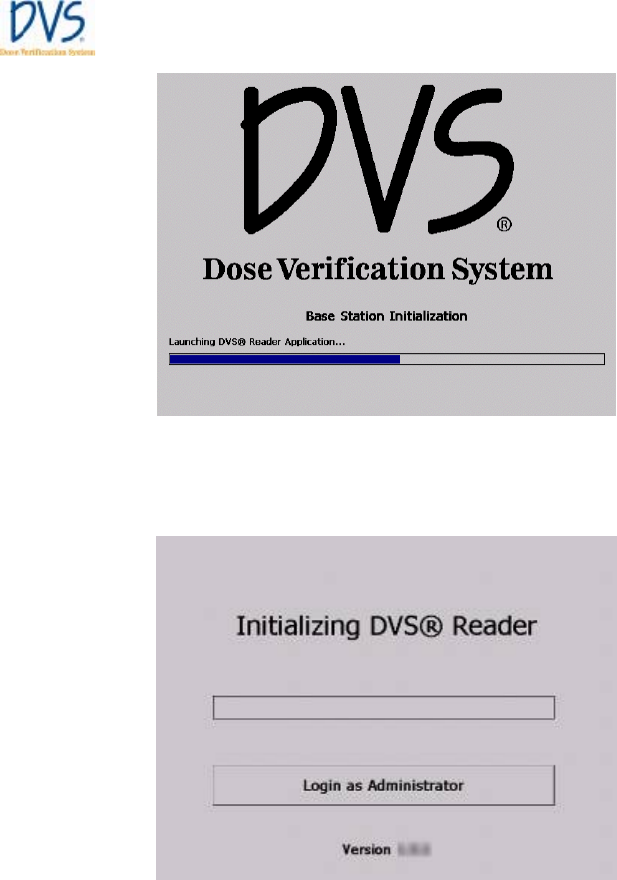
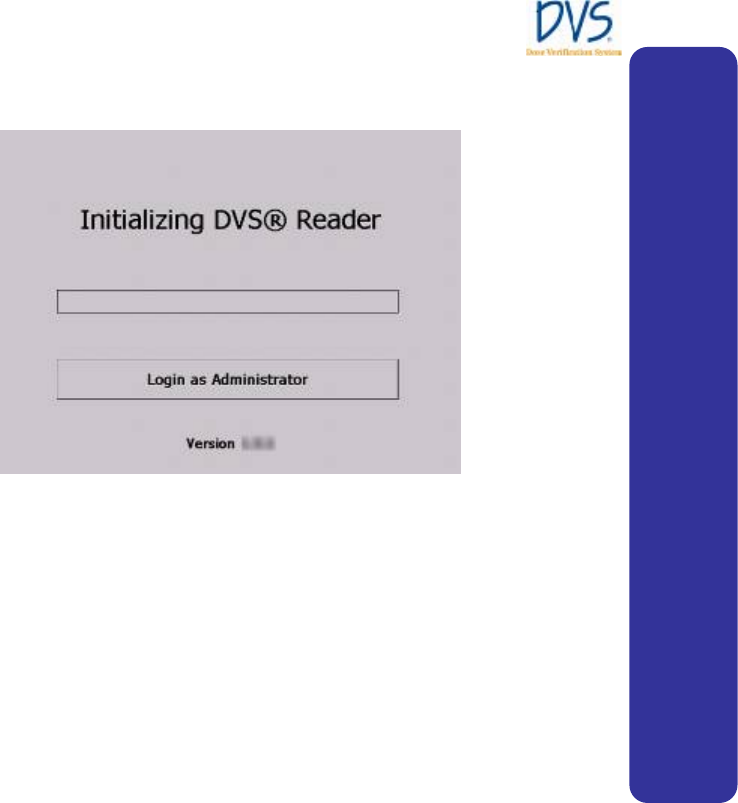
Figure 10 — Power On
2. On the Initializing DVS Reader screen, press Login as
Administrator.
Figure 11 — Initializing DVS Reader
3. Select Administrator in the user list.
4. Press the Password field to display the numeric keypad. Enter
the password-of-the-day received from technical support. Press
Enter.
DVS Dose Verification System
23
5. On the Database Server field, enter the server name and SQL
server instance. For example:
<server>\DVS
where <server> is the name of the database server computer.
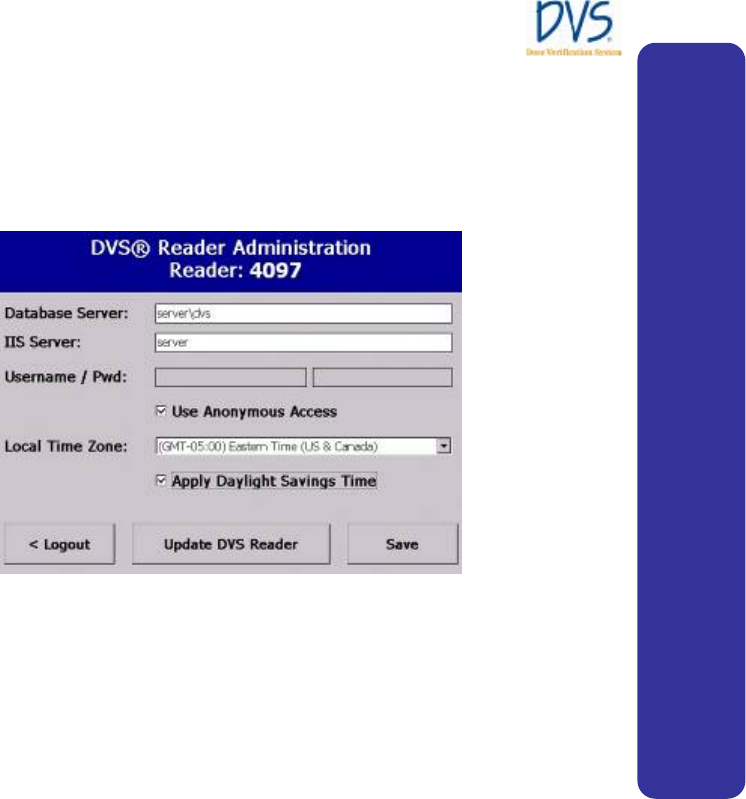
Figure 12 — Administration
6. In the Reader Administration screen, enter the name of the
server computer in the IIS Server field. This is typically the
same as the name of the server entered in the Database Server
field, but without the \DVS instance name.
7. (Optional) Determine whether Anonymous Access should be
used to communicate with the DVS database. If Anonymous
Access is used, verify that the checkbox is checked (default). If
Anonymous Access is not required, uncheck the checkbox for
web server access. Enter the username and password in the
fields provided by using the onscreen keypad.
8. Select the local time zone from the drop-down list box.
9. (Optional) Select the Automatically Adjust for Daylight
Savings Time check box. The date and time is automatically
set when the DVS Reader connects to the DVS Dosimetry
Database Server.
10. Press Save.
System Configuration

DVS Dose Verification System
24
11. Wait for the Initializing DVS Reader screen to appear and
then turn off the power to the DVS Reader.
12. Power on the DVS Reader.

DVS Dose Verification System
25
4 QUICK START INSTRUCTIONS
This section provides an overview of the workflow for using the
DVS system:
• Step 1 – Test Dosimeters (recommended)
• Step 2 – Implant Dosimeter and Record Implant Information
• Step 3 – Enter Patient Information into the Plan and Review
Software
• Step 4 – Measure Radiation Pre-Dose and Post-Dose Values
Using the DVS Reader
4.1 Step 1 - Test Dosimeters
Using the DVS Reader, you can test dosimeters before sending
them to surgery. This assures that the dosimeters are working
properly. This step is encouraged but not required.
Important: Do not remove the dosimeters from the package
because this will compromise sterility. Dosimeters can be scanned
through the package. Check the expiration date on the outer
package to ensure sterility.
1. Log in to the DVS Reader.
2. Press Test Dosimeter on the Reader Login screen.
3. Hold the Reader Wand near the dosimeter.
Quick Start Instructions

DVS Dose Verification System
26
4. Press and release the button on the Reader Wand to scan the
dosimeter. Below the status bar, the DVS Reader displays one
of the following messages:
• Dosimeter <number> was found – the dosimeter is
functional.
• No dosimeter found – the dosimeter could not be located.
Attempt to read again.
• Dosimeter xxxxxx found. MOSFET is not functional –
there is a problem with the dosimeter. Contact the local
representative for technical support.
5. Press Logout to exit.
4.2 Step 2 – Implant Dosimeters and Record Implant Information
Verify that the DVS Dosimeter and insertion tool package sterility
have not been compromised, are not expired, and that the items
have not been contaminated prior to implantation.
At surgery, specify the implant location of each dosimeter on the
transfer labels provided. The transfer label information aids the
dosimetrist in identifying the dosimeters on a CT scan. For each
dosimeter, retain one transfer label in the surgical records and
return the other to Radiation Oncology.

DVS Dose Verification System
27
4.3 Step 3 – Enter Patient Information Into the Plan and Review
Software
Using the Plan and Review Software, enter the patient’s
demographic information and dose planning information. Ensure
that the predicted dose at the dosimeter was obtained by measuring
the point dose 1.3 mm from the end of the capsule opposite the
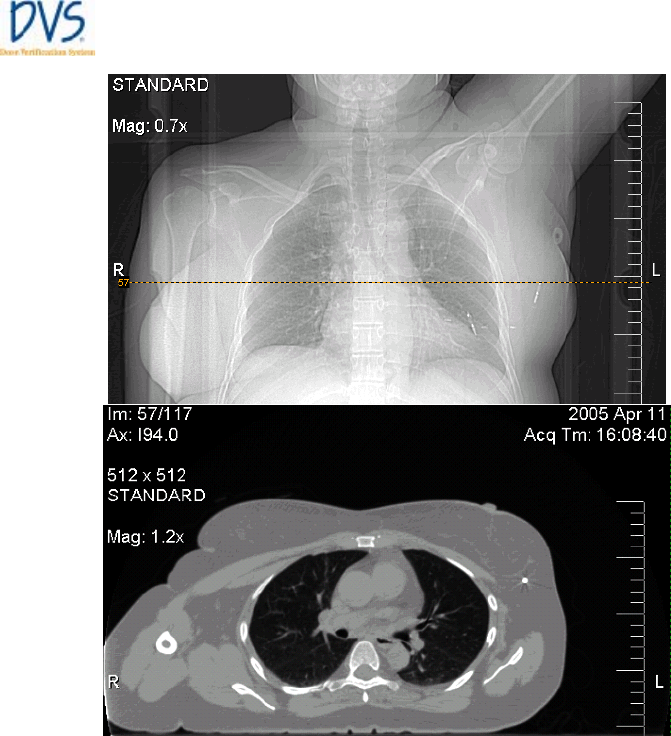
antenna (Figure 13 — DVS Dosimeter Sensitive Volume). Use a
CT scout film or radiograph to determine dosimeter orientation
within the patient (Figure 14 — CT Scout and Transverse Images).
Figure 13 — DVS Dosimeter Sensitive Volume
Quick Start Instructions
DVS Dose Verification System
28
Figure 14 — CT Scout and Transverse Images
1. Log in to the Plan and Review Software.
2. Click Patient Information.
3. Click Add.
4. In the Patient Data Entry dialog box, enter the patient
information:
a. Enter the patient number.
b. Enter the patient’s name.
c. Enter the physician’s name (this is generally the attending
radiation oncologist).

DVS Dose Verification System
29
5. Click Add Dosimeter to assign the implanted dosimeters to
the patient.
a. Scan the dosimeter’s bar code. The bar code contains the
dosimeter’s serial number and calibration information.
b. Enter the implant location for each dosimeter from the
transfer labels.
6. Click Add Plan and add the patient’s plan information:
a. Enter the name of each plan, and the number of fractions
for each plan.
b. Enter the predicted dose at each dosimeter (point dose)
from the planning CTs. Note that this must be in cGy (not
MU). Verify the dose fraction range for the dosimeter
from the dosimeter’s Instruction for Use, specifications
section. Values outside this range will result in an error
message:
This predicted dose is outside the typical range of xxx to
xxx cGY. Are you sure you want to use this value?
Note: Additional plans may be added at any time.
4.4 Step 4 – Measure Radiation Pre-dose and Post-dose Values Us-
ing The DVS Reader
1. Log in to the Reader.
2. Press Scan patient.
3. Select the patient from the list and press Next.
4. Select the current plan and fraction for the patient and press
Next.
5. Read the dosimeters’ pre-dose values.
a. Hold the Reader Wand up to the patient.
b. Press then release the button on the Reader Wand.
c. Hold the Reader Wand near the patient’s treatment area
until the Reader scans and reads all the dosimeters.
6. Proceed with radiation therapy.
Quick Start Instructions

DVS Dose Verification System
30
7. Press Next on the Reader to display the POST-Dose Reading
screen.
8. Read the dosimeters’ post-dose values within 10 minutes of
the completion of treatment:
a. Hold the Reader Wand up to the patient.
b. Press then release the button on the Reader Wand.
c. Hold the Reader Wand near the patient’s treatment area
until the Reader scans and reads all the dosimeters again.
9. Press Next and enter any notes related to the therapy on the
Treatment Notes screen.
10. Press Save to save the readings to the Dosimetry Database.
DVS Dose Verification System
31
5 USING THE PLAN AND REVIEW SOFTWARE
The Plan and Review Software is used to:
• Enter patient, dosimeter, and plan information
• Review results from the patient’s dosimeters
• Maintain the authorized user list
• Setup system options
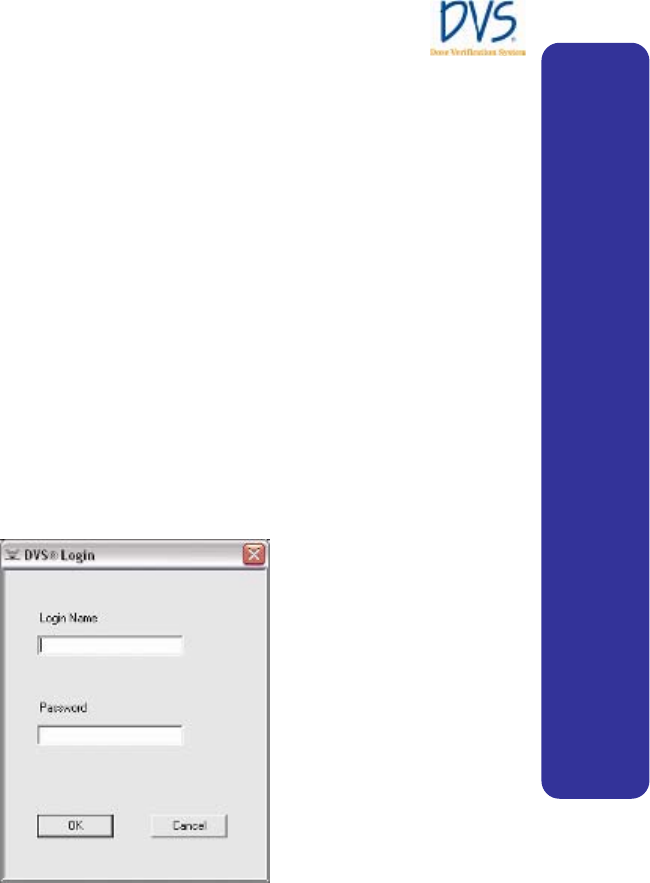
5.1 Logging into the DVS Plan and Review Software
To log in to the Plan and Review Software:
1. Click the DVS Plan and Review icon on the Desktop or select
Start>Programs>DVS>DVS Plan and Review. The DVS
Login dialog box appears (Figure 15 — DVS Login).
Figure 15 — DVS Login
2. Enter the Login Name and Password that were assigned to
you by the DVS Administrator.
3. Click OK.
Using the Plan and Review Software

DVS Dose Verification System
32
5.2 DVS Main Menu Overview
The DVS Main Menu contains five buttons as shown in Figure 16
— DVS Main Menu:
• Patient Information – Enter or edit patient, dosimeter, and
plan information (see Working With Patient Information)
• Patient Results – View charts and reports for the patient’s
dosimeter results (see Quick Start Instructions)
• Administration – Maintain the list of authorized users, and set
DVS options (see DVS System Administration)
• Exit DVS – Exit the Plan and Review Software
• About… – Show software version and copyright information
Note: Depending on the user’s authorization level, some of these
buttons may be disabled. For more information, see Adding and
Editing DVS Users.
Figure 16 — DVS Main Menu
DVS Dose Verification System
33
5.3 Working With Patient Information
From the DVS Main Menu, click Patient Information to perform
the following tasks:
• Adding, Editing and Viewing Patients
• Entering Patient, Dosimeter, and Plan Information
• Entering Patient and Physician Information
• Entering Plans
• Entering Dosimeters
• Changing or Deleting Dosimeters
• Working with Measurement Fractions and Skipped Fractions
• Changing Information for a Fraction
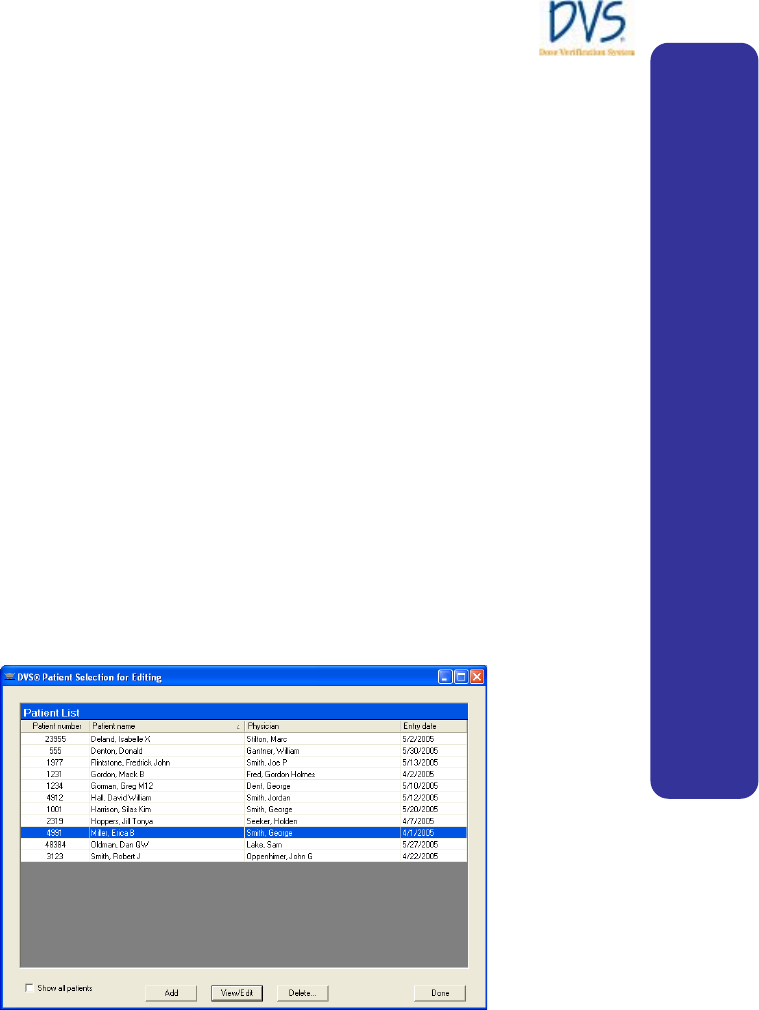
Adding, Editing, and Viewing Patients
To add, edit or view patients, click Patient Information on the
DVS Main Menu. The Patient Selection for Editing window
appears (Figure 17 — Patient Selection for Editing).
Figure 17 — Patient Selection for Editing
Using the Plan and Review Software

DVS Dose Verification System
34
By default, the patient list displays only the patients that are
marked to be shown in the DVS Reader. This makes it easier to
manage a large list of patients. If a patient has been entered, but
neither a plan nor dosimeters have been added to the patient
record, then the patient is not active and will not be listed. To list
all the patients in the Dosimetry Database, select the Show all
patients check box.
From this window, you can perform the following tasks:
• To add a new patient, click Add. The Patient Data Entry
window appears. You can enter the new patient’s information
using this window.
• To delete a patient from the list, select the patient in the list
and click Delete. Patients who have dosimeters with
measurements cannot be deleted. To remove a patient from the
list, clear the Patient shown on Reader check box in the
Patient Data Entry window.
• To edit a patient’s information, select the patient in the list
and click View/Edit. The Patient Data Entry window
appears. You can enter the new patient’s information using this
window.
• To return to the Main Menu, click Done.
For more information about the Patient Data Entry window, see
Entering Patient, Dosimeter, and Plan Information.
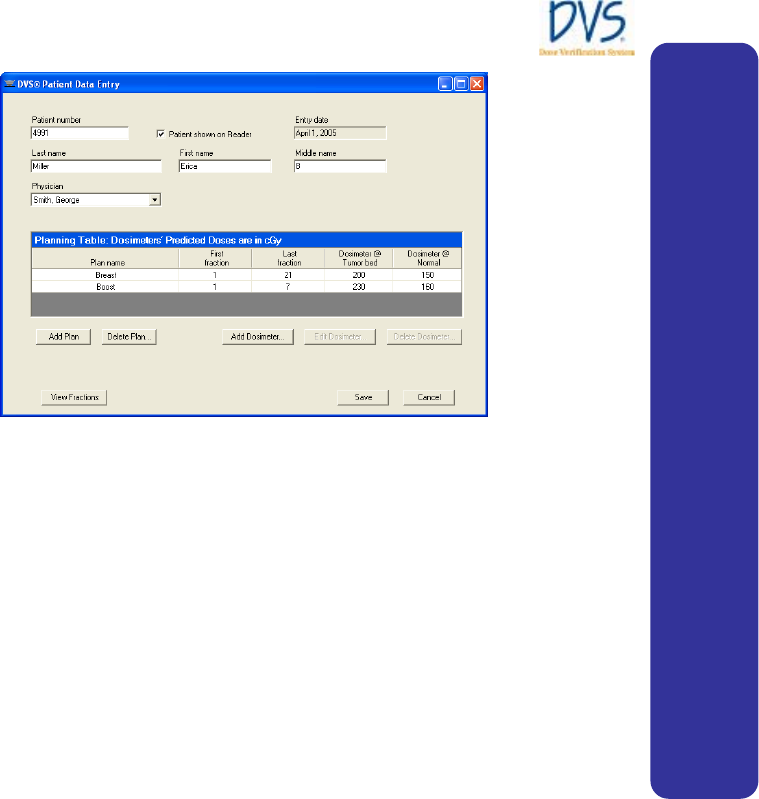
Entering Patient, Dosimeter, and Plan Information
To edit patient, dosimeter, and plan information, click Add or
View/Edit on the Patient Selection for Editing window to
display the Patient Data Entry window (Figure 18 — Patient
Data Entry).
DVS Dose Verification System
35
Figure 18 — Patient Data Entry
From the Patient Data Entry window, you can perform the
following tasks:
• Entering Patient and Physician Information
• Entering Plans
• Entering Dosimeters
• Changing or Deleting Dosimeters
• Working with Measurement Fractions and Skipped Fractions
• Changing Information for a Fraction
Entering Patient and Physician Information
The top of the Patient Data Entry window has the following
fields for entering patient demographic information:
• Patient number – (required) This must contain a unique
patient number or identifier
• Patient shown on Reader – Select this check box to display
the patient on the Select Patient screen on the DVS Reader.
For patients that are no longer active, clear this check box.
• Entry date – (read-only) Displays the date the patient was
entered.
Using the Plan and Review Software
DVS Dose Verification System
36
• Last name – (required) Enter the patient’s last name
• First name – Enter the patient’s first name.
• Middle name – Enter the patient’s middle name
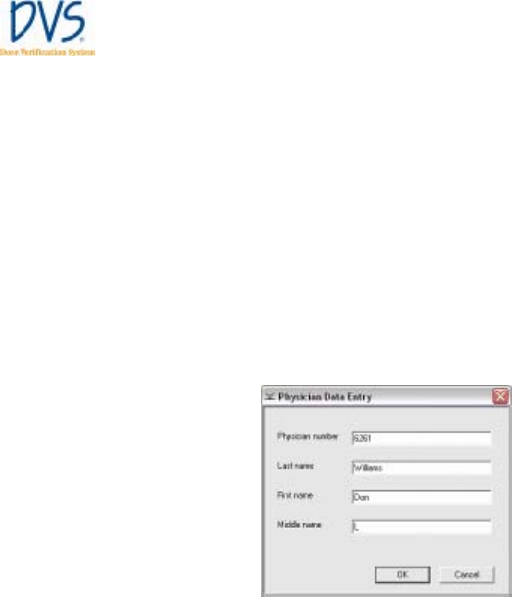
• Physician – Select a physician from the list. If you want to add
a new physician, select Add Physician from the top of the list.
The Physician Data Entry dialog box appears (Figure 19 —
Physician Data Entry). Enter the physician’s name and unique
physician number. The physician number and last name are
required fields. If there is not a unique number that identifies
the physician, enter their name or other identifier.
Figure 19 — Physician Data Entry
When finished making changes, click Save to save the data entered
in this window and its dialog boxes. Click Cancel to discard all
changes made for the current patient.
Entering Dosimeters
Dosimeters assigned to the patient are shown in the planning table
on the Patient Data Entry window.
To add a new dosimeter:
1. Click Add Dosimeter. A dialog box for entering the
dosimeter’s bar coded calibration values appears (Figure 20 —
Dosimeter Barcode).
DVS Dose Verification System
37
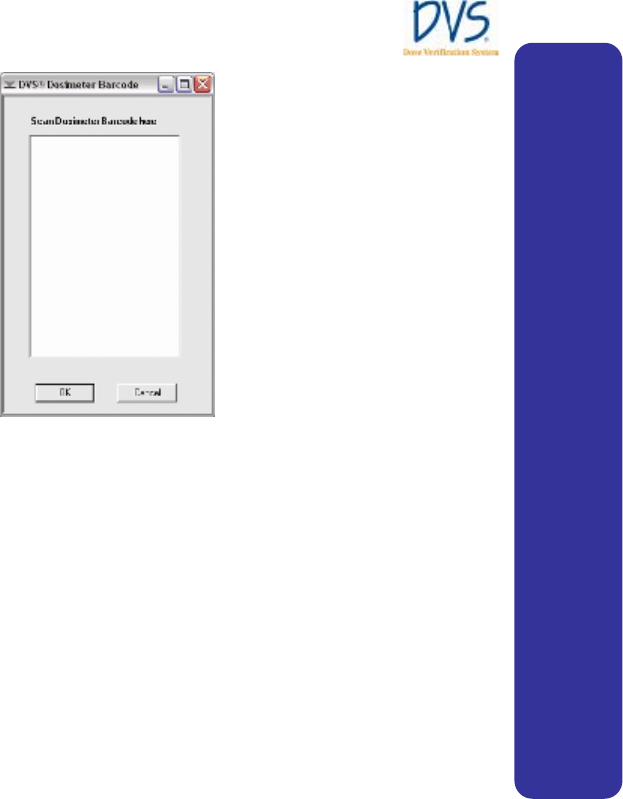
Figure 20 — Dosimeter Barcode
2. Use the bar code scanner to read the 2D bar code on the
dosimeter’s transfer label:
a. Hold the bar code scanner at a slight angle to the transfer
label.
b. Be sure the scanner’s light field completely covers the bar
code from left-to-right.
c. Slowly scan the bar code from top-to-bottom or bottom-to-
top until an audible beep is heard and numeric values are
displayed in the dialog box.
Using the Plan and Review Software
DVS Dose Verification System
38
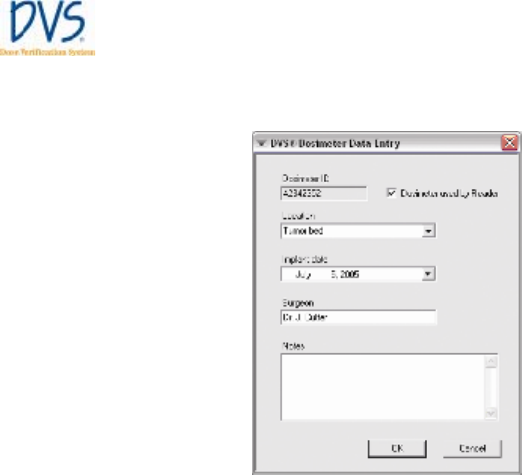
3. When completed, click OK. The Dosimeter Data Entry
dialog box appears (Figure 21 — Dosimeter Data Entry).
Figure 21 — Dosimeter Data Entry
4. Refer to the dosimeter transfer label and enter information
about the dosimeter:
• Dosimeter ID – (Read-only) Displays the serial number of
the dosimeter.
• Location – Select a location name for the dosimeter from
the pull-down menu. If you want to create a new location,
just type it into this field.
• Implant date – (Optional) Select the implant date of the
dosimeter. The default is today’s date.
• Surgeon – (Optional) Enter the surgeon’s name.
• Notes – (Optional) Enter notes about the dosimeter
• Dosimeter used by Reader – To have the DVS Reader
scan for this dosimeter, select this check box. To prevent
the Reader from scanning for this dosimeter, clear this
check box.

DVS Dose Verification System
39
5. Click OK to save the dosimeter information. The planning
table is updated with a new column for the dosimeter. The
Location that was entered in the Dosimeter Data Entry
dialog box appears in the new column’s heading.
Entering Plans
Use the planning table on the Patient Data Entry window to enter
the patient’s plan information. Each row in the planning table
contains a plan for the patient. Each plan is made of a series of
treatment fractions each at the same dose level.
To add a new plan:
1. Click Add Plan and edit the new row that appears.
2. Set the following items for each plan:
• Plan name – The name to use for the plan
• First fraction – The number of the first fraction. This is
typically 1, but can is any number greater than zero, and
less than or equal to the Last fraction.
• Last fraction – The number of the last fraction. This must
be greater than or equal to the First fraction.
If dosimeters have been assigned to the patient, additional columns
appear in the table, one for each dosimeter. For more information
about assigning dosimeters to a patient, see Entering Dosimeters.
To delete a plan:
1. Select the row to delete.
2. Click Delete Plan.
Changing or Deleting Dosimeters
Dosimeters assigned to the patient are shown in the planning table
on the Patient Data Entry dialog box.
To edit dosimeter information
1. Put the cursor in the Dosimeters column.
Using the Plan and Review Software

DVS Dose Verification System
40
2. Click Edit Dosimeter. The Dosimeter Data Entry dialog box
appears (Figure 21 — Dosimeter Data Entry).
3. Change the information in this dialog box.
4. Click OK to save the information.
DVS Dose Verification System
41
To delete a dosimeter:
1. Put the cursor in the Dosimeters column.
2. Click Delete Dosimeter.
Note: Dosimeters with measurements cannot be deleted. Click
Edit Dosimeter to display the Dosimeter Data Entry dialog box.
Clear the Dosimeter used by Reader check box.
Working with Measurement Fractions and Skipped
Fractions
As measurements are collected from a patient’s dosimeters, you
can make changes to the information collected on the DVS
Reader’s Treatment Notes screen, and you can add, edit, or delete
skipped fractions.
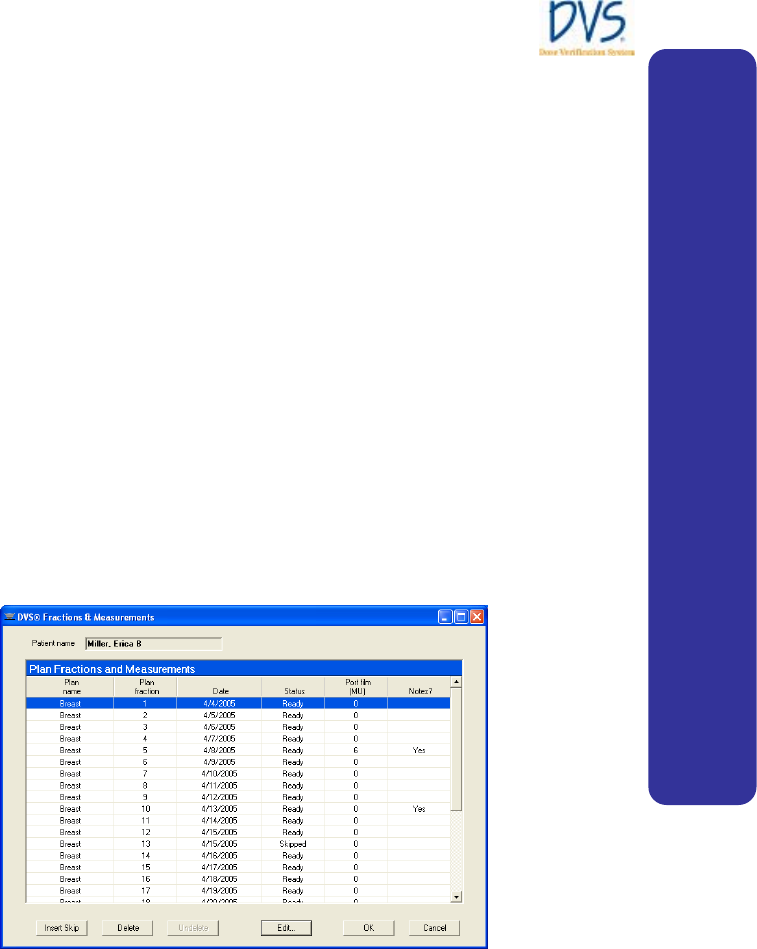
On the Patient Data Entry window, click View Fractions to
display the Fractions & Measurements windows. This window
lists the planned fractions and the measurements made for each
fraction (Figure 22 — Fractions & Measurements).
Figure 22 — Fractions & Measurements
The columns in the Fractions & Measurements window are
defined as follows:
• Plan name – The plan’s name from the planning table.
Using the Plan and Review Software

DVS Dose Verification System
42
• Plan fraction – The plan’s fraction number.
• Date – The measurement date.
• Status – The measurement status for the plan and fraction:
• Ready – A normal measurement was taken.
• Skipped – No measurement was taken, but treatment was
given.
• Deleted – The measurement is marked as deleted; it is not
associated with a plan and fraction.
• [Blank] – No measurement or treatment has been
performed yet.
• Port film (MU) – The number of monitor units from port
films taken during the measurement.
• Notes? – Whether any notes check boxes were selected for the
measurement. Yes means there are notes. Blank means
there are no notes.
Deleting a Fraction
To mark a measurement fraction as deleted so it is not
associated with a plan and fraction, perform the following steps:
1. Select the measurement.
2. Click Delete. The measurement is not actually deleted, but will
not be used to calculate total dose administered.
To restore a deleted measurement:
1. Select the fraction.
2. Click Undelete.
Inserting Skipped Fractions
Skipped fractions are used to record when treatment was given, but
pre- and/or post-dose readings were not recorded. If a skipped
fraction is used, the predicted dose is substituted automatically for
the measured dose to approximate the cumulative dose. The dose
appears in brackets [ ].
DVS Dose Verification System
43
To insert a skipped fraction:
1. Select the row with the plan and fraction that was missed.
2. Click Insert Skip. This associates a skipped fraction with the
selected plan and fraction.
To remove a skipped fraction:
1. Select the row with the skipped fraction.
2. Click Delete.
Changing Information for a Fraction
From the Fractions & Measurements window, you can change
the notes or the port film monitor units for a fraction:
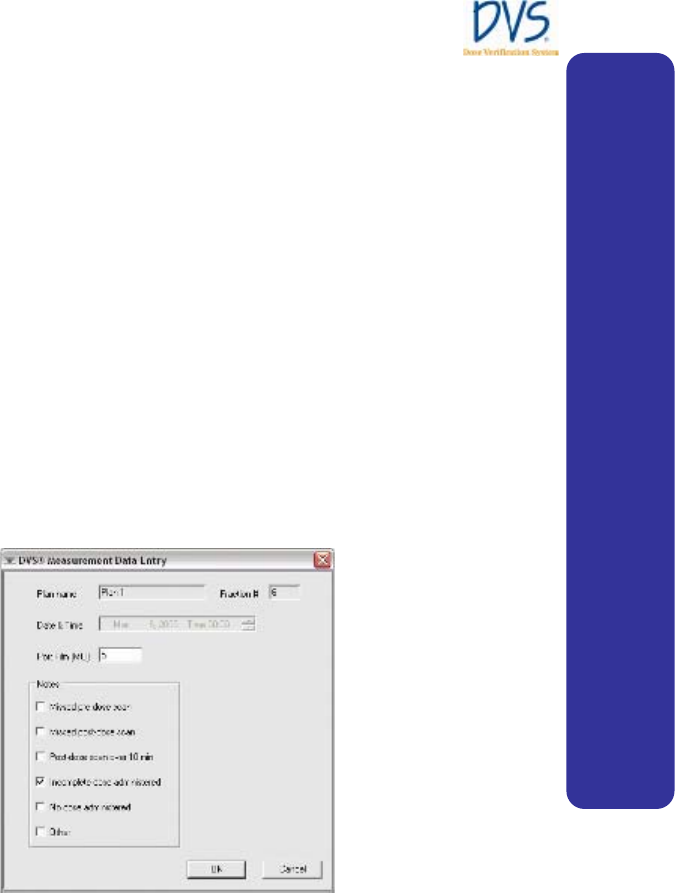
1. Select the fraction to edit.
2. Click Edit to display the Measurement Data Entry dialog
box (Figure 23 — Measurement Data Entry).
Figure 23 — Measurement Data Entry
3. Edit the following information in the Measurement Data
Entry dialog box:
• Plan name – (read-only) The plan name of the selected
fraction
• Fraction # – (read-only) The plan’s fraction number
Using the Plan and Review Software

DVS Dose Verification System
44
• Date & Time – (read-only, except for Skipped fractions)
The date and time of the measurement. For Skipped
fractions, this can be changed; however, the date and time
must stay between the fraction before and after the current
fraction. This is needed to keep the measurement fractions
in the proper order.
• Port Film (MU) – The number of monitor units from Port
films taken during this measurement
• Notes – This group-box contains check boxes that record
the notes entered by the user
4. Click OK to save the changes made in this dialog box. To
discard the changes, click Cancel.
5.4 Viewing Patient Results
From the Main Menu, click Patient Results to perform the
following tasks:
• Displaying a List of Patient Results
• Viewing Results Charts
• Viewing Results Reports
Displaying a List of Patient Results
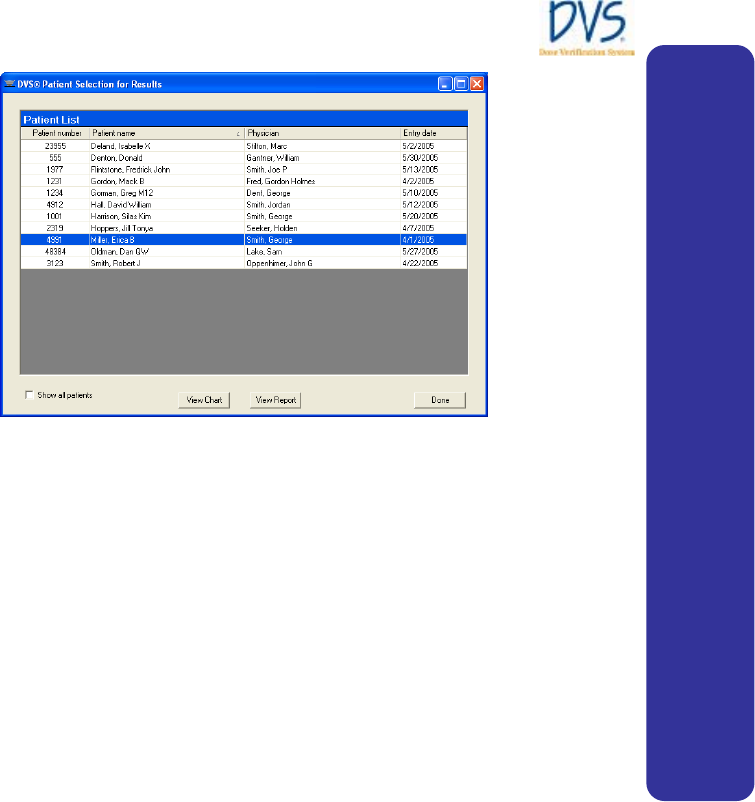
To view patient results, click Patient Results on the DVS Main
Menu. The Patient Selection for Results window appears (Figure
24 — Patient Selection for Results).
DVS Dose Verification System
45
Figure 24 — Patient Selection for Results
By default, the patient list displays only the patients that are
marked to be shown in the DVS Reader. This makes it easier to
manage a large list of patients. To list all the patients in the
Dosimetry Database, select the Show all patients check box. From
this window, you can perform the following tasks:
• To view a chart showing the dose measurements from a
patient’s dosimeters, select the patient and click View Chart
to display the Results Chart screen. For more information, see
Viewing Results Charts.
• To view a report showing the dose measurements from a
patient’s dosimeters, select the patient and click View
Report to display the Results Report screen. For more
information, see Viewing Results Reports.
• To return to the Main Menu, click Done.
Viewing Results Charts
The Results Chart window summarizes a patient’s dosimeter
measurements. There are two charts and a statistics table shown for
each dosimeter (Figure 25 — Results Charts and Figure 26 —
Statistics Table).
Using the Plan and Review Software
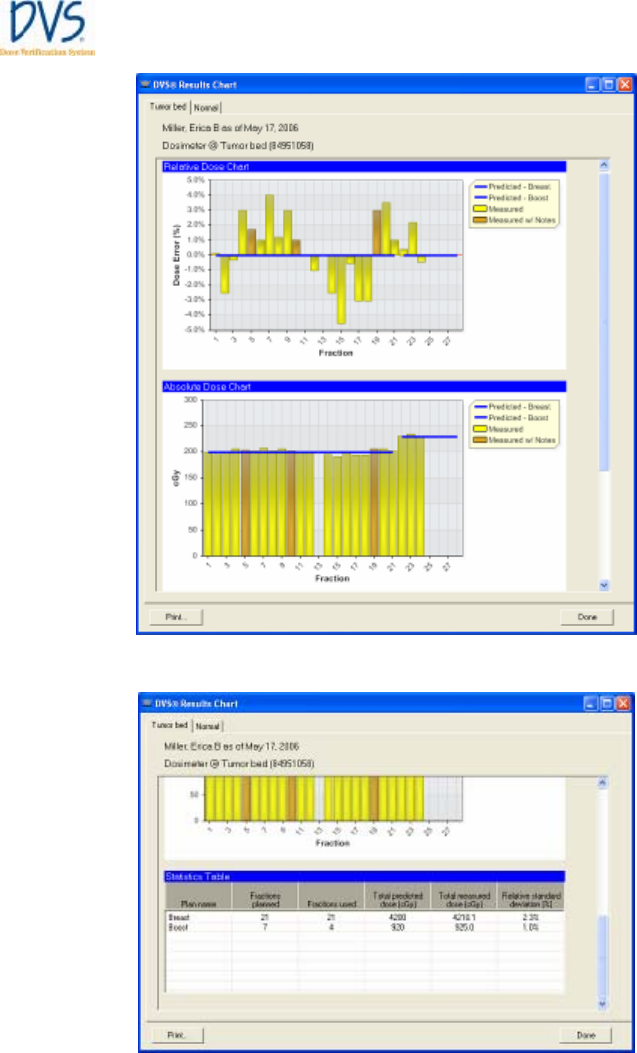
DVS Dose Verification System
46
Figure 25 — Results Charts
Figure 26 — Statistics Table

DVS Dose Verification System
47
Dosimeter results are displayed in a tab labeled with the dosimeter
location.
The first chart is the Relative Dose Chart. This shows the
difference between each measured dose and its predicted dose as a
percentage. The value shown for each bar is the measured dose
relative to the predicted dose.
The second chart is the Absolute Dose Chart. This shows the
measured doses (in cGy) as gold bars, and the predicted doses as
blue lines. Each plan is shown as a separate blue line.
In the charts, the brown bars identify measurements where either a
port film was taken or notes were entered by the user.
For each of the charts, the mouse can be positioned over a bar to
show more information about the measurement:
• The value of the measurement
• The date of the measurement
• Who made the measurement
• The monitor units from port films that were taken
• Any notes selected during the measurement process
No bars are shown for skipped fractions or fractions where a
dosimeter value could not be read. Positioning the mouse over
these empty spaces will show if it was a skipped fraction or a
measurement error.
The Statistics Table shows summary statistics for each of the
patient’s plans. The columns are as follows:
• Plan name – The name of the plan
• Fractions planned – The number of fractions in the plan
• Fractions used – The number of dose fractions administered
so far
• Total predicted dose (cGy) – The expected dose administered
for the number of fractions displayed in the Fractions used
column
Using the Plan and Review Software
DVS Dose Verification System
48
• Total measured dose (cGy) – The measured dose for the
number of fractions displayed in the Fractions used column.
For skipped fractions or fractions with measurement errors, the
predicted dose is used instead.
• Relative standard deviation (%) – The standard deviation of
the measurements divided by the average of the measurements.
For skipped fractions or fractions with measurement errors, the
predicted dose is used instead.
To print the charts for a patient, click Print. One page is printed
for each dosimeter.
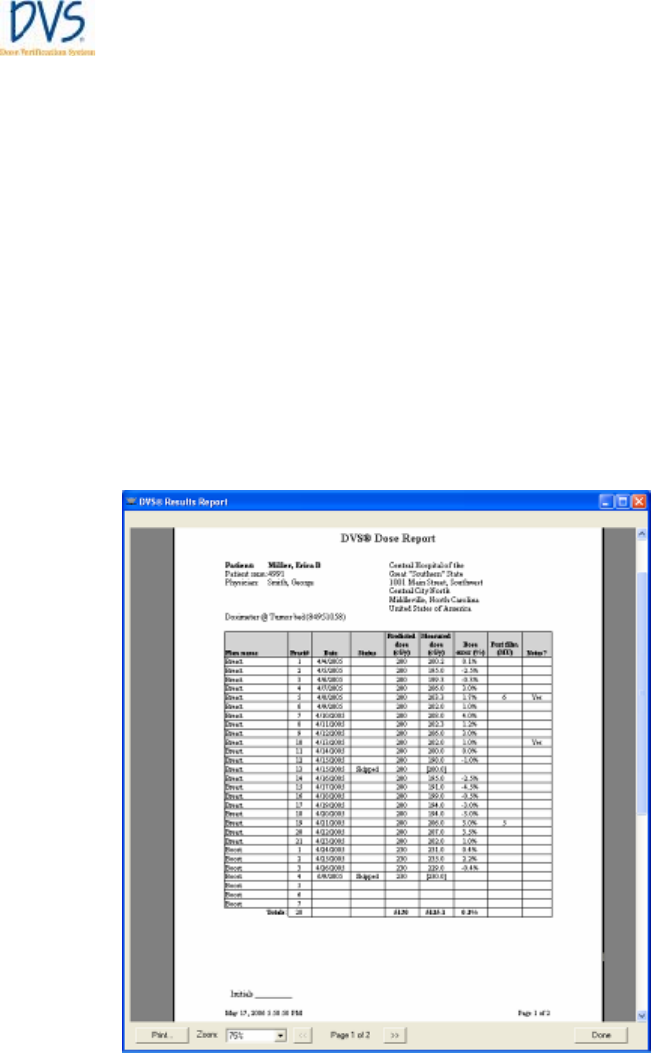
Viewing Results Reports
The Results Report window summarizes a patient’s dosimeter
measurements in a report format (Figure 27 — Results Report).
Figure 27 — Results Report

DVS Dose Verification System
49
The report is similar to the Fractions & Measurements screen
(see Working with Measurement Fractions and Skipped
Fractions). However, the report also shows the dose values from
each dosimeter. The measurement for each dosimeter is shown in a
separate table. The columns in the tables are as follows:
• Plan name – The plan’s name from the planning table.
• Fract # – The plan’s fraction number.
• Date – The measurement date.
• Status – The measurement status for the plan and fraction. It is
one of:
• [Blank] – A normal measurement was taken.
• Skipped – No measurement was taken, but treatment was
given.
• Deleted – The measurement is marked as deleted; it is not
associated with a plan and fraction.
• Error – An error occurred when taking the measurement
from this dosimeter.
• Predicted dose (cGy) – The dose from the planning table.
• Measured dose (cGy) – The measured dose.
• Dose error (%) – The difference between the Measured dose
and the Predicted dose, divided by the Predicted dose.
• Port film (MU) – The number of monitor units from port
films taken during the measurement.
• Notes? – Whether any notes check boxes were selected for the
measurement. Yes means there are notes. Blank means
there are no notes.
The size of the displayed report can be changed with the Zoom
selection. This does not affect the printed report.
To display the next page of the report, click >>. To display the
previous page, click <<.
To print the report, click Print.
Using the Plan and Review Software
DVS Dose Verification System
50
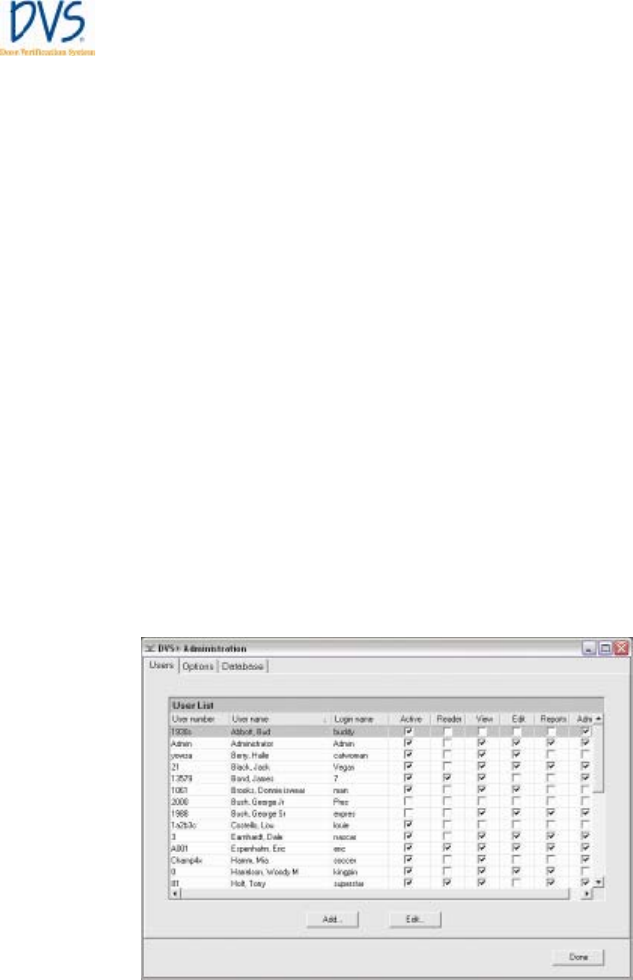
5.5 DVS System Administration
From the Main Menu, click Administration to display the
Administration screen. This screen contains three tabs:
• Users – This tab contains the list of authorized users.
• Options – This tab contains options for the DVS system.
• Database – This tab contains the database connection
information.
From these tabs, you can perform the following tasks:
• Adding and Editing DVS Users
• Changing Institutional Information and System Options
• Changing the Database Connections
• Backing up and Restoring the DVS Database
Adding and Editing DVS Users
The Users tab displays the list of authorized users (Figure 28 —
Users).
Figure 28 — Users

DVS Dose Verification System
51
Each person who uses the DVS Plan and Review Software and the
DVS Reader, must have a login name and password. To add a new
user, click Add. This displays the User Data Entry window
(Figure 29 — User Data Entry). The fields in this window are as
follows:
• Active user – Select this check box to let the user log in. Clear
this check box to disable this user.
• User number – (Required) Enter a unique user number or
identifier.
• Last name – (Required) Enter the user’s last name.
• First name – Enter the user’s first name.
• Middle name – Enter the user’s middle name.
• Login name – (Required) Enter the user’s login name for the
Plan and Review Software.
• Password – (Required) Enter the user’s numeric password.
The password must be a minimum of 4 digits and a maximum
of 8 digits.
• Verify password – (Required) Enter the user’s password for
verification.
• Entry date – (Read-only) Date is entered automatically when
the user is added.
• Can use Reader – Select this check box to allow the user to
log in and use the DVS Reader. Clear this check box to
prevent this user from appearing in the user list on the Reader.
• View Patient data – Select this check box to allow the user to
select the Patient Information button and view the screens that
it contains. Clear this check box to disable the Patient
Information button for this user.
• Edit Patient data – Select this check box to allow the user to
edit patient information. If this check box is selected, then the
View Patient Data check box is selected also. Clear this check
box to prevent the user from changing any patient information.
Using the Plan and Review Software
DVS Dose Verification System
52
• Create reports – Select this check box to allow the user to
select the Patient Results button and view the charts and
reports. Clear this check box to disable the Patient Results
button.
• Administrator – Select this check box to allow the user to
select the Administrator button and perform administrative
functions. Clear this check box to disable the Administrator
button.
Figure 29 — User Data Entry
To edit an existing user, select the user in the list and click Edit.
This displays the User Data Entry window with the user’s
information.
To return to the Main Menu, click Done.
Changing Institutional Information and System
Options
The Options tab contains information that is typically setup once
when the DVS system is installed (Figure 30 — Options).
DVS Dose Verification System
53
Figure 30 — Options
The Options tab contains the following fields:
• Institution’s name – The name of the institution to print on
the charts and reports
• Address – The address printed on the charts and report
• On Reader, time for automatic logout – This is the number
of minutes of idle time to allow before automatically logging
out of the DVS Reader
• How to show the measured dose on the Reader’s Notes
Screen –The user can choose from three options to the dose on
the Reader:
• None – Do not show the measured dose on the Reader
• Percent error – Show the measure dose as a percentage
relative to the predicted dose
• Absolute dose – Show the measured dose in cGy
Changing the Database Connections
The Database tab contains the connection information to the
Dosimetry Database. Contact your DVS administrator to get the
settings for this tab (Figure 31 — Database).
Using the Plan and Review Software
DVS Dose Verification System
54
Figure 31 — Database
Backing up and Restoring the DVS Database
To back up or restore the DVS Database, perform the following
steps:
1. Click the DVS Plan and Review icon on the Desktop or select
Start>Programs>DVS>DVS Plan and Review. The DVS
Main Menu and DVS Login dialog box appears.
2. In the DVS Login dialog box, enter the Admin login name and
password.
3. Click OK. The Main Menu of the DVS Plan and Review
Software appears.
4. Click Administration.
5. Click the Database tab.

DVS Dose Verification System
55
6. To back up the database:
a. Click Backup Database.
b. In the Backup DVS Database dialog box, select a
location to save the backup file.
c. Click Save. The database backup file is saved using the
current date and time in the file name. For example: DVS
DB Backup 20Apr2006 15.20.32.bak
d. When the database is successfully backed up, a message
box appears. Click OK.
7. To restore a database:
a. Click Restore Database.
b. In the Restore DVS Database dialog box, select the
backup file you want to restore. DVS Database files are
saved using the current date and time in the file name. For
example: DVS DB Backup 20Apr2006 15.20.32.bak
c. Click Open.
8. Click Done.
Using the Plan and Review Software
DVS Dose Verification System
56
6 USING THE DVS READER
Use the DVS Reader to perform the following tasks:
• Power on the DVS Reader and Power off the Reader
• Log in to the DVS Reader
• Test a Dosimeter
• Select a Patient
• Select a Plan/Fraction
• Take a Pre-Dose Reading
• Take a Post-Dose Reading
• Enter Treatment Notes
In order to use the DVS Reader, the patient, dosimeter, and plan
information must have been entered using the Plan and Review
Software.
6.1 Power On the DVS Reader and Power Off
1. Power on the Reader. The Power On screen appears briefly.
Figure 32 — Power On
DVS Dose Verification System
57
The Initializing DVS Reader screen appears indicating that the
Reader is starting up (Figure 33 — Initializing DVS Reader).
Figure 33 — Initializing DVS Reader
The Reader performs tests to verify the connection to the
Dosimetry Database, software compatibility, and that the Reader
Wand is functioning.
If you need to set up the DVS Dosimetry Database, you can log in
using the Administrator Login screen by clicking Login as
Administrator. You need to get the Administrator password-of-
the-day from technical support. All other users should wait until
initialization is complete and the DVS Reader Login appears.
Note: If there are any errors, see Troubleshooting for a resolution.
2. To power off the Reader, turn the power switch OFF
3. To remove power from the System, unplug the power cord.
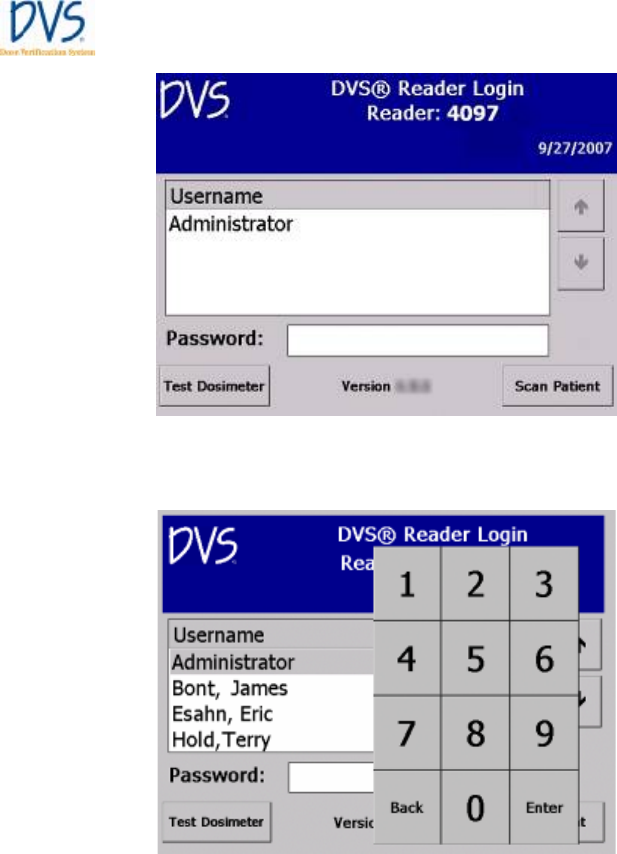
6.2 Log in to the DVS Reader
To log in to the DVS Reader, perform the following steps:
1. Select a username from the list (Figure 34 — Reader Login ).
Using the DVS Reader
DVS Dose Verification System
58
Figure 34 — Reader Login
Tap the Password field and a numeric keypad appears.
Figure 35 — Keypad
2. Enter the password using the touch-screen keypad and then
press Enter on the keypad.
3. Choose whether you want to test a dosimeter or scan a patient:
• Press Test Dosimeter to test a dosimeter’s functionality
before implantation.
DVS Dose Verification System
59
• Press Scan Patient to begin the process of reading a
patient’s dose.
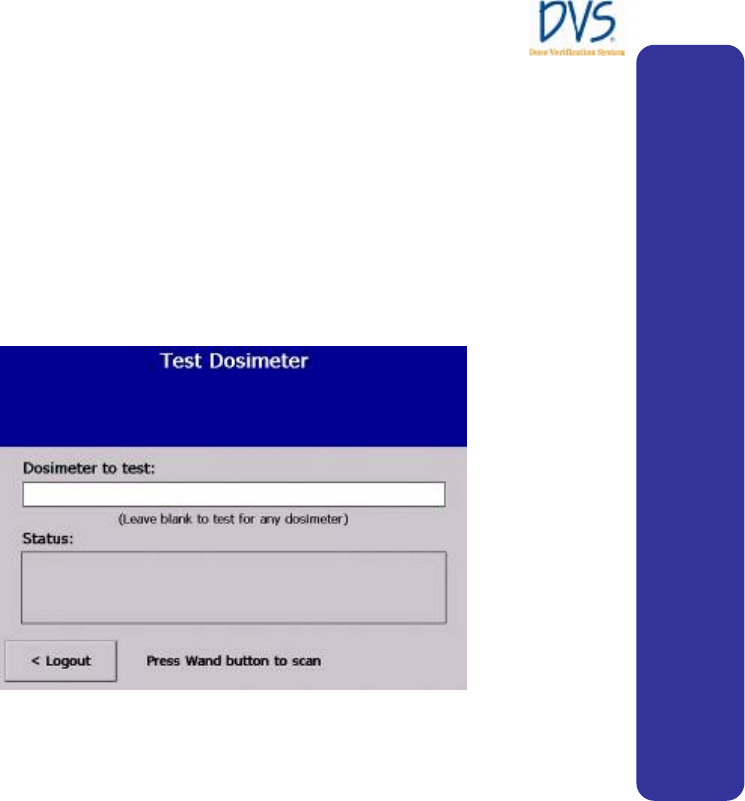
6.3 Test a Dosimeter
Dosimeters may be tested prior to implant to assure functionality
or to verify dosimeters that have already been implanted. The
dosimeter may be tested by either entering the dosimeter’s serial
number and scanning using the Reader Wand, or by simply
scanning using the Reader Wand without entering a serial number.
Figure 36 — Test Dosimeter
If there are two or more dosimeters in the read range, then you
need to enter each dosimeter’s serial number one at a time. If you
do not enter a dosimeter’s serial number, then only one dosimeter
is allowed in the read range volume. If there is only one dosimeter
in the read range, make sure the Dosimeter to test field is blank so
the Reader searches for any dosimeter.
• To read a dosimeter without knowing its serial number,
leave the Dosimeter to test field blank (Figure 36 — Test
Dosimeter ), then hold the dosimeter near the Reader Wand
and press the button on the Reader Wand. The Reader searches
for any available dosimeters within the read range.
Using the DVS Reader
DVS Dose Verification System
60
• To scan for a specific dosimeter, tap the Dosimeter to test
field and a numeric keypad appears. Enter the dosimeter
number in the field and press Enter. Next, hold the dosimeter
near the Reader Wand and press the button on the Reader
Wand.
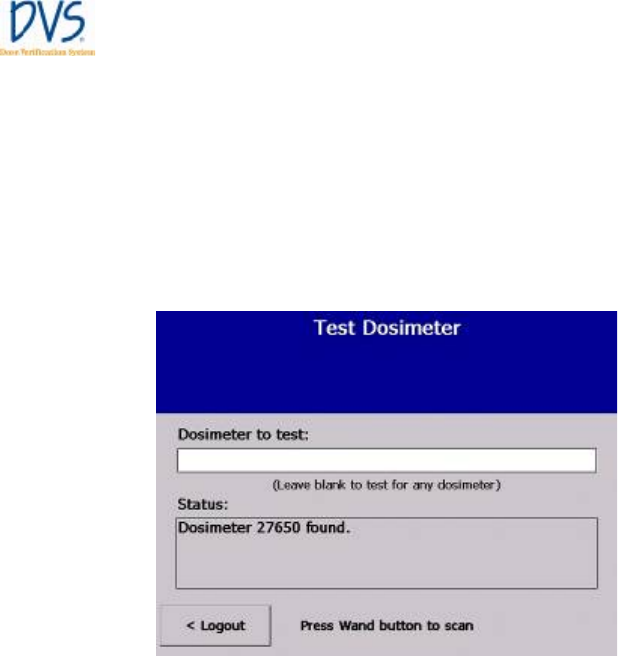
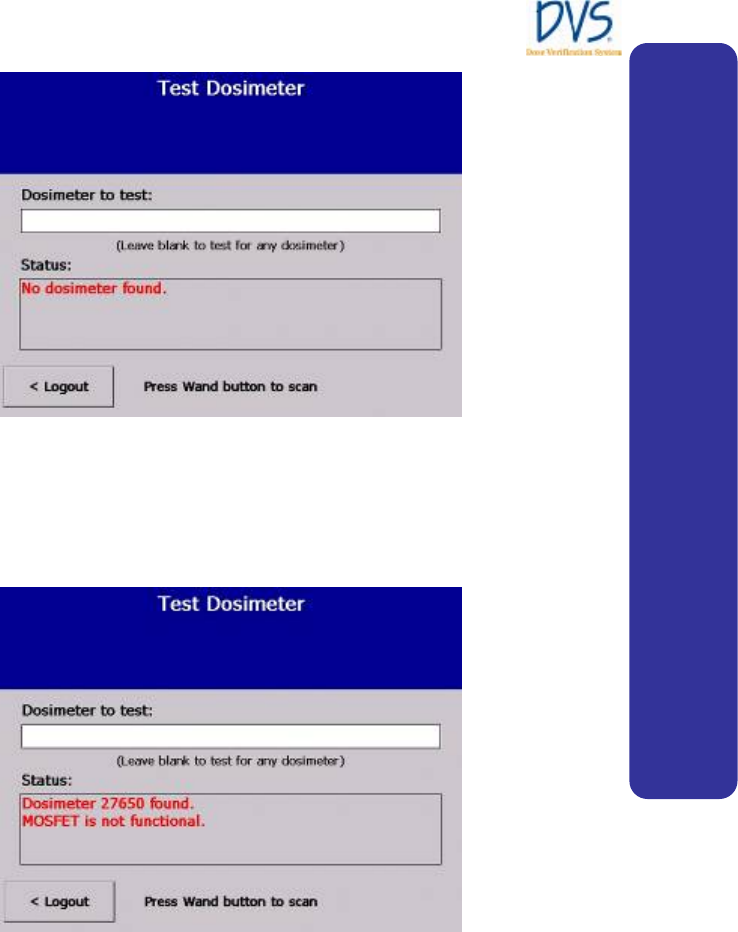
Number 1: If the dosimeter is functional, a message appears
indicating that the dosimeter was found. For example:
Dosimeter 27650 was found.
Figure 37 — Dosimeter Found
Number 2: If the dosimeter could not be read, an error message
appears:
No Dosimeter found.
DVS Dose Verification System
61
Figure 38 — No Dosimeter Found
Number 3: If the dosimeter is not functional, a message appears:
Dosimeter xxxxxx found.
MOSFET is not functional.
Figure 39 — Dosimeter Not Functional
When finished testing, press Logout and the Reader returns to the
Login Screen.
Using the DVS Reader
DVS Dose Verification System
62
6.4 Scan a Patient
To scan a patient, log in to the DVS Reader and press Scan
Patient. The scan patient screens are set up like a wizard. You can
move forward and backward through the series of screens by
pressing Next or Back.
The workflow for scanning a patient is as follows:
• Select a Patient
• Select a Plan/Fraction
• Take a PRE-Dose Reading
• Dose the Patient
• Take a POST-Dose Reading
• Enter Treatment Notes
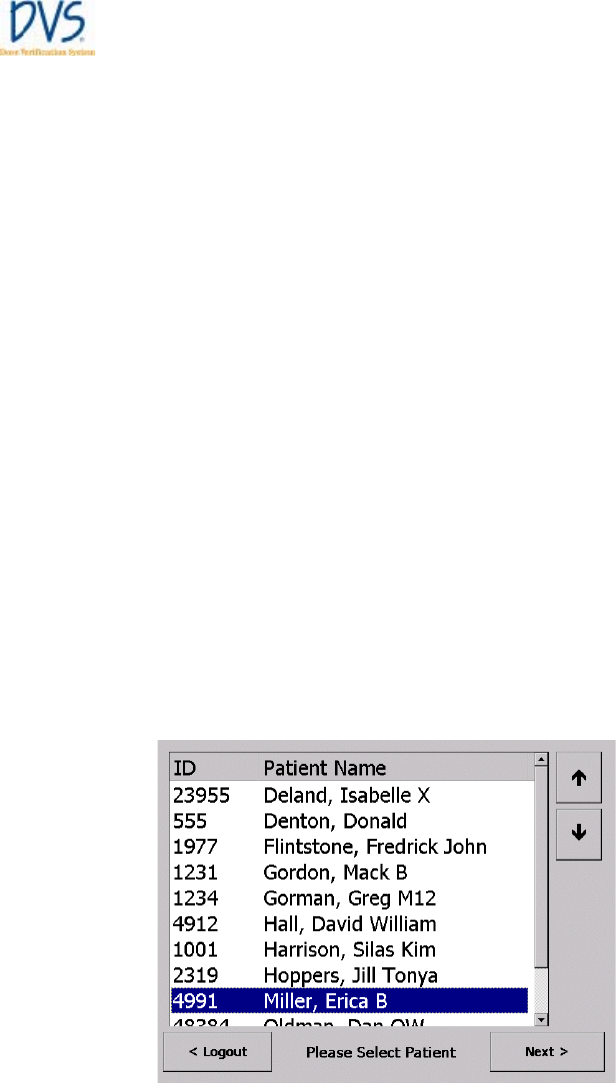
Select a Patient
To select a patient:
1. Press Scan Patient on the Login Screen. The Select Patient
screen appears (Figure 40 — Select Patient ). Patient names
appear in alphabetical order. To find a patient, tap the up and
down arrows on the right side of the screen to move between
pages of patients.
Figure 40 — Select Patient
DVS Dose Verification System
63
2. Select the patient to be scanned by pressing the patient’s name
on the touch screen, then press Next.
Press Logout and the system returns to the Login Screen.
Select a Plan/Fraction
After a patient is selected and the patient data is retrieved from the
database, the Select Plan screen appears for the selected patient
(Figure 41 — Select Plan ).
Important: Always verify that the correct patient is being treated
by verifying the name at the top of the screen.
Figure 41 — Select Plan
The Select Plan/Fraction screen displays the current plan,
treatment fraction, and previous dose measurements. If more than
one plan was set up for the patient, you can select a new plan by
tapping the Plan pull-down menu and selecting the new plan. If
the fraction needs to be changed, press the – button or the + button
to decrease or increase the fraction number. You can also tap the
Fraction field and enter the fraction number using the keypad.
Note: You cannot use a fraction that is not part of the patient’s
plan, use a fraction that has been skipped, or re-use a fraction that
already has measurements.
Using the DVS Reader

DVS Dose Verification System
64
If the selected plan and fraction number is advanced beyond the
initial value, then the following message appears:
Are you sure you wish to add Skip Fraction(s)?
This is a reminder that one or more skipped fractions will be added
to the Dosimetry Database. These skipped fractions serve as
markers that measurements were not made for some of the planned
fractions. Press the OK button to accept the skipped fractions.
Press the Cancel button to return to the Select Plan screen and
choose another plan or fraction.
Later, the skipped fractions can be edited using the Plan and
Review Software. For information about skipped fractions in the
Plan and Review Software, see Working with Measurement
Fractions and Skipped Fractions.
When the correct plan and fraction are selected, press Next to go to
the PRE-Dose screen.
To cancel the treatment at this point, press Back and to return to
the Select Patient screen where you can press Logout.
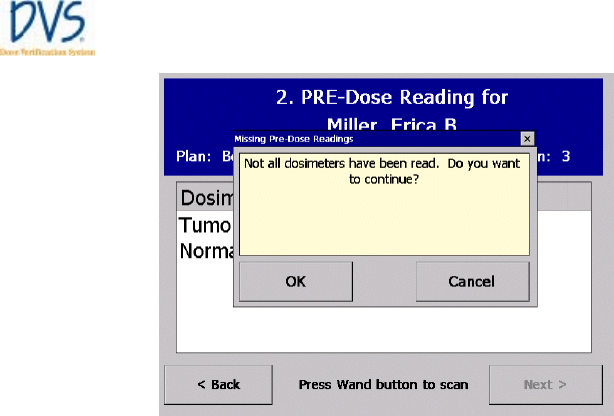
Take a PRE-Dose Reading
The PRE-Dose screen is used to scan the patient’s dosimeters
before being treated (Figure 42 — PRE-Dose ). If the plan and
fraction are correct, position the Reader Wand next to the patient
where the dosimeters are implanted. Press and release the button
on the Reader Wand to activate the Reader Wand.

DVS Dose Verification System
65
Figure 42 — PRE-Dose
As the Reader Wand begins scanning for dosimeters, the blue light
on the Reader Wand is on and steady, indicating that it is searching
for dosimeters. When the Reader Wand detects a dosimeter, the
blue and green lights on the Reader Wand will flash briefly. On the
PRE-Dose screen, the following message appears next to each
dosimeter as it is read:
Scanning…XX%
where XX% is the percentage of the data from the dosimeter that
has been read.
When each dosimeter has been completely read, the Status for the
dosimeter changes to Complete. When all of the dosimeters have
been found, the light on the Reader Wand stops blinking. Press
Next to go on to POST-Dose screen.
All Dosimeters Not Read
If all dosimeters were not read during the pre-dose operation, the
following message appears:
Not all dosimeters have been read. Do you want to
continue?
Using the DVS Reader
DVS Dose Verification System
66
Figure 43 — Dosimeters Not Read
Press OK to skip the dosimeters that were not read and go on to
POST-Dose screen. However, if no dosimeters have been read
(none are Complete), the Treatment Notes screen appears instead
of the POST-Dose screen. Press Cancel to cancel the operation
and stay on the PRE-Dose screen.
Discard Readings
If you want to discard the readings just made, press Back and the
following message appears:
Do you want to discard these Pre-dose readings?
Press OK to discard the pre-dose readings and return to the Select
Plan screen. Press Cancel to cancel the operation and stay on the
PRE-Dose screen.
Dose the Patient
When the pre-dose operation is complete, the patient is ready for
radiotherapy. Treat the patient as usual. Within ten (10) minutes of
completing radiation therapy, scan the patient again to obtain a
post-dose reading (Optimal post-dose reading is 2.5 minutes
following irradiation).
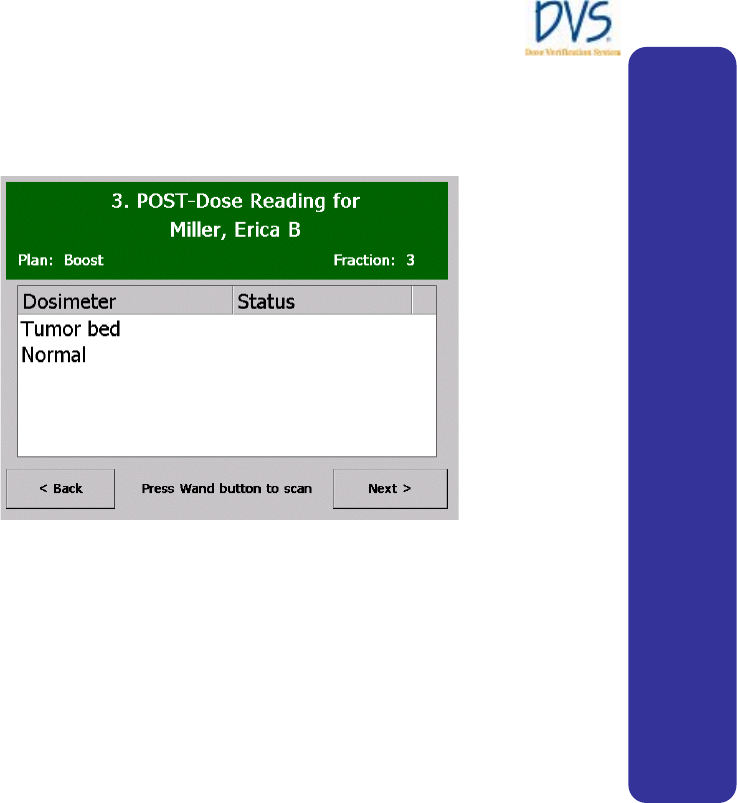
DVS Dose Verification System
67
Take a POST-Dose Reading
The POST-Dose screen is used to scan the patient’s dosimeters
after being treated (Figure 44 — POST-Dose ).
Figure 44 — POST-Dose
Position the Reader Wand next to the patient where the dosimeters
are implanted. Press the button on the Reader Wand to activate the
Reader Wand. As the Reader Wand begins scanning for the
dosimeters, the lights on the Reader Wand blink indicating that it
is looking for the dosimeters. On the POST-Dose screen, the
following message appears:
Scanning…XX%
When each dosimeter has been completely read, the Status for the
dosimeter changes to Complete. When all of the dosimeters have
been found, the light on the Reader Wand stops blinking. Press
Next to display the Treatment Notes screen.
Using the DVS Reader
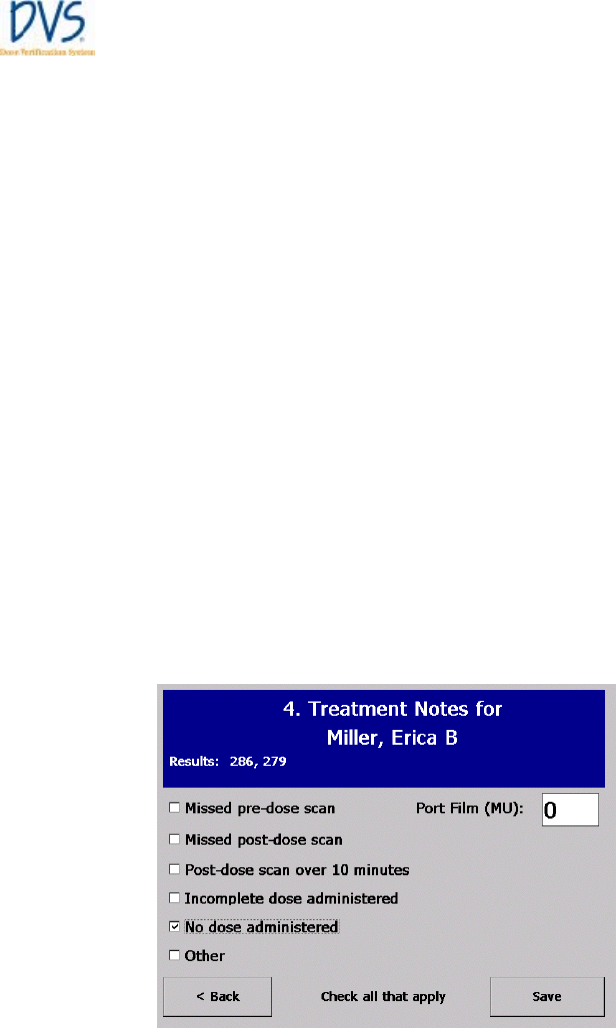
DVS Dose Verification System
68
All Dosimeters Not Read
If all dosimeters were not read during the post-dose operation, the
following message appears:
Not all dosimeters have been read. Do you want to
continue?
Press OK to skip the dosimeters that were not read and go on to
the Treatment Notes screen. Press Cancel to cancel the operation
and stay on the POST-Dose screen.
Discard Readings
If you want to discard the readings just made, press the Back
button and the following message appears:
Do you want to discard these Post-dose readings?
Press OK to discard the post-dose readings and return to the PRE-
Dose screen. Press Cancel to cancel the operation and stay on the
POST-Dose screen.
Enter Treatment Notes
Use the Treatment Notes screen to record information about the
treatment session (Figure 45 — Treatment Notes ).
Figure 45 — Treatment Notes

DVS Dose Verification System
69
Select any of the check boxes in this screen, or enter the number of
monitor units (MU) from a port film that the patient received. To
enter the number of monitor units, tap the Port Film field to
display the keypad. The port film’s monitor units will not be
incorporated into the calculated daily or cumulative dose.
When you have completed this screen, press Save. A dialog box
asks if you want to save the results. Press OK to save the results,
or Cancel to stay on the Treatment Notes screen.
After the data is saved, the Select Patient screen appears again, so
you can start scanning the next patient.
Using the DVS Reader

DVS Dose Verification System
70
7 TROUBLESHOOTING
This section provides a list of common issues and error messages
and the steps you can take to resolve them.
• Troubleshooting the DVS Server System Software Setup
• DVS Reader not operational
• Unable to obtain a pre-dose or post-dose reading
• DVS Reader error messages
• Plan and Review Software error messages
7.1 Troubleshooting the DVS Server System Software Setup
If the window below appears more than two or three times while
installing the DVS Dosimetry Database Server, close it and click
Stop on the DVS Server System Software Setup window. Click
Setup Server Components to restart the setup program. If this
problem continues, remove ALL components from system, reboot
the computer, and restart the setup program.
7.2 DVS Reader Not Operational
Check that the power cord is fully seated in the electrical outlet
and in the back of the Reader Base Station.
7.3 Unable to Obtain a Pre-Dose or Post-Dose Reading
1. Check that the Reader Wand is connected to the Base Station.
2. Make sure metal objects are clear of the patient and Reader
Wand.
3. Re-position the Reader Wand to another area near the
implanted Dosimeters.
4. Hold the Reader steady over the area with the implanted
Dosimeters.

DVS Dose Verification System
71
7.4 DVS Reader Error Messages
The error messages displayed by the Reader are listed in this
section in alphabetical order.
Cannot access the Dosimetry Database. Please check
connections, or contact your IT Department, then press OK to
try again.
If you encounter this error, perform the following
troubleshooting steps:
• Make sure the LAN (local area network) cable is firmly
connected to the Reader.
• Make sure that the Windows XP Firewall is turned OFF on
the database server computer or create an exception to
allow access to the computer over Port 80 (HTTP).
• Make sure the computer with the Dosimetry Database is
running and is connected to the LAN.
• Contact the IT Department to make sure they did not
change the setup of the Dosimetry Database.
To have the Reader try the operation again, press the OK
button.
If the problem remains, turn off the Reader then wait 15
seconds and turn it on again. Try the operation again. If the
problem remains, contact the local representative for technical
support.
Cannot communicate with the Wand. Please refer to the
trouble-shooting guide, and then press OK to try again.
If you encounter this error, make sure that the Reader Wand’s
green power-on light is lit. If it is not, then make sure the
Wand cable is firmly connected to the back of the Base
Station.
Troubleshooting

DVS Dose Verification System
72
To have the Reader try the operation again, press the OK
button.
If the problem remains, turn off the Reader then wait 15
seconds and turn it on again. Try the operation again. If the
problem remains, contact the local representative for technical
support.
The data for this Patient is invalid. Please select another
patient.
This message means that the patient’s data was likely changed
without using the DVS Software. Contact your DVS
Administrator to resolve this problem.
The Dosimetry Database has changed. Contact technical
support.
This message means that the Dosimetry Database was likely
changed without using the DVS Software. Contact the local
representative for technical support to resolve this problem.
The dosimetry database is not compatible with this Reader.
Please correct and press OK to try again.
Verify that all software upgrades needed for the Reader, the
Dosimetry Database, and the Plan and Review Software have
been implemented. Then press the OK button to try this
operation again.
This patient has no more Fractions. Please verify that the
Plans are correct.
This message means that all the planned fractions for this
patient have been used. That is, each planned fraction has
dosimeter measurement data.

DVS Dose Verification System
73
To collect more dosimeter measurements, more fractions must
be added to the patient’s Planning Table (see Entering Plans).
This Plan & Fraction # cannot be found. Please select another.
This message means that the selected plan and fraction number
are not in the patient’s Planning Table.
You can either select another plan and fraction # that is in the
Planning Table, or add more fractions to the patient’s
Planning Table (see Entering Plans).
This Plan & Fraction # has already been used. Please select
another.
This message means that the selected plan and fraction number
have dosimeter measurement data already.
You can either select another plan and fraction number that is
in the Planning Table, or add more fractions to the patient’s
Planning Table (see Entering Plans).
Wand field current <current> A is outside the acceptable
range. Place the Wand in its Base, then press OK to try again.
If you encounter this error, perform the following
troubleshooting steps:
• Check the connection of the Reader Wand cable to the
back of the Base Station.
• Make sure the Reader Wand is not near any metal objects.
It is recommended that the Wand is placed in the Base
Station during initialization.
To have the Reader try the operation again, press the OK
button.
Troubleshooting

DVS Dose Verification System
74
If the problem remains, turn off the Reader then wait 15
seconds and turn it on again. Try the operation again. If the
problem remains, contact the local representative for technical
support.
Wand not operating properly. Place the Wand in its Base, then
press OK to try again.
If you encounter this error, perform the following
troubleshooting steps:
• Check the connection of the Reader Wand cable to the
back of the Base Station.
• Make sure the Reader Wand is not near any metal objects.
It is recommended that the Reader Wand is placed in the
Base Station during initialization.
To have the Reader try the operation again, press the OK
button.
If the problem remains, turn off the Reader then wait 15
seconds and turn it on again. Try the operation again. If the
problem remains, contact the local representative for technical
support.
Wand resonant frequency <freq> kHz is outside the acceptable
range. Place the Wand in its Base, then press OK to try again.
If you encounter this error, perform the following
troubleshooting steps:
• Check the connection of the Reader Wand cable to the
back of the Base Station.
• Make sure the Reader Wand is not near any metal objects.
It is recommended that the Reader Wand is placed in the
Base Station during initialization.
To have the Reader try the operation again, press the OK
button.

DVS Dose Verification System
75
If the problem remains, turn off the Reader then wait 15
seconds and turn it on again. Try the operation again. If the
problem remains, contact the local representative for technical
support.
7.5 Plan and Review Software Error Messages
The error messages displayed by the Plan and Review Software are
listed in this section in alphabetical order.
A Patient cannot have more than 8 Dosimeters.
The limit on the number of dosimeters assigned to a patient is
eight. Delete a dosimeter to add a new one.
A Patient cannot have more than 8 plans.
The limit on the number of plans for a patient is eight. Delete a
plan to add a new one.
Barcode misread. Please scan the Dosimeter barcode again.
The verification check of the dosimeter checksum data failed.
Try to read the dosimeter’s bar code again.
Cannot access the database. Do you want to attempt to connect
again?
This message may appear when the Plan and Review Software
starts and a connection to the Dosimetry Database cannot be
made. To try to connect again, press the Yes button. If the
problem continues, perform the following steps:
• Make sure the LAN (local area network) cable is firmly
connected to the Reader.
• Make sure the computer with the Dosimetry Database is
running and is connected to the LAN.
Troubleshooting

DVS Dose Verification System
76
• Contact the IT Department to make sure they did not
change the setup of the Dosimetry Database.
To try the operation again, press the OK button. If the problem
remains, contact your DVS Administrator or the IT
Department.
Cannot access the database. Please check connections, or
contact your I.T. Department, then press OK to try again.
If you encounter this error, perform the following steps:
• Make sure the LAN (local area network) cable is firmly
connected to the Reader.
• Make sure the computer with the Dosimetry Database is
running and is connected to the LAN.
• Contact the IT Department to make sure they did not
change the setup of the Dosimetry Database.
To try the operation again, press the OK button. If the problem
remains, contact your DVS Administrator or the IT
Department.
Cannot delete a patient with Dosimeter measurements.
Patients who have dosimeters with measurements cannot be
deleted. Instead, open the Patient Data Entry window for the
patient and clear the Patient shown on Reader check box (see
Entering Patient, Dosimeter, and Plan Information).
Cannot delete this Dosimeter because it has measurement data.
Dosimeters with measurements cannot be deleted. Instead,
open the Dosimeter Data Entry dialog box for the dosimeter
and clear the Dosimeter used by Reader check box (see
Entering Dosimeters).

DVS Dose Verification System
77
Cannot insert a Skipped measurement here.
A skipped fraction cannot be within two minutes of the most
recent fraction. Try to add the skipped fraction between two
other factions in the list.
Cannot save Database settings to the registry.
This message means that you do not have permission to write
to the registry on the computer. Contact your system
administrator to correct this problem.
Checksum error reading <table>. This data cannot be loaded.
This message means that the Dosimetry Database was changed
without using the DVS Software. Contact your DVS
Administrator to resolve this problem.
In plan ‘<plan>’, the Last fraction # cannot be less than the
First fraction #.
The last fraction number must be greater than or equal to the
first fraction number. Make the last fraction number greater to
correct this problem.
Login name <login name> is already assigned to User ‘<user
name>’. Please correct before saving this User’s data.
The Login name entered is already used by another person.
Enter a different Login name for this user.
More than 100 Patients cannot be shown on the Reader. Please
reduce the number of Patients shown on the Reader before
adding more Patients.
At most, 100 patients at a time can be shown on the DVS
Reader. The patients shown on the Reader are those with the
Patient shown on Reader check box selected.
Troubleshooting

DVS Dose Verification System
78
To correct this problem, clear the Patient shown on Reader
check box for inactive patients.
Password fields do not match. Please enter Passwords again.
When setting up a new user, the fields Password and Verify
password must be the same. Type the same password into
these two fields again and press OK.
Password must be at least 4 digits long.
Make sure the user’s numeric password is at least four digits
and no greater than eight digits.
Patient number <patient num> is already assigned to patient
<patient>. Please correct before saving this patient’s data.
The Patient number entered is already used by another
patient. Enter a different Patient number for this patient.
Physician number <physician num> is already assigned to
Physician ‘<physician>’. Please correct before saving this
Physician’s data.
The Physician number entered is already used by another
physician. Enter a different Physician number for this
physician.
Plan/Fraction ‘<plan name, fraction #>’ is duplicated. Please
correct before saving the plans.
In the Planning Table, the displayed plan and fraction # are
listed more than once. Remove this duplication from the
Planning Table.

DVS Dose Verification System
79
The dosimetry database is not compatible with this software.
Verify that all software upgrades needed for the Reader, the
Dosimetry Database, and the Plan and Review Software have
been implemented. Then press the OK button to try this
operation again.
There are <x> more measurements than planned fractions for
this Patient. Please adjust the plans/fractions so that all the
measurements will have a planned fraction.
This message means that there are not enough planned
fractions for all the measurements made so far. Each dosimeter
measurement needs to have a planned fraction that it is
associated with. Adjust the number of fractions in the
Planning Table to correct this problem.
There cannot be more than 99 total fractions. Please correct
before saving the plans.
There are more than 99 planned fractions in the Planning
Table. Reduce the number of fractions to correct this problem.
There is nothing to view because no measurements have been
made from this Patient’s Dosimeters.
The Fractions & Measurement window cannot be used until
at least one dosimeter measurement has been taken for the
patient.
This Dosimeter is already assigned to patient ‘<patient
name>’. Please use another Dosimeter.
Each dosimeter can only be assigned to one patient. The
dosimeter scanned is already assigned to another patient.
Either delete the dosimeter from the other patient or select
another dosimeter for this patient.
Troubleshooting

DVS Dose Verification System
80
This record was updated by someone else during this editing
session. Please reload this data and make the changes again.
This message means that someone else changed the same data
(for example, patient or user) that you were editing. Press the
Cancel button to discard your changes, and then make the
changes again.
Since this patient has either no plans or no dosimeters, he/she
will not be shown on the DVS Reader.
In order to scan a patient’s dosimeters using the DVS Reader,
there must be both plans and dosimeters assigned to the
patient. If one or the other of these is not assigned yet, the
patient cannot be used by the Reader. This message is a notice
that the Plan and Review Software will clear the Patient
shown on Reader check box, so the patient will not appear in
the Reader’s patient list.
User number <user num> is already assigned to User ‘<user
name>’. Please correct before saving this User’s data.
The user number entered is already being used by another
person. Enter a different user number for this person.

DVS Dose Verification System
81
8 MAINTENANCE AND TECHNICAL SUPPORT
8.1 Reader Maintenance
The Reader does not require any routine user maintenance or
preventive maintenance for components or the system other than
cleaning. Prior to use, inspect the Reader for damage such as
frayed power cords or visible damage of external surfaces.
8.2 Database Maintenance
Refer to document 934-00553-04 “Archiving the DVS Dosimetry
Database”.
8.3 Dosimeter Maintenance
DO NOT SEND DOSIMETERS TO A RE-PROCESSING
FACILITY FOR RE-STERILIZATION OR RE-STERILIZE
USING A HOSPITAL OR LABORATORY STERILIZER.
8.4 Cleaning the Reader Wand and Reader Base Station
• Turn off all power to the Reader and its components prior
to cleaning. If the Reader Wand or Base Station is in direct
contact with skin or bodily fluids, clean by wiping the
contact surface with a standard isopropyl alcohol-based
disinfectant. More frequent cleaning is not required
otherwise.
Maintenance and Technical Support

DVS Dose Verification System
82
8.5 Technical Support and Product Service
For technical support or to request product servicing, contact the
local representative or
Sicel Technologies, Inc.
Telephone: 1-888-DVS-6697 (1-888-387-6697) / Outside the
US: 1-919-465-2236, ext. 361
E-mail: helpdesk@siceltech.com
Sicel Technologies, Inc.
3800 Gateway Centre Blvd.
Suite 308
Morrisville, NC 27560
USA

DVS Dose Verification System
83
8.6 Disposal and Recycling
When the product has reached the end of its useful life, contact the
local representative for information concerning recycling or
disposal per local, state, county, or country directives.
Maintenance and Technical Support
DVS Dose Verification System
84
9 SPECIFICATIONS
Parameter Rating
Time to Read Dosimeter Up to 10 minutes following radiation therapy. Optimal read time is 2 to 3
minutes following irradiation.
Power 110V-240V~, 50-60 Hz
1A @ 120V~ , 0.5A @ 240V~
RF Frequency
Transmission
Effective Radiated Power
(ERP)
133 kHz
Backscatter modulation
12.1 dBm (16.2mW)
Inputs/Outputs 1-Ethernet port
1-Wand Cable Assembly Connection
1-USB Connection (For Field Service Use Only)
Power Cord – 10ft (3.05m)
maximum length US & Canada – Hospital Grade cordset 10A/120V/60Hz with NEMA 5-
15 plug & IEC 60320 C13 connector
UK, Ireland, Cyprus, & Malta – International style cable 10A/230V/50Hz
with BS 1363 plug & IEC60320 C13 connector
France, Spain, Belgium, Czech Republic, & Slovakia – International style
cable 10A/230V/50Hz with CEE7/7 plug and IEC 60320 C13 connector
Italy – International style cable 10A/230V/50Hz with CEI 23-16/VII plug
& IEC60320 C13 connector
Denmark – International style cable 10A/230V/50Hz with Afsnit 107-2-
D1 plug & IEC 60320 C13 connector
Switzerland – International style cable 10A/230V/50Hz with SEV1011
plug & IEC60320 C13 connector
Remaining members of the European Union –International style cable
10A/230V/50Hz with CEE7/7 plug & IEC 60320 C13 connector
Please contact Technical Support with any questions regarding power
cords
Operating Conditions Temperature: 10°C to 40°C (50°F to 104°F).
Humidity at 10% to 95%, non-condensing
Pressure: 700 hPa – 1060 hPa
DVS Dose Verification System
85
System not suitable for use in the presence of a flammable anesthetic
mixture with air or with oxygen or nitrous oxide
Storage and Transport
Conditions Temperature: -18°C to 55°C
Humidity at 10% to 95%, non-condensing
Pressure: 700 hPa - 1060 hPa
Fuse Type T2AL250V ; 5x20mm or 3AG- ¼”X 1 ¼”
Classification Class I equipment, Type B Applied Part
IPX0
Mode of Operation Continuous Operation
Specifications

Manufactured by: Sicel Technologies®, Inc. 3800 Gateway Centre Blvd, Suite 308 Morrisville, NC 27560
Toll-free tech support (US): 1-888-DVS-6697 Fax: (919) 465-0153 www.dvssmartmarker.com