Siemens Information and Communication Mobile HOME-RF-4000 Spread Spectrum Cordless Phone Handset Transceiver User Manual

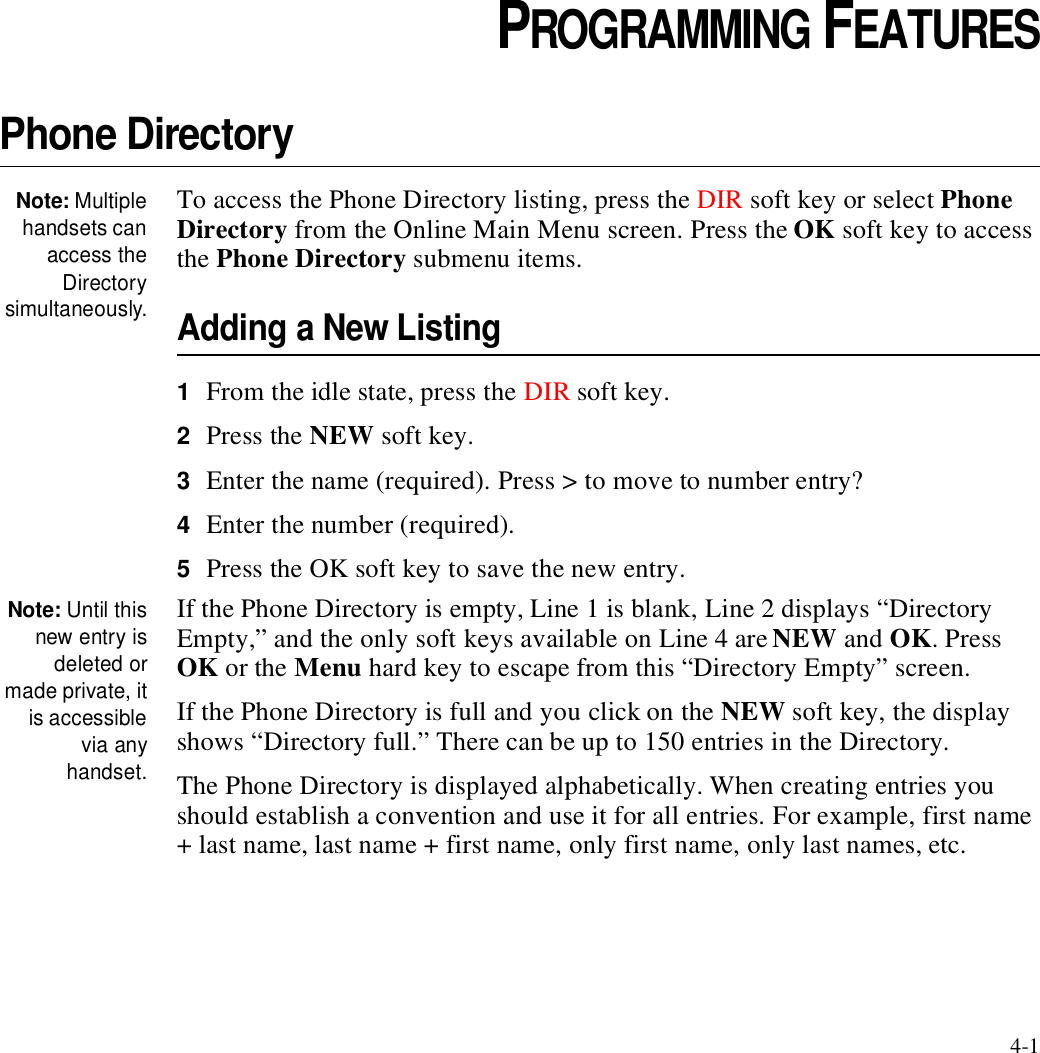
Siemens Information and Communication Mobile LLC Spread Spectrum Cordless Phone Handset Transceiver Users Manual

Users Manual

 User Instruction
Version 1.0User Guide
© 2001 ProximCopying of this document and giving it to others and the use or communication of the contents thereof, are forbidden without expressed authority. Offenders are liable to the payment of damages. All rights reserved in the event of the grant of a patent or the registration of a utility model or design.
iChapter 1: IntroductionText Conventions  .  .  .  .  .  .  .  .  .  .  .  .  .  .  .  . 1-1Description of the Handset Keys   .  .  .  .  .  .  .  . 1-2Power On.  .  .  .  .  .  .  .  .  .  .  .  .  .  .  .  .  .  . 1-3Lock Key .  .  .  .  .  .  .  .  .  .  .  .  .  .  .  .  .  .  . 1-3Using Soft keys  .  .  .  .  .  .  .  .  .  .  .  .  .  .  .  .  . 1-3Registering a Handset.  .  .  .  .  .  .  .  .  .  .  .  .  . 1-4Registering Additional Handsets .  .  .  .  .  .  . 1-4Deregistering the Handset   .  .  .  .  .  .  .  .  .  .  . 1-4Using a Headset.  .  .  .  .  .  .  .  .  .  .  .  .  .  .  .  . 1-5Chapter 2: Menu Quick ReferenceMain Menu.  .  .  .  .  .  .  .  .  .  .  .  .  .  .  .  .  .  .  . 2-1System Settings  .  .  .  .  .  .  .  .  .  .  .  .  .  .  . 2-2Chapter 3: Calling FeaturesMaking a Call  .  .  .  .  .  .  .  .  .  .  .  .  .  .  .  .  .  . 3-1Adjusting the Volume.  .  .  .  .  .  .  .  .  .  .  .  . 3-1Using the Mute Soft Key .  .  .  .  .  .  .  .  .  .  . 3-2Ending a Call  .  .  .  .  .  .  .  .  .  .  .  .  .  .  .  .  .  . 3-2Receiving a Call .  .  .  .  .  .  .  .  .  .  .  .  .  .  .  .  . 3-2During Menu Activity .  .  .  .  .  .  .  .  .  .  .  .  . 3-2Incoming Calls with an Active Call on the Line.  .  .  .  .  .  .  .  .  .  .  .  .  .  .  .  .  .  .  .  .  .  .  . 3-3Multiple Incoming Calls.  .  .  .  .  .  .  .  .  .  .  . 3-4Using the Int Key  .  .  .  .  .  .  .  .  .  .  .  .  .  .  .  . 3-4Auto Answering   .  .  .  .  .  .  .  .  .  .  .  .  .  .  . 3-5Transferring a Call .  .  .  .  .  .  .  .  .  .  .  .  .  .  .  . 3-5Blind Transfer.  .  .  .  .  .  .  .  .  .  .  .  .  .  .  .  . 3-5Announced Transfer  .  .  .  .  .  .  .  .  .  .  .  .  . 3-6Conference Calling  .  .  .  .  .  .  .  .  .  .  .  .  .  .  .  3-6Only Call in the System  .  .  .  .  .  .  .  .  .  .  .  3-6Adding a New Call .  .  .  .  .  .  .  .  .  .  .  .  .  .  3-7More Than One Call Active in the System.  . 3-7Active Conference .  .  .  .  .  .  .  .  .  .  .  .  .  .  3-8Ending a Conference Call .  .  .  .  .  .  .  .  .  .  3-8Exiting a Conference via Line Keys and Hang Up  .  .  .  .  .  .  .  .  .  .  .  .  .  .  .  .  .  .  .  .   3-10Automatic 3-way Conference  .  .  .  .  .  .  .  3-11Placing an External Call on Hold .  .  .  .  .  .  .  3-11Privacy Feature .  .  .  .  .  .  .  .  .  .  .  .  .  .  .  .   3-12Chapter 4: Programming FeaturesPhone Directory.  .  .  .  .  .  .  .  .  .  .  .  .  .  .  .  .  4-1Adding a New Listing   .  .  .  .  .  .  .  .  .  .  .  .  4-1Entering Alphanumeric Characters  .  .  .  .  . 4-2Scrolling Through the Directory .  .  .  .  .  .  . 4-2Private Entries .  .  .  .  .  .  .  .  .  .  .  .  .  .  .  .  4-2Editing an Entry  .  .  .  .  .  .  .  .  .  .  .  .  .  .  .  4-2Deleting an Entry   .  .  .  .  .  .  .  .  .  .  .  .  .  .  4-3Deleting the Directory  .  .  .  .  .  .  .  .  .  .  .  .  4-3Memory Available  .  .  .  .  .  .  .  .  .  .  .  .  .  .  4-3Global Call Log Feature.  .  .  .  .  .  .  .  .  .  .  .  .  4-4Deleting a Call Log Entry  .  .  .  .  .  .  .  .  .  .  4-5Deleting All Call Log Entries .  .  .  .  .  .  .  .  .  4-5Save to Directory   .  .  .  .  .  .  .  .  .  .  .  .  .  .  4-5Setting the PIN  .  .  .  .  .  .  .  .  .  .  .  .  .  .  .  .  .  4-6Resetting the PIN  .  .  .  .  .  .  .  .  .  .  .  .  .  .  4-6Ringer Settings  .  .  .  .  .  .  .  .  .  .  .  .  .  .  .  .  .  4-6Setting the Time and Date  .  .  .  .  .  .  .  .  .  .  .  4-7Table of Contents
1-1CHAPTER1CHAPTER 1INTRODUCTIONThis chapter describes each of the phone keys and provides information on setting up your phone.The VDM has the capability of maintaining four active RF connections between the VDM and the handsets. This means that only four handsets may be in use at any one time. All of the call processing states described in the next chapters require the handset to use an RF channel. Any time a function is attempted which requires an RF channel, but one is not available, the handset displays, “No Channel Available.” Text ConventionsThroughout this document the following conventions are used to identify special text elements.• Keypad names, soft key names, and menu items appear in bold.• Definitions appear in bold italic in the left margin.• Supplemental information about a topic appears as a Note: in the left margin.• Multiple menu selections are separated by |. For example, if you are instructed to select Menu | Speed Dial List, you would first select Menu, and then Speed Dial List from the submenu that appears.
1-2 Home RF User GuideDescription of the Handset KeysKey DescriptionFour soft keys These keys are context sensitive and perform the operation described on the display directly above them.Menu Activates the idle or active menu. Pressing it during a menu escapes one level up from the menu. Pressing and holding menu for over one second completely escapes out of any menu.L1, L2, L3, and L4 Line keys with LEDs.Speaker icon Speaker key with LED.Keypad keys (0 to 9, *, #) Used for dialing or data entry. Pressing and holding 0 to 9 for over one second during idle makes a speed call. Pressing and holding # for over one second during idle state will lock the keypad.Lock key Invoke by pressing # for at least one second.Power on Invoke by pressing the Flash key for at least one second during idle or while the handset is powered off.Flash During data entry of a phone number, this key inserts a two second delay. Pressing and holding Flash for over one second during idle turns the phone off. Pressing Flash when the phone is off powers the phone on.Log Press to go in and out of the call log menu.Int Intercom key.
1-3Power OnNote: TheFlash key isvalid evenwhen thekeypad islocked.To power the handset on, press the Flash key for at least 1 second while the handset is powered off.To power the handset off, press the Flash key for at least 1 second while the handset is idle.Lock KeyTo activate:Press the # keyfor at least 1second whilethe device is inthe idle state.Use this feature to lock the keys on the handset to prevent accidental key presses. After activating the key lock, the handset displays “Keypad Locked” and sounds a confirmation tone.When the keypad is locked, the only keys that are operational are the unlock key (#) and the Flash key. You can answer an incoming call by pressing the corresponding line key or the speaker key. When invalid keys are pressed while the keypad is locked, the device displays: Lock/Unlock Keypad: Press & Hold “#”.Using Soft keysUnder the display screen, there are two rocker soft keys. The functionality of each key changes depending on the currently selected menu item. From an idle state, the left soft key is assigned DIR and LOG. The right key is assigned MSG and RDL. After initiating a function, such as LOG to access the call log, the left soft key most commonly allows you to scroll through menu items, with < and > displayed on the screen. The right soft key generally allows you to delete an item or cancel a function (DEL or ESC) or confirm an action (OK).
1-4 Home RF User GuideRegistering a HandsetEach handset must be registered to communicate with the VDM. At power up or reset, the VDM automatically goes into Registration Mode if no handsets are registered. Note: If theVDM receivesat least on“Locate”message within5 seconds, itdoes not go intoRegistrationMode.The VDM waits for a “Locate” signal from any registered handset. If the VDM does not receive at least one “Locate” message within 5 seconds, it goes into registration mode. The VDM remains in Registration Mode until a handset registers or until 60-seconds is up.After one handset has been registered, it can be used to register other non-subscriber handsets that have been placed in the Search Mode. Registering Additional HandsetsNote: If nohandsetsregister within60 seconds, theprocessceases.To register additional handsets:1From an idle state, press the Menu key.2Use the left soft key to scroll to System Settings, and then press the OK soft key.3Use the left soft key to scroll to Register Handset.4Press the OK soft key.If an incoming call rings at the initiating handset during the registration process, the handset ceases to display the registration status messages and you can accept the call, as normal, on that handset. The VDM continues the registration process or times out within the 60 seconds.Deregistering the HandsetThe Deregister feature allows you to remove a registered handset from the system.Note: AHandset canDeregister itselfand/or it canDeregisterother Handsets.After a handset is deregistered, all settings are returned to factory default.CAUTION: All personal settings such as Speed Dial lists, Call Logs, and Phone Directories are cleared.To deregister a handset:1From an idle state, press the Menu key.2Use the left soft key to scroll to System Settings, and then press the OK soft key.
1-53Use the left soft key to scroll to DeRegister Hndst, and then press the OK soft key.4Scroll to the desired handset.5Press the OK soft key.The handset is deregistered and removed from the list. You can repeat steps 3 and 4 to deregister additional handsets, or press the ESC soft key to exit out of this menu.Using a HeadsetYour handset has a headset jack interface. When a headset is plugged in, all incoming calls are received via the headset if the Line key is pressed. Calls are directed through the speaker phone if the Spkr key is pressed.
2-1CHAPTER2CHAPTER 0MENU QUICK REFERENCEThis chapter provides an overview of the menu structure.Main MenuOffline: Noactive calls.When you press the Menu hard key, the following list of options are available:Table 2.1Offline Main Menu ItemsMenu Item Select to...Speed Dial List Display a list showing which keypad keys (0-9) have been assigned to a name/phone # combination in the Phone Directory.Room Monitor Access the following submenu items:• Start Monitoring/Stop Monitoring• Set Call Number• Set SensitivityHandset Name Display the name and number of the handset.Ringer Settings Access the following submenu items:• Ringer ON/off• L1 Ringer (set volume and pitch)• L2 Ringer (set volume and pitch)• L3 Ringer (set volume and pitch)• L4 Ringer (set volume and pitch)• Intercom Ringer (set volume and pitch)System Settings Access numerous System Settings. See “System Settings” for details.Key Click ON/off Toggle the Key Click ON or off.Battery Warn ON/off Toggle the Battery Warning ON or off.
2-2 Home RF User GuideOnline: Activecall(s) on thehandset.The following items available when there is an active call on the handset:System SettingsNote: If a PINnumber hasbeen created, itmust beentered toaccess theitems in theSystemSettings menu.The following items are available after pressing the Menu hard key and selecting System Settings.Lang:English/Francais Access the following submenu items:•English•FrenchPC Services Access the following submenu items:•Email messages• PC Phone Book• PC Call LogDeregister (Displayed only if the handset is out of sync.)Table 2.1Offline Main Menu ItemsMenu Item Select to...Table 2.2Online Main Menu itemsMain Menu Item Select to...Transfer Transfer the active call to another handset.Conference Set up a 3-way conference.Hold Place the external call on hold.Call Log Access the Call Log.Phone Directory Access the following submenu items:• Dial Number•Edit Entry• Speed Dial• Delete Entry• Delete Directory• Memory AvailableTable 2.3System Settings Menu ItemsMenu Item Select to...Time/Date Update of the time and date displayed on the handset.Register Handset Initiate registration of other handsets.DeRegister Hndst Deregister any registered handset, including itself.
2-3Local Area Codes Access the following submenu items:• Local Area Code• Other MetroCode1• Other MetroCode2• Other MetroCode3Line Privacy Access a list of lines and set the privacy to on or off.Line Access Access:Handset 1L1 IncomingL2 Outgoing, etc. (see page 25...???)Auto Answer off/ON Toggle Auto Answer ON or off.CID Time Upd ON/off Toggle the CID time update feature ON or off.Call Log Access the following submenu items:•Log All Calls•Log No Calls• Log UnansweredLong Distance Prefix Need infoDistinctive Ring Accept or ignore incoming distinctive rings.Dialing Mode Choose Touch Tone dialing or Pulse dialing.PIN Change Enter a new PIN number, or change the existing PIN numberFactory Defaults Access the following submenu items:• Local (resets all Main Menu items, except system settings for this device.)• System (resets all System Settings)• All (not a menu item - type 73738 while the factory default list is displayed. Restores all system settings and local settings for all active subscriber handsets.)CAUTION: All personal settings such as Speed Dial lists, Call Logs, and Phone Directories are cleared.Table 2.3System Settings Menu ItemsMenu Item Select to...
3-1CHAPTER3CHAPTER 0CALLING FEATURESMaking a CallTo make an outgoing call, from an idle state:•Press a Line key or the Speaker key, and then dial the desired number using the keypad keys.•Press the DIR soft key to select the Phone Directory. Press the OK soft key to select Dial Number. Scroll through your directory list using the < or > soft keys. When the desired number is displayed, press the OK soft key.•Press the LOG soft key to access previously received calls. Scroll through the list using the < or > soft keys. When the desired number is displayed, press the OK soft key.Note: PressMenu | SpeedDial List toview keypadassignments.•Press a Line key or the Speaker key, and then press a number on the keypad assigned to the desired Speed Dial listing. •Press the REDIAL soft key to display previous calls made. Use the < or > soft keys to scroll through the list. When the desired number is displayed, press the OK soft key.Adjusting the VolumeThe < VOL > soft key lowers or raises the audio volume of the sound device being used for the active call (headset, handset, or speaker). There are five volume levels. After adjusting the volume, press the OK or ESC soft key.
3-2 Home RF User GuideUsing the Mute Soft KeyPressing the MUTE soft key mutes the handset, speaker, or headset. You can still hear the incoming caller, but the caller cannot hear you until the UNMUTE soft key (which has replaced the MUTE soft key on the display) is pressed. Ending a CallTo end a call, press the Menu key, Speaker key, Int key, or the lit Line key. Placing the handset on the stand also ends a call, however placing a handset that is utilizing the speakerphone on a stand does not end the call.Receiving a CallTo answer an incoming call when the handset is in the idle state, press the corresponding Line key, the Speaker key, or remove the handset from the charger. Note: PressingRINGOFFstops theaudible ringuntil a new callis received.If there is only one incoming call and the calling name and number information is available, the telephone displays which line is ringing, the calling name, and the calling number. The RINGOFF soft key is available.Internal incoming calls display the handset number and the handset name, if one has been assigned. The RINGOFF soft key is available.Ring tones and LED indication are always provided unless you are editing the ring volume or tone, the ringer is turned off, or Room Monitoring is enabled.Calls may ring differently for external and internal calls (depending on local Ringer Settings). Each line can have its own ring volume and pitch. During Menu ActivityIf an external call arrives while you are accessing an Offline Main Menu item, the handset exits to the “idle screen” and begins normal call processing as defined for that handset. This is also true during composed dialing.L1 Ringing Bob Jones 512-555-1234                     RINGOFF Handset 2 Vanessa                      RINGOFF
3-3If an external call arrives while you are accessing an Online Main Menu item, the call pending tone is sounded and you remain in the Online Menu.If an external call arrives while the handset is displaying a data entry screen, the device remains at that data entry screen. You can:• Continue data entry to completion, press OK, exit the menu, and answer the call, or• Abandon data entry by: •Pressing the ESC soft key to exit the current menu•Pressing the Menu hard key to escape up one level holding it for 1 second to return to the idle state•Pressing the incoming external Line Key or Int Key (speaker key?)and answering the call, or • Ignore the call and continue with data entry. Incoming calls do not interrupt the PC services Mode. However, if you press a Line or Speaker key, the VDM aborts PC services and answers the call. The VDM also aborts PC services if you press a Line or Speaker key to make an outgoing call.Unanswered calls continue to ring until the calling end disconnects.Incoming Calls with an Active Call on the LineNote: Incomingcalls areanswered viathe audio path(handset,speaker, orheadset)currently beingused for theactive call.If a handset is active on a call on L1 and another call comes in on L2, the display shows which line is ringing, the calling name, and the calling number. The <VOL> and MUTE soft keys are available for the active call. Pressing L2 puts the L1 call on Hold. You are then connected to the incoming call on L2. You can toggle between the two external lines by alternately pressing the two Line keys. If a handset is active on a call on L1 and an internal call comes in from handset 2, the display shows “Handset 2” and the name of the handset if one has been assigned. The <VOL> and MUTE soft keys are available for the active call.Pressing the Int key puts L1 on Hold and connects you to the incoming internal call. To end the internal call, press the Int key again or press the L1 key to L1 Ringing Bob Jones 512-555-1234 < VOL >             MUTE Handset 2 Vanessa  < VOL >             MUTE
3-4 Home RF User Guidereturn to the L1 call. You cannot toggle between Internal calls and External calls by alternately pressing a Line key and the Int key. Multiple Incoming CallsWhen there are incoming calls on two lines, the last received call is displayed first. If no caller ID name was provided, the caller ID number is used. If neither caller ID name nor number is provided, only the Line number is shown. Press the corresponding line number to answer the desired call.Note: Thescrolling doesnot roll over.For example, ifyou are viewingthe first call,pressing the upsoft key doesnot change thedisplay.When there are incoming calls on three lines, the last received call is displayed on line 1, the second call on line 2, and the first (oldest) call on line 3.If there are more than three calls, pressing the down and up soft keys shows the next and previous calls, respectively. Using the Int KeyFrom an idle state, press the Int hard key to display a list of registered handsets. Use the < or > soft keys to scroll through the list and then press the number of the desired target handset on the keypad (1-8).Press either the * hard key or the ALL soft key, to poll all handsets. The call is connected to the first handset that picks up.The display shows “No Handsets Available” or “Intercom X Busy” if the call is not answered.Press the ESC soft key, Int hard key, or the Menu hard key to return to the idle state. If you are setting up a conference call and press any of these keys you are reconnected to the party on Hold.If you are on an Internal Call and receive and incoming external call, answering the external call disconnects the internal call. You cannot toggle between Internal calls and External calls by alternately pressing a Line key and the Int key. L1: 512-555-1234 L2: Bert Smith                      RINGOFF L1: 512-555-1234 L2: Bert Smith Vanessa                RINGOFF
3-5Auto AnsweringSet auto answering by pressing Menu | System Settings | Auto Answer on/off.Note: The rightsoft keydisplays theopposite of thecurrent setting.Clicking the ONsoft key whenthe menu itemshows “AutoAnswer off”changes themenu item toshow “AutoAnswer ON”and the soft keytext changes tooff.The default is off. This is a global toggle. When it is set to on, you can use the Int hard key like a true Intercom. When ON, users can simply answer the person calling them on the Intercom without having to pickup the Handset. The caller will be heard over the speakerphone and the person being called can simply speak back at the caller with no need for either to have their Handset to their ear. With Auto Answer ON:1Press the Int key.2Select a registered handset from the list.3Start talking.4A tone sounds on the speaker of the receiving handset to alert the user of the intercom call. The user on the receiving end can just start talking.Transferring a CallYou can transfer external calls from one handset to another. External calls cannot be transferred to an external line. Intercom calls cannot be transferred. There are two types of transfers, blind or announced.Blind TransferTo transfer a call:Private Hold:No otherhandsets canpick up this call.1Press the Menu hard key, then select Transfer. The active call is put on Private Hold.2Press the corresponding hard key (1-8) from the registered headset list, or press * or ALL to transfer the call to the first handset that picks up.• If the target is not busy, the initiating handset transitions to Idle and the target device processes the transfer as an incoming call. Only the target device has access to the calls transferred to it. • If the target handset is busy, you are returned to the Active Call state.
3-6 Home RF User Guide• If the target device is not busy, but does not pick up within 30 seconds, the handset that initiated the transfer receives the call back as a regular incoming call. If that handset is busy on another internal call, then the call will keep ringing on the transferred to handset until it is answered or far end disconnected.Call Barge-In is “Prohibited” when a call is in the process of being Transferred. A call is in the process of being Transferred when this screen is showing and up until that point in time when the target device picks up. Calls can be transferred to handsets that wouldn't ordinarily have access to a particular External Line. Example: Handset 3 does not have access to External Line 1 because the user set the L1 incoming and outgoing calls to off through the System Settings menu. Handset 1 can transfer a call on Line 1 to Handset 3.Announced TransferAn announced transfer occurs when the handset establishes a Conference Call with another handset and then hangs up the call.The external line is then active on the destination handset.Conference CallingThis option enables you to set up a 3-way Conference.   A Conference can be set up in one of the two following ways:Note:Conferencescannot be setup betweenthree or morehandset usersvia Int.• Between two handset users (via Int) and one external line. • Between one handset user and calls on two external lines.Conferences must be started from an external active call. While active on an external call, press Menu | Conference Calling.The VDM supports up to two simultaneous conferences throughout the system.Only Call in the SystemProtectedHold: Otherhandsetscannot pick upthe call.If there is only one call in the system, pressing Menu | Conference puts the call on protected hold and displays the Make a New Call screen. Make a New Call Then press CONF  DIR  LOG   MSG  RDL
3-7Adding a New CallAfter you select Menu | Conference, or Menu | Conference | Add A New Call you can make a new call via any normal method of making a call. (See “Making a Call.”)If an incoming call is received before the CONF soft key is pressed, the caller ID for the new call overwrites the conference display. If you answer the call, the VDM treats the new call as the second call in the conference and displays the CONF soft key.When the line is seized for this second call for the Conference, the screen displays the Active Call Screen, except the <Vol> and MUTE soft keys are replaced by the CANCEL and CONF soft keys.Press the CANCEL soft key to cancel the Conference, disconnect the second call, and remove the Protected Hold status of the first call leaving it on regular hold (which means any Handset can now pick it up).Press CONF to complete the conference. The Conference initiating Handset has a connection with both the call that had been put on Protected Hold and the second call that was just made. All three parties can hear and speak with each other. See “Active Conference.”More Than One Call Active in the SystemProtectedHold: Otherhandsetscannot pick upthe call.When the OnLine Main Menu | Conference selection is made, the previously active external call is put on Protected Hold. With other active calls in the system, you can add a new call to the Conference or add one of the other external calls (that are either ringing or have been placed on normal Hold). •Press ESC (or the Menu key) to cancel the Conference setup process and reconnect to the external call that was active when the OnLine Main Menu was first requested by the user. •Press OK to add a new call to the conference. See “Adding a New Call.”• Scroll to an available line and press OK to add an external call. You now have a connection with both the call that had been put on Protected Hold and the second call that was just selected. All three parties can hear and speak with each other.L1                       1:33 Bob Jones 512-555-1234 CANCEL           CONF Add a new call Add L1: Bob Jones Add L2: Cindy Smith <   >             Esc   OK
3-8 Home RF User GuideActive ConferenceIf you press a Line key other than the one on Protected Hold or the new call, the phone puts both calls on hold, winks their LEDs, and aborts the conference procedure. The phone becomes active on the external line last touched. If you press the original call Line key (the one on Protected Hold) while dialing the new call, the new call is put on normal hold, and the original call is retrieved. The conference procedure is aborted.Line 1 of the Active Conference Screen shows “Conference” and the length of time (mm:ss) the oldest external call was active before the Conference option was selected. Lines 2 and 3 show which two connections this handset is connected to. This could be one external line and one internal Intercom connection (shown) OR two external lines. Line 4 shows the normal Active Call soft keys.If there is no CID info, Phone Dir info, or Handset Name available, all that is displayed is the appropriate L1, L2, L3, L4, or Handset number.Ending a Conference CallAny internal Conference participant at any time can exit a Conference. The handset that set up the Conference has no higher priority than any other internal Conference participant.Press the Menu hard key during an Active Conference Screen to display a menu of Conference exit options:•Drop Ln: “CID or Phone Dir info”•Drop Ln: “CID or Phone Dir info”    OR    “Drop Handset 1"    OR    Drop “Handset Name”•Drop All• Leave Conference (Not Available if Conference has 2 External Participants)• Hold (Not Available if Conference has 2 Internal Participants)Menu Option 1The first Menu option is always an option to drop an external line from the Conference. When an external line is dropped from the Conference, the remaining two participants remain in an active connection. Conference          1:33 L2: Bob Jones Vanessa < VOL >             MUTE Drop L1: Bob Jones Drop Vanessa Drop All <   >             Esc   OK
3-9Menu Option 2The second option depends on whether the Conference has two internal participants or two external participants. If there are two internal participants, the second option shows the Handset # or the Handset Name (if provided) of the other internal participant. If there are two external participants, the second option shows the second external line # and the CID (or Phone Dir) information for that second participant.When this line, whether internal or external, is dropped from the Conference, the remaining two participants remain in an active connection. Drop AllThe third option is always Drop All. When Drop All is selected, all connections are broken and the handset returns to the Idle state. Any internal participant can select this option at anytime to end the Conference.Leave ConferenceNote: LeaveConference isnot available ifthe Conferencehas twoexternalparticipants.If the Conference has two internal participants, the fourth option is Leave Conference. When Leave Conference is available and selected, the handset that selects it leaves the Conference, returns to the Idle state, and the remaining single internal and single external participants remain in an active connection.HoldIf the Conference has two external participants, the fourth option is Hold. When Hold is available and selected, the handset that selects it leaves the Conference, returns to the Idle state, and the remaining two external participants are left on “Conference Hold”. When this occurs, both external line keys “wink” on all handsets, which means that the user of any handset can press either key and retrieve the Conference. Pressing either of the Line keys re-establishes the entire Conference.
3-10 Home RF User GuideExiting a Conference via Line Keys and Hang UpThere is no priority set as to which internal handset can initiate exiting or hanging-up a Conference. Any internal Conference participant at any time can exit a Conference. The handset that set up the Conference has no higher priority than any other internal Conference participant.Pressing a Line key (or Int key) for one of the Conference's active connections hangs up that Conference participant, terminates the 3-way Conference, and leaves the remaining two participants on an active connection. If the Conference has two internal participants:• Pressing the Int key disconnects the other internal participant, leaving an active connection between this handset and the external line. • Pressing the participating external Line key disconnects the external line and leaves an active Intercom connection between the two internal participants.• Pressing any of the Line keys that are not part of the Conference disconnects this handset from the Conference (leaving an active connection between the other internal participant and the external line) and enables the user to place a call on the line selected.• Placing the handset on-stand disconnect this handset from the Conference, leaving an active connection between the other internal participant and the external line.If the Conference has two external participants:• Pressing either of the participating external Line keys disconnects that external line and leaves an active connection between this handset and the remaining external line. • Pressing any of the Line keys (or Int key) that are not part of the Conference disconnects this handset from the Conference (leaving the two external participants on Conference Hold) and enables the user to place a call on the line selected. • Placing the handset on-stand disconnects the entire Conference. All participants are disconnected.Far-end Conference participants on external lines can hang up themselves, but they cannot break the link between two internal handsets or between one internal handset and a different far-end participant.
3-11Automatic 3-way ConferenceIf the Line Privacy feature is turned off, conference calls can be set up by a handset joining an active call. Simply press the Line key for the external line. The participants on the original 2-way call hear a double beep and their handset displays “Conference” plus the identity or the other two calls on the line.Placing an External Call on HoldNote: Internalcalls cannot beput on Hold.When selected, this option puts an active external call on Hold, sets the appropriate external Line key to wink, and the user is returned to the Idle state. The winking Line key is the only visual indicator that there is a call on Hold.This option functions exactly the same as when the user is on an active external call and simply presses another external Line key (or the Int key). Pressing another Line key when you are on an active external call places the active call on Hold and enables, for example, answering another ringing line, initiating another call, calling another handset (via Intercom), etc.A call on normal Hold (no Conference or Privacy issues) can be picked up from any handset.A call can be put on Protected Hold by selecting Conference from the Online Main Menu. Only the handset that initiated the Conference can reactivate the call that was put on Protected Hold.A call on an external “Private” line will also be put on Protected Hold. Only the handset that was on an active call on a “Private” line and initiated the Hold can pick up the call on Protected Hold. When a Line is on Hold, the LED for that line winks. If the line is on Protected Hold, the LED winks on the Private Handset, but stays active on all other handsets.Conference          1:33 L2: Bob Jones Vanessa < VOL >             MUTE
3-12 Home RF User GuidePrivacy FeatureThere is a system setting for Line Privacy. This option is configurable for each available external line. If privacy is enabled for a particular external line, calls associated with that line are Protected. Other Handsets may not Barge-In on calls Active on that line. When being put on Hold, Active and Conference calls are put on Protected Hold and Protected Conference Hold (if applicable). Other Handsets may not pick up calls on Protected Hold or Protected Conference Hold; only the associated Handset may do so.If a call on Handset X (that originally came in on a Private line) is transferred to another Handset Y that does have access to that Private line, the call is still Protected and other Handsets can not Barge-In or Pick-up (if the call is later put on Protected Hold). Other Handsets will be prevented from joining/getting calls that are already in progress on that Line.If a call on Handset X (that originally came in on a Private line) is transferred to another Handset Y that does NOT have access to that Private line, that call is no longer Protected, and other Handsets may Barge-In or Pick-up (if the call is later put on Hold).
4-1CHAPTER4CHAPTER 0PROGRAMMING FEATURESPhone DirectoryNote: Multiplehandsets canaccess theDirectorysimultaneously.To access the Phone Directory listing, press the DIR soft key or select Phone Directory from the Online Main Menu screen. Press the OK soft key to access the Phone Directory submenu items.Adding a New Listing1From the idle state, press the DIR soft key.2Press the NEW soft key.3Enter the name (required). Press > to move to number entry?4Enter the number (required).5Press the OK soft key to save the new entry.Note: Until thisnew entry isdeleted ormade private, itis accessiblevia anyhandset.If the Phone Directory is empty, Line 1 is blank, Line 2 displays “Directory Empty,” and the only soft keys available on Line 4 are NEW and OK. Press OK or the Menu hard key to escape from this “Directory Empty” screen. If the Phone Directory is full and you click on the NEW soft key, the display shows “Directory full.” There can be up to 150 entries in the Directory.The Phone Directory is displayed alphabetically. When creating entries you should establish a convention and use it for all entries. For example, first name + last name, last name + first name, only first name, only last names, etc.
4-2 Home RF User GuideEntering Alphanumeric CharactersNote: Textentries arelimited to 16characters.The numeric keypad keys are used to enter text, such as the name in the Phone Directory, or when creating an alias for a handset.To enter a letter, press the corresponding keypad key. For example, to enter the letter “a” press the number 2 key. To enter the letter “b” press the number 2 key quickly two times. After a brief delay, the character is fixed and the cursor moves to the next position.Press the 1 key to enter a space.CapitalizationThe first letter of the line is always capitalized. The first letter after a space is always capitalized. To capitalize one letter, press *, then the desired letter. To capitalize multiple letters, press the # key. All letters are capitalized until the # key is pressed again.Scrolling Through the DirectoryYou can scroll through the Phone Directory using the < and > soft keys. A first-character-match alternative to scrolling through the entire Directory is also available. Use the keypad keys as described in “Entering Alphanumeric Characters.” For example, to quickly move to all Phone Directory entries beginning with “S,” press the 7 keypad key 4 times.Private EntriesA “P” is displayed between soft keys 2 and 3 if a phone number has been made “Private” by the user of this handset. Private Phone Directory entries are only accessible and shown on the handset that made them “Private”. To make an entry private, select Private off/ON from the Phone Directory menu. This feature is a toggle. To make a private entry public, select Private off/ON from the Phone Directory menu to toggle it off.Editing an EntrySelect Edit Entry from the Phone Directory menu to change and save the <Active Entry's> Name and/or Phone number.Press the OK soft key to move to the second field. Press OK on the second field to exit with a request to save the entry.
4-3Characters can be removed by pressing the Delete <-| soft key. Pressing this key removes the character occurring to the left of the highlighted character in the string. The string is shortened by one character and the same character remains highlighted. Deleting an EntryTo delete an active entry select Delete Entry from the Phone Directory Menu. When selected, will delete the <Active Entry>. Private entries are only accessible at the handset that made them private. Any handset can delete any non-private (publicly shared) Phone Directory entry with this option. Deleting the DirectoryWhen selected, you are asked to provide a PIN (if defined) before continuing. After correctly entering the PIN (if defined) or immediately after selecting Delete Directory (if a PIN is not defined), you are prompted with “Delete All Entries?” Click the YES soft key to delete all entries in the Phone Directory and return to the offline Idle state. Click NO to Escape and leave the Phone Directory as is. CAUTION: Deleting the Directory delete all names and numbers, clears all global Speed Dial Key assignments, resets all Private settings, and resets the Memory Available to 150 entries.Memory AvailableWhen selected, shows the amount of additional entries that can be added to the directory. The Phone Directory (maximum of 150 entries of max length) is stored on the VDM and is shared by all subscriber handsets. Fred Jones 123456789  <   >           <- |    OK
4-4 Home RF User GuideGlobal Call Log FeatureThe Call Log (maximum of 50 entries) is stored on the VDM and is shared by all subscriber handsets.While scrolling the Call Log menu, a user at any subscriber handset can:1Dial the <Active Entry's> number (via Dial Number), and/or2Save the <Active Entry> to the shared Directory, and/or 3Delete the entire Call Log, and/or4Press the Menu hard key to escape, and/or 5Press the ESC soft key to escape.To access:• Select Call Log from the Online Main Menu.•Press the LOG soft key.When selected, this option opens the Call Log and initially shows the last call received.If the Call Log is empty, the handset displays “Call Log Empty.”The calls recorded in the Call Log are subject to the Call Log System Setting (i.e.; All Calls are logged or Only Unanswered Calls are logged). If the Call Log System Setting is changed to “Log No Calls,” no new calls are logged.Also, the number of digits stored in phone numbers is affected by what is entered (or not entered) in the System Settings | Local Area Codes option. You can circularly scroll through the Call Log (using the normal scrolling soft keys) to see the Month, Date, Hour, Minute, AM/PM, Line # the Call was made
4-5on, CID Name (if available), and CID Phone Number (if available) of all calls in the log with the latest calls displayed first and the oldest calls displayed last.Incoming calls that match a non-Private number already stored in the Phone Dir show the Phone Dir name associated with that number, regardless of what CID reported. Incoming calls that match a Private # (made Private by Handset X) show on all other Handsets the name as reported by CID. In this case, Handset X shows its Private Phone Directory name (which may or may not be the same thing all the other Handsets are displaying). Deleting a Call Log EntryWhile scrolling the Call Log, press the DEL soft key to delete that entry in the Call Log and shift all calls older than this deleted one up one entry number.   This deletion is then be reflected on all handsets as other users scroll through the now-updated log.If the last and only Call Log entry is deleted, the handset displays “Call Log Empty” and returns the handset to an idle state.Deleting All Call Log EntriesSelect Delete All Calls from the Call Log menu. When selected, you must enter a PIN if one has been set.   If a PIN has not been set or you successfully enter the PIN, “Delete All Entries?” is displayed. Click the YES soft key to delete all entries in the Call Log. Click NO to escape and leave the Call Log as is.Save to DirectoryNote: Saving aCall Log entryto the PhoneDirectory doesnot remove itfrom the CallLog.Select Save to Dirctry from the Call Log menu to enable editing and saving the <Active Entry's> name and number to the shared directory stored on the VDM. If a name was not provided by CID, initially <Name> is displayed, allowing you to provide a name. After entering the name and number, press OK to store the entry. The OK soft key is not displayed unless the name and number fields contain at least one character.If the Phone Directory is full, an error tone is sounded and “Directory Full” is displayed. After two seconds, you are returned to the Call Log menu. Setting the PINThe PIN number can be set by pressing the  Menu hard key, then selecting System Settings | PIN Change.
4-6 Home RF User GuideAll PINs are zero to four characters long, consisting of digits in the set [0-9] inclusive plus Star and Pound.Asterisks or “stars” are used to hide the actual PIN digits as you enter them. The Delete key can be used to remove characters and the cursor movement keys can be used to position the cursor.Pressing the OK soft key ends PIN input and the PIN entered is returned to the calling application. Pressing the Menu key cancels PIN input.Resetting the PINIf you have forgotten the PIN, enter * 6 5 # when a PIN prompt is displayed. The PIN number is cleared and can be reset by pressing the Menu hard key, then selecting System Settings | PIN Change.Ringer SettingsSelect Ringer Settings from the Offline Main Menu. From this menu, you can set the ringer ON or off. The bottom right soft key text is always the opposite of the current setting. Clicking on the off soft key changes the menu item to “Ringer off” and the soft key changes to ON. Click ON and vice versa. If the Ringer is turned off, an icon is displayed on the Offline Idle screen. No Icon is shown if the Ringer is ON.You can also set the volume and pitch of the ringer for each external line, and/or the Internal Intercom Line. Volume has 6 settings (0 to 5) and an additional cascading setting where the ring starts at the lowest volume (1) and increments with every ring up to volume 5. Pitch has 12 settings. To access, from the Offline Main Menu select Ringer Settings, the desired Line number, then Ringer Volume or Ringer Pitch.When a handset is accessing the Ringer Settings Volume or Ringer Settings Pitch option and an incoming call arrives, other than the Line Key blinking, that handset does not have any visual or audio indication that a new call has arrived. That handset does not “ring” for the new incoming call. When you exit this menu, normal ringing and display resumes with the new settings. Enter PIN:     * * * * <   >           <- |    OK
4-7Setting the Time and DateSelect Menu | System Settings | Time/Date to change the System Time, AM/PM, and/or Date.You can toggle between AM and PM in a similar manner as all of the ON/off toggles. Note that the AM/PM soft key text is always be the opposite of the current setting. Clicking on the PM soft key changes the time, for example, from 11:35AM to 11:35PM and the soft key text changes to AM. Click AM and vice versa. The cursor automatically skips fixed text and moves to the hour, minute, month, day, and year fields as you type numbers or cursor soft keys. The first line shows the date format (month before day). The handset also supports European format (day before month and 24 hour clock with no AM/PM) but the VDM will not use it. The handset validates the date and time when you press OK. If invalid fields exist, the handset displays an error message: “Invalid Date” or “Invalid Time” for two seconds and returns to time and date editing. The default time is 8:00 AM. The default date is Jan 1, 2001.
Index-1Aauto answering, 3-5Ccallending, 3-2incoming with active call on the line, 3-3making an outgoing ,3-1multiple incoming, 3-4placing on hold, 3-11receiving, 3-2receiving during menu activity ,3-2transferring, 3-5Call Logaccessing, 4-4deleting all entries, 4-5deleting an entry, 4-5saving entry to directory ,4-5conference callautomatic, 3-11ending, 3-8exiting, 3-10leaving, 3-9putting on hold ,3-9setting up, 3-6Ddate, setting, 4-7deregistering handset, 1-5FFlash keyillustrated, 1-3Hhandsetderegistering, 1-5powering on, 1-4registering, 1-5volume, 3-1handset keysdescription, 1-2headsetusing, 1-6volume, 3-1hold, 3-11IInt keyillustrated, 1-3using, 3-4Intercomusing, 3-4Kkeypadlocking, 1-4Lletterscapitalizing, 4-2entering, 4-2letters, entering, 4-1Line keysillustrated, 1-3Lock keyillustrated, 1-3lock keypad, 1-4Log keyillustrated, 1-3MMenu keyillustrated, 1-3MUTE softkey, 3-2PPhone Directoryaccessing, 4-1adding a new listing ,4-1deleting, 4-3deleting an entry ,4-3editing an entry, 4-2scrolling, 4-2size, 4-3PINchanging, 4-6setting, 4-6privacy, 3-12private entries, 4-2Index
Index-2Rregistering handset, 1-5ringerON/off, 4-6pitch, 4-6settings, accessing, 4-6volume, 4-6RINGOFF softkey, 3-2Ssoftkeysillustrated, 1-3MUTE, 3-2RINGOFF, 3-2using, 1-4speakervolume, 3-1Speaker keyillustrated, 1-3Ttextcapitalizing, 4-2entering, 4-2text conventions, 1-1time, setting, 4-7transferring a call, 3-5Vvolume, adjusting, 3-1

Navigation menu