Siemens Information and Communication Mobile HOME-RF-4000 Spread Spectrum Cordless Phone Handset Transceiver User Manual
Siemens Information and Communication Mobile LLC Spread Spectrum Cordless Phone Handset Transceiver Users Manual
Users Manual

User
Instruction

Version 1.0
User Guide
© 2001 Proxim
Copying of this document and giving it to others and the use or communication
of the contents thereof, are forbidden without expressed authority. Offenders are
liable to the payment of damages. All rights reserved in the event of the grant of a
patent or the registration of a utility model or design.

i
Chapter 1: Introduction
Text Conventions . . . . . . . . . . . . . . . . 1-1
Description of the Handset Keys . . . . . . . . 1-2
Power On. . . . . . . . . . . . . . . . . . . 1-3
Lock Key . . . . . . . . . . . . . . . . . . . 1-3
Using Soft keys . . . . . . . . . . . . . . . . . 1-3
Registering a Handset. . . . . . . . . . . . . . 1-4
Registering Additional Handsets . . . . . . . 1-4
Deregistering the Handset . . . . . . . . . . . 1-4
Using a Headset. . . . . . . . . . . . . . . . . 1-5
Chapter 2: Menu Quick Reference
Main Menu. . . . . . . . . . . . . . . . . . . . 2-1
System Settings . . . . . . . . . . . . . . . 2-2
Chapter 3: Calling Features
Making a Call . . . . . . . . . . . . . . . . . . 3-1
Adjusting the Volume. . . . . . . . . . . . . 3-1
Using the Mute Soft Key . . . . . . . . . . . 3-2
Ending a Call . . . . . . . . . . . . . . . . . . 3-2
Receiving a Call . . . . . . . . . . . . . . . . . 3-2
During Menu Activity . . . . . . . . . . . . . 3-2
Incoming Calls with an Active Call on the Line
. . . . . . . . . . . . . . . . . . . . . . . . 3-3
Multiple Incoming Calls. . . . . . . . . . . . 3-4
Using the Int Key . . . . . . . . . . . . . . . . 3-4
Auto Answering . . . . . . . . . . . . . . . 3-5
Transferring a Call . . . . . . . . . . . . . . . . 3-5
Blind Transfer. . . . . . . . . . . . . . . . . 3-5
Announced Transfer . . . . . . . . . . . . . 3-6
Conference Calling . . . . . . . . . . . . . . . 3-6
Only Call in the System . . . . . . . . . . . 3-6
Adding a New Call . . . . . . . . . . . . . . 3-7
More Than One Call Active in the System. . 3-7
Active Conference . . . . . . . . . . . . . . 3-8
Ending a Conference Call . . . . . . . . . . 3-8
Exiting a Conference via Line Keys and Hang
Up . . . . . . . . . . . . . . . . . . . . 3-10
Automatic 3-way Conference . . . . . . . 3-11
Placing an External Call on Hold . . . . . . . 3-11
Privacy Feature . . . . . . . . . . . . . . . . 3-12
Chapter 4: Programming Features
Phone Directory. . . . . . . . . . . . . . . . . 4-1
Adding a New Listing . . . . . . . . . . . . 4-1
Entering Alphanumeric Characters . . . . . 4-2
Scrolling Through the Directory . . . . . . . 4-2
Private Entries . . . . . . . . . . . . . . . . 4-2
Editing an Entry . . . . . . . . . . . . . . . 4-2
Deleting an Entry . . . . . . . . . . . . . . 4-3
Deleting the Directory . . . . . . . . . . . . 4-3
Memory Available . . . . . . . . . . . . . . 4-3
Global Call Log Feature. . . . . . . . . . . . . 4-4
Deleting a Call Log Entry . . . . . . . . . . 4-5
Deleting All Call Log Entries . . . . . . . . . 4-5
Save to Directory . . . . . . . . . . . . . . 4-5
Setting the PIN . . . . . . . . . . . . . . . . . 4-6
Resetting the PIN . . . . . . . . . . . . . . 4-6
Ringer Settings . . . . . . . . . . . . . . . . . 4-6
Setting the Time and Date . . . . . . . . . . . 4-7
Table of Contents

1-1
CHAPTER
1
C
HAPTER
1
I
NTRODUCTION
This chapter describes each of the phone keys and provides information on
setting up your phone.
The VDM has the capability of maintaining four active RF connections between
the VDM and the handsets. This means that only four handsets may be in use at
any one time. All of the call processing states described in the next chapters
require the handset to use an RF channel.
Any time a function is attempted which requires an RF channel, but one is not
available, the handset displays, “No Channel Available.”
Text Conventions
Throughout this document the following conventions are used to identify
special text elements.
• Keypad names, soft key names, and menu items appear in bold.
• Definitions appear in bold italic in the left margin.
• Supplemental information about a topic appears as a Note: in the left margin.
• Multiple menu selections are separated by |. For example, if you are
instructed to select Menu | Speed Dial List, you would first select Menu,
and then Speed Dial List from the submenu that appears.
1-2 Home RF User Guide
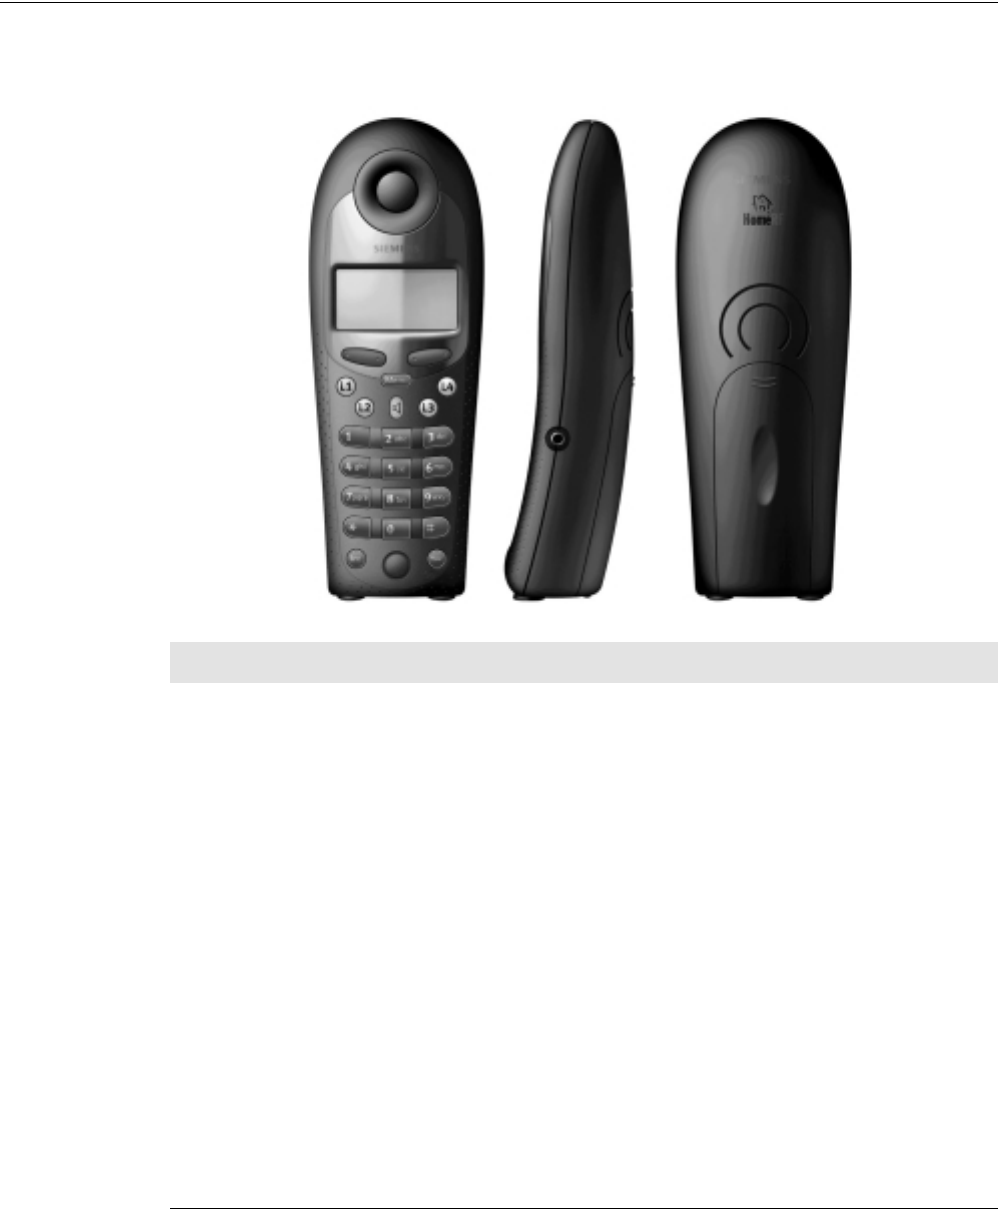
Description of the Handset Keys
Key Description
Four soft keys These keys are context sensitive and perform the operation described
on the display directly above them.
Menu Activates the idle or active menu. Pressing it during a menu escapes
one level up from the menu. Pressing and holding menu for over one
second completely escapes out of any menu.
L1, L2, L3, and L4 Line keys with LEDs.
Speaker icon Speaker key with LED.
Keypad keys (0 to 9,
*, #) Used for dialing or data entry. Pressing and holding 0 to 9 for over one
second during idle makes a speed call. Pressing and holding # for over
one second during idle state will lock the keypad.
Lock key Invoke by pressing # for at least one second.
Power on Invoke by pressing the Flash key for at least one second during idle or
while the handset is powered off.
Flash During data entry of a phone number, this key inserts a two second
delay. Pressing and holding Flash for over one second during idle
turns the phone off. Pressing Flash when the phone is off powers the
phone on.
Log Press to go in and out of the call log menu.
Int Intercom key.

1-3
Power On
Note:
The
Flash
key is
valid even
when the
keypad is
locked.
To power the handset on, press the Flash key for at least 1 second while the
handset is powered off.
To power the handset off, press the Flash key for at least 1 second while the
handset is idle.
Lock Key
To activate:
Press the
#
key
for at least 1
second while
the device is in
the idle state.
Use this feature to lock the keys on the handset to prevent accidental key
presses. After activating the key lock, the handset displays “Keypad Locked”
and sounds a confirmation tone.
When the keypad is locked, the only keys that are operational are the unlock key
(#) and the Flash key. You can answer an incoming call by pressing the
corresponding line key or the speaker key. When invalid keys are pressed while
the keypad is locked, the device displays: Lock/Unlock Keypad: Press & Hold
“#”.
Using Soft keys
Under the display screen, there are two rocker soft keys. The functionality of
each key changes depending on the currently selected menu item. From an idle
state, the left soft key is assigned DIR and LOG. The right key is assigned
MSG and RDL.
After initiating a function, such as LOG to access the call log, the left soft key
most commonly allows you to scroll through menu items, with < and >
displayed on the screen. The right soft key generally allows you to delete an
item or cancel a function (DEL or ESC) or confirm an action (OK).

1-4 Home RF User Guide
Registering a Handset
Each handset must be registered to communicate with the VDM. At power up or
reset, the VDM automatically goes into Registration Mode if no handsets are
registered.
Note:
If the
VDM receives
at least on
“Locate”
message within
5 seconds, it
does not go into
Registration
Mode.
The VDM waits for a “Locate” signal from any registered handset. If the VDM
does not receive at least one “Locate” message within 5 seconds, it goes into
registration mode. The VDM remains in Registration Mode until a handset
registers or until 60-seconds is up.
After one handset has been registered, it can be used to register other non-
subscriber handsets that have been placed in the Search Mode.
Registering Additional Handsets
Note:
If no
handsets
register within
60 seconds, the
process
ceases.
To register additional handsets:
1From an idle state, press the Menu key.
2Use the left soft key to scroll to System Settings, and then press the OK soft
key.
3Use the left soft key to scroll to Register Handset.
4Press the OK soft key.
If an incoming call rings at the initiating handset during the registration process,
the handset ceases to display the registration status messages and you can accept
the call, as normal, on that handset. The VDM continues the registration process
or times out within the 60 seconds.
Deregistering the Handset
The Deregister feature allows you to remove a registered handset from the
system.
Note:
A
Handset can
Deregister itself
and/or it can
Deregister
other Handsets.
After a handset is deregistered, all settings are returned to factory default.
CAUTION: All personal settings such as Speed Dial lists, Call Logs, and
Phone Directories are cleared.
To deregister a handset:
1From an idle state, press the Menu key.
2Use the left soft key to scroll to System Settings, and then press the OK soft
key.

1-5
3Use the left soft key to scroll to DeRegister Hndst, and then press the OK
soft key.
4Scroll to the desired handset.
5Press the OK soft key.
The handset is deregistered and removed from the list. You can repeat steps 3
and 4 to deregister additional handsets, or press the ESC soft key to exit out of
this menu.
Using a Headset
Your handset has a headset jack interface. When a headset is plugged in, all
incoming calls are received via the headset if the Line key is pressed. Calls are
directed through the speaker phone if the Spkr key is pressed.

2-1
CHAPTER
2
C
HAPTER
0
M
ENU
Q
UICK
R
EFERENCE
This chapter provides an overview of the menu structure.
Main Menu
Offline:
No
active calls.
When you press the Menu hard key, the following list of options are available:
Table 2.1
Offline Main Menu Items
Menu Item Select to...
Speed Dial List Display a list showing which keypad keys (0-9) have been assigned
to a name/phone # combination in the Phone Directory.
Room Monitor Access the following submenu items:
• Start Monitoring/Stop Monitoring
• Set Call Number
• Set Sensitivity
Handset Name Display the name and number of the handset.
Ringer Settings Access the following submenu items:
• Ringer ON/off
• L1 Ringer (set volume and pitch)
• L2 Ringer (set volume and pitch)
• L3 Ringer (set volume and pitch)
• L4 Ringer (set volume and pitch)
• Intercom Ringer (set volume and pitch)
System Settings Access numerous System Settings. See “System Settings” for details.
Key Click ON/off Toggle the Key Click ON or off.
Battery Warn ON/off Toggle the Battery Warning ON or off.

2-2 Home RF User Guide
Online:
Active
call(s) on the
handset.
The following items available when there is an active call on the handset:
System Settings
Note:
If a PIN
number has
been created, it
must be
entered to
access the
items in the
System
Settings menu.
The following items are available after pressing the Menu hard key and
selecting System Settings.
Lang:English/Francais Access the following submenu items:
•English
•French
PC Services Access the following submenu items:
•Email messages
• PC Phone Book
• PC Call Log
Deregister (Displayed only if the handset is out of sync.)
Table 2.1
Offline Main Menu Items
Menu Item Select to...
Table 2.2
Online Main Menu items
Main Menu Item Select to...
Transfer Transfer the active call to another handset.
Conference Set up a 3-way conference.
Hold Place the external call on hold.
Call Log Access the Call Log.
Phone Directory Access the following submenu items:
• Dial Number
•Edit Entry
• Speed Dial
• Delete Entry
• Delete Directory
• Memory Available
Table 2.3
System Settings Menu Items
Menu Item Select to...
Time/Date Update of the time and date displayed on the handset.
Register Handset Initiate registration of other handsets.
DeRegister Hndst Deregister any registered handset, including itself.

2-3
Local Area Codes Access the following submenu items:
• Local Area Code
• Other MetroCode1
• Other MetroCode2
• Other MetroCode3
Line Privacy Access a list of lines and set the privacy to on or off.
Line Access Access:
Handset 1
L1 Incoming
L2 Outgoing, etc. (see page 25...???)
Auto Answer off/ON Toggle Auto Answer ON or off.
CID Time Upd ON/off Toggle the CID time update feature ON or off.
Call Log Access the following submenu items:
•Log All Calls
•Log No Calls
• Log Unanswered
Long Distance Prefix Need info
Distinctive Ring Accept or ignore incoming distinctive rings.
Dialing Mode Choose Touch Tone dialing or Pulse dialing.
PIN Change Enter a new PIN number, or change the existing PIN number
Factory Defaults Access the following submenu items:
• Local (resets all Main Menu items, except system settings for this
device.)
• System (resets all System Settings)
• All (not a menu item - type 73738 while the factory default list is
displayed. Restores all system settings and local settings for all
active subscriber handsets.)
CAUTION: All personal settings such as Speed Dial lists, Call Logs,
and Phone Directories are cleared.
Table 2.3
System Settings Menu Items
Menu Item Select to...

3-1
CHAPTER
3
C
HAPTER
0
C
ALLING
F
EATURES
Making a Call
To make an outgoing call, from an idle state:
•Press a Line key or the Speaker key, and then dial the desired number using
the keypad keys.
•Press the DIR soft key to select the Phone Directory. Press the OK soft key to
select Dial Number. Scroll through your directory list using the < or > soft
keys. When the desired number is displayed, press the OK soft key.
•Press the LOG soft key to access previously received calls. Scroll through
the list using the < or > soft keys. When the desired number is displayed,
press the OK soft key.
Note:
Press
Menu
|
Speed
Dial List
to
view keypad
assignments.
•Press a Line key or the Speaker key, and then press a number on the keypad
assigned to the desired Speed Dial listing.
•Press the REDIAL soft key to display previous calls made. Use the < or >
soft keys to scroll through the list. When the desired number is displayed,
press the OK soft key.
Adjusting the Volume
The < VOL > soft key lowers or raises the audio volume of the sound device
being used for the active call (headset, handset, or speaker). There are five
volume levels. After adjusting the volume, press the OK or ESC soft key.
3-2 Home RF User Guide
Using the Mute Soft Key
Pressing the MUTE soft key mutes the handset, speaker, or headset. You can
still hear the incoming caller, but the caller cannot hear you until the UNMUTE
soft key (which has replaced the MUTE soft key on the display) is pressed.
Ending a Call
To end a call, press the Menu key, Speaker key, Int key, or the lit Line key.
Placing the handset on the stand also ends a call, however placing a handset that
is utilizing the speakerphone on a stand does not end the call.
Receiving a Call
To answer an incoming call when the handset is in the idle state, press the
corresponding Line key, the Speaker key, or remove the handset from the
charger.
Note:
Pressing
RINGOFF
stops the
audible ring
until a new call
is received.
If there is only one incoming call and the calling
name and number information is available, the
telephone displays which line is ringing, the
calling name, and the calling number. The
RINGOFF soft key is available.
Internal incoming calls display the handset
number and the handset name, if one has been
assigned. The RINGOFF soft key is available.
Ring tones and LED indication are always provided unless you are editing the
ring volume or tone, the ringer is turned off, or Room Monitoring is enabled.
Calls may ring differently for external and internal calls (depending on local
Ringer Settings). Each line can have its own ring volume and pitch.
During Menu Activity
If an external call arrives while you are accessing an Offline Main Menu item,
the handset exits to the “idle screen” and begins normal call processing as
defined for that handset. This is also true during composed dialing.
L1 Ringing
Bob Jones
512-555-1234
RINGOFF
Handset 2
Vanessa
RINGOFF

3-3
If an external call arrives while you are accessing an Online Main Menu item,
the call pending tone is sounded and you remain in the Online Menu.
If an external call arrives while the handset is displaying a data entry screen, the
device remains at that data entry screen. You can:
• Continue data entry to completion, press OK, exit the menu, and answer the
call, or
• Abandon data entry by:
•Pressing the ESC soft key to exit the current menu
•Pressing the Menu hard key to escape up one level holding it for 1 second
to return to the idle state
•Pressing the incoming external Line Key or Int Key (speaker key?)
and answering the call, or
• Ignore the call and continue with data entry.
Incoming calls do not interrupt the PC services Mode. However, if you press a
Line or Speaker key, the VDM aborts PC services and answers the call. The
VDM also aborts PC services if you press a Line or Speaker key to make an
outgoing call.
Unanswered calls continue to ring until the calling end disconnects.
Incoming Calls with an Active Call on the Line
Note:
Incoming
calls are
answered via
the audio path
(handset,
speaker, or
headset)
currently being
used for the
active call.
If a handset is active on a call on L1 and another
call comes in on L2, the display shows which
line is ringing, the calling name, and the calling
number. The <VOL> and MUTE soft keys are
available for the active call.
Pressing L2 puts the L1 call on Hold. You are
then connected to the incoming call on L2. You can toggle between the two
external lines by alternately pressing the two Line keys.
If a handset is active on a call on L1 and an
internal call comes in from handset 2, the display
shows “Handset 2” and the name of the handset
if one has been assigned. The <VOL> and
MUTE soft keys are available for the active call.
Pressing the Int key puts L1 on Hold and connects you to the incoming internal
call. To end the internal call, press the Int key again or press the L1 key to
L1 Ringing
Bob Jones
512-555-1234
< VOL > MUTE
Handset 2
Vanessa
< VOL > MUTE
3-4 Home RF User Guide
return to the L1 call. You cannot toggle between Internal calls and External
calls by alternately pressing a Line key and the Int key.
Multiple Incoming Calls
When there are incoming calls on two lines, the
last received call is displayed first. If no caller
ID name was provided, the caller ID number is
used. If neither caller ID name nor number is
provided, only the Line number is shown. Press
the corresponding line number to answer the
desired call.
Note:
The
scrolling does
not roll over.
For example, if
you are viewing
the first call,
pressing the up
soft key does
not change the
display.
When there are incoming calls on three lines, the
last received call is displayed on line 1, the
second call on line 2, and the first (oldest) call on
line 3.If there are more than three calls, pressing
the down and up soft keys shows the next and
previous calls, respectively.
Using the Int Key
From an idle state, press the Int hard key to display a list of registered handsets.
Use the < or > soft keys to scroll through the list and then press the number of
the desired target handset on the keypad (1-8).
Press either the * hard key or the ALL soft key, to poll all handsets. The call is
connected to the first handset that picks up.
The display shows “No Handsets Available” or “Intercom X Busy” if the call is
not answered.
Press the ESC soft key, Int hard key, or the Menu hard key to return to the idle
state. If you are setting up a conference call and press any of these keys you are
reconnected to the party on Hold.
If you are on an Internal Call and receive and incoming external call, answering
the external call disconnects the internal call. You cannot toggle between
Internal calls and External calls by alternately pressing a Line key and the Int
key.
L1: 512-555-1234
L2: Bert Smith
RINGOFF
L1: 512-555-1234
L2: Bert Smith
Vanessa
RINGOFF

3-5
Auto Answering
Set auto answering by pressing Menu | System Settings | Auto Answer on/off.
Note:
The right
soft key
displays the
opposite of the
current setting.
Clicking the ON
soft key when
the menu item
shows “Auto
Answer off”
changes the
menu item to
show “Auto
Answer ON”
and the soft key
text changes to
off.
The default is off. This is a global toggle. When it is set to on, you can use the
Int hard key like a true Intercom. When ON, users can simply answer the
person calling them on the Intercom without having to pickup the Handset. The
caller will be heard over the speakerphone and the person being called can
simply speak back at the caller with no need for either to have their Handset to
their ear.
With Auto Answer ON:
1Press the Int key.
2Select a registered handset from the list.
3Start talking.
4A tone sounds on the speaker of the receiving handset to alert the user of the
intercom call. The user on the receiving end can just start talking.
Transferring a Call
You can transfer external calls from one handset to another. External calls
cannot be transferred to an external line. Intercom calls cannot be transferred.
There are two types of transfers, blind or announced.
Blind Transfer
To transfer a call:
Private Hold:
No other
handsets can
pick up this call.
1Press the Menu hard key, then select Transfer. The active call is put on
Private Hold.
2Press the corresponding hard key (1-8) from the registered headset list, or
press * or ALL to transfer the call to the first handset that picks up.
• If the target is not busy, the initiating handset transitions to Idle and the target
device processes the transfer as an incoming call. Only the target device has
access to the calls transferred to it.
• If the target handset is busy, you are returned to the Active Call state.

3-6 Home RF User Guide
• If the target device is not busy, but does not pick up within 30 seconds, the
handset that initiated the transfer receives the call back as a regular incoming
call. If that handset is busy on another internal call, then the call will keep
ringing on the transferred to handset until it is answered or far end
disconnected.
Call Barge-In is “Prohibited” when a call is in the process of being Transferred.
A call is in the process of being Transferred when this screen is showing and up
until that point in time when the target device picks up.
Calls can be transferred to handsets that wouldn't ordinarily have access to a
particular External Line.
Example: Handset 3 does not have access to External Line 1 because the user
set the L1 incoming and outgoing calls to off through the System Settings menu.
Handset 1 can transfer a call on Line 1 to Handset 3.
Announced Transfer
An announced transfer occurs when the handset establishes a Conference Call
with another handset and then hangs up the call.The external line is then active
on the destination handset.
Conference Calling
This option enables you to set up a 3-way Conference. A Conference can be set
up in one of the two following ways:
Note:
Conferences
cannot be set
up between
three or more
handset users
via
Int
.
• Between two handset users (via Int) and one external line.
• Between one handset user and calls on two external lines.
Conferences must be started from an external active call. While active on an
external call, press Menu | Conference Calling.
The VDM supports up to two simultaneous conferences throughout the system.
Only Call in the System
Protected
Hold:
Other
handsets
cannot pick up
the call.
If there is only one call in the system, pressing
Menu | Conference puts the call on protected
hold and displays the Make a New Call screen. Make a New Call
Then press CONF
DIR LOG MSG RDL

3-7
Adding a New Call
After you select Menu | Conference, or Menu | Conference | Add A New Call
you can make a new call via any normal method of making a call. (See “Making
a Call.”)
If an incoming call is received before the CONF soft key is pressed, the caller
ID for the new call overwrites the conference display. If you answer the call, the
VDM treats the new call as the second call in the conference and displays the
CONF soft key.
When the line is seized for this second call for
the Conference, the screen displays the Active
Call Screen, except the <Vol> and MUTE soft
keys are replaced by the CANCEL and CONF
soft keys.
Press the CANCEL soft key to cancel the
Conference, disconnect the second call, and remove the Protected Hold status of
the first call leaving it on regular hold (which means any Handset can now pick
it up).
Press CONF to complete the conference. The Conference initiating Handset has
a connection with both the call that had been put on Protected Hold and the
second call that was just made. All three parties can hear and speak with each
other. See “Active Conference.”
More Than One Call Active in the System
Protected
Hold:
Other
handsets
cannot pick up
the call.
When the OnLine Main Menu | Conference selection is made, the previously
active external call is put on Protected Hold.
With other active calls in the system, you can
add a new call to the Conference or add one of
the other external calls (that are either ringing or
have been placed on normal Hold).
•Press ESC (or the Menu key) to cancel the
Conference setup process and reconnect to the
external call that was active when the OnLine Main Menu was first requested
by the user.
•Press OK to add a new call to the conference. See “Adding a New Call.”
• Scroll to an available line and press OK to add an external call. You now
have a connection with both the call that had been put on Protected Hold and
the second call that was just selected. All three parties can hear and speak
with each other.
L1 1:33
Bob Jones
512-555-1234
CANCEL CONF
Add a new call
Add L1: Bob Jones
Add L2: Cindy Smith
< > Esc OK

3-8 Home RF User Guide
Active Conference
If you press a Line key other than the one on Protected Hold or the new call, the
phone puts both calls on hold, winks their LEDs, and aborts the conference
procedure. The phone becomes active on the external line last touched.
If you press the original call Line key (the one on Protected Hold) while dialing
the new call, the new call is put on normal hold, and the original call is
retrieved. The conference procedure is aborted.
Line 1 of the Active Conference Screen shows
“Conference” and the length of time (mm:ss) the
oldest external call was active before the
Conference option was selected.
Lines 2 and 3 show which two connections this
handset is connected to. This could be one
external line and one internal Intercom connection (shown) OR two external
lines. Line 4 shows the normal Active Call soft keys.
If there is no CID info, Phone Dir info, or Handset Name available, all that is
displayed is the appropriate L1, L2, L3, L4, or Handset number.
Ending a Conference Call
Any internal Conference participant at any time can exit a Conference. The
handset that set up the Conference has no higher priority than any other internal
Conference participant.
Press the Menu hard key during an Active Conference Screen to display a menu
of Conference exit options:
•Drop Ln: “CID or Phone Dir info”
•Drop Ln: “CID or Phone Dir info” OR
“Drop Handset 1" OR Drop “Handset
Name”
•Drop All
• Leave Conference (Not Available if Conference has 2 External Participants)
• Hold (Not Available if Conference has 2 Internal Participants)
Menu Option 1
The first Menu option is always an option to drop an external line from the
Conference. When an external line is dropped from the Conference, the
remaining two participants remain in an active connection.
Conference 1:33
L2: Bob Jones
Vanessa
< VOL > MUTE
Drop L1: Bob Jones
Drop Vanessa
Drop All
< > Esc OK
3-9
Menu Option 2
The second option depends on whether the Conference has two internal
participants or two external participants.
If there are two internal participants, the second option shows the Handset # or
the Handset Name (if provided) of the other internal participant.
If there are two external participants, the second option shows the second
external line # and the CID (or Phone Dir) information for that second
participant.
When this line, whether internal or external, is dropped from the Conference,
the remaining two participants remain in an active connection.
Drop All
The third option is always Drop All. When Drop All is selected, all connections
are broken and the handset returns to the Idle state. Any internal participant can
select this option at anytime to end the Conference.
Leave Conference
Note:
Leave
Conference is
not available if
the Conference
has two
external
participants.
If the Conference has two internal participants, the fourth option is Leave
Conference. When Leave Conference is available and selected, the handset
that selects it leaves the Conference, returns to the Idle state, and the remaining
single internal and single external participants remain in an active connection.
Hold
If the Conference has two external participants, the fourth option is Hold. When
Hold is available and selected, the handset that selects it leaves the Conference,
returns to the Idle state, and the remaining two external participants are left on
“Conference Hold”. When this occurs, both external line keys “wink” on all
handsets, which means that the user of any handset can press either key and
retrieve the Conference. Pressing either of the Line keys re-establishes the entire
Conference.

3-10 Home RF User Guide
Exiting a Conference via Line Keys and Hang Up
There is no priority set as to which internal handset can initiate exiting or
hanging-up a Conference. Any internal Conference participant at any time can
exit a Conference. The handset that set up the Conference has no higher priority
than any other internal Conference participant.
Pressing a Line key (or Int key) for one of the Conference's active connections
hangs up that Conference participant, terminates the 3-way Conference, and
leaves the remaining two participants on an active connection.
If the Conference has two internal participants:
• Pressing the Int key disconnects the other internal participant, leaving an
active connection between this handset and the external line.
• Pressing the participating external Line key disconnects the external line and
leaves an active Intercom connection between the two internal participants.
• Pressing any of the Line keys that are not part of the Conference disconnects
this handset from the Conference (leaving an active connection between the
other internal participant and the external line) and enables the user to place a
call on the line selected.
• Placing the handset on-stand disconnect this handset from the Conference,
leaving an active connection between the other internal participant and the
external line.
If the Conference has two external participants:
• Pressing either of the participating external Line keys disconnects that
external line and leaves an active connection between this handset and the
remaining external line.
• Pressing any of the Line keys (or Int key) that are not part of the Conference
disconnects this handset from the Conference (leaving the two external
participants on Conference Hold) and enables the user to place a call on the
line selected.
• Placing the handset on-stand disconnects the entire Conference. All
participants are disconnected.
Far-end Conference participants on external lines can hang up themselves, but
they cannot break the link between two internal handsets or between one
internal handset and a different far-end participant.

3-11
Automatic 3-way Conference
If the Line Privacy feature is turned off,
conference calls can be set up by a handset
joining an active call. Simply press the Line key
for the external line. The participants on the
original 2-way call hear a double beep and their
handset displays “Conference” plus the identity
or the other two calls on the line.
Placing an External Call on Hold
Note:
Internal
calls cannot be
put on Hold.
When selected, this option puts an active external call on Hold, sets the
appropriate external Line key to wink, and the user is returned to the Idle state.
The winking Line key is the only visual indicator that there is a call on Hold.
This option functions exactly the same as when the user is on an active external
call and simply presses another external Line key (or the Int key). Pressing
another Line key when you are on an active external call places the active call
on Hold and enables, for example, answering another ringing line, initiating
another call, calling another handset (via Intercom), etc.
A call on normal Hold (no Conference or Privacy issues) can be picked up from
any handset.
A call can be put on Protected Hold by selecting Conference from the Online
Main Menu. Only the handset that initiated the Conference can reactivate the
call that was put on Protected Hold.
A call on an external “Private” line will also be put on Protected Hold. Only the
handset that was on an active call on a “Private” line and initiated the Hold can
pick up the call on Protected Hold.
When a Line is on Hold, the LED for that line winks. If the line is on Protected
Hold, the LED winks on the Private Handset, but stays active on all other
handsets.
Conference 1:33
L2: Bob Jones
Vanessa
< VOL > MUTE

3-12 Home RF User Guide
Privacy Feature
There is a system setting for Line Privacy. This option is configurable for each
available external line. If privacy is enabled for a particular external line, calls
associated with that line are Protected. Other Handsets may not Barge-In on
calls Active on that line. When being put on Hold, Active and Conference calls
are put on Protected Hold and Protected Conference Hold (if applicable). Other
Handsets may not pick up calls on Protected Hold or Protected Conference
Hold; only the associated Handset may do so.
If a call on Handset X (that originally came in on a Private line) is transferred to
another Handset Y that does have access to that Private line, the call is still
Protected and other Handsets can not Barge-In or Pick-up (if the call is later put
on Protected Hold). Other Handsets will be prevented from joining/getting calls
that are already in progress on that Line.
If a call on Handset X (that originally came in on a Private line) is transferred to
another Handset Y that does NOT have access to that Private line, that call is no
longer Protected, and other Handsets may Barge-In or Pick-up (if the call is later
put on Hold).

4-1
CHAPTER
4
C
HAPTER
0
P
ROGRAMMING
F
EATURES
Phone Directory
Note:
Multiple
handsets can
access the
Directory
simultaneously.
To access the Phone Directory listing, press the DIR soft key or select Phone
Directory from the Online Main Menu screen. Press the OK soft key to access
the Phone Directory submenu items.
Adding a New Listing
1From the idle state, press the DIR soft key.
2Press the NEW soft key.
3Enter the name (required). Press > to move to number entry?
4Enter the number (required).
5Press the OK soft key to save the new entry.
Note:
Until this
new entry is
deleted or
made private, it
is accessible
via any
handset.
If the Phone Directory is empty, Line 1 is blank, Line 2 displays “Directory
Empty,” and the only soft keys available on Line 4 are NEW and OK. Press
OK or the Menu hard key to escape from this “Directory Empty” screen.
If the Phone Directory is full and you click on the NEW soft key, the display
shows “Directory full.” There can be up to 150 entries in the Directory.
The Phone Directory is displayed alphabetically. When creating entries you
should establish a convention and use it for all entries. For example, first name
+ last name, last name + first name, only first name, only last names, etc.

4-2 Home RF User Guide
Entering Alphanumeric Characters
Note:
Text
entries are
limited to 16
characters.
The numeric keypad keys are used to enter text, such as the name in the Phone
Directory, or when creating an alias for a handset.
To enter a letter, press the corresponding keypad key. For example, to enter the
letter “a” press the number 2 key. To enter the letter “b” press the number 2 key
quickly two times. After a brief delay, the character is fixed and the cursor
moves to the next position.
Press the 1 key to enter a space.
Capitalization
The first letter of the line is always capitalized. The first letter after a space is
always capitalized. To capitalize one letter, press *, then the desired letter. To
capitalize multiple letters, press the # key. All letters are capitalized until the #
key is pressed again.
Scrolling Through the Directory
You can scroll through the Phone Directory using the < and > soft keys. A first-
character-match alternative to scrolling through the entire Directory is also
available. Use the keypad keys as described in “Entering Alphanumeric
Characters.” For example, to quickly move to all Phone Directory entries
beginning with “S,” press the 7 keypad key 4 times.
Private Entries
A “P” is displayed between soft keys 2 and 3 if a phone number has been made
“Private” by the user of this handset. Private Phone Directory entries are only
accessible and shown on the handset that made them “Private”.
To make an entry private, select Private off/ON from the Phone Directory
menu. This feature is a toggle. To make a private entry public, select Private
off/ON from the Phone Directory menu to toggle it off.
Editing an Entry
Select Edit Entry from the Phone Directory menu to change and save the
<Active Entry's> Name and/or Phone number.
Press the OK soft key to move to the second field. Press OK on the second field
to exit with a request to save the entry.

4-3
Characters can be removed by pressing the
Delete <-| soft key. Pressing this key removes
the character occurring to the left of the
highlighted character in the string. The string is
shortened by one character and the same
character remains highlighted.
Deleting an Entry
To delete an active entry select Delete Entry from the Phone Directory Menu.
When selected, will delete the <Active Entry>. Private entries are only
accessible at the handset that made them private. Any handset can delete any
non-private (publicly shared) Phone Directory entry with this option.
Deleting the Directory
When selected, you are asked to provide a PIN (if defined) before continuing.
After correctly entering the PIN (if defined) or immediately after selecting
Delete Directory (if a PIN is not defined), you are prompted with “Delete All
Entries?” Click the YES soft key to delete all entries in the Phone Directory and
return to the offline Idle state. Click NO to Escape and leave the Phone
Directory as is.
CAUTION: Deleting the Directory delete all names and numbers, clears all
global Speed Dial Key assignments, resets all Private settings, and resets the
Memory Available to 150 entries.
Memory Available
When selected, shows the amount of additional entries that can be added to the
directory.
The Phone Directory (maximum of 150 entries of max length) is stored on the
VDM and is shared by all subscriber handsets.
Fred Jones
123456789
< > <- | OK
4-4 Home RF User Guide
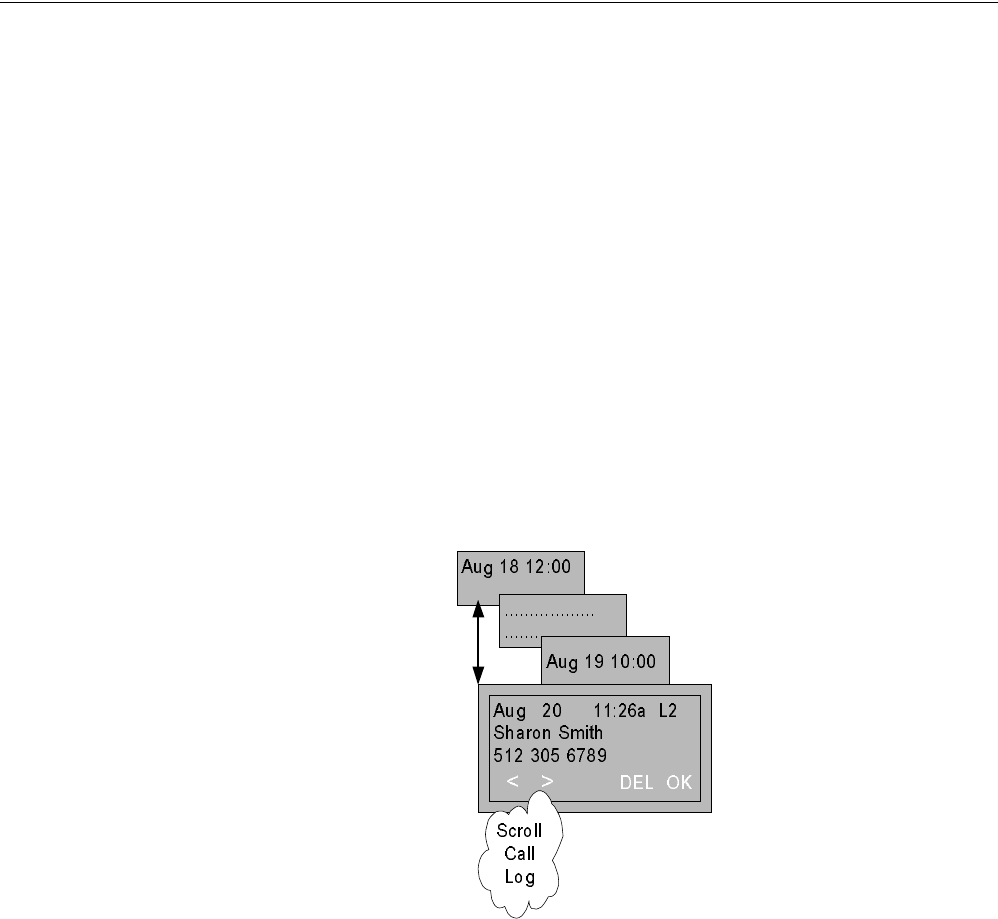
Global Call Log Feature
The Call Log (maximum of 50 entries) is stored on the VDM and is shared by
all subscriber handsets.
While scrolling the Call Log menu, a user at any subscriber handset can:
1Dial the <Active Entry's> number (via Dial Number), and/or
2Save the <Active Entry> to the shared Directory, and/or
3Delete the entire Call Log, and/or
4Press the Menu hard key to escape, and/or
5Press the ESC soft key to escape.
To access:
• Select Call Log from the Online Main Menu.
•Press the LOG soft key.
When selected, this option opens the Call Log and initially shows the last call
received.
If the Call Log is empty, the handset displays “Call Log Empty.”
The calls recorded in the Call Log are subject to the Call Log System Setting
(i.e.; All Calls are logged or Only Unanswered Calls are logged). If the Call Log
System Setting is changed to “Log No Calls,” no new calls are logged.
Also, the number of digits stored in phone numbers is affected by what is
entered (or not entered) in the System Settings | Local Area Codes option.
You can circularly scroll through the Call Log (using the normal scrolling soft
keys) to see the Month, Date, Hour, Minute, AM/PM, Line # the Call was made

4-5
on, CID Name (if available), and CID Phone Number (if available) of all calls in
the log with the latest calls displayed first and the oldest calls displayed last.
Incoming calls that match a non-Private number already stored in the Phone Dir
show the Phone Dir name associated with that number, regardless of what CID
reported.
Incoming calls that match a Private # (made Private by Handset X) show on all
other Handsets the name as reported by CID. In this case, Handset X shows its
Private Phone Directory name (which may or may not be the same thing all the
other Handsets are displaying).
Deleting a Call Log Entry
While scrolling the Call Log, press the DEL soft key to delete that entry in the
Call Log and shift all calls older than this deleted one up one entry number.
This deletion is then be reflected on all handsets as other users scroll through the
now-updated log.
If the last and only Call Log entry is deleted, the handset displays “Call Log
Empty” and returns the handset to an idle state.
Deleting All Call Log Entries
Select Delete All Calls from the Call Log menu. When selected, you must enter
a PIN if one has been set. If a PIN has not been set or you successfully enter
the PIN, “Delete All Entries?” is displayed. Click the YES soft key to delete all
entries in the Call Log. Click NO to escape and leave the Call Log as is.
Save to Directory
Note:
Saving a
Call Log entry
to the Phone
Directory does
not remove it
from the Call
Log.
Select Save to Dirctry from the Call Log menu to enable editing and saving the
<Active Entry's> name and number to the shared directory stored on the VDM.
If a name was not provided by CID, initially <Name> is displayed, allowing you
to provide a name. After entering the name and number, press OK to store the
entry. The OK soft key is not displayed unless the name and number fields
contain at least one character.
If the Phone Directory is full, an error tone is sounded and “Directory Full” is
displayed. After two seconds, you are returned to the Call Log menu.
Setting the PIN
The PIN number can be set by pressing the Menu hard key, then selecting
System Settings | PIN Change.

4-6 Home RF User Guide
All PINs are zero to four characters long, consisting of digits in the set [0-9]
inclusive plus Star and Pound.
Asterisks or “stars” are used to hide the actual PIN digits as you enter them. The
Delete key can be used to remove characters and the cursor movement keys can
be used to position the cursor.
Pressing the OK soft key ends PIN input and the PIN entered is returned to the
calling application. Pressing the Menu key cancels PIN input.
Resetting the PIN
If you have forgotten the PIN, enter * 6 5 # when a PIN prompt is displayed.
The PIN number is cleared and can be reset by pressing the Menu hard key,
then selecting System Settings | PIN Change.
Ringer Settings
Select Ringer Settings from the Offline Main Menu. From this menu, you can
set the ringer ON or off. The bottom right soft key text is always the opposite of
the current setting. Clicking on the off soft key changes the menu item to
“Ringer off” and the soft key changes to ON. Click ON and vice versa.
If the Ringer is turned off, an icon is displayed on the Offline Idle screen. No
Icon is shown if the Ringer is ON.
You can also set the volume and pitch of the ringer for each external line, and/or
the Internal Intercom Line. Volume has 6 settings (0 to 5) and an additional
cascading setting where the ring starts at the lowest volume (1) and increments
with every ring up to volume 5. Pitch has 12 settings. To access, from the
Offline Main Menu select Ringer Settings, the desired Line number, then
Ringer Volume or Ringer Pitch.
When a handset is accessing the Ringer Settings Volume or Ringer Settings
Pitch option and an incoming call arrives, other than the Line Key blinking, that
handset does not have any visual or audio indication that a new call has arrived.
That handset does not “ring” for the new incoming call. When you exit this
menu, normal ringing and display resumes with the new settings.
Enter PIN:
* * * *
< > <- | OK

4-7
Setting the Time and Date
Select Menu | System Settings | Time/Date to change the System Time, AM/
PM, and/or Date.
You can toggle between AM and PM in a similar manner as all of the ON/off
toggles. Note that the AM/PM soft key text is always be the opposite of the
current setting. Clicking on the PM soft key changes the time, for example,
from 11:35AM to 11:35PM and the soft key text changes to AM. Click AM and
vice versa.
The cursor automatically skips fixed text and moves to the hour, minute, month,
day, and year fields as you type numbers or cursor soft keys. The first line
shows the date format (month before day). The handset also supports European
format (day before month and 24 hour clock with no AM/PM) but the VDM
will not use it. The handset validates the date and time when you press OK. If
invalid fields exist, the handset displays an error message: “Invalid Date” or
“Invalid Time” for two seconds and returns to time and date editing. The default
time is 8:00 AM. The default date is Jan 1, 2001.

Index-1
A
auto answering, 3-5
C
call
ending, 3-2
incoming with active call on the line, 3-3
making an outgoing ,3-1
multiple incoming, 3-4
placing on hold, 3-11
receiving, 3-2
receiving during menu activity ,3-2
transferring, 3-5
Call Log
accessing, 4-4
deleting all entries, 4-5
deleting an entry, 4-5
saving entry to directory ,4-5
conference call
automatic, 3-11
ending, 3-8
exiting, 3-10
leaving, 3-9
putting on hold ,3-9
setting up, 3-6
D
date, setting, 4-7
deregistering handset, 1-5
F
Flash key
illustrated, 1-3
H
handset
deregistering, 1-5
powering on, 1-4
registering, 1-5
volume, 3-1
handset keys
description, 1-2
headset
using, 1-6
volume, 3-1
hold, 3-11
I
Int key
illustrated, 1-3
using, 3-4
Intercom
using, 3-4
K
keypad
locking, 1-4
L
letters
capitalizing, 4-2
entering, 4-2
letters, entering, 4-1
Line keys
illustrated, 1-3
Lock key
illustrated, 1-3
lock keypad, 1-4
Log key
illustrated, 1-3
M
Menu key
illustrated, 1-3
MUTE softkey, 3-2
P
Phone Directory
accessing, 4-1
adding a new listing ,4-1
deleting, 4-3
deleting an entry ,4-3
editing an entry, 4-2
scrolling, 4-2
size, 4-3
PIN
changing, 4-6
setting, 4-6
privacy, 3-12
private entries, 4-2
Index
Index-2
R
registering handset, 1-5
ringer
ON/off, 4-6
pitch, 4-6
settings, accessing, 4-6
volume, 4-6
RINGOFF softkey, 3-2
S
softkeys
illustrated, 1-3
MUTE, 3-2
RINGOFF, 3-2
using, 1-4
speaker
volume, 3-1
Speaker key
illustrated, 1-3
T
text
capitalizing, 4-2
entering, 4-2
text conventions, 1-1
time, setting, 4-7
transferring a call, 3-5
V
volume, adjusting, 3-1