Siemens Information and Communication Mobile SL3501 Spread Spectrum Cordless Phone System User Manual 4015co
Siemens Information and Communication Mobile LLC Spread Spectrum Cordless Phone System 4015co
UserManual.wiki
>
Siemens Information and Communication Mobile
>
SL3501 User Manual
Users Manual
Navigation menu
Upload a User Manual
Namespaces
Wiki Guide
HTML
PDF
Info
Views
User Manual
Discussion / Help
Navigation

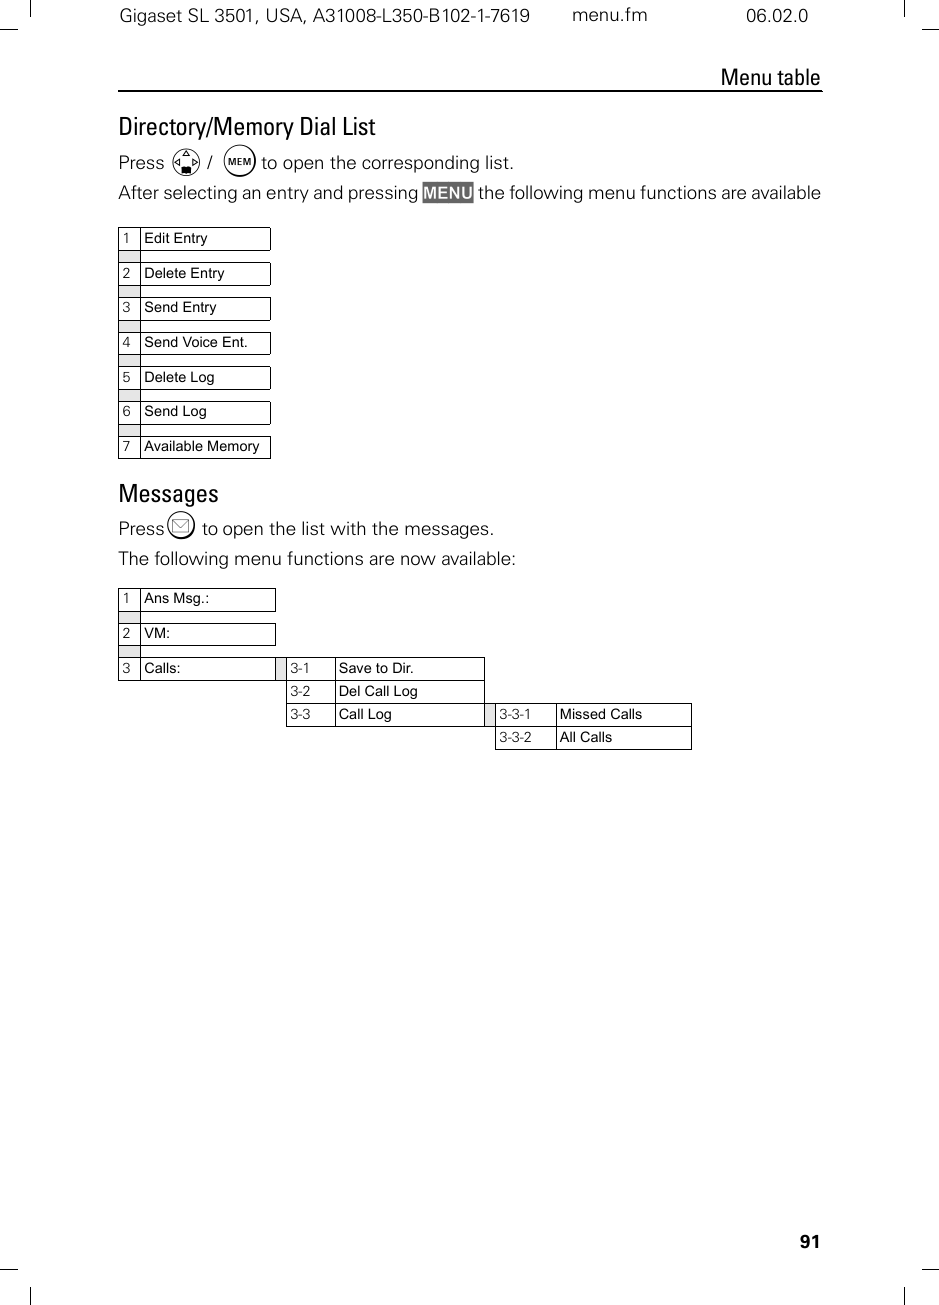
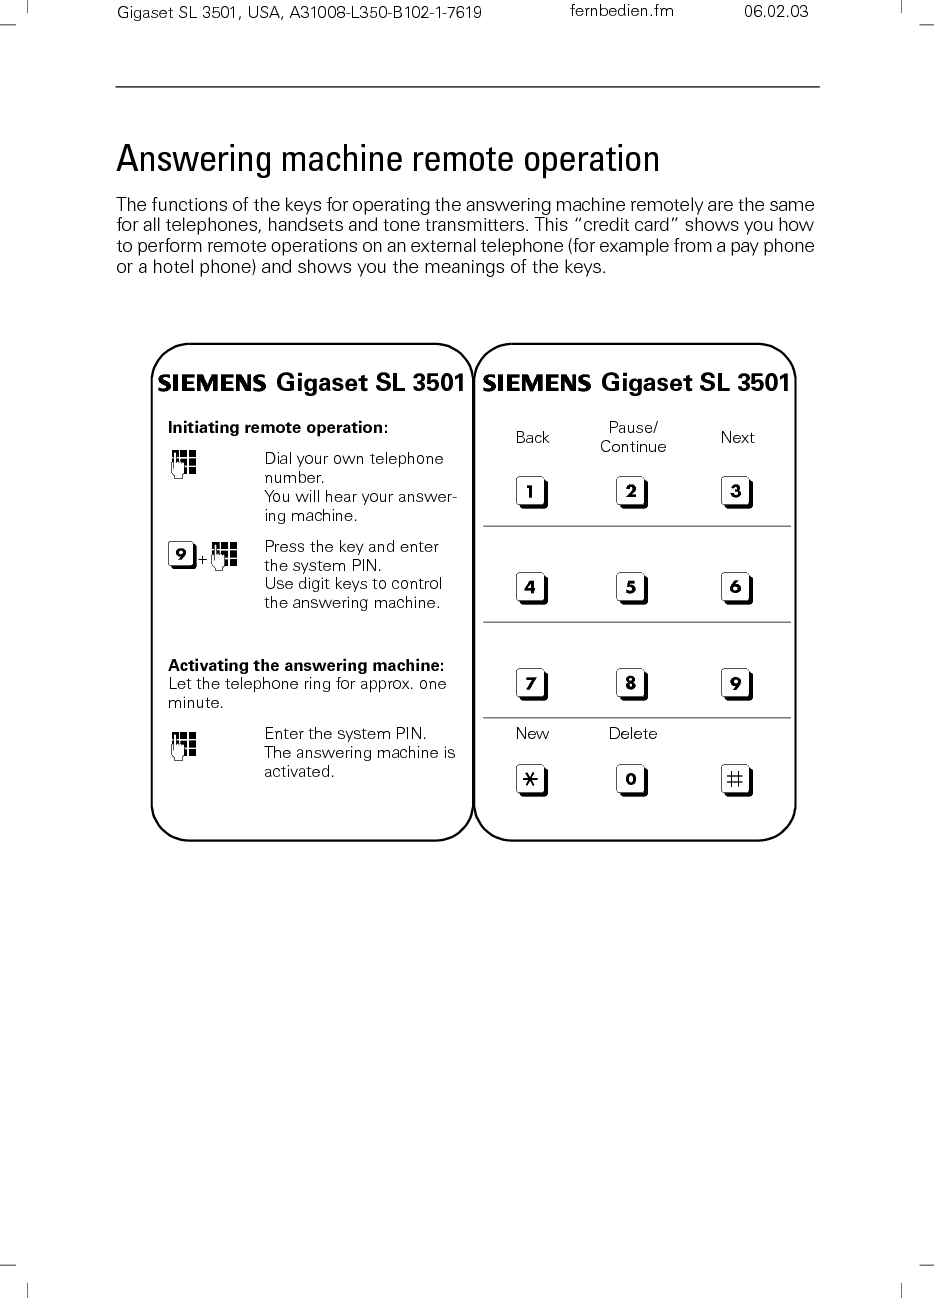
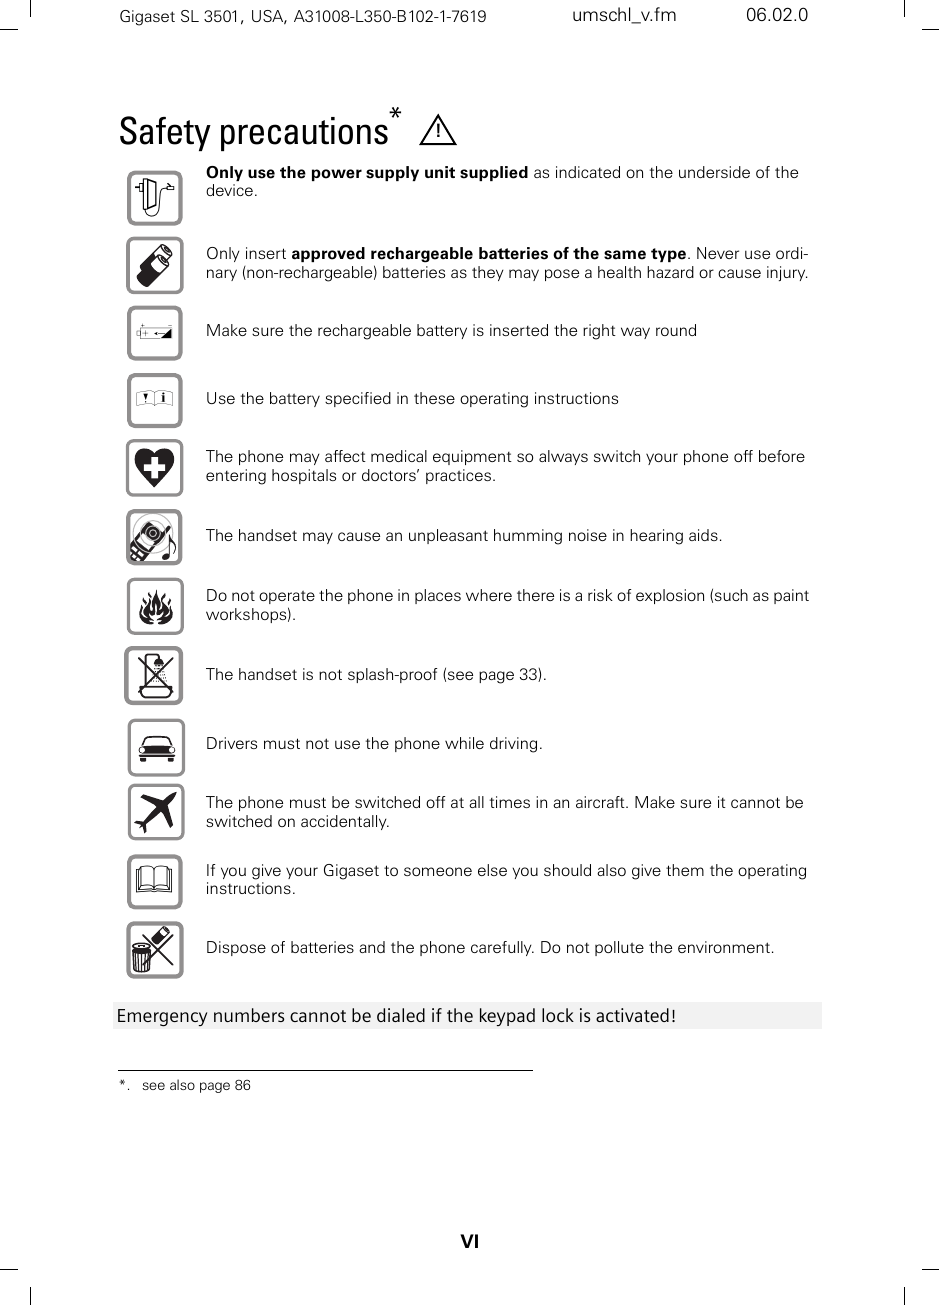
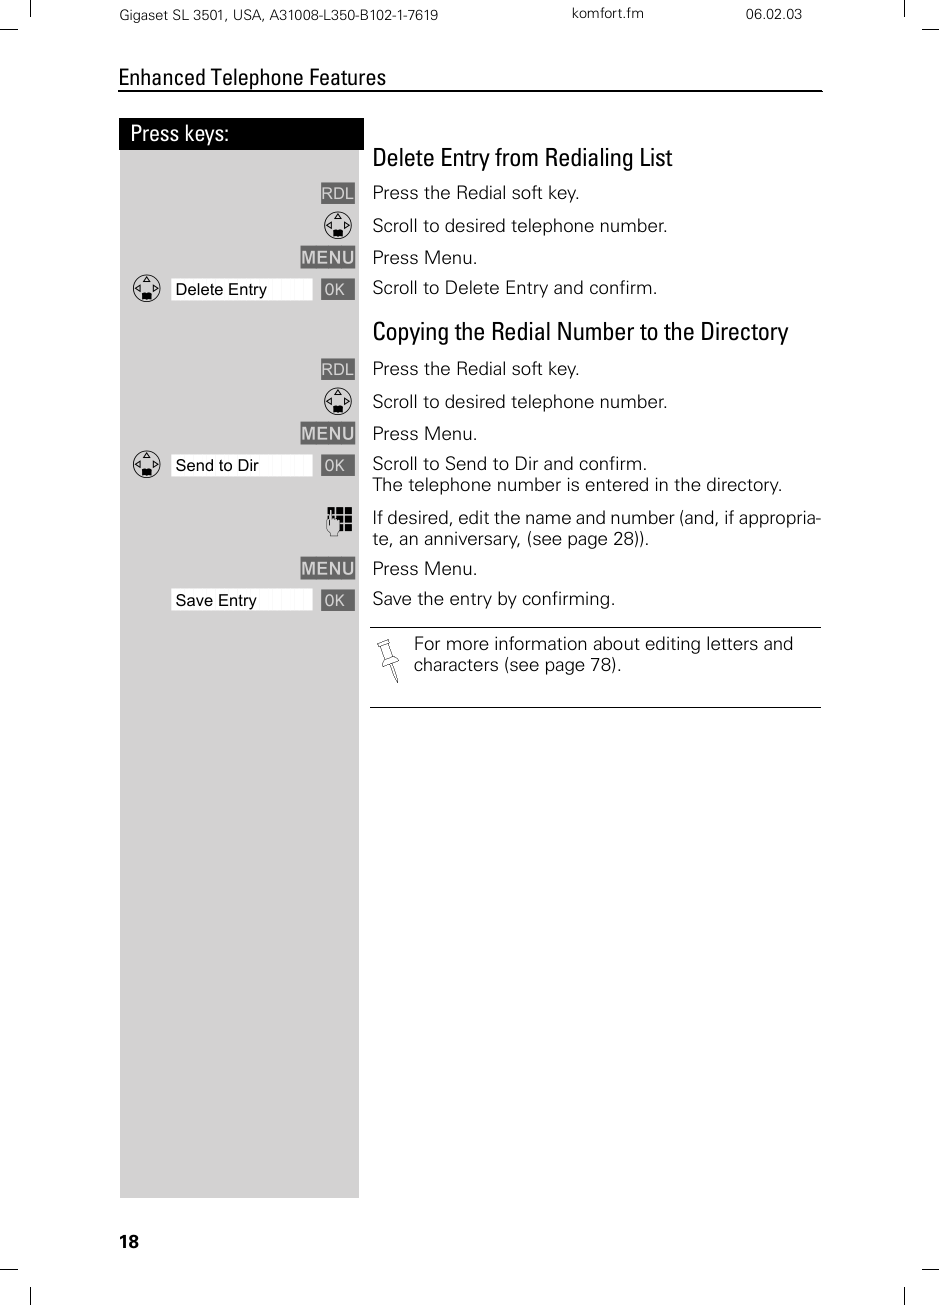
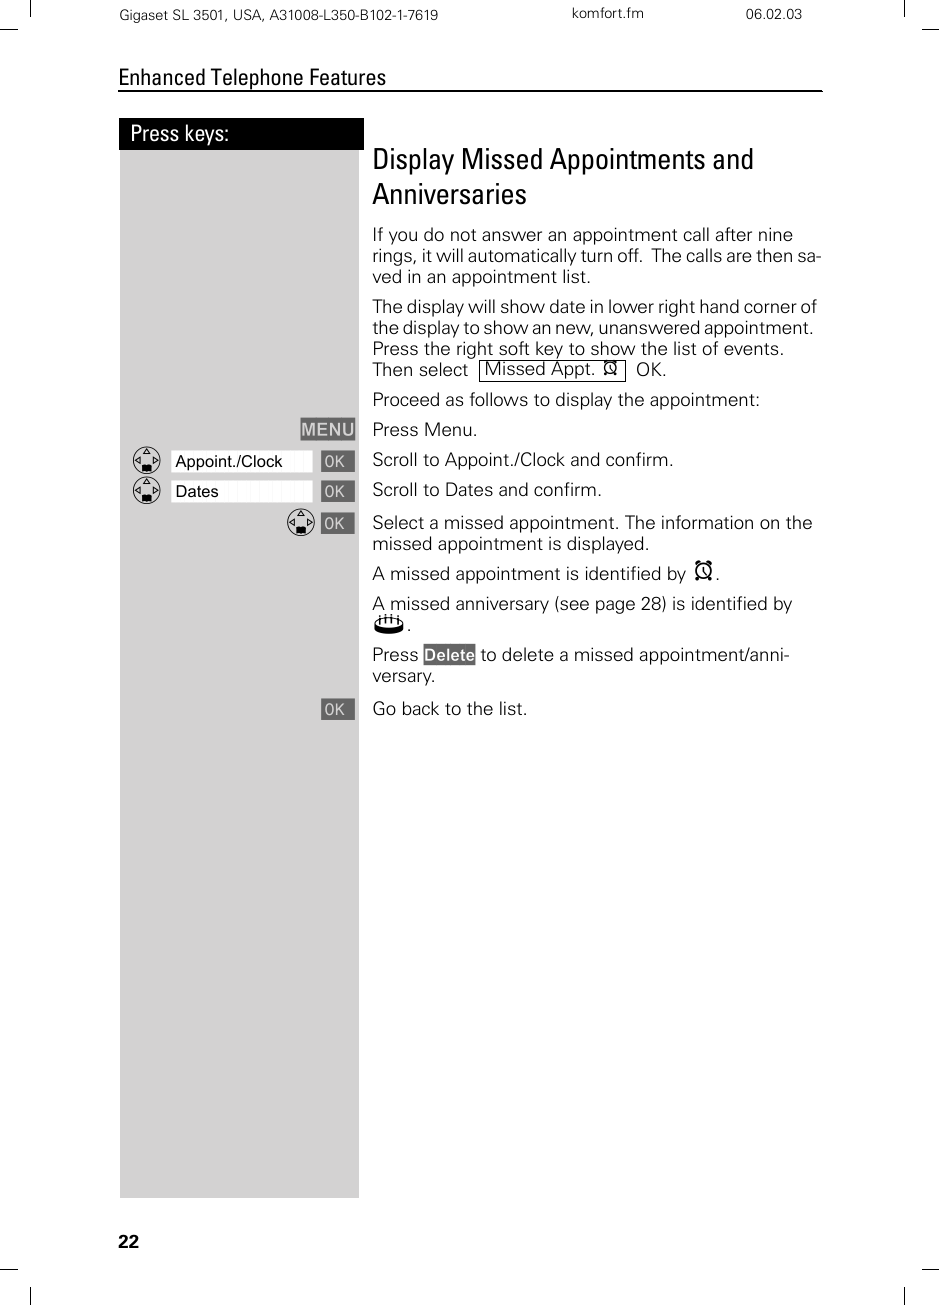
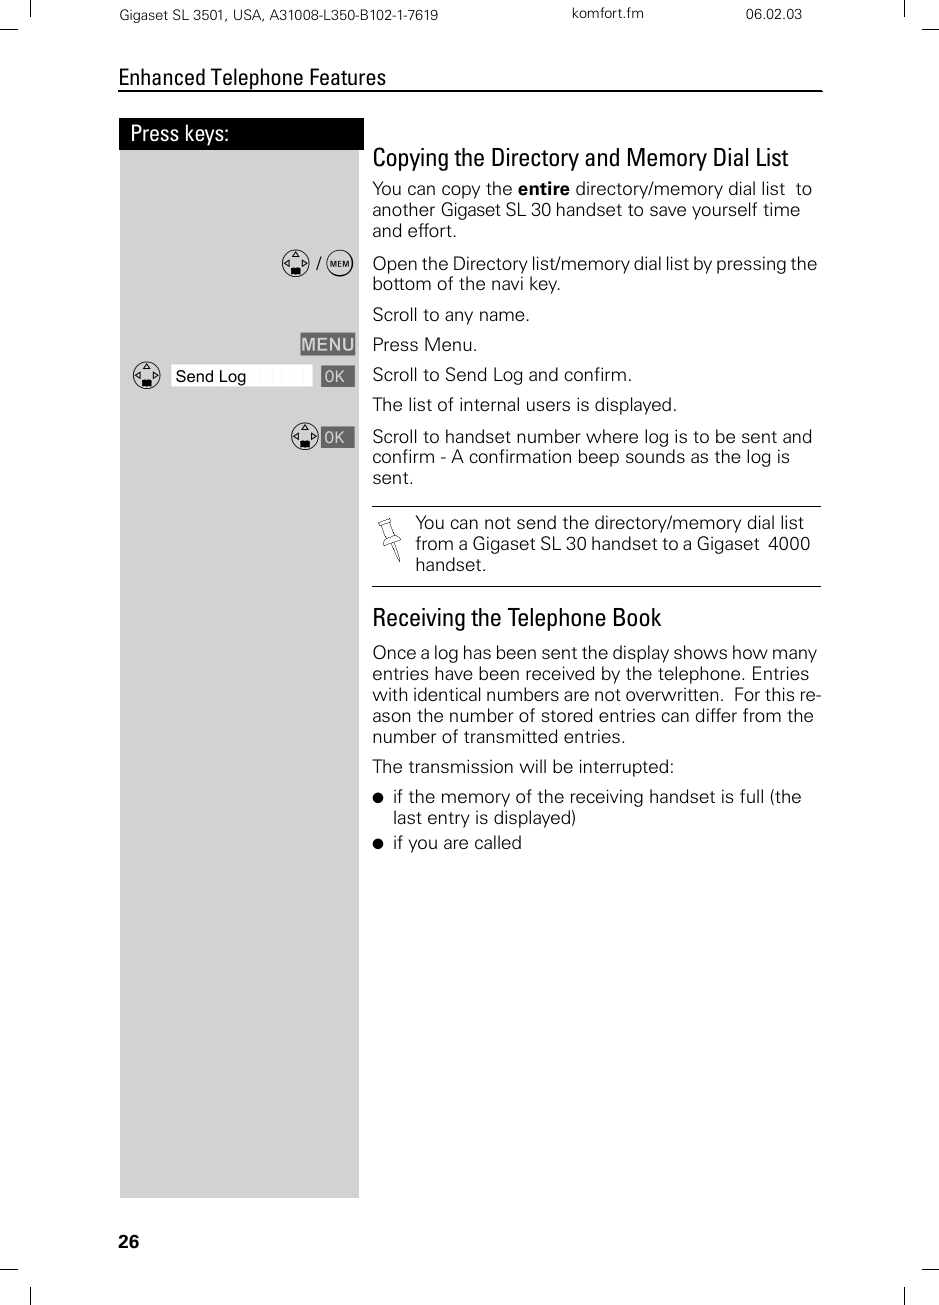
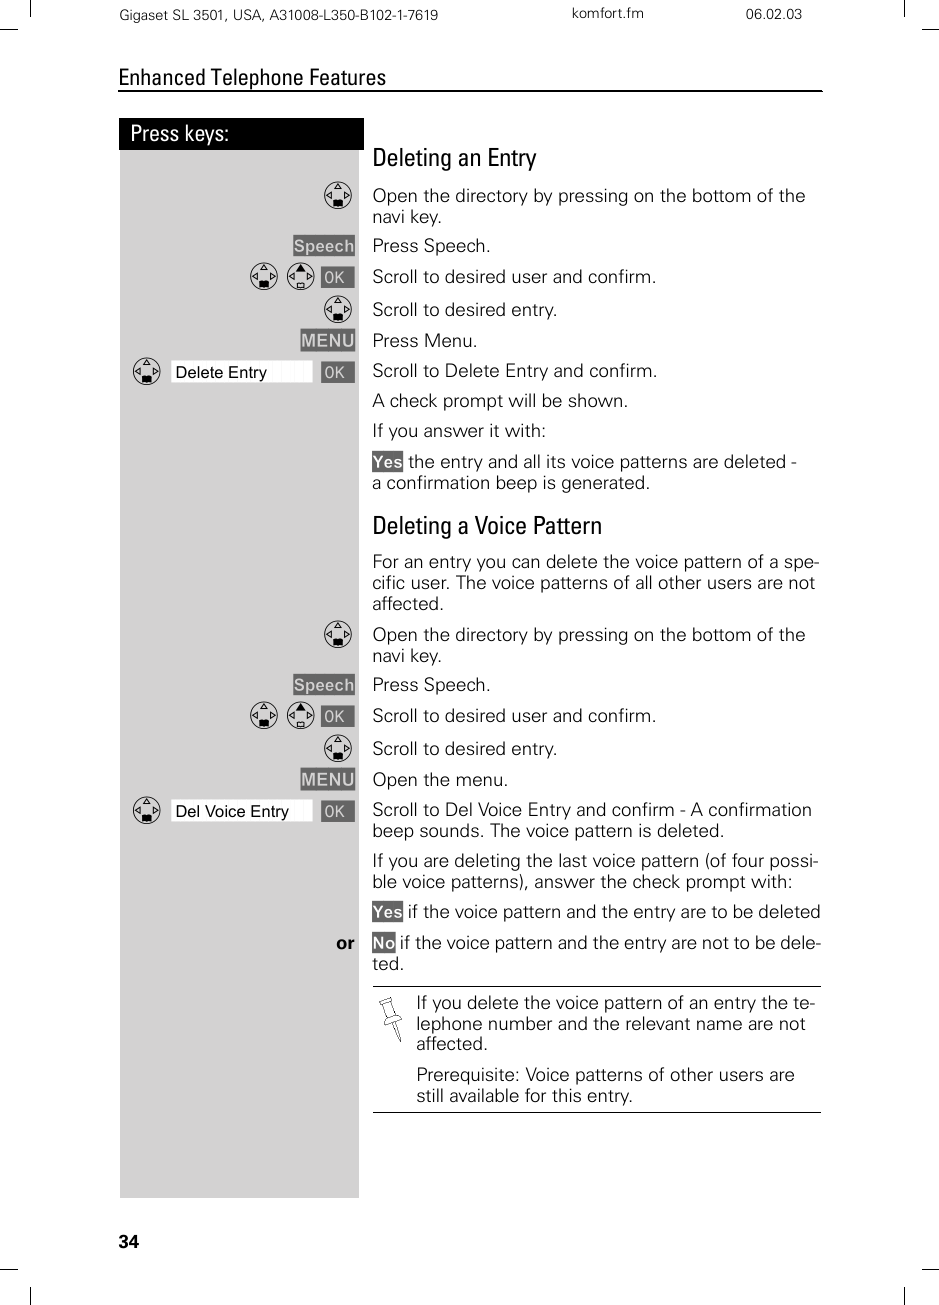
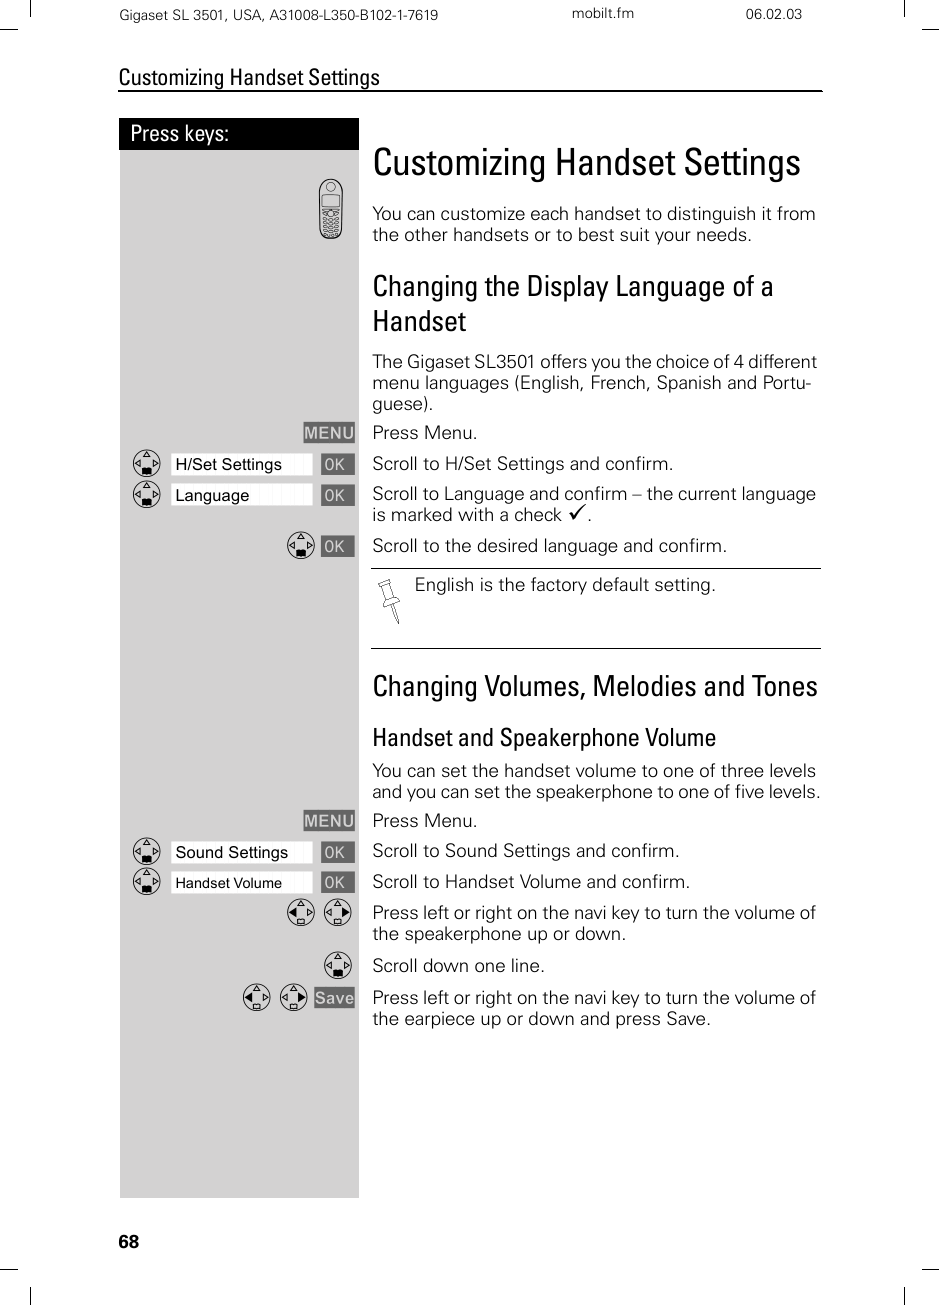
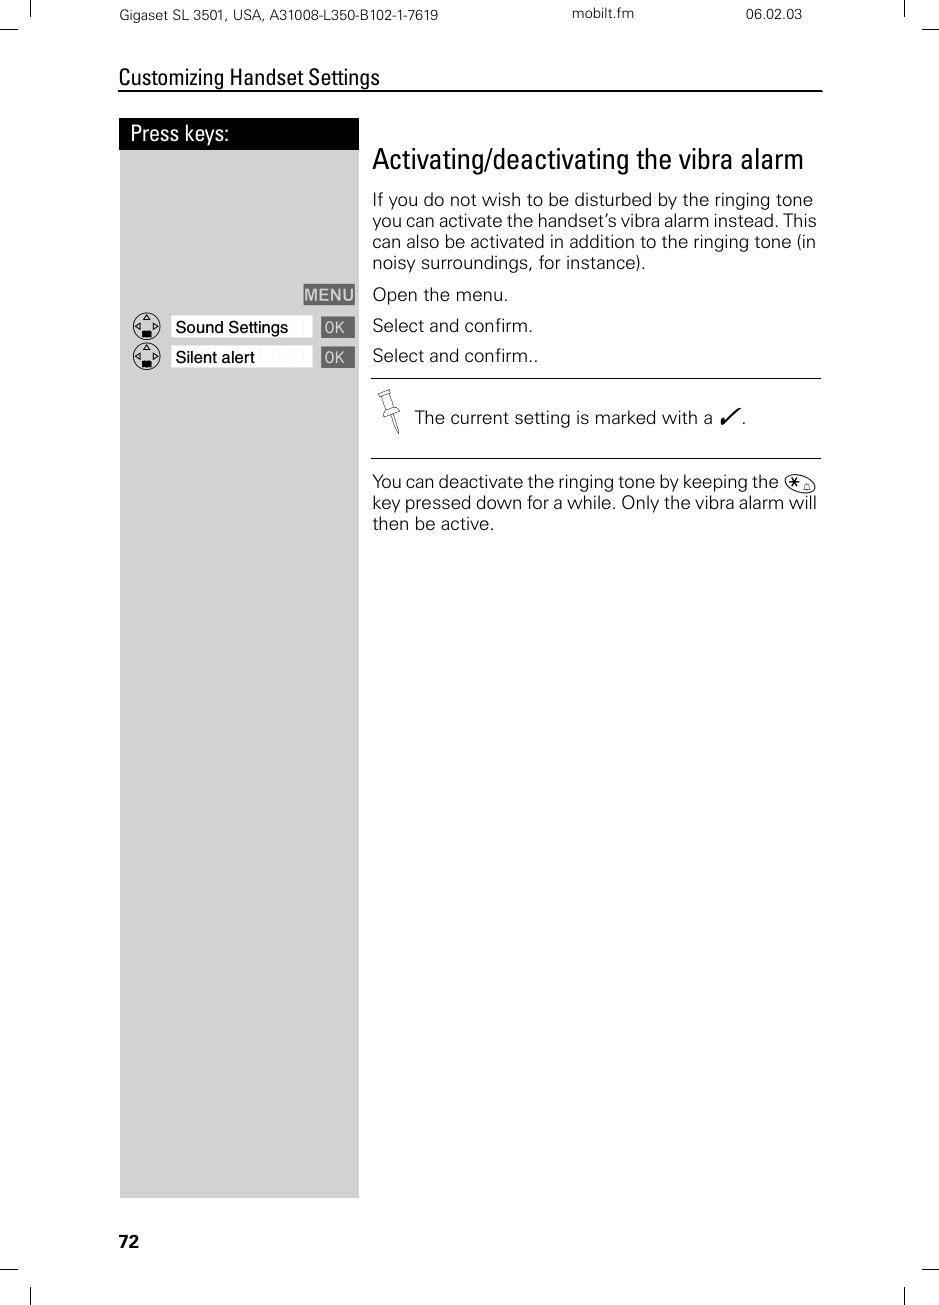
![IIIGeneralGigaset SL 3501, USA, A31008-L350-B102-1-7619 umschl_v.fm 06.02.0Quick Reference Handset Turning on/off the handset (see page 6) hold down a Turning keypad protection on/off (see page 7) hold down ªTurning tones on/off (see page 68) hold down «Making an external call (see page 10) o cRedialing a number (see page 17) z if necessary D select entry cSaving a called number in the directory (see page 23) zMENU D [Dialing from the directory (see page 24) D o[Name] if necessary D c or D cDialing from the call log (see page 38) ? D [ if necessary F G entry cSetting the handset volume (see page 68)MENU D [ [ DF or G SaveMaking an Internal call to a spe-cific handset F and D to select internal user cMaking an Internal call to a all handsets (see page 10) F and D cTransferring a call to another handset F and D to select internal user [ aMaking a consultation call F and D to select internal user [ ; end: EndSetting the date and time (see page 8)MENU D[D[ Set date and time F G D SaveSetting the alarm clock (see page 19)MENU D[D[ Enter settings F G D SaveAnswering machine Playing back messages (see page 45) ? D [ or hold down]Skipping to the next message:(see page 46)Repeating the message G or ^F or ]Deleting messages (see page 47) MENU D [ or press DeleteSkipping to the previous mes-sage (see page 46) 2 x FSend to DirCall LogSound Settings Handset VolumeIntercom CallAppoint./Clock Date/TimeAppoint./Clock Alarm ClockAns Msg.:Delete Old Msg.](https://usermanual.wiki/Siemens-Information-and-Communication-Mobile/SL3501/User-Guide-302580-Page-3.png)
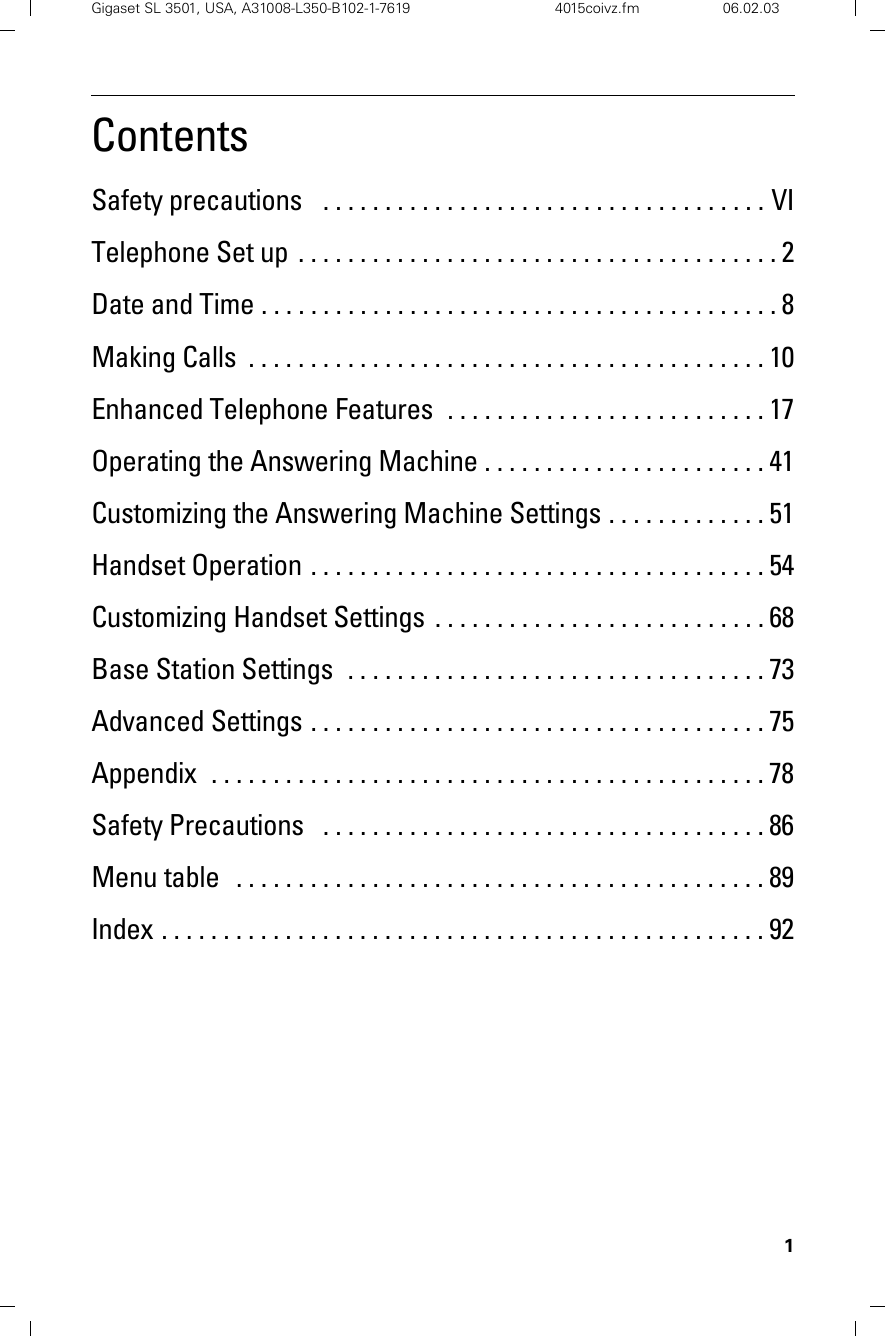
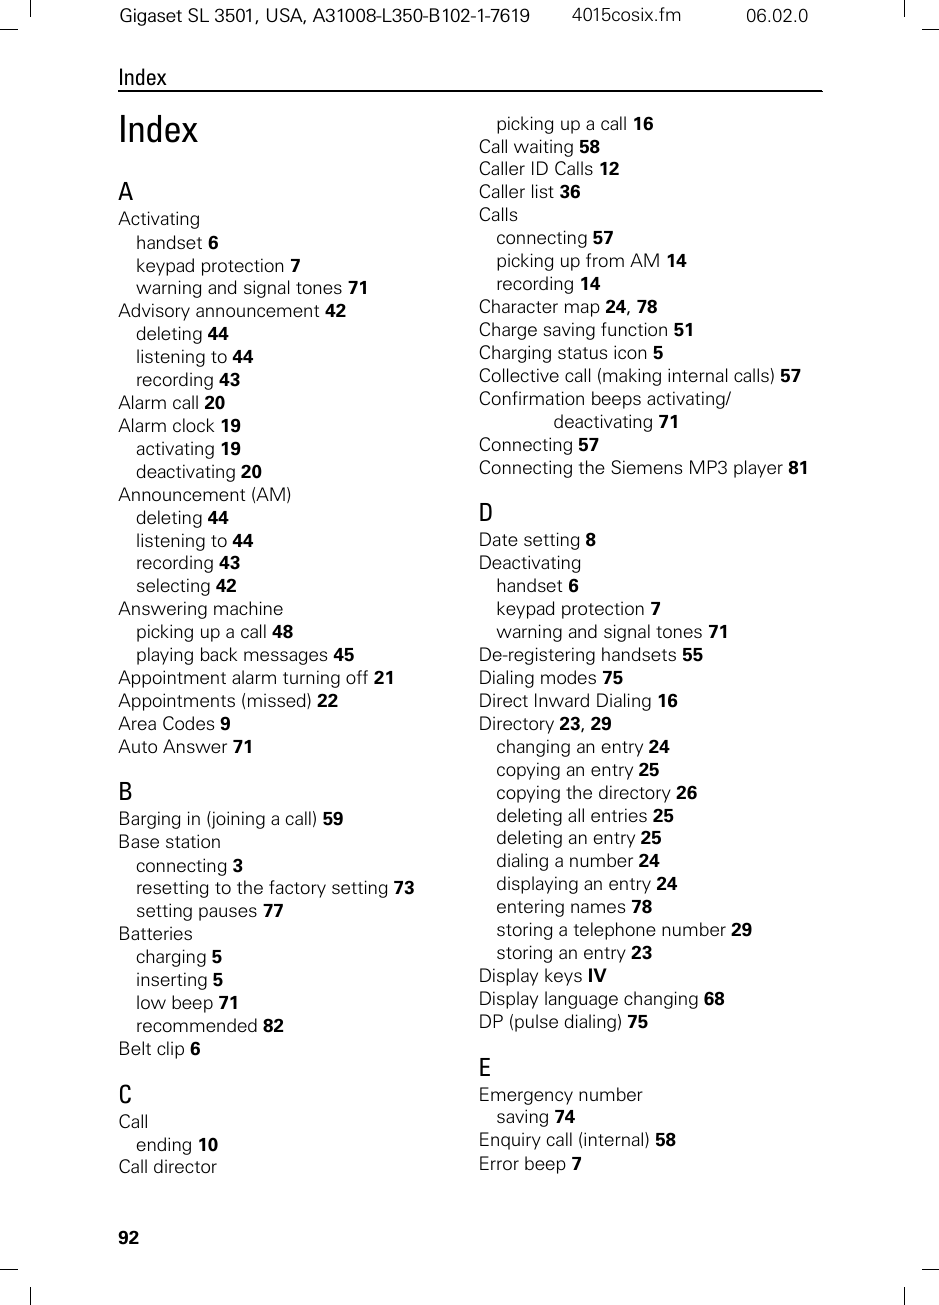
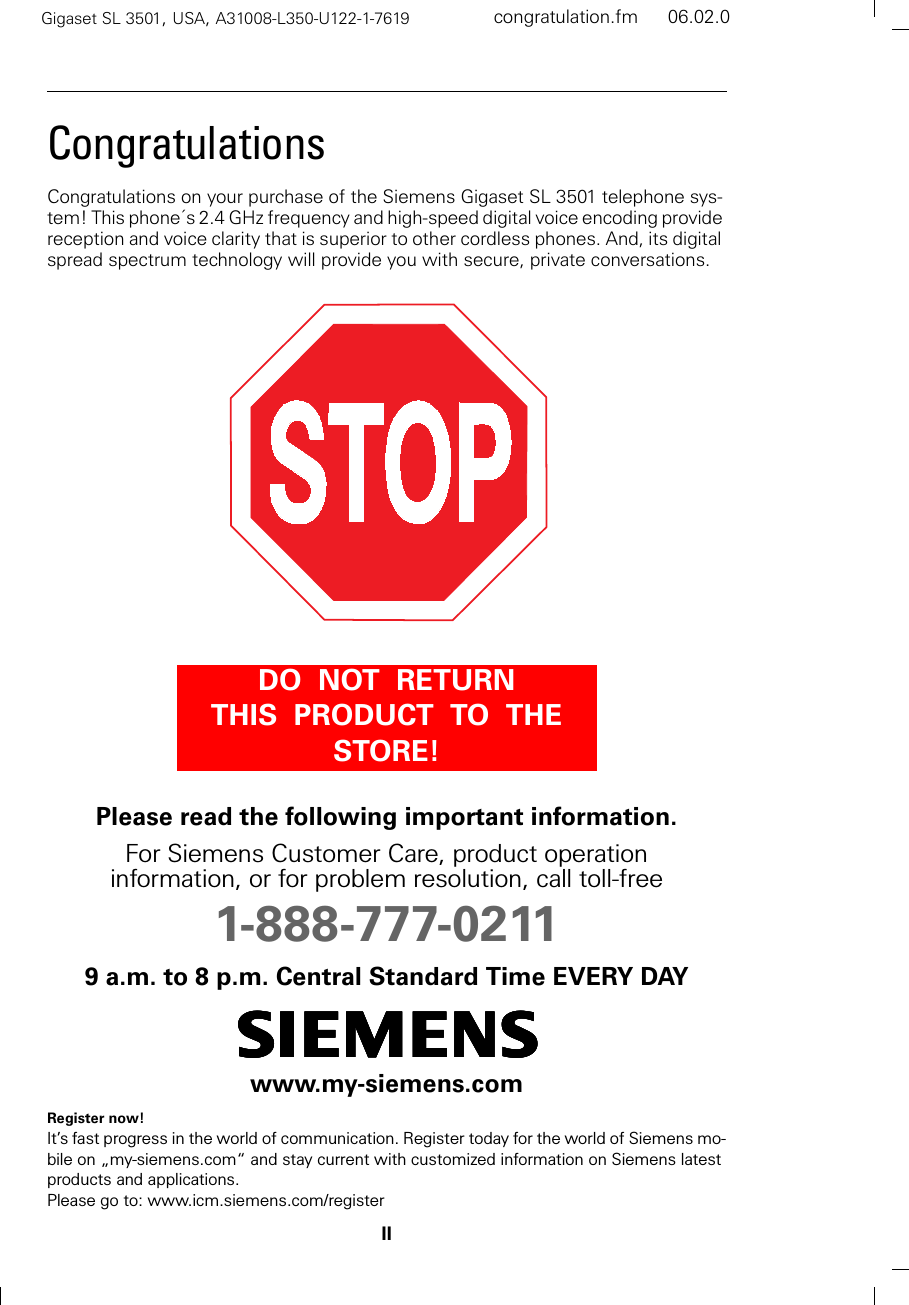
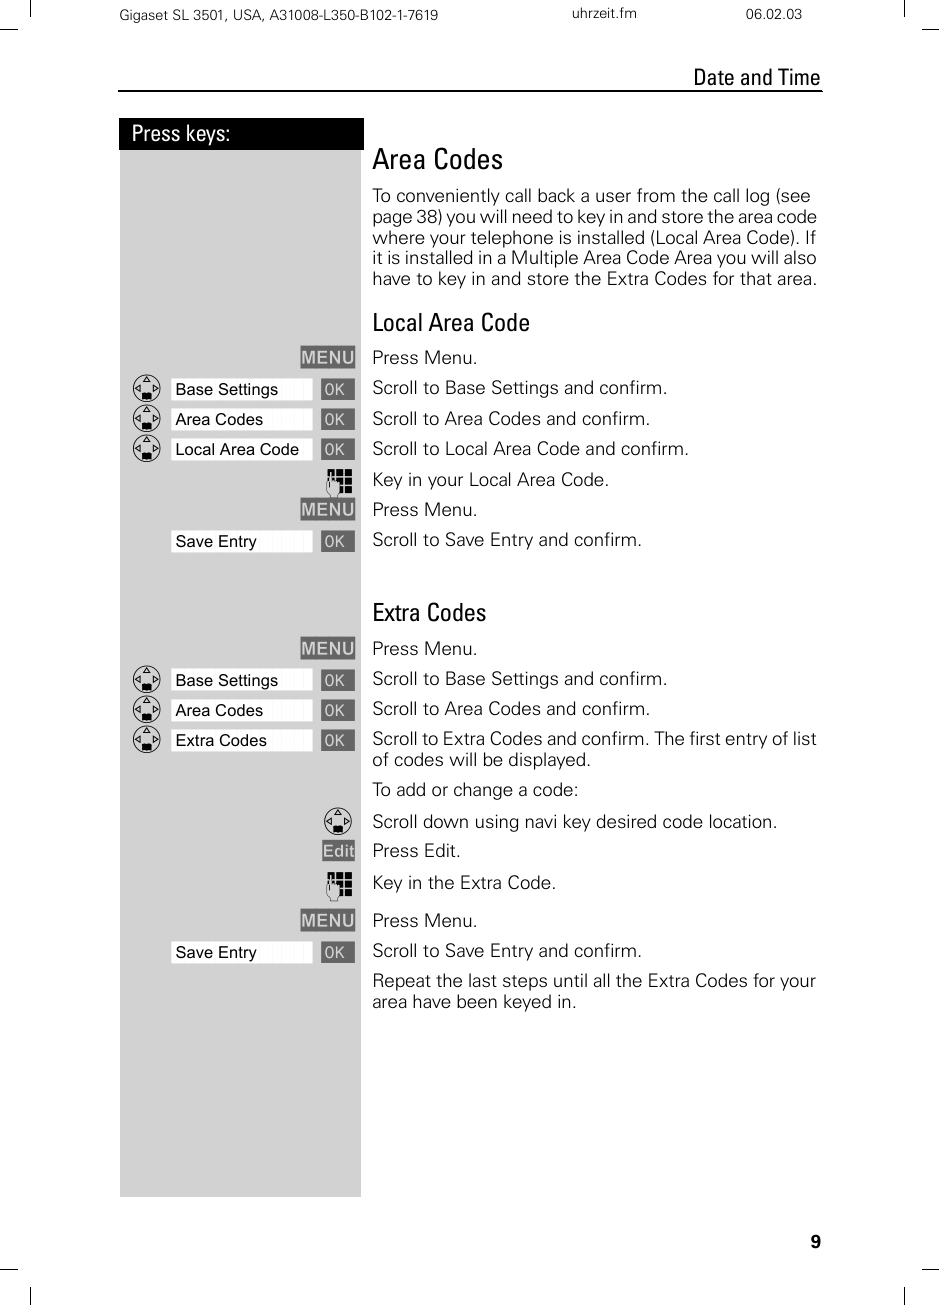
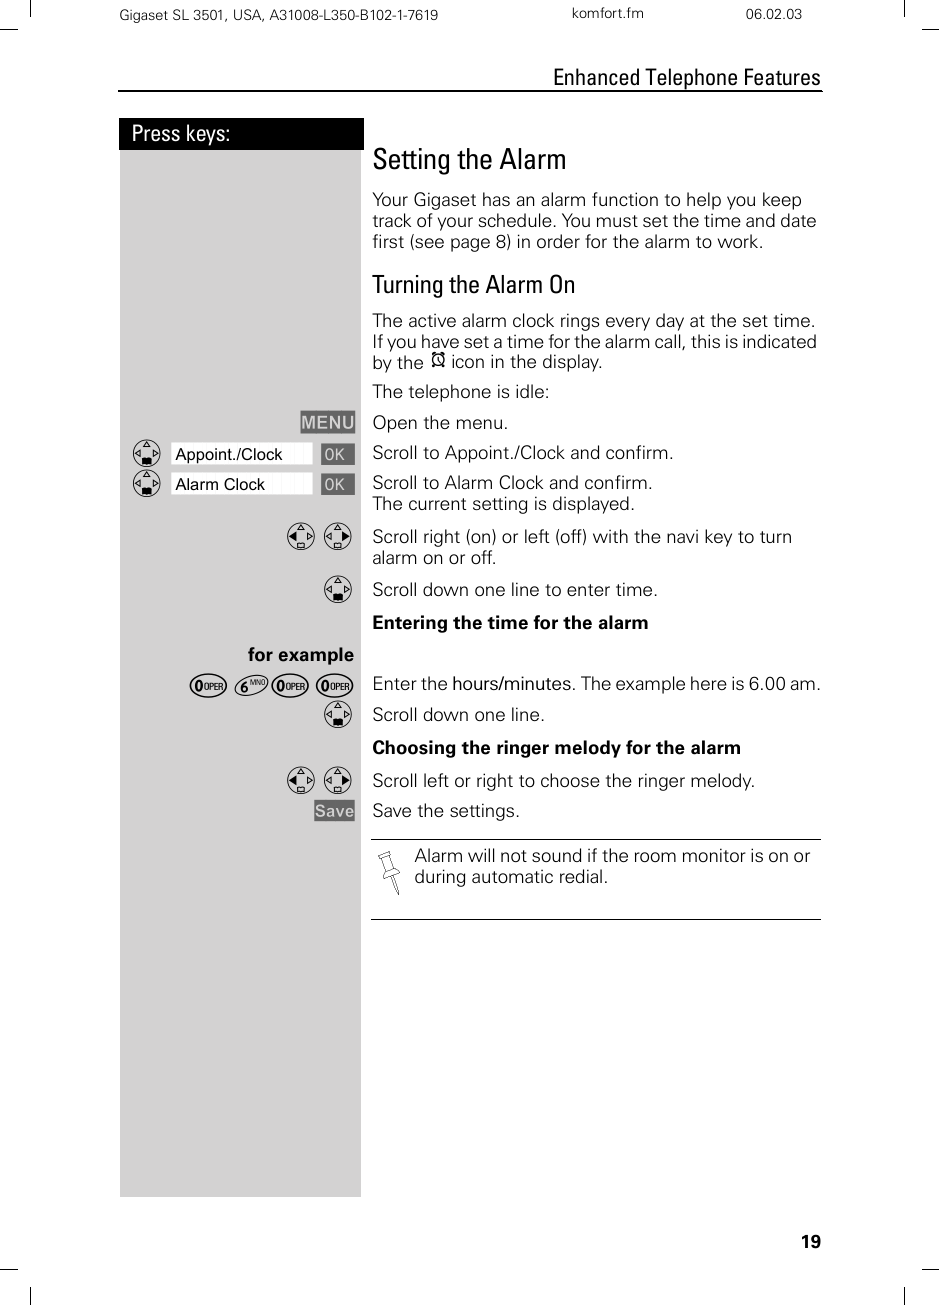
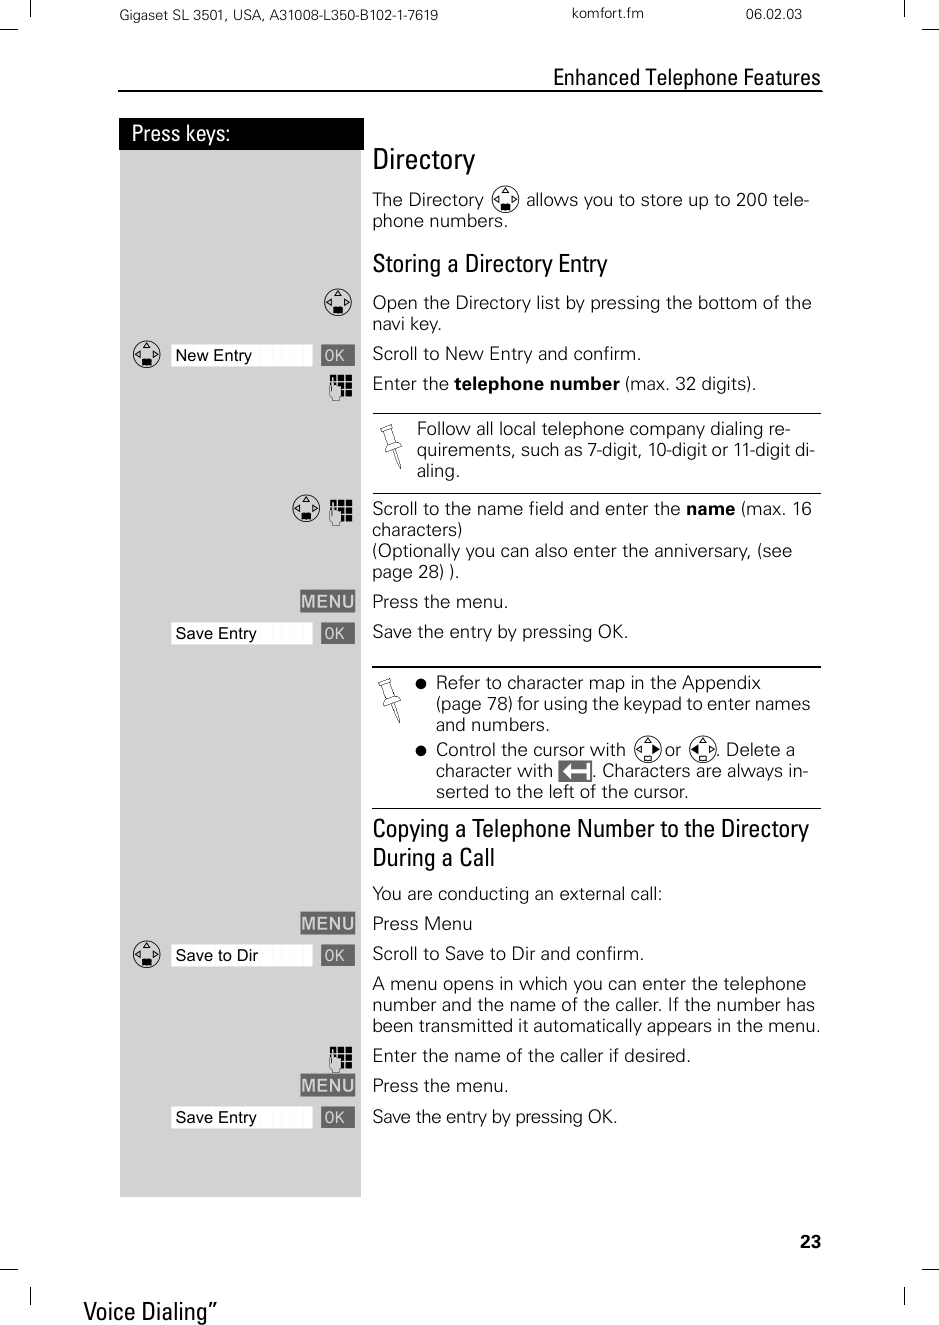
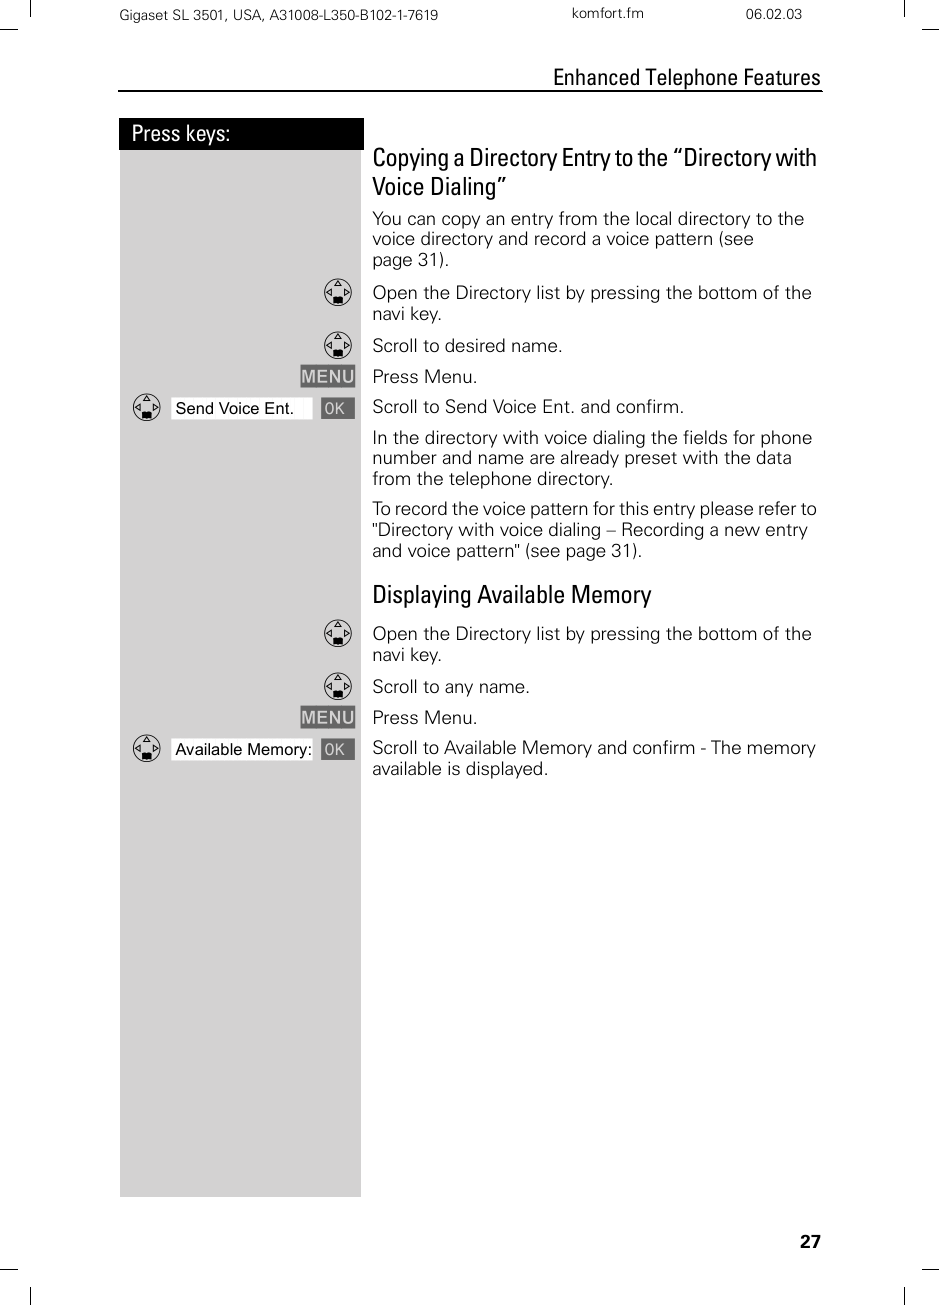
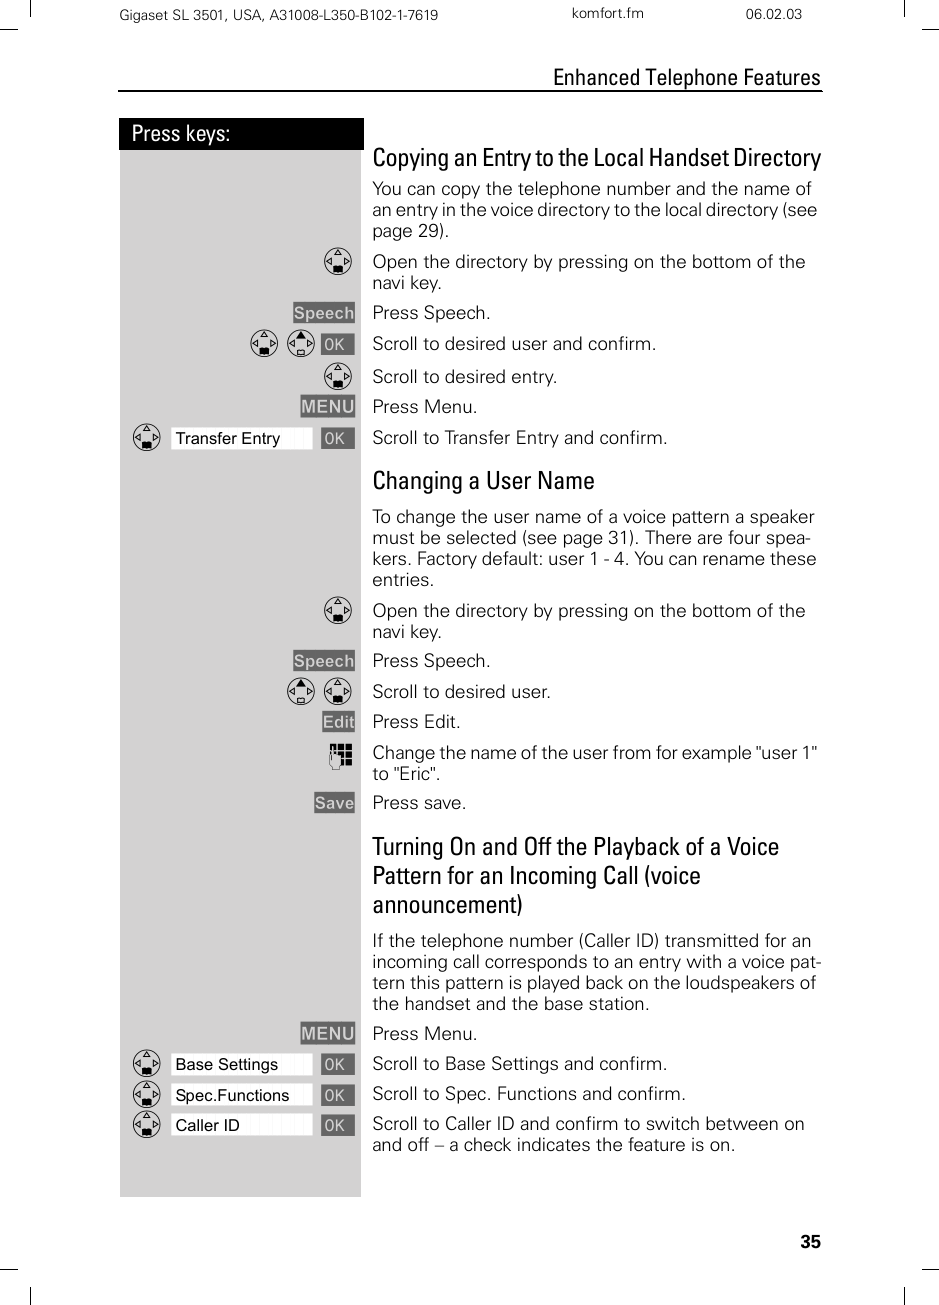
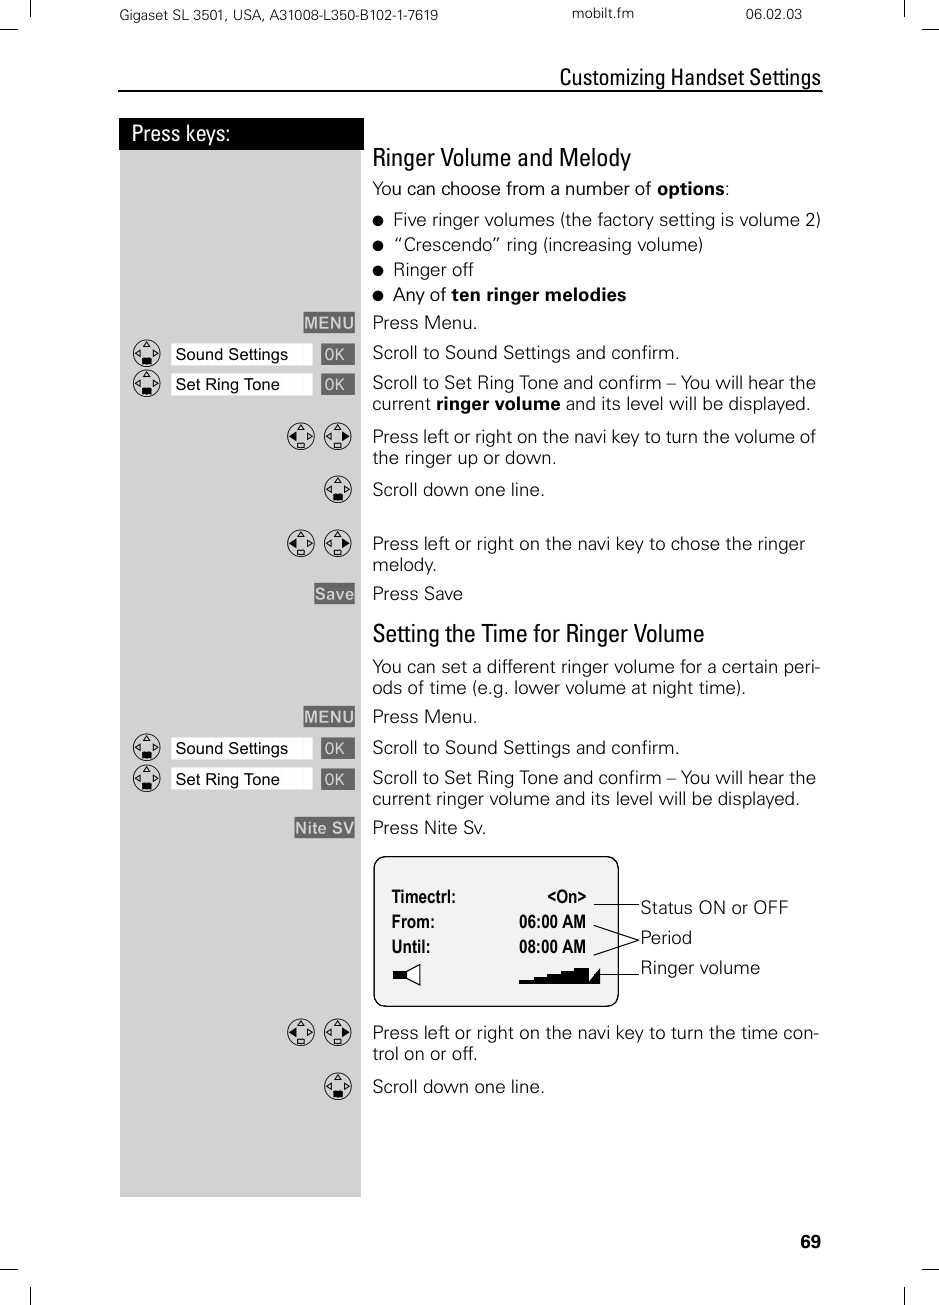
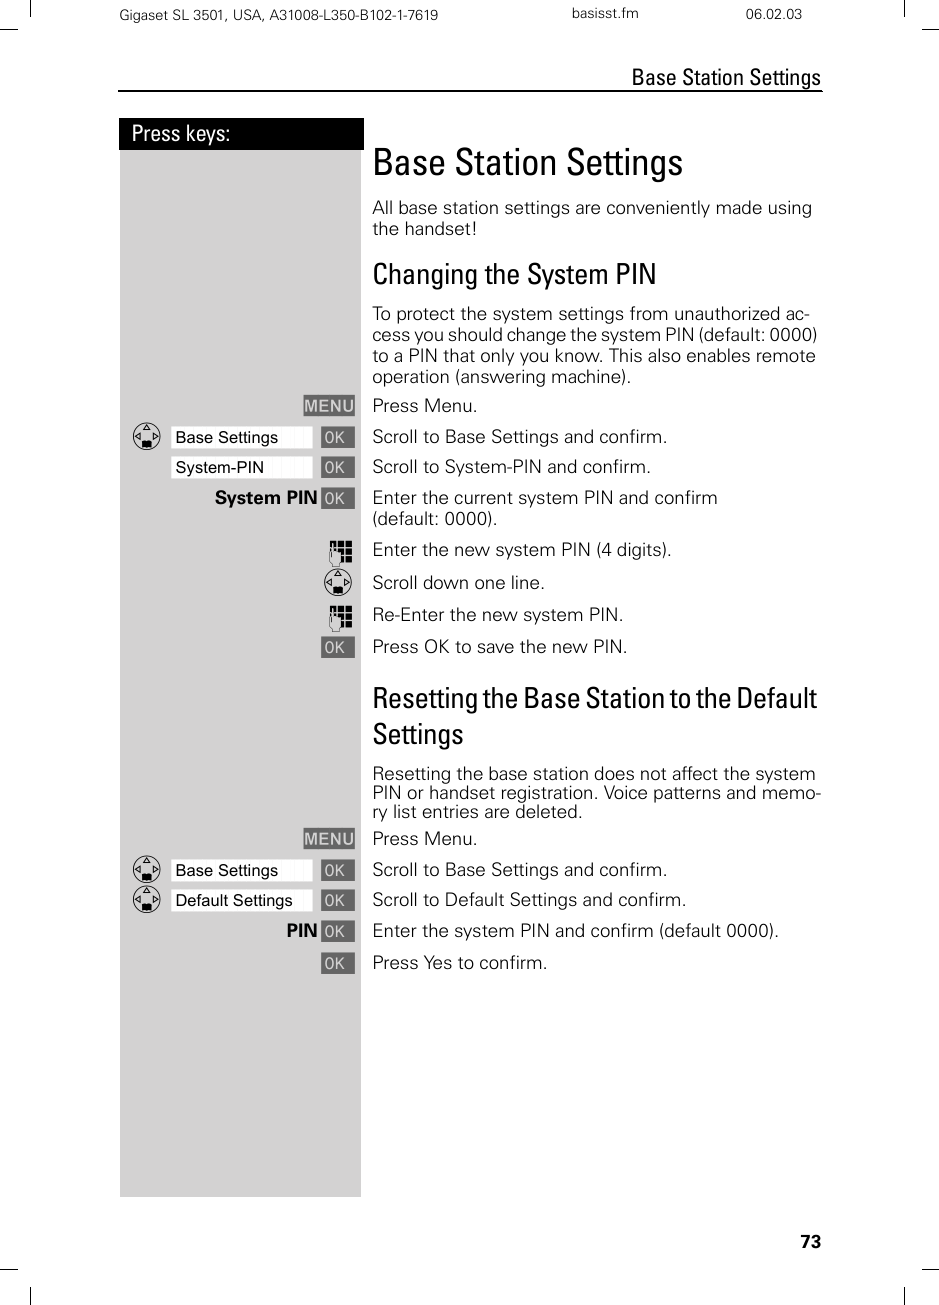
![8Press keys:Date and TimeGigaset SL 3501, USA, A31008-L350-B102-1-7619 uhrzeit.fm 06.02.03Date and TimeSetting the Date and the TimeThe date and time settings are necessary in order for the date and time of the arriving of messages/incoming calls to be displayed correctly.You can also set the clock mode, to the 12 hour mode (AM and PM) or 24 hour mode. If you subscribe the Caller ID the date and time are automatically set. If you do not subscribe to Caller ID follow the steps below to set the date and time. DateMENU Press Menu.ååååååååååååååååååååååååååååååååDAppoint./Clock [Scroll to Appoint/Clock and confirm.ååååååååååååååååååååååååååååååååDDate/Time [Scroll to Date/Time and confirm.The current setting is displayed in the MM-DD-YY mode. For example:Þ¢ŸÞÞ] Enter the month/day/year (for example: 05-20-01, as shown).TimeDScroll down one line.] Þ Þ ¢ Enter the hours/minutes (for example: 10.05 am, as shown).Factory default: 12 hour mode. If am or pm is displayed next to the time, 12 hour mode is activated. If you move the cursor to the time field, you can change from am to pm using the left display key.Clock Mode (12 or 24 Hours)DScroll down one line to set mode.F G If necessary, select either 24 hour or 12 hour display mode.Save Save the settings. • The default setting is 12 hour mode.• If you subscribe to Caller ID, the date and time may be sent from your telephone service and will be automatically set.By default, the clock is set to the 12 hour mode and am or pm is displayed next to the time. If you move the cursor to the time field, you can change from am to pm using the left soft key.](https://usermanual.wiki/Siemens-Information-and-Communication-Mobile/SL3501/User-Guide-302580-Page-14.png)
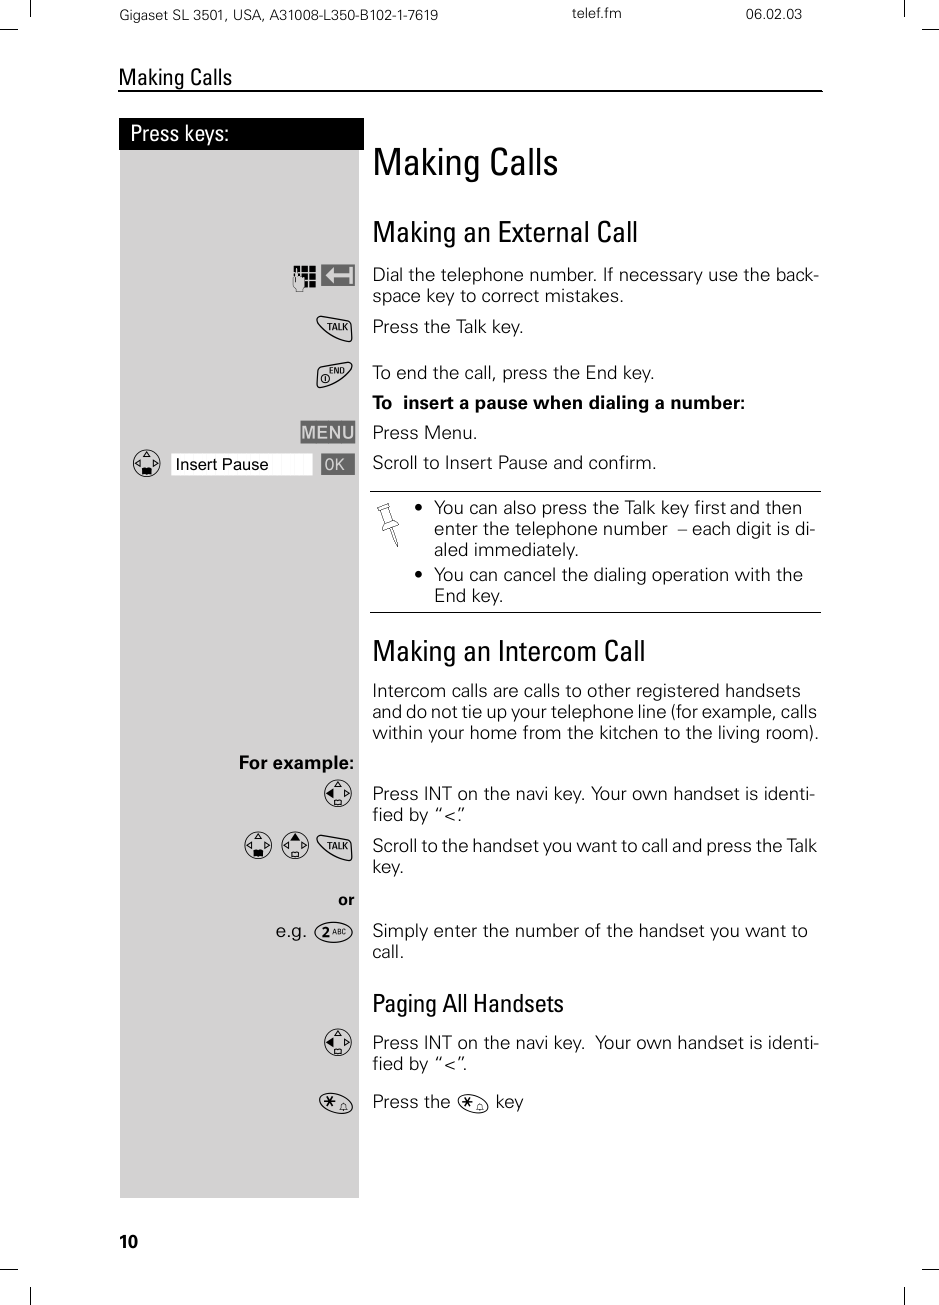
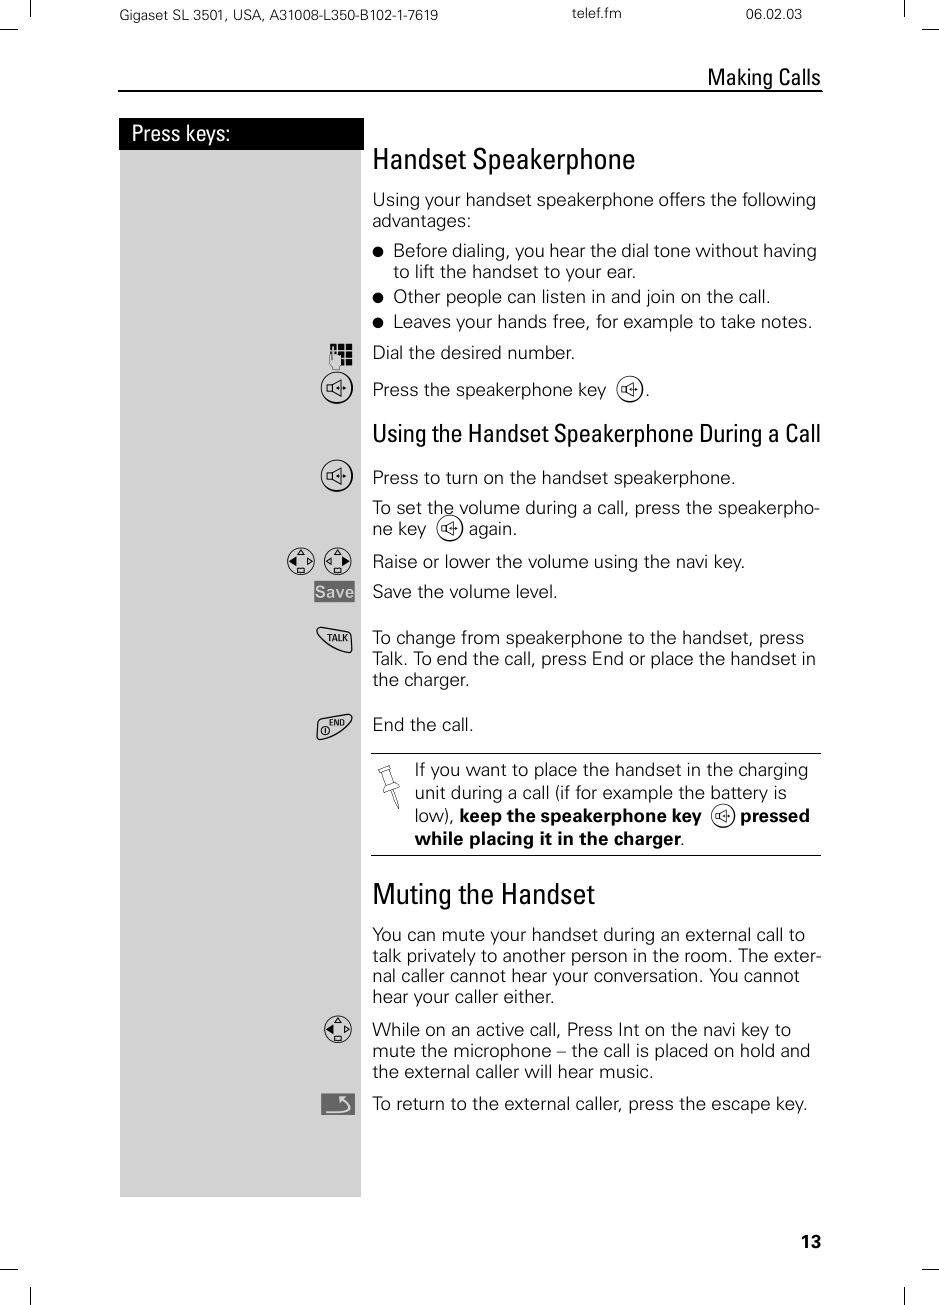
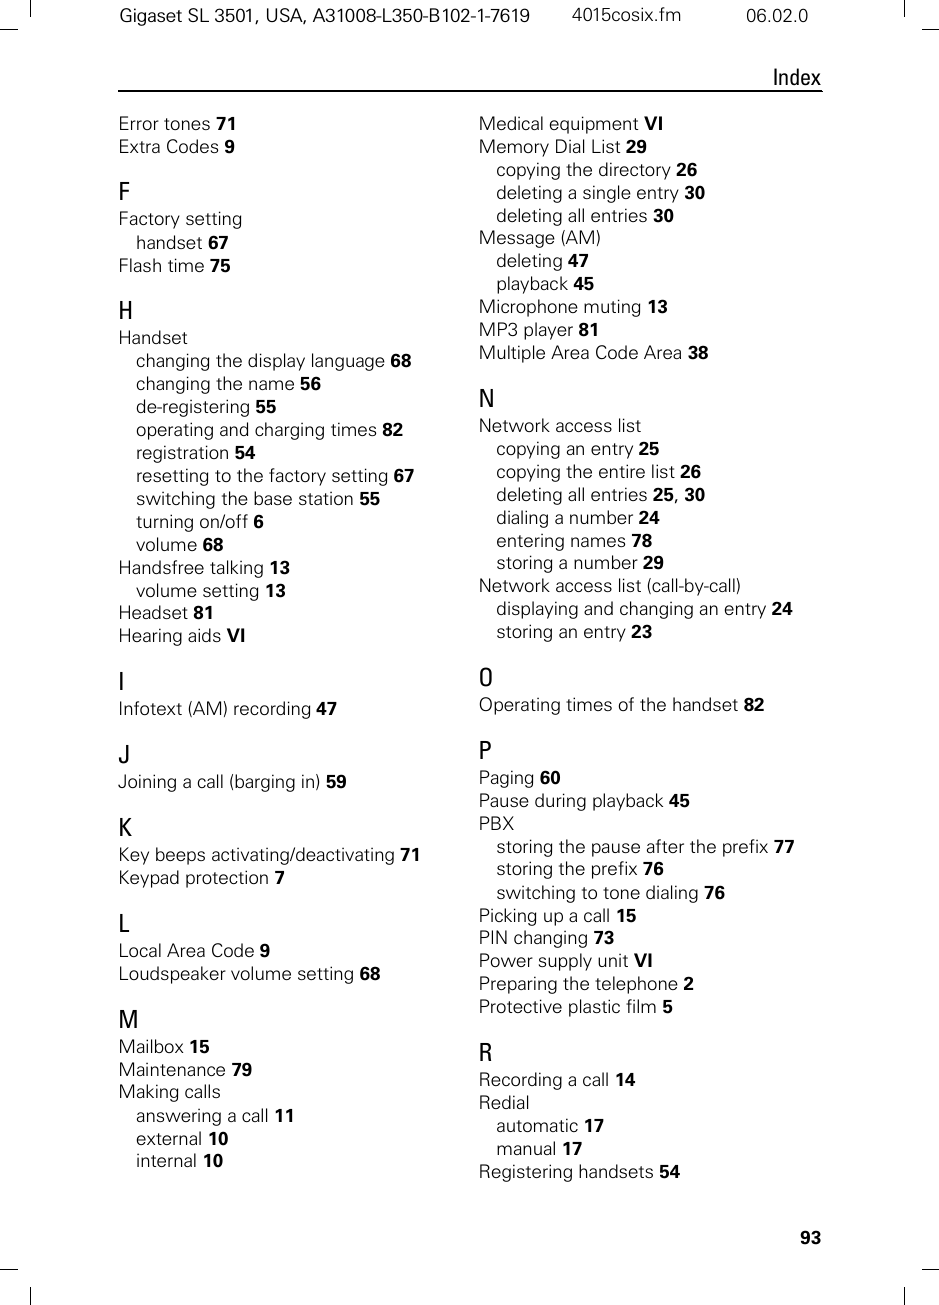
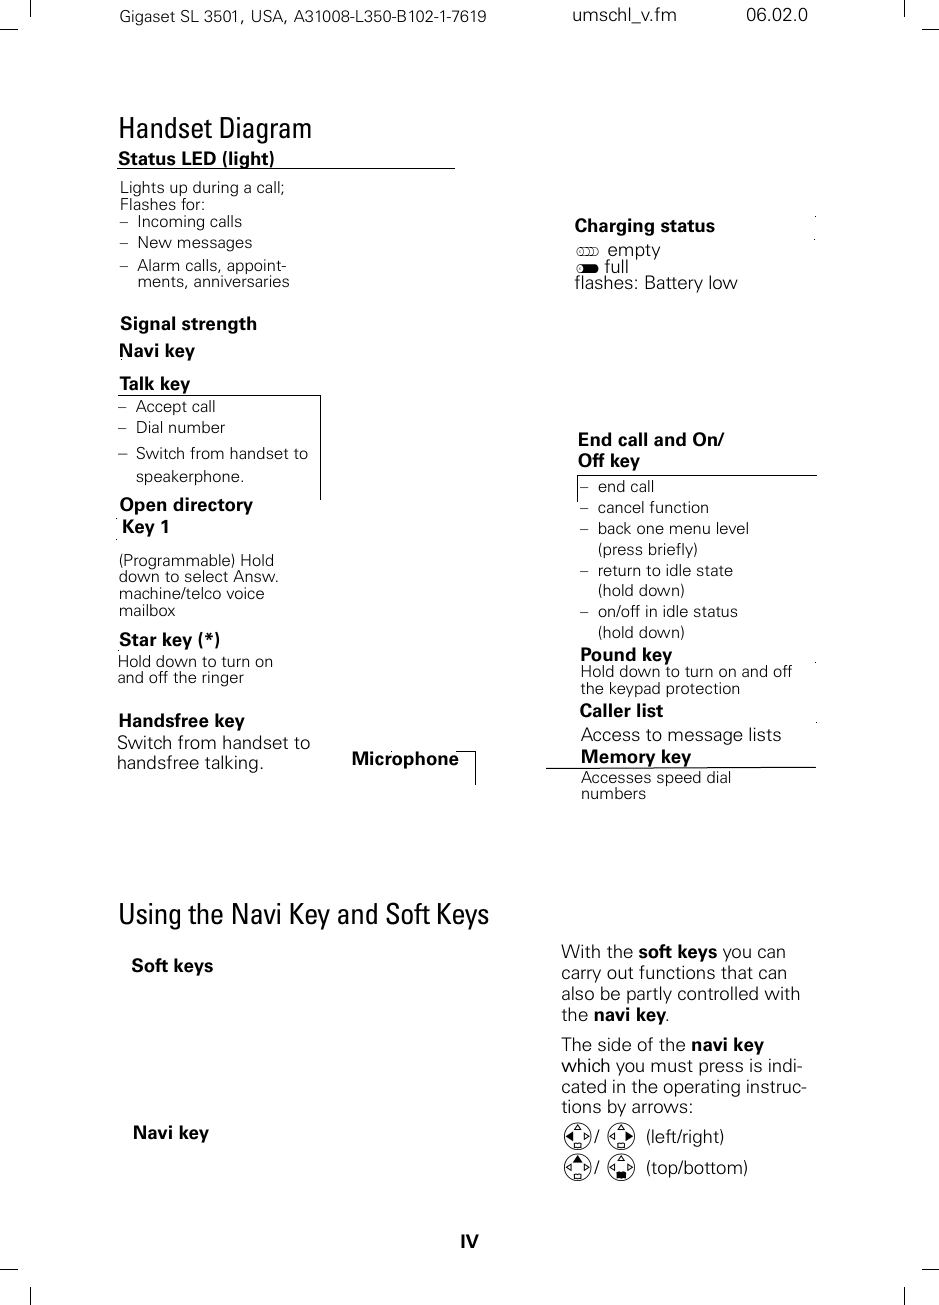
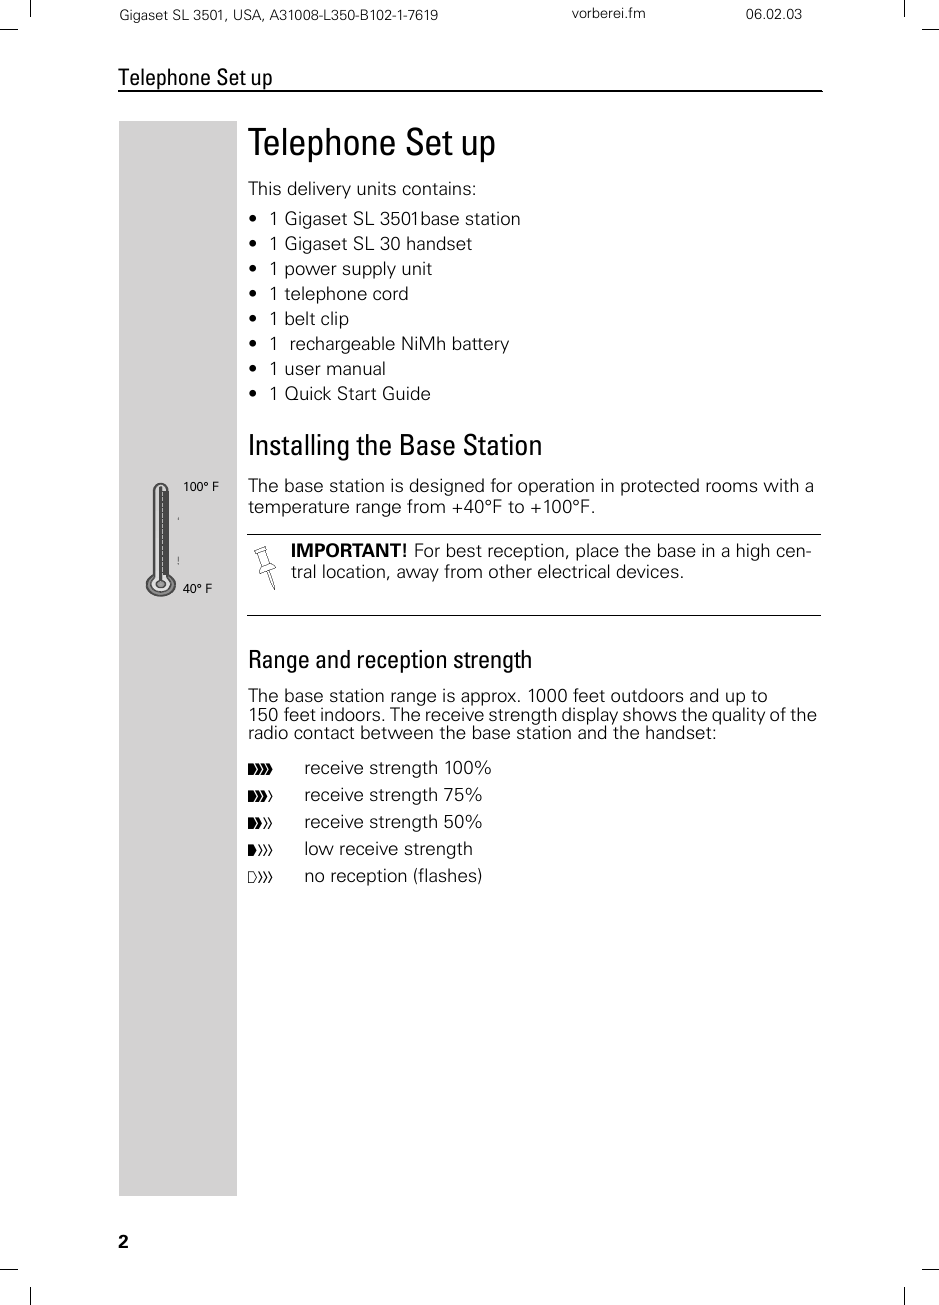
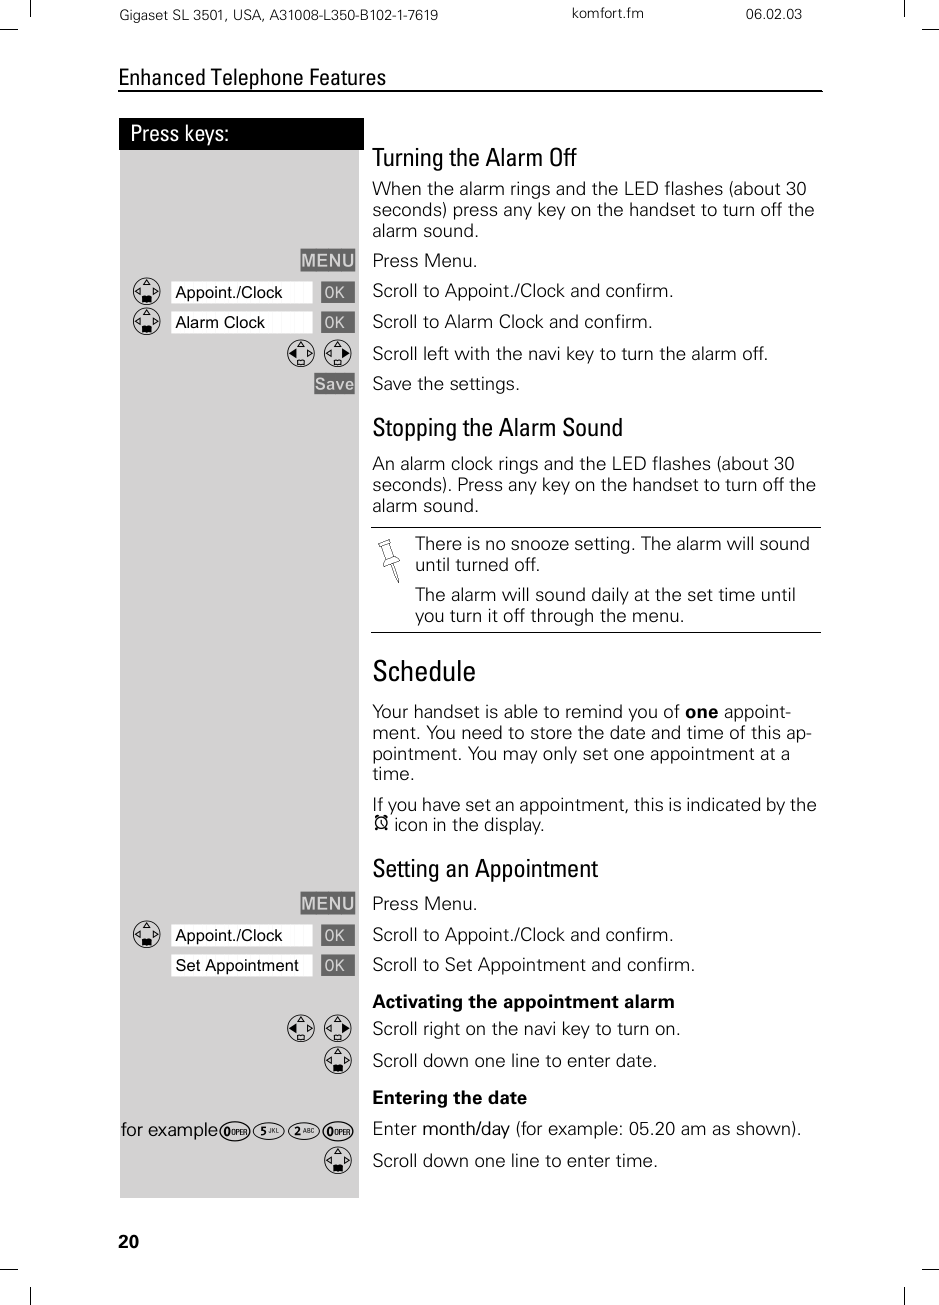
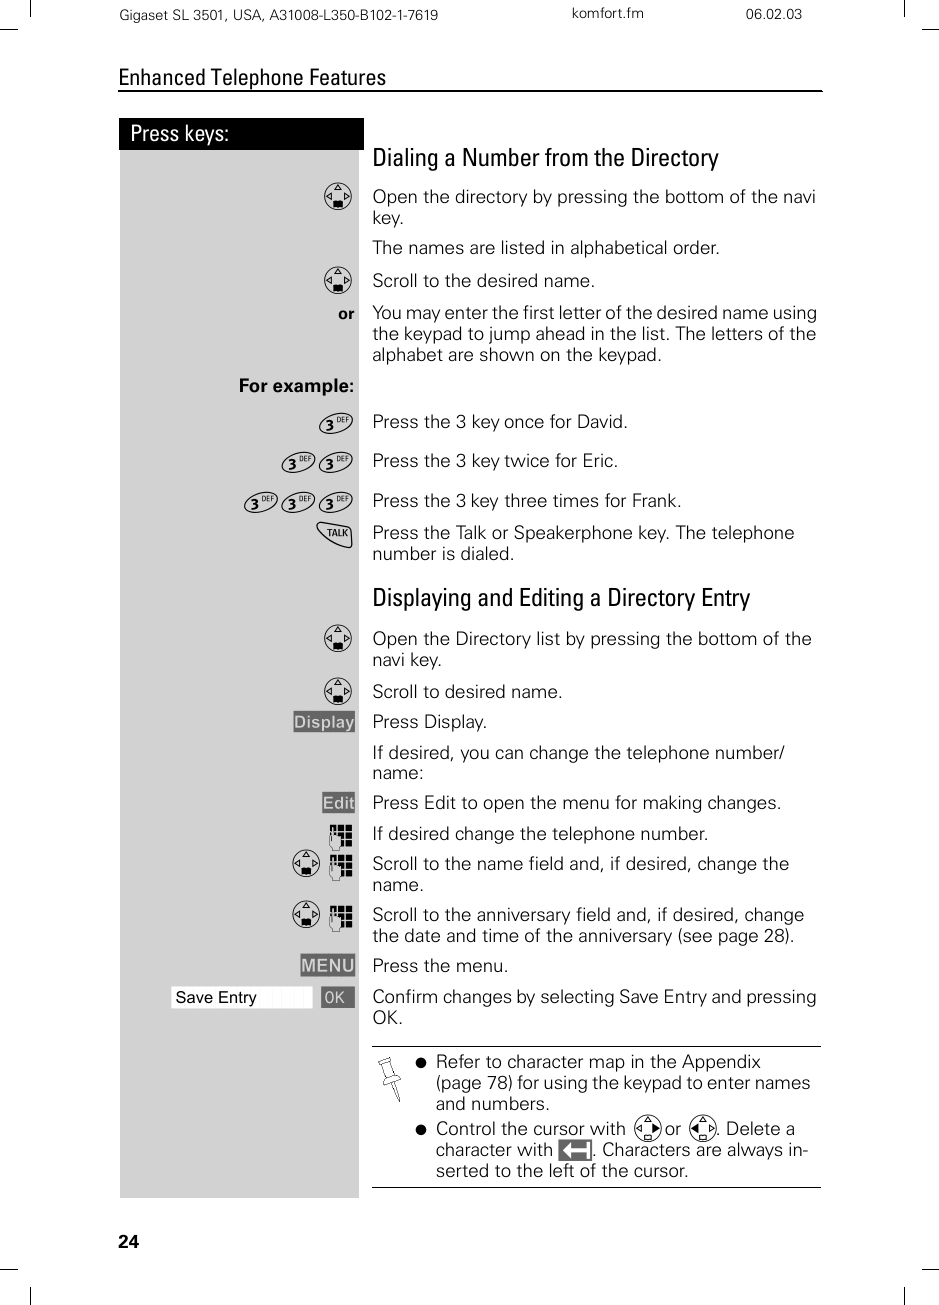
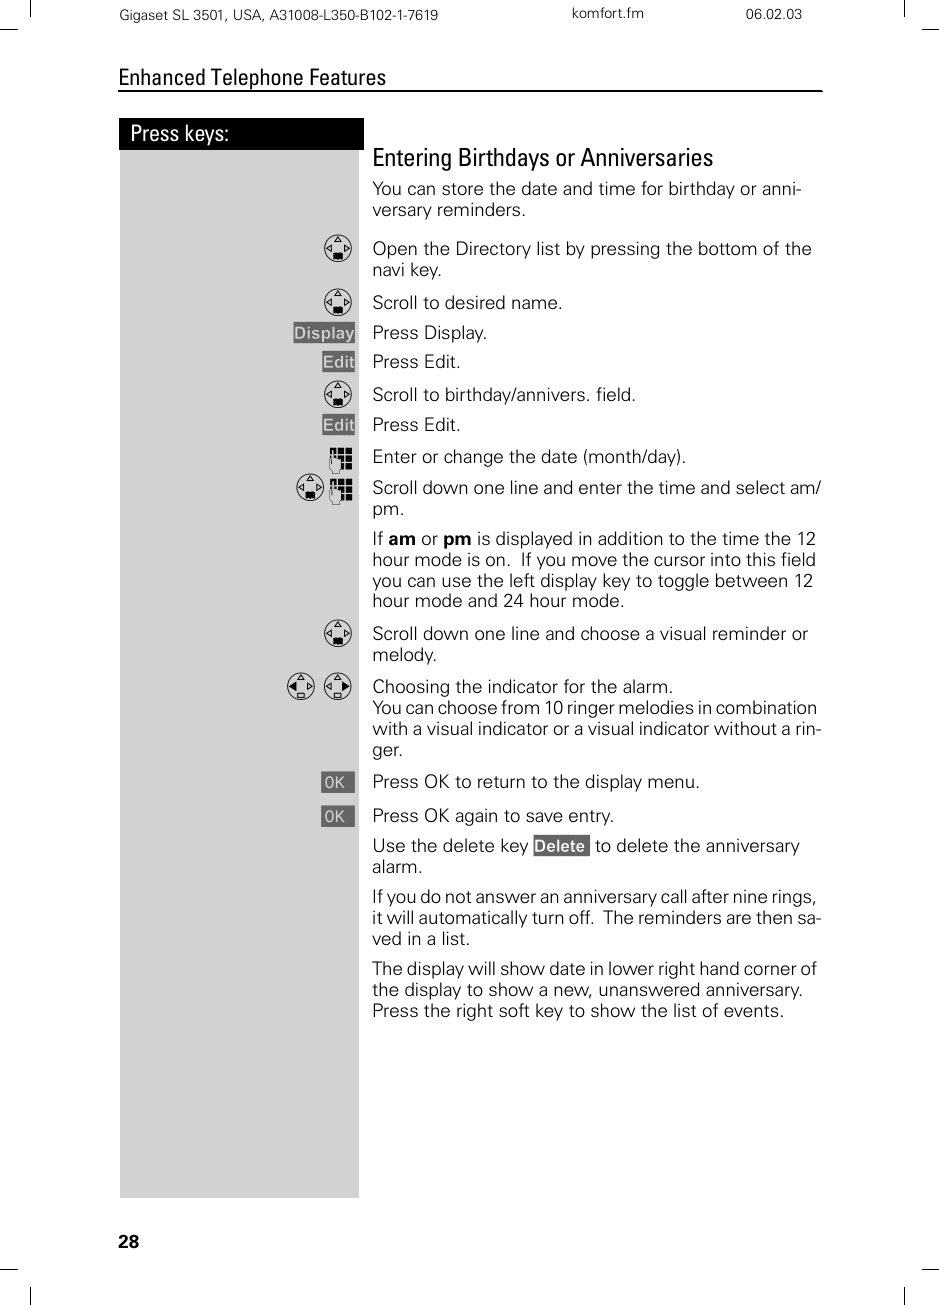
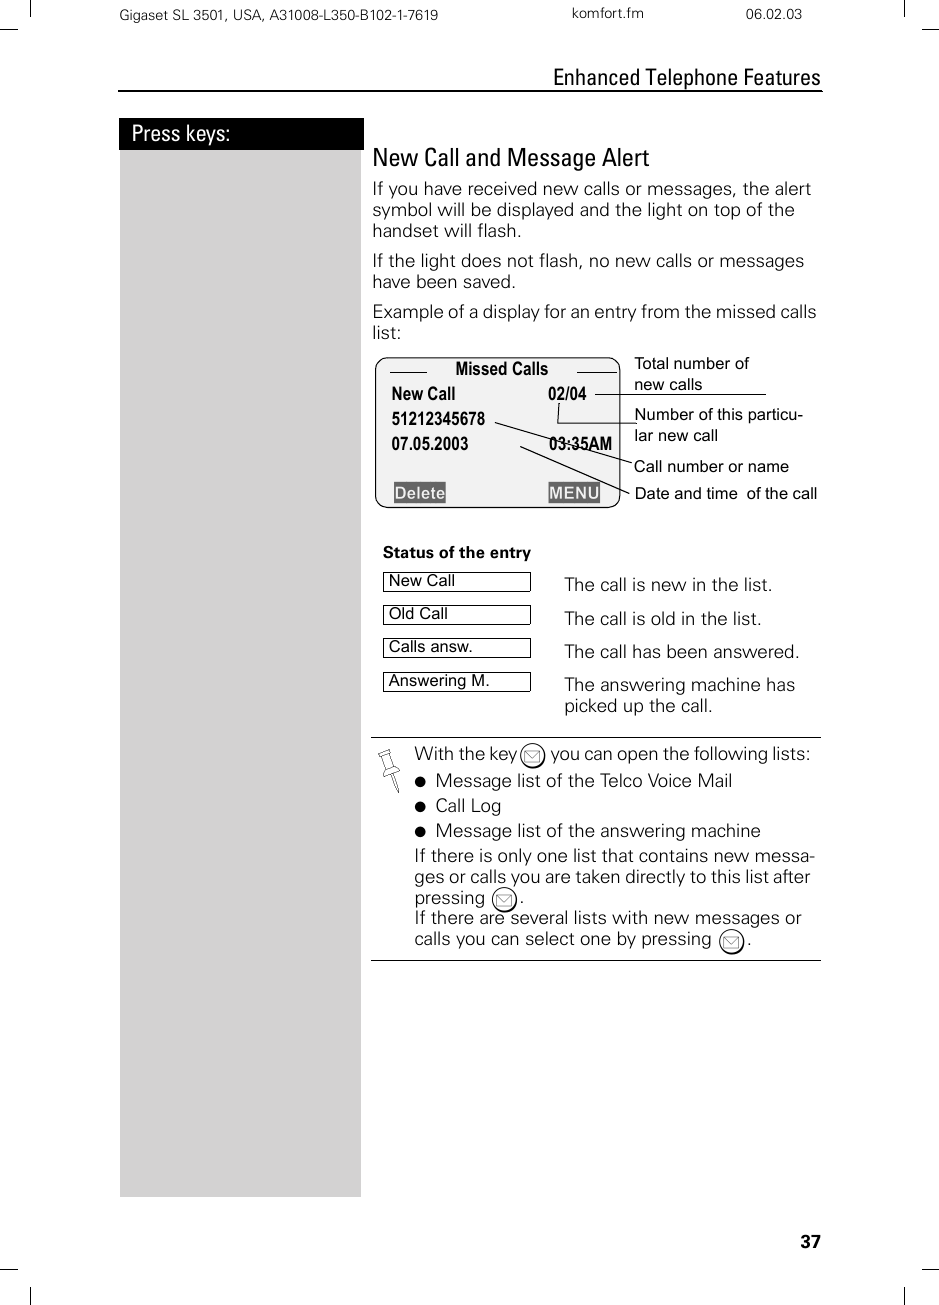
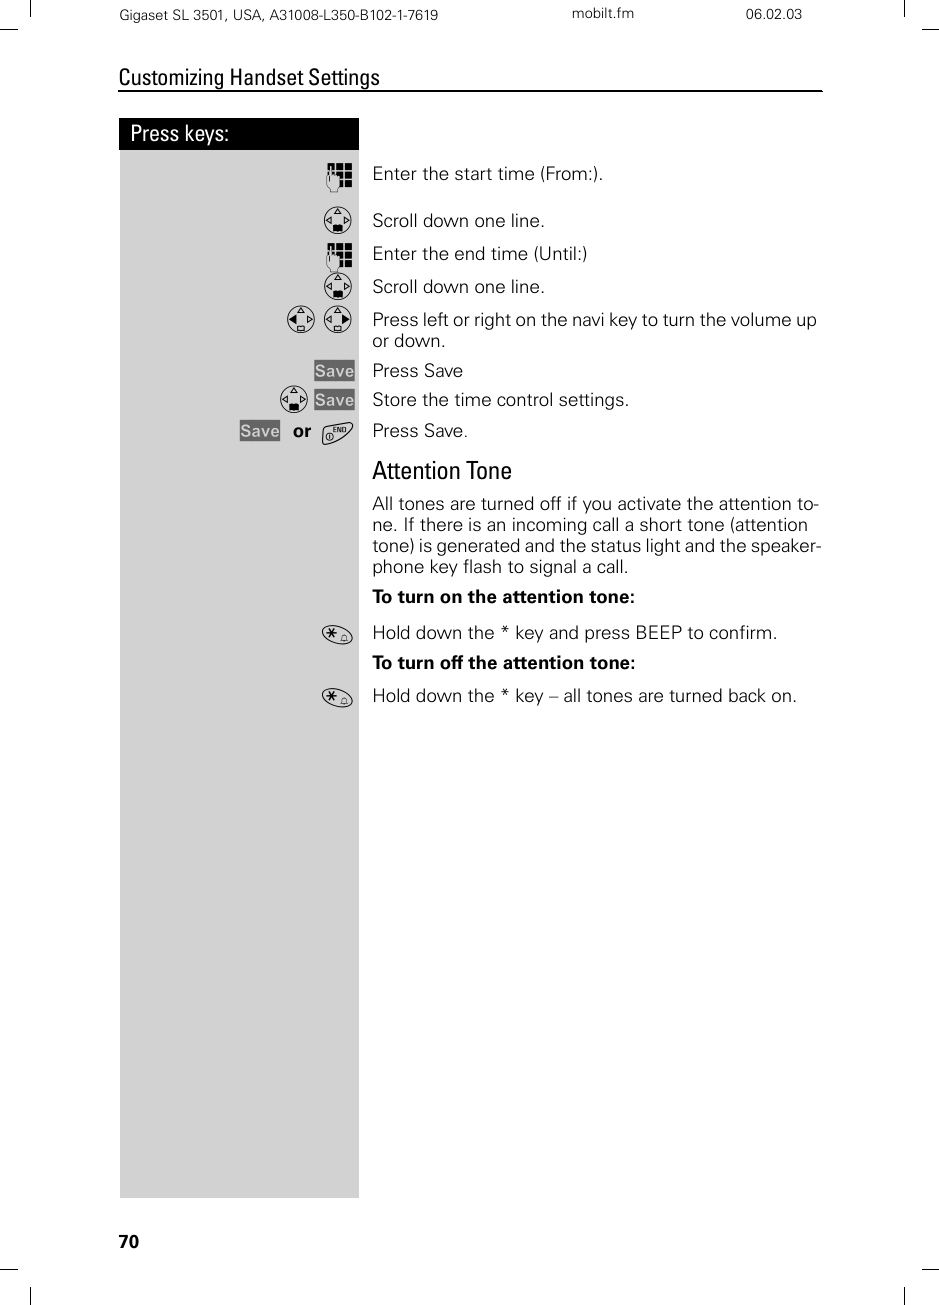
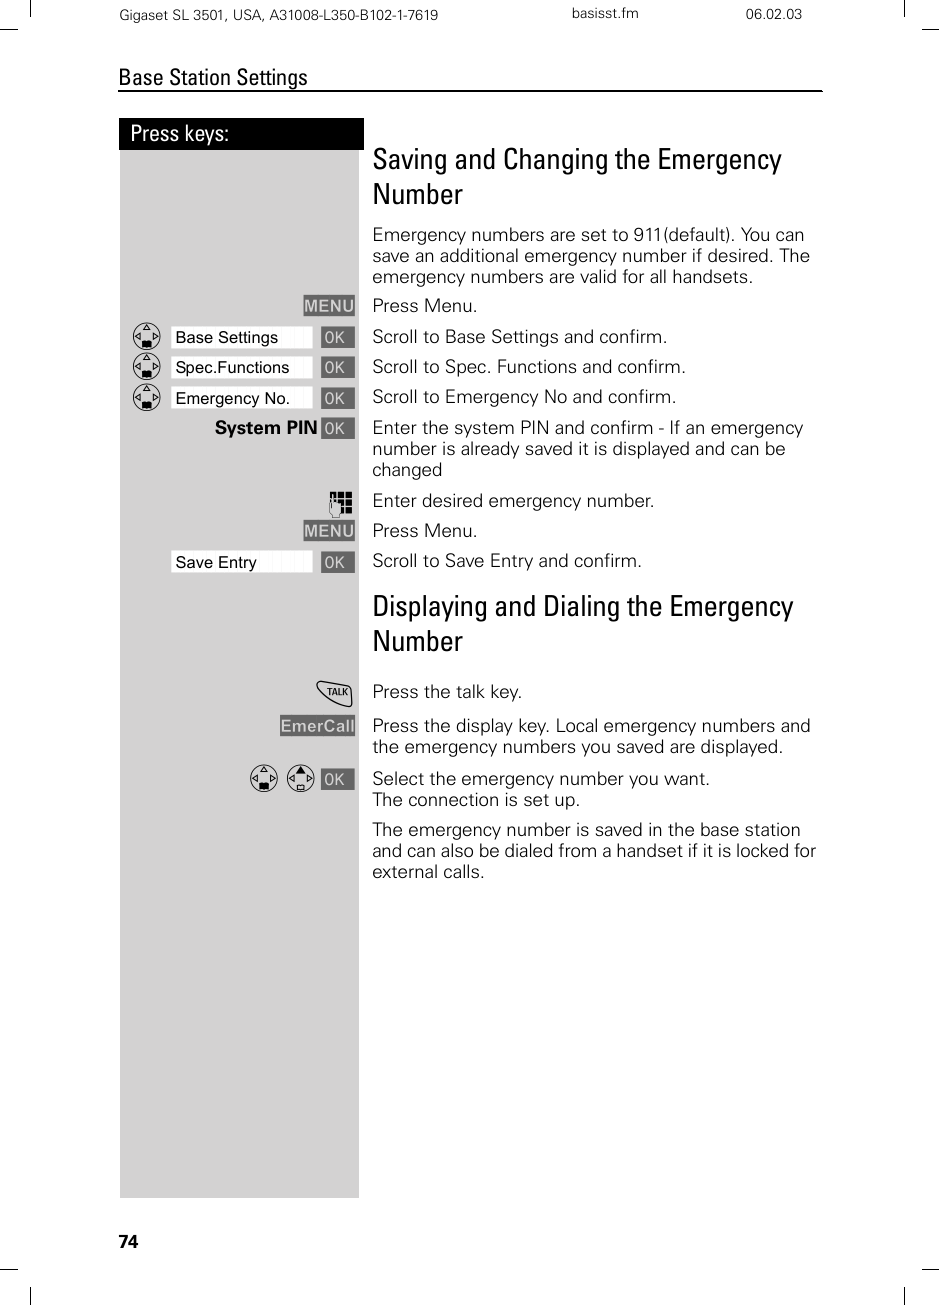
![15Press keys:Making CallsGigaset SL 3501, USA, A31008-L350-B102-1-7619 telef.fm 06.02.03Telco Voice MailIf you subscribe to voice mail from your local telephone company, you may use your Gigaset handset to re-trieve messages. It is recommended you store the ac-cess number in the "1" key.Storing Access Number for Retrieving Voice MailMENU Press Menu.ååååååååååååååååååååååååååååååååDAnswering M. [ Scroll to Ans Machine and confirm.ååååååååååååååååååååååååååååååååDSet Key 1 [ Select to Set Key 1 and confirm.ååååååååååååååååååååååååååååååååDVoice Mail [ Set the Voice Mail.oDial the voice mail access number. MENU Press Menu.ååååååååååååååååååååååååååååååååSave Entry [Scroll to Save Entry and confirm.Once you have saved the voice mail access num-ber, simply hold down the ] key on the hand-set and you are directly connected to the Telco voice mail system. Follow the Telco instructions.](https://usermanual.wiki/Siemens-Information-and-Communication-Mobile/SL3501/User-Guide-302580-Page-21.png)
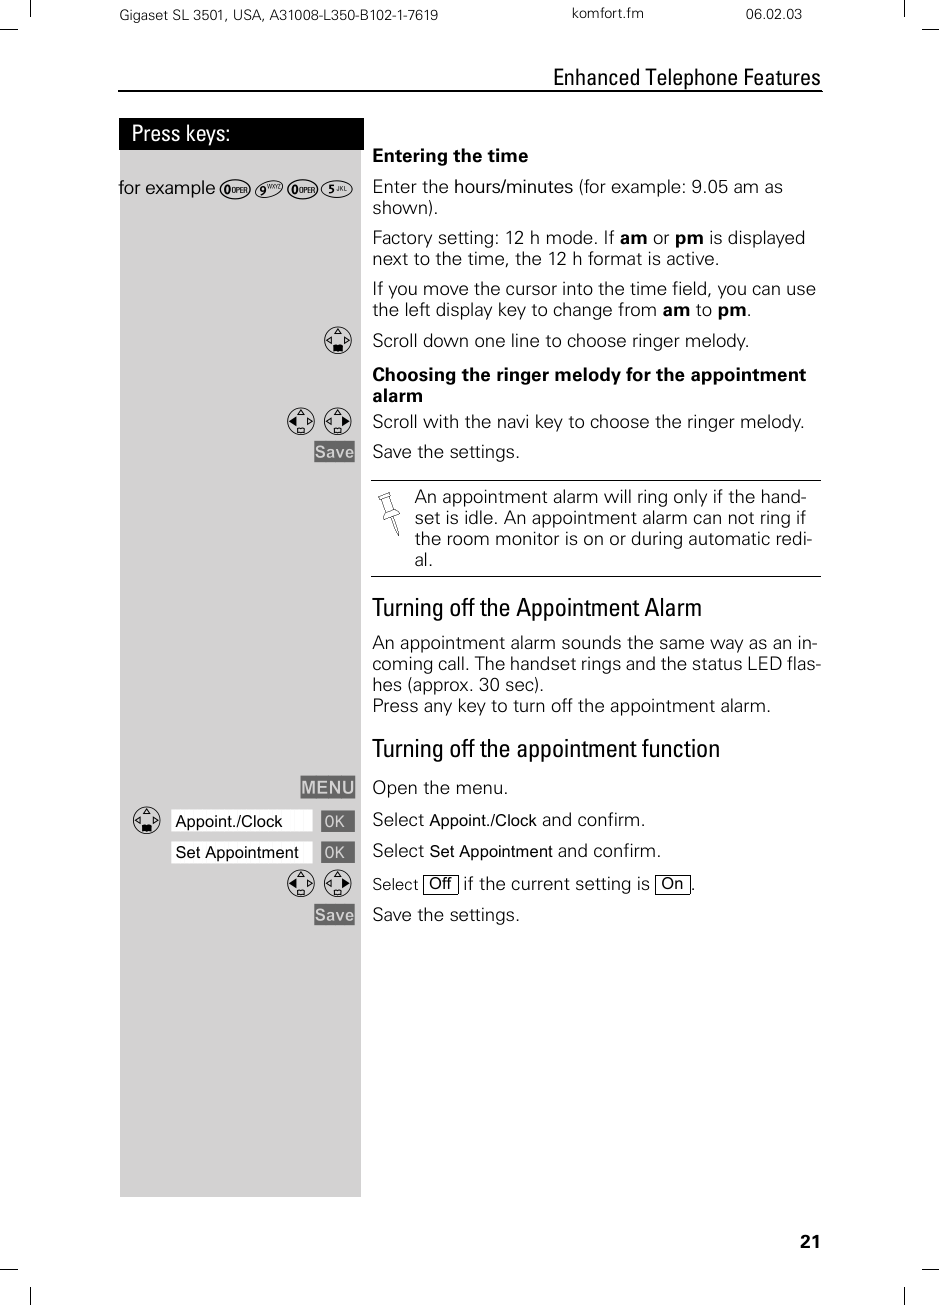
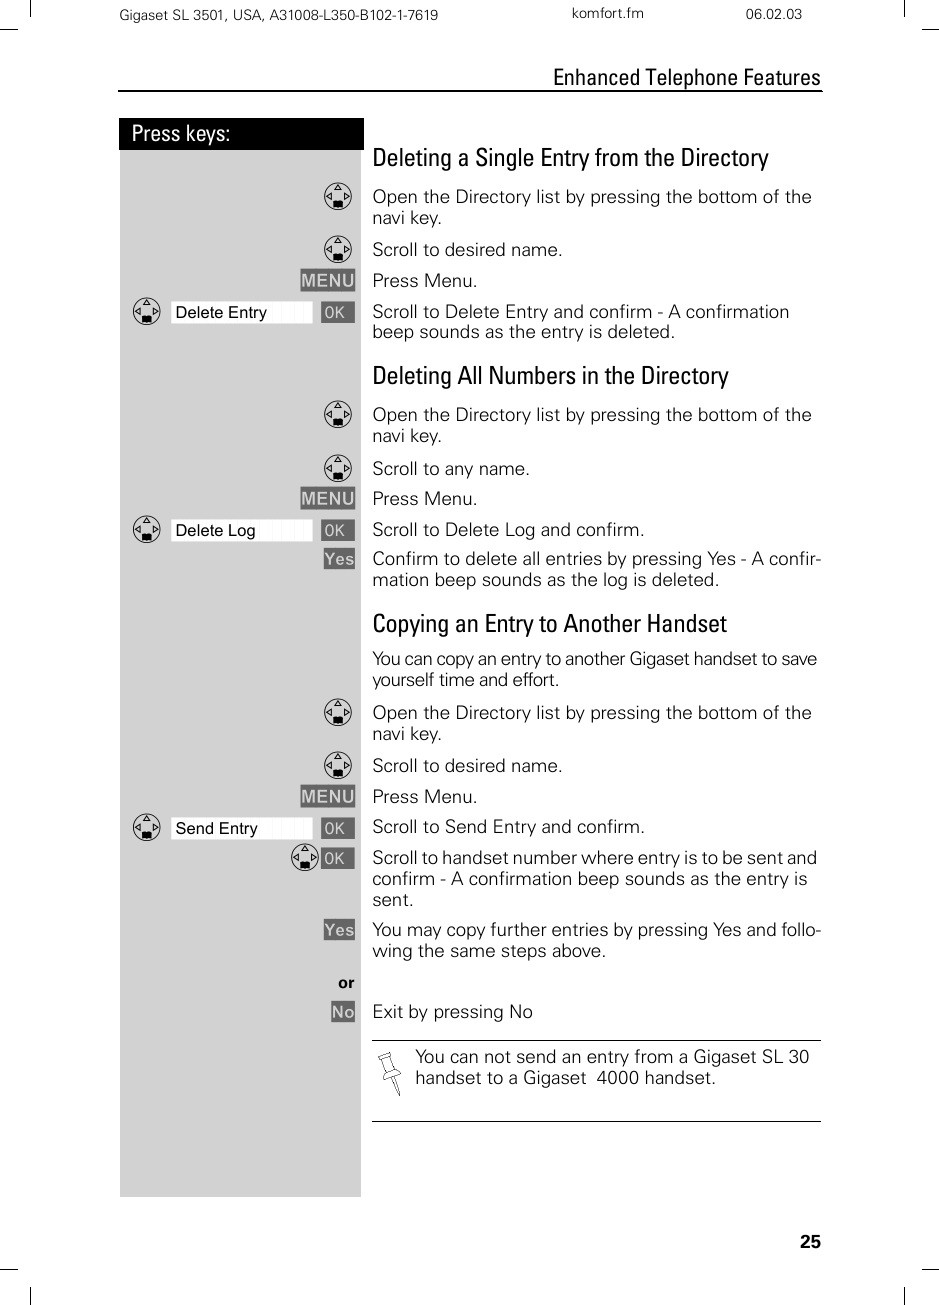
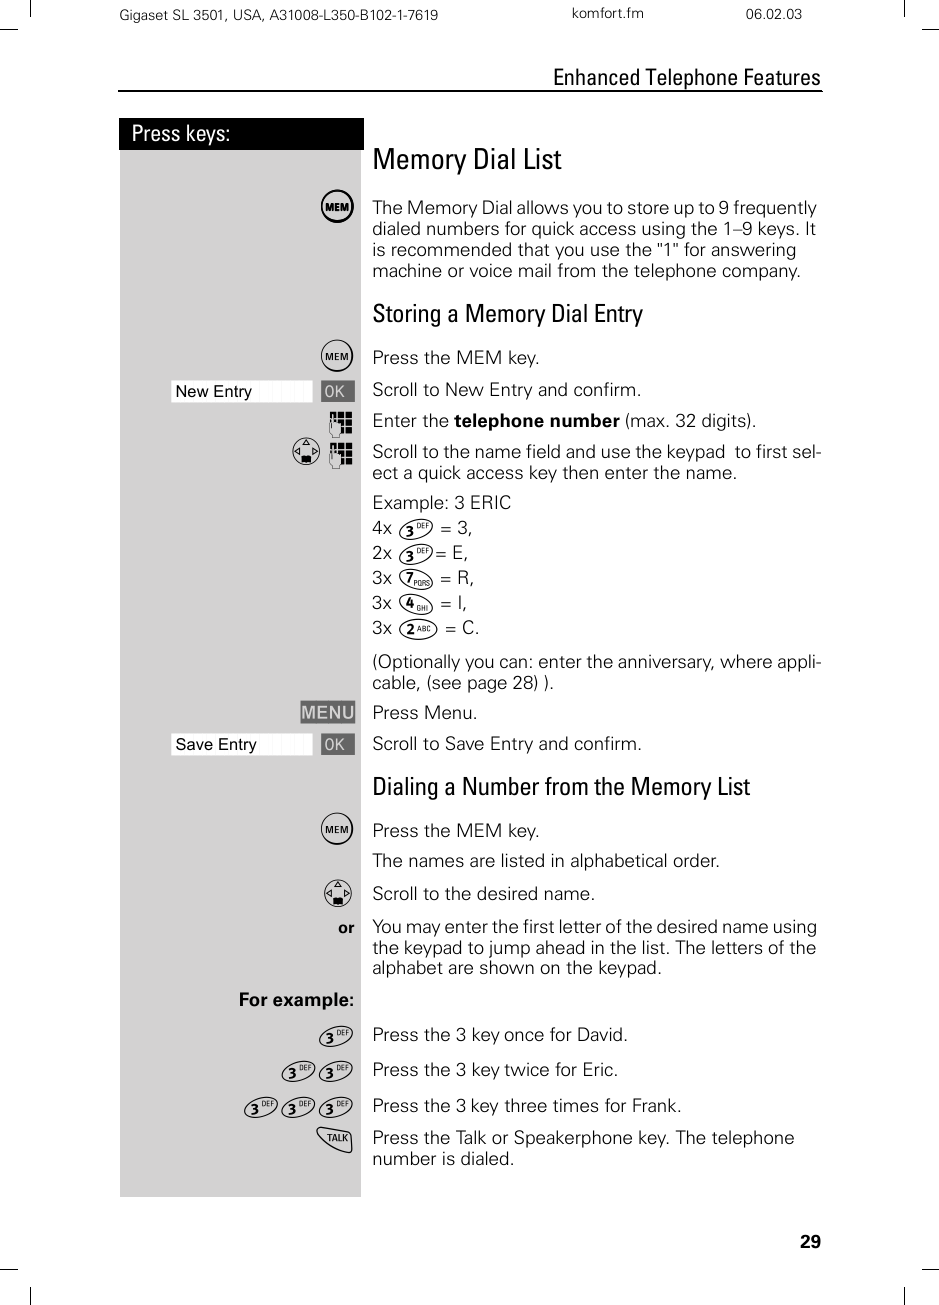

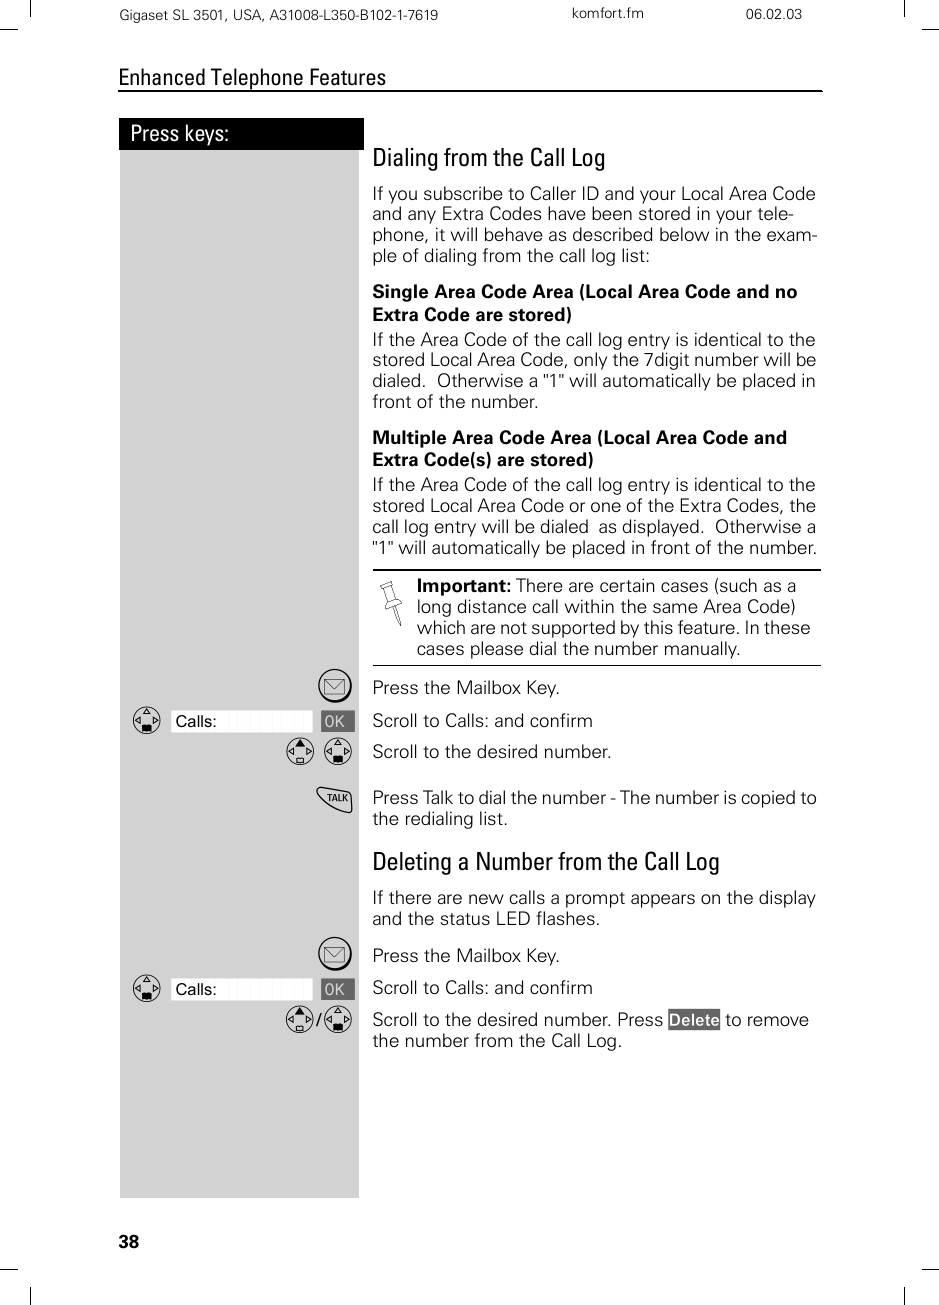


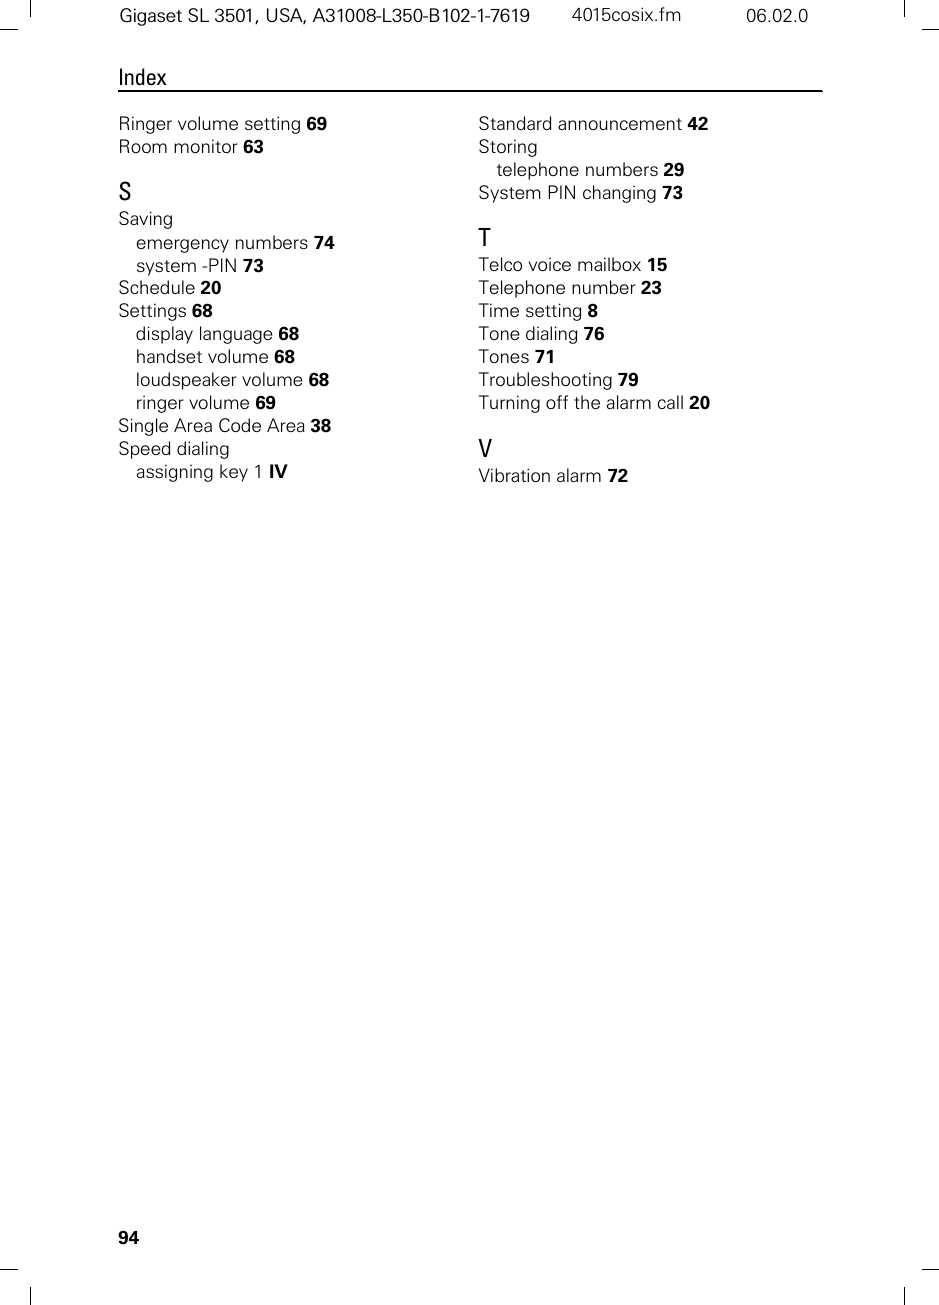
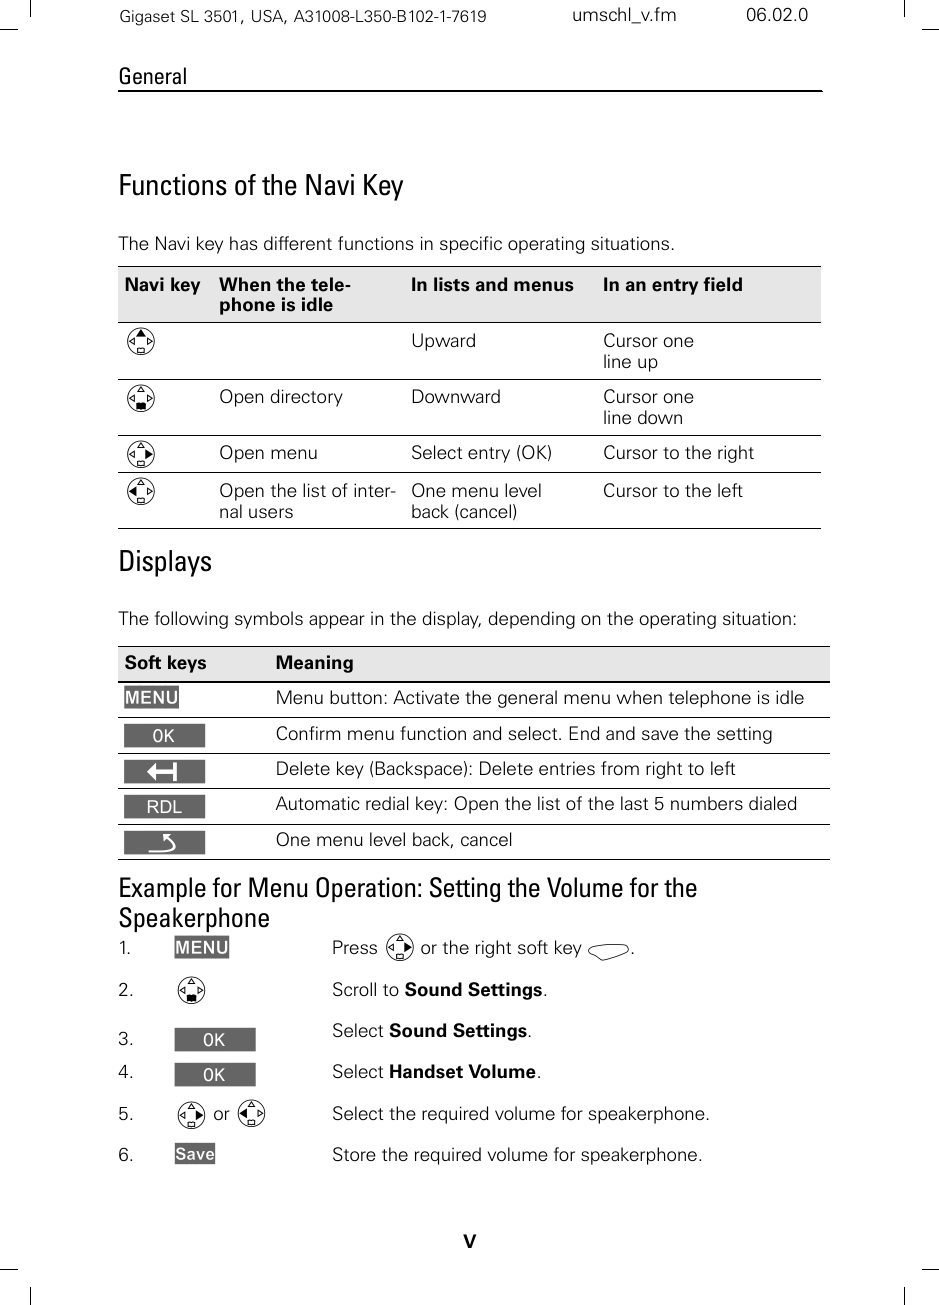
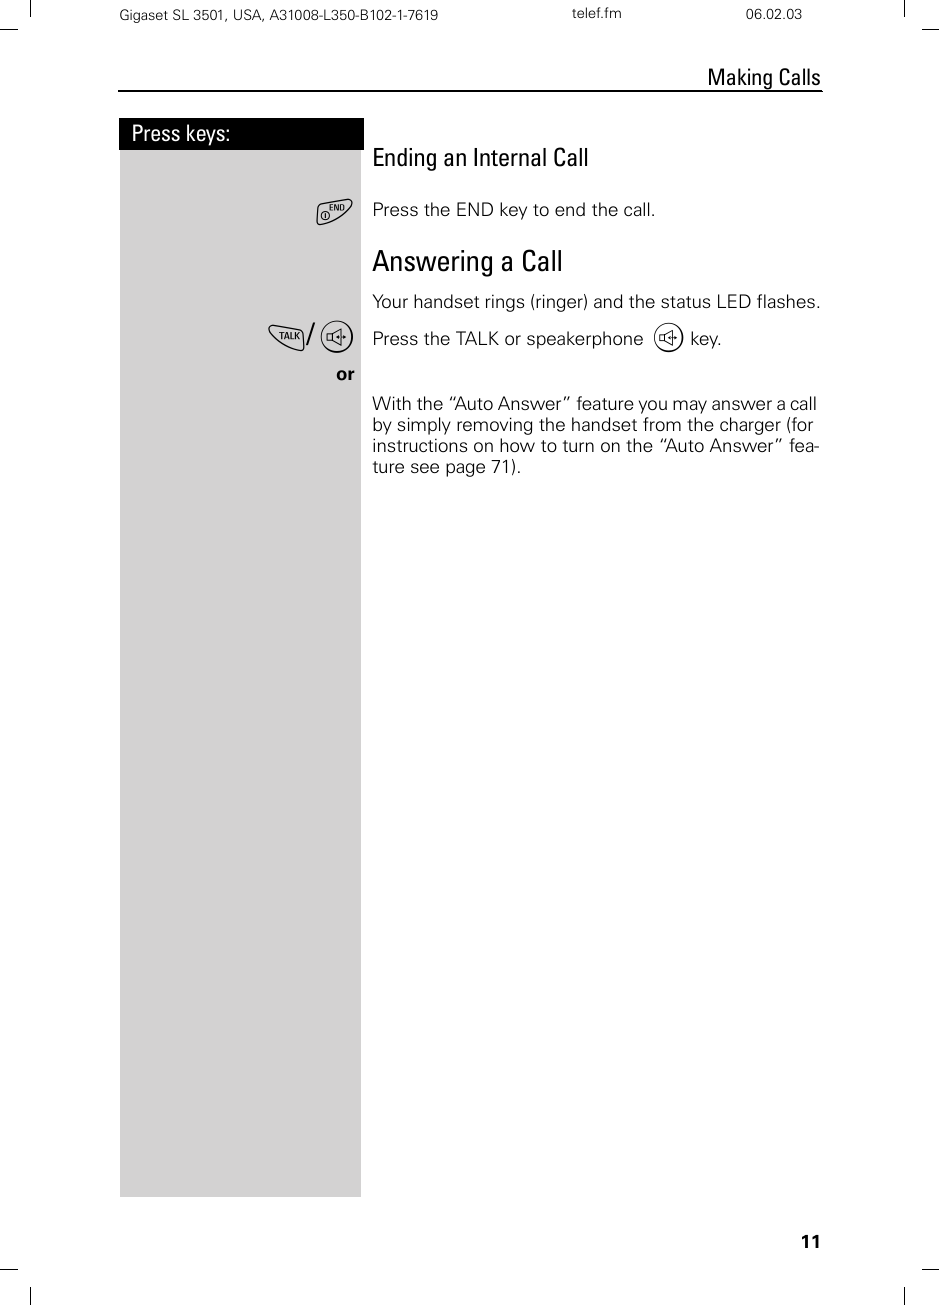
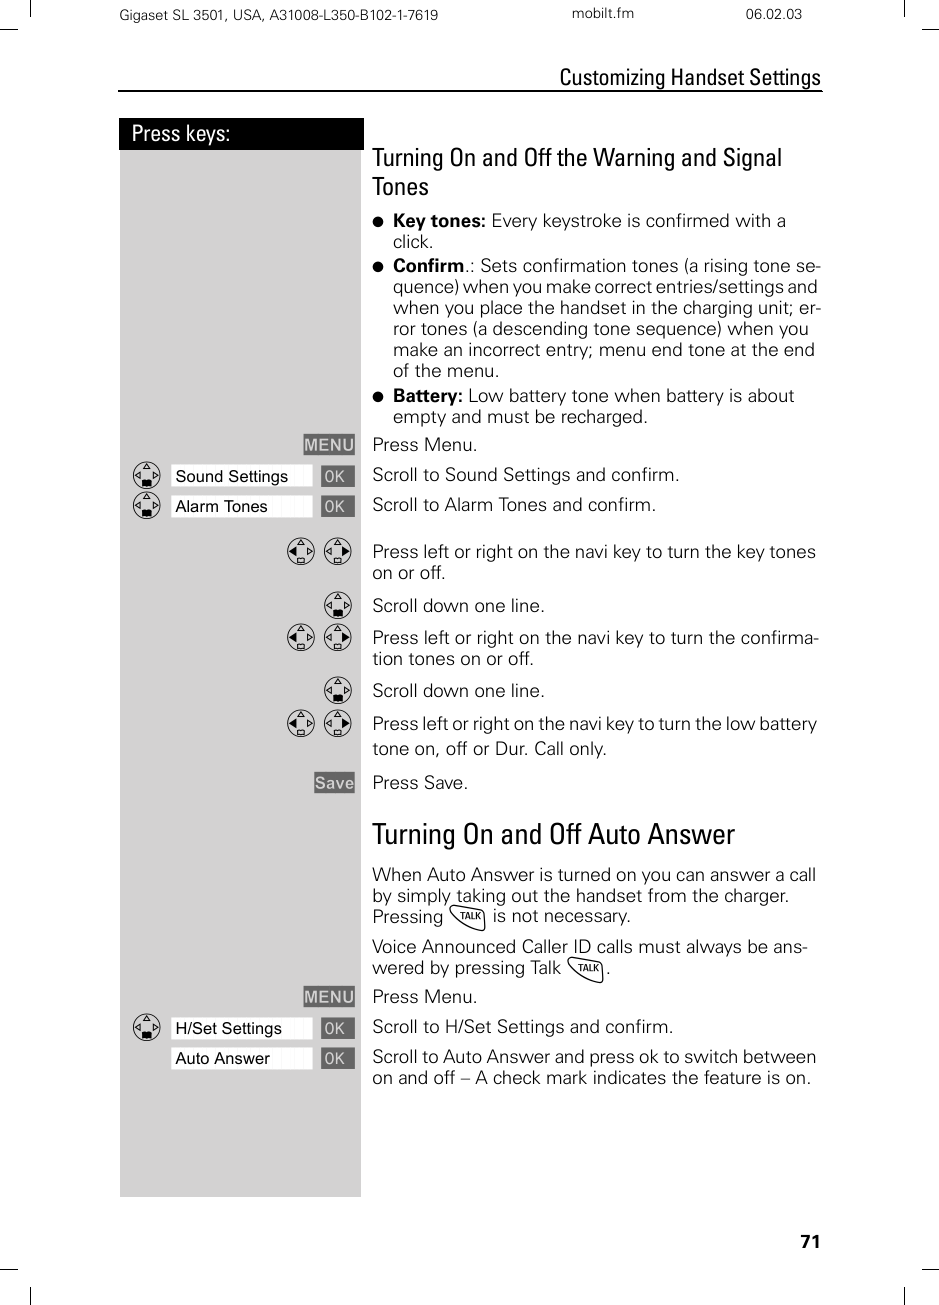
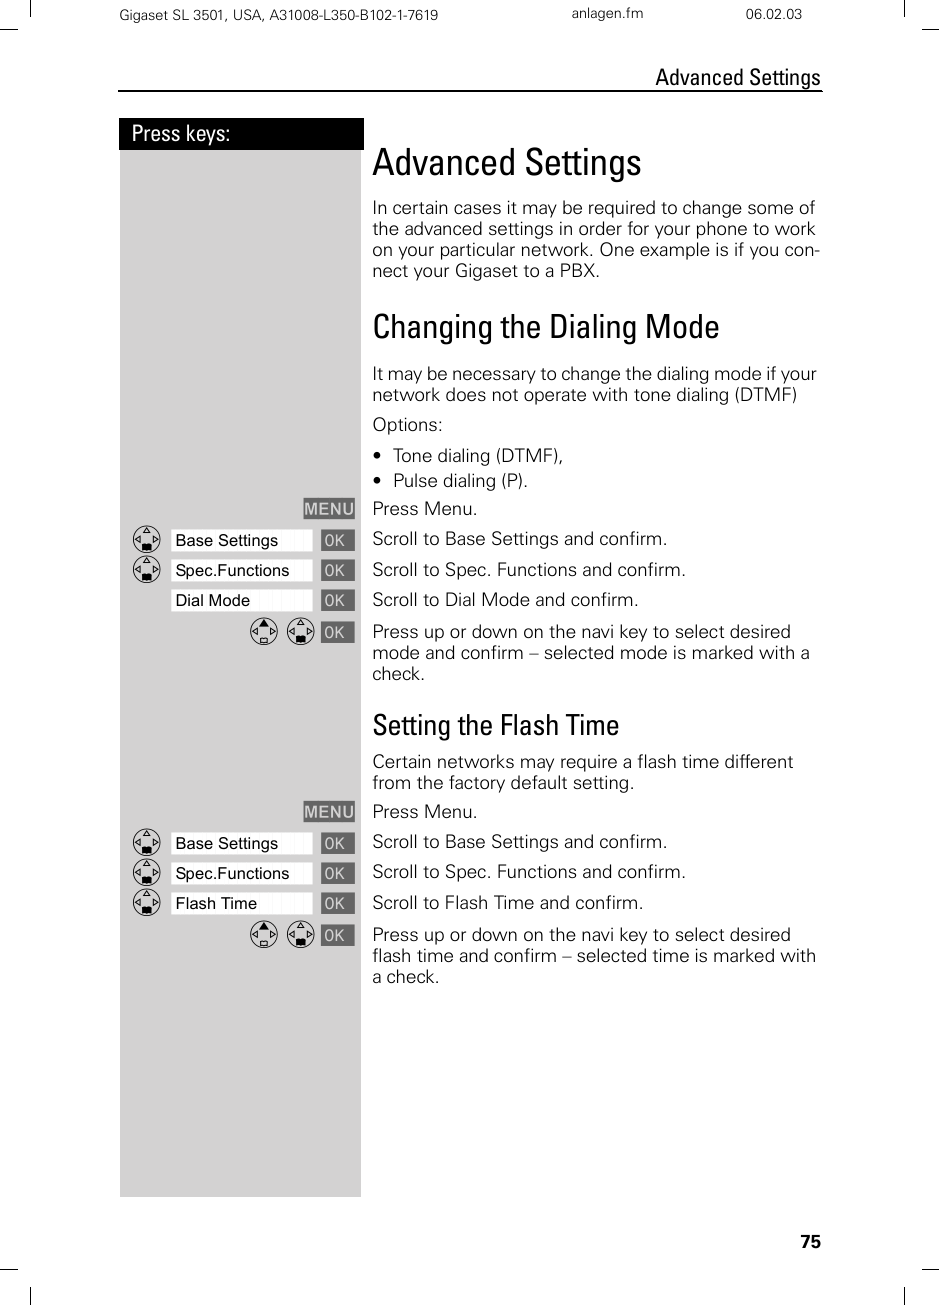
![42Press keys:Operating the Answering MachineGigaset SL 3501, USA, A31008-L350-B102-1-7619 anrufb_comfort.fm 06.02.03Setting a Different LanguageYou may change the language for the voice prompts and for the standard announcement.MENU Press Menu.¥ ¬ Ÿ From the keypad enter 8, 9, 2 then the number of the desired language from the table below.For example to set the language to English you would press Menu then enter 8, 9, 2, 1.Selecting an AnnouncementA standard announcement is already preset: “There is nobody available to take your call. Please leave a message after the beep.”This announcement is used until you record your own announcement, or after you have deleted your own an-nouncement.When selecting an announcement you may choose from the following two options:●Announcement – Plays the announcement and re-cords messages●Announcement Only – Plays the announcement but does not record messages You can only select the Announcement Only if you have already recorded an Announcement Only mes-sage (see page 43). MENU Press Menu.ååååååååååååååååååååååååååååååååDAns Machine [ Scroll to Ans Machine and confirm.ååååååååååååååååååååååååååååååååDAnnouncements [ Scroll to Announcements and confirm.ååååååååååååååååååååååååååååååååDMode [ Scroll to Mode and confirm.ååååååååååååååååååååååååååååååååDAnnc [ Scroll to Annc and confirm to activate the Announce-ment (A check mark indicates option is selected) .An announcement can be recorded.orååååååååååååååååååååååååååååååååDAnnc Only [ Scroll to Annc Only and confirm to activate the An-nouncement Only (A check mark indicates option is selected).The announcement you selected is available even after the answering machine has been switched off.]English ^SpanishŸFrench](https://usermanual.wiki/Siemens-Information-and-Communication-Mobile/SL3501/User-Guide-302580-Page-48.png)

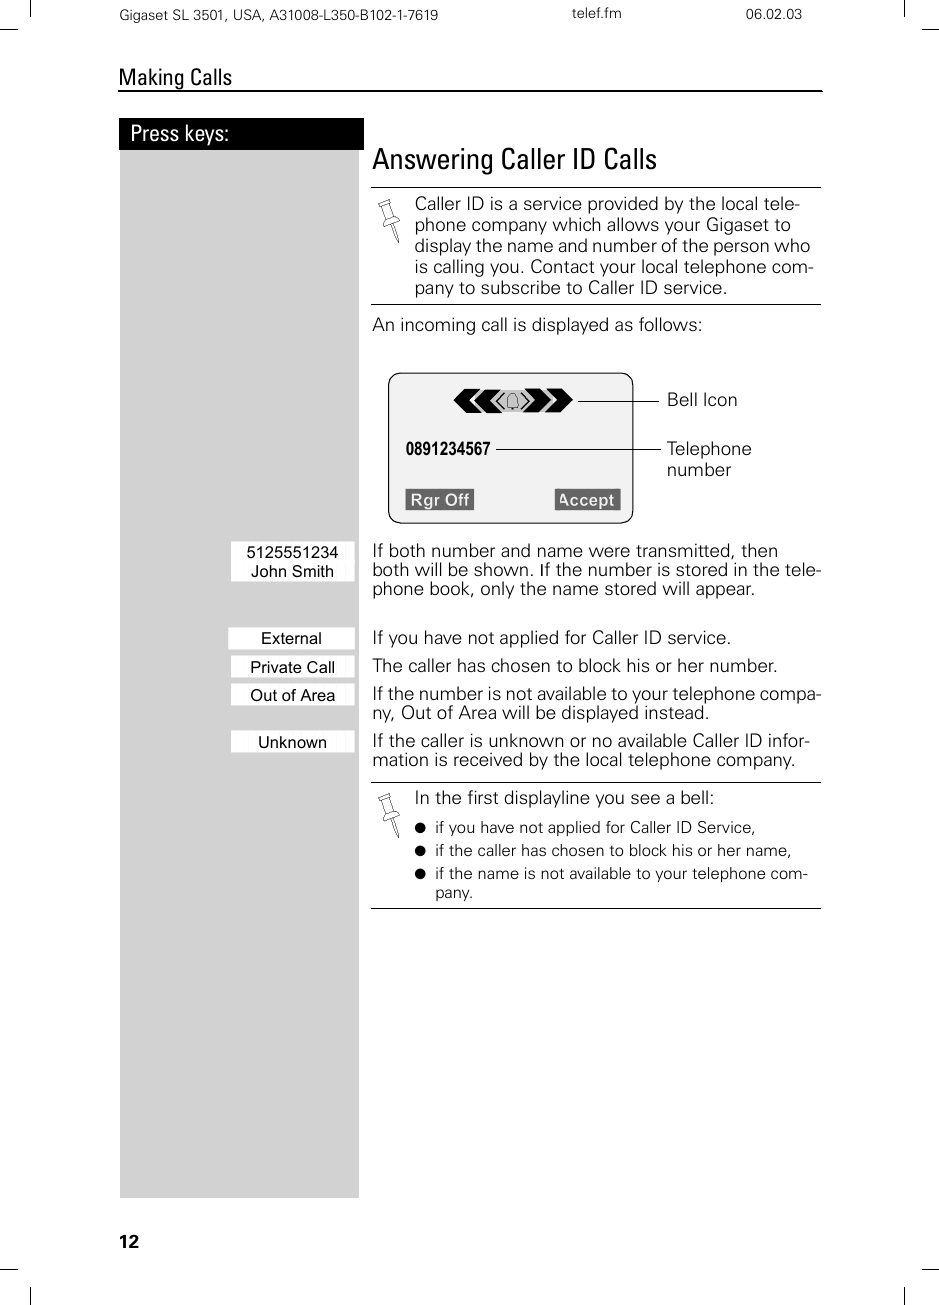
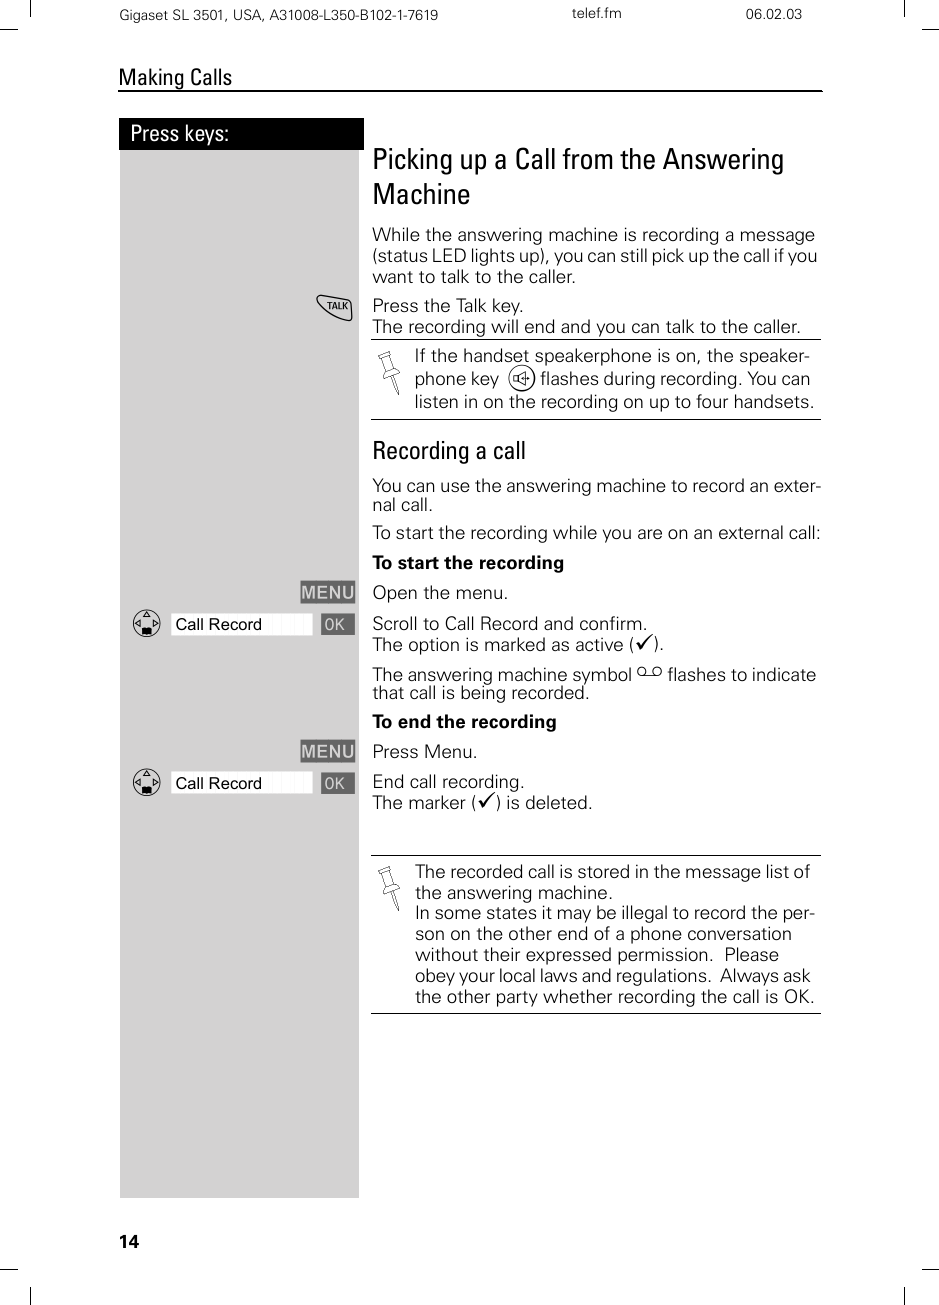
![48Press keys:Operating the Answering MachineGigaset SL 3501, USA, A31008-L350-B102-1-7619 anrufb_comfort.fm 06.02.03Picking up a Call from the Answering MachineWhile the answering machine is recording a message (status light is on) you can still pick up the call if you want to talk to the caller. cPress Talk – The recording ends and you can talk to the caller.Setting Instant Access to the Answering Machine or Voice Mail*You can set your telephone to instantly access the ans-wering machine or to dial your voice mailMENU Press Menu.ååååååååååååååååååååååååååååååååDAns Machine [ Scroll to Ans Machine and confirm.ååååååååååååååååååååååååååååååååDSet Key 1 [ Scroll to Set Key 1 and confirm.ååååååååååååååååååååååååååååååååDAnswering M. [ Scroll to Answering M. and confirm - You now have in-stant access to the answering machine by holding down the 1 keyorååååååååååååååååååååååååååååååååDVoice Mail [ Scroll to voice mailbox and confirm.oEnter your voice mail number.MENU Press Menu.ååååååååååååååååååååååååååååååååDSave Entry [ Scroll to Save and confirm – You now have instant ac-cess to your voice mail by holding down the 1 key.*. Voice Mail requires a subscription from you local telephone compa-ny.After you have selected the answering machine or voice mail, you simply need to hold down the ] key on the handset to connect yourself di-rectly to the selected answering machine.](https://usermanual.wiki/Siemens-Information-and-Communication-Mobile/SL3501/User-Guide-302580-Page-54.png)


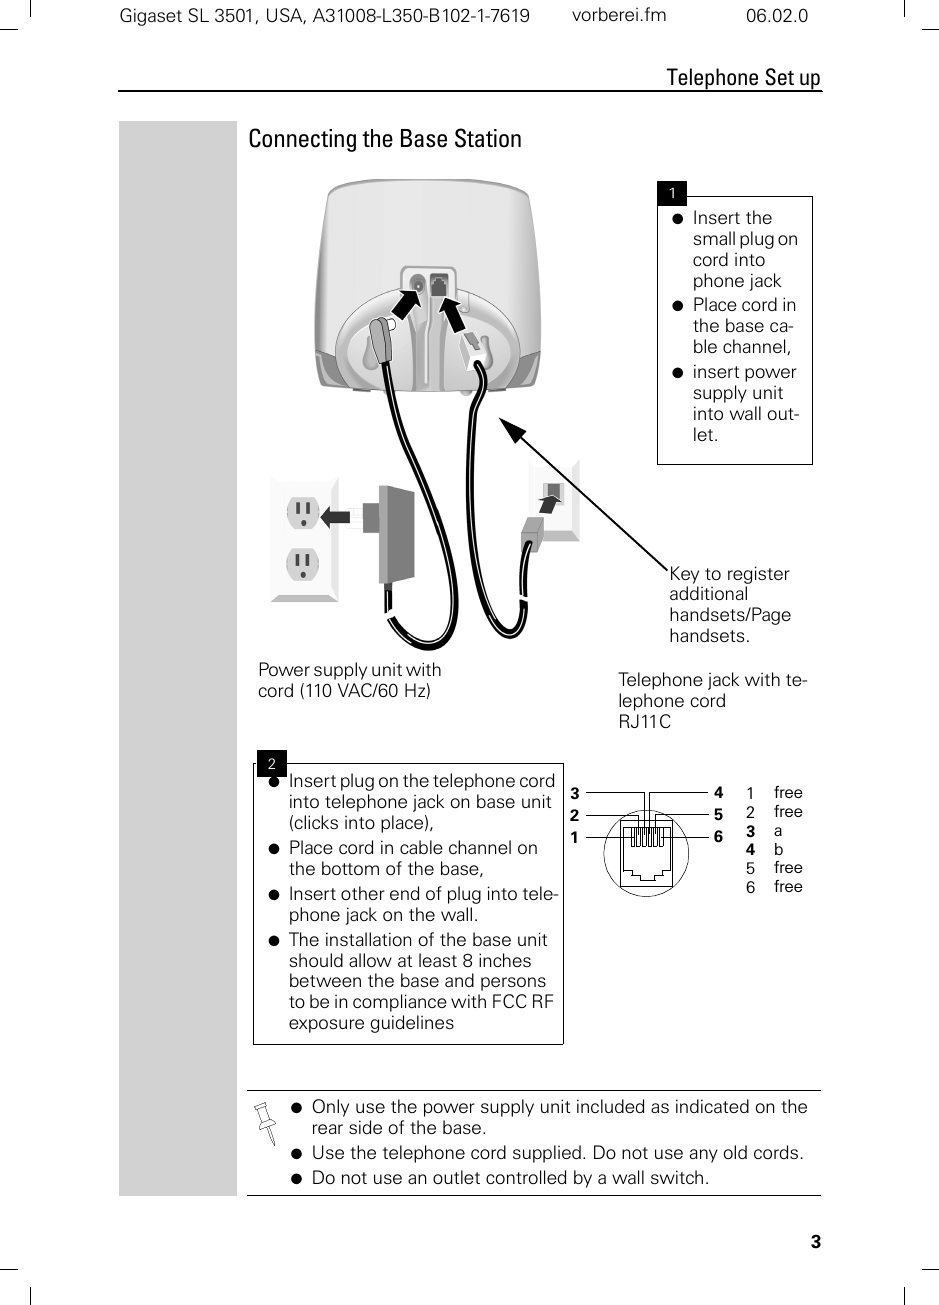
![77Press keys:Advanced SettingsGigaset SL 3501, USA, A31008-L350-B102-1-7619 anlagen.fm 06.02.03Setting PausescWith this feature you can set the length of the pause inserted automatically after pressing the Talk key but before transmitting the telephone number.Pause after Line SeizureMENU Press Menu.¥ ¬]£ Enter 8,9,1,6.e.g. ]Enter the pause length.Enter the pause length -1 second = 1; 3 seconds = 2; 7 seconds = 3; 3.2 seconds = 4[Press OK to save.Pause for the MEM KeyWith this feature you can set the length of the pause that is inserted after holding down the C key.MENU Press Menu.¥ ¬]Ÿ Enter 8,9,1,2.e.g. ]Enter the pause length - None = 1; 800 ms = 2; 1600 ms = 3; 3200 ms = 4[The setting is savedPause after Access CodePrerequisite: you have saved an access code and want to change the pause.The base station always automatically inserts this pau-se after the prefix. Please refer to the operating instruc-tions for your network to see whether there has to be a pause and how long it must be.MENU Press Menu.¥ ¬]] [Enter 8,9,1,1.e.g. ]Enter the pause length - 1 second = 1; 2 seconds = 2; 3 seconds = 3; 3.2 seconds = 4[Press OK to save](https://usermanual.wiki/Siemens-Information-and-Communication-Mobile/SL3501/User-Guide-302580-Page-83.png)
![78AppendixAppendixCharacter Map *BlankPress the relevant key repeatedly or hold it down.The entries are sorted in the following sequence:1. Blank: s2.Digits: (0 - 9)3. Letters (alphabetical)4. Other charactersTo bypass the alphabetical sequence of entries in the directory, enter a blank before the name. This entry then goes to the start of the directory (for example, “sEric”).1 x 2 x 3 x 4 x 5 x 6 x 7 x 8 x 9 x 10 x 11x 12x 13x 14x]s*1â£$¥¤Ÿa bc2äáàâãç^d ef 3ëéèê¡gh i4ïíìî¢jkl5£mno6öñóòôõ¤pqrs7ߥt uv8üúùû¬wxyz9ÿýæøå«a→A* /()<=>%Þ.,?!0+-:¿¡“‘ ;_ª#@\&§The first letter of the name is automatically written in upper case (also af-ter punctuation marks), the letters immediately afterwards are written in lo-wer case.To change a letter from upper case to lower case or vice versa press «.Control the cursor with F G E D.The letter to the left of the cursor is deleted with X.Letters are always inserted to the left of the cursor.](https://usermanual.wiki/Siemens-Information-and-Communication-Mobile/SL3501/User-Guide-302580-Page-84.png)

![Menu tableGigaset SL 3501, USA, A31008-L350-B102-1-7619 menu.fm 06.02.089Menu tableIt is faster to select a menu function by pressing MENU than selecting the digit com-binations by scrolling! For example: ¡¡= 4-4 to set the date.Main menuMENU when the telephone is idle, press:1Not Available2Not Available3Room Mon. 3-1 Room Monitor. [entry]4Appoint./Clock 4-1 Set Appointment [entry]4-2 Alarm Clock [entry]4-3 Dates [entry]4-4 Date/Time [entry]5Sound Settings 5-1 Handset Volume [entry]5-2 Set Ring Tone [entry]5-3 Alarm Tones [entry]5-4 Vibration6Not Available7H/Set Settings 7-1 Auto Answer7-2 Language [list]7-3 Reg. Handset [list]7-4 Select Base [list]7-5 Default Sett.8Base Settings 8-2 System-PIN [entry]8-3 Default Settings8-4 Spec.Functions 8-4-1 Dial Mode 8-4-1-1 To n e8-4-1-2 Pulse8-4-1-3 DTMF-Earth8-4-2 Flash Time 8-4-2-1 80 ms8-4-2-[...] [etc. until]8-4-2-7 800 ms8-4-4 Access Code [entry]8-4-5 Emergency No. [entry]8-4-6 Barge In8-4-7 Caller ID](https://usermanual.wiki/Siemens-Information-and-Communication-Mobile/SL3501/User-Guide-302580-Page-95.png)
![Menu tableGigaset SL 3501, USA, A31008-L350-B102-1-7619 menu.fm 06.02.0908-5 Area Codes 8-5-1 Local Area Code8-5-2 Extra Codes8-6 DID Settings 8-6-1 Dir.Inward Dial8-6-2 Rec.DID Annc8-6-3 Play Annc8-6-4 Delete Annc9Answering M. 9-1 Set Key 1 9-1-1 Voice Mail9-1-2 Answering M.9-2 Answering M.9-4 Record Memo9-5 Announcements 9-5-1 Record Annc9-5-2 Play Annc9-5-3 Delete Annc9-5-4 Rec Annc Only9-5-5 Play Annc Only9-5-6 Del Annc Only9-5-7 Mode [list]9-6 Msg. Settings 9-6-1 Msg. Length9-6-2 Msg. Quality9-7 Call Screen9-8 No. of Rings](https://usermanual.wiki/Siemens-Information-and-Communication-Mobile/SL3501/User-Guide-302580-Page-96.png)