Siemens Medical Solutions Department MED EH and S WRCII Wireless Remote Control II User Manual Ysio full

Siemens Medical Solutions, Department MED EH&S; Wireless Remote Control II Ysio full

Contents

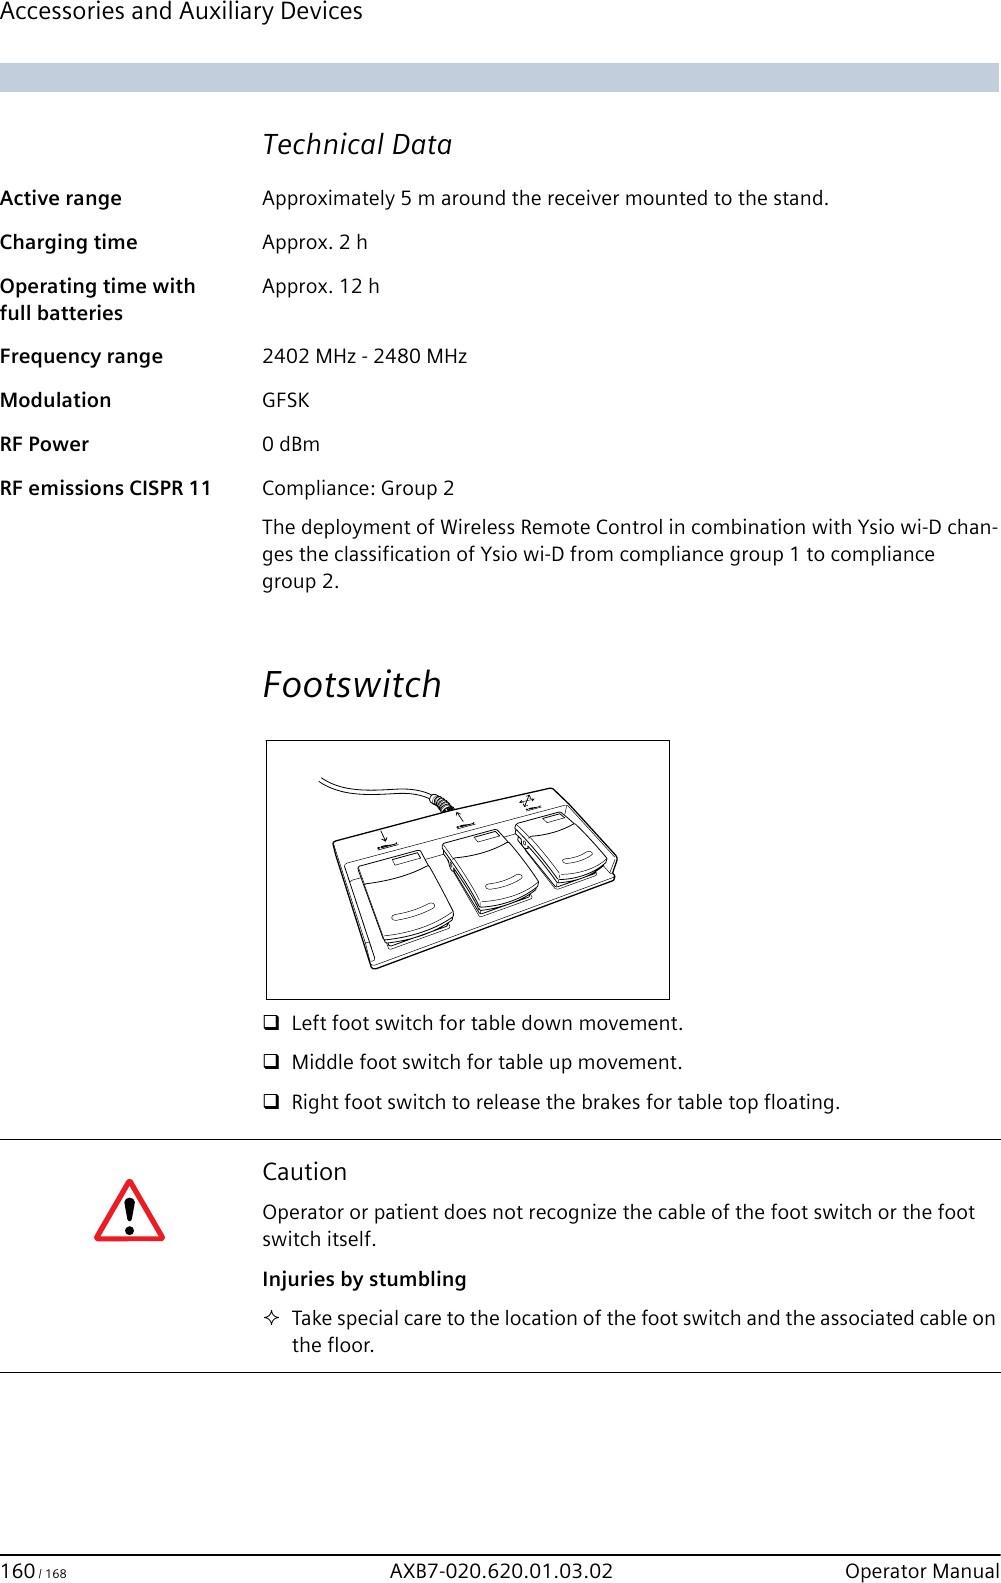
User Manual Footswitch

www.siemens.com/medical SafetySystem OverviewSystem ComponentsSystem OperationAccessories and Auxiliary DevicesTechnical DataYsio with fully automatic overhead supportOperator Manual
www.siemens.com/medical  UsabilityBEFORE USING THIS SYSTEMThis system should be used only by employees adequately trained in the use of this equipment.Before using this system, the operator should be thoroughly acquainted with the instructions for use and safety recommendations provided in this manual.Failure to follow the instructions for use and safety recommendations provided in this manual can cause serious injury to the patient, to the operator or to other persons.Important Information from the ManufacturerThis product is provided with a CE marking in accordance with the regulations stated in Appendix II of the Directive 93/42/EEC of June 14th, 1993 concerning medical devices. In accordance with Appendix IX of the Directive 93/42/EEC, this device is assigned to class II b.The CE marking applies only to medical devices which have been put on the market according to the above-mentioned EC Directive.Unauthorized changes to this product invalidate this declaration.Siemens AGWittelsbacherplatz 2D-80333 MuenchenGermany© Siemens AG All rights reservedOrder No.: AXB7-020.620.01.03.0209.2008Original Language: EnglishContact InformationSiemens AG, Medical SolutionsAngiography, Fluoroscopic and Radiographic SystemsSiemensstrasse 1D-91301 ForchheimGermanyTelephone: +49 9191 18-0
Accessories and Auxiliary Devices 154 / 168 AXB7-020.620.01.03.02 Operator Manual Storing the BABIX cradleRemove the child from the BABIX cradle and attend to its needs.Hang the BABIX cradle on the wooden hook with the opening in the BABIX cradle facing the retainer.Press the 2 longitudinal sides of the BABIX cradle into the grooves of the retainer.Check to make sure that the BABIX cradle is securely seated in the retainer.Wireless Remote Control Important informationThe functions of the Wireless Remote Control are activated via an RF transmitter. pOperate the Wireless Remote Control only in close vicinity to the patient table and with full visibility to the patient on the table.Take care that the batteries are always sufficiently charged.NoteThe Wireless Remote Control may be interfered by other equipment, including portable and fixed RF communication equipment, even if such equipment meets the applicable emission requirements.The operator must assure that other wireless devices in the 2.4-GHz ISM band are not operated in the vicinity of appr. 5 m around the Ysio wi-D system. System movements can interrupt sporadically.Please observe and verify normal operation of the Wireless Remote Control prior to using it.CautionWireless Remote control or portable detector generate an electromagnetic field too high that disturbs life supporting device.Interference with life supporting device resulting in possible malfunctionMake sure to keep a safety separation distance of larger than 90 cm between the Wireless Remote Control or portable detector or docking station and the life supporting device.In case of interference with other equipment increase the distance between the interfering devices.
Accessories and Auxiliary DevicesYsio AXB7-020.620.01.03.02 155 / 168 Changes or modifications not expressly approved by the party responsible for compliance could void the user´s authority to operate the equipment. The Wireless Remote Control may be interfered with by other equipment, includ-ing portable and mobile RF communication equipment, even if this equipment meets the applicable emissions requirements.In order to perform its intended function, the Wireless Remote Control must emit electromagnetic energy. Maybe, nearby electronic equipment is affected.OperationThe remote control is active in a range of appr. 5 m around the table/stand, where the receiver is mounted. If the remote control is in a wider range of the table, it may lose contact with the receiver. It then turns into an inactive mode.Wireless Remote Control (example)CautionCollision with operator or patientMechanical or personal damageTake care that the used remote control and the system have the same colored label.Use the remote control only when there is visual and acoustic contact with the patient.If unintended movement occurs, press the next emergency STOP button.NoteUse the remote control only inside the examination room.Display areaOperation areaSelection area
Accessories and Auxiliary Devices 156 / 168 AXB7-020.620.01.03.02 Operator Manual Display areaThere are 3 LEDs showing the status of the remote control.Green LED on: Remote control is on and is in active mode.Green LED off: Remote control is inactive.– It is too far away from the table – The Ysio wi-D is switched off – The batteries are discharged– The remote control is in “sleep mode”. Press a button swiftly to activate it again.Orange LED on: An operation button is being pressed.LED off: battery sufficiently charged, remote control not connected to the Charging StationLED flashing red: battery needs charging, remaining capacity < 4 hLED on red: remote control connected to Charging Station and batteries are be-ing chargedLED on green: remote control connected to Charging Station and batteries arefully chargedThis symbol marks an RF transmitting component.Selection areaIn the selection area, you can select which part of the system you want to operate.The green LED on the selected button is on.Selection of tube unitSelection of detectorSelection of patient tableSelection of collimator
Accessories and Auxiliary DevicesYsio AXB7-020.620.01.03.02 157 / 168 Operation areaAngular movement of tube unit and detectorAngular movement of tube unit and detector clockwise about the α-axisAngular movement of tube unit and detector counter-clockwise about the α-axisAngular movement of tube unit and detector clockwise about the β-axisAngular movement of tube unit and detector counter-clockwise about the β-axisOpening/closing the collimator; moving tube unit and detector in x and y di-rection (orange and green)Opening the collimator in transverse directionMoving tube unit and detector in x direction (orange)Closing the collimator in transverse directionMoving tube unit and detector in x direction (orange)NoteOn the backside of the remote control, there is a dead-man switch. To execute an operation with a button of the operation area you have to press the dead-man switch simultaneously.As soon as you release the dead-man switch, the current operation is stopped.NoteAll following operation directions only apply if you are standing in front of the tube unit.Dead-manswitch
Accessories and Auxiliary Devices 158 / 168 AXB7-020.620.01.03.02 Operator Manual Opening the collimator in longitudinal directionMoving tube unit and detector in y direction (green)Closing the collimator in longitudinal directionMoving tube unit and detector in y direction (green)OGP position of patient table or parking positionMoving the patient table to OGP position;Moving the system in parking positionMoving detector, tube unit, and patient tableMoving up and down detector, tube unit, and patient table.’Center lock’ trackingDisable/enable ’center lock’ tracking–Press the ’center lock’ tracking button just for a short time (< 3 s) to activate or deactivate center-lock tracking at the current position.When an OGP with centered tracking is selected press the tracking button longer than 3 s and keep it pressed (dead-man switch). Detector and tube unit are then centered as programmed.– LED at tube support control panel lights up when tracking is active– LED at tube support control panel flashes when tracking is not possible or being in progressSID trackingDisable/enable SID tracking control– Press: The tracking control is switched off(on).– LED at tube support control panel lights up when tracking is active– LED at tube support control panel flashes when tracking is not possible or being in progressParking positionSwitching over the function of the OGP button to parking position– Green LED is on.After the parking position is reached, immediately switch off this function again.– Green LED is off.
Accessories and Auxiliary DevicesYsio AXB7-020.620.01.03.02 159 / 168 Marking signsThe Wireless Remote Control is marked with a colored sign of different shape. So you can avoid a mix up for installations with a multitude of Wireless Remote Con-trols. The same marks are attached to the respective table and room during instal-lation.These signs are 2 examples of colored signs of different shape to mark the remote control to a Ysio wi-D system.Charging StationThe Wireless Remote Control is plugged in the Charging Station for charging the batteries. We recommend charging the batteries every day after deployment.Charging StationIf the Wireless Remote Control needs charging during a patient procedure, simply plug it in the Charging Station.Never use another charging device than the Charging Station delivered with the Wireless Remote Control.Installation You can install the Charging Station either at the wall or on the table.Exchange of batteriesLet authorized and trained staff exchange the batteries of the Wireless Remote Control once a year. Please call Siemens Service. Unauthorized exchange may cause severe damage.NoteFor safety reasons, never touch the charging contacts and the patient simulta-neously when the charging station is connected to a socket (charging contacts are permanently energized).
Accessories and Auxiliary Devices 160 / 168 AXB7-020.620.01.03.02 Operator Manual Technical DataActive range Approximately 5 m around the receiver mounted to the stand.Charging time Approx. 2 hOperating time with full batteriesApprox. 12 hFrequency range 2402 MHz - 2480 MHzModulation GFSKRF Power 0 dBmRF emissions CISPR 11 Compliance: Group 2The deployment of Wireless Remote Control in combination with Ysio wi-D chan-ges the classification of Ysio wi-D from compliance group 1 to compliance group 2.Footswitch Left foot switch for table down movement.Middle foot switch for table up movement.Right foot switch to release the brakes for table top floating.CautionOperator or patient does not recognize the cable of the foot switch or the foot switch itself.Injuries by stumblingTake special care to the location of the foot switch and the associated cable on the floor.

Navigation menu