Siemens 277IWLAN-V210 MobilePanel277(F)IWLAN V2 User Manual III
Siemens AG MobilePanel277(F)IWLAN V2 III
Siemens >
Contents
User Manual III
Commissioning the plant
9.4 RFID tag system
Mobile Panel 277F IWLAN V2, Mobile Panel 277F IWLAN (RFID Tag)
250 Operating Instructions, 09/2010, A5E02766325-01
3. Press the "RFID Config" icon.
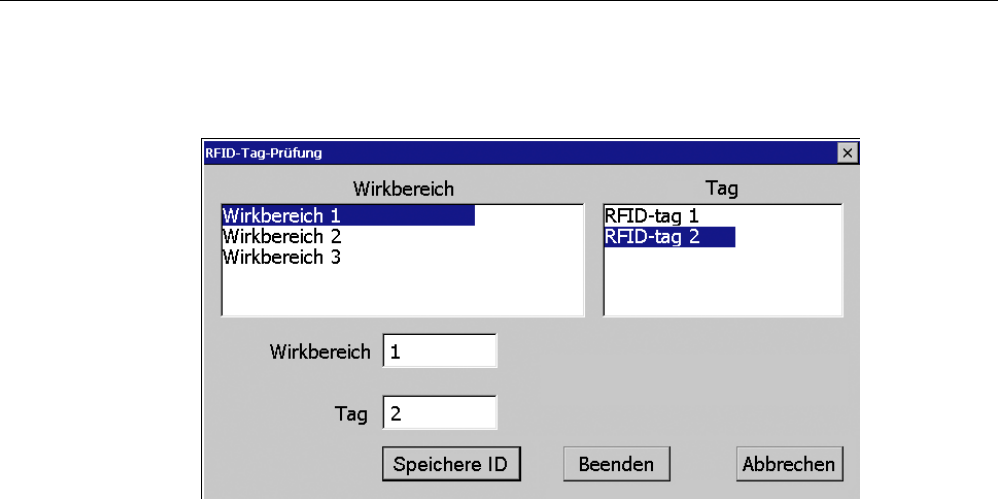
The following dialog appears:
4. Select the effective range ID in the "Effective range" selection box and the ID of the
defective RFID tag in the "Tag" selection box.
5. Bring the HMI device into the effective range of the RFID tag.
6. Press "Save ID".
The HMI device transmits the ID to the RFID tag. The new RFID tag has the ID of the
previously used RFID tags.
7. Click "Exit" to close the dialog.
8. Close the Control Panel and start the project.
9. Log the HMI device onto a machine to check the new RFID tag.
– When the logon is successful, you can continue working in the project.
– If logon is not possible close the dialog and repeat steps 2 to 8.
REVIEW ENGLISH
27.07.2010

Commissioning the plant
9.5 Diagnostics
Mobile Panel 277F IWLAN V2, Mobile Panel 277F IWLAN (RFID Tag)
Operating Instructions, 09/2010, A5E02766325-01 251
9.5 Diagnostics
Use the diagnostics function to determine the following:
● Does signal acquisition function without errors on the HMI device?
● Does the safety-related module of the HMI device work properly?
Diagnostic function of the HMI device in STEP 7
The HMI device provides diagnostics conforming to PROFINET IO standard IEC 61784-1,
Ed1, CP 3/3 for standard application.
The diagnostics function cannot be parameterized. The diagnostics are always enabled and
information is provided automatically by the HMI device in STEP 7 in the event of an error.
The diagnostic function also passes the "Communication error" message, if at all possible,
for the safety-related component.
The communication between the HMI device as an input and output device, and the F-CPU
and IO controller is disrupted. This situation can be caused, for example, by an incorrect
PROFIsafe address or the lack of a wireless network.
Reading diagnostics information
Open the module diagnostics in STEP 7 to determine the cause of the error. For additional
information, refer to the online help for STEP 7.
You also have the option of reading the diagnostic information using SFB 52 or SFB 54 in
the standard user program. For additional information, refer to the "System and Standard
Functions" reference manual.
REVIEW ENGLISH
27.07.2010
Commissioning the plant
9.5 Diagnostics
Mobile Panel 277F IWLAN V2, Mobile Panel 277F IWLAN (RFID Tag)
252 Operating Instructions, 09/2010, A5E02766325-01
Diagnostic information for internal errors
All LEDs of the LED display go out when an internal error of the HMI device causes a failure.
When a project is running on the HMI device, the following occurs:
● The project is closed.
● The following error code message is displayed on the HMI device:
A severe problem has occurred!
Date: 2010-04-30 09:18
ErrorCode: 000 0008 00006 01506
Please report this error code to your technical support
http://www.siemens.de/automation/support-request
Procedure
Proceed as follows:
1. Record the error number – see Error Code.
2. Switch off the HMI device.
3. Restart the HMI device.
Contact Technical Support (http://support.automation.siemens.com) if the error persists.
Based on the error code, Technical Support can come to a conclusion about the type of
internal error.
Error code for discrepancy errors
The following table lists the error codes for discrepancy errors. You may be able to find a
remedy for a discrepancy error yourself, depending on the situation. The first six digits of the
error code are decisive for the correct identification of the error.
Error code Error type Remedy
000 008 Discrepancy error at the EMERGENCY
STOP button
Release the EMERGENCY STOP button.
REVIEW ENGLISH
27.07.2010

Mobile Panel 277F IWLAN V2, Mobile Panel 277F IWLAN (RFID Tag)
Operating Instructions, 09/2010, A5E02766325-01 253
Fail-safe operation 10
10.1 Organizational measures
The HMI device should only be operated in the system with a battery or in the charging
station.
You must adhere to the organizational measures described in this section to ensure fail-safe
operation of the HMI device.
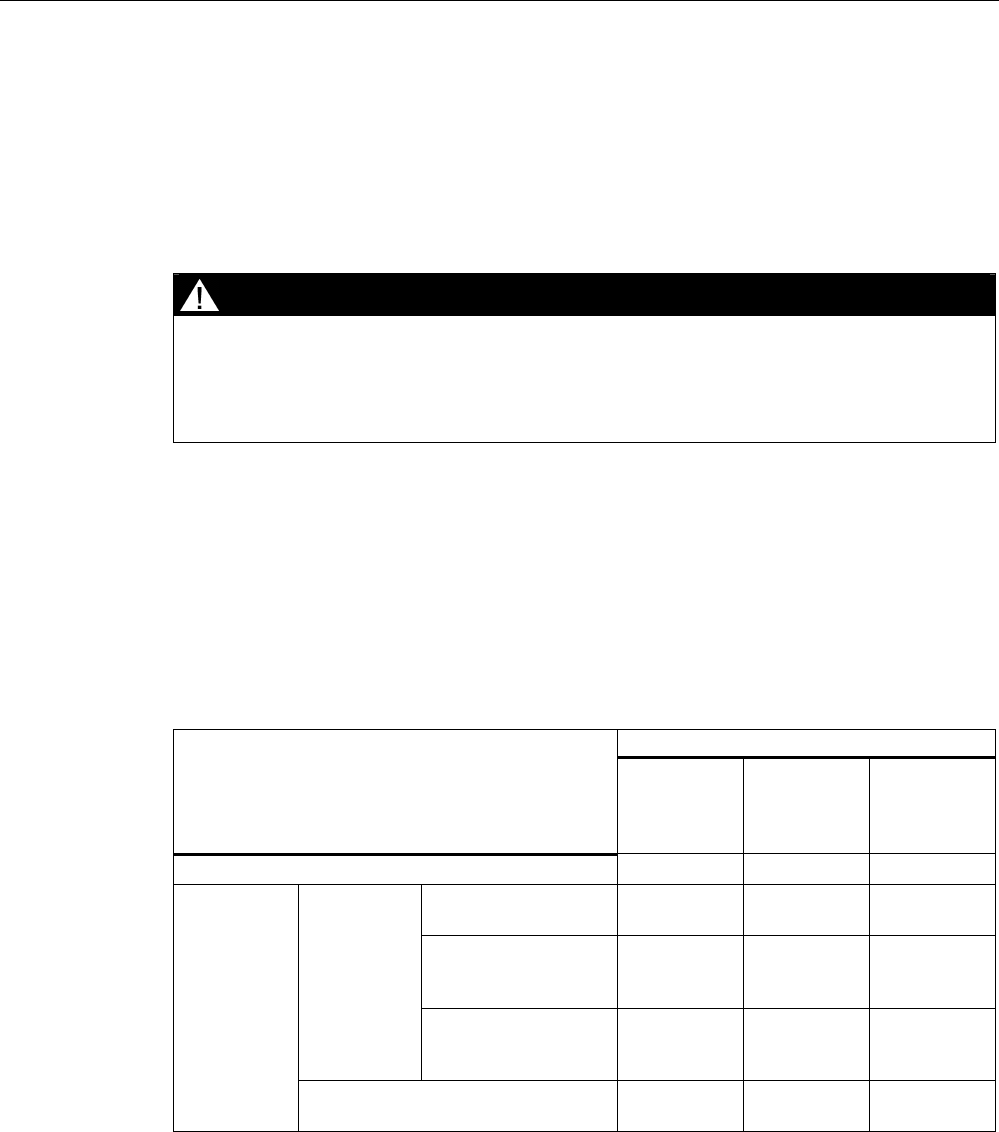
WARNING
EMERGENCY STOP button out of service when HMI device is removed
If the HMI device is not integrated in the safety program of the F-CPU, the EMERGENCY
STOP button will be out of service.
To avoid confusion between HMI devices with enabled and disabled EMERGENCY STOP
buttons, only one integrated HMI device should be freely accessible.
If an HMI device is not integrated and not in use, store the HMI device in a location with
protected access.
Handling the HMI device during operation
CAUTION
Shutdown or global rampdown may occur with an empty main rechargeable battery
An integrated HMI device with an empty main rechargeable battery triggers a
communication error. This error results in the following reaction of the F-CPU:
When the HMI device is logged onto a machine – shutdown
When the HMI device is not logged onto a machine – global rampdown
Check the charge of the main rechargeable battery at brief intervals using the "BAT" LED.
Note
It is prohibited to leave the effective range without an HMI device while the HMI device is
logged onto the effective range.
Log the HMI device off from the effective range or remove it from the HMI device.
Pay attention to the LED display of the HMI device – see section "LED display (Page 103)".
REVIEW ENGLISH
27.07.2010

Fail-safe operation
10.2 Integrating the HMI device
Mobile Panel 277F IWLAN V2, Mobile Panel 277F IWLAN (RFID Tag)
254 Operating Instructions, 09/2010, A5E02766325-01
10.2 Integrating the HMI device
During fail-safe operation, a safety program runs in the F-CPU. The HMI device is integrated
into this safety program. The HMI device and F-CPU communicate via PROFINET IO.
When there is a project for a safety program on the HMI device, it is automatically integrated
following the start of the project. The "SAFE" LED lights up to indicate that integration is
complete.
The EMERGENCY STOP button is enabled as soon as the HMI device is integrated.
Requirement
● WLAN
● PROFIsafe safety-related bus profile, as of V2.0
● The plant has been accepted.
● The loader is displayed on the HMI device.
Procedure
Proceed as follows:
1. Start the project.
PROFIsafe communication is established. While the connection is being established, the
"Establishing secure connection" dialog is displayed with the following symbol.
The HMI device is integrated in the safety program of the F-CPU.
The "SAFE" LED lights up.
The "Test enabling switch" dialog is displayed with the following symbol.
2. Fully press down both enabling buttons.
The project start screen appears.
See also
Terms for fail-safe operation (Page 38)
REVIEW ENGLISH
27.07.2010
Fail-safe operation
10.3 Operating the transponder system in a fail-safe mode
Mobile Panel 277F IWLAN V2, Mobile Panel 277F IWLAN (RFID Tag)
Operating Instructions, 09/2010, A5E02766325-01 255
10.3 Operating the transponder system in a fail-safe mode
10.3.1 Switch-off behavior
The shutdown reaction of the plant will vary according to cause and effect.
DANGER
Triggering shutdown
The shutdown response described in the next sections is only triggered in the plant if the F
CPU has been programmed accordingly.
Program the F CPU accordingly.
The following types of shutdown may occur depending on the operating state of the plant.
● EMERGENCY STOP
● Global rampdown
● Local rampdown
● Shutdown
The following table shows the shutdown reaction depending on the operating state and the
cause:
Cause of the shutdown Operating state
EMERGENC
Y STOP
button
pressed
Communicati
on error
Timeout 1)
HMI not integrated --- --- ---
HMI device is in the
effective range
EMERGENC
Y STOP
Shutdown ---
HMI device< 30 s
outside of the effective
range
EMERGENC
Y STOP
Shutdown ---
HMI device
logged on at
the effective
range
HMI device > 30 s
outside of the effective
range
EMERGENC
Y STOP
Shutdown Local
rampdown
HMI
integrated
HMI device is logged off from the
effective range
EMERGENC
Y STOP
Global
rampdown
---
1) The HMI device is logged onto the effective range and the operator leaves the
effective range with the HMI device for longer than 30 seconds.
See also
Terms for fail-safe operation (Page 38)
REVIEW ENGLISH
27.07.2010
Fail-safe operation
10.3 Operating the transponder system in a fail-safe mode
Mobile Panel 277F IWLAN V2, Mobile Panel 277F IWLAN (RFID Tag)
256 Operating Instructions, 09/2010, A5E02766325-01
10.3.2 Determine the current effective range and current zone
The determination of the current effective range and the current zone occurs through a
distance verification between the HMI device and the transponder. The distance verification
requires that both devices are located in the wireless range of the other and the HMI device
is logged onto the project.
The result of the distance verification is evaluated in the HMI device and displayed with the
"effective range quality" object within the project.
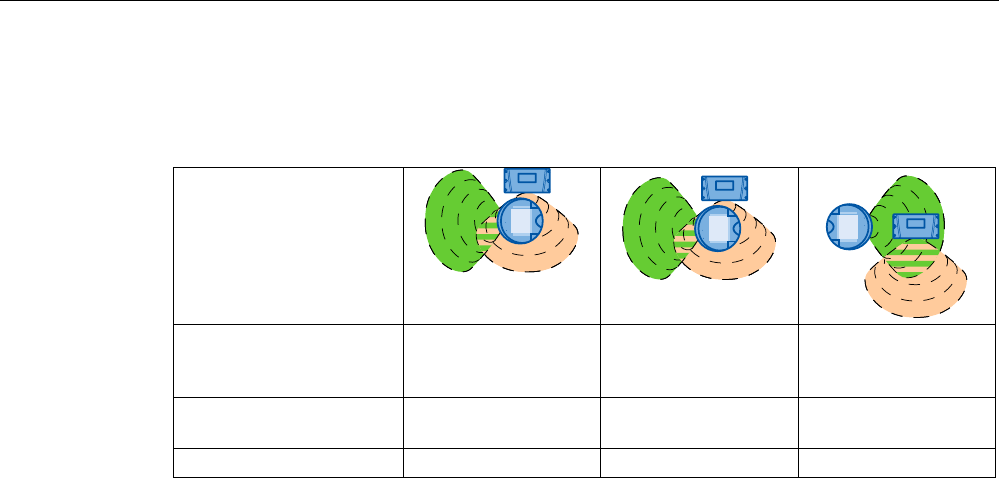
Aligning the HMI device to the transponder
You must align the HMI device to the transponder to enable them to recognize one another.
The further away the HMI device is from the transponder, the more accurately it must be
aligned to the transponder. The moving of the HMI device is only possible in a small angle.
The closer the HMI device is to the transponder, the greater the moving angle can be.
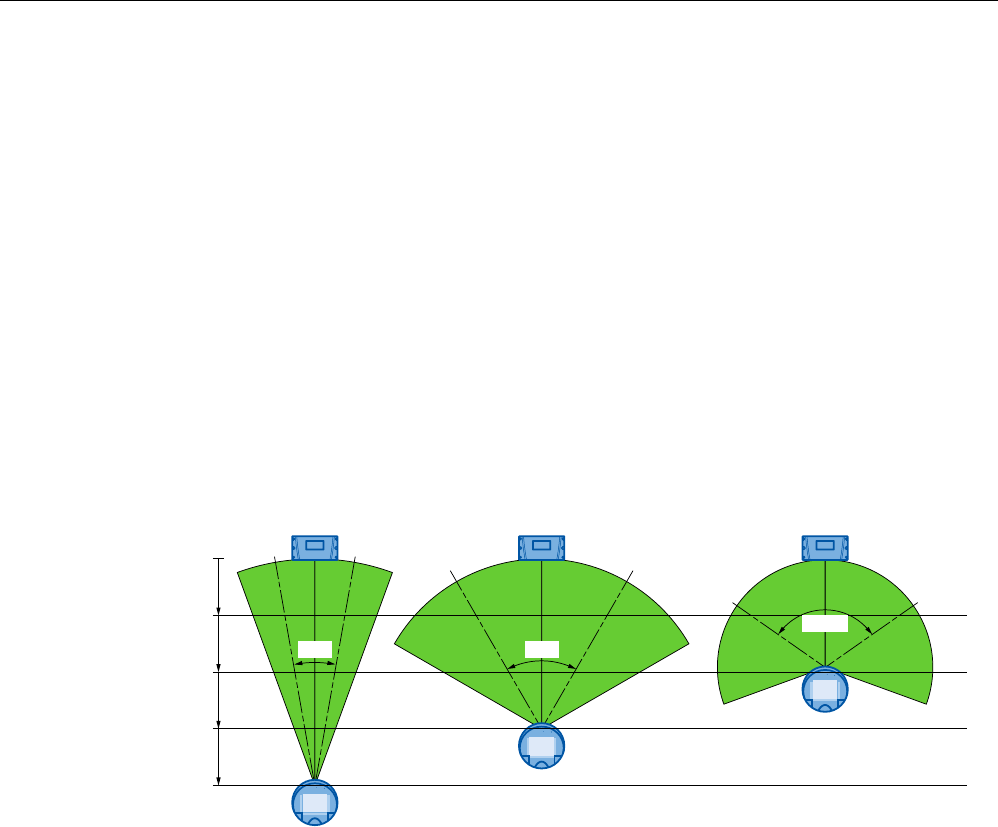
The figure below shows an example of the possible angle of movement in relation to the
distance from the transponder.
P
P
P
P
r
r
r
With a distance of 8 m, the angle of movement is about 20°. At a distance of 4 m, the
permissible angle of movement is about 110°.
REVIEW ENGLISH
27.07.2010
Fail-safe operation
10.3 Operating the transponder system in a fail-safe mode
Mobile Panel 277F IWLAN V2, Mobile Panel 277F IWLAN (RFID Tag)
Operating Instructions, 09/2010, A5E02766325-01 257
Determine the current effective range and current zone
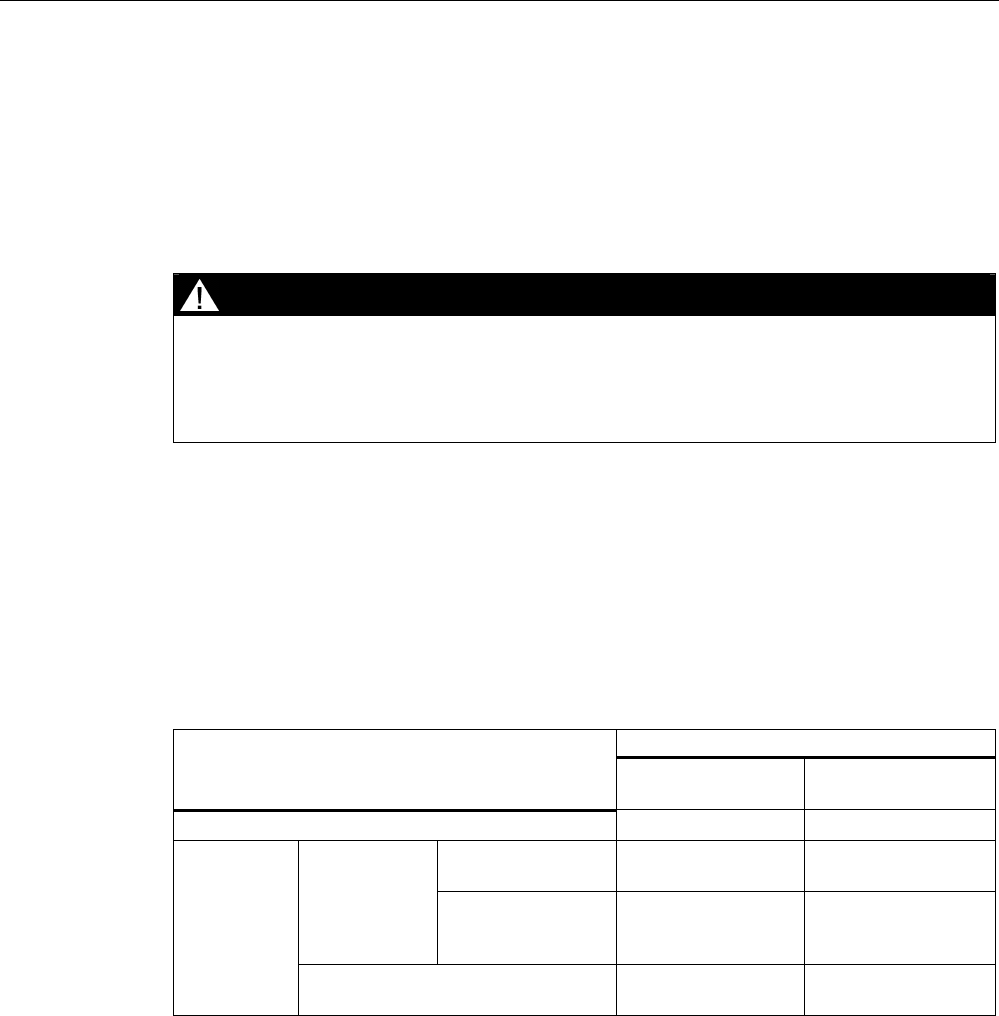
The table below shows when a logon is feasible.
Alignment
HMI device in
transponder's wireless
range
Yes Yes No
Transponder in HMI
device's wireless area
Yes No Yes
Logon Successful Not supported Not supported
The current effective range or the current zone is determined as follows:
● The HMI device transmits with a running project.
● If a transponder recognizes the wireless range of an HMI device, the transponder ID will
be sent to the HMI device.
● The HMI device evaluates the ID and signal strength.
Through this, the HMI device determines the current effective range and its quality.
See also
Dividing plant into effective ranges (Page 59)
10.3.3 Logging onto a machine
As soon as you are in an effective range with the HMI device, you can log the HMI device
onto the respective machine. After successfully logging on, operating the machine in fail-safe
mode within the effective range is possible.
REVIEW ENGLISH
27.07.2010

Fail-safe operation
10.3 Operating the transponder system in a fail-safe mode
Mobile Panel 277F IWLAN V2, Mobile Panel 277F IWLAN (RFID Tag)
258 Operating Instructions, 09/2010, A5E02766325-01
Behavior in the effective range following successful logging on
CAUTION
Local rampdown possible
If you leave the effective range without logging off, or the HMI device no longer recognizes
the transponder, the dialog will be displayed after 5 s: "Effective range left without logging
off". If you do not return to the effective range within 25 seconds, the HMI devices initiates a
local rampdown and begins logging off from the effective range. After confirming the logoff,
the HMI device will be removed. The effective range is open for logging on for other HMI
devices.
Return to the effective range in good time. Always align the HMI device so that it is possible
to measure the distance between the HMI device and the transponder.
Shutdown possible
If the HMI device is in a state where it is constantly ready for operation, the main
rechargeable battery will lose its charge. A discharged main rechargeable battery causes
communication failure. The F CPU initiates a shutdown.
Never leave the effective range without the HMI device, as long as the HMI device is
logged on in the effective range. If you do not need the HMI device:
Log the HMI device off from the effective range.
Turn off the HMI device or place it in the charging station.
Note the displays of the HMI device LEDs; in particular, the "RNG" and "BAT" LEDs.
Requirements
● The HMI device is integrated and the "SAFE" LED is illuminated.
● The "Effective range name" operating element is displayed.
5DQJHQDPH
Procedure
Proceed as follows:
1. Touch the "Effective range name" operating element.
The "Effective range logon" dialog opens with the following symbol.
2. Enter the ID of the effective range.
3. Enter the ID of the effective range.
4. Confirm your entries.
The dialog closes.
REVIEW ENGLISH
27.07.2010
Fail-safe operation
10.3 Operating the transponder system in a fail-safe mode
Mobile Panel 277F IWLAN V2, Mobile Panel 277F IWLAN (RFID Tag)
Operating Instructions, 09/2010, A5E02766325-01 259
Result
● If the ID entered matches the ID configured for the effective range, the HMI device is
logged onto the effective range.
● No other HMI device can log onto this effective range.
The "RNG" LED lights up.
● You can use the enabling buttons to operate the machine in the effective range.
● The "Effective range name" operating element is displayed.
5DQJHQDPH
10.3.4 Logging off the machine
Before leaving the effective range or closing the project, you must log off the HMI device
from the effective range.
Requirement
● The HMI device is logged onto the effective range.
The "RNG" LED lights up.
● The "Effective range name" operating element is configured and displayed.
5DQJHQDPH
Procedure
Proceed as follows:
1. Touch the "Effective range name" operator control.
The "Effective range logoff" dialog opens with the following symbol.
2. Confirm by clicking "OK".
– The "RNG" LED goes out.
– The HMI device is no longer logged onto the effective range.
– The "Effective range name" operating element is displayed.
5DQJHQDPH
or
– An HMI device can log on to this effective range again.
REVIEW ENGLISH
27.07.2010

Fail-safe operation
10.3 Operating the transponder system in a fail-safe mode
Mobile Panel 277F IWLAN V2, Mobile Panel 277F IWLAN (RFID Tag)
260 Operating Instructions, 09/2010, A5E02766325-01
10.3.5 Activating and deactivating "Override" mode
Introduction
The effective range functionality of the HMI device can be extended with the "Override"
mode.
"Override" mode can be used in the following cases:
● If a protection zone is available instead of an effective range.
An existing safety system from your system, for example, a protective gate, can be
integrated into the safety system for the "override" mode.
● If parts should be operated with enabling buttons, which are not in the wireless range of a
transponder.
This cannot occur within a robot cell. In this case, a protection zone must be set up.
WARNING
"Override" mode
If the "override" mode is used outside of a protection zone, this may result in death.
Only use the "Override" mode in a protection zone, which excludes access for
unauthorized individuals.
REVIEW ENGLISH
27.07.2010
Fail-safe operation
10.3 Operating the transponder system in a fail-safe mode
Mobile Panel 277F IWLAN V2, Mobile Panel 277F IWLAN (RFID Tag)
Operating Instructions, 09/2010, A5E02766325-01 261
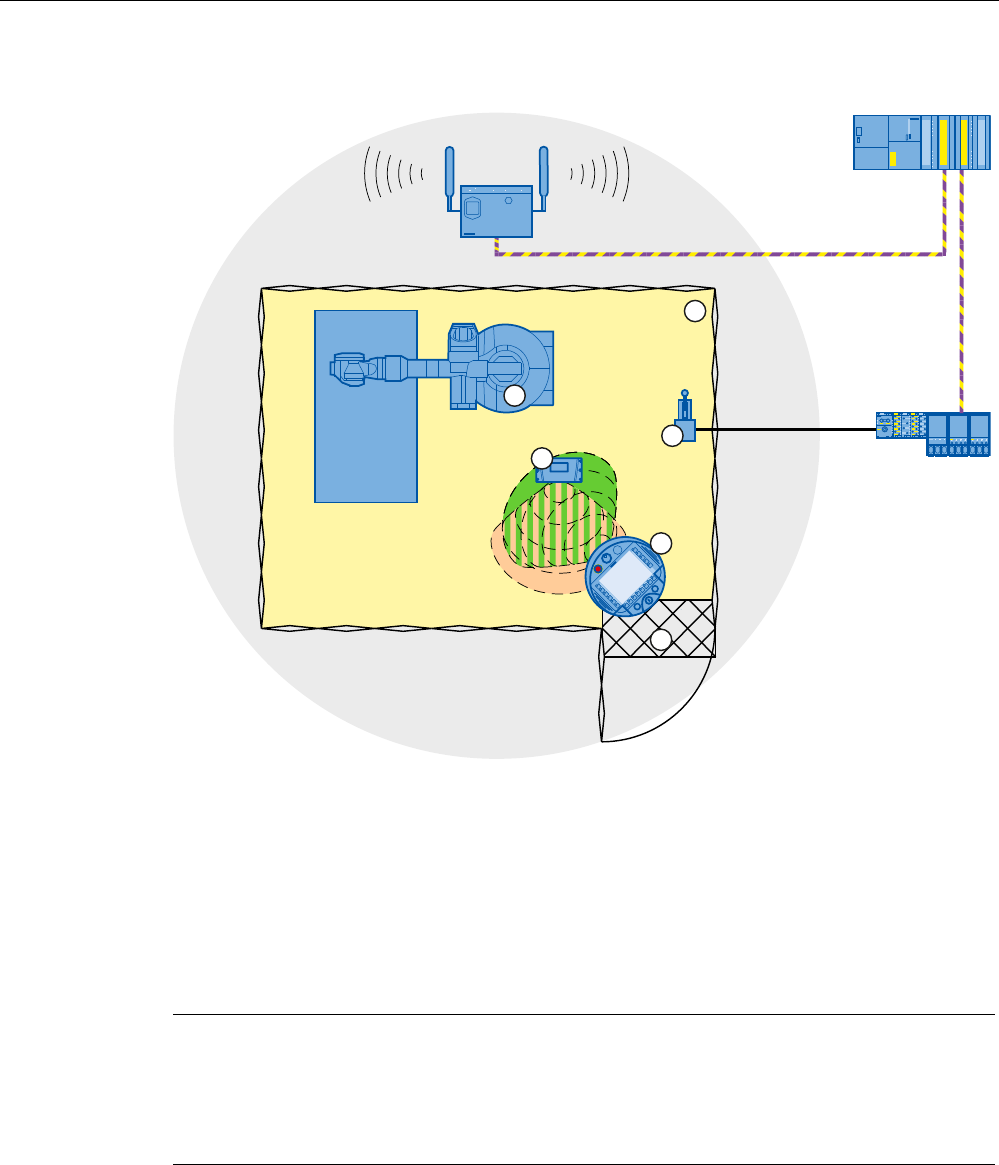
352),VDIH
① Protection zone
② Plant
③ Switch for activating "Override" mode (override switch)
④ Transponder
⑤ HMI device
⑥ Access monitoring
The switch for activating "Override" mode must be inside the protective zone and in an
effective range.
Note
The safety system from the protection zone must be integrated into the system so that the
enabled mode "Override" is automatically disabled upon leaving the protection zone.
You must reactivate the override switch when you return to the protection zone. The
"Override" mode will then be reactivated.
REVIEW ENGLISH
27.07.2010

Fail-safe operation
10.3 Operating the transponder system in a fail-safe mode
Mobile Panel 277F IWLAN V2, Mobile Panel 277F IWLAN (RFID Tag)
262 Operating Instructions, 09/2010, A5E02766325-01
Requirement – activating "Override" mode
● The system has a protection zone.
● The HMI device is integrated.
The "SAFE" LED lights up.
● The HMI device is logged on to the same effective range in which the override switch is
located.
The "RNG" LED lights up.
Procedure
Proceed as follows:
1. Enter the protection zone.
The assigned safety system is activated.
2. Activate the override switch.
"Override" mode is active. The "Effective range quality" screen object is displayed entirely
in green.
The effective range of the transponder is not evaluated. The operation with the HMI
device only occurs in the entire protection zone as if you were in an effective range.
Another HMI device cannot logon to the respective effective range.
Note
You can log on again to this effective range under the following circumstances:
You have deactivated "Override" mode using the override switch.
You have logged the HMI device off from the effective range.
The "RNG" LED is off.
Requirement – deactivating "Override" mode
● "Override" mode is activated.
Procedure
Proceed as follows:
1. Activate the override switch.
"Override" mode is deactivated. The HMI device is logged on in the effective range.
REVIEW ENGLISH
27.07.2010
Fail-safe operation
10.4 RFID tag system run in a fail-safe manner
Mobile Panel 277F IWLAN V2, Mobile Panel 277F IWLAN (RFID Tag)
Operating Instructions, 09/2010, A5E02766325-01 263
10.4 RFID tag system run in a fail-safe manner
10.4.1 Switch-off behavior
The shutdown reaction of the plant will vary according to cause and effect.
DANGER
Shutdown
The shutdown response described in the next sections is only triggered in the plant if the F-
CPU has been programmed accordingly.
Programming the F-CPU accordingly.
The following types of shutdown may occur depending on the operating state of the plant:
● EMERGENCY STOP
● Global rampdown
● Local rampdown
● Shutdown
The following table shows the shutdown reaction depending on the operating state and the
cause:
Cause of the shutdown Operating state
EMERGENCY STOP
button pressed
Communication error
HMI not integrated – –
HMI device is in the
protection zone
EMERGENCY STOP Shutdown HMI device is
logged onto a
machine HMI device is
outside the
protection zone
EMERGENCY STOP Shutdown
HMI
integrated
HMI device is logged off from the
machine
EMERGENCY STOP Global rampdown
See also
Terms for fail-safe operation (Page 38)
REVIEW ENGLISH
27.07.2010
Fail-safe operation
10.4 RFID tag system run in a fail-safe manner
Mobile Panel 277F IWLAN V2, Mobile Panel 277F IWLAN (RFID Tag)
264 Operating Instructions, 09/2010, A5E02766325-01
10.4.2 Logging onto a machine
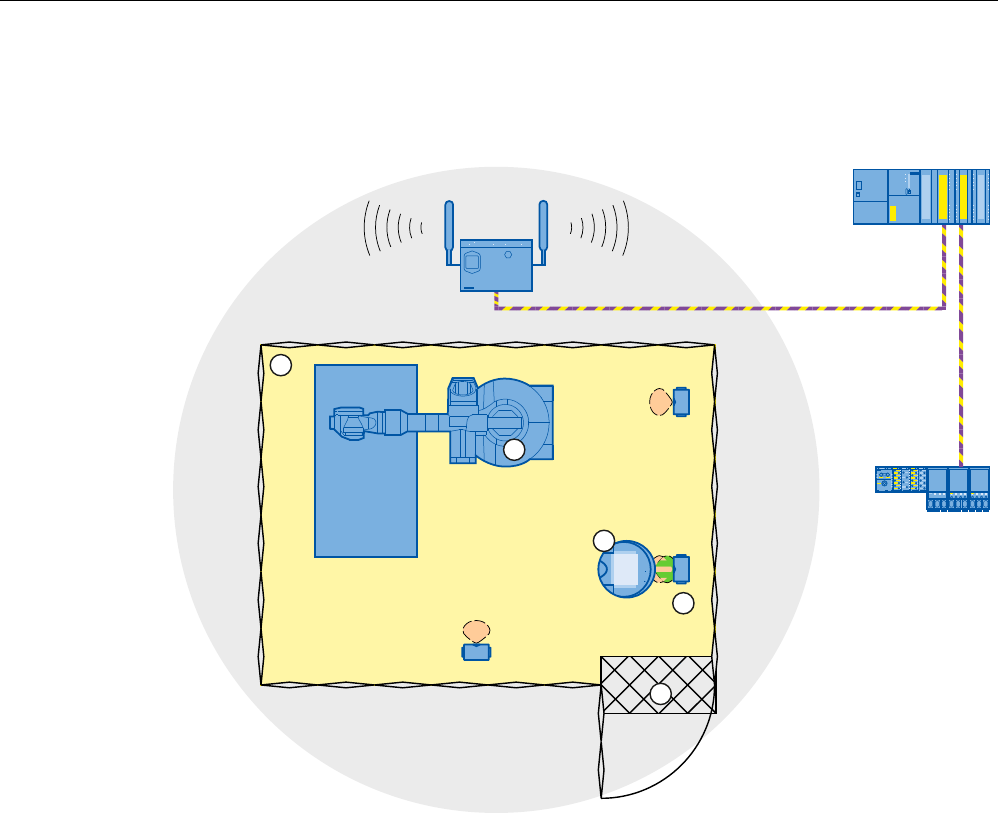
The following figure shows the logon of an HMI device to a machine within a protection zone.
352),VDIH
① Protection zone
② Machine
③ HMI device
④ RFID tag 1
⑤ Access monitoring
Requirement
● The HMI device is connected through WLAN
● RFID tags are accepted
● The HMI device is integrated
REVIEW ENGLISH
27.07.2010
Fail-safe operation
10.4 RFID tag system run in a fail-safe manner
Mobile Panel 277F IWLAN V2, Mobile Panel 277F IWLAN (RFID Tag)
Operating Instructions, 09/2010, A5E02766325-01 265
Procedure - logging onto the protection zone
Proceed as follows:
1. Switch to the screen that contains the "Effective range name (RFID)" button labeled
"Scan".
6FDQ
2. Bring the HMI device into the effective range of the RFID tag to which you want to log on,
for example, "RFID Tag 1".
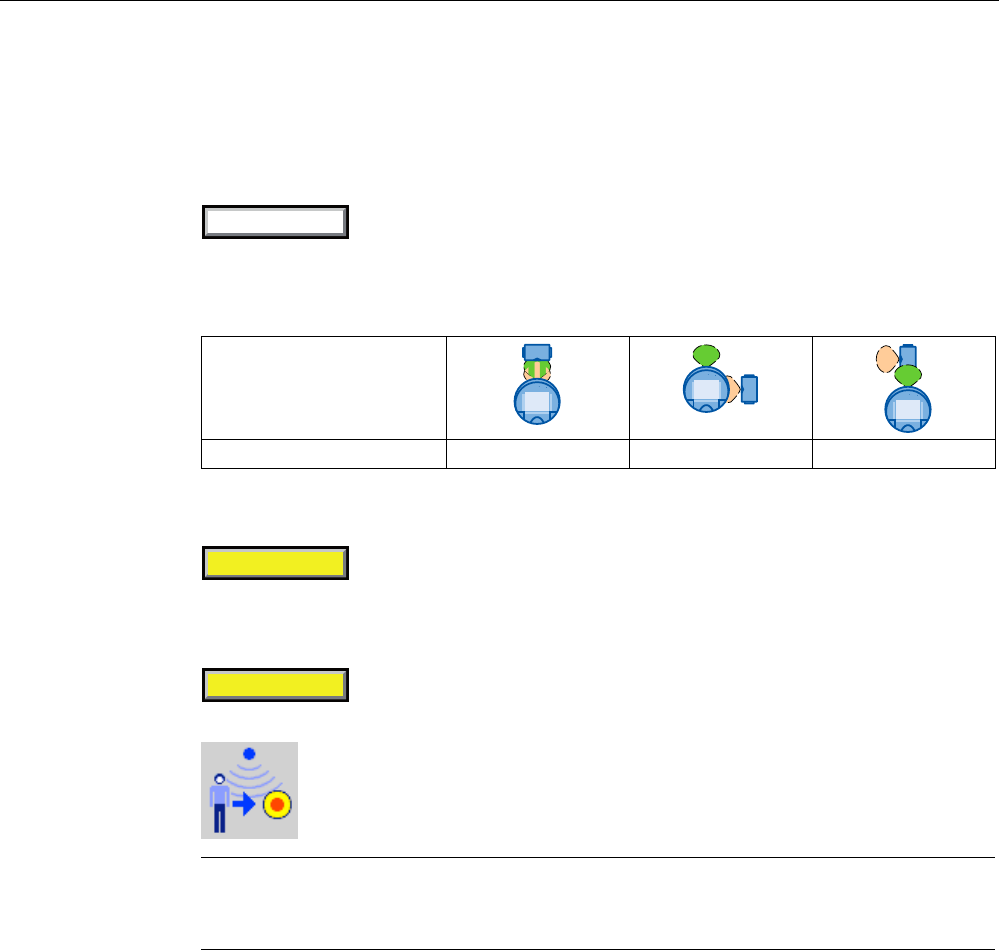
The table below shows when a logon on the effective range of the RFID tag is successful.
Alignment
Logon Possible Not supported Not supported
3. Press the button labeled "Scan".
During the scan operation, the button is yellow and displays the text "Scanning...".
6FDQQLQJ
The HMI device reads the ID of the effective range from the RFID tag. After the data
transfer, the name of the effective range will be briefly displayed on the "Effective range
name (RFID)" operator control, for example, "Robot 1".
5RERW
The "Effective range logon" dialog is then displayed with the following symbol.
Note
As soon as the "Effective range logon" dialog is displayed, you can remove the HMI
device from the effective range of the RFID tag.
4. Enter the ID of the effective range in the text box.
The ID of the effective range is located on the label of the RFID tag.
REVIEW ENGLISH
27.07.2010
Fail-safe operation
10.4 RFID tag system run in a fail-safe manner
Mobile Panel 277F IWLAN V2, Mobile Panel 277F IWLAN (RFID Tag)
266 Operating Instructions, 09/2010, A5E02766325-01
5. Confirm the entry with "OK".
The dialog box closes.
NOTICE
A message appears if the ID of the effective range is incorrect. This dialog must be
acknowledged. Repeat the logon to the effective range with a valid ID.
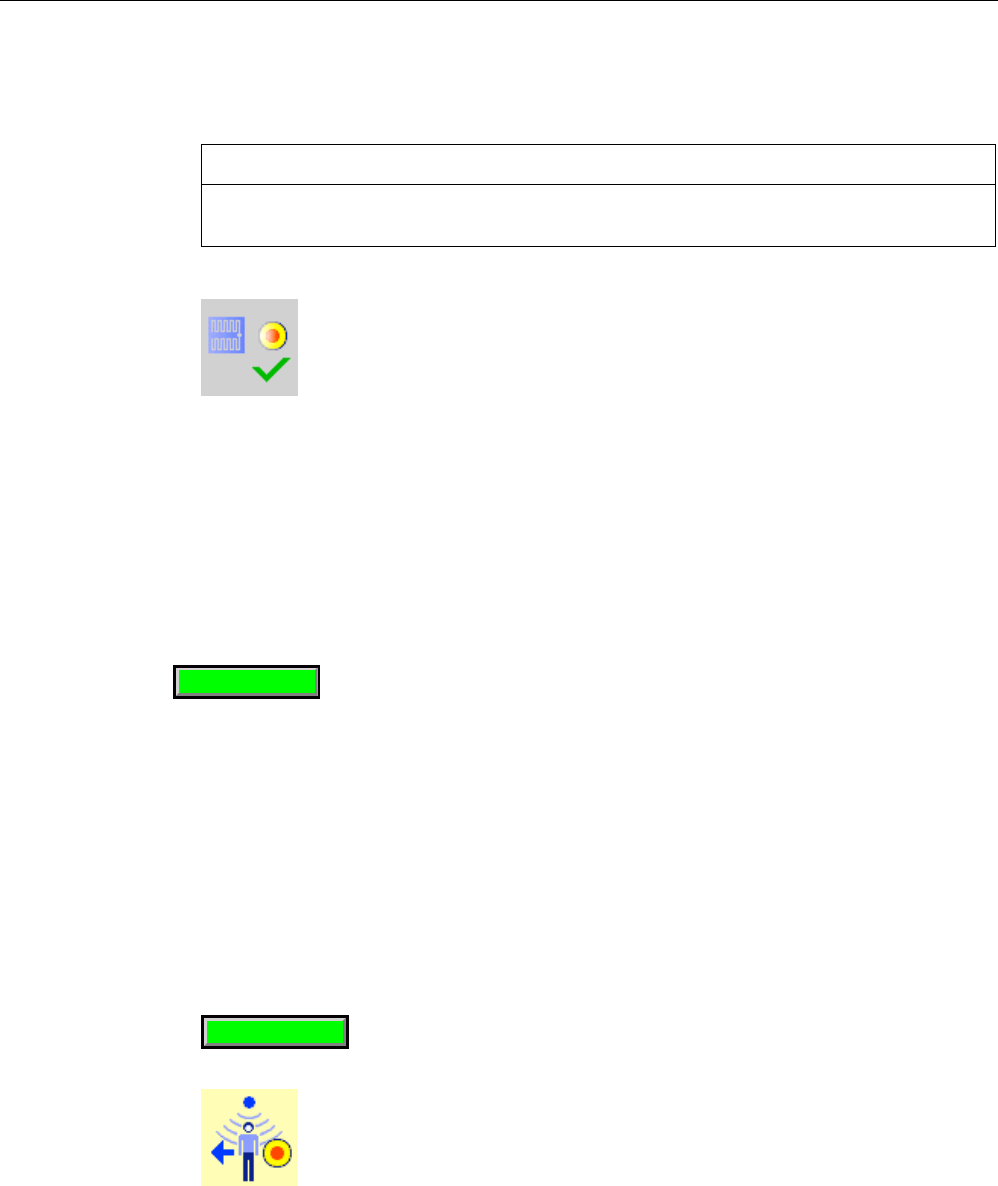
The "Confirmation of logon" dialog is displayed with the following symbol.
6. Confirm the logon to the RFID tag with the enabling button.
The successful logon is indicated by the "RNG" LED on the HMI device.
Result
You are logged onto the machine and the machine can operate within the protection zone in
fail-safe mode. The "Effective range name (RFID)" operator control is shown in green and
labeled with the name of the effective range. The following figure shows the "Effective range
name (RFID)" object after logon to an effective range with the name "Robot 1".
5RERW
10.4.3 Logging off the machine
You do not need to stand directly in front of the RFID tag to log off the machine you are
operating in fail-safe mode.
Procedure
Proceed as follows:
1. Press the "Effective range name (RFID)" operator control.
5DQJHQDPH
The "Effective range logoff" dialog is displayed with the following symbol.
2. Confirm the logoff from the machine with the "OK" button.
The "RNG" LED goes out when the logoff is successfully completed.
REVIEW ENGLISH
27.07.2010
Fail-safe operation
10.4 RFID tag system run in a fail-safe manner
Mobile Panel 277F IWLAN V2, Mobile Panel 277F IWLAN (RFID Tag)
Operating Instructions, 09/2010, A5E02766325-01 267
Result
● The HMI device is logged off the machine.
● The "Effective range name (RFID)" operator control is shown in white and labeled "Scan".
6FDQ
10.4.4 Replacing an RFID tag
If it is not possible to log onto an effective range, the HMI device or RFID tag may be
defective. This section describes the configuration work carried out after replacement of a
defective RFID tag.
Requirement
● The defective RFID tag has been replaced.
● The ID of the defective RFID tag is available.
● The project, in which the RFID tag has failed, is still on the HMI device.
Procedure
Proceed as follows:
1. Switch on the HMI device.
2. Open the Control Panel.
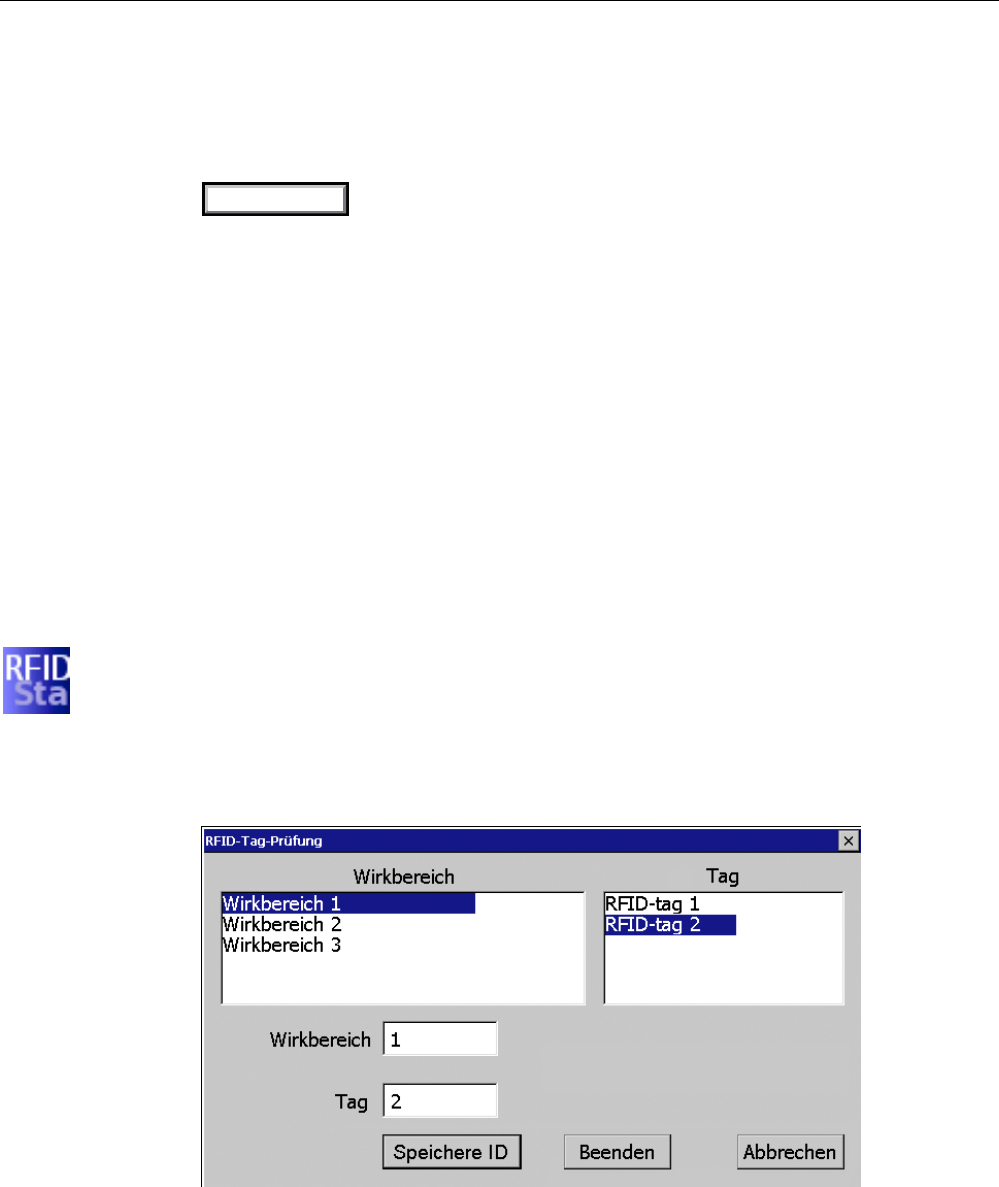
3. Press the "RFID Config" icon.
The following dialog appears:
4. Select the effective range ID in the "Effective range" selection box and the ID of the
defective RFID tag in the "Tag" selection box.
5. Bring the HMI device into the effective range of the RFID tag.
REVIEW ENGLISH
27.07.2010

Fail-safe operation
10.5 Removing the HMI device
Mobile Panel 277F IWLAN V2, Mobile Panel 277F IWLAN (RFID Tag)
268 Operating Instructions, 09/2010, A5E02766325-01
6. Press "Save ID".
The HMI device transmits the ID to the RFID tag. The new RFID tag has the ID of the
previously used RFID tags.
7. Click "Exit" to close the dialog.
8. Close the Control Panel and start the project.
9. Log the HMI device onto a machine to check the new RFID tag.
– When the logon is successful, you can continue working in the project.
– If logon is not possible close the dialog and repeat steps 2 to 8.
See also
Installing an RFID tag (Page 82)
Logging onto a machine (Page 264)
10.5 Removing the HMI device
You have the following options for removing the HMI device:
● Close the project.
● Press and hold the "ON/OFF" button for at least 4 seconds.
WARNING
EMERGENCY STOP button out of service when HMI device is removed
If the HMI device is not integrated in the safety program of the F-CPU, the
EMERGENCY STOP button will be out of service.
To avoid confusion between HMI devices with enabled and disabled EMERGENCY
STOP buttons, only one integrated HMI device should be freely accessible.
If an HMI device is not integrated and not in use, store the HMI device in a location with
protected access.
Requirement
● The project must be started.
● The HMI device is integrated into the safety program of the F-CPU.
● The HMI device is not logged onto a machine.
REVIEW ENGLISH
27.07.2010
Fail-safe operation
10.5 Removing the HMI device
Mobile Panel 277F IWLAN V2, Mobile Panel 277F IWLAN (RFID Tag)
Operating Instructions, 09/2010, A5E02766325-01 269
Procedure
Proceed as follows:
1. Close all open dialogs.
2. Close the project using the operator control designed for this purpose or press the
"ON/OFF" button for more than 4 seconds.
The "Start removal" dialog is displayed with the following symbol.
3. Use the "Yes" button to confirm the removal.
The "Confirm removal" dialog opens with the following symbol.
4. Press an enabling button within 60 seconds.
NOTICE
Global rampdown
A global rampdown will occur, if you do not confirm the "Confirm removal" dialog within
60 seconds with the enabling button.
Press an enabling button within 60 seconds.
The "Confirm removal" dialog closes.
– The "SAFE" LED on the HMI device goes out.
– PROFIsafe communication is terminated.
– The HMI device has been successfully removed from the safety program of the F-
CPU.
– The project is closed.
– If you have pressed the ON/OFF" button during step 1, the HMI device switches off.
See also
Terms for fail-safe operation (Page 38)
REVIEW ENGLISH
27.07.2010

Fail-safe operation
10.5 Removing the HMI device
Mobile Panel 277F IWLAN V2, Mobile Panel 277F IWLAN (RFID Tag)
270 Operating Instructions, 09/2010, A5E02766325-01
REVIEW ENGLISH
27.07.2010

Mobile Panel 277F IWLAN V2, Mobile Panel 277F IWLAN (RFID Tag)
Operating Instructions, 09/2010, A5E02766325-01 271
Operating a project 11
11.1 Starting the project
In the following chapters, the operating and display elements that can be configured in
WinCC flexible and their importance and meaning are explained.
Note
Some operations with the project may require in-depth knowledge about the specific plant on
the part of the operator. Proceed with caution, for example, when you use jog mode. Refer to
your plant documentation for additional information.
Requirement
In order to switch on the HMI device and start the project, the following requirements must
be met:
● The main rechargeable battery is charged and inserted in the HMI device.
If a main battery is not available, place the HMI device into the charging station.
● The project has been transferred to the HMI device.
● The radio signal from the WLAN is sufficiently strong.
● If effective ranges are configured in the project, you will need to perform an acceptance
test when the project is started for the first time. See section "Commissioning the plant
(Page 241)".
● SSIDs for up to 3 WLAN networks can be stored in the project.
The SSIDs stored in the project must be set in the HMI device. If one of the 3 WLAN
networks is available when the HMI device is started, the HMI device connects
automatically.
Procedure
Note
If you want to use the HMI device in fail-safe mode, the conditions for mail-safe mode must
be fulfilled. See section "Fail-safe operation (Page 253)".
REVIEW ENGLISH
27.07.2010

Operating a project
11.1 Starting the project
Mobile Panel 277F IWLAN V2, Mobile Panel 277F IWLAN (RFID Tag)
272 Operating Instructions, 09/2010, A5E02766325-01
Proceed as follows:
1. Press the "ON/OFF" button.
The HMI device performs the following tasks:
– The HMI device starts.
– The "PWR" LED lights up.
– The "BAT" LED shows the remaining charge of the main rechargeable battery.
– The WLAN connection is established.
– The WLAN connection is established as follows:
The "COM" LED will flash as long as the WLAN connection is established. The
configured sequence of SSIDs determines the order in which the HMI device will
attempt to connect to the WLAN networks.
If the HMI device cannot establish a connection with any of the 3 configured WLAN
networks, the HMI device will attempt to connect to other WLAN networks.
For this to happen, connection to other WLAN networks must be authorized in the
project.
Once the HMI device has established the WLAN connection, the "COM" LED lights
up.
The HMI device is integrated.
If the HMI device is unable to establish a connection to a WLAN network, "Not
Connected" is displayed in the status line of the dialog box.
The project cannot be started. Contact the network administrator.
2. Applies to the initial project start:
Perform the acceptance test of the plant.
3. Start the project.
The following is performed at the start:
– The HMI device is integrated.
– The emergency stop button becomes active.
– The HMI device displays the start screen of the project.
Result
You can operate the plant on the HMI device in fail-safe operation.
REVIEW ENGLISH
27.07.2010

Operating a project
11.2 Operator input options
Mobile Panel 277F IWLAN V2, Mobile Panel 277F IWLAN (RFID Tag)
Operating Instructions, 09/2010, A5E02766325-01 273
11.2 Operator input options
Introduction
Some operations with the project may require in-depth knowledge about the specific plant on
the part of the operator. Proceed with caution, for example, when you use jog mode. More
detailed information is available in your plant documentation.
CAUTION
Unintentional action
If you press several operator controls at once, you may trigger an unintentional action.
Do not carry out several operations simultaneously.
When using the touch screen:
Always touch only one operating element on the screen
When using an external keyboard:
Do not press more than two keys simultaneously
Operator input options
Once the project is transferred to the HMI device, you can operate and monitor active
processes during the process control phase. You have the following operating options:
● Touch screen
The operating elements shown in the project images are touch-sensitive. Touch objects
are operated in the same way as mechanical keys. You trigger an operator control by
pressing it with your finger. To double-click them, touch an operating element twice in
succession.
Note
Observe the notes about the operation in chapter "Overview (Page 101)".
● External input device
The use of external input devices is recommended for the commissioning phase. The
following external input devices can be connected through the USB port:
– Keyboard
You can use an external keyboard to operate a project in exactly the same way as
with the screen keyboard.
Note
The function keys of the external keyboard are disabled.
– Mouse
You can use an external mouse to operate a project in exactly the same way as with
the touch screen of the HMI device.
REVIEW ENGLISH
27.07.2010

Operating a project
11.2 Operator input options
Mobile Panel 277F IWLAN V2, Mobile Panel 277F IWLAN (RFID Tag)
274 Operating Instructions, 09/2010, A5E02766325-01
Feedback from an operator control
The HMI device provides optical feedback as soon as it detects that an operating elements
has been selected. The operating element receives the focus and is selected. This selection
is independent of any communication with the PLC. Therefore this selection does not
indicate whether the relevant action is actually executed or not.
The selection of an operator control can deviate from the standard. More detailed information
is available in your plant documentation.
The type of optical operation feedback depends on the operator control:
● Buttons
The HMI device outputs different views of the "Pressed" and "Unpressed" states,
provided the configuration engineer has configured a 3D effect:
– "Pressed" state
– "Not pressed" state
The configuration engineer determines the appearance of a marked field, for example, line
width and color for the focus.
● Invisible button
By default, invisible buttons are not displayed as pressed when they are touched. No
optical operation feedback is provided in this case.
The configuration engineer may, however, configure invisible buttons so that their outline
appears as lines when touched. This outline remains visible until you select another
operating element.
● I/O field
When you select an I/O field, the content of the I/O field is displayed against a colored
background. With touch operation, a screen keyboard is displayed for the entering of
values.
REVIEW ENGLISH
27.07.2010

Operating a project
11.3 Direct keys
Mobile Panel 277F IWLAN V2, Mobile Panel 277F IWLAN (RFID Tag)
Operating Instructions, 09/2010, A5E02766325-01 275
11.3 Direct keys
A direct key on the HMI device is a direct way to set a bit in the I/O area of the controller. A
direct key enables an operation with a fast response time. Fast response time is essential,
for example, for jogging mode.
NOTICE
Leaving the WLAN
Note that leaving the WLAN area will cause the PROFINET IO device to fail and therefore
result in a PLC stop.
Determine suitable programming measures in the PLC, in order to prevent a PLC stop.
Refer to your plant documentation for additional information.
Direct key immediately effective
If you trigger an operator control with direct key functionality in an active project, the
corresponding function is always executed, regardless of the screen display at the time.
Exception: Function keys are inactive, while a safety-related message is displayed.
Avoid pressing a direct key unintentionally.
Note
A direct key is enabled when both of the following conditions are satisfied:
The HMI device is in the WLAN with sufficient radio signal.
The HMI device is in "Offline" mode.
The following objects can be configured as a direct key:
● Buttons
● Function keys
● Screen number
● Handwheel
● Illuminated pushbutton
● Key-operated switch
Note
Direct keys result in additional power load on the HMI device.
Additional information is available in the "WinCC flexible, Communication" system manual.
REVIEW ENGLISH
27.07.2010

Operating a project
11.4 Setting the project language
Mobile Panel 277F IWLAN V2, Mobile Panel 277F IWLAN (RFID Tag)
276 Operating Instructions, 09/2010, A5E02766325-01
11.4 Setting the project language
The HMI device supports multilingual projects. You must have configured a corresponding
operator control which lets you change the language setting on the HMI device during
runtime.
The project always starts with the language set in the previous session.
Requirement
● The required language for the project must be available on the HMI device
● The language switching function must be logically linked to a configured operator control
such as a button
Selecting a language
You can change project languages at any time. Language-specific objects are immediately
output to the screen in the new language when you switch languages.
The following options are available for switching the language:
● A configured operator control switches from one language to the next in a list
● A configured operator control directly sets the desired language
More detailed information is available in your plant documentation.
REVIEW ENGLISH
27.07.2010
Operating a project
11.5 Operating the screen keyboard in the project
Mobile Panel 277F IWLAN V2, Mobile Panel 277F IWLAN (RFID Tag)
Operating Instructions, 09/2010, A5E02766325-01 277
11.5 Operating the screen keyboard in the project
If you do not use an external keyboard, use the screen keyboard to enter numeric and
alphanumeric characters. As soon as you touch a text box, a numeric or alphanumeric
screen keyboard is displayed, depending on the type of the text box.
Display methods for the screen keyboard
You can change the type of display for the screen keyboard and move its position on the
screen.
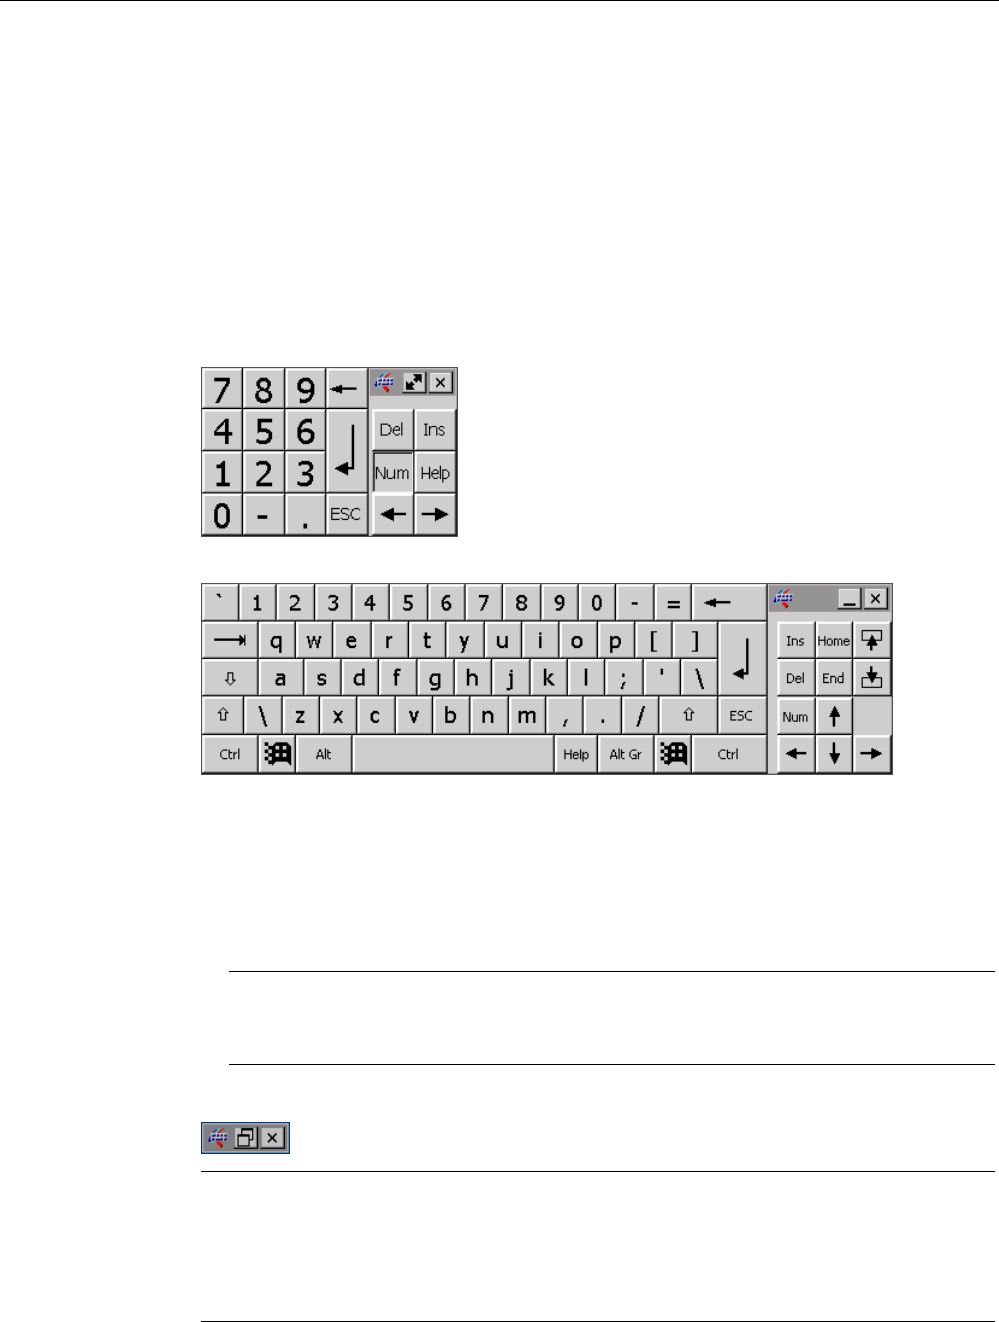
● Numerical screen keyboard
● Alphanumerical screen keyboard
The alphanumerical screen keyboard has the following levels.
– Normal level
– Shift level
The shift level includes uppercase letters.
– Special character level
Note
The ' character (button between ";" and "\") appears only when followed by a space. If
the ' character is followed by a letter, then the result will be an accent, such as "á".
● Reduced screen keyboard
Note
When the screen keyboard is open, PLC job 51, "Select screen" has no function.
The screen keyboard display is independent of the configured project language.
Language switching in the project has no influence on the alphanumerical screen
keyboard. This means you cannot enter Cyrillic or Asian characters.
REVIEW ENGLISH
27.07.2010
Operating a project
11.5 Operating the screen keyboard in the project
Mobile Panel 277F IWLAN V2, Mobile Panel 277F IWLAN (RFID Tag)
278 Operating Instructions, 09/2010, A5E02766325-01
Procedure for moving the screen keyboard
Proceed as follows:
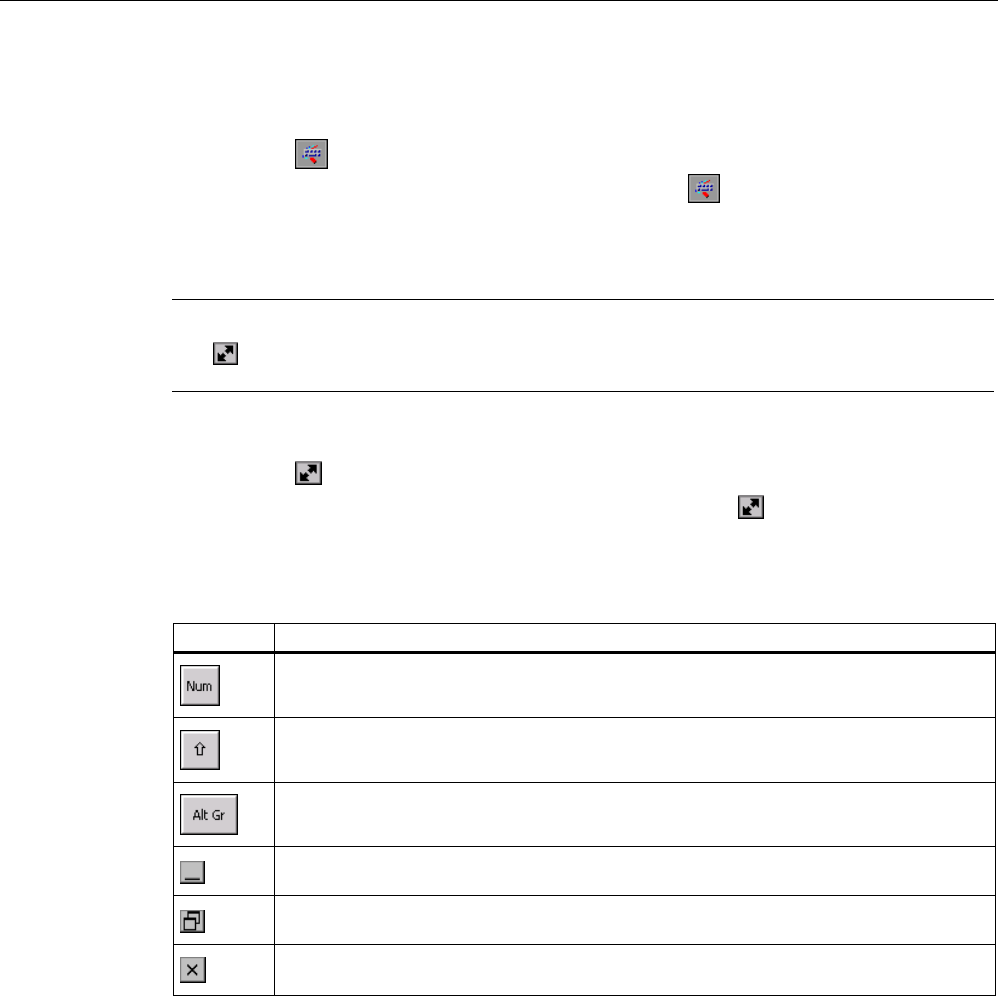
1. Touch the symbol and move the screen keyboard on the touch screen.
2. When the desired position is reached, release the icon .
Procedure for adjusting the size of the screen keyboard
Note
The icon only appears on the screen keyboard if in the "Siemens HMI InputPanel" dialog
you have selected the "Show Resize button" check box.
Proceed as follows:
1. Touch the symbol and drag the screen keyboard to the appropriate size.
2. When the size you want is reached, release contact with the icon.
Changing the display of the screen keyboard
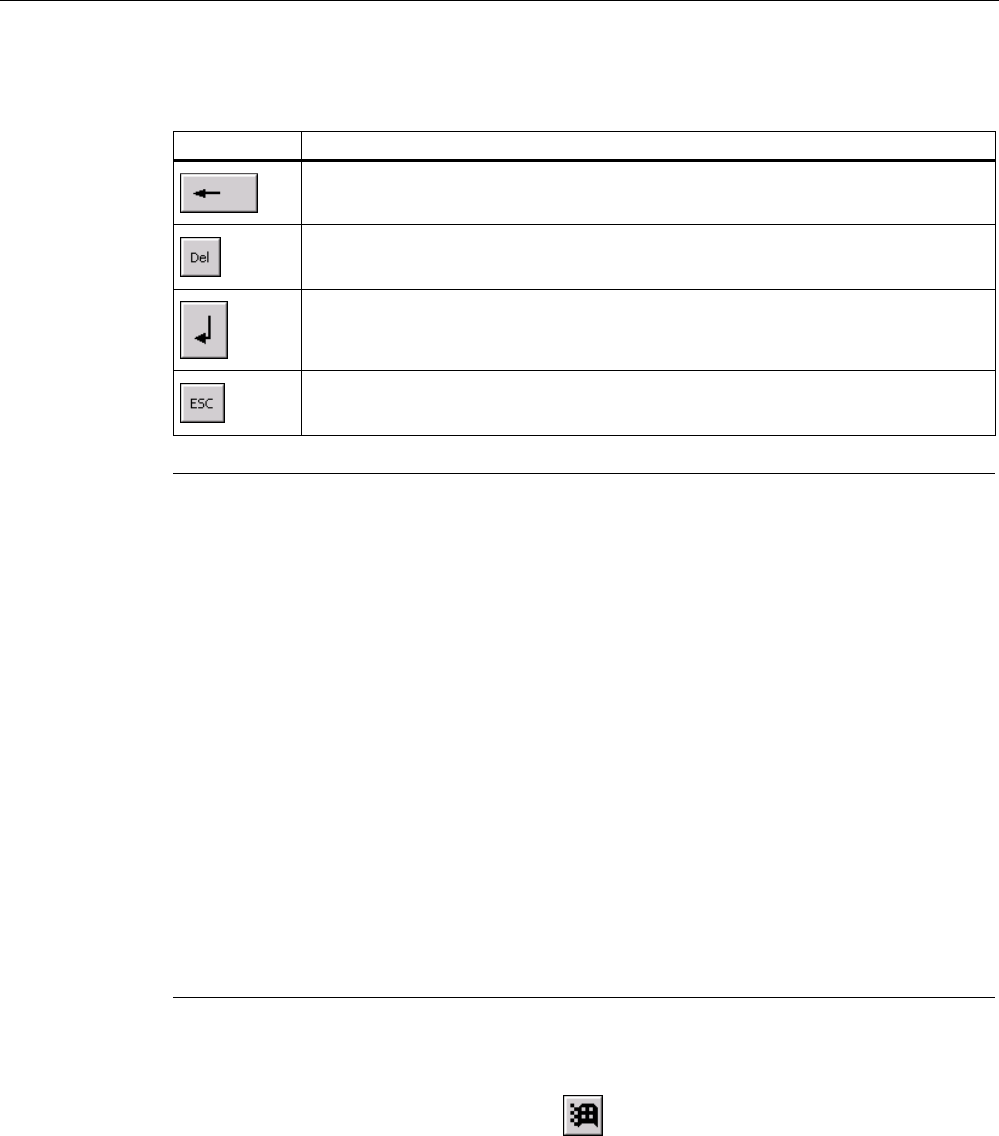
Key Function
Switching between the numerical and alphanumerical keyboard
Switching between the normal level and Shift level of the alphanumerical screen
keyboard
Switchover to special characters
Switching from full display to reduced display
Switching from reduced display to full display
Closing of reduced display of the screen keyboard
REVIEW ENGLISH
27.07.2010
Operating a project
11.5 Operating the screen keyboard in the project
Mobile Panel 277F IWLAN V2, Mobile Panel 277F IWLAN (RFID Tag)
Operating Instructions, 09/2010, A5E02766325-01 279
Entering data
Key Function
Delete character left of cursor
Delete character right of cursor
Confirm entry and close the screen keyboard
Cancel input
Note
Data input - numerical text box
Hexadecimal values
When you enter a value in hexadecimal format, the alphanumerical screen keyboard
opens.
Decimal places
The configuration engineer can define the number of decimal places for a numerical text
box. The number of decimal places is checked when you enter a value in this type of I/O
field.
– Decimal places in excess of the limit are ignored.
– Empty decimal places are filled with "0".
Limits
A tag can be configured with limits. If you enter a value outside these limits, it will be
rejected.
If an alarm view is configured, a system event is triggered and the original value is
displayed again.
Data input – date and time
When entering the date and time, note that their format is determined by the configured
project language.
Opening the Windows CE taskbar
You open the Windows CE taskbar with the key.
REVIEW ENGLISH
27.07.2010
Operating a project
11.6 Device-specific displays
Mobile Panel 277F IWLAN V2, Mobile Panel 277F IWLAN (RFID Tag)
280 Operating Instructions, 09/2010, A5E02766325-01
Displaying infotext
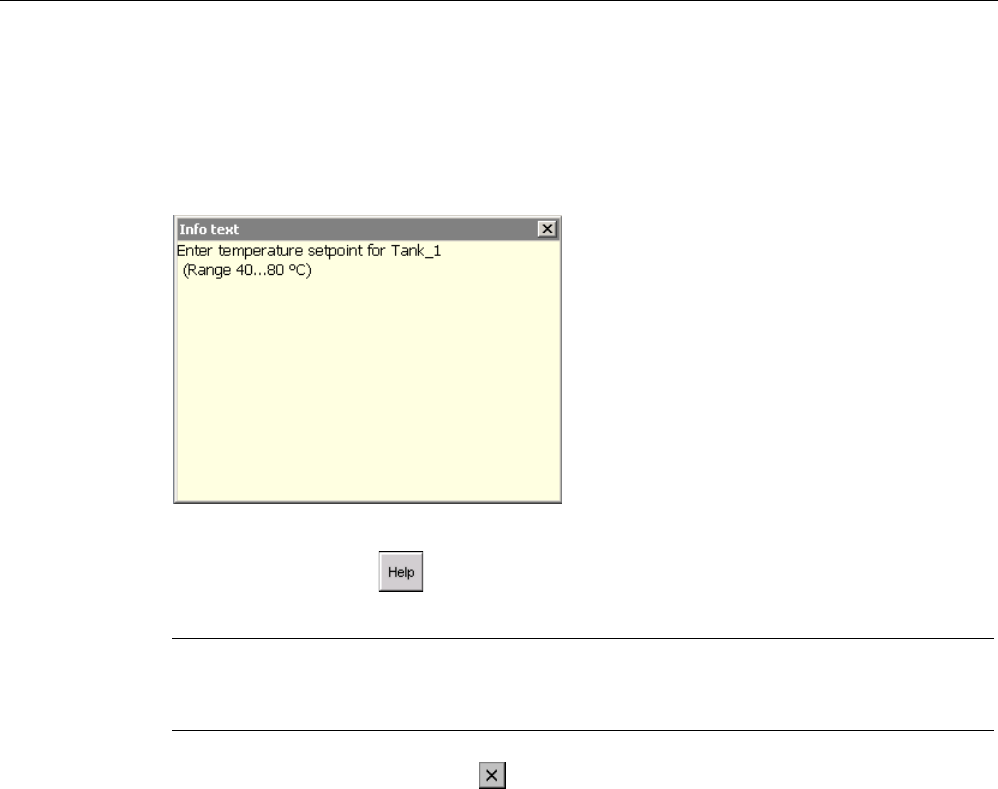
The configuration engineer uses infotext to provide additional information and operating
instructions. There may be infotext for HMI screens and operator controls in the project.
The infotext for an I/O field may contain, for example, information on the value to be entered.
The screen keyboard appears on the HMI device touch screen when you touch an operator
control that requires input. If an infotext was configured for the current operator control, call
up the infotext with the button. If no infotext is available for the current operator control,
the infotext for the current HMI screen will be displayed.
Note
If an infotext was configured for the current control object as well as the current HMI screen,
you can switch between both infotexts by touching the infotext window.
Close the infotext window with the button.
Depending on the project, infotext can also be called by an operator control configured for
this purpose. For additional information, refer to the online help of WinCC flexible.
11.6 Device-specific displays
11.6.1 Showing the battery charge
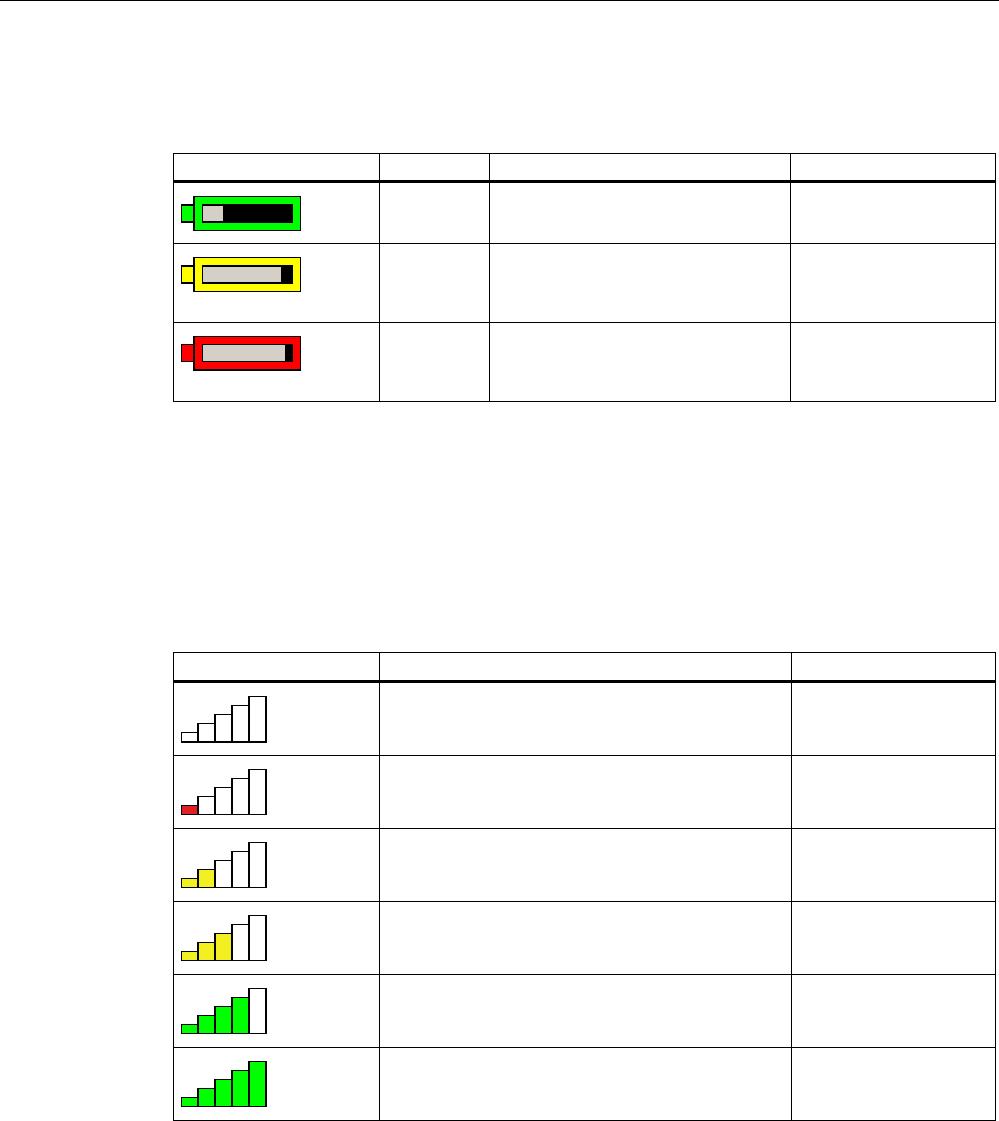
The "Battery" object indicates the remaining charge of the main rechargeable battery.
Charge the main rechargeable battery in time or replace it. Read the information provided in
section "Replacing and charging the main rechargeable battery (Page 89)".
REVIEW ENGLISH
27.07.2010
Operating a project
11.6 Device-specific displays
Mobile Panel 277F IWLAN V2, Mobile Panel 277F IWLAN (RFID Tag)
Operating Instructions, 09/2010, A5E02766325-01 281
The amount of charge for the main rechargeable battery is shown by the "Battery" object as
follows:
Icon Color Meaning Charge level
Green The main rechargeable battery is
sufficiently charged.
> 20 %
Yellow The charge is low.
The main rechargeable battery
must be charged or replaced.
6% to 20 %
Red The charge is very low.
The main rechargeable battery
must be charged or replaced.
< 6 %
11.6.2 Displaying WLAN quality
The "WLAN quality" object indicates the signal strength of the wireless network at the
location of the HMI device. The HMI device measures the signal strength and depicts it with
the "WLAN quality" object.
The signal strength of wireless network is indicated by the "WLAN quality" object as follows:
Icon Meaning Signal strength
No wireless connection No signal
Very poor wireless connection ≤ 20%
Poor wireless connection ≤ 40%
> 20%
Wireless connection OK ≤ 60%
> 40%
Good wireless connection ≤ 80%
> 60%
Very good wireless connection > 80%
REVIEW ENGLISH
27.07.2010
Operating a project
11.6 Device-specific displays
Mobile Panel 277F IWLAN V2, Mobile Panel 277F IWLAN (RFID Tag)
282 Operating Instructions, 09/2010, A5E02766325-01
11.6.3 Display "effective range name" object
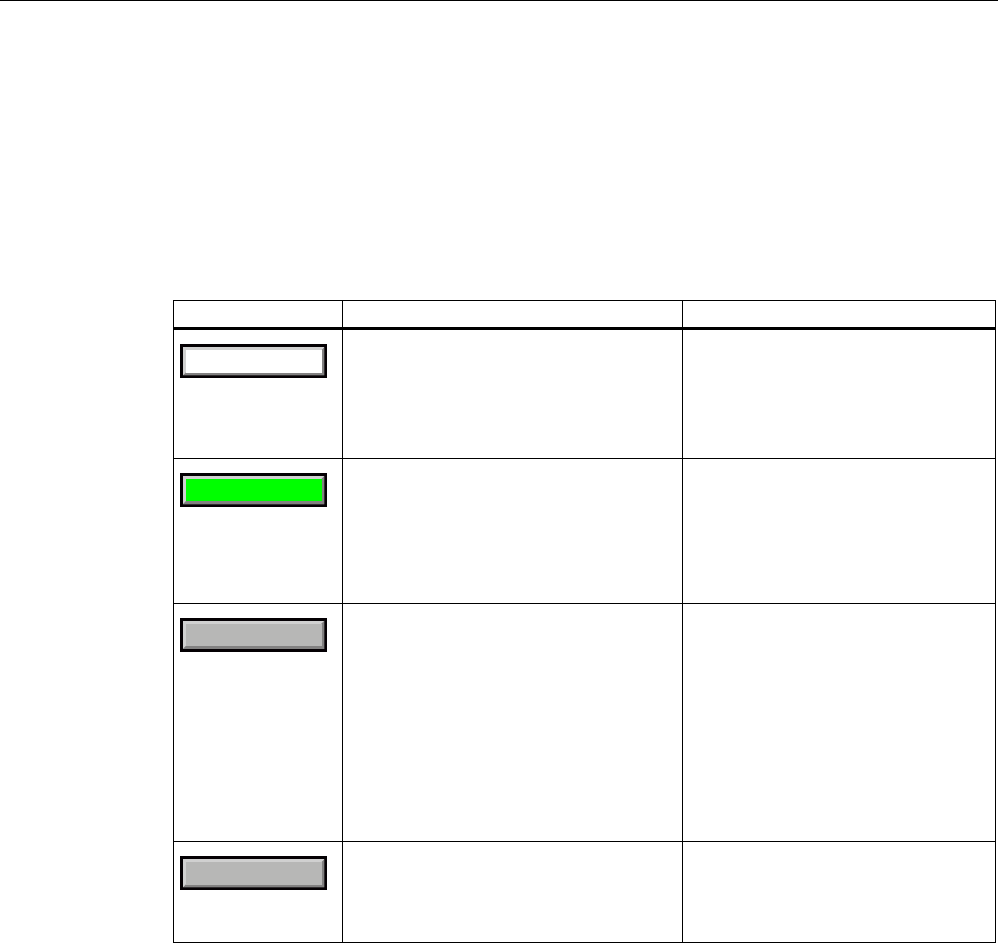
The "effective range label" object exists exclusively for the Mobile Panel 277F IWLAN V2
HMI device. The "effective range name" object indicates the following:
● Name of the effective range in which the HMI device is located.
● Logon status
The effective range is displayed by the "effective range label" object as follows:
Symbol Meaning Logon
5DQJHQDPH
The HMI device is within the effective
range shown.
The HMI device is not logged onto the
effective range.
The enabling button is not enabled.
It is possible to log onto the effective
range.
5DQJHQDPH
The HMI device is within the effective
range shown and is logged onto the
effective range.
Using the enabling buttons, safe
operation in the effective range is
possible.
The HMI device is logged on in the
effective range.
5DQJHQDPH
The HMI device is within the effective
range shown.
The enabling button is not enabled
Logon to the effective range is
rejected because a different HMI
device is already logged on.
The following applies when using the
"Override" mode:
You cannot log onto an effective
range as long as override switch is
activated – even when no other HMI
device is logged on in the effective
range.
The HMI device is outside all of the
effective ranges.
The enabling button is not enabled.
It is not possible to log onto the
effective range.
You can only log on within the
effective range.
REVIEW ENGLISH
27.07.2010
Operating a project
11.6 Device-specific displays
Mobile Panel 277F IWLAN V2, Mobile Panel 277F IWLAN (RFID Tag)
Operating Instructions, 09/2010, A5E02766325-01 283
11.6.4 Displaying the "Effective range name (RFID)" object
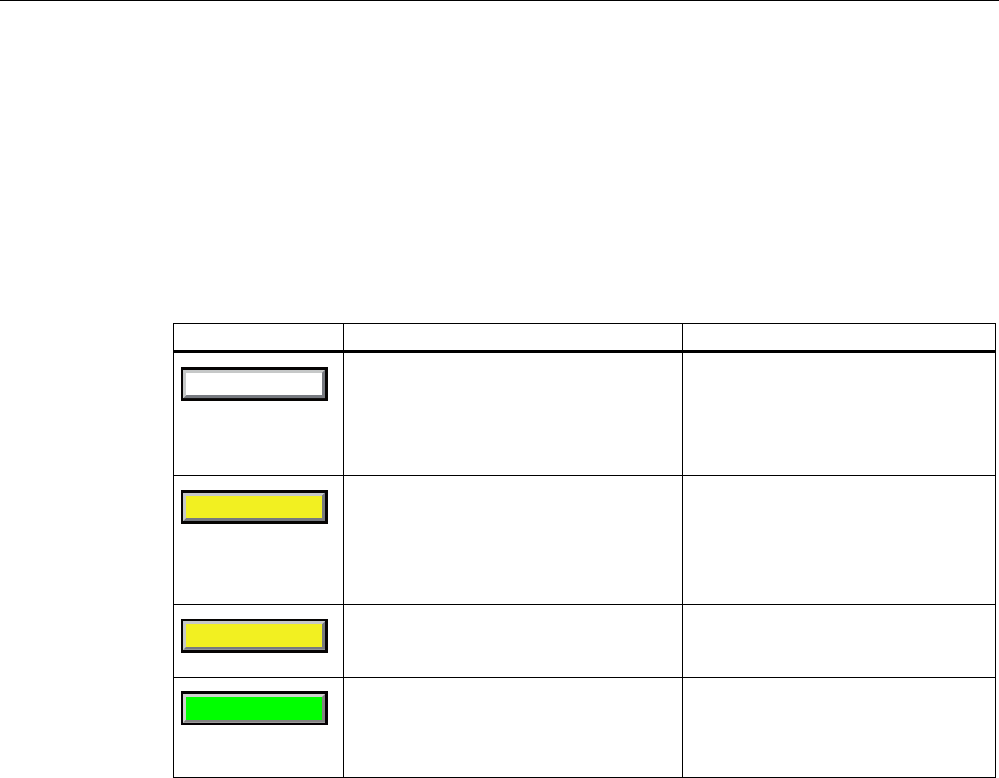
The "Effective range name (RFID)" object is only available for an HMI device of the RFID tag
system. The "Effective range name (RFID)" object displays the following information:
● Logon status
● "Scan", "Scanning..." or name of the effective range associated with the machine on
which the HMI device is logged on
The "Effective range name (RFID)" object can show the following operating states:
Icon Operating state Logon
6FDQ
The HMI device is not logged onto a
machine.
The enabling button is not enabled.
It is not possible to log onto a
machine.
To log onto a machine, the user must
press the operator control and
search for effective ranges.
6FDQQLQJ
The user has pressed the operator
control to search for effective ranges.
The HMI device searches for an
effective range.
The enabling button is not enabled.
Logon can only take place when the
HMI device has detected an effective
range.
5RERW
The HMI device has detected the
effective range, "Robot 1".
The logon to the machine associated
with the "Robot 1" effective range is
possible.
5RERW
The user is logged onto the machine
associated with the "Robot 1" effective
range.
The enabling button is enabled.
–
11.6.5 Display "effective range quality" object
The "effective range quality" object shows if the HMI device is in the center of the effective
range or at the edge of the effective range. In contrast to the "WLAN quality" object, the
signal strength is not decisive. The HMI device calculates the effective range quality on the
basis of the distance between it and the assigned transponders.
The "Effective range quality" is then also updated if the HMI device is not logged onto the
effective range.
The "Effective range name" object indicates which effective range this concerns.
REVIEW ENGLISH
27.07.2010
Operating a project
11.6 Device-specific displays
Mobile Panel 277F IWLAN V2, Mobile Panel 277F IWLAN (RFID Tag)
284 Operating Instructions, 09/2010, A5E02766325-01
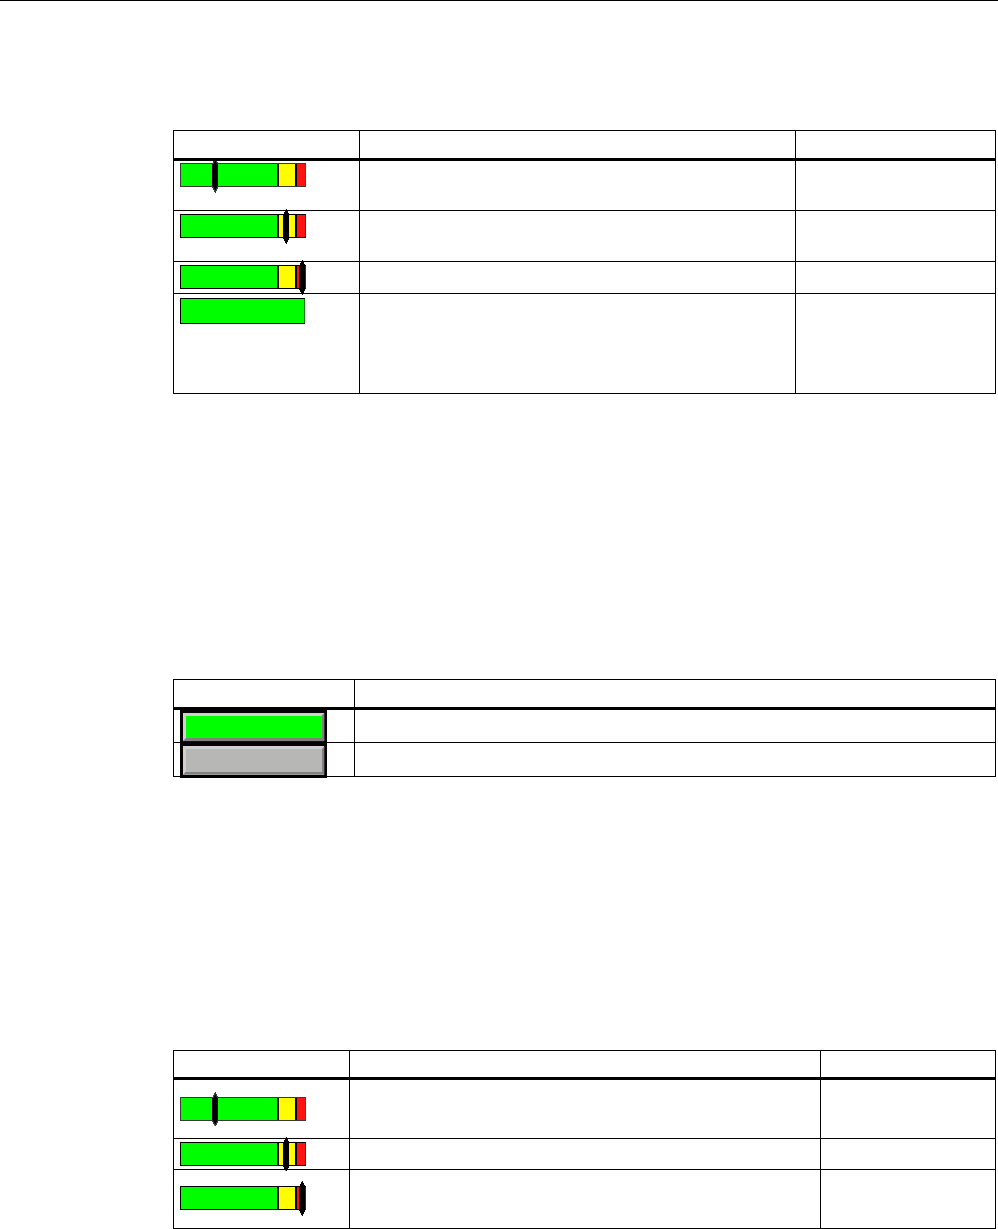
The effective range quality is displayed by the "effective range quality" object as follows:
Icon Meaning Quality
The HMI device is located in the center of the
effective range.
>15 %
The HMI device is at the border of an effective
range.
1% to 15%
The HMI device is not within the effective range. 0 %
"Override" mode is active.
The distance of the HMI device to the transponders
is not evaluated. See section "Determine the current
effective range and current zone (Page 256)".
–
Additional information is available in the "Planning the installation location of transponders
(Page 67)" section.
11.6.6 Display "zone name" object
The "Zone name" object shows the names of the zone in which the HMI device is currently
located.
The zone is displayed by the "zone label" object as follows:
Icon Meaning
=RQHQQDPH
The HMI device is within the indicated zone.
The HMI device is not inside any zone.
11.6.7 Display "zone quality" object
The "zone quality" object shows if the HMI device is in the center of the zone or at the edge
of the zone. Unlike with "WLAN quality", the HMI device does not measure signal strength.
The HMI device calculates the quality of the wireless signal from the distance between it and
the assigned transponders.
The "Zone name" object indicates which zone this concerns.
Icon Meaning Quality
The HMI device is within a zone. > 15 %
The HMI device is at the limits of a zone. 1% to 15%
The HMI device is not within any zone. 0 %
REVIEW ENGLISH
27.07.2010

Operating a project
11.7 Project security
Mobile Panel 277F IWLAN V2, Mobile Panel 277F IWLAN (RFID Tag)
Operating Instructions, 09/2010, A5E02766325-01 285
11.7 Project security
11.7.1 Overview
Design of the security system
The configuration engineer can protect the operation of a project by implementing a security
system. The security system is based on authorizations, user groups and users.
If operator controls protected by a password are pressed, the HMI device first requests that
you log on. A logon screen is displayed in which you enter your user name and password.
After logging on, you can press the operator controls for which you have the necessary
authorizations.
The logon dialog can be set up by the configuration engineer via an individual operator
control. Similarly, an operator control can be configured for logoff. After logging off, objects
with password protection can no longer be operated – you need to log on again.
Refer to your plant documentation for additional information.
Central user administration using SIMATIC Logon
Users, user groups and authorizations can be stored on a central server.
If user administration cannot contact the server, an error message is displayed. If this is the
case, you can only log on locally. More detailed information is available in your plant
documentation.
The operation of SIMATIC Logon differs as follows:
● The simple user display is not supported
● Users cannot be deleted
● You cannot change your logout time
● When changing the password, you must enter it twice for security reasons
● The domain name is also indicated in the "User" field
User groups and authorizations
Project-specific user groups are created by the configuration engineer. The "Administrators"
and "PLC User" groups are included in all projects by default. User groups are assigned
authorizations. Authorization required for an operation is specifically defined for each
individual object and function in the project.
Users and passwords
Each user is assigned to exactly one user group.
The following persons are allowed to create users and assign them passwords:
REVIEW ENGLISH
27.07.2010

Operating a project
11.7 Project security
Mobile Panel 277F IWLAN V2, Mobile Panel 277F IWLAN (RFID Tag)
286 Operating Instructions, 09/2010, A5E02766325-01
● The configuration engineer during configuration
● The administrator on the HMI device
● A user with user management authorization on the HMI device
Irrespective of the user group, each user is allowed to change his own password.
Logoff times
A logoff time is specified in the system for each user. If the time between any two user
actions, such as entering a value or changing screens, exceeds this logoff time, the user is
automatically logged off. The user must then log on again to continue to operate objects
assigned password protection.
Backup and restore
Note
Backup and restore is not available to central user administration with SIMATIC Logon.
The user data is encrypted and saved on the HMI device to protect it from loss due to power
failure.
The users, passwords, group assignments and logoff times set up on the HMI device can be
backed up and restored. This prevents you having to enter all of the data again on another
HMI device.
NOTICE
The currently valid user data is overwritten in the following cases:
Depending on the transfer settings, when the project is transferred again
Upon restore of a backed-up project
Upon import of the user administration via an operator control.
More detailed information is available in your plant documentation.
The retransferred or restored user data and passwords are valid with immediate effect.
Number of characters for user, password and user view
Number of characters
Length of user name, maximum 40
Length of password, minimum 3
Length of password, maximum 24
Entries in user view, maximum 50
REVIEW ENGLISH
27.07.2010
Operating a project
11.7 Project security
Mobile Panel 277F IWLAN V2, Mobile Panel 277F IWLAN (RFID Tag)
Operating Instructions, 09/2010, A5E02766325-01 287
11.7.2 User View
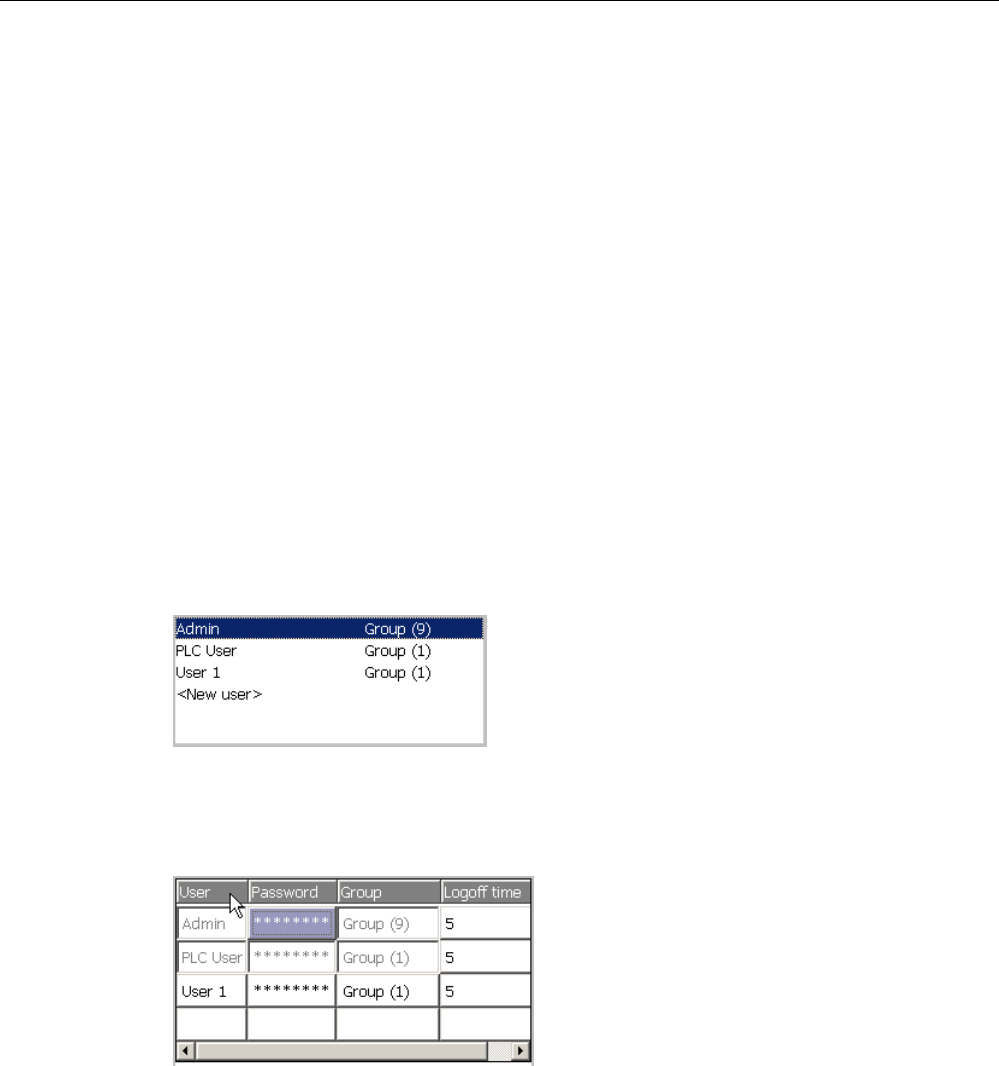
The user view is used to show user accounts configured on the HMI device.
● If you are an administrator or a user with administrator rights, you can see all user
accounts configured on the HMI device in the user view.
● If you are a user without user management rights, you can only see your personal user
account.
The authorizations of a user after logging on depends on the user group to which the user
belongs.
More detailed information is available in your plant documentation.
A simple or extended user view can be configured in the project. The two user views offer
the same functions. The presentation of information differs.
Simple user view
If you are not logged onto the HMI device, the only entry contained in the simple user view is
"<ENTER>".
If you are logged onto the HMI device, the simple user view only displays the user name and
user group.
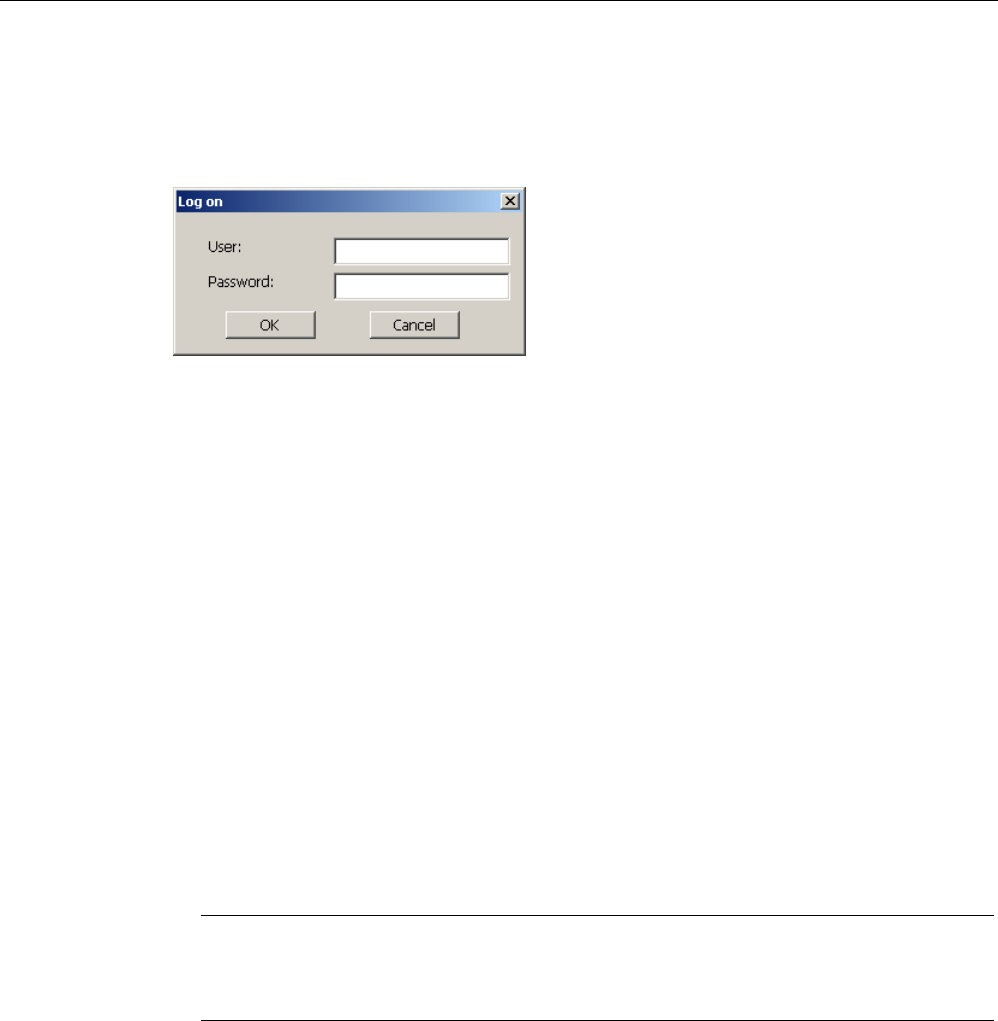
Extended user view
The extended user view displays information about the users.
The extended user view contains the following columns:
● Users
● Password
● Group
● Logoff time
REVIEW ENGLISH
27.07.2010
Operating a project
11.7 Project security
Mobile Panel 277F IWLAN V2, Mobile Panel 277F IWLAN (RFID Tag)
288 Operating Instructions, 09/2010, A5E02766325-01
11.7.3 User logon
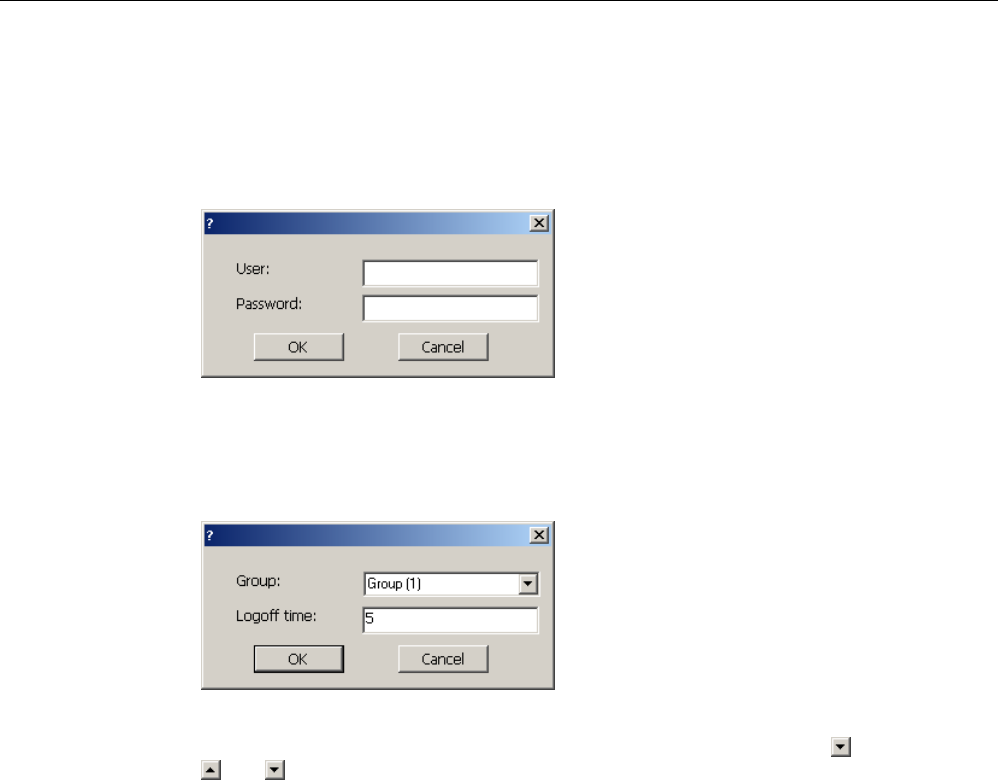
Use the logon dialog of the HMI device to log onto the security system. Enter your user
name and password in the logon dialog.
The logon dialog opens in the following cases:
● You press an operator control with password protection
● You press an operator control that was configured for displaying the logon dialog
● Select the "<ENTER>" entry in the simple user view
● Select a blank entry in the extended user view
● The logon dialog will be automatically displayed when the project is started, depending on
the configuration
More detailed information is available in your plant documentation.
Requirement
● The logon dialog is open.
Procedure
Proceed as follows:
1. Enter the user name and password.
Touch the corresponding text box. The alphanumerical screen keyboard is displayed.
Note
The user name is not case-sensitive.
The password is case-sensitive.
2. Select "OK" to confirm logon.
Result
After successful logon to the security system, you can execute password-protected functions
on the HMI device for which you have authorizations.
If you enter a wrong password, an error message is displayed when an alarm window has
been configured.
REVIEW ENGLISH
27.07.2010

Operating a project
11.7 Project security
Mobile Panel 277F IWLAN V2, Mobile Panel 277F IWLAN (RFID Tag)
Operating Instructions, 09/2010, A5E02766325-01 289
11.7.4 User logoff
Requirement
● You have logged into the security system of the HMI device.
Procedure
You have the following options for logging off:
● Press an operator control that is configured for logging off the security system.
● If you do not operate a project and exceed the logoff time, your user account will be
locked.
Your user account will be automatically logged off if you enter an incorrect password.
Result
You are no longer logged onto the project. In order to use an operator control in the security
system, you need to log on again.
11.7.5 Creating users
You create a user with both the simple and enhanced user display.
Requirement
● A configured screen with user display is shown.
● You have user management authorization or you are the administrator.
Note
The following characters are prohibited in passwords:
Blank
Special characters * ? . % / \ ' "
REVIEW ENGLISH
27.07.2010
Operating a project
11.7 Project security
Mobile Panel 277F IWLAN V2, Mobile Panel 277F IWLAN (RFID Tag)
290 Operating Instructions, 09/2010, A5E02766325-01
Procedure – Creating a user in the simple user view
Proceed as follows:
1. Touch the "<New User>" entry in the user view.
The following dialog appears:
2. Enter the desired user name and password.
Touch the corresponding text box. The alphanumerical screen keyboard is displayed.
3. Touch the "OK" button.
The following dialog appears:
4. Assign the user to a group.
In order to do so, open the "Group" drop down list box by means of the button. Select
and to scroll in the drop down list box.
5. Touch the required entry in the drop down list box.
The selected entry is then accepted as input.
6. Touch the text box "Logoff time".
The screen keyboard is displayed.
7. Enter a value between 0 and 60 for the logoff time in minutes.
The value 0 stands for "no automatic logoff."
8. Touch the "OK" button to confirm your entries.
Procedure – Creating a user in the extended user view
Proceed as follows:
1. Double-click the desired field in the blank line of the user view.
The screen keyboard is displayed.
2. Enter the respective user data in the field:
– Assign the user to one of the groups from the drop down list box.
– Enter a value between 0 and 60 for the logoff time in minutes.
The value 0 stands for "no automatic logoff."
REVIEW ENGLISH
27.07.2010

Operating a project
11.7 Project security
Mobile Panel 277F IWLAN V2, Mobile Panel 277F IWLAN (RFID Tag)
Operating Instructions, 09/2010, A5E02766325-01 291
Result
The new user is created.
11.7.6 Changing user data
You have opened a screen with a user view. The data you are allowed to change depends
on your authorization:
Requirement
● You are an administrator or a user with user management authorization.
In these cases you are allowed to change the data for all the users on the HMI device in
the user view:
– User name
– Group assignment
– Password
– Logoff time
● You are a user without user management authorization.
In this case you are only allowed to change your personal user data:
– Password
– Logoff time, if configured
Note
You can only change the logoff time and password for the "Admin" user.
You can only change the logoff time for the "PLC_User". This user is used for logging
on via the PLC
Procedure
The procedure applies to simple and extended user view alike.
Proceed as follows:
1. In the user view, touch the user whose user data you want to change
2. When entering the data, use exactly the same procedure as for creating a user
Result
The user data for the user is changed.
REVIEW ENGLISH
27.07.2010

Operating a project
11.8 Function keys
Mobile Panel 277F IWLAN V2, Mobile Panel 277F IWLAN (RFID Tag)
292 Operating Instructions, 09/2010, A5E02766325-01
11.7.7 Deleting users
Requirement
● You have opened a screen with a user view.
● You are an administrator or you have permission for user management.
Procedure
Note
The "Admin" and "PLC_User" users exist by default. You cannot delete these users.
1. Delete the entered user name.
Result
The affected user can no longer use the operator controls with permission.
11.8 Function keys
Function key assignment is defined during configuration. The configuration engineer can
assign function keys globally and locally. The local assignment function takes priority over
the global setting.
Function keys with global function assignment
A globally assigned function key always triggers the same action on the HMI device or in the
PLC irrespective of the screen displayed. Such an action is, for example, the enabling of an
image. Exception: Function keys are inactive, while a safety-related message is displayed.
Function keys with local function assignment
A function key with local function assignment is screen-specific and is therefore only
effective within the active screen. The function assigned locally to a function key can vary
from screen to screen.
The function key of a screen can be assigned one function only, either a global or local one.
The configuration engineer can assign function keys in such a way so that you can operate
an operating element with a function key. This includes, for example, the alarm view, trend
view, recipe view or status/PLC.
REVIEW ENGLISH
27.07.2010
Operating a project
11.9 Bar
Mobile Panel 277F IWLAN V2, Mobile Panel 277F IWLAN (RFID Tag)
Operating Instructions, 09/2010, A5E02766325-01 293
Multi-key operation
Unwanted actions may be triggered, if the operator unintentionally actuates a key
combination.
CAUTION
Unintentional actions
In "Online" mode, simultaneous operation of more than two keys may cause unintentional
actions in the plant.
Do not press more than two keys simultaneously
11.9 Bar
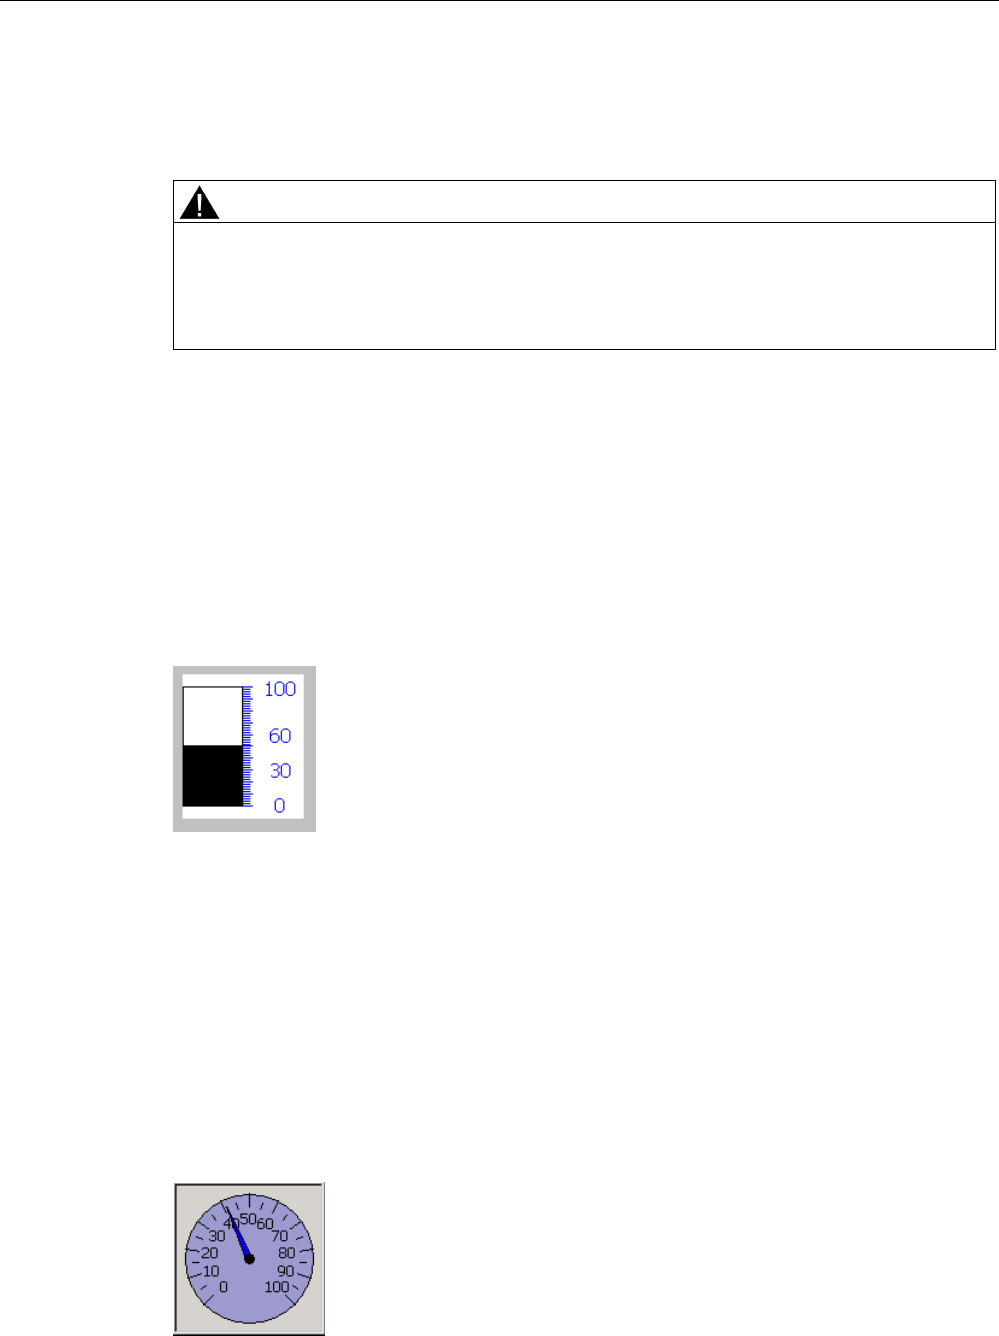
The bar is a dynamic display object. The bar displays a value from the PLC as a rectangular
area. A bar eases the recognition of:
● Distance of the current value from the configured limit value
● A set point value has been reached
The bar can display values such as fill levels or batch counts.
The layout of the bar depends on the configuration:
● The bar may feature a scale of values
● A configured limit can be marked through a line.
● A color envelope can signalize a limit being exceeded or not reached.
11.10 Gauge
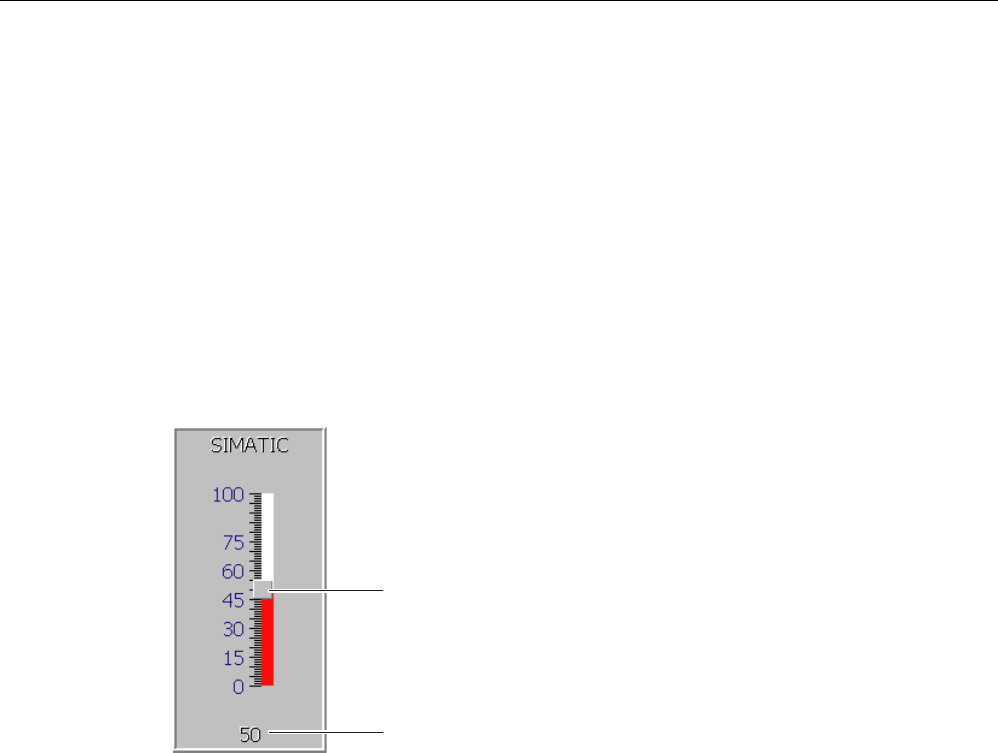
The gauge is a dynamic display object. The gauge displays numerical values in analog form
by means of a pointer. This enables an operator at the HMI device to see at a glance if the
boiler pressure is in the normal range, for example.
REVIEW ENGLISH
27.07.2010
Operating a project
11.11 Operating the slider control
Mobile Panel 277F IWLAN V2, Mobile Panel 277F IWLAN (RFID Tag)
294 Operating Instructions, 09/2010, A5E02766325-01
The layout of the gauge depends on the configuration:
● A trailing pointer can display the maximum value reached so far on the scale. The trailing
pointer is reset when the screen is reloaded
● The label on the scale can show the measured variable, for example boiler pressure and
the physical unit, for example bar
11.11 Operating the slider control
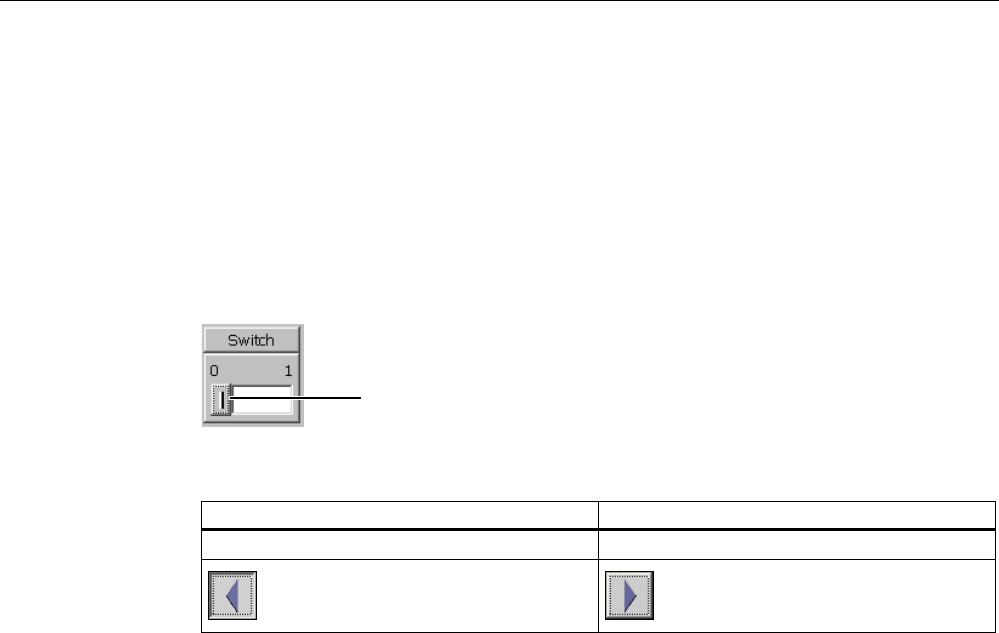
The slider control can be used to monitor and change process values within a defined range.
The slider control can also be configured without a slider. In this case, you cannot enter a
value. The slider control is then only used for displaying values.
6FKLHEHU]XU:HUWHLQJDEH
:HUWDQ]HLJHPLWDNWXHOOHP:HUW
The layout of the slider control depends on the configuration:
● The slider control can contain a label and a setting range
● The current value can be displayed in the value display below the area of the slider
control
Procedure
Proceed as follows:
1. Touch the slider.
2. Move the slider to the required value.
If the value display was configured, you can verify the entered value.
3. Release the slider.
The set value is applied.
REVIEW ENGLISH
27.07.2010
Operating a project
11.12 Operating the switch
Mobile Panel 277F IWLAN V2, Mobile Panel 277F IWLAN (RFID Tag)
Operating Instructions, 09/2010, A5E02766325-01 295
11.12 Operating the switch
The switch is an operating element and display object with two predefined switching states,
for example "On" and "Off". Switches can signalize the state of a plant section, for example if
a motor is running or not. At the same time, you can use the switch to change the state of
the corresponding plant section via the HMI device, for example from "On" to "Off".
The layout of the switch depends on the configuration:
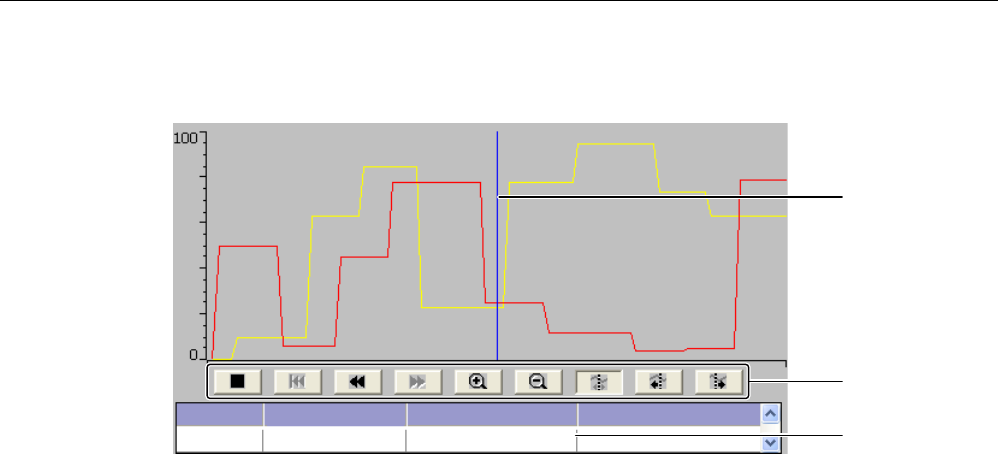
● Switch with slider
The two states are displayed by the position of the slider
6OLGHU
● Switch with text or graphic
The switch states can be labeled with text or graphics.
Switch state 0 Switch state 1
Backward Up
Procedure - Switch with Slider
1. Move the slider to the other position or double-click the slider area
The switch changes its appearance. The associated value is switched.
Procedure - Slider with Text or Graphic
1. Touch the switch
The switch changes its appearance. The associated value is switched.
11.13 Operating the Trend View
Trends continuously display the current process data or process data from a log. The layout
and operation of the trend view depends on the configuration. The following can be
configured:
● Appearance of the trend view, the axes, value ranges and labels
● Operating options of the trend view
● Limits for the trend view
● Display of a limit violation through a color change
REVIEW ENGLISH
27.07.2010
Operating a project
11.13 Operating the Trend View
Mobile Panel 277F IWLAN V2, Mobile Panel 277F IWLAN (RFID Tag)
296 Operating Instructions, 09/2010, A5E02766325-01
A trend view can display several trends.
9DOXH7DJFRQQHFWLRQ7UHQG 'DWHWLPH
3ULQWSURFHVV3ULQW
5XOHU
%XWWRQVIRUWUHQG
RSHUDWLRQ
7UHQGYDOXHLQWKH
YDOXHWDEOH
You can read the respective trend values from the value table.
● If the ruler is displayed
The trend value of the position of the ruler displayed in the value table.
● If the ruler is hidden
The newest trend values are displayed in the value table.
Operating buttons
The following elements of the trend view can be operated:
● Time interval - enlarge or reduce
● Display area - scroll forward or back
● Trend display - stop or continue
● Ruler - move
● Ruler - display or hide.
REVIEW ENGLISH
27.07.2010
Operating a project
11.13 Operating the Trend View
Mobile Panel 277F IWLAN V2, Mobile Panel 277F IWLAN (RFID Tag)
Operating Instructions, 09/2010, A5E02766325-01 297
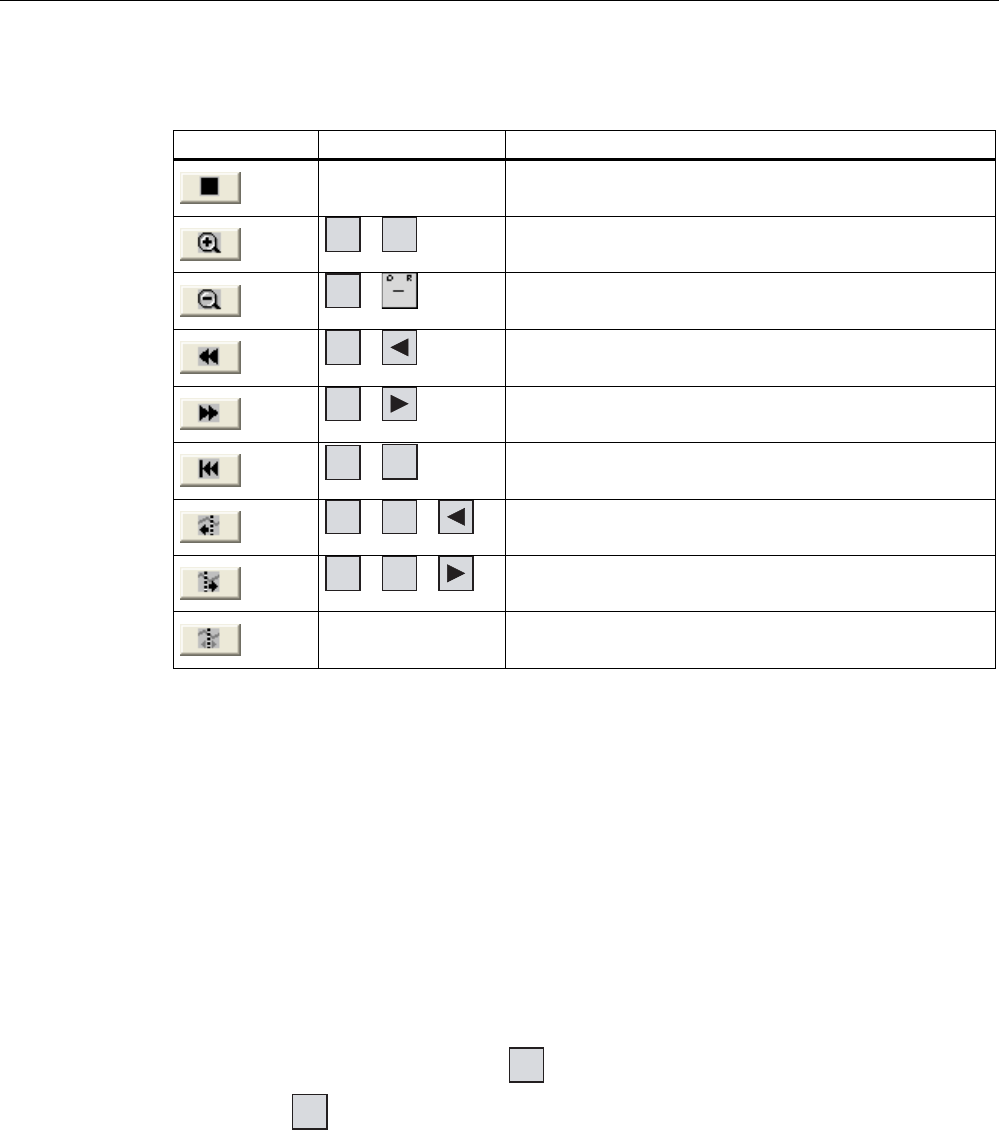
The following table shows the trend view buttons:
Button Key combination Function
– Stops or continues trend recording.
CTRL +
+
ZY
Enlarges the displayed time section.
CTRL + Reduces the displayed time section.
SHIFT + Scrolls one display area backward (to the left).
SHIFT + Scrolls one display area forward (to the right).
CTRL +
ENTER
Scrolls back to the beginning of the trend recording. The
start values of the trend recording are displayed there.
CTRL + ALT + Moves the ruler backward (to the left).
CTRL + ALT + Moves the ruler forward (to the right).
– Shows or hides the ruler.
Moreover, function keys or operating elements can be configured for the operation of the
trend display. Refer to your plant documentation for additional information.
Procedure - touch operation
Proceed as follows:
1. Touch the required button in the trend view.
2. Touch and drag the ruler.
The size of the ruler changes.
Procedure - touch operation
Proceed as follows:
1. Open the desired button using the TAB key.
2. Press the
ENTER
key.
REVIEW ENGLISH
27.07.2010
Operating a project
11.14 Operating the status force
Mobile Panel 277F IWLAN V2, Mobile Panel 277F IWLAN (RFID Tag)
298 Operating Instructions, 09/2010, A5E02766325-01
11.14 Operating the status force
You read or write access values of the connected PLC directly with Status Force. Status
force allows you to monitor or change addresses of the PLC program, etc. You don't need to
connect an additional programming device or additional PC to the PLC.
Note
Status force can only be used in combination with SIMATIC S7.
With status/control, you can:
● Change the column sequence
● Read the status values of the connected controller
● Enter values and transfer them to the controller
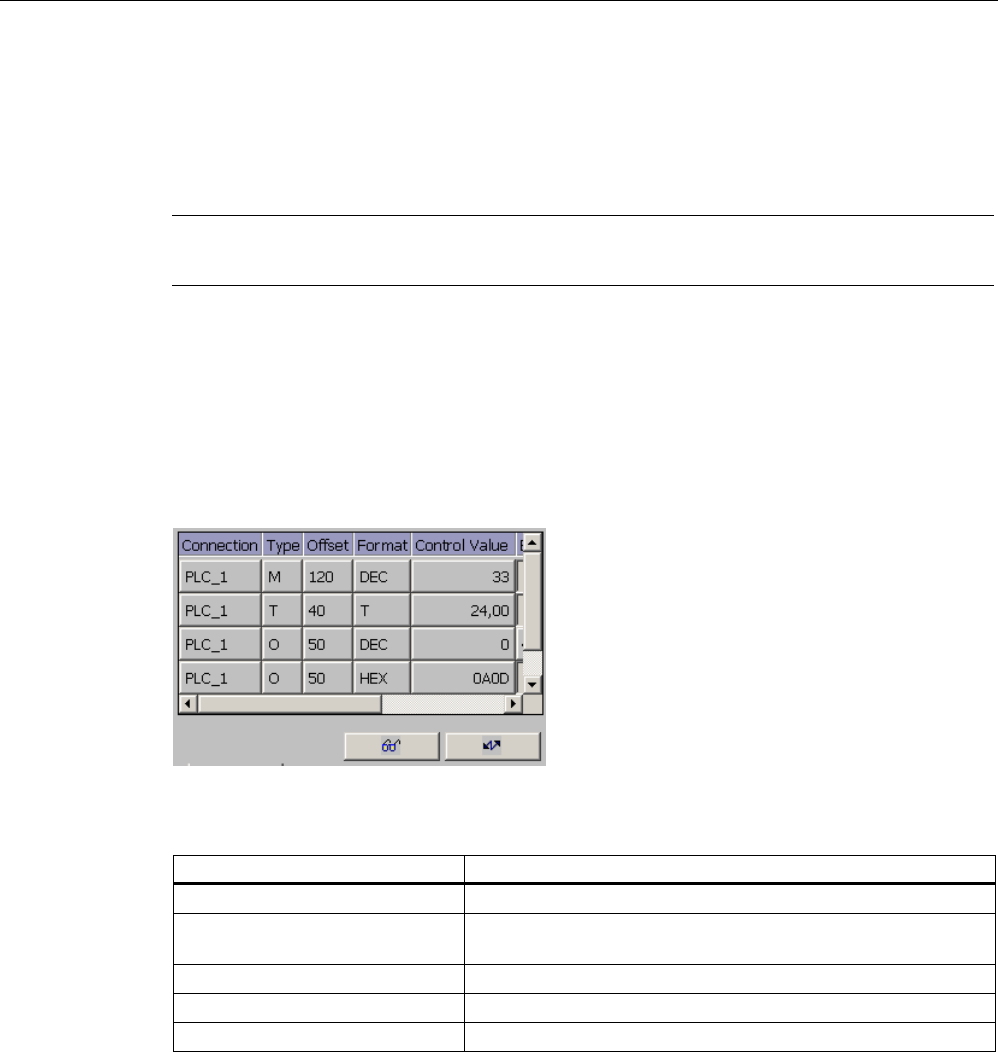
The layout of Status Force depends on the configuration. The figure shows the general
layout of Status Force. A value can be monitored or controlled on every line.
The configuration engineer specifies which columns appear in Status Force. The table
shows the significance of all configurable columns.
Column Functions
"Connection" The PLC whose address ranges must be displayed.
"Type", "DB Number", "Offset",
"Bit"
The address range of the value
"Data type", "Format" The data type of the value
"Status value" The value read from the specified address.
"Control value" The value to be written to the specified address.
Refer to your plant documentation for additional information.
REVIEW ENGLISH
27.07.2010
Operating a project
11.14 Operating the status force
Mobile Panel 277F IWLAN V2, Mobile Panel 277F IWLAN (RFID Tag)
Operating Instructions, 09/2010, A5E02766325-01 299
Operating buttons
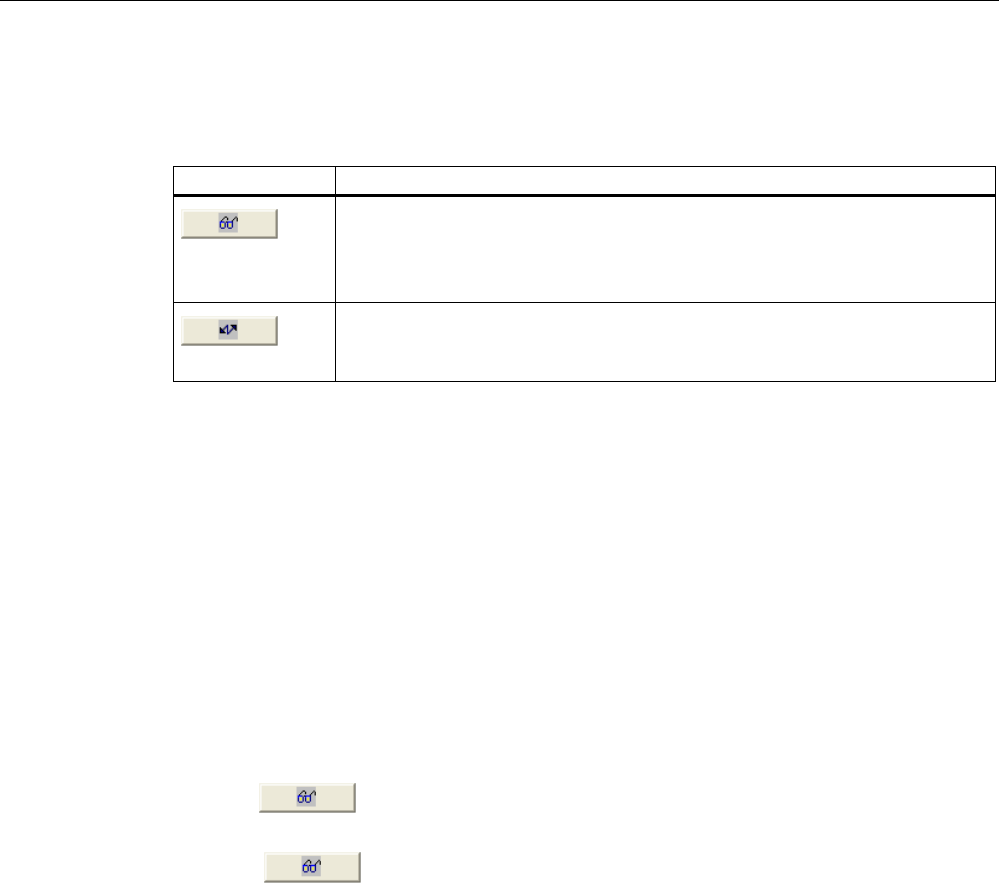
Depending on your configuration, you can operate the trend view using the following buttons:
Buttons Functions
"Read" button
Updates the display in the "Status value" column.
This button engages when it is pressed. You cannot operate any text boxes until
the button is actuated again and the refresh is stopped.
"Write" button
Applies the new value in the "Control value" column. The control value is written
to the PLC.
Procedure - changing the column sequence
Proceed as follows:
1. Touch the column header which you wish to exchange with a different column header
2. Keeping the touch screen pressed, move the column heading to the column heading you
wish to exchange it with
The columns are displayed in the modified sequence.
Procedure for reading the status value
Proceed as follows:
1. Enter the address and the desired format of a value for each line. Touch the respective
columns to display the screen keyboard.
2. Press .
All values are read cyclically by the PLC and entered in the "Status value" column.
3. Touch button.
The cyclical reading from the PLC is completed.
Requirement - controlling values
● The "Control value" column must be available
● The "Write" button must be available
Procedure
Proceed as follows:
1. Enter the address of a value for each line.
2. Touch the corresponding column.
The screen keyboard is displayed.
REVIEW ENGLISH
27.07.2010

Operating a project
11.15 Operating the Sm@rtClient view
Mobile Panel 277F IWLAN V2, Mobile Panel 277F IWLAN (RFID Tag)
300 Operating Instructions, 09/2010, A5E02766325-01
3. Enter the desired value in the "Control value" column.
4. Press .
The values from the "Control value" column are transferred once to the PLC.
11.15 Operating the Sm@rtClient view
The Sm@rtClient view enables you to monitor and remotely operate the current project of a
remote HMI device. With the correct configuration, several equal priority HMI devices can
access a remote HMI device.
Note
If another HMI device accesses your HMI device via the Sm@rtClient view, this leads to an
additional load on your HMI device.
The Sm@rtClient view can be operated as follows:
● Starting remote control
● Forcing permission
● Ending remote operation
In the Sm@rtClient view, the remote HMI is displayed with the complete layout. Depending
on the configuration, you can monitor and also operate this screen. You can also operate the
function keys like buttons on an HMI device with a touch screen.
On a Sm@rtClient view which is configured for monitoring mode, you can monitor the
affected HMI device. You cannot access to control.
Note
It is not possible to operate the direct keys of the remote HMI device from the local HMI
device.
The available operator controls depend on the HMI devices used:
● Same type of HMI devices
You can operate the project of the remote HMI device with the operator controls of your
HMI device
● Button operation from a local touchscreen
All the keys of the remote HMI device are displayed as buttons on the touch screen. You
can touch them to operate them.
● Touch operation from a local HMI device using keys
You operate the buttons in the usual manner.
REVIEW ENGLISH
27.07.2010

Operating a project
11.15 Operating the Sm@rtClient view
Mobile Panel 277F IWLAN V2, Mobile Panel 277F IWLAN (RFID Tag)
Operating Instructions, 09/2010, A5E02766325-01 301
Procedure - starting remote control
Proceed as follows:
1. On the HMI device change to the screen with the Sm@rtClient view.
The following options are available for establishing the connection to the remote HMI
device:
– The connection is established automatically.
– The connection must be established by touching the appropriate button.
Depending on the configuration, you may be required to enter the address of the
remote HMI device and a password.
NOTICE
Unencrypted password transmission with http
If a password is stored in the configuration, this password can be transmitted without
encrypting.
In order to transmit the password in an encrypted manner, operate Sm@rtService
and Sm@rtAccess through a secured protocol, for example, vpn or https.
2. The current screen of the project running on the remote device is displayed on the screen
of your HMI device.
3. You can now monitor and control this screens according to your configuration.
Scroll bars are displayed if the screen of the remote HMI device is larger than that of the
current HMI device.
Forcing permission
If several HMI devices have access to a HMI device, only one HMI device has operating
permission at any one time.
Two cases must be distinguished for this calculation:
● If another HMI device is already controlling the remote HMI device, if configured
accordingly, you can force operating permission for the remote HMI device
– You are trying to operate the remote HMI device
A dialog box opens.
– Enter the required password for forcing remote operation.
You are now authorized to operate the remote HMI device
● If another HMI device is accessing your HMI device via the Sm@rtClient view, you can
force local operating permission for your HMI device
– Touch the screen of your HMI device five times consecutively
You are given permission to operate your local HMI device
REVIEW ENGLISH
27.07.2010

Operating a project
11.15 Operating the Sm@rtClient view
Mobile Panel 277F IWLAN V2, Mobile Panel 277F IWLAN (RFID Tag)
302 Operating Instructions, 09/2010, A5E02766325-01
Procedure - ending remote control
The steps depend on the project. Refer to your plant documentation for additional
information.
In general - proceed as follows:
1. Touch a button configured for this action
2. Exit the screen containing the Sm@rtClient view
3. Touch an operating element operating position for a longer period of time.
This opens a menu.
4. Select the "Close" menu command.
REVIEW ENGLISH
27.07.2010

Operating a project
11.16 Error cases in the project operation
Mobile Panel 277F IWLAN V2, Mobile Panel 277F IWLAN (RFID Tag)
Operating Instructions, 09/2010, A5E02766325-01 303
11.16 Error cases in the project operation
During fail-safe operation, you must be aware that the following error cases may arise:
● Leaving the HMI device logged onto the effective range
CAUTION
Shutdown possible
If the HMI device is in a state where it is constantly ready for operation, the main
rechargeable battery will lose its charge. A discharged main rechargeable battery
causes communication failure. The F CPU initiates a shutdown.
Never leave the effective range without the HMI device, as long as the HMI device is
logged on in the effective range. If you do not need the HMI device:
Log the HMI device off from the effective range.
Turn on the HMI device or place it in the charging station.
● Internal error
If an internal error occurs on the HMI device, the "SAFE" and "RNG" LEDs go out. and
the project is terminated immediately. The HMI device shows a red error display.
Safety functions are no longer available.
Contact the SIEMENS hotline.
● Communication error
If a communication error occurs on the HMI device, the "SAFE" LED goes out. Safety
functions are no longer available.
– If the HMI device is logged on at the effective range:
The F CPU initiates a shutdown. The F CPU stops the section of the system that
belongs to the effective range.
– If the HMI device is not logged on at the effective range.
The F CPU initiates a global rampdown.
– If communication is reestablished within 60 seconds.
The emergency stop button becomes active again. The "SAFE" LED lights up again.
Acknowledge the communication error.
If it was logged onto the effective range, the HMI device is logged off. The "RNG" LED
goes out.
– If communication remains interrupted for more than 60 seconds.
The HMI device terminates the project. The "RNG" LED goes out.
REVIEW ENGLISH
27.07.2010

Operating a project
11.17 Operate alarm view and alarm window
Mobile Panel 277F IWLAN V2, Mobile Panel 277F IWLAN (RFID Tag)
304 Operating Instructions, 09/2010, A5E02766325-01
11.17 Operate alarm view and alarm window
11.17.1 Overview
Alarms
Alarms indicate events and states on the HMI device which have occurred in the system, in
the process or on the HMI device itself. A status is reported when it is received.
An alarm could trigger one of the following alarm events:
● Incoming
● Outgoing
● Acknowledge
The configuration engineer defines which alarms must be acknowledged by the user.
An alarm may contain the following information:
● Date
● Time
● Alarm text
● Location of fault
● State
● Alarm class
● Alarm number
● Alarm group
● Diagnostics capability
Alarm classes
Alarms are assigned to various alarm classes:
● Error
Alarms in this class must always be acknowledged. Error alarms normally indicate critical
errors within the plant such as "Motor temperature too high"
● Operation
Warning alarms usually indicate states of a plant such as "Motor switched on"
● System
System alarms indicate states or events which occur on the HMI device
REVIEW ENGLISH
27.07.2010

Operating a project
11.17 Operate alarm view and alarm window
Mobile Panel 277F IWLAN V2, Mobile Panel 277F IWLAN (RFID Tag)
Operating Instructions, 09/2010, A5E02766325-01 305
● SIMATIC diagnostic alarms
SIMATIC diagnostic alarms show states and events of the SIMATIC S7 or SIMOTION
PLCs
● User-specific alarm classes
The properties of this alarm class must be defined in the configuration
More detailed information is available in your plant documentation.
Alarm groups
The configuration engineer can group alarms into alarm groups. When you acknowledge an
individual alarm of an alarm group, you acknowledge all alarms which belong to the same
alarm group.
Alarm buffer
The alarm events are stored in an internal buffer. The size of this alarm buffer depends on
the HMI device type.
Alarm report
The configuration engineer can activate alarm reporting on the project. In this case, alarm
events are output directly on the connected printer.
The configuration engineer can define whether each individual alarm is logged. An alarm of
this type is printed when the alarm events "Incoming" and "Outgoing" occur.
If you want to print alarms of the "System" alarm class, you have to print the contents of the
associated alarm buffer. For this case the configuration engineer has to configure an
operating element for printing the alarm buffer.
Alarm log
Alarm events are stored in an alarm log, provided this log file is configured. The capacity of
the log file is limited by the storage medium and system limits.
REVIEW ENGLISH
27.07.2010

Operating a project
11.17 Operate alarm view and alarm window
Mobile Panel 277F IWLAN V2, Mobile Panel 277F IWLAN (RFID Tag)
306 Operating Instructions, 09/2010, A5E02766325-01
11.17.2 Recognizing pending alarms
You can recognize pending alarms that must be acknowledged by means of the alarm
indicator.
The alarm indicator is a graphic symbol indicating pending alarms or alarms requiring
acknowledgment, depending on the configuration. The configuration determines whether an
alarm has to be acknowledged or not. This is also defined by the alarm class which an alarm
belongs to.
The following image shows an alarm indicator for three pending alarms.
The alarm indicator flashes as long as alarms are pending for acknowledgment. The number
displayed indicates the number of pending alarms. The configuration engineer can assign
functions to be executed when the alarm indicator is operated.
Usually, the alarm indicator is only used for error alarms. More detailed information is
available in your plant documentation.
11.17.3 Alarm view
11.17.3.1 Overview
Alarms are displayed in the alarm view or in the alarm window on the HMI device. The
message window, in contrast to the message display, is independent of the displayed
process image.
11.17.3.2 Displaying alarms
Alarm view
Depending on the configuration, the alarm view is displayed as follows:
● As a single line.
Alarm numbers and alarm texts are displayed as single lines
● As simple alarm view
● As extended alarm view
For the configuration, which information is displayed for which messages are displayed for
the simple and expanded message displays.
Depending on the configuration, alarms from alarm logs are also displayed in the alarm view.
REVIEW ENGLISH
27.07.2010
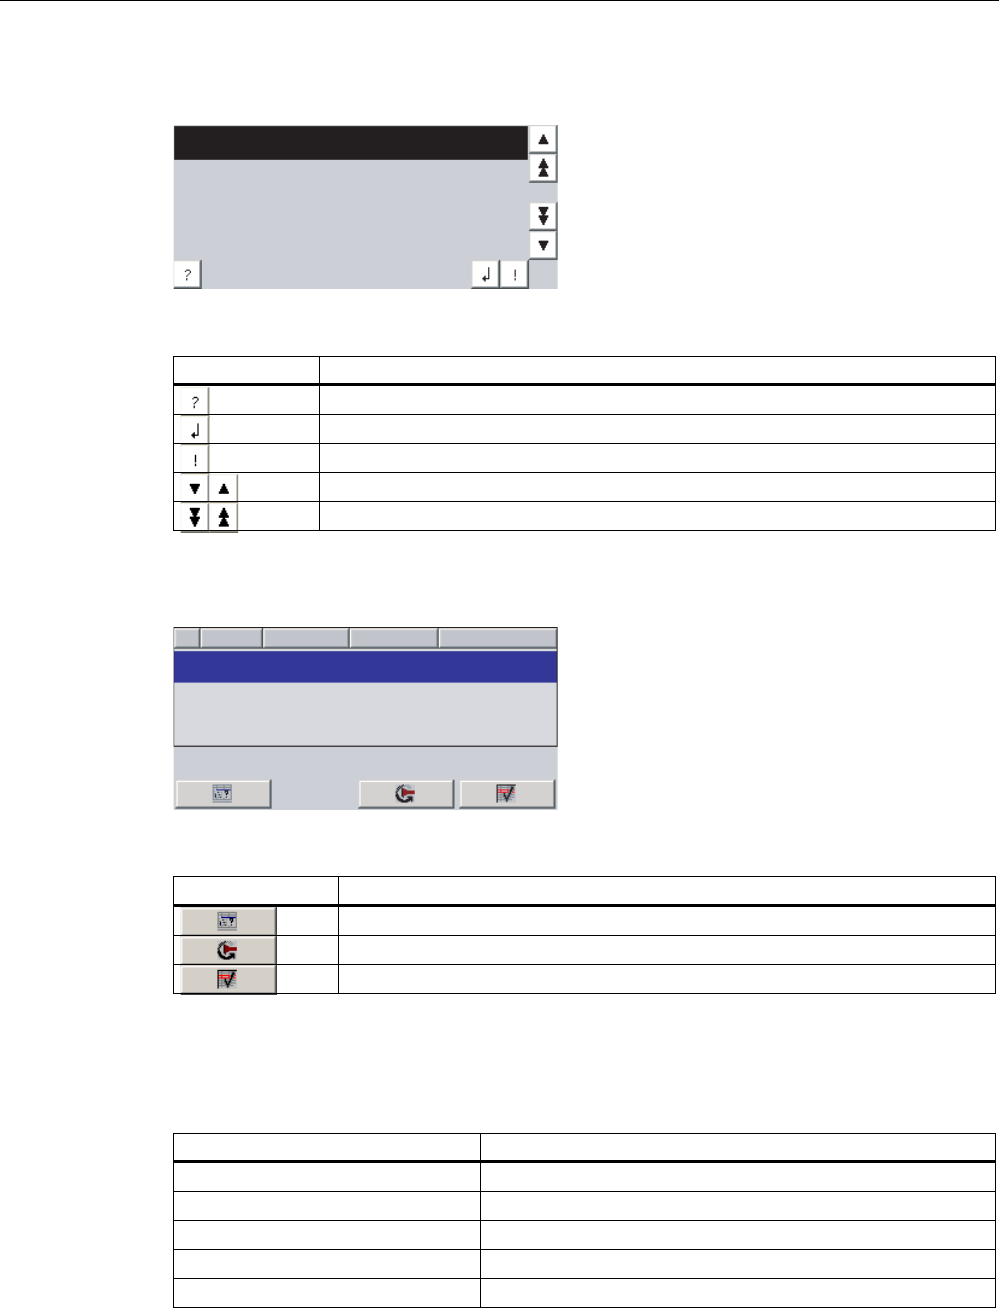
Operating a project
11.17 Operate alarm view and alarm window
Mobile Panel 277F IWLAN V2, Mobile Panel 277F IWLAN (RFID Tag)
Operating Instructions, 09/2010, A5E02766325-01 307
Simple alarm view
0RWRUWRRKRW
The buttons have the following function:
Buttons Functions
Display infotexts for an alarm
Edit alarm
Acknowledge alarm
Select the next or previous alarm in the list
Scroll one page up or down
Extended alarm view
0RWRUWRRKRW
.
'DWH7LPH1R 6WDWXV
The buttons have the following function:
Buttons Functions
Display infotexts for an alarm
Edit alarm
Acknowledge alarm
Alarm class icons
In order to label the different alarm classes, icons can be configured.
Icon Alarm class
! Error
Without a symbol Operation
Symbol depending on the project User-defined alarm classes
S7 SIMATIC or SIMOTION diagnostic alarm
$ System
REVIEW ENGLISH
27.07.2010

Operating a project
11.17 Operate alarm view and alarm window
Mobile Panel 277F IWLAN V2, Mobile Panel 277F IWLAN (RFID Tag)
308 Operating Instructions, 09/2010, A5E02766325-01
Refer to your plant documentation for additional information.
Procedure - change column sequence in the expected alarm display
Depending on the project, you can change the column sequence for messages on the HMI
device.
Proceed as follows:
1. Touch the column header which you wish to exchange with a different column header
2. Keeping the touch screen pressed, move the column heading to the column heading you
wish to exchange it with
The column sequence of the messages is changed.
Procedure - change sorting in the expected alarm display
Depending on the project, you can change the sorting for messages on the HMI device.
Proceed as follows:
1. Touch the column overview that should be changed correspondingly.
The sorting of the messages is changed.
11.17.3.3 Display alarm window
The alarm window is independent of the process screen. Depending on the configuration,
the alarm window opens automatically as soon as a new alarm is pending for
acknowledgment. The alarm window can be configured so that it only closes after all the
alarms have been acknowledged.
The layout and the operation of the alarm window are the same as for the alarm view.
Refer to your plant documentation for additional information.
11.17.4 Display infotexts for an alarm
Introduction
An alarm can be assigned an infotext.
REVIEW ENGLISH
27.07.2010
Operating a project
11.17 Operate alarm view and alarm window
Mobile Panel 277F IWLAN V2, Mobile Panel 277F IWLAN (RFID Tag)
Operating Instructions, 09/2010, A5E02766325-01 309
Procedure
Proceed as follows:
1. Touch the desired alarm in the alarm view or the alarm window.
The alarm is selected.
2. Touch the button in the simple alarm view or in the extended alarm view.
A dialog with configured infotext is displayed.
3. Press .
The dialog box closes.
11.17.5 Acknowledge alarm
Introduction
Depending on the project, an alarm can be acknowledged with a function key or with a
button in the alarm display or in the alarm window.
More detailed information is available in your plant documentation.
Requirement
● The alarm to be acknowledged is displayed in the alarm window or the alarm view.
Procedure
Proceed as follows:
1. Touch the desired alarm in the alarm view or the alarm window.
The alarm is selected.
2. Touch the button in the simple alarm view or in the extended alarm view.
Result
The alarm was acknowledged. If the alarm belongs to an alarm group, all the alarms of the
associated group were acknowledged.
REVIEW ENGLISH
27.07.2010
Operating a project
11.18 Operating recipes
Mobile Panel 277F IWLAN V2, Mobile Panel 277F IWLAN (RFID Tag)
310 Operating Instructions, 09/2010, A5E02766325-01
11.17.6 Edit alarm
Introduction
The configuration engineer can assign additional functions to each alarm. These functions
are executed when the alarm is processed.
Note
When you edit an unacknowledged alarm, it is acknowledged automatically.
Requirements
● The alarm to be edited is displayed in the alarm window or the alarm view.
Procedure
Proceed as follows:
1. Touch the desired alarm in the alarm view or the alarm window.
The alarm is selected.
2. Touch the button in the simple alarm view or in the extended alarm view.
The system executes the additional functions of the alarm. Refer to your plant
documentation for additional information.
11.18 Operating recipes
11.18.1 Overview
Introduction
Recipes are used when different variants of a product are manufactured with the same
process. In this case, the product variants differ in terms of their type and quantity of the
components, but not in terms of the manufacturing process sequence. The configuration
engineer can store the combination of each individual product variant in a recipe.
REVIEW ENGLISH
27.07.2010
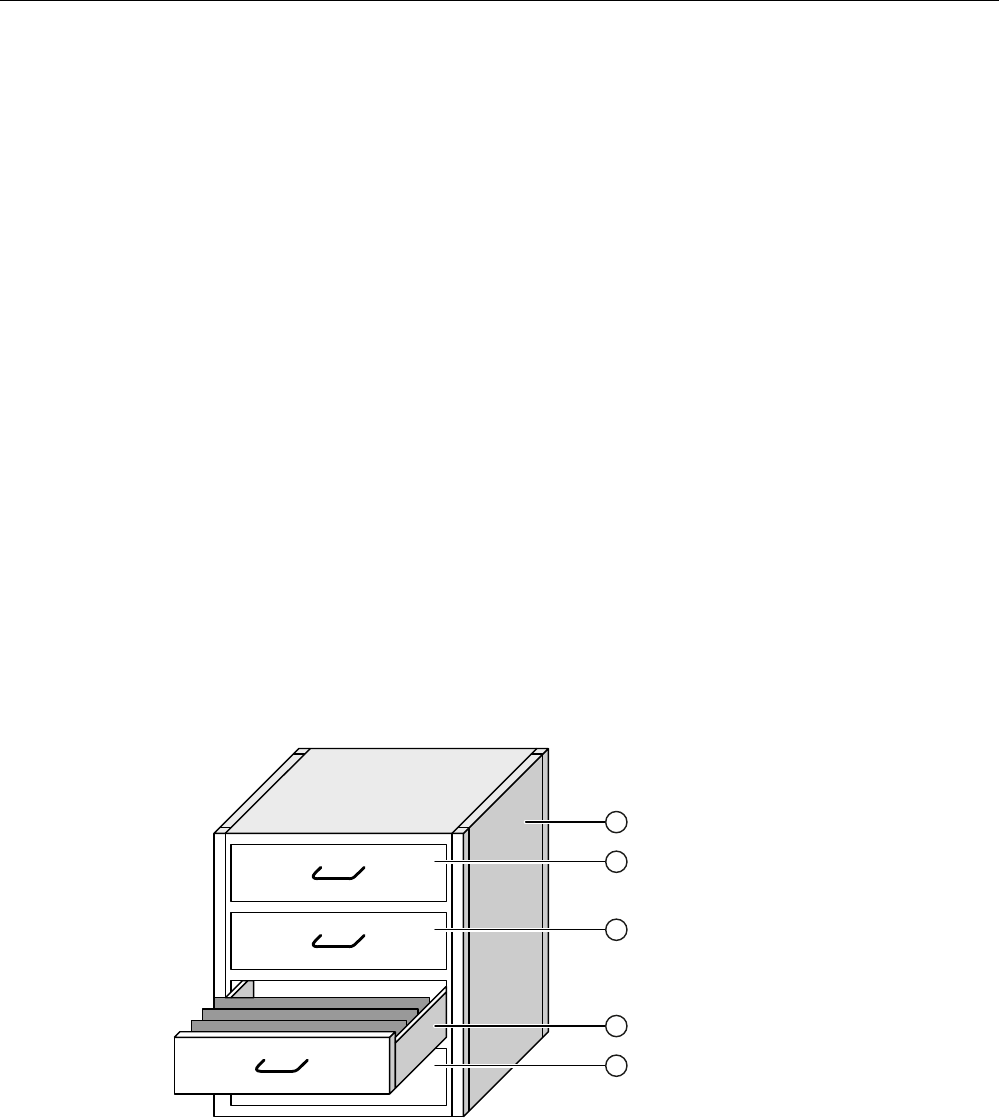
Operating a project
11.18 Operating recipes
Mobile Panel 277F IWLAN V2, Mobile Panel 277F IWLAN (RFID Tag)
Operating Instructions, 09/2010, A5E02766325-01 311
Field of application
Recipes can be used everywhere the same product components are used in variable
combinations to create different product variants.
Examples:
● Beverage industry
● Food processing industry
● Pharmaceutical industry
● Paint industry
● Building materials industry
● Steel industry
11.18.2 Structure of a recipe
Recipes
The recipe collection for the production of a product family can be compared to a file cabinet.
A recipe which is used to manufacture a product corresponds to a drawer in a file cabinet.
Example:
In a plant for producing fruit juice, recipes are required for different flavors. There is a recipe,
for example, for the flavors orange, grape, apple and cherry.
① File cabinet Recipe collection Recipes for a fruit juice plant
② Drawer Recipe Orange flavored drinks
③ Drawer Recipe Grape flavored drinks
④ Drawer Recipe Apple flavored drinks
⑤ Drawer Recipe Cherry flavored drinks
REVIEW ENGLISH
27.07.2010

Operating a project
11.18 Operating recipes
Mobile Panel 277F IWLAN V2, Mobile Panel 277F IWLAN (RFID Tag)
312 Operating Instructions, 09/2010, A5E02766325-01
Recipe data records
The drawers of the file cabinet are filled with suspension folders. The suspension folders in
the drawers represent records required for manufacturing various product variants.
Example:
Product variants of the flavor apple might be a soft drink, a juice or nectar, for example.
① Drawer Recipe Product variants of apple flavored drinks
② Suspension
folder
Recipe data record Apple drink
③ Suspension
folder
Recipe data record Apple nectar
④ Suspension
folder
Recipe data record Apple juice
Elements
In the figure showing the file cabinet, each suspension folder contains the same number of
sheets. Each sheet in the suspension folder corresponds to an element of the recipe data
record. All the records of a recipe contain the same elements. The records differ, however, in
the value of the individual elements.
Example:
All drinks contain the same components: water, concentrate, sugar and flavoring. The
records for soft drink, fruit juice or nectar differ, however, in the quantity of sugar used in
production.
REVIEW ENGLISH
27.07.2010

Operating a project
11.18 Operating recipes
Mobile Panel 277F IWLAN V2, Mobile Panel 277F IWLAN (RFID Tag)
Operating Instructions, 09/2010, A5E02766325-01 313
11.18.3 Recipes in the Project
Overview
If recipes are used in a project, the following components interact:
● Recipe view / recipe screen
On the HMI device, recipes are displayed and edited in the recipe view or in a recipe
screen.
– The recipe data records from the internal memory of the HMI device are displayed and
edited in the recipe view.
– The values of the recipe tags are displayed and edited in the recipe screen.
Depending on the configuration, the values displayed in the recipe view are synchronized
with the values of recipe tags.
● HMI device recipe memory
Recipes are saved in the form of data records in the HMI device recipe memory.
The recipe data can also be saved in recipe tags.
● Recipe tags
The recipe tags contain recipe data. When you edit recipes in a recipe screen, the recipe
values are stored in recipe tags. Depending on the configuration, the values of the recipe
tags are exchanged with the PLC.
The recipe tags can be synchronized with the recipe data records so that the same
values are saved in both.
● External memory medium
The memory cards or USB sticks are external memory media for recipe data records. The
recipe data records are exported from the HMI device recipe memory and are saved on
the external memory medium in a *.csv file. The records can be reimported from the
external memory medium to the recipe memory.
REVIEW ENGLISH
27.07.2010
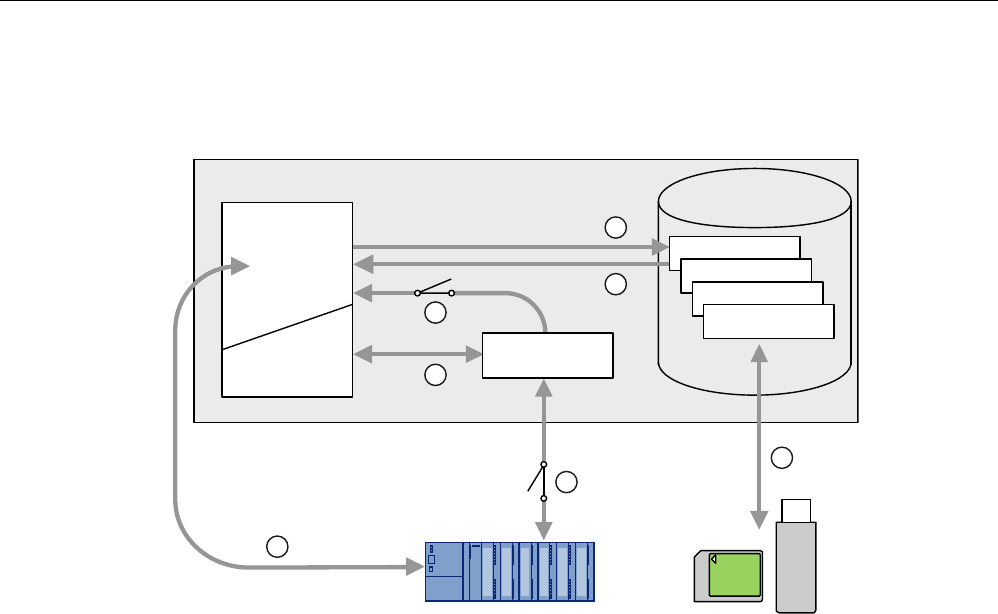
Operating a project
11.18 Operating recipes
Mobile Panel 277F IWLAN V2, Mobile Panel 277F IWLAN (RFID Tag)
314 Operating Instructions, 09/2010, A5E02766325-01
Data flow
The following figure shows the data flow in a project with recipes.
'LVSOD\LQJD
UHFLSH 5HFLSH
5HFLSH
5HFLSH
5HFLSHQ
5HFLSHPHPRU\
+0,GHYLFH
3/&
5HFLSH
LPDJH
5HFLSHYDULDEOH
([WHUQDO
PHPRU\PHGLXP
① Editing, saving or deleting a recipe data record
② Display recipe data record
③ Synchronize or do not synchronize recipe tags
④ Display and edit recipe tags in the recipe screen
⑤ Write records from the recipe view to the PLC or read records from the PLC and display them
in the recipe view
⑥ Recipe tags are sent to the PLC online or offline
⑦ Export or import recipe data record to external memory medium.
REVIEW ENGLISH
27.07.2010
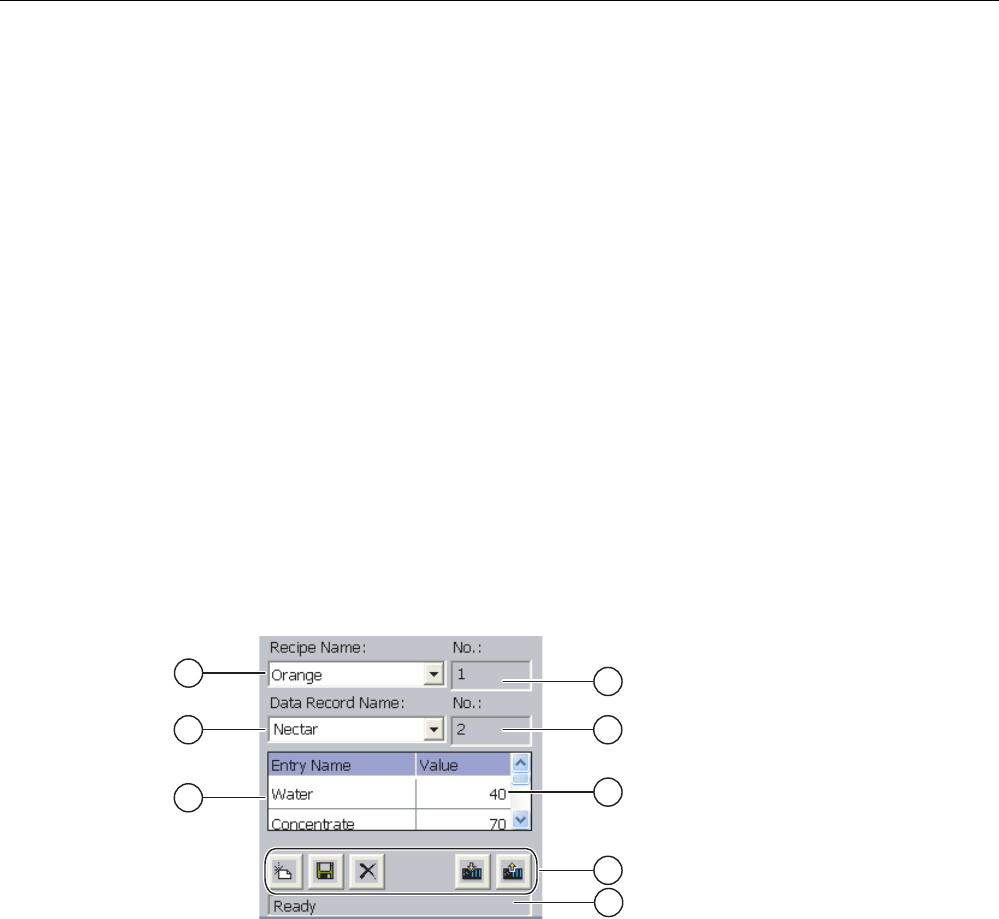
Operating a project
11.18 Operating recipes
Mobile Panel 277F IWLAN V2, Mobile Panel 277F IWLAN (RFID Tag)
Operating Instructions, 09/2010, A5E02766325-01 315
11.18.4 Recipe displays
Displaying recipes
You can display and edit recipes on the HMI device with a recipe view or recipe screen.
Recipe view
A recipe view is a screen object used to manage recipe data records. The recipe view shows
recipe data records in tabular form.
Depending on the configuration, the recipe view is displayed as follows:
● As extended recipe view
● As simple recipe view
The configuration engineer also defines which operator controls are displayed in the recipe
view.
Extended recipe view
The following figure shows an example of the extended recipe view.
① Selection box for the recipe
② Selection box for the recipe data record
③ Element name
The element name designates a specific element in the recipe data record
④ Display field
This show the number of the selected recipe or the selected recipe data record
⑤ Value of the element
⑥ Buttons for editing a recipe data record
⑦ Status bar for display of the status messages
REVIEW ENGLISH
27.07.2010
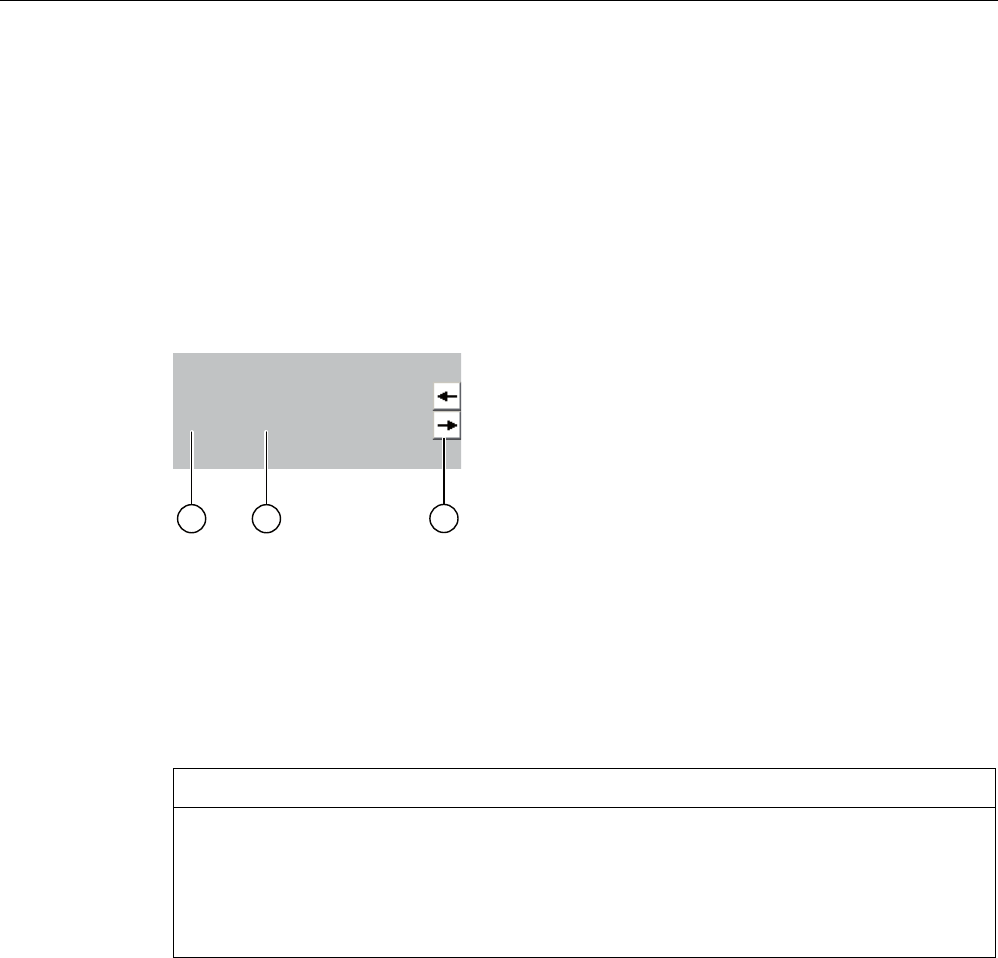
Operating a project
11.18 Operating recipes
Mobile Panel 277F IWLAN V2, Mobile Panel 277F IWLAN (RFID Tag)
316 Operating Instructions, 09/2010, A5E02766325-01
Simple recipe view
The simple recipe view consists of three areas:
● Recipe list
● Data record list
● Element list
In the simple recipe view, each area is shown separately on the HMI device. Depending on
the configuration, the simple recipe view starts with the recipe list or data record list.
The following figure shows an example of the record list.
%HYHUDJH
-XLFH
1HFWDU
① Number of the recipe data record
② Recipe data records
③ Buttons for changing the displayed list and calling the menu
Display of values
NOTICE
Changing the recipe data record in the background
Applies to the processing of a recipe data record:
If values of the corresponding recipe data record are changed by a PLC job, the recipe view
is not updated automatically.
To update the recipe view, reselect the respective recipe data record.
Recipe screen
A recipe screen allows the correlation between the plant and the recipe data to be displayed
in graphic form. The configuration engineer combines I/O fields and screen objects to form a
custom input screen. The configuration engineer can distribute the I/O fields of a recipe over
several recipe screens, thus allowing recipe elements to be arranged by subject. The recipe
screen can be operated using buttons configured accordingly.
REVIEW ENGLISH
27.07.2010
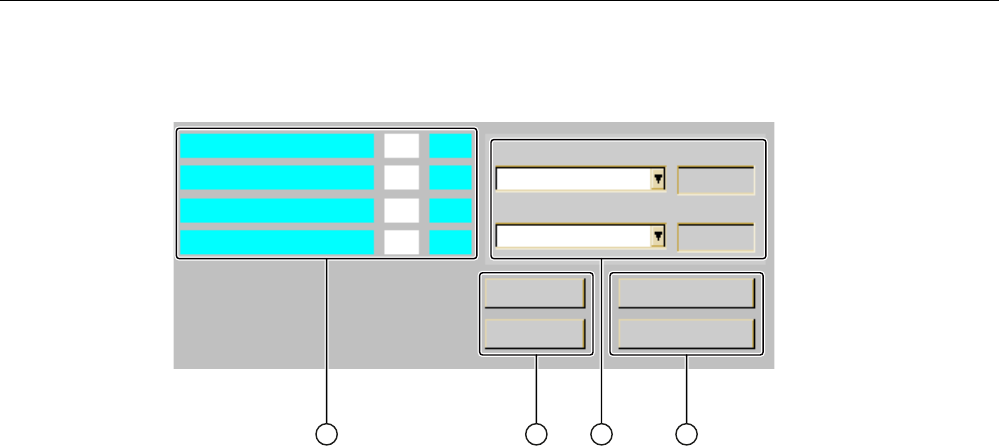
Operating a project
11.18 Operating recipes
Mobile Panel 277F IWLAN V2, Mobile Panel 277F IWLAN (RFID Tag)
Operating Instructions, 09/2010, A5E02766325-01 317
The following figure shows an example of the recipe screen.
:DWHU
6DYH
)ODYRULQJ
6XJDU
&RQFHQWUDWH
O
O
NJ
O2UDQJH
1HFWDU
5HFLSHQDPH 1R
'RZQORDG
'DWDIURPWKH3/&
'DWDWR3/&
1R'DWDUHFRUGQDPH
① Element name and associated values
The element name designates a specific element in the recipe data record
② Buttons for editing a recipe data record
③ Modified recipe view
④ Buttons for transferring recipe data
The values displayed or entered in the recipe screen are saved in recipe tags. The recipe
values are exchanged with the PLC immediately or later via these tags.
A configured recipe view can itself be a component of a recipe screen You must synchronize
the tags in order to synchronize data between the tags of the recipe screen and the recipe
data records displayed in the recipe view. Synchronization of tags is only possible in the
extended recipe view.
More detailed information is available in your plant documentation.
11.18.5 Recipe Values in the HMI Device and the PLC
Introduction
You can change the values of a recipe on the HMI device. The production process can be
controlled by this.
Depending on the configuration, the recipe values are displayed, edited and saved in
different ways:
● If you are editing recipes with a recipe view in your project, the values are saved in recipe
data records.
● If you are editing recipes in a recipe screen in your project, the values are saved in recipe
tags.
Differences may occur between the display values in the recipe view and the values saved in
the associated tags in an ongoing project when you edit recipes with a recipe view and in a
recipe screen. To prevent this, the recipe data record values must be synchronized with the
values of the recipe tags.
REVIEW ENGLISH
27.07.2010

Operating a project
11.18 Operating recipes
Mobile Panel 277F IWLAN V2, Mobile Panel 277F IWLAN (RFID Tag)
318 Operating Instructions, 09/2010, A5E02766325-01
You have however the option to perform synchronization operations at any time.
Synchronization only takes place if the configuration engineer has activated the respective
settings for a recipe.
Note
Recipe tags can only be synchronized in the extended recipe view.
Synchronizing recipe tags
Synchronization of the recipe tags depends on the configuration:
● Automatic synchronization
The values of the recipe view are synchronized with the associated recipe tags. In this
case, changes to values in the recipe view have an immediate effect on the values of the
associated recipe tags. The values are only synchronized, when an operating element
that is outside the recipe view is operated.
● Synchronization by the user
The values of the recipe view and the associated recipe tags are not synchronized
automatically. The configuration engineer has assigned the same function to the
button or a different operating element in the recipe view. The recipe tags and the recipe
view are only synchronized when you operate the buttons or the appropriate operating
element.
Recipe tags online / offline
The configuration engineer can configure a recipe so that changes to the values of the recipe
tags do not have an immediate effect on the current process.
Synchronization of the recipe values between the HMI device and the PLC depends on
whether the configuration engineer has selected the settings "Tags online" or the setting
"Tags offline" for a recipe.
● "Tags online:"
This setting has the following effect:
– When you change recipe values in the recipe screen, these changes are applied
immediately by the PLC and immediately influence the process.
– If recipe values are changed in the PLC, the changed values are displayed
immediately in the recipe screen.
● "Tags offline"
With this setting, changed recipe values are not synchronized immediately between the
HMI device and the PLC.
In this case, the configuration engineer must configure operating elements for transferring
the values to the PLC or reading them from the PLC in a recipe screen. The recipe values
are only synchronized between HMI device and PLC when you operate the appropriate
operating element.
REVIEW ENGLISH
27.07.2010
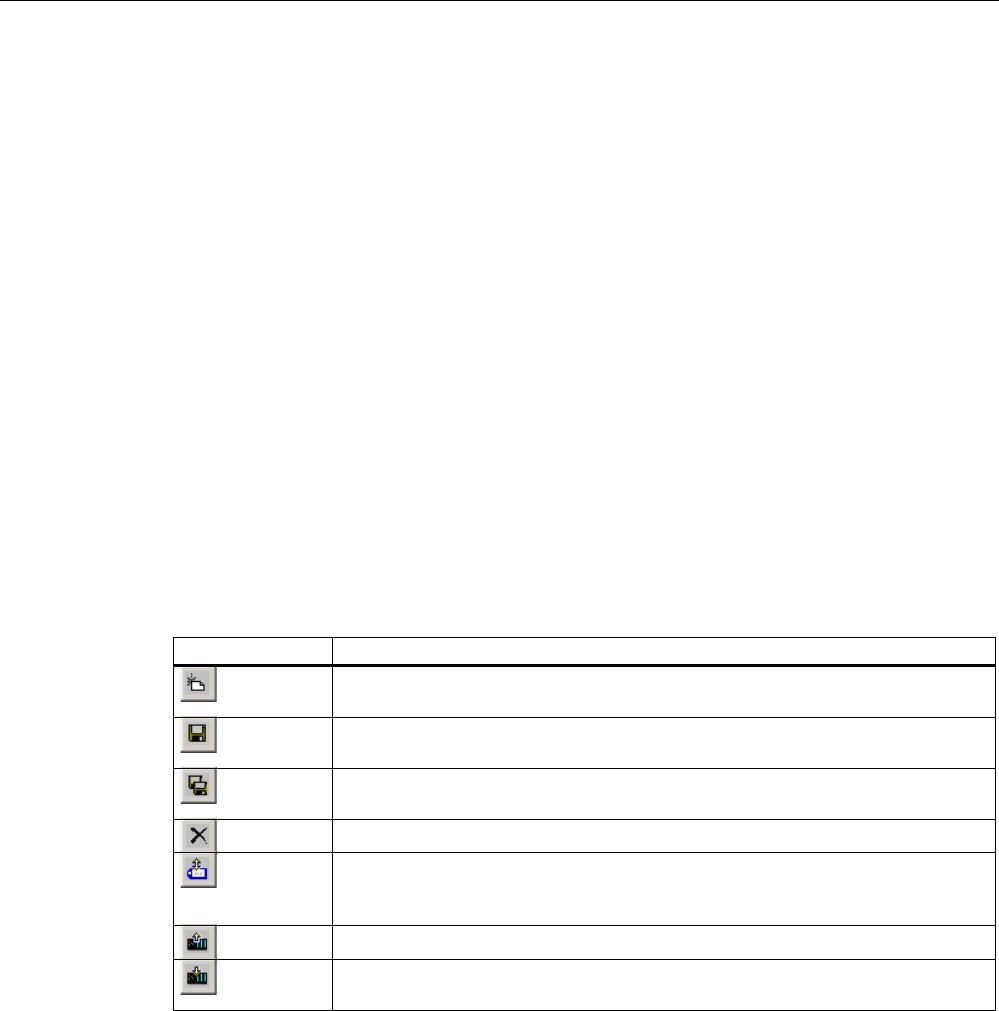
Operating a project
11.18 Operating recipes
Mobile Panel 277F IWLAN V2, Mobile Panel 277F IWLAN (RFID Tag)
Operating Instructions, 09/2010, A5E02766325-01 319
11.18.6 Operating the recipe view
11.18.6.1 Overview
Operating the recipe view
The recipe view can be operated as follows:
● Enter values for the recipe elements
● Create recipe data records
● Save recipe data records or save them under a new name
● Delete recipe data records
● Synchronize values of the recipe view with the associated recipe tags
● Transfer recipe data records from the PLC and to the PLC
Operator controls of the recipe view
The following table shows the operator controls of the recipe view.
Buttons Functions
Creates a new recipe data record.
If a start value is configured, it is shown in the text box.
Saves the displayed values of the recipe data record.
The storage location is predefined by the project.
The recipe data record is saved under a different name irrespective of the recipe
view. A dialog box opens in which the name is entered.
The displayed recipe data record is deleted.
The values of the recipe view are synchronized with the associated recipe tags.
The values changed during editing are written to the associated recipe tags.
Subsequently all the values of the tags are read out and updated in the table.
The recipe values from the PLC are displayed in the recipe view.
The values of the set recipe data record displayed in the recipe view are
transferred to the PLC.
Operating the recipe screen
You operate the recipes in a recipe screen with the operator controls provided by the
configuration engineer.
More detailed information is available in your plant documentation.
REVIEW ENGLISH
27.07.2010

Operating a project
11.18 Operating recipes
Mobile Panel 277F IWLAN V2, Mobile Panel 277F IWLAN (RFID Tag)
320 Operating Instructions, 09/2010, A5E02766325-01
11.18.6.2 Creating a recipe data record
Introduction
You create a new recipe data record by modifying an existing record. You then save the
modified data record under a new name.
Requirements
● A screen with a recipe view is displayed
Procedure
Proceed as follows:
1. Select the recipe for which you want to create a new recipe data record.
2. Touch .
A new recipe data record with the next available number is created.
If you change the new data record number to an existing data record number, the existing
data record is overwritten.
3. Enter values for the elements of the data record.
The elements of the recipe data record can be assigned default values depending on the
configuration.
4. Touch .
5. Enter a name for the data record.
The data record is saved under the new name.
If the recipe data record already exists, a dialog is opened. In this dialog, specify whether
the existing data record is to be overwritten.
Result
The created recipe data record is saved to the selected recipe.
REVIEW ENGLISH
27.07.2010
Operating a project
11.18 Operating recipes
Mobile Panel 277F IWLAN V2, Mobile Panel 277F IWLAN (RFID Tag)
Operating Instructions, 09/2010, A5E02766325-01 321
11.18.6.3 Editing a recipe data record
Introduction
Edit the values of the recipe data records and save them in a recipe view.
Synchronization with the PLC
If you want to display the current recipe values from the PLC in the recipe view, you first
have to read the current values from the PLC with .
The values changed in the recipe view only become effective when the amended data record
is transferred to the PLC by means of the button.
Requirements
● A screen with a recipe view is displayed
Procedure
Proceed as follows:
1. If the recipe view contains several recipes: Select the recipe which contains the desired
recipe data record.
2. Select the recipe data record you want to change.
3. Change the data record as required.
4. Save your changes by means of the button.
If you want to save the recipe data record under a different name, touch the key.
5. The recipe data record is saved.
Result
The edited recipe data record has now been saved in the selected recipe.
11.18.6.4 Deleting a recipe data record
Introduction
You can delete all the data records of a recipe which are not required.
Requirements
● A screen with a recipe view is displayed
REVIEW ENGLISH
27.07.2010
Operating a project
11.18 Operating recipes
Mobile Panel 277F IWLAN V2, Mobile Panel 277F IWLAN (RFID Tag)
322 Operating Instructions, 09/2010, A5E02766325-01
Procedure
Proceed as follows:
1. If the recipe view contains several recipes: Select the recipe which contains the desired
recipe data record.
2. Select the recipe data record you want to delete.
3. Touch .
Result
The recipe data record is deleted.
11.18.6.5 Synchronizing tags
Introduction
The values of the recipe elements can be saved to recipe tags, depending on the
configuration.
Differences may occur between the display values in the recipe view and the actual values of
tags in an ongoing project. Synchronize the tags to equalize such differences.
Synchronization always includes all the variables which belong to a recipe data record.
NOTICE
Changed tag name
Tags and the value of the recipe data record cannot be assigned to each other if the tag
name of the tag to be synchronized has been changed. The tags in question are not
synchronized.
Note
Recipe tags can only be synchronized in the enhanced recipe view.
Requirements
● A screen with a recipe view is displayed
Procedure
Proceed as follows:
1. If the recipe view contains several recipes: Select the recipe which contains the desired
recipe data record.
2. Select the recipe data record you want to synchronize.
3. Touch .
REVIEW ENGLISH
27.07.2010

Operating a project
11.18 Operating recipes
Mobile Panel 277F IWLAN V2, Mobile Panel 277F IWLAN (RFID Tag)
Operating Instructions, 09/2010, A5E02766325-01 323
Result
The elements of the recipe data record are synchronized with the recipe tags.
If the values of the recipe view and the tag do not match, the more current value is accepted.
11.18.6.6 Reading a recipe data record from the PLC
Introduction
In the current project, the values which are also stored in the recipes in the HMI device can
be changed directly in the plant. This is the case, for example, if a valve was opened further
directly at the plant than is stored in the recipe. The values of the recipe data records saved
in the HMI device possibly no longer match the values in the PLC.
To synchronize the recipe values, read the values from the PLC and display them in the
recipe view.
Requirement
● A screen with a recipe view is displayed
Procedure
Proceed as follows:
1. If the recipe view contains several recipes: Select the recipe which contains the desired
recipe data record.
2. Select the recipe data record to which you want to apply the values from the PLC.
3. Touch .
The values are read from the PLC.
4. If you want to store the displayed values in the HMI device, touch the button.
Result
The values were read from the PLC, displayed on the HMI device and saved to the selected
recipe data record.
11.18.6.7 Transferring a recipe data record to the PLC
Introduction
In order for an edited recipe data record to take effect in the process, you must transfer the
values to the PLC.
The display values in the recipe view are always transferred to the PLC.
REVIEW ENGLISH
27.07.2010

Operating a project
11.18 Operating recipes
Mobile Panel 277F IWLAN V2, Mobile Panel 277F IWLAN (RFID Tag)
324 Operating Instructions, 09/2010, A5E02766325-01
Requirements
● A screen with a recipe view is displayed
Procedure
Proceed as follows:
1. Select the recipe which contains the desired recipe data record.
2. Select the recipe data record whose values you want to transfer to the PLC.
3. Touch .
Result
The display values in the recipe view were transferred to the PLC and take effect in the
process.
11.18.7 Using the simple recipe view
11.18.7.1 Overview
Introduction
The simple recipe view consists of three areas:
● Recipe list
● Data record list
● Element list
You can use the context menu to operate each of these display areas.
Editing recipe display
The simple recipe view can be processed as follows:
● Enter values for the recipe elements
● Create recipe data records
● Save recipe data records or save them under a new name
● Delete recipe data records
● Transfer recipe data records from the PLC and to the PLC
REVIEW ENGLISH
27.07.2010
Operating a project
11.18 Operating recipes
Mobile Panel 277F IWLAN V2, Mobile Panel 277F IWLAN (RFID Tag)
Operating Instructions, 09/2010, A5E02766325-01 325
Operator controls of the simple recipe view
Toggle between the display areas and the context menus to operate the simple recipe views.
The following table shows the operation of the display area.
Operation Functions
Touching an entry The next lower display area opens.
The next higher display area opens.
The context menu of the display area opens.
The following table shows the operation of the context menu.
Operation Functions
The menu is closed.
The display area opens.
Touch the menu command The menu command is executed.
Context menus of the simple recipe view
● Recipe list
Menu item Functions
New A new recipe data record is created for the selected recipe.
If a start value is configured, it is shown in the text box.
Displaying infotext The infotext configured for the simple recipe view is displayed.
Open The record list of the selected recipe opens.
● Data record list
Menu item Functions
New A new recipe data record is created for the selected recipe.
If a start value is configured, it is shown in the text box.
Delete The selected record is deleted.
Save as The selected record is saved under a different name irrespective of the
simple recipe view. A dialog box opens in which the name is entered.
Rename The selected data record is renamed. A dialog box opens in which the
name is entered.
● Element list
Menu item Functions
Save The selected record is saved.
To PLC The displayed values of the selected data record are transferred from the
HMI device to the PLC.
From PLC The recipe values from the PLC are displayed on the HMI device in the
recipe view.
Save as The selected data record is saved under a new name. A dialog box
opens in which the name is entered.
REVIEW ENGLISH
27.07.2010

Operating a project
11.18 Operating recipes
Mobile Panel 277F IWLAN V2, Mobile Panel 277F IWLAN (RFID Tag)
326 Operating Instructions, 09/2010, A5E02766325-01
Operating Menus
Touch the desired menu command. The command is executed.
Operating the recipe screen
You operate the recipes in a recipe screen with the operator controls provided by the
configuration engineer.
Refer to your plant documentation for additional information.
11.18.7.2 Creating a recipe data record
Introduction
Create a new recipe data record in the recipe list or in the record list. Then enter the values
for the new record in the element list and save the record.
Requirement
● A screen with a simple recipe view is displayed.
Procedure
Proceed as follows:
1. Select the recipe for which you want to create a new recipe data record.
2. Open the recipe list menu.
3. Select the menu command "New".
Creates a new record The element list of the new record is displayed.
4. Enter values for the elements of the data record.
The tags of the record can be assigned default values depending on the configuration.
5. Open the menu of the element list and select the command "Save".
6. Enter a name for the new record.
7. Confirm your entries.
If you change the new data record number to an existing data record number, the existing
data record is overwritten.
Result
The created recipe data record is saved to the selected recipe.
REVIEW ENGLISH
27.07.2010

Operating a project
11.18 Operating recipes
Mobile Panel 277F IWLAN V2, Mobile Panel 277F IWLAN (RFID Tag)
Operating Instructions, 09/2010, A5E02766325-01 327
11.18.7.3 Editing a recipe data record
Introduction
Edit the values of the recipe data records in a simple recipe view.
If you want to display the current recipe values from the PLC in the simple recipe view, you
first have to read the current values from the PLC with the menu command "From PLC" in
the element list.
The values changed in the recipe view only take effect in the PLC when you transfer the
edited data record to the PLC with the menu command "To PLC".
Requirement
● A screen with a simple recipe view is displayed.
Procedure
Proceed as follows:
1. Select the recipe which contains the desired recipe data record.
2. Open the data record list.
3. Select the recipe data record you want to change.
4. Open the element list.
5. Change the values of the records as required.
6. Save your changes with the menu command "Save".
The recipe data record is saved.
Result
The edited recipe data record has now been saved in the selected recipe.
11.18.7.4 Deleting a recipe data record
Introduction
You can delete all the data records which are not required.
Requirement
● A screen with a simple recipe view is displayed.
REVIEW ENGLISH
27.07.2010

Operating a project
11.18 Operating recipes
Mobile Panel 277F IWLAN V2, Mobile Panel 277F IWLAN (RFID Tag)
328 Operating Instructions, 09/2010, A5E02766325-01
Procedure
Proceed as follows:
1. Select the recipe which contains the desired recipe data record.
2. Open the data record list.
3. Select the data record you want to delete.
4. Open the menu.
5. Select the menu command "Delete".
Result
The data record is deleted.
11.18.7.5 Reading a recipe data record from the PLC
Introduction
The values of recipe elements are exchanged with the PLC via tags.
In the current project, the values which are also stored in the recipes in the HMI device can
be changed directly in the plant. This is the case, for example, if a valve was opened further
directly at the plant than is stored in the recipe. The values of the tags on the HMI device
possibly no longer match the values in the PLC.
To synchronize the recipe values, read the values from the PLC and display them in the
recipe view.
Requirement
● A screen with a simple recipe view is displayed.
Procedure
Proceed as follows:
1. Select the recipe which contains the desired recipe data record.
2. Select the element list of the recipe data record to which you want to apply the values
from the PLC.
3. Open the menu.
4. Select the menu item "From PLC".
The values are read from the PLC.
5. If you want to save the displayed values in the HMI device, select the menu item "Save".
Result
The values were read from the PLC, displayed on the HMI device and saved to the selected
recipe data record.
REVIEW ENGLISH
27.07.2010

Operating a project
11.18 Operating recipes
Mobile Panel 277F IWLAN V2, Mobile Panel 277F IWLAN (RFID Tag)
Operating Instructions, 09/2010, A5E02766325-01 329
11.18.7.6 Transferring a recipe data record to the PLC
Introduction
In order for an edited recipe data record to take effect in the process, you must transfer the
values to the PLC.
The display values in the recipe view are always transferred to the PLC.
Requirement
● A screen with a simple recipe view is displayed.
Procedure
Proceed as follows:
1. Select the recipe which contains the desired recipe data record.
2. Select the element list of the recipe data record whose values you want to transfer to the
PLC.
3. Open the menu.
4. Select the menu item "To PLC".
Result
The values of the recipe data record were transferred to the PLC and take effect in the
process.
11.18.8 Exporting a recipe data record
Introduction
You can export one or more recipe data records to a CSV file, depending on the
configuration. After export, the values in the recipe data record can be further processed in a
spreadsheet program such as MS Excel. The degree to which you can influence the export
depends on the configuration:
NOTICE
Export recipe data
The USB interface is deactivated while the main battery is being changed.
During the main battery change, do not transfer any data to a USB memory stick.
REVIEW ENGLISH
27.07.2010

Operating a project
11.18 Operating recipes
Mobile Panel 277F IWLAN V2, Mobile Panel 277F IWLAN (RFID Tag)
330 Operating Instructions, 09/2010, A5E02766325-01
Requirement
● A screen with a recipe view is displayed
● An operating element with the function "Export record" has been configured.
● The following tags are configured equally in the recipe view and for the "Export record"
operating element.
– Recipe number
– Data record number
Procedure
Proceed as follows:
1. Select the recipe which contains the desired recipe data record.
2. Select the recipe data record you want to export.
3. Operate the operator control which was configured for export, for example the "Export
data record" button.
The data record is exported as a CSV file to an external data medium.
Refer to your plant documentation for additional information.
11.18.9 Importing a recipe data record
Introduction
You can import values from a CSV file to a recipe data record, depending on the
configuration.
If the structure of the CSV file differs from the structure of the recipe, deviations are handled
as follows:
● Any additional values in the CSV file will be rejected
● The system applies the configured default value to the recipe data record if the CSV file
contains an insufficient number of values
● If the CSV file contains values of the wrong data type, the configured default value is set
in the recipe data record
Example:
The imported CSV file contains values that were entered as floating point numbers
However, the corresponding tag expects an integer value. In this case, the system
discards the imported value and uses the configured default
Requirements
● An operating element with the function "Import data record" has been configured, for
example a button
● A screen with a recipe view is displayed
REVIEW ENGLISH
27.07.2010

Operating a project
11.18 Operating recipes
Mobile Panel 277F IWLAN V2, Mobile Panel 277F IWLAN (RFID Tag)
Operating Instructions, 09/2010, A5E02766325-01 331
Procedure
Proceed as follows:
1. Select the recipe which contains the recipe data record to be imported.
2. Operate the operating element with the function "Import data record".
The record is imported from an external data medium as a CSV file and then displayed in
the recipe view.
11.18.10 Examples
11.18.10.1 Entering a recipe data record
Introduction
You would like to enter production data on the HMI device without interrupting the process in
the plant. For this reason, the production data should not be transferred to the PLC.
Procedure
Proceed as follows:
1. Call the recipe view or a recipe screen.
2. Select the desired recipe data record.
3. Enter the values of the elements.
4. Save the recipe data record.
The recipe data record is saved in the internal memory of the HMI device.
REVIEW ENGLISH
27.07.2010
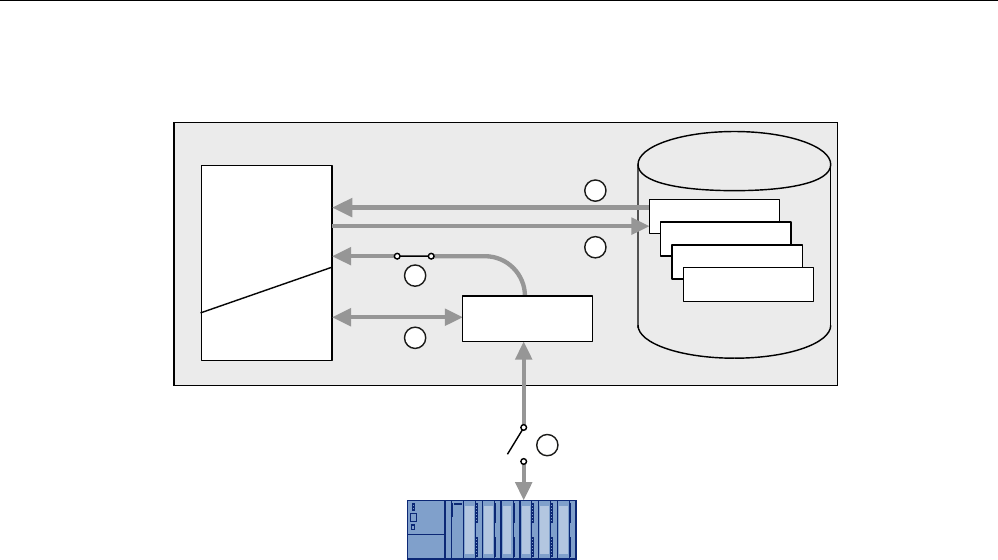
Operating a project
11.18 Operating recipes
Mobile Panel 277F IWLAN V2, Mobile Panel 277F IWLAN (RFID Tag)
332 Operating Instructions, 09/2010, A5E02766325-01
The following figure shows the data flow schematically.
5H]HSWXU
5H]HSWXU
5H]HSWXU
5H]HSWXUQ
5H]HSWXUVSHLFKHU
%HGLHQJHU¦W
6WHXHUXQJ
5H]HSWXU
DQ]HLJH
5H]HSWXU
ELOG
5H]HSWXU
YDULDEOH
① Display recipe data record
② Save recipe data record
③ Tags are synchronized
④ Display and edit recipe tags in the recipe screen
⑤ Tags are offline
11.18.10.2 Manual production sequence
Introduction You request the production data of different workpieces from the PLC and display this data
on the screen of the HMI device for inspection. You want to correct the transferred
production data in the recipe view or the recipe screen if necessary.
Procedure A scanner connected to the PLC reads the barcode of a workpiece. The barcode names
correspond to the names in the recipe data record. Based on the barcode name, the PLC
can read the required recipe data record. The recipe data record is displayed for inspection
on the HMI device. You can now edit and save the recipe data record. Then transfer the
edited recipe data record to the PLC again.
REVIEW ENGLISH
27.07.2010
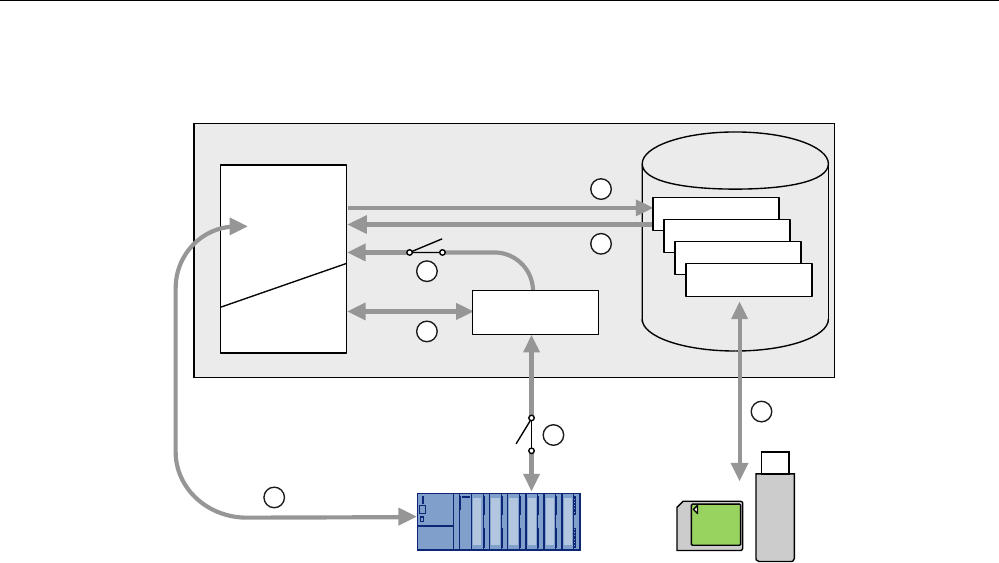
Operating a project
11.19 Closing the project
Mobile Panel 277F IWLAN V2, Mobile Panel 277F IWLAN (RFID Tag)
Operating Instructions, 09/2010, A5E02766325-01 333
The following figure shows the data flow schematically.
'LVSOD\LQJD
UHFLSH 5HFLSH
5HFLSH
5HFLSH
5HFLSHQ
5HFLSHPHPRU\
+0,GHYLFH
3/&
5HFLSH
LPDJH
5HFLSHYDULDEOH
([WHUQDO
PHPRU\PHGLXP
① The recipe data record is read from the PLC and written to the PLC again following
changes
② Display and edit recipe tags in the recipe screen
③ Tags are synchronized
④ Recipe data records are saved in the recipe memory of the HMI device
11.19 Closing the project
The procedure for closing the active project is identical to the procedure for removing the
HMI device.
See also
Removing the HMI device (Page 268)
REVIEW ENGLISH
27.07.2010

Operating a project
11.19 Closing the project
Mobile Panel 277F IWLAN V2, Mobile Panel 277F IWLAN (RFID Tag)
334 Operating Instructions, 09/2010, A5E02766325-01
REVIEW ENGLISH
27.07.2010