Sierra Wireless MHS802 CDMA + WiMAX + WiFi Hot Spot User Manual
Sierra Wireless Inc. CDMA + WiMAX + WiFi Hot Spot
UserManual.wiki
>
Sierra Wireless
>
MHS802 User Manual
>
User Manual
Contents
1.
User Manual
2.
Users Manual
3.
Box statements
4.
Box Statements
User Manual
Navigation menu
Upload a User Manual
Namespaces
Wiki Guide
HTML
PDF
Info
Views
User Manual
Discussion / Help
Navigation
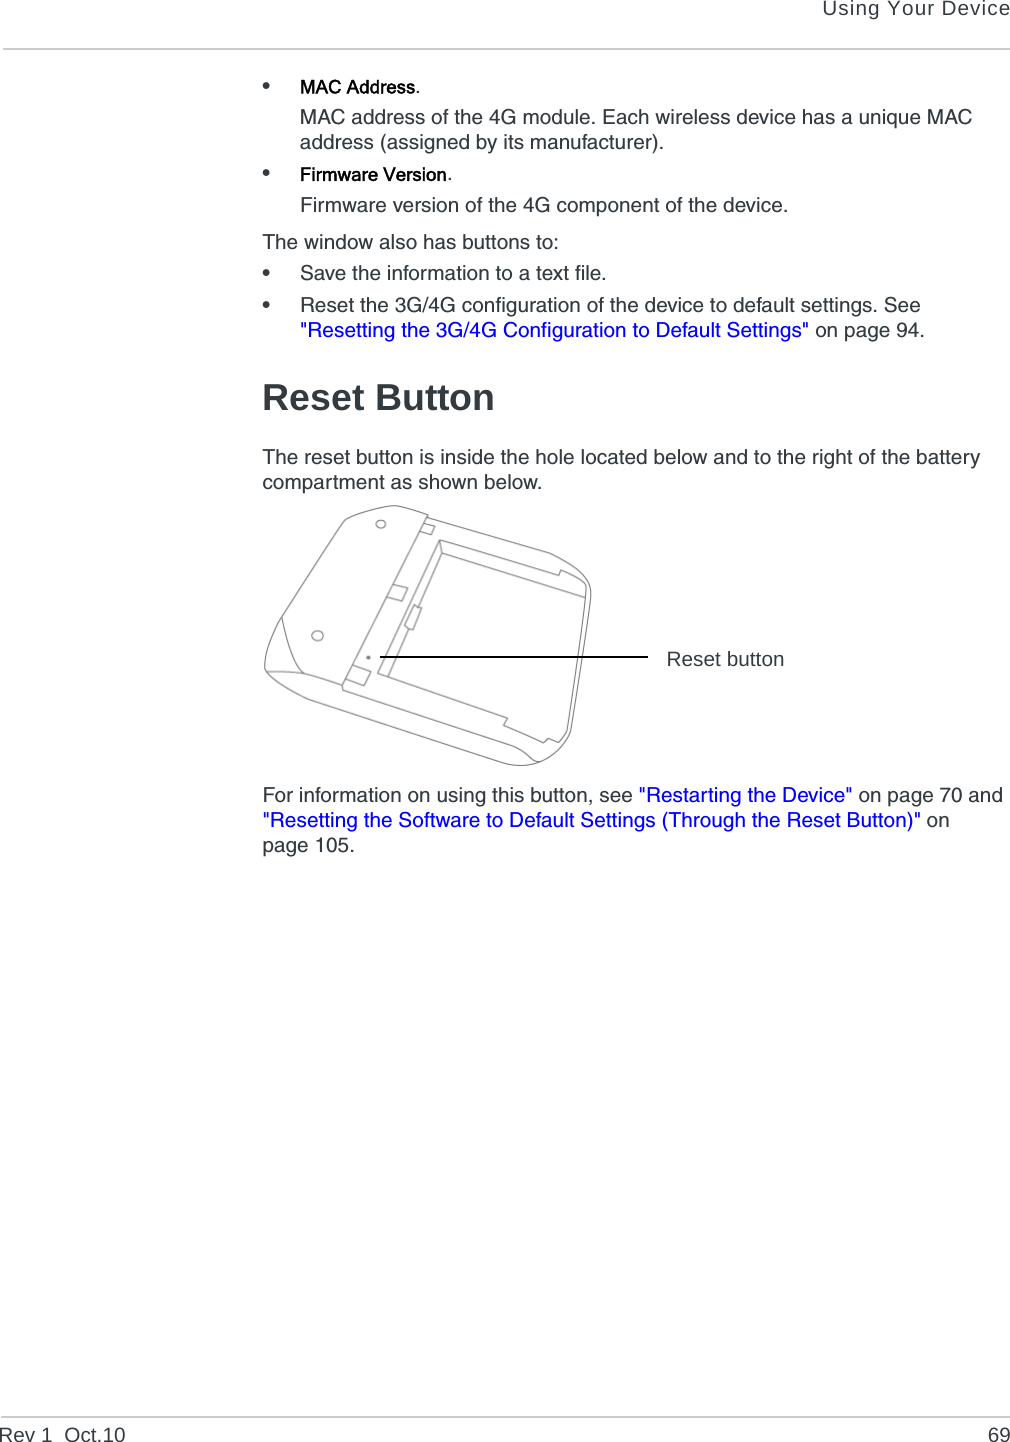
![PrefaceRev 1 Oct.10 131. Redistributions of source code must retain the copyright notice, this list of conditions and the following disclaimer.2. Redistributions in binary form must reproduce the above copyright notice, this list of conditions and the following disclaimer in the documentation and/or other materials provided with the distribution.3. All advertising materials mentioning features or use of this software must display the following acknowledgement:“This product includes cryptographic software written by Eric Young (eay@cryptsoft.com)”The word ‘cryptographic’ can be left out if the rouines from the library being used are not cryptographic related :-).4. If you include any Windows specific code (or a derivative thereof) from the apps directory (application code) you must include an acknowledgement:“This product includes software written by Tim Hudson (tjh@cryptsoft.com)”THIS SOFTWARE IS PROVIDED BY ERIC YOUNG “AS IS” AND ANY EXPRESS OR IMPLIED WARRANTIES, INCLUDING, BUT NOT LIMITED TO, THE IMPLIED WARRANTIES OF MERCHANTABILITY AND FITNESS FOR A PARTICULAR PURPOSE ARE DISCLAIMED. IN NO EVENT SHALL THE AUTHOR OR CONTRIBUTORS BE LIABLE FOR ANY DIRECT, INDIRECT, INCIDENTAL, SPECIAL, EXEMPLARY, OR CONSEQUENTIAL DAMAGES (INCLUDING, BUT NOT LIMITED TO, PROCUREMENT OF SUBSTITUTE GOODS OR SERVICES; LOSS OF USE, DATA, OR PROFITS; OR BUSINESS INTERRUPTION) HOWEVER CAUSED AND ON ANY THEORY OF LIABILITY, WHETHER IN CONTRACT, STRICT LIABILITY, OR TORT (INCLUDING NEGLIGENCE OR OTHERWISE) ARISING IN ANY WAY OUT OF THE USE OF THIS SOFTWARE, EVEN IF ADVISED OF THE POSSIBILITY OF SUCH DAMAGE.The licence and distribution terms for any publically available version or derivative of this code cannot be changed. i.e. this code cannot simply be copied and put under another distribution licence [including the GNU Public Licence.]PPPD LicenseCopyright (c) 1984-2000 Carnegie Mellon University. All rights reserved.Redistribution and use in source and binary forms, with or without modification, are permitted provided that the following conditions are met:1. Redistributions of source code must retain the above copyright notice, this list of conditions and the following disclaimer.2. Redistributions in binary form must reproduce the above copyright notice, this list of conditions and the following disclaimer in the documentation and/or other materials provided with the distribution.3. The name “Carnegie Mellon University” must not be used to endorse or promote products derived from this software without prior written permission. For permission or any legal details, please contactOffice of Technology TransferCarnegie Mellon University5000 Forbes Avenue](https://usermanual.wiki/Sierra-Wireless/MHS802.User-Manual/User-Guide-1412542-Page-13.png)
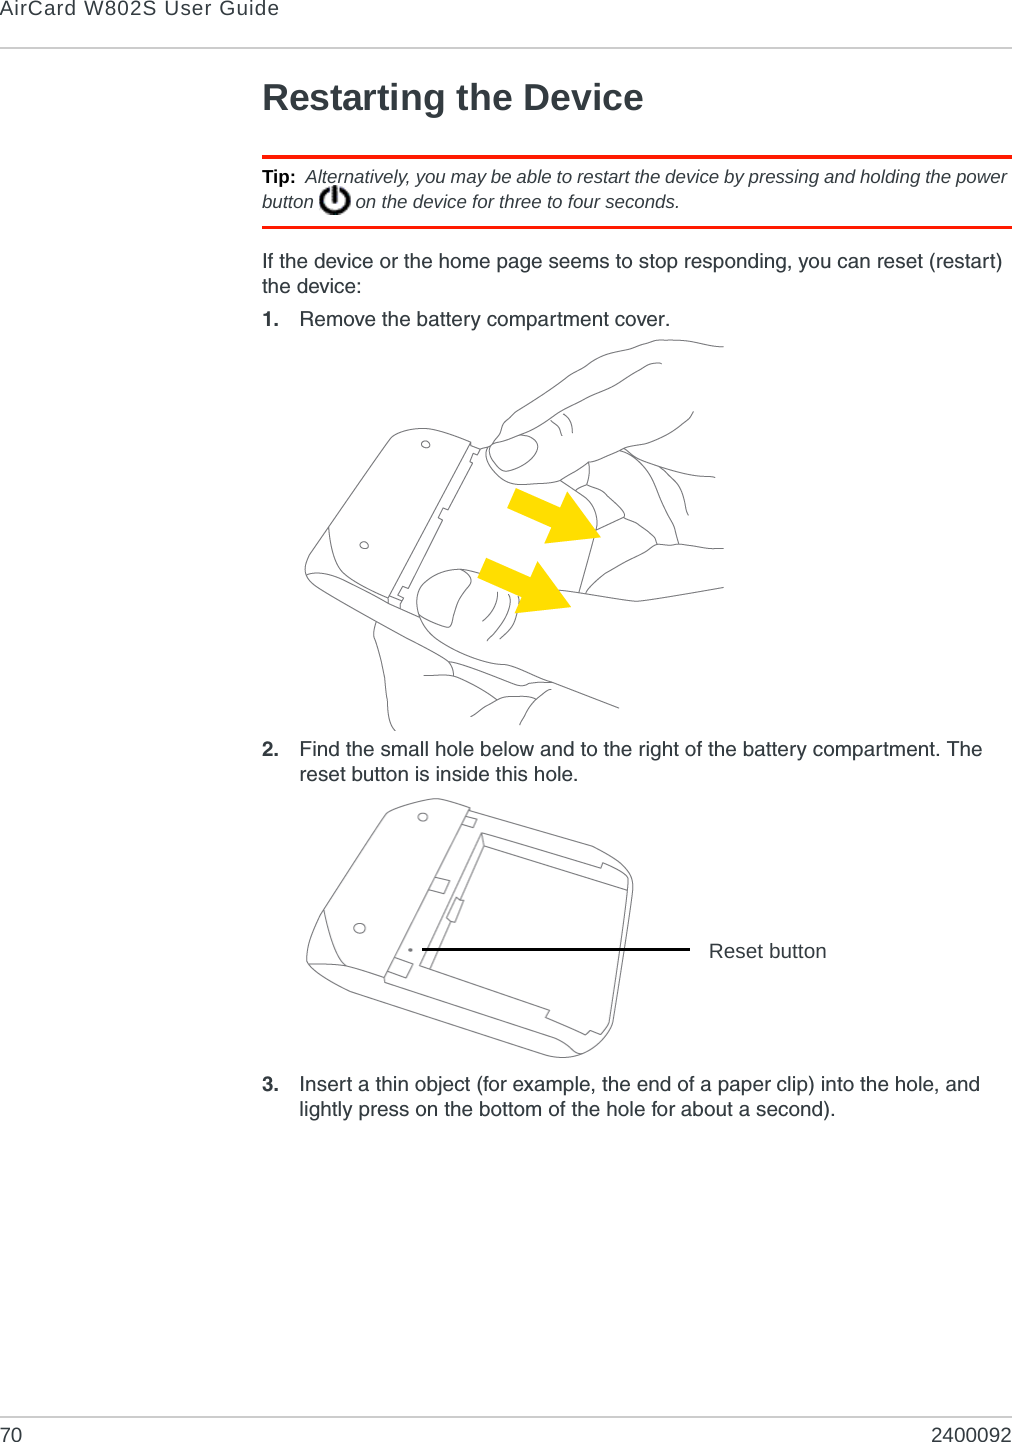
![AirCard W802S User Guide34 2400092Using the Power Button to Determine the Device StateThe power button on the device also indicates the device's status, as shown in the following table.Controlling the Device Using the Power ButtonPower button Description Your actionNot lit •The device is turned off, and may or may not be charging.•The device is turned on, but you have turned off the LED.•To turn the device on, press and hold the power button for two seconds.•[OPTIONAL]: Turn on the LED. See "Enabling and Disabling the LED" on page 74.Lit, flashing (approximately every 4 seconds)The device is turned on, and the LED is enabled. No action required.Lit, flashing (approximately every 30 seconds)The device is in standby (low power) mode.The following are off: LCD, Wi-Fi radio, 3G/4G radios.For more information, see "Standby (Low Power) Mode" on page 57.To exit standby mode:Connect the device to the power adapter or computer, through the USB cable.— or —Press the power button .Type of press ResultQuick press •The device leaves standby (low power) mode.•The LCD wakes up (turns on) if it was enabled but dormant. (The LCD turns dark, after a configurable time of inactivity.)•A displayed message is confirmed or acknowledged.•Display of the Wi-Fi network name (SSID) and password is turned off.Quick double-press •The LCD wakes up (turns on) if it was enabled but dormant. (The LCD turns dark, after a configurable time of inactivity.)•The Wi-Fi network name (SSID) and password are briefly displayed. See "Wi-Fi Password Reminder" on page 90.Long press (press and hold for two seconds) The device turns on or off.](https://usermanual.wiki/Sierra-Wireless/MHS802.User-Manual/User-Guide-1412542-Page-34.png)


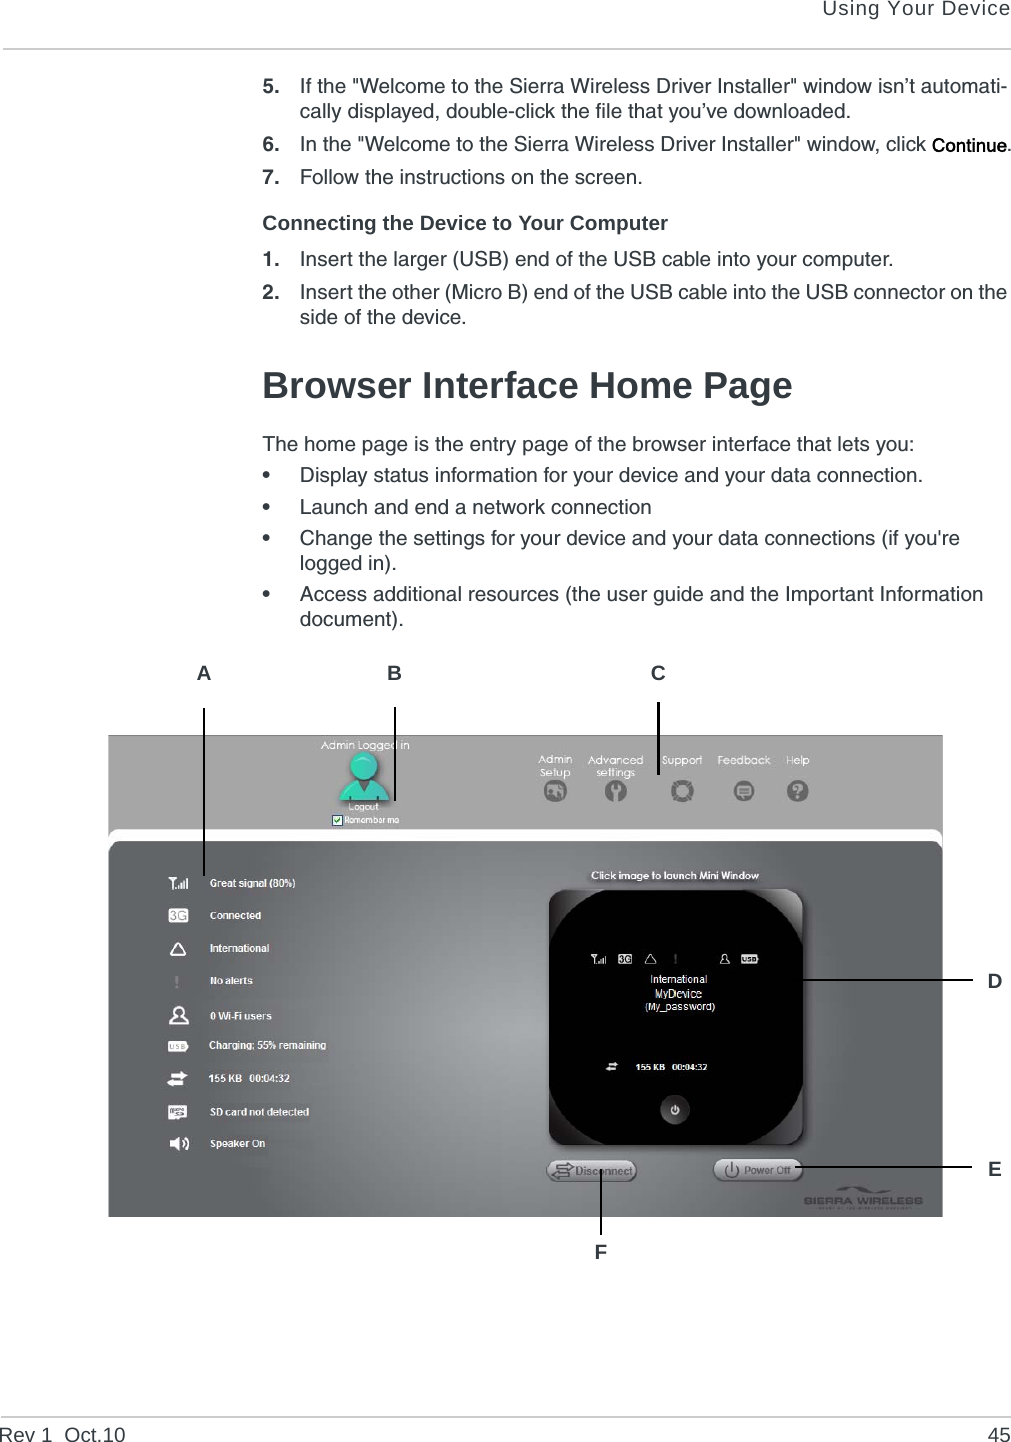
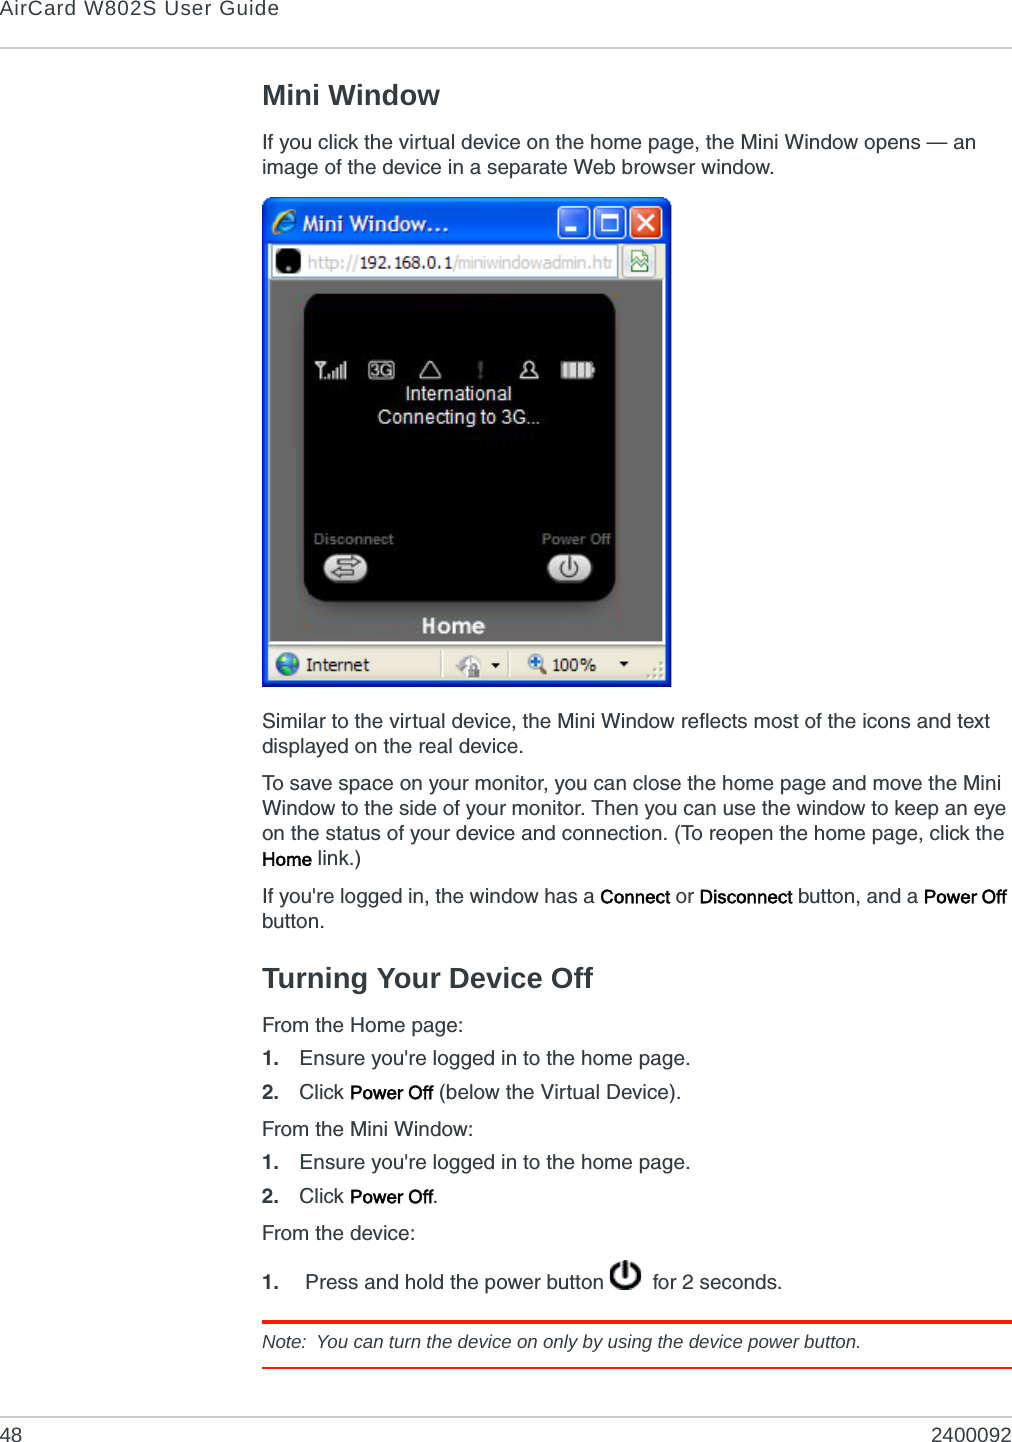
![Using Your DeviceRev 1 Oct.10 47Logging On as an AdministratorYou don't need to log in to access and use the home page. However, when you're logged in:•Additional information appears in the window that appears when you click an item on the left side of the home page. See "Vertical Row (of Icons and Text)" on page 52.•You can access the Advanced Settings window, where you can modify additional settings.•You can rerun the device setup, if required (Admin Setup []).•You can install updates.To log in:1. Ensure that nobody else is already logged in — other people can use the home page at the same time, but only one user can be logged in.2. In the Admin Login section (in the upper left area of the home page), enter the administrator password (1–20 characters/numbers). (The default password is "password". It's recommended you change the password, if you haven't already.)3. Click OK.After a certain time, you will be automatically logged off (timeout security feature), unless you select Remember me (below the password field). For more information, see "Automatic Login ("Remember Me")" on page 77.Virtual DeviceThe right half of the home page contains an image of your device.This is a "virtual device" — it reflects most of the icons and text displayed on the real device.](https://usermanual.wiki/Sierra-Wireless/MHS802.User-Manual/User-Guide-1412542-Page-47.png)
![Using Your DeviceRev 1 Oct.10 49AlertsDisplaying AlertsThe alerts icon indicates whether there are any alerts (messages that require your attention).The icon is on the left side of the home page.Click the icon to display the Alert window. If more than one alert is available:•The higher priority alert opens.•When you close an alert, the next alert opens.•You can use the and buttons (at the top of the alert window) to view other alerts.The options and instructions shown in the alert window depend on the alert event. Please read the instructions carefully. They may state, for example, that you have to reconnect to Wi-Fi after an update is installed.3G Activation RequiredIf only 3G coverage is available, you won't be able to connect to the Internet until 3G activation has been completed.To activate 3G on your device:1. Ensure you have 3G coverage.2. In the Admin Login section (in the upper left area of the home page), enter the administrator password (1–20 characters/numbers). (The default password is "password".)3. Click OK.4. Click the alerts icon to display the alert window.5. If more than one alert is available, use the and buttons (at the top of the alert window) to browse to the "3G Activation Required" alert.6. In the 3G Activation Required alert window, click Activate now. (Activation is then performed over the network; no user interaction is required.)•If activation is successful, "Activation complete!" is displayed. You can now connect to the 3G network. If the connection is not established automatically, click Connect on the home page or Mini Window.•If activation was not successful, "Activation failed" is displayed. Retry the activation. If it is not successful, prepare the following, and contact <Carrier_Name>:·Your billing information.·ESN of the device (displayed on the packaging, on the device [under the battery], and at Advanced settings > Device > About).](https://usermanual.wiki/Sierra-Wireless/MHS802.User-Manual/User-Guide-1412542-Page-49.png)
![Using Your DeviceRev 1 Oct.10 55If you don’t have 4G coverage, you can save power by selecting "3G Only".To automatically connect to the network upon loss of connection or when the device powers on, select Connect Automatically. 3G Roaming Information and SettingsThe roaming indicator shows whether you are roaming. The text near the icon may indicate additional details.Note: Roaming on 4G is not supported.Click the icon to display the 3G Roaming Information window. The window displays:•Roaming status.•Allow 3G roaming field (if you're logged in).·If you select this field, you can roam and connect when outside of <Carrier_Name> coverage, but additional charges may occur. (To roam outside of North America, you must also select Allow international access.)·If you do not select this field, you can connect only when you're inside the <Carrier_Name> coverage area.•Allow international access field (if you're logged in, and subject to feature avail-ability) — allows roaming outside of North America.·If this field is displayed but not available, select Allow 3G roaming.Alert InformationThe alerts icon indicates whether there are any alerts (situations that require your attention).Note: To view alert information, you must be logged in. New alerts are checked upon device power-up. That is, if an event occurs, you won't be notified until the device is restarted.The text next to the icon indicates the number of alerts.Click the icon or text to display the Alert window.Icon DescriptionNot roamingRoaming [flashing] Enhanced roaming indicatorIcon DescriptionNo alerts are available.One or more alert is available.](https://usermanual.wiki/Sierra-Wireless/MHS802.User-Manual/User-Guide-1412542-Page-55.png)

![Using Your DeviceRev 1 Oct.10 61FeedbackThe Feedback button opens, in a new Web browser window (or tab), the online feedback site for your device.Note: This button is available only when you're connected to the Internet.Help ButtonThis button displays a menu with options to:•Display the online Help.•Download the user guide.•View the important information booklet. This booklet contains warranty and other information.Buttons Below the Virtual DeviceNote: The buttons appear only when you're logged in.Connect/Disconnect ButtonThis button disconnects a connection, or connects (if currently there's no connection).Power Off ButtonThis button turns the device off.Note: You can turn the device on by using the device power button.Using the microSD CardBefore Using the microSD Card Slot1. Enable the slot. See "Enabling the microSD Card Slot" on page 62.2. Set up access to the slot. See "Setting Up Access to the microSD Card" on page 62.3. [OPTIONAL]: Rename the microSD Shared Folder Name. See "microSD Shared Folder Name" on page 62.4. Inform others how they can access the card. See "Accessing the microSD Card" on page 64.](https://usermanual.wiki/Sierra-Wireless/MHS802.User-Manual/User-Guide-1412542-Page-61.png)
![AirCard W802S User Guide62 2400092Enabling the microSD Card SlotBefore computers can recognize the microSD card, you must enable the microSD slot on the device.1. Ensure you're logged in to the home page.2. In the SD Card Information and Settings window, select Enable SD Card. (See "microSD Card Information and Settings" on page 58.)— or —From Advanced settings > Device > microSD card, in the SD-Card Slot section select Enable.Setting Up Access to the microSD CardIf you've enabled access to the microSD card, you must also specify whether a username and password are required to access the card.1. Ensure you're logged in to the home page.2. In the SD Card Information and Settings window or from Advanced settings > Device > microSD card, under Username and Password Security, select one of the values:·To have no security, select None.Anyone can use the card; no username or password is required.·To allow only the administrator to use the card, select Administrator Only.When prompted for the username (when you try to use the card), enter "admin". For the password, enter the home page login password.·To allow non-administrators to use the card, select Administrator + Guest.3. If you've selected Administrator + Guest:a. [OPTIONAL]: Change the Set Guest Username and Set Guest Password fields (up to 20 characters each; spaces are allowed).b. Give the guest username and password to people whom you want to allow access to the card.microSD Shared Folder NameYou can optionally change the name of the folder that the microSD card shows up as (in the file browser program); the default folder name is "shared".1. Ensure you're logged in to the home page.2. Click Advanced settings > Device > MicroSD card.3. In the MicroSD Shared Folder Name field, type the new name.You can use up to 32 letters, numbers, and spaces in any combination.For information on how this folder name is used, see "Accessing the microSD Card" on page 64.](https://usermanual.wiki/Sierra-Wireless/MHS802.User-Manual/User-Guide-1412542-Page-62.png)
![Using Your DeviceRev 1 Oct.10 67Upgrade Firmware From a FileUse this option when you have an updated firmware file that you've, for example, downloaded from the <Carrier_Name> or Sierra Wireless website.Note: During installation of the update:• DO NOT turn off or unplug the device.• Your Wi-Fi and Internet connections won’t be available.When the installation is complete, you will need to reconnect to Wi-Fi. (See "How Do I Connect to Wi-Fi?" on page 112).To upgrade the device firmware from a file:1. Log in to the home page.2. Ensure Disable Wi-Fi when connected via USB is selected. See "Disabling Wi-Fi When Connected Through USB" on page 93.3. Ensure your device is connected to the power adapter or computer, through the USB cable.4. Click Advanced settings ().5. If you want to later confirm that the upgrade was successful, write down the current version information (shown in Device > About):·Software version·Firmware version (in the 3G section)·Firmware version (in the 4G section)6. Click Device > Basic.7. [OPTIONAL]: Save the current configuration (recommended).a. Click Export.b. Save the file. Note the filename and path.8. Click Browse next to the Update Firmware From File field, and click the firmware file to upload to the device.9. Click Update.Please wait while the upgrade occurs; this may take several minutes. The device LCD shows the upgrade status. The device will restart (possibly sev-eral times).Once the upgrade is complete, the LCD device shows the usual icons and text (for example, the device name).10. Compare the current version information (in Device > About) to the values you wrote down in step 5 to confirm that the upgrade was successful.11. If you've saved the current configuration, reload it.a. Click Browse next to the Import Router Settings field, and click the file you've saved.b. Click Import.12. Reconnect to Wi-Fi. See "How Do I Connect to Wi-Fi?" on page 112.](https://usermanual.wiki/Sierra-Wireless/MHS802.User-Manual/User-Guide-1412542-Page-67.png)


![SettingsRev 1 Oct.10 91•Click Add.In the MAC Address field, enter the MAC address of the computer you're adding to the list. (If you don't know this address, see "Finding the MAC Address" on page 117.)In the Name field, enter a name, for example "Amy's PC".6. Repeat step 5 for each computer you want to allow access.Specifying Computers That Are Not Allowed to Access the Network1. Log in to the home page.2. Click Advanced settings ().3. Click Wi-Fi > MAC Filter.4. In the MAC Filter Mode list, click Block all in list.5. Determine and block an undesired user of your network.a. Click the List of connected devices link.b. If you see a device you don't recognize, you can compare its MAC address to the MAC address of each of the devices on your network.To determine the MAC address of each device you have, see "Finding the MAC Address" on page 117. If none of your devices have this MAC address, that device might be an intruder.c. In the row for the device you want to block, click Add.6. For each computer you want to block, repeat step 5.Tip: The Connected Users window has a Block check box, available for each currently connected user (except the administrator [ ]). See "Wi-Fi Users Information and Settings" on page 56.Removing a Computer From the Allowed or Disallowed Lists1. Log in to the home page.2. Click Advanced settings ().3. Click Wi-Fi > MAC Filter.4. In the MAC filter mode list, click either Allow all in list or Block all in list.5. Click the row that you want to remove.A row of buttons (Delete, OK, Cancel) appears.6. Click Delete.](https://usermanual.wiki/Sierra-Wireless/MHS802.User-Manual/User-Guide-1412542-Page-91.png)
![AirCard W802S User Guide100 2400092DNS ModeThe DNS Mode setting specifies how the DNS servers (that the DHCP clients are to communicate with) are obtained.1. Log in to the home page.2. Click Advanced settings ().3. Click Router > LAN.4. Set DNS Mode to one of the following:•Auto: Use the DNS server specified by <Carrier_Name>. DNS Relay is enabled by default.•Manual: The routing hardware assigns DHCP clients the DNS servers specified in the Manual DNS Server #1 and #2 fields.Use this option to access a DNS server that provides customized addressing or if you have a local DNS server on your network.If DNS Relay is disabled, the routing hardware rejects DNS requests targeting the internal DNS proxy.For information on DNS Relay, see "LAN Panel" on page 96.Port Forward PanelNormally, incoming traffic (from the Internet) is blocked. However, port forwarding lets you forward incoming traffic to specific ports and devices (per their local IP address) on your network. For example, you can configure port forwarding so that:•You can access your Remote Desktop from the Internet (by specifying the WAN [public] IP address that the device is using).•Internet users can access a Web, FTP, or email server, or gaming or Internet application hosted by your computer.Note: Port forwarding creates a security risk. When not required, port forwarding should be disabled.Port forwarding does not apply to normal browsing, file downloading, running most online games or other applications hosted on the Internet. (Some online games require port forwarding.)Before you can use or configure port forwarding, you must enable it. See "Enabling Port Forwarding" on page 101.From the Port Forward panel of the Router tab of the Advanced Settings window, you can:•Enable port forwarding for an application. See "Enabling Port Forwarding for an Application" on page 101.•Remove an application from the port forwarding list. See "Disabling Port Forwarding for an Application" on page 101.](https://usermanual.wiki/Sierra-Wireless/MHS802.User-Manual/User-Guide-1412542-Page-100.png)
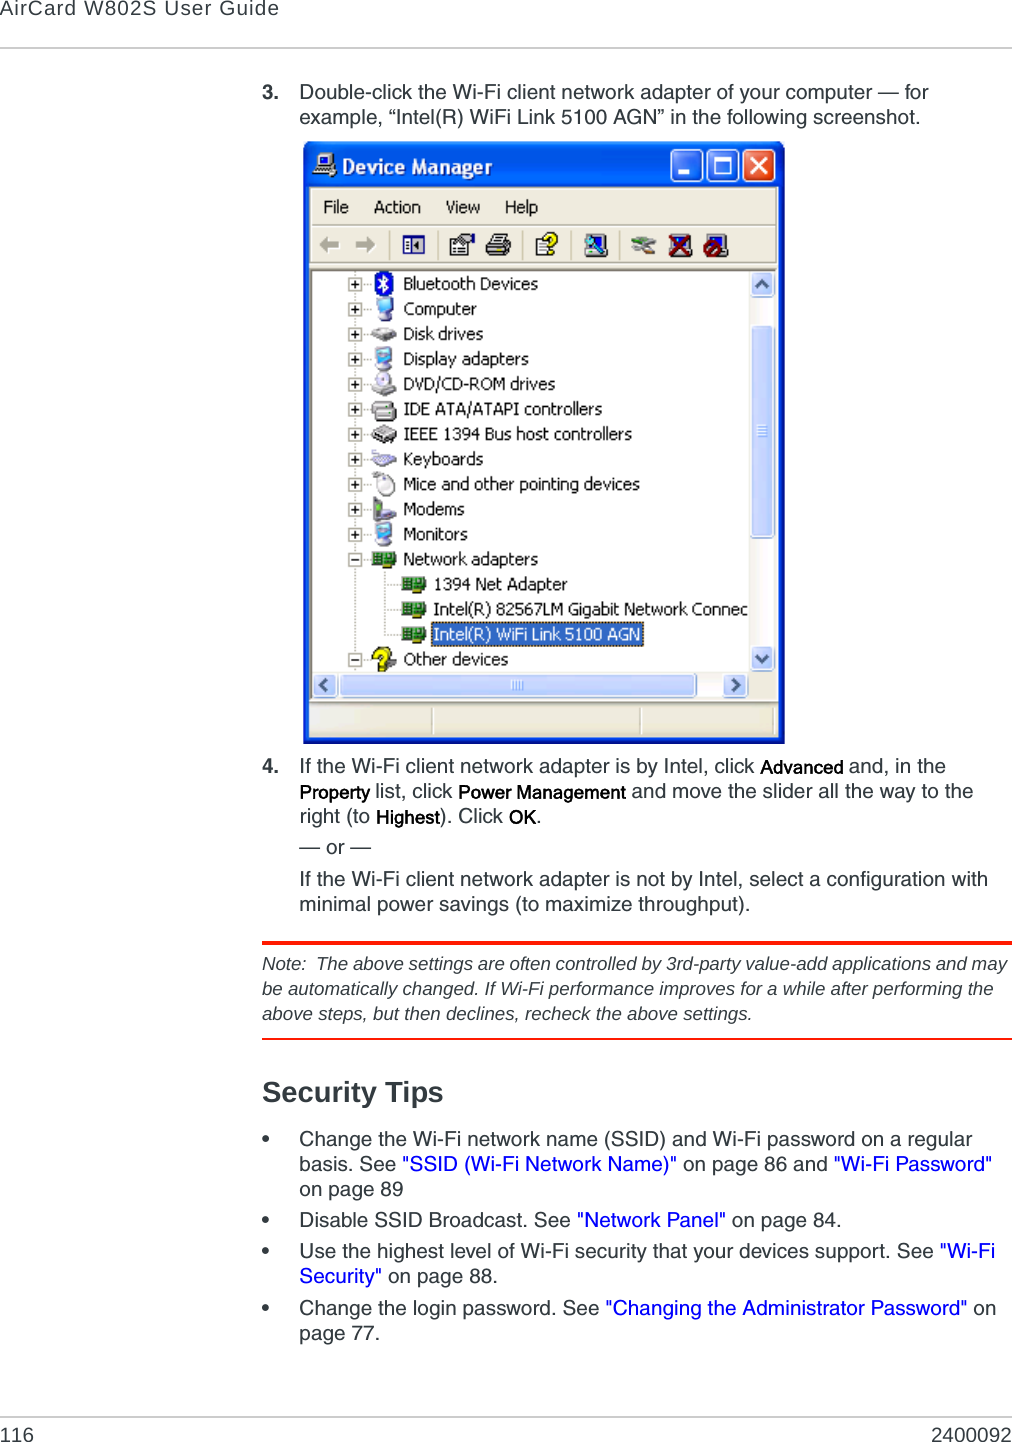
![ResourcesRev 1 Oct.10 115Improving 3G Network ServiceTo improve your network service, periodically check for PRL and profile updates.The PRL (Preferred Roaming List) is an account configuration item set by your service provider. It controls the radio channels and network carrier used by the 3G modem.To check for these updates:1. Log in to the home page.2. Click Advanced settings ().3. Click WAN > Setup.4. Click Update 3G PRL.5. After the update checking is completed, click Update 3G Profile.Improving Wi-Fi Performance•Try a different channel number. See "Wi-Fi Channel" on page 93.•Check whether any device updates are available. See "Updates" on page 65.•See the tips in "Improving Signal Strength" on page 114.•Limit the number of Wi-Fi users (Advanced settings > Wi-Fi > Network > Max Number of Users).•Select a longer Wi-Fi range. (Advanced settings > Wi-Fi > Network > Longer Wi-Fi range [two locations: Battery or USB Powered, and AC Powered])Windows XP Users1. Open the Device Manager.a. Click start > Settings > Control Panel.b. Double-click System.c. Click Hardware.d. Click Device Manager.2. Double-click Network adapters.](https://usermanual.wiki/Sierra-Wireless/MHS802.User-Manual/User-Guide-1412542-Page-115.png)
![ResourcesRev 1 Oct.10 119LCD Is DarkThe LCD is dark and is not displaying any text or icons if:•The device is turned on and:·The LCD is turned off (Advanced settings > Device > Display > LCD Backlight).·The LCD is turned on, but the LCD is dormant (inactivity timeout). To make the LCD active, briefly press the power button on the device.·The device is in standby (low power) mode. To exit this mode, briefly press the power button on the device.•The device is turned off.To turn the device on:a. Ensure a battery is inserted into the device.b. Press the power button on the device for approximately two seconds.If the LCD is still dark, use the USB cable to connect the device to the power adapter or to a computer.Insufficient Signal StrengthIf you have insufficient signal strength, the icon is displayed (on the left side of the home page).Insufficient signal strength may occur because:•You are outside the network coverage area.•Your device’s internal antenna is pointing in the wrong direction.•You are in or near a structure that is blocking the signal.•You are near a device that is causing radio signal interference.•A network or account problem is preventing you from obtaining service.See also "Improving Signal Strength" on page 114.Messages Displayed on the Device LCDSee also "SD Card Error" on page 50.3G Activation FailedIf this message is displayed on the device LCD or in the 3G Activation Required alert window (after you've attempted activation):1. Ensure you're in 3G coverage and the signal strength is strong.2. Turn the device off and on. See "Turning Your Device Off" on page 48 and "Turning Your Device On" on page 33.3. If the "Activation failed" message is still displayed, prepare the following, and contact <Carrier_Name>:·Your billing information.·ESN of the device (displayed on the packaging, on the device [under the battery], and at Advanced settings > Device > About).](https://usermanual.wiki/Sierra-Wireless/MHS802.User-Manual/User-Guide-1412542-Page-119.png)