Sierra Wireless PC3220P Dual-Band CDMA PCMCIA Modem Card User Manual QSG REV5 generic
Sierra Wireless, Inc Dual-Band CDMA PCMCIA Modem Card QSG REV5 generic
Contents
- 1. Users Manual
- 2. Users Manual 1 per CRN 24858
- 3. Users Manual 2 per CRN 24858
- 4. Users Manual per CRN 24959
Users Manual 2 per CRN 24858
PC3220 REV6 022803
1
A Quick Start Guide
1. Launch the Mobile Connection Manager installation software and Fourelle Venturi 2.1 data
compression software
2. Insert your PC3220 Wireless PC Card into your laptop (Driver Installation)
3. Activating your PC3220
4. Get Connected
5. Exiting the Mobile Connection Manager & Removing the PC3220
About your PC3220
This Quick Start Guide provides a brief overview of the installation and configuration process for
your PC3220. Please reference the User’s Guide for complete installation and configuration
procedures and for detailed instructions on using your PC3220.
The Mobile Connection Manager is an application designed to assist you in managing the PC3220.
With this application you can easily monitor and customize your connections. This guide outlines
the installation procedures and basic functions of the Mobile Connection Manager. For detailed
information on the features of the Mobile Connection Manager, consult the User’s Guide.
The Fourelle Venturi 2.1 Data Compression Software is also included on the installation CD. You
will be given the option to install this software during the installation process. This data
compression software is an enhancing feature available with the PC3220. When you install and
enable the Venturi software, data compression will automatically occur wherever Venturi is
available on the network. In areas where the Venturi server is implemented, you will notice an
increase in the speed of your data connections.
CAUTION: Do not insert your PC3220 until you have installed the Mobile Connection Manger
software onto your notebook PC.
WARNING: Once the card is inserted, do not physically remove the PC3220 from the PC Card slot
until you have completed the Unplug/Eject process. Removing the card improperly may cause a fatal
error to your PC.
Note: Your PC3220 will not work in Handhelds or Pocket PCs
Note: If you have previous versions of the Mobile Connection Manager or Fourelle Venturi
applications installed on your notebook PC, it is strongly recommended that you remove the
application by utilizing the Add/Remove Programs Windows utility. Once removed, proceed with the
installation procedures of the current version located on your Installation CD.
Go to: Start>Control Panel>Add/Remove Programs. Select Mobile Connection Manager or Fourelle
Venturi 2.1 and click Change/Remove. Next select Remove and click OK to proceed when
prompted. Your computer will need to restart in order to complete the un-install.
System Requirements
Your PC3220 functions in notebook PCs with these Windows® operating systems: Windows®
98SE/ME/XP/2000. This card is not designed to function in handhelds and Pocket PCs and does not
support Windows CE.
2
In order to install the PC3220 and the Mobile Connection Manager software, these minimum
system resources are required:
• Card slots: Type II PC Card slot (Cardbus)
• Disk-Drive: CD-ROM
• Memory: 32 MB
• Disk Space: 50 MB
• Processor: Pentium 150MHz or higher
• Browser: Internet Explorer 6.0 or later
Note:
Windows Internet Explorer version 6.0 or later is required for the activation stage. You can
download and install Internet Explorer from www.microsoft.com/windows/ie/default.asp.
Windows 98:
You may be prompted during installation that you will need the original Microsoft Windows 98
installation CD.
Windows 98 and 2000:
To function properly, the PC3220 IOTA protocol requires support for high-security 128-bit
encryption. If the installer does not detect high-security support on your system, a pop-up window
will appear instructing you to update your Internet Explorer to version 6 (Windows 98SE) or update
your Windows 2000 to support 128-bit security (Windows 2000). Follow the onscreen instructions
to update your system.
3
Software Installation
Installing the Mobile Connection Manager
1. Insert the installation CD into your CD-ROM drive.
2. The Setup program should launch automatically and a Welcome window will appear. If the
Setup program does not launch automatically, select Start>Run and enter d:\Setup.exe,
where d is the designation for the CD-ROM drive.
3. Click Next on the Mobile Connection Manager Setup Welcome Window.
4. Please read the Licensing Agreement carefully and click Yes to agree to the terms.
5. Click Next to install the software in the default folder. You may choose to install a different
folder by clicking the Browse button.
6. If you prefer to have the Mobile Connection Manager launch automatically each time your
computer starts up, ensure the Run Mobile Connection Manager at Start up checkbox is
checked. If you prefer to add the Mobile Connection Manager shortcut to your desktop,
ensure the Desktop Shortcut checkbox is checked. Click Next.
Windows 2000 and XP only:
Please read the “Signature Not Found” notice and click OK to proceed.
7. Wait for the Setup Status to load 100% and the window will close automatically.
Windows 2000 and XP only:
This “Digital Signature Not Found” window may appear. Please disregard the notice and click Yes
or Continue Anyway to proceed with installation.
8. Installing the Fourelle Venturi 2.1 data compression software is recommended for
accelerated performance. Click Yes to install the Fourelle Venturi 2.1 and proceed to step
10.
9. Click Finish and proceed to step 19.
NOTE:
If you choose to install Venturi later, select No and continue to step 9.
Your computer will not restart.
4
Installing Fourelle Venturi 2.1 Data Compression
Windows 98 only:
a. Click OK. Your computer will restart before installation of Fourelle Venturi begins. Once
the Installation screen appears, click Finish.
b. You must restart your computer before the new settings will take effect. Click Yes to
restart your computer.
c. Once your computer does reboot, you will need to manually install Venturi. Go to
Start>Run and enter d:\Setup.exe, where d is the designation for the CD-ROM drive.
Select Fourelle Venturi 2.1 and click OK.
10. If you haven’t saved and closed other active applications and critical files, do so at this time
and then click OK.
11. Wait while the Venturi Setup prepares the InstallShield™ Wizard. This window will close
automatically.
12. To begin installation of the Venturi, click Next.
13. Read the Licensing Agreement carefully and click Yes to agree to the terms.
14. Review the Readme document and click Next.
15. Click Next to install the Venturi software to the default folder. If you prefer to install it to a
different folder, click the Browse button.
16. A command box will appear briefly. No action is required when this screen appears; it will
close automatically.
17. Before clicking Finish, close any open programs and save critical files. Your computer will
restart automatically.
18. Wait for your computer to restart. You will need to log on again.
19. Skip to step 21 if you did not check the option Run Mobile Connection Manager at Start up
from the Mobile Connection Manager Setup window (see step 6).
20. Skip to step 22 if you did check Run Mobile Connection Manager at Start up from the
Mobile Connection Manager Setup window (see step 6).
21. In order to manually launch Mobile Connection Manager, double-click on the Mobile
Connection Manager icon located on your desktop.
22. The Mobile Wireless Connection Manager will launch at the start up of your computer. Do
not insert the PC3220 until you have followed the instructions for proper installation
outlined in section 2: Driver Installation.
5
Driver Installation
WARNING:
Once the card is inserted, do not physically remove the PC3220 until you have completed the
Unplug/Eject process. Removing the card improperly may cause a fatal error.
NOTE:
Before inserting the PC3220 into your computer’s PC Card slot, it is recommended that you remove
the Installation CD from your CD-ROM drive.
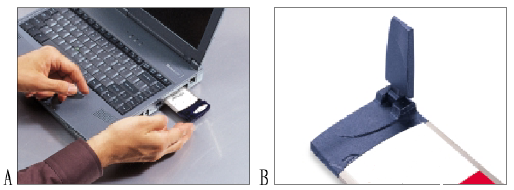
1. Insert the PC3220 into your computer’s PC Card Slot with the label facing up. Then, raise
the antenna so that it is fully extended and pointed up at a 90° angle. Use in any other
configuration may exceed FCC RF Exposure Limits.
2. Once you have inserted the card properly, your Windows operating system will notify you
that new hardware has been detected.
Windows XP only:
The Hardware Detection Wizard will launch upon insertion of the PC3220. Follow the on screen
instructions. This three-step wizard process will perform five times.
Windows 2000 and XP only:
A “Digital Signature Not Found” window may appear. Please disregard the notice and click Yes or
Continue Anyway to proceed with installation.

6
Activating the PC3220
1. Once you have properly inserted your PC3220 into the Type II PC Card slot of your
computer, the Activation Wizard will automatically appear. Click Activate. (You will not be
able to connect to the network if your PC3220 has not been activated).
2. The Activation Progress window shows you the status of the activation. Once the
procedure is completed, the window will close automatically.
3. An “Activation complete” message appears. Click OK to exit the Activation Wizard and wait
for your computer to restart automatically.
NOTE:
If you cancel the Activation Wizard before Activation is complete, an Activation Alert Notification
will be displayed explaining that you must activate your card in order to connect to the Internet or
other Internet dependent function, such as email.
Fig 2 [File Name: circle X.bmp]
If you receive an "Activation Unsuccessful" message when you attempt to activate the PC3220
through Auto Activation follow these steps for Manual Activation:
1. Contact your Service Provider for an Activation Code, Phone Number and SID.
2. Select Manual Activation from the Activation Unsuccessful alert window.
3. A four-step Activation Wizard appears. Follow the on screen instructions and click Finish
when complete.
Get Connected
1. Once you have properly inserted the PC3220 into your computer’s Type II PC Card slot, the
Mobile Connection Manager will notify that it is ready to connect to the network.
2. Select your network connection preference from the pull down and then click Connect in
order to activate a session.
Fig 3 [File Name: UI_menu callout.bmp; OR UI_menu.bmp]
FOR VERIZON USE: VZW_menu callout.bmp; OR VZW_menu.bmp]
7
NOTE:
If you have not activated your PC3220, an Activation Alert Notification will be displayed once
you click the Connect button explaining that you must activate your card in order to establish a
session.
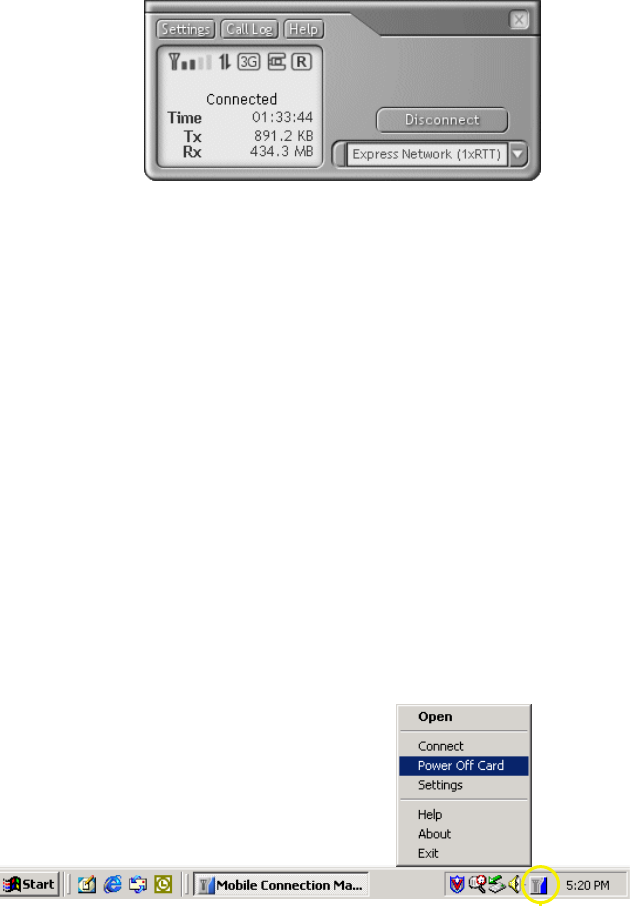
3. The Mobile Connection Manager will take a few moments to connect to the network. The
word Connected appears notifying you that a connection has been established. The Connect
button will change to read Disconnect.
Fig 4 [File Name: UI_Connected.bmp]
FOR VERIZON USE: VZW_connected.bmp
4. To disconnect from the network and terminate your connection, click Disconnect.
NOTE:
"No Service" message is displayed when the PC3220 cannot locate the network. "Connected"
message is displayed once a connection is established.
5. The dialog box will return to the “Ready state” to notify you that your session is no longer
active.
6. To “power-off” the Mobile Connection Manager, click on the icon found in your system
tray.
Fig 5. [File Name: ST_shortcut menu_power.bmp; OR systemtray.bmp; OR powermenu.bmp]
8
WARNING:
Do not eject the PC3220 from your notebook until you have followed the instructions for proper
removal. Removing the card improperly may cause a fatal error.
Removing the PC3220 from your Notebook PC
1. Click on the “Mobile Connection Manager” icon found in the system tray.
Fig 6 [File Name: MCM_icon.bmp]
2. Select Exit from the menu and the icon will disappear from the system tray.
3. After the Mobile Connection Manager has exited, go to the system tray and click on the
“Unplug and Eject Hardware” icon.
Fig 7 [File Name: WIN98 Eject.bmp; WINXP Eject.bmp; WIN2KME Eject.bmp]
4. Select “AirPrime USB Open Host Controller” from the Unplug/Eject Hardware window. Next
click Stop and then Close.
5. A Stop Hardware Device window pops up, asking to confirm which device to stop. Select
“AirPrime USB Open Host Controller” and click OK.
6. After the “Safe to Remove Hardware” message appears, click OK.
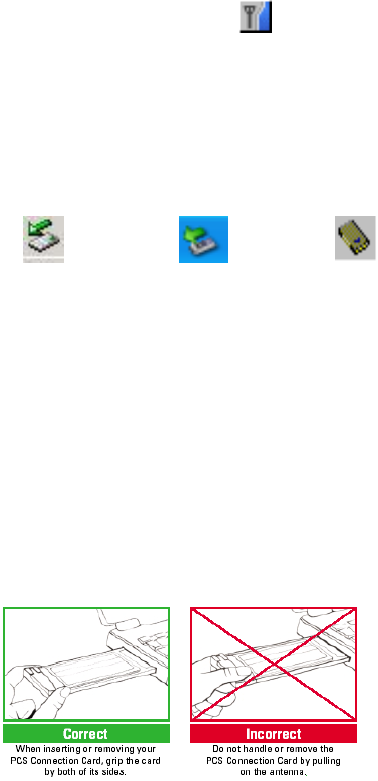
7. You may now remove the PC3220 from your notebook. When removing the PC3220,
always grip it by the sides of the card rather than from the top. Pulling on the antenna over
time may damage the card. If available, use the Card Ejector tool on your laptop.
Note:
For detailed information regarding the Mobile Connection Manager functions and action buttons,
reference the User’s Guide.
Windows 2000 & ME Windows XP Windows 98SE
9