Sierra Wireless VOQA10 Tri-band Voq Professional Cellular Phone User Manual Voq User Guide
Sierra Wireless Inc. Tri-band Voq Professional Cellular Phone Voq User Guide
User Manual

Explore your VoqTM
user guide
Beta Documentation

Contents
Draft D (Jan. 20, 2004) 3
7 Getting Started
8 What’s in the box?
8 Getting up and running
13 Knowing Your Phone
14 The VoqTM professional phone
15 Flip-open QWERTY thumbpad
16 Home screen
16 myVoqTM screen
16 Keypad
17 Joystick
17 Keys and buttons
19 Programs
20 Status icons
21 The Basics
22 Turning your phone on and off
22 Locking and unlocking the keypad
22 Setting the time and date
23 Using the Quick List
23 Entering text and numbers
24 Navigating menus using numbers
25 Navigating with the joystick
25 About myVoq
28 Using Secure Digital (SD) cards
29 Making and Answering Calls
30 Making calls
32 Voice dialing
35 Answering calls
37 Reviewing calls
39 Managing Your Personal Information
40 Managing your contacts
44 Using the calendar
45 Using tasks
46 Writing notes
49 E-mail and Messaging
50 Choosing your e-mail program
53 VoqMailTM Software
59 Creating Messages
63 Working with message folders
64 Viewing and responding to messages
68 Multimedia Messaging Service (MMS)
68 Instant messaging

Voq User Guide
42130324
73 Synchronizing Your Phone
74 Synchronizing your Voq phone
75 Getting started
77 Synchronizing remotely
81 Configuring Your Phone
82 Phone
84 Sounds
85 Profiles
86 Home screen
86 About
87 Accessibility
87 Beam
87 Certificates
88 Data connections
92 Date and time
92 Owner information
92 Power management
93 Regional settings
93 Voq software updates
95 Securing Your Phone
96 Keypad lock
96 Phone lock
97 SIM lock
97 PIN2
99 Browsing the Internet
100 Browsing the Internet
102 Customizing Internet Explorer
103 Playing Music, Games, and More
104 Playing audio and video files
106 Java MIDlet Manager
107 VoqTag indexes
108 Playing Solitaire
108 Playing Mount Voq
109 Using the calculator
110 Recording voice notes and memos
111 Using your phone as a modem
112 Adding programs
112 Removing programs
113 Remove Programs
115 VoqTM Accessories
116 Accessories
119 Accessory Kits
120 TTY Devices
121 Using the desktop cradle


Voq User Guide
62130324

Voq User Guide
82130324
What’s in the box?
Your box contains the following:
•VoqTM handset
•Battery
•AC adapter/charger
•Mono headset
•Synchronization cable
•Companion CD
•Documentation:
·VoqTM Pocket Reference
·VoqTM User Guide (this guide)
·Accessories fold-out
If any items are missing, please contact your Voq
dealer.
Getting up and running
Before you begin using your new Voq phone, prepare
and test it by completing the following steps:
1Insert your SIM card.
2Install the battery.
3Charge the battery (12 hour initial charge).
4Make a call.
5Send an SMS.
6Set up synchronization.
7Check out the “Top ten things to do next”.
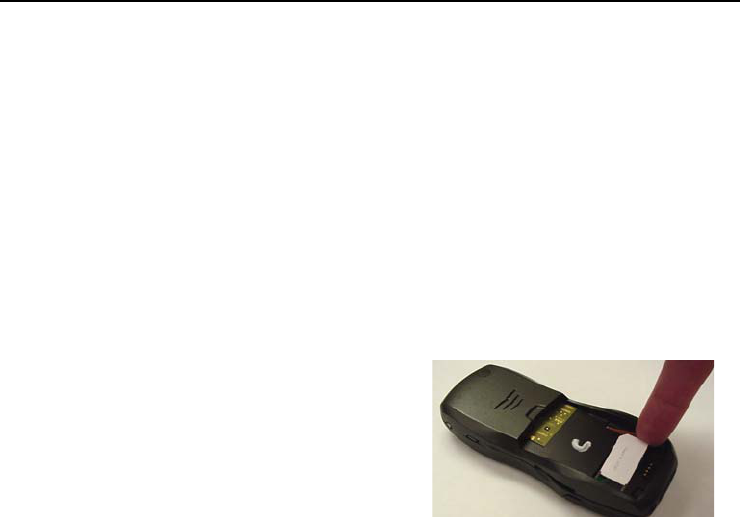
1 Insert your SIM card
Your service provider will provide you with a SIM
(Subscriber Information Module) card that contains all
your account information. Your phone cannot function
without this card. To install it:
1Remove the SIM card from its packaging.
2Lay the phone face down with the battery
removed.
3Position the SIM card with the gold contacts
down and line it up with the SIM card outline on
the phone. The cut corner of the card should
point towards the center of the phone.
4Insert the SIM card under the two metal guides.
5Gently push the SIM card until it slides snugly
into place.
Getting Started
Draft D (Jan. 20, 2004) 9
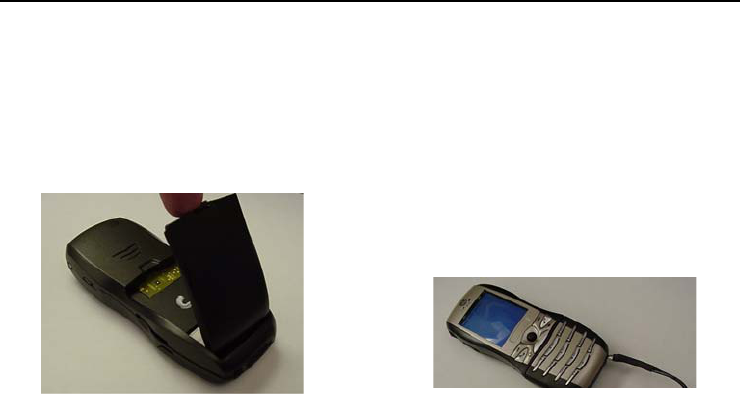
2 Install the battery
You cannot operate the phone without the battery even
if the phone is attached to the AC adapter.
1Insert the battery, bottom end first, into the
opening on the back of the phone.
2Lower the battery to the phone. Press the top of
the battery until it clicks into place.
To remove the battery:
1Slide and hold the locking latch open.
2With the latch open, pull the top of the battery
away from the phone and lift out the battery.
Note: Always turn off the phone using the Power
button before you remove the battery. Otherwise you
may lose e-mails and other data.
3 Charge the battery
Note: The initial charge must last a minimum of 12
hours. You can use your phone while the battery is
charging. If the battery is totally discharged when you
plug in the AC adapter, it takes several minutes for the
phone to start up. This is normal and ensures that the
phone has sufficient power for reliable operation.
1Plug the lead from the AC adapter into the bottom
of the phone.
2Insert the AC adapter plug into a power outlet. If
required, use the plug adapter for your country.
If you ordered the optional Premium Accessory Kit, you
can also use the cradle to charge the battery. See
“Using the desktop cradle” on page 121.
3a During or after charging, set the correct date
and time. This is crucial to the proper functioning of
many applications. On the Home screen, press Start >
Settings > More > Date and Time. Press any key to
change AM/PM.
Voq User Guide
10 2130324
4 Make a call
Try your new phone by making a phone call or by
calling your voicemail box, if you have one.
To call your wireless voicemail, press and hold the 1
key for two seconds. You do not need to press the
button.
For information about other call options, see “Making
and Answering Calls” on page 29.
5 Send an SMS
1Flip open the QWERTY thumbpad. When you do,
the phone displays the myVoq screen.
2Start typing your message.
3When you finish typing, press the Send SMS soft
key, located just below the display screen under
Send SMS.
4In the Insert Contact screen, either:
·type a phone number, the press Add.
·type or choose a name from your contact list,
then press Select.
5Edit your message if necessary, the press Send.
1) Turn on
the phone.
2) Dial the
number.
4) To end,
press the red
button.
3) Press
the green
button.

Getting Started
Draft D (Jan. 20, 2004) 11
6 Set up synchronization
You can synchronize your E-mail, Contacts, Calendar,
and Tasks so that the information on your phone and
your desktop PC is the same and up to date. To do this
you must install Microsoft® ActiveSync® and VoqTM
Desktop Tools onto your desktop PC.
To install the software, insert the Voq companion CD
into the CD-ROM drive of your PC. On the Getting
Started window, click Start Here and follow the
instructions.
For more information, see “Synchronizing your Voq
phone” on page 74.
7 Top ten things to do next!
The Voq phone is an exciting new device that combines
a phone, a PDA, and an e-mail/SMS text messenger in
a single package. Try out these other key Voq features:
•Set up your e-mail. Choosing your e-mail
program, page 50.
•Add contacts and make a call from your contacts
list. See “Managing your contacts” on page 40.
•Browse the Web. See “Browsing the Internet” on
page 100.
•Wirelessly sync your calendar to Microsoft
Exchange 2003. See “Synchronize your calendar
wirelessly” on page 78.
•Play a song. See “Playing Music, Games, and
More” on page 103.
•Configure voice dialing. See “Voice dialing” on
page 32.
•Send a multimedia (MMS) message. See
“Multimedia Messaging Service (MMS)” on
page 68.
•Use the speakerphone. See “Turn the
speakerphone On and Off” on page 35.
•Learn about myVoq. See “About myVoq” on
page 25.
•Change your ring tones. See “Change the sound
for an event” on page 84.

Voq User Guide
12 2130324

Voq User Guide
14 2130324
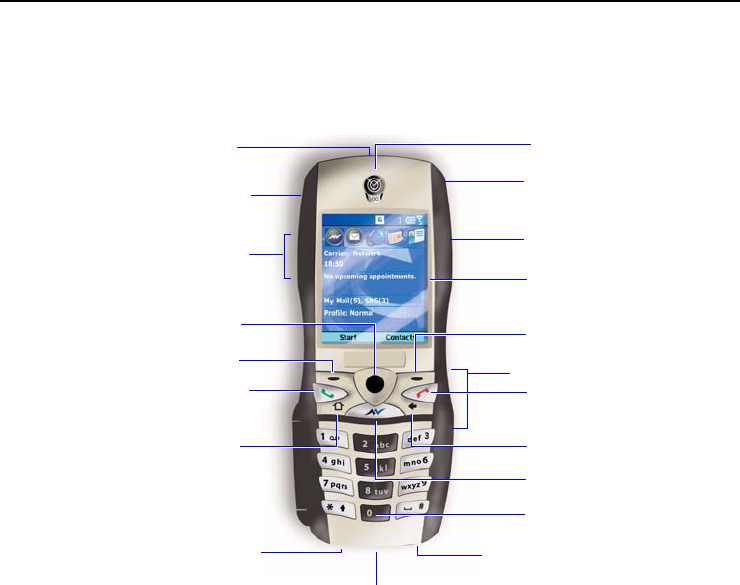
The VoqTM professional phone
Congratulations! Your new Voq phone will change the
way you communicate. This innovative phone puts the
best of wireless technology in the palm of your hand—
make calls, send e-mail and SMS messages, browse
the Internet, and manage your calendar. For a person
on the go, it’s everything you need and more.
Handset speaker
Color display
Soft key
End button–red
myVoq button
Back button
On/Off button
Joystick
Soft key
Home button
Talk button–green
Volume control
Microphone AC adapter connector
USB connector
Infrared port
SD card slot
Record button
Keypad
Headset connector
OS: Windows MobileTM 2003
software for Smartphone
Knowing Your Phone
Draft D (Jan. 20, 2004) 15
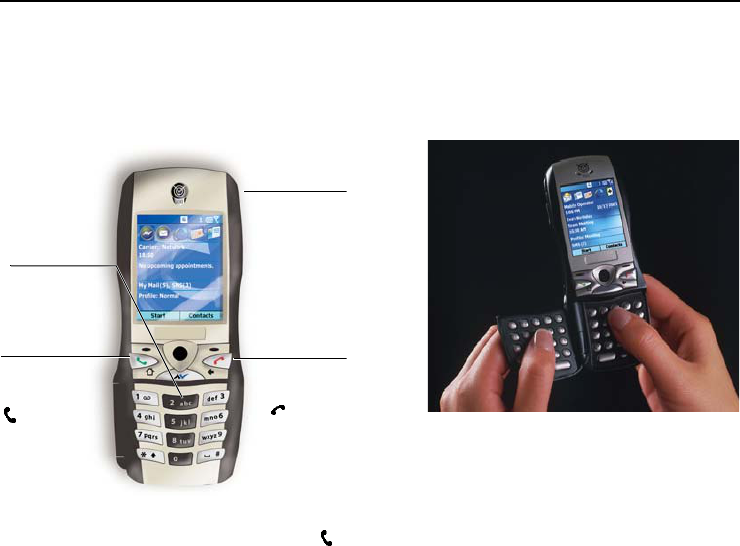
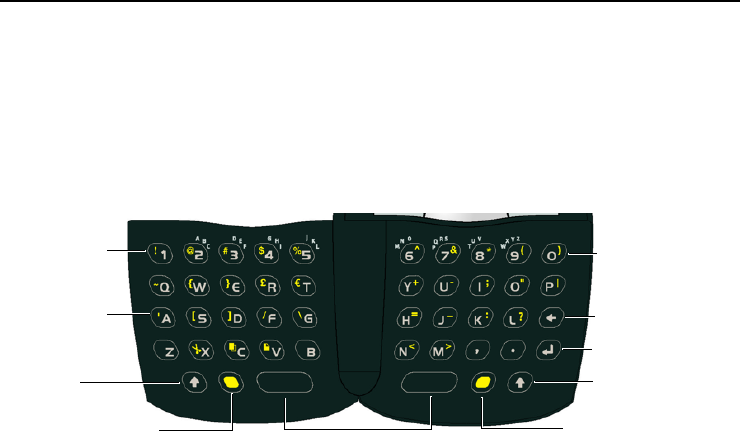
Flip-open QWERTY thumbpad
The Voq phone has a remarkable flip-open QWERTY
thumbpad that lets you create text messages and
e-mails using a full-featured keyboard. To use the
thumbpad, just flip it open and start typing. It’s that
simple. When in the Home screen or on a call, opening
the thumbpad launches the myVoq screen.
Most keys have a second character printed just above
the main character. To type this character, press a
function key and then a character key. For example, to
type an equal sign (=), press “function+h”. When you
are in a text field, such as in a contact record, you can
display a full table of symbols, by pressing the function
key twice.
Shift key
Function key
Backspace key
Number keys
Space keys
Shift key
Number keys
See Note.
Function key
Return key
Letter keys
Press the Shift key twice to invoke shift lock. The next
key you press will be in uppercase.
You can cut, copy and paste just like on a PC keyboard.
To select text, press and hold the Shift key, then move
the joystick left or right. To cut, copy, or paste, press
the function key, then x (cut), c (copy), or v (paste).
For a complete list of keystrokes that you use to display
special characters, see “QWERTY thumbpad key
strokes” on page 124.
Voq User Guide
16 2130324
Home screen
The Home screen is what you see when you first turn
on your phone. You can change the background
images and colors of your Home screen to suit you.
You can even download your own images. For more
information on customizing your display, see “Home
screen” on page 86.
The Home screen is the starting point for many tasks.
Scroll to any area on the Home screen and press the
joystick to start the application.
Start–Press Start to display a list of all the programs
on your phone. To start a program, scroll to it and press
the joystick. Select More to display more programs.
Contacts–Press Contacts to display your list of
contacts. To call a contact, scroll to a name and press
.
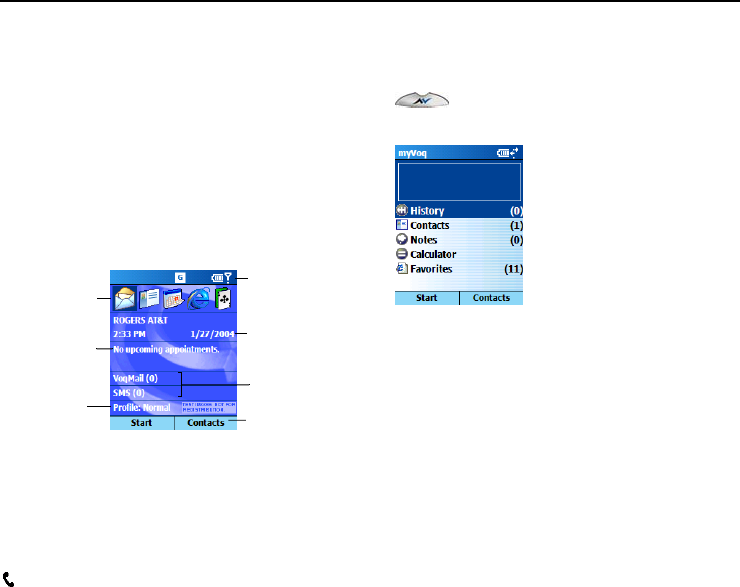
myVoqTM screen
The myVoq screen is what you see when you press
or flip open the thumbpad from the Home
screen or during a call.
The myVoq program powers the thumbpad and
activates the phone’s advanced search, store, and
send capabilities. Use myVoq to:
•Easily send an SMS or e-mail
•Quickly find information stored on your phone
•Store your notes, new contacts, and lists
For more information, see “About myVoq” on page 25.
Keypad
The keypad is a standard 12-key alphanumeric pad
that you can use to dial a number, type messages with
one hand, or navigate a menu by pressing a number.
Recently used
programs
Time and date
Next
Appointment
Messages
Current soft
key commands
Status icons
Ring profile

Knowing Your Phone
Draft D (Jan. 20, 2004) 17
Joystick
In the center of the phone is the joystick. You use it to
move around the screens and select the items you
want. The joystick moves in five directions: left, right,
up, down, and in.
When you press the joystick in, it works like the Enter
key on a keyboard, or like a left mouse click. It
confirms your selection and starts an action.
Keys and buttons
Talk button
•Dials a phone number you enter or select.
•Redials your last number when you press it twice
quickly with no number entered.
•Places a call on hold and answers a second call if
you have Call Waiting.
•Switches between an active call and a call that is
on hold.
•Activates or deactivates the Speakerphone when
you press and hold it during a call.
End button
•Ends voice or data calls.
•Ends the active call when you are on a
conference call, or when you have another call on
hold.
•Locks the keypad when you press and hold the
button.
Home button
•Displays the Home screen leaving other
applications open.
myVoq button
•Launches myVoq with the thumbpad closed.
•Activates the phone’s advanced search, store,
and send capabilities.
•Clears any text and returns you to the myVoq
screen when you press and hold the button.
Back button
•Returns to the previous screen.
•Deletes characters like a backspace key when
you are typing a message or entering data.
•Clears all when you press and hold it, when you
are typing a message or entering data.

Voq User Guide
18 2130324
Soft keys
The phone has two keys located directly below the
display. Each key performs the command displayed
above the key. The command changes depending on
the screen.
On many screens, the right soft key is called Menu.
The Menu soft key lists options that are relevant to
what your are doing. It is a good idea to press Menu to
check out the many options available to you.
Power button
•Turns the phone on and off when you press and
hold.
•When the phone is on, displays Quick List when
you press it once. For a list of Quick List
commands, see “Using the Quick List” on
page 23.
Volume buttons
The volume buttons are located on the left side of the
phone. They raise or lower the volume of the phone
speaker or the headset for voice calls.
To change the ringer volume, press Start > Settings
> Profiles, then change the settings for the profile you
are using.
Record/Voice Dial button
•Turns voice dialing on when when you press and
hold. See “Voice dialing” on page 32.
•Turns the voice memo recording function on
when you press once. See “Recording voice
notes and memos” on page 110.
* Key
•Changes between upper and lowercase when
you are using the keypad in text input mode.
•Switches between text and numeric input modes
when you are in a text field and you press and
hold it on the keypad.
Soft key
Command Command
Soft key
Knowing Your Phone
Draft D (Jan. 20, 2004) 19
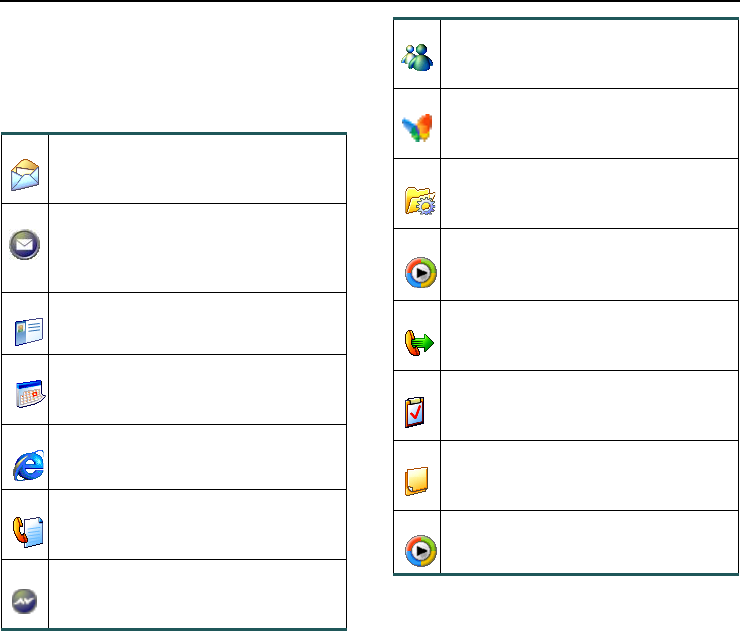
Programs
Your phone comes with a number of installed
applications as shown below. To access these
applications, press Start.
Inbox/SMS
Read, write, and send e-mail and SMS mes-
sages.
VoqMail
Set customized alerts for incoming mail. Con-
figure rapid, low-bandwidth, battery-saving
mail delivery.
Contacts
Quickly find who you are looking for.
Calendar
Keep track of your appointments and events,
and set up reminders.
Internet Explorer
Browse the Internet or visit a favorite site.
Call History
Look up who called or sent a message. Display
call statistics.
myVoq
Activate the thumbpad and the phone’s power-
ful search, store, and save capabilities.
MSN Messenger
Send instant messages to your friends and col-
leagues.
Pocket MSN
Sign up for Microsoft’s offering of online ser-
vices.
Settings
Change the way the phone looks and behaves
to suit you.
ActiveSync
Keep the information on your phone and your
PC up to date.
Speed Dial
View and set up numeric shortcuts for impor-
tant contacts.
Tasks
Keep a list of things you need to do and set up
reminders.
Voice Notes
Record short voice messages and memos, and
play them back.
Windows Media
Play music/video clips. Listen to Internet radio.
Voq User Guide
20 2130324
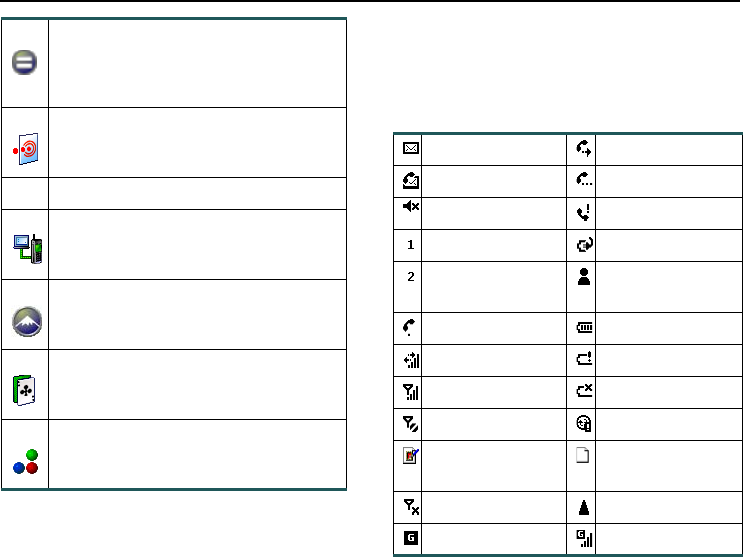
Status icons
The phone displays a row of small icons across the top
of the Home screen that provide information about the
status of the phone, incoming calls, and messages.
myVoq Calculator
A calculator that keeps a running tab of what
you type. Use it to quickly divide up the restau-
rant bill, including tip and taxes.
Infrared
Beam information to/from other phones, PDAs,
and laptops using infrared (Accessories folder).
Modem Link
Turn your phone into a modem that lets other
devices send information (Accessories folder).
Mount Voq
Climb Mount Voq with this challenging thumb-
pad typing game (Games folder).
Solitaire
Pass the time playing this well-known card
game (Games folder).
Jawbreaker
Pass the time playing this challenging new
game (Games folder).
New e-mail or SMS Call forwarding
New voicemail Call on hold
Ringer off Missed call
Line 1 Battery charging
Line 2, switch to Line
2, to listen to call
New instant message
Voice call in progress Battery level
Data call in progress Low battery
Signal strength No battery
No signal Sync error
An e-mail attach-
ment–downloaded
An e-mail attachment
– not downloaded
Flight mode -radio off Roaming
GPRS available GPRS in use


Voq User Guide
22 2130324
Turning your phone on and off
To turn your phone On or Off, press and hold the Power
button. If you are in another application and you want
to turn off your phone, return to the Home screen first
by pressing before you press the Power button.
If you remove the battery without turning Off the phone,
you will not lose personal data such as contacts,
calendar, tasks, and saved notes. You will lose any
unsaved data in forms or notes as well as the state of
suspended games.
Locking and unlocking the
keypad
Locking the keypad prevents accidental keypresses. If
the keypad is locked you can still answer a call or
make an emergency call.
•To lock the keypad, on the Home screen, press
and hold . When the keypad is locked, the left
soft key on the Home screen displays Unlock.
•To unlock the keypad, press Unlock, then press
the # key.
You can also set up a password for your phone. For
more information, see “Phone lock” on page 96.
Setting the time and date
Note: Your phone needs the correct date and time to
ensure that your calendar and inbox work properly. For
example, alarms will not occur at the expected times,
and messages may not load correctly into your
mailbox. Some service provider networks automatically
set the date and time. If not, you must set them
manually.
The clock has a separate battery that continues to work
even when you remove the main battery. Whenever
possible, leave the main battery installed to preserve
the backup battery.
To set the date and time.
1Press Start > Settings > More > Date and
Time.
·Set your time zone.
·Set the date and time.
·Set the alarm clock if you wish.
2Press Done when you have finished.
To change from AM to PM or vice versa, highlight AM
or PM in the Time or the Alarm field, then press any
key on the keypad. To toggle back to the original
setting, press the key again.

The Basics
Draft D (Jan. 20, 2004) 23
Setting number, time, and currency
formats
Number, time, and currency formats can vary
depending on where you live.
To change how numbers and dates appear on the
screen:
1Press Start > Settings > More > Regional
Settings.
2Scroll to the Locale field and choose your
language location, for example, English (United
Kingdom). This automatically changes the time
and date format and other number settings for
your area.
If you wish, you can scroll to the individual fields
such as Date Style or Time Format field and
choose a different format.
3Press Done.
Using the Quick List
Use the Quick List to perform common actions quickly.
To display the Quick List:
1When the phone is on, momentarily press the
Power button.
2Scroll to a command and press the joystick. The
list items are:
Entering text and numbers
The simplest way to enter text and numbers is using
the flip-open thumbpad. For a list of keystrokes to
display special characters, see “QWERTY thumbpad
key strokes” on page 124.
Power off Turn off the phone safely.
Flight mode (off) Turn the radio On or Off (e.g. to
play a game on an airplane). You
cannot make calls or send mes-
sages but you can use other fea-
tures.
Key lock Lock the keypad.
Device lock Turn on password protection.
Profile
•Normal
•Silent
•Meeting
•Outdoor
•Automatic
•Headset
•Car
•Speaker-
phone
Choose a profile, which is a set
of ring tone and volume settings.
To change the settings for a pro-
file, from the Home screen,
press Start > Settings >
Profiles >Select profile >
Menu > Edit.
For more information on profiles,
see “Profiles” on page 85.
Voq User Guide
24 2130324
Keypad input modes
If you need to enter text or numbers using the keypad,
or the top row of numbers on the thumbpad, there are
several modes to choose from. To change the input
mode, press the * key when you are in a text field.
Press and hold the * key to display a menu. These
modes apply only to text fields.
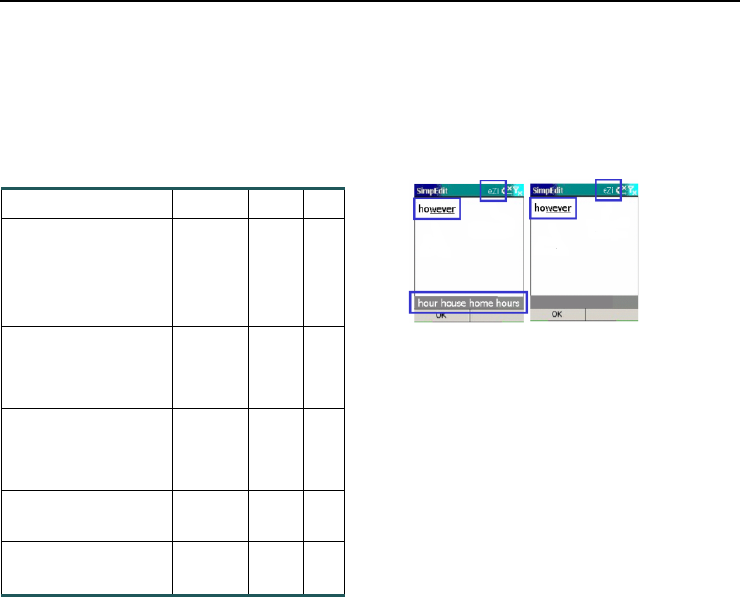
Predictive text
When you type using the keypad, your phone can
predict and display words before all letters are
pressed. There are two display options: inline and
multiple candidate. As shown below, multiple
candidate displays a row of possible words at the
bottom of the display screen.
To choose a word in multiple candidate mode, select
the word with the joystick, then press the joystick.
To change the input mode and other display options:
1Press Start > More > eZiTap > Options.
2Scroll to the option you wish to change.
3Press OK when you have finished.
Navigating menus using
numbers
Many menus provide numeric shortcuts to save
scrolling and keystrokes. When you see a number
beside an item in a list, press the corresponding
Input Mode Icon Press Get
Multipress. To type the
first letter on a key,
press it once. To type
the second letter on a
key, press it twice.
ABC
Changes
to abc
after key
press.
2
22
222
A
b
c
Multipress. All caps. ABC 2
22
222
A
B
C
Multipress. All lower-
case.
abc 2
22
222
a
b
c
Numeric. Type num-
bers rather than letters.
123 222 222
Predictive text. See
below.
eZi
The Basics
Draft D (Jan. 20, 2004) 25
number on the keypad or the thumbpad to select the
item.
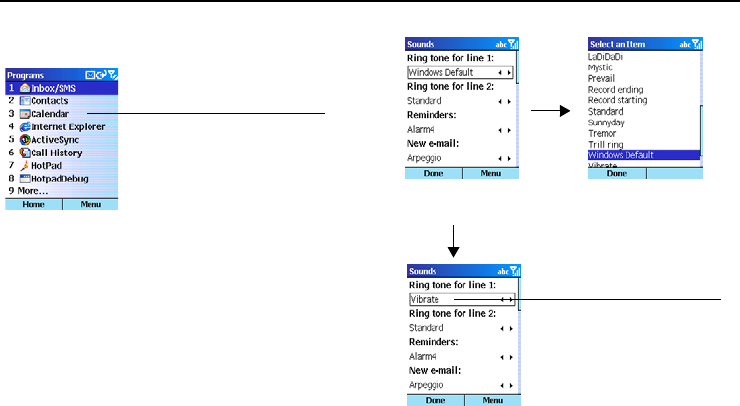
Navigating with the joystick
The joystick can help you navigate and select
information quickly. For example, if you are changing
the ring tone for your phone (Start > Settings >
Sounds), you can use the joystick to select a tone
without displaying a list.
In the Ring tone for line 1 field, pressing the joystick
in displays the complete list of sounds. However, if you
move the joystick left or right, you toggle through the
items in the list rather than displaying it.
About myVoq
The myVoq program is the best way to search, store,
and send information from your phone. This program:
•Uses an innovative "enter-then-act" approach.
You enter information first, then decide what to
do with it. For example, type a name, then save it
to your Contacts list or dial the person’s number.
To open your Calendar, press 3
on the keypad or the thumbpad.
Joystick
left or right
In
Joystick
As you move the joystick
left or right, you change the
information in the field.
Voq User Guide
26 2130324
•Provides a "predictive search engine," which
means that if you enter the letters "sco" on the
thumbpad, the phone immediately returns a list
of possible applications and entries where the
letters appear.
•Reduces the frustration of text entry dramatically.
In addition to powering a full keyboard, the
"Send" capability further reduces the number of
keystrokes you need to send messages.
For a quick overview of what you can do with myVoq,
see the Quick Reference “myVoq (including sending e-
mail and SMS)” on page 135.
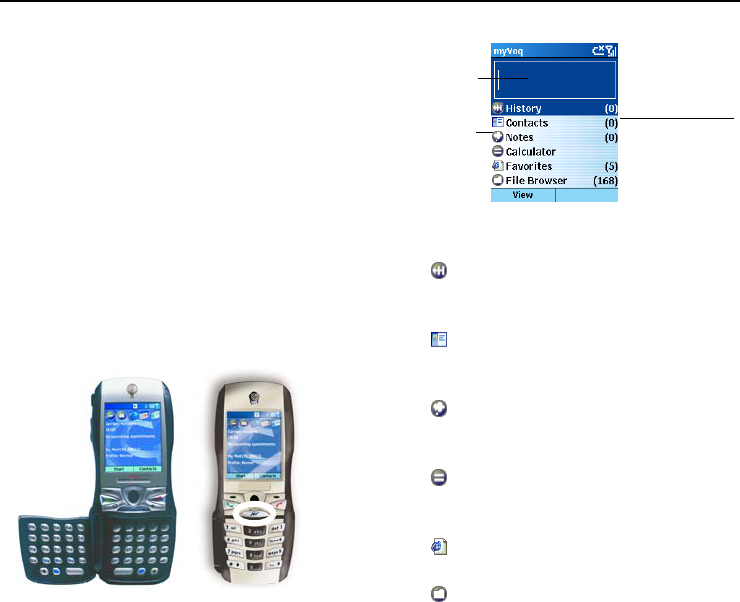
Starting myVoq
myVoq starts when you flip open the thumbpad or
press the myVoq button just below the joystick.
The default myVoq home screen looks like this.
The myVoq screen displays a list of the default
categories shipped with the phone. These are:
• History–a record of each of the actions you
have previously taken. This allows for the easy
"recall" of a commonly executed task.
• Contacts–your address book, synchronized
with your PC. You can search for the first name,
last name, and company name fields.
• Notes–a note pad program that allows you to
store notes easily and retrieve them later. You
can search for the title of a note.
• Calculator–a dynamic calculator. Preserves
a history of your calculations on a simulated
"paper tape".
• Favorites–a list of your favorite Internet
sites. You can search for the title of a favorite.
• File browser–a browser to find files on your
phone.
Text input
area.
Categories Count of items in
each category.
The Basics
Draft D (Jan. 20, 2004) 27
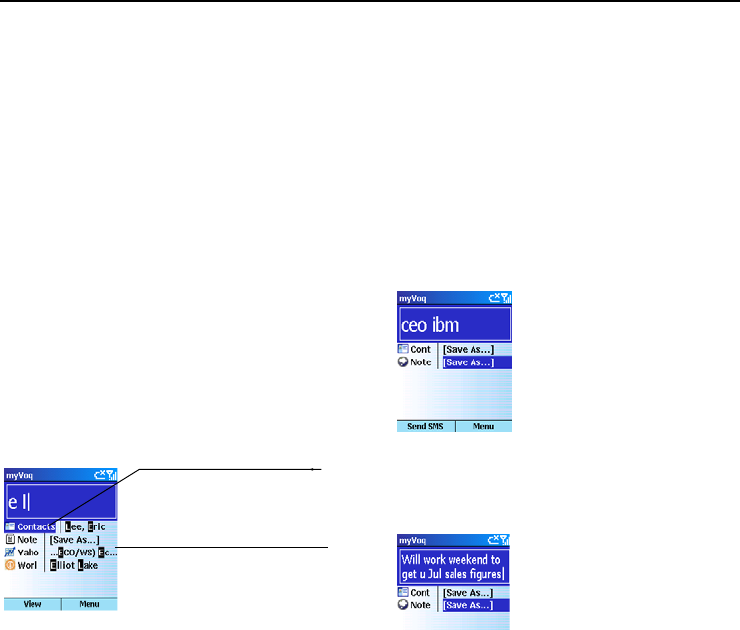
Searching
The myVoq program provides powerful search
capabilities that check multiple applications and
categories at the same time.
Note: When the thumbpad is closed, myVoq uses 0-9
to find alphabetic names. When the thumbpad is open,
myVoq uses the actual keyboard letters.
To search, start typing. As you type, the program
compares the letters, numbers, or characters you type
with data in many of the applications listed on the
phone, not just the Contacts list.
For example, myVoq automatically checks your notes
or stock lists if you have any. To narrow the search you
can type two letters separated by a space. myVoq will
find entries that have at least two words that start with
the letters.
Matches appear below the text area in two columns.
The left column displays the application, the right
column the matched field.
To view all matches for a category, highlight the
category in the left-hand column, then press the
joystick or press View.
To view an item, highlight it in the right-hand column,
then press the joystick, or press View.
To clear the myVoq text input area, press and hold the
myVoq button.
Search contact fields
You can search any field in a contact record. For
example, you could search using a person’s title and a
company name.
Storing and sending
The myVoq program allows you to type text and save it
as a Note, or even as a Contact record.
A selected entry on the left
indicates there is more than one
match for the application.
A selected entry on the right
indicates a single match for the
application.
Voq User Guide
28 2130324
You can also decide to send the note as an SMS or an
e-mail message by pressing Menu and selecting Send
as E-mail or Send as SMS.
Browsing for files
You can browse for files stored on the Voq phone by
typing the a portion of the folder or a file name. When
you see the filename, highlight it with the joystick, then
press the left soft key to open the file. You can also use
the File browser to navigate to a folder.
Note: Files will open only if there is a suitable
application launcher or reader available.
To start the file browser:
1Open the thumbpad or press .
2Select File browser.
3Use the joystick to navigate from folder to folder.
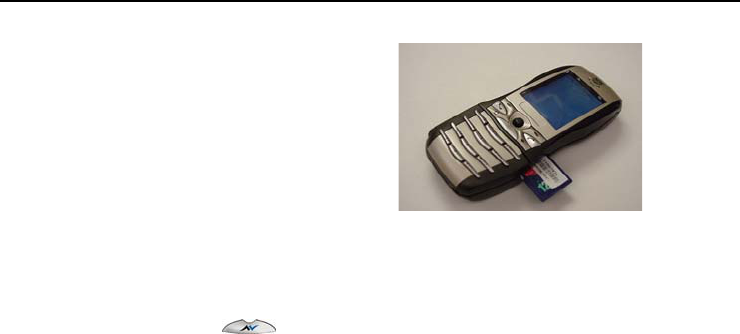
Using Secure Digital (SD) cards
An SD storage card is a stamp-sized flash memory
card that comes in a variety of storage capacities. The
Voq phone can access information such as music or
contacts or e-mail attachments stored on an SD card.
Note: The Voq phone ships with a dummy SD card to
protect the phone from dust and debris. You must
remove this card before inserting your own SD card.
To insert an SD card:
1Position the card with the contacts facing down
and the cut corner of the card facing the phone.
2Push the card into the slot until the card clicks
into place.
To remove an SD card,
1Push the card into the phone, then quickly
release the card. It should pop out.
2Remove the card from the slot.
For information on copying information to an SD card,
refer to the documentation for the application you are
using. If you are using ActiveSync, refer to the
ActiveSync online help (3.7.1 or later).


Voq User Guide
30 2130324
Making calls
There are many ways to make a call. The simplest is to
dial the number and press . To end a call, press .
What you see when you dial
When you dial a number using the keypad, the phone
matches what you type with the information stored in
your Contacts list. For example, if you type 3, you
might see a list of contacts that start with the letter E.
This is because the number 3 also corresponds to the
letter E. The fields included in the basic contact search
are first name and last name.
Note: to activate the phone’s advanced search
capabilities, press before you type.
Make a call from the Contacts list
There are several ways to make a call from the
Contacts list:
•Using the thumbpad
•Using the keypad
•Using the joystick
Find a contact/make a call using the
thumbpad
The easiest way to find a contact, particularly in a long
list, is to use the thumbpad.
1Open the thumbpad.
2Type the contact’s first name, last name, or
company name as listed in the contact record.
As you type, myVoq displays all possible matches
for the letter or number combinations. The more
you type, the more the search narrows.
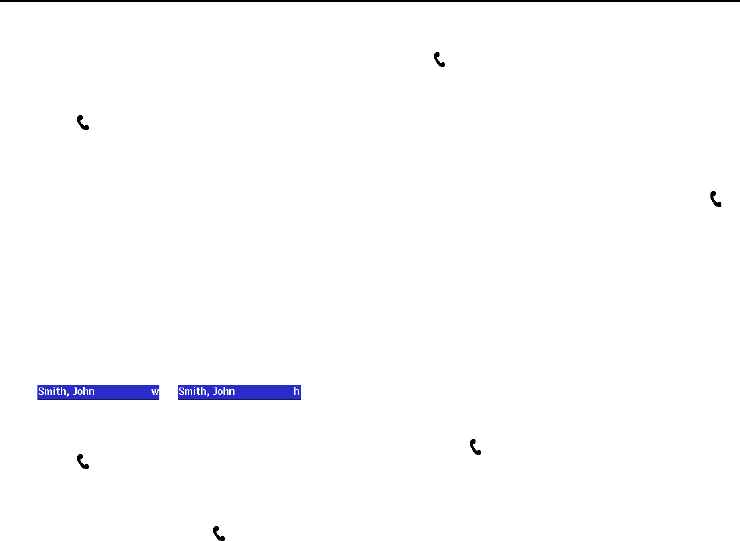
3If you see the contact name displayed, select the
name using the joystick, then press . The
phone dials the default number for the contact.
For example, a “w” beside a name means the
work number is the default number.
Find a contact/make a call using the keypad
1Press Contacts.
2On the Contacts screen, use the keypad to type a
name, for example, 3, 666, 66 for Don.
3When you see the name you want, highlight it,
then Press to dial the default number for this
contact.
On the keypad, the number 3
also corresponds to the letters
“DEF”, so the screen phone
lists possible matches for these
letters! If you are not contacting
anyone shown, simply continue
typing.
Making and Answering Calls
Draft D (Jan. 20, 2004) 31
Find a contact/make a call using the joystick
1Press Contacts.
2Use the joystick to scroll to the person you want
to call.
3Press . The phone dials the default number for
the contact.
Assign a different default phone number to a
contact
To change the default number for a contact:
1Press Contacts to display the Contacts list.
2Scroll to the contact.
3Press the joystick left or right until you see the
abbreviation that corresponds to the number you
want to call. For example, w means work
number, h means home number.
If the abbreviation does not change, it means the
contact record contains only one number.
4Press to call the new default number.
Make a call using a recently dialed numbers
1On the Home screen, press . The phone
displays a list of recently dialed numbers.
2Select the name or number to call, then press the
joystick.
Redial the last number called
Press twice with no numbers entered.
Make a call from Call History
The Call History list displays the last 25 calls you made,
received, and missed.
1Press Start > Call History.
2Select a name or number to call, then press .
Make a call from an e-mail or SMS hyperlink
If you receive a text message with an underlined
(hyperlinked) phone number, select the hyperlink, then
press the joystick.
Make an emergency call
You can make emergency calls at any time, even when
the keypad is locked.
1Dial the emergency number for your area.
2Press .
Make a conference call
Up to 10 people can participate in the same conference
call but your service provider may limit this number.
To make a conference call:
1Call the first person.
2Press Hold.

Voq User Guide
32 2130324
3Call the second person, while the first is on hold.
4When the second person answers, the screen
displays Conference. Press the joystick.
5To add more people, repeat steps 2 to 4.
Speed dialing
Speed dial shortcuts allow you to press and hold a
single key or two keys on the keypad to make a call.
To make a call using a speed dial shortcut:
•If the speed dial number has a single digit (0-9),
press and hold the key.
•If the speed dial number has a double digit (10-
99), press the first digit key, release, then press
and hold the second digit key.
Create a speed dial shortcut
A speed dial shortcut links to a field in your contact list.
When you press the shortcut number, the phone dials a
phone number, opens an e-mail message, or goes to
the associated Web page. You can create speed dials
from 2 to 99. The number 1 is reserved for your
voicemail.
To add a person or number to your Contacts list first.
See “Adding Contacts” on page 40.
To create a speed dial shortcut:
1Press Contacts, then select a name on the list.
2On the Contact screen, highlight a phone
number, e-mail address, or web page, then press
Menu > Add Speed Dial.
3On the Add Speed Dial screen, enter the keypad
assignment, then press Done.
To view your speed dial shortcuts.
Press Start > More > Speed Dial.
Voice dialing
You can program your phone to dial numbers, open an
e-mail message or go to a web page in response to
your voice. For example, you can say “Home”, and
your phone dials your home phone number
automatically.
Your phone also recognize digits, that is, you can say a
telephone number in natural, continuous speech, and
the phone identifies and dials the number.
Voice dialing modes
Voice dialing has three modes:
•Voice. Speaker dependent mode. This means the
phone responds only to the person who recorded
the word. You must record “voice tags”. Each
voice tag is linked to a contact.
Making and Answering Calls
Draft D (Jan. 20, 2004) 33
•Digits. Not speaker dependent. Anyone can say
a number and have the phone recognize it. You
do not need to record the digits. However, if the
phone has trouble recognizing your speech, you
can record the digits to “train” the phone.
•Main. Combines both modes, Voice Tags and
Digits, and also recognizes commands.
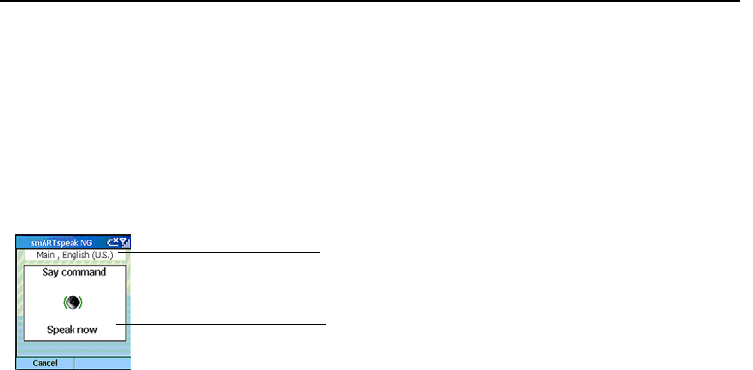
When you press and hold the Record button just below
the On/Off button, the phone displays the Say
Command screen.
To change a voice dialing mode:
1Press Start > More > SmARTspeak >
Options > Settings.
Commands
If you are in Main mode, you say a preset command to
activate or start a function on your phone.
To view the list of available commands on the phone,
switch to Main mode, press the Record button, then
say “Menu.” The phone recognizes these commands.
To use a command, press and hold the Record button
until the Say Command screen appears, then speak the
command. For example, to verbally dial a number, say
“Dial” first. To call a person, say “Call,” then speak the
name you recorded for the person.
Record a voice tag
A voice tag is essentially a one-word shortcut to a
phone number, e-mail address, or Web page address.
The number or address must already be stored in your
Contacts list.
To record a voice tag:
1Press Start > More > SmARTspeak >
Options > Voice Tags. Your list of contacts
appears.
The SmartSpeak screen dis-
plays the selected mode and
language.
Always wait for the “Speak now”
indicator and the “Say Com-
mand” prompt before speaking.
•Calendar •Menu
•Call (“name”) •Messages (Messenger)
•Contacts •Settings (Settings menu)
•Dial (“number”) •To Do (Tasks)
•Internet

Voq User Guide
34 2130324
2Scroll to the contact for whom to create a voice
tag, then press Options > Train.
3Wait for the prompt telling you to speak, then
begin recording the voice tag.
4When prompted, repeat the voice tag. The phone
plays back the voice tag.
5Press Exit when you have finished.
Note: Record voice tags in a quiet environment. Speak
naturally using normal speech volume.
View and Edit voice tags
This is an alternate way of viewing voice tags rather
than opening the smARTspeak application.
1Press Start > More > Speed Dial. The speed
dial screen shows both numeric and voice
shortcuts.
2To edit a voice tag, select the contact and press
the joystick.
3Press Menu > Edit.
4Press Menu >Delete Voice Tag. You must
delete the current voice tag first.
5Scroll down to the Voice Tag field, then select
Add Voice Tag.
6Record the voice tag, then press Done.
Make a call using a voice tag
The way you make a call with a voice tag depends on
the mode you are in.
1Press and hold the Record button on the right
side of the phone.
Note: if you press and release the Record button
quickly, you start the Memo record function.
2Wait for the prompt.
·If you are in Voice mode, say the voice tag
associated with the contact. The phone plays
back the voice tag and then dials the phone
number, opens a new e-mail message, or
displays the Web page.
·If you are in Main mode, say the command
“Call” then say the voice tag.
3If the phone misinterprets the word, press No
and start over.
Make a call by speaking the number
To verbally dial a number:
1Press and hold the Record button on the right
side of the phone.
2Wait for the prompt
·If you are in Digits mode, say the number you
want to dial in normal speech.
·If you are in Main mode, say the command
“Dial”, then speak the number.
Note: If the phone does not recognize a digit when you
say it, you can teach the phone to recognize your voice.
Choose Start > More > SmARTspeak > Options >
Digit Adaptation, then speak the numbers shown.

Making and Answering Calls
Draft D (Jan. 20, 2004) 35
Advanced dialing options
You can add country codes and pauses to dialing
sequences that may be required for international calls.
To add a country code to a dialing sequence:
1Enter the country code:
·On the keypad, press and hold 0 until a plus
(+) sign appears.
·On the thumbpad, press function, then Y to
display the + sign.
2Enter the rest of the number.
To add a pause to a dialing sequence:
1Press Contacts, then select the person in whose
phone number you want to insert a pause.
2Scroll to the phone number, then press Edit.
3Place the cursor in the number where you want
to insert a pause.
·To insert a 3-second pause, press Menu >
Insert Pause. The letter “p” appears where
the pause will occur during dialing.
·To insert a manual pause, press Menu >
Insert Wait. The letter “w” appears where
the pause will occur during dialing. To resume
dialing after a manual pause, press .
4Select Done.
Answering calls
When you receive a call, the screen displays the
caller’s name and phone number. If the caller is not in
your Contacts list, the screen displays the number only.
To answer an incoming call, press or Accept.
To reject an incoming call, press or Reject.
Reject means the call is redirected to your voice mail
box if you have one. If you don’t have a mail box, the
call is terminated.
Turn the ringer off for all calls
1Press the Power button to display the Quick List.
2Choose Silent.
Turn the speakerphone On and Off
•To turn the speakerphone On, press and hold
for two seconds during an active call.
•To turn the speakerphone Off, press again.
Options while talking
While you are on a call, you can press Menu to display
a list of things you may want to do. Some of these
Voq User Guide
36 2130324
options are available only when multiple calls are in
progress or during a conference call.
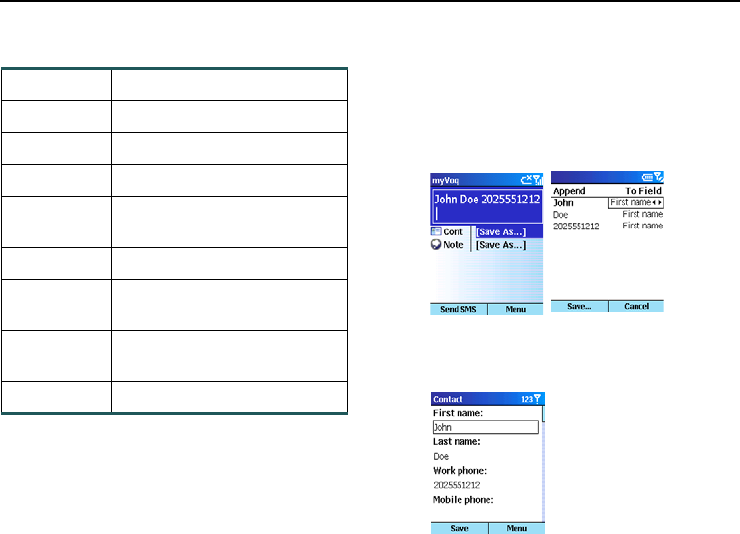
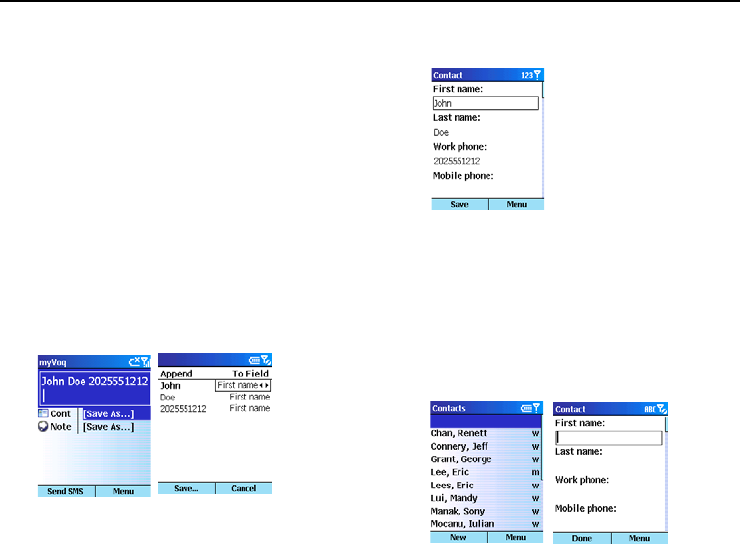
Taking notes while on a call or
listening to voicemail
The Voq phone provides the remarkable ability to use
your phone to take notes while you are on a call or
listening to voicemail using a headset. For example,
you can record a caller’s contact information.
1Open the thumbpad and start typing the name
and phone number, for example.
2To save the information in the Contacts list, scroll
to Save As beside Contact, and press the
joystick.
3Assign a category to each piece of information by
selecting the item, and pressing the joystick left
or right. For example, change the field for “Doe”
to Last name rather than First name.
4When you have finished, press Save.
5On the Contact screen, fill in other fields as
necessary, then press Save.
Note: Be sure to enter information in the appro-
priate field. Note: the phone uses the number in
the Mobile field to send text messaging; it does
not check other phone number fields.
End Disconnect the call
Hold Put the active call on hold
Unhold Activate the call on hold
Swap Switch between two calls
Save Contact Create a new Contacts record for the
caller
Conference Join calls together
Private Put all conference calls on hold
except one
Mute Mute the microphone (you hear the
caller but the caller can’t hear you)
Unmute Turn the microphone back on

Making and Answering Calls
Draft D (Jan. 20, 2004) 37
6Finish your call as you normally would.
Answering a second call
To be able to answer a second call while already on a
call, your phone service package must include call
waiting.
•To end the first call and answer the second call,
press , then press Accept.
•To put the first call on hold and answer the
second call, press or press Accept. To switch
between calls, press .
•To create a conference call, put the first caller on
hold, answer the second call, then press Menu >
Conference.
•To postpone answering the call, press Wait. The
call will continue ringing until one of the following
occurs: you answer the call by pressing , the
call is placed in voice mail after the requisite
number of rings, or the caller disconnects.
Note: When you press , you disconnect all calls,
whether active or on hold.
Call forwarding
You configure Call Forwarding in your Phone Settings.
See “Phone” on page 82.
Reviewing calls
You can view information about calls you have made
and received. For example, you can see who has called
you recently and see the duration of the call.
Call history
Call History displays the last calls that you have made,
received, and missed. Each entry for a call contains the
start time, duration, caller’s name, if available, and
caller’s number. The oldest calls are automatically
deleted from the list to make room for new ones.
Note: The phone does not record the duration of calls
when you use Call Waiting.
View call history
1Press Start > Call History.
2To separately view missed calls, incoming calls,
and outgoing calls, press Menu > Filter, and
then select the type of calls to view.
View details about a call
1Press Start > Call History.
2Select the call for which to view details, then
press the joystick.

Voq User Guide
38 2130324
Retrieve voice-mail messages
The speed dial “1” shortcut is reserved for your voice
mail. On the Home screen, press and hold 1 to call your
voice mailbox. Follow the prompts to retrieve your
messages. To change your speed dial shortcut, see
“Speed dialing” on page 32.
Call timers
Call timers record the length of your last call and other
call statistics. This information is useful for keeping
track of your calling patterns. It can also help you
estimate your monthly billing.
View Call Timers
Press Start > Call History > Menu > View Timers.
Note: The length of calls is not recorded when you are
using Call Waiting.
Reset call timers
You can reset Call Timers to zero, for example to start
timing calls for a new monthly billing cycle.
1Press Start > Call History > Menu >
View Timers > Menu > Reset Timers.
2Press Yes to reset all of the call timers to zero
(0), except for Last call and Lifetime calls timers.


Voq User Guide
40 2130324
Managing your contacts
The Contacts list is similar to an address book where
you store information about the people and businesses
you deal with. You can:
•Synchronize contacts with your desktop
computer (Microsoft Exchange only)
•Dial phone numbers, compose e- mails and SMS
messages directly from a contact record
•Specify a special ring when a contact calls
•Assign the contact to a category, such as
business or personal, so you can filter and view
contacts in a category
•Use infrared to beam contact information to
another device
•Save contacts to a SIM card, and view SIM
contact information
Contacts list
To display your Contacts list, press Contacts on the
Home screen.
Each name on the list displays an abbreviation beside it
to remind you of the default number or address the
phone uses to contact that person.
Change the default number or address
1Press Contacts.
2Select a contact.
3On the Contact screen, scroll to the person’s
number or address.
4Press Menu > Set as Default > Edit > Done.
Note: you can also press the joystick left or right.
Adding Contacts
There are several ways to add contacts:
•Downloading from your PC (via ActiveSync)
•Using the thumbpad
•Using the keypad
•From existing contacts on your SIM card
•From an incoming or outgoing call
wwork phone w2 second work phone
hhome phone h2 second home phone
mmobile phone ee-mail
pgr pager e2 second e-mail address
web web address e3 third e-mail address
car car phone sms text message address
Managing Your Personal Information
Draft D (Jan. 20, 2004) 41
The contact information screens you see differ slightly
depending on the method of adding contacts you
choose.
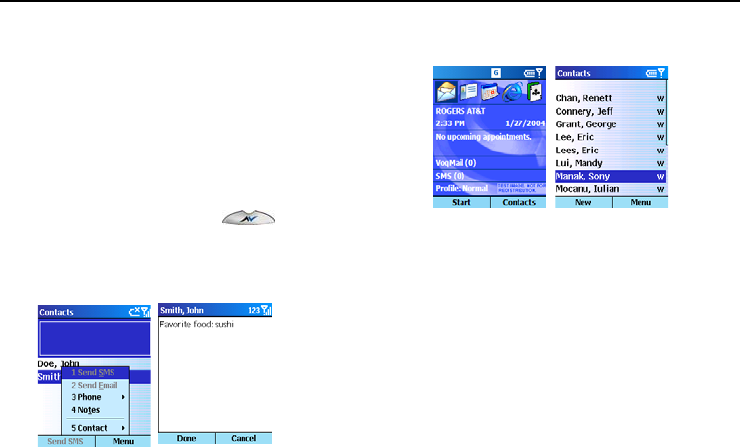
Add a contact using the thumbpad
The easiest way to add a contact is using the
thumbpad.
1Open the thumbpad and start typing the name.
2Select Save As beside Cont, then press the
joystick. The phone displays the information you
typed in a list.
3Assign a category to each piece of information by
selecting the item, and pressing the joystick left
or right. For example, change the field for “Doe”
to Last name rather than First name.
4Press Save.
5On the Contact screen, fill in other fields as
necessary, then press Save.
Enter information in the appropriate field. For
example, the phone uses the number in the
Mobile field to send an SMS; it does not check
other phone number fields.
Add a contact using the keypad
1Press Contacts > New. The Contact screen is
displayed.
2Enter the contact information using the keypad.
To type a space, press #. Use the joystick to
move from field to field.
Voq User Guide
42 2130324
3When you have finished entering information,
press Done.
Add notes to a contact
You can add additional information about a contact
using notes. Notes is the very last field in the contact
record.
To add a note:
1Open the thumbpad or press .
2Start typing the contact name or select Contacts.
3Highlight the contact, then press Menu > Notes.
4Write the note, then press Done.
Edit a contact
1Press Contacts.
2Select a name from the list, then press the
joystick.
3Scroll to the field you want to change, then press
Edit.
4Change the information, then press Done.
Add a contact from an incoming call
1On the Call Progress screen, press Menu > Save
to Contacts.
2Fill in the contact fields, the press Done.
Download contacts from your PC
You can download and synchronize the contacts on
your PC to your phone using ActiveSync. For more
information, see “Synchronizing your Voq phone” on
page 74.
SIM contacts
SIM contacts are stored on your SIM card. When you
insert your SIM card into a different phone, you can
view and use the SIM contact information on the new

Managing Your Personal Information
Draft D (Jan. 20, 2004) 43
phone. Unlike regular contacts, you can store only one
phone number for each SIM contact.
A SIM contact has a special icon that appears to the
right of the name in your Contacts list.
Create a regular contact from a SIM contact
You can copy a SIM phone number to your regular
contact list.
1Press Contacts.
2Scroll to the SIM contact from which to copy a
phone number and press the joystick.
3On the SIM Contact screen press Menu > Save
to Contacts.
4On the Select Contact screen, scroll to <New
Item>, then press Select.
5Scroll to the correct phone number field, then
press Insert. The telephone number from the
SIM card is inserted into the field.
6Fill in the name fields and other contact fields as
necessary.
7Press Done.
Create a SIM contact from a regular contact
You can save the contact name and one phone number
from a contact record to a SIM card.
1Press Contacts.
2Select a contact and scroll to the phone number
you want to save to the SIM card.
3Press Menu > Save to SIM > Done.
Create a new SIM contact
1Press Contacts > Menu > New SIM Contact.
2Enter the contact's name and phone number.
3Press Done.
The new SIM contact appears in your contact list.
Edit a SIM contact
1Press Contacts.
2Select the SIM contact to edit.
3Press Edit.
4Edit the information, then press Done.
Delete a SIM contact
1Press Contacts.
2Scroll to the SIM contact to delete.
3Press Menu > Delete.
The contact information is deleted from the SIM card.
SIM contact icon
Voq User Guide
44 2130324
Using the calendar
Use the Calendar to keep track of your appointments,
and view your schedule by day, week, or month. When
you synchronize your phone with your PC, changes to
your phone calendar are added to your desktop Outlook
calendar and vice versa.
Answer meeting requests
When you receive a meeting request in your VoqMail
inbox, you can choose to accept or decline the
invitation. Your phone sends your response as an e-
mail. The phone updates your calendar differently
depending on the software and software version
running on the e-mail server. For more information,
see “Meeting requests” on page 66.
Add a new appointment
1Press Start > Calendar > Menu > New.
2Fill in the fields. In Reminder, select the amount
of time before the appointment you want to be
reminded. The default is 15 minutes.
3When your appointment information is complete,
press Done.
View an appointment
1Press Start > Calendar.
2Select the appointment.
Edit an appointment
1Press Start > Calendar.
2Select the appointment to edit, then press Edit.
3Make your changes, then press Done.
Delete an appointment
1Press Start > Calendar.
2Select the appointment, press Menu > Delete.
View your schedule
You can view your schedule in three different ways:
Agenda, Week, and Month.
For more information on configuring meeting requests,
see “Meeting requests” on page 66.
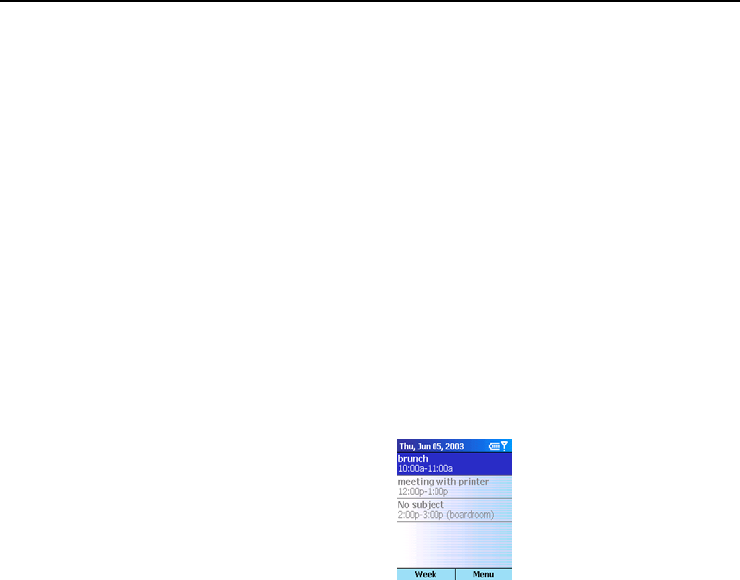
Agenda view
The Agenda view displays meetings and appointments
scheduled for the current day in chronological order.
Managing Your Personal Information
Draft D (Jan. 20, 2004) 45
View today’s agenda:
1Press Start > Calendar. The phone displays
today’s appointments.
If you are already in Week or Month view, press
Menu > Agenda View.
Tip: To look at your agenda for previous or
approaching days, scroll left or right with the joystick.
View the agenda for a specific date:
1Press Start > Calendar > Menu > Go to Date.
2Type the date to view, then press Done.
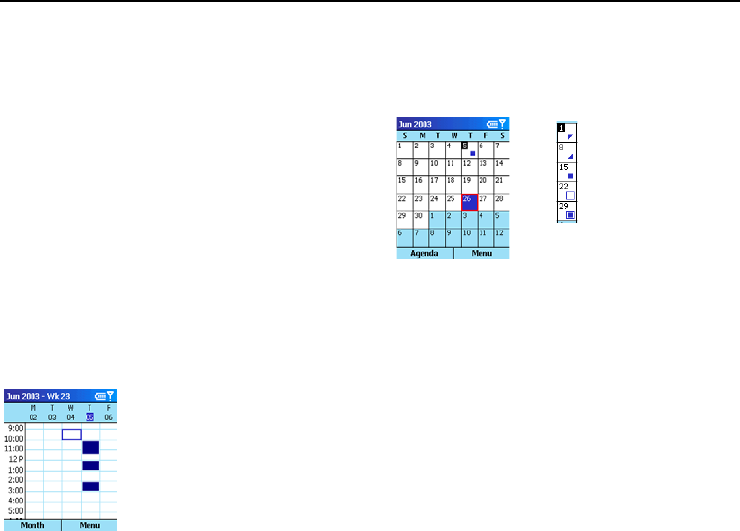
Week view
Week view displays your schedule one week at a time,
with one-hour increments from 9:00 to 5:00 down the
side of the screen.
View appointments for the week
Press Start > Calendar > Menu > Week View.
Month view
Month view provides an overview of your schedule one
month at a time. The symbols on the calendar indicate
when you have appointments
Using tasks
A task is a project, assignment, or errand that you don’t
want to forget. A task can occur once, or it can recur.
The task list
You can create and delete tasks and mark them as
complete. Overdue tasks are displayed bold and red.
You can mark a task as high-priority (exclamation
mark) or low priority (down arrow).
Note: If you synchronize tasks with your PC, the sync
process removes completed tasks from your phone
and displays them on your PC in gray with a line
through.
morning (a.m.)
afternoon (p.m.)
all-day event
both a.m and p.m.
a.m., p.m., and all day

Voq User Guide
46 2130324
Create a new task
1Press Start > More > Tasks.
2In Enter new task here, begin typing.
3When you have finished typing your task, press
Complete.
Mark a task as complete
1Press Start > More > Tasks.
2Select the task, then press Complete.
Mark a task as incomplete
1Press Start > More > Tasks.
2Select the task, then press Activate.
Delete a task from the Tasks list
1Press Start > More > Tasks.
2Select the task, then press Delete.
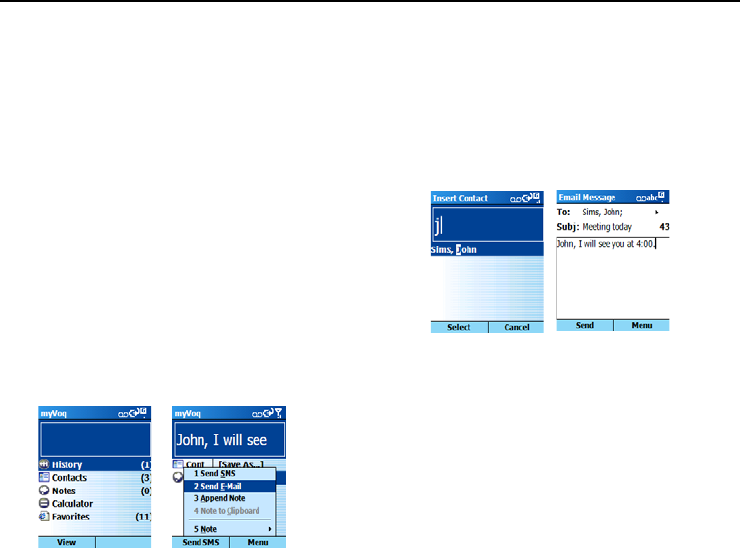
Writing notes
The Voq phone supports text notes such as the ones
available in the Notes application on a desktop PC
To write a note:
1Open the thumbpad and start typing.
2Select Save As beside Note and press the
joystick.
3When you have finished typing, you can save the
note or send it:
·To save the note, press Save.
·To send the note as an SMS, press Menu >
Send as SMS.
·To send the note as an e-mail, press Menu >
Send as E-Mail.
4If you are sending a message, type the address
or phone number, then press Send.
Edit a note
You can edit or add to an existing note. For example,
you can add an item to a grocery list.
1There are three ways to edit an existing note:
·Browse for the note by typing its name. For
example, groc for grocery list.
·Start typing the item you want to add. For
example, eggs, and append it to the note.
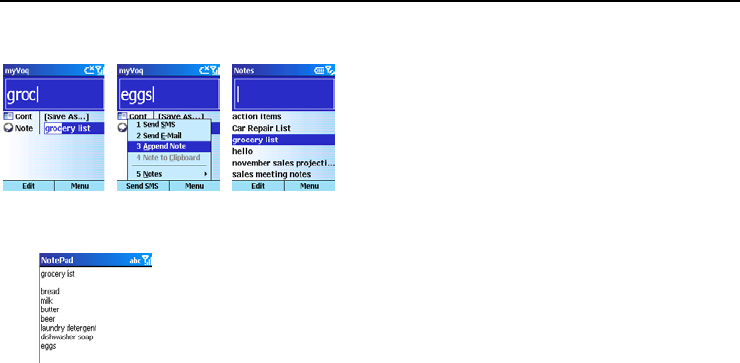
Managing Your Personal Information
Draft D (Jan. 20, 2004) 47
·Select Notes from the myVoq screen, then
select the note to edit.
2Once you find and display the note, edit it, then
press Save.
Tip: you can use myVoq notes as a contact manager.
Simply use the contact name (e.g. person or company)
as the first word in the note.

Voq User Guide
48 2130324

Voq User Guide
50 2130324
The Voq phone supports a full range of e-mail and
messaging programs including e-mail Inbox, Text
Messaging, Multimedia Messaging Service, and Instant
Messaging.
Choosing your e-mail program
Your phone arrives with two different e-mail programs
pre-installed: VoqMail and ActiveSync. You must
choose one of these programs to handle your mail and
then configure your e-mail account.
The program you choose will depend on the type of e-
mail server your service provider or corporate e-mail
system uses. The question you must answer is, “Does
my service provider support IMAP4 or POP3 only?”
•If your e-mail server supports the IMAP4 protocol,
we recommend you use VoqMail or VoqMail Pro
because it was specially designed and optimized
for the Voq phone. See “Setting up a VoqMail
account” on page 54.
•If your e-mail server supports only the POP3
protocol, you must use ActiveSync. See “Create
an ActiveSync e-mail account” on page 79.
Working with multiple accounts
You can configure and use up to eight different
messaging accounts. All accounts are stored in the
Inbox program. For example, you can have a separate
account for:
•Home e-mail (e.g. myname@myprovider.com)
•Work e-mail (e.g. myname@mywork.com)
•Internet e-mail (e.g. myname@hotmail.com)
•SMS (e.g. myname@myprovider.com)
Each account has its own separate set of message
folders: Drafts, Inbox, Outbox, Sent.
About “Inbox”
The word “inbox” can mean different things depending
on where it appears on your phone:
•Inbox is the name of the program you open from
the Start menu that contains all your messaging
accounts such as VoqMail, ActiveSync, and SMS.
•Inbox is a folder that contains your messages.
Each messaging account has its own inbox
E-mail and Messaging
Draft D (Jan. 20, 2004) 51
About “ActiveSync”
The word “ActiveSync” can mean different things
depending on where it appears on your phone:
•ActiveSync is the name of the program that you
use to synchronize information with your desktop
PC.
•ActiveSync is also the account name for your
Microsoft Exchange mailbox.
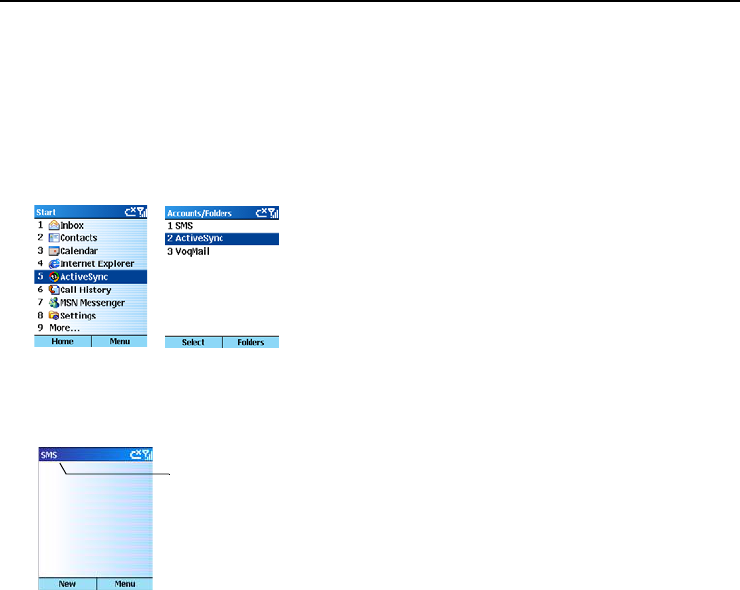
Switch between accounts
When you open your Inbox, by clicking Start > Inbox,
the phone displays the last account you used.
To switch to a different account:
1Press Start > Inbox.
2Push the joystick right or left to switch from one
account to another.
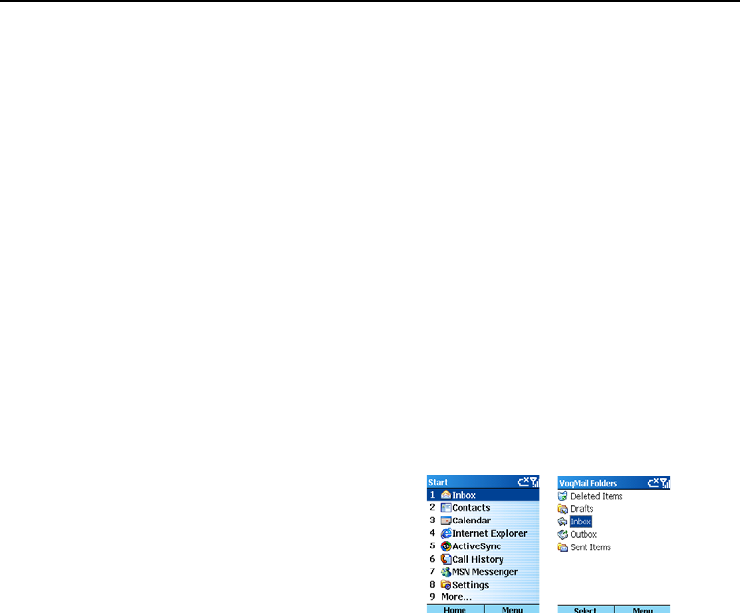
View the complete list of accounts
To see a list of all your accounts:
1Press Start > Inbox > Menu > Accounts/
Folders.
The list of accounts displays with the number of unread
messages in each account in parentheses. You can
switch to any account by selecting it in the list.
Change e-mail options
1Press Start > Inbox. If necessary, scroll right or
left to switch to the account you want.
2Press Menu > Options.
3Select and change options you want.
4Press Done.
Delete an account
1Press Start > Inbox > Menu > Options >
Account Setup.
2Scroll to the account to delete.
3Press Menu > Delete.
Always check the title bar
for the account name. To
change it, push the
joystick left or right.

Voq User Guide
52 2130324
Inbox
Account
Name
Management
Operator
network
ISP
network
Work
Network
VoqMail Automatically or manually synchronized.
Settings: Start > Inbox > Menu >
Accounts > VoqMail > Menu > Options.
Setup Wizard: Start > More > VoqMail Set-
tings > Setup & Test Wizard.
Wireless Internet
Operator Mailbox
ISP Mailbox n/a
VoqMail
Pro
Automatically or manually synchronized.
Settings: Start > Inbox > Menu >
Accounts > VoqMail > Menu > Options.
Setup Wizard: Start > More > VoqMail Set-
tings > Setup & Test Wizard.
Wireless Internet Wired Internet Microsoft Exchange
Mailbox, or
Lotus Notes Mail-
box, or
GroupWise Mailbox
POP3 Automatically or manually synchronized.
Set up: Start > Inbox > Menu >
Accounts > POP3 > Menu > Options.
Note: You create a new POP3 account as an
ActiveSync account. When you select POP3 as the
server type, the account name changes to POP3.
Wireless Internet
Operator Mailbox
Wired Internet
ISP Mailbox
Work Mailbox
SMS Automatically updated when messages sent or
received.
Wireless Internet
Operator Text
Message Mailbox
n/a n/a
Active-
Sync
Automatically or manually synchronized.
Set up: Start > Inbox > Menu >
Accounts > ActiveSync > Menu > Options.
Wireless Internet Wired Internet Microsoft Exchange
Mailbox

E-mail and Messaging
Draft D (Jan. 20, 2004) 53
VoqMailTM Software
Your phone comes with VoqMail software already
installed. VoqMail is a powerful e-mail program that
provides you with an “always there” e-mail
experience. VoqMail is remarkable because it uses a
fraction of the time and bandwidth required by some
other mail programs to check and retrieve mail.
There are two versions of VoqMail: VoqMail Personal,
and the optional VoqMail Pro. Even if you have not
purchased the VoqMail Pro version, your new phone
includes a demo license that lets you try out VoqMail
Pro features for a limited period of time.
VoqMail Personal version features
VoqMail Personal allow you to:
•Connect to mail servers hosted by Internet or
telephone service providers
•Enjoy full e-mail functionality–send, receive,
forward and delete messages
•Define your e-mail delivery settings
•Send messages immediately
•Download existing contacts from your PC
•Send e-mails using the Contacts list
•Reply to e-mails with a phone call
•Synchronize with your PC–messages you read on
VoqMail are shown as read on your desktop PC
Battery, bandwidth, and memory
management features
VoqMail includes many features that minimize airtime
use and maximize battery life. For example, the
program suspends mail delivery when memory and
battery are low, you are out of coverage, or you receive
a voice call. Mail delivery resumes when the condition
passes.
VoqMail Pro features
VoqMail Pro is an optional upgrade to the VoqMail
Personal program. In addition to all the features of the
Personal version listed above, VoqMail Pro allows your
phone to seamlessly connect to your work e-mail on
your company network. Messages sent to your
company e-mail address are forwarded to your phone.
Messages sent from your phone leave a copy in the
Sent folder of your desktop PC.
VoqMail Pro also includes these enhanced features:
•“Always there” business e-mail–no need to
manually check for mail
•Direct communication with the e-mail server–you
do not need to leave your work PC running
•Custom alerts–assign different alerts to e-mails
from different people
•Download settings–choose how much of a
message body to download

Voq User Guide
54 2130324
•Smart polling–automatically check for responses
to e-mails you send
•Accept Outlook meeting invitations, which
automatically updates your Voq calendar, and
preserves meeting attachments
•Secure VPN access
VoqMail Pro compatibility
VoqMail Pro consists entirely of the software on your
Voq phone and works with your existing IMAP4-
enabled mail server. You do not need to leave your
work PC running, install extra software on your
enterprise mail server, or install a dedicated server to
push e-mail to your phone.
VoqMail Pro is compatible with:
•Microsoft Exchange 5.5, 2000 and 2003
•Lotus Notes 4.6, 5.0 and R6
•Novell GroupWise
•Other IMAP4 servers
VoqMail Pro is not compatible with:
•POP3 servers
The Voq phone provides POP3 support through a
standard account that you can set up using ActiveSync.
See “Create an ActiveSync e-mail account” on
page 79.
Setting up a VoqMail account
You set up your VoqMail e-mail account using the
VoqMail Setup Wizard.
If you are using VoqMail Professional Edition, the
wizard allows you to send a pre-composed e-mail
message from your phone to your IT manager from the
setup wizard, and he or she can configure your work
e-mail settings remotely. In this case, you do not need
to gather your system information.
Gather system information for a manual
setup
To configure your e-mail, you need the following:
VoqMail Personal
•An e-mail account with an Internet service
provider
•E-mail address (e.g. jsmith@myprovider.com)
•Your password
•Domain name (e.g. myprovider)
•Incoming and outgoing mail server names (e.g.
mail.myprovider.com)
•A data connection for connecting to the Internet.
See “Data connections” on page 88
VoqMail Pro
•E-mail display name (e.g. John Smith)
•E-mail address (e.g. jsmith@mywork.com)
•VPN protocol (e.g. Microsoft PPTP, Cisco IPsec)

E-mail and Messaging
Draft D (Jan. 20, 2004) 55
•VPN server name (e.g. server.mywork.com)
•VPN user name (e.g. jsmith)
•Incoming and outgoing mail server names (e.g.
mail.mywork.com)
•Work domain name (e.g. mywork)
Start the VoqMail setup wizard
Use the setup wizard to configure both VoqMail
Personal and VoqMail Pro software.
1On the Home screen, scroll to VoqMail Setup,
then press the joystick to start the setup wizard.
2Follow the instructions on the display. Press
Next to move to the next screen or Previous to
move to a previous screen.
If you are setting up your work e-mail with
VoqMail Pro, you can send an e-mail to have your
IT manager remotely configure the phone. This is
probably your simplest option.
For more information about setting up VoqMail, visit
www.voq.com/site/support/default.voq.
Setting up an ActiveSync account
You need to set up an ActiveSync account only if your
service provider does
not
support the IMAP4 protocol.
Contact your service provider for more information.
See “Create an ActiveSync e-mail account” on
page 79.
Scheduling e-mail polling with
VoqMail
The Voq phone periodically contacts your mail server
and checks for mail. This is called polling and you don’t
have to do it manually. This means your e-mail is
“always there” similar to your desktop PC.
Although polling uses very little bandwidth, you can
control how often your phone checks for mail to
maximize battery life and minimize airtime charges.
For example, you can check less frequently after
business hours when receiving mail is generally less
urgent.
Using the schedule wizard, you can define the polling
frequency for three different periods throughout the
day: Work, Sleep, and All Other Times. The default
settings are: Work (every 15 minutes), Sleep (manually,
i.e. no polling), All Other Times (every hour).
Start the VoqMail Setup
Wizard.

Voq User Guide
56 2130324
Define the polling frequency
1Press Start > More > More > VoqMail
Settings > Schedule Settings > Basic. This
starts the schedule wizard.
2Follow the instructions on the screen for each
period. Press Next to move forward. Press
Previous to go back and change information on
a previous screen.
3When you have finished, press Done.
Automatic increase in polling frequency
When you send an e-mail, the phone automatically
increases its polling frequency to once every minute for
five minutes to check for replies. After five minutes the
polling frequency returns to the previous setting.
Turn off e-mail polling
When you define the polling frequency, you can choose
to check for e-mails manually. In other words, the
phone will not automatically check for mail.
1Press Start > More > More > VoqMail
Settings > Schedule Settings > Basic.
2Press Next.
In the Check Messages field, set the polling
frequency to Manually for the Work Schedule.
3Continue to press Next and set the polling
frequency to manually for the remaining periods:
Sleep and All Other Times.
4Press Next until you reach the last screen, then
press Done.
Check for messages manually
To check for new messages immediately without
waiting for the next scheduled polling, or if the polling
schedule is set to Manually:
1Press Start > Inbox.
2If necessary, scroll right or left to switch to your
e-mail account.
3Press Menu > Send/Receive. The phone
connects to your mail server and sends and
receives your messages.
To stop this process, Press Menu > Stop Send/
Receive.
Note: the phone will check and download messages in
the background so you can continue to use your inbox.
E-mail sound alerts
Note: VoqMail Personal and VoqMail Pro sound alert
settings override standard settings in Start >
Settings > Sounds.
VoqMail Personal uses the same alerts, or sounds,
for all incoming e-mail messages.
VoqMail Pro can use different alerts, or sounds, for
incoming e-mail messages from different contacts.

E-mail and Messaging
Draft D (Jan. 20, 2004) 57
Change the sound alert for standard
messages
1Press Start > Settings > Sounds.
2In New e-mail, scroll left or right to select a new
sound, or press the joystick to see the complete
list of sounds.
3Select the sound you want. You can also select
Vibrate or None from the bottom of the list.
·VoqMail Personal–This is the alert used for
all incoming e-mail messages.
·VoqMail Pro–This is the alert used for
contacts that do not have an alert level
assigned to them, or for contacts that have
been assigned the alert level “Normal”.
4Press Done.
Custom e-mail sound alerts (Pro only)
With VoqMail, you can define custom alerts for the
e-mail messages you receive depending on the sender.
For example, you could assign a special sound alert to
an important customer.
VoqMail Pro also has a unique reply alert feature. If you
receive a reply to an e-mail you have sent, the phone
uses an alert that is different from the standard alert.
You can apply a custom alert to:
•A person
•A keyword that appears in the message header
Alert level settings have two parts: the ring tone and
how much of the message body is downloaded. The
default alert level settings are:
Assign an alert to a contact (Pro only)
To assign a special alert to a contact:
1Add the person to your contacts list first. Be sure
to include an e-mail address.
2To assign an alert to the contact, press Start >
More > More > VoqMail Settings > Contact
Alerts > Add.
VoqMail searches your list of contacts and
displays all contacts with an e-mail address that
do not have an alert assigned to them.
3Select a contact, then press Add. By default, the
phone assigns an alert level of High.
4To change the alert level to critical, press Menu,
then select the alert level.
Level Ring tone Message body
download
Critical Critical ring tone Full message body
High High ring tone Full message body
Normal Standard ring tone 2 screens
Low No ring tone 2 screens

Voq User Guide
58 2130324
Add an alert to a keyword (Pro only)
To assign a special alert to a keyword in a message
header:
1Press Start > More > More > VoqMail
Settings > Keyword Alerts > New.
2Fill in the fields:
·Keyword–Type a word that will trigger an
alert.
·Priority–move the joystick left or right to
change the alert level for the word.
3Press Done.
Delete a custom alert (Pro only)
1Press Start > More > More > VoqMail
Settings > Contact Alerts.
2Select the contact from whom you want to
remove an alert.
3Press Menu > Delete. This removes the contact
from the list of Contact Alerts. It does not remove
the contact from the Contacts list.
Change custom alert settings (Pro only)
For each alert level, you can change the sound and
how much of the message body the phone downloads.
1Press Start > More > More > VoqMail
Settings > Alert Settings.
2Select the alert level you want to change, then
press Edit.
3Choose the sound and download options for the
alert, then press Done twice.
VoqMail message limits
You can set the following limits on messages and data
traffic:
•Maximum number of messages saved
•Maximum number of megabytes downloaded in a
month
To change VoqMail limits:
1Press Start > More > More > VoqMail
Settings > VoqMail Limits.
2Set the parameters as necessary.
3Press Done.
VoqMail traffic statistics (Pro only)
The phone gathers statistics on the number of
messages received and sent, and the number of
megabytes of data sent to or from the phone. This can
help you to understand and manage your data traffic.
Note: This measurement is approximate and within
+/- 20% of the actual bandwidth used.
The phone takes measurements above the security
layers, and cannot identify packets in an encrypted
e-mail message. Accuracy is affected because some
security layers increase the amount of traffic, while
others use compression to reduce it.
E-mail and Messaging
Draft D (Jan. 20, 2004) 59
To see traffic statistics, press Start > More >
VoqMail Settings > Traffic.
Creating Messages
E-mail and SMS are different messaging systems but
they share many common features. With myVoq, you
create both types of messages the same way.
Consequently, SMS and e-mail are described together
in many of the instructions that follow.
Create a quick e-mail message with
myVoq
1Open the thumbpad and start typing your e-mail
message. When your message is complete or
after you have typed a few words, press Menu >
Send E-mail.
2On the Insert Contact screen, type an e-mail
address or start typing the recipient’s name to
search for a contact in your contacts list. If you
find the name you want, highlight the name with
the joystick, then press Select.
Tip: If the Send E-mail option is not available
when you press Menu, try typing more of your
message before you choose Menu.
3On the E-mail Message screen, enter a subject
and edit the body of your e-mail message, if
necessary.
4Press Send.
Create a quick SMS message with
myVoq
You can send and receive SMS messages up to 160
characters in size. The phone splits up and sends
longer messages as several small messages.

Voq User Guide
60 2130324
1Open the thumbpad and start typing.
2Press Send SMS.
3Enter a phone number or select a contact with a
mobile phone number.
4Enter a subject, then press Send.
Create a message in Inbox
You can also create a message from Inbox.
1Press Start > Inbox > New.
2Press Select, to choose the mail account you
want to use to send the message.
3Complete the message fields:
·To–enter recipient e-mail addresses or SMS
numbers. Press the joystick to see a list of
recipients. Insert a semicolon (;) between
multiple addresses or SMS numbers.
·Cc–enter the e-mail addresses of persons to
receive a copy. This field does not appear for
SMS messages.
·Subj–enter a subject. This field does not
appear for SMS messages.
4Enter a message and press Send.
When using the keypad in Multipress mode, you can
type punctuation such as the “at” sign (@), a period (.),
or a semicolon (;), by repeatedly pressing the 1 key
until the punctuation appears.
Cancel a message
To cancel a message you are creating, press Menu >
Cancel Compose.
If you have included an e-mail address or SMS number
in a contact card, you can create a new message from
a contact card.
Create a message from a contact
1Press Start > Contacts.
2Select a contact from the list.
3Select the e-mail address or SMS number to use.
If you selected an e-mail address, select the
e-mail account to use.
4In Subj, enter a subject. This field does not
appear for SMS messages.

E-mail and Messaging
Draft D (Jan. 20, 2004) 61
5Type a message and press Send.
Tips: When using the keypad in Multipress mode, you
can insert punctuation such as the “at” sign (@), a
period (.), or a semicolon (;), by repeatedly pressing the
1 key until the punctuation appears.
To cancel a message, Press Menu > Cancel
Compose.
Make a voice call from an e-mail
You can easily phone the sender of an e-mail if the
person appears in your Contacts list.
1Open the e-mail message.
2Scroll to the sender’s name in the From field,
then press the joystick. A screen appears with all
known phone numbers for the contact.
3Scroll to the desired number and press the
joystick to make the call.
Other e-mail options
Inserting predefined text into messages
To save time entering text, you can insert predefined
text into messages. The phone includes a list of
standard predefined text, which you can edit to create
words or phrases that you frequently use.
Insert predefined text into a message
1Press Start > Inbox > New.
2Select the account to use.
3In Subj or the message area, press Menu >
Insert Text.
4Scroll to the text, then press Insert, or press the
associated number.
Edit predefined text
1Press Start > Inbox > Menu > Options >
Edit My Text.
2Scroll to the text to edit.
3Edit the text, then press Done.
Insert a voice recording into a message
You can easily insert a voice recording into an e-mail
message. Inserting a voice recording is useful when
you want to verbally explain information that is
contained in the message.
1In the message area of an e-mail message, press
Menu > Insert Recording > Record.
2Start speaking into the phone microphone.
3When you finish speaking, press Stop > Done.
Note: You can send only one voice recording in a
message. If you insert a second recording, it replaces
the first.

Voq User Guide
62 2130324
Insert a signature
You can specify a signature that is automatically
inserted into messages you send for each messaging
account.
1Press Start > Inbox > Menu > Options >
Signatures.
2Scroll right to switch to the account for which to
specify a signature.
3Select Use signature with this account.
4To insert a signature in every message you send,
select Include when replying and
forwarding. Otherwise, a signature is inserted
only in new messages.
5Replace the text with in the Signature box with a
signature to insert, and press Done. The
signature is inserted into messages that you send
from this account.
To remove a signature, repeat steps 1 and 2 above,
then uncheck Use signature with this account. A
signature is no longer inserted in messages that you
send from this account.
Save a draft of a message
You can save a draft of a message that you are
composing to finish and send later.
1Press Start > Inbox > New.
2Select the account to use.
3Enter information in the message.
4Press Menu > Postpone Message. The phone
saves a draft of the message in the Drafts folder.
Reopen and send a message draft
1Press Start > Inbox > Menu > Accounts/
Folders.
2Scroll to the account whose folders you want to
view.
3Press Folders > Drafts.
4Open the draft message and edit it.
5Press Send.
Requesting a delivery receipt
You can request a delivery receipt for an SMS
message. When you do this, you receive an SMS
message to confirm that your message was delivered
to the recipient’s SMS service.
Request a delivery receipt for an SMS
message
1Before sending an SMS message, press Menu >
Message Options.
2Select Request SMS text message delivery
notification.
3Press Done. When your message is delivered,
you receive a receipt on the phone.

E-mail and Messaging
Draft D (Jan. 20, 2004) 63
Working with message folders
Each messaging account has a set of folders in which
the phone stores messages for that account. The
default folders are:
•Deleted Items–Contains messages that you
delete until you empty this folder.
•Drafts–Contains messages that you save before
sending.
•Inbox–Contains messages that you receive.
•Outbox–Depends on your message account:
·ActiveSync–sent messages are stored until
you synchronize.
·VoqMail–e-mail messages are sent
immediately and appear in your Outbox folder
only for a few seconds.
·SMS–messages are sent immediately over the
network and appear in your SMS Outbox folder
only for a few seconds.
•Sent Items–Contains copies of messages that
you send.
You can move a message to a different folder within
the same account.
View message folder contents
1Press Start > Inbox > Menu > Accounts/
Folders.
2Scroll to the account for which to view the
contents of a message folder.
3Press Folders and then the folder to view.
4To view all ActiveSync folders, even those not
marked to synchronize, press Menu > Show All
Folders.
5To return to Inbox, Press Menu > Accounts/
Folders.
6Press Folders > Inbox.
Mark a folder for synchronization
Synchronize Inbox with your desktop computer. This
creates the same ActiveSync Inbox folders on your
phone as in Outlook on your desktop computer.
Note: The more folders you synchronize wirelessly, the
more bandwidth you use. Normally, you would
synchronize your inbox only.
1Press Start > Inbox > Menu > Accounts/
Folders
2Highlight ActiveSync, then press Folders >
Menu > Manage Folders.
3Scroll to a folder to synchronize.
4Press Show > Done. The next time you
synchronize, the folder(s) that you marked on
your phone are synchronized with the
corresponding folders in Outlook on your desktop
PC.

Voq User Guide
64 2130324
Move a message to a different folder
1Press Start > Inbox.
2If necessary, scroll right or left to switch to the
account in which to move a message.
3Scroll to the message to move.
4Press Menu > Move.
5Highlight the folder into which to move the
message, then press Select.
You can move an open message in the same manner,
by pressing Menu > Move.
Empty the Deleted Items folder
1Press Start > Inbox > Menu > Accounts/
Folders.
2If necessary, scroll right or left to switch to the
inbox for which to empty the Deleted Items
folder.
3Press Folders > Deleted Items > Menu >
Empty Folder.
Viewing and responding to
messages
When you receive an e-mail message, the phone plays
a sound and displays an envelope icon at the top of the
screen.To quickly view new messages, select the
message notification area on the Home screen.
The phone stores received messages in the Inbox
folder of the appropriate account and displays them in
the Inbox message list.
View the Inbox message list
1Press Start > Inbox. The Inbox message list
displays your received messages for the account.
2If necessary, push the joystick right or left to
switch to change accounts.
3By default, messages are displayed in the order
received. You can change the order in which
messages are displayed and show the date and
time that messages were sent.
Change message list display options
1Press Start > Inbox > Menu > Options >
Display.
2Change the display options, then press Done.
You can change the status of a message by marking it
as Read or Unread.
Mark a message as Read or Unread
1Press Start > Inbox.
2Scroll to the message to mark.
3Press Menu > Select Mark as Read or Mark
as Unread.
The message display is changed to reflect its

E-mail and Messaging
Draft D (Jan. 20, 2004) 65
new status: normal text for read messages and
bold text for unread messages.
Working with messages
You can open messages by selecting them in the
message list. Using Inbox menu commands, you can
quickly reply to, forward, and delete messages.
Open a message
1Press Start > Inbox.
2If necessary, scroll right or left to switch to the
account you want.
3Select the message to open.
4To return to the message list, press the Back
button.
Tips: To open the next message in the list from within
an open message, scroll right; to open the previous
message in the list, scroll left.
To create a contact card for the sender, Press Menu >
Save Sender to Contacts.
Choose the character set for messages
1From an open message, press Menu > Options.
2In E-mail message language, scroll to the
language.
3Press Done. The message is displayed using the
appropriate characters for the selected language.
Reply to a message
1From an open message, press Menu > Reply or
Reply All.
2Enter a message in the message area.
3Press Send.
Forward a message
1From an open message, press Menu >
Forward.
2Select the account to use.
3In To, enter recipient e-mail addresses or SMS
numbers. Insert a semicolon (;) between multiple
addresses or SMS numbers.
Optionally, you can enter an introductory mes-
sage by scrolling to the message area, pressing
the joystick to insert a blank line, and entering
your text.
4Press Send.
Delete a message
1Press Start > Inbox.
2If necessary, scroll right or left to switch to the
inbox in which to delete a message.
3Scroll to the message to delete.
4Press Menu > Delete. For the ActiveSync
account, the message is also deleted from
Outlook on your desktop computer or Exchange
Server the next time you synchronize.

Voq User Guide
66 2130324
Working with large messages and
attachments
The phone downloads only a portion of any large
e-mail messages and attachments you receive. You
can decide to download the remainder or not.
Messages with an attachment have an envelope icon
with a paperclip in the message list. The attachment
icon has the following three states:
•Not downloaded
•Marked for download
•Downloaded
Open messages display their attachments as a list of
hyperlinks at the bottom of the message.
Download a complete e-mail message
1Press Start > Inbox.
2Scroll to the message to download.
3Press Menu > Mark for Download. The phone
begins downloading the full e-mail message,
except for attachments.
Download an attachment
1Open the message with an attachment to
download.
2Scroll down to the attachment, then press the
joystick. The phone downloads the attachment.
If the message contains several attachments, you can
individually select one or more attachments to
download, which are then marked with a down arrow.
View an attachment
In an open message containing a downloaded
attachment, select the attachment.
Note: To view attachments, you must have the
appropriate viewer or reader installed. If an attachment
will not open, your phone likely does not have the
application that supports the file type. Many
attachments cannot be viewed on the phone.
Delete an attachment
1In an open message containing a downloaded
attachment, scroll to the attachment.
2Press Menu > Delete.
Caution: This deletes all of the attachments to this
message, not only the selected attachment. This
deletes attachments on the device only.
Meeting requests
You can receive and reply to Outlook meeting requests
on your phone. Your response is sent back to the
meeting organizer as an e-mail.
Your calendar is updated as follows:

E-mail and Messaging
Draft D (Jan. 20, 2004) 67
•When you accept a meeting, VoqMail:
·Updates your local calendar immediately
·Updates the meeting organizer or the
delegate’s calendar the next time you sync
your phone
·Updates the free/busy indicators on your
calendar the next time you sync your phone
•When you decline a meeting:
·The organizer is notified immediately
Respond to a meeting request
To respond to a meeting request:
1Press Start > Inbox.
2Select the meeting request, then respond to it:
·To accept, press Menu > Accept.
·To decline, press Menu > Decline.
·To tentatively accept, press Menu >
Tentative.
Appointing a delegate
If you accept an invitation, you update the calendar on
the mail server the next time you sync your phone. This
means that the calendar at your office may not
accurately reflect your free and busy time to your
colleagues until you synchronize your phone. To
address this, you can send an e-mail to a “delegate”–
someone at work who has access to your Calendar–
asking them to book the appointment that you just
accepted.
You can automatically generate and send this e-mail
whenever you accept or tentatively accept a meeting.
Configure an automatic e-mail to send to a
delegate
1Press Start > More > VoqMail Settings >
Calendar Settings.
2Check Notify my delegate of meeting
requests and updates, then fill in the
delegate’s name and e-mail address.
3Press Done.
Import SMS messages from a SIM
card
In addition to receiving SMS messages wirelessly, you
can import them from your Subscriber Identity Module
(SIM) card.
Press Start > Inbox > Menu > Options > Import
SIM Messages> Done.
The SMS messages are copied from the SIM card to
the SMS account Inbox. A copy of the messages
remains on the SIM card.
Note: You cannot export SMS messages from your
phone to a SIM card.

Voq User Guide
68 2130324
Multimedia Messaging Service
(MMS)
Multimedia Messaging Services (MMS) let you send
short messages containing pictures, audio, and text
from your phone to other MMS customers. (Your
wireless network service provider must enable MMS
services on your account).
To view an MMS message:
1Press Start > jMMS messaging.
2Select Inbox to view your received MMS
messages. MMS Messages may have multiple
pages to view.
To send an MMS message:
1Press Start > jMMS messaging.
2To quickly send a picture to someone, select
Send Image, attach a picture, and insert any
text.
·Select Send Audio to compose a message
and attach a sound file stored on your
handset.
·Select Compose to send a message that
contains a combination of pictures, sounds
and text. Compose allows you to create
messages with multiple pages.
3When your MMS is complete, press Send to
address your message. Insert the phone number
of a person whose phone accepts MMS
messages.
At any time, press Menu to review other options.
Instant messaging
MSN Messenger may be available on your Voq phone.
If it is available, MSN Messenger on your phone
provides the same chat environment as MSN
Messenger on your desktop PC.
Setting up MSN Messenger
To set up MSN Messenger, you need either a Microsoft
.NET Passport account or a Hotmail account. To set up
a Microsoft .NET Passport account, go to: http://
www.passport.com. Once you have this account, you
need to do the following:
Create a connection on your phone, such as a modem
or wireless connection that allows you to connect to
the Internet. For more information about creating
connections, see “Data connections” on page 88.
Using MSN Messenger
You can sign in to MSN Messenger using your Hotmail
or your .NET Passport credentials. Once you sign in,
you can exchange instant messages with others. This

E-mail and Messaging
Draft D (Jan. 20, 2004) 69
is called “chatting.” Contacts must have a Hotmail or
.NET Passport account.
Sign in to MSN Messenger
Note: When you sign in to MSN Messenger, your
phone communicates periodically with the MSN
Messenger server to check for messages. This
consumes airtime. To avoid extra charges, be sure to
sign out when finished using MSN Messenger.
1Press Start > MSN Messenger > Sign In.
2Fill in the fields:
·Sign-in Name–enter the sign-in name that
you use for Hotmail or your .NET Passport
(Example: name_123@hotmail.com).
·Password–enter your Hotmail or .NET
Passport password.
3Select Remember my password if you don’t
want to enter your password again in the future.
4Press Sign In.
When you sign in, MSN Messenger retains your sign-in
name, and your password if you opted to save it, so
that you don’t need to enter this information again.
Sign out of MSN Messenger
Press Menu > Sign out.
Add an MSN Messenger contact
In the contacts list, Press Menu > Add Contact.
Add the Hotmail or .NET Passport sign-in name of a
person with whom you want to chat. Their sign-in
name is added to the contacts list.
Delete an MSN Messenger contact
In the MSN Messenger contacts list, select the contact.
Press Menu > Delete Contact.
Send an instant message
1Sign in to MSN Messenger.
2Scroll to the contact with whom you want to chat.
3Press Menu > Send Message.
4Enter your message and press Send. This starts
a chat with the contact.
Tips: To quickly add common messages, press
Menu > My Text, then select the text to use.
To edit this text, press Menu > Options > Edit My
Text. Select the text, make any edits, then press
Done.
Reply to an instant message
1Press Menu > Chats.
2Select the name of the person sending the instant
message. The message displays, along with a
box for your reply.
3Enter your reply and press Send.

Voq User Guide
70 2130324
Tips: By default, your phone plays a sound when you
receive an instant message. For instructions on
changing the sound, see “Sounds” on page 84.
If you want to be able to receive instant messages at
any time your phone is connected to a network, press
Menu > Options > Passport Account > Run this
program when connection is available > Done.
Invite a contact to an ongoing chat
From a chat, press Menu > Invite, and then select a
contact. The contact receives an instant message and
can join the chat.
Change between chats
1Press Menu > Chats.
2In the list of ongoing chats, select the name of a
contact with whom to chat.
Return to the contacts list
From a chat, press Menu > My Contacts.
End a chat
Press Menu > End Chat.
See who is already chatting
Press Menu > Chats.
Block or unblock an MSN Messenger contact
1In the MSN Messenger contacts list, select the
contact's name.
2Press Menu > Block. The contact will no longer
be able to see your status or send you messages.
3To unblock the contact, Press Menu > Unblock.
Change your MSN status
1In the contacts list, select your name.
2Select a status description, such as Away. This
status is displayed next to your name in the
contact lists of your contacts.
Change your display name
1In the MSN Messenger contacts list, press
Menu > Select Options > Passport Account.
2In My display name, enter your name as you
want it to display in the contacts lists of your
contacts.

E-mail and Messaging
Draft D (Jan. 20, 2004) 71
Features according to e-mail program
The table below lists the features available depending
on the type of e-mail account you use on the phone.
VoqMail
Personal
VoqMail
Pro
Wireless
ActiveSync
POP3
E-mail Features
Continuous delivery ✔✔
Work E-mail ✔✔
Personal E-mail ✔✔ ✔ ✔
Optimized Polling ✔✔
Battery Saver ✔✔
Bandwidth Saver ✔✔
Contact/Subject/Reply Alerts ✔
Auto Download Rules ✔
Auto Suspend Rules ✔✔ ✔
E-mail Servers:
Microsoft Exchange 5.5 ✔✔
Microsoft Exchange 2000 ✔✔
Microsoft Exchange 2003 ✔✔ ✔
Lotus Notes ✔✔
GroupWise ✔✔

Voq User Guide
72 2130324
VoqMail
Personal
VoqMail
Pro
Wireless
ActiveSync
POP3
E-mail Features
Calendar:
Accept/Decline Meeting Requests ✔✔ ✔
Save attachments to invitations ✔✔ ✔
Microsoft Exchange 5.5 ✔✔
Microsoft Exchange 2000 ✔✔
Microsoft Exchange 2003 ✔✔ ✔
Lotus Notes ✔✔
Novell GroupWise ✔✔
E-mail response to originator ✔✔ ✔
E-mail request to delegate ✔✔
Device Calendar Updated ✔✔
Server Calendar Updated ✔

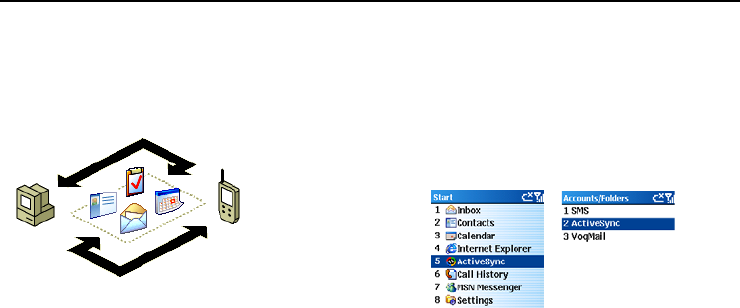
Voq User Guide
74 2130324
Synchronizing your Voq phone
Synchronization ensures that the information on your
phone and your PC is the same and up to date. You can
synchronize your Inbox, Contacts, Calendar, and Tasks.
Microsoft® ActiveSync® 3.7.1 or later and Voq Desktop
Tools are the programs you use to synchronize. They
are already installed on your Voq phone but you must
install them on your desktop PC. If your company has
Microsoft Exchange 2003 installed as a messaging and
collaboration server, you may be able to synchronize
your Voq professional phone Calendar, Contacts and
Tasks while working wirelessly.
Note: The Voq phone supports Lotus Notes and
GroupWise using the Microsoft Outlook client provided
on the disk. Please see the readme-sync.txt on the
companion CD for more information.
About “ActiveSync”
The word “ActiveSync” can mean different things
depending on where it appears on your phone:
•ActiveSync is the name of the program you use to
synchronize information with your desktop PC.
•ActiveSync is also the account name on the
phone for your Microsoft Exchange mailbox.
This section deals with ActiveSync, the application you
use to synchronize information with your desktop PC.
Voq Desktop Tools
Voq Desktop Tools provide the following capabilities:
•Synchronize Calendar appointments and Meeting
invitations you accept wirelessly, and preserve
document attachments to those appointments
•Synchronize your Microsoft Exchange Global
Address List (GAL). Send e-mail from myVoq
using your corporate address list, including your
distribution lists
•Synchronize your text Notes between your Voq
phone and Outlook or Lotus Notes

Synchronizing Your Phone
Draft D (Jan. 20, 2004) 75
Getting started
Before you begin synchronizing your Voq phone with
your desktop PC, complete the following steps:
1Install ActiveSync and Voq Desktop tools on your
desktop PC.
2Connect the phone and the PC.
3Create a partnership.
4Synchronize your phone.
1Install ActiveSync and Voq Desktop
Tools
Even if you use VoqMail only, you must install both
ActiveSync and Voq Desktop Tools on your desktop PC.
To install ActiveSync and Voq Desktop Tools:
1Insert the Voq companion CD into your
computer’s disk drive. The installation wizard
starts automatically.
2Click Start Here to display the Overview screen.
3Click Install ActiveSync 3.7 first. Follow the
instructions on the screen.
4Once you have finished installing ActiveSync, go
to the Overview screen, and click Install Voq
Desktop Tools.
2 Connect the phone and the PC
After you install ActiveSync and the Voq Desktop Tools,
connect your phone and the PC.
1Plug the sync cable into the handset connector at
the bottom of the phone. The Voq logo on the top
of the connector should face up.
2Insert the other end of the sync cable into a USB
port on your PC. If ActiveSync is installed on your
PC, it automatically detects your phone and starts
the New Partnership Wizard.
3 Create a partnership
The ActiveSync New Partnership Wizard helps you set
up a partnership and personalize your settings:
1Open ActiveSync if you have not already done so.
This starts the New Partnership Wizard, which
steps you through the set-up procedure.
2The wizard asks you to choose a device to which
to connect. If you are using your phone with your
own PC, choose Synchronize with this
desktop.
3The wizard asks you to choose what folders you
wish to synchronize when connected via a cable
or cradle. Your choice also depends on the e-mail
program you use. Set up your account as follows.
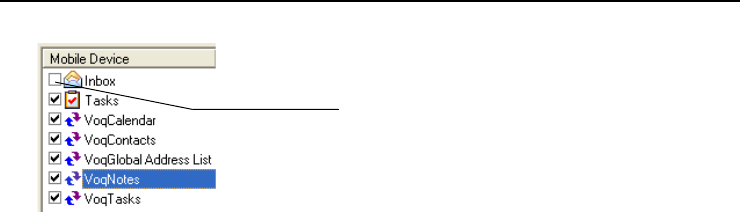
Voq User Guide
76 2130324
When you finish using the wizard, the first
synchronization begins automatically.
4 Synchronize your phone
ActiveSync should detect your phone. If not, start the
synchronization from your PC:
1Click Start > Programs >Microsoft
ActiveSync.
2In ActiveSync, choose File > Synchronize.
Change what to synchronize when
connected via cable or cradle
You can change the folders and information types you
want to synchronize when the phone and the PC are
connected by changing the settings on your desktop
PC.
1Start ActiveSync.
On your desktop PC, click Start > Programs >
Microsoft ActiveSync.
2On the ActiveSync window, choose Tools >
Options.
3Check the items to synchronize, then click OK.
The next synchronization will use the new
settings.
Synchronizing your e-mail inbox
VoqMail—If you are using VoqMail, your VoqMail
Inbox and other VoqMail folders are always up to date
and synchronized with your desktop PC or mail server.
If you use VoqMail,
you must uncheck
Inbox.

Synchronizing Your Phone
Draft D (Jan. 20, 2004) 77
ActiveSync e-mail—When you synchronize your
ActiveSync inbox, the phone:
•Copies messages from the Outlook Inbox folder
on your desktop computer, or from your mail
server, to the Inbox folder on your phone.
•Copies messages to your phone from the last
three days only, and the first 500 bytes of each
new message.
•Links messages on your phone and your PC.
When you delete a message on your phone,
ActiveSync deletes the message from your PC the
next time you synchronize, and vice versa.
•Synchronizes messages in subfolders of other
e-mail folders only if you selected the folders for
synchronization on your phone.
Note: SMS messages are not sychronized.
Synchronizing remotely
You can synchronize remotely with your desktop
computer, or with a mail server. Synchronization takes
place over a wireless connection instead of a direct
local connection. To synchronize remotely with a
desktop PC, the PC must be turned on.
Note: Using ActiveSync to keep your e-mail accounts
synchronized remotely can use a significant amount of
bandwidth and battery power.
if you are using VoqMail, your mail folders are always
up to date on both the PC and the Voq phone using a
minimal amount of bandwidth. See “Set VoqMail Sync
Settings” on page 78. You can still use ActiveSync to
synchronize your Calendar and Contacts.
Create a synchronization schedule
Create a schedule so that your phone and server
synchronize at the intervals you specify.
1Press Start > ActiveSync > Menu >
Options > Mobile Schedule.
2Select how often you want the synchronization to
take place, then Press Done.
Select the PC for wireless synchronization
How you configure wireless synchronization depends
on your network. For example, you may need to set up
a virtual private network (VPN) connection to the
network.
1Press Start > ActiveSync > Menu >
Options > PC Settings.
·In Use, select the name of the PC.
·Check Use mobile schedule to sync with
this PC.
·Check Sync with this PC during manual
sync, if you want to initiate synchronization
manually.
2Press Done twice.

Voq User Guide
78 2130324
Choose what to sync wirelessly
Note: if you are using VoqMail, do not set any server
parameters for Inbox.
To choose what to synchronize over the air:
1Press Start > ActiveSync > Menu >
Options > Server Settings.
2Scroll to the information type that you wish to
synchronize.
3Check Sync <...> with a server, then press
Done.
Tip: The most efficient use of bandwidth for remote
synchronization is:
•VoqMail for e-mail
•ActiveSync for Calendar - once a day
•No wireless sync for Contacts - you would do this
at home or at the office via your sync cable.
Synchronize your calendar wirelessly
To synchronize your calendar over the air:
1Press Start > ActiveSync > Menu >
Options > Server Settings >Calendar.
2Check Sync calendar with a server, then press
Done.
Set VoqMail Sync Settings
You can control the VoqMail synchronization between
the phone and your desktop PC.
To set synchronization parameters:
1Press Start > VoqMail Settings > Schedule
Settings > Advanced.
2Choose how you want the phone to synchronize
your messages:
·Smart Sync–Smart Sync periodically checks
your work mail server to see if the status of
any messages have changed. For example, if
Smart Sync detects that a message has been
read on your desktop PC, it also changes the
status of the message on the phone to read.
The reverse is also true. Messages read on the
phone are marked as read on the desktop.
·Sync Full Messages–Choose how often you
want the phone to complete a full
synchronization of messages. This means
downloading the full bodies of all messages in
your VoqMail Inbox.
·Sync When Roaming–enable or disable
automatic polling when the phone is in
roaming mode.

Synchronizing Your Phone
Draft D (Jan. 20, 2004) 79
ActiveSync errors
If ActiveSync cannot synchronize your information, it
displays an error on your phone. When the message
appears, press the joystick to display more information
about the error.
Note: Some types of errors can interfere with
automatic synchronization. If you suspect that a
scheduled automatic synchronization has not occurred,
try to manually synchronize your information. A
successful manual synchronization resets the
automatic synchronization.
ActiveSync e-mail accounts
If your service provider or corporate mail server
supports the IMAP4 protocol, we recommend you set
up a VoqMail Personal or a VoqMail Pro account to
handle your mail. See “Setting up a VoqMail account”
on page 54.
Before you begin to set up an ActiveSync e-mail
account, talk to your service provider or system
administrator. You will need the name of the server and
the server domain name.
Configure an Exchange Server connection
To configure or edit the server connection:
1Press Start > ActiveSync > Menu >
Options > Connection.
2Fill in the fields:
·User name–enter your Microsoft Exchange
User name.
·Password–enter your Microsoft Exchange
password.
·Domain–enter the name of the domain for
your Microsoft Exchange Server (if required).
·Save password–select this to have the
phone save your password so that you don’t
need to type it again.
·Server name–enter the name of the
Microsoft Mobile Information Server you
connect to.
3Press Done > Sync.
Create an ActiveSync e-mail account
To set up an ActiveSync e-mail account, use the
ActiveSync setup wizard:
1Press Start > Inbox > Menu > Options >
Account Setup > Menu > New.
2Fill in the fields on each page of the wizard. Press
Next or Previous to move from page to page.
3Press Done.

Voq User Guide
80 2130324


Voq User Guide
82 2130324
The Settings screen lets you change the way your Voq
phone looks and behaves to match the way you use it.
For example, you can change the Home screen
background or the sounds your phone makes.
To view the main Settings menu:
1Press Start > Settings.
2Select an option from the list. These options are
described below.
Phone
You use Phone settings to set options including call
forwarding, call waiting, and caller ID.
Call Barring
Block incoming or outgoing calls. For example, you can
block all outgoing international calls. See also Fixed
Dialing as a different way to restrict outgoing calls.
1Press Start > Settings > Phone >
Call Barring.
2In Block incoming calls or Block outgoing
calls, scroll to the option you want.
3Press Done.
Call Forwarding
Its easy to forward your unanswered Voq calls to
another number (your corporate voice mail, for
example).
1Press Start > Settings > Phone >
Call Forwarding.
2Choose when to forward a call:
·Unconditional–forward all calls immediately
·No Reply–forward calls when you do not
answer
·Busy–forward calls when your line is busy
·Unavailable–forward calls when your phone
is off or out of service range
3Select Enable call forwarding.
4Enter the phone number to which calls are to be
forwarded.
5Select Done.
Call Options
Use Call Options to set various phone options. Press
Start > Settings > Phone > Call Options.
•Any key answer—Answer calls by pressing any
key on the keypad.
•Show SIM contacts—Display contacts stored
on your SIM card in your Contacts list.
•Voice mail number—Enter the number you dial
for your voice mailbox. The phone dials this num-
ber when you press and hold 1.

Configuring Your Phone
Draft D (Jan. 20, 2004) 83
•SMS Service Center—Enter or change the
service provider number used to process SMS
calls. Contact your wireless network operator to
obtain this number.
•Country code—Specify your country code.
•Area code—Specify your area code.
Call Waiting
You can choose to be notifiied if you receive a call
while you are already on a call.
1Press Start > Settings > Phone >
Call Waiting.
2Select or clear Provide call waiting
notifications.
Caller ID
Caller ID lets you decide if you want people to see your
name and number on their phones when you call them.
1Press Start > Settings > Phone > Caller ID.
2In Provide my caller ID to, scroll to the option
you want: Everyone, No one, or Only my
contacts.
3Press Done. The selected callers are able to see
your name and phone number information when
you call them.
Channels
You can configure phone channel settings.
1Press Start > Settings > Phone > Channels.
2Select the options you want, then press Done.
Fixed Dialing
Fixed dialing lets you restrict outgoing calls to the area
codes and phone numbers you specify.
1Press Start > Settings > Phone > Fixed
Dialing.
2Check Enable fixed dialing, then press
Menu > Edit Numbers > Menu > Add.
3Enter the phone number or area code to which to
restrict calling and press Done.
4Repeat these steps to add more numbers as
necessary.
You will be able to make and receive calls only to and
from the numbers or area codes specified.
Networks
Choose a specific network or allow the phone to
determine the network automatically.
1Press Start > Settings > Phone > Networks.

Voq User Guide
84 2130324
2In Network selection, scroll to the option you
want, either Manual or Automatic.
·Manual–press Menu > Select a Network.
Select the network, then press Done. The
phone uses the selected network.
·Automatic–press Menu > Preferred
Networks. Select the networks to use, then
press Done. The phone automatically uses the
preferred networks.
Sounds
You can choose the sounds for ring tones, notifications,
reminders, and other events. You can also turn off the
tones you hear when pressing number keys. Your
phone can also remain silent or vibrate.
To set alert sounds for incoming e-mail messages, see
“E-mail sound alerts” on page 56.
Change the sound for an event
1Press Start > Settings > Sounds.
2Scroll to the event for which to specify a sound.
3Scroll (right or left) to select a sound. Press None
if you don’t want to hear a sound.
When you select a sound, the sound plays. To play it
again, press Menu > Play.
Copy a sound from your PC
1Connect the phone to the USB port on your
desktop PC by using the sync cable or the cradle.
2On your PC, copy the sound file you want. The file
format must be .wav, .mp3, or .wma.
3From your desktop PC, start ActiveSync.
4On the main window, click Explore, double-click
My phone, double-click Storage, double-click
Application Data, double-click Sounds, and
then paste the sound file into the Sounds folder.
Delete a sound
You can only delete sounds that you have added, not
sounds that come with the phone.
1Press Start > Settings > Sounds > Menu >
Delete Sounds.
2Select the sound to delete.
3Press Yes.
Changing keypad tones
The phone generates tones that represent the numbers
you press on the keypad and sends these tones over
the network to communicate with other devices. The
phone also plays these tones for you to hear.
You can turn off the tones you hear or change them to
clicks. The phone still sends tones across the network.

Configuring Your Phone
Draft D (Jan. 20, 2004) 85
Change or turn off keypad tones
1Press Start > Settings > Sounds > Keypad
control.
2Select Tone, Click, or None.
3Press Done.
Tip: If you have trouble accessing your voice mail
system or answering machine, try changing from Short
tone to Long tone.
Turn on keypad tones
1Press Start > Settings > Sounds.
2In Keypad control, select either Short tone or
Long tone.
3Press Done.
Profiles
A profile is a group of settings that determines how
your phone notifies you of incoming calls, messages,
or approaching appointments. For example, if you are
going into a meeting, you may want all visual
notifications only.
The default profile is called Normal. The table below
compares the default Normal and Silent settings:
Select a profile
The quickest way to select a profile is to scroll to the
profile displayed at the bottom of the Home screen and
press the joystick. Scroll to a new profile and press the
joystick. Or:
1Press Start > Settings > Profiles.
2Scroll to a new profile, press Menu > Select >
Done.
Tip: You can also change your profile using the Quick
List. Press the Power button and then select the profile.
Profile Normal Silent
Auto-answer n/a n/a
Ring type ring vibrate
Ring volume 3off
Alarm type increasing vibrate
Alarm volume 3off
Notification type play sound vibrate
Notification vol. 3off
System sound vol. 3off

Voq User Guide
86 2130324
Edit a profile
1Press Start > Settings > Profiles.
2Scroll to the profile to edit.
3Press Menu > Edit.
4Modify the settings and press Done.
To revert to the default profile settings, press Menu >
Reset to default.
Home screen
Home Screen settings determine the Home screen
layout, the color scheme, the background image, and
the time delay before the Home screen appears when
your phone is idle.
Change the Home screen
1Press Start > Settings > Home Screen.
2In Home screen layout, Color scheme, and
Background image, select the options you want.
3Press Done. The image appears behind the text
on the Home screen.
Copy a background from your PC
You can copy an image from your PC to your phone.
The image must be in .gif, .jpg, or .bmp format. For
best results, use images with a 176 x 200 screen
resolution.
1Connect the phone to your desktop PC with a USB
cable or place the phone in the desktop cradle.
2On the desktop PC, start ActiveSync.
3On the main ActiveSync window, click File >
Explore, double-click My phone, double-click
IPSM, double-click Application Data, double-
click Home, and then paste the image file into
the Home folder.
4Follow the instructions under “Change the Home
screen” above, to select the new background you
just copied to your phone.
Specify the idle time before the Home screen
appears
1Press Start > Settings > Home Screen.
2In Time out, scroll to the amount of time for the
phone to be idle before the Home screen
automatically appears.
3Press Done.
About
The About screen displays information about the phone
operating system, including the version number and
copyright information.
View operating system information
Press Start > Settings >About.

Configuring Your Phone
Draft D (Jan. 20, 2004) 87
Accessibility
Accessibility settings determine:
•System font size–the size of the display font.
•Multipress time out–the length of time
between keypresses in Multipress mode.
•Confirmation time out–the time before an
unconfirmed action times out. For example, if a
dialog box appears on the Home screen and you
do not respond, the time it takes for the dialog
box to disappear on its own.
•In-call alert volume–the volume level for
sounds that play when you are on a call.
Change Accessibility settings
1Press Start > Settings > Accessibility.
2Select the options you want, then press Done.
Beam
If you want to receive infrared beams from other
devices, you must turn on the option to receive
incoming beams.
Receive incoming beams
Press Start > Settings > Beam > Receive
incoming beams. The phone receives all incoming
beams from other devices until you clear this option.
Note: Turn off this option when not in use to save
battery power.
Certificates
Public key certificates identify you when you log on to a
secure network. Certificates also help establish the
identity of other computers, such as servers, with
which you connect. This helps prevent unauthorized
users from accessing your device. You can store two
types of certificates on your phone:
•Personal certificates–Establish your identity.
•Root certificates–Establish the identity of serv-
ers to which you connect.
View and delete certificates
Press Start > Settings > More > Certificates.
·To view the list of personal certificates, press
Personal.
·To view the list of root certificates, press
Root.
·To delete a certificate, scroll to it, then press
Menu > Delete.
·To view details about a certificate, select it in
the list.

Voq User Guide
88 2130324
Data connections
Data Connections settings specify dial-up, Virtual
Private Network (VPN), and proxy connections so that
you can connect to the Internet or your company
network.
Check with your service provider to see if a data
connection has already been set up for you, and if
over-the-air configuration is supported.
Dial-up connections
You can create a dial-up connection to connect
remotely to the Internet, a Wireless Application Protocol
(WAP) network, or your company network.
When you open a program that is configured to use this
connection, your phone connects automatically. For
example, you can create a connection to the Internet
and then configure Internet Explorer to use it.
Create a dial-up connection
1Press Start > Settings > More > Data
Connections > Menu > Edit Connections >
Dial-up Connections > Menu > Add.
2Enter the requested information as follows and
then press Done:
·Description–enter a name for the
connection.
·Connects to–scroll to the network.
·Phone number–enter the phone number you
use to dial the network.
·User name–enter your network user name.
·Password–enter your password.
·Domain–enter the domain name, if required.
Note: If you are not sure about the information to
enter, ask your network administrator.
Tip: If you subscribe to General Packet Radio Services
(GPRS), you can set up a GPRS connection to access
your company network or the Internet, which is faster
than a dial-up connection. For instructions, see “GPRS
connections” on page 90.
Edit a dial-up connection
1Press Start > Settings > More > Data
Connections > Menu > Edit Connections >
Dial-up Connections.
2Scroll to the connection to edit.
3Press Menu > Edit.
4Change any information, then press Done.

Configuring Your Phone
Draft D (Jan. 20, 2004) 89
Delete a dial-up connection
1Press Start > Settings > Data Connections >
Menu > Edit Connections > Dial-up
Connections.
2Scroll to the connection to delete.
3Press Menu > Delete.
VPN connections
Note: if you are using VoqMail Pro, use the VoqMail
setup wizard to set up your VPN connection. See
“Setting up a VoqMail account” on page 54.
If your company has set up a virtual private network
(VPN), you can create a VPN connection to gain access
to your company network over an Internet connection.
Create a VPN connection
1Press Start > Settings > Data Connections >
Menu > Edit Connections > VPN
Connections > Menu > Add.
2Enter the requested information as follows, then
press Done:
·Description–enter a name for the
connection.
·VPN type–scroll to the type of VPN.
·Server–enter the VPN server name.
·Connects from–scroll to the type of network
from which you will connect to the VPN
(typically The Internet).
·Connects to–scroll to the type of network to
which you will connect (typically My company
Network).
·User name–enter your user name for the
VPN.
·Password–enter your password.
·Domain–enter the domain name, if required.
·If you selected IPSec in VPN type, select the
type of authentication, either Pre-Shared Key
or Certificate, in IPSec authentication. If you
selected Pre-Shared Key, enter the key.
Note: If you are not sure about the information to
enter, ask your network administrator.
Edit a VPN connection
1Press Start > Settings > Data Connections >
Menu > Edit Connections > VPN
Connections.
2Scroll to the connection to edit.
3Press Menu > Edit.
4Change any information and press Done.
Delete a VPN connection
1Press Start > Settings > Data Connections >
Menu > Edit Connections > VPN
Connections.
2Scroll to the connection to delete.
3Press Menu > Delete.

Voq User Guide
90 2130324
Proxy connections
Proxy connections provide access to the Internet over
an existing connection to your company network.
Create a proxy connection
1Press Start > Settings > Data Connections >
Menu > Edit Connections > Proxy
Connections > Menu > Add.
2Enter the requested information as follows, then
press Done:
·Description–Enter a name for the
connection.
·Connects from–Scroll to the type of network
from which you will connect.
·Connects to–Scroll to the type of network to
which you will connect.
·Proxy (name:port)–Enter the proxy server
name and port number in the form: server
name:port number.
·Type–Scroll to the type of proxy connection to
create.
·User name–Enter your user name for the
network to which you will connect.
·Password–Enter your password.
Note: If you are not sure about the information to
enter, ask your network administrator.
Edit a proxy connection
1Press Start > Settings > Data Connections >
Menu > Edit Connections > Proxy
Connections.
2Scroll to the connection to edit.
3Press Menu > Edit.
4Change any information and press Done.
Delete a proxy connection
1Press Start > Settings > Data Connections >
Menu > Edit Connections > Proxy
Connections.
2Scroll to the connection to delete.
3Press Menu > Delete.
GPRS connections
If you subscribe to General Packet Radio Services
(GPRS), you can set up a GPRS connection to gain
access to your company network or the Internet.
When you open a program that connects to the
Internet, the phone uses this connection.
Create a GPRS connection
1Press Start > Settings > Data Connections >
Menu > Edit Connections > GPRS
Connections > Menu > Add.

Configuring Your Phone
Draft D (Jan. 20, 2004) 91
2Enter the requested information as follows and
press Done:
·Description–enter a name for the
connection.
·Connects to–scroll to the type of network to
which you will connect.
·Access point–enter the information provided
by your system administrator.
·User name–enter the user name for the GPRS
network.
·Password, enter the password.
·Primary DNS–enter the primary domain
naming system (DNS) address, as provided by
your network administrator.
·Secondary DNS–enter the secondary DNS
address, as provided by your system
administrator.
·IP address–enter the IP address provided by
your system administrator.
Note: If you are not sure about the information to
enter, ask your network administrator.
Edit a GPRS connection
1Press Start > Settings > Data Connections >
Menu > Edit Connections > GPRS
Connections.
2Scroll to the connection you want to edit, then
press Menu > Edit.
3Change any information and press Done.
Delete a GPRS connection
Press Start > Settings > Data Connections >
Menu > Edit Connections > GPRS Connections >
Menu > Delete.
Adding a URL exception
Some URLs for Web pages on your company intranet
may use periods, for example:
intranet.companyname.com. To view these pages in
Internet Explorer, you must create an URL exception,
otherwise, the pages do not display.
Note: You do not need to create URL exceptions for
Internet URLs.
Add a URL exception
1Press Start > Settings > Data Connections >
Menu > Work URL Exceptions > Menu >
Add.
2In URL Pattern, enter the URL. Separate
multiple URLs with a semicolon (;).
3Press Done.
Edit a URL exception
1Press Start > Settings > Data Connections >
Menu > Work URL Exceptions.
2Select the URL to edit.
3Edit the URL, then press Done.

Voq User Guide
92 2130324
Delete a URL exception
1Press Start > Settings > Data Connections >
Menu > Work URL Exceptions.
2Scroll to the URL to delete.
3Press Menu > Delete.
Date and time
Use Date and Time settings to change the local time
zone, the current date and time, and to set the alarm.
Set the date and time
1Press Start > Settings > Date and Time.
·Time Zone–scroll to your time zone.
·Date–scroll to the month, day, or year and
edit the information.
·Time–scroll to a number and edit it.
2Press Done.
Set the alarm
1Press Start > Settings > Date and Time.
·Alarm–scroll to Off or On.
·Alarm time–set the time for the alarm to go
off.
2Press Done.
Owner information
Owner Information settings allow you to record
personal information such as your name, phone
number, and e-mail address. If, for example, you lose
your phone, the person finding it can contact you.
Configure owner information
1Press Start > Settings > Owner Information.
2Enter your information, then press Done.
Power management
Power Management settings provide ways to conserve
battery power, such as a timeout for the display and
backlight when the phone is idle.
Configure power management settings
1Press Start > Settings > More > Power
Management.
·Main battery–displays the amount of battery
life remaining.
·Backlight time out–select the amount of
time the phone is idle before the backlight
turns off.
·Display time out–select the amount of time
the phone is idle before the display turns off.
2Press Done.

Configuring Your Phone
Draft D (Jan. 20, 2004) 93
Regional settings
Regional settings change the language, date, and time
style, as well as number and currency formatting
options.
Configure Regional Settings
1Press Start > Settings > Regional Settings.
·Language–scroll to the language to use when
entering information.
·Locale–scroll to your locale. This changes the
remaining settings appropriately.
2Configure other settings in the same manner.
3Press Done.
Note: After changing the language, you must turn the
phone off and on again for the change to take effect.
Voq software updates
The Voq phone contains code and configuration which
over time may require replacement to add or enhance
features, or to fix bugs.
To ensure that you are running the latest software or
firmware, your phone periodically contacts the Voq
Update Server and notifies you if any updates are
available. If one is available, your phone displays a
screen that asks you to confirm the download and
installation of the update file. Press Install to update
your phone. If you cancel the VoqUpdate screen, the
phone displays it again on a periodic basis. You should
install all updates at your earliest convenience to
ensure the smooth operation of your phone.
In the event of a major upgrade, you may need to use
your PC to download the software or firmware and
install it on your phone using ActiveSync. The phone
will notify you of any action you need to take.
Change VoqUpdate settings
You can choose how often your phone checks for
updates.
1Press Start > More > VoqUpdate > Menu >
Settings.
2Choose Daily or Weekly.
Manually check for updates
You can manually check for updates at any time.
1Press Start > More > VoqUpdate > Scan.
2The phone checks for updates and notifies you if
updates are available.
3If updates are available, press Install.

Voq User Guide
94 2130324


Voq User Guide
96 2130324
Your Voq phone provides several levels of security to
avoid accidental or unintended use of your phone:
•Keypad lock: locks the keys to prevent
accidental dialing.
•Phone lock: locks the phone after a period of
inactivity to prevent unauthorized use of your
phone.
•SIM lock: locks your SIM card to prevent unau-
thorized use of your SIM. When enabled, you
must enter a password when you turn on your
phone or if you use the SIM card in another
phone.
•PIN2: locks specific features of the phone such
as call barring. You are prompted for this number
only when you try to change settings, not when
you start your phone.
Keypad lock
To lock the keypad, on the Home screen, press and
hold the . The left soft key command displays
Unlock.
To unlock the keypad on the Home screen, press
Unlock, then press the # key.
Keypad lock nevers requires a password.
Phone lock
Phone lock is a security feature that automatically
locks the keypad after a specified period of inactivity.
You need a password to unlock the phone. You can still
receive calls and make emergency calls when the
phone is locked.
Enable the phone lock
1Press Start > Settings > More > Security >
Enable Phone Lock.
2Fill in the fields:
·Lock phone after–scroll to the amount of
time for the phone to be inactive before
automatically locking.
·Password–enter the password to unlock the
phone. If you do not want to use a password,
leave this field blank.
·Confirm password–if you entered a
password, enter it again.
3Press Done.
Disable the phone lock
1Press Start > Settings > More > Security >
Disable Phone Lock.
2Enter the password.
3Press Done.

Securing Your Phone
Draft D (Jan. 20, 2004) 97
Lock your phone with Quick List
Once you select the time delay and create a password,
you can quickly enable phone lock from the Quick List,
without configuring your settings again.
1Press and hold the Power button to display the
Quick List.
2Select Device lock.
3Press Done.
SIM lock
The Subscriber Identity Module (SIM) card stores all
your account information. You can lock your SIM card
so that a PIN is required each time someone turns on
the phone.
Important: Be sure to make a note of your PIN. With
the SIM lock enabled, you will not be able to use your
phone without it, except for emergency calls.
Lock the SIM card
1Press Start > Settings > More > Security >
Enable SIM Lock.
2Enter your PIN.
3Press Done.
Unlock the SIM card
1Press Start > Settings > More > Security >
Disable SIM Lock.
2Enter your PIN.
3Press Done.
PIN2
A second PIN number controls specific features of your
SIM card such as call barring. You are prompted for
this number only when you try to change settings, not
when you start your phone.
Change PIN2
1Press Start > Settings > More > Security >
Change PIN2.
2Fill in the fields:
·Old PIN–enter the current PIN.
·New PIN–enter the new PIN.
·Confirm new PIN–enter the new PIN again.
3Press Done.

Voq User Guide
98 2130324


Voq User Guide
100 2130324
Browsing the Internet
You can browse the Web on your phone using Pocket
Internet Explorer. The Favorites list, rather than a home
page, is the main screen, so you can easily go to your
favorite Web sites.
Note: Pocket Internet Explorer does not support frames
on a web page.
Setting up Internet access
When you install the SIM card you received from your
service provider, you should be able to access the
Internet without any extra configuration, provided you
subscribe to a GPRS data service.
For information on manually configuring your Internet
connections, see “Data connections” on page 88.
Open Internet Explorer
Press Start > Internet Explorer.
Disconnect from the Internet
If you are viewing a Web page, press End to
disconnect from the Internet.
Search the Internet
1Flip open the thumbpad.
2Enter the word or words you wish to search.
3Select Google. This launches google with your
text as the search string.
View a favorite using myVoq
1Open the thumbpad
2Start typing the name of the favorite. For
example, MSN.
3Highlight the Link, then press Go.
View a favorite
1Press Start > Internet Explorer.
2Scroll to a favorite and press Go.
3To view your Favorites list from a web page,
press Favorites.
Go to a link
1Open a web page.
2Scroll vertically or horizontally to see all available
links.
3Select the link, then press the joystick.
Go to a Web page
1Press Start > Internet Explorer > Menu >
Address Bar.
2Enter the Web address, then press Go.

Browsing the Internet
Draft D (Jan. 20, 2004) 101
Return to previous Web pages
On a Web page, press the Back button repeatedly until
the page appears. Only pages viewed during the cur-
rent session are available.
View a list of recently-visited Web pages
1Press Start > Internet Explorer > Menu >
Address Bar > View History.
2Scroll to the Web page address, then press Go.
Note: While you are connected to the Internet, you can
change between Pocket Internet Explorer and other
programs on your phone by pressing the Home button
and navigating to the program you want. This does not
close your Internet connection. To return to the Web
page you were viewing, press the Back button.
Using the Favorites list
You can save a Web page you may want to visit again
as a favorite.
Add a Web page to the Favorites list
1Press Start > Internet Explorer > Menu >
Add Favorite.
2Fill in the fields, then press Add.
Edit a favorite
1Press Start > Internet Explorer > Favorites.
2Scroll to the favorite to edit.
3Press Menu > Edit.
4Make your changes, then press Done.
Delete a favorite
1Press Start > Internet Explorer > Favorites.
2Scroll to the favorite to delete.
3Press Menu > Delete > Yes.
Create a new folder in Favorites
1Press Start > Internet Explorer > Menu >
Add Folder.
2Under Name, type a name for the folder, then
press Add.
Refreshing Web pages
Your phone stores the Web pages that you visit. If you
go to a page that is stored on your phone, you see the
stored version unless you refresh the page.
When the web page cache is full, the phone replaces
the oldest pages with new pages.
Refresh a Web page
1Press Start > Internet Explorer.
2Display the Web page.
3Press Menu > Refresh.

Voq User Guide
102 2130324
Customizing Internet Explorer
You can customize Web browsing options, change the
network to connect to, and make more memory avail-
able on your phone by clearing stored cookies and Web
pages.
Change Web page display options
1Press Start > Internet Explorer > Menu >
Options > General.
2Select the options you want, as described in the
following table, then press Done.
·Show pictures–Display graphics on Web
pages
·Play sounds–Play sounds on Web pages
·Fit to screen–Fit Web pages to the phone
display screen
·Warn when changing to an insecure
page–Display a warning when moving from a
secure to a non-secure Web page
·Allow cookies–Allow Web sites to download
cookies to your phone
·Language–Select the character set to use.
Change connection options
1Press Start > Internet Explorer > Menu >
Options > Connections.
2Select Automatically detect settings, or select
the network to which Internet Explorer should
connect.
3Press Done.
Note: To configure network settings, see “Data con-
nections” on page 88.
Clear memory
1Press Start > Internet Explorer > Menu >
Options > Memory.
2Select the type of memory to clear.
·Temporary files–Deletes personal
information about you that is stored for use by
various Web sites.
·Cookies–Deletes any cookies stored on your
phone.
·History–Deletes the record of web sites you
have visited.
3Press Clear > Yes > Done > Done.

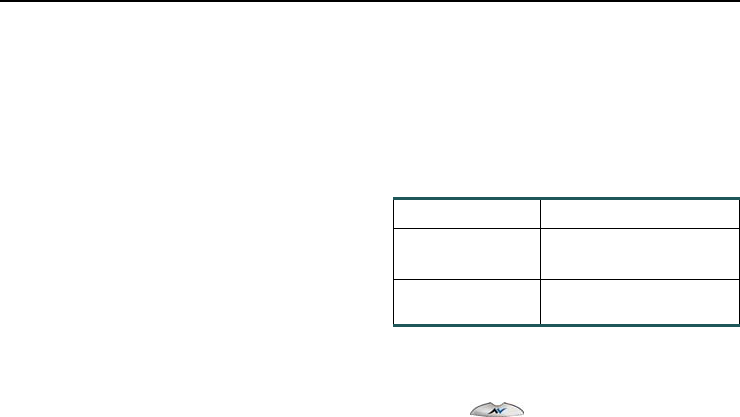
Voq User Guide
104 2130324
The Voq phone can play music, including .mp3 audio
files, games, and Java applications written for mobile
devices.
Your phone also supports VoqTag files, which are
special index applications that let you search and
retrieve customized information such as contact
information and stock quotes. The possibilities for
VoqTag files are limitless. For information on creating
your own VoqTag file, see the
VoqTag Development
Guide
, available from the Voq website (www.voq.com).
Playing audio and video files
You can play a variety of audio and video files with your
phone.You can also copy digital music and videos from
your desktop PC to your phone. For information about:
•Copying files with Windows Media Player, see the
Media Player Help on your desktop PC.
•Copying files with ActiveSync, see the ActiveSync
Help on your desktop PC.
Supported audio and video codecs
Media Player can play files that have been compressed
using the following codecs.
Audio codecs:
•Microsoft Windows Media Audio codec version
2.0, 7.0, and 8.0
•Fraunhofer IIS-A MPEG-1 Audio Layer-3 codec
Video codecs:
•Microsoft Windows Media Video codec version
7.0 and 8.0
•Microsoft MPEG-4 video codec version 3.0
•ISO MPEG-4 video codec version 1.0
Supported file formats
Select and play a file with myVoq
You can quickly find a song using myVoq.
1Press or open the thumbpad.
2Type the name of the song.
3Select the song.
Select and play a file
1Press Start > More > Windows Media > Play.
2Scroll to the file to play, then press Play.
Start and pause a file
Press the joystick in, to start or pause a file.
Format File name extensions
Windows Media .asf, .asx, .wax, .wm, .wma,
.wmv, .wmx, .wvx
Moving Picture
Experts Group
.mp3

Playing Music, Games, and More
Draft D (Jan. 20, 2004) 105
Configure playback settings
1Press Start > More > Windows Media >
Menu > Settings.
2Fill in the fields:
·In Volume, enter a default volume: 0 is silent
and 10 is maximum.
·To repeat files as soon as they finish playing,
check Repeat.
·To randomly shuffle the files that play, check
Shuffle.
·To play files while using another program,
check Background play.
3Press Done.
Skip back to the beginning of the current file
Move the joystick to the left.
Skip to the beginning of the previous file
Move the joystick to the left twice.
Skip to the next file in the list
Move the joystick to the right.
Play a streaming media file on a network
1Press Start > More > Windows Media >
Menu > Open URL.
2Enter the Web page address, then press Play.
Play files randomly
Press Start > More > Windows Media > Menu >
Settings > Shuffle > Done.
Stop playback when using another program
Press Start> More > Windows Media > Menu >
Settings > Background play > Done.
Using menu commands
When you are choosing or playing a file, you can use
the menu commands to start and stop playback, skip
to the next or previous file, display information about a
file, change volume and playback settings, or add files
to your Favorites.
Using Media Player Favorites
You can play your favorite streaming media file on the
Internet and add it to Favorites.
Tip: For optimal performance, store you songs on an
SD card.
Play a streaming media file
1Press Start > More > Windows Media >
Menu > Open URL.
2Enter the Web page address.
3Press Play.

Voq User Guide
106 2130324
Add a streaming media file to Favorites
1Press Start > More > Windows Media >
Menu > Open URL.
2Enter the Web page address.
3Press Play > Menu > Add to Favorites.
Play a favorite
1Press Start > More > Windows Media >
Playlist > Menu > Favorites.
2Select a file and press Play.
Delete a favorite
1Press Start > More > Windows Media >
Playlist > Menu > Favorites.
2Scroll to the file to delete, then press Menu >
Delete.
Java MIDlet Manager
Your Voq phone is Java enabled. This means you can
download and run Java applications that have been
written for mobile devices.
The Java MIDlet Manager allows you to install or delete
Java applications on your phone. You also use the
MIDlet manager to play your Java applications.
Installing Java MIDlets
You can install MIDlets several different ways:
•From an SD memory card
•From the Internet directly to your phone
•From your PC using a USB cable or cradle
Install MIDlets from an SD card
To install from an SD memory card:
1Insert the SD card into your phone.
2Press Menu > Install. The Install screen
displays a list of available MIDlets.
3Select a MIDlet and press the joystick. Press Yes
to confirm your choice.
Install MIDlets from the Internet
To install from the Internet:
1Start Internet Explorer and locate a MIDlet you
wish to download (this is normally a .jad or a .jar
file).
2Click the link to download the file. You will be
asked to confirm that you wish to download the
files.
3Once your download is complete, the MIDlet
Manager prompts you to install the new MIDlet.

Playing Music, Games, and More
Draft D (Jan. 20, 2004) 107
Install MIDlets from a PC
To install from a PC:
1Cradle your phone or connect it to your desktop
PC using a sync cable.
2Start ActiveSync and copy your MIDlet file(s) from
your PC to either of the following locations:
·Mobile Device\My Smartphone\Storage\
·Mobile Device\My Smartphone\ Storage\
Program Files\tao\intent\midlets\
Note: If the \midlets folder does not exist, cre-
ate it first.
3Press Start > More > Accessories > MIDlet
Manager. The phone displays a list of available
MIDlets.
4Select a MIDlet, then press Menu > Install.
5Press Yes to confirm your choice.
Uninstall MIDlets from the phone
To remove MIDlet files from the phone:
1Press Start > More > Accessories > MIDlet
Manager. The phone displays a list of MIDlets.
2Select a MIDlet, then press Menu > Manage >
Delete.
3Press Yes to confirm the delete.
Play Java MIDlets
To change display settings:
1Press Start > More > Accessories > MIDlet
Manager. The phone displays a list of MIDlets.
2Select a MIDlet, then press the joystick.
Change MIDlet display settings
To change display settings:
1Press Start > More > Accessories > MIDlet
Manager. The phone displays a list of MIDlets.
2Select a MIDlet, then press Menu > Settings >
Display options.
Upgrade, delete or change security
You can upgrade and delete MIDlets, as well as change
security.
1Press Start > More > Accessories > MIDlet
Manager. The phone displays a list of MIDlets.
2Select a MIDlet, then press Menu > Manage.
VoqTag indexes
VoqTag indexes are customized lists of items that you
can search. The principle behind a VoqTag index is that
item names are stored on the phone while the
information relating to the items is stored outside the
phone. For example, you could have a VoqTag file with

Voq User Guide
108 2130324
a list of stocks. When you click a stock, the phone
displays a web page with a current stock quote.
In general, you download VogTag indexes from a
webserver to your phone. Once the file is installed, you
can seamlessly search and display items using myVoq.
To download a VoqTag file to your phone:
1Start Internet Explorer.
2Go to the web site that contains the VogTag file.
Navigate to the link to the file.
3Click the link to download the file. The phone
automatically installs the file.
For more information on VoqTag indexes, visit the
Support section of the Voq website at www.voq.com.
Playing Solitaire
The object of Solitaire is to use all the cards in the deck
to build up the four suit stacks in ascending order,
beginning with the aces. You win the game when all
cards are on the suit stacks.
Start a game of Solitaire
1Press Start > More > More > Games >
Solitaire.
2To start a new game after finishing a game, press
Menu > New Game.
Move cards
Each card stack has a number or character above it.
1On the keypad, press the number or character of
the card to move.
2Press the number or character of the stack to
which you want to move the card.
Play Solitaire
Move any aces on the seven stacks to the four card
spaces at the top of the screen, and then make any
other available plays.
When you have made all available plays, press Draw
to turn over cards. The card that is face up on the deck
is always available for play.
Playing Mount Voq
The object of Mount Voq is to reach the top of the
mountain, and to improve your thumb typing speed.
You climb the mountain by typing the letters that float
by on your display. If you type a letter before it reaches
the other side of the display, the letter disappears and
you advance up the mountain. If you fail to type the
letter before it reaches the other side, you lose points
and retreat down the mountain.
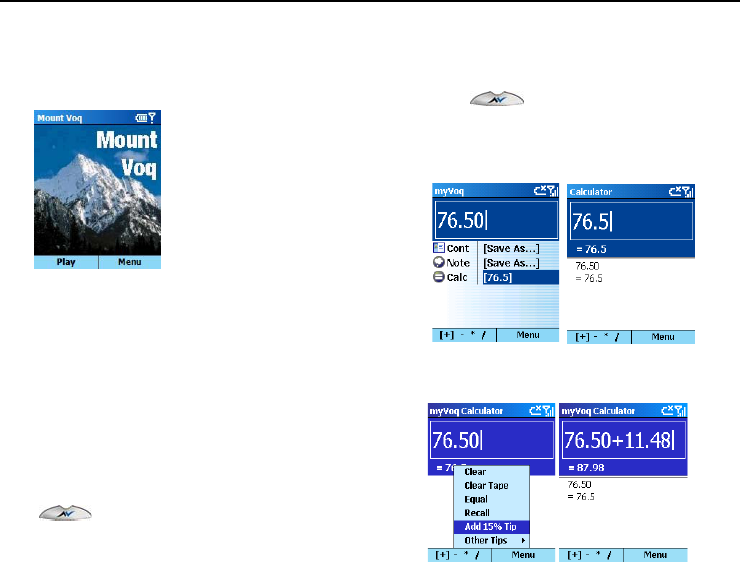
Playing Music, Games, and More
Draft D (Jan. 20, 2004) 109
To start playing Mount Voq:
1Press Start > More > Games > Mount Voq >
Play.
2Start typing the letters you see on the screen.
3To start a new game after finishing a game, press
Menu > New Game.
Using the calculator
Your phone contains two calculators:
•A basic calculator that you start by pressing
Start > More > Accessories > Calculator.
•The myVoq calculator that you start by pressing
> Calculator.
The myVoq calculator displays a running tape of your
operations. Use it to calculate a bill. For example,
imagine you are sitting in a restaurant with four friends
when the bill arrives. If you are splitting the cost of the
meal equally, how much does each person pay?
To calculate each person’s share of the bill:
1Press > Using the keypad, type in
76.50 as the amount. To enter a decimal point,
press the * key.
2Press the joystick to open the myVoq calculator.
3To calculate the tip, press Menu, then scroll to
Add 15% Tip.
4Press the joystick to choose the tip and complete
the calculation.
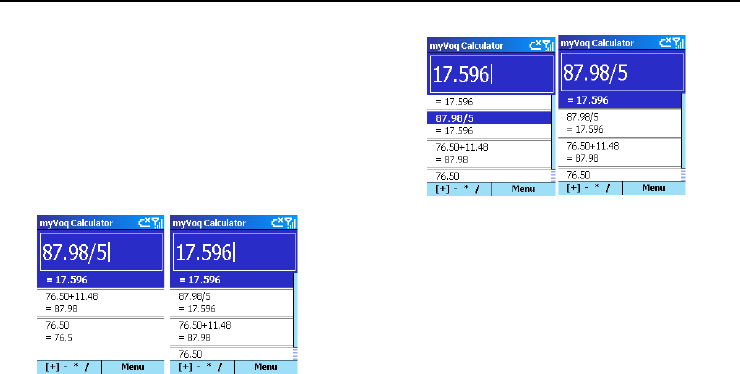
Voq User Guide
110 2130324
5Press the joystick again to start another
calculation.
6Divide the total by the number of diners, press
[+]-*/ until you display the division symbol.
·On the keypad, you can also press # to scroll
through the mathematical symbols.
·On the thumbpad, press Function, then “F”.
7Press 5 for the number of people sharing the bill,
then press the joystick. Each person pays 17.60.
8Now, you decide to spit the bill by 4 instead of 5.
To do this, scroll to your last calculation and
press the joystick. The calculator displays the
calculation.
9Press Backspace to remove the 5, press 4, then
press the joystick. The new total is 21.995 per
paying person or 22.00 rounded off.
10 To clear the information on the screen, press
Menu > Clear or Menu > Clear Tape.
Recording voice notes and
memos
You can use your Voq phone to record short voice notes
and conversations. The phone stores your recordings
under Start > Voice Notes, and names such as
Recording 1, Recording 2.
Create a voice note
1Hold the phone as you would for a voice call.
2Press the Record button, located on the right
side of your phone, twice to begin recording.
3To stop recording, press Stop.

Playing Music, Games, and More
Draft D (Jan. 20, 2004) 111
To listen to your recording, select it from the All Notes
list, press Menu > Play.
Rename a recording
1Press the Record button on the right side of your
phone.
2Select the recording to rename.
3Press Menu > Rename.
4In Name, type a new name.
5Press Done.
Delete a recording
1Press the Record button on the right side of your
phone.
2Select the recording to delete.
3Press Menu > Delete > Yes.
Using your phone as a modem
Using Modem Link, you can use your phone as an
external modem for another device or computer by
using a serial port, infrared, or USB connection.
Set up an infrared or USB modem
connection
Ensure that your phone is not connected to another
device.
1Press Start > More > Accessories > Modem
Link.
2In Connection, select USB or IrCOMM.
3Press Menu > Activate.
Set up a serial port modem
connection
Ensure that the phone is not connected to another
device.
1Press Start > More > Accessories > Modem
Link.
2In Connection, select Serial (COM1).
3press Menu > Activate.
Note: The default baud rate is set for 19,200. Do not
change this default unless the port speed of the phone
or computer requires you to do so.
Activate the modem link
Press Start > More > Accessories > Modem Link
> Menu > Activate.
Deactivate the modem link
Press Start > More > Accessories > Modem Link
> Menu > Deactivate.

Voq User Guide
112 2130324
Important. Failing to deactivate the modem link when
you are finished using it might result in problems with
using ActiveSync in the same session.
Adding programs
You can expand the capabilities of your phone by
adding new programs to it. You can add programs
using:
•ActiveSync
•The Internet
•An SD card
All programs must be compatible with your phone.
Consult the program documentation for details.
Add programs with ActiveSync
To add a program to your phone from your desktop PC:
1From your desktop, click Start > Programs >
Microsoft ActiveSync.
2From the ActiveSync window, click Tools >
Add/Remove Programs.
3Follow the instructions on the screen. For more
information, refer to the ActiveSync online help.
Note: You can also copy files from your PC to your
phone. From the main ActiveSync window, click File >
Explore. For more information, see the ActiveSync
online help.
Download a program from the Internet
You can download programs from the Internet using
Internet Explorer.
1Press Start > Internet Explorer.
2Display the desired web page.
3Select the link to download, then press the
joystick.The phone will download the program to
your Start > More > Accessories folder in a
compressed format.
4Navigate to the file, then click it to unpack it.
5Click the new program to run it.
Install a program from an SD card
1Insert the card into your phone.
2Press Install.
Removing programs
You can remove programs installed on the phone, with
the exception of key applications such as Contacts,
Calendar, and Internet Explorer.
To remove a program:
1Press Start > Settings > More > Remove
Programs.
2Scroll to the program to remove.
3Press Menu > Remove.

Playing Music, Games, and More
Draft D (Jan. 20, 2004) 113
Remove Programs
You can remove programs that you have installed on
the phone but you cannot remove programs that come
with the phone.
1Press Start > Settings > More > Remove
Programs.
2Scroll to the program to remove.
3Press Menu > Remove.

Voq User Guide
114 2130324

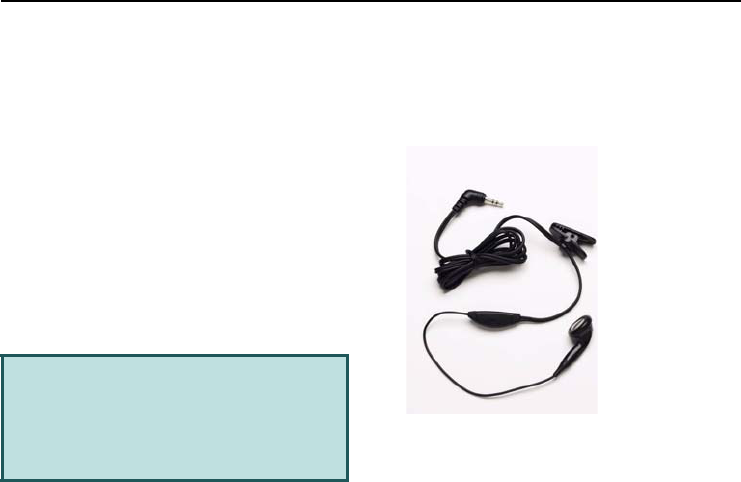
Voq User Guide
116 2130324
Accessories
Your Voq phone comes packed with software and
accessories but you can enhance your experience by
choosing from a wide range of additional items.
Voq accessories include:
•Mono headset
•Stereo headset
•Sync cable
•AC adapter
•Desktop cradle (includes sync cable and AC
adapter)
•Premium carrying case
•Cigarette lighter adapter
•Car kit
Mono headset
The small, comfortable mono headset plugs directly
into the phone and attaches to your ear for safety and
convenience. The headset frees up your hands so you
can do the things you want while staying connected.
For maximum sound quality, be sure to push the mono
headset connector all the way into the phone so that no
rings on the connector are showing.
Warning! Voq accessories are designed and
tested to work with the Voq phone. Non-Voq
accessories including third-party earbuds,
headsets, and adapters may not work properly. Use
of non-Voq accessories may void the Voq warranty.
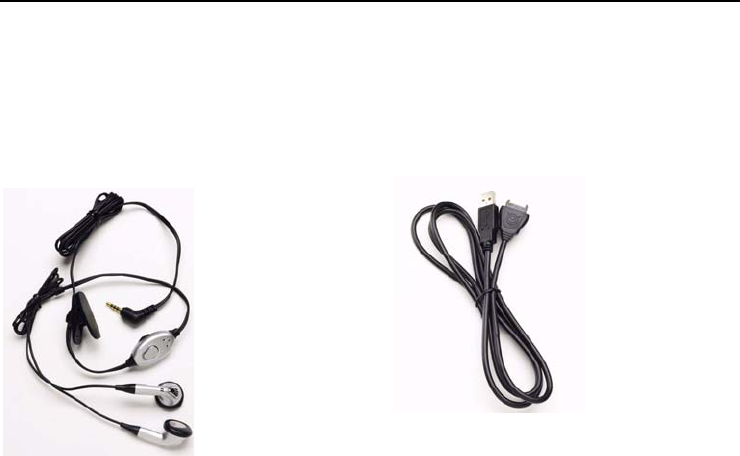
VoqTM Accessories
Draft D (Jan. 20, 2004) 117
Stereo headset
The stereo headset provides superior sound quality and
hands-free operation. It includes a call “answer/end”
button that lets you answer the phone without pulling it
out of your pocket. The volume control on the stereo
headset is independent of the volume control on the
phone.
Warning! Some jurisdictions do not allow you to
operate a motor vehicle while wearing a headset.
Please check your local regulations.
Sync cable
The sync cable provides ultra fast USB connectivity
between your PC and your phone. Use the sync cable
to keep your Inboxes, Contacts, Calendar, and Tasks
up to date using ActiveSync. You can also use the sync
cable to backup data and download programs to your
phone.
To attach the sync cable to the phone:
1Hold the phone connector with the Voq label
facing up.
2Line up the cable connector with the connector at
the bottom of the phone. Push the connector into
the phone until it seats firmly.
Note: Always pull the sync cable straight out the
phone. Applying pressure sideways can result in
broken pins.
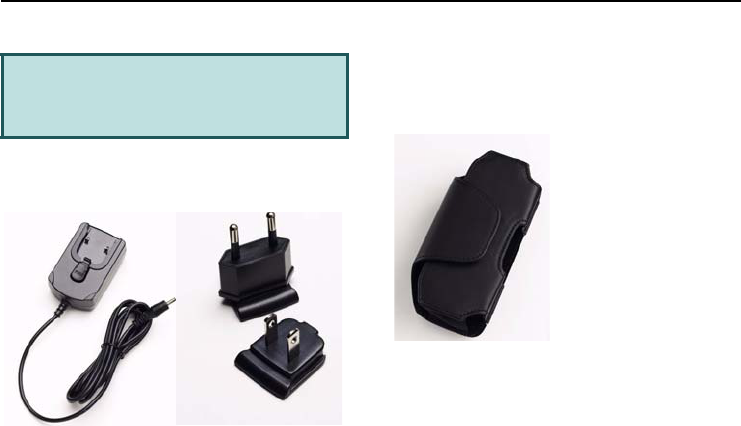
Voq User Guide
118 2130324
AC adapter
Designed to travel, Voq AC adapters are lightweight,
compact, and come with a variety of pin
configurations.
Check the adapter label for voltage compliance with
your area.
Premium carrying case
Protect your Voq phone in style. This elegant carrying
case cushions your Voq phone and fits easily into a
pocket or a handbag. You can also clip it to a belt for
easy access.
Warning! Use of any AC adapter other than the
one supplied with the Voq phone or a Voq
accessory kit, voids the Voq warranty.

VoqTM Accessories
Draft D (Jan. 20, 2004) 119
Vehicle adapter
Charge while you’re on the road. Plug this adapter into
the cigarette lighter of your vehicle. The adapter lets
you operate your phone and charge the phone’s battery
at the same time.
Desktop cradle
Keep your Voq phone fully charged and synchronized
without attaching and detaching cables. The cradle
provides convenient, time-saving, desktop access.
For more information about the desktop cradle, see
“Using the desktop cradle” on page 121.
Accessory Kits
Voq offers several kits that combine a number of
accessories in a single package.
Premium Accessory Kit
The premium accessory kit is a complete set of Voq
accessories. This is the most cost-effective way of
getting everything you want for your phone. This kit
contains:
•Cradle
•Sync cable
•AC adapter
•Stereo headset
•Premium carry case
•Cigarette lighter adapter
When you plug the
adapter into the cigarette
lighter, the green power
LED indicates that you
have power.
The adapter contains a
fuse to protect the phone.
To check the fuse,
unscrew the silver cap.

Voq User Guide
120 2130324
Car kit (installed)
The car kit is permanently installed in your car and
provides you with hands free use of the phone while
charging your battery.
For more information and instructions on installing the
car kit, see the
Voq Car Kit Quick Start Guide
.
TTY Devices
The Voq phone includes support for TTY devices. A TTY
device (also known as a TDD or Text Telephone),
enables people who are hearing- or speech-impaired
to communicate by typing messages back and forth
over a phone. Unlike SMS or e-mail, the text message
is carried over the phone’s voice channel, not a data
channel. A TTY device is required at both ends of the
conversation.
Please check with the manufacturer of your TTY device
for connectivity information and to ensure that the TTY
device supports digital wireless transmission.
You must enable TTY mode on the Voq phone each
time you turn on your phone. To enable TTY:
1Press Start > More > Accessories > TTY.
2Switch to TTY mode by selecting Audio path is
in TTY/CTM mode.
3To run your TTY device, plug the device into the
headset jack located on the top left side of the
phone.
For more information, please refer to the
documentation that comes with your TTY device.
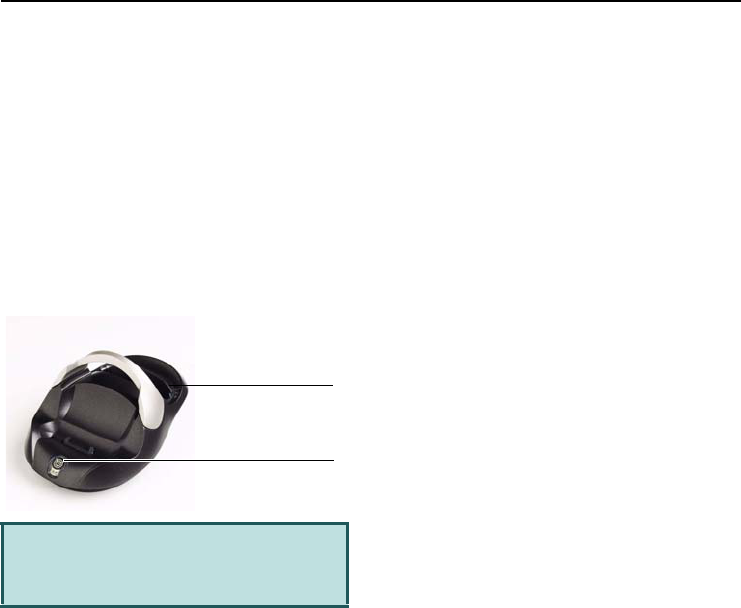
VoqTM Accessories
Draft D (Jan. 20, 2004) 121
Using the desktop cradle
The optional desktop cradle allows you to synchronize
and charge your phone without connecting or
disconnecting any wires. With the phone in the cradle,
you can still make calls using a headset or the
speakerphone. However, you cannot use the
thumbpad.
The cradle contains a convenient second slot to charge
a spare battery in addition to the phone.
Recharge times:
•Phone - 2 hours
•Spare battery in slot - 5 hours
To set up the cradle for the first time:
1Remove the cradle components from the
packaging.
2Attach the cradle to the PC by inserting the USB
connector into a USB port on the PC.
3Attach the AC adapter.
aInsert the lead from the AC adapter into the
back of the cradle.
bInsert the plug from the AC adapter into an
electrical wall outlet. If necessary, use a plug
adapter for your region.
Setting up the cradle is a one-time operation. Your Voq
phone comes with an extra sync cable and an AC
adapter.
Charge and sync the phone
Note: If you are charging a battery for the first time,
the initial charge must last a minimum of 12 hours.
To charge your phone, lower it into the cradle until the
phone seats firmly into the cradle pocket. You should
feel a slight click as the connectors meet. A light on the
front of the cradle indicates a good connection.
To remove the phone from the cradle, lift the phone up
and out. Never pull the phone directly towards you to
remove it from the cradle.
When you insert the phone into the cradle, charging
begins immediately. If the battery is totally discharged
Warning! Use of any AC adapter other than the
one supplied with the Voq phone or a Voq
accessory kit, voids the Voq warranty.
Rear slot for spare
battery.
Power indicator.

Voq User Guide
122 2130324
when you plug in the AC adapter, it will take a few
moments for the phone to start up. This is normal and
ensures that the phone has sufficient power for reliable
operation.
If you have a working e-mail account and have
configured ActiveSync on your desktop PC,
synchronization also starts. For information on setting
up ActiveSync, see “Synchronizing your Voq phone” on
page 74.
Charging indicators
Phone
When you insert the phone into the cradle, an LED on
the front of the cradle turns on to indicate that the
connection is successful. The phone displays all
charging indications for the Phone on the status bar at
the top of the Home screen. indicates the battery is
charging.
To check the battery level, remove the phone from the
cradle. Check the icons at the top of the Home screen:
• indicates a fully charged battery
• indicates a partially charged battery
• indicates a low or discharged battery
Spare battery
The Voq battery pack incorporates new smart chip
technology that tracks the number of times you charge
your battery and modifies the batteries output
accordingly.
When you insert a secondary battery into the cradle:
•a red LED on the cradle indicates that the cradle
is charging
•a green LED indicates the battery is fully charged
•a red flashing LED indicates a fault condition.
Remove the battery and re-insert it
Tip: If you have two batteries, alternate your charging
method from time to time between the phone and the
secondary battery slot in the charger. This can prolong
your battery life.

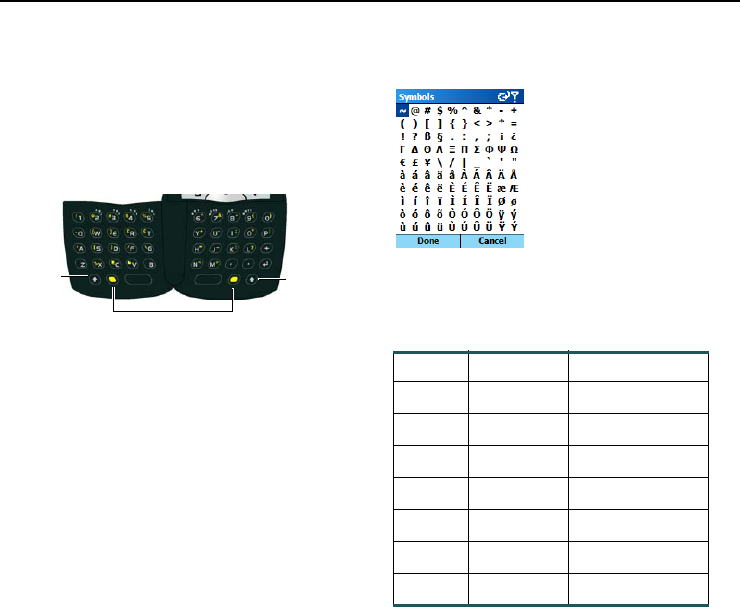
Voq User Guide
124 2130324
QWERTY thumbpad key strokes
Each key on the thumbpad can type more than one
letter or character by using the Shift or Function key.
Shift keys
The two Shift keys are located on the outside of the
bottom row of keys beside the function keys
•To type an uppercase letter, press the Shift key,
then the desired letter key.
•To use Caps lock, press the Shift key twice.
Function keys
The two function keys are located on the bottom row of
keys beside the Space key.
Symbol table
To display a symbol table when you are in a text field,
press either function key twice.
To insert a character from the symbol table, press the
function key twice. Scroll to the character in the table,
then press the joystick.
Symbol keys
To type the symbol printed on a key, press the function
key, then the desired letter key.
Shift key
Function keys
Shift key
Key Shift+ Key Function + Key
1! !
2@ @
3# #
4$ $
5% %
6^ ^
7& &

Keystrokes
Draft D (Jan. 20, 2004) 125
Key Shift+ Key Function + Key
8* *
9( (
0) )
Up Select text Up
Down Select text Down
Left Select text Left
Right Select text Right
QQ ~
WW {
EE }
RR £
TT
YY +
UU -
II ;
OO "
PP |
Key Shift+ Key Function + Key
AA '
SS [
DD ]
FF /
GG \
HH =
JJ _
KK :
LL ?
ZZ Z
X X Cut text to clipboard
C C Copy text to
clipboard
V V Paste text from
clipboard
BB B
NN <
MM >

Voq User Guide
126 2130324
Using cut, copy, and paste
You can cut, copy, and paste text from one place to
another or from one application to another.
To cut, copy, and paste text:
1Position the cursor beside the text that you want
to cut or copy.
2Press and hold the Shift key, then move the
joystick left or right to highlight the text you want
to cut or copy.
3Press the function key, then the Cut (x) or the
Copy (c) key.
4Place the cursor where you want to paste the
text.
5Press the function key, then the Paste (v) key.

C
Regulatory, Safety,
and Warranty
Information

Voq User Guide
128 2130324
Important Notice
Due to the nature of wireless communications,
transmission and reception of data can never be
guaranteed. Data may be delayed, corrupted (i.e., have
errors) or be totally lost. Although significant delays or
losses of data are rare when wireless devices such as
the Voq Professional phone are used in a normal
manner with a well-constructed network, the Voq
Professional phone should not be used in situations
where failure to transmit or receive data could result in
damage of any kind to the user or any other party,
including but not limited to personal injury, death, or
loss of property. Sierra Wireless, Inc., accepts no
responsibility for damages of any kind resulting from
delays or errors in data transmitted or received using
the Voq Professional phone, or for failure of the Voq
Professional phone to transmit or receive such data.
Safety and Hazards
Do not operate the Voq Professional phone:
•in areas where blasting is in progress
•where explosive atmospheres may be present,
•near medical equipment,
•near life support equipment, or any equipment
which may be susceptible to any form of radio
interference. In such areas, the Voq Professional
phone MUST BE POWERED OFF. The Voq
Professional phone can transmit signals that
could interfere with this equipment.
Do not operate the Voq Professional phone in any
aircraft, whether the aircraft is on the ground or in
flight. In aircraft, the Voq Professional phone MUST
BE POWERED OFF. When operating, the Voq
Professional phone can transmit signals that could
interfere with various onboard systems.
Some airlines may permit the use of cellular phones
while the aircraft is on the ground and the door is open.
Voq Professional phones may be used at this time.
The driver or operator of any vehicle should not operate
the Voq Professional phone while in control of a
vehicle. Doing so will detract from the driver or
operator's control and operation of that vehicle. In
some states and provinces, operating such
communications devices while in control of a vehicle is
an offence.
Limitation of Liability
The information in this manual is subject to change
without notice and does not represent a commitment
on the part of Sierra Wireless, Inc. SIERRA WIRELESS,
INC. AND ITS AFFILIATES SPECIFICALLY DISCLAIM
LIABILITY FOR ANY AND ALL DIRECT, INDIRECT,
SPECIAL, GENERAL, INCIDENTAL, CONSEQUENTIAL,
PUNITIVE OR EXEMPLARY DAMAGES INCLUDING, BUT
NOT LIMITED TO, LOSS OF PROFITS OR REVENUE OR

Regulatory, Safety, and Warranty Information
Draft D (Jan. 20, 2004) 129
ANTICIPATED PROFITS OR REVENUE ARISING OUT OF
THE USE OR INABILITY TO USE ANY SIERRA
WIRELESS, INC. PRODUCT, EVEN IF SIERRA
WIRELESS, INC. AND/OR ITS AFFILIATES HAS BEEN
ADVISED OF THE POSSIBILITY OF SUCH DAMAGES OR
THEY ARE FORESEEABLE OR FOR CLAIMS BY ANY
THIRD PARTY.
Notwithstanding the foregoing, in no event shall Sierra
Wireless, Inc. and/or its affiliates aggregate liability
arising under or in connection with the Sierra
Wireless, Inc. product, regardless of the number of
events, occurrences, or claims giving rise to liability, be
in excess of the price paid by the purchaser for the
Sierra Wireless, Inc. product.
Important safety/compliance information for
North American users
Your Voq professional phone complies with U.S.
Federal Communications Commission (FCC) and
Industry Canada (IC) guidelines respecting safety levels
of radio frequency (RF) exposure for mobile phones,
which in turn are consistent with the following safety
standards previously set by Canadian, U.S., and
international standards bodies:
•ANSI/IEEE C95.1-1999, IEEE Standard for Safety
Levels with Respect to Human Exposure to Radio
Frequency Electromagnetic Fields, 3kHz to 300
GHz
•National Council on Radiation Protection and
Measurements (NCRP) Report 86, -1986,
Biological Effects and Exposure Criteria for Radio
Frequency Electromagnetic Fields
•Health Canada, Safety Code 6, 1999, Limits of
Human Exposure to Radio frequency
Electromagnetic Fields in the Frequency Range
from 3 kHz to 300 GHz
•International Commission on Non-Ionising
Radiation Protection (ICNIRP) 1998, Guidelines for
limiting exposure to time-varying electric,
magnetic, and electromagnetic fields (up to 300
GHz)
To maintain compliance with FCC and IC RF exposure
guidelines, use only the accessories supplied or
approved by Sierra Wireless, Inc. The Voq professional
phone is designed to be carried in a Sierra-approved
holster when carried on your body. When carrying the
phone while it is switched on, use the specific Sierra-
approved holster that has been tested for compliance.
Use of accessories that are not approved by Sierra
Wireless, Inc. could void compliance with regulatory
rules, and thereby your authority to use this equipment.
This device complies with Part 15 of the FCC Rules.
Operation is subject to the following two conditions: (1)
this device may not cause harmful interference, and (2)
this device must accept any interference received,

Voq User Guide
130 2130324
including interference that may cause undesired
operation.
CAUTION Unauthorized modifications or changes not
expressly approved by Sierra Wireless, Inc. could void
compliance with regulatory rules, and thereby your
authority to use this equipment.
WARNING (EMI) - United States FCC Information -
This equipment has been tested and found to comply
with the limits for a Class B digital device, pursuant to
Part 15 of the FCC Rules. These limits are designed to
provide reasonable protection against harmful
interference in an appropriate installation. This
equipment generates, uses, and can radiate radio
frequency energy and, if not installed and used in
accordance with the instructions, may cause harmful
interference to radio communication.
However, there is no guarantee that interference will
not occur in a particular installation.
If this equipment does cause harmful interference to
radio or television reception, which can be determined
by turning the equipment off and on, the user is
encouraged to try to correct the interference by one or
more of the following measures:
•Reorient or relocate the receiving antenna
•Increase the separation between the equipment
and receiver
•Connect the equipment into an outlet on a circuit
different from that to which the receiver is
connected
•Consult the dealer or an experienced radio/TV
technician for help
Important safety/compliance information for
European users
Your Voq professional phone complies with European
Union (EU) guidelines respecting safety levels of radio
frequency (RF) exposure for mobile phones, which in
turn are consistent with the following safety standards
and guidelines previously set by international
standards bodies:
•EN 50360, 2001, Product standard to
demonstrate the compliance of mobile phones
with the basic restrictions related to human
exposure to electromagnetic fields (300 MHz - 3
GHz)
•International Commission on Non-Ionising
Radiation Protection (ICNIRP) 1998, Guidelines for
limiting exposure to time-varying electric,
magnetic, and electromagnetic fields (up to 300
GHz)
•Official Journal of the European Union, 1999,
Council Recommendation of 12 July 1999 on the
limitation of exposure of the general public to
electromagnetic fields (0 Hz to 300 GHz)

Regulatory, Safety, and Warranty Information
Draft D (Jan. 20, 2004) 131
To maintain compliance with EU RF exposure
guidelines, use only the accessories supplied or
approved by Sierra Wireless, Inc. The Voq professional
phone is designed to be carried in a Sierra-approved
holster when carried on your body. When carrying the
phone while it is switched on, use the specific Sierra-
approved holster that has been tested for compliance.
Use of accessories that are not approved by Sierra
Wireless, Inc. could void compliance with regulatory
rules, and thereby your authority to use this equipment.
EU REGULATORY CONFORMANCE
Sierra Wireless, Inc. hereby declares that the A10 Voq
Professional Phone is in conformity to all the essential
requirements of Directive 1999/5/EC.
The Declaration of Conformity made under Directive
1999/5/EC is available for viewing at the following
location in the EU community:
Sierra Wireless (UK), Limited
Lakeside House
1 Furzeground Way, Stockley Park East
Uxbridge, Middlesex
UB11 1BD
England
Warranty
Voq phone model numbers
•Model A10 operates in the 900/1800/1900 MHz
range for Europe and Asia
•Model A11 operates in the 850/1800/1900 MHz
range for North America
Patents
Portions of this product are covered by some or all of
the following US patents:
XXXXXXXX and other patents pending.
This product includes technology licensed from:
Copyright
©February, 2004 Sierra Wireless. All rights reserved.
Printed in Canada.
Trademarks
The Voq logo and the terms Voq, myVoq, VoqMail,
VoqManager are trademarks of Sierra Wireless, Inc.
Windows® is a registered trademark of Microsoft
Corporation.

Voq User Guide
132 2130324
Other trademarks that appear in this document are the
property of their respective owners.
Contact Information
Visit our website for up-to-date product descriptions,
documentation, application notes, firmware upgrades,
troubleshooting tips, and press releases at:
www.voq.com.
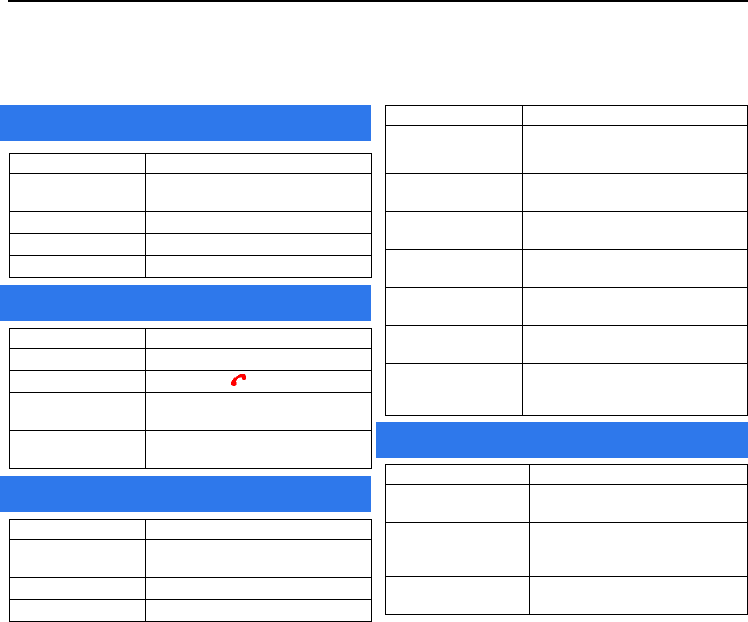
Quick Reference
Draft D (Jan. 20, 2004) 133
Quick Reference
This Quick Reference section is a duplication of the Pocket Reference Guide that you received with your Voq phone
and is included here for your convenience.
To... Follow these instructions...
Change input modes Press * (asterisk key). This applies to text
fields only.
Type a space Press # (pound key).
Type punctuation Press the 1 key repeatedly.
Display character table Press and hold the # key.
To... Follow these instructions...
Turn On/Off the phone Press and hold the Power button.
Lock the keypad Press and hold .
Unlock the keypad Unlock > #. Enter password if
necessary.
Add/Change/Remove
password
Start > Settings > More > Security >
Enable/Disable Phone Lock.
To... Follow these instructions...
Use the Quick List Press Power button quickly when phone is
on.
Turn the ringer off Press Power button > Silent.
Turn the ringer on Press Power button > Normal.
Keypad text input
On and Off
Home screen and ring tones
To... Follow these instructions...
Change the ring sound Start > Settings > Sounds > Ring
tone for line 1.
Change to vibration alert Start > Settings > Sounds >
Ring tone for line 1 > Vibrate.
Choose/edit an alert
profile
Start > Settings > Profiles.
Set the time and date Start > Settings > More > Date and
Time.
Set the alarm clock Start > Settings > More > Date and
Time > Alarm > Alarm Time.
Change the Home
screen
Start > Settings > Home Screen.
Change backlight time
out
Start > Settings > More > Power
Management > Backlight battery
time out.
To... Follow these instructions...
Add a new appointment Start > Calendar > Menu > New >
Enter times and reminders > Done.
Change an appointment
including reminders
Start > Calendar > Select
appointment > Press joystick > Edit >
Change fields as required > Done.
Display week view Start > Calendar > Menu > Week
View.
Calendar
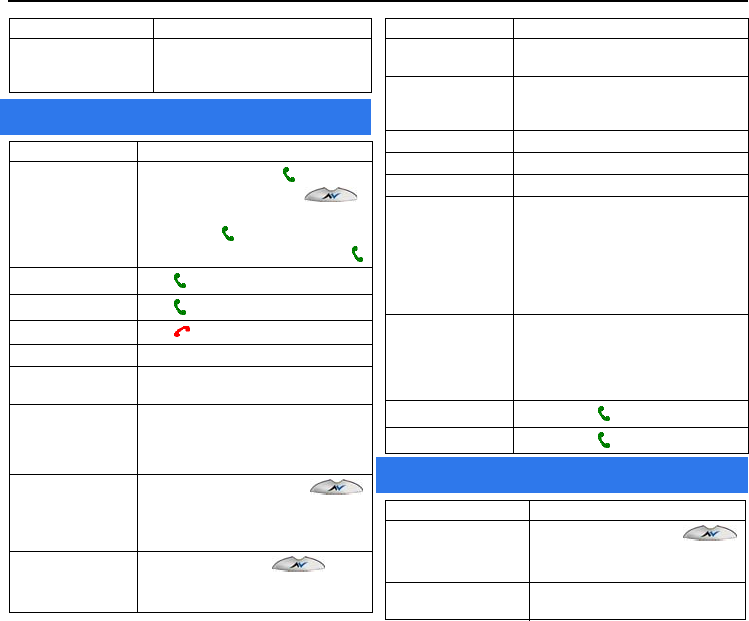
Voq User Guide
134 2130324
To... Follow these instructions...
Display month view Start > Calendar > Menu > Month
View.
To... Follow these instructions...
Make a call •Dial number > Press .
•Open thumbpad or press
> Start typing name > Select contact
> Press .
•Contacts > Select contact > Press .
Redial Press twice.
Receive a call Press or
Accept.
End a call Press .
Call voice mail Press and hold the 1 key.
Call speed dial number Press and hold the speed dial key for the
contact.
Add a speed dial
number
(Add person to Contacts list first.)
Contacts > Select contact > Press joystick
> Menu > Add Speed Dial >
Keypad assignment.
Add a contact •Open thumbpad or press
> Type contact details > Cont l
[Save As...].
•Contacts > New.
Find a contact Open thumbpad or press > Type
contact name/info > Select contact > Press
joystick to display info.
V
oice Calls
To... Follow these instructions...
Change default
number for a contact
Contacts > Select contact >
Move joystick left or right.
Assign special ring to a
contact
Contacts > Select contact> Press joystick
> Edit > Scroll down to Custom Ring
Tone > Done.
Put a caller on Hold Menu > Hold.
Activate call on Hold Menu > Unhold.
View previous calls Start > Call History.
Make a conference call 1Call the first person. Press Hold.
2Call the second person while first is
on hold.
3When the second person answers,
the screen displays Conference.
Press the joystick.
4Repeat steps to add more people.
Forward calls Start > Settings > Phone > Call
Forwarding >
Choose when to forward calls > Check
“Enable call forwarding when...” > Enter
number > Done.
Turn On speakerphone Press and hold for two seconds.
Turn Off speakerphone Press and hold for two seconds.
To... Follow these instructions...
Go to a favorite using
myVoq Open the thumbpad or press
> Begin typing name > Select favorite >
Go.
Go to a web page Start > Internet Explorer > Menu
> Address Bar > Type URL > Go.
Internet browsing
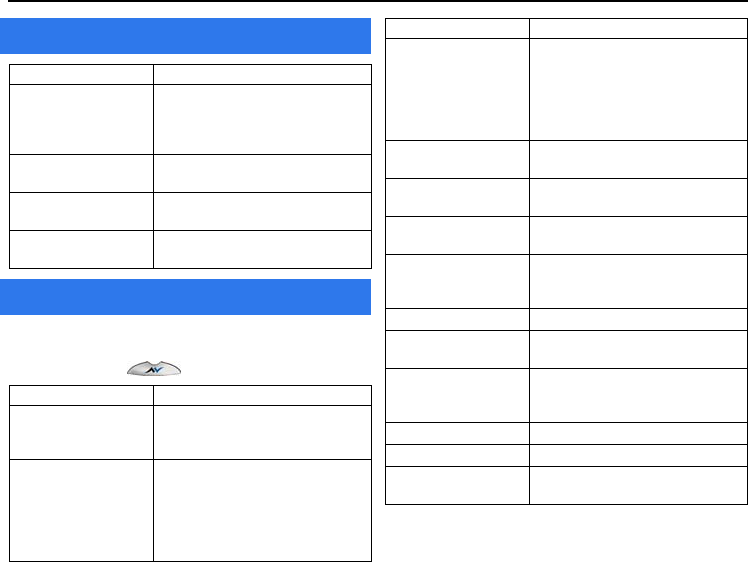
Quick Reference
Draft D (Jan. 20, 2004) 135
The instructions below assume that the myVoq screen is displayed. To
display the myVoq screen, flip open the thumbpad when you are in the
Home screen or press .
To... Follow these instructions...
Configure your e-mail
(VoqMail Personal and
Pro)
Start > More > VoqMail Settings >
Setup Wizard > Follow wizard
instructions > Press Next or Previous
to move from screen to screen > Finish.
Read your messages Start > Inbox > Move joystick to
select inbox.
Configure how often Voq
checks server for e-mail
Start > More > VoqMail > Schedule
Settings > Basic.
Manually check for
messages
Start > Inbox > Menu > Send/
Receive.
To... Follow these instructions...
Make a call Type phone number > Send.
Type Contact recipient’s name > Send.
Type GAL recipient’s name > Send.
Send an e-mail Type message > Menu > Send E-mail
> select Contact > Send.
Type Contact recipient’s name > Send
E-mail.
Type GAL recipient’s name > Send E-
mail.
E-mail
myVoq (including sending e-mail and SMS)
To... Follow these instructions...
Send an SMS message Type phone number > Send SMS.
Type Contact name > Send SMS.
Type GAL recipient’s name > Send
SMS.
Type message > Send SMS > select
Contact > Send.
Write a note Type note > Note l [Save As...] >
Save.
Add text to a note Type text > Highlight Notes > Menu >
Append Note.
Edit a note Type name of note > Highlight note >
Edit.
Send a note Type name of note > Highlight note >
Menu > Send Email or Send SMS >
Enter address/number > Send.
Edit Contact notes Type contact name > Menu > Notes.
View a file or hear a sound Type file name > Highlight file > Press
joystick.
Repeat the last action Press the joystick to open History. Press
the joystick again to repeat the last
action in History.
Launch an URL Type URL > Go.
Launch a favorite Type favorite name > Favo l [Go...].
Perform a calculation Type number > Type operation (e.g. +)
> Type number.

Voq User Guide
136 2130324
VoqMail Pro is an optional upgrade to the VoqMail Personal e-mail
application that lets you seamlessly connect to your work e-mail via a
secure VPN, and includes other advanced features.
To... Follow these instructions...
Change custom alert
settings
Start > More > VoqMail Settings >
Alert Settings > Select alert level to
change > Edit.
Add a custom alert to a
contact
(Person must be in Contacts list with e-
mail address.)
Start > More > VoqMail Settings >
Contact Alerts > Add > Select a
contact > Add.
Add a custom alert to a
keyword in message title
Start > More > VoqMail Settings >
Keyword Alerts > New > Enter
keyword and priority > Done.
V
oqMail Professional
To... Follow these instructions...
Play a song from the
playlist
Start > More > Windows Media >
Scroll to the file to play > Play.
Skip to:
Beginning of current file
Beginning of previous file
Next file on playlist
Move joystick to the left
Move joystick to the left twice
Move joystick to the right
Change playback settings Start > More > Windows Media >
Menu > Settings > Set volume or
other settings > Done.
Play a streaming media
file Open the thumbpad or press
> Begin typing URL > Select URL > Go.
Play a game Start > More > Games > Select
game.
Music and Games

Index
Draft D (Jan. 20, 2004) 137
A
A10 model number 131
A11 model number 131
AC adapter 118
accepting meeting requests 66
accessories 116
ActiveSync
adding/removing programs
112
e-mail account 79
partnerships 75
synchronizing 74
adapter, AC 118
adding
contacts 40
contacts from a PC 42
contacts on SIM 42
programs 112
agenda view
calendar 44
alerts
changing for calls 84
changing for e-mail 57
AM, changing time 22
answering calls 35
Any key answer 82
applications
list of 19
removing 112
appointments
adding 44
area code 83
attachments 66
audio files 104
B
backgrounds
changing 86
backlighting timer
see power management 92
batteries
charging 9
initial charging 9
installing 9
prolonging life 122
saving power 92
battery charger 118
beaming infrared 87
blocking calls 83
browsing the Internet 100
buttons 17
C
cable 117
calculator 109
calendars 44
agenda view 44
month view 45
week view 45
Call Barring 82
PIN2 96
Call Forwarding 82
Call History 31, 36
Call Options
changing voicemail 82
SIM contact numbers 82
call timers 38
call waiting 83
caller ID 83
calling
contacts 30
redialing 31
calls
answering 35
blocking 83
calling 30
conference 31
forwarding 82
limiting numbers 83
putting on hold 36
reviewing 36
certificates 87
changing voicemail numbers 82
channels 83

Voq User Guide
138 2130324
characters
typing 124
charger 118, 119
charging
with cigarette lighter 119
with cradle 121
with sync cable 9
charging batteries 9
checking e-mail 55
cigarette lighter adapter 119
clocks
setting dates and times 22
conference calls 31
connections
data 88
GPRS 90
proxy 90
VPNs 89
contacts
adding 40
default numbers 31, 40
downloading from a PC 42
finding 30
making a call 30
on SIM cards 42
Contacts list 40
cookies 102
copy and paste 126
country codes 83
cradles 119
using 121
currency formats 23
cut and paste 126
D
data connections
setting up 88
date format 23
dates and times 22, 92
default numbers
changing 31, 40
deleting programs 112
desktop cradles 119
dialing
voice 32
dialpad, see keypad 16
dial-up connections 89
display
font size 87
downloading
attachments 66
contacts 42
E
earphones 117
editing a note 46
e-mail 53
ActiveSync account 79
attachments 66
changing ring tones 57
checking manually 55, 56
custom alerts 56
folders 63
POP3 account 55
saving a draft 62
signatures 62
statistics 58
exception, URL 91
eZi 24
F
favorites
viewing 100
file formats
Media player 104
finding contacts 30
Flight mode 23
folders 63
font size
Home screen 87
forwarding
e-mail or SMS messages 65
voice calls 82
G
games
Mount Voq 108
Solitaire 108
getting started 8
GPRS connections 90

Index
Draft D (Jan. 20, 2004)) 139
H
headsets 117
history of calls 31
hold 36
Home screen 16
changing backgrounds 86
font size 87
I
icons
input text 24
list of 20
idle time
specifying Home screen 86
infrared 87
input modes 18, 24
inserting voice into e-mail 61
instant messaging 68
international calling 35
Internet
browsing 100
searching 100
setting up 100
J
Java applications 106
joystick 17
navigating 25
K
keyboard, see thumb pad 15
keypad 15, 17
changing tones 84
input modes 24
locking 23, 96
keys
locking keypad 96
keystrokes
thumbpad 124
L
language settings 93
large attachments 66
list of contacts 40
lock the keypad 23
locking keys 96
locking the phone 22, 96
with Quick List 97
M
mail
checking manually 56
POP3 55
see e-mail 53
making
appointments 44
calls 30
manually checking e-mail 56
Media Player
file formats 104
meeting requests 66
meetings 44
memos
recording voice notes 110
taking notes 36
menus
navigating 24
messages
folders 63
forwarding 65
replying 65
SMS 59
voice mail 38
missed calls 31
MMS 68
model number 131
modem
using Voq as a 111
month view 45
Mount Voq 108
MP3 files 104
MSN Messenger 68
multipress mode 87
music files 104
myVoq
about 25
button 17
clearing text 27
entering contacts 41

Voq User Guide
140 2130324
screen 16
taking notes 36
N
navigating
using numbers 24
notes
editing 46
taking notes 36
writing 46
number formats 23
numbers for navigating 24
O
Off 23
turning phone off 22
On
turning phone on 22
on hold 36
owner information 92
P
partnerships
ActiveSync 75
passwords
device lock 23
paste text 126
pauses
in dialing 35
phone keys 17
Phone Lock 96
phoning 30
PIN2 96
changing 97
playing
Mount Voq 108
music 104
Solitaire 108
PM, changing time 22
POP3 e-mail 55
Power button 18
power management 92
power off 23
predefined text 61
predictive text 24
profiles 23, 85
programs
adding 112
list of 19
removing 112
proxy connections 90
public key certificates 87
Q
Quick List 23
QWERTY
keystrokes 124
thumbpad 15
R
recently dialed numbers 31
Record button 18
recording
voice notes 110
redialing 31
regional settings 93
remote synchronizations 77
removing programs 112
software
removing 112
replying to messages 65
resetting call timers 38
ring tones
changing for calls 84
changing for e-mail 57
S
saving
battery life 92
draft messages 62
scheduling
e-mail polling 55
meetings 44
SD cards 28
searching 25
automatic 30
the Internet 100
secure digital cards 28
security

Index
Draft D (Jan. 20, 2004)) 141
locking/unlocking keypad 22
Phone Lock 96
SIM Lock 97
sending
SMS messages 10
setting alarms 92
settings
data connections 88
date format 23
dial-up connections 88
GPRS connections 90
language display 93
power management 92
proxy connections 90
regional 93
ring profiles 85
sounds 84
times and dates 22
VPN connections 89
Settings menu 82
shortcuts 23
Speed Dial 32
signatures 62
SIM
contact numbers 82
contacts 82
SIM Lock 97
SIM cards
adding contacts 42
inserting 8
SMS
messages 59
sending messages 10
service center 83
software
adding 112
updates 93
Solitaire 108
sound levels 18
sounds 84
adding your own 84
changing for e-mail 57
changing keypad tones 84
speakerphone 35
speed dialing 32
voice tags 34
statistics
e-mail 58
status icons 20
stereo headsets 117
sync cable 117
synchronizing
wirelessly 77
with ActiveSync 74
T
tagfiles 104, 107
tags
voice dialing 32
voice tags 32
VoqTags 107
tasks 45
creating 46
text
adding predefined 61
input modes 18, 24
thumbpad 15
keystrokes 124
time management 44
timers 38
times and dates 22, 92
traffic statistics 58
TTD devices 120
TTY devices 120
turning phone On and Off 22
typing modes 18, 24
U
unlocking the phone 22
updates 93
upgrades 93
URL exception 91
V
video files 104
viewing attachments 66
voice dialing 32
voice mail
changing 82
retrieving 38
