Sigmacom USBHD USB HDTV RECEIVER User Manual USERS MANUAL
Sigmacom Co., Ltd. USB HDTV RECEIVER USERS MANUAL
Sigmacom >
USERS MANUAL
BlueBox USB HD
User’s Manual
Version 1.1
Notice
This device has been approved by FCC for a home appliance
and is suitable for all residential areas.
NOTE: THE MANUFACTURER IS NOT RESPONSIBLE FOR ANY RADIO OR TV
INTERFERENCE CAUSED BY UNAUTHORIZED MODIFICATIONS TO THIS
EQUIPMENT. SUCH MODIFICATIONS COULD VOID THE USER'S AUTHORITY TO
OPERATE THE EQUIPMENT.
NOTE: This equipment has been tested and found to comply with the limits for a Class B
digital device, pursuant to part 15 of the FCC Rules. These limits are designed to provide
reasonable protection against harmful interference in a residential installation. This
equipment generates, uses and can radiate radio frequency energy and, if not installed an!
d used in accordance with the instructions, may cause harmful interference to radio
communications. However, there is no guarantee that interference will not occur in a
particular installation. If this equipment does cause harmful interference to radio or
television reception, which can be determined by turning the equipment off and on, the
user is encouraged to try to correct the interference by one or more of the following
measures:
- Reorient or relocate the receiving antenna.
- Increase the separation between the equipment and receiver.
- Connect the equipment into an outlet on a circuit different from that to which
the receiver is connected.
- Consult the dealer or an experienced radio/TV technician for help.

Contents
Chapter 1 Before getting started
} Features of BlueBox USB HD
} System requirements
} Package contents
} Description of each function
Chapter 2 Installation
} Before installing the BlueBox USB HD
} Connecting the antenna and the adapter
} Connecting the USB cable
} Connecting the external device such as VCR and camcorder
} Installing to the device manager
} Confirming the device manager
} Program installation
Chapter 3 Using BlueBox USB HD
} Screen menu
TV window
Control panel and channel pad
Adjustments
Play list
Zoom
} Option
TV input
Channel
Screen
Sound
Still image capture
Video capture
Time-shift
Pre-scheduled recording
Sleep
Remote control option Other options
Chapter 1 Before getting started
z Important notice
1. BlueBox USB HD has been designed to work with a USB 2.0 supported PC. Therefore we
suggest you to check your main-board of the PC whether it supports the USB 2.0 high seed
bandwidth or not. If your PC does not support USB2.0, you need to buy a PCI USB2.0 add-in card
for USB 2.0 interface.
2. Make sure that you have plugged into the right USB 2.0 port of your PC. Because your
motherboard may have several USB ports for 1.1 and 2.0.(refer to the manual for the main-board)
3. Make sure that your PC has a DXVA supported graphics card. Without this acceleration
technology, HDTV broadcasts are not worked correctly because its decoding process requires a
huge processing power. Generally NVIDIA Geforce MX440 and ATI Redeon 7200 are the minimum
requirement therefore you need to have higher spec. of the graphics card at least.
4. Make sure that your OS(operating system) is MS Windows XP(service pack 1 or higher)
BlueBox USB HD is suitable for Microsoft Windows XP OS, service pack 1 or higher. Lower OS
versions such as Windows98, Windows2000 and Windows ME may cause a serious system
conflict.

z Features of BlueBox USB HD
¾ Digital/analog TV reception
¾ High definition TV resolution (1920x1080i)
¾ HDTV broadcast reception on PCs
¾ Terrestrial TV( NTSC) and clear-cable TV(CATV) support
¾ High performance MP@HL MPEG-II decode
¾ Various aspect ratio support(16:9 , 4:3, letter box and pan and scan mode)
¾ Video and audio data process by PCI bus mastering
¾ Random or serial HD-stream file playback
¾ Time-shift function support
¾ D-VHS record or playback
¾ External A/V input(Video, Stereo Audio, S-Video) support(NTSC/PAL)
¾ SPDIF output with a sound card
¾ Multi-language and stereo sound output

z System requirements
. OS
. Windows XP Service pack1 or higher, MS Media Center Edition 1.x or higher
. Peripherals
. HDD (Ultra DMA 66)
. USB 2.0-supported desktops or laptops (PCI/PCMCIA USB 2.0 card)
. CD-ROM Drive
. MS compatible mouse
. SoundBlaster compatible sound card
Minimum requirements
CPU: Intel Pentium-III 800MHz
System memory: 128MB
Graphics card: ATI Radeon 7200(32MB) or Nvidia Geforce4 level card
Recommendation
CPU: Intel Pentium-IV 1.5GB or higher
System memory: 256MB or higher
Graphics card: ATI Radeon 7500 or Nvidia Geforce4 or higher

z Package contents
Thank you for purchasing the BLUEBOX USB HD.
Please check the package contents when you remove the box. If you find an omitted item
in the package, please visit a nearer dealer or A/S center for a quick product exchange.
z BlueBox USB HD body / holder
HDTV broadcast receiver and holder to stand the receiver
z Installation CD
Used for installing drivers and application programs for the BlueBox HD USB
z User’s manual
Used for the installation and usage guide of the BlueBox HD USB
z USB cable
Used for connecting the BlueBox HD USB to a PC
z Power adapter
Used for the power input of the BlueBox HD USB
z Remote control
Used for controlling HDTV broadcast programs
z Description of each function
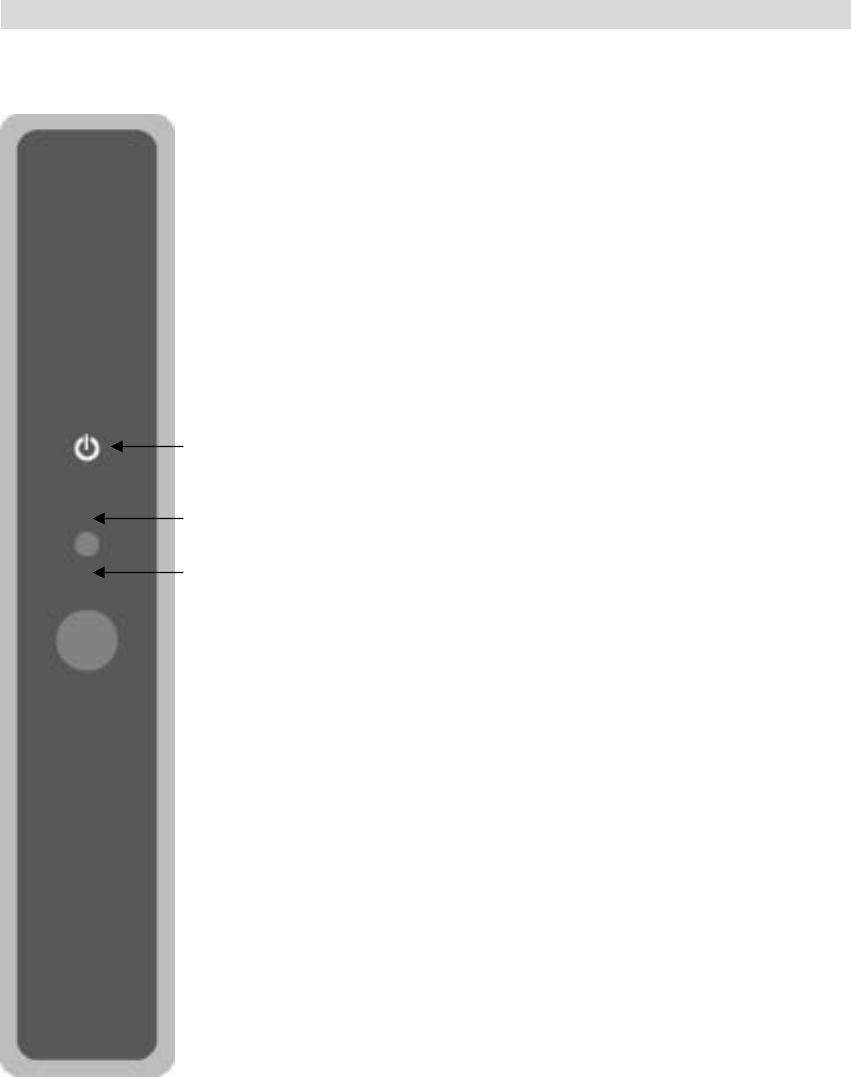
Front
Power LED: the status of power
IR (Infrared): the status of the remote control receiver
HDTV Signal LED: the status of the HDTV signals
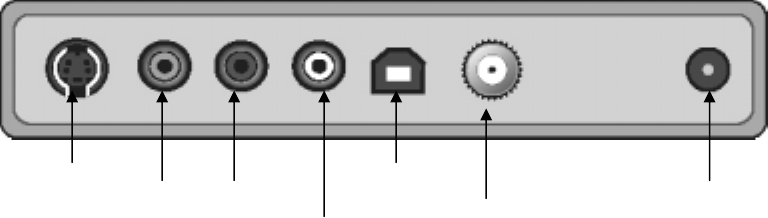
Back
DC-In
Used for power input (adapter included)
Audio In (L/R)
Used for receiving audio signals from the external devices (VCR, camcorder...)
Video In
Used for receiving video signals (composite) from the external devices (VCR, camcorder...)
S-Video In
Used for receiving S-Video signals from the external devices (VCR, camcorder...)
Antenna input (RF IN)
Used for receiving HDTV, analog TV or cable TV signals
USB port
Used for connecting the BlueBox USB to a PC
S-Video In
USB port
Audio In(L/R)
Video In Antenna input DC-In
Chapter 2 Installation
(Before installing the BlueBox USB HD)
We would like to recommend you to refer to the following checkpoints for your system.
1. Installation of Windows XP Service pack 1 or 2
Check your system OS in “My computer” (“Properties”. If your system OS has not installed
the Service Pack 1 or 2, click “Windows update” and install the SP1 or 2.
2. USB 2.0 patch
USB2.0 is a newly wide-spread high speed interface for PCs. Since the USB2.0 device
driver in Windows XP service pack1 has been updating, you should check whether your
system has a fixed USB driver or not. Select “control panel->add/delete program” and
check “Windows XP hotfix-KB822603” has been installed. If not, run “Windows update” to
install the appropriate updates.
The Hotfix (KB822603) is a bug-fixed patch for USB2.0 detection.

(Connecting power and antenna cable)
In order for you to receive the HDTV signals, you should connect an air TV cable or CATV cable
to the Bluebox USB HD with the power input connection as drawn below. To make sure for the
digital TV broadcasts, call your local cable TV service provider to check that your residential
area can receive digital TV broadcasts. (Important!!)
Air TV antenna cable or CATV cable Power adapter cable
Antenna input
DC-In
(Power In)
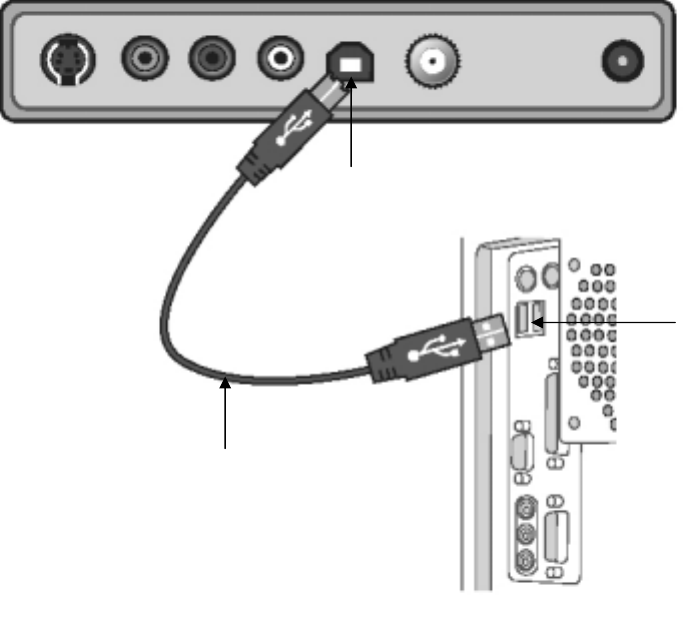
z Connecting the USB cable
You need to connect the Bluebox USB HD and your system with the USB cable as drawn
below.
Note)
Make sure that your system supports USB2.0 interface. If your system does not support
USB2.0, buy a PCI-type USB2.0 card at a near computer shop and install it to the PC.
z Connecting a VCR or camcorder
You can connect it to an external device such as VCR, camcorder or game console.
Video connection
For the composite video connection, you should connect the video output (yellow) of the
video device to the video input port (yellow) of the Bluebox USB HD. For the S-Video
connection, you should match the S-Video ports of the video devices with the video cable.
Audio connection
For the audio connection, you should connect the audio output (red/white) of the device to
USB port
USB2.0 port
USB cable
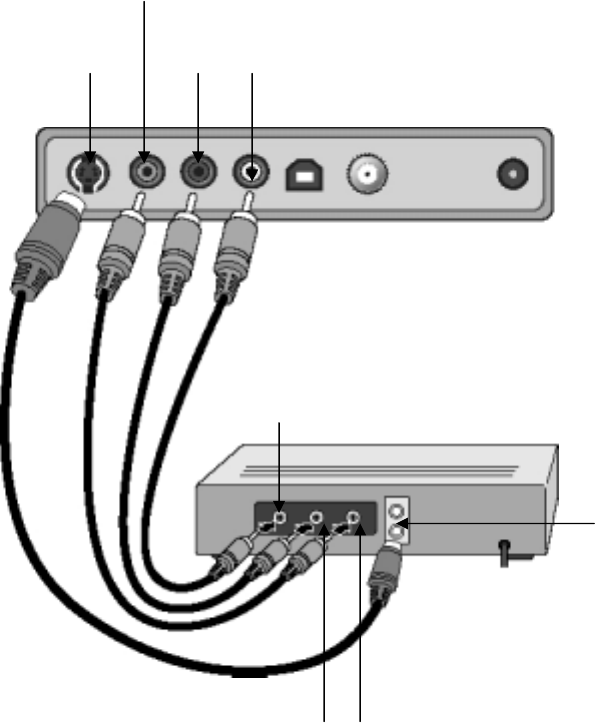
the audio input port (red/white) of the Bluebox USB HD.
S-Video In Audio In(white/red)
Video In (Yellow)
Video Out (yellow)
Audio Out (white/red)
S-Video Out
z Installing the drivers
Insert the Bluebox USB HD CD into the CD-ROM Drive.
Drivers are in the DRIVER folder of the CD.
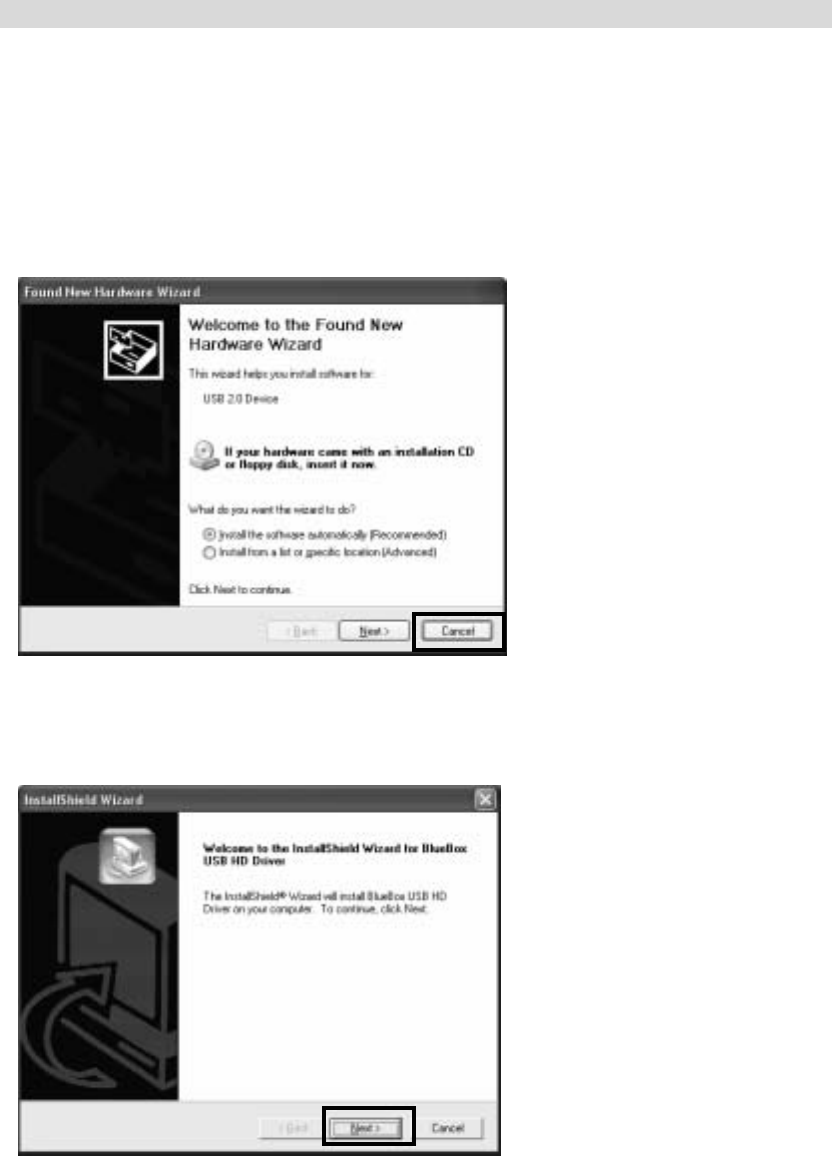
1. When connecting the Bluebox USB HD to your system, the following dialog box appears
“Found New Hardware wizard” then click “Cancel.”
2. Run “Setup.exe” in the DRIVER folder of the CD.
3. Install Shield Wizard appears then click NEXT.
4. Driver files will be copied to your system automatically.
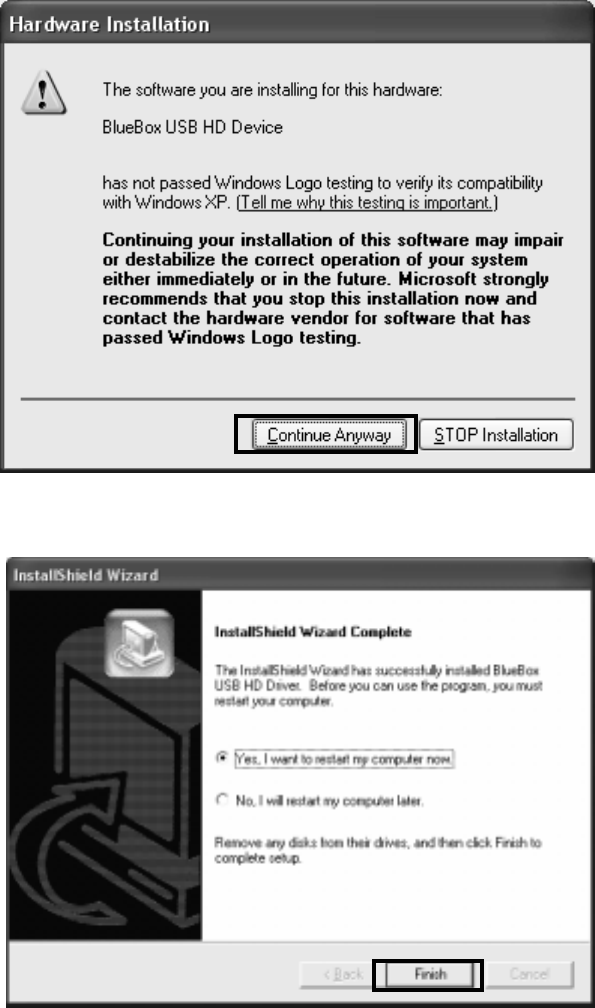
5. While installing the drivers, “Hardware Installation” that requires the digital signature
appears then click “Continue Anyway”.
6. When “InstallShield Wizard Complete” appears then click “Finish.”
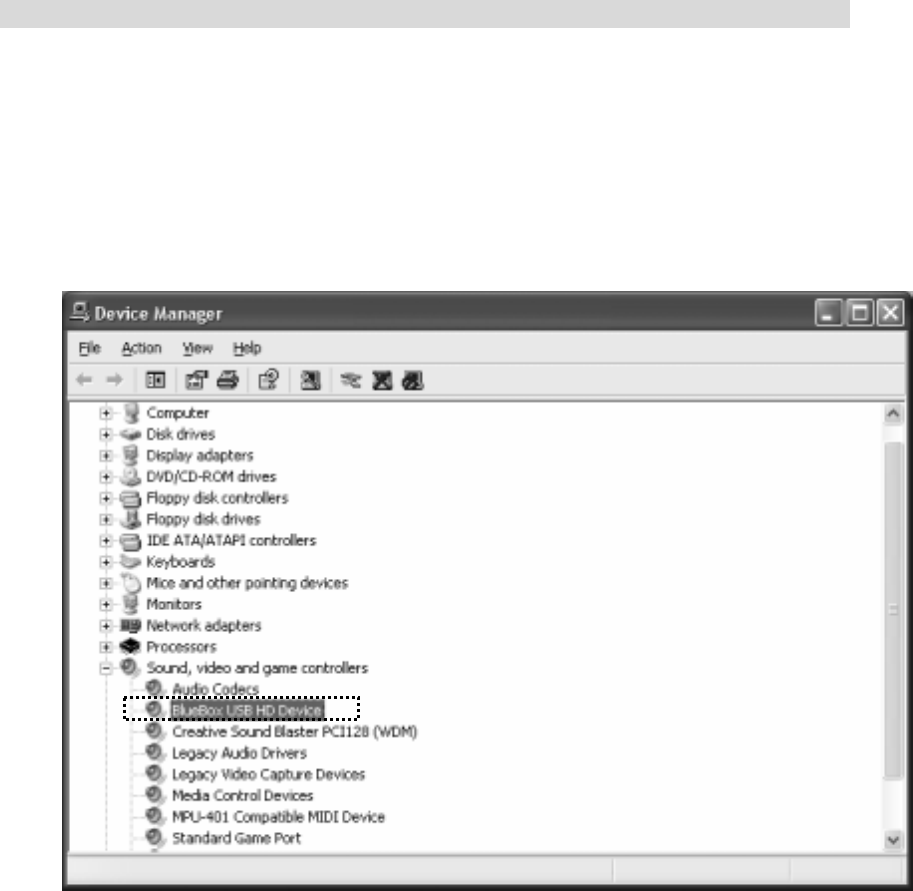
z Checking Device Manager
If the BLUEBOX USB HD driver has been successfully installed, you can check it in “Sound,
Video and game controllers” in Device Manager. To go to the item in “Device Manager,” select
“Start->setting->Control panel->System->(Hardware)->Device Manager”.
(Below picture is an example that the driver has been installed.)
If the driver is not installed correctly, the BlueBox USB HD can not work in your system.
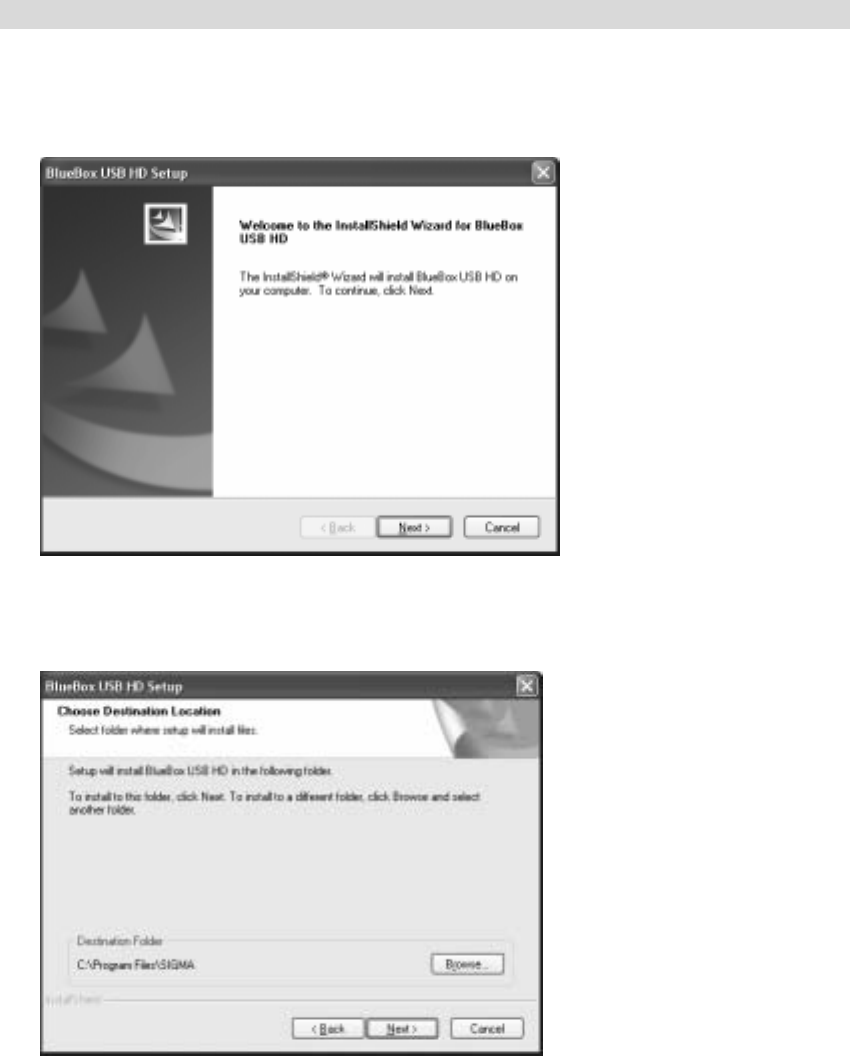
z Installing the BlueBox USB HD program
1. Run Setup.exe in the install CD in your PC.
2. Click “Next” in “BlueBox USB HD Setup.”
3. Follow the instructions in “BlueBox USB HD Setup.”
If you want to change the Folder to be copied, you can specify the location with Browse.
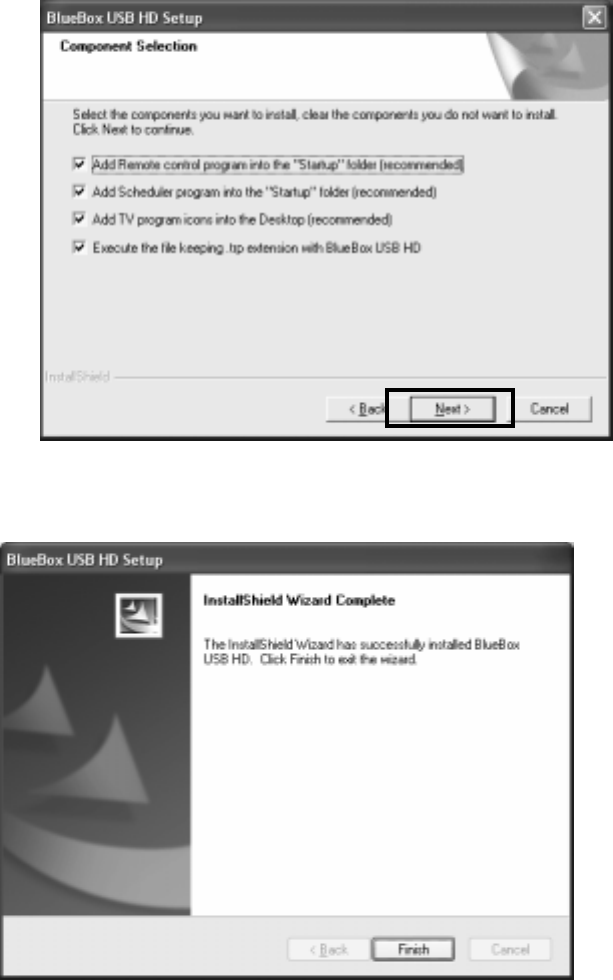
4. Follow the below instruction in “BlueBox USB HD Setup”
5. When “InstallShield Wizard Complete” appears, click “Finish.”
Note)
When reinstalling the Bluebox USB HD program, remove the pre-installed program and restart
your system. If not, the reinstallation may cause a malfunction with errors
Chapter 3 Using the program
1. Screen menu
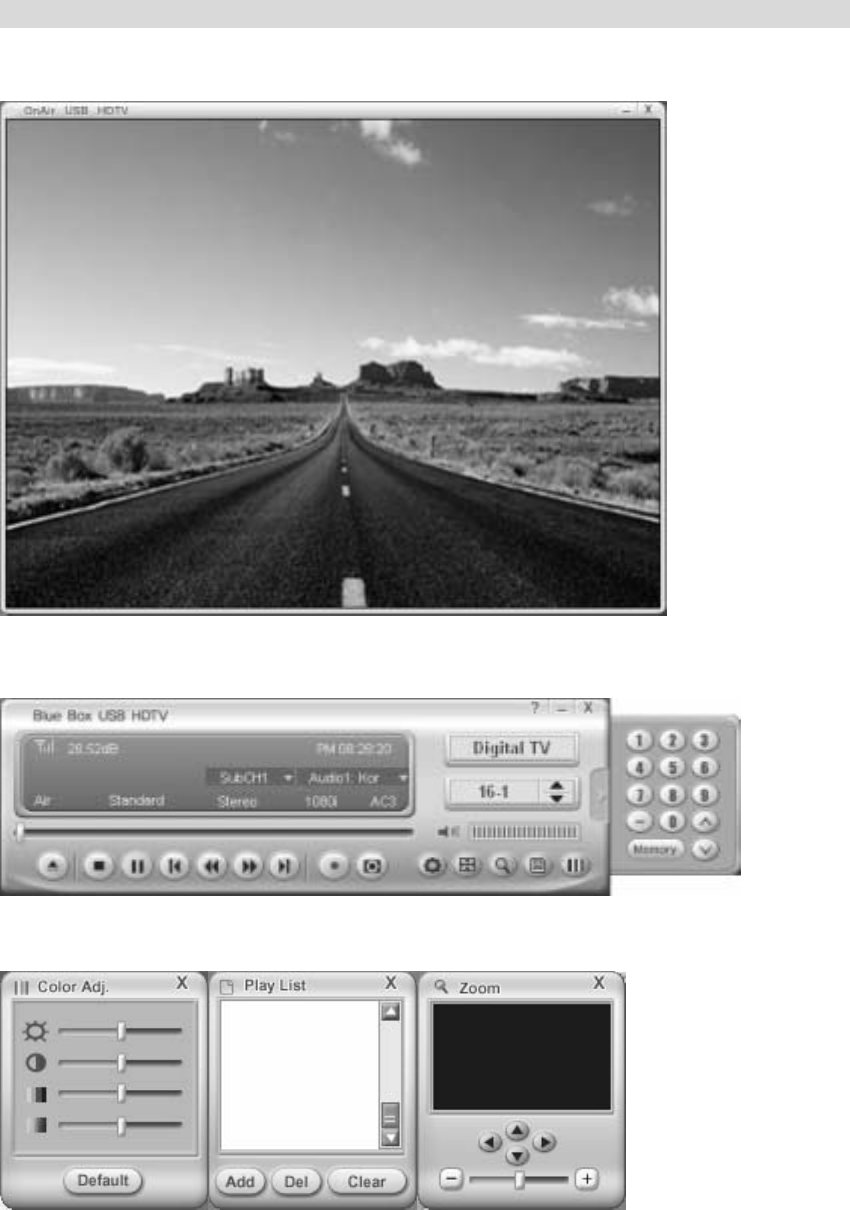
[TV window]
[Control panel]
[Adjustments] [Play list] [Zoom]
TV window
This is to watch a TV program on the screen. Input source (digital TV, analog TV, Video, and S-
video) is marked on the screen for a second.
Minimize: hides the TV program.
Quit: exits the TV program.
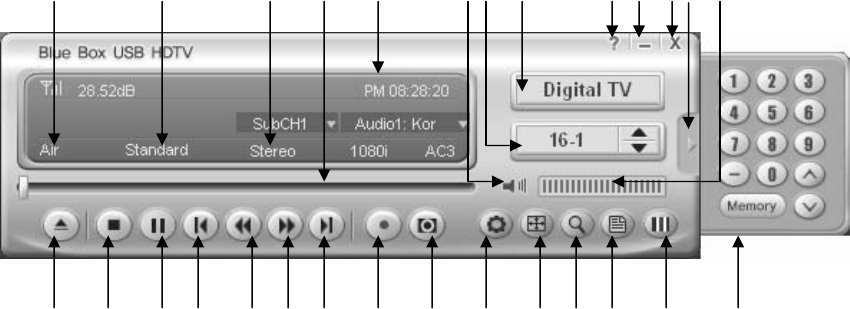
Control panel and channel pad
1: Input source
2: Aspect ratio
3: Audio source
4: Play status bar (analog TV: current play position)
5: Time /full running time/playing time
6: Mute /on/off
7: Registered channel display
8: Video input select
9: Help
10: Minimize (icon)
11: Quit
1 2 3 4 5 6 7 8 9 10 11 12 13
14 15 16 17 18 19 20 21 22 23 24 25 26 27 28
12: Channel pad button (slice-in/out)
13: Volume
14: File open
15: Stop
16: Pause (plays and pauses in time-shift mode)
17: Backward (move to the first position of the recording in the time-shift mode)
18: Backward jump (move to the previous position in the time-shift mode)
19: Forward (move to the forehead position in the time-shift mode)
20: Next (move to the last position of the recording in the time-shift mode)
21 Record (video capture)
22: Still image capture
23: Configuration
24: Aspect ratio
25: Maximize
26: Play list
27: Adjustments
28: Channel change and save
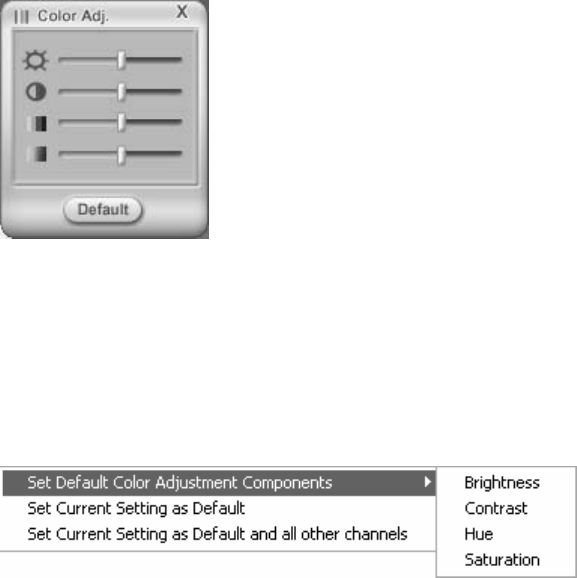
Adjustments
Default: sets to the default value.
Screen adjustments menu
Click the right button of your mouse then the following menu appears.
Select your preferred option on the menu.
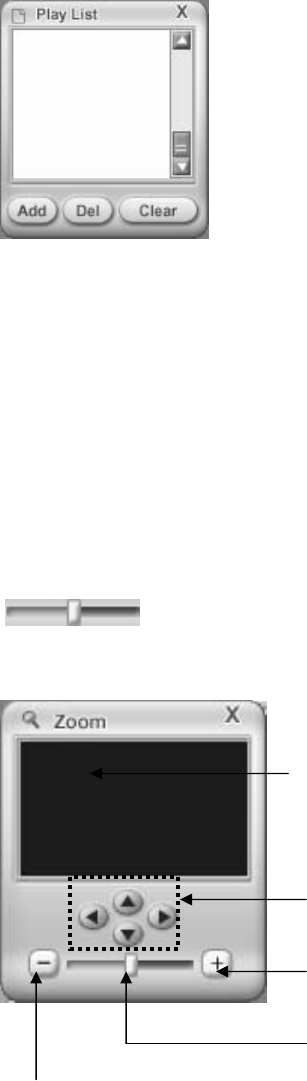
Play list
Add: adds your files in the play list.
Del: deletes your files in the play list.
Clear: deletes all files in the play list.
Zoom
This is a function to maximize a point of a viewing picture.
1X to 5X is available in the Zoom and you can control the zoom ratio with the scroll bar.
[]
A
zoomin
g
ratio and
p
osition
Up/down/left/right
Zooming ratio with a mouse drag
Zoom out (25%)
Zoom in (25%)
2. Option
This is a function to change or select configurations of a TV show.
Click the right button of your mouse then the option menu appears.
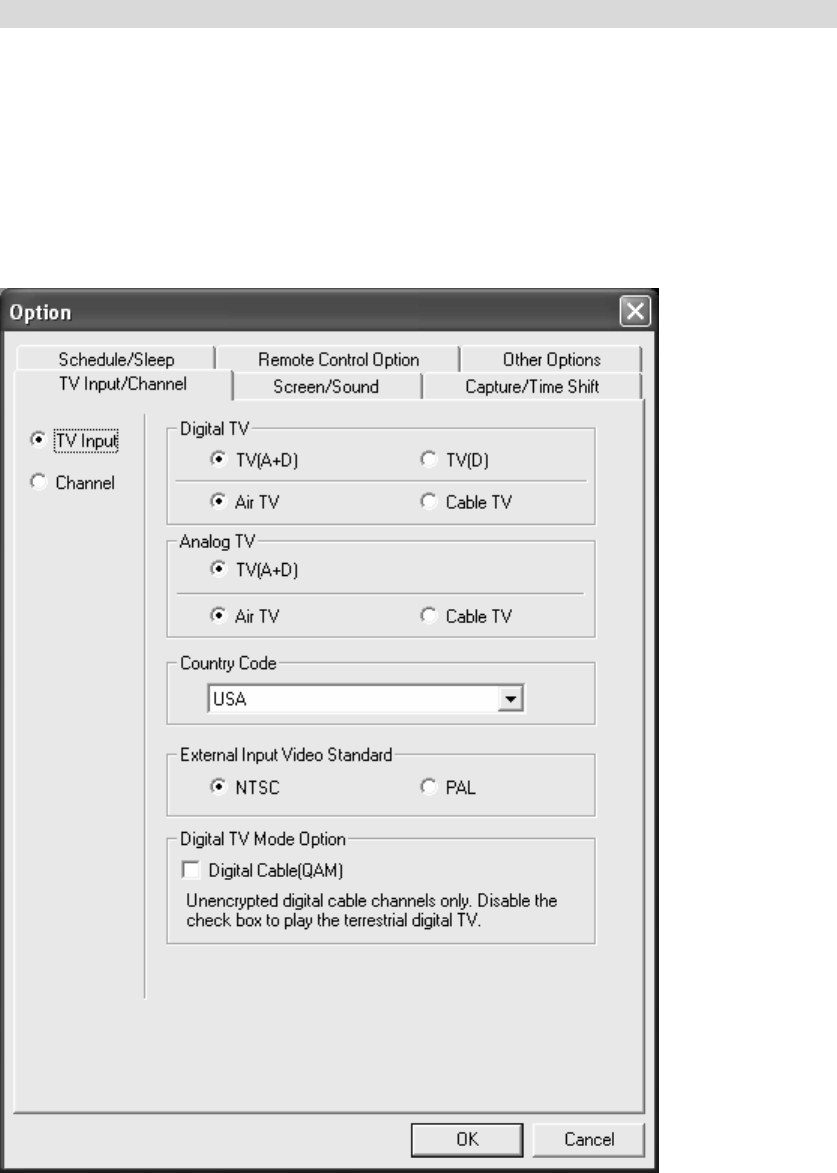
TV Input
This is to set an input port of the antenna.
Digital TV
“Air TV” or “Clear-cable TV” can be selected in your area for digital TV reception.
Analog TV
“Air TV” or “clear-cable TV” can be selected in your area for analog TV reception.
Country code
Country code needs to be set in your area. (ex: Select “U.S” in the USA)
External Input Video Standard
This sets an input TV broadcast standard. NTSC can be selected for US customers and PAL for
European customers.
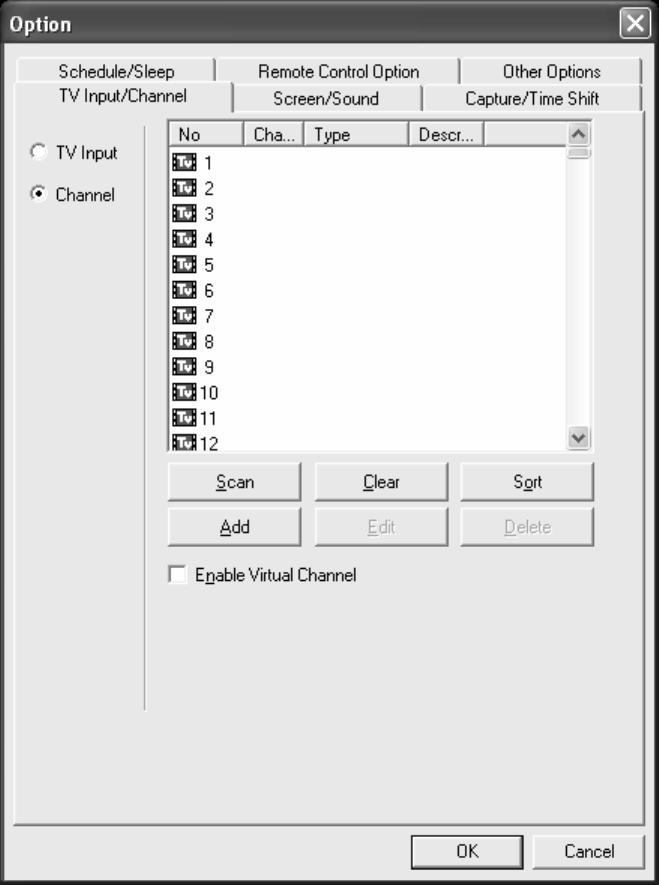
Channel
This is to search, add, edit or delete channels for digital and analog TV.
Scan: finds available channels automatically.
Clear: deletes all saved channels.
Sort: arranges channels in serial.
Add Channel: adds a channel you want to register.
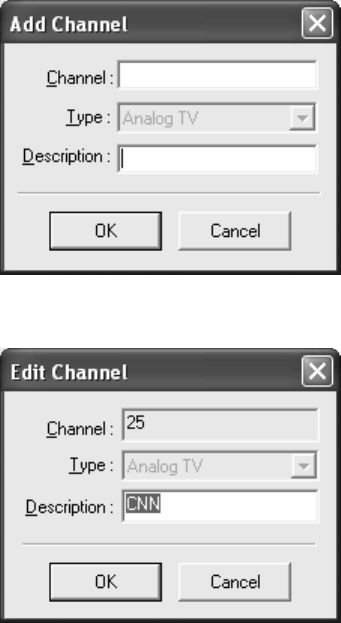
Edit Channel: gives a sub-name or description of a channel.
Delete Channel: removes a selected channel in the channel list.
Virtual channel priority
This is to show virtual channels in the list with the priority.
If you select the virtual channel priority, the digital TV channels are worked with the virtual
channels. For example, if you select a digital channel that is matched with an analog channel, it
will mark “9-1” for the same analog channel “9-0.”
Note)
If you stop to search channels while scanning available channels, the searched channels that
have been scanned are saved only.

Screen
This is to set the screen ratio (standard, wide, DVD and Zoom) and video hardware.
Screen ratio: sets one of four different TV screen ratios. 4:3 for standard, 16:9 for wide, a
certain DVD format for DVD and a maximized for zoom are supported.
Screen: sets the TV screen position, a default position or always on top.
Video hardware: sets the hardware acceleration (DXVA) of a graphics card.
DxVA (DirectX Video Acceleration) support is required for a seamless digital TV reception.
DxVA support is related to a graphics chipset and its driver, to make sure for the performance of
your graphics card, back to the system requirements in chapter 1 and check whether your
graphics card is a good match with the digital TV reception. If not, we strongly recommend you
to buy a new graphics card for the best configuration.
De-interlace mode: sets an overlay mode, AUTO, BOB or WEAVE
Show this dialog when starting program
This is to show the settings of the video hardware when starting the TV program.
Over-scan
When a TV window is not matched with the screen, you can move and match with the real TV
screen size.
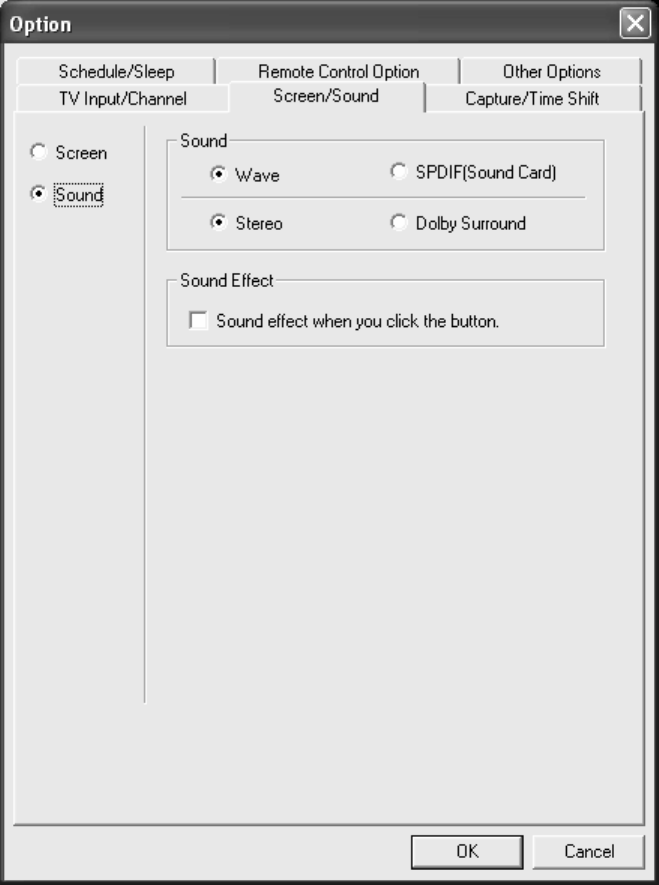
Sound
This is to set the audio outputs and effects.
Sound: sets an audio format of a TV broadcast.
Wave: sets to the wave format of a sound card. Wave is a sound format that is used in Windows
and used for MP3 and WAV audio format.
SPDIF: transfers the SPDIF signals to the SPDIF sound card.
Stereo: sets to the stereo audio.
Dolby surround: sets to the Dolby surround sound.
Sound Effect: sets to an effect sound.
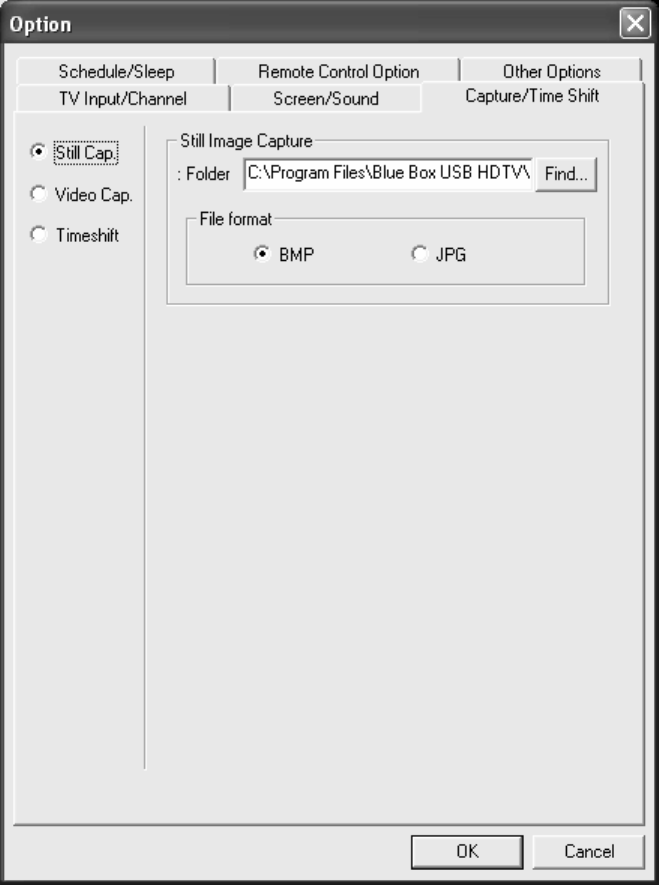
Still Image Capture
This is to capture a TV show as still image.
Still image capture: specifies a location to be saved.
File format: sets a file format (BMP/JPG).
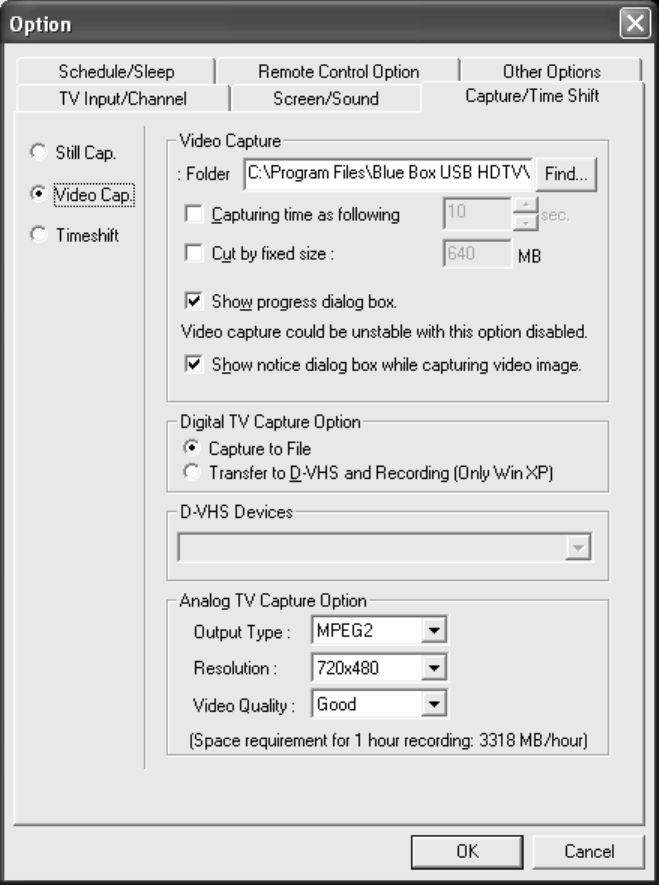
Video capture
This is to capture a TV show as motion video.
Folder: specifies a location to be saved.
Capturing time as following: sets a time for a capture.
Cut by fixed size: sets a file size for a capture.
Show Progress dialog box: When capturing a TV show, the progress bar is displayed.
This does not work for pre-scheduled recording.
Show notice dialog box while capturing video image: The remarkable notice is displayed
while capturing a TV show.
Digital TV capture option
Capture to file: This allows capturing a video file that runs in Windows.
Transfer to D-VHS and recording (only Windows XP): This allows capturing a video to a
D-VHS.
D-VHS devices: shows a D-VHS device connected.
Analog TV capture option
Output type: sets a compression type for a capture file.
Resolution: sets a resolution for a capture file.
Video quality: sets a video quality for a capture file. Better quality needs bigger size.
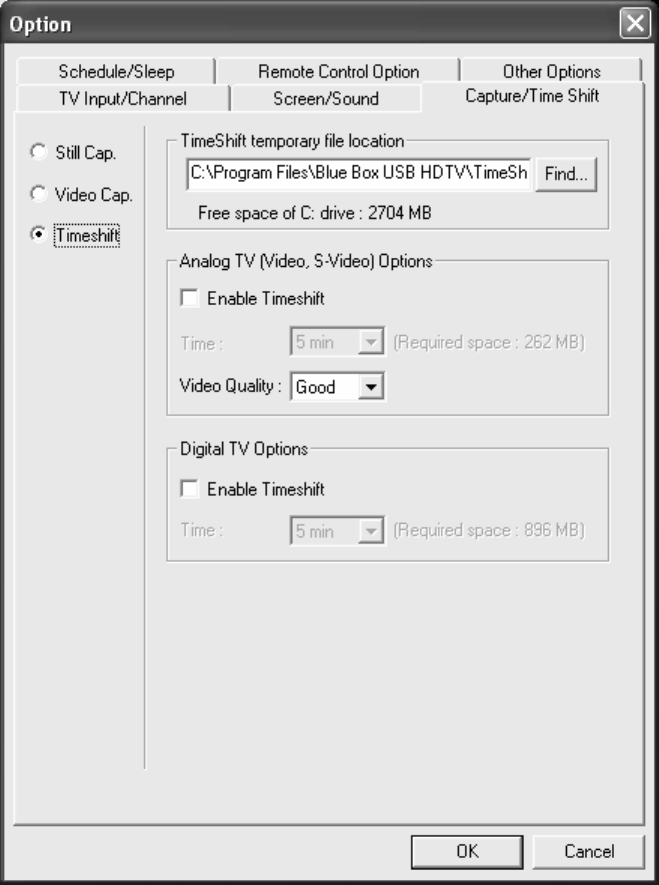
Time-shift
This allows you to pause a live broadcast and return to it or moments or even hours later and
continue exactly where you left off. The live broadcast is saved in a hard disk space as much as
its available free space. Therefore you can watch and enjoy your favorite TV show like your
VCR tape.
Time-shift temporary file location
You can specify a location for time-shift saving space. Select or create an available folder that is
enough to save a big-sized video file.
Analog TV (video and S-video) / digital TV options
Enable Time-shift: This is to set time-shift of an analog TV, video or S-Video.
Time: This is to set a time for time-shift. Check your available hard disk space before you set
the time.
Video quality: This is to select a video quality for time-shift. A better quality requires more
space.
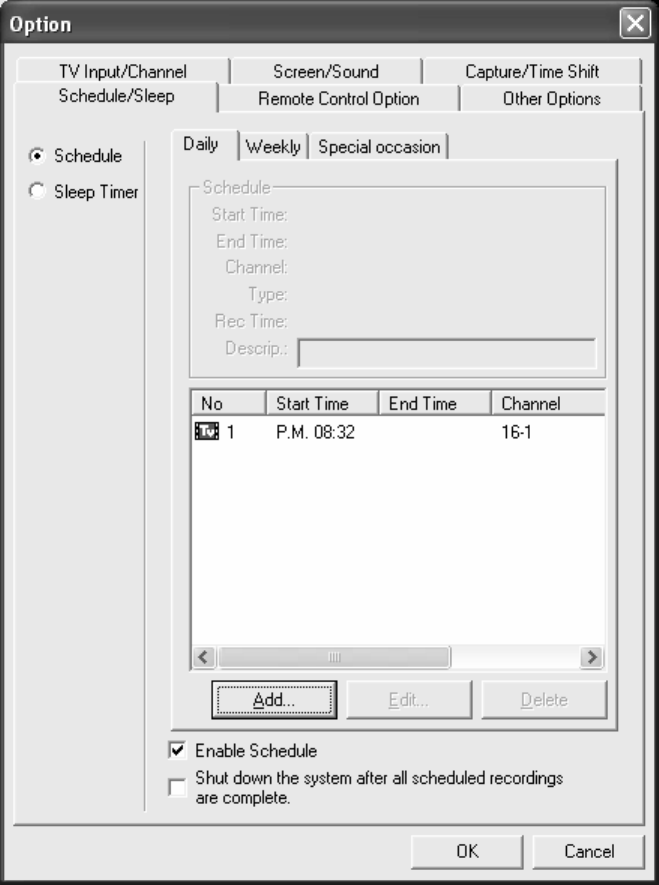
Pre-scheduled recording
This allows you to record your favorite TV show on a time that has been scheduled in advance.
There are three options for pre-scheduling, daily, weekly and special occasion.
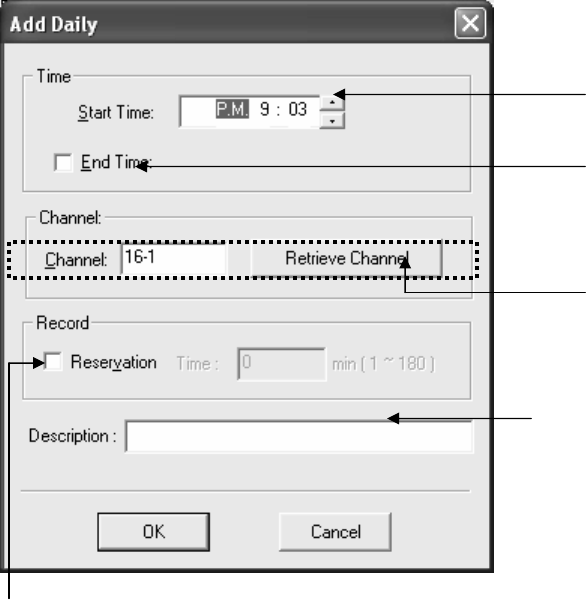
If you click “Add” the following “Add Daily” dialog box appears.
Set a start time for recording
Set an end time for recording
Select a channel for recording
Click “Retrieve Channel” for unsure
channel information
Enables “Reservation” and sets a time duration for recording
Add a description for a recorded file
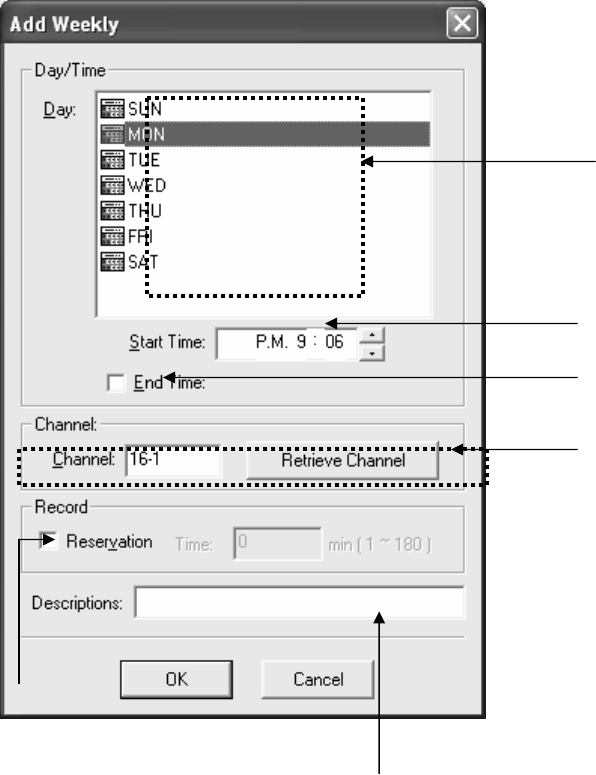
Add weekly
This is to set weekly based pre-scheduling for a TV show
Select a week day for recording
Select a channel for recording
Click “Retrieve Channel” for unsure
channel information
Add a description for a recorded file
Set a start time for recording
Set an end time for recording
Enable “Reservation” and set a time duration for recording
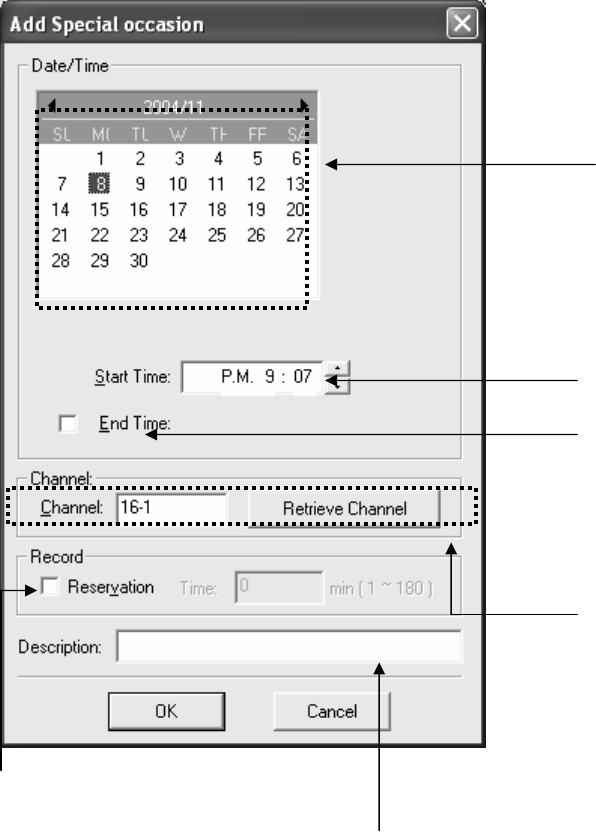
Add Special Occasion
This is to set a recording day at your preference.
Select a date for recording
Select a channel for recording
Click “Retrieve Channel” for unsure
channel information
A
dd a descri
p
tion for a recorded file
Enable Reservation and set a time duration for recording
Set a start time for recording
Set an end time for recordin
g
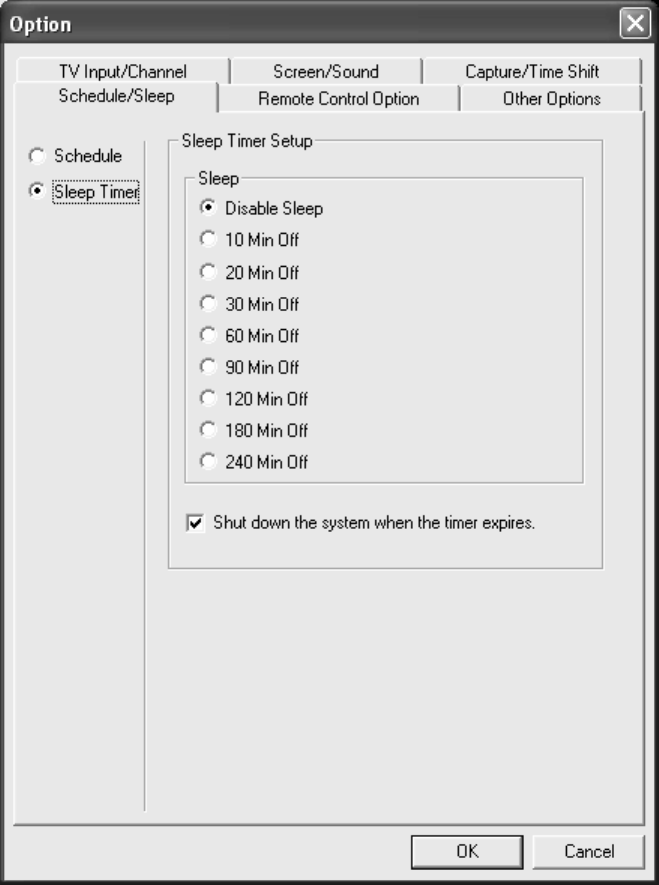
Sleep
Sleep timer: allows you to turn the TV off at your convenient time.
Shut down the system when the timer expires: allows you to turn your PC off at a set time.
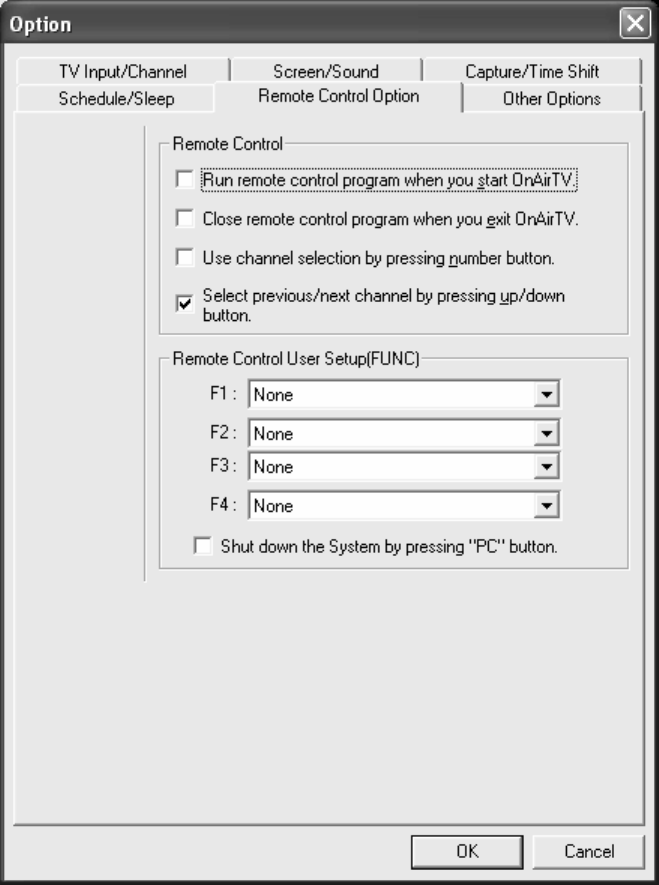
Remote Control Option
Remote control
There are four options that you can select. Select your preferred option at your convenience.
Remote Control User Setup
4 user-defined hot keys (F1~F4) are available.
Shut down the system by pressing “PC” button
The PC button on the remote control unit is used for system shut down.

Other Options
There are four options for program priority. Select your preferred options at your convenience.
On screen display
6 different colors are selectable for OSD.
Troubleshooting
1. How can I check whether my PC supports USB2.0 or not?
You can check it in the “device manager” Select Start->Control panel->System-
>Hardware-> device manager then you will see a device is enrolled at “Universal Serial
Bus Controller”(Non-INTEL based main board may show a different name “standard-
extension USB host controller” instead of USB2.0. If you realize that your PC does not
support USB2.0, please purchase a PCI USB2.0 add-in card ( for laptop, you need a
PCMCIA USB 2.0 card)
2. Can I watch a HDTV show using BlueBox USB HD with USB1.1 connection?
No. you can not watch a HDTV show with USB 1.1 interface due to its very limited data
transmission rate (13Mbps or lower). However you are able to watch an analog TV
show with USB 1.1 interface.
3. What’s the maximum length of the USB2.0 cable?
The recommendation by the USB2.0 specification is 4.5M. However we do not
recommend the maximum length because the video data can be damaged by signal
interference with the length.
4. What should I be careful for the digital TV broadcasts?
Do not connect the other USB cable while running the BlueBox USB HD. It may cause
a serious damage to your PC (system halt). If you need to connect another USB cable
to your system, quit the Bluebox USB HD program and do another job on your PC.
5. What kind of antenna do I need to use for the digital TV reception?
You need to use an UHF antenna for the digital TV reception. A VHF antenna also can
be used for the analog TV reception but not for the digital. Several indoor UHF/VHF
antennas are available at your nearer Electronics shop. Please make sure that your
residential area is not a blanket area. If you are in a blanket area, you can not watch
the digital TV broadcasts.
6. I can not see the LED light in the front panel of the BlueBox USB HD.
BlueBox USB HD has been designed to work with the Power and USB connection
simultaneously. So when you connect the power and USB cable to your PC(your PC
should be power-on), you can see the LED light in the front panel.
7. I have been using a desk lamp with the BlueBox USB HD on the desk. When I use
the remote control for the BlueBox USB HD under the light of the desk lamp,
sometimes the remote control does not work. Why does it happen?
The electric wave of the desk lamp may jam signal of the infrared remote control. We
recommend you to turn it off and use the BlueBox USB solely.
8. The screen is not in full size and screen noise happens in the bottom.
As TV stations have its own screen size, the screen size may differ slightly then use the
over-scan so you can control the screen size to match with the original size. Refer to
the over-scan page for more information.
9. What is DXVA?
DXVA stands for DirectX Video Acceleration that is specified by Microsoft and allows
video processing operations that are frequently executed and simple to be performed
by a hardware accelerator. Most mainstream graphics cards integrate its hardware acceleration
logic inside.