Silicon Laboratories Finland WRAP229X Multiradio Access Server User Manual WRAP User s and Developer s Guide
Silicon Laboratories Finland Oy Multiradio Access Server WRAP User s and Developer s Guide
UserManual.wiki
>
Silicon Laboratories Finland
>
WRAP229X User Manual
manual
Navigation menu
Upload a User Manual
Namespaces
Wiki Guide
HTML
PDF
Info
Views
User Manual
Discussion / Help
Navigation


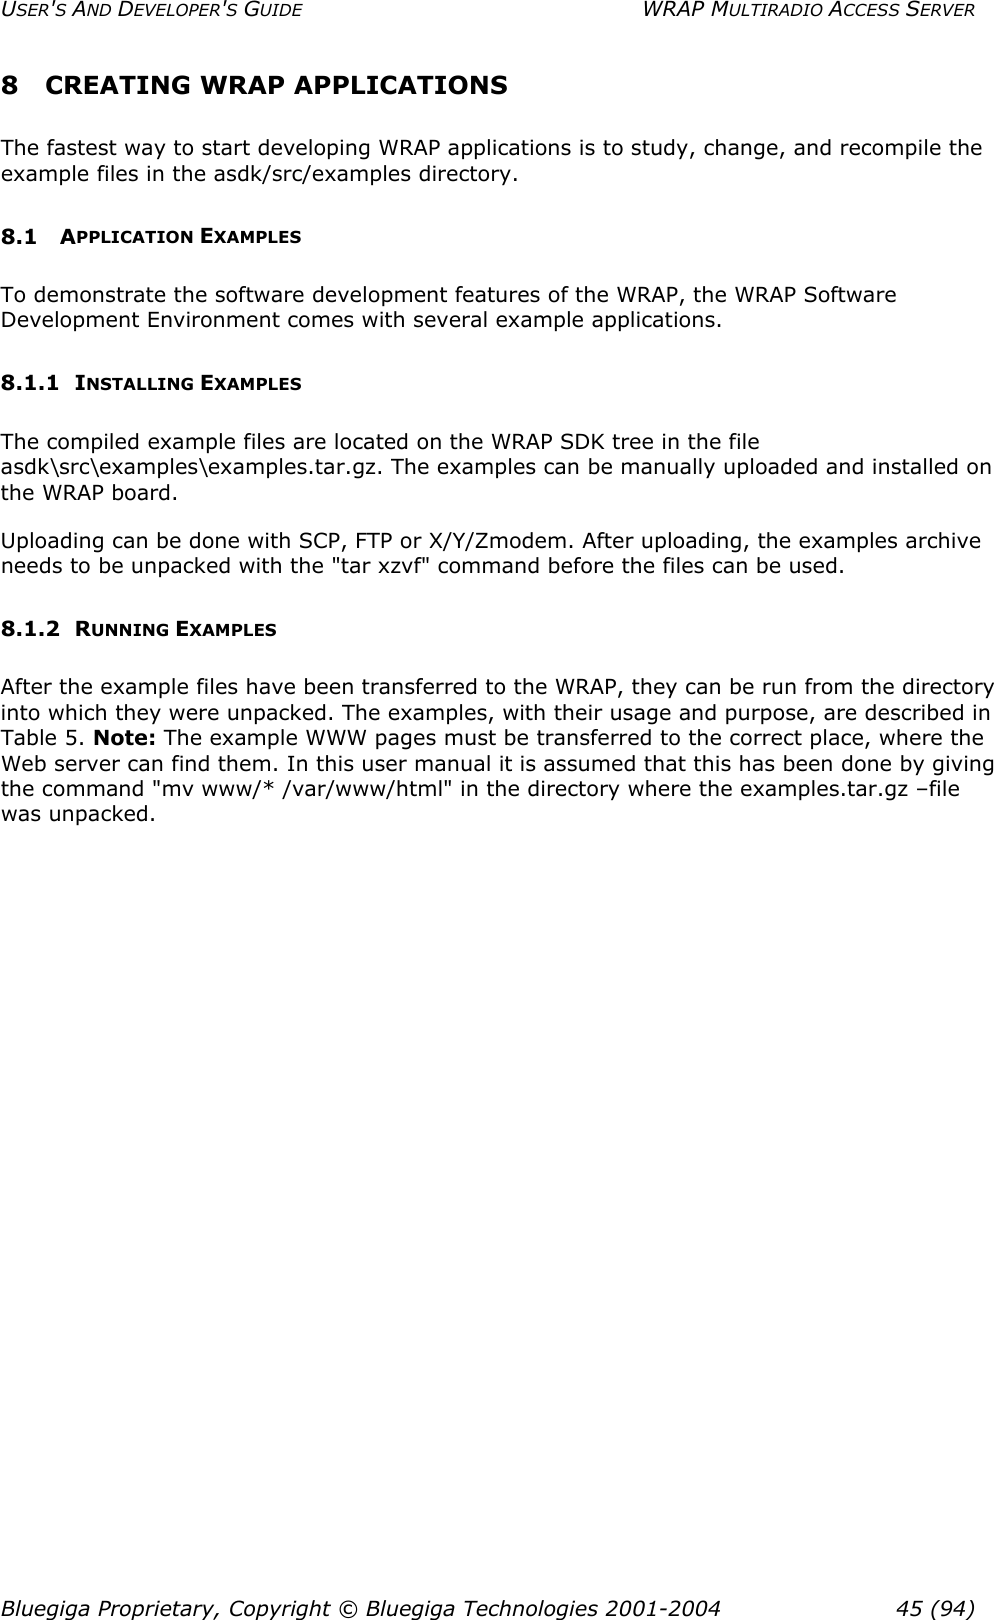
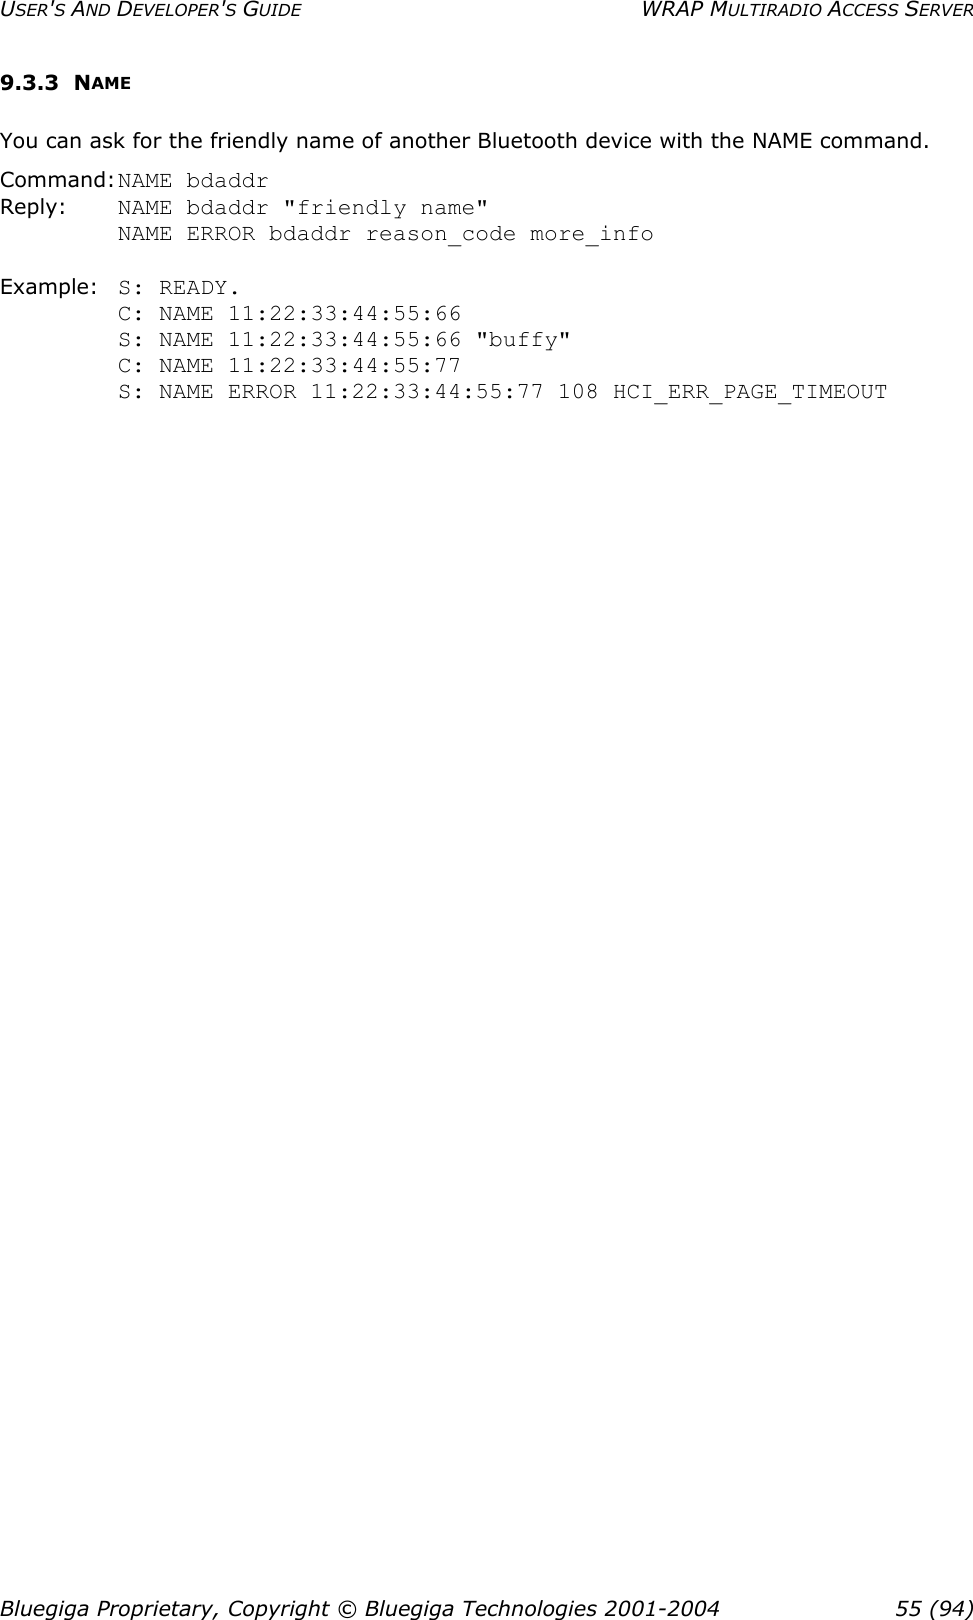
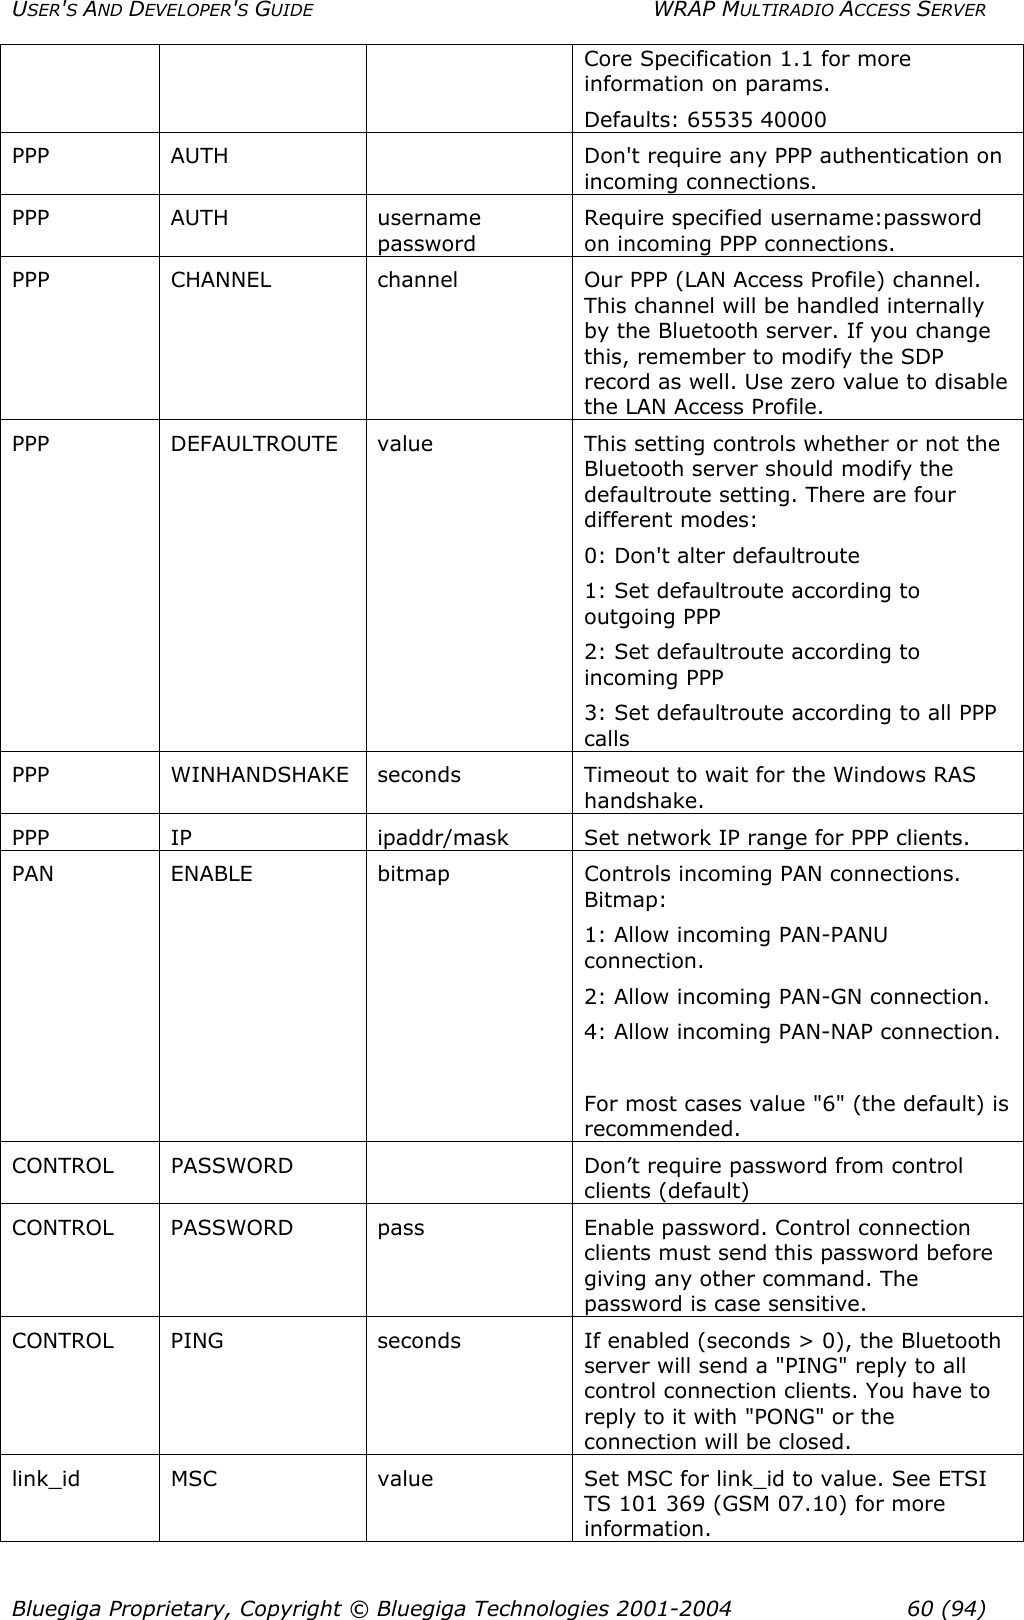
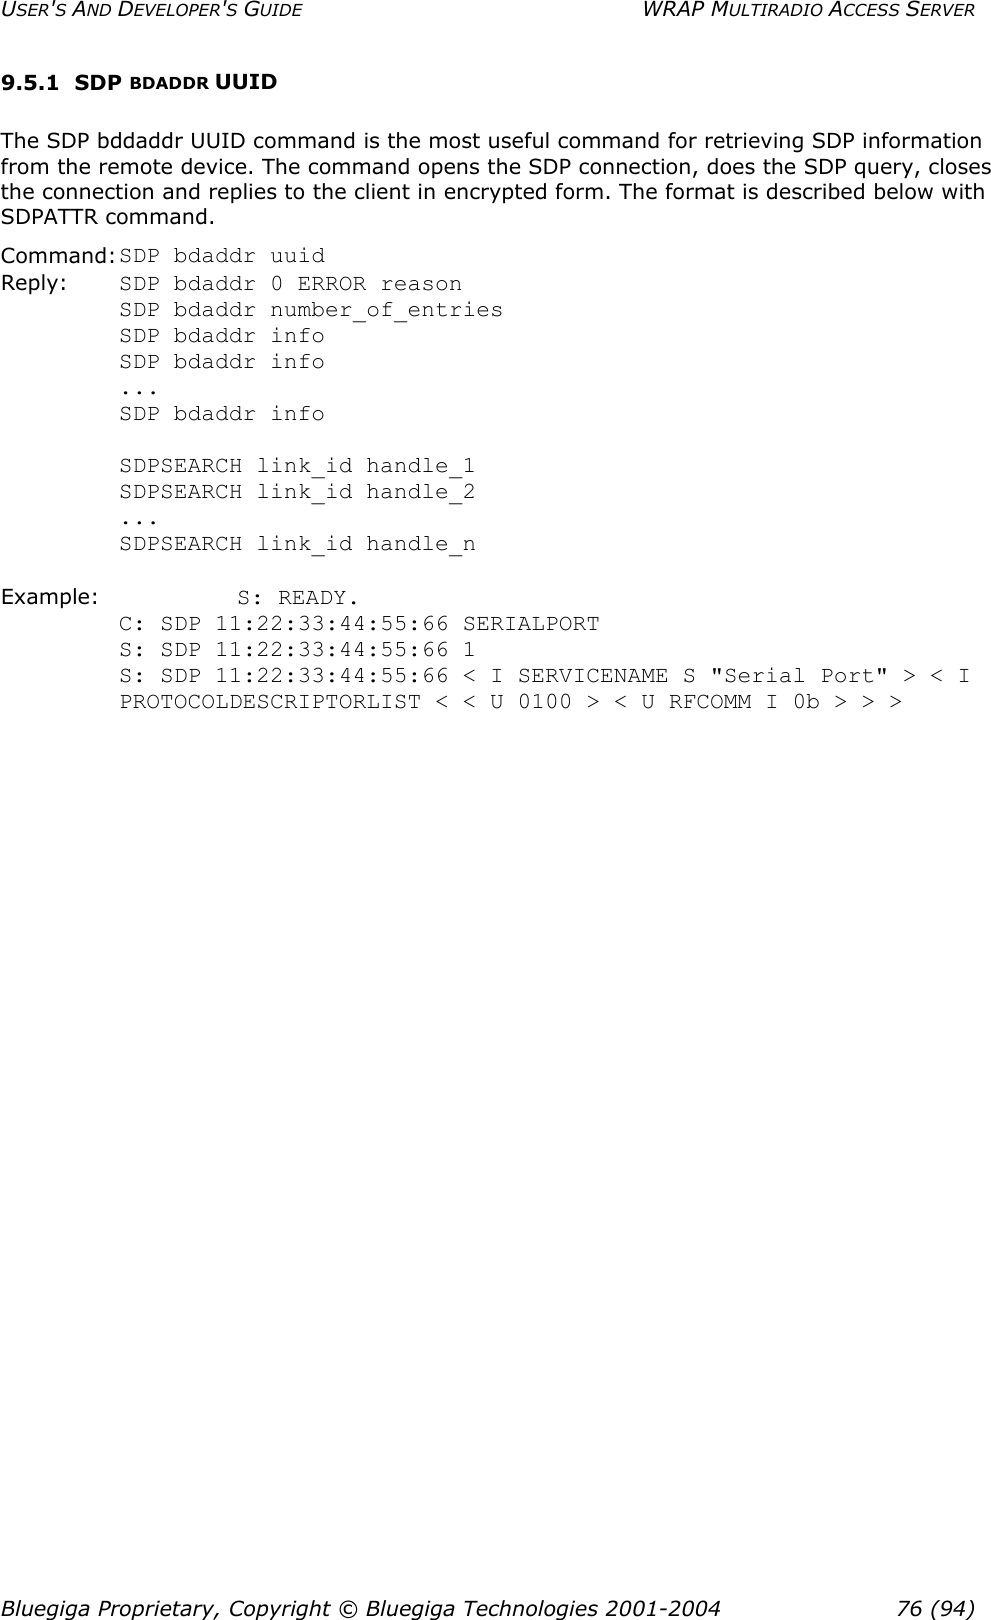
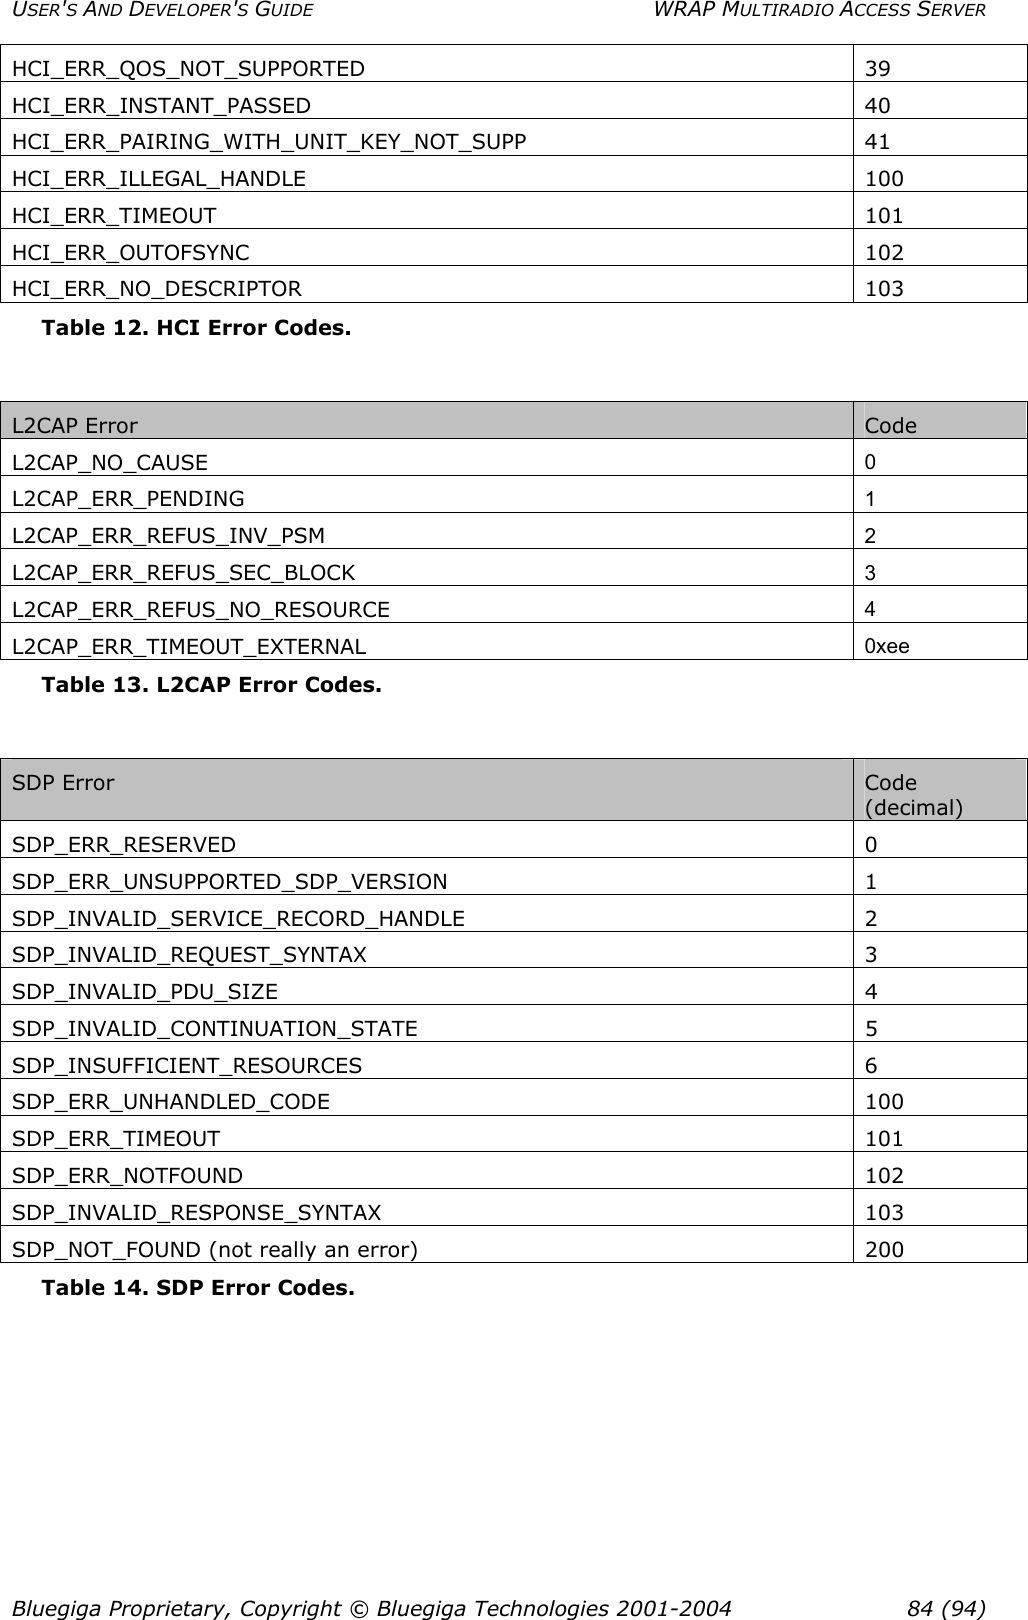
![USER'S AND DEVELOPER'S GUIDE WRAP MULTIRADIO ACCESS SERVER Setting Value Speed 115 200 bps Data Bits 8 Parity None Stop Bits 1 Flow Control None Table 1. The Management Console Port Settings. 4. Connect the serial cable shipped with the Access Server to your PC's free COM port. 5. Connect the null-modem adapter shipped with the Access Server to the serial cable. 6. Connect the serial cable with the null-modem adapter to the management / user port in the Access Server (see Figure 1). 7. Power on the Access Server. 8. Enter letter "b" in the terminal application during the first five seconds, while the blue LEDs in the Access Server turn on one by one. 9. The management console is now activated and you should see the boot log in your terminal window. Wait for the device to boot up and end with the prompt "[root@wrap /]$ " 10. You are ready to control the Access Server from the management console. 2.2.2 ACCESSING REMOTELY When the WRAP is connected to a LAN it tries to get the IP address using DHCP by default. One way to see the IP address of the WRAP board, connect to the WRAP with a management console, power on the board and, after the system is up and running, give the command "ifconfig nap". The field "inet addr" for the interface "nap" contains the IP address of the WRAP board. For example, in the following capture from the management console, the IP address is "10.1.1.43": [root@wrap /]$ ifconfig nap nap Link encap:Ethernet HWaddr 00:07:80:00:04:6C inet addr:10.1.1.43 Bcast:10.255.255.255 Mask:255.255.255.0 inet6 addr: fe80::207:80ff:fe00:46c/64 Scope:Link UP BROADCAST MULTICAST MTU:1500 Metric:1 RX packets:12635 errors:0 dropped:0 overruns:0 frame:0 TX packets:8 errors:0 dropped:0 overruns:0 carrier:0 collisions:0 txqueuelen:100 RX bytes:1686246 (1.6 MiB) TX bytes:1640 (1.6 KiB) Interrupt:24 Base address:0xc000 You can use this address to connect the Access Server remotely via SSH, telnet, FTP, SFTP. 2.3 TRANSFERRING FILES TO/FROM THE ACCESS SERVER You can transfer file to and from the access server by default using for example: Bluegiga Proprietary, Copyright © Bluegiga Technologies 2001-2004 12 (94)](https://usermanual.wiki/Silicon-Laboratories-Finland/WRAP229X/User-Guide-486574-Page-12.png)
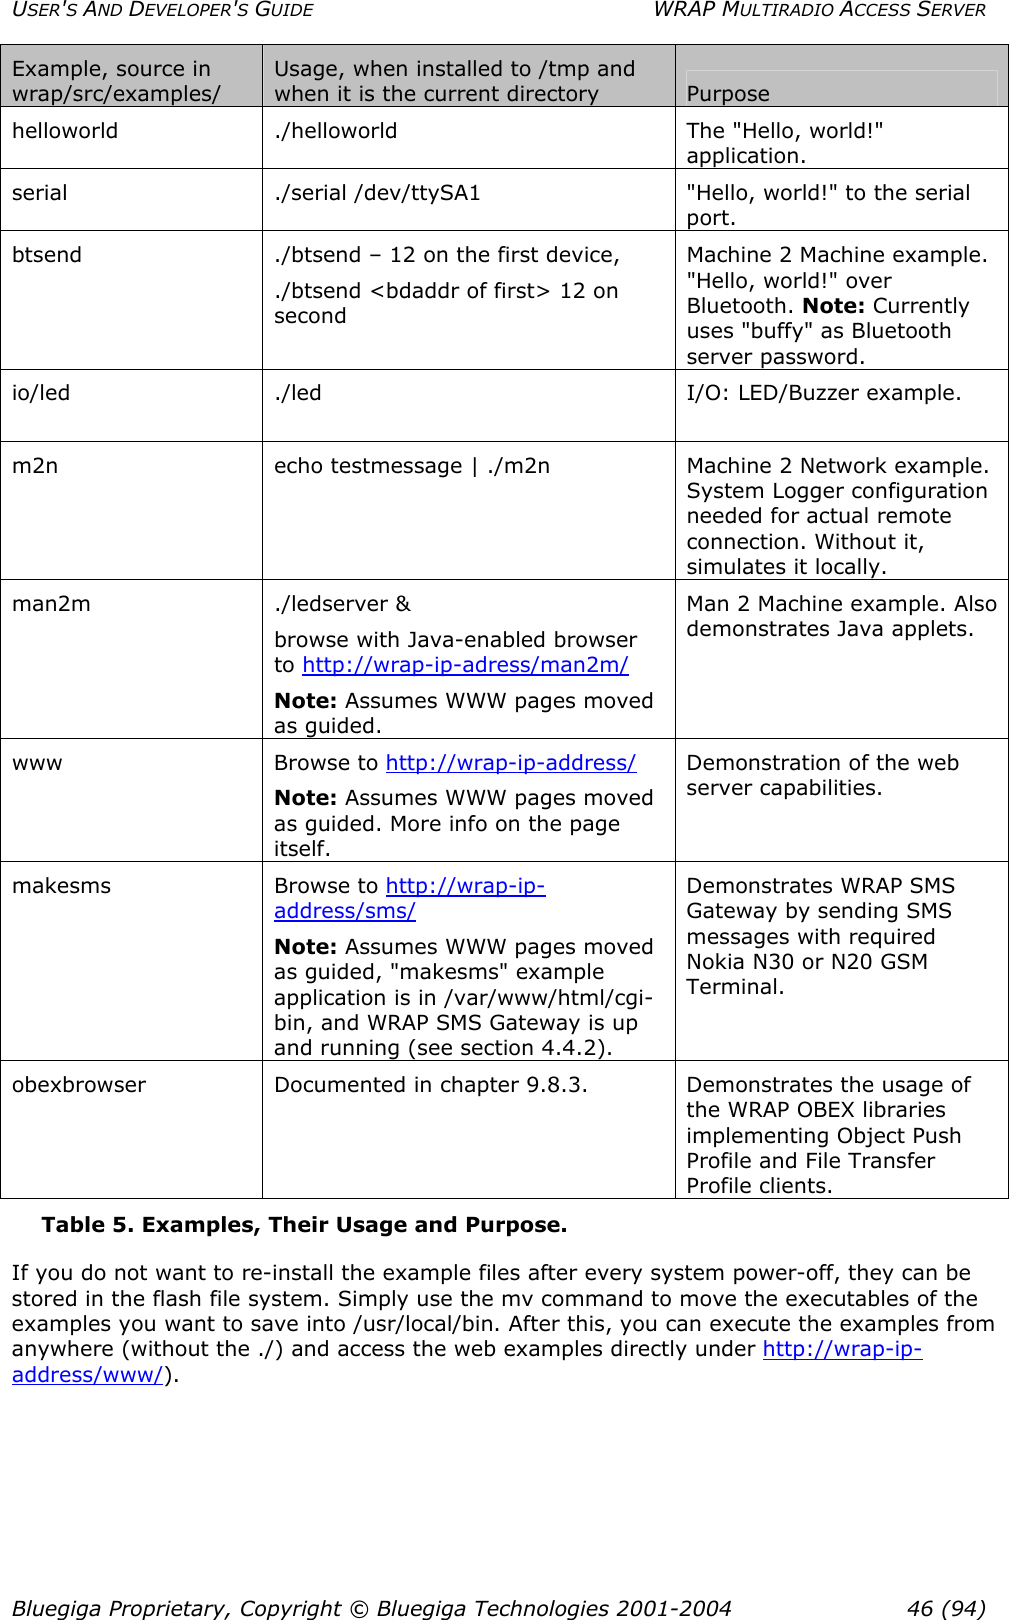
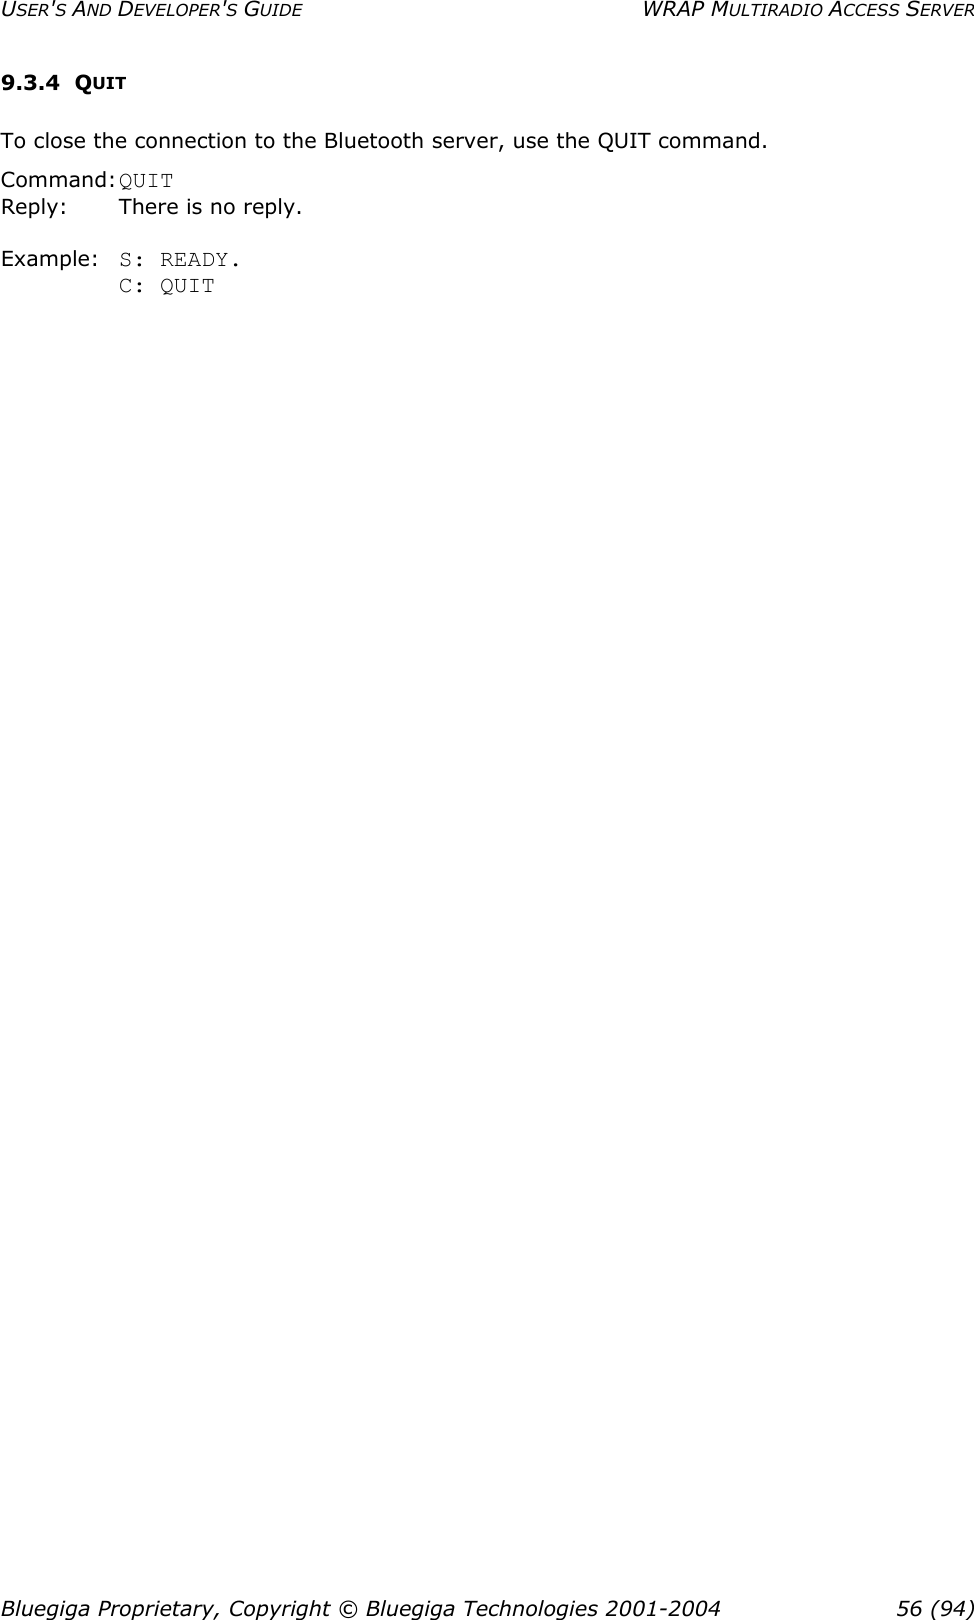
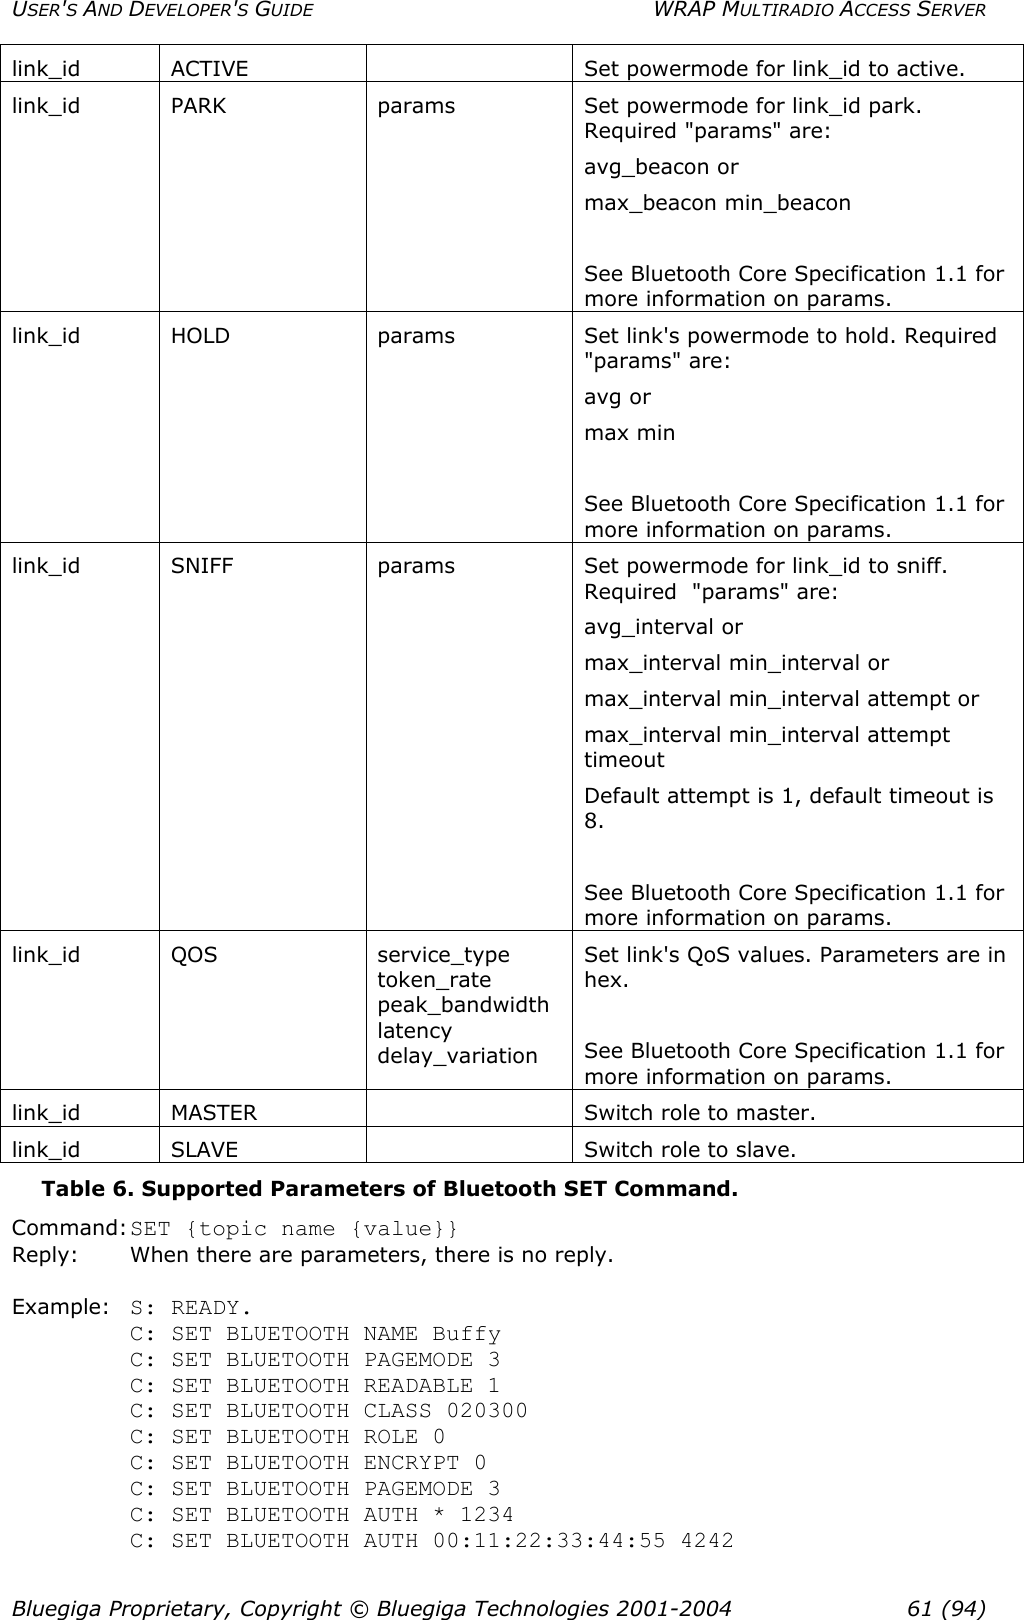
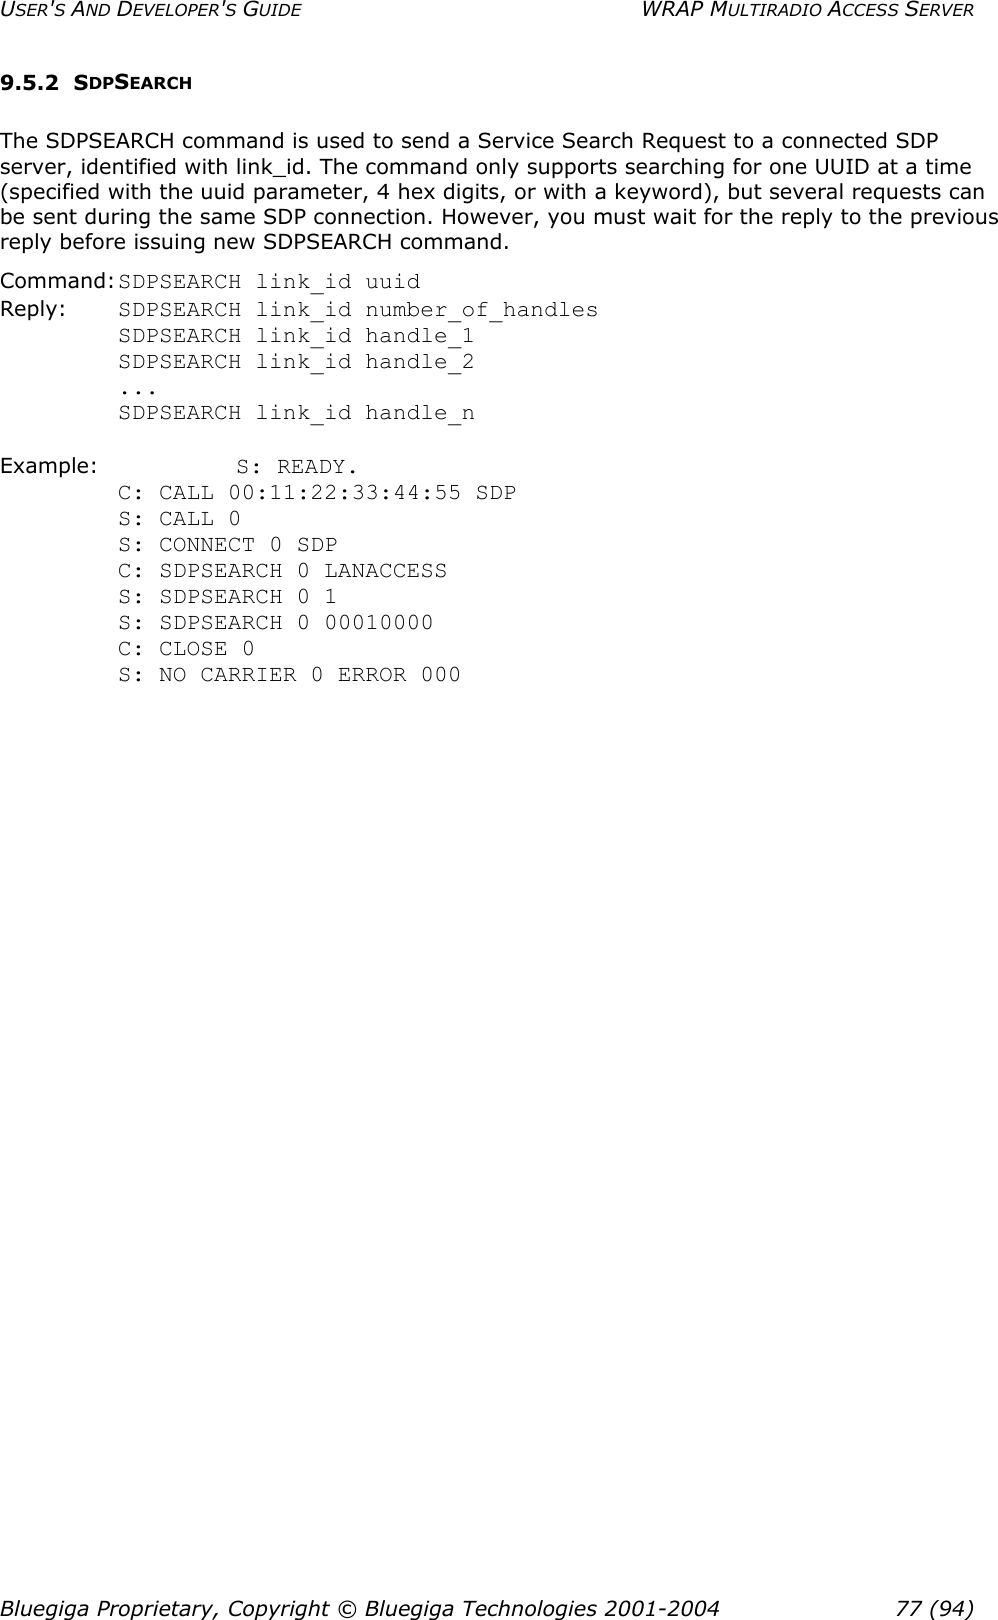
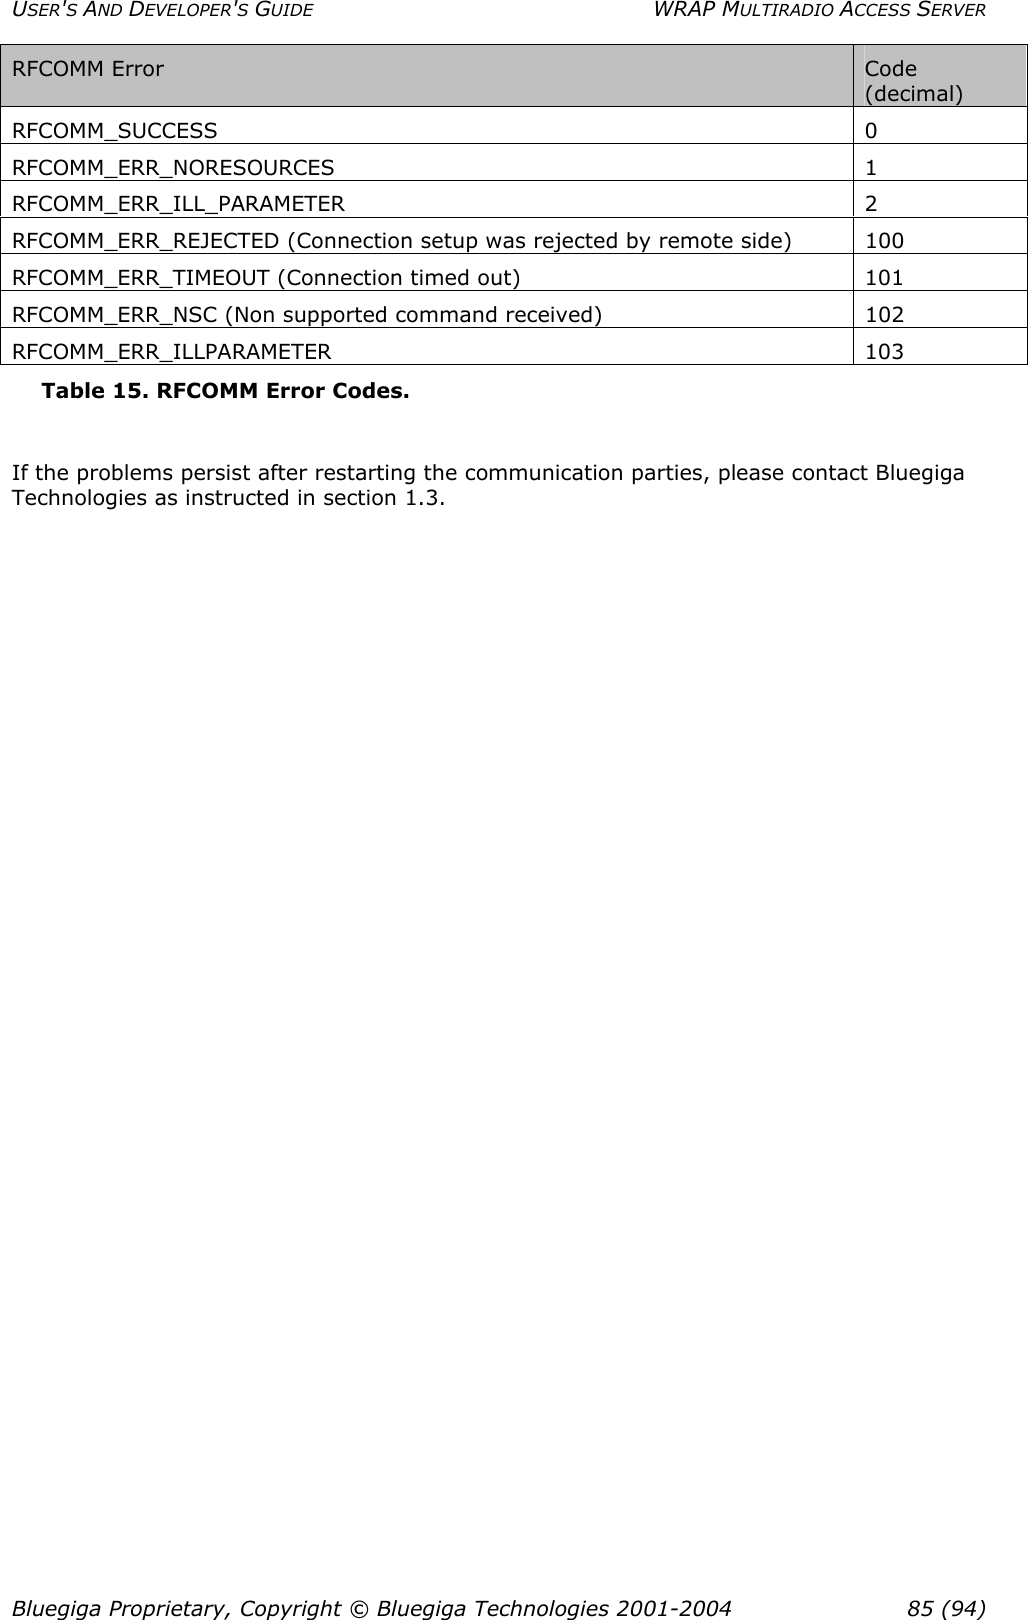
![USER'S AND DEVELOPER'S GUIDE WRAP MULTIRADIO ACCESS SERVER 3 CONFIGURATION When the WRAP is installed and powered up for the first time, the default configuration settings are being used. With these settings, the WRAP automatically configures its network settings assuming that the board is connected to a LAN network with a DHCP server running. After booting, you can use the WRAP as a Bluetooth LAN/PAN access point to the network without any changes in configuration. Also, the Serial Port Profile is enabled by default in listening mode. You can also use Object Push and File Transfer Profiles to send files to/from the WRAP. 3.1 USING THE SETUP APPLICATION The basic configuration settings can be changed using the "setup" application. It displays the settings in a hierarchical menu. Navigating the menu is accomplished by entering the number or letter corresponding to the setting to be viewed and/or changed and pressing <enter>. Pressing only <enter> either accepts the previous value of the setting or returns to the previous level in the menu hierarchy. The settings and their meanings, as well as their default values are described in the following sections. Note: Ensure that your terminal application transmits only Carriage Return (CR) when the <enter> key is pressed. If your terminal transmits both CR and LF, you cannot navigate in the "setup" application. 3.1.1 NETWORK CONFIGURATION 1. Enable Interface Eth0 [Y] This option determines whether or not an Ethernet interface is brought up at all at boot. If set to no, the other options in the Network Configuration menu are not visible. 2. Hostname of the Device [wrap] The hostname of the WRAP device. Local applications will see this name. 3. Domain of the Device [locadomain] The domain name of the WRAP device. Local applications will see this name. 4. Time Server [] Hostname (or IP address) of the time server connected at system boot to retrieve correct time using the Time Protocol (RFC 868) 5. Use Dynamic Network Configuration [Y] This option determines whether or not automatic configuration of the Ethernet interface using DHCP should be attempted at boot. If set to yes, the following options in the Network Configuration menu are not visible. 6. IP Address of the Host [10.0.0.101] If the dynamic network configuration is disabled (step 5), the IP address of the WRAP must be entered here. 7. Subnet Mask [255.255.255.0] Bluegiga Proprietary, Copyright © Bluegiga Technologies 2001-2004 14 (94)](https://usermanual.wiki/Silicon-Laboratories-Finland/WRAP229X/User-Guide-486574-Page-14.png)
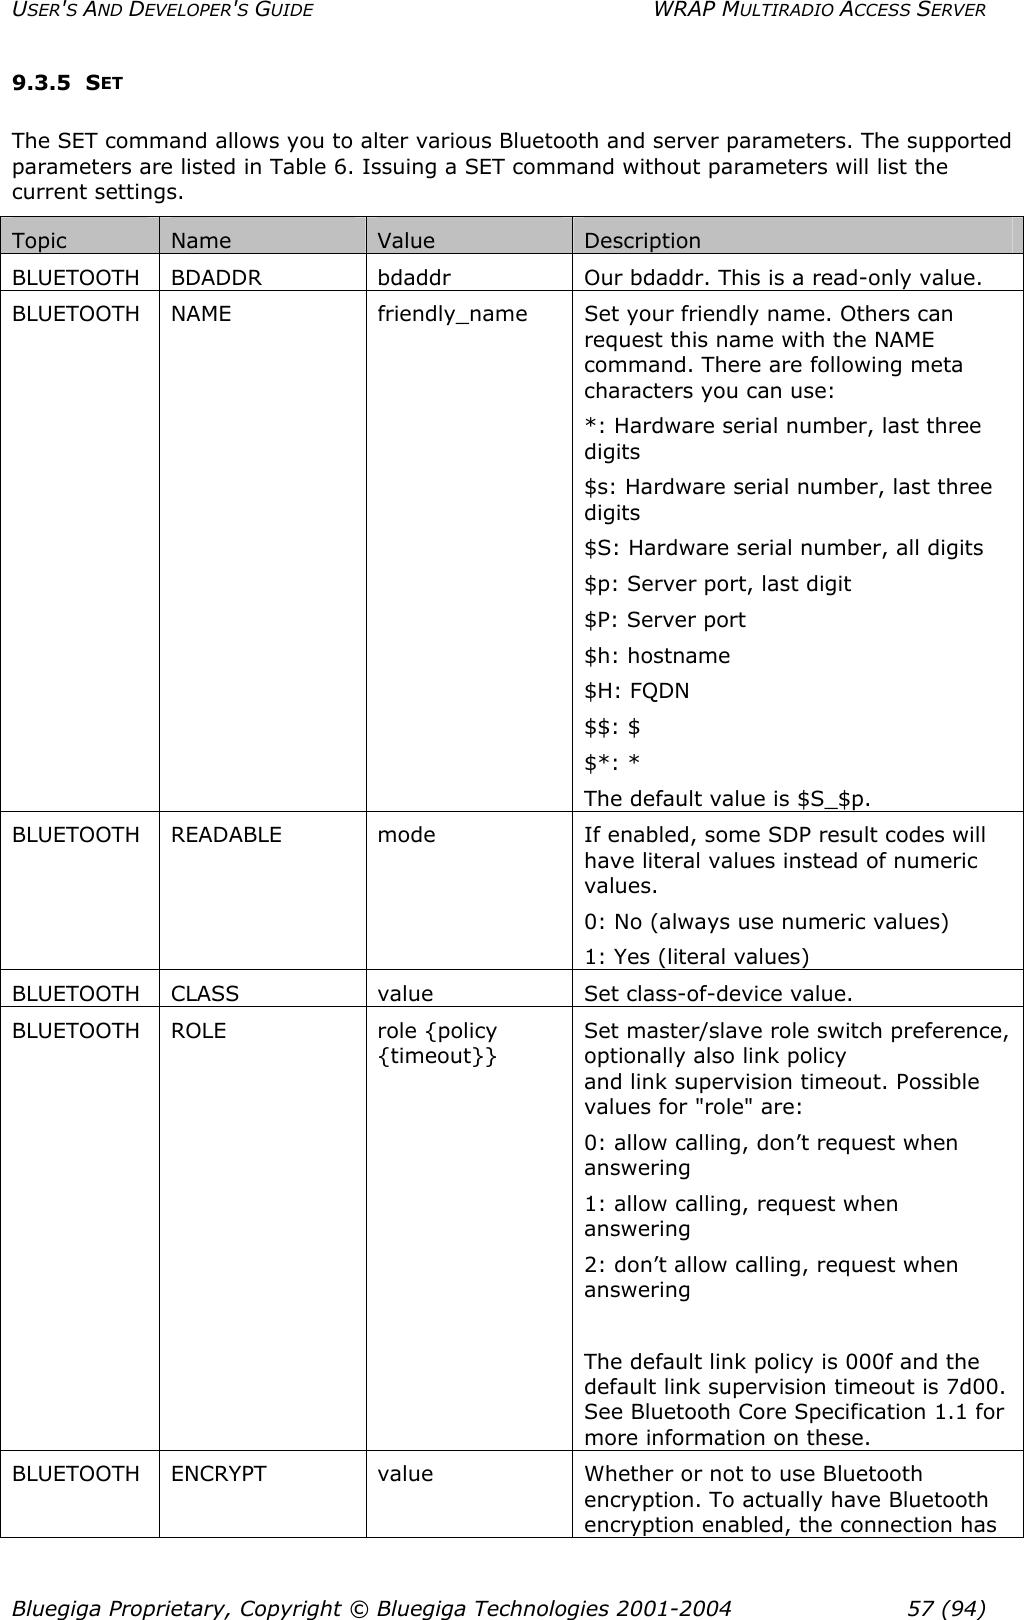
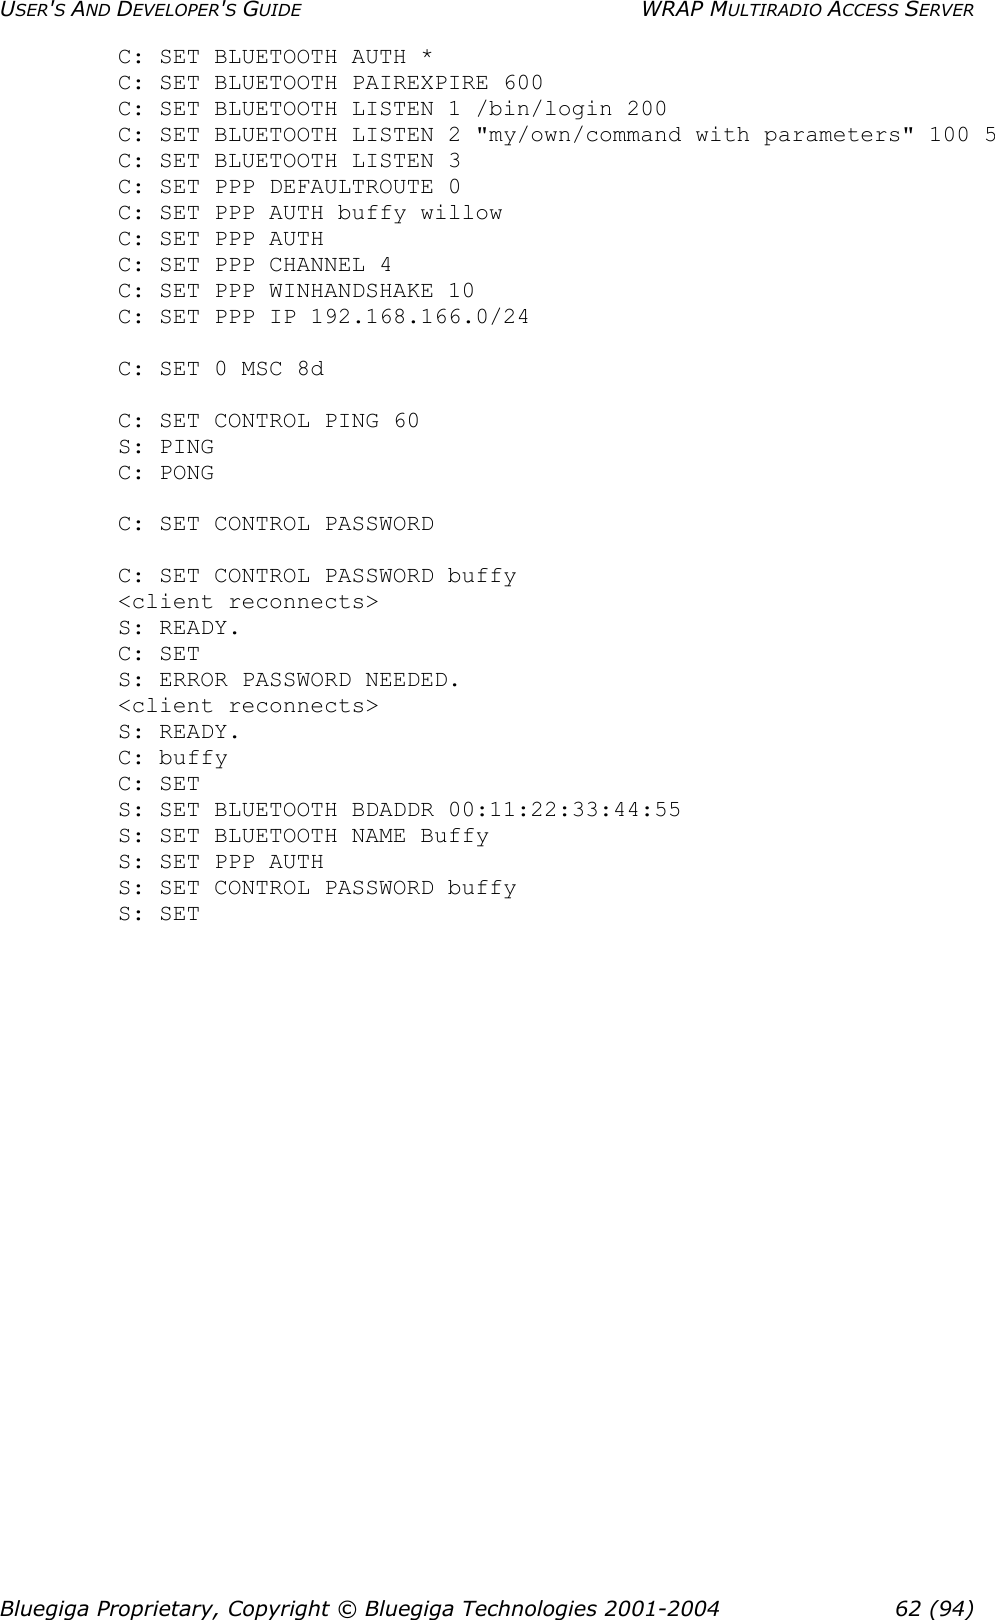
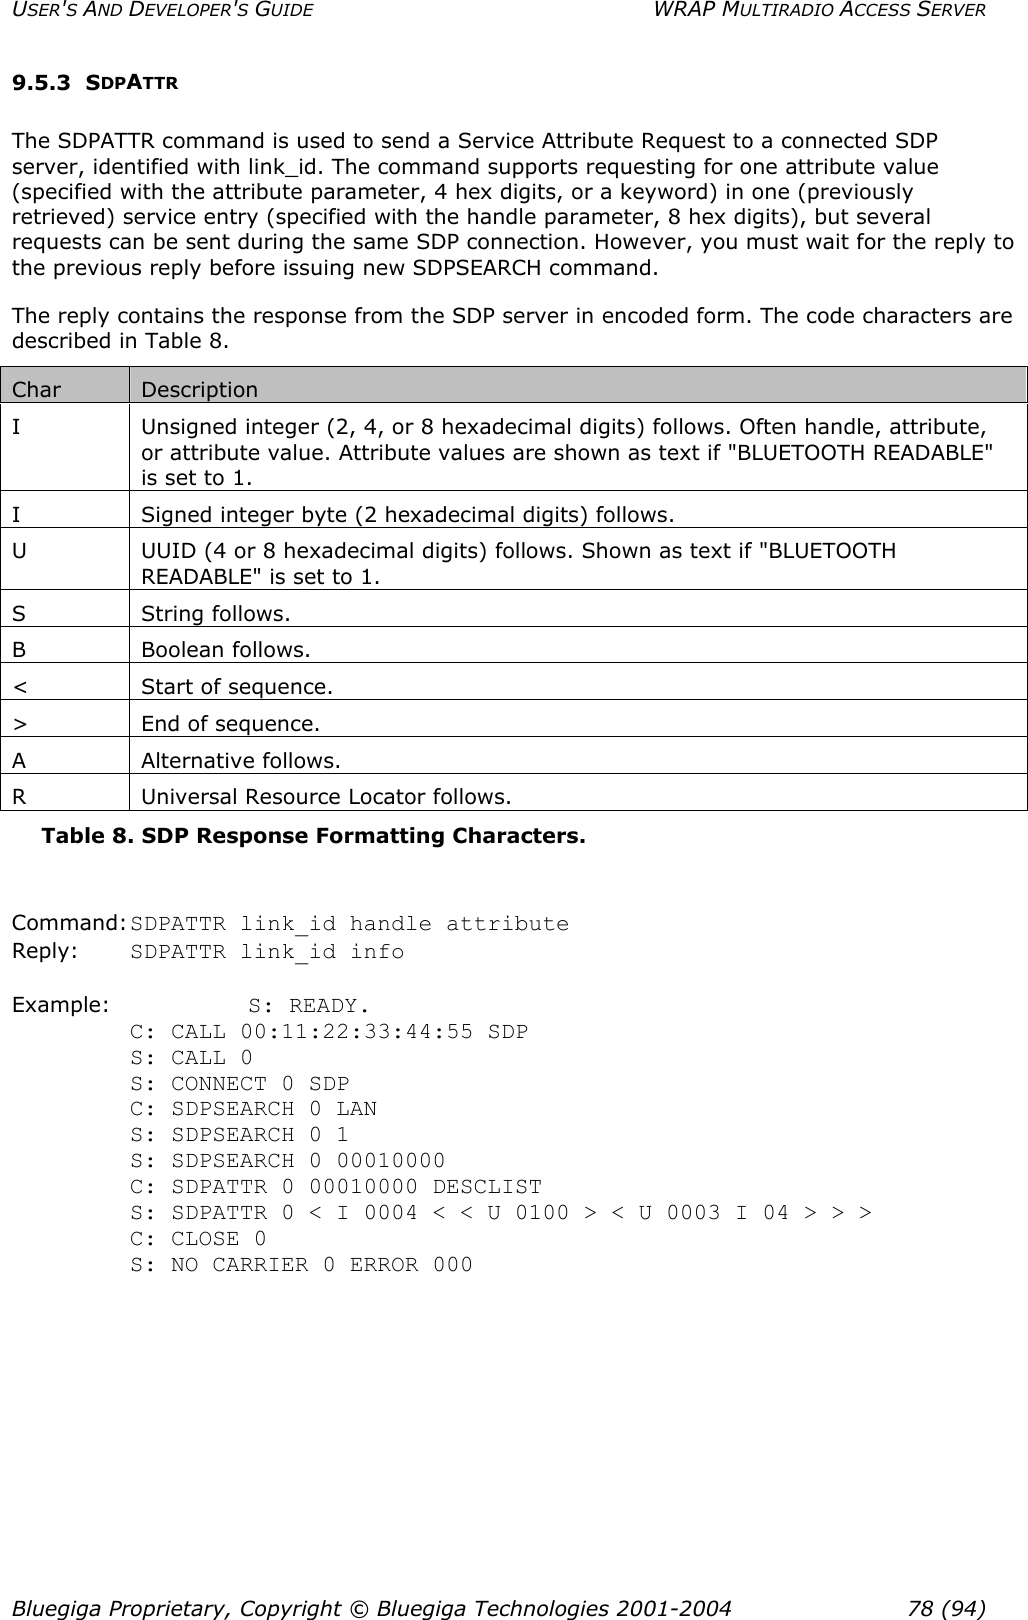
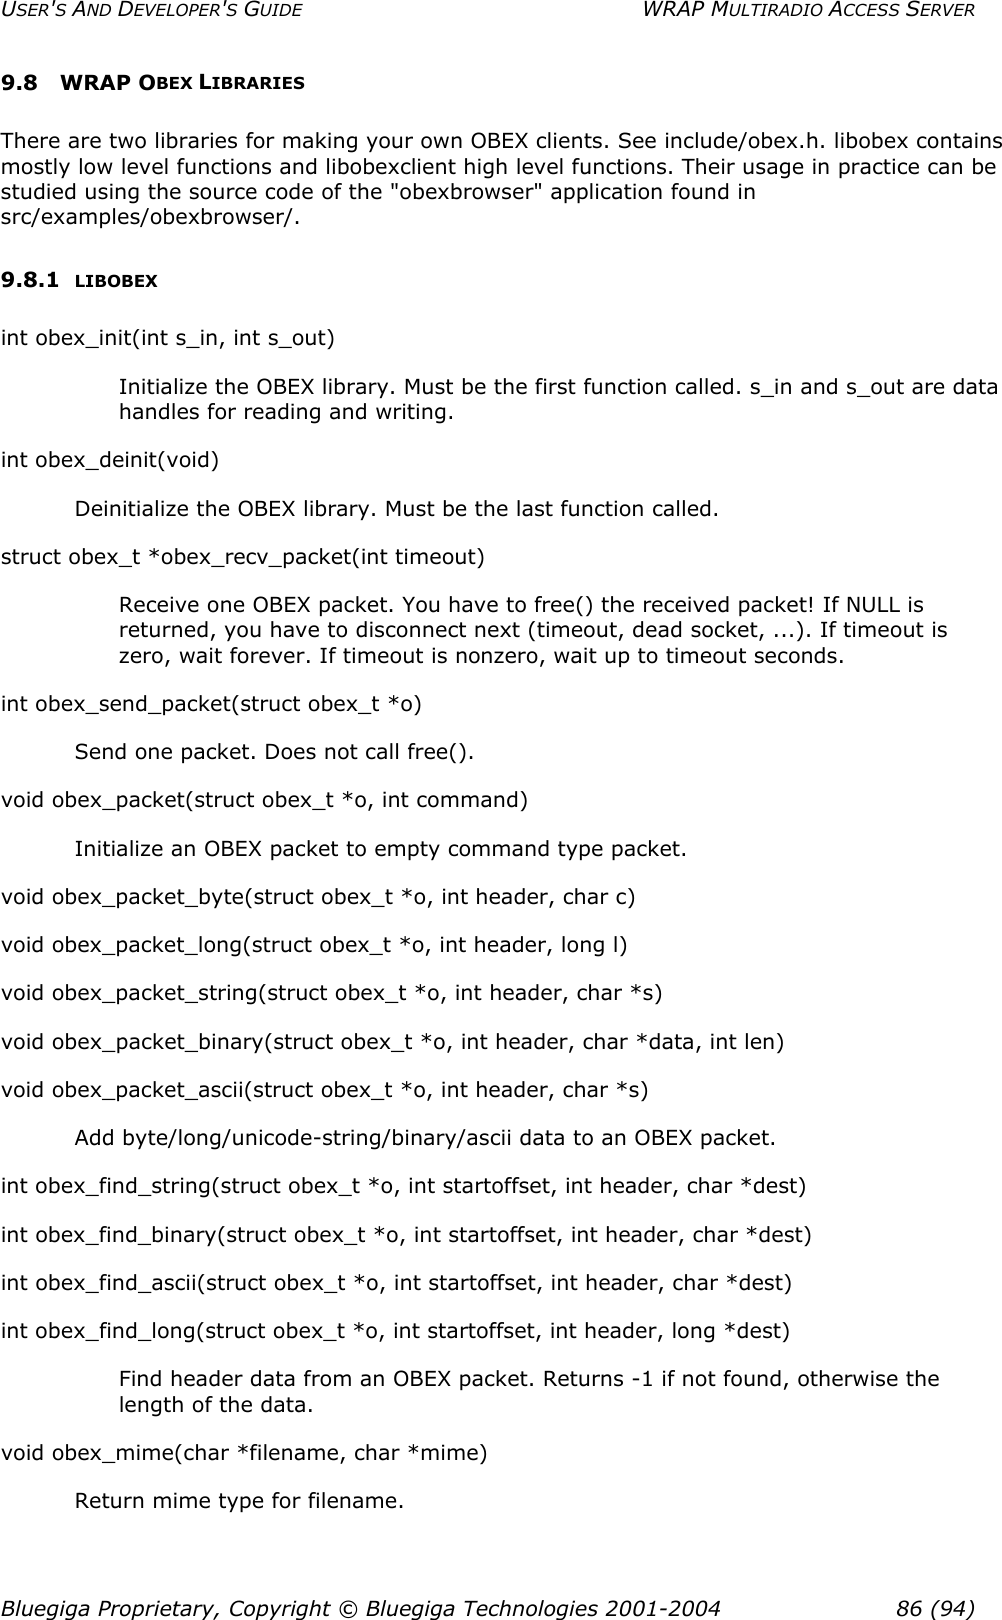
![USER'S AND DEVELOPER'S GUIDE WRAP MULTIRADIO ACCESS SERVER If the dynamic network configuration is disabled (step 5), the network mask of the WRAP must be entered here. 8. IP Address of the Default Gateway [10.0.0.254] If the dynamic network configuration is disabled (step 5), the IP address of the default gateway in the LAN to which the WRAP is connected must be entered here. 9. IP Address of the Primary Name Server [10.0.0.1] The IP address of the primary name server. 10. IP Address of the Secondary Name Server [10.0.0.2] The IP address of the secondary name server. 3.1.2 BLUETOOTH SETTINGS The Bluetooth settings are divided into general and profile specific settings, and are described in the following sections. 3.1.2.1 GENERAL BLUETOOTH SETTINGS 1. Friendly Name [W$S_$p] The name shown when this device is found when inquired about by other Bluetooth devices. The name may end with asterisk (*), which will be replaced with the last 3 digits of the serial number of the WRAP board. 2. Bluetooth Server Socket Interface Password [] The password required to be entered before any commands when discussing with the WRAP Bluetooth Server Socket Interface. Can be empty. 3. Connectable and Discoverable Mode [3] The setting specifying whether this device is connectable and/or discoverable or not by other Bluetooth devices. When a device is connectable, other Bluetooth devices can make a Bluetooth connection to it. Before making a connection, the calling device must know the Bluetooth address of the device it is connecting to. The Bluetooth addresses can be found by making an inquiry. When a device is discoverable, it shows up in inquiries. Possible values for all combinations of these settings are: 0. Not connectable, not discoverable 1. Not connectable, discoverable 2. Connectable, not discoverable 3. Connectable and discoverable (default) 4. Master/Slave Role Switch Policy [1] Bluegiga Proprietary, Copyright © Bluegiga Technologies 2001-2004 15 (94)](https://usermanual.wiki/Silicon-Laboratories-Finland/WRAP229X/User-Guide-486574-Page-15.png)
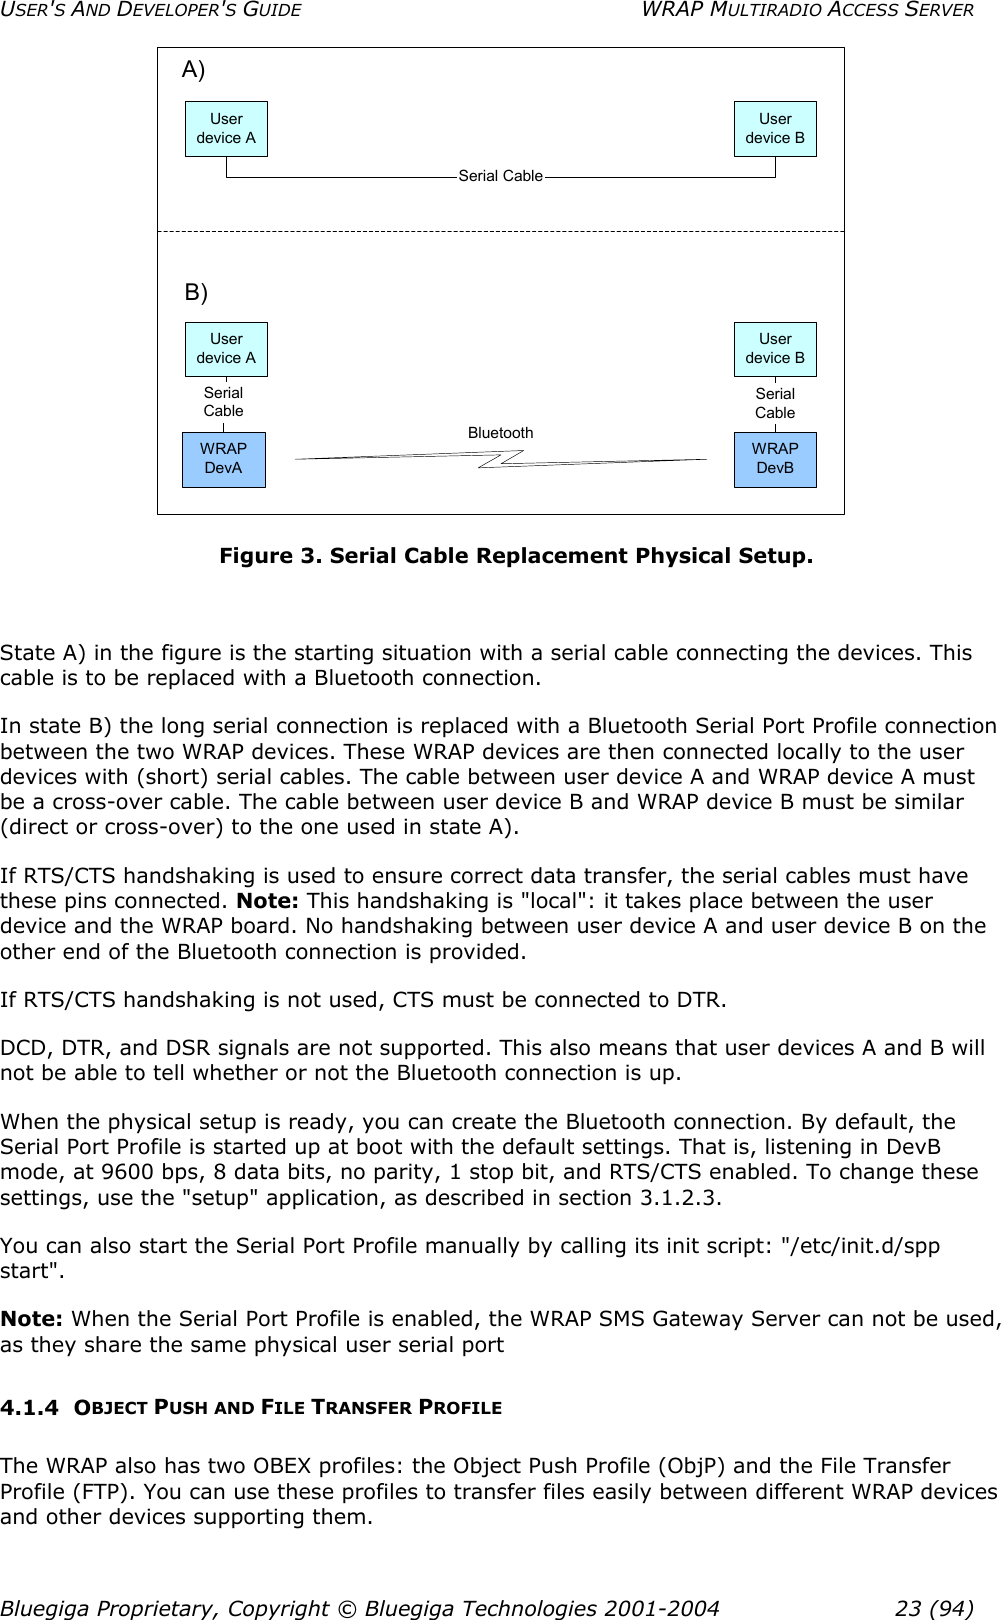
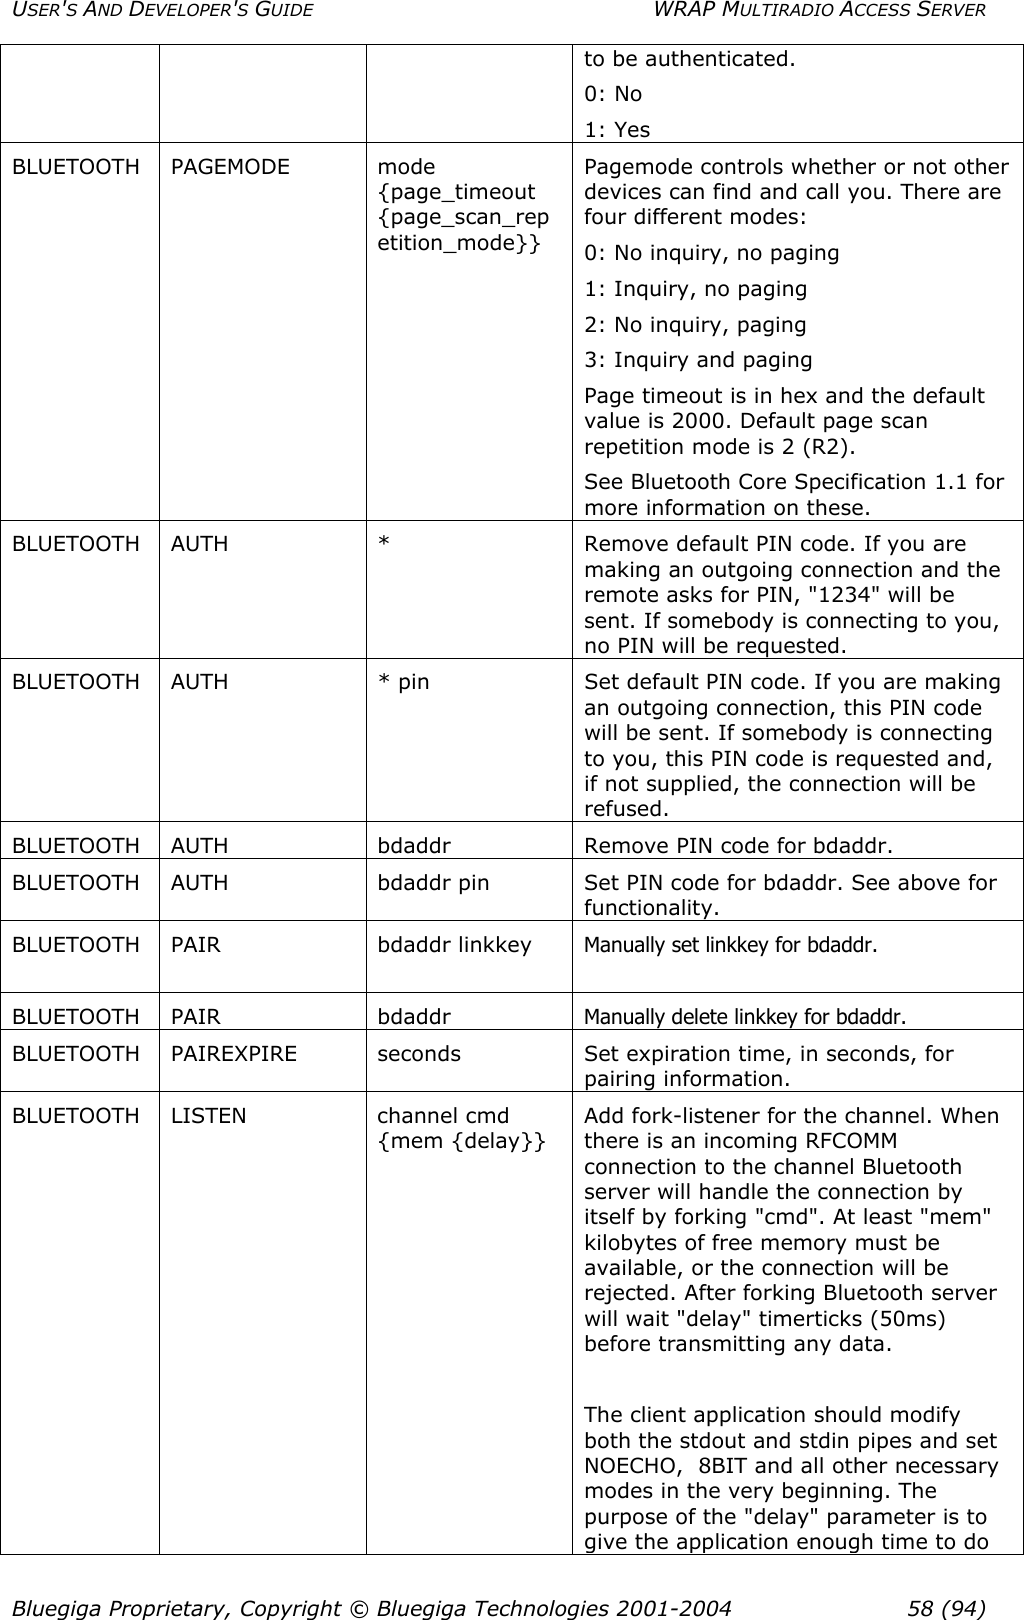
![USER'S AND DEVELOPER'S GUIDE WRAP MULTIRADIO ACCESS SERVER The setting specifying how the connecting Bluetooth devices should decide their roles. When a device is calling another Bluetooth device, it originally is the master and the answering device is the slave. When the connection is being built, a role switch can be made. Normally, access point devices want to be the master for all their slaves, and therefore they require a master-slave switch when a new device is connecting. This is also how the WRAP is configured by default. Other possible combinations are: 0. Allow switch when calling, do not request when answering 1. Allow switch when calling, request when answering (default) 2. Do not allow switch when calling, request when answering If you have problems with connecting to the WRAP, it might be due to the fact that your client device does not support a master/slave switch. In this case, set this setting to "0". 5. Default PIN Code [] The PIN code used when establishing connections. Up to 16 characters are significant. If there is no default PIN code, the WRAP does not require a PIN code when establishing connections. If in this case the other device requests a PIN code, the default PIN code "1234" is sent, following the Bluetooth specification. 6. Power Save Mode and Parameters [4] The power save mode used by default for all connections. 0. Active 1. Park: Round-robin 2. Park: Idle 3. Sniff: All 4. Sniff: Idle 3.1.2.2 LAN ACCESS PROFILE SETTINGS 1. Enable Lan Access Profile [Y] Whether or not the LAN Access Profile is enabled. 2. Lan Access Login Name and Password [] The login name and password required from LAN Access Clients. Must be entered as a single string, separated with a space. For example: "guest buffy". If empty (default), no login is required. 3. Service Name (shown in SDP) [Lan Access Using PPP] The name of this service as shown in the Service Discovery. 3.1.2.3 SERIAL PORT PROFILE SETTINGS Note: The visibility of some of these settings is controlled by the "Act as the Calling Device" setting. Bluegiga Proprietary, Copyright © Bluegiga Technologies 2001-2004 16 (94)](https://usermanual.wiki/Silicon-Laboratories-Finland/WRAP229X/User-Guide-486574-Page-16.png)
![USER'S AND DEVELOPER'S GUIDE WRAP MULTIRADIO ACCESS SERVER Note2: the Serial Port Profile is disabled if the SMS Gateway is enabled, as they share the same physical serial port. 1. Enable Serial Port Profile [Y] Whether the Serial Port Profile is enabled or not. 2. Act as the Calling Device [N] Whether this device should act as the calling device (DevA) or the answering device (DevB). 3. BPS Rate [9600] The bits-per-second rate of the connection. Possible values are 300, 1200, 2400, 4800, 9600, 19200, 38400, 57600, 115200, 230400, and 460800. 4. Data Bits [8] The number of data bits in the connection. Possible values are 5, 6, 7, and 8. 5. Parity [0] The parity bit setting of the connection. Possible values are: 0: no parity, 1: odd parity, and 2: even parity. 6. Stop Bits [1] The number of stop bits in the connection. Possible values are 1 and 2. 7. Hardware Flow Control (RTS/CTS) [Y] Whether or not the hardware flow control is used in the connection. 8. Software Flow Control (XON/XOFF) [N] Whether or not the software flow control is used in the connection. 9. Service Name (shown in SDP) [Serial Port] The name of this service as shown in the Service Discovery. (This setting is visible only when setting 2., "Act as the Calling device", is disabled.) 10. Bluetooth Address of the Remote Device [00:07:80:80:01:1f] The Bluetooth address of the device to be contacted. (This setting is visible only when setting 2., "Act as the Calling device", is enabled.) 11. Server Channel of the Remote Device [2] The Bluetooth server channel of the device to be contacted. (This setting is visible only when setting 2., "Act as the Calling device", is enabled.) 12. Optional Command Line Parameters for SPP Application [] Optional extra parameters for the WRAP Serial Port Profile application. Currently the only supported parameter is "--msc", which enables transmitting of DCD/DSR status in MSC. By default, they are not transmitted. Bluegiga Proprietary, Copyright © Bluegiga Technologies 2001-2004 17 (94)](https://usermanual.wiki/Silicon-Laboratories-Finland/WRAP229X/User-Guide-486574-Page-17.png)
![USER'S AND DEVELOPER'S GUIDE WRAP MULTIRADIO ACCESS SERVER 3.1.2.4 OBEX SETTINGS 1. Enable Object Push Profile [Y] Whether or not the Object Push Profile is enabled. 2. Service Name (shown in SDP) [OBEX Object Push] The name of this service as shown in the Service Discovery. 3. Enable File Transfer Profile [Y] Whether or not the File Transfer Profile is enabled. 4. Service Name (shown in SDP) [OBEX File Transfer] The name of this service as shown in the Service Discovery. Bluegiga Proprietary, Copyright © Bluegiga Technologies 2001-2004 18 (94)](https://usermanual.wiki/Silicon-Laboratories-Finland/WRAP229X/User-Guide-486574-Page-18.png)
![USER'S AND DEVELOPER'S GUIDE WRAP MULTIRADIO ACCESS SERVER 3.1.2.5 PERSONAL AREA NETWORK PROFILE SETTINGS 1. Personal Area Network User (PANU) Profile 1. Enable PANU Whether or not the PAN User Profile is enabled. 2. Service Name (shown in SDP) [PAN User] The name of this service as shown in the Service Discovery. 2. Personal Area Network Generic Networking (PAN-GN) Profile 1. Enable PAN-GN [Y] Whether or not the PAN Generic Networking Profile is enabled. 2. Use Dynamic Network Configuration for Local IP Address [N] Whether or not DHCP is used for configuring Local IP Address. Enable only if you are connecting this PAN-GN to another PAN-GN that will provide the IP configuration. 3. Local GN Interface IP Address [192.168.161.1] The IP address for the local GN interface (if the dynamic configuration is not used; step 2 above). 4. Local GN Interface Netmask [255.255.255.0] The netmask for the local GN interface (if the dynamic configuration is not used; step 2 above). 5. Start DHCP Server for Remote Devices [Y] Whether or not this device should launch DHCP for Remote Devices connecting to this PAN-GN. Disabled if dynamic configuration is used; step 2 above. 6. Service Name (shown in SDP) [Generic Networking] The name of this service as shown in the Service Discovery. 3. Personal Area Network Network Access Point (PAN-NAP) Profile 1. Enable PAN-NAP Whether or not the PAN Network Access Point Profile is enabled. 2. Service Name (shown in SDP) [Network Access Point] The name of this service as shown in the Service Discovery. 3.1.3 RAMDISK SETTINGS 1. Size of the ramdisk (in kilobytes) [512] The size of the ramdisk (/mnt/ram/). Sizes below minimum (currently 50) and above maximum (currently 20480) are not allowed. Bluegiga Proprietary, Copyright © Bluegiga Technologies 2001-2004 19 (94)](https://usermanual.wiki/Silicon-Laboratories-Finland/WRAP229X/User-Guide-486574-Page-19.png)
![USER'S AND DEVELOPER'S GUIDE WRAP MULTIRADIO ACCESS SERVER 3.1.4 SYSTEM LOGGER SETTINGS 1. Log locally [Y] This option determines whether or not the System Logger (syslogd) should log locally (to /var/log/messages). 2. Address of the Remote Syslog Server [] The address of the device in the network to which the System Logger should log to. Note: The remote device must be configured to accept syslogd connections from the WRAP board. See the system logger documentation on the remote device for more information on how to accomplish that. 3.1.5 WEB SERVER SETTINGS 1. Enable Web Server [Y] Whether or not the Web (WWW) server is enabled. 2. Web Server Root Directory [/var/www/html] The directory where the WWW pages to be served by the Web server are located. 3.1.6 INSTALL POINT SETTINGS 1. Install Point logging device [/dev/null] The file to which the Install Point writes its logs. Use /dev/console for console output and, for example, /tmp/installpoint.log if you want to save this information. Be careful, however, not to fill the RAM file system (use a cron job to free disk space from time to time). Note: If the file is invalid, Install Point is not started at boot. 3.1.7 SMS GATEWAY SETTINGS Note: The SMS Gateway is disabled by default, as the Serial Port Profile is enabled by default, and they share the same physical serial port. Disable the Serial Port Profile first to be able to enable the SMS Gateway. 1. Enable SMS Gateway at startup [N] Whether or not the SMS Gateway (smsgw) should be started automatically when the system boots up. 2. SMS Gateway logging device [/dev/null] The file to which the SMS Gateway (smsgw) logs all traffic. Use /dev/console for console output and, for example, /tmp/smsgw.log if you want to save this information. Be careful, however, not to fill the RAM file system (use a cron job to free disk space from time to time). 3.2 /ETC/RC.D/RC.LOCAL While not configurable with the "setup" application, the file "/etc/rc.d/rc.local" is important for system boot configuration. It is the last init script executed at system startup. Bluegiga Proprietary, Copyright © Bluegiga Technologies 2001-2004 20 (94)](https://usermanual.wiki/Silicon-Laboratories-Finland/WRAP229X/User-Guide-486574-Page-20.png)
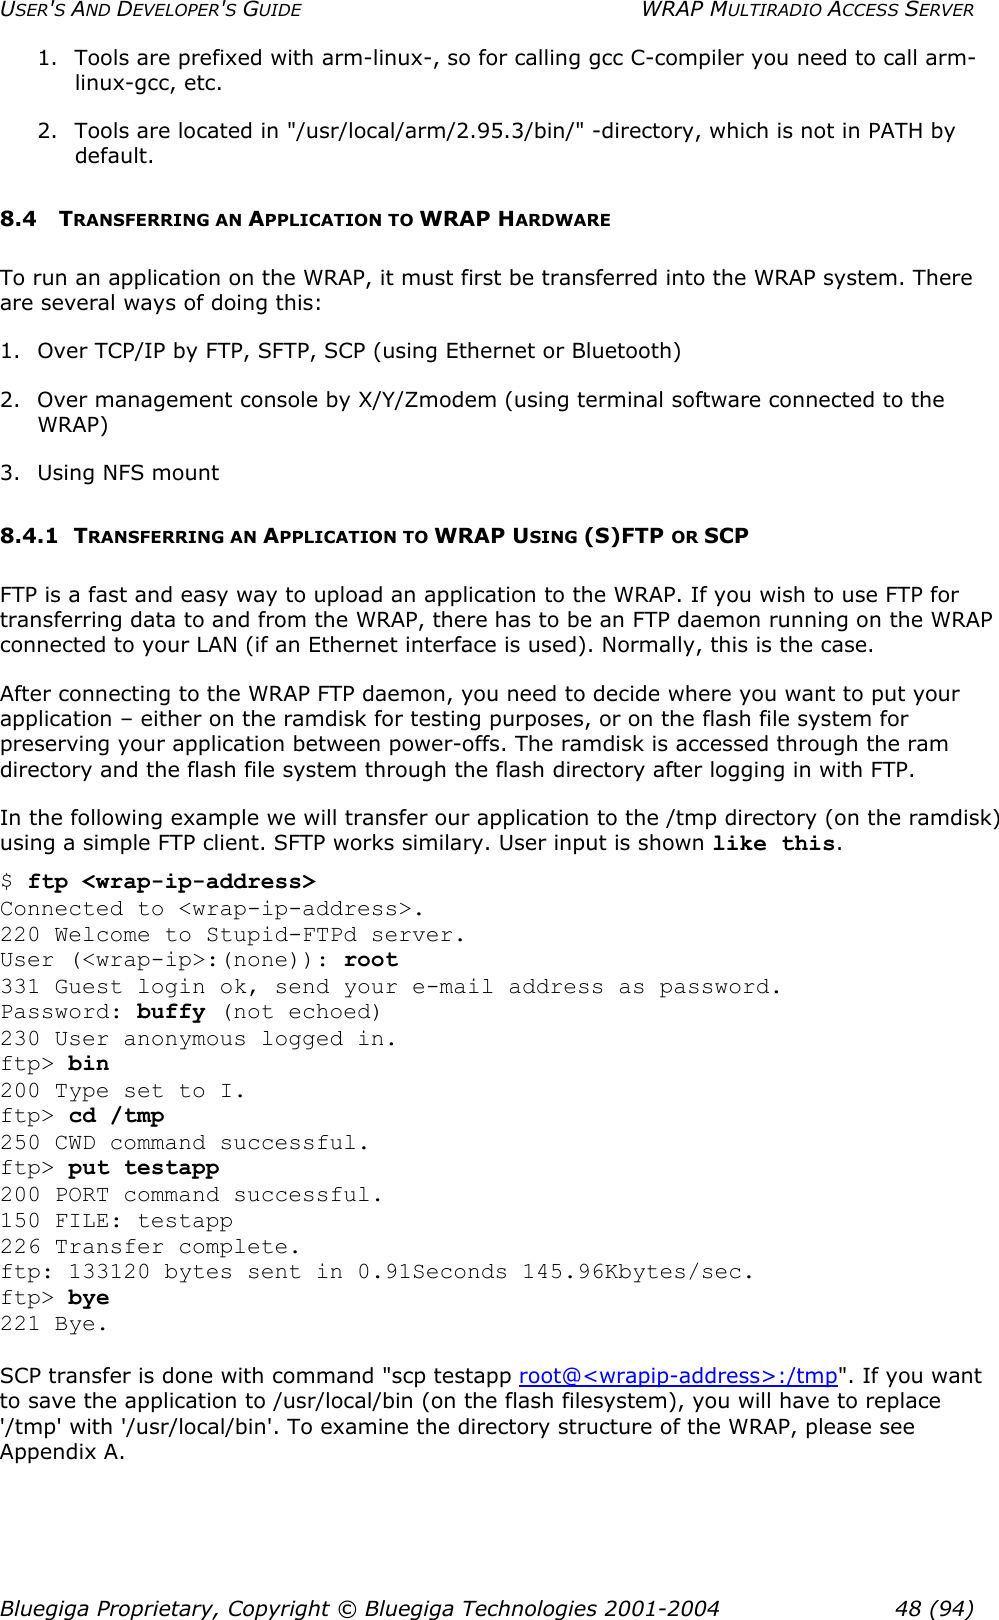
![USER'S AND DEVELOPER'S GUIDE WRAP MULTIRADIO ACCESS SERVER By default, the script "/etc/rc.d/rc.local" just turns off all LEDs to indicate the startup has finished. If you want to initialize something automatically at every boot, or start up your own servers, for example, you should add the required commands here. You can use "vi" editor to edit the file. 3.3 RESETTING CONFIGURATION You can restore the default configuration by deleting the main configuration file and rebooting the board. When the system starts up, the default configuration settings are restored. If you have only changed the configuration by using the "setup" application, the following commands at the WRAP command prompt will suffice: [root@wrap /]$ rm /etc/sysconfig/config.xml [root@wrap /]$ reboot 3.4 ADVANCED CONFIGURATION More advanced configuration can be done by editing the appropriate files in the /etc directory. Do not alter these files unless you are an expert user. The files that are the most "safe" to edit, and their respective purposes, are listed in Table 2. Note: Files are in Linux text file format, where the lines end with a single Line Feed (LF, "\n") character. Some applications will not work if the configuration file format is changed to DOS format, where the lines end with both Carriage Return and Line Feed (CR+LF, "\r\n") characters. File Purpose /etc/bluetooth.conf WRAP Bluetooth Server Socket Interface commands that are run every time the Bluetooth Server is started. See section 9 for details. /etc/crontab Cron daemon settings. Standard crontab format. Note: cron is not enabled by default. You must enable it with command "chkconfig --add cron". /etc/stupid-ftpd/stupid-ftpd.conf FTP daemon configuration file. Self documented. /etc/installpoint.conf Install Point configuration file. See section 4.4.2 for details. /etc/smsgw.conf SMS Gateway configuration file. See section 4.4.3 for details. /etc/profile Basic user profile. Table 2. The Supported Advanced Configuration Files. Bluegiga Proprietary, Copyright © Bluegiga Technologies 2001-2004 21 (94)](https://usermanual.wiki/Silicon-Laboratories-Finland/WRAP229X/User-Guide-486574-Page-21.png)
![USER'S AND DEVELOPER'S GUIDE WRAP MULTIRADIO ACCESS SERVER These profiles are handled by forwarding incoming calls to "obexserver" program, which handles both profiles. The OBEX working directory is /tmp/obex, and users have full read and write access there. By default, that directory also contains the default vCard. Two simple command line utilities, "obexput" and "obexget", are also provided. They can be used to send and retrieve a single file to and from another Bluetooth device supporting OBEX. Enter either of the commands without parameters to get a short help for using the command. If the return value is non-zero, one of the following situations has happened: -2: --help, 2: Invalid parameter, -3: Error connecting to control socket, -4: Failed talking to Bluetooth Server, -1: Error connecting to data socket. Note that return value is zero (0) even if the OBEX communication has failed. You should therefore scan the standard output of the command. On error, you will see the OBEX error in format "Failed to <what>, errorcode <hexcode>" where <what> can be "connect", "setpath", "put", "get" or "disconnect" and <hexcode> is the obexclientlib return code in hexadecimal format for the corresponding command, documented in 9.8.2. 4.1.5 PAN PROFILE The WRAP Multiradio Access Server has support for all PAN profile modes: Personal Area Network User (PANU), Network Access Point (NAP) and Group Node (GN). The device creating the PAN connection decides, which of these modes are to be used. Incoming connections are handled automatically by the WRAP. The WRAP board can also act as a PAN Client, but in this case it must be controlled manually using the socket interface, described in the Bluetooth developer documentation. 4.1.6 BLUETOOTH RANGE CHANGING The transmit power of the WRAP Multiradio Access is configurable. By default, class 1 (100 meter range) settings are used. The settings can be changed down to "class 2" settings (10 meter range) with "b2b_class2" command or even less with "b2b_class3" command. The class 1 settings can be restored with "b2b_class1" command. After "b2b_classX" is given, it is recommended to reboot the WRAP once to restart Install Point and other applications connected to the Bluetooth server(s). Note: When the operation is successful, you should get one "Can't open baseband" message with WRAP Multiradio Access Server model 2293 and three messages with 2291. 4.1.7 BTCLI - BLUETOOTH SERVER COMMAND LINE INTERFACE UTILITY You can send commands to a Bluetooth server using the "btcli" application. Usage: btcli [options] command To see the options, enter the command "btcli --help". The specified command is sent to a WRAP Bluetooth server (default: first server at port 10101) and all replies are echoed to the standard output. The application waits and prints the replies for a certain amount of time (default: 10 seconds) and exits. 4.1.8 SERIALBLUETOOTH It is also possible to control the first WRAP Bluetooth server (at port 10101) via RS-232 with the "serialbluetooth" application. Note: When you want to use this application, you must first disable the Bluetooth Serial Port Profile and the WRAP SMS Gateway Server with the "setup" application, as described in chapter 3. Bluegiga Proprietary, Copyright © Bluegiga Technologies 2001-2004 24 (94)](https://usermanual.wiki/Silicon-Laboratories-Finland/WRAP229X/User-Guide-486574-Page-24.png)
![USER'S AND DEVELOPER'S GUIDE WRAP MULTIRADIO ACCESS SERVER Usage: serialbluetooth [options] To see the options, enter the command "serialbluetooth --help". Basically, serialbluetooth takes commands from a serial port and forwards them to the Bluetooth server. All the commands available via socket interface are also available via serial port. There are two exceptions: 1) After making an outgoing RFCOMM data call, all input from the serial port is forwarded to the data socket, not the control socket. To close the data socket, you have to write "+++" with a 200ms pause before each character. There is no way to have two concurrent RFCOMM calls. 2) All incoming RFCOMM calls are answered automatically. Again, to close the data socket, write "+++" as with the outgoing call. 4.2 COMPACT FLASH GPRS CARD The Compact Flash GPRS card is identified automatically by the operating system when inserted. At that time, the device file "/dev/ttyS0" is created. A GPRS connection is made with command "pppd call gprs" and closed by killing the pppd –process handling the GPRS connection. The connections settings are in the directory "/etc/ppp/peers". The default GPRS call settings work with major Finnish operators (TeliaSonera, Radiolinja, DNA). If needed for special use, the Compact Flash GPRS card can also be accessed directly from "/dev/ttyS0". 4.2.1 SIM CARD’S PIN CODE If your SIM card has PIN code checking enabled, insert the following line just after the line '"" AT' in file "/etc/ppp/peers/gprs.connect": OK 'AT+CPIN="pincode"' 4.2.2 GPRS TROUBLESHOOTING If you don’t get connection, check "/var/log/messages". To get more verbose error messages from the GPRS modem, enable more verbose error codes by adding line "OK 'AT+CMEE=2'" just after the line '"" AT' in file "/etc/pp/peers/gprs.connect". 4.2.3 CONSOLE MESSAGE "SERIAL_CS: PARSETUPLE: BAD CIS TUPLE" Sometimes, the Compact Flash GPRS card does not get identified. Instead, an error message "serial_cs: ParseTuple: Bad CIS tuple" appears at console and the device file "/dev/ttyS0" is not created. This happens most likely because of timing problems but there is no fix available yet. As a workaround, one can force the identification process to restart with the command line: "[ ! -c /dev/ttyS0 ] && cardctl eject && cardctl insert". Bluegiga Proprietary, Copyright © Bluegiga Technologies 2001-2004 25 (94)](https://usermanual.wiki/Silicon-Laboratories-Finland/WRAP229X/User-Guide-486574-Page-25.png)
![USER'S AND DEVELOPER'S GUIDE WRAP MULTIRADIO ACCESS SERVER 4.3 COMPACT FLASH WLAN The WLAN configuration with "setup" application is not yet available. The currently supported WLAN cards are "EZ Connect" by SMC Networks and "Instant Wireless" by Linksys. For this kind of Prism II/III based CF WLAN cards there are two different drivers. 4.3.1 HOSTAP DRIVER If your WLAN card firmware is 1.7.4, you have to use Hostap driver. It supports both client and master modes. You can check the firmware version by inserting the card and entering command "dmesg". If you see the following line among the latest ones, you have firmware 1.7.4: eth1: Looks like an Intersil firmware version 1.7.4 To select Hostap driver enter the following command (ignore errors): [root@wrap /]$ mv /etc/pcmcia/hostap_cs.conf.hermes /etc/pcmcia/hostap_cs.conf To use the master mode create the file "/etc/sysconfig/wlan" with one line "DISABLE=no", for example with the following command: [root@wrap /]$ echo DISABLE=no > /etc/sysconfig/wlan To configure the master mode to use encryption, add following lines (replace examples with your ESSID and encryption key, which can be also shorter for 40/64bit encryption) to the file "/etc/sysconfig/wlan": WEPKEY="0123456789abcdef0123456789" ESSID="myessid" To use client mode create the file "/etc/sysconfig/wlan" with one line "DISABLE=yes", for example with the following command: [root@wrap /]$ echo DISABLE=yes > /etc/sysconfig/wlan In client mode you also have to configure client settings in the file "/etc/sysconfig/network.pcmcia", see below. 4.3.2 HERMES DRIVER You have to use Hermes driver if your WLAN card firmware is below 1.7.4. Hermes supports only client modes. To select Hermes driver enter command (ignore errors): [root@wrap /]$ mv /etc/pcmcia/hostap_cs.conf /etc/pcmcia/hostap_cs.conf.hermes To configure WLAN to use DHCP, create the file "/etc/sysconfig/network.pcmcia" with one line "DHCP=y", for example with the following command: [root@wrap /]$ echo "DHCP=y" > /etc/sysconfig/network.pcmcia To configure WLAN with static network settings, create the file "/etc/sysconfig/network.pcmcia" similar to this example configuration: DHCP=n IPADDR="10.0.0.41" NETMASK="255.255.255.0" NETWORK="10.0.0.0" BROADCAST="10.0.0.255" GATEWAY="10.1.1.254" SEARCH="local.net" Bluegiga Proprietary, Copyright © Bluegiga Technologies 2001-2004 26 (94)](https://usermanual.wiki/Silicon-Laboratories-Finland/WRAP229X/User-Guide-486574-Page-26.png)
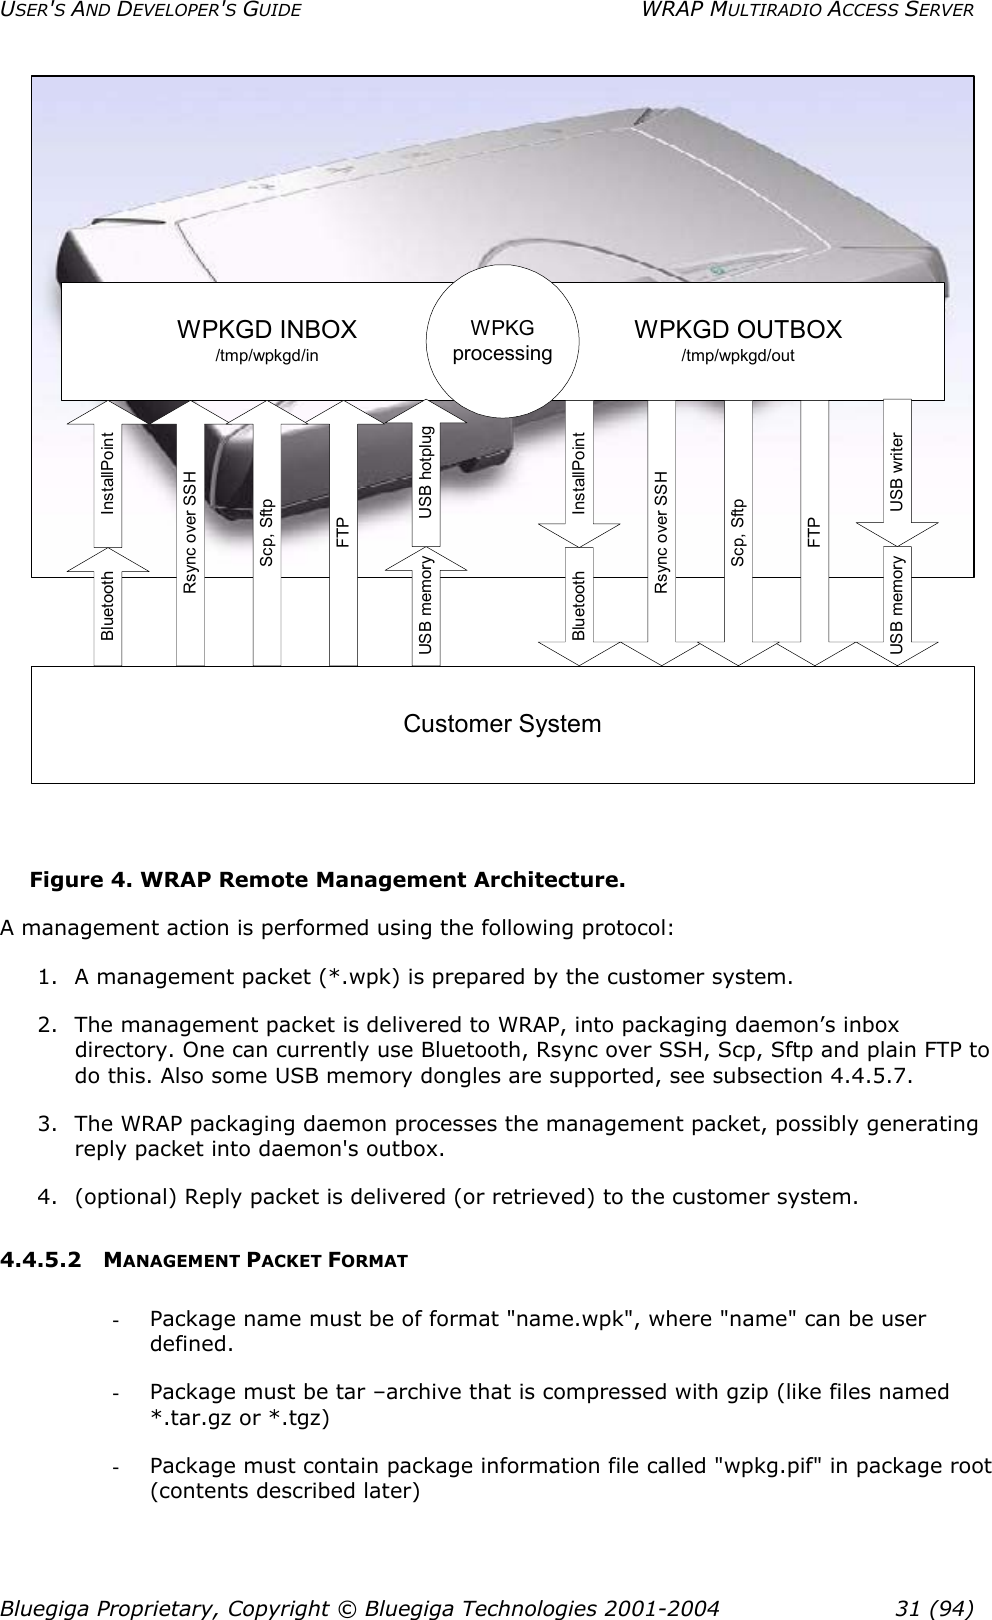
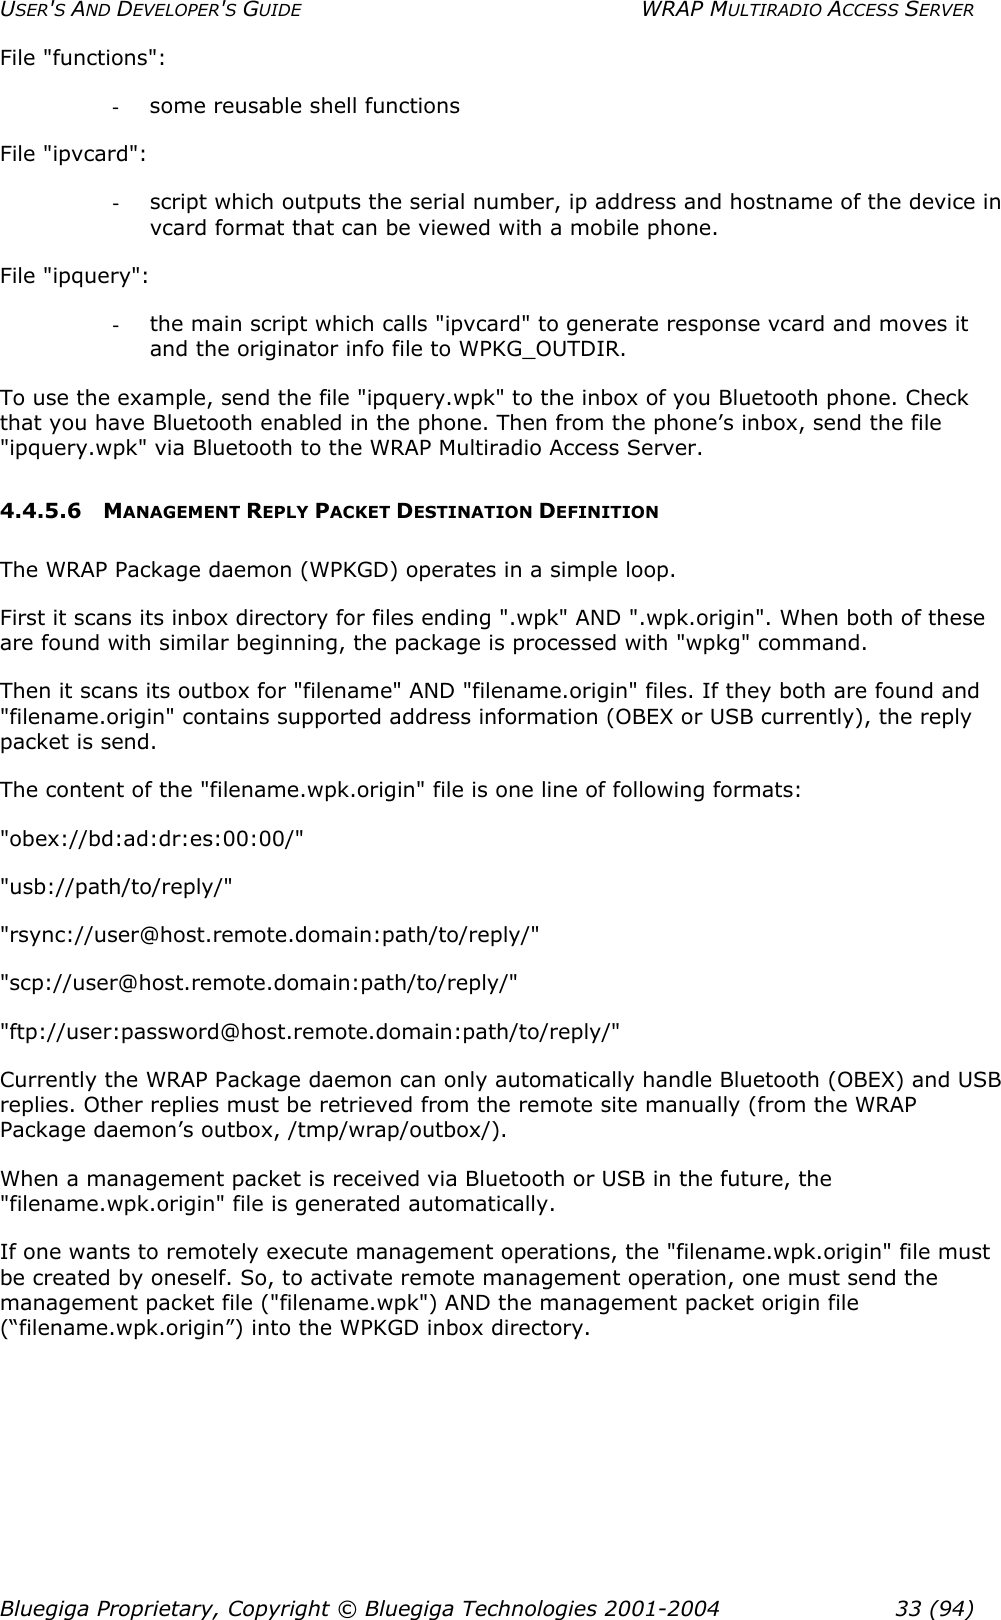
![USER'S AND DEVELOPER'S GUIDE WRAP MULTIRADIO ACCESS SERVER - Optional signature information file "wpkg.sig" may exist in package root (it is not used yet though) - All other files, if exist, should be data files, scripts or executables required for the management operation 4.4.5.3 MANAGEMENT PACKET INFORMATION FILE FORMAT The management packet information file (wpkg.pif) consists of tags and their data, described here %wpkg-version:0.0.1 - Must be the first line of the file. Contains information for version checking. 0.0.1 is currently the only version supported. Cannot be multi-line. %wpkg-prepare:[command line[s]] - One or more commands (all lines until next tag are interpreted as command lines) to execute. Commands may contain parameters, but output redirection and job control does not work. %wpkg-output:[output line[s]] - One or more lines of texts (all lines until next tag are interpreted as output lines) to output. Useful mainly in interactive use (not in remote management). 4.4.5.4 MANAGEMENT SYSTEM ENVIRONMENT VARIABLES The management system communicates to the management packets via environment variables. As of version 0.0.1, two variables are supported and set by the system for user scripts to use: WPKG_OUTDIR: - WPKGD OUTBOX directory, the place where the reply packet should be generated. WPKG_ORIGIN: - file containing one line which identifies the sender of the management packet. As of version 0.0.1, if Bluetooth was used to transmit the management packet and this file is moved to "reply_packet_name.origin" in the WPKG_OUTDIR, the reply packet is sent automatically. 4.4.5.5 MANAGEMENT OPERATION EXAMPLE: IPQUERY In this example we build a simple packet that can be used with Bluetooth-enabled phone to retrieve IP Address of the WRAP Multiradio Access Server. More (complex) examples will be available soon. The package consists of the following files (see ipquery.wpk, unpack it with "tar xzvf ipquery.wpk"): File "wpkg.pif": - package information file, just tells to run "./ipquery" file. Bluegiga Proprietary, Copyright © Bluegiga Technologies 2001-2004 32 (94)](https://usermanual.wiki/Silicon-Laboratories-Finland/WRAP229X/User-Guide-486574-Page-32.png)


![USER'S AND DEVELOPER'S GUIDE WRAP MULTIRADIO ACCESS SERVER 7 INSTALLING THE WRAP SOFTWARE DEVELOPMENT ENVIRONMENT Note: The Software Development Environment can be installed only on a PC running the Linux operating system! 7.1 WRAP SOFTWARE DEVELOPMENT ENVIRONMENT SYSTEM REQUIREMENTS The following hardware and software is required to run the WRAP Development Environment: PC with • CD-ROM drive • Linux (tested with RedHat 6.2 and above, Fedora Core 1) • 200MB of available hard disk space An Ethernet connection to a Local Area Network (also connected to the WRAP board) is highly recommended. Mount the WRAP SDK CD-ROM or ISO image, change the current working directory to where it is mounted, and run install as root. Example (things you need to type are printed like this): $ su -m (-m to keep original user's environment, will prompt for password) $ mount /dev/cdrom /mnt/cdrom $ (or mount –o loop /path/to/sdk2.iso /mnt/cdrom) $ cd /mnt/cdrom $ sh install Install will ask you some questions (described below) regarding which components to install and the paths to install them to. If you are not very familiar with Linux, just press <enter> to these questions (the default values are suitable for most users and systems). 7.2 QUESTIONS ASKED BY THE INSTALL SCRIPT 1. WRAP tools directory (default: /usr/local/arm) This is the path where you want the WRAP Software Development tools (arm-linux-gcc, etc.) to be installed. Note: If you change this value, the WRAP tools and libc must be recompiled. The recompilation process is very complicated and lengthy, and it may fail, depending on your system. Recompilation is done automatically by the install script, if necessary. 2. Development directory (default: [home_of_current_user]/asdk) This is the path where you want the WRAP Software Development Environment to be installed. 3. Development directory owner (default: [current_user]) This is the username of the owner of the development directory. Note: If this is not the username of the developer for whom the Software Development Environment is being installed, the user will not have rights to use the development files and therefore can not develop any WRAP software. Bluegiga Proprietary, Copyright © Bluegiga Technologies 2001-2004 43 (94)](https://usermanual.wiki/Silicon-Laboratories-Finland/WRAP229X/User-Guide-486574-Page-43.png)

![USER'S AND DEVELOPER'S GUIDE WRAP MULTIRADIO ACCESS SERVER 8.4.2 TRANSFERRING AN APPLICATION TO WRAP USING TERMINAL SOFTWARE If your WRAP is not connected to a LAN, you may use terminal software of your own choice to transfer data to the WRAP. The WRAP contains an X/Y/Zmodem protocol application, which allows you to transfer data over the console using almost any terminal software available. 1. Connect your computer to the WRAP management UART using a cross-over serial cable, and start your terminal software (115 200bps, 8 data bits, no parity, 1 stop bit). 2. Change your working directory to where you want to upload your application, and run the xmodem application with your application name as parameter. 3. Start Xmodem send from your terminal software. Example: [root@wrap /] cd /tmp [root@wrap /tmp] rx testapp rx: ready to receive testapp. now start xmodem (checksum, not CRC) send from your terminal [root@wrap /tmp] If you want to save the application to /usr/local/bin (on the flash file system), you will have to replace 'cd /tmp' with 'cd /usr/local/bin'. To examine the directory structure of the WRAP, please see Appendix A. 8.4.3 USING NFS MOUNT To use NFS mount, have a NFS share prepared in your development PC and mount the directory with command "mount -o nolock <dev-pc-ipaddress>:/nfsshare /mnt/nfs". After this, you can access the share in directory "/mnt/nfs". 8.5 RUNNING AN APPLICATION TRANSFERRED TO WRAP To run the application you just transferred to the WRAP, you need access to the WRAP Linux console, either using terminal software connected to the WRAP management UART or using the telnet connection (log in as "root" and remember the password, which is "buffy" by default). After establishing a connection to the WRAP, change the directory to where your application is located and change file permissions so that it can be executed, then run it. Example: [root@wrap /] cd /tmp [root@wrap /tmp] chmod 755 testapp [root@wrap /tmp] ./testapp 8.6 USING DEBUGGER (GDB/DDD) It is possible to use GNU debugger GDB and a graphical user interface, like DDD, for debugging applications in the WRAP Access Server. You have to compile with debug options and without symbol stripping to make debugging work. As mentioned above, this can be done by adding lines "APP_STRIP=false" and "CFLAGS = -ggdb" to the Makefile below SRC line. After you have compiled your application with these options and transferred your application to WRAP, you can start debugging the application as follows: 1) Start gdbserver on the WRAP Access Server Bluegiga Proprietary, Copyright © Bluegiga Technologies 2001-2004 49 (94)](https://usermanual.wiki/Silicon-Laboratories-Finland/WRAP229X/User-Guide-486574-Page-49.png)
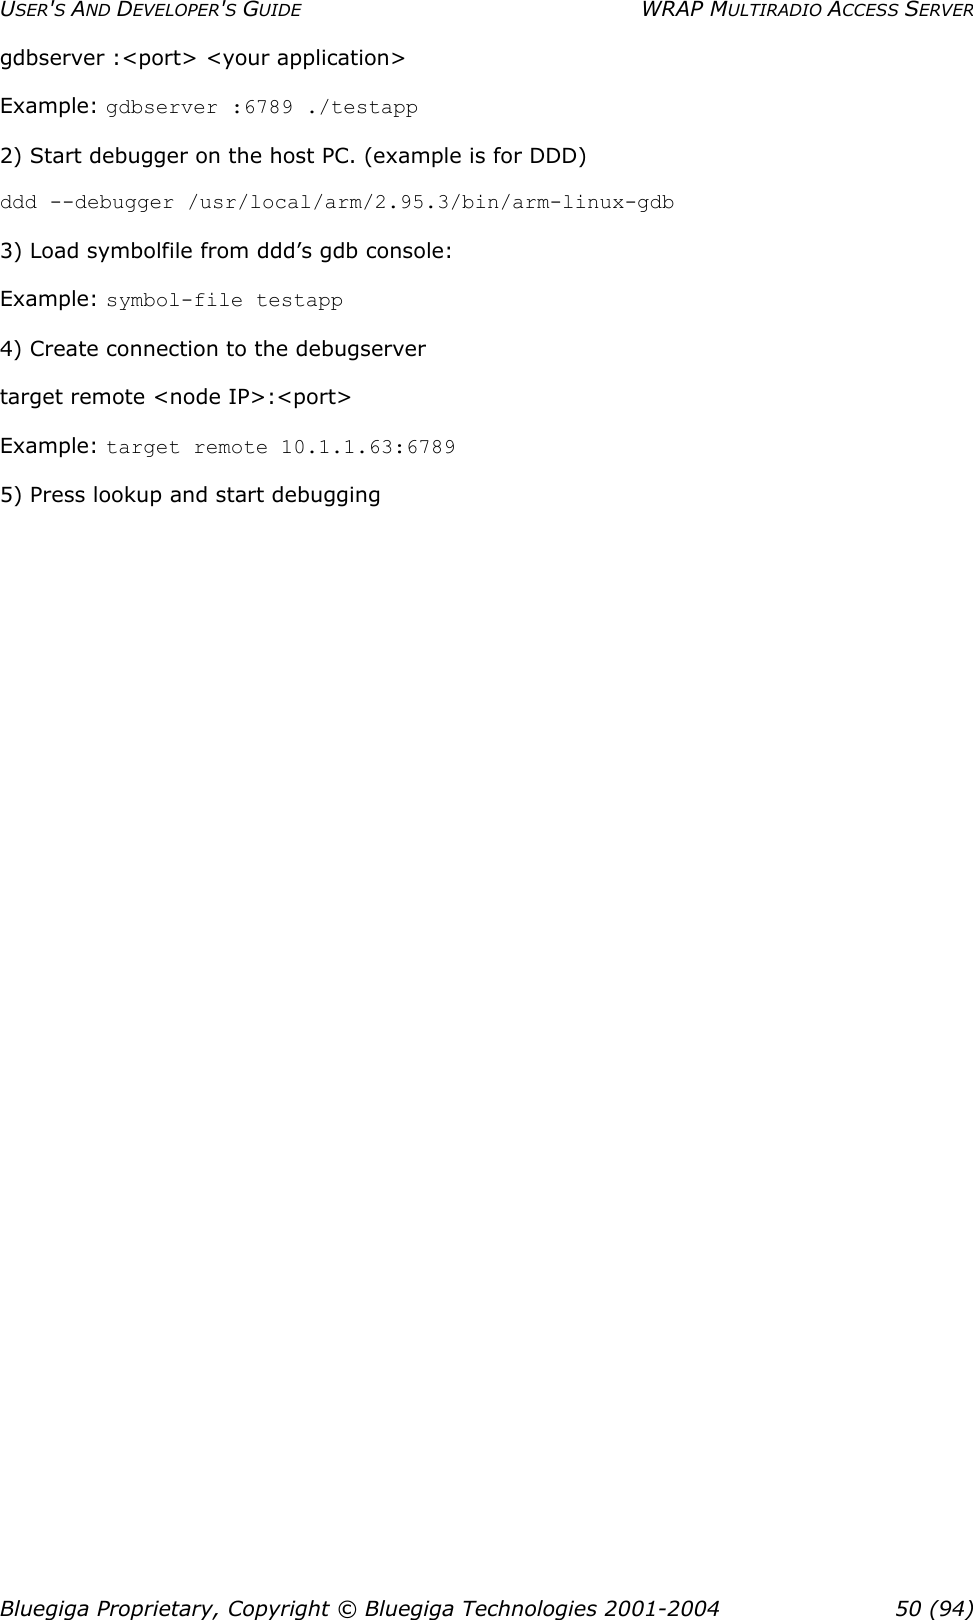

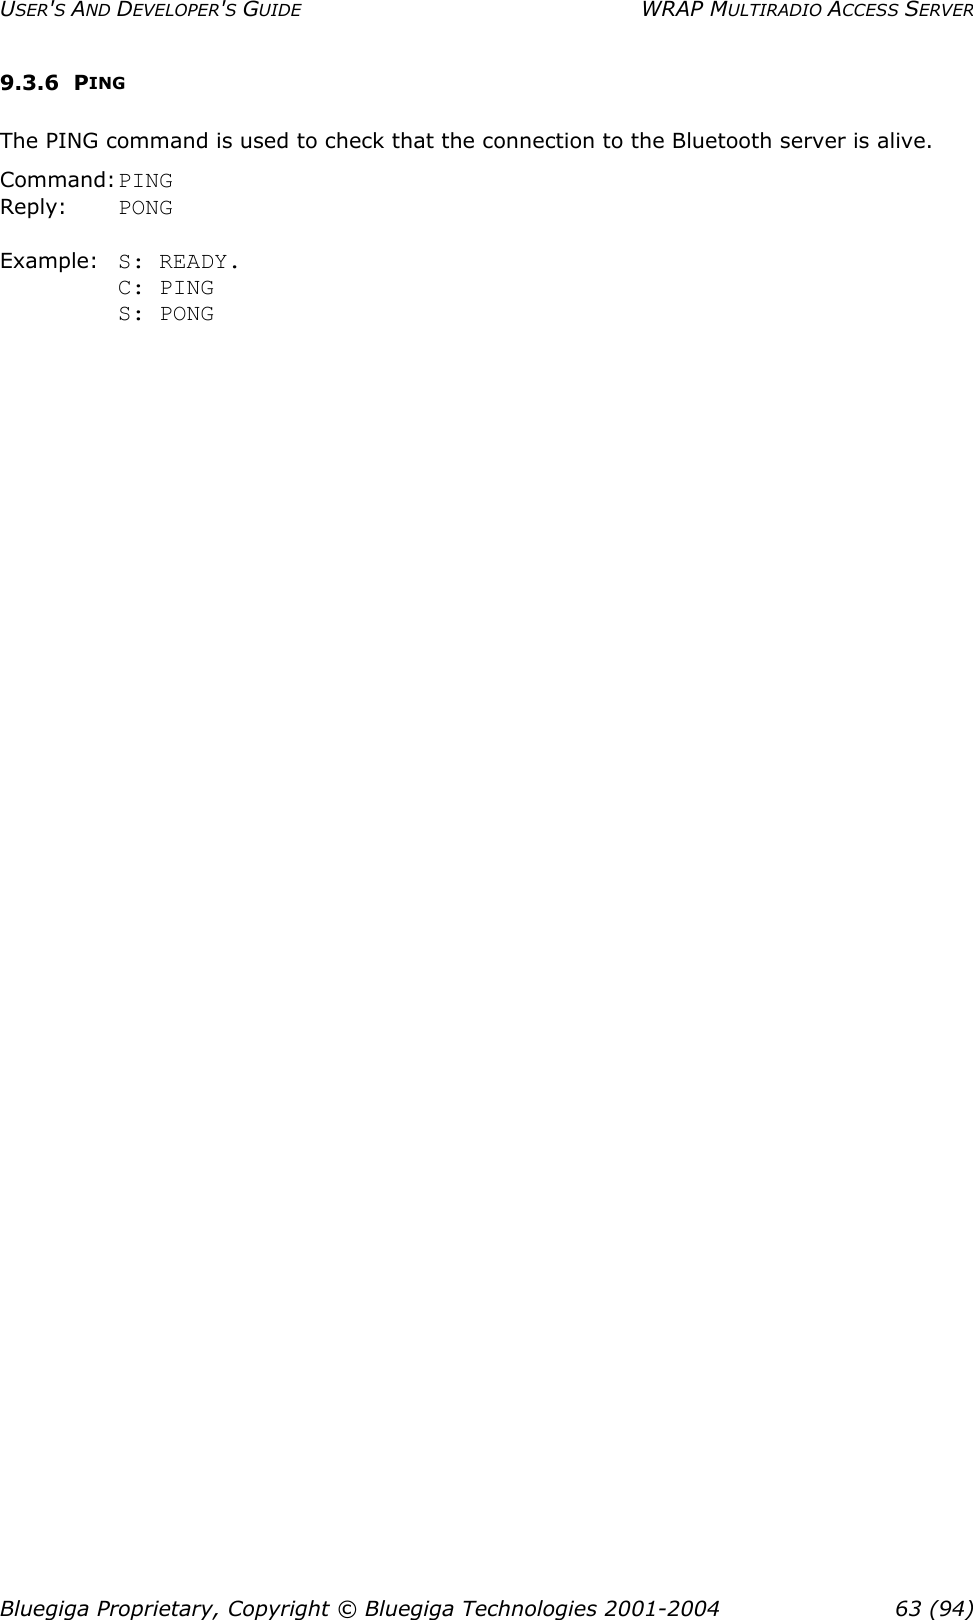
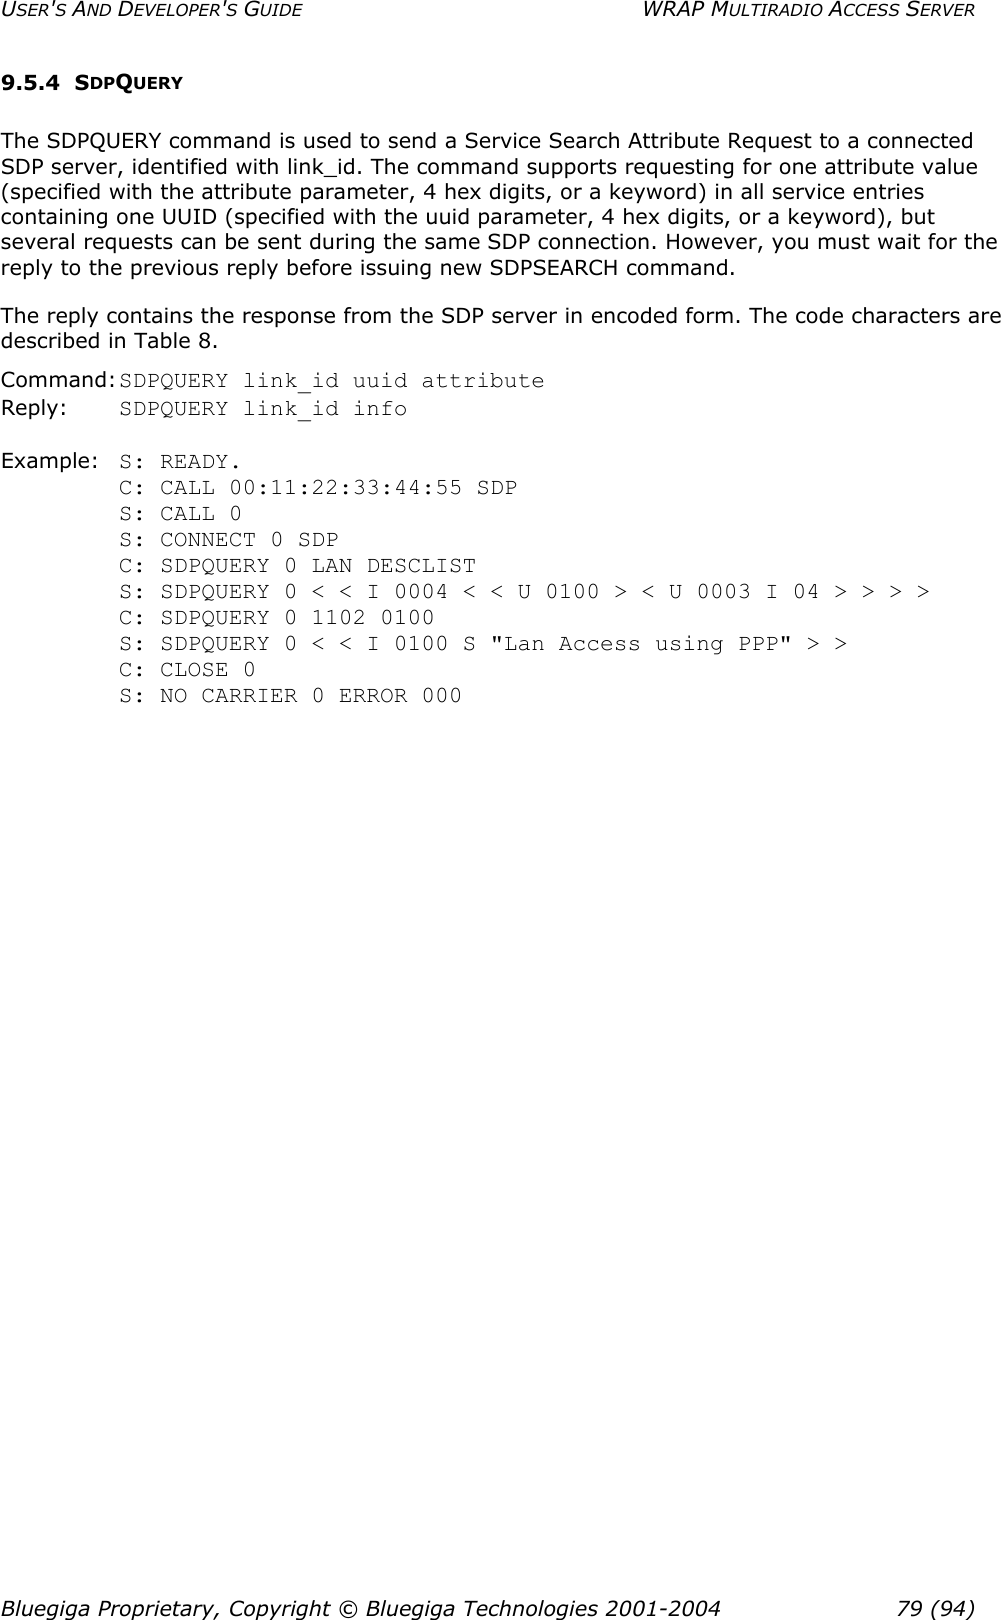
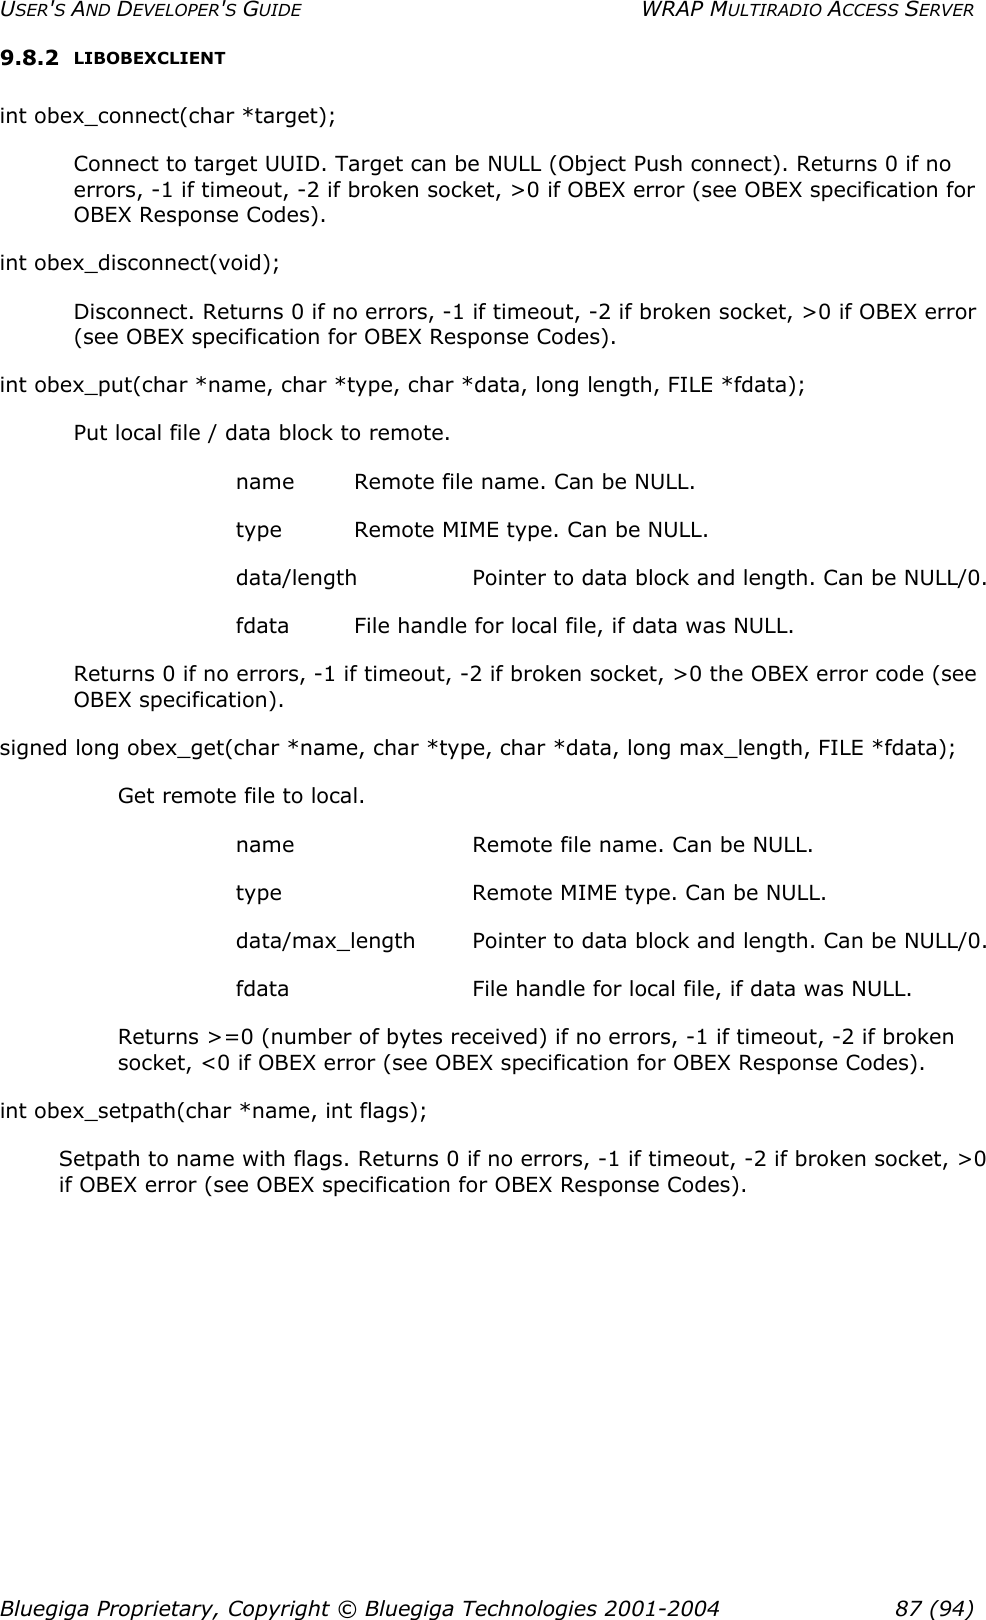


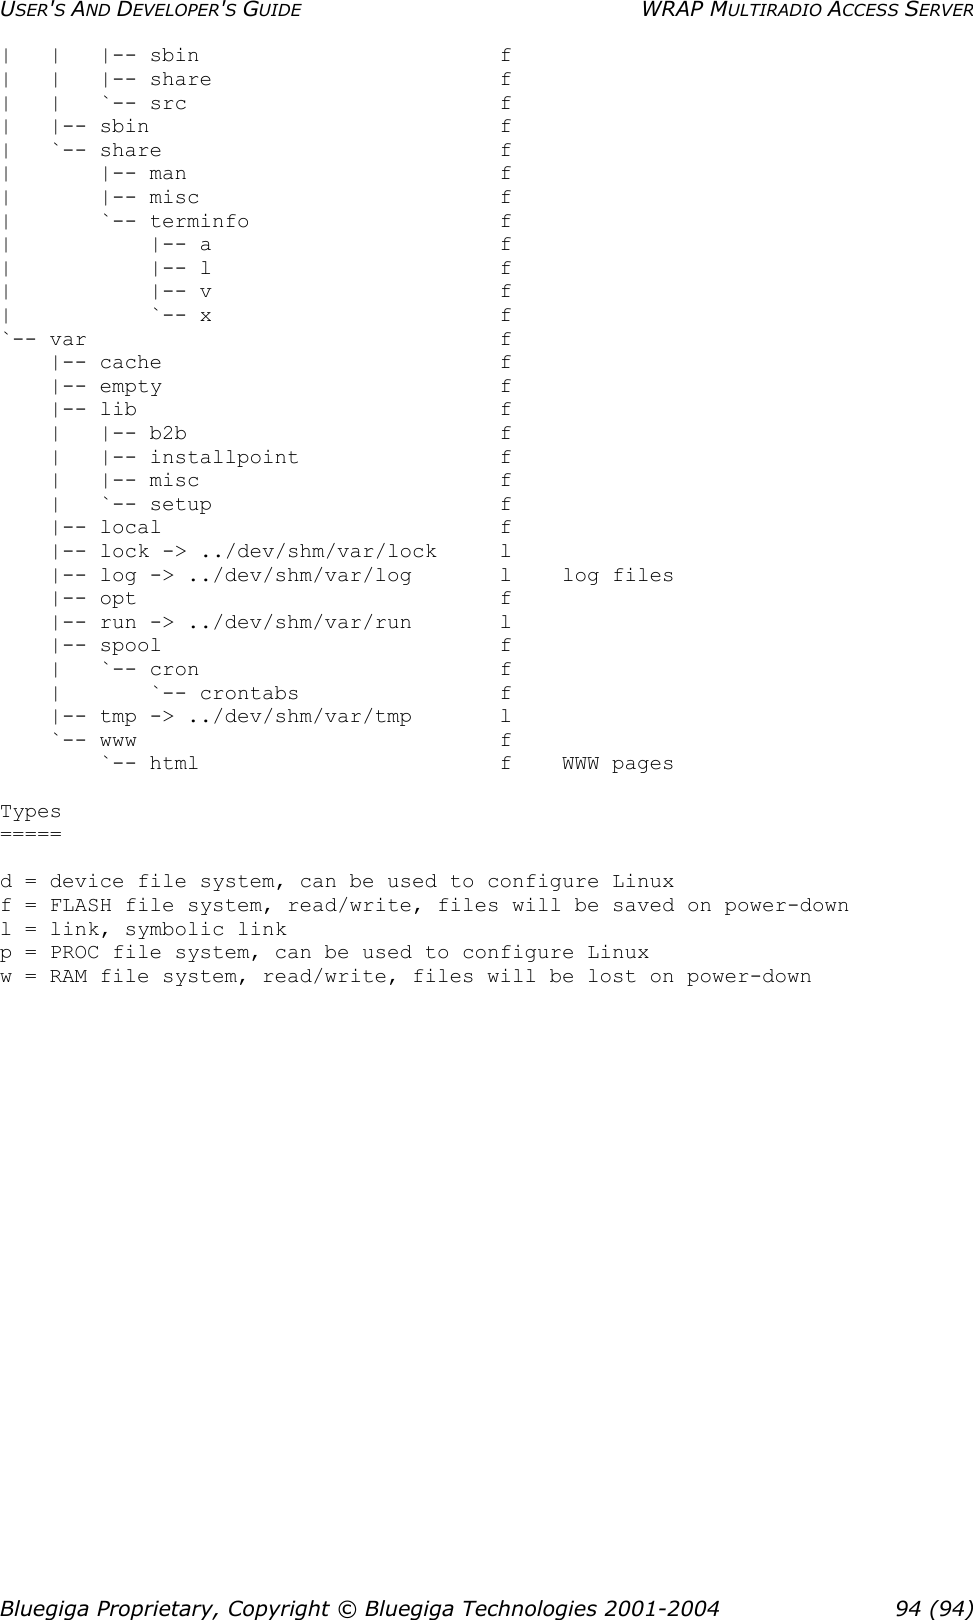
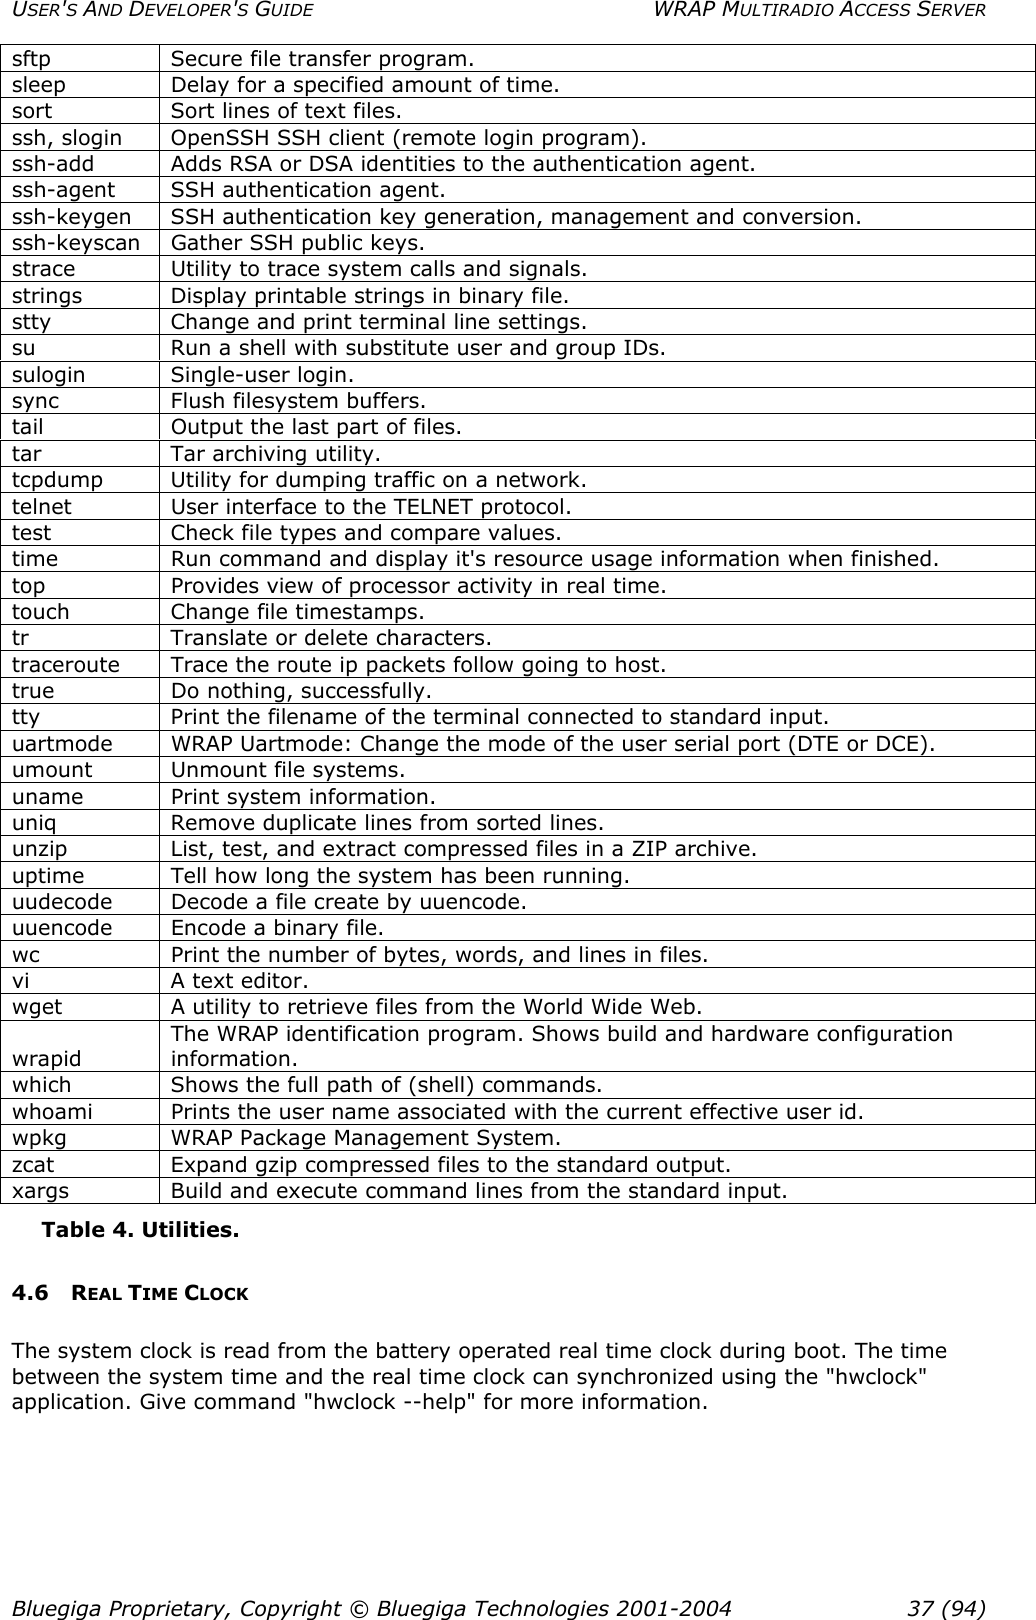
![USER'S AND DEVELOPER'S GUIDE WRAP MULTIRADIO ACCESS SERVER APPENDIX A – WRAP DIRECTORY STRUCTURE Directory Tree Type Note ============== ==== ==== / f whole filesystem is root writable |-- bin f |-- boot f contains skeleton ramdisk structure |-- dev d | |-- [other devices] d | `-- shm d resizable ramdisk | |-- etc w resolv.conf | |-- tmp w /tmp | | |-- in w smsgw dir | | |-- logo w smsgw dir | | |-- obex w obexserver dir | | |-- out w smsgw dir | | |-- tone w smsgw dir | | `-- wpkgd w wpkgd dirs | | |-- in w | | |-- out w | | `-- spool w | `-- var w ramdisk part of /var | |-- lock w | | `-- subsys w | |-- log w | |-- run w | `-- tmp w |-- etc f system config and init scripts | |-- init.d -> rc.d/init.d l | |-- pcmcia f | | `-- cis f | |-- ppp f | | `-- peers f | |-- rc.d f | | |-- init.d f | | `-- rc3.d f | |-- rc3.d -> rc.d/rc3.d l | |-- stupid-ftpd f | `-- sysconfig f |-- lib f system libraries | |-- iptables f | `-- modules f | `-- [module directories] f |-- mnt f mount points | |-- mtd f2 second flash, 8MB for user use | `-- nfs f empty mount point |-- opt f |-- proc p proc filesystem |-- sbin f system binaries |-- tmp -> dev/shm/tmp l temporary data (ramdisk) |-- usr f | |-- bin f | |-- include f | |-- lib f | |-- local f | | |-- bin f user binaries here | | |-- etc f | | |-- games f | | |-- include f | | |-- lib f | | |-- libexec f | | |-- man f Bluegiga Proprietary, Copyright © Bluegiga Technologies 2001-2004 93 (94)](https://usermanual.wiki/Silicon-Laboratories-Finland/WRAP229X/User-Guide-486574-Page-93.png)