Silicon Laboratories Finland WRAPAS229X Bluetooth Access Server User Manual Manual
Silicon Laboratories Finland Oy Bluetooth Access Server Manual
UserManual.wiki
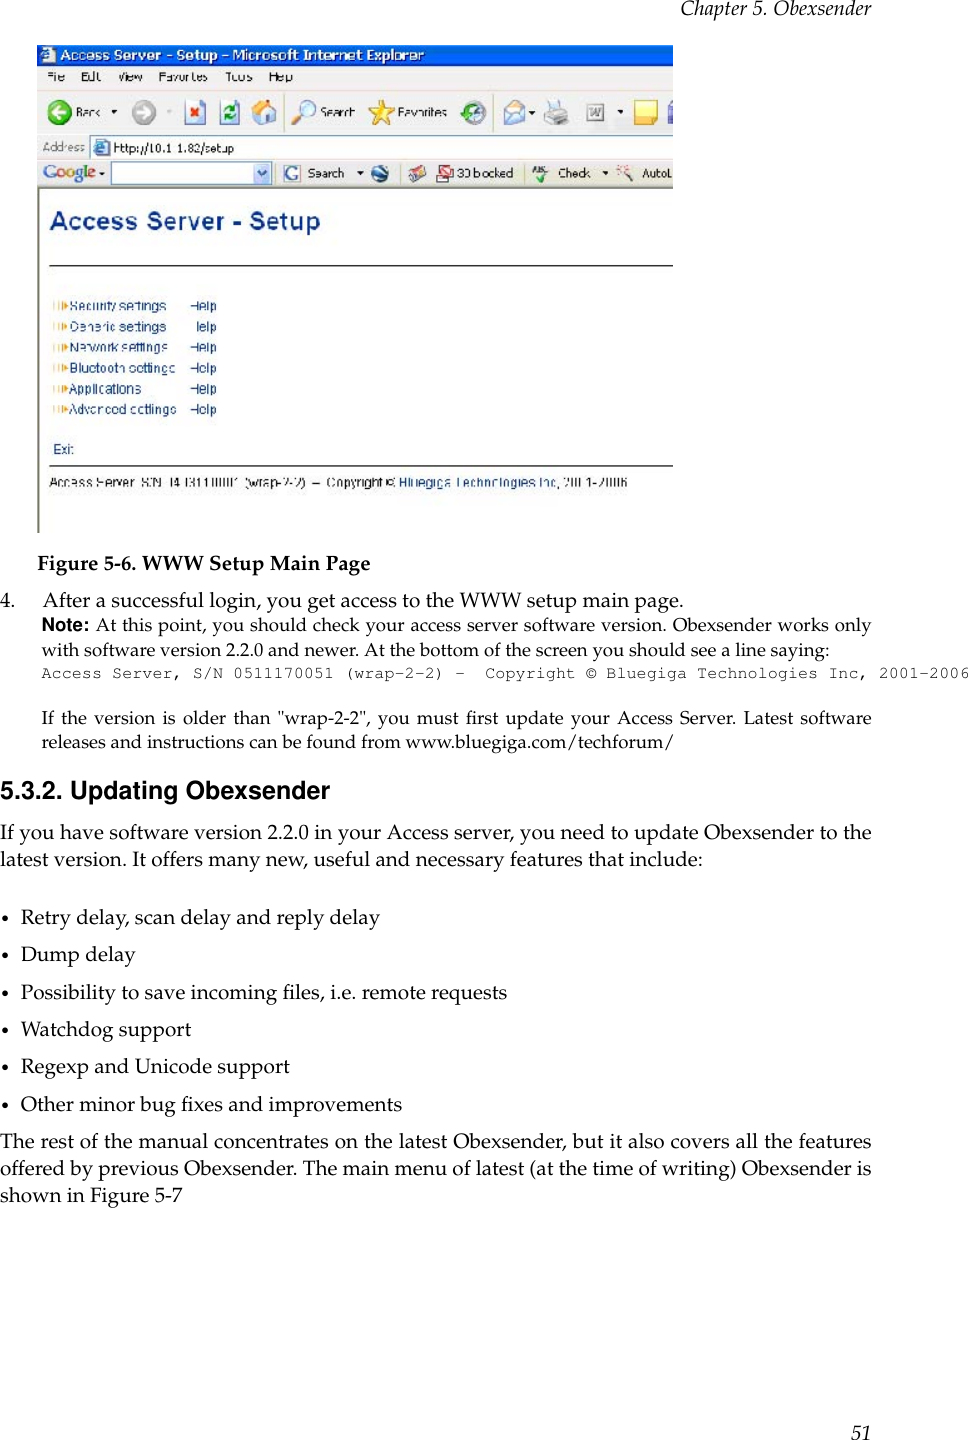
>
Silicon Laboratories Finland
>
WRAPAS229X User Manual
Manual
Navigation menu
Upload a User Manual
Namespaces
Wiki Guide
HTML
PDF
Info
Views
User Manual
Discussion / Help
Navigation
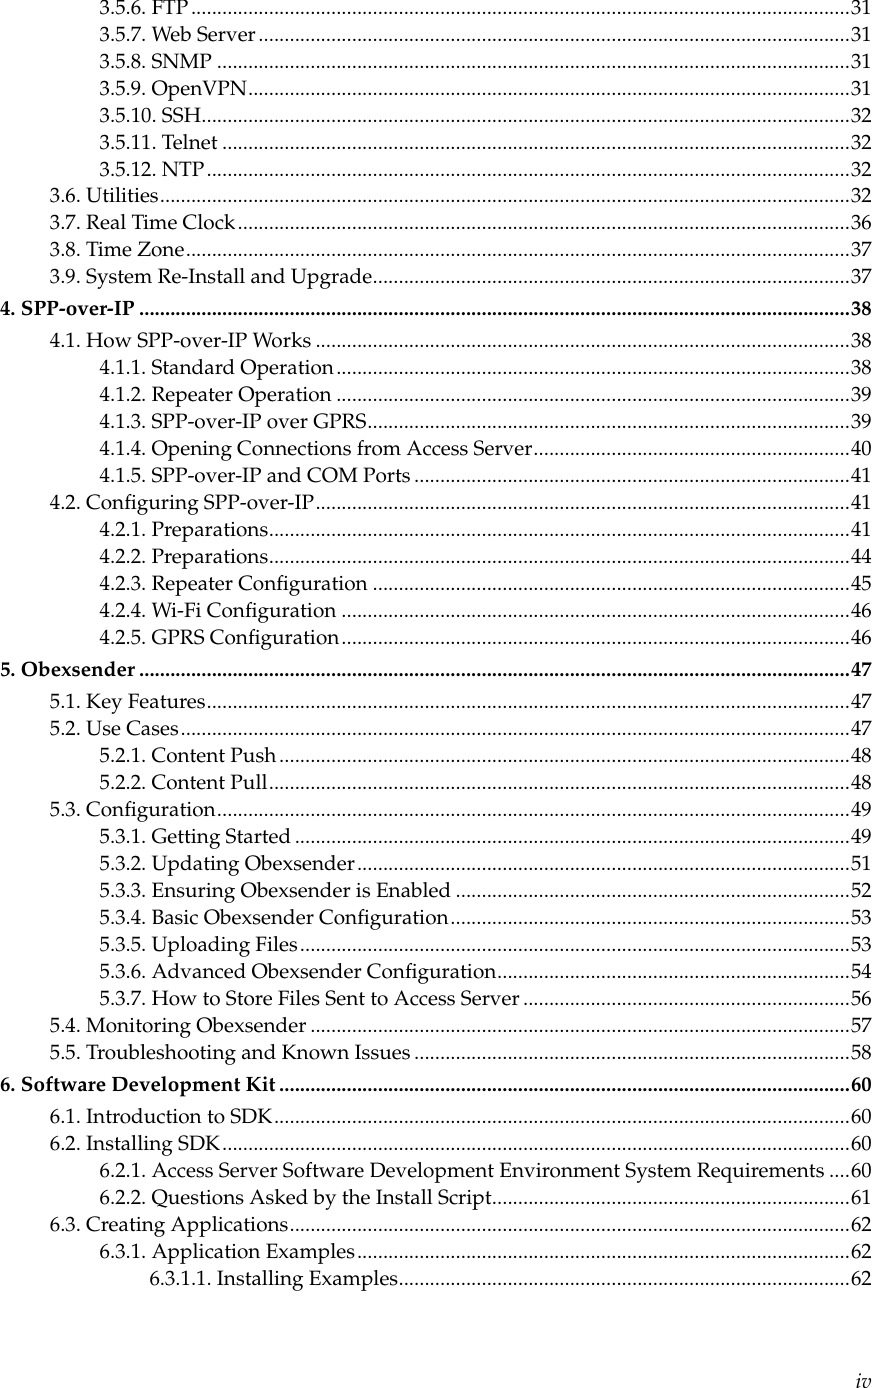

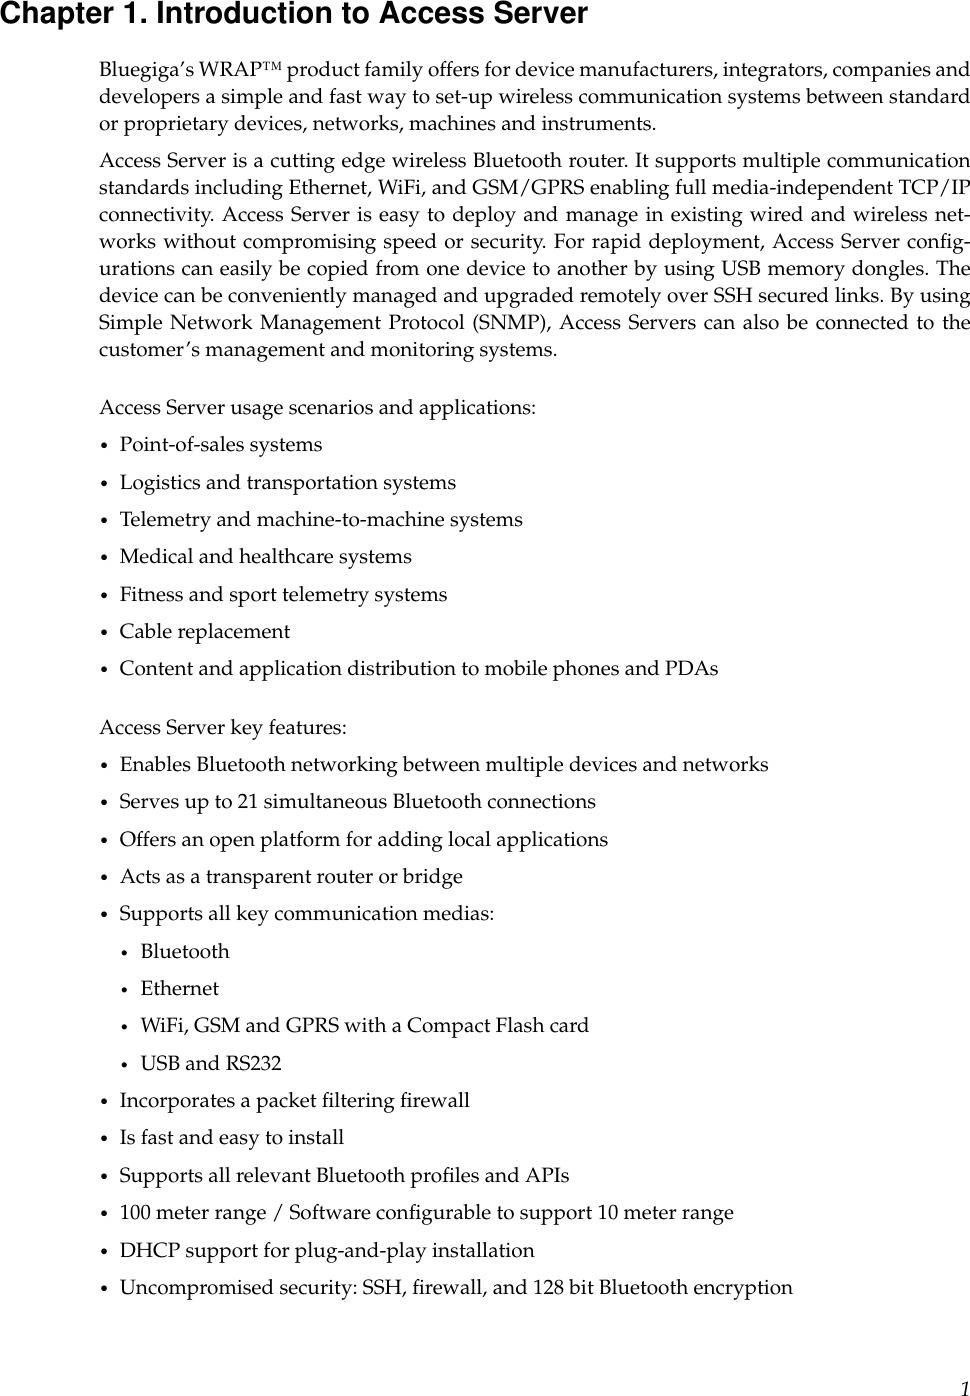
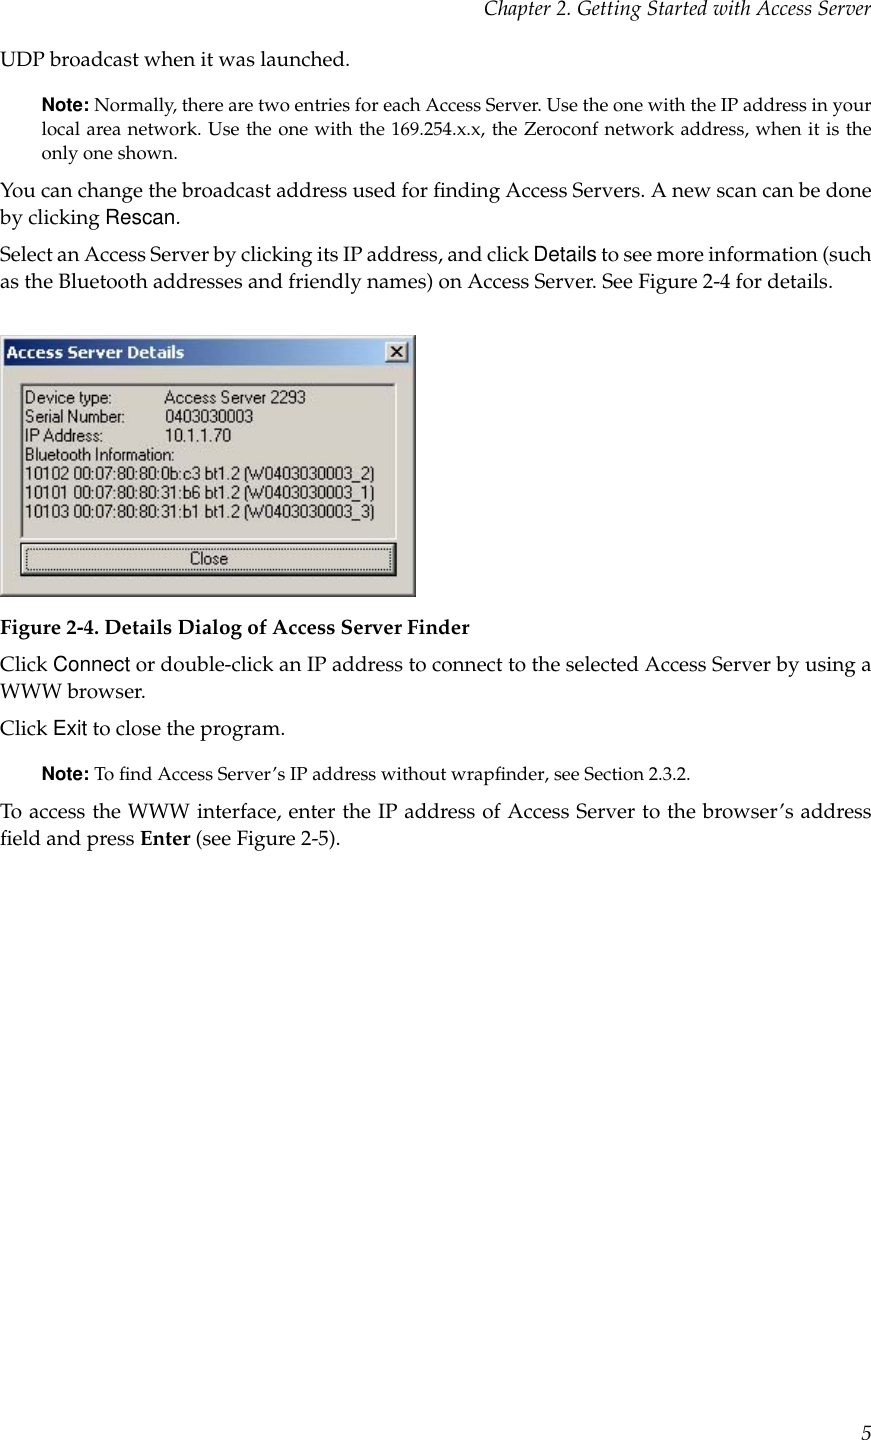
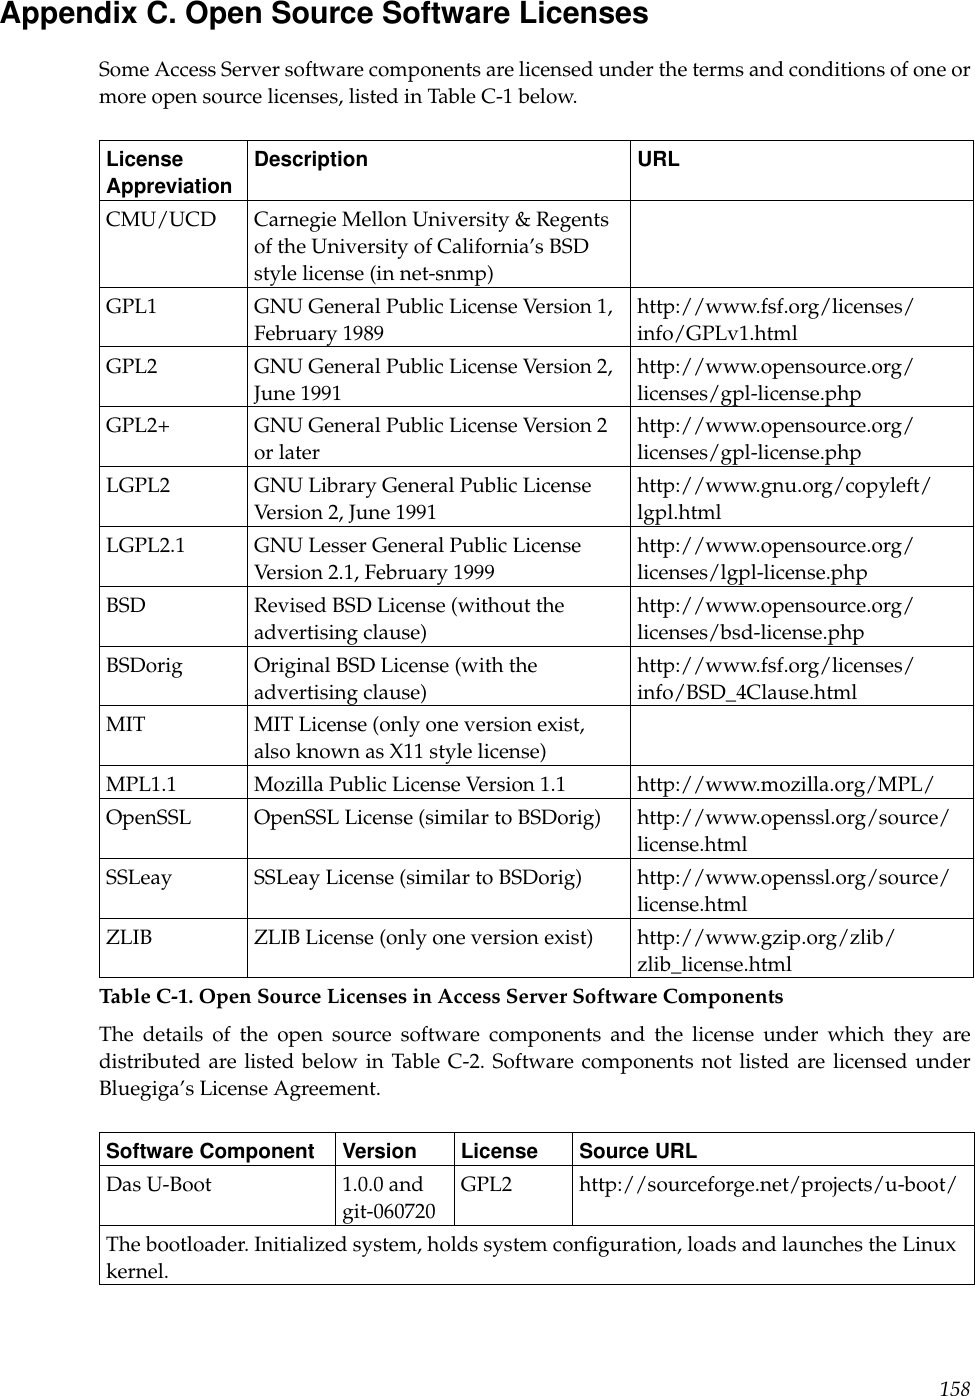
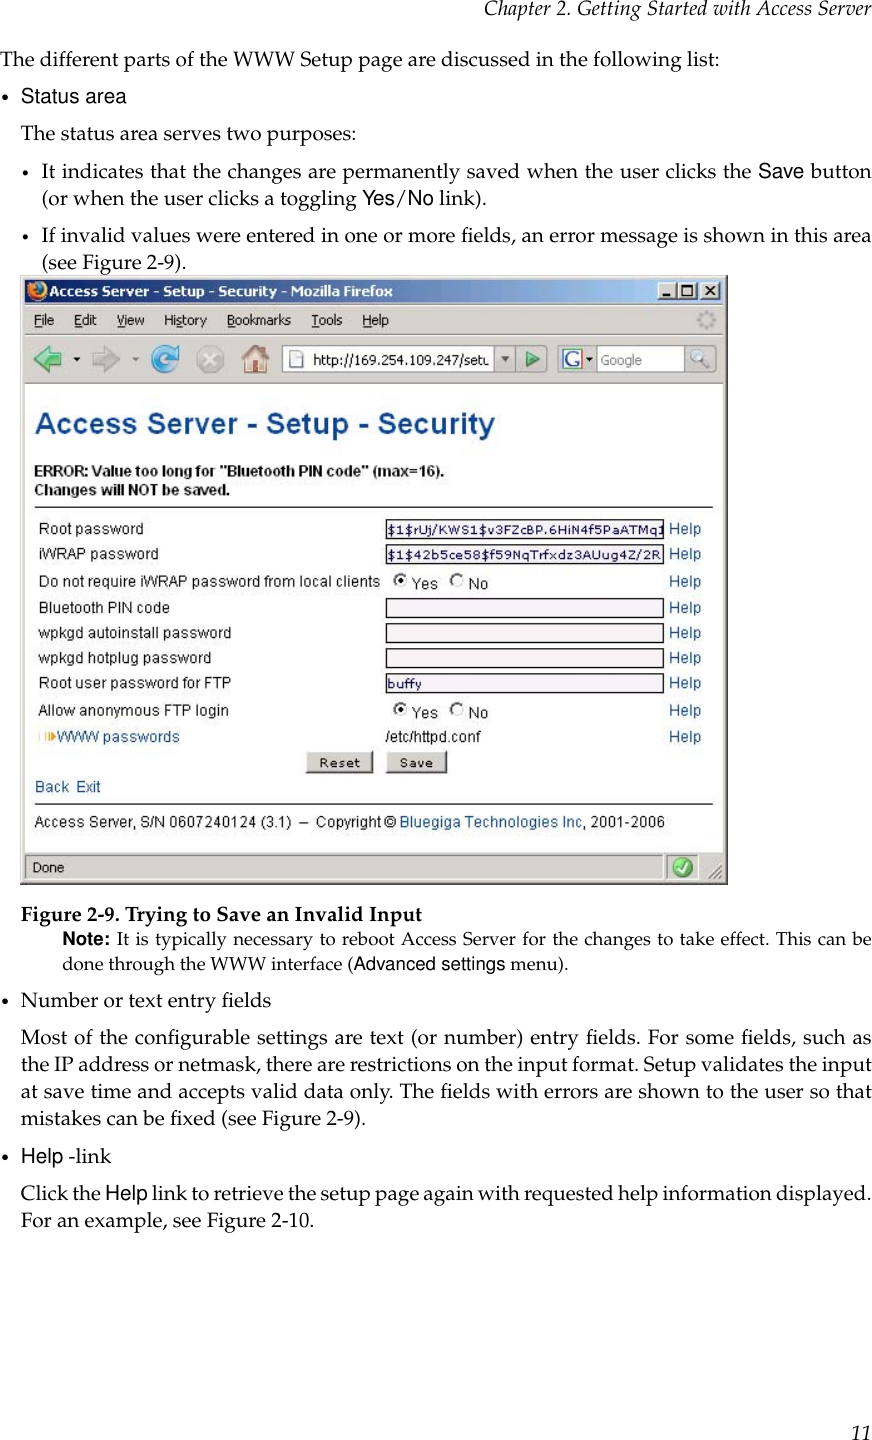
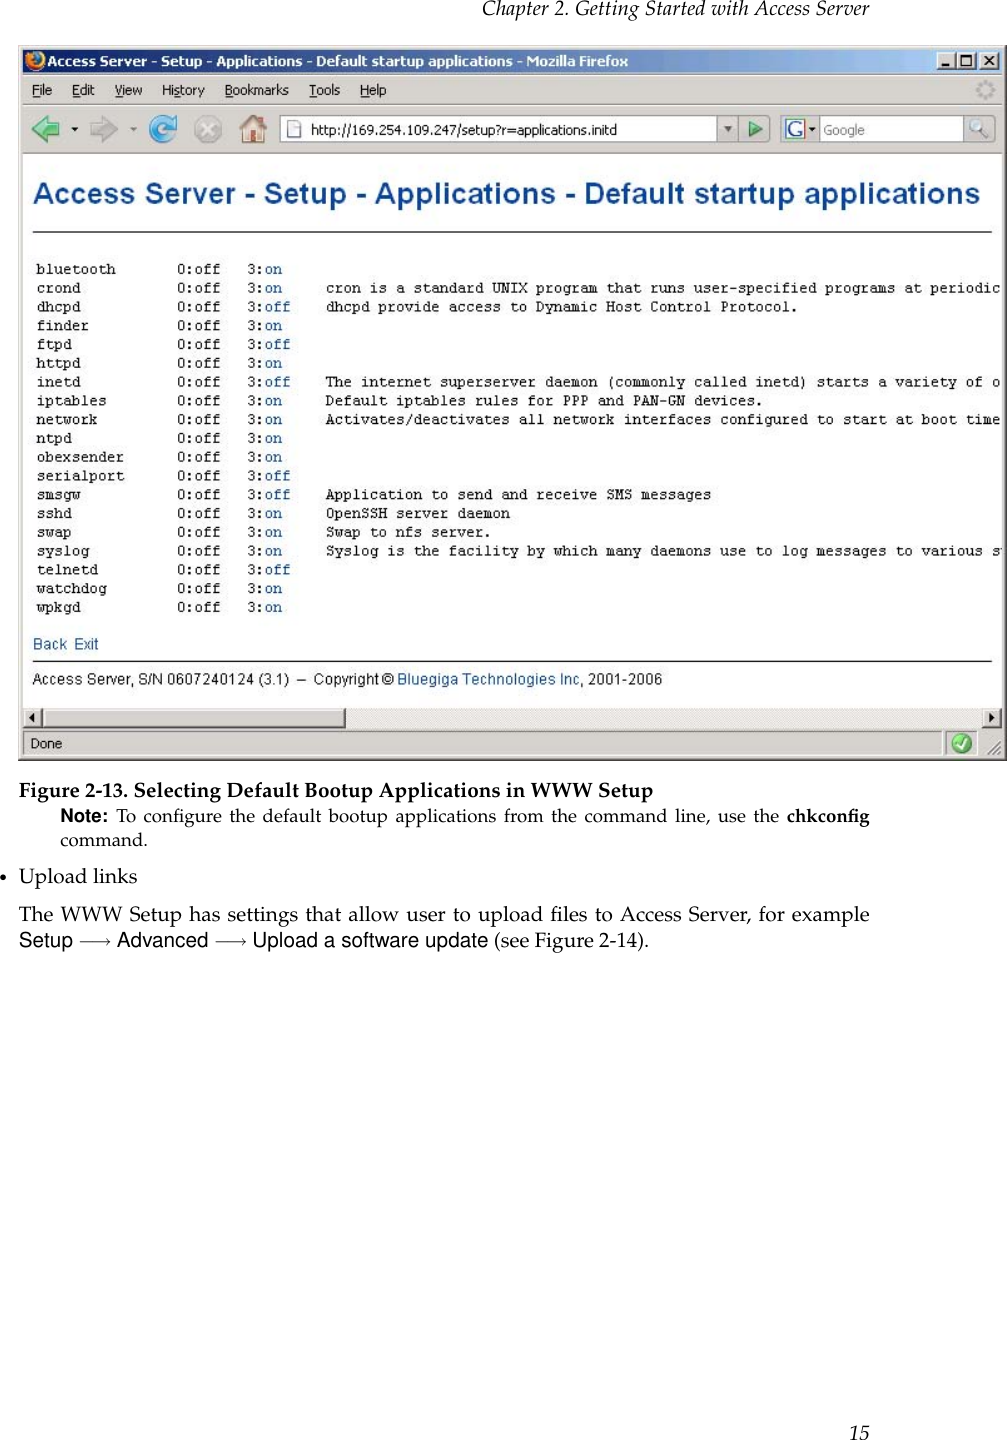
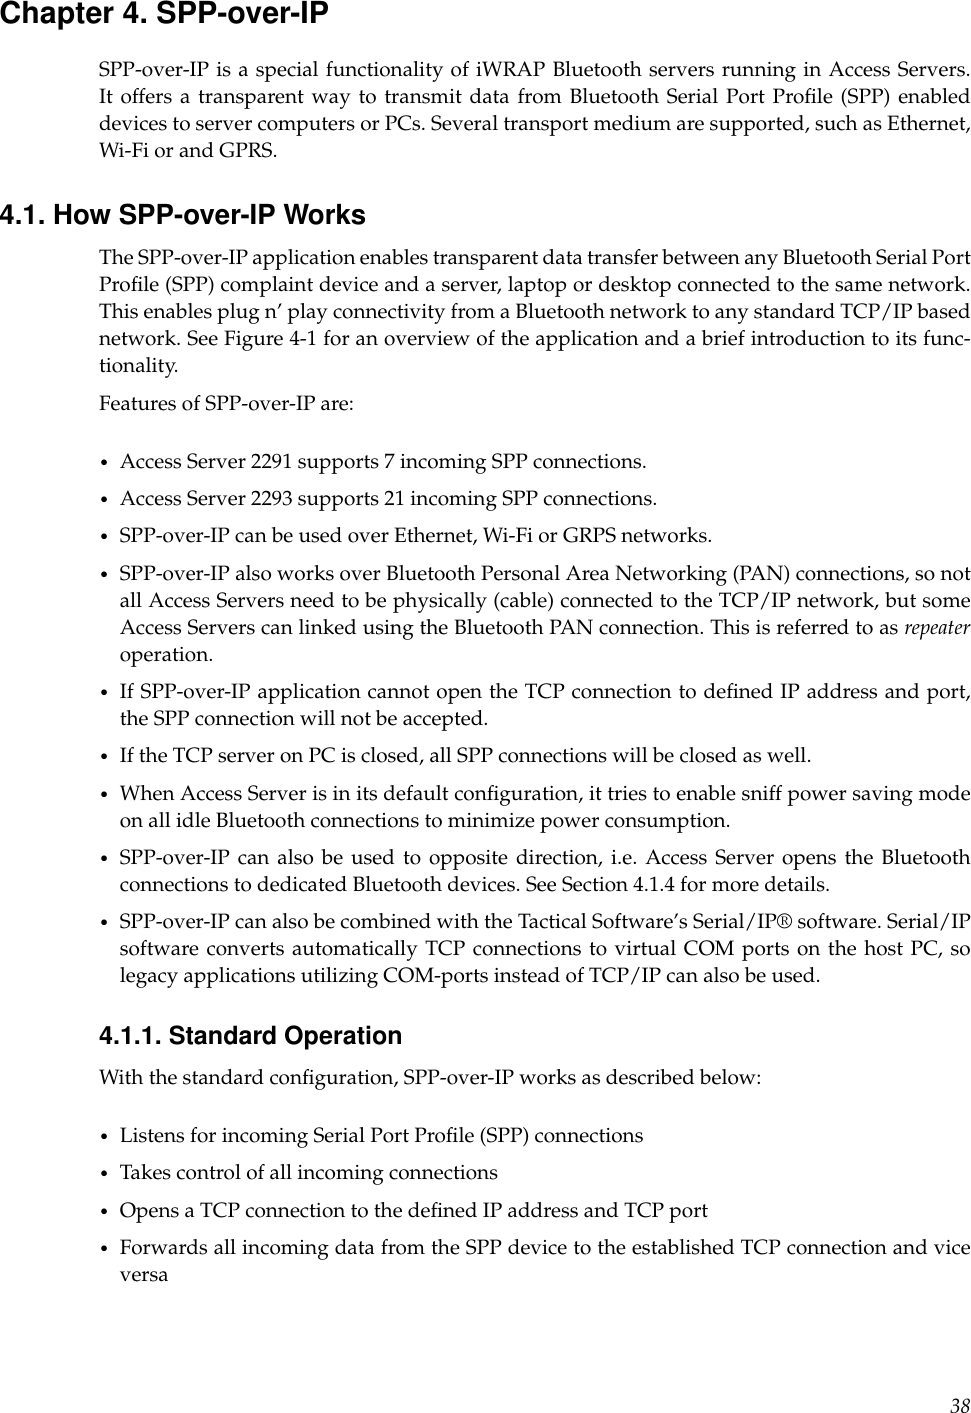
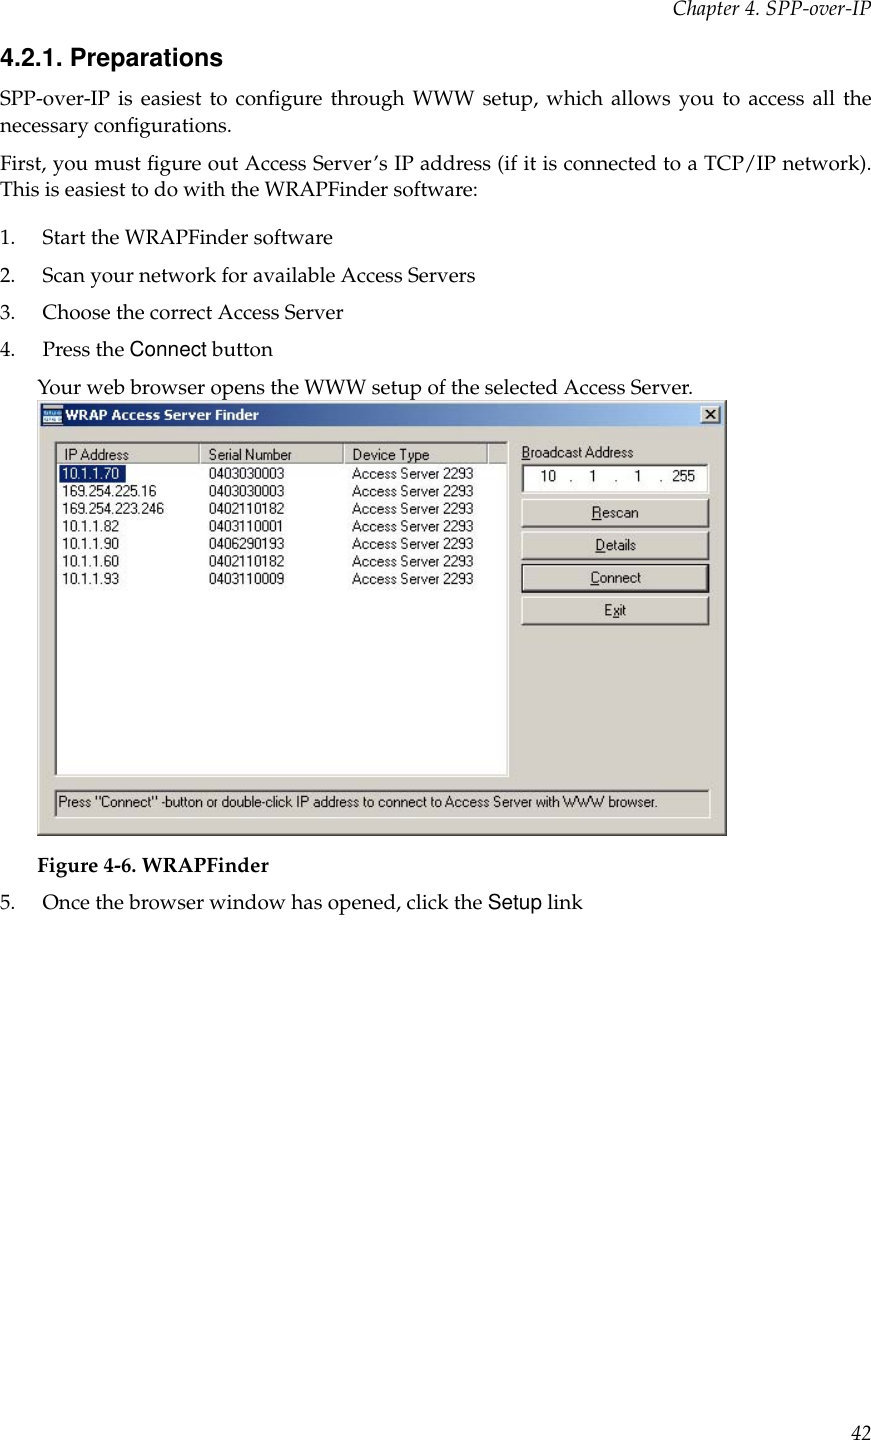
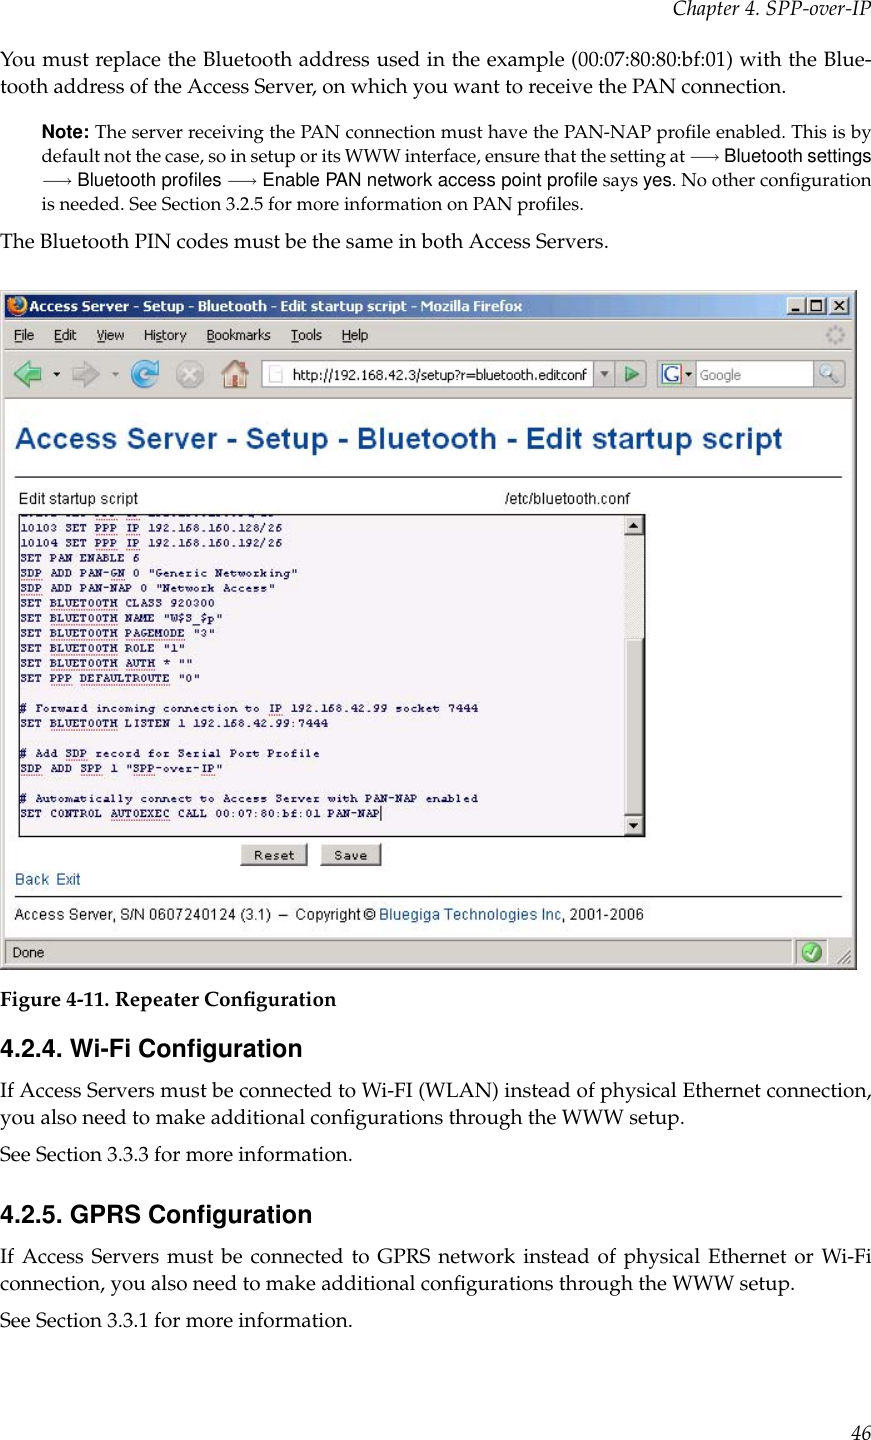
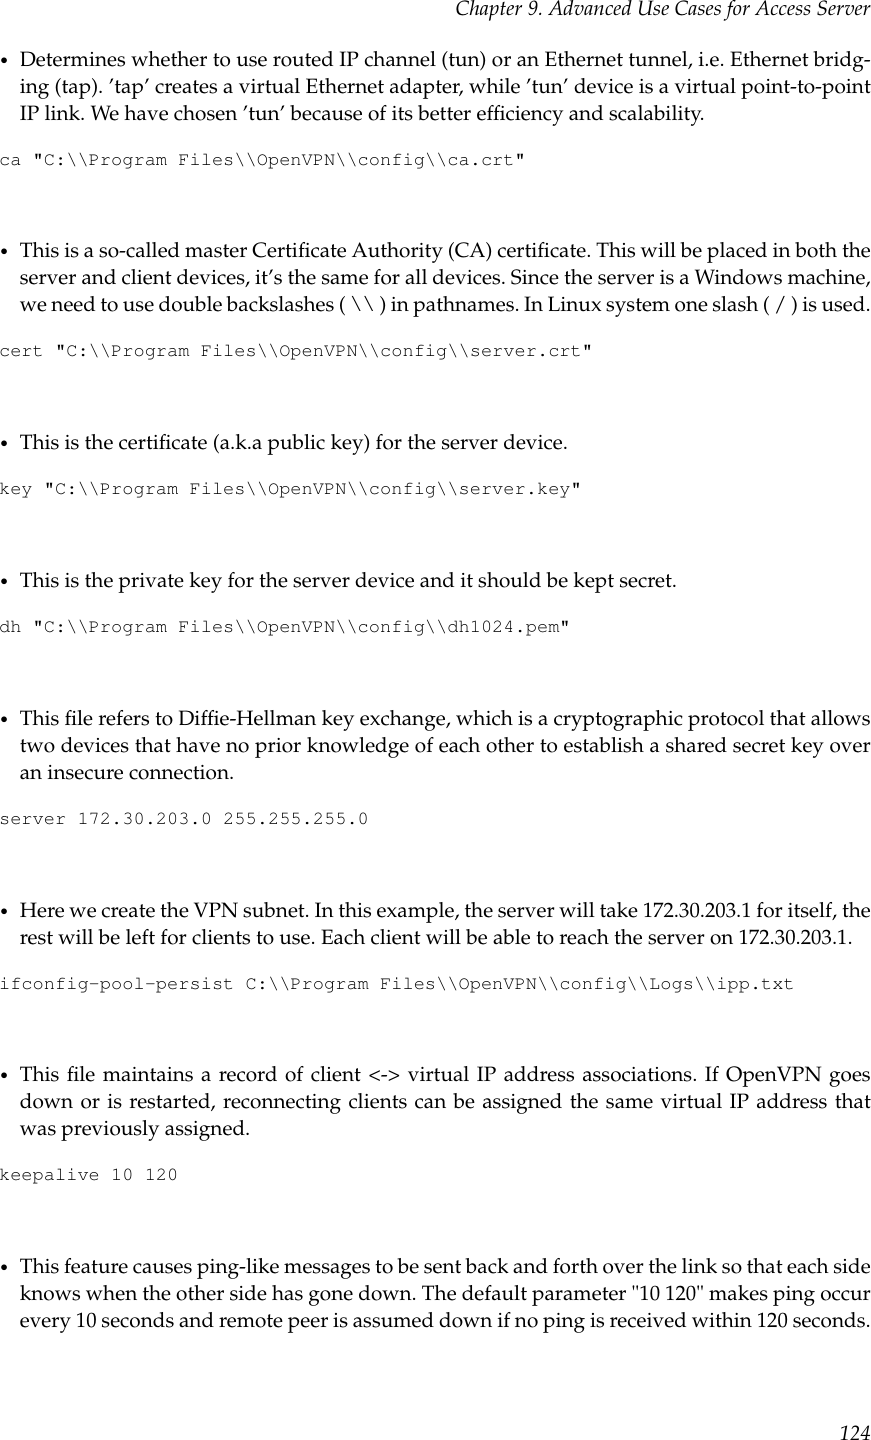
![Chapter 2. Getting Started with Access Server2.3.1. Management ConsoleIf you do not have a Bluetooth LAN/PAN client and if Access Server is not connected to yourLAN, or if you do not know the IP address given to Access Server, you can get the first shellprompt access by using the management console.To setup the management console, proceed as follows:1. Have a PC with a free COM port.2. Power off Access Server.3. Configure your terminal application, such as HyperTerminal in Windows, to use the settingsbelow for your computer’s free COM portSetting ValueSpeed 115200bpsData Bits 8Parity NoneStop Bits 1Flow Control NoneTable 2-1. The Management Console Port Settings4. Connect the serial cable shipped with Access Server to your PC’s free COM port.5. Connect the serial cable to the management (user) port in Access Server (see Figure 2-1).6. Power on Access Server.7. Enter letter bin the terminal application during the first five seconds, while the blue LEDsin Access Server turn on one by one.8. The management console is now activated and you can see the boot log in your terminalwindow.Note: The boot process may stop at the following U-Boot prompt:Hit any key to stop autoboot: 0U-Boot>If this happens, enter command boot to continue to boot Linux.9. Wait for the device to boot up and end with the following prompt:Please press Enter to activate this console.10. Press Enter to activate the console. You will be logged in as root in directory /root:[root@wrap root]11. You can now control Access Server from the management console.2.3.2. Accessing RemotelyWhen Access Server is connected to a LAN, it tries to get the IP address by using DHCP andZeroconf by default. You can then use the wrapfinder application to find the IP address (see8](https://usermanual.wiki/Silicon-Laboratories-Finland/WRAPAS229X/User-Guide-753326-Page-16.png)
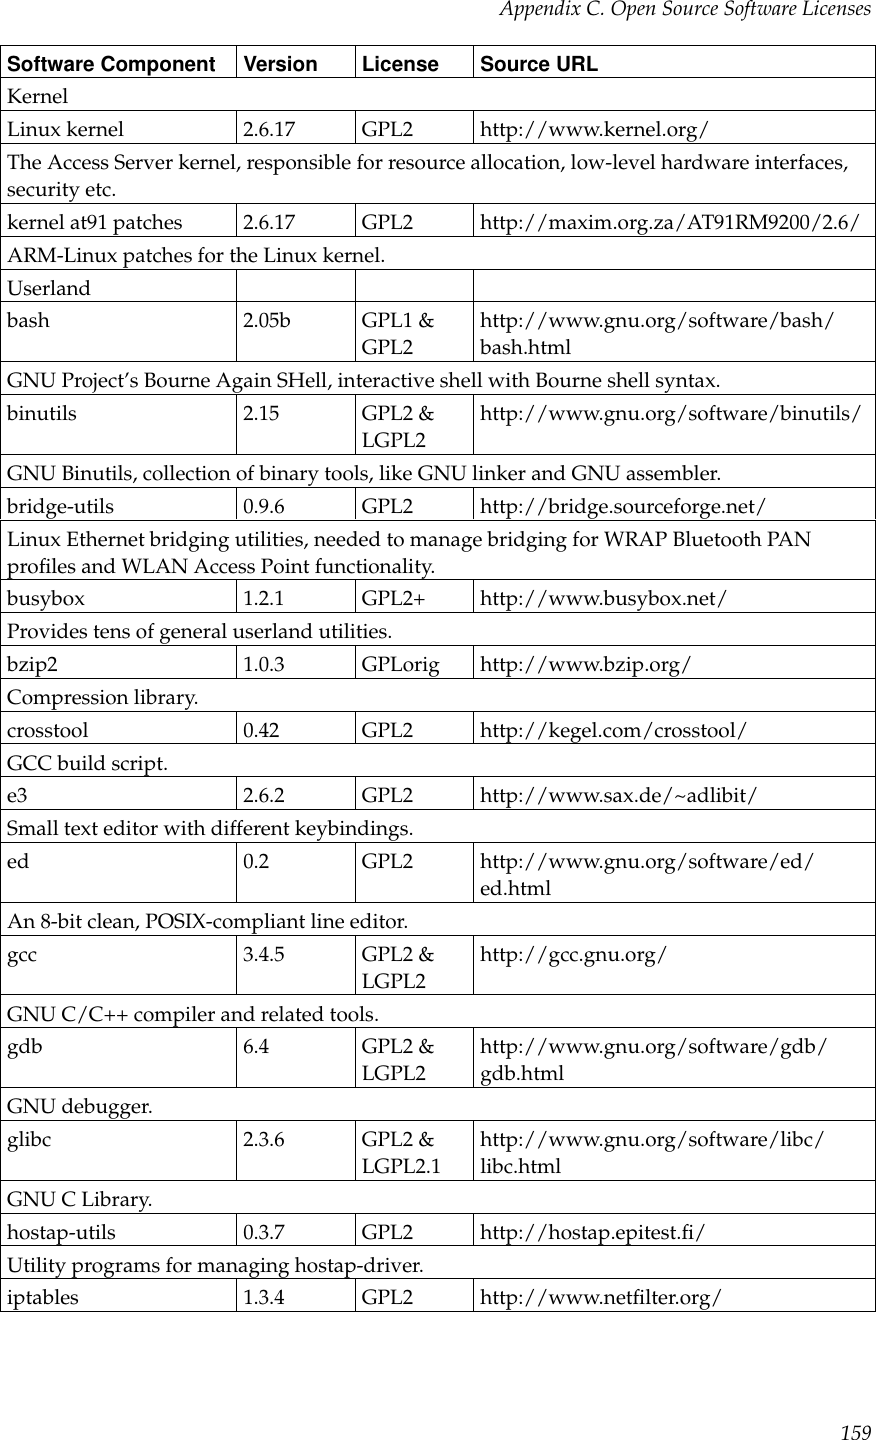
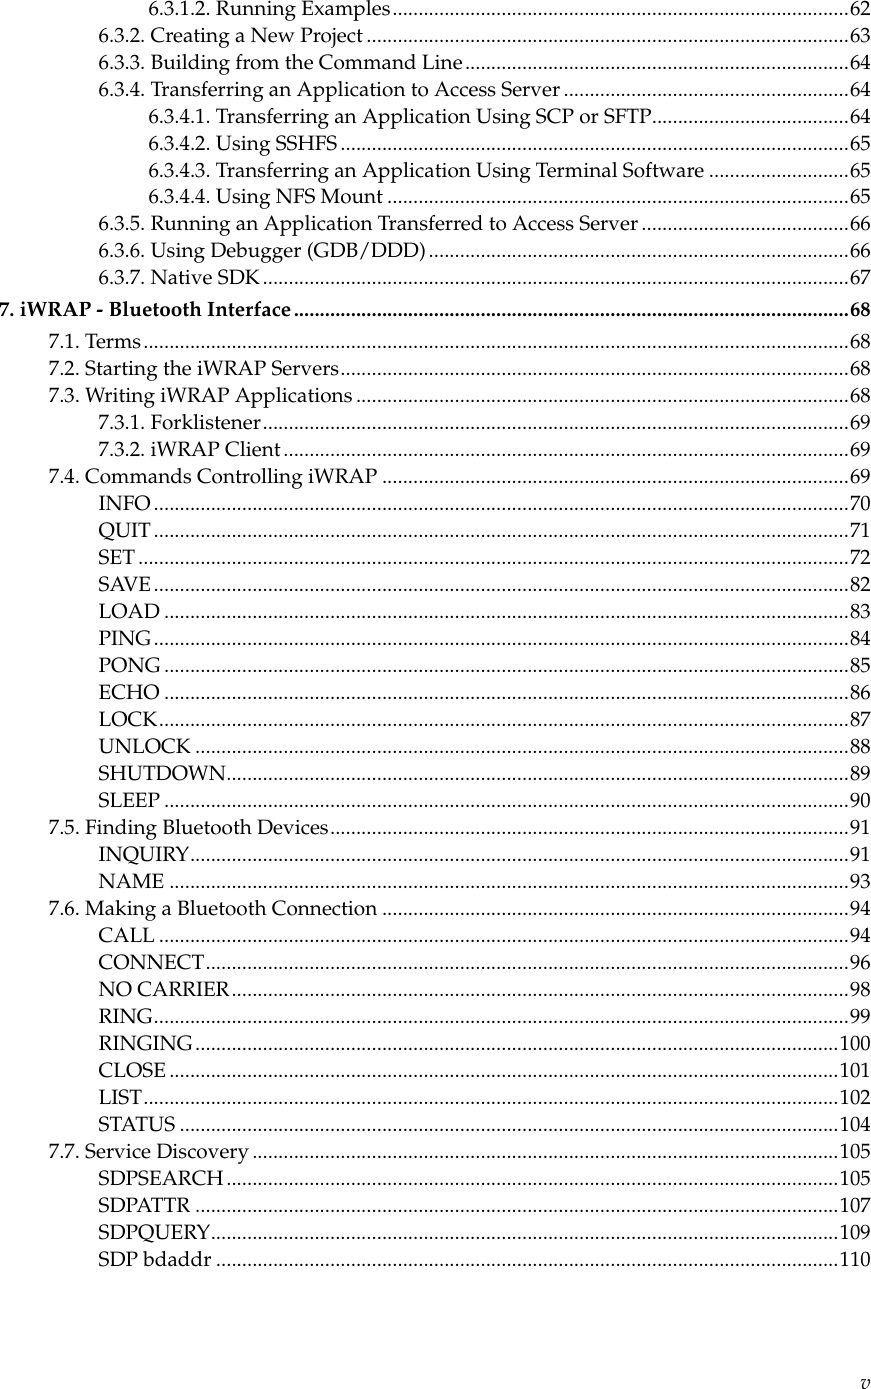
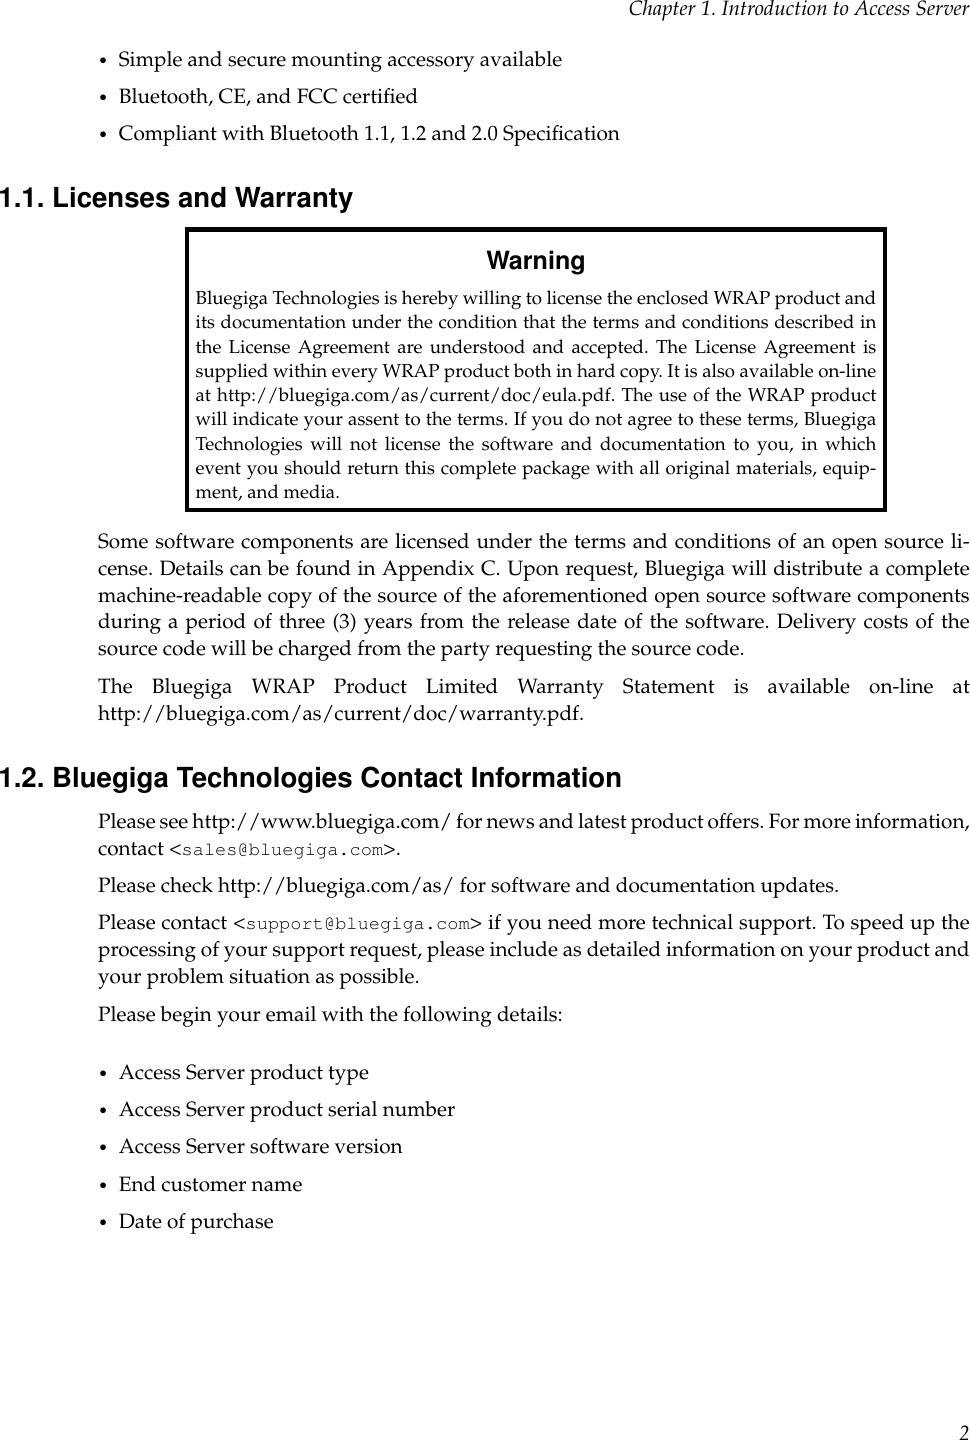
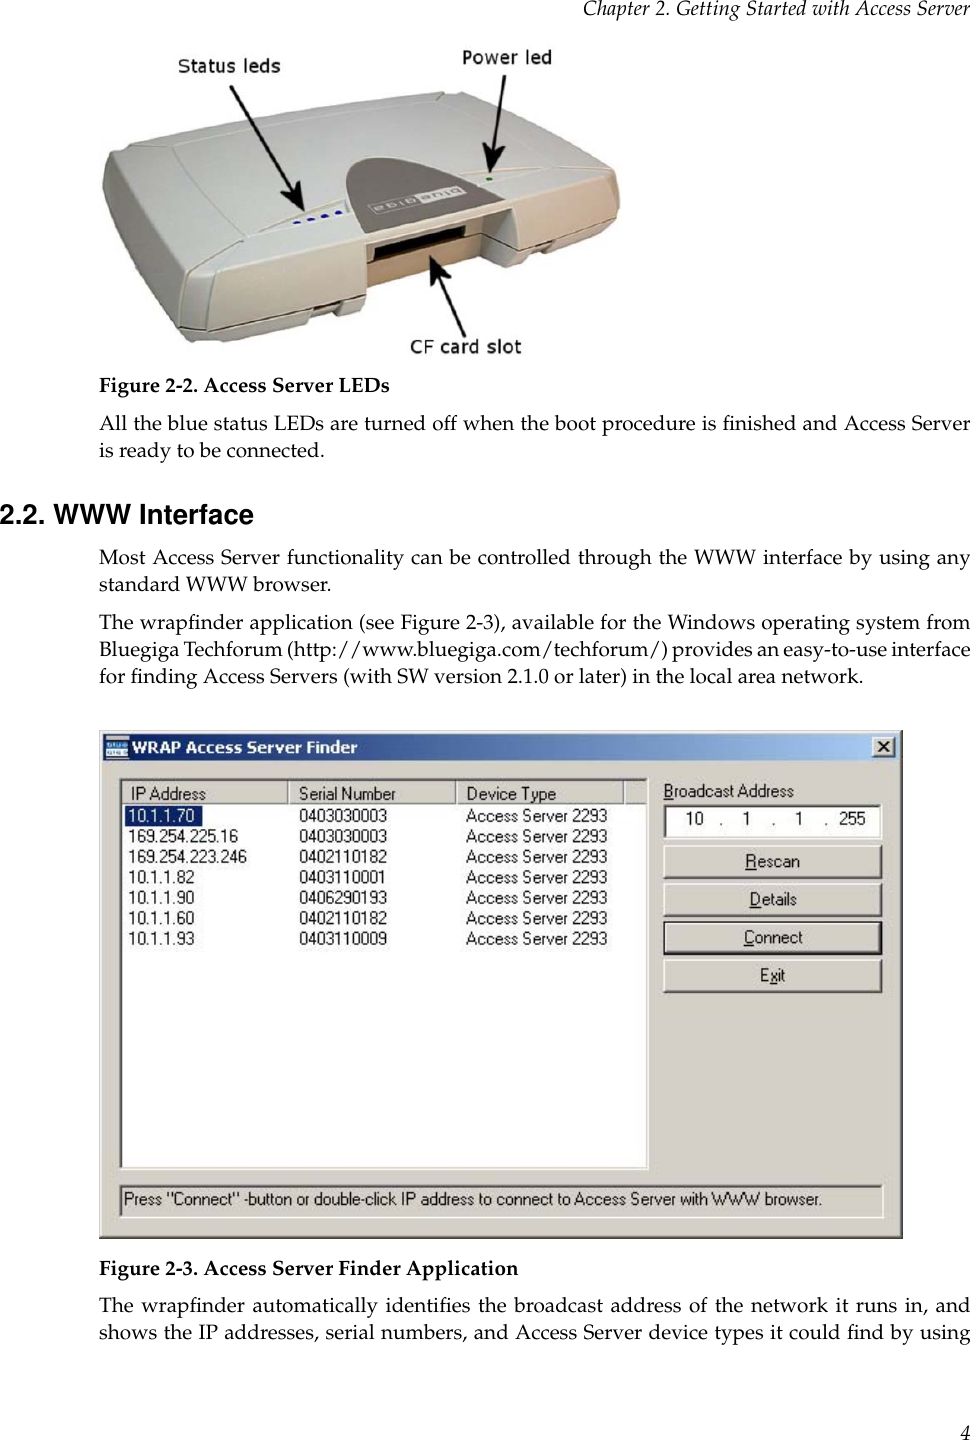
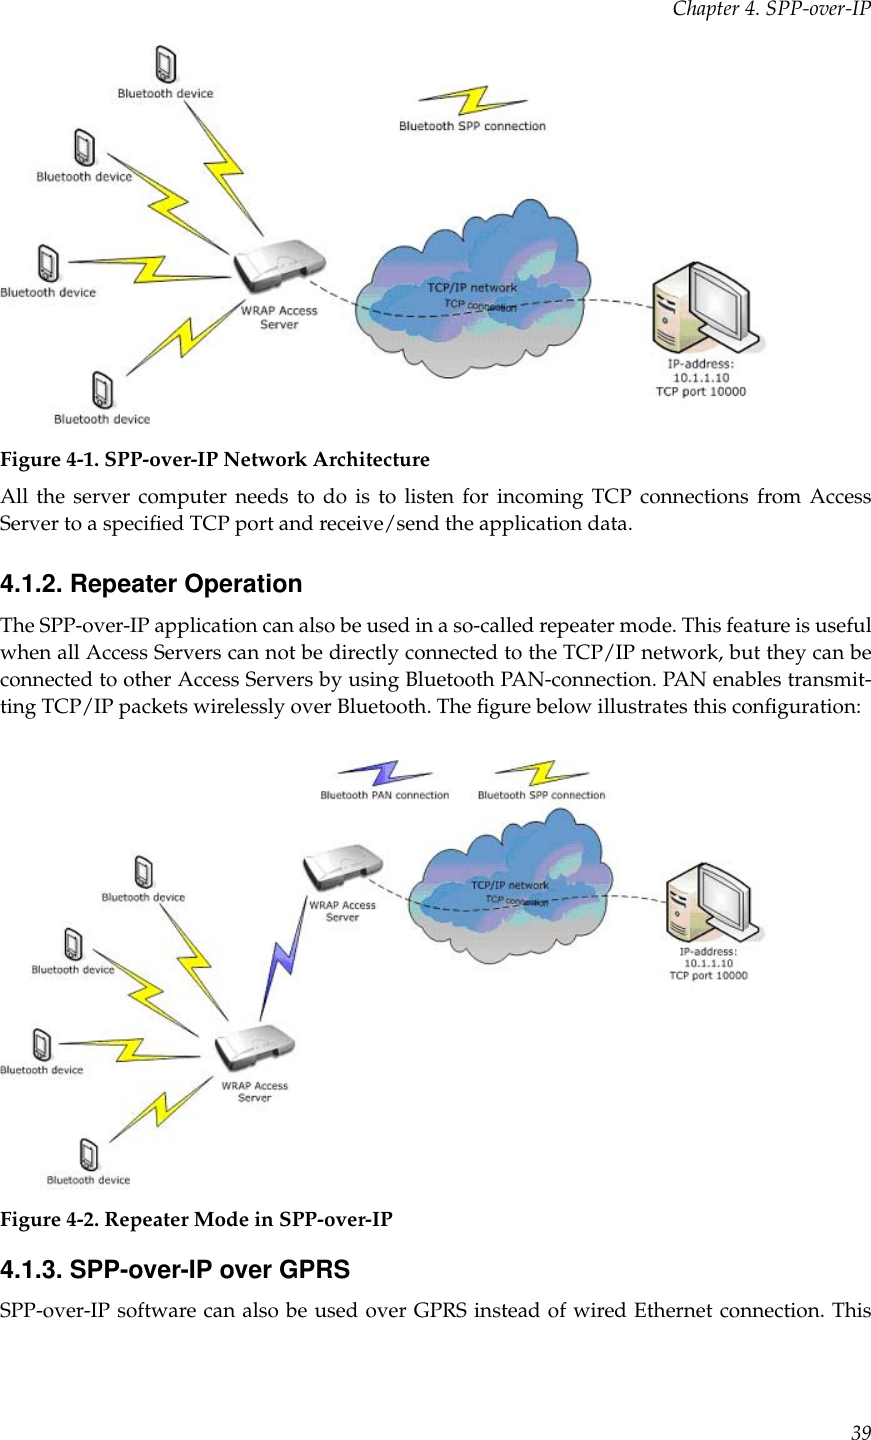
![Chapter 2. Getting Started with Access ServerSection 2.2).If you cannot get the IP address by using the wrapfinder, another way to see the IP address ofAccess Server is to connect with a management console (see previous section), power on theunit and, after the system is up and running, give the ifconfig nap command. The inet addrfield for the nap interface contains the IP address of Access Server. For example, in the followingcapture from the management console, the IP address is 192.168.42.3.[root@wrap /]$ ifconfig napnap Link encap:Ethernet HWaddr 00:07:80:00:BF:01inet addr:192.168.42.3 Bcast:192.168.42.255 Mask:255.255.255.0inet6 addr: fe80::207:80ff:fe00:bf01/64 Scope:LinkUP BROADCAST MULTICAST MTU:1500 Metric:1RX packets:12635 errors:0 dropped:0 overruns:0 frame:0TX packets:8 errors:0 dropped:0 overruns:0 carrier:0collisions:0 txqueuelen:100RX bytes:1686246 (1.6 MiB) TX bytes:1640 (1.6 KiB)Interrupt:24 Base address:0xc000You can use this address to connect to Access Server remotely over SSH, SCP or SFTP.Note: The default username is root and the default password is buffy.2.3.3. Transferring Files to/from Access ServerYou can transfer files to and from Access Server by using, for example:•SCP (secure copy over SSH)•SFTP (secure FTP connection over SSH)•FTP (plain FTP connection)Note: FTP is disabled by default for security reasons. Use SFTP instead.Tip: If enabled, use the integrated FTP client on the Internet Explorer (type ftp://root:buffy@wrap-ip-address/ in the address bar)•Bluetooth OBEX (Object Push and File Transfer Profiles) to/from directory /tmp/obex in Ac-cess Server•NFS (mount an NFS share from a remote device as a part of Access Server’s file system)•SSHFS (mount an Access Server directory over SSH as a part of any other Linux host filesystem)To download and install SSHFS, visit http://fuse.sourceforge.net/sshfs.html.•USB memory dongle (see Section 3.4 for more information).•Xmodem/Ymodem/Zmodem (use rz/rx/rb/sz/sx/sb commands from the management con-sole)For examples of transferring files, see Section 6.3.4.9](https://usermanual.wiki/Silicon-Laboratories-Finland/WRAPAS229X/User-Guide-753326-Page-17.png)

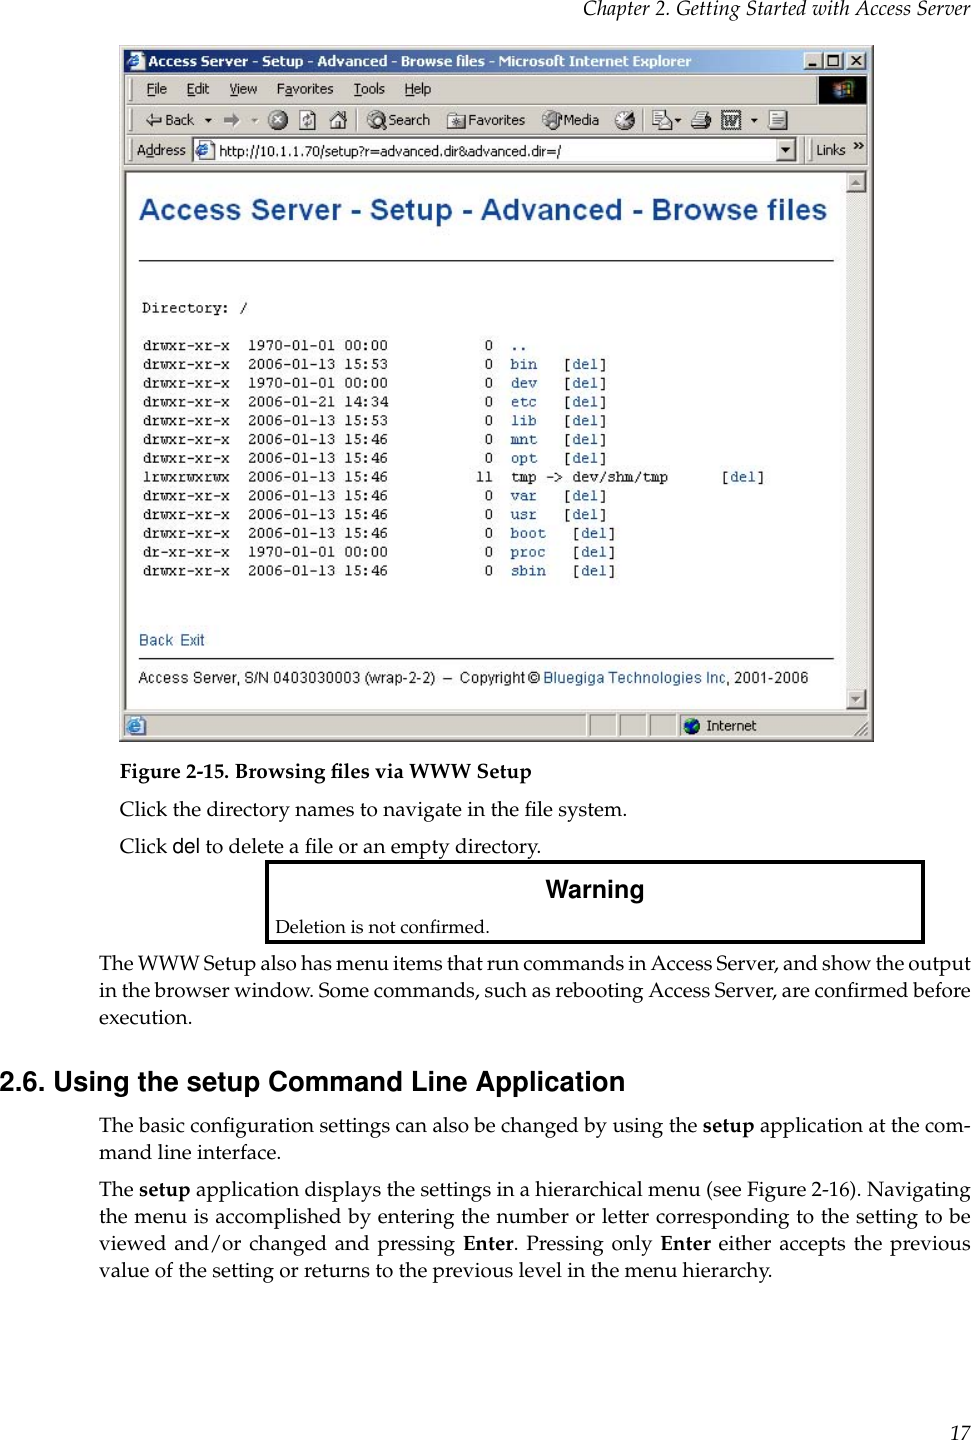
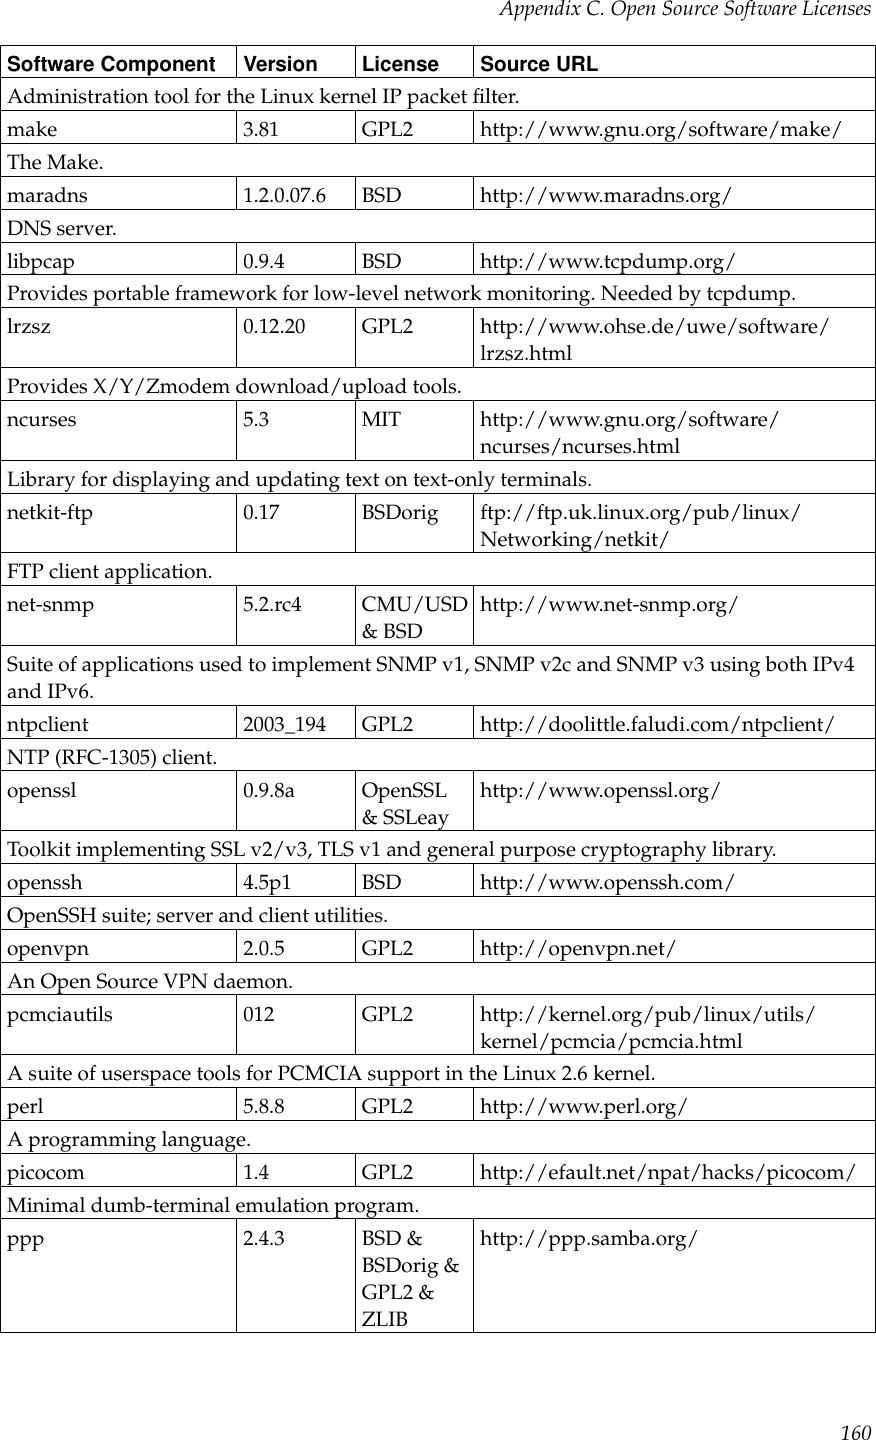
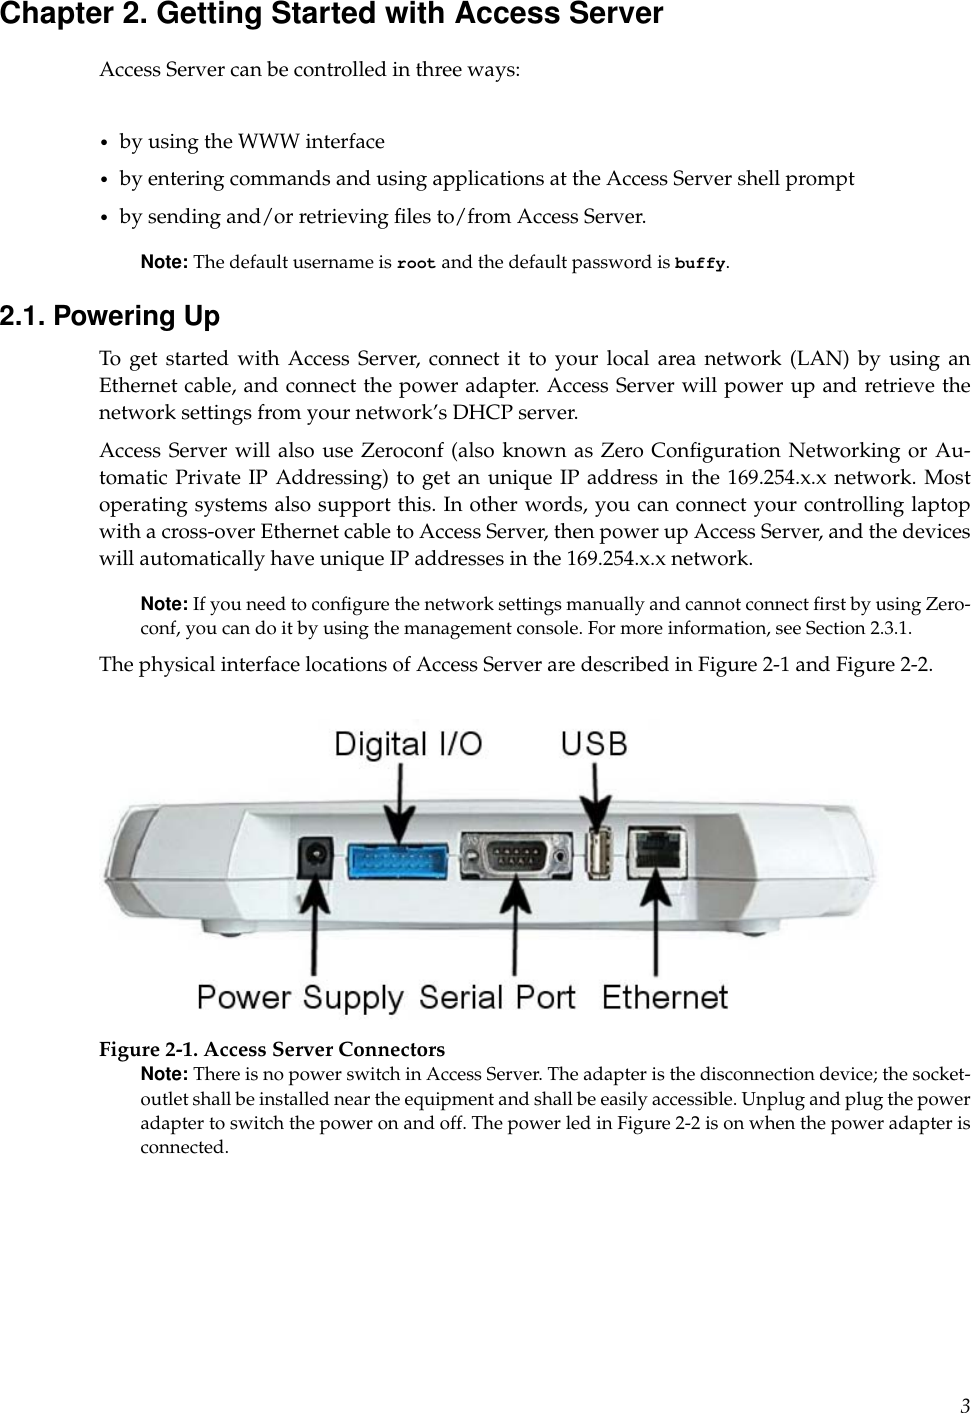
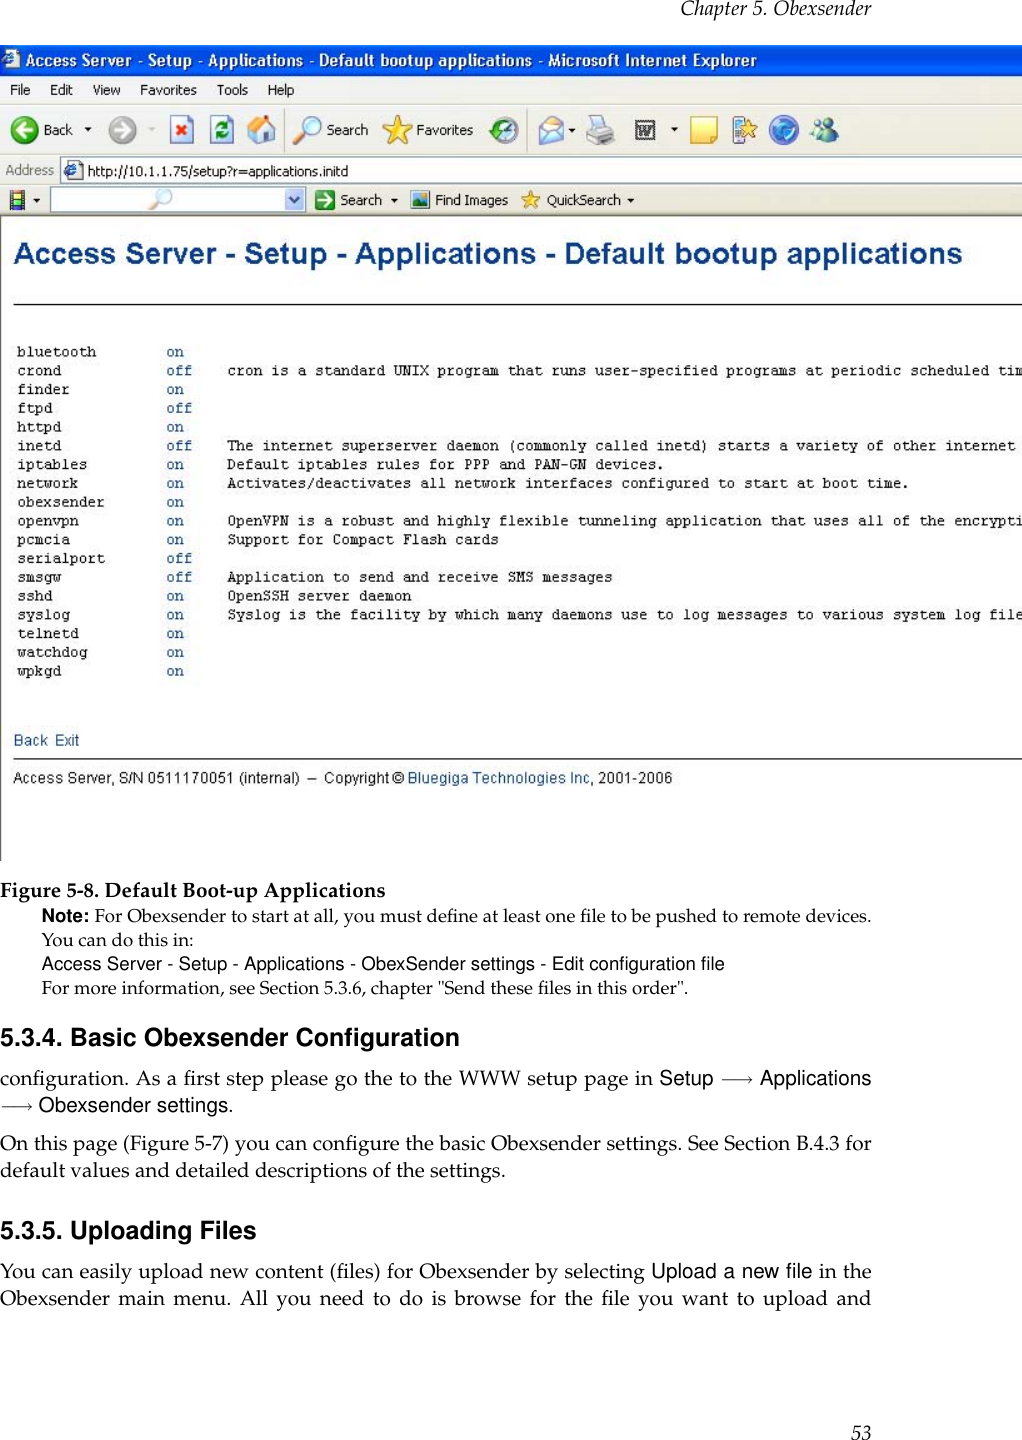
![Chapter 2. Getting Started with Access ServerFigure 2-16. Using the setup Command Line ApplicationNote: Ensure that your terminal application does not send line ends with line feeds. If your terminalsends both CR and LF when you press Enter, you cannot navigate in the setup application.2.7. Resetting a ConfigurationYou can reset the default configuration with the setup -r command. The command requiresrebooting of Access Server. When the system starts up, the default configuration settings are re-stored. If you have only changed the configuration by using the setup application, the followingcommands at the Access Server’s command prompt will suffice:[root@wrap /]$ setup -r[root@wrap /]$ rebootNote: This does not reset the edited files to factory defaults; it only affects only the settings changedthrough the WWW Setup or the setup command line application.2.8. Exporting and Importing ConfigurationsYou can export configuration settings (expect for passwords and the list of default bootup ap-plications) with the following command:[root@wrap /root]$ setup -o > settings.txtThe saved settings can later be restored with the following commands:[root@wrap /root]$ setup -m settings.txt[root@wrap /root]$ reboot18](https://usermanual.wiki/Silicon-Laboratories-Finland/WRAPAS229X/User-Guide-753326-Page-26.png)
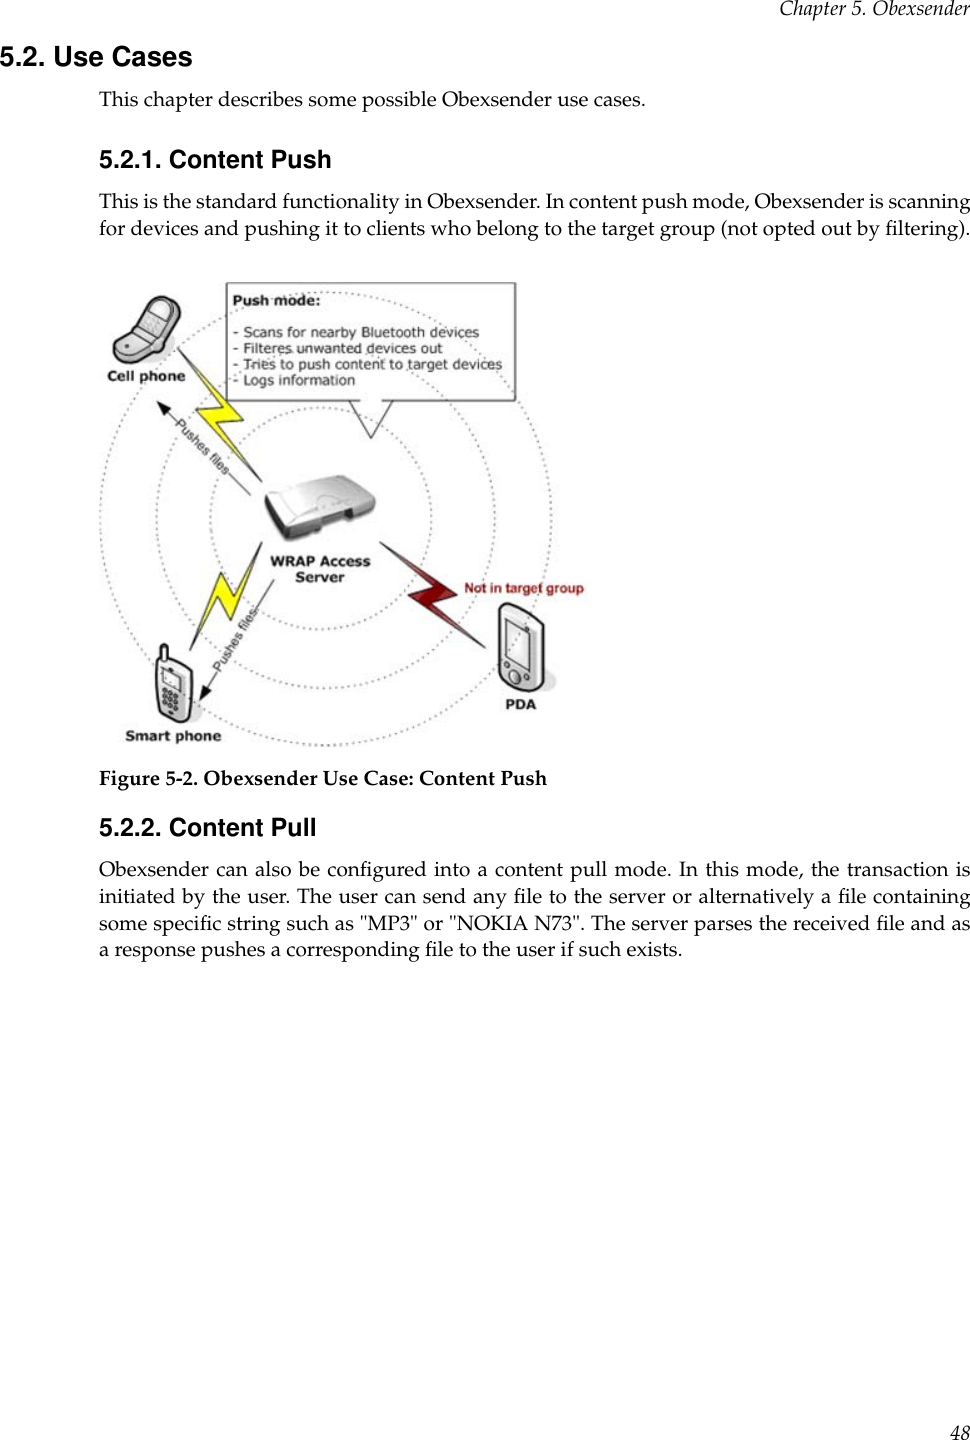
![Chapter 3. Using the Systemto the user devices with (short) serial cables. The cable between user device A and Access Serverdevice A must be a cross-over cable. The cable between user device B and Access Server deviceB must be similar (direct or cross-over) to the one used in state A).If RTS/CTS handshaking is used to ensure correct data transfer, the serial cables must have thesepins connected. Notice that this handshaking is "local": it takes place between the user deviceand Access Server. No handshaking between user device A and user device B on the other endof the Bluetooth connection is provided.If RTS/CTS handshaking is not used, CTS must be connected to DTR.DCD, DTR, and DSR signals are not supported. This also means that user devices A and B willnot be able to tell whether or not the Bluetooth connection is up.When the physical setup is ready, you can create the Bluetooth connection. By default, the SerialPort Profile is started up at boot with the default settings. That is, listening in DevB mode, at115200 bps, 8 data bits, no parity, 1 stop bit, and RTS/CTS enabled. To change these settings, usethe setup application or the WWW Setup interface, as described in Section 2.4.Note: To enable Serial Port Profile, navigate to Setup −→ Applications −→ Default bootup applicationsin the WWW Setup interface, and switch serialport application to off.Enabling can also be done from command prompt with command chkconfig serialport on.3.2.4. Object Push and File Transfer ProfileAccess Server has two OBEX profiles: Object Push Profile (ObjP) and File Transfer Profile (FTP).You can use these profiles to transfer files easily between different Access Server devices andother devices supporting ObjP/FTP.The OBEX profiles are handled by forwarding incoming calls to the obexserver program, whichhandles both profiles. The working directory is /tmp/obex, and users have full read and writeaccess to that directory. By default, the default contact card /etc/default.vcf is copied to thatdirectory at boot.In the ObjP mode, obexserver will prefix received files with the sender’s Bluetooth address andiWRAP port number.Two simple command line utilities, obexput and obexget, are provided. They can be used tosend and retrieve files to and from another Bluetooth device supporting ObjP/FTP.Usage:obexput [parameters] bdaddr channel file(s)Note: You can use the friendly name instead of Bluetooth address as the "bdaddr" parameter andkeywords "OBJP" and "FTP" as the "channel" parameter for automatic service discovery.Enter either of these commands without parameters to view a short help text for using thecommand.A non-zero return value indicates an error. The reason for this error is printed to the terminal.Tip: Special parameters and the iWRAP interface (see Chapter 7) obexput command can be easilyused from the user application as follows:CALL bdaddr OBJP FORK \"/usr/bin/obexput - 1 filename\"21](https://usermanual.wiki/Silicon-Laboratories-Finland/WRAPAS229X/User-Guide-753326-Page-29.png)
![Chapter 3. Using the System-as bdaddr and 1as channel tells obexput that it will be launched by the iWRAP server, and thatdata connection is bound to standard input and output.3.2.5. PAN ProfilesAccess Server has support for all PAN profile modes: Personal Area Network User (PANU), Net-work Access Point (NAP) and Generic Networking (GN). Accepting incoming PAN connectionsto any of these modes is disabled by default for security reasons.Access Server can be configured to accept incoming PAN connections and the default settingscan be changed by using the setup application (see section Section 2.4).The Network Access Point mode is the most useful PAN profile mode. You can enable it bysending the enable-pan.wpk file (available on-line at http://bluegiga.com/as/current/enable-pan.wpk) to Access Server by using the Bluetooth Object Push profile. Alternatively, you cancopy the file to the root of a USB memory dongle and insert the dongle to Access Server’s USBport.The device creating the PAN connection decides upon the modes to be used. Access Serverautomatically handles incoming connections. Access Server can also act as a PAN client, but inthis case it must be controlled manually by using the iWRAP interface, described in Chapter 7.3.2.6. Changing the Bluetooth RangeThe transmit power of Access Server is configurable. By default, class 1 (100 meter range) set-tings are used. The settings can be changed down to "class 2" (10 meter range) settings withthe b2b_class2 command, or even lower with the b2b_class3 command. Class 1 settings can berestored with the b2b_class1 command.After b2b_class# is given, it is recommended to reboot Access Server once to restart ObexSenderand other applications connected to the iWRAP server(s).Note: If the operation is successful, you get one Can’t open baseband message with Access Servermodel 2293 and three messages with the 2291 model.3.2.7. BTCLI - iWRAP Command Line Interface UtilityYou can send commands to an iWRAP server by using the btcli application.Usage:btcli [options] commandTo see the command options, enter the btcli --help command.The specified command is sent to an Access Server iWRAP server (the first server at port 10101by default) and all replies are echoed to the standard output. The application waits and printsthe replies for a certain amount of time (10 seconds by default) and exits.The iWRAP commands are described in Chapter 7.3.2.8. serialbluetoothIt is also possible to control the first iWRAP server (at port 10101) through RS-232 with theserialbluetooth application.22](https://usermanual.wiki/Silicon-Laboratories-Finland/WRAPAS229X/User-Guide-753326-Page-30.png)
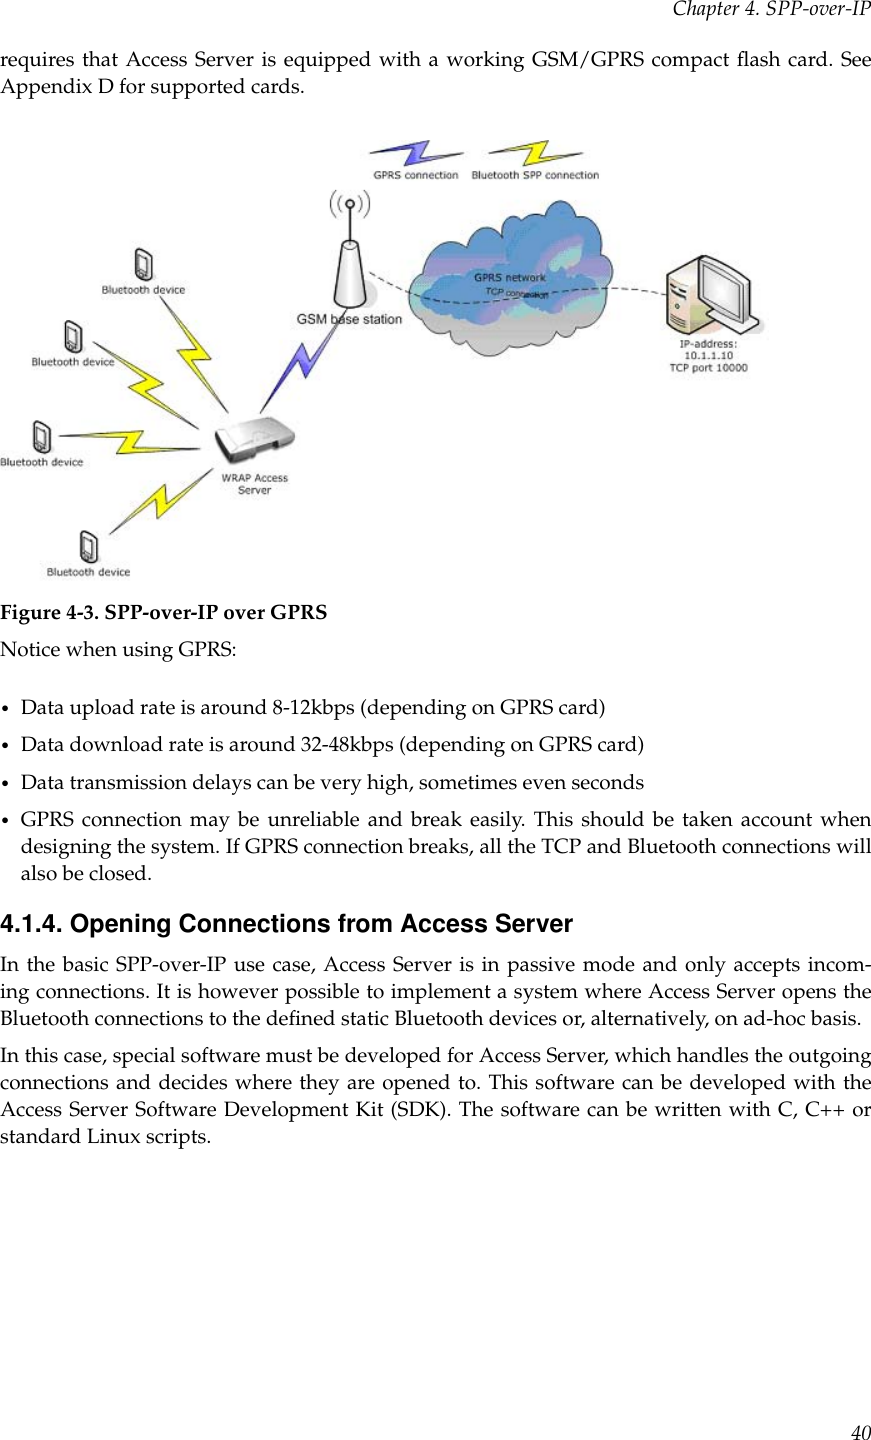
![Chapter 3. Using the SystemUsage:serialbluetooth [options]To see the command options, enter the serialbluetooth --help command.Basically, serialbluetooth takes commands from a serial port and forwards them to the iWRAPserver. All the commands available through iWRAP are also available through serial port.There are two exceptions:1. After making an outgoing RFCOMM data call, all input from the serial port is forwardedto the data socket, not to the control socket. To close the data socket, you have to write+++ with a 200ms pause before each character. It is not possible to have two concurrentRFCOMM calls.2. All incoming RFCOMM calls are answered automatically. Again, to close the data socket,write +++ as with the outgoing call.3.3. Compact Flash CardsAccess Server functionality can be extended by using GSM/GPRS, Wi-Fi and GPS CompactFlash cards. The supported Compact Flash cards are listed in Appendix D.3.3.1. Compact Flash GPRS CardsThe operating system automatically identifies the Compact Flash GPRS card when it is inserted.Access Server can use the GPRS card to connect to the GPRS network, or to act as an SMSgateway to send and receive SMS messages.You can enable the GPRS mode and configure its settings, such as the SIM card’s PIN code, byusing the setup application or its WWW interface. For more information, see Section 2.4 anddocumentation for Setup −→ Network settings −→ Enable GPRS interface in Appendix B.GPRS, when enabled, is by default only turned on when needed. If Access Server can access theInternet (or any desired address) by using the default interface nap, it does not activate and usethe GPRS (ppp0) interface.The simplest way to test the GPRS interface is to configure the default interface nap to usedynamic network configuration (the default) and enable GPRS through the setup application,then to disconnect the Ethernet cable, reboot the device with the management console enabled.After the boot, ping an IP address in the Internet, such as 194.100.31.45 (bluegiga.com).The first five or so packets are lost, but after that the GPRS connection should be up. To enablethe interface automatically, just enter ping -c 20 ip-in-internet to /etc/rc.d/rc.local.Note: If you also want to use the Ethernet connection, you must remove it from the default inter-face (nap) bridge and configure its network settings individually using the setup application whilekeeping the default interface network settings in their default (dynamic) state.Using WRAP SMS Gateway Server is documented in Section 3.5.3.If needed for some special use, the Compact Flash GPRS card can also be accessed directly from/dev/ttyS0, a device file which exists if the GPRS card is successfully initialized.23](https://usermanual.wiki/Silicon-Laboratories-Finland/WRAPAS229X/User-Guide-753326-Page-31.png)
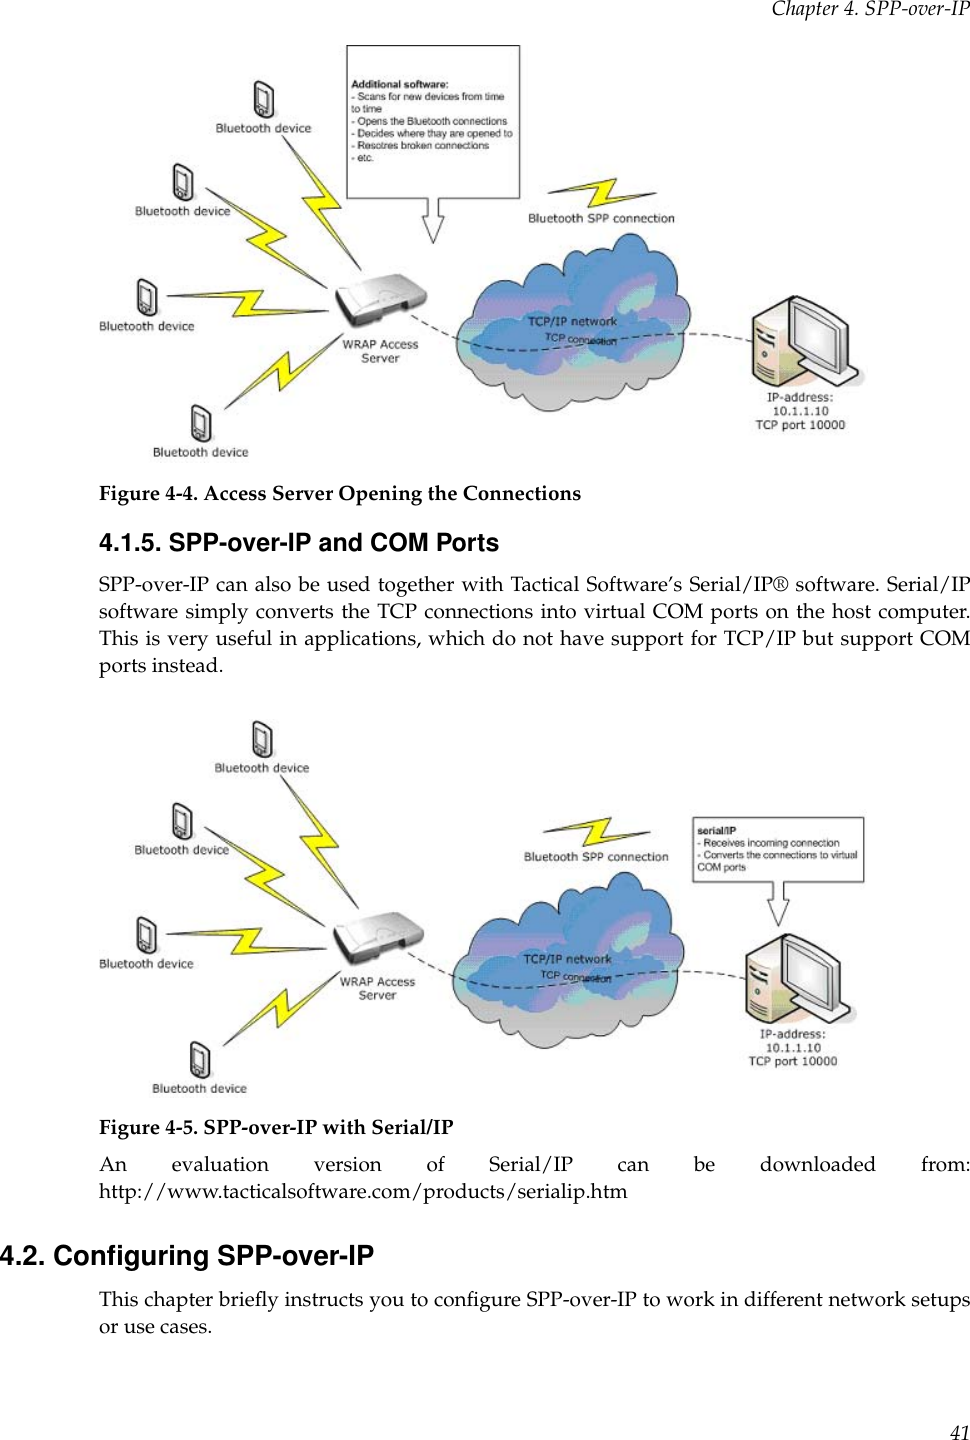
![Chapter 3. Using the System3.3.2. Compact Flash GPS CardThe operating system automatically identifies the Compact Flash GPS card when it is inserted.At that time, the device file /dev/ttyS0 is created and the GPS card can be accessed by usingthat device with the serial port settings the GPS card uses.The supported Compact Flash cards are listed in Appendix D.3.3.3. Compact Flash Wi-Fi CardsAccess Server supports Prism II/III based CF Wi-Fi cards. The supported Compact Flash cardsare listed in Appendix D.By default, Access Server notices when a supported Wi-Fi card is inserted and tries to use it inthe client mode, without encryption. So, if there is an open Wi-Fi Access Point in range, AccessServer will automatically connect to it.To configure Wi-Fi to the Access Point mode, or to change other Wi-Fi settings, use the setupapplication or its WWW interface at Setup −→ Network settings −→ Wi-Fi.Note: Older Compact Flash cards with firmware version 1.4.2 do not work in the Access Point mode.Instead, you will see an error message in the system log (/var/log/messages, viewable at Setup −→Advanced −→ System Information −→ Show system log file).A standard set of command line wireless utilities is provided to fine-tune your Wi-Fi configura-tion:•iwconfig•iwlist•iwprivFor more information on these utilities, see: http://www.hpl.hp.com/personal/Jean_Tourrilhes/Linux/Tools.html3.4. USB Memory Dongles and Compact Flash Memory CardsAccess Server’s persistent memory storage can be extended by using an USB memory dongle ora Compact Flash memory card. These are also used by the Access Server Remote ManagementSystem (see Section 3.5.5) - each time a dongle or memory card is inserted, it is automaticallymounted, and scanned for management packets, which are processed and unmounted.To use the USB dongle or Compact Flash memory card for your own applications, the memorymust be mounted manually by using command:[root@wrap /]$ mount -t vfat device /mnt/usbThe device parameter is a path to the USB dongle or Compact Flash memory card filesystemdevice. For the first dongle inserted after a reboot, it is /dev/sda1 if the dongle is partitioned(which often is the case) and /dev/sda if the dongle has no partition table. The first CompactFlash memory card is typically at /dev/hda1, correspondingly. If you have used several donglesafter reboot, new device file names are created: /dev/sdb1 for the second one, /dev/sdc1 forthe third one, and so on. In the case of memory cards, naming is similar, that is, the second onegets device file name /dev/hdb1.24](https://usermanual.wiki/Silicon-Laboratories-Finland/WRAPAS229X/User-Guide-753326-Page-32.png)
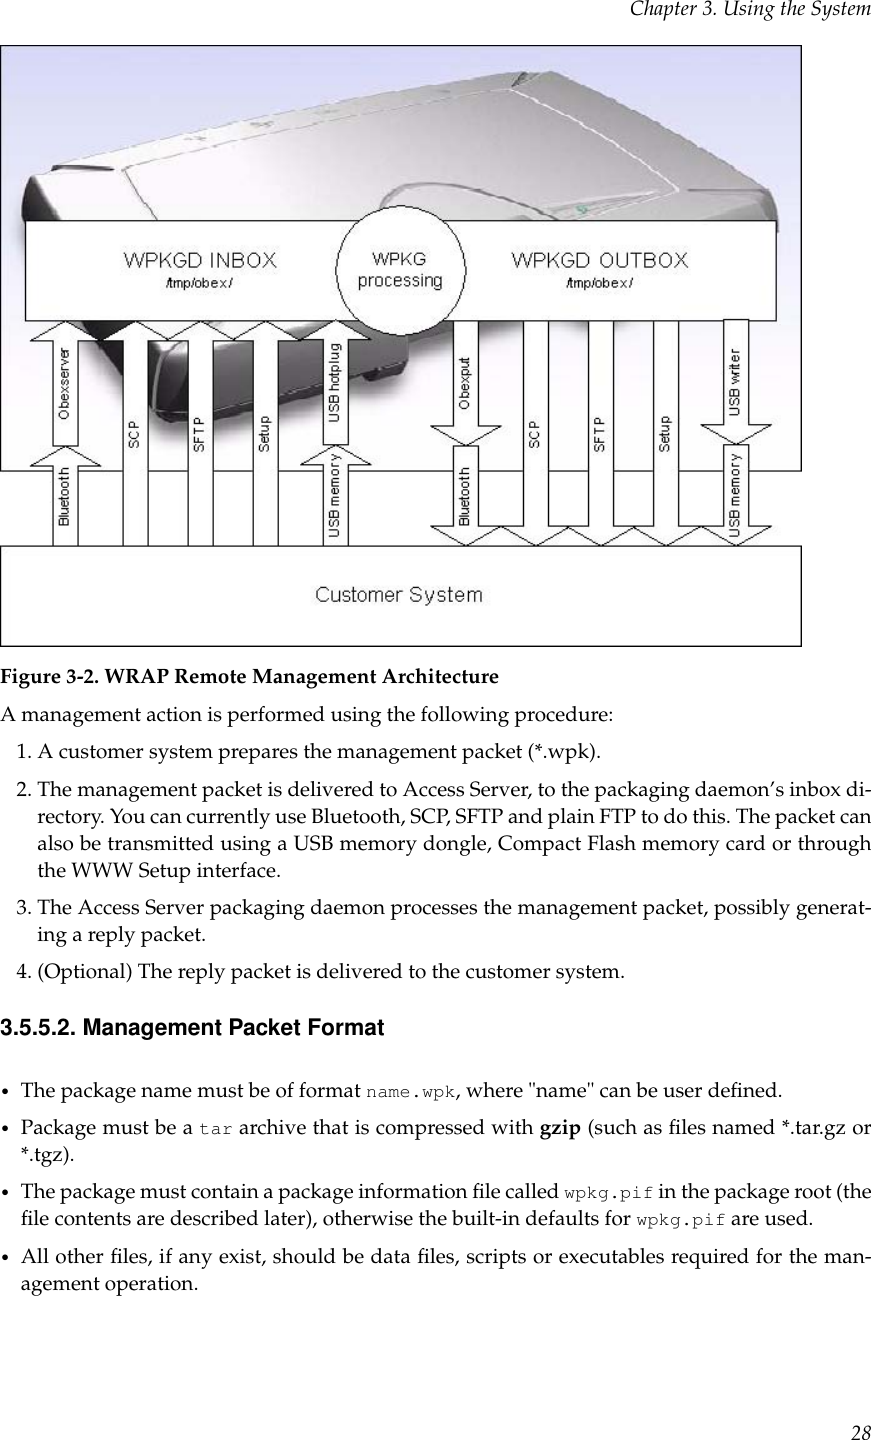
![Chapter 3. Using the SystemNote: Always remember to unmount the memory dongle or memory card with command:[root@wrap /]$ umount /mnt/usb3.5. ServersAccess Server server applications are started automatically at system power-up or when aniWRAP server or the Internet services daemon needs them. The servers and their purposes aredescribed in Table 3-2.Server Descriptionbluetooth Access Server iWRAP Server, which is described in detail in Chapter 7.finder WRAP Finder Service.obexsender WRAP ObexSender server.smsgw WRAP SMS gateway server, which is described in detail in Section3.5.3. Notice that this server is disabled by default. Use the setupapplication or the chkconfig smsgw on command to enable it.watchdog WRAP user level watchdog.wpkgd WRAP remote management system daemon.crond A daemon to execute scheduled commands. This server is configurablethrough the /var/spool/cron/crontabs/root file or the crontabcommand in the same way as any Linux crond.ftpd Internet File Transfer Protocol Server. You can configure this serverwith the setup application. Notice that this server is disabled bydefault. Use the WWW interface of the setup application or thechkconfig ftpd on command to enable it.udhcpd This server is a DHCP daemon for providing automatic networkconfiguration for clients in the network. Notice that, by default, thisserver is only enabled for the gn interface, used by Bluetooth PANGeneric Networking profile.udhcpcd DHCP client daemon for automatic network configuration.inetd Internet services daemon. Notice that this server is disabled by default.Use the setup application or the chkconfig inetd on command toenable it.httpd Web server, which is described in detail in Section 3.5.7.pppd Point to Point Protocol daemon. iWRAP server uses this server. Thisserver can be used manually over the user serial port (/dev/ttyAT1).snmpd SNMP daemon. This server is available as a separate installationpacket.sshd SSH daemon.syslogd System logging daemon. This server can be configured by using thesetup application.25](https://usermanual.wiki/Silicon-Laboratories-Finland/WRAPAS229X/User-Guide-753326-Page-33.png)
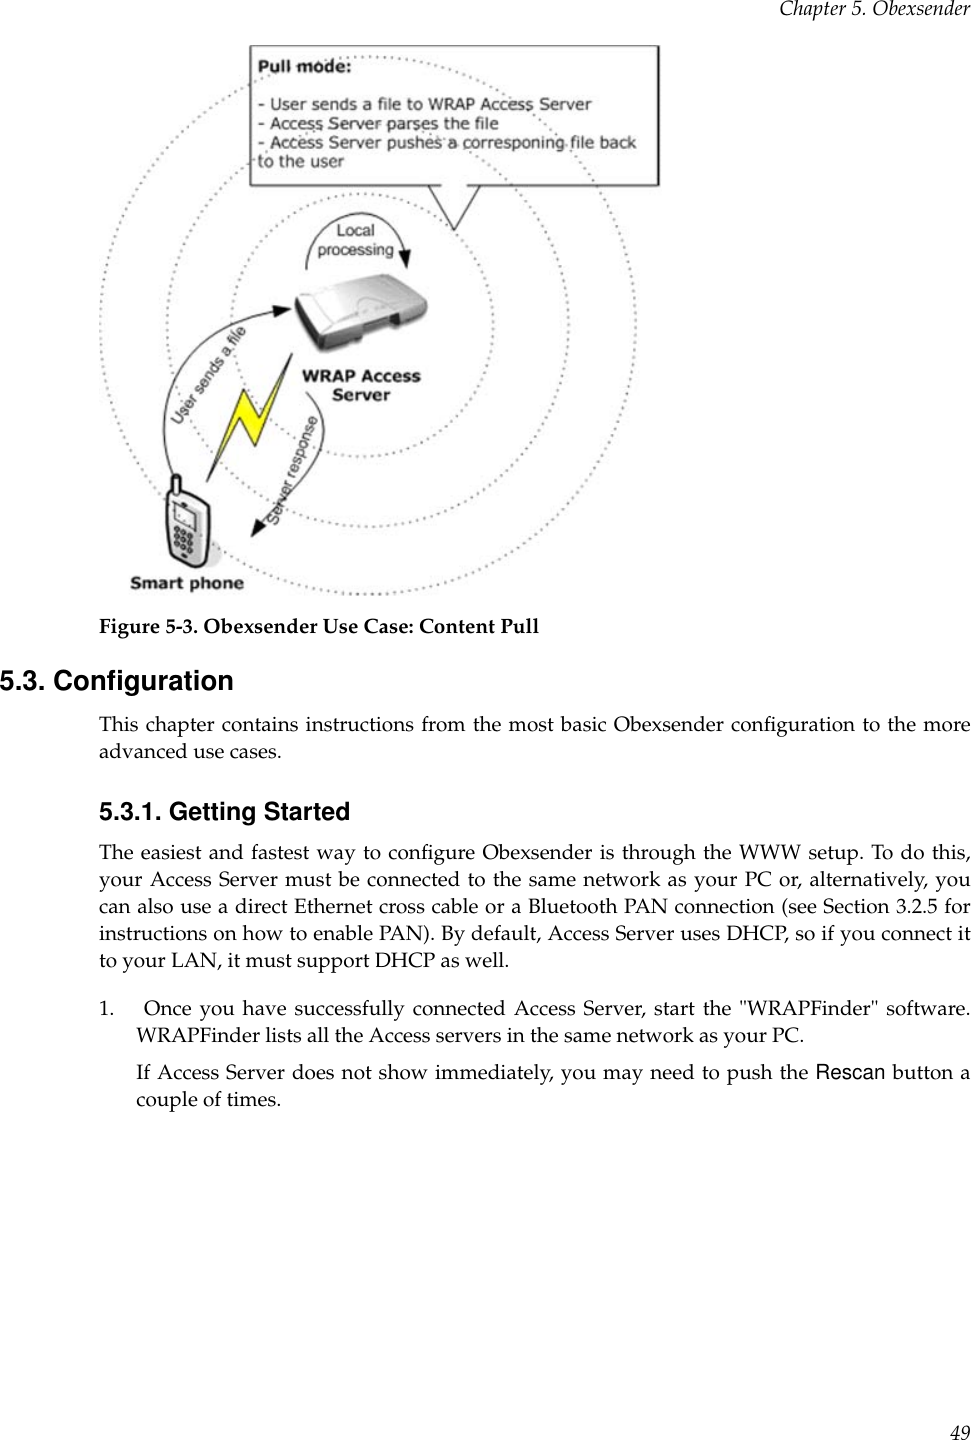
![Chapter 3. Using the SystemServer Descriptiontelnetd Telnet protocol server. Notice that this server is disabled by default.Use the setup application or the chkconfig telnetd on command toenable it.zcip Zero configuration networking service.ntpd Network Time Protocol (NTP) daemon.Table 3-2. Access Server Servers3.5.1. FinderThe Finder service is a small service, which listens for UDP broadcast queries from Access ServerFinder applications and responses to those queries with identification information (IP address,model, serial number, etc.) about Access Server.The finder command can be used to query Finder service information from Access Servers in thenetwork. With no parameters, finder sends the query using the broadcast address of the defaultinterface (nap). Broadcasting to networks of other interfaces can be done with --interfaceparameter, such as the zero configuration interface nap:9in the following example:[root@wrap root]$ finder --interface nap:9Access Server 2291 (S/N: 0402110112) (build: 3.1)- Hostname: wrap.localdomain- IP: 169.254.30.233 (nap:9), 192.168.161.1 (gn)- Ethernet MAC: 00:07:80:00:03:ed- iWRAP: 10101 00:07:80:80:0b:c3 bt1.2 (W0402110112_1)Access Server 2291 (S/N: 0606221029) (build: 3.1)- Hostname: wrap.localdomain- IP: 169.254.36.138 (nap:9), 192.168.161.1 (gn)- Ethernet MAC: 00:07:80:00:0d:44- iWRAP: 10101 00:07:80:80:0b:c4 bt1.2 (W0606221029_1)[root@wrap root]$3.5.2. ObexSenderThe ObexSender application is automatically started in Access Server. Its purpose is to receivebusiness cards (vCards), images, or other files, and analyze their content and send files backselecting them based on configured keywords found.ObexSender can also make an inquiry for bluetooth devices, and automatically send one or morefiles to all new devices found.ObexSender can be configured with the setup application or by editing the/etc/obexsender.conf file (see Section 2.4).For detailed instructions on using ObexSender, see Chapter 5.3.5.3. SMS Gateway ServerWRAP SMS Gateway Server supports Nokia 20, Nokia 30, or Wavecom WMOD2 compatibleGSM terminals and the supported GSM/GPRS Compact Flash cards for sending and receiving26](https://usermanual.wiki/Silicon-Laboratories-Finland/WRAPAS229X/User-Guide-753326-Page-34.png)
![Chapter 3. Using the System3.5.5.3. Management Packet Information File FormatThe management packet information file (wpkg.pif) consists of tags and their data, describedhere:%wpkg-version: 2Contains information for version checking. 2 is currently the only supported version. It is alsothe default value.%wpkg-prepare: [command line[s]]One or more commands (all commands are lines until the next tag is interpreted as a commandline) to execute. Commands may contain parameters, redirections and job control as well.The built-in default value for this is /usr/bin/dpkg -i *.deb || echo ERROR: Installation failed..This enables the special case of creating .wpk packets from .deb packets simply with tar czffoo.wpk foo.deb. (wpkg.pif is not needed in this special case).%wpkg-reply: methodThis value indicates where the generated reply packet is sent. By default, it is sent to where itcame from. Possible values are:•default•file:///path/filename•scp://remote:file•objp://bdaddr/•none%wpkg-format: typeThis value indicates what kind of a reply packet will be generated. Possible values are:•ascii (this is the default value, everything echoed by the prepare-section will be sent).•tgz (all files in the current directory will be sent).•vcf (same as ascii, but assume it is a vCard).•vmg (same as ascii, but assume it is a vMessage).•vnt (same as ascii, but assume it is a vNote).•vcs (same as ascii, but assume it is a vCalendar).•html (same as ascii, but assume it is HTML).%wpkg-auth: authOptional authentication string required by wpkgd.3.5.5.4. Management Operation Example: Hello WorldSee below for the simplest example of wpkg.pif:%wpkg-version: 2%wpkg-prepare:29](https://usermanual.wiki/Silicon-Laboratories-Finland/WRAPAS229X/User-Guide-753326-Page-37.png)
![Chapter 3. Using the Systemecho Hello worldThis will generate a reply packet containing text "Hello world". You can generate the wpk filesimply by giving the command tar czf hello.wpk wpkg.pif.3.5.5.5. Management Operation Example: Software UpdateSee below for a more complex example of wpkg.pif:%wpkg-version: 2%wpkg-prepare:FOO=‘pwd‘cd /tar xzf ${FOO}/files.tar.gzecho Done.This example will extract files from the included files.tar.gz file. You can generate the wpkfile with command tar czf update.wpk wpkg.pif files.tar.gz.3.5.5.6. Management Operation Example: IPQUERYIn this example, we build a simple packet that can be used with a Bluetooth enabled phone toretrieve the IP address of an Access Server. File wpkg.pif reads:%wpkg-version: 2%wpkg-format: vcf%wpkg-prepare:ipaddr() {echo ‘ifconfig nap | grep "inet addr" | awk -F [:] \\\{print\\$2\\} | awk \\{print\\$1\\}‘}serialno() {echo ‘wrapid | grep Hardware | awk \\{print\\$5\\}‘}echo -e "BEGIN:VCARD\r"echo -e "VERSION:2.1\r"echo -e "N:‘serialno‘\r"echo -e "TEL:‘ipaddr‘\r"echo -e "URL:‘hostname‘\r"echo -e "END:VCARD\r"This example will send the reply back as a vCard (contact card). Please note that you have toinclude all required vCard formatting by yourself. You can generate the wpk file simply givingthe command tar czf ipquery.wpk wpkg.pif.To use this example, send the file ipquery.wpk to the inbox of your Bluetooth phone. Checkthat you have Bluetooth enabled in the phone. Then, from the phone’s inbox, send the fileipquery.wpk over Bluetooth to Access Server.30](https://usermanual.wiki/Silicon-Laboratories-Finland/WRAPAS229X/User-Guide-753326-Page-38.png)


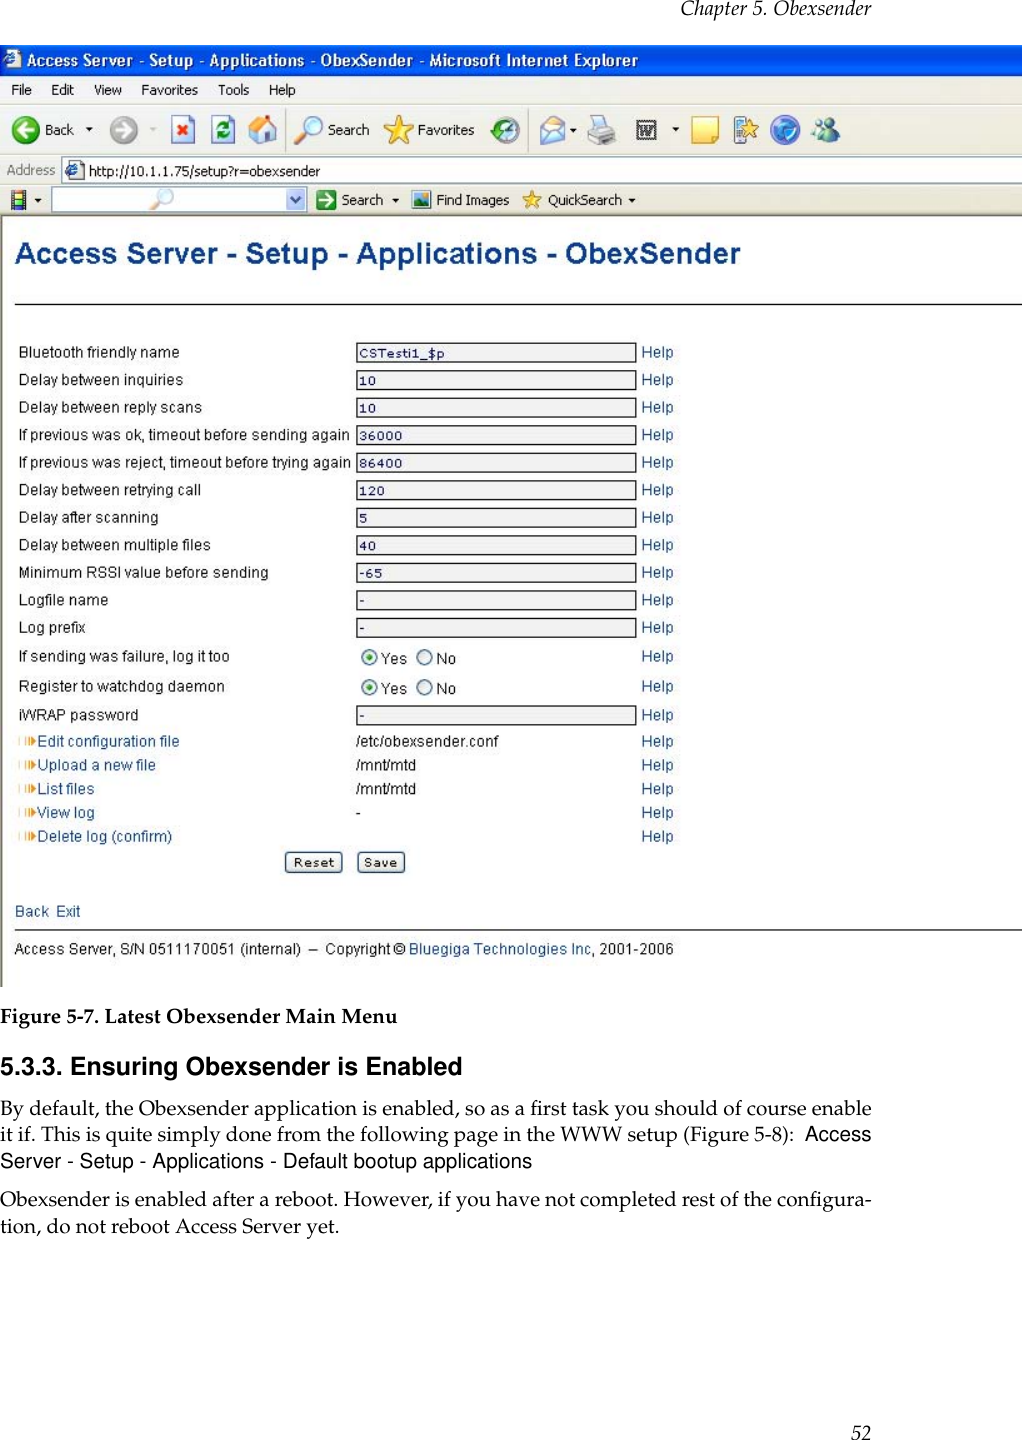
![Chapter 5. Obexsenderclick Upload. You will see a confirmation note, for example "File /usr/local/obexsender/Bike.jpguploaded" .At the moment, you can only upload to /usr/local/obexsender directory using WWW setup.If you would like to upload to another directory, you must use secure FTP to accomplish that.(Normal FTP is disabled by default in Access Server for security reasons). For example WinSCP,available from http://www.winscp.org, is a good application that for secure FTP file transmis-sions.5.3.6. Advanced Obexsender ConfigurationSpecifying the content (files) to be sent by ObexSender is done by editing the/etc/obexsender.conf file. The file also contains all configurable ObexSender settings (thesettings covered earlier and some advanced settings).In this section, we will only go through the settings that can not be configured using the WWWinterface.Note: Lines beginning with the hash character "#" are comments and ObexSender will ignore them.Advanced Configuration DirectivesbasebandSpecify which iWRAPs are used for sending/inquiry. By default all basebands in this AccessServer are in use.Syntax: baseband <ip> <port> [password]Example:baseband 127.0.0.1 10101ignoreDon’t send to these Bluetooth devices. The default setting ignore 00:07:80: is recom-mended. It disables sending files to other Bluegiga Access Servers.Syntax: ignore <bdaddr-prefix>Example:ignore 00:07:80:testerAlways send to these devices when found (60s interval). Other timeout settings are ignoredwith these devices.Syntax: tester <bdaddr>Example:tester 00:07:80:80:00:bfscandirObexserver’s directory (for remote requests). This is the directory which ObexSendersearches for remote requests. It should match the directory configured for Obexserver(/tmp/obex/ in default configuration.Syntax: scandir <directory>54](https://usermanual.wiki/Silicon-Laboratories-Finland/WRAPAS229X/User-Guide-753326-Page-62.png)
![Chapter 5. ObexsenderExample:scandir /tmp/obexfileSpecify full pathname(s) of file(s) to be sent, possibly at given time. If there are no filesspecified, ObexSender does not do inquiry. The files specified are sent in listed order.Syntax: file <filename> [timestamp]Example for sending tp1.gif first, then tp2.gif:file /usr/local/obexsender/tp1.giffile /usr/local/obexsender/tp2.gifTimestamp can be specified as Weekday (Mon/Tue/Wed/Thu/Fri/Sat/Sun), Starthour-Endhour or WeekdayStarthour-Endhour:Example for sending image.jpg on Fridays, image2.jpg every day between 8am and 2pmand image3 only on Tuesdays between 8am and 2pm:file /usr/local/obexsender/image1.jpg Frifile /usr/local/obexsender/image2.jpg 8-14file /usr/local/obexsender/image2.jpg Tue8-14replyThis feature allows you to request specific content from ObexSender. Basic operation is thatyou send a file with needed information to Access Server and you will receive a correspond-ing file in return.The keyword specified is matched for "<content of file from user> + <bd-ad-dr-es-ss>".Keyword is extended regular expression (regex) and case-non-sensitive.Syntax: reply <keyword> <filename>Example for replying with pic.gif if a GIF image is sent to Access Server (in fact thismatches for the string "GIF" found in the image headers; you could use "VCF" for vCards,"JFIF" for JPEG images and so on):reply GIF /usr/local/obexsender/pic.gifExample for replying only to a certain device (its Bluetooth address is already known),ignoring file content (pic.gif is sent back after device sends anything to Access Server):reply 00:07:80:80:00:bf /usr/local/obexsender/pic.gifdelnomatchThis setting applies if you’re using REPLY-feature of ObexSender and you send a file to Ac-cess Server to receive specific content. Now, if the file you sent doesn’t match to ObexSenderconfiguration, the file will be deleted if this settings is set to "Yes". Otherwise the file issaved. Matching files are always deleted. Disable this if you have some other program do-ing ObjP/FTP. By default, this is enabled.Syntax: delnomatch Yes|NoExample of disabling the functionality:delnomatch No55](https://usermanual.wiki/Silicon-Laboratories-Finland/WRAPAS229X/User-Guide-753326-Page-63.png)

![Chapter 6. Software Development KitA PC with:•CD-ROM drive•The Linux operating system (the SDK has been tested with RedHat Enterprise Linux 3 andabove, Fedora Core 2 and above; Suse and Ubuntu are reported to work too)make and gawk must be installedDevel libraries (especially zlib-devel,e2fsprogs-devel and ncurses-devel) must be in-stalledmodutils-2.4.26 or newer must be installed•300MB of available hard disk spaceAn Ethernet connection to a Local Area Network (also connected to Access Server) is highlyrecommended.Mount the Access Server SDK CD-ROM or ISO image, change the current working directoryto where it is mounted, and run the install script. If the user running install does not haveprivileges to create the directory for the toolchain, normally /usr/local/arm, the install scriptprompts for root’s password.Example (user input is printed like this):$mount /dev/cdrom /mnt/cdrom$ (or mount -o loop /path/to/sdk2.iso /mnt/cdrom)$cd /mnt/cdrom$sh installDuring the installation, the system will prompt you with some questions (described below)regarding the components to install and the paths to install them to. If you are not familiar withLinux, just press enter to these questions to accept the default values. The default values aresuitable for most users and systems.6.2.2. Questions Asked by the Install ScriptAccess Server toolchain directory (default: /usr/local/arm)This is the path where you want the Access Server Software Development tools(arm-linux-gcc, etc.) to be installed.Note: If you change this value, the Access Server tools and libc must be recompiled. The recompila-tion process is complicated and lengthy, and it can also fail, depending on your system. Recompilationis automatically done by the install script, if necessary.Development directory (default: [home_of_current_user]/asdk)This is the path where you want the Access Server Software Development Environment to beinstalled.Development directory owner (default: [current_user])(Asked only if run as root.) This is the development directory owner’s username.61](https://usermanual.wiki/Silicon-Laboratories-Finland/WRAPAS229X/User-Guide-753326-Page-69.png)

![Chapter 6. Software Development Kit/path/to/myapp/myapp 100% 20KB 20.0KB/s 00:00sftp> quit$6.3.4.2. Using SSHFSWith SSHFS, the Access Server filesystem can be securely mounted to be a part of the develop-ment host’s filesystem.To download and install SSHFS, visit http://fuse.sourceforge.net/sshfs.html. After installationyou can mount the whole filesystem and copy the myapp application to the /tmp directory inAccess Server by using the following commands:$mkdir mnt$sshfs root@<wrap-ip-address>: mntroot@<wrap-ip-address>’s password: buffy (not echoed back)$cp myapp mnt/tmp$fusermount -u mnt$6.3.4.3. Transferring an Application Using Terminal SoftwareIf your Access Server is not connected to a LAN, you can use terminal software of your choiceto transfer data to Access Server.Access Server contains an X/Y/Zmodem protocol application, which allows you to transferdata over the console using almost any terminal software available:1. Connect your computer to the Access Server management UART using a cross-over serialcable, and start your terminal software (use settings: 115 200bps, 8 data bits, no parity, 1 stopbit).2. Change your working directory to where you want to upload your application, and run theXmodem application with your application name as a parameter.3. Start Xmodem send from your terminal software.Example 6-1. Transfering Files with Xmodem[root@wrap /] cd /tmp[root@wrap /tmp] rx testapprx: ready to receive testapp.now start xmodem (checksum, not CRC) send from your terminal[root@wrap /tmp]If you want to save the application to /usr/local/bin (on the flash file system), you will haveto replace cd /tmp with cd /usr/local/bin (and possibly create the directory, if it does not exist).To examine Access Server directory structure, please see Appendix A.65](https://usermanual.wiki/Silicon-Laboratories-Finland/WRAPAS229X/User-Guide-753326-Page-73.png)
![Chapter 6. Software Development Kit6.3.4.4. Using NFS MountTo use NFS mount, have a NFS share prepared in your development PC and mount the directoryby using command mount -o nolock <dev-pc-ipaddress>:/nfsshare /mnt/nfs. After this, youcan access the share in directory /mnt/nfs.6.3.5. Running an Application Transferred to Access ServerTo run the application you just transferred to Access Server, you need access to the Access Serverconsole, either using terminal software connected to the Access Server management UART orusing the SSH connection (log in as user root and the root password, which is buffy by default).Having established a connection to Access Server, change the directory to where your applica-tion is located and change file permissions so that it can be executed, then run it.Example 6-2. Running an Application[root@wrap /] cd /tmp[root@wrap /tmp] chmod 755 testapp[root@wrap /tmp] ./testapp6.3.6. Using Debugger (GDB/DDD)You can use GNU debugger GDB and a graphical user interface, such as DDD, for debuggingapplications in Access Server. This requires that you install gdbserver to Access Server. It can beinstalled from a software package located in directory asdk/arch/arm/gpl/gdbserver/You have to compile with debug options and without symbol stripping to make debuggingwork. This can be done by overriding the default CFLAGS variable set in asdk/Rules.mak. Youcan do this by adding lineCFLAGS = -Wall -Os -ggdb -I$(SDKBASE)/includeafter lineinclude /home/user/asdk/Rules.makin MakefileAfter you have compiled your application with these options and transferred your applicationto Access Server, you can start debugging the application as follows:1. Start gdbserver on Access ServerUsage:gdbserver :<port> <your application>Example: gdbserver :6789 ./hello2. Start debugger on the host PC. (This example is for the DDD)Example: ddd --debugger /usr/local/arm/3.4.5/bin/arm-linux-gdb hello3. Create a connection to Access Server.Usage:66](https://usermanual.wiki/Silicon-Laboratories-Finland/WRAPAS229X/User-Guide-753326-Page-74.png)

![Chapter 7. iWRAP - Bluetooth InterfaceThe Bluetooth service in Access Server is controlled through the TCP socket interface callediWRAP. The first iWRAP server is listening on port 10101. In the case of Access Server 2293, thesecond iWRAP server is listening on port 10102, and the third one is listening on port 10103. Allcommands to an iWRAP server and replies from the server are plain ASCII strings ending inCR+LF ("\r\n"). Commands and replies are not case sensitive.When connecting to a server, you must first wait for the READY. prompt. Do not send any com-mands prior to this. Some replies are broadcast to all clients of the server. If you see somethingthat you have not requested or that is not intended for your client (identified by the link identi-fier), simply ignore the reply.Normally, the iWRAP is protected with the buffy password. The password can be disabledor changed. For more information, see the SET command. If the password is enabled, it mustbe sent first, immediately following the READY. prompt, to the iWRAP server. Otherwise, allcommands will fail.For an example of using the iWRAP, please see the asdk/examples/btsend file in the SDKdirectory.In the following examples, bold lines are commands sent by the client to the iWRAP serverand normal lines are replies received from the iWRAP server by the client.7.1. TermsBluetooth address (bdaddr) consists of six hex digits separated by a colon. For example,"00:07:80:80:bf:01". With commands requiring a Bluetooth address, you can also use theBluetooth friendly name instead.Bluetooth channels are numbered from 1 to 30. In Access Server, the Serial Port Profile is as-signed to channel number two, the Object Push Profile and File Transfer Profile to channel num-ber three, and the LAN Access Profile is on channel number four. The other channels are free foruser applications.Link Identifier (link_id) is a number from 0 to 99. It is used to identify established Bluetoothconnections.7.2. Starting the iWRAP ServersNormally, the iWRAP servers are started automatically upon power-up. You can restart theservers manually (for example, to apply the changes made to the iWRAP settings with the setupapplication without rebooting the system). To restart the servers manually, execute the startupscript with option restart:[root@wrap /] /etc/init.d/bluetooth restartWhen the iWRAP servers start up, they use the settings configured with the setup application.You can put additional iWRAP commands to the /etc/bluetooth.conf file. The commands inthat file are processed as the last task every time the iWRAP server is started.68](https://usermanual.wiki/Silicon-Laboratories-Finland/WRAPAS229X/User-Guide-753326-Page-76.png)
![SETSET — Change parametersSynopsisSET [variable [value] ]DescriptionThe SET command allows you to alter various Bluetooth and iWRAP parameters. The sup-ported variables are listed in Table 7-1. Issuing a SET command without parameters lists thecurrent settings.Variable DescriptionBLUETOOTH BDADDR bdaddr Our bdaddr. This is a read-only value.BLUETOOTH NAME friendly_name You can set your Bluetooth friendly name with thiscommand. Others can request this name with theNAME command. You can use the following metacharacters:$S: Hardware serial number, all ten digits$s: Hardware serial number, last three digits$P: Server port$p: Server port, last digit$H: FQDN$h: hostname$$: $The default value is $S_$p.BLUETOOTH READABLE mode If enabled, some SDP result codes will have literalvalues instead of numeric values.0: No (always use numeric values)1: Yes (literal values)BLUETOOTH CLASS value You can set the class-of-device value with thiscommand.72](https://usermanual.wiki/Silicon-Laboratories-Finland/WRAPAS229X/User-Guide-753326-Page-80.png)


![7.5. Finding Bluetooth DevicesINQUIRYINQUIRY — Search for other devicesSynopsisINQUIRY [timeout] [NAME] [LAP {lap}]DescriptionThe INQUIRY command is used to search for other Bluetooth devices. The timeout is defined inunits of 1.25 seconds. The default timeout is 4 units. If an optional NAME parameter is provided,the NAME command will be automatically sent to all found devices. The LAP option specifiesthe used IAC LAP; the default value is 9e8b33 (GIAC).During the inquiry, all devices are listed as soon as they are found by using INQUIRY_PARTIALreplies. If the iWRAP server has cached the friendly name of the device found, it is also dis-played. When the inquiry times out, a summary is displayed indicating how many devices werefound. The summary also repeats the device information.WarningDo not use the NAME parameter in your program. It is for manual testing only.Use separate NAME commands instead.ReplyINQUIRY_PARTIAL bdaddr_of_dev_1 class_of_dev_1 "friendly name" rssiINQUIRY_PARTIAL bdaddr_of_dev_2 class_of_dev_2 "friendly name" rssi...INQUIRY_PARTIAL bdaddr_of_dev_n class_of_dev_n "friendly name" rssiINQUIRY number_of_devices_foundINQUIRY bdaddr_of_dev_1 class_of_dev_1 "friendly name"INQUIRY bdaddr_of_dev_2 class_of_dev_2 "friendly name"...INQUIRY bdaddr_of_dev_n class_of_dev_n "friendly name"ExampleREADY.INQUIRY 10INQUIRY 0INQUIRYINQUIRY_PARTIAL 00:07:80:80:bf:01 120300 "willow" 255INQUIRY_PARTIAL 00:07:80:80:bf:02 520204 "" 255INQUIRY 2INQUIRY 00:07:80:80:bf:01 120300 "willow"INQUIRY 00:07:80:80:bf:02 520204 ""91](https://usermanual.wiki/Silicon-Laboratories-Finland/WRAPAS229X/User-Guide-753326-Page-99.png)
![7.6. Making a Bluetooth ConnectionCALLCALL — Connect to other deviceSynopsisCALL {bdaddr} SDPCALL {bdaddr} {psm} L2CAPCALL {bdaddr} {channel} RFCOMMCALL {bdaddr} {uuid} RFCOMMCALL {bdaddr} {channel} PPP [username password]CALL {bdaddr} {uuid} PPP [username password]CALL {bdaddr} {channel} WINPPP [username password]CALL {bdaddr} {uuid} WINPPP [username password]CALL {bdaddr} {channel} FORK {"/full/path/to/command and parameters"}CALL {bdaddr} {uuid} FORK {"/full/path/to/command and parameters"}CALL {bdaddr} {channel} FORK {host:port}CALL {bdaddr} {uuid} FORK {host:port}CALL {bdaddr} {PAN-destUUID} [PAN-srcUUID]DescriptionThe CALL command is used to make a connection to other Bluetooth devices. It returns the linkidentifier (with an immediate reply), which will be used in subsequent commands and replies.Note: Always check for a correct link_id before processing replies further.You can use the special FORK call type to create an RFCOMM connection and automaticallylaunch an application, which gets the RFCOMM connection bound to its standard input andoutput. The client application should modify both the stdout and stdin pipes and set NOECHO,8BIT and all other necessary modes at the very beginning.Note: There can only be one pending CALL at a time. You have to wait for the RINGING event beforeissuing another CALL. The RINGING event comes almost immediately after the CALL. You get theERROR 008 error if you try to establish another call too quickly. In that case, wait for some tens ofmilliseconds and retry. Receiving the CONNECT or NO CARRIER reply may take some time, for example,when the user is keying in the PIN code.Note: PPP is "raw" PPP without any special handshaking. WINPPP is a Windows RAS handshakefollowed by raw PPP. If you are unsure, use WINPPP.ReplyCALL link_idRINGING link_id94](https://usermanual.wiki/Silicon-Laboratories-Finland/WRAPAS229X/User-Guide-753326-Page-102.png)


![SDP ADDSDP ADD — Add entry to local SDPSynopsisSDP ADD {uuid [:uuid2]} {channel} {description}DescriptionThis command adds a new entry to Access Server’s SDP record.ReplySDP handleSDP handle ERROR reasonExampleREADY.SDP ADD LANACCESS 4 "Lan access"SDP 65536SDP ADD SERIALPORT 10 "Serial port"SDP 65537SDP ADD PAN-NAP 0 "PAN Network Access Point"SDP 65538SDP ADD L2CAP:1201 4099 "Private L2CAP for networking"SDP 65539111](https://usermanual.wiki/Silicon-Laboratories-Finland/WRAPAS229X/User-Guide-753326-Page-119.png)

![Chapter 8. I/O APIThe Bluegiga I/O API defines how to access Access Server’s LEDs, buzzer, and general purposeI/O.8.1. Led and Buzzer APIAccess Server’s LEDs and buzzer can be accessed through the /dev/led device. You can checkthe status of the LEDs and the buzzer with the cat /dev/led command and set LEDs or the buzzerwith the echo abcde > /dev/led command. An upper case letter means that the LED or buzzeris ON, a lower case letter means that the LED or buzzer is OFF. Letter "a" is the buzzer, letters"b".."e" are LEDs 1..4.Example:[root@wrap /] echo abCDe > /dev/led8.2. GPIO APIThe Digital I/O pins of Access Server can be controlled write-only by using the /dev/io devicein the same way as the /dev/led device for LEDs and buzzer described above.The letter-to-I/O mapping of the 16 pins is as follows, when looking at the connector:hgfedcbaXijklmnoX is the ground pin (and cannot be set).o is the voltage sense pin (user can use any voltage from 3.3V to 5.0V).The I/O must first be enabled by using the echo Z > /dev/io command. After that, pins can bedriven up by echoing the corresponding upper case letter (A-N) or down by echoing a lowercase letter (a-n) to the /dev/io device.Example:[root@wrap /] echo ZaBcD > /dev/io118](https://usermanual.wiki/Silicon-Laboratories-Finland/WRAPAS229X/User-Guide-753326-Page-126.png)
![Chapter 9. Advanced Use Cases for Access ServerThe build-ca builds the certificate authority (CA) certificate and key by invoking the interactiveopenssl command:ai:easy-rsa # ./build-caGenerating a 1024 bit RSA private key............++++++...........++++++writing new private key to ’ca.key’-----You are about to be asked to enter information that will be incorporatedinto your certificate request.What you are about to enter is what is called a Distinguished Name or a DN.There are quite a few fields but you can leave some blankFor some fields there will be a default value,If you enter ’.’, the field will be left blank.-----Country Name (2 letter code) [FI]:State or Province Name (full name) [NA]:Locality Name (eg, city) [ESPOO]:Organization Name (eg, company) [OpenVPN-TEST]:Organizational Unit Name (eg, section) []:Common Name (eg, your name or your server’s hostname) []:OpenVPN-CAEmail Address [me@myhost.mydomain]:Note: In the above sequence, the most queried parameters were defaulted to the values set in thevars or vars.bat files. The only parameter which must be explicitly entered is the Common Name. Inthe example above, we have used "OpenVPN-CA".Next, we will generate a certificate and private key for the server:build-key-server serverAs in the previous step, most parameters can be defaulted. When the Common Name is queried,enter "server". Two other queries require positive responses, "Sign the certificate? [y/n]" and "1out of 1 certificate requests certified, commit? [y/n]".Generating client certificates is very similar to the previous step:build-key clientIf you want to use many clients, then you could use, for example, the following commands:build-key client1build-key client2build-key client3In this case, remember that for each client, make sure to type the appropriate Common Namewhen prompted, i.e. "client1", "client2", or "client3". Always use a unique common name foreach client.Next we’ll create Diffie Hellman parameters that must be generated for the OpenVPN server:122](https://usermanual.wiki/Silicon-Laboratories-Finland/WRAPAS229X/User-Guide-753326-Page-130.png)
![Chapter 9. Advanced Use Cases for Access ServerFigure 9-3. Client Configuration File9.4.5. Starting up VPNFirst, place the configuration files in the client and server. Like in the examples, the locationfor these files can be, for example, C:\Program Files\OpenVPN\config in Windows and/usr/local/openvpn/config in Linux. Next, copy the authentication files ( ca.crt,server.crt,server.key,client.crt and client.key) into the same directories.9.4.5.1. Starting up the ServerThe OpenVPN server must be accessible from the internet:•open UDP port 1194 on the firewall (or the TCP/UDP port you’ve configured), or•set up a port forward rule to forward UDP port 1194 from the firewall/gateway to the machinerunning the OpenVPN server•make sure TUN/TAP device is allowed access through firewallsTo start the OpenVPN server right-click on the .ovpn file on Windows and choose "Start Open-VPN on this config file" or by right-clicking the GUI icon on taskbar and start correct config filefrom there. It’s also possible to start from command line:openvpn [server_config_file]Where "server_config_file" is in our Windows examples is server.ovpn.128](https://usermanual.wiki/Silicon-Laboratories-Finland/WRAPAS229X/User-Guide-753326-Page-136.png)
![Chapter 9. Advanced Use Cases for Access ServerA normal server startup should look like this (output will vary across platforms):Sun Feb 6 20:46:38 2005 OpenVPN 2.0_rc12 i686-suse-linux [SSL] [LZO] [EPOLL] built on Feb 5 2005Sun Feb 6 20:46:38 2005 Diffie-Hellman initialized with 1024 bit keySun Feb 6 20:46:38 2005 TLS-Auth MTU parms [ L:1542 D:138 EF:38 EB:0 ET:0 EL:0 ]Sun Feb 6 20:46:38 2005 TUN/TAP device tun1 openedSun Feb 6 20:46:38 2005 /sbin/ifconfig tun1 10.8.0.1 pointopoint 10.8.0.2 mtu 1500Sun Feb 6 20:46:38 2005 /sbin/route add -net 10.8.0.0 netmask 255.255.255.0 gw 10.8.0.2Sun Feb 6 20:46:38 2005 Data Channel MTU parms [ L:1542 D:1450 EF:42 EB:23 ET:0 EL:0 AF:3/1 ]Sun Feb 6 20:46:38 2005 UDPv4 link local (bound): [undef]:1194Sun Feb 6 20:46:38 2005 UDPv4 link remote: [undef]Sun Feb 6 20:46:38 2005 MULTI: multi_init called, r=256 v=256Sun Feb 6 20:46:38 2005 IFCONFIG POOL: base=10.8.0.4 size=62Sun Feb 6 20:46:38 2005 IFCONFIG POOL LISTSun Feb 6 20:46:38 2005 Initialization Sequence Completed9.4.5.2. Starting up the ClientWe’ll start the client from Linux command line:openvpn [client_config_file]Where "client_config_file" is in our examples client.conf.A normal client startup looks similar to the server output and should end with the "InitializationSequence Completed" message.Now, try a ping across the VPN from the client:ping 10.8.0.1If the ping succeeds, you have a functioning VPN.129](https://usermanual.wiki/Silicon-Laboratories-Finland/WRAPAS229X/User-Guide-753326-Page-137.png)


![Appendix A. Directory StructureDirectory Tree Type Note============== ==== ====/ f whole filesystem is root writable|-- bin f|-- boot f|-- dev r| ‘-- shm r ramdisk| |-- etc r resolv.conf| |-- tmp r /tmp| | |-- obex r obexserver dir| ‘-- var r ramdisk part of /var| |-- lock r| | ‘-- subsys r| |-- log r| |-- run r| ‘-- empty r|-- etc f system config and init scripts| |-- init.d -> rc.d/init.d l| |-- ppp f| | ‘-- peers f| |-- rc.d f| | |-- init.d f| | ‘-- rc3.d f| |-- rc3.d -> rc.d/rc3.d l| |-- ssh f| ‘-- sysconfig f|-- lib f system libraries| |-- iptables f| |-- pppd f| ‘-- modules f| ‘-- [module directories] f|-- mnt f mount points| |-- nfs f empty mount point| ‘-- usb f empty mount point|-- proc p proc filesystem|-- root f home directory of root|-- sbin f|-- sys p sys filesystem|-- tmp -> dev/shm/tmp l temporary data (ramdisk)|-- usr f| |-- bin f| |-- lib f| | ‘-- gconv f| |-- libexec f| |-- local f mount point for second flash| |-- sbin f| ‘-- share f| |-- tabset f| ‘-- terminfo f| |-- a f133](https://usermanual.wiki/Silicon-Laboratories-Finland/WRAPAS229X/User-Guide-753326-Page-141.png)

![Appendix B. Setup OptionsB.1. Security settingsSubmenu containing most important security settings, like passwords.1. Root password [$1$rUj/KWS1$v3FZcBP.6HiN4f5PaATMq1]Password of "root" user, shown in encrypted form. The default is "buffy".To change the password, clear the field, enter a new password and click Save.Saving an empty field keeps the old password.Please note that the new password is shown in plain text only right afteryou have saved it. Later it is only shown encrypted, and there is no wayto decrypt it. You must either remember it or change it again tosomething you do remember.2. iWRAP password [buffy]The password required to be entered before any commands when communicatingwith iWRAP (the Bluetooth server). The default is "buffy".To change the password, clear the field, enter a new password and click Save.Saving an empty field keeps the old password.Please note that the new password is shown in plain text only right afteryou have saved it. Later it is only shown encrypted, and there is no wayto decrypt it. You must either remember it or change it again tosomething you do remember.Use "-" to disable iWRAP password.3. Do not require iWRAP password from local clients [Yes]Ask iWRAP password only from remote clients, not from local (127.0.0.1).4. Bluetooth PIN code []This PIN code used when establishing connections. Up to 16 characters aresignificant.If there is no default PIN code set, Access Server does not requirea PIN code when establishing connections.However, if there is no default PIN code set, but the other devicerequests a PIN code, "1234" is replied.5. wpkgd autoinstall password []This is optional password to authenticate wpk autoinstall packets (wpkpackets sent to the autoinstall directory, /tmp/obex by default).The password is shown encrypted here, if set. By default, it is not set.To change the password, clear the field, enter a new password and click Save.Please note that the new password is shown in plain text only right after135](https://usermanual.wiki/Silicon-Laboratories-Finland/WRAPAS229X/User-Guide-753326-Page-143.png)
![Appendix B. Setup Optionsyou have saved it. Later it is only shown encrypted, and there is no wayto decrypt it. You must either remember it or change it again tosomething you do remember.Use "-" do disable the password.The password must match the authentication parameter in the "wpkg.pif"file in the wpk packet. Otherwise the packet is not processed.Syntax in the "wpkg.pif" file:%wpkg-auth: auth6. wpkgd hotplug password []This is optional password to authenticate wpk installation packetsautomatically run from USB memory dongles or Compact Flash memory cards.The password is shown encrypted here, if set. By default, it is not set.To change the password, clear the field, enter a new password and click Save.Please note that the new password is shown in plain text only right afteryou have saved it. Later it is only shown encrypted, and there is no wayto decrypt it. You must either remember it or change it again tosomething you do remember.Use "-" to disable the password.The password must match the authentication parameter in the "wpkg.pif"file in the wpk packet. Otherwise the packet is not processed.Syntax in the "wpkg.pif" file:%wpkg-auth: auth7. Root user password for FTP [buffy]Password of the "root" user for FTP connections.8. Allow anonymous FTP login [Yes]Whether "anonymous" FTP login is allowed or not.9. WWW passwords [/etc/httpd.conf]Access to WWW pages served by Access Server can be restricted using theconfiguration file "httpd.conf", editable from here.The file consists of lines in format "/dir:username:password". Thisspecifies that to view the WWW page at address "http://as-ip/dir", youmust enter username "username" and password "password".More than one username can be defined for the same "/dir"by adding multiple lines.By default, this file specifies that only user "root" with password"buffy" is allowed to access the WWW Setup.136](https://usermanual.wiki/Silicon-Laboratories-Finland/WRAPAS229X/User-Guide-753326-Page-144.png)
![Appendix B. Setup OptionsB.2. Generic settingsSubmenu containing generic settings.1. Root password [$1$rUj/KWS1$v3FZcBP.6HiN4f5PaATMq1]Password of "root" user, shown in encrypted form. The default is "buffy".To change the password, clear the field, enter a new password and click Save.Saving an empty field keeps the old password.Please note that the new password is shown in plain text only right afteryou have saved it. Later it is only shown encrypted, and there is no wayto decrypt it. You must either remember it or change it again tosomething you do remember.2. Use local syslog service [Yes]This option determines whether the System Logger (syslogd) logslocally to /var/log/messages or not.Set this to No if you want to log to a remote syslog server.3. IP address of the remote syslog server [192.168.42.1]The IP address of the device in the network to which the System Loggershould log to.The remote device must be configured to accept syslogd connections fromthis Access Server. See the system logger documentation on the remote devicefor more information on how to configure that.B.3. Network settingsSubmenu containing network settings.1. Hostname of the unit [wrap]The hostname of Access Server. Local applications will see thisname. This name may be changed by dynamic network configuration.2. Domain of the unit [localdomain]The domain name of Access Server. Local applications will see thisname. This name may be changed by dynamic network configuration.3. Enable Ethernet cable interface [Yes]Set this option to Yes if you want to have the Ethernet cable interfaceenabled.If you don’t use this interface, you may disable it to slightly increasesecurity and system boot speed.4. Enable Wi-Fi interface [Yes]Set this option to Yes if you want to have the Wi-Fi interface enabled(you can use the Wi-Fi interface with a supported Compact Flash Wi-Ficard or USB Wi-Fi dongle).If you don’t use this interface, you may disable it to slightly increase137](https://usermanual.wiki/Silicon-Laboratories-Finland/WRAPAS229X/User-Guide-753326-Page-145.png)
![Appendix B. Setup Optionssecurity and system boot speed.5. Enable GPRS interface [No]Set this option to Yes if you want to have the GPRS interface enabled.To use the interface, a supported Compact Flash GPRS card or a serial GPRSmodem must be attached to Access Server.6. Time server (rdate) []Hostname or IP address of the time server to be connected at system boot toretrieve correct time using the Time Protocol (RFC 868).NTP client is running by default, so rdate should not be needed at all.7. Zeroconf interface [nap]Defines the interface in which Zeroconf is running.Possible interface names are "nap", "gn" and "none".B.3.1. Default interface settingsDefault interface settings. By default, Ethernet and BluetoothPAN-NAP interfaces are assigned to this interface.1. Use dynamic network configuration [Yes]This option determines whether or not automatic configuration of the defaultnetwork interface (nap) using DHCP should be attempted at boot. If set tono, you have to manually enter IP address and other network settings.2. IP address [192.168.42.3]The IP address of Access Server.3. Subnet mask [255.255.255.0]The network mask of Access Server.4. IP address of the default gateway [192.168.42.254]The IP address of the default gateway in the LAN to which Access Serveris connected.5. List of name server IPs [192.168.42.1 192.168.42.2]The IP address(es) of the name servers, separated by space.B.3.2. Ethernet cable settingsEthernet cable settings.1. Assign to default interface [Yes]Assigns Ethernet (eth0) to default interface (nap) with settingsspecified in Default interface settings.Do NOT set this to No if you don’t know what you are doing. Thereis a high risk that you end up with invalid network settings if youdo so.If you need to set a static IP address to Access Server, do itin the Default interface settings.138](https://usermanual.wiki/Silicon-Laboratories-Finland/WRAPAS229X/User-Guide-753326-Page-146.png)
![Appendix B. Setup Options2. Use dynamic network configuration [Yes]Use dynamic network configuration (DHCP) on Ethernet interface whenit is not assigned to the default interface.3. IP address [192.168.43.3]IP address of the Ethernet interface when it is not assigned to thedefault interface and dynamic network configuration is not in use.4. Subnet mask [255.255.255.0]Network mask of the Ethernet interface when it is not assigned to thedefault interface and dynamic network configuration is not in use.B.3.3. Wi-Fi settingsWi-Fi settings.1. Act as a Wi-Fi Access Point [No]This option defines whether Access Server acts as a Wi-Fi AccessPoint when Wi-Fi is enabled.2. ESSID []Access point network name (Service Set ID).3. Nickname []The nickname, or station name.4. WEP encryption key []WEP encryption key for Wi-Fi.Examples:10 hex digits: "abcdef1234"26 hex digits: "1234567890abcdef1234567890"or "1234-5678-90ab-cdef-1234-5678-90"5 ASCII characters: "s:abcde"13 ASCII characters: "s:abcdefghijklm"5. Extra commands for Access Point mode [/etc/sysconfig/ifup-wlan0]Extra commands for Access Point mode.6. Assign to default interface [No]Assigns Wi-Fi to default interface with settings specified inDefault interface settings.7. Use dynamic network configuration [Yes]Use dynamic network configuration (DHCP) for Wi-Fi interface.8. IP address [192.168.44.3]IP address of Wi-Fi interface.9. Subnet mask [255.255.255.0]Subnet mask of Wi-Fi interface.139](https://usermanual.wiki/Silicon-Laboratories-Finland/WRAPAS229X/User-Guide-753326-Page-147.png)
![Appendix B. Setup OptionsB.3.4. GPRS settingsGPRS settings.1. Dial on demand [Yes]If this option is set to Yes, the GPRS link is not opened at boot time butwhen there is data to be transferred.2. SIM card PIN code []PIN code of the SIM card in the GPRS modem.3. Username [blue]Username for GPRS network. Contact your GSM operator for correct value.Some examples:Elisa/Finland: blueSonera/Finland: blueWataniya/Kuwait: blueEtisalat/UAE: MnetSee also: http://www.kh-gps.de/gprsset.htm4. Password [giga]Password for GPRS network. Contact your GSM operator for correct value.Some examples:Elisa/Finland: gigaSonera/Finland: gigaWataniya/Kuwait: gigaEtisalat/UAE: MnetSee also: http://www.kh-gps.de/gprsset.htm5. Internet APN [internet]Internet APN for GPRS network. Contact your GSM operator for correct value.Some examples:Elisa/Finland: internetSonera/Finland: internetWataniya/Kuwait: action.wataniya.comEtisalat/UAE: mnetSee also: http://www.kh-gps.de/gprsset.htm6. Extra parameters for pppd []Optional extra parameters for pppd. Use only if you know what you are doing.140](https://usermanual.wiki/Silicon-Laboratories-Finland/WRAPAS229X/User-Guide-753326-Page-148.png)
![Appendix B. Setup OptionsB.4. ApplicationsSubmenu containing settings of various applications.1. Default startup applications []Change which applications are to be started at startup and which don’t.B.4.1. wpkgd settingsSubmenu containing settings for wpkgd application.1. wpkgd’s autoinstall directory [/tmp/obex]wpkgd will automatically check this directory for wpk files containingsoftware update packets.Use "/tmp/obex" if you want to allow updates via Bluetooth Object Push.Use empty to disable autoinstall.2. Password for autoinstall packages []This is optional password to authenticate wpk autoinstall packets (wpkpackets sent to the autoinstall directory, /tmp/obex by default).The password is shown encrypted here, if set. By default, it is not set.To change the password, clear the field, enter a new password and click Save.Please note that the new password is shown in plain text only right afteryou have saved it. Later it is only shown encrypted, and there is no wayto decrypt it. You must either remember it or change it again tosomething you do remember.Use "-" do disable the password.The password must match the authentication parameter in the "wpkg.pif"file in the wpk packet. Otherwise the packet is not processed.Syntax in the "wpkg.pif" file:%wpkg-auth: auth3. Delete processed autoinstall packages [Yes]If this option is set Yes, the wpk autoinstall packets are deletedafter they have been processed.4. Process hotplug packages [Yes]If this option is set to Yes, wpk packets are automatically processedfrom USB memory sticks or Compact Flash memory cards when they areplugged into Access Server.5. Password for hotplug packages []This is optional password to authenticate wpk installation packetsautomatically run from USB memory dongles or Compact Flash memory cards.The password is shown encrypted here, if set. By default, it is not set.To change the password, clear the field, enter a new password and click Save.141](https://usermanual.wiki/Silicon-Laboratories-Finland/WRAPAS229X/User-Guide-753326-Page-149.png)
![Appendix B. Setup OptionsPlease note that the new password is shown in plain text only right afteryou have saved it. Later it is only shown encrypted, and there is no wayto decrypt it. You must either remember it or change it again tosomething you do remember.Use "-" to disable the password.The password must match the authentication parameter in the "wpkg.pif"file in the wpk packet. Otherwise the packet is not processed.Syntax in the "wpkg.pif" file:%wpkg-auth: auth6. Delete processed hotplug packages [No]If this option is set Yes, the wpk packets are deletedafter they have been processed.7. Extra parameters for wpkgd []Optional extra command line parameters for wpkgd.Please see wpkgd --help for detailed information on the options.B.4.2. FTP server settingsSubmenu containing settings for FTP server application.1. Root user password [buffy]Password of the "root" user for FTP connections.2. Root user directory [/]Root directory of the "root" user for FTP connections.3. Root user instances [5]Maximum number of simultaneous logins of the "root" user for FTPconnections.4. Allow anonymous login [Yes]Whether "anonymous" FTP login is allowed or not.5. Anonymous user password [*]Password of the "anonymous" user for FTP connections.Use "*" to allow everything (aka anonymous login).6. Anonymous user directory [/tmp/obex]Root directory of the "anonymous" user for FTP connections.7. Anonymous user instances [5]Maximum number of simultaneous logins of the "anonymous" user for FTPconnections.8. Allow anonymous user to do everything [No]Whether "anonymous" user is allowed to do everything (all below) or not.142](https://usermanual.wiki/Silicon-Laboratories-Finland/WRAPAS229X/User-Guide-753326-Page-150.png)
![Appendix B. Setup Options9. Allow anonymous user to download [Yes]Whether "anonymous" user is allowed to download files or not.10. Allow anonymous user to upload [No]Whether "anonymous" user is allowed to upload files and make directoriesor not.11. Allow anonymous user to overwrite [No]Whether "anonymous" user is allowed to overwrite existing files or not.12. Allow anonymous user to multiple login [No]Whether "anonymous" user is allowed to multiple logins or not.13. Allow anonymous user to erase [No]Whether "anonymous" user is allowed to erase files and directories or not.14. Edit configuration file [/etc/ftpd.conf]Edit the self documented configuration file of the FTP server. Here youcan change more advanced settings.B.4.3. ObexSender settingsSubmenu containing settings for ObexSender application.1. Bluetooth friendly name [W$S_$p]The name shown when this device is found when inquired about by otherBluetooth devices. Following meta tags are available:$S : Hardware serial number, all ten digits$s : Hardware serial number, last three digits$P : Server port$p : Server port, last digit$H : Fully Qualified Domain Name (FQDN)$h : hostname$$ : $For example, "Server_$p" would set the Bluetooth friendly name as"Server_1" for 1st baseband, "Server_2" for 2nd baseband and"Server_3" for 3rd baseband.2. Delay between inquiries [10]Delay between inquiries (Bluetooth device discoveries) in seconds.3. Delay between reply scans [10]Determines how often (in seconds) OBEX incoming directory (/tmp/obex)is scanned for remote requests. A low value increases CPU usage.4. If previous was ok, timeout before sending again [36000]If a file has been successfully sent to a device, this timeout(in seconds) defines when content can be sent again to the same device.5. If previous was reject, timeout before trying again [86400]If a file transmission to a device has failed or user has declined143](https://usermanual.wiki/Silicon-Laboratories-Finland/WRAPAS229X/User-Guide-753326-Page-151.png)
![Appendix B. Setup Optionsthe file, this timeout (in seconds) defines when ObexSender cansend content to the same device again.6. Delay between retrying call [120]When user doesn’t accept or reject the file, ObexSender will try tosend the file again. This setting determines the timeout (in seconds)before resend occurs. Default value is 120 seconds.If you wish to disable this feature you can use the same value as in"ok delay" or "reject delay", i.e. the two previous settings.7. Delay after scanning [5]When a remote request from user has been received, this settingdetermines how long (in seconds) ObexSender will wait until theresponse file is sent back to the user.Default value is 5 seconds, because some mobile phones are notable to receive files over Bluetooth until at least 5 secondshas passed from sending.8. Delay between multiple files [40]If ObexSender has been configured to send multiple files, thisconfiguration sets the delay (in seconds) between the filetransmissions.9. Minimum RSSI value before sending [-65]The working range of ObexSender can be configured or limited withthis setting. When ObexSender searches for devices, the RSSI(Receiver Signal Strength Indicator) value is also measured.This value ranges from -128 to -1.-128 means the signal strength is very weak. A connection attempt wouldvery likely fail.-65 means the signal strength is ok. Connection can be created.With Class 2 devices, like most mobile phones, this means thephone is 10-20 meters away. A Class 1 device can be even morethan 100 meters away.-30 to -1 means the signal is very strong. The devices are most likelyvery close to each other (less than a meter away).10. Logfile name [-]Defines the path and name of the ObexSender log file(for example "/usr/local/obexsender/obexsender.log").Log file contains information about successful and unsuccessfultransmissions, timestamps and information about sent files.You can also use an IP address of a log server, which must be anotherAccess Server running ObexSender.Type "-" to use syslog.11. Log prefix [-]144](https://usermanual.wiki/Silicon-Laboratories-Finland/WRAPAS229X/User-Guide-753326-Page-152.png)
![Appendix B. Setup OptionsThis prefix is put in front of every event in the log file.Type "-" for none (default).12. If sending was failure, log it too [Yes]If this is enabled failed transmissions will be logged too.13. Register to watchdog daemon [Yes]If this is enabled, ObexSender will reboot Access Serverautomatically if Bluetooth basebands have stopped responding.14. iWRAP password [-]iWRAP password. "-" for none (default).15. Edit configuration file [/etc/obexsender.conf]This link opens ObexSender configuration file(/etc/obexsender.conf) and allows you to edit it manually.It also allows you to change the settings that are notconfigurable with Setup application.16. Upload a new file [/usr/local/obexsender]This link allows you to upload files into the ObexSender file directory.17. List files [/usr/local/obexsender]This link allows you to browse files on the ObexSender file system.18. View log [-]This link allows you to view ObexSender log file if it exists.By default a summary of the logged events is displayed.Detailed information is available by clicking the date links.B.4.3.1. Delete log (confirm)This link will delete the current log file after confirmation.1. Delete log now! [/bin/true]Delete ObexSender log file immediately!WARNING: There is no confirmation for this!B.4.4. SMS gateway settingsSubmenu containing settings for SMS gateway application.1. Modem device [/dev/ttyS0]Modem device for SMS gateway./dev/ttyAT1 for user uart/dev/ttyS0 for CF slot2. Log file name [-]The file to which the SMS gateway (smsgw) logs all traffic. Use /dev/nullfor none, - for syslog, /var/log/smsgw.log if you want to save thisinformation. Be careful, however, not to fill the RAM file system (use a145](https://usermanual.wiki/Silicon-Laboratories-Finland/WRAPAS229X/User-Guide-753326-Page-153.png)
![Appendix B. Setup Optionscron job to free disk space from time to time).3. SMSC number [+358405202000]SMSC number. Contact your local GSM operator if you don’t know the correctvalue.+358405202000 for Sonera/Finland+358508771010 for Elisa/Finland4. Edit configuration file [/etc/smsgw.conf]Edit the self documented configuration file of the SMS gateway.B.5. Bluetooth settingsSubmenu containing all Bluetooth related settings.1. iWRAP password [buffy]The password required to be entered before any commands when communicatingwith iWRAP (the Bluetooth server). The default is "buffy".To change the password, clear the field, enter a new password and click Save.Saving an empty field keeps the old password.Please note that the new password is shown in plain text only right afteryou have saved it. Later it is only shown encrypted, and there is no wayto decrypt it. You must either remember it or change it again tosomething you do remember.Use "-" to disable iWRAP password.2. Do not require iWRAP password from local clients [Yes]Ask iWRAP password only from remote clients, not from local (127.0.0.1).3. Friendly name [W$S_$p]The name shown when this device is found when inquired about by otherBluetooth devices. Following meta tags are available:$S : Hardware serial number, all ten digits$s : Hardware serial number, last three digits$P : Server port$p : Server port, last digit$H : Fully Qualified Domain Name (FQDN)$h : hostname$$ : $For example, "Server_$p" would set the Bluetooth friendly name as"Server_1" for 1st baseband, "Server_2" for 2nd baseband and"Server_3" for 3rd baseband.4. Connectable and discoverable mode [3]This setting specifies whether this device is connectable and/ordiscoverable or not by other Bluetooth devices.146](https://usermanual.wiki/Silicon-Laboratories-Finland/WRAPAS229X/User-Guide-753326-Page-154.png)
![Appendix B. Setup OptionsWhen a device is connectable, other Bluetooth devices can make a Bluetoothconnection to it. Before making a connection, the calling device must knowthe Bluetooth address of the device it is connecting to. The Bluetoothaddresses can be found by making an inquiry. When a device is discoverable,it shows up in inquiries. Possible values for all combinations of thesesettings are:0 : Not connectable, not discoverable1 : Not connectable, discoverable2 : Connectable, not discoverable3 : Connectable and discoverable (default)5. Master/slave role switch policy [1]This setting specifies how local Bluetooth device should decideit’s role. When a Bluetooth device calls another Bluetooth device,it is master by default and the answering device is slave. When theconnection is being built, a role switch can be made. Normally,access point devices need to be the master, and therefore theyrequire a master-slave switch when a new device is connecting.This is also how Access Server is configured by default. OtherwiseAccess server couldn’t host the maximum number of slaves (7).Other possible combinations are:0 : Allow switch when calling, don’t request it when answering1 : Allow switch when calling, request it when answering (default)2 : Don’t allow switch when calling, request it when answeringIf you have problems with connecting to Access Server, it might bebecause your client device does not support the master/slave switch.In this case, set this setting to 0.6. Default PIN code []This PIN code used when establishing connections. Up to 16 characters aresignificant.If there is no default PIN code set, Access Server does not requirea PIN code when establishing connections.However, if there is no default PIN code set, but the other devicerequests a PIN code, "1234" is replied.7. Power save mode and parameters [4]The power save mode used by default for all connections. Possible settingsare:0 : Active.1 : Park: Round-robin.2 : Park: Idle.3 : Sniff: All4 : Sniff: Idle (default)."Active" means that no power saving is in use."Sniff: All" means that the connections are kept in sniff mode always.147](https://usermanual.wiki/Silicon-Laboratories-Finland/WRAPAS229X/User-Guide-753326-Page-155.png)
![Appendix B. Setup Options"Sniff: Idle" means that a connection is switched to sniff mode afterit has not transmitted data for some time (2 seconds by default).When data transmission resumes, switch to active mode is made.Park modes are generally not useful. See User’s and Developer’s Guideand Bluetooth specification for more information.8. Use literal replies in SDP [Yes]If enabled, some SDP result codes will have literal values instead ofnumeric values.9. Optional command line parameters []Optional extra command line startup parameters for the iWRAP servers.10. Edit startup script [/etc/bluetooth.conf]Opens iWRAP configuration file (/etc/bluetooth.conf) for editing.You can append extra iWRAP commands to that file. iWRAP servers processthe file each time they start. See the User’s and Developer’s Guidefor iWRAP command reference.B.5.1. Bluetooth profilesSubmenu for the settings of all supported Bluetooth profiles.1. Enable lan access profile [No]Whether or not the LAN Access Profile is enabled.2. Enable PAN user profile [No]Whether or not the PAN User Profile is enabled.3. Enable PAN generic networking profile [No]Whether or not the PAN Generic Networking Profile is enabled.4. Enable PAN network access point profile [No]Whether or not the PAN Network Access Point Profile is enabled.5. Enable object push profile [Yes]Whether or not the Object Push Profile is enabled.6. Enable file transfer profile [Yes]Whether or not the File Transfer Profile is enabled.B.5.1.1. Lan access profile settingsSubmenu containing LAN Access Profile settings.1. Login name and password []The login name and password required from LAN access clients. Must be enteredas a single string, separated with a space. For example: guest buffyIf empty (default), no login is required.2. Service name (shown in SDP) [Lan Access]148](https://usermanual.wiki/Silicon-Laboratories-Finland/WRAPAS229X/User-Guide-753326-Page-156.png)
![Appendix B. Setup OptionsThe name of the LAN Access Profile service shown in the Service Discovery.3. Defaultroute modification policy [0]How the LAN Access Profile should modify the defaultroute in routing tables:0: Do not alter defaultroute (default)1: When acting as a LAP client, set defaultroute according to the LAP server2: When acting as a LAP server, set defaultroute according to the LAP client3: Set defaultroute according to the LAP server/client connected4. First IP for LAP clients [192.168.160.0]This defines the C-class of IP addresses to be used in point-to-pointconnections between Access Server and LAP clients.Full C-class is required: use "x.y.z.0".B.5.1.2. PAN user profile settingsSubmenu containing Personal Area Network User Profile settings.1. Service name (shown in SDP) [PAN User]The name of the PAN User Profile service shown in the Service Discovery.2. Enable zeroconf when calling [No]Enable ZeroConf protocol for outgoing PANU connections.3. Enable zeroconf when answering [No]Enable ZeroConf protocol for incoming PANU connections.B.5.1.3. PAN generic networking profile settingsSubmenu containing Personal Area Network Generic Networking Profilesettings.1. Service name (shown in SDP) [Generic Networking]The name of the PAN Generic Networking Profile service shown inthe Service Discovery.2. Use dynamic network configuration for local IP address [No]Whether or not DHCP is used for configuring local IP Address. Enable only ifyou are connecting this PAN-GN to another PAN-GN that will provide the IPconfiguration.3. Local GN interface IP address [192.168.161.1]The IP address for the local GN interface.4. Local GN interface subnet mask [255.255.255.0]The netmask for the local GN interface.5. Start DHCP server for remote users [Yes]Whether or not this device should start DHCP for remote devices connectingto this PAN-GN. Disabled if "Use dynamic network configuration for local IPaddress" is used.6. First IP for lease block [192.168.161.2]149](https://usermanual.wiki/Silicon-Laboratories-Finland/WRAPAS229X/User-Guide-753326-Page-157.png)
![Appendix B. Setup OptionsFirst IP address of the lease block.7. Last IP for lease block [192.168.161.254]Last IP address of the lease block.8. Subnet of lease block [255.255.255.0]Subnet mask of the lease block.9. Lease time [86400]Lease time in seconds.B.5.1.4. PAN network access point profile settingsSubmenu containing Personal Area Network Network Access Point Profilesettings.1. Service name (shown in SDP) [Network Access]The name of the Bluetooth PAN Network Access Point Profile serviceshown in the Service Discovery.B.5.1.5. Serial port profile settingsSubmenu containing the Bluetooth Serial Port Profile settings.The profile itself is enabled and disabled by switching "serialport"application "on" or "off" from the menu:Setup -> Applications -> Default bootup applications.1. Act as the calling device [No]Whether this device should act as the calling device (DevA) or the answeringdevice (DevB).2. BPS rate [115200]The bits-per-second rate of the connection. Possible values are:300, 1200, 2400, 4800, 9600, 19200, 38400, 57600, 115200, 230400, and 460800.3. Data bits [8]The number of data bits in the connection. Possible values are:5, 6, 7, and 8.4. Parity [0]The parity bit setting of the connection. Possible values are:0: No Parity (default)1: Odd Parity2: Even Parity5. Stop bits [1]The number of stop bits in the connection. Possible values are 1 and 2.6. Hardware flow control (RTS/CTS) [Yes]Whether or not the hardware flow control is used.7. Software flow control (XON/XOFF) [No]Whether or not the software flow control is used.150](https://usermanual.wiki/Silicon-Laboratories-Finland/WRAPAS229X/User-Guide-753326-Page-158.png)
![Appendix B. Setup Options8. Bluetooth address of the remote device [00:07:80:80:bf:01]The Bluetooth address of the device to be contacted. If the local deviceis configured as DevA, this is the DevB it tries to connect.9. Service channel [2]In DevA (call) mode: The Bluetooth RFCOMM channel of the remote device.In DevB (answer) mode: The Bluetooth RFCOMM channel of the local device.10. Service name (shown in SDP) [Serial Port]The name of the Bluetooth Serial Port Profile service shown in the ServiceDiscovery.11. Optional command line parameters []Optional extra parameters for the Access Server Serial Port profileapplication. Currently the supported parameters are:--device dev Device, if not the user port (/dev/ttyS0 for CF Card)--msc Enables transmitting of DCD/DSR Modem Status Control signals.--nobuffer Discard data if no Bluetooth connection, do not buffer it.B.5.1.6. Object push profile settingsThis submenu contains Bluetooth Object Push Profile settings.1. Service name (shown in SDP) [Object Push]The name of the Object Push Profile service shown in the Service Discovery.B.5.1.7. File tranfer profile settingsThis submenu contains Bluetooth File Transfer Profile settings.1. Service name (shown in SDP) [File Transfer]The name of the File Transfer Profile shown in the Service Discovery.B.6. Advanced settingsSubmenu containing advanced settings of Access Server.1. System startup script [/etc/rc.d/rc.local]This is the last initialization script executed at system startup.By default, the script /etc/rc.d/rc.local just turns off all LEDs toindicate the startup has finished. If you want to initialize somethingautomatically at every boot, or start up your own applications,you should add the required commands to this file.Remember to start your programs to the background. Example:/usr/local/bin/myapp &If you do not start the programs to the backgroud, you will not ableto access the management console using a serial cable.2. Default user profile [/etc/profile]151](https://usermanual.wiki/Silicon-Laboratories-Finland/WRAPAS229X/User-Guide-753326-Page-159.png)
![Appendix B. Setup OptionsEdit the file containing the default user profile settings.3. WWW passwords [/etc/httpd.conf]Access to WWW pages served by Access Server can be restricted using theconfiguration file "httpd.conf", editable from here.The file consists of lines in format "/dir:username:password". Thisspecifies that to view the WWW page at address "http://as-ip/dir", youmust enter username "username" and password "password".More than one username can be defined for the same "/dir"by adding multiple lines.By default, this file specifies that only user "root" with password"buffy" is allowed to access the WWW Setup.4. Setup access [/etc/setup.conf]The "/etc/setup.conf" file can be used to give different access rights todifferent users of the WWW Setup.The file consist of lines in following format:example.tag +user1 +user2 -user3 -user4This will allow (+) access to tag "example.tag" for "user1" and "user2"and denies (-) access from "user3" and "user4". You can find the tagsfrom the output ofSetup -> Advanced -> System Information -> Collect info for support requestFor example, the tag of this setting is advanced.setupconf. If youhave created another user "guest" in /etc/httpd.conf that can access"/setup", you can deny that user from changing the Setup access settingswith following line in this file:advanced.setupconf -guest5. Edit other configuration files []From this menu you can edit any files located in Access Server file system.You can for example create "/var/spool/cron/crontabs/root" file forconfiguring the cron daemon.6. Browse files []Browse files stored in Access Server.7. Find other Access Servers [/usr/sbin/finder]Find other Access Servers.8. Inquiry for Bluetooth devices [/usr/bin/btcli inquiry]Inquiry for other Bluetooth devices.9. Upload a software update [/tmp/obex]Upload a software update file (*.wpk).Access Server supports a special management packet format (wpk), which152](https://usermanual.wiki/Silicon-Laboratories-Finland/WRAPAS229X/User-Guide-753326-Page-160.png)
![Appendix B. Setup Optionscan be used to update Access Server software components or to installcustom software and configuration files. Please consult User’s andDeveloper’s Guide for more information.B.6.1. System informationThis submenu contains tools to retrieve system status information.1. Hardware informationDisplays hardware and software identification information (output ofcommand "wrapid").2. List installed software components [/usr/bin/dpkg -l]Lists currenty installed software components and their version numbers.3. List running processes [/bin/ps ww]Lists running processes.4. List memory status [/usr/bin/free]Lists memory status.5. List free disk space [/bin/df -h]Lists free disk space.6. Show system log file [/var/log/messages]Shows system log file.7. Show system boot log file [/var/log/dmesg]Shows system boot log.8. Collect info for support request [/usr/sbin/supportinfo]This page contains collectively all the system status and configurationinformation.Include this information when sending a support request tosupport@bluegiga.comWARNING: All classified information, like passwords, should be automaticallyexcluded. It is still recommended to manually check that all such informationis really removed.B.6.2. Reboot system (confirm)Reboot Access Server. Confirmation will be asked.1. Reboot now! [/sbin/reboot]Reboot Access Server immediately!WARNING: There is no confirmation for this!B.7. Summary of Setup OptionsSecurity settingsRoot password [$1$rUj/KWS1$v3FZcBP.6HiN4f5PaATMq1]153](https://usermanual.wiki/Silicon-Laboratories-Finland/WRAPAS229X/User-Guide-753326-Page-161.png)
![Appendix B. Setup OptionsiWRAP password [buffy]Do not require iWRAP password from local clients [Yes]Bluetooth PIN code []wpkgd autoinstall password []wpkgd hotplug password []Root user password for FTP [buffy]Allow anonymous FTP login [Yes]WWW passwords [/etc/httpd.conf]Generic settingsRoot password [$1$rUj/KWS1$v3FZcBP.6HiN4f5PaATMq1]Use local syslog service [Yes]IP address of the remote syslog server [192.168.42.1]Network settingsHostname of the unit [wrap]Domain of the unit [localdomain]Default interface settingsUse dynamic network configuration [Yes]IP address [192.168.42.3]Subnet mask [255.255.255.0]IP address of the default gateway [192.168.42.254]List of name server IPs [192.168.42.1 192.168.42.2]Enable Ethernet cable interface [Yes]Ethernet cable settingsAssign to default interface [Yes]Use dynamic network configuration [Yes]IP address [192.168.43.3]Subnet mask [255.255.255.0]Enable Wi-Fi interface [Yes]Wi-Fi settingsAct as a Wi-Fi Access Point [No]ESSID []Nickname []WEP encryption key []Extra commands for Access Point mode [/etc/sysconfig/ifup-wlan0]Assign to default interface [No]Use dynamic network configuration [Yes]IP address [192.168.44.3]Subnet mask [255.255.255.0]Enable GPRS interface [No]GPRS settingsDial on demand [Yes]SIM card PIN code []Username [blue]Password [giga]Internet APN [internet]Extra parameters for pppd []Time server (rdate) []Zeroconf interface [nap]ApplicationsDefault startup applications []154](https://usermanual.wiki/Silicon-Laboratories-Finland/WRAPAS229X/User-Guide-753326-Page-162.png)
![Appendix B. Setup Optionswpkgd settingswpkgd’s autoinstall directory [/tmp/obex]Password for autoinstall packages []Delete processed autoinstall packages [Yes]Process hotplug packages [Yes]Password for hotplug packages []Delete processed hotplug packages [No]Extra parameters for wpkgd []FTP server settingsRoot user password [buffy]Root user directory [/]Root user instances [5]Allow anonymous login [Yes]Anonymous user password [*]Anonymous user directory [/tmp/obex]Anonymous user instances [5]Allow anonymous user to do everything [No]Allow anonymous user to download [Yes]Allow anonymous user to upload [No]Allow anonymous user to overwrite [No]Allow anonymous user to multiple login [No]Allow anonymous user to erase [No]Edit configuration file [/etc/ftpd.conf]ObexSender settingsBluetooth friendly name [W$S_$p]Delay between inquiries [10]Delay between reply scans [10]If previous was ok, timeout before sending again [36000]If previous was reject, timeout before trying again [86400]Delay between retrying call [120]Delay after scanning [5]Delay between multiple files [40]Minimum RSSI value before sending [-65]Logfile name [-]Log prefix [-]If sending was failure, log it too [Yes]Register to watchdog daemon [Yes]iWRAP password [-]Edit configuration file [/etc/obexsender.conf]Upload a new file [/usr/local/obexsender]List files [/usr/local/obexsender]View log [-]Delete log (confirm)Delete log now! [/bin/true]SMS gateway settingsModem device [/dev/ttyS0]Log file name [-]SMSC number [+358405202000]Edit configuration file [/etc/smsgw.conf]Bluetooth settingsiWRAP password [buffy]Do not require iWRAP password from local clients [Yes]155](https://usermanual.wiki/Silicon-Laboratories-Finland/WRAPAS229X/User-Guide-753326-Page-163.png)
![Appendix B. Setup OptionsFriendly name [W$S_$p]Connectable and discoverable mode [3]Master/slave role switch policy [1]Default PIN code []Power save mode and parameters [4]Use literal replies in SDP [Yes]Optional command line parameters []Edit startup script [/etc/bluetooth.conf]Bluetooth profilesEnable lan access profile [No]Lan access profile settingsLogin name and password []Service name (shown in SDP) [Lan Access]Defaultroute modification policy [0]First IP for LAP clients [192.168.160.0]Enable PAN user profile [No]PAN user profile settingsService name (shown in SDP) [PAN User]Enable zeroconf when calling [No]Enable zeroconf when answering [No]Enable PAN generic networking profile [No]PAN generic networking profile settingsService name (shown in SDP) [Generic Networking]Use dynamic network configuration for local IP address [No]Local GN interface IP address [192.168.161.1]Local GN interface subnet mask [255.255.255.0]Start DHCP server for remote users [Yes]First IP for lease block [192.168.161.2]Last IP for lease block [192.168.161.254]Subnet of lease block [255.255.255.0]Lease time [86400]Enable PAN network access point profile [No]PAN network access point profile settingsService name (shown in SDP) [Network Access]Serial port profile settingsAct as the calling device [No]BPS rate [115200]Data bits [8]Parity [0]Stop bits [1]Hardware flow control (RTS/CTS) [Yes]Software flow control (XON/XOFF) [No]Bluetooth address of the remote device [00:07:80:80:bf:01]Service channel [2]Service name (shown in SDP) [Serial Port]Optional command line parameters []Enable object push profile [Yes]Object push profile settingsService name (shown in SDP) [Object Push]Enable file transfer profile [Yes]File tranfer profile settingsService name (shown in SDP) [File Transfer]156](https://usermanual.wiki/Silicon-Laboratories-Finland/WRAPAS229X/User-Guide-753326-Page-164.png)
![Appendix B. Setup OptionsAdvanced settingsSystem startup script [/etc/rc.d/rc.local]Default user profile [/etc/profile]WWW passwords [/etc/httpd.conf]Setup access [/etc/setup.conf]Edit other configuration files []Browse files []Find other Access Servers [/usr/sbin/finder]Inquiry for Bluetooth devices [/usr/bin/btcli inquiry]Upload a software update [/tmp/obex]System informationHardware informationList installed software components [/usr/bin/dpkg -l]List running processes [/bin/ps ww]List memory status [/usr/bin/free]List free disk space [/bin/df -h]Show system log file [/var/log/messages]Show system boot log file [/var/log/dmesg]Collect info for support request [/usr/sbin/supportinfo]Reboot system (confirm)Reboot now! [/sbin/reboot]157](https://usermanual.wiki/Silicon-Laboratories-Finland/WRAPAS229X/User-Guide-753326-Page-165.png)