Singer 14CG744 User Manual OVERLOCK MACHINE Manuals And Guides 1409385L
User Manual: Singer 14CG744 14CG744 SINGER OVERLOCK MACHINE - Manuals and Guides View the owners manual for your SINGER OVERLOCK MACHINE #14CG744. Home:Laundry & Garment Care Parts:Singer Parts:Singer OVERLOCK MACHINE Manual
Open the PDF directly: View PDF ![]() .
.
Page Count: 54

14SH744/14CG744
(2.3.4 THREAD OVERLOCK MACHINE)
(2.3.4 MAQUINA SOBREORILLADORA)
(SURJETEUSE 2.3.4 FILS)
14SH754/14CG754
(2.3.4 THREAD OVERLOCK MACHINE WITH DIFFERENTIAL FEED)
(2.3.4 MAQUINA SOBREORILLADORA CON TRANSPORTE DIFERENClAL)
(SURJETEUSE 2.3.4 FILS ENTRAINEMENT DIFFERNTIEL)
/
Operator's Guide
Manual de lnstrucciones
Manuel D'instructions
\
,\
/
J
®

14SH744/14CG744
(2.3.4 THREAD OVERLOCK MACHINE)
14SH754/14CG754
(2.3.4 THREAD OVERLOCK MACHINE WiTH DiFFERENTiAL FEED)
Operator s' Guide

14SH744/14CG744
PREFACE
Thank you for your purchase of this sewing machine, This machine intended for househo(d use w((I provide you
with exceUent pedormance in sewing from )ight to heavy mate_ia( (lawn to denim) Please refer to this booklet
for proper use and optimum service. To get the most out of your sewing machine read the entire operators
guide before attempting to operate the machine. Then familiar ze yourself with the machine by foilowing the
op,eratoCs guide _a_4eby page.
To ensure that you a_e always provided with the most modern sewing capabiHties_ the manufacturer reserves
the dght to change the appearance_ design or accessories of this sewing machine when considered necessary
without notification or oMigafion.
For European Territories:
_is S_ngerSewing Mac:hine was tested _n8to European no_s and m_ts the requirements
resarding et_tMca( safety radio interference and e gnetic immunity.
_econfo_yisdo_'_ with t_ C_ mark_
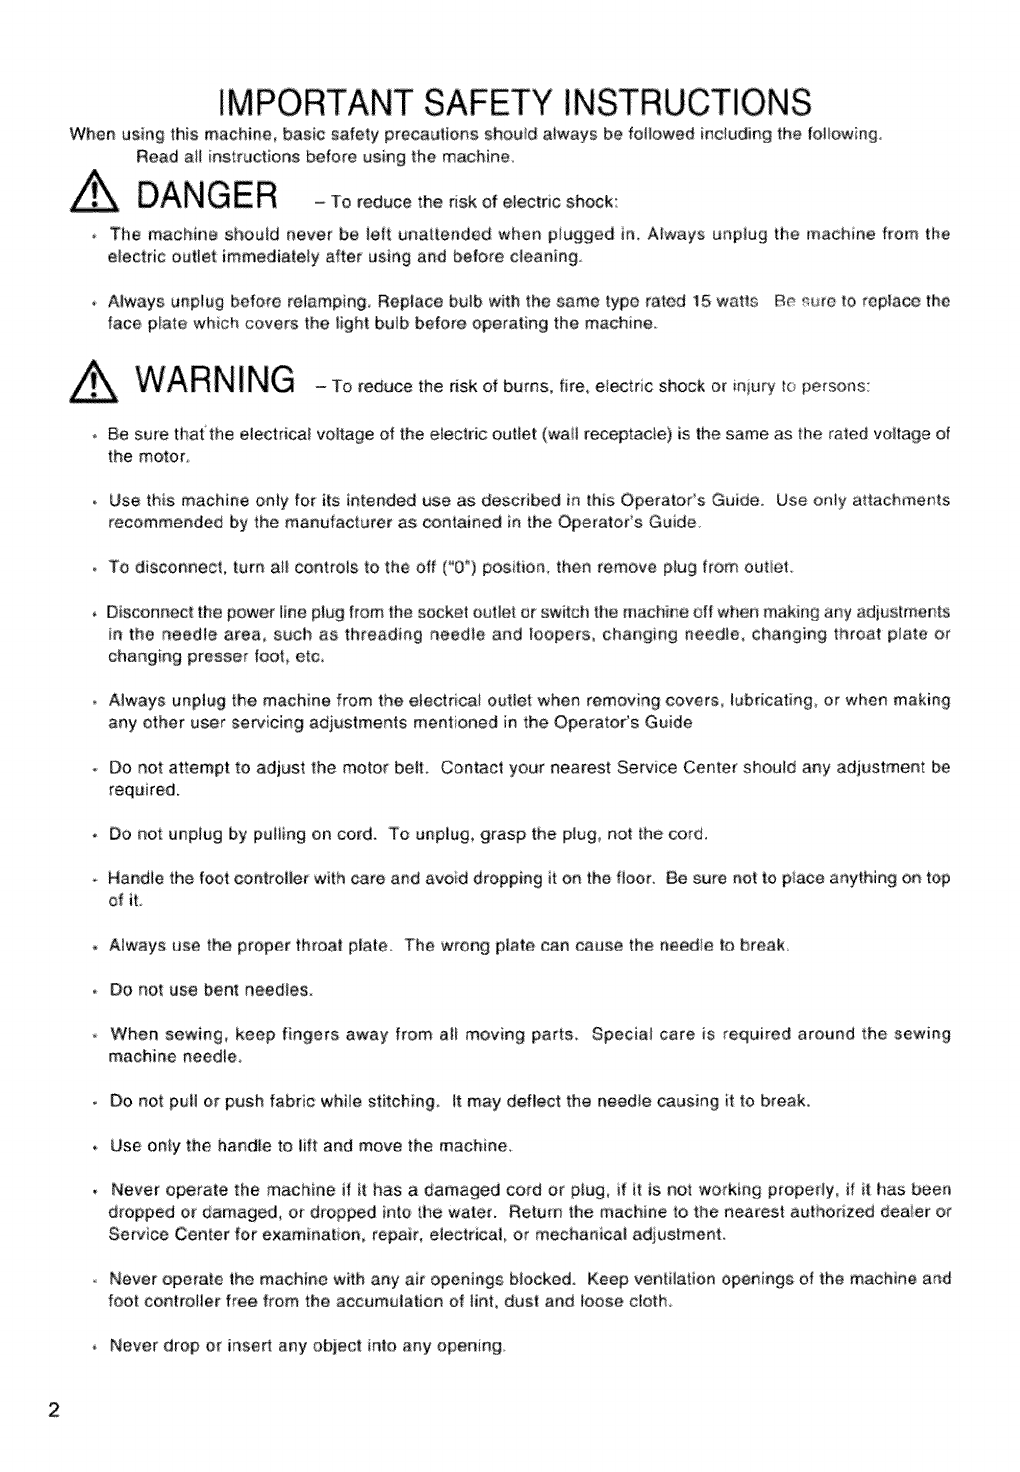
IMPORTANT SAFETY INSTRUCTIONS
* if the supply cord is damaged, it must be rep$aced by the manufacturer or its service agent or a similarly
qaalified person in order to avoid a hazard.
'_The appliance is not intended for use by young chiid_en or infirm persons without supewisiom
'_Young c:hiidren shouid be supervised to ensure that they do not play with the appliance.
Switch off or unp!ug the machine when leaving it unattended.
* Before sewicing the appliance or replacing lamps, unpiug the machine,
@Singer is a _istered trede_ of The Singer Company Umffed or its amliates.
Copyright@2005 The Singer Company Limited
2
IMPORTANT SAFETY INSTRUCTIONS
When us}ng this machine, basic safety precaut}ens shouid always be followed including the following
Read aH instructions before using the machine
- To reduce the risk of electric shock:
. The machii_e shouid [lever be ieft unattended when p_ugged in Always unptug the machine from the
electric outlet immediateiy after using and before cleaning,
, Always unpiug before relamping Replace buib with the same type rated 15 watts Be stJre to replace the
face plate which covers the light bulb before operating the machine_
WARNING -To,educethe,skofburns,fire.e ectdc shock or iniury ,< persons
, Be sure tha[the electdca_ voitage of the e_ectric outlet (wail receptacle) is the same as the rated voltage of
the motor,
. Use this: machine only for its intended use as described in this Operator's Guide. Use only a_tachments
recommended by the manufacturer as contained in the Ope_atoCs Guide
To disconnect, turn a_l controls to the off (°0°) position, then remove plug from out_et
• Disconnec[ the power iine plug from the socket out_e_or switch the mach#_e off when making any adius[me_ts
in the needie area, such as threading needle and ioopers, changing needie, changing throat pinto or
changing presser foot, etc,
, Always unplug the machine from the eiectdcai out/el when removing covers, lubdcatir_g or when making
any other user serv cing adjustments mentioned in the Operato¢s Guide
.Do net attempt to adjust the motor bell. Contact your nearest Service Center should any adjustment be
required.
.Do not: unplug by patiing on cord. To unplug, grasp the piug_ not the cord.
.Handie the feet controller with care and avoid dropping it on the floor. Be sure not to piece anyt,hing on top
of it
, Always use the proper th_oat plate The wrong plate can cause the needle to break
. Do not use bent needles.
When sewing keep fingers away from at! moving parts_ Special care is required around the sewing
machine needle.
. Do not pull or push fabric while stitehing_ it may deflect the needle causing it to break.
• Use only the handle to lift and move the machine.
, Never operate the machine if it has a damaged cord or plug, if it is not working property if it has been
dropped o$ damaged or dropped into the water. Return the mact_ine to the nea_esf authorized deaer or
Service Center for examination, repair, electrical, or mechanical adjustment.
.Never operate the machine with any air openings blocked Keep ventilation openings dthe machine and
foot contro!ier free from the accumulation of iint, dust and ioose cloth
, Never drop or insert any object i_to any opening.
_Dono_use outdoors_
Do not operate where aeroso_ (spray) products are being used or where oxy_n is being administered.
,, Do not allow to be used as a toy_ Close attention is necessary when the machine is used by or near
children.
Do not expose the machine or machine plastic case to sunlight directly. Atso, do not keep itin a very warm
or' damp placm
._Do not touch the machine, foot controller and power line cord with wet hand, wet cloth or with anything we_.
Do not connect power line cord to one of the many cords connected to one power outlet with adapte_,
÷ Use machine on fiat and stable table.
_,Be sure to close the cylinder cover and looper cover be{ore operat ng the machine.
* Keep Dresser foot and need!es away from children s reach.
£e sure the right bulb has coeted off before chang ng with e new one
Do not dismantle or modify the roach ne yourself_
,_8e sure to turn off the Dower switch and disconnect the power he plug before eadng for your machine as
instructed in the operator's guide
SAVE THESE INSTRUCTIONS
Servicing Shou{d be pedormed by an authorized service representattvm
This product is intended for household use,
FOR EUROPEAN AND SIMILAR TERRITORIES:
Machines lot Great Britain and some other cour_tdes having similar widng standards are shipped from the
facte_ without: a plug for connection to the mains. The wires in this mains lead are colored in accordance with
t:he fotfowing codm
£1ue: neutrai (N) Brown: !ire (L)
As the co_ors of the wires in the mains tend of this appliance may not correspond with the coveted markings
identifying the terminals in you_ piug proceed as fotlowe:
The wire which is colored blue must be connected to the terminal which is marked with the letter N or colored
black: The wire whch is co_ored brown must be connected to the terminal which is marked with letter L or
colored red if a 13 Amp (BS 1363) piug is used, a 3 Amp. fuse must be fitted_ or ff any other type of p|ug is
used a 5 Amp. fuse must be titled e_ther in the plug or adaptor or at the distdbut{on board
Neither cord is to be connected to the earth termina! of a three-pin plug.
3
P_ge
_.Selection ef Slitches ....................... 5
2. Handy Reference Cha_ 6
3 Accessories .................................. 7
4 Needle Informa_er ........................ 7
5, Pnnc pal Parts ............................. 8
6. How tO Open Leoeer Cover .................9
7. Pr_ne pal Parts Behind Loooer Cover .... 9
8oPreparationPriortoSewing ............... 9
9 Preparation for Threading ................ 10
,,Settin _ up me thread guide holder ......... 10
I0.How to Remove and InsertNeedles .......... 11
• To remove needle_s} ................. 11
•To insertneedle_s)....................... 11
11.Threading the Machine ....................... 12
-Threadin_ diag_am ....................... 12
•Understandingthecolorcode ................. 12
• To thread (he machine correctly ............ 12
1_Threading Ihe upper looper (Orange) ........ t2
2) Threading the lower _oeper (Yellow}. 14
3) Threading the right needle (Green) ..... 16
4} Threading lhe let! needte (B/uel ........ I8
,m po_tantthreadingw_formabon ............. 19
12 How to Change Threads Tie on M_thod ....... 20
13.Hew toAdjustthe SlitchLength ............... 21
14. HOW tO Adfus! the Seam Widih 21
,W_dtn aG uslme_t by changing needte p_smen . 21
,Width adjustmentwithadjustment knob ........21
15. How _o A@ust the Presser Feet Press_ re.......
I_6. Different_a_ Feed .......................... 23
_Gathered everedge ..................... 23
• Stretch overedge .......................... 24
17 How io Disengage Movable Upper Knite 25
18 ConveMing tRe upper _ooDer rote _reade_ 26
!9 Free Arm Sewing _Tubular Work_ ........ 27
20 S_andard Overedge and Roiled Hem Sli_chmg -- 28
To sew standardoveredge ................. 28
,To sew reliedhem ...........................28
21. Chainingelf and Test Sewing .................29
Page
22 Suggested Tension Se_ing ...................... 30
I ) 2othread wrapped edge overlook ........ 30
2) 24hread :standard rolled _m _ite_ng ..... 3t
3) 3 Thread Ovedock ....................... 32
4) 3-Thread Fiatlock 33
5) 3-Thread Wrap_d Edge Ouerloc_ ........ 34
6) 4.Thread Ultra Stretch Mock Satey S_i_ch........ 35
2& How to Sew a Reied Hem .................
} 24hread wrapped edge overlook 37
24hread standard rolled _m stitcNng .... 37
2) 34bread standard roiled hem st tch ng ..... 38
34hread upper ioope_ thread wrapped
relied hem slitching 38
24. S ilcl_ Variations and Sewing Techniques ....... 40
-How to sew s flatlock decorative seam .......... 40
• Hew to sew an ovedock b_ind hem ....... 42
• How to sew pin tucks 42
• T_ming square comer& .......... 43
• Pin placement
,,Securing _he thread chain .....
",How to reinforce a seam ................ 45
_,Bra ding by' cha ning elf 45
25 Machine Ma ntenance 46
•C/caning the machine ................ 46
• Oilieg the roach ne .....................................46
-How to replace _he stationary kn#e .................47
,How to exchange light bulb 48
26 Troublesh_ting Chatl ...........................49
27 Relationship between Cloth, Thread and Needle .... 50
28 Specificatie_ .............. 51
4
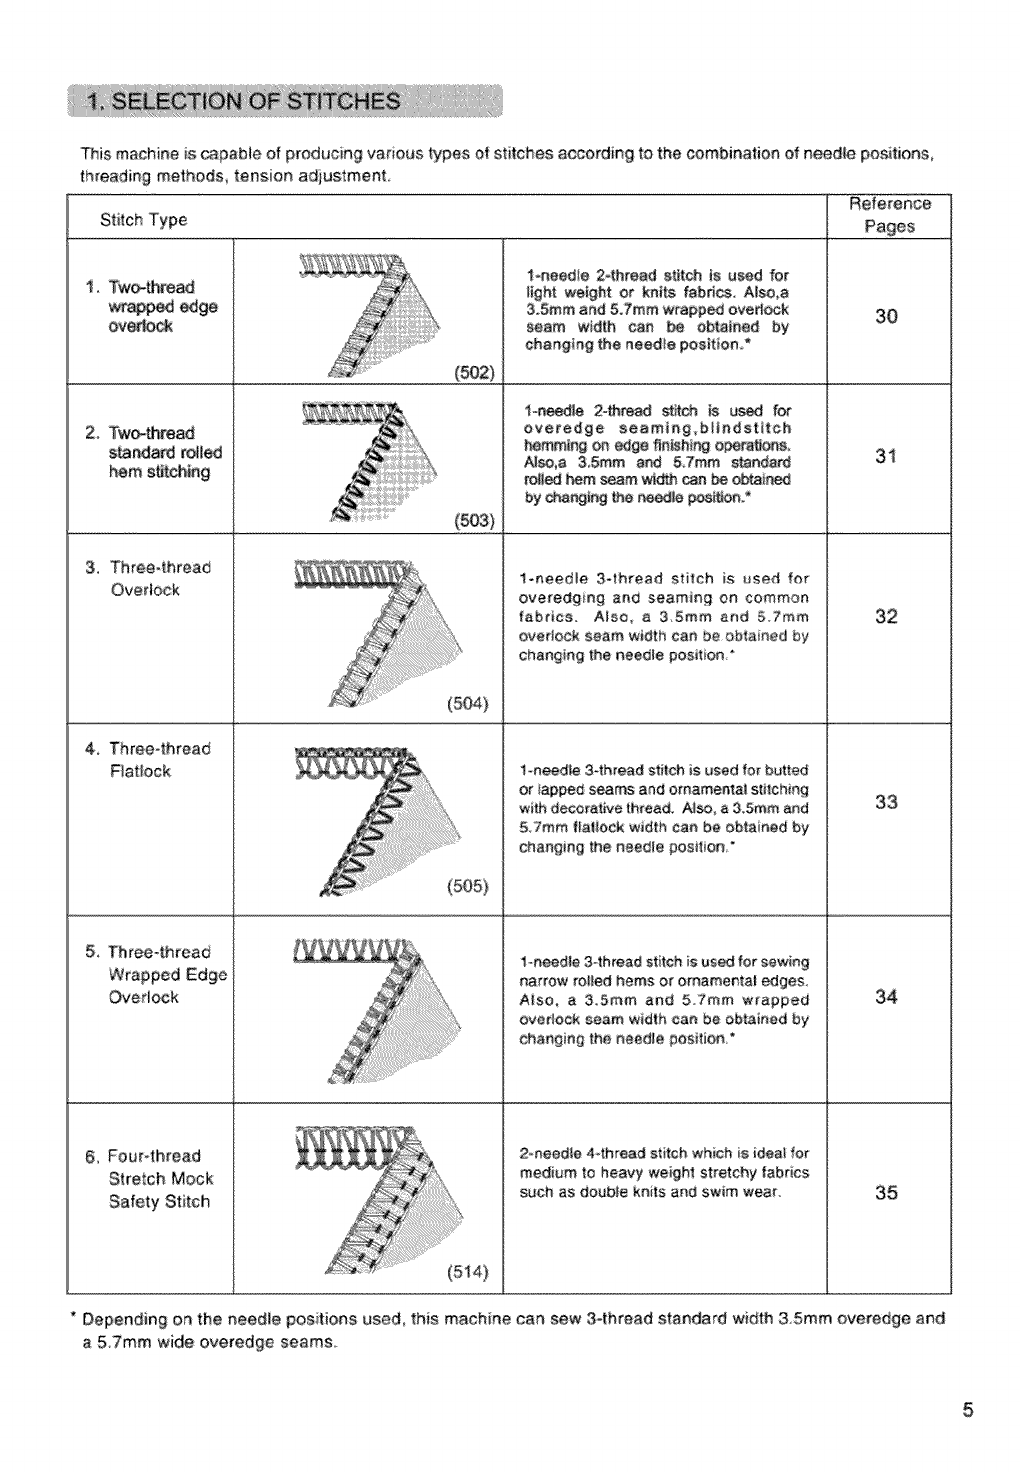
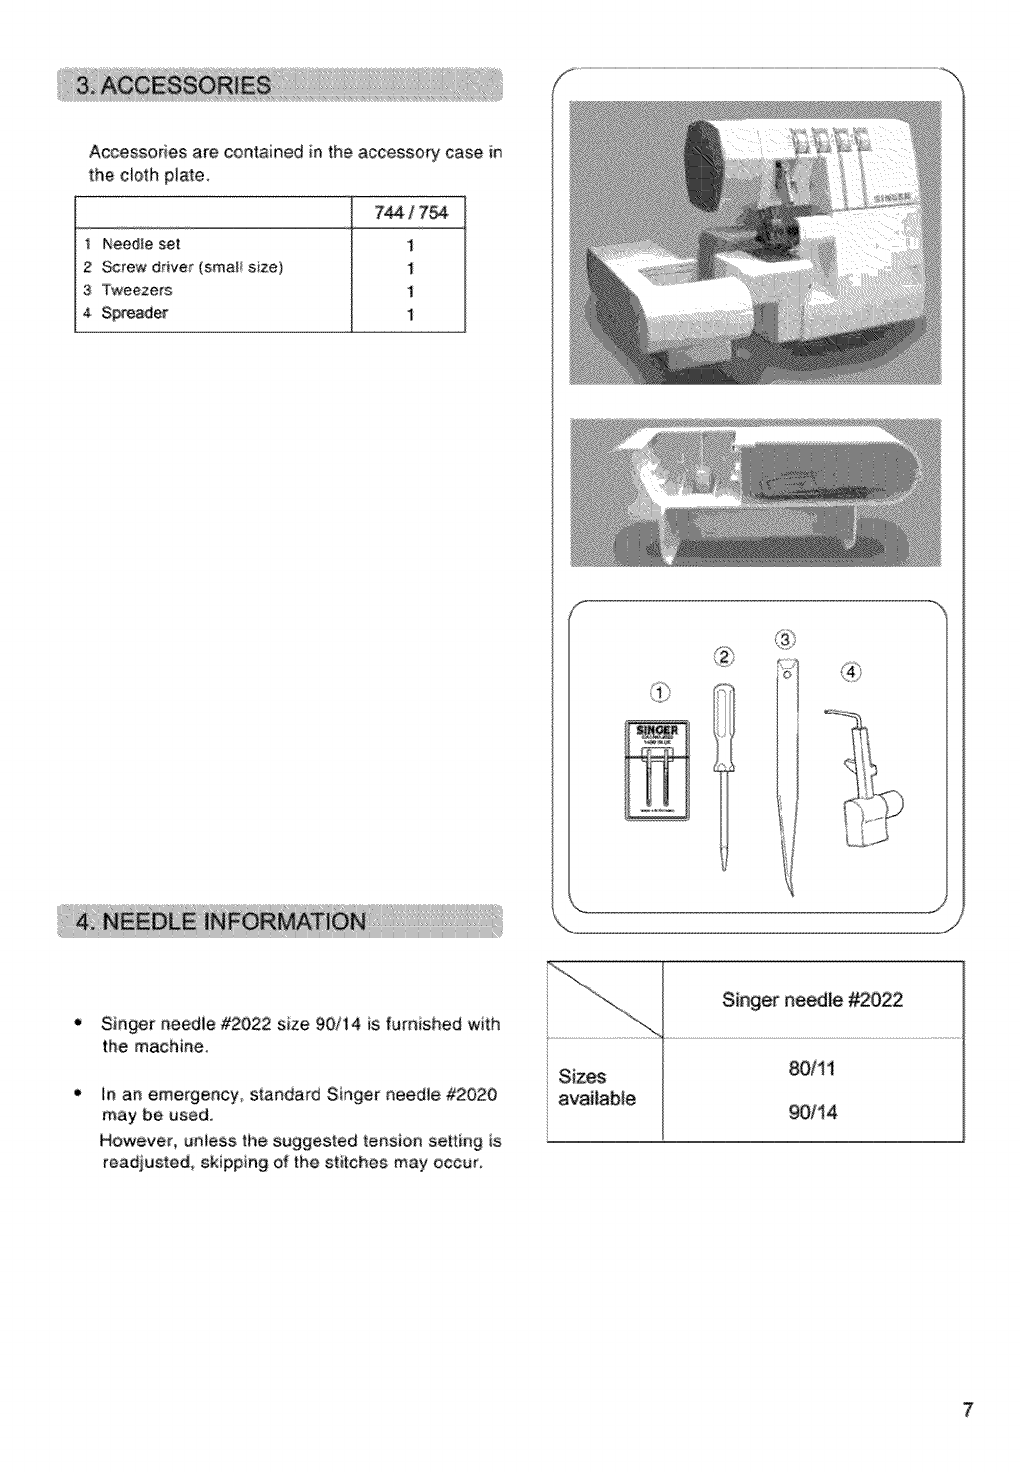
This machine is eapab!e of producing vadoas types ol stitches according to the combination of needle positions,
threading methods, tension adjustment
Referesce
Stitch Type
2. Twin.read
standard roll_
hem sUtehing
3. Th:ree4hread
Overiock
4, Three4hread
Fiatlock
5, Thteeothread
Wrapped Edge
Ovedock
6, Four4hread
Stretch Mock
Safety Stitch
Pages
!_eeedle 24bread stttc_h is used for
light wetght or ke_ts febdcs, Alse,a
3.Smm and 5.7ram wropped eve#oak 30
Ham width can be obtained by
changing the needie posit ore"
l-needle 2-_,read stitch ts u_ for
everedge sesmteg,bHedstiteh
hemming on ago flnishir_ o
_,a &5ram a_ &Tram s_ndard 3t
r_i_ _m _am _J_ _n _ ebtai_d
by ®or._teg the re_!e p_tion"
1-needle 3-thread s_ilch is tised for
ovefedg ng sad seaming on common
fabrics. A_so_ s 35ram and 5.Tram 32
ovedoek seam width ass be obtained by
changing the needle posit on"
I meedie 3-thread stitch is used fo_ bulted
Or tapped seams and ornamental stitching
with d_o_etive thread, A_so, a 3,Smm and 33
57ram flatiock width ca# be obtained by
changing the needle posit on"
1.-needle 34bread sf_tch is u_ for sewing
narrow roiled hems at omameRtal edges
Also, a 3.5ram and 57ram w_appod 34
oeedosk seam widish ca# be obtained by
changing the noedio position*
2_ceedIe 44htead s_itch wh_h is ideaI _or
medium _o heavy weight st[etchy fabrics
such as doubio kn_s ned swlm wea_. 35
"Depending on the needle positions used, this machine can sew 34bread standard width 35ram overedge and
a 5oTmm wide overedge seams.
5
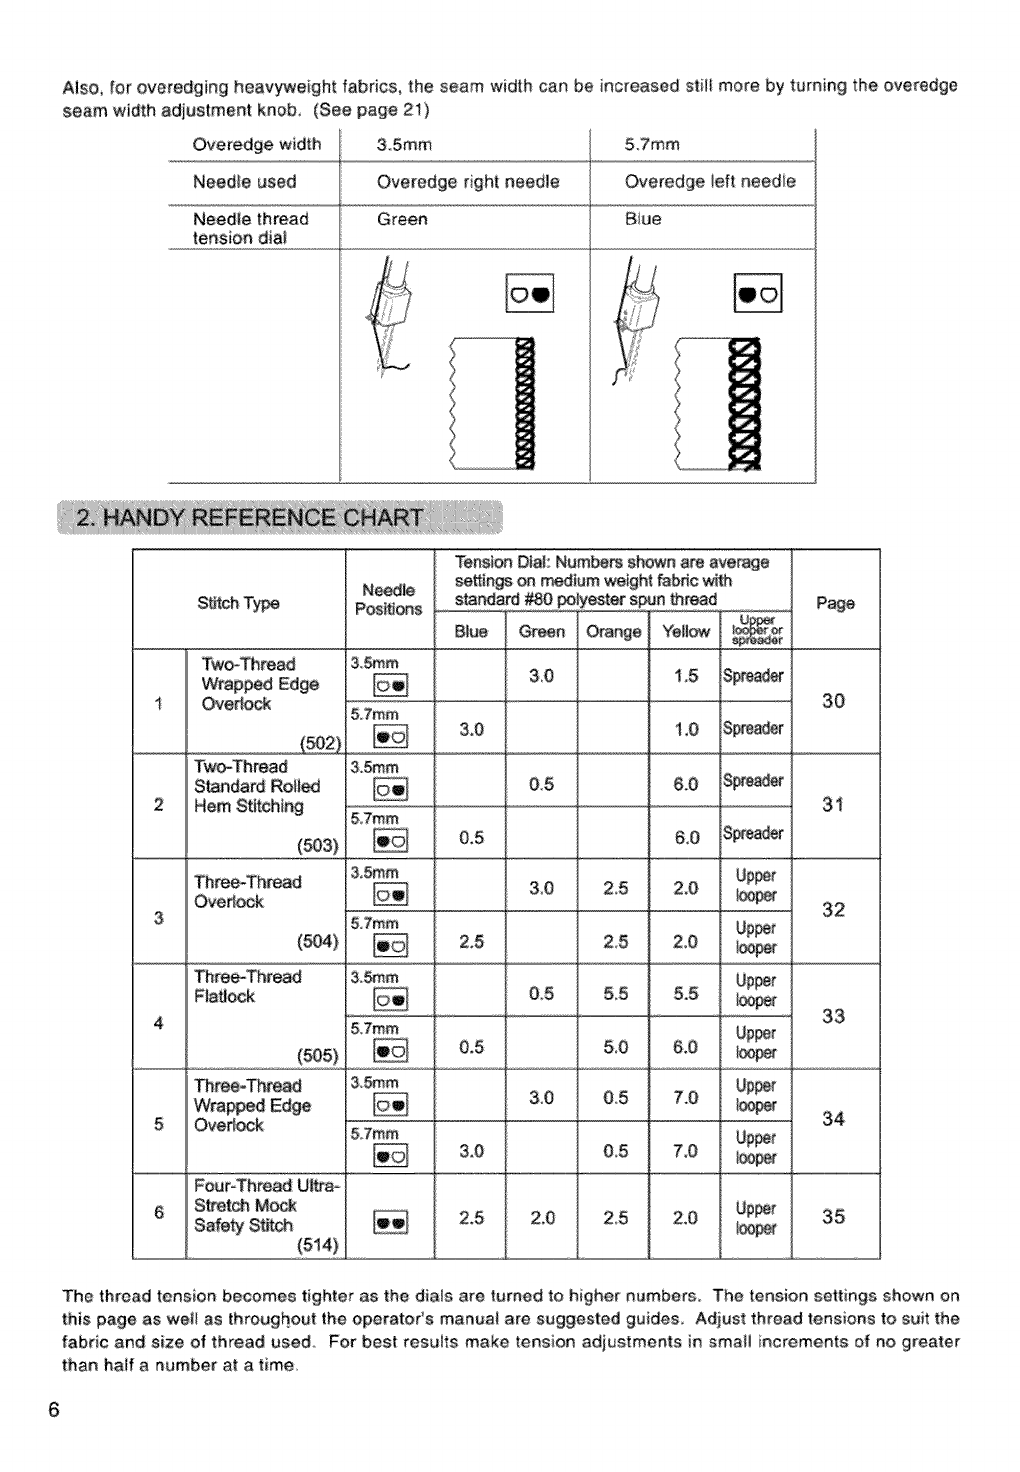
Also, for overedging heavyweight fabrics, the seam width can be increased still more by turning the overedge
seem width ediustment knob, (See page 21)
&5mm 5o7mm
Needie used Overedge rght needle Overedge ieft needie
Needle thread Green Bi[Je
tension die!
SUtchTy'_
Thme-Thre_
Ove_k
(5_)
Thme-Tn_ad
FtaUoek
_ree-Thread
Wrapped Edge
O_¢e#_
Four'Thread Uitra-
S#et_ M_J,:
(514)
N_dIe
Pos_ons
3,Smm
5,7ram:
&_m
&Tram
3_m
&Tram
Tension D|aI: Numbem shown are average
_nge _ m_ium weight fabdc wi_h
s=ndord_o _!yest_"sp.n_read........Page
Biue G_n Yeii_
3.0 2.5 2.0
2.5 2.5 2.0
&5 55 5.5
0,5 &0 &O
3,0 0,5 7.0
3,0 0.5 7.0
2.5 2,0 2,5 2.0
30
31
32
33
_r 34
35
The thread tension becomes tighter as the d|ets are turned to higher numbers, The tension settings shown on
this page as well as throughout the operators menua_ are suggested guides Adiust thread tensions to suit the
fabric end s_ze of thread used. For best results make tension adjustments in small ncrements of no greater
than haft e number at e t_me
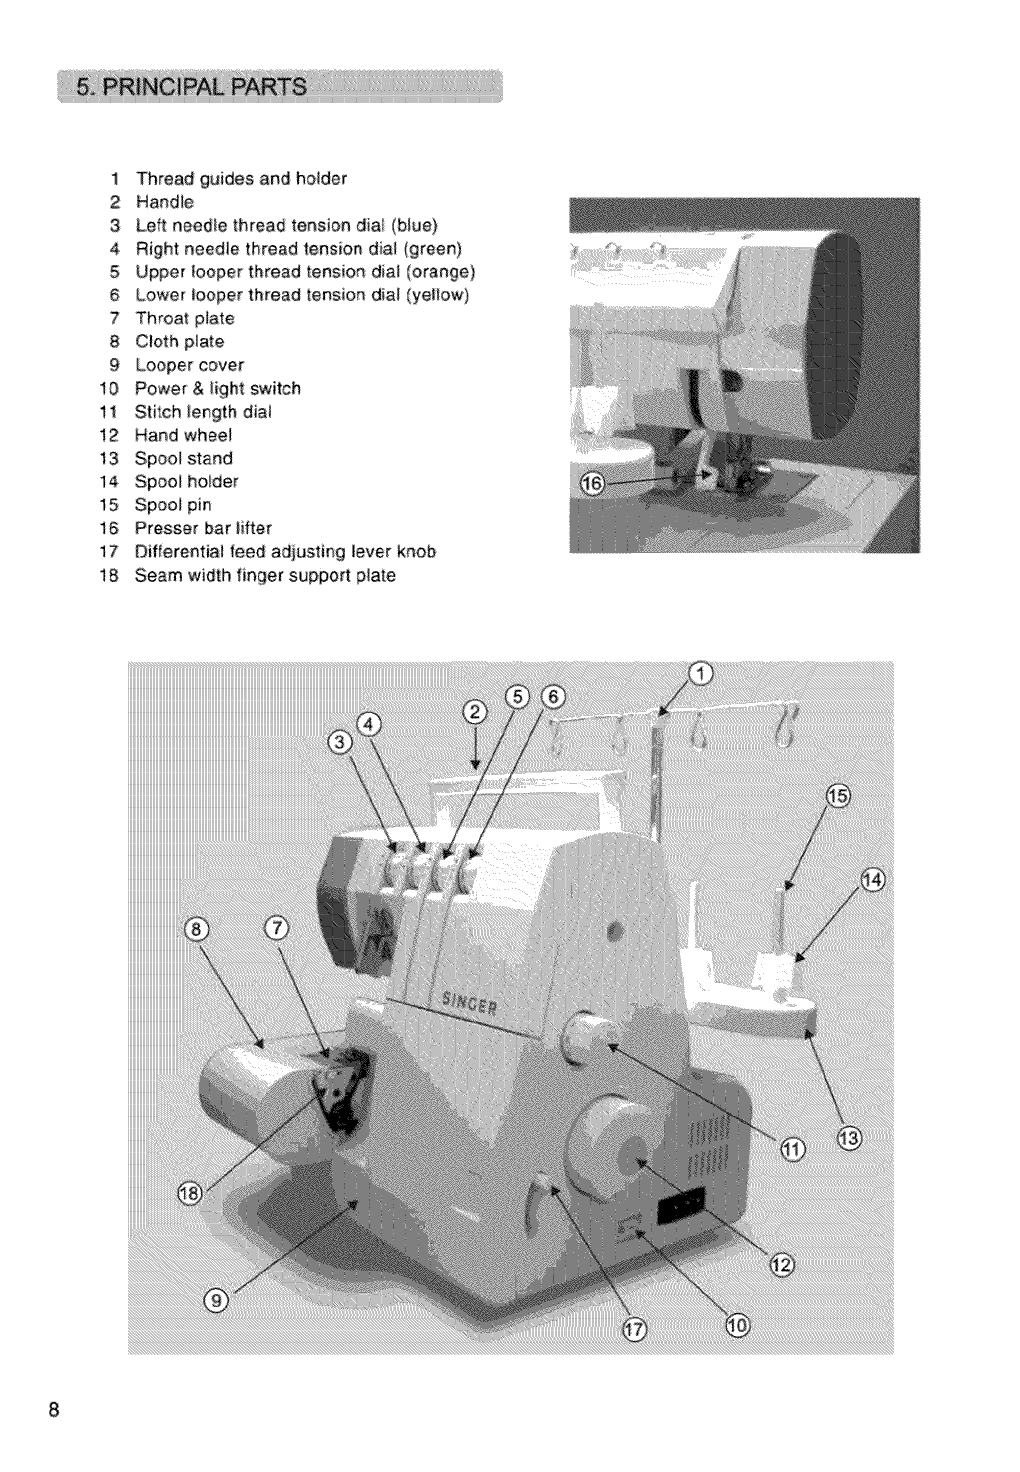
2 Screw drive (sina!! size)
3Tweezers
4 Spreader
Accessories are contained in the accessory case in
the c_oth pi_te_
74417_ j
1 Needle set t
t
1
1
Singer needle #2022 size 90/! 4 is furnished with
the machine,
in an emergency standard Singer needle #2020
may be used_
However, untess ti_e suggesled tension setting is
readjusted, skipping of the stitches may occur,
L_i,
Sizes
avaiiable
Singer needle #2022
80/11
90/14
7
1
2
3
4
5
6
7
8
9
!0
11
12
f3
14
15
16
17
18
Thread guides and hofder
Handle
Left needle thread tension dia! (blue)
Right needie thread lension dial (green)
Upper tooper thread tension dial (orange)
Lower looper thread tension dial (yellow)
Throat plate
Cloth p_ate
Looper cover
Power& light switch
Stitch !ength dia_
Hand whee!
Presser bar _ifter
Differentia! feed adjusting lever knob
Seam width finger support plate
8
o
e
Caution ;
Be sure to turn off power switch.
Push the cover to the right as far as it will go 1
Pull cover down toward you 2
Caution:
Be sure looper covet is closed when sewing,
1 Upper looper
2 Movable upper knife
3 Presser foot
4 Stationary bwer knife
5 Lower tooper
6 Seam width finger knob
7 Seam width adjustment knob
Connect the controiier /eiectric plug 1 to the
machine reeeptacle 2
* Plug power line 3 into electde outlet 4,
" Power Switch: Push "-" mark side to turn °Of'J°.
Push _0" mark side to turn "OFF".
" To run the machine and control the speed, press
the contro!_e_.
* The harder you press, the faster the machine will
SeW
o To stop the machine from sewing, remove your foot
from the controller.
WARNING:
Be sure to make reference to °Warning" on
following page.
9
POLARIZED PLUG INFORMATION (FOR U.S,A, & CANADA ONLY)
This appliance has a polarized plug (one blade wider than the other). To reduce the risk of
electric shock, this piug is intended to fit in a polarized outlet only one way. if the plug
does not fit fully in the outtet, reverse the plug. ff it stil! does not fit, contact a qualified
electrician to install the proper outlet. Do not modify the plug in any way
Warning:
Be sure that the electrical voltage of the electric outlel (waii receptacle} is the same as the rated
vomtage of the motor.
Handle the foot co_trolier with care and avoid dropping it on the floor Be sure not to place
anything on top of it when not in use.
Disconnect the power line plug from the e_ectdc outJet wt_en changing needies, presser feet o_'
throat plates, or when:ieeving the machine unattended_ This eliminates the possibiiity ol starti_g
the machiRe by accid:entaliy pressing the controLier
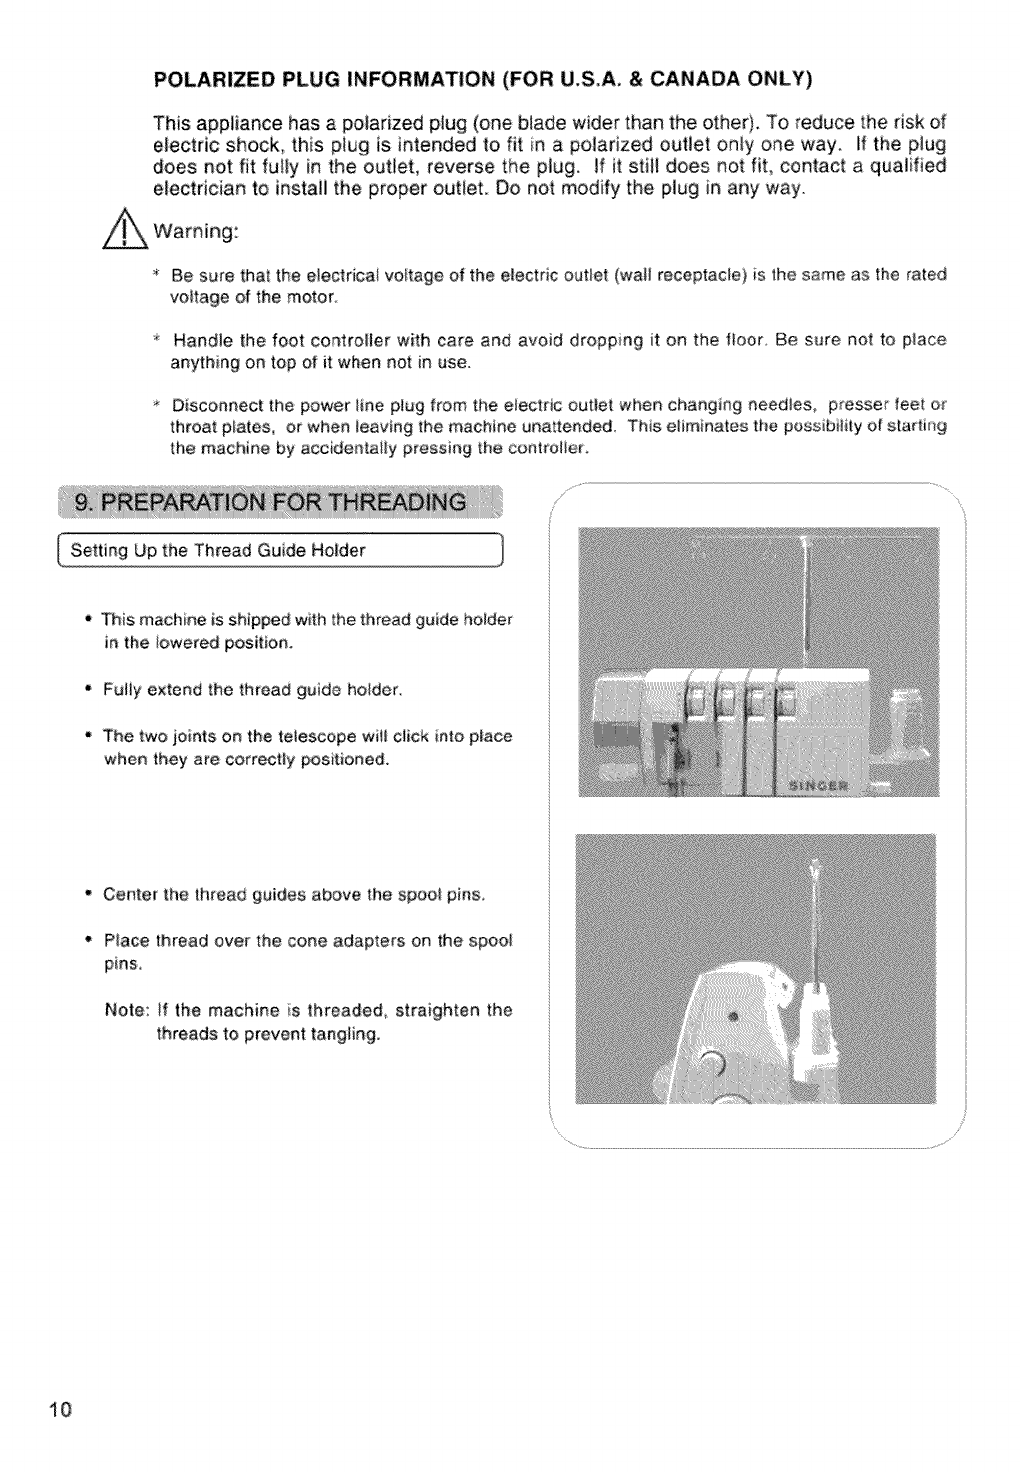
Setting Up the Thread Guide Holder
• _is machine is shipped with the thread guide holder
in the iowered position,
•Fully extend the thread guide holder
* The two joints on the telescope wifl click into p_ace
when they are correctly positioned.
"Ce_ter the thread guides above the spoo_ pins.
•P_ace thread over the cone adapters on the spool
pins,
Note: _f the machir_e s threaded_ straighten the
threads to prevent tangiingo
10
f
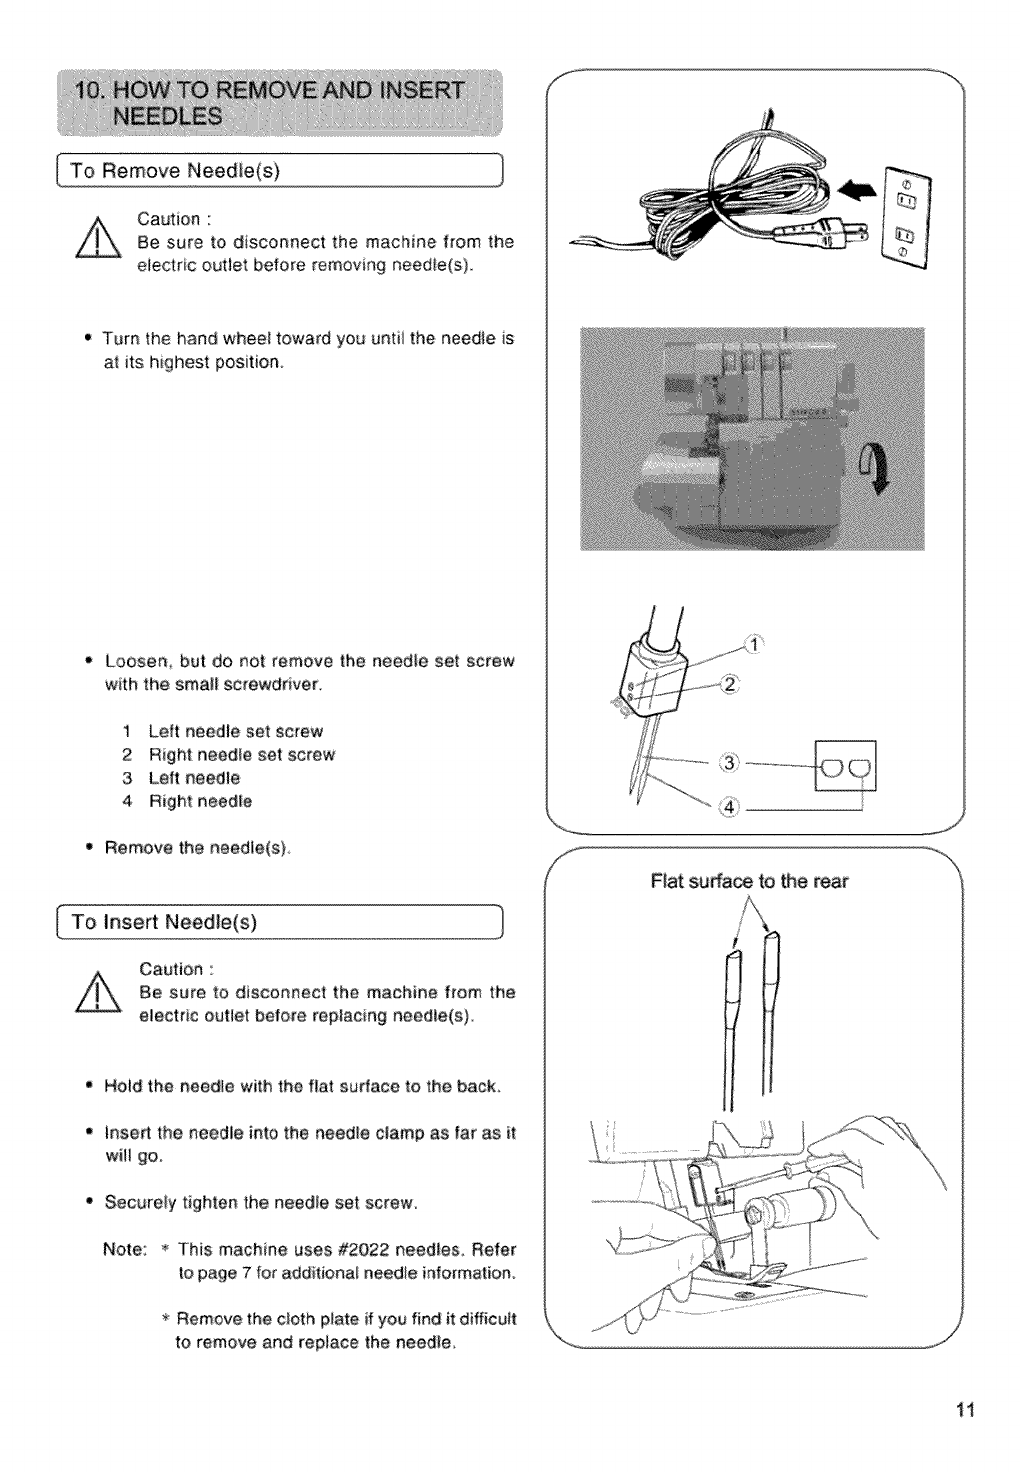
Caution '
Be sure to disconnect the machine flora the
eiectric outlet before removing needie(s)
•Turn the hand wheel toward you unfi_ the needle is
at its highest position
Loosen, but do not remove the needte set screw
with the smaii screwdriver.
1 Left needle set screw
2 Right needle set screw
3 Left needle
4 Right needle
Remove the needle(s)
To Inse_ Needle(s)
Caution:
Be sure to discennect the machine from the
electric outlet before replacing needle(s}.
tHold the needie with the flat eudace to the back,
lnse_ the needle into the needle clamp as far as it
wiii go.
Securely tighten the needle set screw.
Note: _ This machine uses #2022 needles. Refer
Io page 7 for additional needle information,
_ Remove the cloth plate if you find it difficult
to remove and replace the needie,
Fiat surfa_ to the rear
j'
_J
lil
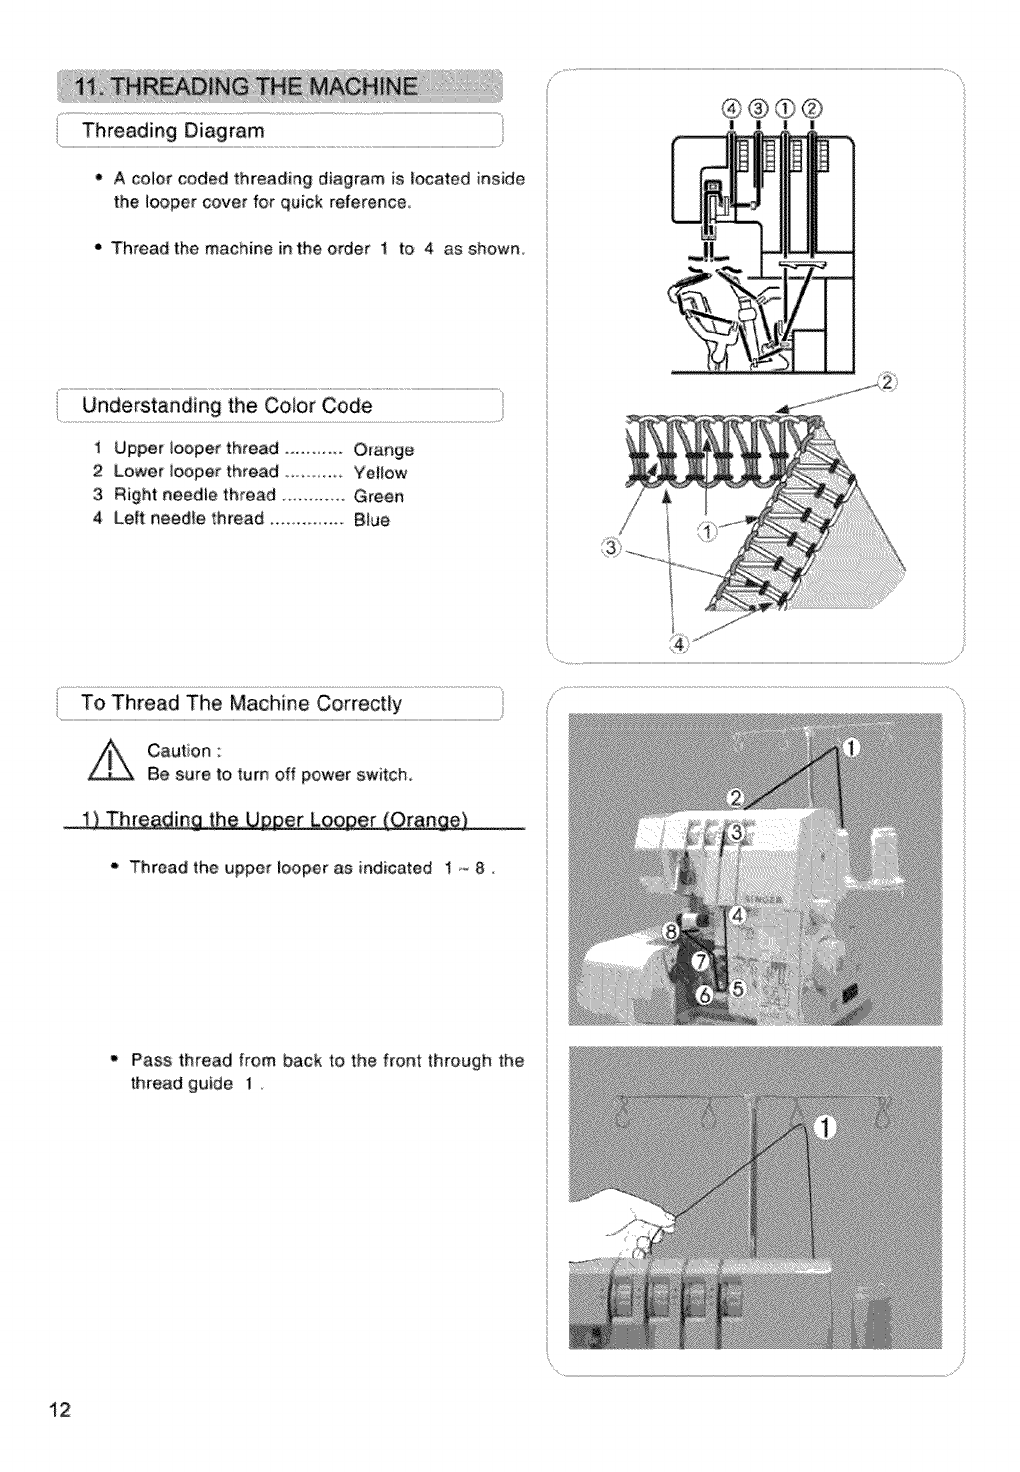
• A color coded threading diagram is located inside
the looper cover for quick reference
• Thread the machine in the order 1 to 4 as shown,
Unde rstand!ng the Co!o[ c£de ;!
IUpper looper thread ....... Orange
2Lower iooper thread ......... Yellow
3 Right needle thread ........ Green
4 Left needle thread ..............Blue
To Thread The Machine Correctly
Caution :
Be sure to turnoff power switch,
_) Threading the Upper Looper (Orange)
- Thread the upper looper as indicated t ,,_8.
• Pass thread from back to the front through the
thread guide 1 .
! | |
12
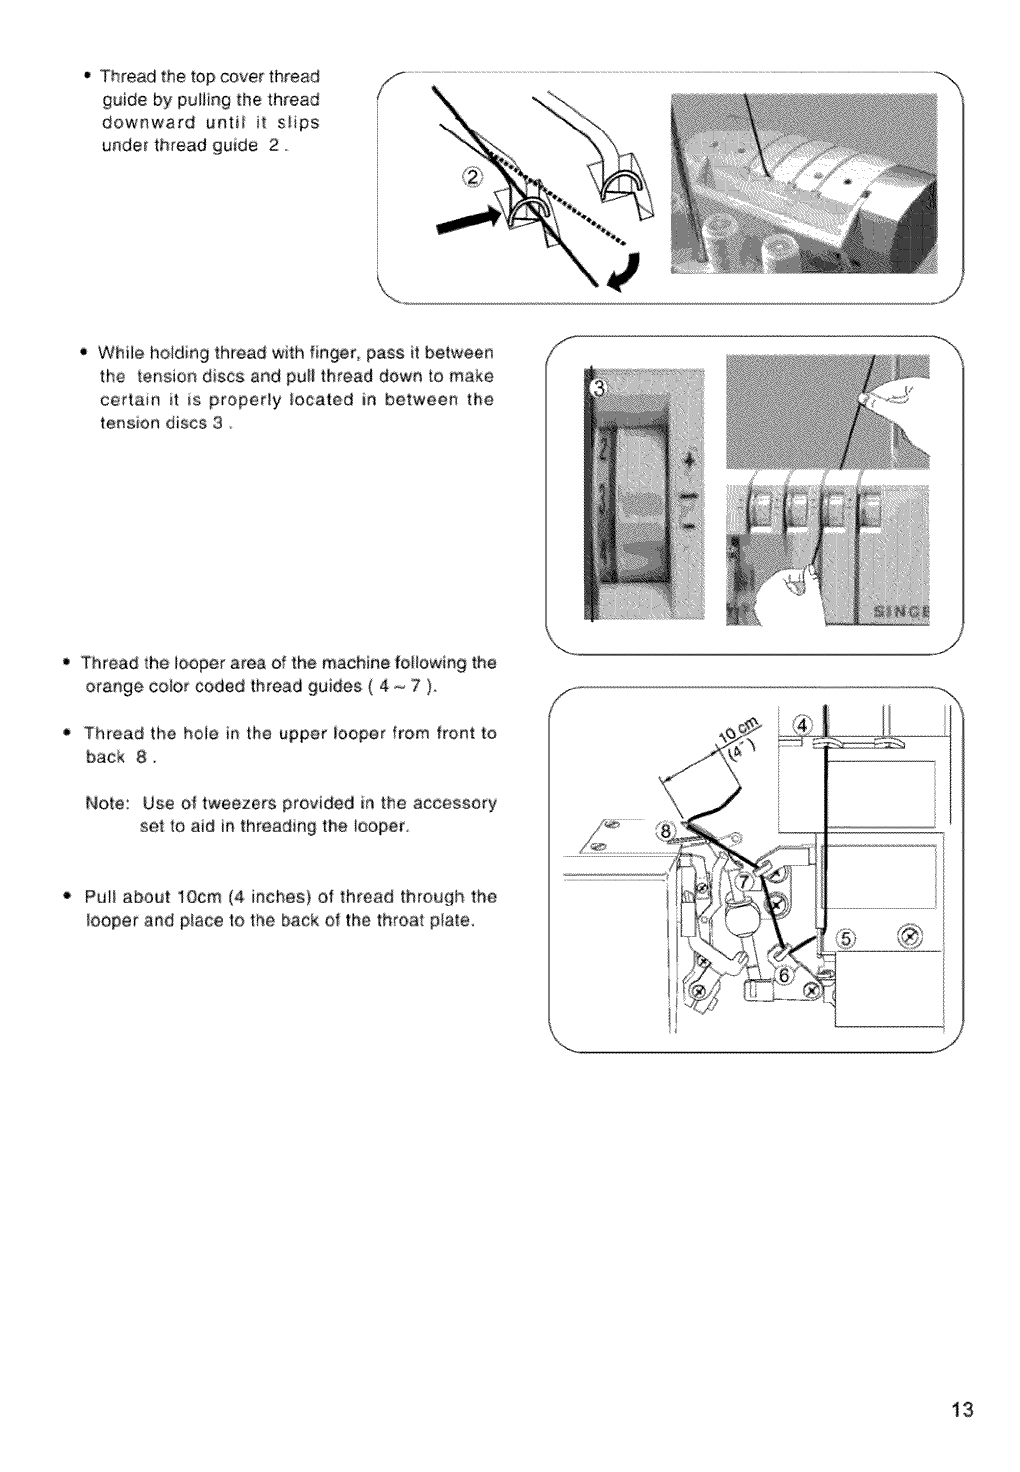
• Thread the tep cover thread
guide by pulling the thread
downward until it slips
under thread guide 2.
- While holding thread with finger, pass it between
the tension discs and pull thread down to make
certain it is properly !ocated in between the
tension discs 3
• Thread the looper area of the machine following the
orange color coded thread guides ( 4 _ 7 )
• Thread the hole in the upper looper from front to
back 8.
Note: Use of tweezers provided in the accessory
set to aid in threading the _ooper
Pull about lOcm (4 inches) of thread through the
looper and place to the back of the threat piate.
J
13
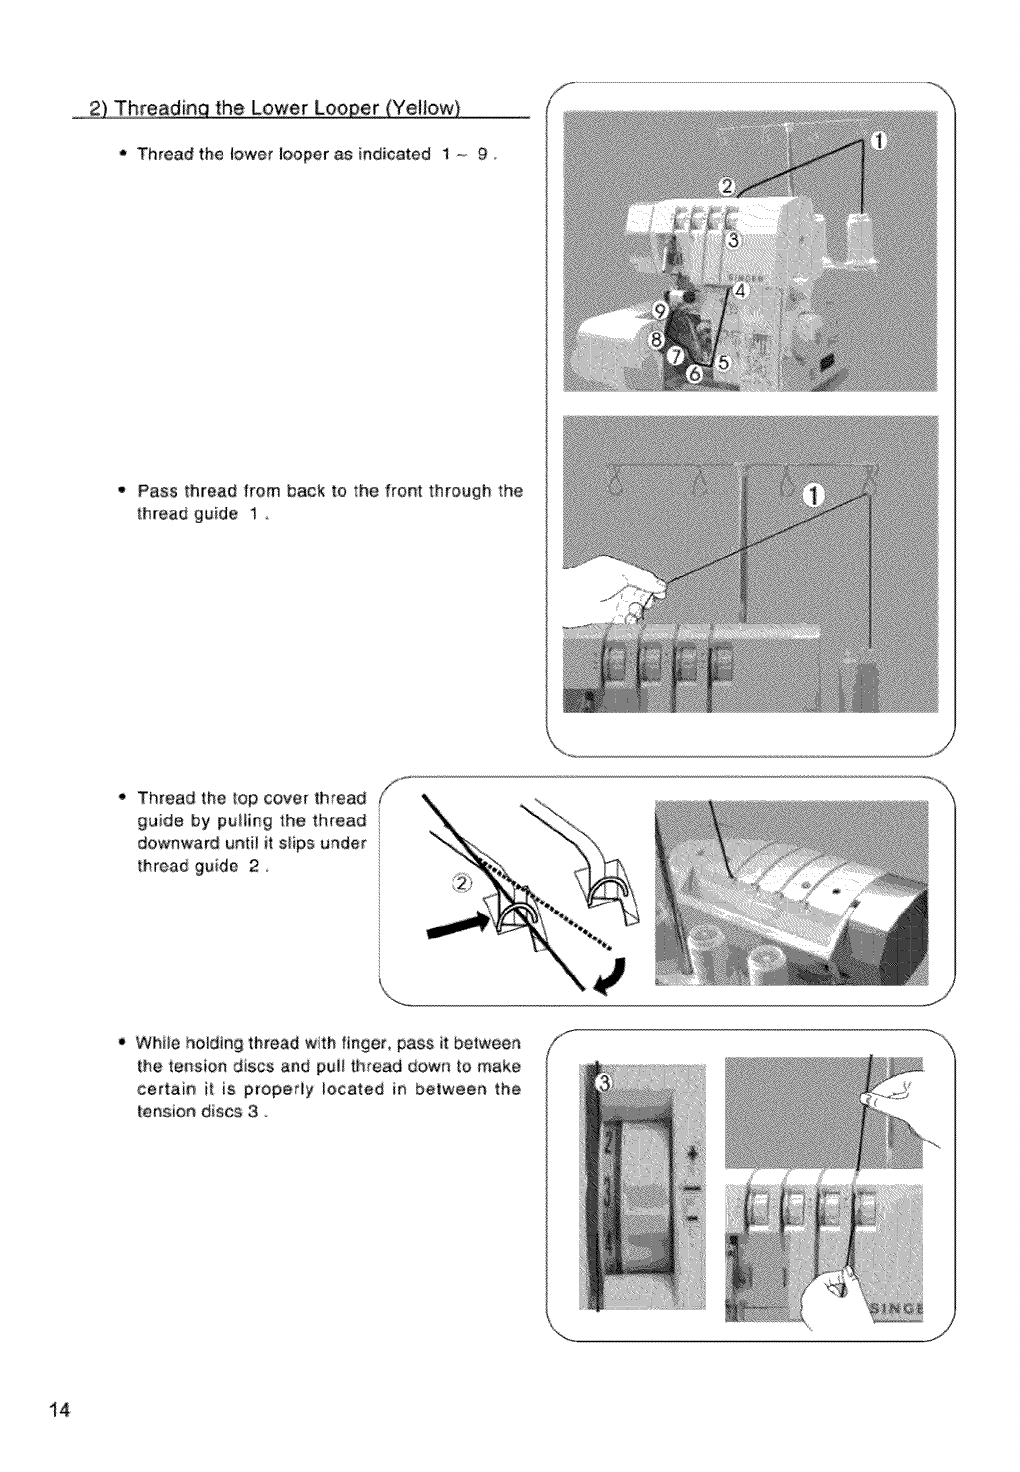
2) Threadinq the Lower Looper _Yellow)
,, Thread the !ower |ooper as indicated I ,- 9,
- Pass thread from back to the front through the
i:hfead guide 1
- Thread the iop cover thread
guide by puiling the thread
downward until it slips under
thread guide 2
J
• Whiie ho_ding thread with finger, pass it between
the te_sion discs and puli thread down to make
certain it is properiy _ocated in between the
tension discs 3
14

• Turn the hand wheel toward you until the !ower
iooper is at the far righL
Thread the iooper area of the machine fo[fow[ng
the ye[tow ootor coded thread guides 4 - 7
Note: Use the tweezers provided in the accessory
set to aid in threading the _ooper,
•Grasp the thread with the tweezers 4 cm (1_1/2
inches) from thread guide 7
•Piace the thread with the point of the tweezers
siightly under and to the }eft of threading guide 8,
t Puil the thread up and into thread guide 8,
Pass the thread behind and over the top end of
_eft looper 9*A_
Then puJi it downward gently so that it wiil slip
into the slot in the iooper goB.
•Pick up the thread and pass it:through the hole in
the end of the _ooper 10
Note : Use the tweezers provided in the
accessory set to aid in threading the
_ooper
• The thread should be positioned in the groove of
the lower _ooper.
•Pull about 10cm (4 inches) of thread through the
_ooper and place it: over the top of the upper
looper and to the back o_the throat plate
i 5
)
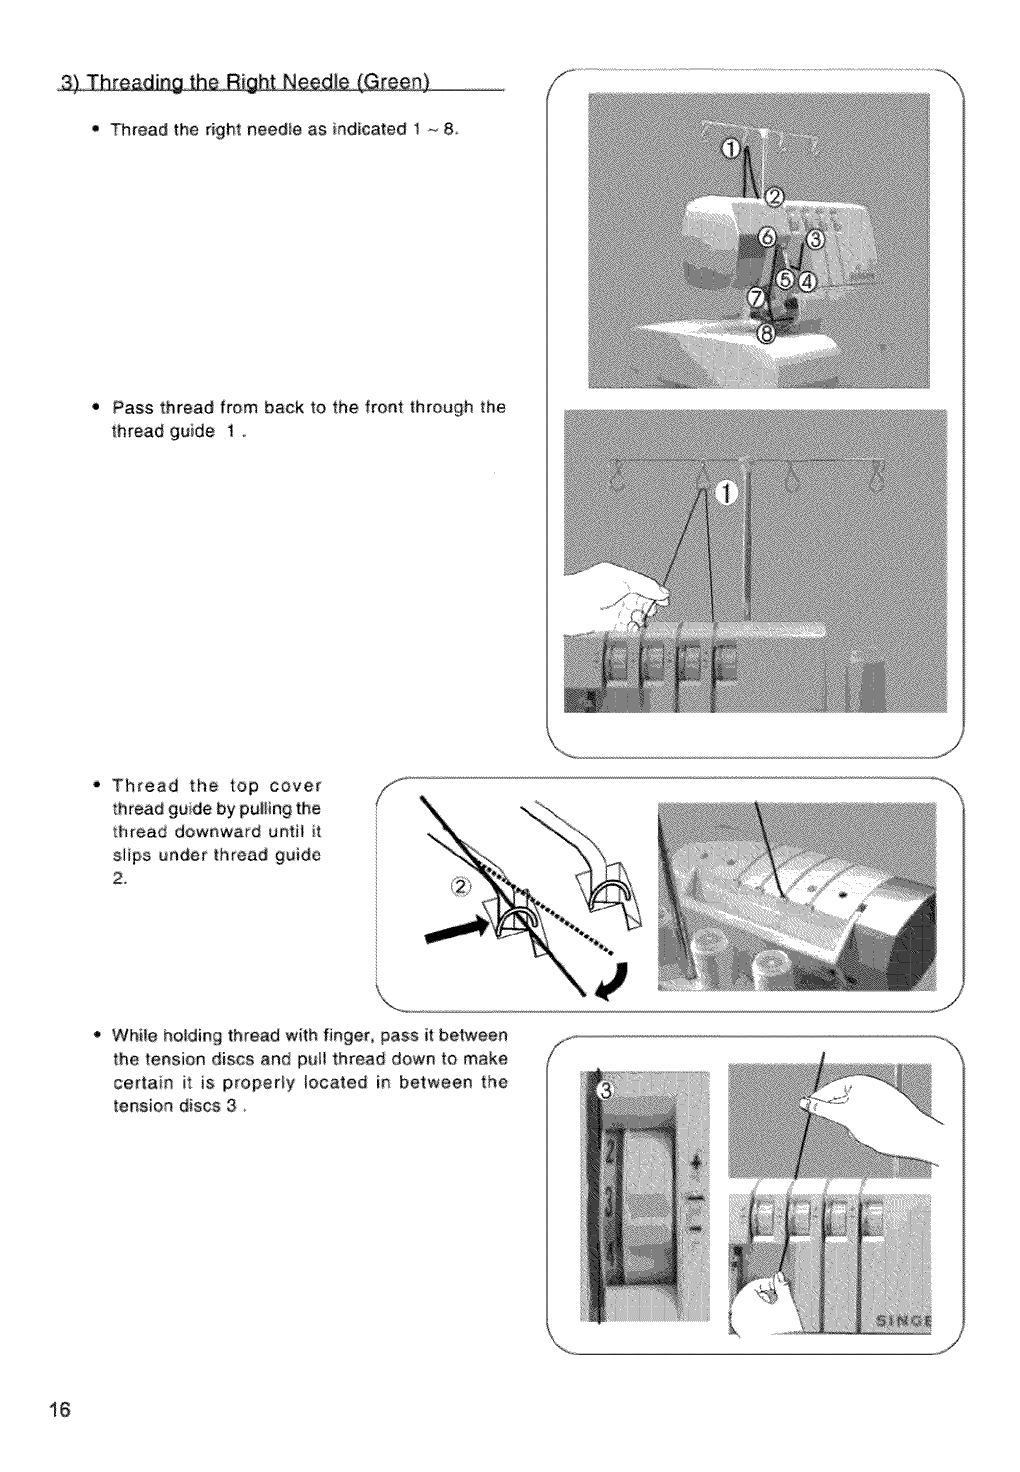
Thread the right needte as indicated t _ 8,
• Pass thread from back to the front through the
thread guide !
Thread the top cover
thread guide by pul_ing the
thread downward until it
slips under thread guide
2
•While holding thread with finger, pass it between
the tension discs and pair thread down to make
certain: it is proper{y tocated in between the
tension discs 3,
I6
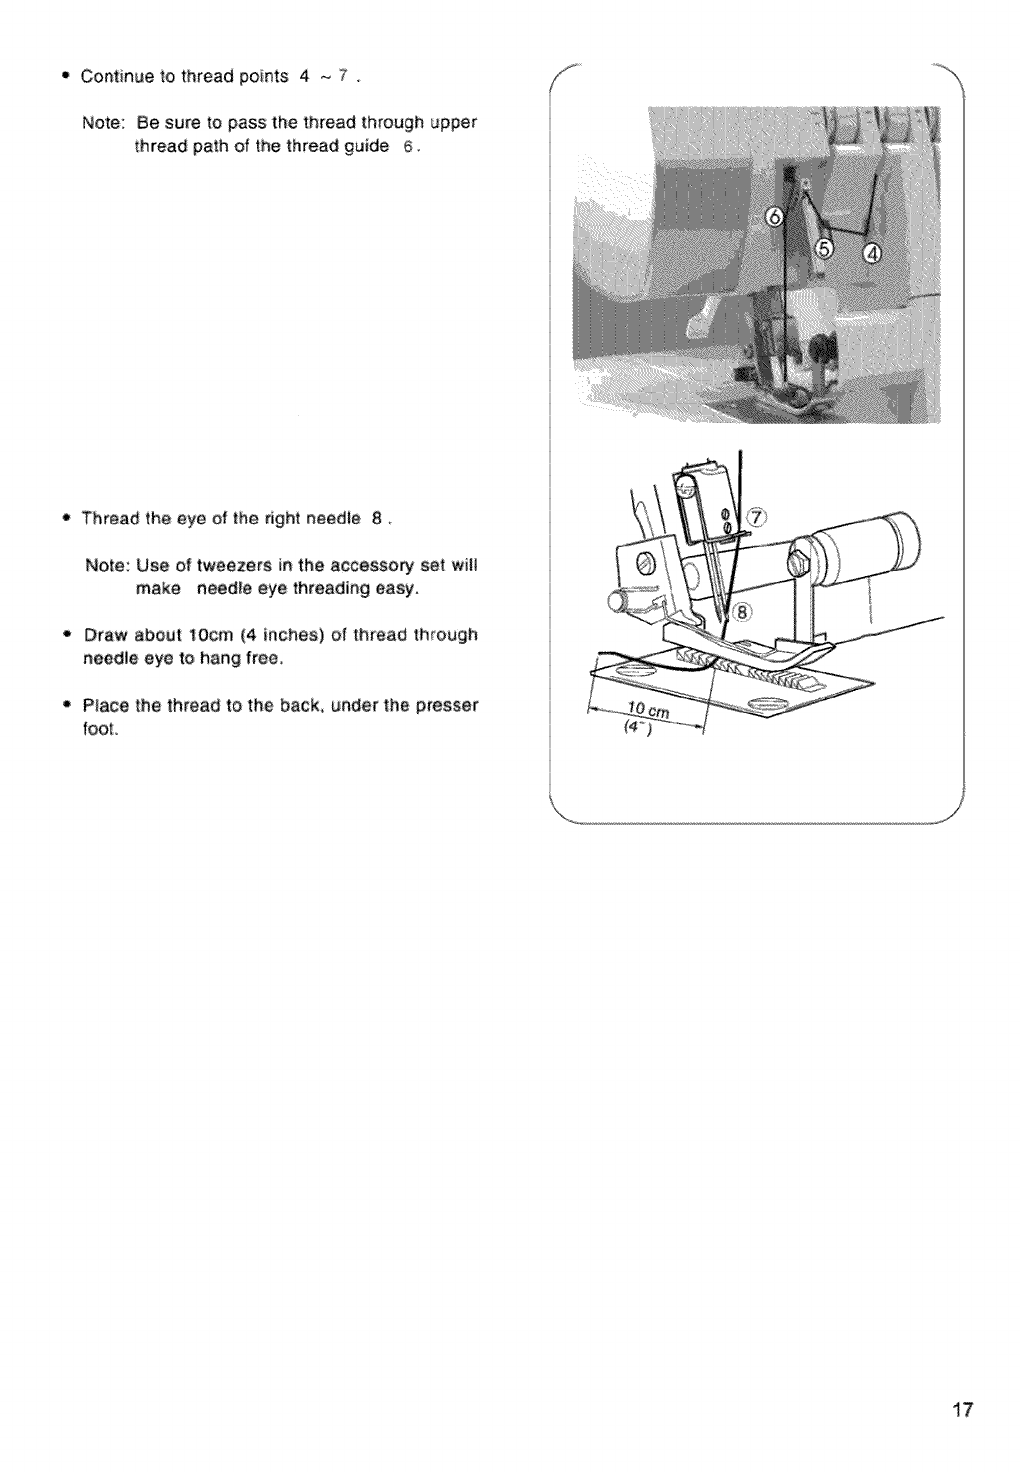
Continue to thread points 4 - 7
Ne_e: Be sure to pass the t:htead through _pper
thread path of the thread guide 6,
• Thread the eye oRthe right needle 8.
Note: Use of tweezers in the accesse_ set wi_{
make needle eye threading easy,
o Draw about lOcm (4 inches) of thread through
needle eye to, hang free,
• P_aee the thread to the back, under the presser
foot:.
17
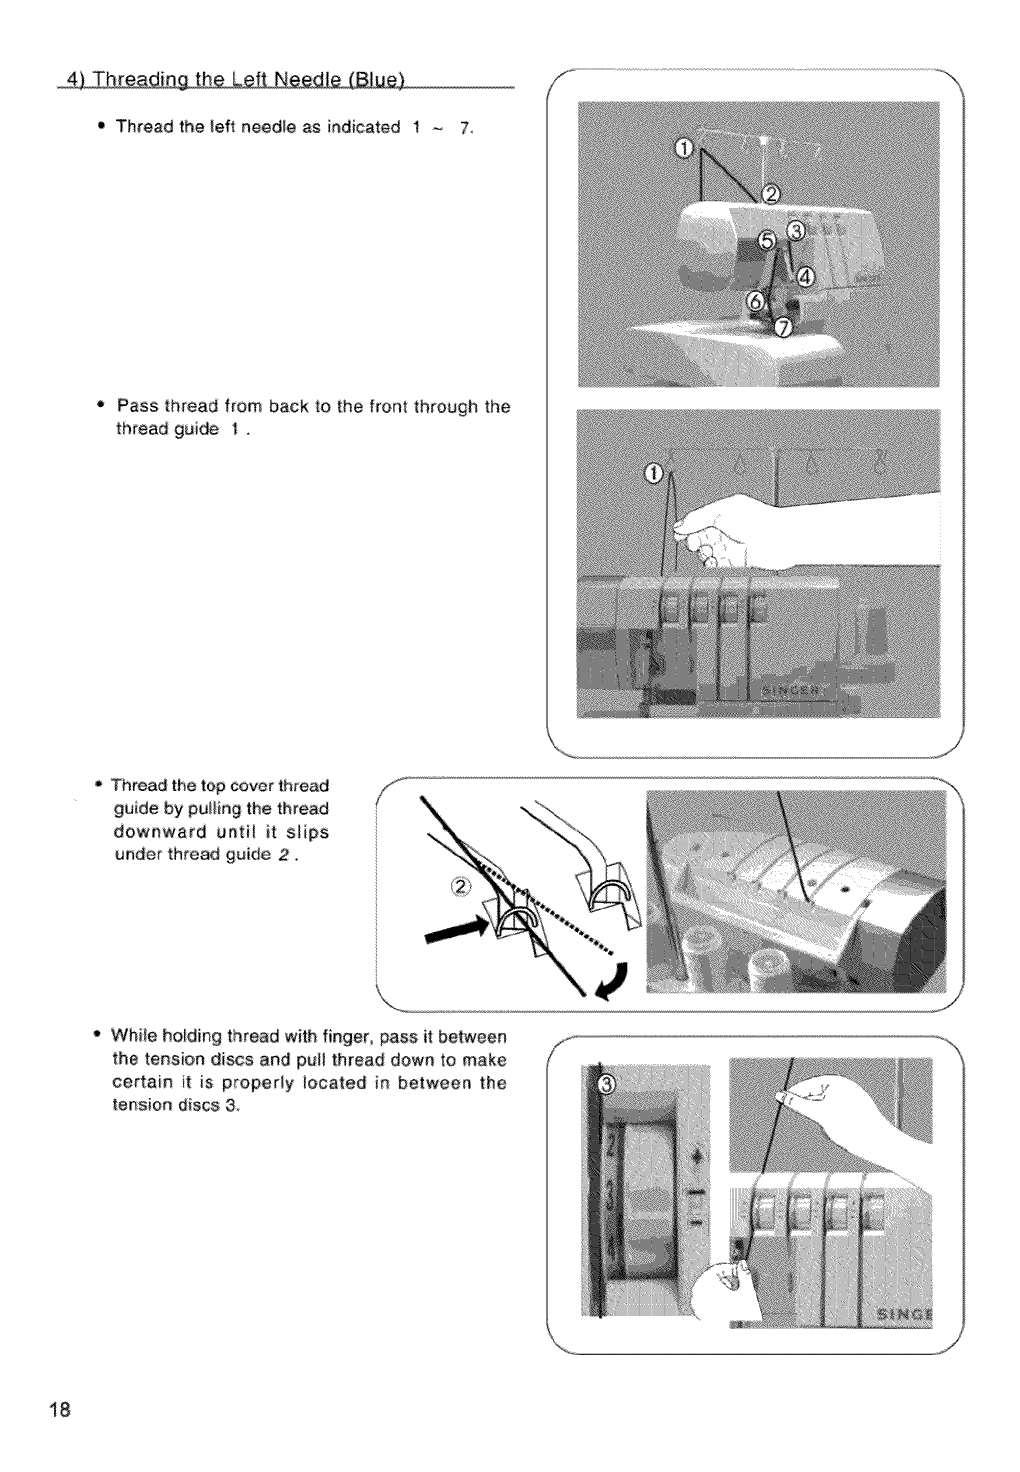
Thread the ieft needie as indicated t - 7_
6 Pass thread from back to the front through the
thread guide 1.
Thread the top cover thread
guide by pulling the thread
downward untii it: slips
under thread guide 2.
•While holding thread with finger, pass it between
the tension d_scs and pull thread down to make
certain t is proper_y _ocated in between the
tension discs 3
I8
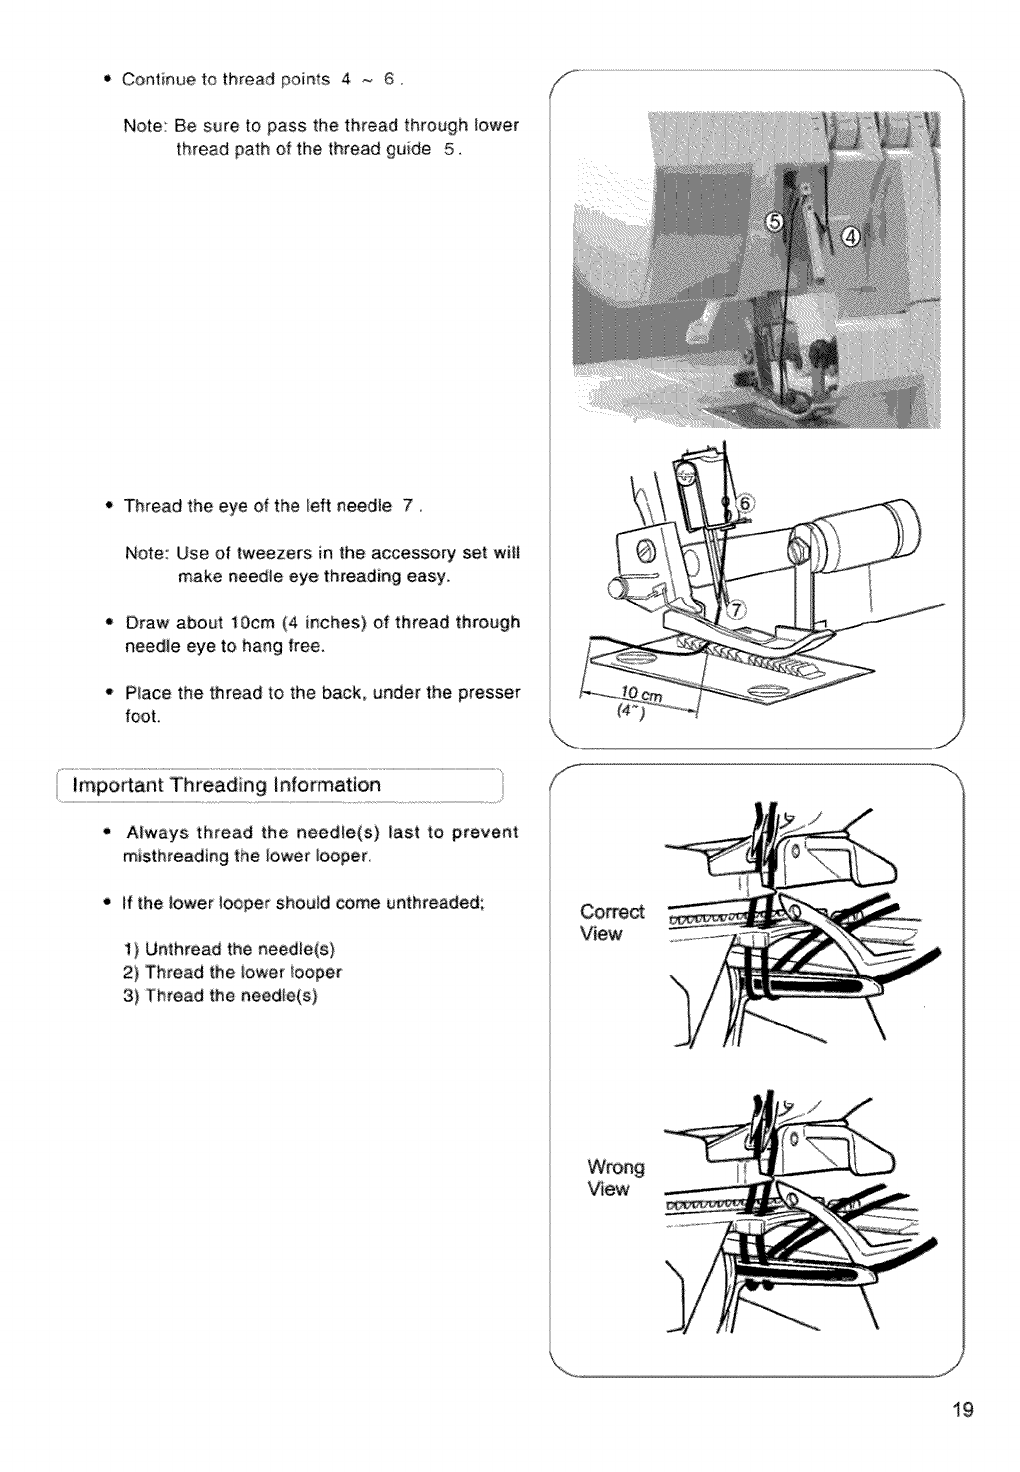
• Continue to thread points 4 ~ 6
Note: Be sure to pass the thread through lower
thread path of the thread guide 5.
t Thread the eye of the left needle 7
Note: Use of tweezers in the accessory set witl
make needle eye threading easy,
- Draw about lOcm (4 inches) of thread through
needie eye to hang free,
• Place the thread to the back, under the presser
fool
-If the lower !ooper should come unthreaded;
1} Unthread the needle(s)
2) Thread the iower iooper
3) Thread the needle(s)
Corre_
View
Wrong
View
\
19
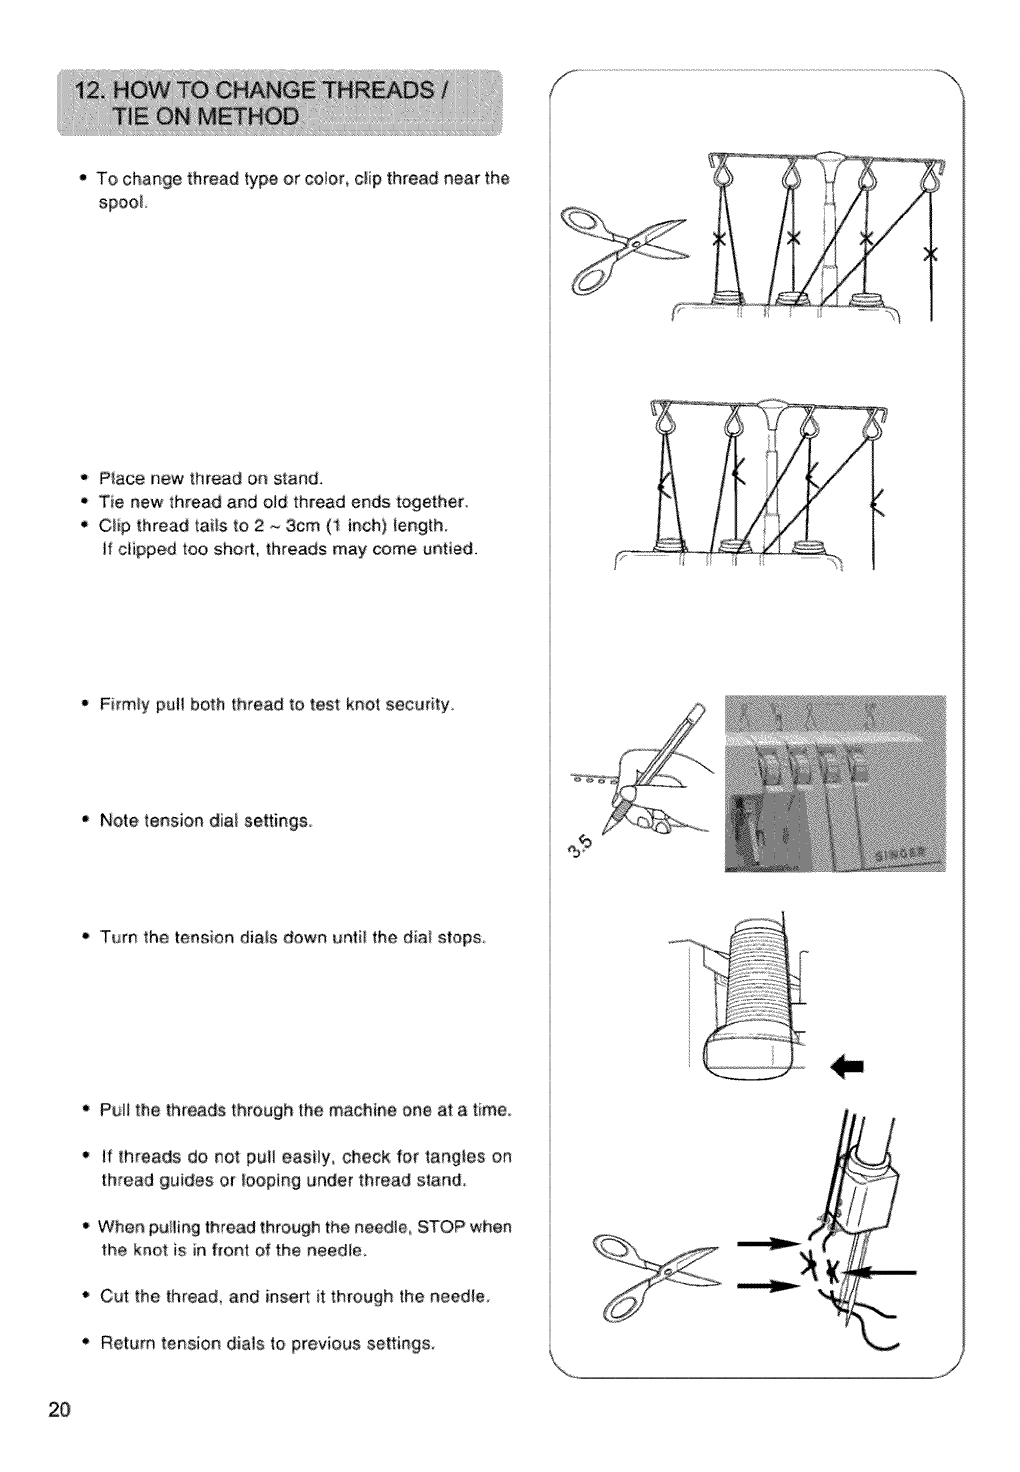
- To change thread type or coior, c_ipthread near the
spooi,
o Place new thread on stand,
i Tie new thread and o_d thread ends together,
Cli# thread tai!s to 2 _ 3cm (1 inch) _ength_
if c_#ped too sho_, threads may come untied,
Firmiy puliboth thread to test knot security
• Note tension dial settings.
o Tl_m the tension d_ais down unti{ the d_at stop&
t pe_! the threads through the machine one at a t_me_
• if threads de not pull easily,, check for tangles on
thread guides or !ooping under thread start&
When pu_ing thread through the needle_ STOP when
_he knot is in front of the needle
• Cut the thread_ and _nsert it through the need_e_
" Rett_m tension dials to previous settings.
2O
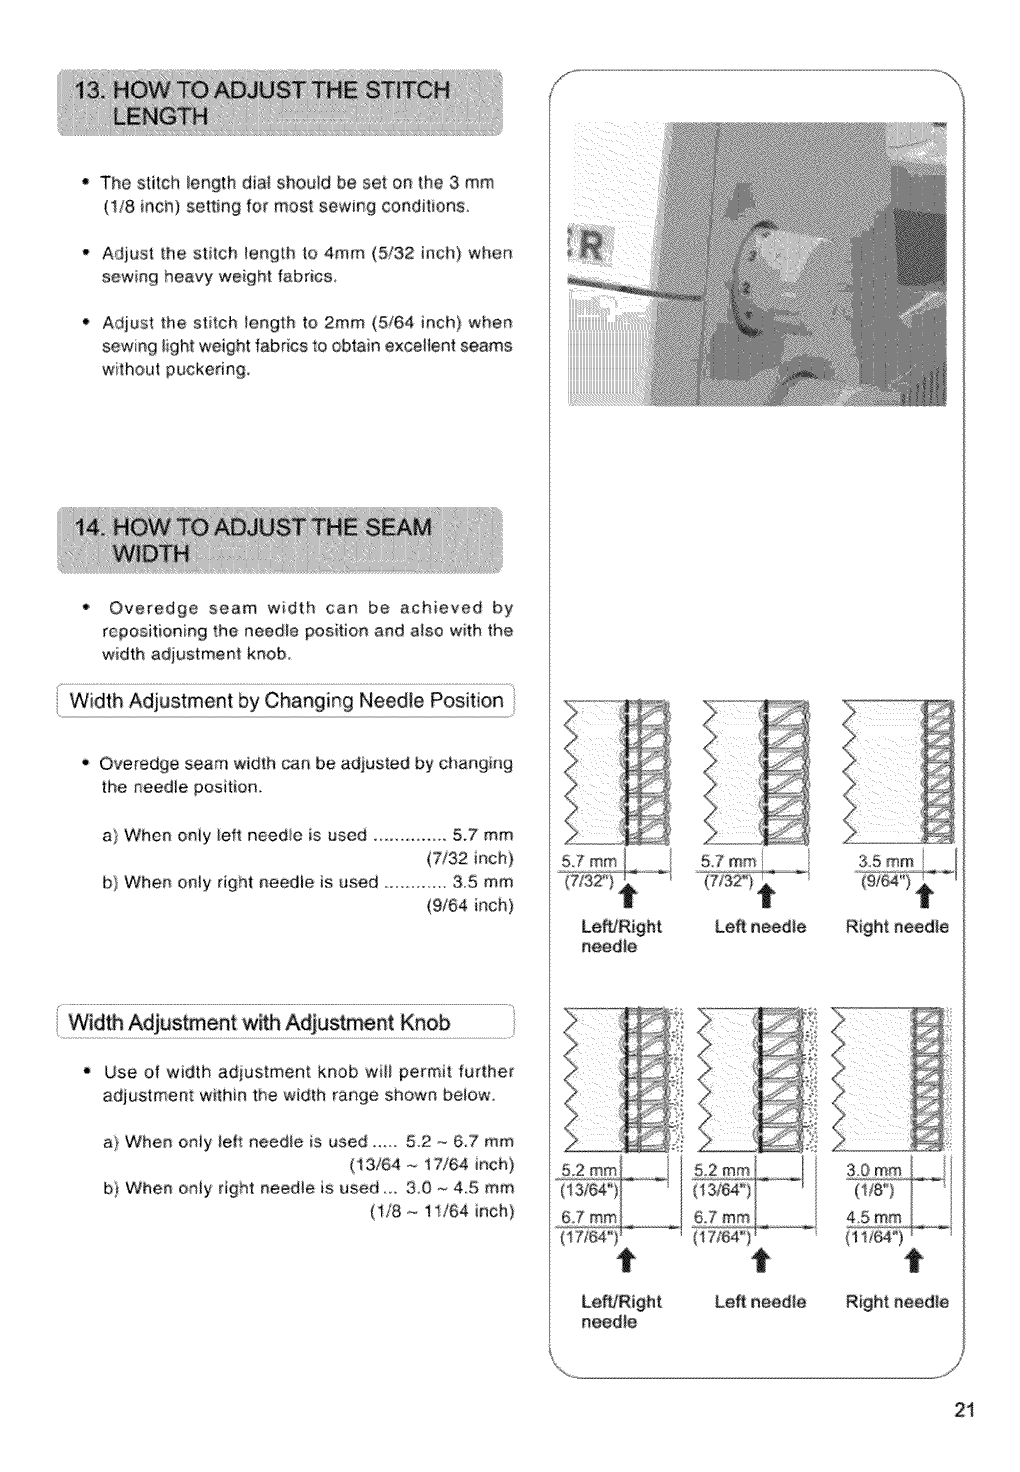
• The st[ch length diat shouid be set on the 3 mm
(!/8 inch)seting for most sewing conditions.
Adjust the stitch length to 4ram (5/32 inch} when
sewing heavy weight: fabrics,
* Adiust the stitch iength to 2ram (5/64 inch)when:
sewing ligh_ weight fabrics to obtain exce/ent seams
without puckering.
• Overedge seam width can be achieved by
repositioning the needie position and a_so w_th the
width adjustment knob.
Width Adiustment by Changing Needle Position
" Overedge seam width can be adjusted by changk_g
the _eedle position_
a} When only left needle is used ............ 5.7 mm
(7/32 inch)
b) When only right needle is used ............. 3,5 mm
(9/64 inch)
Use of width adiustment knob wi/permit further
adjustment wthin the width range ShOWnbelow
a} When eniy left needie is used ..... 5,2 ,,_67 mm
(13/64 _ 17/64 inch)
b} When oniy right needie is used_ 30 ,_ 45 mm
(_/8 *o 1It64 inch}
&7 mm
needie
LeA needle
/
5,2
6,7 mm
t t
Leftneedle
needie
35 mm
4 _
(9/6)
!
t
21
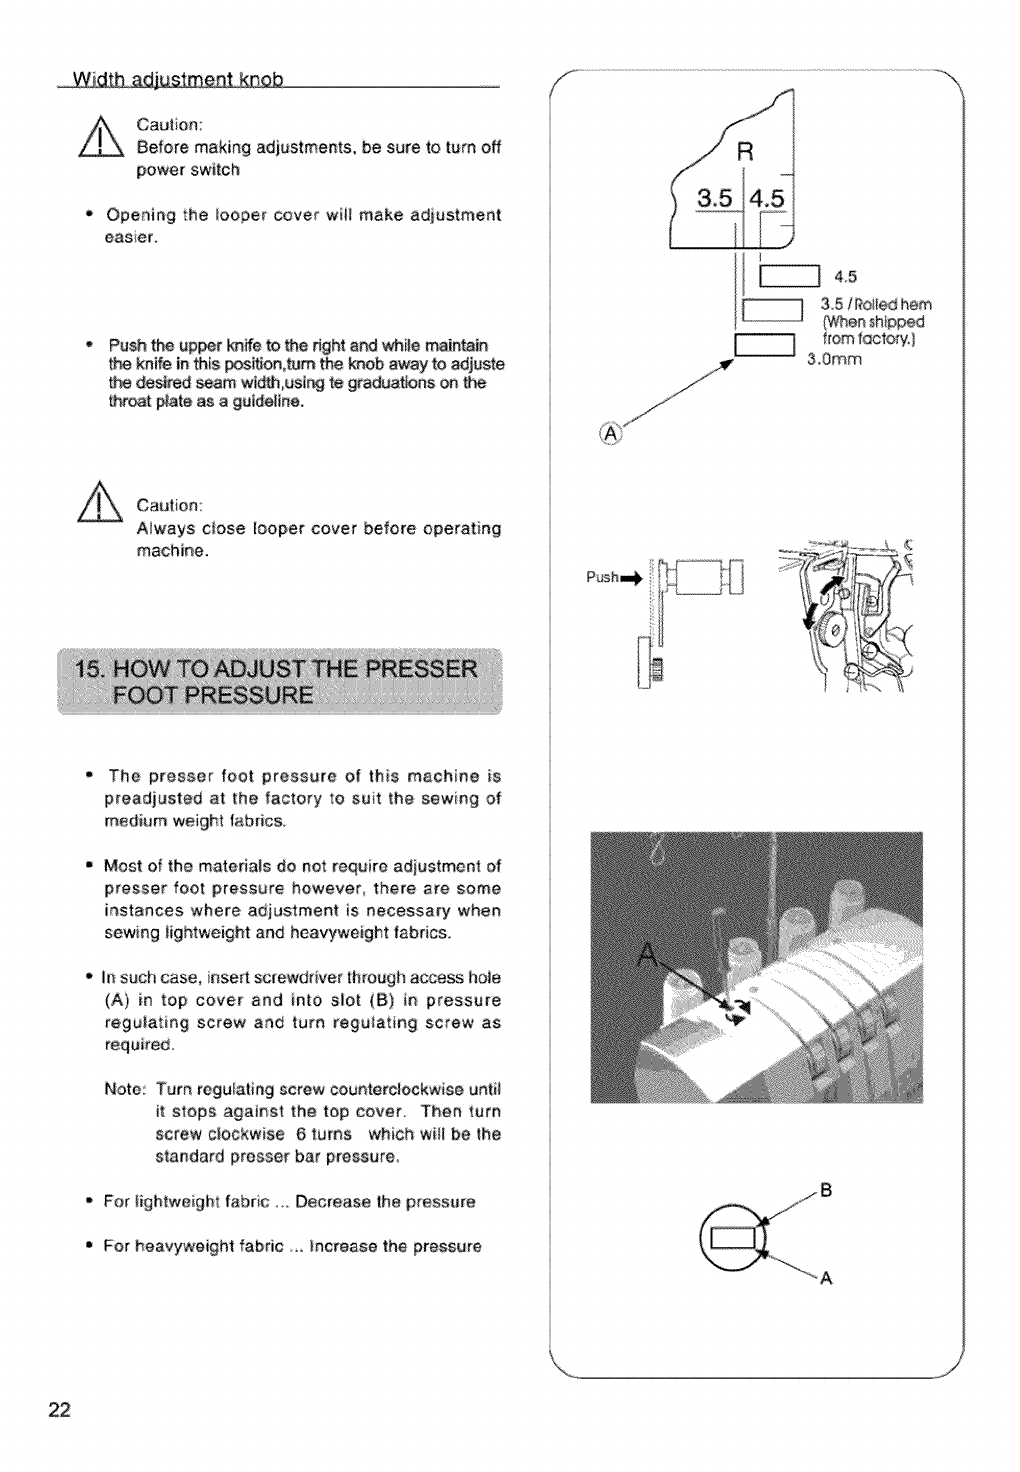
Push the upper knife to the right and _ile maintain
Me knife in this pesffJon,_m Me k,_.,obaway to adjuste
Me desi_ seam _dth,usi_ te graduations on the
throat p|ate as a gu_d_tne.
Cau|iol'l:
Aiways ciose looper cover before operating
machine.
I
i
The presser foot pressure of this machine is
preadjusted at the factory to sut the sewing of
medium weight {abdcso
Most of the materials do not require adjustment of
presser foot pressure however_ there are some
instances where adjustment is necessary when
sewing lightweight and heavyweight fabrics,
In s_Jchcase_ inse_ sc[ewdriver through access hole
(At in top cover and into slot (B) in pressure
regulating screw and turn regulating screw as
required.
Note: Turn regulating screw counterclockwise until
it stops against the top cover. Then turn
screw clockwise 6 turns which wHibe the
standard presser bar pressure.
For lightweight fabric o. Decrease the pressure
For heavyweight fabric Increase the pressure

i Differentia_ feed is a system which 'stretches" or
"gathers '_the fabric, when amount of feed of front
feed dog in reiation to the rear feed d_ is changed
J The differentiai feed ratio ranges from i : 0,7
1 " 20_ Adjustment is made by means of the
differential feed adiusting _ever pictured betow,
• Use of differentiai feed is very effective in overedging
streich fabrics and fabrics cut on the bias_
Graduation "1_0' is differentiai feed adiusting lever
setting for ra!io t :i,
(Ga_ered Overedge
Gathered overedge _s most suited for sh!tring
sleeves, yokes front and back bodices, ski_ hems,
etc, in stretch fabrics such as knits and jersey before
assembiing into garment
To set the differentiai feed ad lever
Set different{ai feed adiusting _ever knob below
graduation "1,0 _, Setting of adjusting lever knob
depends on materia! being sewn as well as the
amount of gather therefore set knob to suit the fabrc
and test sew before sewing your garment
When feed regulating diai is set at "3_ or over the
amount of feed of the main feed dog wi|| change to
"3' automatica!!y when adiusting lever knob is set
to 20
Note: For normai overedge stifching, set differential
r z
feed adiusting _ever knob to g aduat_on 1.0.
23
-Stretch overedge is ideal for sewing decorative
coHars_ sleeves, ski_ hems, etc, on loosely knit and
woven fabrics.
• Set differential feed adiusting _ever knob above
graduation "1_0".
To sew a seam, apply gentle tension to the fabric
by holding the seam lightly in front and back of the
presser foot.
Note:, if amount of "stretch" is not correctly set in
relation to the fabric being sewn the f_ric
is apl to shift away from the needie
resulting in {mproperly sewn overedge
seam, in such case, reset differentia_ feed
adjusting lever c_oser to the center msrk.
Be sure to reset the differential feed
adjusting lever to graduation "1.0" for
normal overedge stitching.
24
Caution :
Be sure to turn off power switch.
TO place movable knife in nonworkin_osition
• Turn handwheei over toward you and raise _pper
knife to its highest position,
• Open iooper cover (page 9)_
- Push the movable knife holder to the right as far as
it will go,
• Turn the knob away from you until the knife clicks
inlo a her{zonta! position.
Note: If the knife stops in the up position;
," Turn the hand whee! toward you until the
knife ctears the top of the machine.
Continue to rotate the knife to the horizontal
position,
!e kni_ in wc.rkin9 position
- Open _ooper cover and push the movable knife
holder to the right as far as it wii! go,
• Turn the knob up and toward you until the knife
Clicks into the working position,
Caution :
Always close looper cover before operating
machine,
Movable Knife
Holder
25
Warning:
Switch off the machine before installing
er removing the spreader_
(Ins_lling the spreader
,, insert the pin (A) of the spreader in the
hole (B) of the upper looper.
• Put the positioning rib (C) {n contact
with the upper surface of the looper.
i insert the point (D)in the hole (E)
of the upper iooper
J
Removing the spreader
• Remove lhe point (O) of the hole (E)
of the upper looper and take the
spreader off the I_per.
Note: Put the spreader back to the
accessory storage.
C
B
26
This machine become a free arm machine simply
by removing the cloth plate
. To[emove thec_othpla$e
" Slide cioth piate to the _eftand remove from machine
wNe pressing button (A) !ecate_ on the uederside_
• This is especially suited for sewing hard to _'each
garment areas such as armhoies and overcasting
trouser cuffs
, Place garment over the free arm and sewo
cloth plate
• A_ig:nprojection on cloth plate with groove in cylinder
cover and slide to the right until tab on c_oth plate
(front) snaps into s_ot in cytinder cover,
27
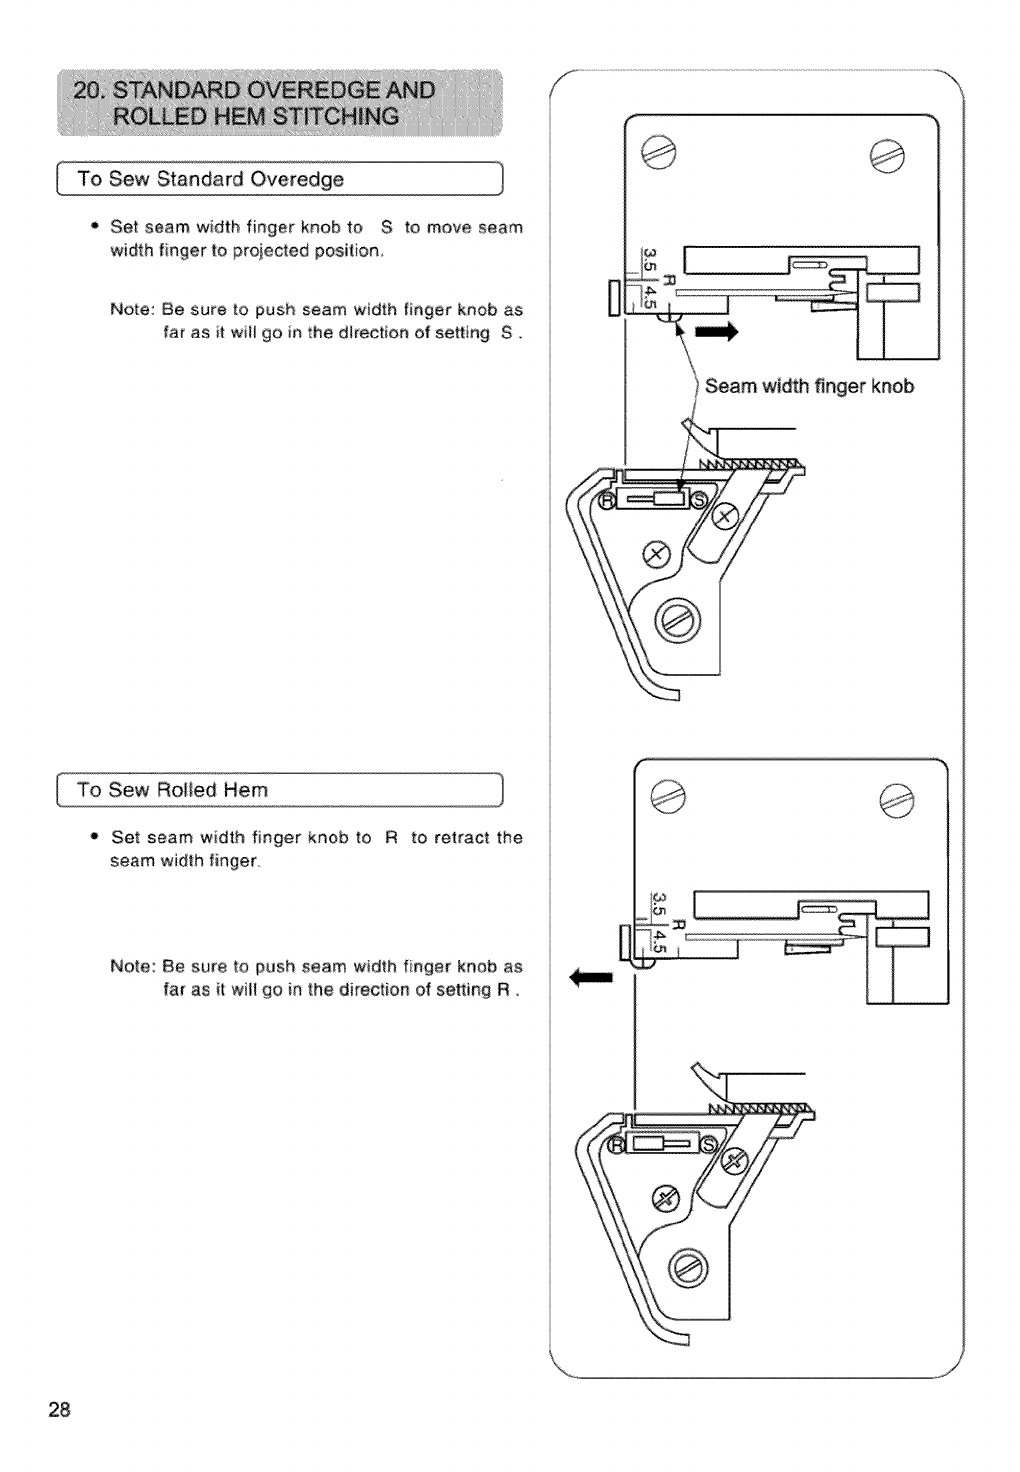
To Sew Standard Overedge
t Set seam width finger knob to S
width finger to projected position,
J
to move seam
Note: Be sure to push seam width finger knob as
far as it will go in the d_rection of setting S ,,
To Sew Rolied Hem
• Set seam width finger knob to R to retract the
seam width finger
Note: Be s_re to pl_sh seam width fnget knob as
far as it wili go in the direction of setting R.
Seam width finger knob
28
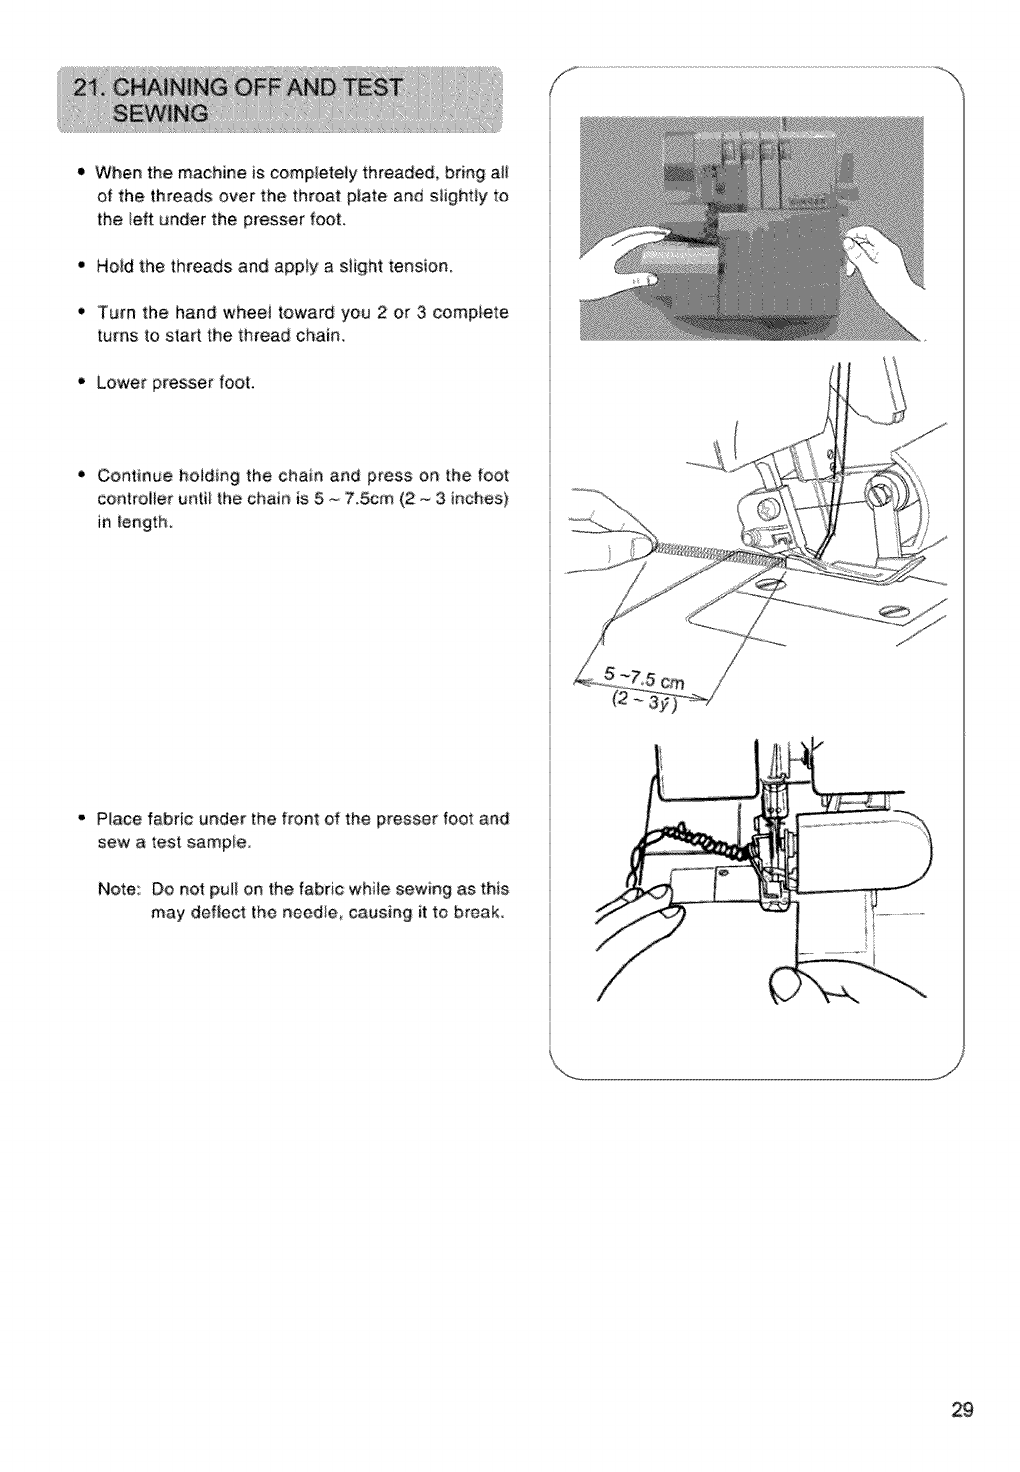
When the machine is completely threaded, bring aH
of the threads over the throat plate and siight|y to
the eft under the presser foot.
•Hoid the threads and apply a slight tension.
• Turn the hand wheei toward you 2 or 3 comptete
turns to sfart the thread chain,
• Lower presser foot,
Continue hoiding the chain and press on the foot
controlier until the chain is 5 ~ ?.Scm (2 _ 3 inches)
inlength.
Place fabric under the front of the presser foot and
sew a test sample
Note:: Do not pul_ on the fabric while sewing as this
may deflect the need e, causing ff to break.
29
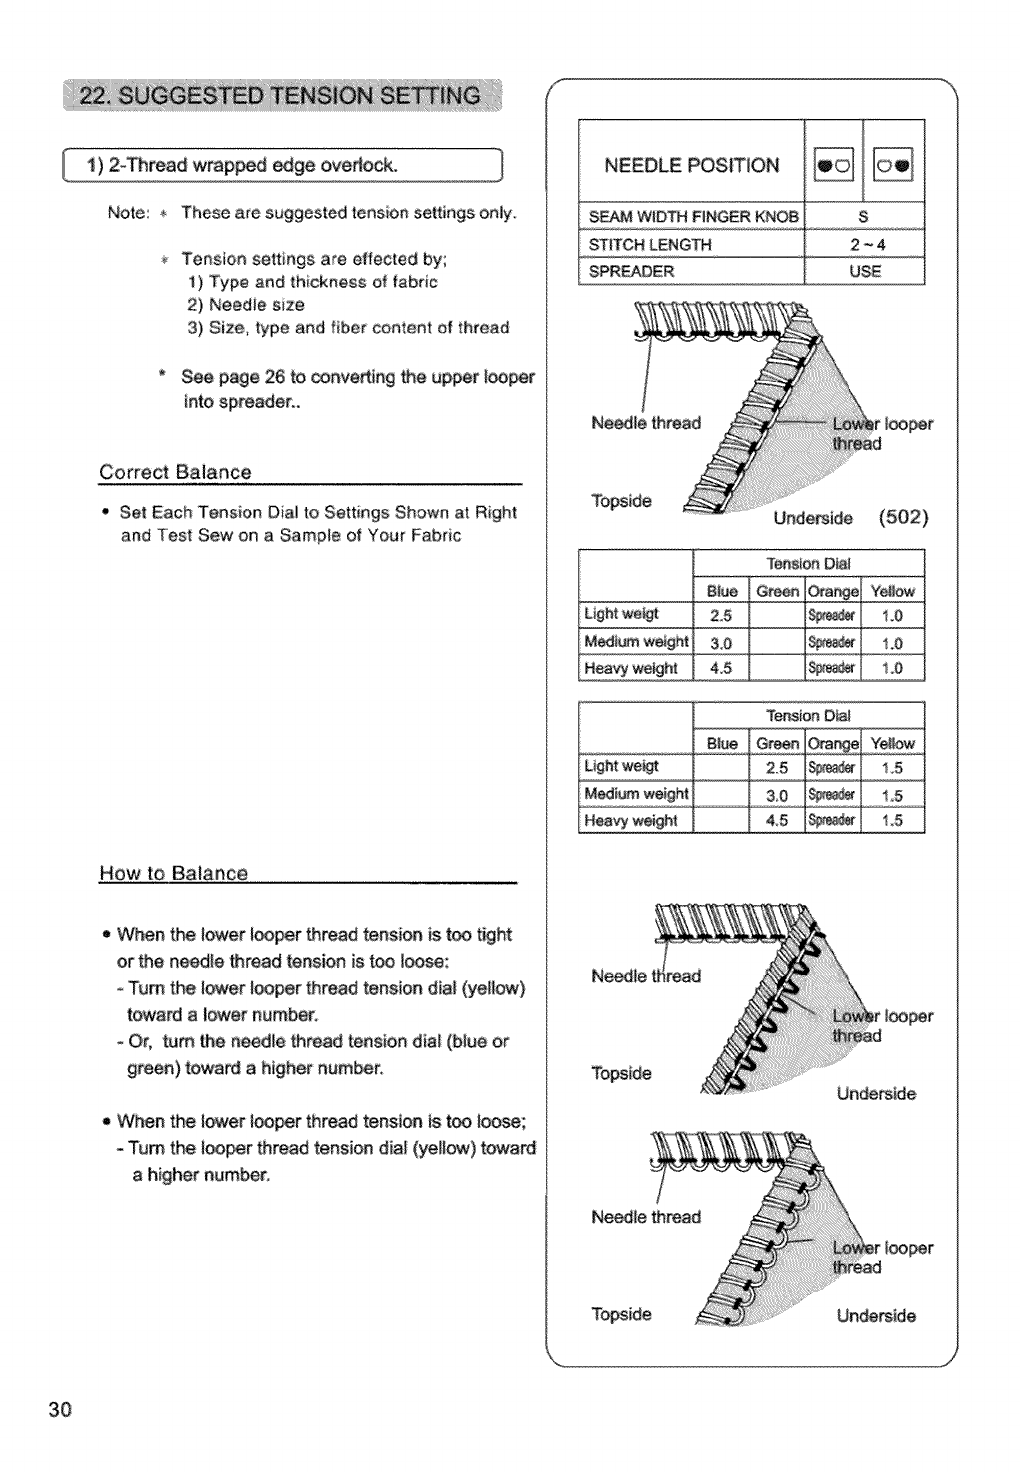
Note: * These a_e suggested tension settings only,
Tension settings are effected by;
1) Type and thickness of fabric
2) Needie size
3) Size type and fiber content of thread
* _e page 26 to _nveAing the up_t _oo_r
into spreader,.
Correct Balance
• Set Each Tension Dia! to Settings Shown at Right
and Test Sew on a SampJ:e of Your Fabric
How to Balance
e When the lower looper thread tens}on is too [_ght
or the needle thread tension is too loose;
-"rum the _ower looper thread tension dial (yellow)
toward a lower number.
- Or, turn the needle Dread tension diaf _blue or
green) towa_ a higher number.
, When the lower tooper thread tens_oois too io_;
- "rum the Ioo_r thread tension din! (_llow) toward
a higher humor.
NEEDLE POSITION
SEAM WIDTHFINGER KNOB
STITCHLENGTH
SPR_ER
S
2_4
USE
Nea,,_ywe_ht
TensionDial
Lightwe_
Heartyweigh| 45 $_ 'I_5
Underside
NeedSethread
Topside Unde_ide
30
%
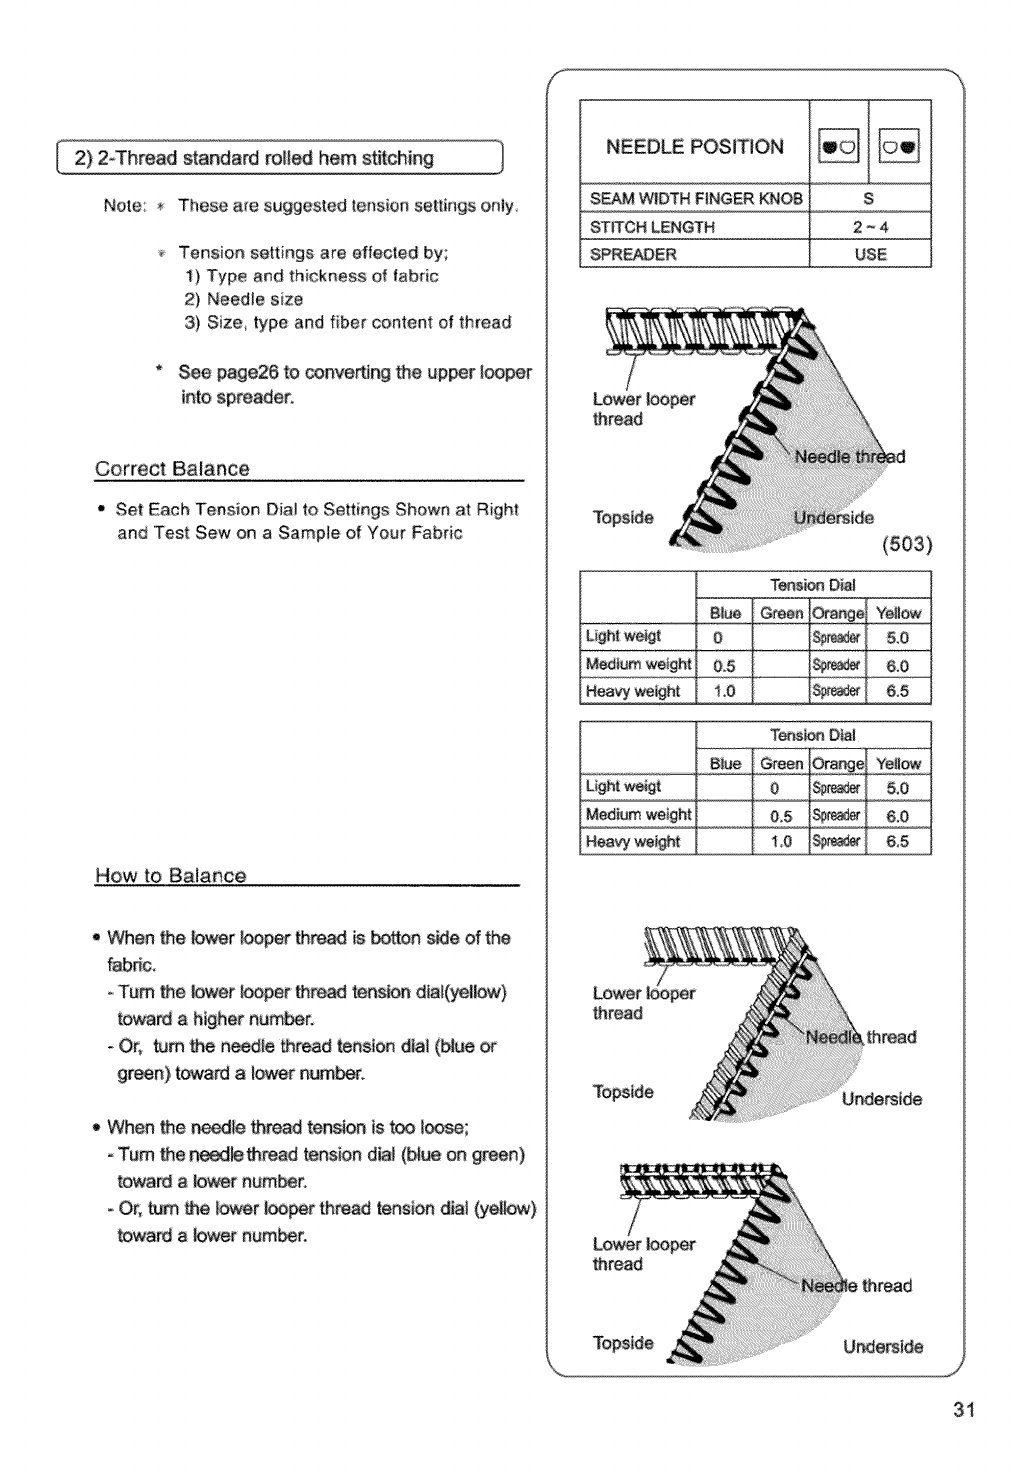
2) 2-Thread standard rolI_ hem stitching J
Note: _ Ti/ese are suggested tension settings onty,
Tension settings are effeeted by;
t) Type and thickness of fabric
2) Nsed_e size
3) Size, type and fiber content of thread
* See pege26 to _nve_ng the upper looper
into spreader.
Correct Balance
t Set Each Tension Diai to Settings Shown at Right
and Test Sew on a Sampie of Your Fabric
How to Balance
Men the lower looper _read is botton _e of the
fabdc.
-"rum the lower _per thr_ tension dlaf(yellow)
toward a higher humor.
Or, turn _ n_{e thread tension diet (blue or
green) t_ward a lower number_
When _e needle thread is too loose;
-Turn _e _ _read tension dial (blue on green)
toward a kxwer humor.
- Or, _m _e _ower looper thread tension diet (yellow)
toward a lower number.
NEEDLE POSITION
SE_M V_ffDTHFINGER KNOB
STITCH LENGTH
SPREADER
s
2_4
USE
Lower I_per
thread
Tens_n Diai
L_ghtweigt 0 _
M_ium weight 0,5 8_ 6,0
N_ we_ht i,0 $_ 6,5
Lower
_read
thread
Lower I_r
thread
3t ¸
3) 34hread Overlock 1
Note: These are suggested tension settings oniy
Tension settings are effecled by;
1) Type and thickness of fabric
2) Needie size
3) Size, type and fiber content of thread
•Set Each Tension Dial to Se_ings Shown at Right
and Test Sew on a Sampie of Your Fabric
o When the upper _eoper thread _ies on Me underside
of the fabric;
o Turn the upper looper thread tension dia_
(orange) to a higher number,
Or, turn the lower looper thread tension dial
(yellow) to a lower number.
•When the iower looper thread appears on the top
of fabric;
oTurn the _ower looper thread tension din! (yellow)
toward a hgher number_
- Or, turn the upper looper thread tension diaI
(orange) to a ower number.
•When the needle thread is too ioose, turn the
needte tension dial (blue or green)to a higher
number
NEEDLE POSITION
SEAM WIDTH F!NGERKNOB S
STITCH LENGTH 2 ~ 4
Up_ ioo_r_read
Topside
(504)
U_erside
Unde_ide
32
4) 34hread Fiatlock 1
Note:, These are suggested tension settings on_y.
Tension settings are effected by:
1) Type and thickness of fabric
2) Needle size
3) Size, type and fiber content ef thread
•Set Each Tension Dial to Settings Shown at Right
and Test Sew on a Sample of Your Fabric
- When the lower looper thread tension istoo loose;
Turn the iower looper thread tension dial (yel!ow)
toward a higher number.
- Or, turn the needle thread tension dial (blue or
green) toward a iower number.
" When the upper iooper thread tension is too _oose;
Turn the upper _ooper thread tension dia{
(orange) toward a higher number.
o Or, turn the needle thread tension dial(blue or
green) toward a lower number.
, When the needle thread tension is too _oose;
-Turn the needle thread tension dial (blue or
green) toward a higher number.
- Or, turn the upper looper thread tension din!
(orange) toward a lower number.
NEEDLE POSITION
S
STITCH LENGTH 2 - 4
Fe_c Tension D_I
Biue Green Yellow
L_hf[weight 05 4.5 50
M_ium weight &5 5.0 &0
Heavy wean 0,5 5,5 7,0
thread
Tops_ Underside
_read thread
Tepsi_ U_ide
'T_e U_emide
33
5) 3_thread Wrapped Edge Ovedock
Note: _ These are suggesled [ension settings on!yo
Tension settings are effected by:
1) Type and thickne_ of fabric
2} Neede size
3) Size, type and fiber content dthread,
• Set Each Tension Dial to Settings Shown at Right
and Test Sew on a Sample of Your Fabric
How to BalaDce
• When the upper looper thread tension is too loose;
- Turn, the upper looper thread tension dta_
(orange) toward a higher number
- When the lower tooper thread tension is too loose;
Turn the lower looper thread tension dial (yel!ow)
toward a higher number.
- Or, turn the upper looper thread tension dial
(orange) toward a Sower number.
-When the needie thread tension is too loose;
'Turn the needle thread tension diai (blue or
green) toward a higher number,
-Or, turn the upper iooper thread tension dial
(orange) toward a lower number,
34
NEEDLE POSITION
SEAM W{DTH FINGER KNOB S
STITCH LENGTH 2 ~ 4
Topside Un_ide
_htead N_e _read
Tops_e Un_ide
To_e Unde_
I6) 44hread Ultra Stretch Mock Safety Stitch I
Note: _ These are suggested tension settings oniy
Tensioin settings are effected by;
1) Type and thickness of fabric
2) Needle size
3) Size, type and ftber content of thread
• Set Each Tension Dial to Settings Shown at Right
and Test Sew on a Sample of Your Fabric
Howto Ba_anoe ....
" When the upper ioo_r thread ties on the underside
of the fabric;
oTurn the upper looper thread tension d_al
(orange) to a higher number.
-Or, turn lower looper thread tension dial (yellow)
to a lower number,
• When the lower [ee_r thread appears on the top
of the fabric;
-Turn tower looper thread tension dial (yellow)
toward a higher number
o Or, turn the upper looper thread tension dia_
(orange) toward a _ower number,
•When the lee needle thread tension is too loose;
-Turn the left needle thread tens{on dial (blue)
toward: ahigher number
•When the r{ght needle thread tension is too _oose;
Turn the dght needle thread tension dial (green)
toward a higher number,
NEEDLE POSITION !
SEAM W_DTHFINGER KNOB S
STITCH _NGTH 2 ~ 4
U_;_ ioo_ _read
Right
thread
Topside
Fabr_ Ten,onmml
B!ue Gream0ra_ Ye!low
Ligh_we_ht 20 15 2_0 2,0
M_umwe_ht 25 2.5 , 2.0
Hea%v_ight
Upper i_,.et thm_
R_Jh_
_ad need!e
thread
Lower
_per
_h.read
Tops_ Un_
R_ght
ne_|e
_read
To.de U_e_ide
35

j
" This machine can sew four types of roiled hems.
o Relied hemming is done by rofting and everedging
the fabric edge,
- Light weght fabrics such as tawn_ voii_ organdy_
crepe etc. perform the best
*_ Reiied hemming is not suited for heavy o_ stff
fabrics
Machine Set Up
-Remove the left needle,
_' Move seam width finger knob to setting R. (See
page 28 )
i Afige left face of seam width finger support plate
with R mark on throat plate by turning seam width
finger knob as required,
• Set stitch length dia_ to "F '2" and a fine seam ,#ill
be sewn.
•Needte: Singer Needle #2022 size 80/1! or 90/14
Q Thread: A variety of thread combinations can be
used fo_' rolled hemming.
36
f
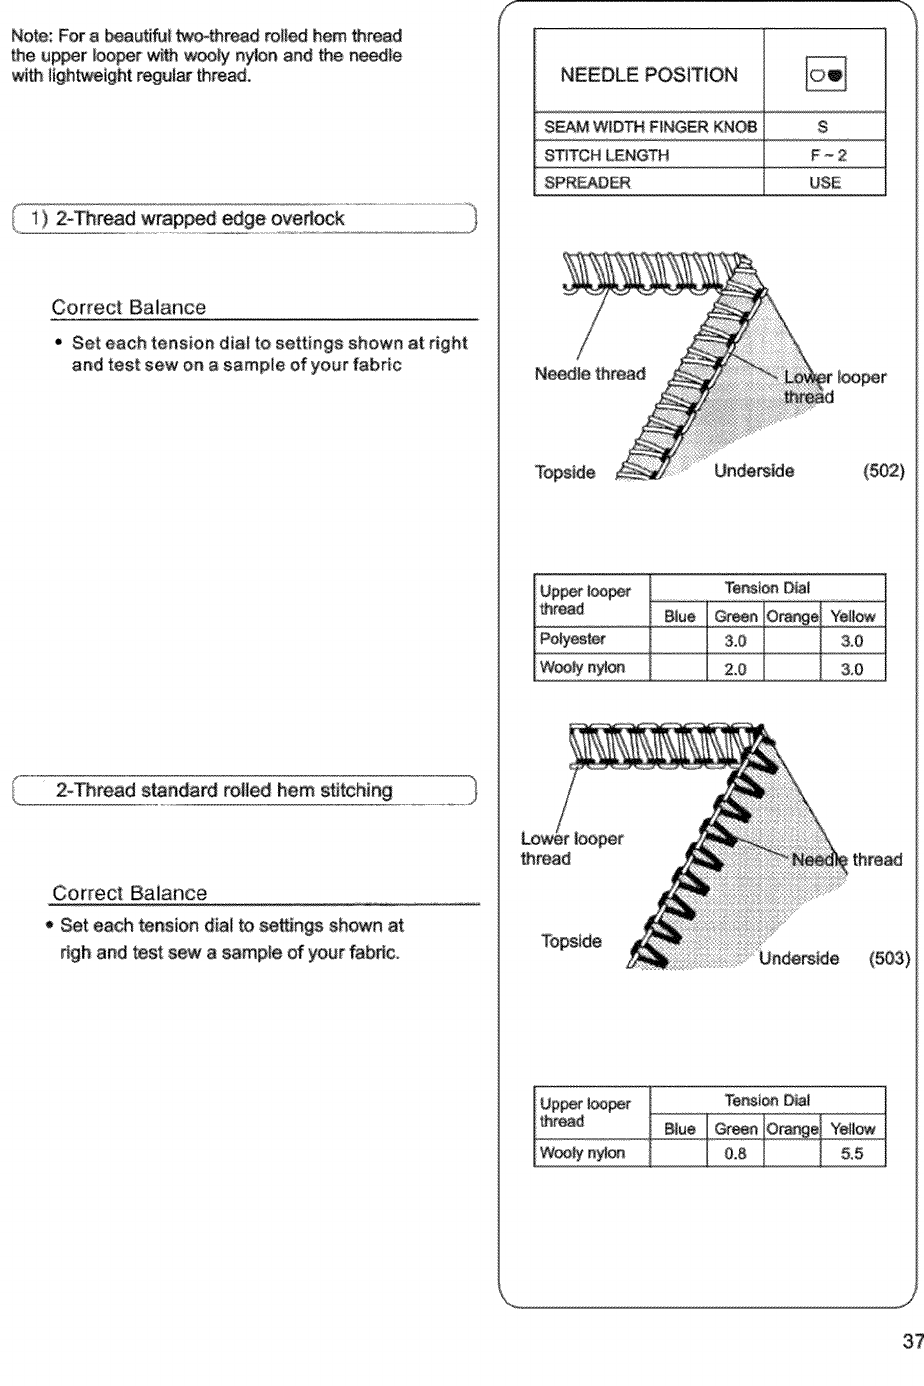
Note: For a b_u_l _th_ad _H_ hem thread
the upper looper w_ w_y n_on and the n_dle
with ligh_eight _gular thread.
Correct Balance
•Set each tension diai to settings shown at right
and test sew on a sample of your fabric
2-Thread standard rolled hem stitching
Correct Balance
• Set each tension diat to se_ings shown at
righ and test sew a sample of your fab_c.
NEEDLE POSiTiON !
SEAM WIDTH FINGER KNOB 8
STITCH_NGTH F- 2
SPR_DER USE
N_le t_hread
Unde_ide
thread
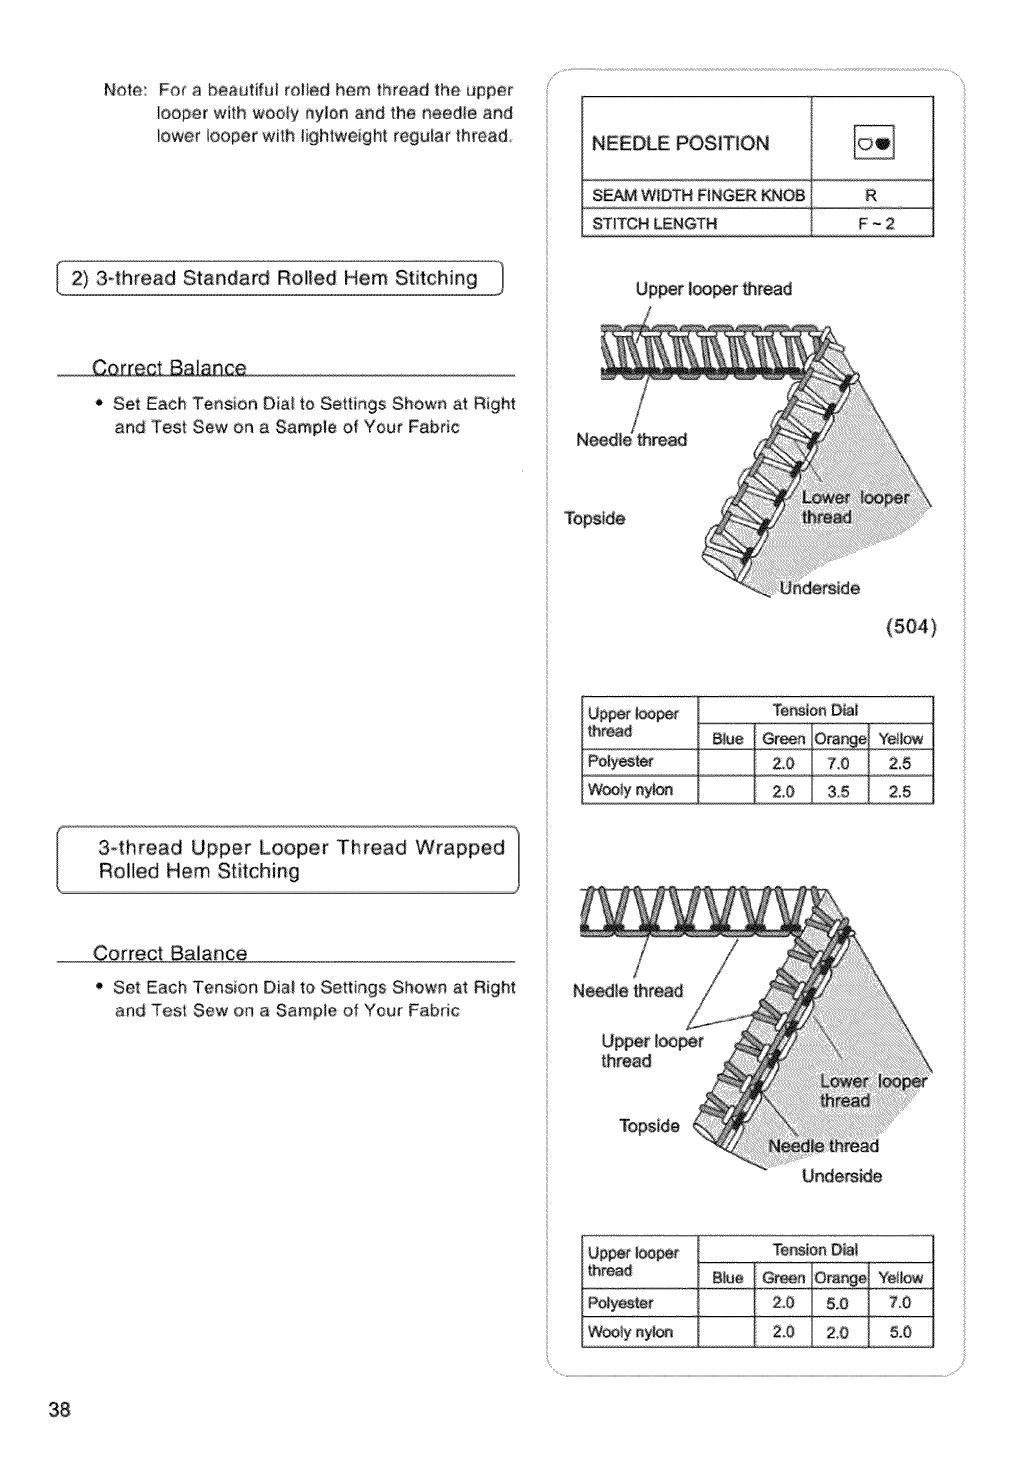
Note:Forabeautifu_rolledhemthreadtheupper
_ooperwithwoolynylonandtheneedleand
_owerlooperwithti¢lhiweightreguarthread
2) 34hread Standard Rolled Hem Stitching I
* Set Each Tension Dial to Settings Shown at Right
and Test Sew on a Sample of Your Fabric
o Set Each Tension Diai to Settings Shown at Right
and Test Sew on a Sample of You_" Fabric
38
NEEDLE POSITION
SEAM WIDTH FINGER KNOB R
STITCH LENGTH F -2
Upper I®per _read
Up_ i®_
Ithread
/
N_ie thread
thread Blue G_n Yei_
PoJyes_r 2.0 50 7,0
Woolynyl_ 2_0 20 5.0
3
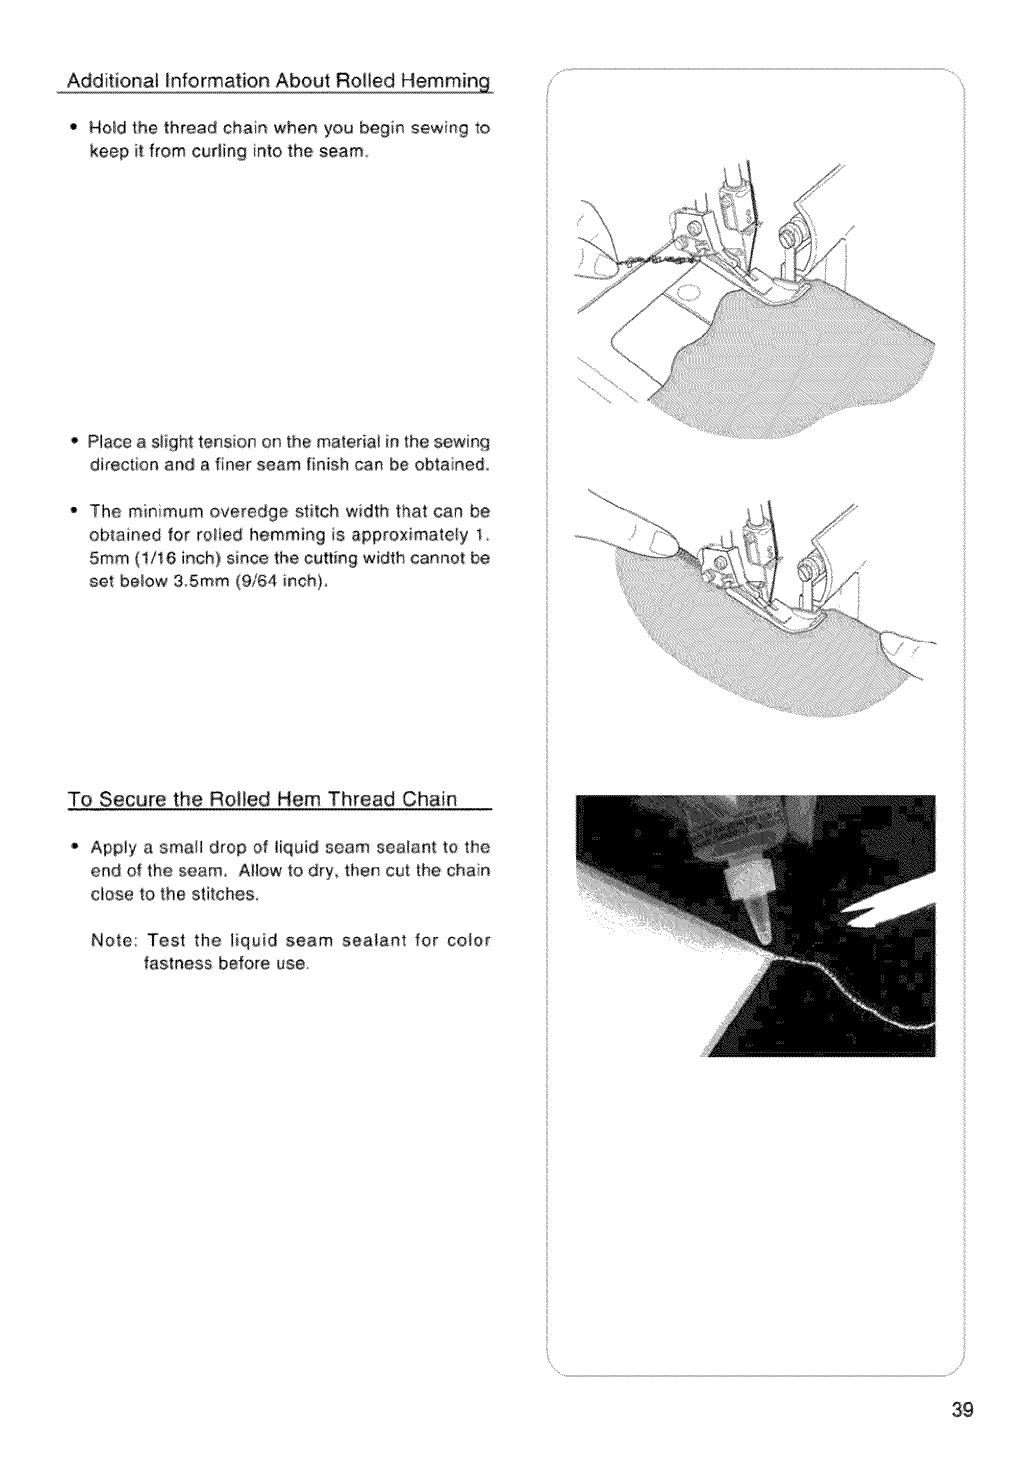
Additional information About Roiled Hemmin£
Hoid the thread chain when you begin sewing to
keep it from curiing into the seam
Piace a slight tension on the mateda_ in the sewing
direction and a finer seam tinish can be obta ned,
The minimum overedge stitch width that can be
obtained for to!ted hemming is approximately 1.
5ram (1/16 inch) since the cutting width cannot be
set be_ow 3oSmm (9,t64 inch},
To Secure the Roiled Hem Thread Chain
• Apply a. smaii drop of liquid seam sea!ant to the
end of the seam Aiiow to d:ry, then cut the chain
ClOSe to i the stitches.
Note: Test the _iquid seam sealant for co_o_
fastness before use
39
f
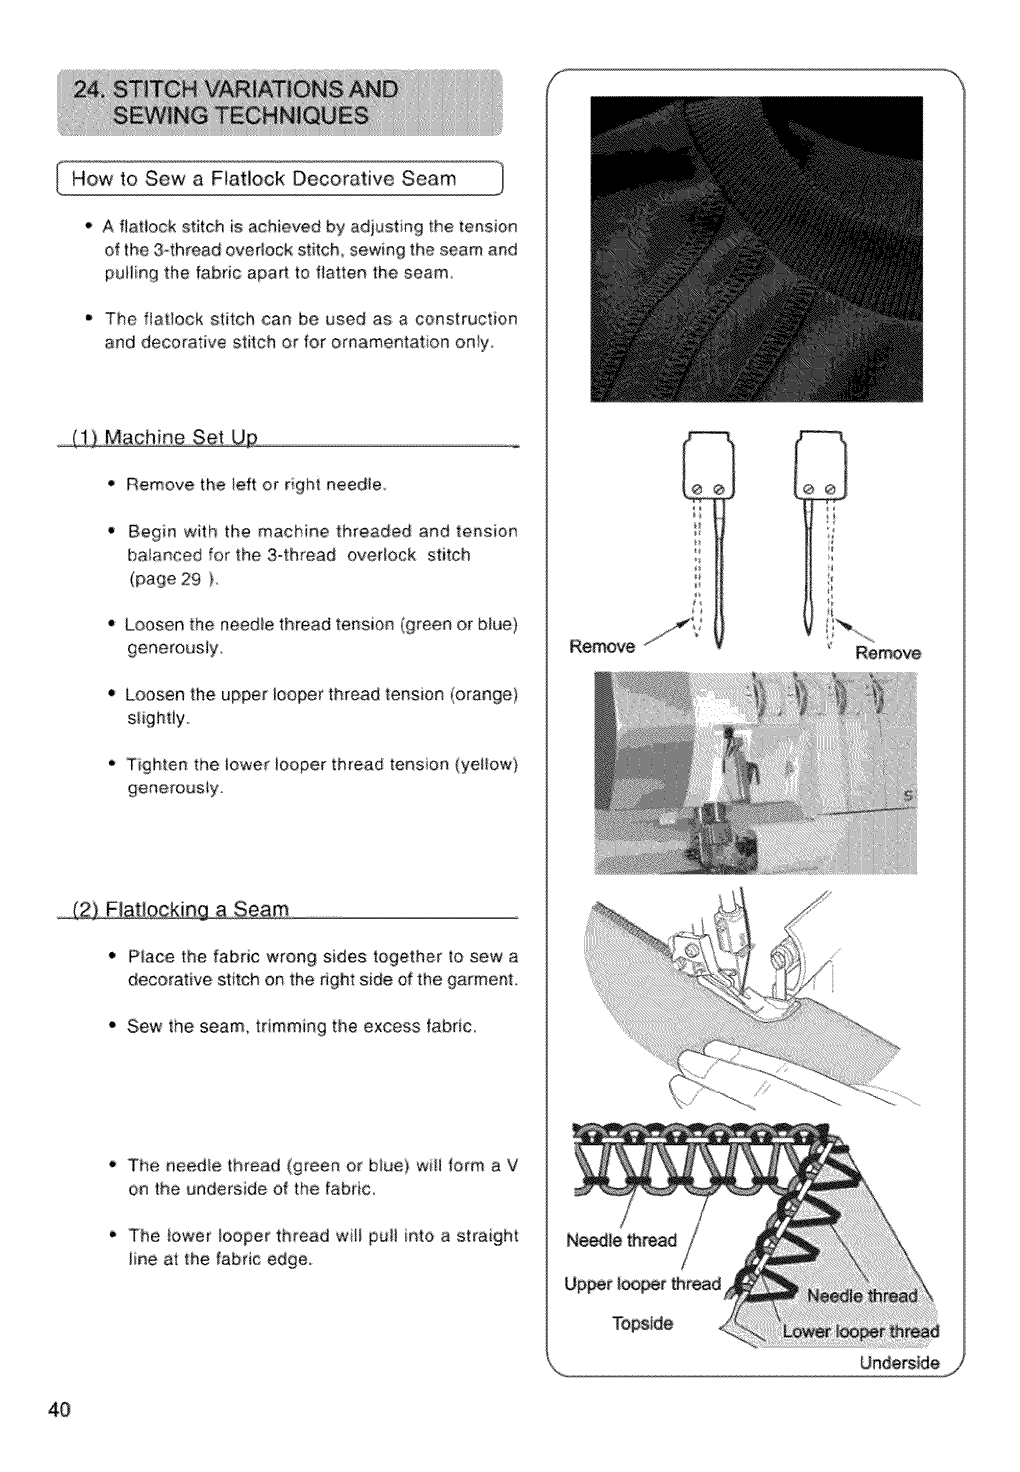
How to Sew a FJatiock Decorative Seam 1
* A flatlock stitch is achieved by adjust ng the tension
of the 34hread ovedock stitch_ sewing the seam and
puliing the fabric apart to flatten ihe seam_
- The fiai:lock stitch can be used as a construction
and decorative stitch or for omamentat on on_yo
J1) Machine Se_U_
*, Remove the left or right needle,
, Begin with the machine threaded and tension
balanced for the 3,q:hread ovedock stitch
(page 29 )
e Loosen the needle thread tension (green o_ blue)
• Loosen the upper looper thread tension (orange)
Tighten: the lower _ooper thread tens on (yellow}
generously
....Seam
•Piace the fabric wrong sides together to sew a
decorative stitch on the #ght side of the garment,
• Sew the seam_ trimming the excess fabdc_
_' The needle tt_read (green or b!ue)will form a V
on the underside of the fabric
• The [ower looper thread wH pull into a straight
iine at the fabric edge_
_t
Remove _'_''/
Needle _read
Remove
Underside
40
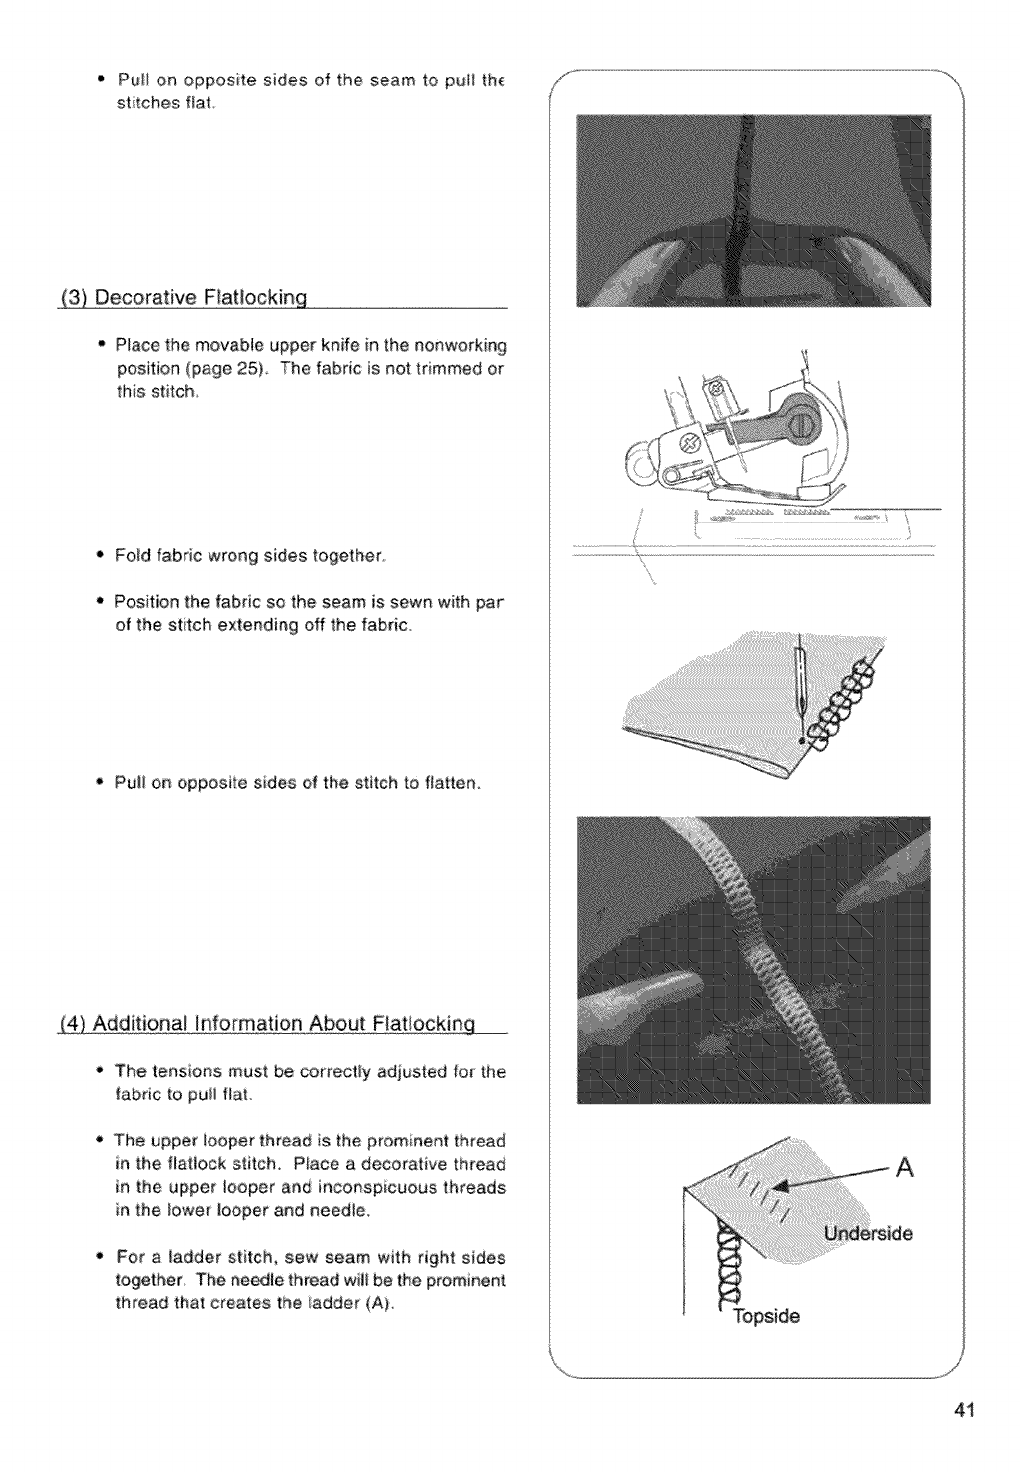
Pull on opposite sides of the seam to pull th_
st tches fiat
,_ Decorative Flatlockinq
-Place the movab!e upper knife in the nonworking
position (page 25), The fabric is not trimmed Or
this stitch
• Fo_d fabric wrong sides together,
• Position the fabric so the seam is sewn with par
of the stitch extendinq off the fabric
• Pull on opposite sides of the stitch to flatten,
Additional information About Flat!ockin_
• The tensions must be correctly adjusted fo_' the
fabric to pull fiat
The upper !ooper thread is the prom nent thread
in the flat|ock stitch. Place a decorative thread
in the upper _ooper and inconspicuous threads
in the lower looper and needle,
• For a ladder stitch, sew seam with right sides
together The needle thread wiii be the prominent
thread that creates the iadder (A}
J
41

How to Sew an Overlock Blind Hem 1
"The excess fabric is trimmed and the hem is sewn
and the raw edges are overJocked in one operation
* The ovedock biind: hem is best suited for sewing
knit wear Jtprovides a darabie finish that is almost
invisib!e.
@
I
Remove the left needie and adjust machine for a
narrow 3-,thread ovedock stitch.
Note: The three4hread flat_ock stitch can a_so be
used.
Set the stitch iength dial at 4,
Foid the hem to the wrong side of the fabric, then
back to the right side with 6ram (!/4") beyond the
fo_d_
Stitch on the extended hem edge ailowing the
machine needie to bareiy catch the edge of the fold,
How to Sew Pin Tucks J
• Sew decorative pin tucks on the fabric before cutting
out the garment,
• Remove the left needle and adjust machine for a
narrow 34bread ovedock stitch.
Note: The to}led hem stitch can aso be used for
this technique
• Place the movabie upper knife in the nonworking
positio# (page 25).
• Mark the fabric with the desired number of pin tucks
using a water soluble fabric markeL
Remove
Remove
42
Fold the _abdc with the wrong sides together and
sew.
o Press the pin tucks in the same direction
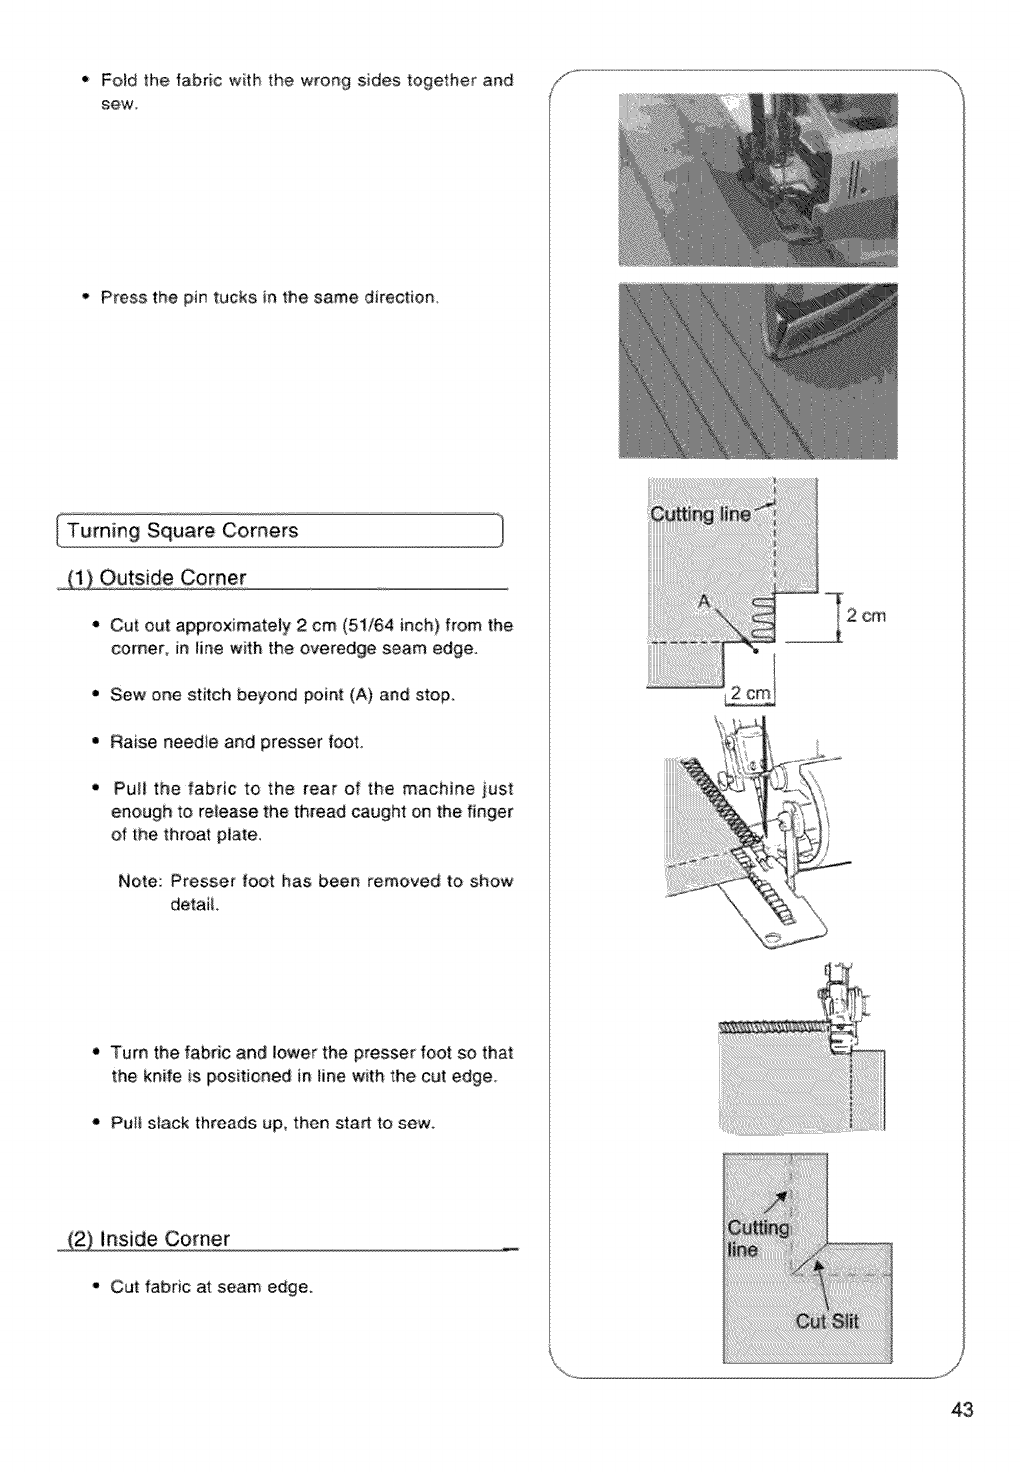
f Turning Square Corners 1
_) Outside Corner
•Cut cut approximateJy 2 cm (51/64 inch) from the
corner, in line with the overedge seam edge.
•Sew one stitch beyond point (A)and stop.
•Raise needie and presser foot.
•Pull t:he fabric to the rear of the machine just
enough to retease the thread caught on the finger
of the throat piate,
Note: Presser toot has beer removed to show
detaii
* Turn the fabric and lower the presser foot so that
the knife is positioned in line with the cut edge
_, Pull slack threads up_ then sta_ to sew.
,_ Inside Corner
o Cut fabric at seam edge,
om
43

"Piaee the movabte upper knife in nonworkmg
position (page 25)_
Stitch on cut edge of fabric,
Stop sewing before you reach the corner and fold
the fabric to the left to straighten the corner,
• Continue to sew siow_y ho_ding the fabdc edge in
a straight line moving the fold as you sew.
Pin Placement
" Insert pins to the left of the presser foot, The pins
wi_!be easy to remove and are away from the cutting
action of the knives.
Caution:
Sewing over pins will damage and/or destroy
the cutting edge of the knives,,
C Securing the Thread Chain
• Thread a iarge eye, hand sewing needle (such as a
tapestry needie) with the thread chaim
• _nsert the need!e into the end of the seam to secure
thread.
Note; To secure a re_!ed hem thread ehain, see
page 3£
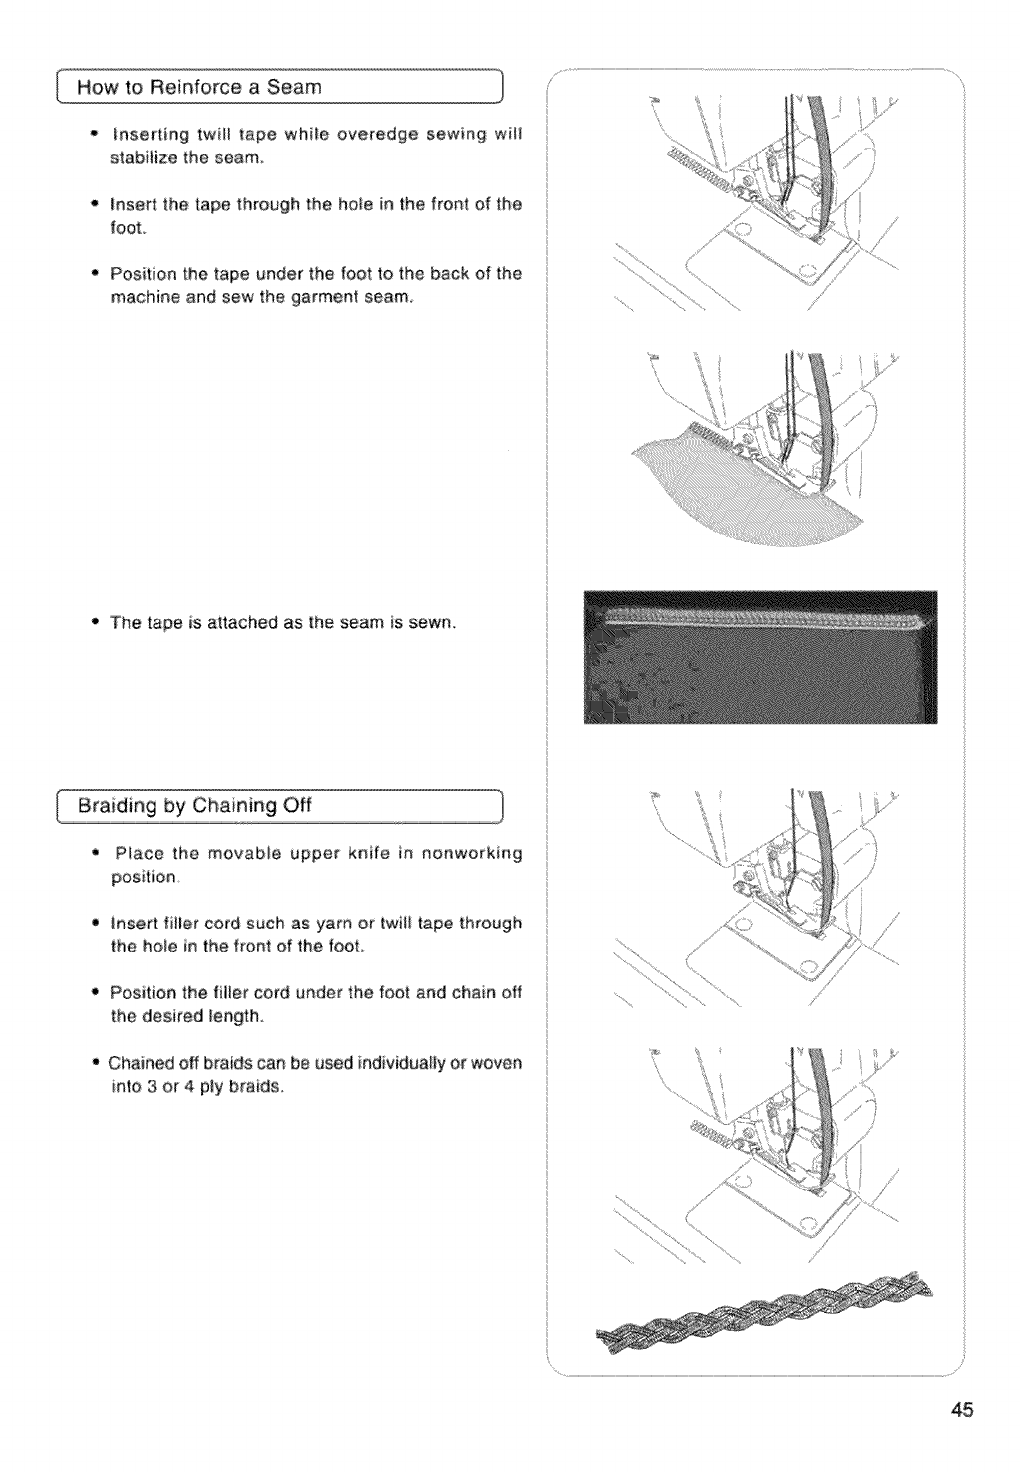
How to Reinforce a Seam J
• inserting twiii tape while eye,edge sewing wil_
stabilize the seam_
• insert the tape through the hole in the front of the
foot.
•Position the tape under the foot to the back of the
machine and sew the garment seam.
,The tape is attached as the seam is sewn.
Braiding by Chaining Off i/
•Place the movsbie upper knife in nenworking
position.
•Insert filler cord such as yarn or twili tape through
the hole inthe front of the foot.
"Position the filler cord under the foot and chain off
the desired length.
•Chained off braids can be used individua_ly or woven
into 3 or 4 piy braids.
45 ¸
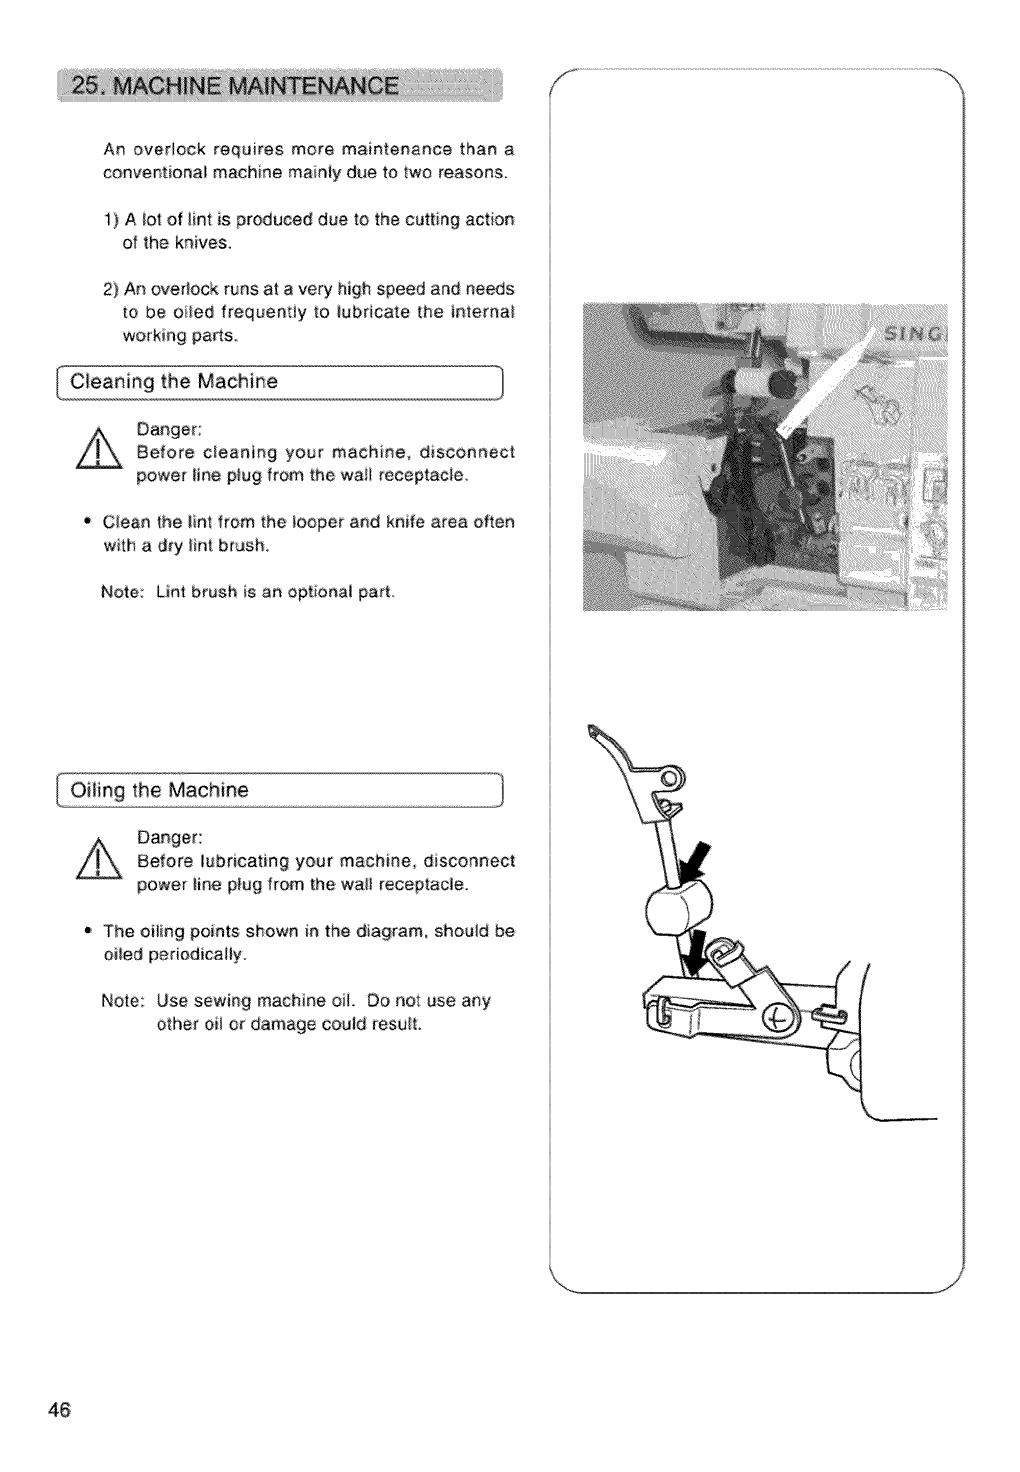
An over!ock requires more maintenance than a
conventiona_ machine mainiy due to two reasons_
1) A _otof }int is produced due to the cutting action
of the knives,
2) Ar_ overlook runs at a very high speed and needs
to be oiled frequendy to _ubricate the internal
working pe!ts.
Ii Cleaning the Machine
Before cleaning your machine, disconnect
power line plug from the waii receptacle,
•Ciean |he _iat from the looper and knife area often
with a dry Ha|:brush_
Nots: Lint brush is an optiona_ part,
I Oiiing the Machine
Danger:
Before {ubricating your machine, disconnect
power line ptug from the wall recep_ade_
, The oiling points shown in the diagram, should be
oiled periodically
Note: Use sewing machine oi_ Do not use any
other oi_ or damage could result,
46
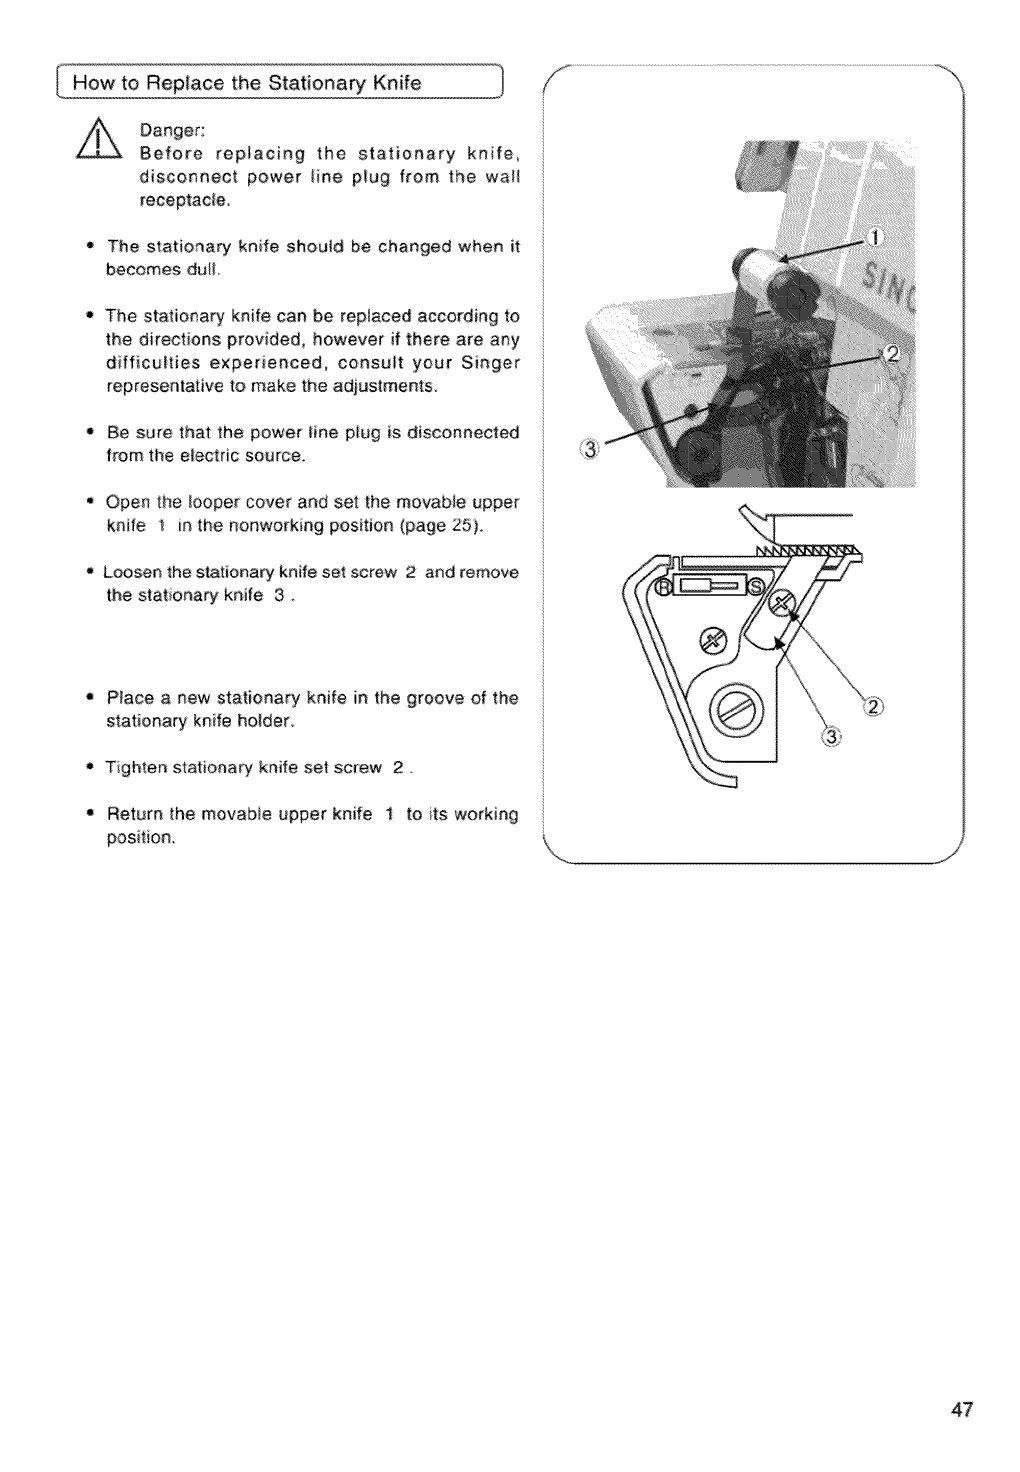
How to Replace the Stationary Knife 1
Before replacing the stationary knife,
disconnect power line plug from the wail
receptacle.
The stationa_ knife shou{d be changed when it
becomes duH,
The stationary knife can be replaced according to
the directions provided, however if there are any
difficulties experienced, consult your Singer
representative to make the adjustments,
Be sure that the power fine plug is disconnected
from the electric source.
Open the _ooper cover and set the movable upper
knife 1 in the nonworking position (page 25)
Loosen the stationa_ knife set screw 2 and remove
the stationary knife 3.
• Ptace a new stationary knife in the groove of the
s_ationary knife hoider,
o Tighten stationary knife sef screw 2
• Return the movable upper knife 1 to its working
posiflon,
47
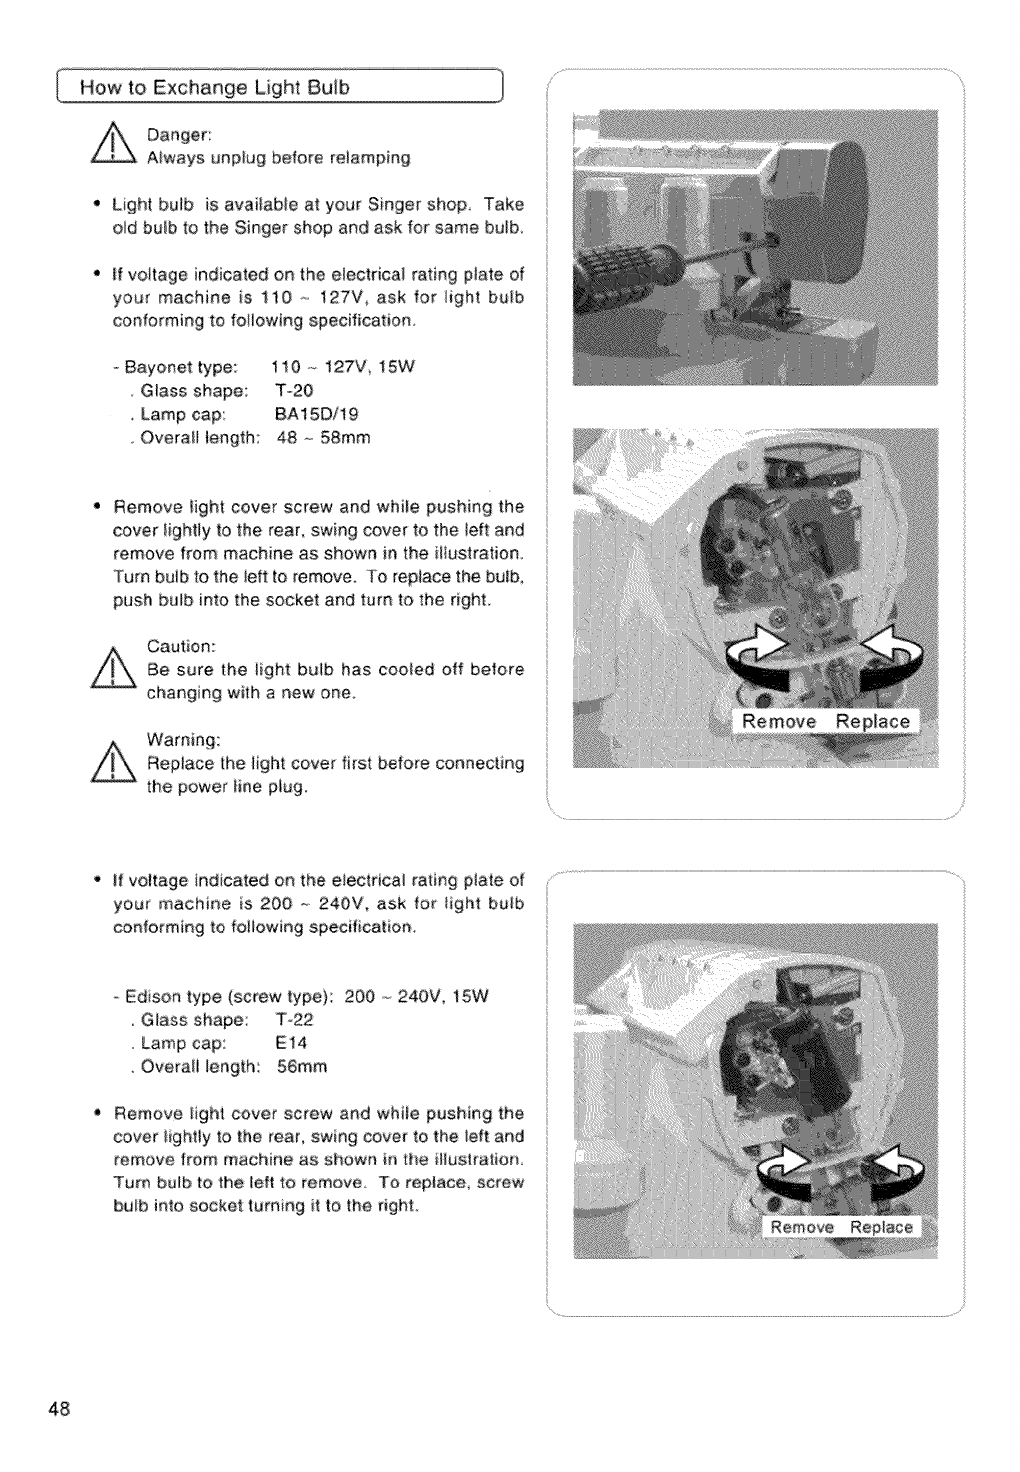
How to Exchange Light BuJb ]
Danger:
Always unpk_g before revamping
• Light bulb is available at your Singer shop, Take
old buib to the Singer shop and ask for same bulb
if voltage indicated on the electrical rating p_ate of
your machine is i!0 .... 127V, ask for light bu!b
conforming to foi_ow!ng specification
o Bayonet type: 110 --_127V, 15W
G_ass shape: To20
,Lamp cap: BAI5Dt19
.Overaii {ength: 48 _.,58ram
Remove Iight cover screw and wMle pushing the
cover lightly to the rear, swing cover to the left and
remove from machine as shown in the iiiustration,
Turn bulb to the _eft to remove, To replace the bulb
push bulb into the socket and turn to _he right
Caution:
Be sure the iight bulb has cooled off before
changing with s new one
Replace ihe light cover first before connecting
the power tine plug.
f
• if voltage indicated on the electrical rating p_ate of
your machine is 200 ......240V_ ask for light bulb
conforming te foliowing specification
Edson type (screw type): 200 _ 240V_ 15W
,Glass shape: T_22
,,Lamp cap: E14
. Overail length: 56ram
• Remove !ight cover screw and whiie pushing the
cover lightly to the rear, swing cover fo the left and
remove from machine as shown in the Hiustration,
T'um bulb to the _eft to remove. To replace, screw
bulb into socket turning it to the right.
48
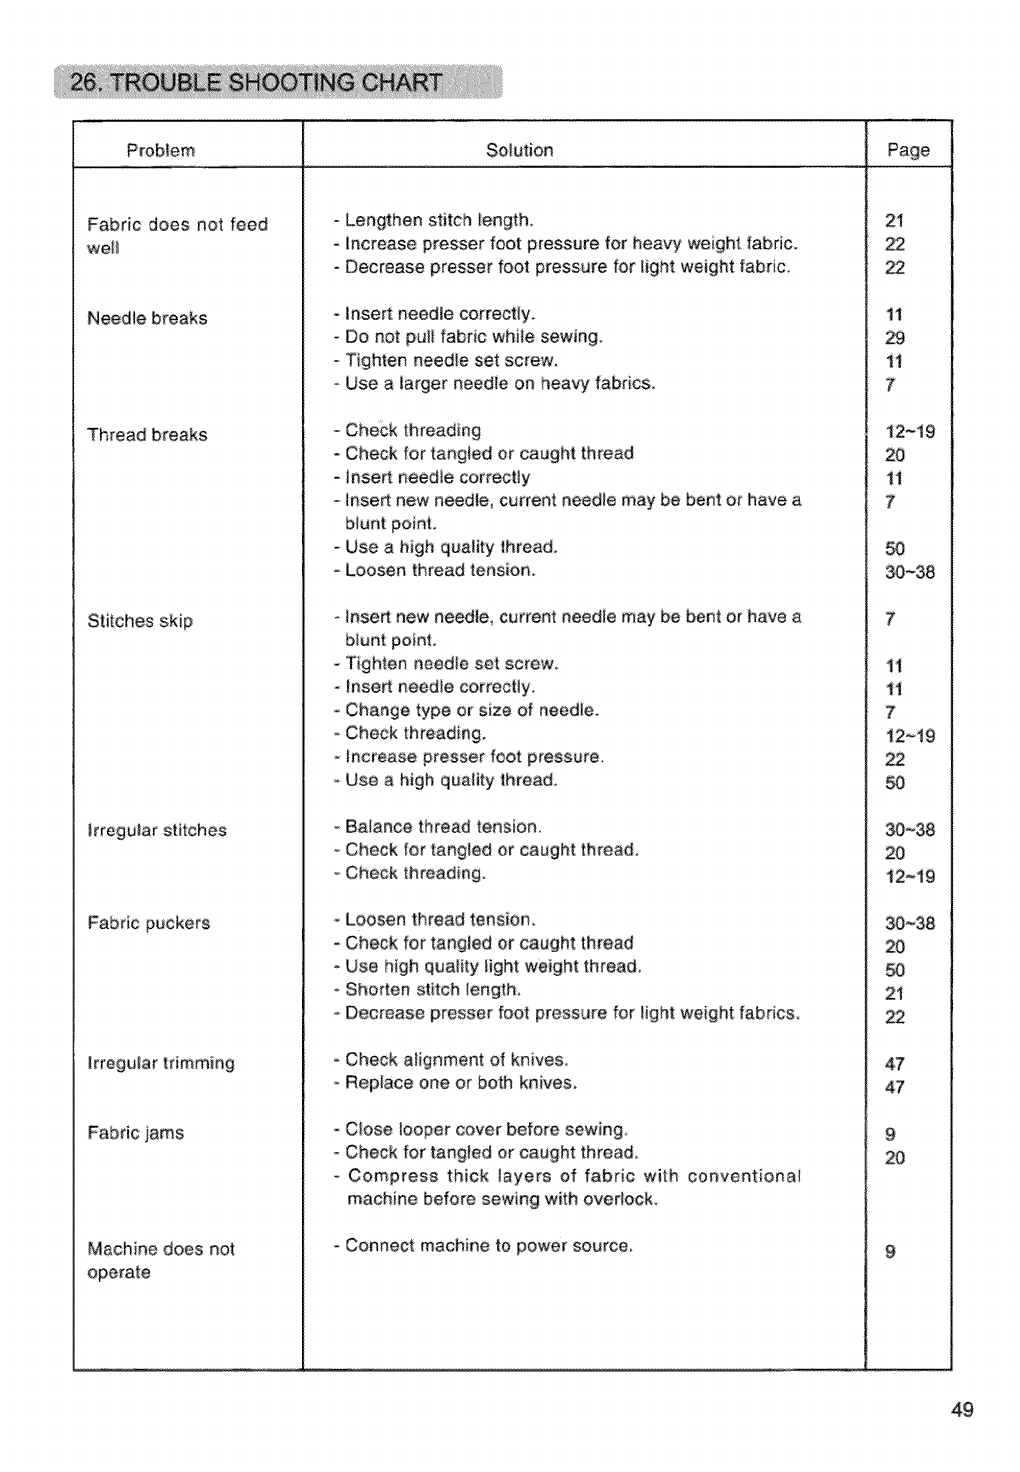
Problem Solution
Fabric does not feed
well
Needle breaks
Thread breaks
Stitches skip
Irregular stitches
Fabric puckers
Irregular trimming
Machine does not
operate
-Lengthen stitch length,
-increase presser foot pressure for heavy weight fabric.
-Decrease presser foot pressure for Eight weight fabric,
-Insert needle correctly
Do not pult fabric while sewing,
o Tighten needle set screw,
o Use a larger needle on heavy fabrics,
oCheck threading
- Check for tangled or caught thread
- lnse_ needle correctly
- !nse_ new needle, current needle may be bent or have a
blunt point
-Use a high quatity lhread,
-Loose# thread tension.
InseA new needie_ current needie may be bent or have a
Tighten needle set screw.
InseA needie correctly
-Change type or size of needle.
Check threading.
-_ncrease presser foot pressure.
Use a high quatity thread,
oBalance thread tension,
oCheck for tangled or caught thread,
-Check threading.
-Loosen thread tension.
-Check for tangled or caught thread
- Use high quality light weight thread,
-Shorten stitch length,
-Decrease presser foot pressure for light weight fabdcs.
- Check a_ignment of knives.
- Replace one or both knives.
Close looper cover before sewing
Check for tang_ed or caught thread.
-Compress thick iayers of fabric with conventional
machine before sewing with ove#ock
Connect machine to power source
21
22
11
29
11
7
i2~19
2O
!1
7
50
30~38
1i
11
7
12-i9
22
_38
2O
t2~19
2O
21
9
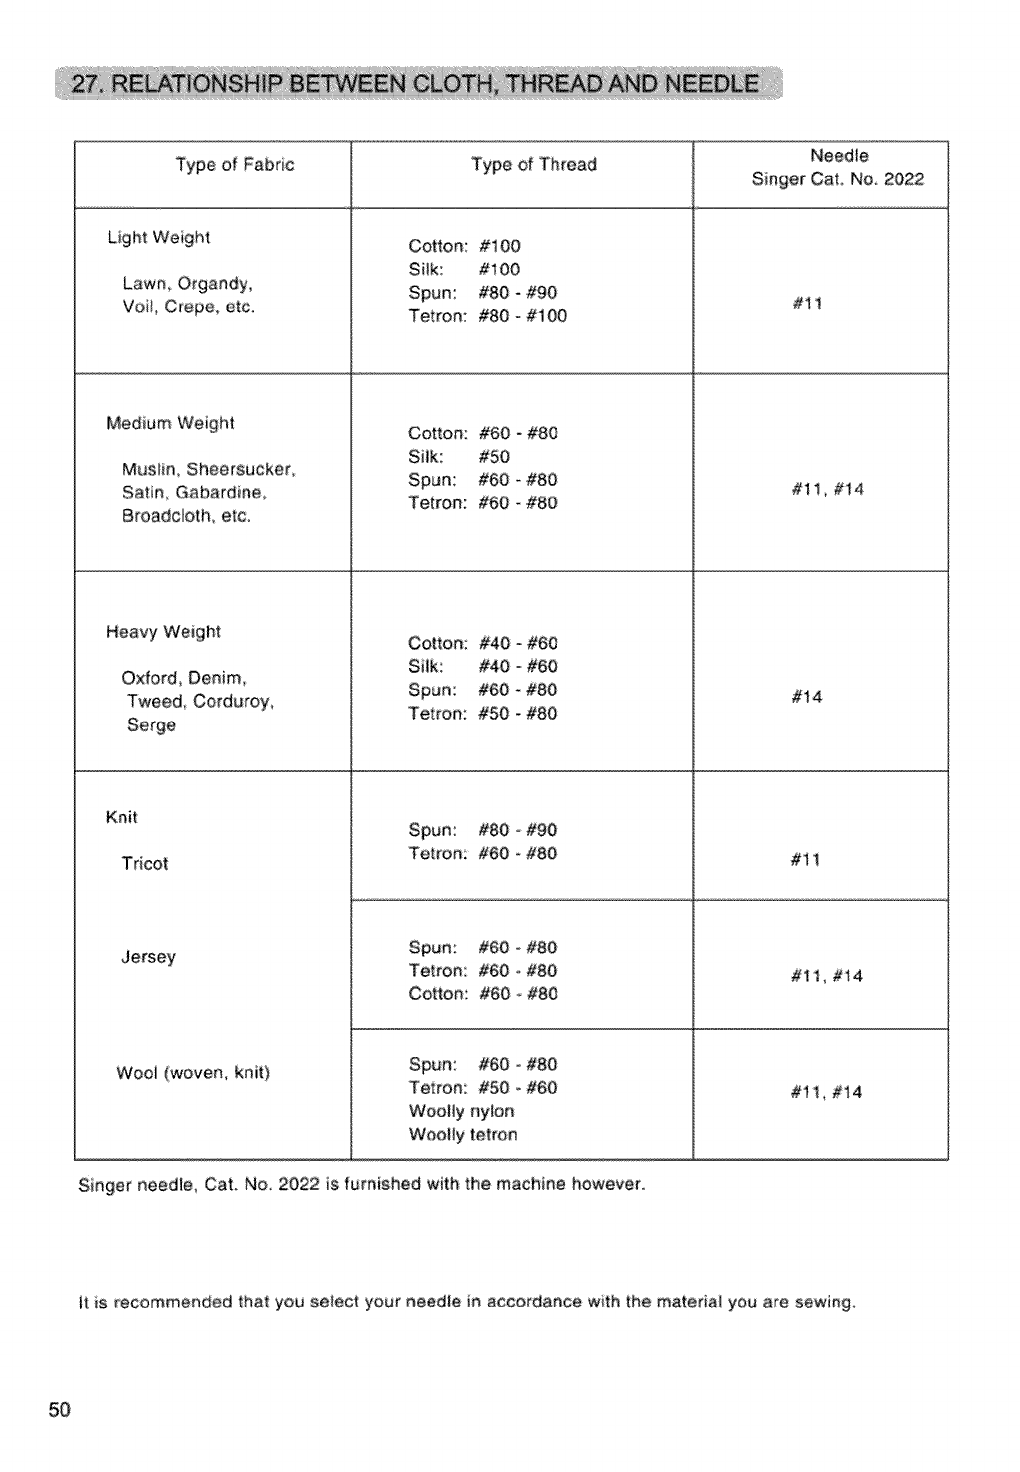
TypeofFabric
Light:Weight
Lawn,Organdy,
VoiiC_epe,etc.
Medium Weight
Muslin, Sheersucker,
Satin_ Gabardine,
Bmadcioth, etc,
Heavy Weight
Knit
Oxford Denim,
Tweed, Corduroy,
Tdcot
Jersey
Woei (woven, knit)
Type of Thread Needle
Singer Cat No 2022
Cotton: #100
Siik: #100
#80 o#90
Tetron: #80o#100
Cotton: #60 =#80
Silk: #50
#60 _#80
Tetren: #60 - #80
Cotton: #40- #60
Silk: #40 - _0
#60 _#80
Tetron: #50 _#80
#It
#11,#t4
#!4
#80 - #90
Tetron: #60 - #80 #11
#11,#14
#11_#14
Spun: #60 ° #80
Tetron: #60 #80
Cotton: #60 - #80
Spun: #60 o#80
Tetron: #50 _#60
Wooliy nylon
Wooliy tetron
Singer needge, Cat. No, 2022 is furnished with the machine however,
it is recommended that you select your needle in accordance with the mateda! you are sewing,
50
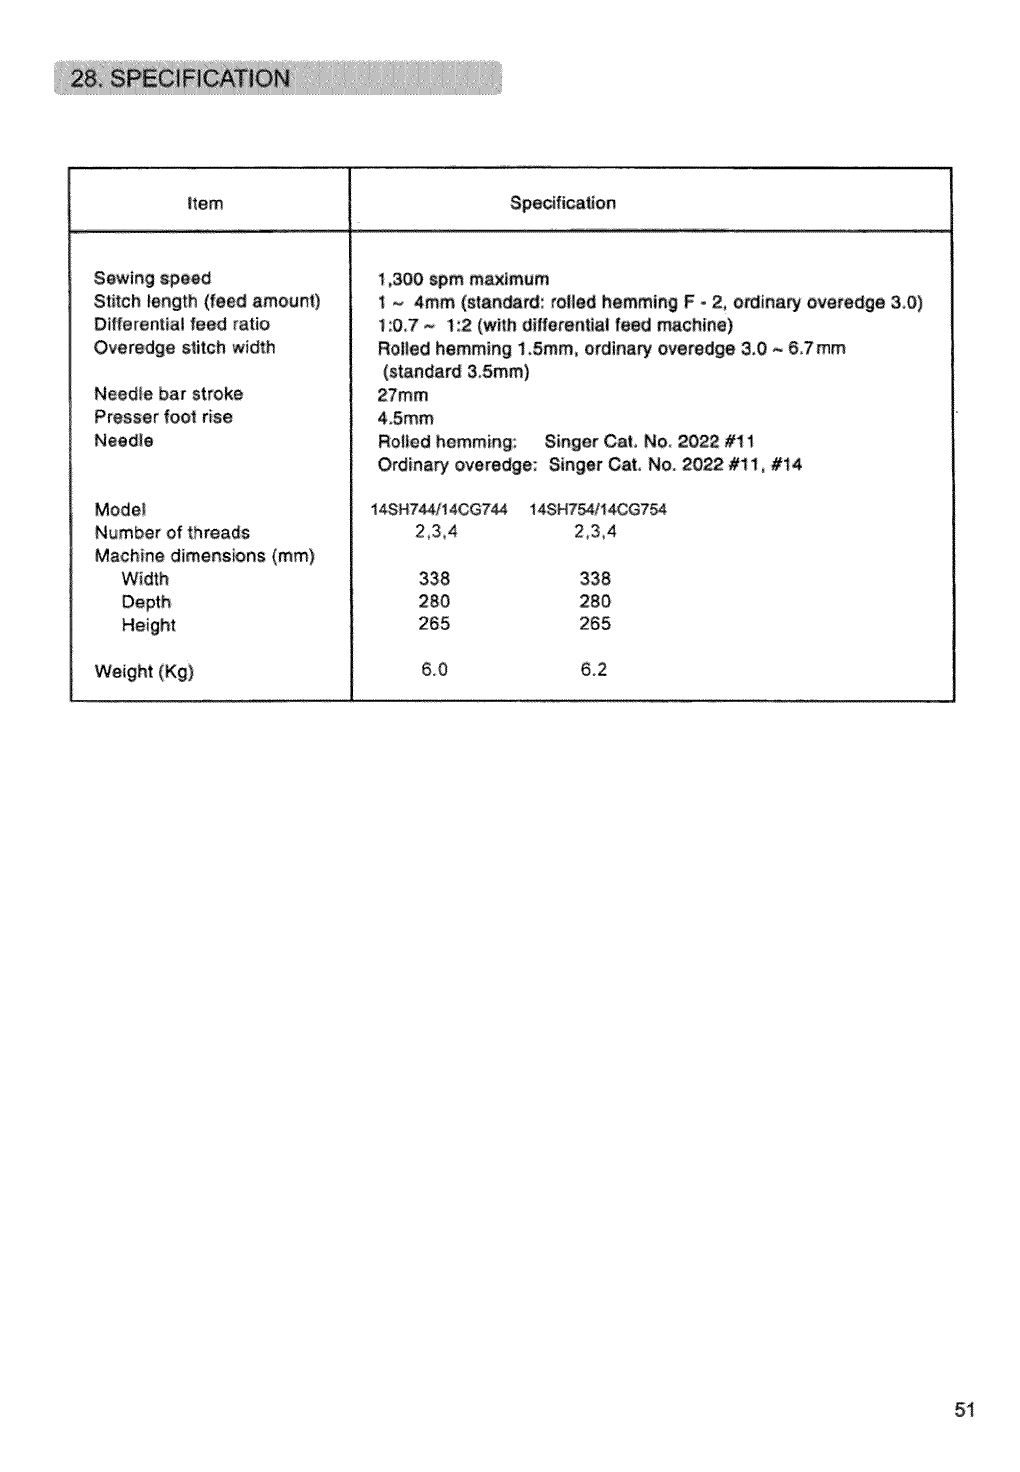
item
Sewing speed
Stitch length (feed amount)
Differential feed ratio
Overedge stitch wfdth
Needle bar stroke
Presser foot rise
Needle
!,300 spin maximum
1 - 4ram (standard: rolled hemming F-2, e_ina_ overedge &0)
1:0.7 ~ !:2 (with dilferential feed machine)
Rolled hemming 1.Smm, ordinary overedge 3,0 - 6.7ram
(standard &5ram)
27mm
4.5mm
Roiled hemming: Singer Cat, No. 2022 #11
Ordinary overedge: Singer Cat. No. 2022 #I 1, #i4
Mode!
Number of threads
Machine dimensions (mm)
Width
Depth
Height
Weight(Kg)
14SH744/14CG?44 t48HT_/14CGT_
2,3,4 2,3,4
338 338
280 280
265 265
&O &2
51
$2
