Sintai Optical SP1 Digital Action Cam User Manual SP1 Manual EN 1 20130902 RF
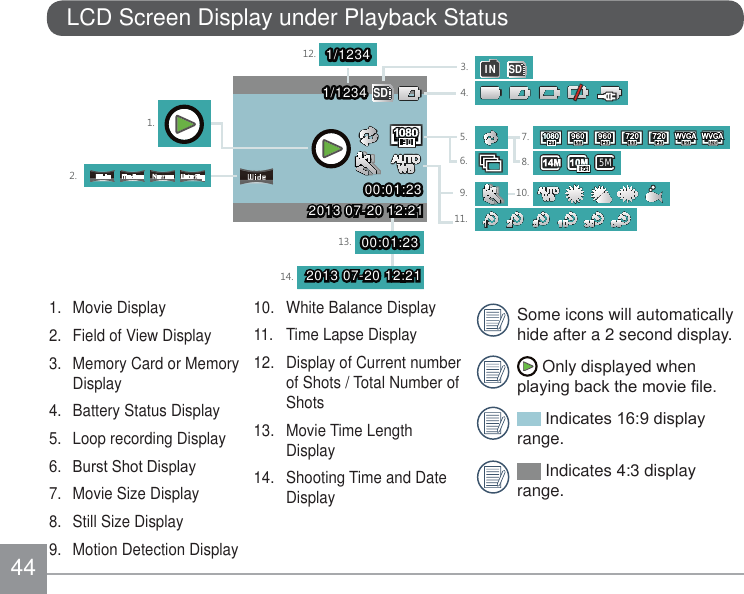
Sintai Optical (Shenzhen) Co., Ltd. Digital Action Cam SP1 Manual EN 1 20130902 RF
UserManual.wiki
>
Sintai Optical
>
SP1 User Manual
User manual
Navigation menu
Upload a User Manual
Namespaces
Wiki Guide
HTML
PDF
Info
Views
User Manual
Discussion / Help
Navigation
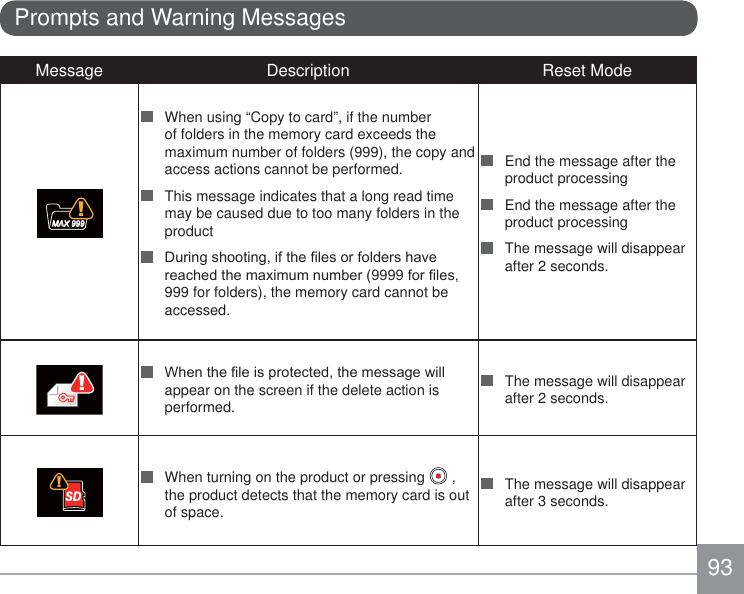
![1Declaration of ConformityResponsible Party: JK Imaging Ltd.Address: 1411 W. 190th Street, Suite 550, Gardena, CA 90248, USACompany Website: www.kodakcamera.jkiltd.comFor Customers in CanadaThis device complies with Industry Canada license-exempt RSS standard(s). Operation is subject to the following two conditions: (1) This device may not cause interference, and (2) this device must accept any interference, including interference that may cause undesired operation of the device.Le présent appareil est conforme aux CNR d’Industrie Canada applicables aux appareils radio exempts de licence. L’exploitation est autorisée aux deux conditions suivantes : (1) l’appareil ne doit pas produire de brouillage, et (2) l’utilisateur de l’appareil doit accepter tout brouillage radioélectrique subi, même si le brouillage est susceptible d’en compromettre le fonctionnement.For Customers in Europe"CE" mark indicates that this product complies with the European requirements for safety, health, environment and customer protection. "CE" marked products are intended for sales in Europe.This symbol [crossed-out wheeled bin WEEE Annex IV] indicates separate collection of electrical waste and electronic equipment in the European countries. Please do not throw the equipment into domestic refuse. Please use the return and collection systems available in your country for proper, safe disposal of this product.BEFORE YOU START](https://usermanual.wiki/Sintai-Optical/SP1/User-Guide-2070183-Page-2.png)


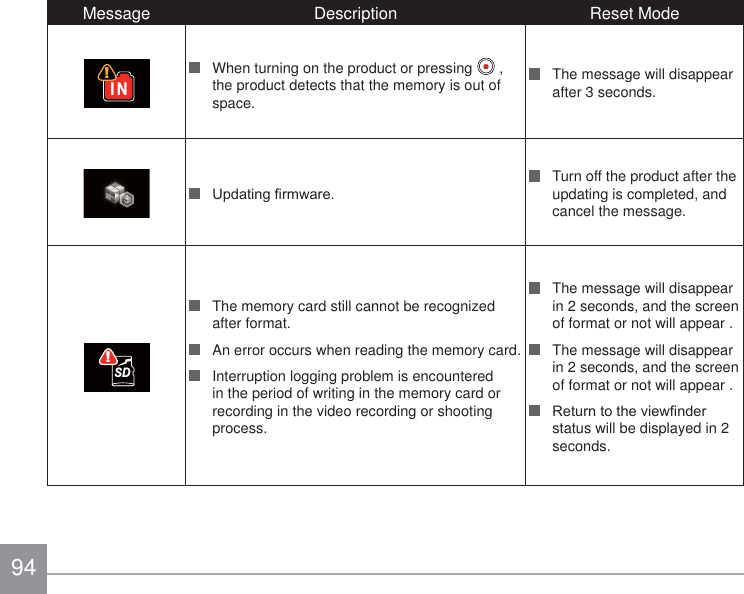
![90APPENDICES6SHFL¿FDWLRQV澨'HVLJQDQGVSHFL¿FDWLRQVDUHVXEMHFWWRFKDQJHZLWKRXWQRWLFH澩Active Pixels 14.24 MegapixelsTotal Pixels 15.31 Megapixels [1/2.33" MOS]LensFocal Length 3.0mm(TXLYDOHQWWRPP¿OP PPF number F2.8Lens Construction JURXSVHOHPHQWVOptical Zoom Fixed focusFocusing Range 1RUPDOFPaField of View Ultra Wide, Medium, Narrow, Water RingAnti-Handshake EISFile FormatStill Image Exif 2.3 (JPEG)Movie 0RYLH)RUPDW029+ Audio: Linear PCM (Stereo)](https://usermanual.wiki/Sintai-Optical/SP1/User-Guide-2070183-Page-91.png)
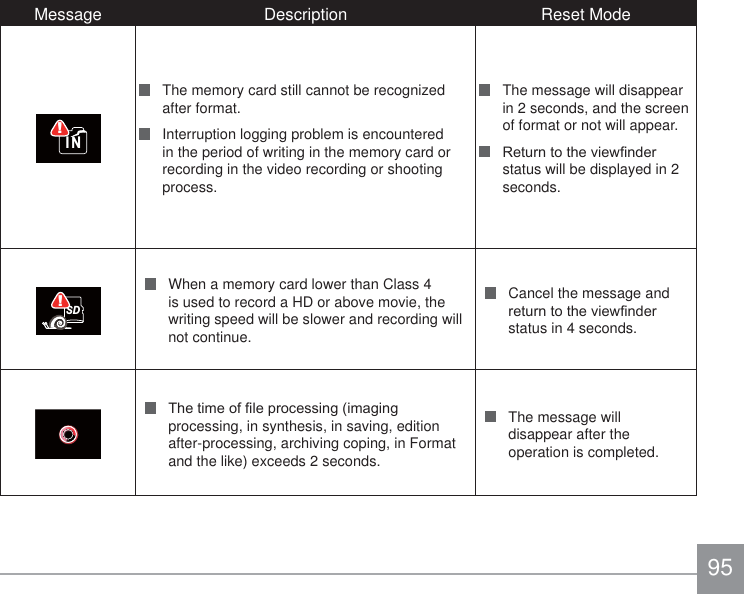
![91Image DimensionsStill Size (4:3) 14MP: 4320×32405MP: 2592×1944 03îMovie SizeîISVîISVîISV îISVîISVîISV VHS recording: 848×480(120fps)Detection Features Face detectionWaterproof Feature Up to 10 m underwaterShockproof Feature Up to 2 mDustproof Feature (TXLYDOHQWWR-,6,(&,3;)UHH]HSURR¿QJ)HDWXUH -10°CWireless SupportedLCD Screen 1.5 inch (115k Pixels)ISO Sensitivity $XWRaExposure Metering Method $UWL¿FLDO,QWHOOLJHQFH$($L$()DFH$(Exposure Control Method Program AE (AE-Lock)](https://usermanual.wiki/Sintai-Optical/SP1/User-Guide-2070183-Page-92.png)
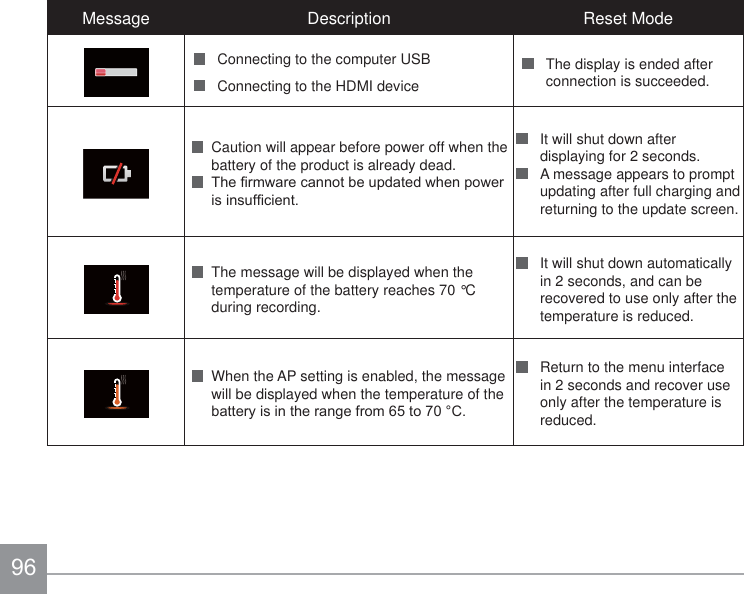
![92Burst Shot SupportedPlayback Modes Single PhotoWhite Balance Auto (AWB), Daylight, Cloudy, Fluorescent, UnderwaterStorage MediaInternal Memory: Approx. 100 MBMicro SD / Micro SDHC Card (Up to 32GB Support) \ [ MMC Card not supported ]Language Support6XSSRUWODQJXDJHV(QJOLVK&KLQHVHVLPSOL¿HGDQGWUDGLWLRQDO-DSDQHVHKorean, French, Spanish, Portuguese, Thai, Indonesian, Vietnamese, Italian, German, Dutch, Russian, Polish, Swedish, Danish, Finnish, Norwegian, Greek, Turkish, Hungarian, Croatian, Czech, Arabic, HindiInterface USB 2.0 ( Micro 5 pin USB ) , HDMI ( Type D ) Power supply 5HFKDUJHDEOH/LLRQ%DWWHU\/%9P$K,QDFWLRQFDP&KDUJLQJBattery Performance Approx. 350 Shots (Based on CIPA Standards); Approx. 130 min for Video (@1080p/30fps )Operation Environment 7HPSHUDWXUHa&+XPLGLW\aDimensions 84.7×51.4×39.5mm (Based on CIPA Test Standards)Weight Approx. 135g (excluding battery and memory card)](https://usermanual.wiki/Sintai-Optical/SP1/User-Guide-2070183-Page-93.png)