Sirius XM Radio XPVD1 Sirius XM Satellite RX with FM Transmitter User Manual XMP3i Users Guide 88 to 128
Sirius XM Radio Inc. Sirius XM Satellite RX with FM Transmitter XMP3i Users Guide 88 to 128
Contents
- 1. FEA User Guide
- 2. XMP3i Users Guide 1 to 43
- 3. XMP3i Users Guide 44 to 87
- 4. XMP3i Users Guide 88 to 128
- 5. XMp3i Vehicle Kit
XMP3i Users Guide 88 to 128

88
Auto Recordings
Auto Recordings are content that your XMp3i has recorded automatically for you.
The XMp3i learns your listening habits and automatically records XM programming
from the five channels you listen to most frequently. You can turn off this feature
if desired.
1 Press menu.
2 Turn the Control Wheel to highlight Settings and press Select.
3 Turn the Control Wheel to highlight Channel Access and press Select.
4 Turn the Control Wheel to highlight Auto Recordings and press Select.
5 Each press of Select will toggle between Off and On.
Settings
89
Settings
Vehicle Settings
NOTE! The Vehicle Settings menu item only appears if the XMp3i is in a
Vehicle Dock. The settings apply only when the XMp3i is in a Vehicle Dock.
In Vehicle Settings, there are three options:
• FM Channels: Set and select FM channel presets. When using the
PowerConnect™ Vehicle Dock, this option is enabled if there is no
connection to the AUDIO connector on the Vehicle Dock.
• Automatic Power: When Automatic Power is set to On, the XMp3i
will turn on when power to the vehicle dock is detected. Some vehicle
power sockets are switched on when the vehicle ignition is turned on,
while others remain powered on at all times. This feature does not
work with a power adapter socket which is always powered on.
• Power Off: Some vehicle power sockets are powered on at all times,
which means you could turn the vehicle off and the XMp3i will remain
on. Using the Power Off feature, you can set the XMp3i to turn off
automatically after a specified period of time. Should you forget to
turn the XMp3i off before exiting the vehicle, it will turn itself off
automatically.
To set and select an FM channel preset
1 Press menu.
2 Turn the Control Wheel to highlight Settings and press Select.
3 Turn the Control Wheel to highlight Vehicle Settings and press
Select.
90
4 FM Channels will be highlighted. Press Select.
5 Turn the Control Wheel to highlight the storage location (FM 1 to
FM 5) you want to set and press Select. You can choose among the
following options:
•If the chosen storage location is empty (denoted by “---“), or if
the storage location contains the FM preset currently being used
(denoted by “current”), then the FM channel tuning screen is
displayed.
•If the chosen storage location has an FM preset that is not currently
being used, and you want to edit it, Edit Channel is highlighted. Press
Select. The FM channel tuning screen is displayed.
•If the chosen storage location has an FM preset that is not currently
being used, and you want to start using it, turn the Control Wheel to
highlight Start Using and press Select. Skip to step 8.
6 Turn the Control Wheel to tune the desired FM channel and press
Select to select the FM channel.
7 If you are editing the storage location that has the “current” FM
preset, skip to step 8. Otherwise, Start Using will be highlighted. Press
Select.
NOTE! You can also preset an FM channel in a storage location without having to
start using it right away. Just press menu and exit the screen.
8 The chosen FM channel will be confirmed on the display screen and the
XMp3i will tune to that FM channel.
10 Set your vehicle’s FM radio to same FM channel.
Settings
91
IMPORTANT! You’ll first need to find a suitable FM channel that is unused
or available in your area.
To quickly select an FM channel from the preset list:
1 Press and hold Select. You will be prompted to set your vehicle
radio to the displayed FM channel.
2 If you want to select a different FM channel preset, Press and
hold Select again. Repeat until the desired FM channel preset is
selected.
To turn Automatic Power On or Off
1 Press menu.
2 Turn the Control Wheel to highlight Settings and press Select.
3 Turn the Control Wheel to highlight Vehicle Settings and press
Select.
4 Turn the Control Wheel to highlight Automatic Power and press
Select.
5 Each press of Select will toggle between Off and On.
To configure Power Off
1 Press menu.
2 Turn the Control Wheel to highlight Settings and press Select.
Settings

92
3 Turn the Control Wheel to highlight Vehicle Settings and press Select.
4 Turn the Control Wheel to highlight Power Off and press Select.
5 Each press of Select sequences through the choices, Off, 60 Minutes,
90 Minutes, 120 Minutes, and 180 Minutes.
Settings

93
Line Out Level
Line Out Level is used to adjust the XMp3i’s volume level to match the
volume of other audio sources you may use, such as a CD player, other FM
stations, a TV, or an MP3 player.
Do not use the Line Out Level as a volume control. Use the volume control
on the device that the XMp3i is connected to instead.
1 Press menu.
2 Turn the Control Wheel to highlight Settings and press Select.
3 Turn the Control Wheel to highlight Line Out Level and press
Select.
4 Use the Control Wheel to increase or decrease the level and
press Select to confirm the new setting.
Settings
94
Settings
Antenna Aiming
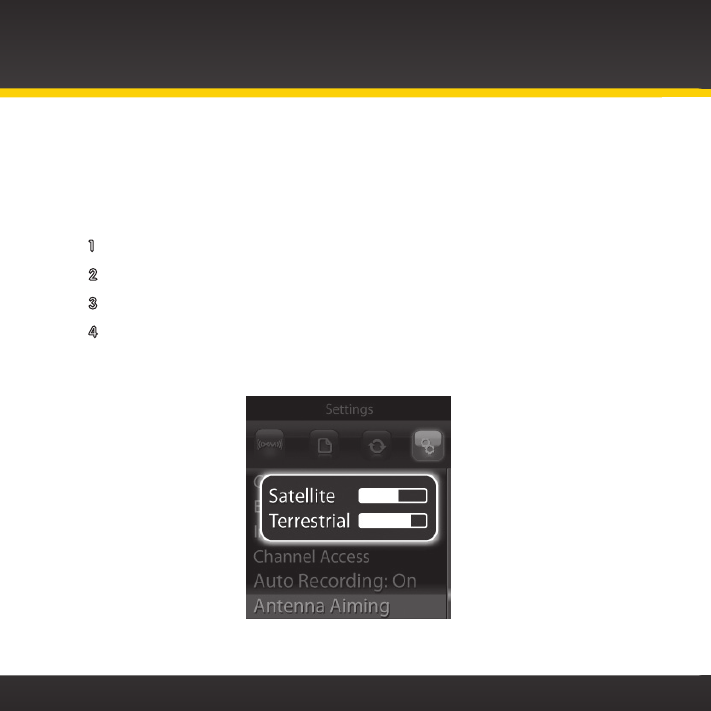
Your XMp3i can display the received strength of the satellite and terrestrial
signals being received. This is useful if you are troubleshooting signal reception
problems.
1 Press menu.
2 Turn the Control Wheel to highlight Settings and press Select.
3 Turn the Control Wheel to highlight Antenna Aiming and press Select.
4 The Antenna Aiming screen will remain displayed until you dismiss it
by pressing back.

95
Settings
Set Time
In Set Time there are three options:
• Time Zone: Select the time zone you are in for an accurate clock.
• Daylight Savings: Select whether Daylight Savings Time is observed
in your location.
• Hour Mode: Select whether the clock is displayed in 12-hour or 24-
hour mode.
To select your Time Zone
1 Press menu.
2 Turn the Control Wheel to highlight Settings and press Select.
3 Turn the Control Wheel to highlight Set Time and press Select.
4 Turn the Control Wheel to highlight Time Zone and press Select.
5 Each press of Select sequences through the choices: Atlantic,
Eastern, Central, Mountain, Pacific, Alaska, and Newfoundland.
To select whether Daylight Savings Time is observed
1 Press menu.
2 Turn the Control Wheel to highlight Settings and press Select.
3 Turn the Control Wheel to highlight Set Time and press Select.

96
Settings
4 Turn the Control Wheel to highlight Daylight Savings and press Select.
5 Each press of Select will toggle between Off and On.
To select a 12 or 24 Hour Mode for the clock display
1 Press menu.
2 Turn the Control Wheel to highlight Settings and press Select.
3 Turn the Control Wheel to highlight Set Time and press Select.
4 Turn the Control Wheel to highlight Hour Mode and press Select.
5 Each press of Select will toggle between 12 hour display mode and 24
hour display mode.

97
Settings
Restore Defaults
In Restore Defaults, there are two options:
• Restore Settings: This erases all personal settings on your XMp3i and
restores the factory defaults, but does not delete your recorded or
downloaded content. Personal settings include TuneSelects, Favorite
Channels, Scheduled Recordings, and Info Extras.
• Restore and Erase: This option erases all personal settings, XM
recordings, and stored content. Use this with caution as you will not
be able to retrieve stored content once it has been erased.
To Restore Settings
1 Press menu.
2 Turn the Control Wheel to highlight Settings and press Select.
3 Turn the Control Wheel to highlight Restore Defaults and press
Select.
4 Turn the Control Wheel to highlight Restore Settings and press
Select.
5 Turn the Control Wheel to highlight Yes and press Select.
To Restore and Erase
1 Press menu.
2 Turn the Control Wheel to highlight Settings and press Select.

98
3 Turn the Control Wheel to highlight Restore Defaults and press Select.
4 Turn the Control Wheel to highlight Restore and Erase and press
Select.
5 Turn the Control Wheel to highlight Yes and press Select.
Settings

99
Settings
Memory Usage
Memory usage displays how much of the memory in your XMp3i is currently
being used:
• XM Singles: This is the songs you have recorded from XL Live.
• Other Content: These are channel recordings from Live XM,
scheduled recordings from Live XM, and MP3, WMA, and audio book
files you have downloaded to your XMp3i using the XM2go Music
Manager software.
• SD Card: This is the MP3 and WMA files stored on the microSD card
in your XMp3i.
To display the Memory Usage
1 Press menu.
2 Turn the Control Wheel to highlight Settings and press Select.
3 Turn the Control Wheel to highlight Memory Usage and press
Select.
The Memory Usage screen will remain displayed until you dismiss it by
pressing back.

100

101
Using your XMp3i with a PC

102
Using your XMp3i with a PC
Introduction
The XM2go Music Manager runs on Microsoft® Windows®-based personal
computers and allows you to:
• Manage your music: create and customize playlists of XM recordings or
your personal MP3 or WMA files on your XMp3i.
• Schedule recordings on your XMp3i.
• View XM’s Online Program Guide: discover new music and programs by
seeing what’s available on all XM channels for the next week.
• Rip CDs to MP3 or WMA files so you can download them to your XMp3i.
• View your XMp3i bookmarks and purchase songs from compatible online
music services including Napster®.
• Listen to and purchase audio books from Audible.com®.
• Manage up to 5 compatible XM Radios.
System Requirements
PCs running Microsoft Windows XP® must meet the following requirements:
• Service Pack 2 (SP2) or higher
• CPU: 400 MHz or higher
• Hard drive: at least 100 MB free disk space
• RAM: at least 256 MB
• High-speed Internet connection
• Windows Media Player 11 (loaded at time of installation if not present)

103
Using your XMp3i with a PC
PCs running Microsoft Windows Vista® must meet the following
requirements:
• CPU: 800 MHz or higher for Vista Home; 1 GHz or higher for other
Vista editions
• Hard drive: at least 100 MB free disk space
• RAM: at least 512 MB for Vista Home; at least 1 GB for other Vista
editions
• High-speed Internet connection
• Windows Media Player 11 (loaded at time of installation if not present)
Setup and Installation
Download the XM2go Music Manager software and installation instructions
from:
http://www.xmradio.com/xm2gomusicmanager
104
My Music
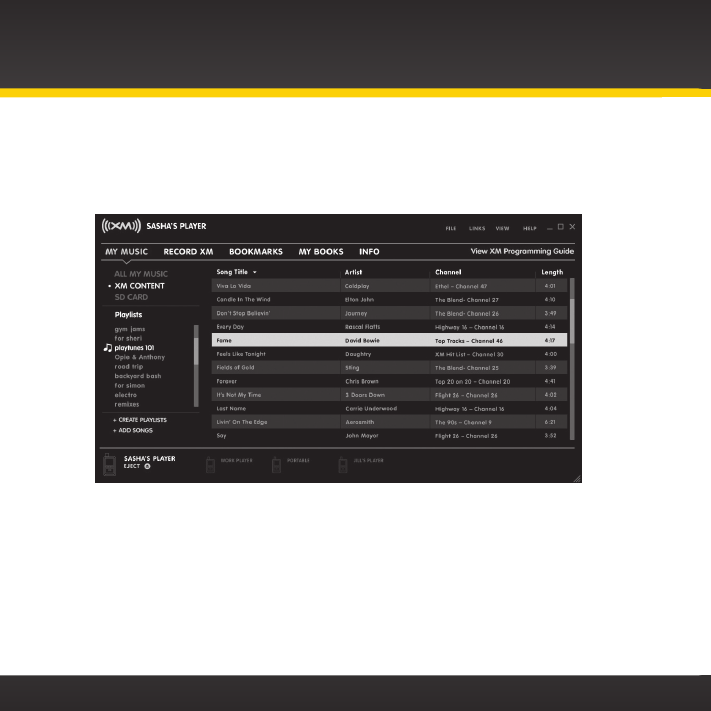
The XM2go Music Manager helps you organize recorded XM content, your MP3
and WMA files, and audio book files on your XMp3i.
• View your XM recordings, including the artist name, song title, the channel
it was recorded from, and song length.
• View your personal music (MP3 and WMA file) collection, including the
artist name, song title, album, and song length.
• View, create, and modify playlists, and add songs to playlists.
• View XM’s Online Programming Guide to see what’s playing on XM.
Using your XMp3i with a PC
105
Using your XMp3i with a PC
Record XM
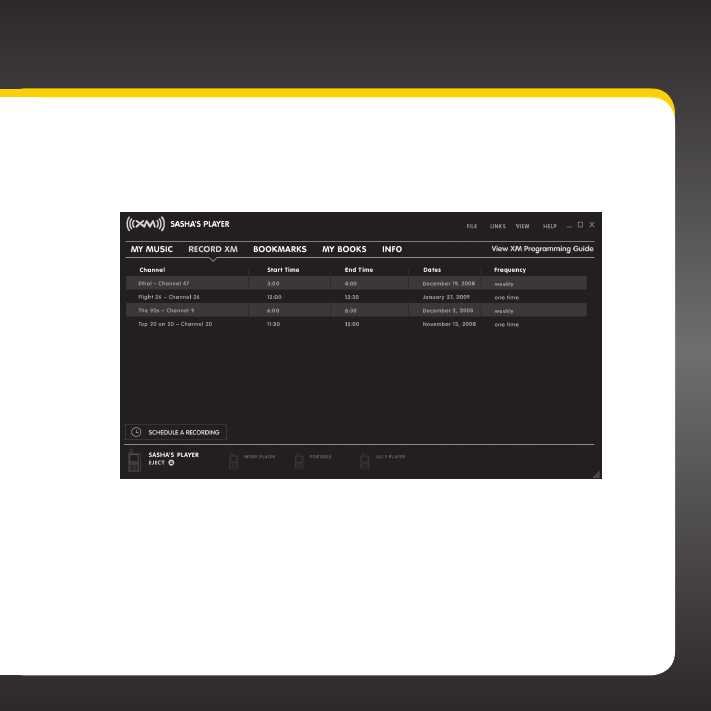
Schedule Recordings of XM content on your XMp3i, using the XM2go Music
Manager.
• Save time by recording up to five channels at the same time.
• View all scheduled recordings, including the duration of the recording.
• View XM’s Online Programming Guide to see what’s playing on XM.
106
Bookmarks
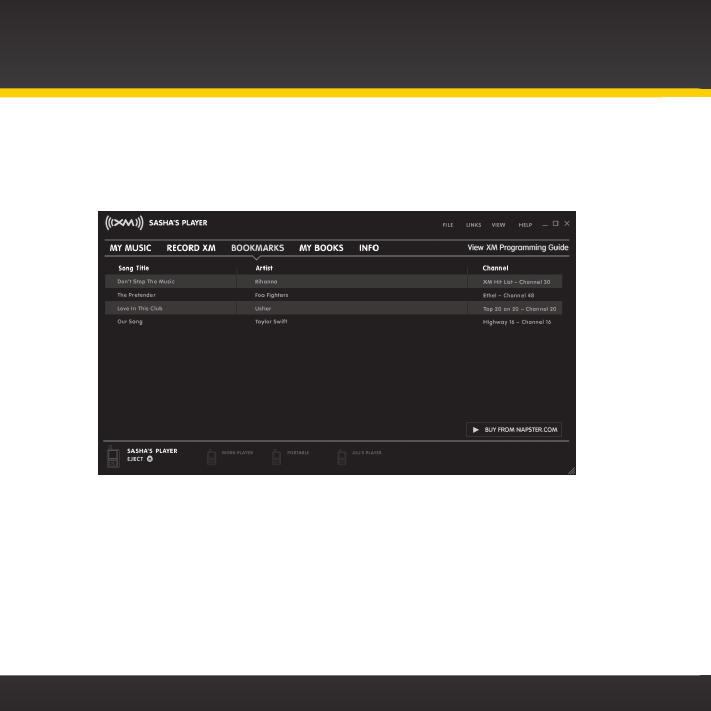
Bookmarks are an easy way to flag your favorite songs for later reference while
listening to your XMp3i.
• View songs you have bookmarked on your XMp3i and link to
Napster.com to purchase them.
• Add your music library to the XMp3i with a standard or high capacity
microSD card. We recommend storing your MP3 files on a microSD card
since you can only record XM content to the XMp3i. Recorded content
cannot be transferred to a microSD card.
• View XM’s Online Programming Guide to see what’s playing on XM.
Using your XMp3i with a PC
107
Using your XMp3i with a PC
napster.com
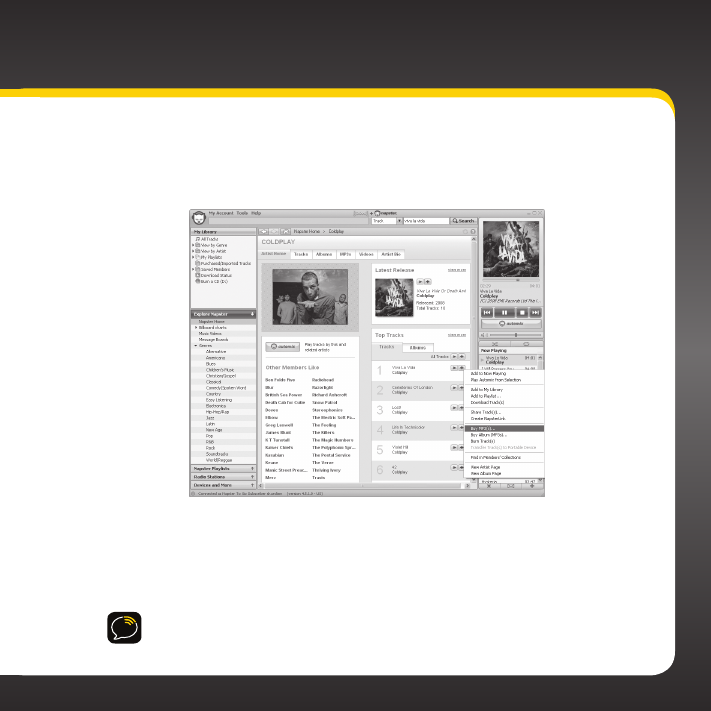
Napster enables you to purchase and own songs you heard and bookmarked
on your XMp3i.
• Connect to Napster directly from the XM2go media manager.
• Easy access to a library of millions of songs.
• Add your music library to your XMp3i with a standard or high capacity
microSD card.
NOTE! We recommend storing your MP3 files on a microSD card since you
can only record XM content to the XMp3i. Recorded content cannot be
transferred to a microSD card.
108
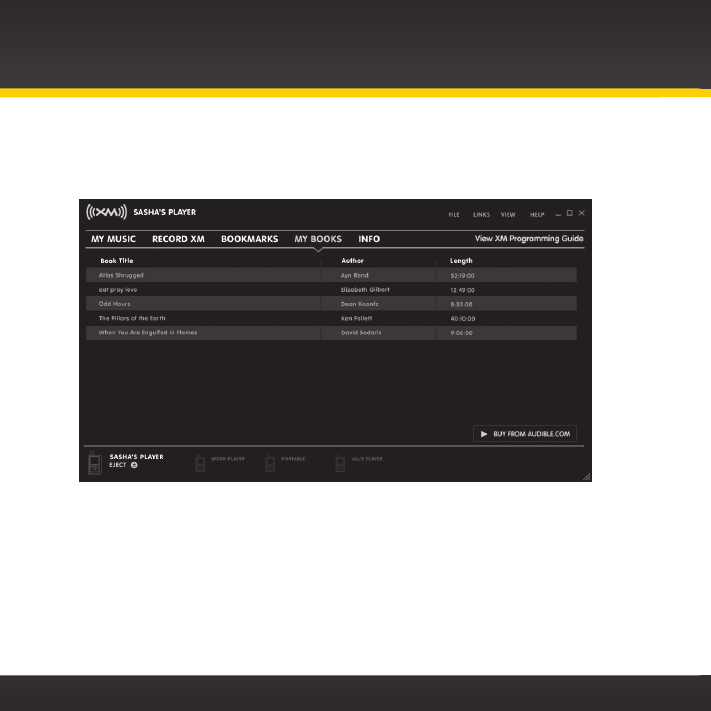
My Books
View the authors, titles, and length of audio books saved on your XMp3i.
• Link to http://www.audible.com/xm to see available audio books.
Using your XMp3i with a PC

109
Using your XMp3i with a PC
audible.com/xm
Audible.com is your source for the internet’s largest selection of premium
digital audio.
• Link to http://www.audible.com/xm to see available audio books.
• Choose from over 40,000 downloadable audio books, including the
latest best sellers and timeless classics.
• Download audio books to your XMp3i (or other compatible devices)
and listen at the gym, on your commute, anywhere, anytime.
110
Info
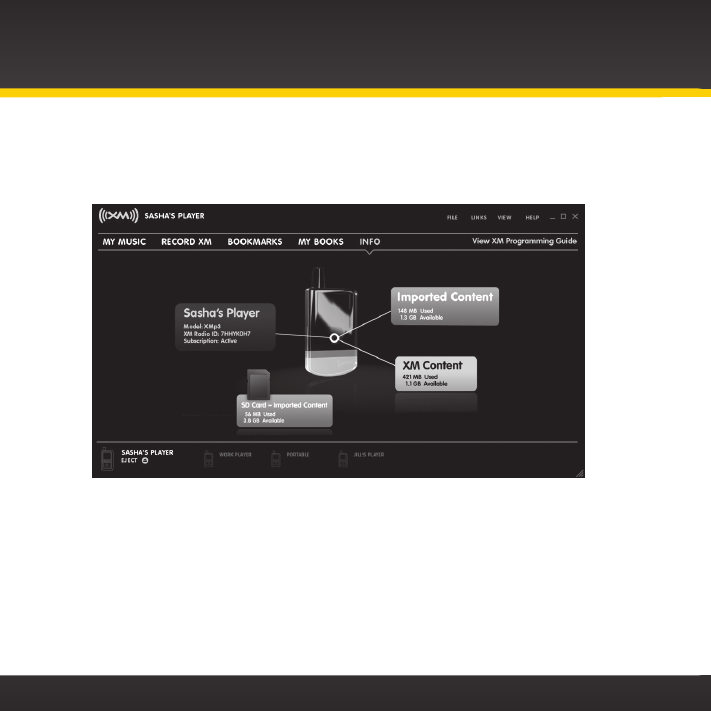
View Information about your XMp3i such as model and Radio ID.
• Personalize the name of your XMp3i.
• View the amount of XM content storage used/available, and personal
music storage used/available on your XMp3i.
• View the amount of personal music storage/used on your microSD card.
• View XM’s Online Programming Guide to see what’s playing on XM.
Using your XMp3i with a PC

111
Using your XMp3i with a PC
Updating the XMp3i Firmware
Occasionally we make improvements to the XMp3i’s software to add
features or improve performance. To be sure your XMp3i is taking advantage
of the latest software it is recommend you attempt to update your XMp3i at
least once a year.
Updating the software can be done two ways:
1 Visiting http://xmradio.com/XMp3update and following the
directions there.
2 Using the XM2go Music Manger Software. Click on the HELP
option, and then click Check for Updates.
Remember that:
• Your XMp3i must be docked and with the Power Adapter plugged in,
and must be connected to your PC.
• You should not attempt updating the firmware if your XMp3i is not
connected to an external power source.
• Your PC must be connected to the Internet.
112
Disconnecting the XMp3i from a PC
To disconnect your XMp3i from your PC, you must follow these steps:
3 Click on “Eject” on the lower left-hand corner of the XM2go Music
Manager screen.
4 XM2go Music Manager will sync with your XMp3i, and then inform you
that you can disconnect your XMp3i.
5 Unplug the USB cable from either the PC or your XMp3i.
NOTE! Do not use Windows’ “Safely Remove Hardware” button as it does not
properly sync the XM2go Music Manager with your XMp3i.

113
Troubleshooting

114
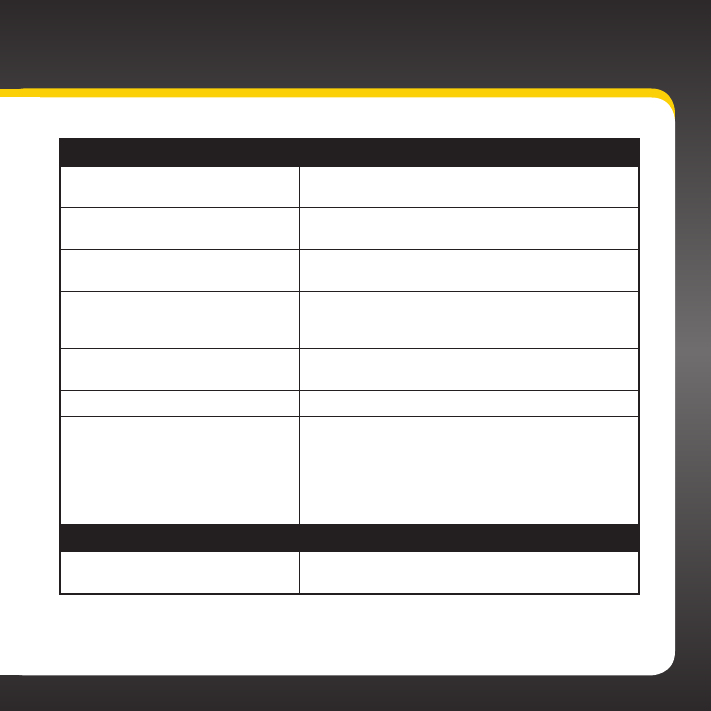
XMp3i has been designed and built to be trouble-free but if you experience a
problem, try this:
• Check that all connections are firm and secure.
• Make sure you have installed the XMp3i as described in this User Guide.
If you see this on the screen: Try this:
No signal Make sure the XM antenna is not obstructed.
Check Antenna Make sure that the antenna cable is firmly and
securely plugged into the Home Dock. Make sure
the cable is not bent or broken.
Turn XMp3i off, then on, to reset this message.
Off Air The channel you’ve selected is not currently
broadcasting. Tune to another XM channel.
- - - No program information, such as artist name,
song title, or channel exists.
Loading Your XMp3i is acquiring audio or program
information from the XM signal. This message
usually goes away in a few seconds.
You may also see this message if the channel
you’re tuning to is blocked. Try another channel.
Updating XM is updating your XMp3i with the latest
encryption code. Wait until the update is done.
You may be trying to tune to a channel that is
blocked or unavailable. Tune to another channel.
Channel Unavailable Tune to another channel. The one you’re trying to
access is not available.
Troubleshooting
115
Troubleshooting
If you see this on the screen: Try this:
All Recording Features Not
Available
Activate your XM subscription to be able to
record XM programming on your XMp3i.
This Channel Not Available for
Recording
Do nothing. Recording is restricted by the content
owners.
This Program Not Available for
Recording
Do nothing. Recording is restricted by the content
owners.
Connect to XM Antenna Within 30
Days to Avoid Interruption in
Listening to XM Recordings
You must receive a live XM signal for at least
8 hours a month to authenticate your XM
subscription.
Please Connect to XM Antenna to
Confirm Valid Subscription
Select “Live XM” and make sure you get a strong
signal.
Activation Required for Playback Activate your XM subscription.
SD Card Error Check to see whether the microSD card is too
full; if so, delete files so that at least 32 MB of
memory is available.
Check whether the microSD has been formatted
correctly; if not, reformat the microSD card using
your PC.
If this happens: Try this:
XMp3i shuts off unexpectedly. If you’re in a vehicle, check whether the Power
Off feature is set, and set it to “Off”, if desired.

116
If this happens: Try this:
There is no power or the XMp3i
shuts off quickly.
Check the battery level, it may be low. Charge the
battery for 8 hours.
You do not receive all the XM
channels you subscribed to.
Check that you have not skipped any channels.
If you still do not receive all channels, your XMp3i
may not be properly activated. Contact XM Listener
Care.
No audio or poor audio. Check all cables and secure connection between
connectors on your XMp3i and your stereo system or
powered speakers for a firm and secure connections.
No song title or artist name is
displayed.
The information may not be available or updates may
be in progress.
Buttons do not respond. Check whether the Power/Lock switch is in the “lock”
position. If so, slide it to the center position to unlock
the buttons.
The buttons still refuse to
respond, the display does not
change, or the backlight does not
turn off as expected.
To reset your XMp3i, slide and hold the Power/Lock
switch down for 3 seconds. If this doesn’t work
remove and re-insert the battery.
XM Instant Traffic and Weather
channels sound different from
other channels.
Do nothing. These channels use a different audio
technology than the other XM channels.
Battery level meter does not
match the expected charge or
playback time.
Fully charge the battery, then use your XMp3i until
the battery is exhausted. This calibrates the battery
level meter.
Troubleshooting
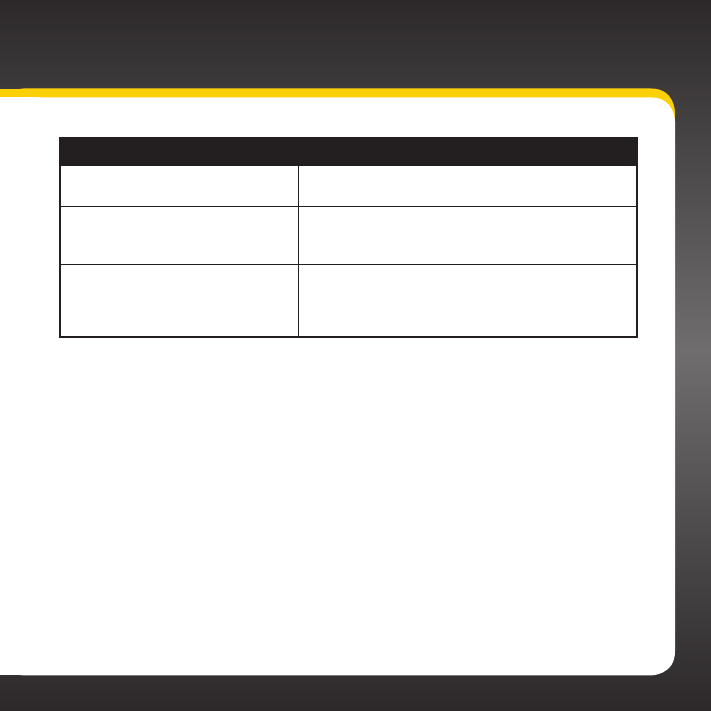
117
Troubleshooting
If this happens: Try this:
Your XMp3i cannot see any files
on the microSD card.
Check that the microSD card is unlocked.
Your XMp3i still cannot see any
files on the microSD card.
Check whether the microSD card is too full. There
must be at least 32 MB of free space available on
the microSD card for XMp3i to use it successfully.
Your XMp3i does not
communicate with your PC.
Check power and USB connections between your
XMp3i and your PC. Be sure to use the supplied
USB cable. Remove your XMp3i from the Home
Dock, then re-insert.

118

119
Product Specifications

120
Product Specifications
XMp3i Radio
Power Requirements 5.2 V DC, 1.6 A (max)
Operating Temperature -4°F to +140°F (-20°C to +60°C)
Audio Output 2 x 12mW @ 32 Ohm
Dimensions 2 in (width) x 3.6 in (height) x 0.6 in (depth)
51 mm (width) x 92 mm (height) x 15 mm (depth)
Weight: 3.1 oz (88 g) with battery
2.4 oz (69 g) without battery
Storage Capacity 2 GB internal
microSD™ removable (up to 16 GB)
Audio Connector 3.5 mm female
Power Connector 4.8 mm female
Battery
Type 3.7 V Lithium Ion rechargable
Capacity 920 mAh
3.6 hr live / 16.5 hr playback / 30 day standby
Music File Formats MP3 and WMA. Fixed Bitrates: 32, 48, 96, 128,
160, 192, 256, 320 kbps. Variable Bitrates: 64-128,
128-256, 160-320 kbps.
Home Dock
Dimensions 2.7 in (W) X 1.4 in (H) X 2.1 in (D)
69.6 mm (W) X 35.1 mm (H) X 53.2 mm (D)
Weight 2.5 oz (71 g)
Audio Connector 1/8 in (3.5 mm) female
Antenna Connector SMB male
Power Connector 3.0 mm female
Remote Control
Dimensions: 1.5 in (width) x 4.7 in (height) x 0.60 in (depth)
40 mm (width) x 119 mm (height) x 15.4 mm (depth)
Weight: 2.4 oz (69 g)
Battery: CR2032, 3 V

121
Patent and Environmental Information
Patent Information
It is prohibited to, and you agree that you will not, copy, decompile,
disassemble, reverse engineer, hack, manipulate, or otherwise access and/
or make available any technology incorporated in this product. Furthermore,
the AMBE™ voice compression software included in this product is protected
by intellectual property rights including patent rights, copyrights, and trade
secrets of Digital Voice Systems, Inc. The software is licensed solely for use
within this product. The music, talk, news, entertainment, data, and other
content on the Services are protected by copyright and other intellectual
property laws and all ownership rights remain with the respective content
and data service providers. You are prohibited from any export of the
content and/or data (or derivative thereof ) except in compliance with
applicable export laws, rules and regulations. The user of this or any other
software contained in a SIRIUS | XM Radio is explicitly prohibited from
attempting to copy, decompile, reverse engineer, hack, manipulate or
disassemble the object code, or in any other way convert the object code
into human-readable form.
Environmental Information
Follow local guidelines for waste disposal when discarding packaging and
electronic appliances.
Your Radio is packaged with cardboard, polyethylene, etc., and does not
contain any unnecessary materials.

122
The user is cautioned that changes or modifications not expressly approved by SIRIUS XM
Radio Inc. can void the user’s authority to operate this device.
This device complies with Part 15 of the FCC Rules. Operation is subject to the following two
conditions:
1. This device may not cause harmful interference.
2. This device must accept any interference received, including
interference that may cause undesired operation.
This equipment has been tested and found to comply with the limits for a Class B digital
device, pursuant to Part 15 of the FCC Rules. These limits are designed to provide
reasonable protection against harmful interference in a residential installation.
This equipment generates, uses, and can radiate radio frequency energy and, if not installed
and used in accordance with the installation instructions, may cause harmful interference
to radio communications. However, there is no guarantee that interference will not occur
in a particular installation. If this equipment does cause harmful interference to radio or
television reception, which can be determined by turning the equipment off and on, the user
is encouraged to try to correct the interference by one or more of the following measures:
• Reorient or relocate the receiving antenna of the affected receiver.
• Increase the separation between the SIRIUS | XM equipment and the affected
receiver.
• Connect the SIRIUS | XM equipment into an outlet on a circuit different from that to
which the affected receiver is connected.
• Consult the dealer or an experienced radio/TV technician for help.
WARNING! The FCC and FAA have not certified this Satellite Radio Receiver for use in any
aircraft (neither portable nor permanent installation). Therefore, SIRIUS XM Radio Inc.
cannot support this type of application or installation.
FCC Statement

123
©2009 SIRIUS XM Radio Inc. “SIRIUS”, “XM” and all related marks and logos are
trademarks of SIRIUS XM Radio Inc. and its subsidiaries. “BBC” and “Radio One”
are trademarks of the British Broadcasting Corporation and are used under license.
BBC logo © BBC 1996. Radio 1 logo © BBC 2001. Cosmopolitan™ is a registered
trademark of Hearst Communications, Inc. Elvis Radio logo © EPE Reg. U.S. Pat & TM
off. IndyCar (and Design) are registered trademarks of Brickyard Trademarks, Inc.,
used with permission. Major League Baseball trademarks and copyrights are used with
permission of Major League Baseball Properties, Inc. Visit the official website at MLB.
com. Games subject to availability and change and may not include all spring training
games. All rights reserved. NASCAR™ is a registered trademark of the National
Association for Stock Car Auto Racing, Inc. The NBA identifications are the intellectual
property of NBA Properties, Inc. and the respective NBA member teams. © 2009
NBA Properties, Inc. © 2009 NFL Properties LLC. All NFL-related trademarks are
trademarks of the National Football League. NHL and the NHL Shield are registered
trademarks of the National Hockey League. © NHL 2009. All NHL logos and marks
and NHL team logos and marks depicted herein are the property of the NHL and
the respective teams and may not be reproduced without the prior written consent
of NHL Enterprises, L.P. The Home Ice® channel is a registered trademark of XM
Satellite Radio Inc. The Swinger Golfer logo is a registered trademark of PGA TOUR,
Inc. Visit xmradio.com/xmlineup for updates. All programming/channel lineup/XM
service subject to change or preemption. All other marks and logos are the property
of their respective owners. All rights reserved. Hardware, subscription and activation
fee required. Other fees and taxes may apply. Month-to-month subscriptions must
be activated via telephone. Hardware and subscription sold separately. Subscription
governed by XM Customer Agreement, which can be found at xmradio.com/
serviceterms. Prices and programming are subject to change. XM Radio U.S. service
only available in the 48 contiguous United States and the District of Columbia.
Copyrights and Trademarks

124
Owner’s Record
The Radio model number is located below and the XM Radio ID is located on the label
on the back of the XMp3i.
Record the XM Radio ID in the space provided below. Refer to these numbers
whenever you call your dealer regarding this product.
Radio Model Number: XMp3i
XM Radio ID:___________________________
Owners Record

125
Owners Record
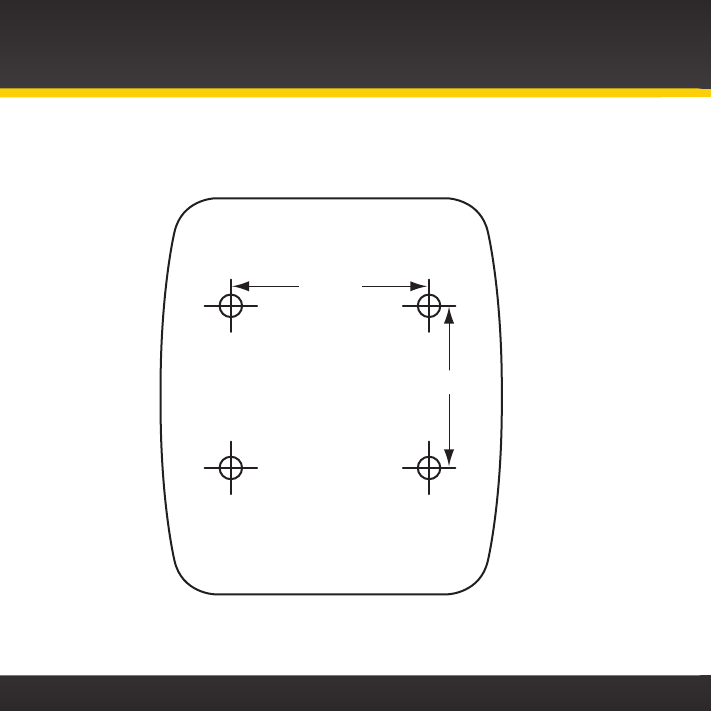
Indoor/Outdoor Antenna Template
126
Indoor/Outdoor Antenna Template
1-3/8”
1-1/8”

xmradio.com
SIRIUS XM Radio Inc.
1221 Avenue of the Americas
New York, NY 10020
1.800.967.2346
© 2009 SIRIUS XM Radio Inc.
XMP3i User Guide_XMP3IUG1109_111709a