Sivantos PR02 Wireless Programmer User Manual UserGuide
Sivantos GmbH Wireless Programmer UserGuide
Sivantos >
UserGuide

Click Dome
ConnexxAir
User Guide
Draft | english | 2016-12-13

2
Draft | english | 2016-12-13
Content
Before you art 3
Included in delivery 4
Components 5
Getting arted 6
Assembling the power plug 6
Charging 7
Turning on and o 9
Inalling the neckloop 10
Connecting ConnexxAir 11
Programming with ConnexxAir 13
Wearing ConnexxAir 14
Programming on the table 15
Important safety information 16
Important information 21
Status LEDs 21
Troubleshooting 22
Maintenance and care 23
Explanation of symbols 24
Operating, transport, and orage conditions 25
Technical data of the power supply 26
Disposal information 26
Conformance information 26

3
Draft | english | 2016-12-13
Before you art
ConnexxAir is a wireless programming syem for our
specic wirless hearing inruments.
Place ConnexxAir around your patient's neck and
wirelessly connect your patient's hearing inruments to
the programming software on the PC. No programming
cables are necessary.
Follow these inructions to set up ConnexxAir and to
underand how ConnexxAir works.
CAUTION
Read this user guide thoroughly and completely
and follow the safety information in this document
to avoid damage or injury.
4
Draft | english | 2016-12-13
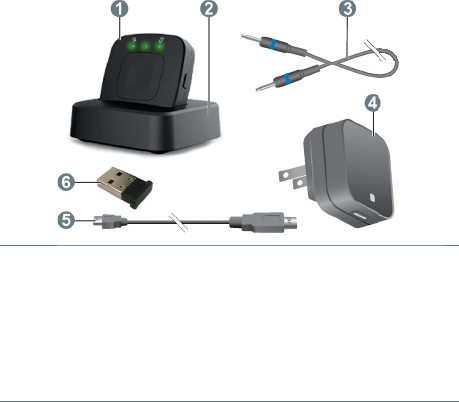
Included in delivery
➊
ConnexxAir
➋
Charging cradle
➌
Neckloop (is also
the antenna)
➍
Power plug, with dierent
adapters (depending on
your country)
➎
USB power cable
➏
USB Bluetooth dongle
5
Draft | english | 2016-12-13
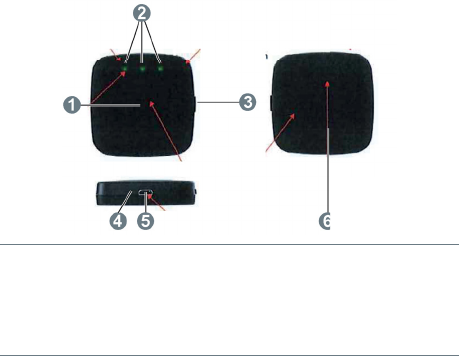
Components
➏
➊
Power button
➋
Status LEDs
➌
Pairing button
➍
Reset button (recessed)
➎
USB port for rmware updates
➏
Battery compartment
6
Draft | english | 2016-12-13
Getting arted
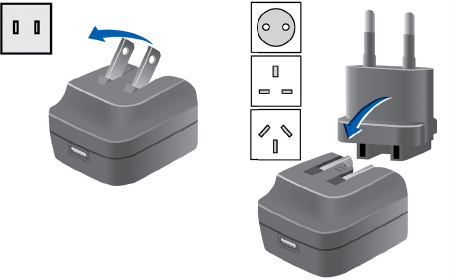
Assembling the power plug
The power plug comes with several country-specic
adapters. Depending on your country you have to
assemble the power plug with an adapter:
XFor US sockets, no adapter is required. Fold out the
plugs (left picture).
XFor all other sockets, an adapter is required
(right picture): Fold the plugs in and slide the adapter
onto the folded plugs. The adapter clicks noticeably in
place.
You can now connect the cable with the power plug.

7
Draft | english | 2016-12-13
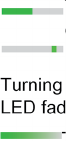
Charging
ConnexxAir is partly charged on delivery. Charge it
before r use and when the battery is low and the
middle LED is ashing orange.
Battery is low
XConnect the charging cradle with the power plug to a
power supply:
XCarefully push ConnexxAir in the
charging cradle.
ConnexxAir is automatically
turned o.
XWhile ConnexxAir is in the charging cradle, the
charging atus is indicated by the middle LED:
Charging
Battery is fully charged
8
Draft | english | 2016-12-13
XWhen you take ConnexxAir out of the charging cradle,
ConnexxAir is automatically turned on.
Further information:
■ A fully charged ConnexxAir can be used for
approximately 10 programming sessions before
recharging is required.
■ Do not use ConnexxAir for programming while
charging.
9
Draft | english | 2016-12-13
Turning on and off
XTurning on: Shortly press the power button.
The middle LED r shines green, then goes
o.
Left and right LED light up shortly.
XTurning o: Press the power button until the middle
LED fades o.
The middle LED r shines green, then fades
o.
10
Draft | english | 2016-12-13
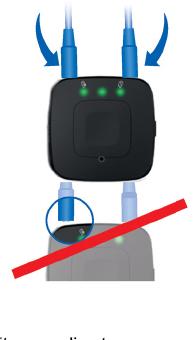
Installing the neckloop
The neckloop is the antenna for the wireless connection
of ConnexxAir and the hearing
inruments.
XInsert both neckloop plugs all
the way.
Further information
■ If the neckloop is not
plugged in completely,
the programming software
displays a warning message.
■ If the neckloop is
disconnected for more than
15 minutes, ConnexxAir turns
automatically o.
■ Some of our remote control units or audio reamers
have similar neckloops. The neckloop that is intended
for ConnexxAir has a blue ring around the connector.
Do not mix up neckloops.
11
Draft | english | 2016-12-13
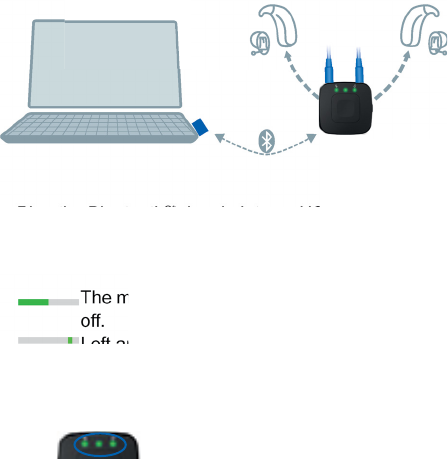
Connecting ConnexxAir
XPlug the Bluetooth®* dongle into an USB slot of your
PC.
XTurn on ConnexxAir: Press the power button.
The middle LED r shines green, then goes
o.
Left and right LED light up shortly.
If you are using ConnexxAir or a new dongle for the
r time, ConnexxAir searches for the dongle - it is in
pairing mode. All three LEDs ash green from left to
right .
XIn the software for programming the hearing
inruments (e.g.Connexx), select ConnexxAir as
the programming device and detect the hearing
inruments.
* The Bluetooth word mark and logos are owned by the Bluetooth SIG, Inc., and any
use of such marks by Sivantos GmbH is under licenses. Other trademarks and trade
names are those of their respective owners.

12
Draft | english | 2016-12-13
The connection is automatically eablished:
As soon as the connection to the PC could be
eablished, the middle LED shines green for
3 seconds, then arts ashing.
If the middle LED ashes slowly (once every
3 seconds), the connection to the hearing
inruments could not be eablished.
Refer to section "Troubleshooting".
If the middle LED ashes quickly (once
per second), the connection to the hearing
inruments is eablished.
ConnexxAir is ready for programming the
hearing inruments.
When left or right LED ash green , data are
transferred to the respective hearing inrument.
Further information
■ Use only the supplied dongle.
■ Dongle and ConnexxAir need to be within a range of
10 m (32 ft).
■ If the connection to the PC or to the hearing
inruments could not be eablished, refer to section
"Troubleshooting".
■ If you replace the dongle with a new one, or if you
use the dongle with another PC, you may have to pair
dongle and ConnexxAir manually. This is done by
shortly pressing the pairing button.
13
Draft | english | 2016-12-13
Programming with ConnexxAir
When programming the hearing inruments while
your patient is wearing them, you have to ensure
that ConnexxAir is worn correctly. Refer to section
"Wearing ConnexxAir"
When programming hearing inruments that are lying on
the table, certain diances mu be considered. Refer to
section "Programming on the table".
14
Draft | english | 2016-12-13
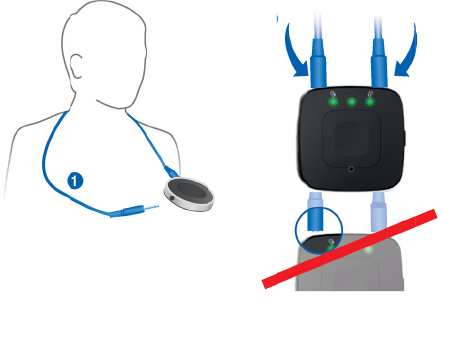
Wearing ConnexxAir
In order to function correctly, your patient mu wear the
hearing inruments and ConnexxAir with the neckloop
around the neck. The neckloop is also the antenna.
XUnplug one neckloop plug and place the neckloop
loosely around the patient's neck ➊.
XInsert both neckloop plugs all the way ➋.
➋
➋
15
Draft | english | 2016-12-13
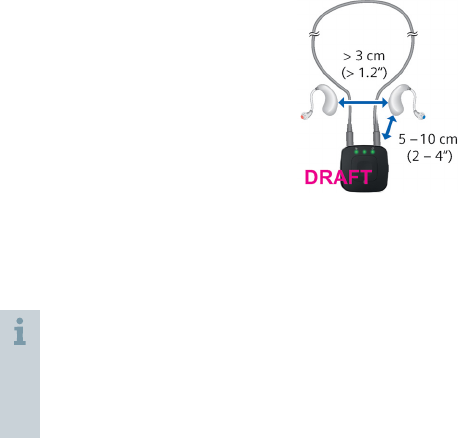
Programming on the table
If you want to pre-congure the hearing inruments you
can also have ConnexxAir and the
hearing inruments lying on the
table.
When programming on the table:
XPlace the hearing inruments
along the neckloop (refer to the
picture).
XKeep a minimum diance
of 3 cm (1.2 inches) between the two hearing
inruments.
XKeep a diance of 5 to 10 cm (2 to 4 inches) between
each hearing inrument and ConnexxAir.
During the programming process ConnexxAir
can reach other hearing inruments outside the
neckloop.
XKeep a minimum diance of 1 m (40 inches) to
other hearing inruments.

16
Draft | english | 2016-12-13
Important safety information
WARNING
Risk of explosion!
XDo not use your device in explosive
atmospheres (e. g. in mining areas).
WARNING
Choking hazard!
Your device contains small parts which can be
swallowed.
XKeep hearing inruments, batteries and
accessories out of reach of children and
mentally disabled persons.
XIf parts have been swallowed consult a physician
or hospital immediately.
NOTICE
Your device is sensitive to extreme heat, high
humidity, rong magnetic elds (> 0.1T), X-rays
and mechanical ress.
XDo not expose your device to extreme
temperature or high humidity.
XDo not leave it in direct sunlight.
XDo not immerse it in water.
XDo not place your device in a microwave oven.

17
Draft | english | 2016-12-13
The performance of the wireless function may be
aected by electromagnetic interference – e.g. from
a computer monitor or uorescent lamp syem.
XMove away from the source of interference if you
experience diculty.
### Note: Compatiblity with active implants mu be veried.
Otherwise, the following two warnings have to be deleted and
we have to ate that ConnexxAir is not compatible with active
implants.
WARNING
Interference with implantable devices
XThe device can be used with all
electronic implants that comply with the
ANSI/AAMI/ISO 14117:2012 Electromagnetic
compatibility andard for human implants.
XFor proper placement, position the device with
a lateral diance of at lea 3 cm (1.2 inches) to
the implants. Do not position the device directly
above the implant.
XIn case your implant does not comply with the
ANSI/AAMI/ISO 14117:2012 andard, consult
the manufacturer of your implantable device for
information about the risk of diurbance.

18
Draft | english | 2016-12-13
WARNING
This device may interfere with measuring and
electronic equipment.
XDo not use your device on airplanes or areas
where sensitive or life-supporting electronic
equipment is used.
WARNING
Risk of explosion when the rechargeable battery is
handled wrong.
XDo not short circuit, pierce, crush or disassemble
the rechargeable battery.
XPrior to return the battery for recycling, tape the
electrodes to prevent short circuit, which may
cause the battery to explode.
XDo not place it in oven or re.
XDo not immerse it in water.
XCharge the rechargeable battery between 0ºC
and 45ºC.
XRemove the rechargeable battery when the
inrument is not in use for a prolonged period
of time.
XTo repair or exchange the rechargeable
battery, return the device to your Hearing Care
Professional.

19
Draft | english | 2016-12-13
In some countries rerictions for the usage of
wireless equipment exi.
XRefer to local authorities for further information.
NOTICE
Please make sure that the power plug is easily
accessible to remove it from power supply if
necessary.
WARNING
Risk of electrical shock!
XDo not use obviously damaged devices and
return them to point of sale.
WARNING
Note that any unauthorized changes to the product
may cause damage to the product or cause injury.
XUse only approved parts and accessories. Ask
your Hearing Care Professional for support.

20
Draft | english | 2016-12-13
WARNING
Risk of rangulation!
XEnsure that the neckloop does not get
entangled, e. g. in moving mechanical parts of
machines.
XUse only the delivered neckloop. It will
automatically detach when entangled.
XDo not use the device for children under the age
of twelve.
21
Draft | english | 2016-12-13
Important information
This device is intended to program hearing inruments
wirelessly.
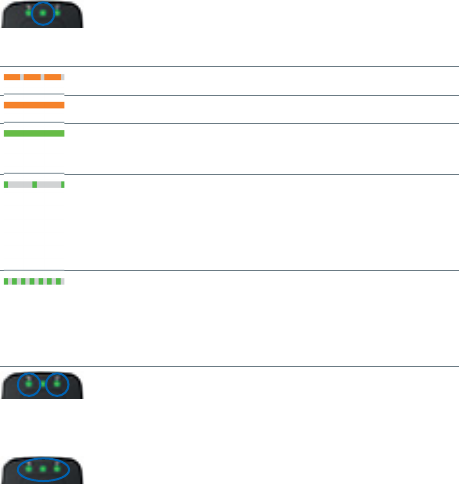
Status LEDs
The middle LED indicates the power atus
and the atus of the wireless connection:
Battery is low
Charging
Battery is fully charged
(only when ConnexxAir is in charging cradle)
Flashing slowly (once every 3 seconds)
Programming connection is not eablished
Data transfer between ConnexxAir and hearing
inruments is not possible.
Flashing quickly (once per second):
Programming connection is eablished
Data transfer between ConnexxAir and hearing
inruments is possible.
The left and right LEDs blink at data rate,
while data is transferred to the respective hearing
inrument.
When all three LEDs are ashing green from
left to right, ConnexxAir is searching for a dongle (pairing
mode).

22
Draft | english | 2016-12-13
Troubleshooting
Problem and possible solutions
Connection to the hearing inruments cannot be
eablished (middle LED is ashing slowly )
■ Ensure that the hearing inruments are within
operating diance and turned on.
■ Ensure that the neckloop is plugged in
completely.
■ Ensure that the hearing inruments are
compatible with ConnexxAir.
Connection to the dongle cannot be eablished (all three
LEDs are ashing green from left to right).
■ Ensure that the dongle is plugged and within
operating diance.
■ Ensure that dongle and ConnexxAir t
together. The programming software Connexx
provides special service functions under
"Preferences > Devices".
■ If you have a new dongle, you have to manually
pair it with ConnexxAir: Press the pairing button
shortly.
ConnexxAir is not responding
■ Use a long thin tool, for example a wooden or
plaic toothpick, and press the reset button.

23
Draft | english | 2016-12-13
Maintenance and care
NOTICE
XDo not put your device in water!
XDo not clean your device with alcohol
or benzine.
X Clean the device as necessary with a soft tissue.
XAvoid abrasive cleaning liquids with additives such as
citric acids, ammonia, etc.
Replacing the battery
The rechargeable battery is inalled on delivery. If the
battery deteriorates and it does not ore charge as well
as before, you can replace the battery. Spare batteries
are available as service parts.
XSlide the battery compartment open.
XRemove the battery and unplug the battery cable.
XPlug the cable of the new battery.
XPlace the battery in the battery compartment and ore
the cable neatly so that it cannot be jammed by the
cover.
XPlace the cover on the battery compartment and slide
it shut. It snaps noticeably in place.
24
Draft | english | 2016-12-13
Firmware update
The programming software informs you if a rmware
update for ConnexxAir is available. To perform this
update:
XUse the supplied USB cable to connect ConnexxAir
and the PC.
XFollow the inructions on the screen.
Explanation of symbols
Symbols used in this document
Points out a situation that could lead to serious,
moderate, or minor injuries.
Indicates possible property damage.
Advice and tips on how to handle your device better.
Symbols on the device or packaging
CE compliance label, conrms compliance with
certain European Directives, refer to section
"Conformance information".
EMC and radio communications
compliance label Auralia, refer to section
"Conformance information".
Indicates the legal manufacturer of the device.
25
Draft | english | 2016-12-13
Symbols on the device or packaging
Do not dispose of the device with general
domeic wae. Read more in section
"Disposal information".
Read and follow the inructions in the user
guide.
Operating, transport, and storage conditions
Operating conditions
Temperature 10 to 45 °C
Relative humidity 5 to 93 %
During extended periods of transport and orage, please
observe the following conditions:
Storage Transport
Temperature 10 to 40 °C -20 to 60 °C
Relative humidity 10 to 80 % 5 to 90 %
WARNING
Risk of injury, re or explosion during shipment.
XShip lithium batteries according to local
regulations.
For other parts, such as hearing inruments, other
conditions may apply.

26
Draft | english | 2016-12-13
Technical data of the power supply
Golden Prot GPE006H-050100-Z
Input voltage: 100-240 V AC
Input current: 0.5 A
Input frequency: 50-60 Hz
Output voltage: 5 V DC
Output current: 1 A
Disposal information
XRecycle devices, accessories and packaging
according to local regulations.
XTo avoid environmental pollution, do not throw
batteries into household trash.
XRecycle or dispose of batteries according to local
regulations or return them to your Hearing Care
Professional.
Conformance information
The CE mark indicates conformity with the following
European directives:
■ 93/42/EEC concerning medical devices
■ 2014/53/EU RED concerning radio equipment
■ 2011/65/EU RoHS concerning the reriction of
hazardous subances

27
Draft | english | 2016-12-13
Wireless functionality
USA FCC ID: ###
Canada: ###
Operating frequencies: fc = 3.28 MHz
CE, FCC and Indury Canada compliance information
can be found inside the battery compartment.
### FCC/IC IDs are missing.
The ACMA compliance mark indicates conformity
with the electromagnetic interference andards set by
the Auralian Communications and Media Authority
(ACMA).
Devices with the FCC marking comply with the andards
of the FCC regarding electromagnetic interference.
This Class B digital apparatus complies with Canadian
ICES-003.
This device complies with Part 15 of the FCC Rules and
with ISED's licence-exempt RSSs.
Operation is subject to the following two conditions:
■ This device may not cause harmful interference, and
■ this device mu accept any interference received,
including interference that may cause undesired
operation.
This equipment has been teed and found to comply
with the limits for a Class B digital device, pursuant to
28
Draft | english | 2016-12-13
Part 15 of the FCC Rules. These limits are designed
to provide reasonable protection again harmful
interference in a residential inallation. This equipment
generates, uses and can radiate radio frequency energy
and, if not inalled and used in accordance with the
inructions, may cause harmful interference to radio
communications. However, there is no guarantee that
interference will not occur in a particular inallation. If
this equipment does cause harmful interference to radio
or television reception, which can be determined by
turning the equipment o and on, the user is encouraged
to try to correct the interference by one or more of the
following measures:
■ Reorient or relocate the receiving antenna.
■ Increase the separation between the equipment and
receiver.
■ Connect the equipment to an outlet on a circuit
dierent from that to which the receiver is connected.
■ Consult the dealer or an experienced radio/TV
technician for help.
FCC caution: Any changes or modications not expressly
approved by the party responsible for compliance could
void the user's authority to operate this equipment.

Draft | english | 2016-12-13
www.sivantos.com/brands
Document No. #####-99T##-#### ##
Order/Item No. ### ### ##
Master Rev##, ##.2016
© Sivantos GmbH, ##.2016 ####
Legal Manufacturer
Sivantos GmbH
Henri-Dunant-Strasse 100
91058 Erlangen
Germany
Phone +49 9131 308 0