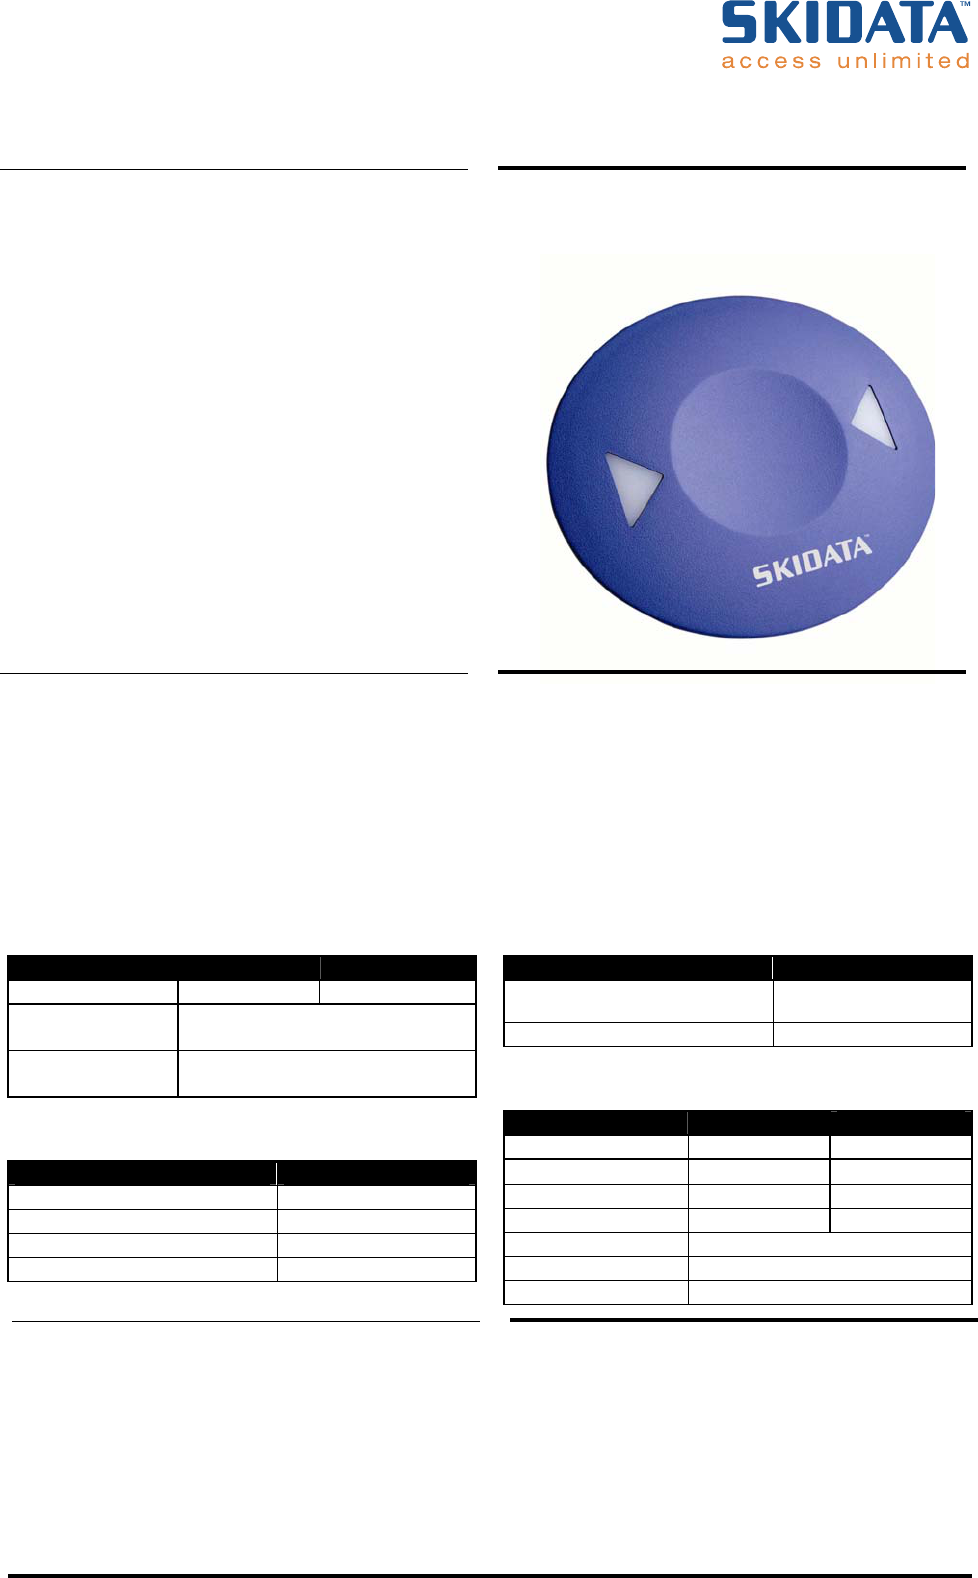
Skidata KEYDDUO232 Transponder-card reader for access control User Manual Certification KeyDetector DUO
Skidata AG Transponder-card reader for access control Certification KeyDetector DUO
Skidata >
User manual

Manual and operational description
Reading Device
KeyD 232 DUO
KeyD 485 DUO
KeyD ANT DUO

Manual and operational description KeyDetector DUO
Page 2 © SKIDATA AG, February 2004
SKIDATA AG
Technical Documentation
Untersbergstrasse 40
A-5083 Gartenau
Telephone +43 6246 888-0,
Telefax +43 6246 888-7
Internet http://www.skidata.com
e-mail docu@skidata.com
Copyright
© 2004 by SKIDATA AG. All rights reserved. All information in the
following document is protected by copyright law. No part of this
document may be reproduced without the written consent of SKI-
DATA AG. SKIDATA AG reserves the right to make any changes
of specification and other information in this document without
further notice.
Please note
During the compilation of this Technical Documentation, great
care has been taken to ensure the accuracy of the information
contained in it. However, despite our constant effort to ensure the
highest degree of accuracy and comprehensiveness possible,
the information provided cannot be guaranteed to be absolutely
error-free.
Trademarks
This documentation may contain representations of registered
product or service trademarks owned by SKIDATA AG or third
parties, as well as references to proprietary know-how protected
by copyright laws or other legal provisions. In any case the intel-
lectual property rights remain exclusively with their respective
owners.
Declaration of Conformity
The KeyDetector DUO has been developed, designed and manu-
factured in accordance with the following EU directive:
R&TTE (99/5/EC)
0408
Version February 2004

KeyDetector DUO Manual and operational description
© SKIDATA AG, February 2004 Page 3
EU countries only: The length of the DC cable (cable between
power adaptor and KeyDetector) must not exceed 3 m.
FCC 15.19:
This device complies with Part 15 of the FCC Rules. Operation
is subject to the following two conditions: (1) this device may not
cause harmful interference, and (2) this device must accept any
interference received, including interference that may cause un-
desired operation.
FCC 15.21:
IMPORTANT: Any changes to or modifications of KeyDetector
DUO unless expressly approved by SKIDATA AG, may void the
user's authority to operate this device.
FCC only: the DC cable or combined DC/interface cable must be
fitted with a ferrite element of type “Würth 74271131” near the lo-
cation where the cable connects to the KeyDetector (see image;
the cable must be ‘looped’ twice through the ferrite element, as il-
lustrated below).
Ferrite element
KeyDetector

Manual and operational description KeyDetector DUO
Page 4 © SKIDATA AG, February 2004
KeyDetector DUO 1
Document Management – Version Table
Tab. 1: Document Version Table for Installation & Maintenance Instructions
Section
Document Pages Version Date
1 KeyDetector DUO 4 1.0 2004-02-02

1 Copyright by SKIDATA AG 2004
KeyDetector DUO KD DUO
KeyDetector DUO is the standard interface module
for SKIDATA’s keymotion technology. As such it
constitutes a connecting link interfacing keycard and
Swatch Access data carriers with higher systems
and applications.
Proximity 122 kHz and 13 MHz transmission
technology.
Reads keymotion Data Carriers; allows coding
them using automatic memory management.
Contains a security-IC for encrypting data for
keymotion data carriers.
Control and communication via serial inter-
face RS232 (RS485 optional) with defined
protocol.
Signalling by red/green/orange LED and
beeper.
Mounting Information
The data transmission between the KeyDetector and
data carriers is sensitive against electrical and electro-
magnetical fields. Those fields are produced by
electrical devices of any kind such as monitors, TV-
sets, ... Thus the KeyDetector must not be placed near
electrical devices. Also metal surfaces placed near the
KeyDetector have a strong impact on the data
transmissions. For sure and reliable operation it is
neccessary that there are no metal objects within 10
cm around the KeyDetector in any direction. If metal
objects are placed between the KeyDetector and a
data carrier data transmission will be impossible at all
in most cases.
Electrical Characteristics
RS232-Versions RS485-Versions
Supply Voltage (Vin) 7 V to 12 V 7 V to 12 V
Supply Current (Iin)
TAG write-mode
max. 500 mA
excl. external antenna
Supply Current (Iin)
Idle mode
typ. 60 mA max. 100 mA
(no LEDs switched on)
Reading distance
Typical
Swatch Access 40 mm
Swatch Beat 40 mm
KeyCard 100 mm
GemFree 80 mm
Weights
Weight
KeyDetector in housing 150 g (excl. power supply
and cable)
module version 50 g
Absolute Maximum Ratings
RS232-Versions RS485-Versions
Supply Voltage (Vin) +15.00 V +15.00 V
Input Voltage (RxD) ±30.00 V
Input Voltage (A,B) +5.00 V
Input Voltage IO1 – IO3 +32.00 V +32.00 V
Output Current IO1/IO2 1.0 A
Storage Temperature -30 °C to +70 °C
Operating Temperature -20 °C to +60 °C

2 Copyright by SKIDATA AG 2004
Pin Description - Desktop Versions
All desktop Versions have a cable with D-type
subminiature connector with 9 pins; receptable (=female)
housing. A plug-in power supply, connected to the cable,
is also be included.
Figure 1 - connector-receptable, front view
12345
6789
Pin # Signal Function
1 - not connected
2 RxD / A RS232: Receive Data
RS485: Signal A
3 TxD / B RS232: Transmit Data
RS485: Signal B
4 - not connected
5 GND Power Ground
RS232: Signal Ground
6 - not connected
7 - not connected
8 - not connected
9 Vin Power Supply Voltage
Figure 2
140
130
25120
60
Mounting Plate
(bottom view)
Casing
Installing KD DUO
1. Thread cable through bottom section and fasten
2. Screw bottom section to mounting socket
NOTE: Ensure correct alignment of TOP marking
3. Screw top cover to bottom section
All cables must be fed in vertically to prevent water from
leaking in. Adjust cable feed as needed. Note that fixing
screws are not included in delivery
Figure 3
Cable hole Fixing screw
Break-out for mounting Snap-in latch
Figure 4
Cover PCB
Bottom
section Cable
Concealed
mounting socket
Cable feed hole
(desktop version)

Copyright by SKIDATA AG 2004 3
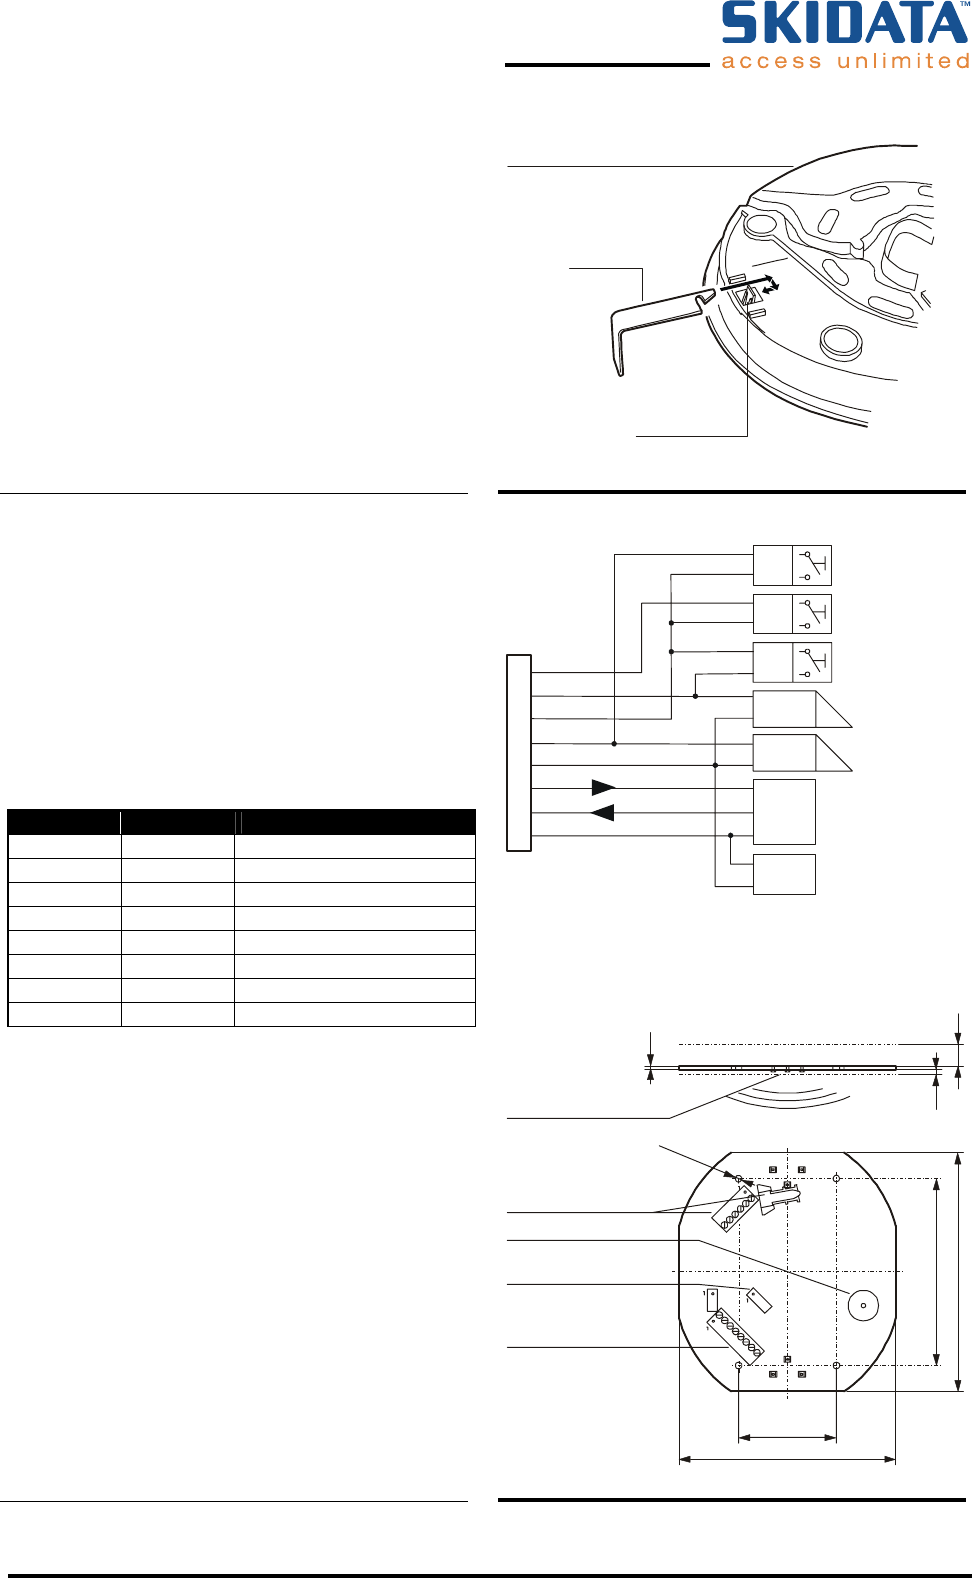
Deinstalling KeyDetector DUO
1. Slide opener into top and bottom guide rail (see Fig.
12).
2. Pull lever upwards or downwards
3. Pull lever out and lift off cover
Figure 5
KeyDetector DUO – Rear view
Opener
Opener –
Snap-in latch
Figure 6
Pin Description
The PCB has three connectors, one to connect the
optional external antenna, one for the power supply and
data, separate for surface mount and desktop version.
To attach an external antenna (optional), see Fig. 10.
Pin Description – Connector “power / data 1”
This is an 8 pin connector, fixed by screws. Cable
diameter: 0,14 mm² - 0,75 mm².
Pin Signal Function
1 IN 3 Input
2 IO1 Input / Output
3 GND Power Ground
4 IO2 Input / Output
5 Vin Power supply voltage
6 TxD/A KeyD: Data out KD
7 TxD/B KeyD: Data in KD
8 GND Power Ground
1
2
3
4
5
6
7
8
IN3
GND
IO1
RxD
GND
TxD
IO2
Vin
Power
supply
in
in
-
+
Host
2
2
1
1
1
1
2
e.g. button
e.g. door opener
out
out
in
Figure 7
1.6
ø3.2 (4x)
86
110 10
2.5
100
45
LEDs red/green/orange
Connector for external
antenna
beeper
Connector “power/data 2”
Connector “power/data 1”

4 Copyright by SKIDATA AG 2004
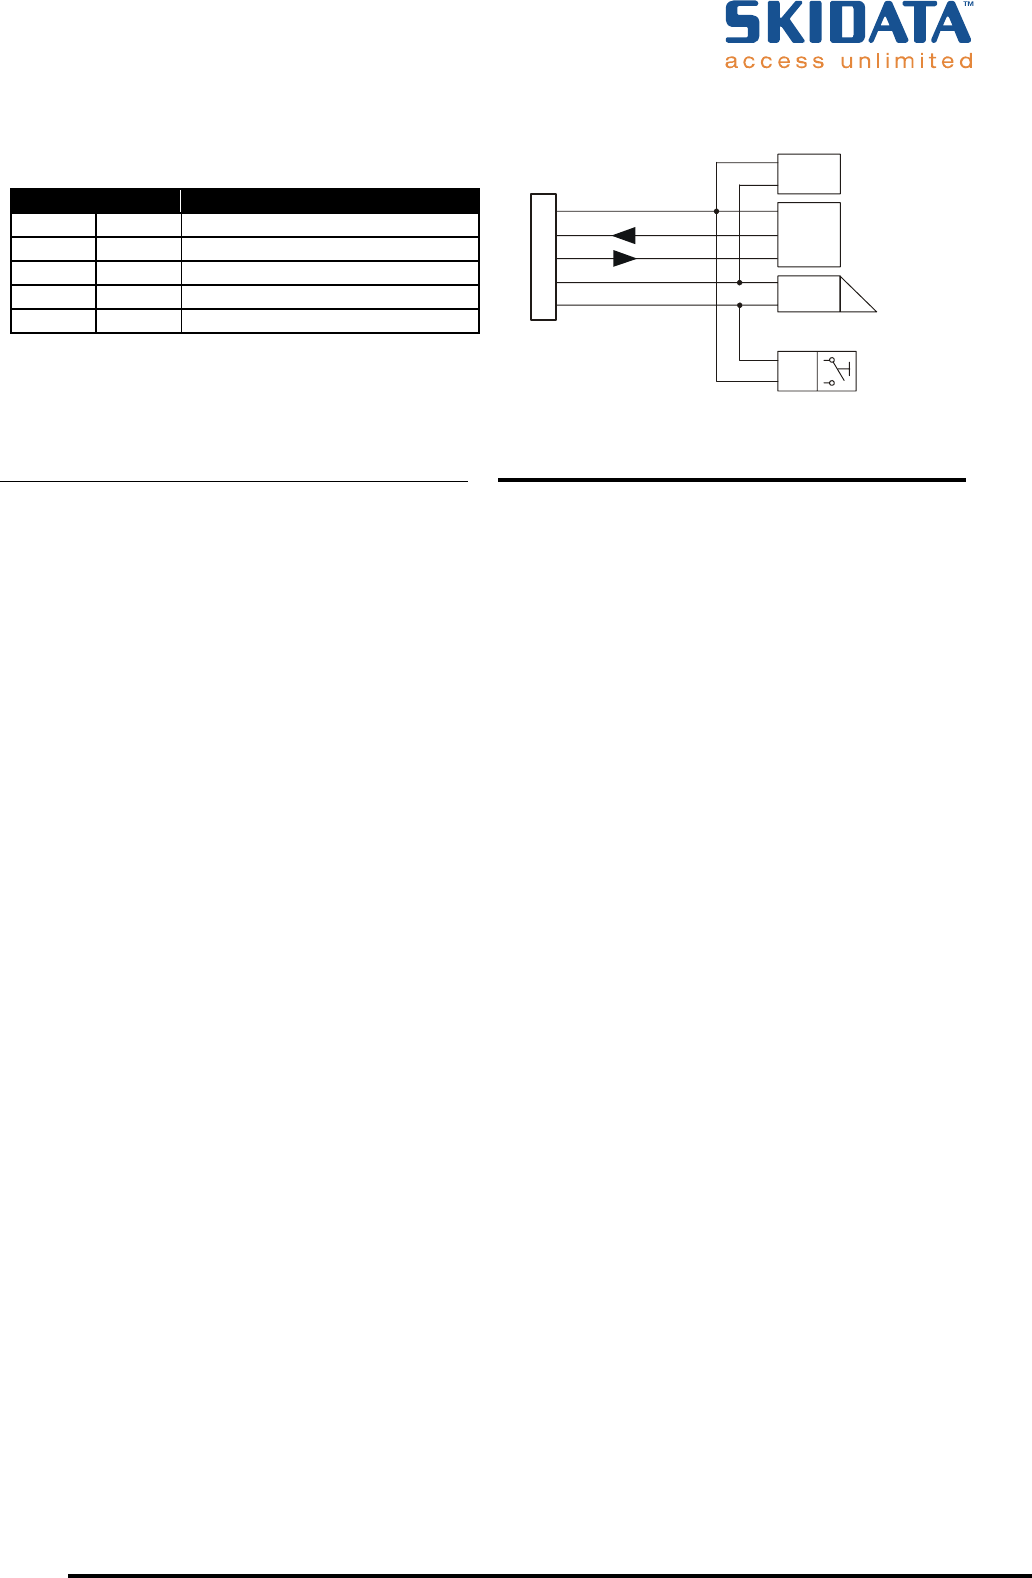
Connector “Power / Data 2”
(use connector JST-PHR-5 or JST-08KR)
Pin # Signal Function
1 GND Power Ground
2 RxD RS232: Receive Data KD DUO
3 TxD RS232: Transmit Data KD DUO
4 Vin Power supply, 9 to 12 VDC
5 IO1 Signal in / out
Figure 8
1
2
3
4
5
GND
RxD
TxD
Vin
IO1
Power
supply
in
-
+
Host
out
e.g. Door opener
e.g. button

Copyright by SKIDATA AG 2004 5
External Antenna DUO KeyD ANT DUO
The external antenna can be used in applications
where the KeyDetector with integrated antenna is
not applicable and/or where a second KeyDetector
would be unneccessarily redundant.
Increases KeyDetector security
Signalling by red/green/orange LED
Design and outline dimensions similar to
KeyDetector
Can be mounted directly on a flat surface or
in a standard wall socket
KeyDetector External
Antenna
Figure 9
Block diagram Function scheme
KeyDetector inside
Wall
outside External Antenna
2
2
Mounting Information
The data transmission between the external antenna
and data carriers is sensitive against electrical and
electro-magnetical fields. Those fields are produced
by electrical devices of any kind such as monitors, TV-
sets, ... Thus the external antenna must not be placed
near electrical devices. Also metal surfaces placed
near the external antenna have a strong impact on the
data transmission. For reliable operation no metal
objects should be within 10 cm around the external
antenna in any direction. If metal objects are placed
between the external antenna and a data carrier, data
transmission will be impossible at all in most cases.

6 Copyright by SKIDATA AG 2004
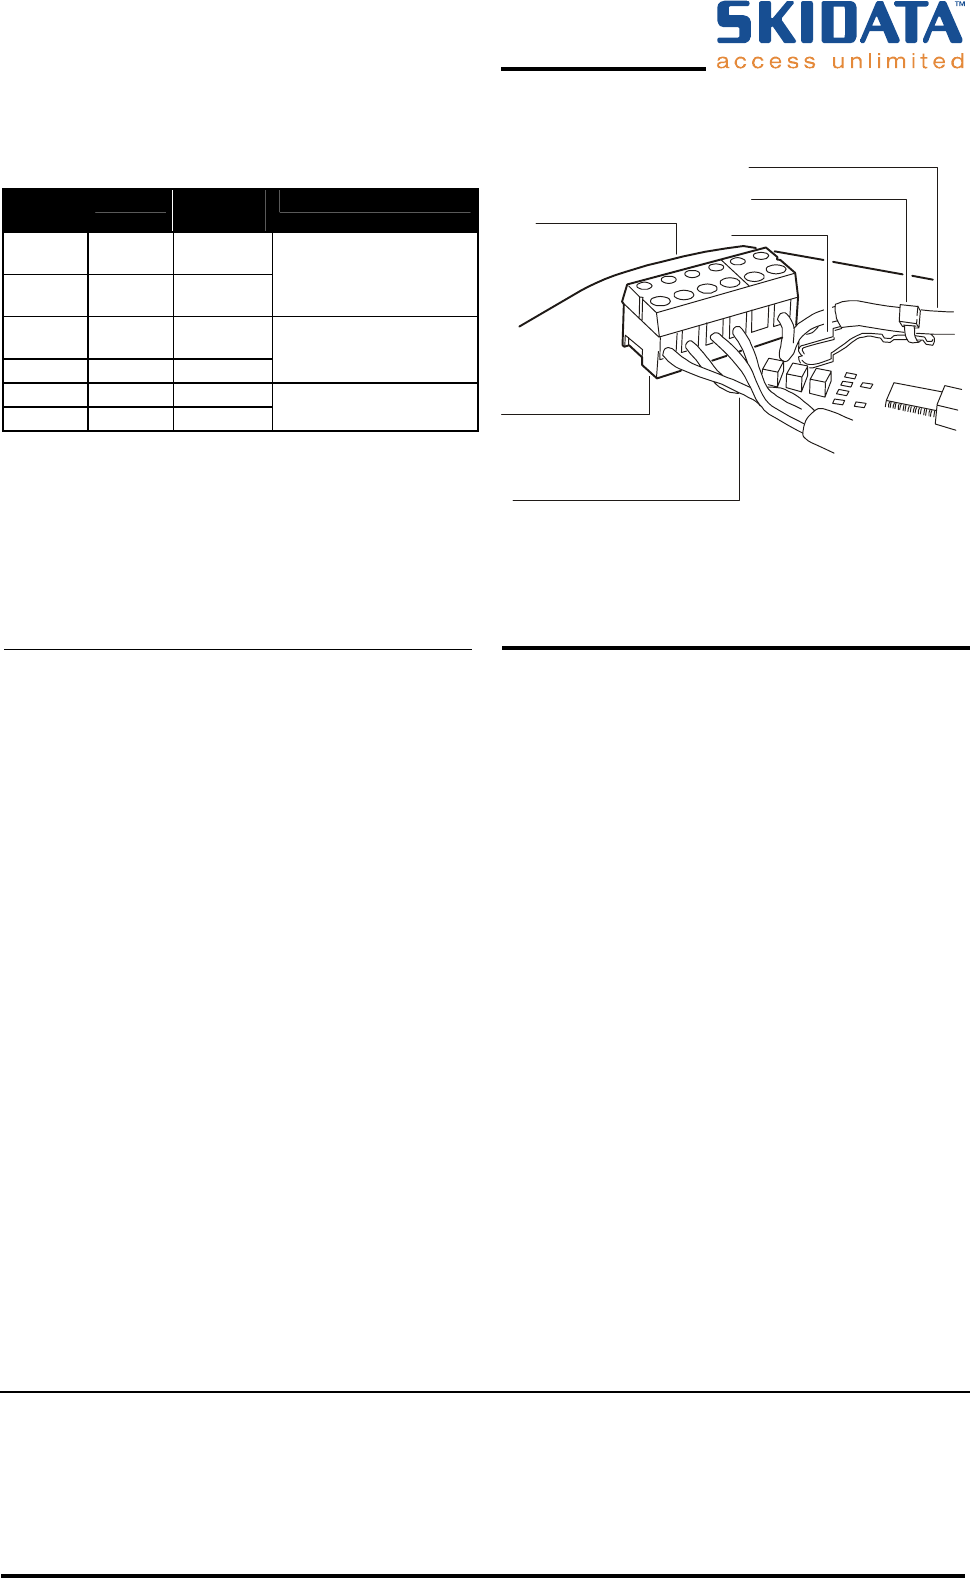
Connector for External Antenna
(use connector RIACON Type 166)
Terminal
pin #
Signal Wire
Colours
Function
1 ANT 13
MHz
Coaxial
cable inside
External 13 MHz antenna
2 GND Coaxial
cable shield
3 ANT 122
kHz
White External 122 kHz antenna
4 GND Brown
5 LED-R Yellow LED, red or green
6 LED-G Green or orange (both)
Figure 10
Main board
Cable tie
Metal tongue
Coaxial cable RG 174 (50
for 13 MHz antenna
Ω
)
Cable (LifYCY, 2x2x0.25 mm²)
for 122 kHz antenna and LEDs
Connector
for external antenna
To connect and fasten the coaxial cable
- Insert metal tongue between cable shield and
insulation
- Fasten cable tie
SKIDATA AG • Untersbergstraße 40 • A-5083 Gartenau
[p] +43 6246 888-0 • [f] +43 6246 888-7 • [e] info@skidata.com • [w] www.skidata.com
Version 1.0 • 2003-01-29 • Copyright © 2004 by SKIDATA AG
This documentation may contain representations of registered product or service trademarks owned by SKIDATA AG or third parties, as well as references
to proprietary know-how protected by copyright laws or other legal provisions.
In any case the intellectual property rights remain exclusively with their respective owners.
This document is subject to change without notice. It cannot form part of a binding contract.