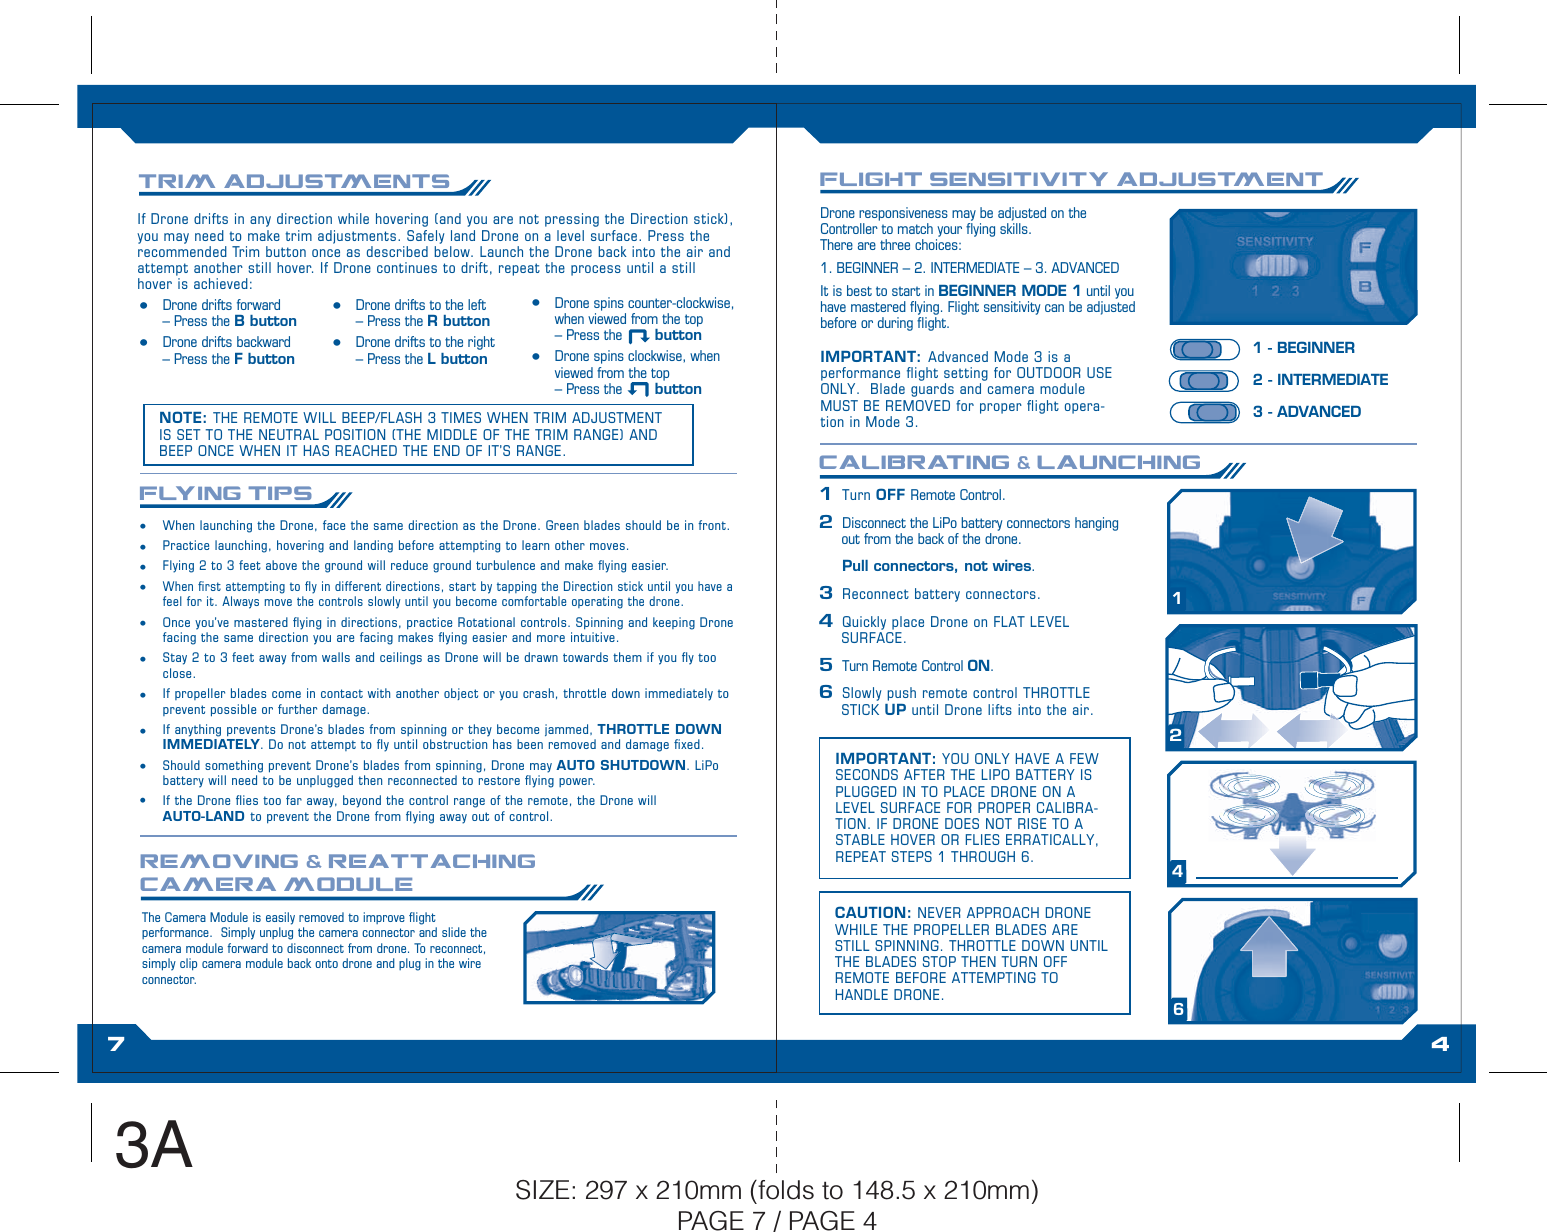
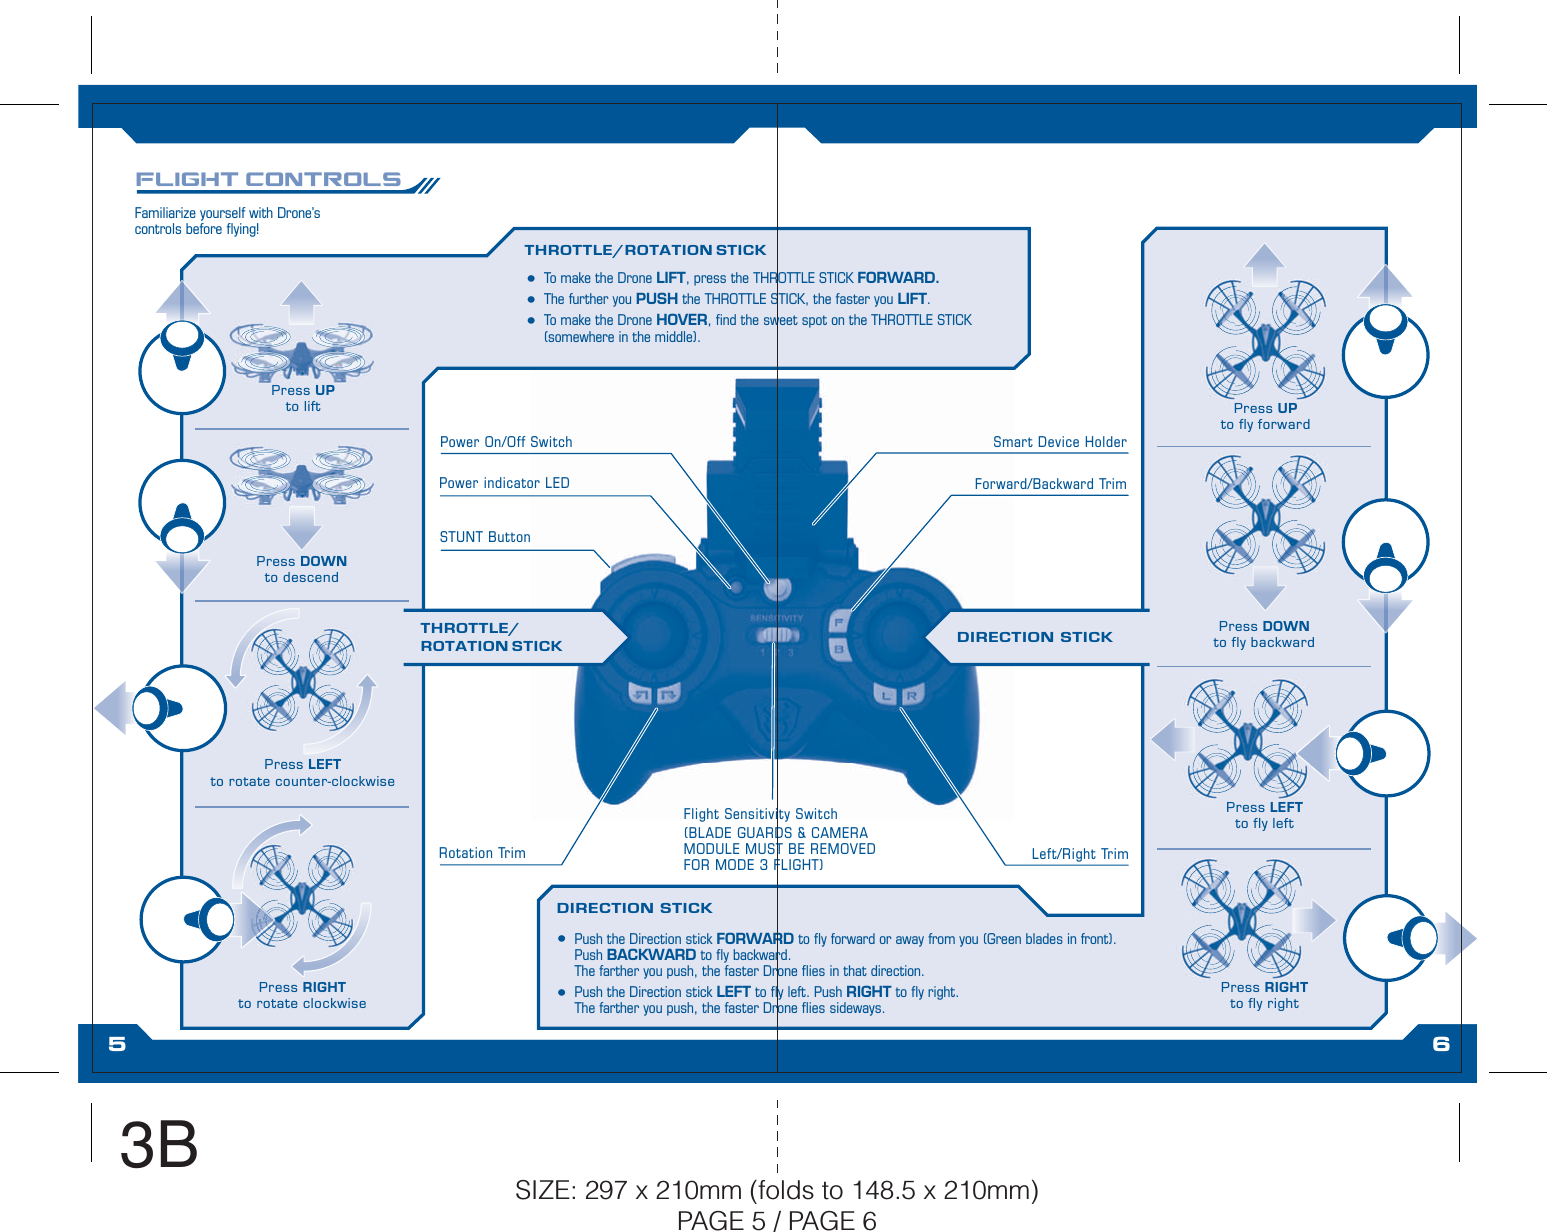
Skyrocket Toys 01526RX24G Sky Viper Streaming Drone User Manual SV StreamingDrone IS 061115 F1

Skyrocket Toys LLC Sky Viper Streaming Drone SV StreamingDrone IS 061115 F1

User manual

LiPo BATTERYBattery door includes security screw to prevent child access to LiPo battery.  Users over 14 years of age may remove screw from door for easier access.Download the Sky Viper Video Viewer app at™™#skyviper#skyviperwww.skyrockettoys.com/products/sky-viperCustomer Service : 888-674-5650©2015 Skyrocket Toys LLC, Los Angeles, CA 90066 USA. All Rights Reserved. Sky Viper is a registered tradmark and the Skyrocket logo are trademarks of Skyrocket Toys LLC. MADE IN CHINA.t Drone may be miscalibrated by launching from an unlevel surface.  Turn the remote off and unplug Drone’s battery for 30 seconds then turn them back on and try again from a at, level launching surface.t Ensure your remote is within unobstructed view of Drone and you are within 30 feet range.t Ensure the remote has fresh batteries and the LiPo battery is fully charged.t Inspect Drone for any possible damage. Turn the remote off and unplug Drone’s battery for 30 seconds then turn them back on and try again from a at, level launching surface.t Drone’s blades may have been installed incorrectly.  Reinstall and remember that the Green blades point forward.t Adjust the trim controls until drifting ceases, see page 7.t Propellers may be installed in the wrong position.  Ensure proper installation.t Ensure that Drone is ying a minimum distance of 9 feet from the ground with a minimum 9 feet clearance in all directions.t Be sure to detatch the camera unit from the Drone.Drone is unresponsive or behaving erratically All blades spin, but Drone will not y properlyDrone drifts in any direction during ight without direction from the remoteDrone crashes immediatelyDrone crashes when attempting stunt functionsStunt button does not workTROUBLESHOOTINGPROBLEM SOLUTIONRemove all packaging attachments before giving the toy to a child.Not suitable for children under 3 years due to small parts that could be swallowed. Conforms to product safety standards ASTM F963. Keep instructions for future reference. Do not discard. This device complies with PART 15 of the FCC Rules. Operation is subject to the following two conditions. (1) This device may not cause harmful interference, and (2) this device must accept any interference received, including interference that may cause undesired operation. CAUTION: Changes or modifications to this unit not expressly approved by the party responsiblefor compliance could void the user’s authority to operate the equipment.  NOTE: This equipment has been tested and found to comply with the limits for a Class B digital device, pursuant to Part 15 of the FCC Rules.  These limits are designed to provide reasonable protection against harmful interference in a residential installation.  This equipment generates, uses and can radiate radio frequency energy and, if not installed and used in accordance with the instructions, may cause harmful interference to radio communications. However, there is no guarantee that interference will not occur in a particular installation.  If this equipment does cause harmful interference to radio or television reception, which can be determined by turning the equipment off and on, the user is encouraged to try to correct the interference by one or more of the following measures: Reorient or relocate the receiving antenna - Increase the separation between the equipment and receiver - Connect the equipment into an outlet on a circuit different from that to which the receiver is connected - Consult the dealer or an experienced radio/TV technician for help.INSTRUCTION GUIDECONTENTSRC Streaming DroneRechargeable 3.7v650mAH LiPo BatteryRemote Control4 Replacement BladesDevice HolderUSB Charging CableScrewdriverScrews12RClDrone ight is erratic when Flight Sensitivity is set to 3t Ensure blade guards and camera module are removed to reduce performance inhibiting weight.STRDRONEVIDEOVIDEOSTREAMING  Art Release for Production (Mechanical)  Sky Instructions Domestic File Name: SV_StreamingDrone_IS.ai Revision:  Licensor Approval Date:  Production Release Date: 06/11/15  Production Artist:  JJ Hwang Colors: Pantone 294 Trim Size:  Notes: SIZE: 297 x 210mm (folds to 148.5 x 210mm)BACK COVER / FRONT COVER1A
Before each use, an adult should check this product and the LiPo battery to ensure no damage or hazards exist. Drone has rotating blades that move at high speed, posing danger of damage and injury. Pilots are responsible for any actions that result in damage or injury from the improper operation of Drone. Adequate ying space is required. Avoid ying near interior fans and/or vents as they may make ying difcult to control. Keep a safe distance away from streets, public thoroughfares and power lines. Never attempt to retrieve Drone from any location higher than your reach (such as rooftops or trees) or from any location that poses a safety hazard. Never y Drone at night. Keep Drone in sight at all times during operation. Discontinue operation immediately if Drone ies out of your eld of view. Do not y near spectators or animals. Pets can become excited about R/C vehicles therefore keep away from pets at all times. Keep spinning rotors away from ngers, hair, eyes and other body parts. Always launch from a at surface. Never leave Drone unattended while it is turned on. Read all enclosed information before operating.ALKALINE BATTERY CAUTIONSt  Do not use rechargeable batteries.t  Non-rechargeable batteries are not to be recharged.t  Different types of batteries or new and old batteries are not to be mixed.t  Batteries are to be inserted using correct polarity.t  Remove exhausted batteries as soon as possible and discard properly.t  Remove all batteries from compartment if toy is not used for a long period.t  The supply terminals are not to be short-circuited.t  Never throw batteries in a re or attempt to open the outer casing.WARNING:Batteries are harmful if swallowed. Please keep away from children.Battery Disposal: Dispose of batteries according to the local laws and regulations of your region. Some batteries may be recycled, and may be accepted for disposal at your local recycling center. If you are not able to identify the applicable rules in your area, please check the instructions of the battery manufacturer.LiPo batteries have a severe risk of re and injury if they are improperly handled or misused. They may explode, overheat or ignite.Read all following precautions and instructions regarding the care and use of LiPo batteries. The enclosed LiPo battery is only to be used with the vehicle and charger included with this product. t  Keep away from ammable materials.t  Do not expose to direct sunlight.t  Do not place in res or leave in hot places.t  Do not drop or make subject to strong impact.t  Keep dry and away from water.t  Remove exhausted batteries as soon as possible and discard properly.t  Remove all batteries from the compartment if toy is not used for a long period.t  The supply terminals are not to be short circuited.t  Never throw batteries in a re or attempt to open outer casing.LiPo Battery Disposal: LiPo batteries must be recycled or disposed of properly. They should not be disposed of with other household waste. Check your local laws and regulations for correct recycling and/or battery disposal. ADULT SUPERVISION REQUIREDWARNING: Do not y with broken or damaged propeller blades as it may cause damage or lead to injury.1  Unplug LiPo battery on Drone.2 Make note of the blade color and letter (A or B) before removing the blade from Drone. (Markings are located on the underside of blades and Drone).  Remove the small screw using the mini screwdriver provided.4  Replace the damaged blade with a new blade with matching color and letter.  Secure the blade with the retaining screw.CHANGING DAMAGED PROPELLERSMAINTENANCE4AABBBBAAFRONTBACKBottom View of DroneOver time, loose hair or carpet bers may get wound in blades, reducing performance. Unplug Drone and remove bers from motors. (Remove blades if necessary)GREENBLADESGREYBLADES110SIZE: 297 x 210mm (folds to 148.5 x 210mm)PAGE 1 / PAGE 101BThis device complies with Industry Canada's licence-exempt RSSs. Operation is subject to the following two conditions:  (1) This device may not cause interference; and  (2) This device must accept any interference, including interference that may cause undesired operation of the device.  Cet appareil est conforme aux CNR exemptes de licence d'Industrie Canada . Son fonctionnement est soumis aux deux conditions suivantes : ( 1 ) Ce dispositif ne peut causer d'interférences ; et ( 2 ) Ce dispositif doit accepter toute interférence , y compris les interférences qui peuvent causer un mauvais fonctionnement de l'appareil. The distance between user and products should be no less than 20cm La distance entre l'utilisateur et de produits ne devrait pas être inférieure à 20cm
1 2CHARGING, INSTALLING & CARING FOR LIPO BATTERY IN THE DRONEONE TOUCH STUNTSFRONT BARREL ROLL REAR BARREL ROLLBLADE GUARDS FOR BEGINNERSNOTE: Once a stunt has been initiated, DO NOT adjust Throttle or press any other controls until the stunt has been completed.12While ying forward (or reverse), press the STUNT BUTTON.BARREL ROLLS12 3RIGHT FLIPFRONT FLIPFLIPS1  Bring the Drone to a mid air hover without ying in any direction. Remove nger from the DIRECTION STICK 2 While HOVERING, press and hold the STUNT BUTTON. 3  While still holding the STUNT BUTTON, tap the DIRECTION STICK in the direction you want to the drone to ip.Blade guards are great for beginning pilots and can be easily installed if desired. The guards however add undesired weight and reduce ight performance.  Blade guards are optional and should NOT be used with Advanced Flight Sensitivity setting 3.1  Insert the posts of the blade guards into the holes of the drone.2  Secure the blade guards with the retaining screws.IMPORTANT: LiPo battery can be removed from Drone by loosening battery compartment screw, opening door and removing the battery. When replacing the battery, be careful not to pinch battery connector wires when closing the door. Also ensure that wires protrude through open slots on the sides of the battery door as shown. Make sure there is sufcient wire slack for easily connecting and disconnecting plugs, but not so much slack that wires interfere with spinning blades.1  Disconnect the LiPo battery connectors hanging out from the back of the drone.2  Plug the red male connector from the LiPo battery into the black female connector end of the USB charging cord.3  Plug the USB end of the charging cord into a USB power source and charge battery until full.  RED LIGHT = CHARGING  GREEN LIGHT = FULLY CHARGED4  Once fully charged, disconnect the charing cord from battery and power source. (Always unplug from power source when not in use).12CHARGING PRECAUTIONS:After use, allow LiPo battery to cool down to room temperature before charging again.t Charge LiPo battery in an isolated area, away from excessive heat or moisture.t If LiPo battery swells, unplug it immediately and permanently discontinue use.t  Do not modify, heat, or wet the battery in any way. Only recharge with provided charger.REMOVE THE CAMERA UNIT FROM THE DRONE BEFORE PERFORMING STUNTS. STUNT FUNCTIONS WILL NOT WORK WITH CAMERA UNIT ATTATCHED. ALSO REMOVE BLADE GUARDS WHEN FLYING IN ADVANCED SENSITIVITY MODE 3.IMPORTANTDrone should be ying at least 9 feet in the air with a minimum clearance of 9 feet in all directions before attempting stunt functions.  STUNT FUNCTIONS SHOULD BE PERFORMED OUTSIDE ONLY.CAUTION!9 2SIZE: 297 x 210mm (folds to 148.5 x 210mm) PAGE 9  / PAGE 22A
DOWNLOADING THE APPATTACHING YOUR DEVICE TO THE REMOTECONNECTING TO THE STREAMING DRONE WITH YOUR DEVICEiOS Go to the App Store and search for Sky Viper Video Viewer app. Then, click install. Sky Viper Streaming Drone is equipped with WiFi connectivity, so you can view streaming video on your smart device.Android Go to the Google Play Store and search for Sky Viper Video Viewer app. Then, click download. 1  Install the DEVICE HOLDER to remote. 2 Pull the DEVICE HOLDER arm.   Insert a smart device (Devices larger than 3.1/8”wide can be used, can not be attached to remote).4  Follow app directions for streaming, recording and video playback. 1  Go to Wi-Fi setting on your smart device.  2 Select SKYVIPER_XXXXXX and connect. Open the Sky Viper app on your device.4  The App will bring up your Drone’s ID.Follow the on-screen icons to interact with your Drone.STREAM LIVE VIDEO TO YOUR SMART DEVICE 421+–1.5 VAAA (LR03)+–1.5 VAAA (LR03)+–1.5 VAAA (LR03)+–1.5 VAAA (LR03)4 xIF AT ANY TIME DURING CHARGING OR USE THE BATTERY  BECOMES DAMAGED IN ANY WAY, DISCONTINUE CHARGING OR USE OF THE BATTERY IMMEDIATELY.Continuing to charge or discharge a battery that has been damaged can result in a re. Quickly and safely disconnect the Drone from charging and place away from ammable materials. Observe the battery for at least 30 minutes to be certain no additional swelling or rupture occurs. Completely discharge the battery by submerging it in a saltwater solution (1/2 cup salt per gallon of water) for 24 hours. Check your local laws and regulations for correct recycling and/or battery disposal.WARNING!WHEN NOT IN USE: t Always UNPLUG the Drone’s LiPo battery when not in use or when Drone is being stored or transported. t  Store the LiPo battery and Drone in a dry area at room temperature.t  Avoid temperatures less than 40°F/4°C and greater than 120°F/49°C. t  Do not leave the  LiPo battery in a car or exposed to direct sunlight. If exposed to temperatures greater than 120°F/49°C, the  LiPo battery can be damaged or may catch re.AUTO SHUTDOWN:t  If battery voltage drops to an extremely low level, Drone will automatically shutdown. The Video Drone will need to be recharged to restore ying power.t  If anything prevents Drone’s blades from spinning or they become jammed, Drone will automatically shutdown. The LiPo battery will need to be unplugged, then reconnected to restore ying power.Loosen screw in the Remote Control battery compartment door with Philips screw driver and insert batteries as shown. Replace door andtighten screw.INSTALLING REMOTE BATTERIES+ AAA/LR03/R03 1.5V –+ AAA/LR03/R03 1.5V –– AAA/LR06/R03 1.5V +– AAA/LR03/R03 1.5V +Li Po BATTERY1 While HOVERING, press and hold the STUNT BUTTON. 2 Move the DIRECTION STICK (Right or left) to start drone rotation.3 Press the RECORD BUTTON on your smart device to start recording. Press again to stop recording.360˚ PANORAMIC VIEW ROTATION217 SEC3 8SIZE: 297 x 210mm (folds to 148.5 x 210mm)PAGE 3 / PAGE 82B
IMPORTANT: YOU ONLY HAVE A FEW SECONDS AFTER THE LIPO BATTERY IS PLUGGED IN TO PLACE DRONE ON A LEVEL SURFACE FOR PROPER CALIBRA-TION. IF DRONE DOES NOT RISE TO A STABLE HOVER OR FLIES ERRATICALLY, REPEAT STEPS 1 THROUGH 6.CAUTION: NEVER APPROACH DRONE WHILE THE PROPELLER BLADES ARE STILL SPINNING. THROTTLE DOWN UNTIL THE BLADES STOP THEN TURN OFF REMOTE BEFORE ATTEMPTING TO HANDLE DRONE. FLIGHT SENSITIVITY ADJUSTMENTCALIBRATING & LAUNCHING14Drone responsiveness may be adjusted on the Controller to match your ying skills. There are three choices:1. BEGINNER – 2. INTERMEDIATE – 3. ADVANCEDIt is best to start in BEGINNER MODE 1 until you have mastered ying. Flight sensitivity can be adjusted before or during ight.IMPORTANT: Advanced Mode 3 is a performance ight setting for OUTDOOR USE ONLY.  Blade guards and camera module MUST BE REMOVED for proper ight opera-tion in Mode 3. 1 - BEGINNER2 - INTERMEDIATE3 - ADVANCED1 Turn OFF Remote Control.  2 Disconnect the LiPo battery connectors hanging out from the back of the drone.   Pull connectors, not wires.3 Reconnect battery connectors.4 Quickly place Drone on FLAT LEVEL SURFACE.5 Turn Remote Control ON.6 Slowly push remote control THROTTLE STICK UP until Drone lifts into the air.t  When launching the Drone, face the same direction as the Drone. Green blades should be in front. t  Practice launching, hovering and landing before attempting to learn other moves. t Flying 2 to 3 feet above the ground will reduce ground turbulence and make ying easier. t When rst attempting to y in different directions, start by tapping the Direction stick until you have a feel for it. Always move the controls slowly until you become comfortable operating the drone. t  Once you’ve mastered ying in directions, practice Rotational controls. Spinning and keeping Drone facing the same direction you are facing makes ying easier and more intuitive.t  Stay 2 to 3 feet away from walls and ceilings as Drone will be drawn towards them if you y too close. t  If propeller blades come in contact with another object or you crash, throttle down immediately to prevent possible or further damage.t  If anything prevents Drone’s blades from spinning or they become jammed, THROTTLE DOWN IMMEDIATELY. Do not attempt to y until obstruction has been removed and damage xed.t  Should something prevent Drone’s blades from spinning, Drone may AUTO SHUTDOWN. LiPo battery will need to be unplugged then reconnected to restore ying power.t  If the Drone ies too far away, beyond the control range of the remote, the Drone will AUTO-LAND to prevent the Drone from ying away out of control.FLYING TIPSt Drone drifts forward – Press the B button t Drone drifts backward – Press the F buttont Drone drifts to the left – Press the R button t Drone drifts to the right – Press the L buttont Drone spins counter-clockwise, when viewed from the top – Press the        buttont Drone spins clockwise, when viewed from the top – Press the        buttonIf Drone drifts in any direction while hovering (and you are not pressing the Direction stick), you may need to make trim adjustments. Safely land Drone on a level surface. Press the recommended Trim button once as described below. Launch the Drone back into the air and attempt another still hover. If Drone continues to drift, repeat the process until a still hover is achieved:TRIM ADJUSTMENTSNOTE: THE REMOTE WILL BEEP/FLASH 3 TIMES WHEN TRIM ADJUSTMENT IS SET TO THE NEUTRAL POSITION (THE MIDDLE OF THE TRIM RANGE) AND BEEP ONCE WHEN IT HAS REACHED THE END OF IT’S RANGE.  REMOVING & REATTACHING CAMERA MODULEThe Camera Module is easily removed to improve ight performance.  Simply unplug the camera connector and slide the camera module forward to disconnect from drone. To reconnect, simply clip camera module back onto drone and plug in the wire connector.7 42SIZE: 297 x 210mm (folds to 148.5 x 210mm)PAGE 7 / PAGE 43A
t  To make the Drone LIFT, press the THROTTLE STICK FORWARD.t  The further you PUSH the THROTTLE STICK, the faster you LIFT.t  To make the Drone HOVER, nd the sweet spot on the THROTTLE STICK (somewhere in the middle).t Push the Direction stick FORWARD to y forward or away from you (Green blades in front).Push BACKWARD to y backward. The farther you push, the faster Drone ies in that direction.t Push the Direction stick LEFT to y left. Push RIGHT to y right. The farther you push, the faster Drone ies sideways.Press UPto fly forwardPress LEFT to fly leftPress RIGHTto fly rightPress DOWN to fly backwardPress UPto liftPress LEFT to rotate counter-clockwisePress RIGHTto rotate clockwisePress DOWN to descendSTUNT ButtonFlight Sensitivity SwitchRotation TrimSmart Device HolderDIRECTION STICKDIRECTION STICKTHROTTLE/ROTATION STICKTHROTTLE/ROTATION STICKFamiliarize yourself with Drone’s controls before ying!FLIGHT CONTROLSForward/Backward TrimPower indicator LEDPower On/Off SwitchLeft/Right Trim(BLADE GUARDS & CAMERA MODULE MUST BE REMOVED FOR MODE 3 FLIGHT)5 6SIZE: 297 x 210mm (folds to 148.5 x 210mm)PAGE 5 / PAGE 63B

Navigation menu