Sleep Number 3000F Firmness Control™ System 9000 User Manual
Select Comfort Corp Firmness Control™ System 9000 Users Manual
Users Manual

Finding Your Comfort Level
Congratulations on the successful assembly of your foundation. Now
you are ready to assemble your SLEEP NUMBER®mattress. It can be
quickly and easily completed without tools.
Sleep Number®9000 Model owners:
After completing the foundation assembly
instructions in the Owner’s Manual, refer
to these mattress assembly and Firmness
Control™system instructions instead of
those in the Owner’s Manual.
Sleep Number®9000 Model
Carefully Check the Contents
of Your Mattress Boxes
If you are missing any items listed on the
following page, please e-mail Customer Service
at customerservice@selectcomfort.com
or call 1-800-472-7185.
Orientation
These instructions refer to “left” and “right”
as if you are standing at the head of the bed
looking toward the foot of the bed.
Prepare Your Foam Pads
Carefully open the Foam Comfort Pads and
Foam Base Pad and set aside.
NOTE: At least 20 minutes of expansion
time is needed.
before you begin
It is wonderful! After
only one night, we both
commented that we
had the best night’s
sleep in years!
Lowell S.
Flagstaff, AZ
Congratulations on the successful assembly
of your SLEEP NUMBER®bed. Now you
are ready to find your comfort level.
Firmness Control ™system 9000
Unlike innerspring mattresses, a Sleep Number®
bed can be personalized at any time to the
changing condition of your body. Some
reasons to alter the firmness of your bed
include:
• strained muscles
• back pain
• weight change
• pregnancy
• bad sunburn
In addition to personalizing your bed for
a great night's sleep, you can also alter the
mattress firmness when you wake in the
morning in order to:
• facilitate getting out of bed, if needed
• achieve a “fuller” bed appearance
Dual Adjustability
If you purchased a dual chamber model, you
have the ability to personalize each side of your
Sleep Number®bed. Since no two body types
are the same, each sleep partner should find
their own comfort level.
If your model came with one remote for a dual
chamber bed, pressing the “L” button on the
remote enables you to make changes to the
left side of the bed (left is determined when
laying on your back on the bed).
before you begin
NOTE: A 9-volt battery is included
and should last about six months under
normal use. Replace the battery when
the low battery indicator is displayed.
2 Wired Remotes
Firmer (top button)
Softer (bottom button)
Setting Your Sleep Number®
STEP 1. Lie on The Sleep Number Bed by Select Comfort™in your normal sleep position,
holding your remote.
STEP 2. Press any button on the remote to “wake” it up. (If using the wireless
remote with the L and R buttons, press L or R to choose a side.) It will
display the current Sleep Number®setting. If you have an idea of what
your Sleep Number®is, enter it on the remote by pressing the firmer
or softer buttons until the number you desire is displayed. The display
will go back to your current Sleep Number®and then the adjustment
will begin. The Sleep Number®and number of reference bars displayed
will change as the firmness changes. Remain still until the change is
complete. When the adjustment is complete, the Sleep Number®will
stay lit for 5 seconds and then the display will turn off.
If you decide to change your Sleep Number®before the firmness adjustment is complete, just press any
button and the Firmness Control™system will stop. Then, go to the Sleep Number®you want.
It sometimes takes several nights of sleeping at different settings to discover your ideal Sleep Number®.
If you would like to experiment further with your Sleep Number®setting, refer to the inside of page 13 in the
Owner’s Manual. Follow the step-by-step instructions for the Deluxe Sleep Number®Firmness Control System™.
1 Wireless Remote
Firmer (top button)
Softer (bottom button)
Firmness Control™system 9000
Memory
Wireless Remote
Recalling the Memory
• Press the “L" or “R" for the side you'd
like to recall.
• Press the MEM button 2 times within
5 seconds. The first time you press
MEM it will show you the Sleep
Number®currently in the memory
setting, the second time it will begin
changing the Sleep Number®to that
memory setting.
Wired Remote
Recalling the Memory
• Press the MEM button 2 times within
5 seconds. The first time you press
MEM it will show you the Sleep
Number®currently in the memory
setting, the second time it will begin
changing the Sleep Number®to that
memory setting.
Fill Feature
This feature will allow you to inflate one or both chambers to a Sleep Number®of 100.
Wireless Remote
To Fill Both Chambers
• Press and hold the FILL button for at
least 2 seconds.
The right chamber will fill to 100 then
the left chamber will fill to 100.
To Fill One Chamber
• Press any button to “wake up" the remote.
• Press “L" or “R" to determine side to fill.
• Press and hold the FILL button for at
least 2 seconds.
Wired Remote
• On one remote, press and hold the
FILL button for at least 2 seconds. This
chamber will begin filling immediately.
• To fill the second chamber, on the other
remote, press and hold the FILL button
for at least 2 seconds. This chamber will
fill to 100 when the first chamber is full.
To stop the fill feature at any time, press any button on the remote.
Wireless Remote
Setting the Memory
• Press the “L" or “R" to choose a
side and “wake up” the remote.
• Adjust the bed to the Sleep Number®
you'd like as your memory setting.
• Once at the desired Sleep Number®,
press and hold the MEM button for
3 seconds.
• “Memory Set" will appear above the
Sleep Number®when it's set.
Wired Remote
Setting the Memory
• Press the up or down arrow to
“wake up" the remote.
• Adjust the bed to the Sleep Number®
you'd like as your memory setting.
• Once at the desired Sleep Number®,
press and hold the MEM button for
3 seconds.
• “Memory Set" will appear above the
Sleep Number®when it's set.
Memory Feature more
This feature allows you to set your favorite Sleep Number®into memory and recall it at any time.
Follow these steps to change the memory setting at any time.
As the adjustment is taking place, the number displayed and tick marks will indicate
the change.
▲
Fill
Memory
Fill
Left/Right side buttons
© 2004 Select Comfort
106926
01/04
Class B Device Statement: (Section 15.105 (b) of the FCC Rules)
“Note: This equipment has been tested and found to comply with the limits for a Class B digital device, pursuant to
part 15 of the FCC Rules. These limits are designed to provide reasonable protection against harmful interference in a
residential installation. This equipment generates, uses, and can radiate radio frequency energy and, if not installed and
used in accordance with the instructions may cause harmful interference to radio communications. However, there is
no guarantee that interference will not occur in a particular installation. If this equipment does cause harmful
interference to radio or television reception, which can be determined by turning the equipment off and on, the user
is encouraged to try to correct the interference by one or more of the following measures:
• Reorient or relocate the receiving antenna.
• Increase the separation between the equipment and receiver.
• Connect the equipment into an outlet on a circuit different from that to which the receiver is connected.
• Consult the dealer or an experienced radio/TV technician for help.
This device complies with Part 15 of the FCC Rules. Operation is subject to the following two conditions: (1) this
device may not cause harmful interference, and (2) this device must accept any interference received, including
interference that may cause undesired operation.
Insert2_JR 3/9/04 1:31 PM Page 1
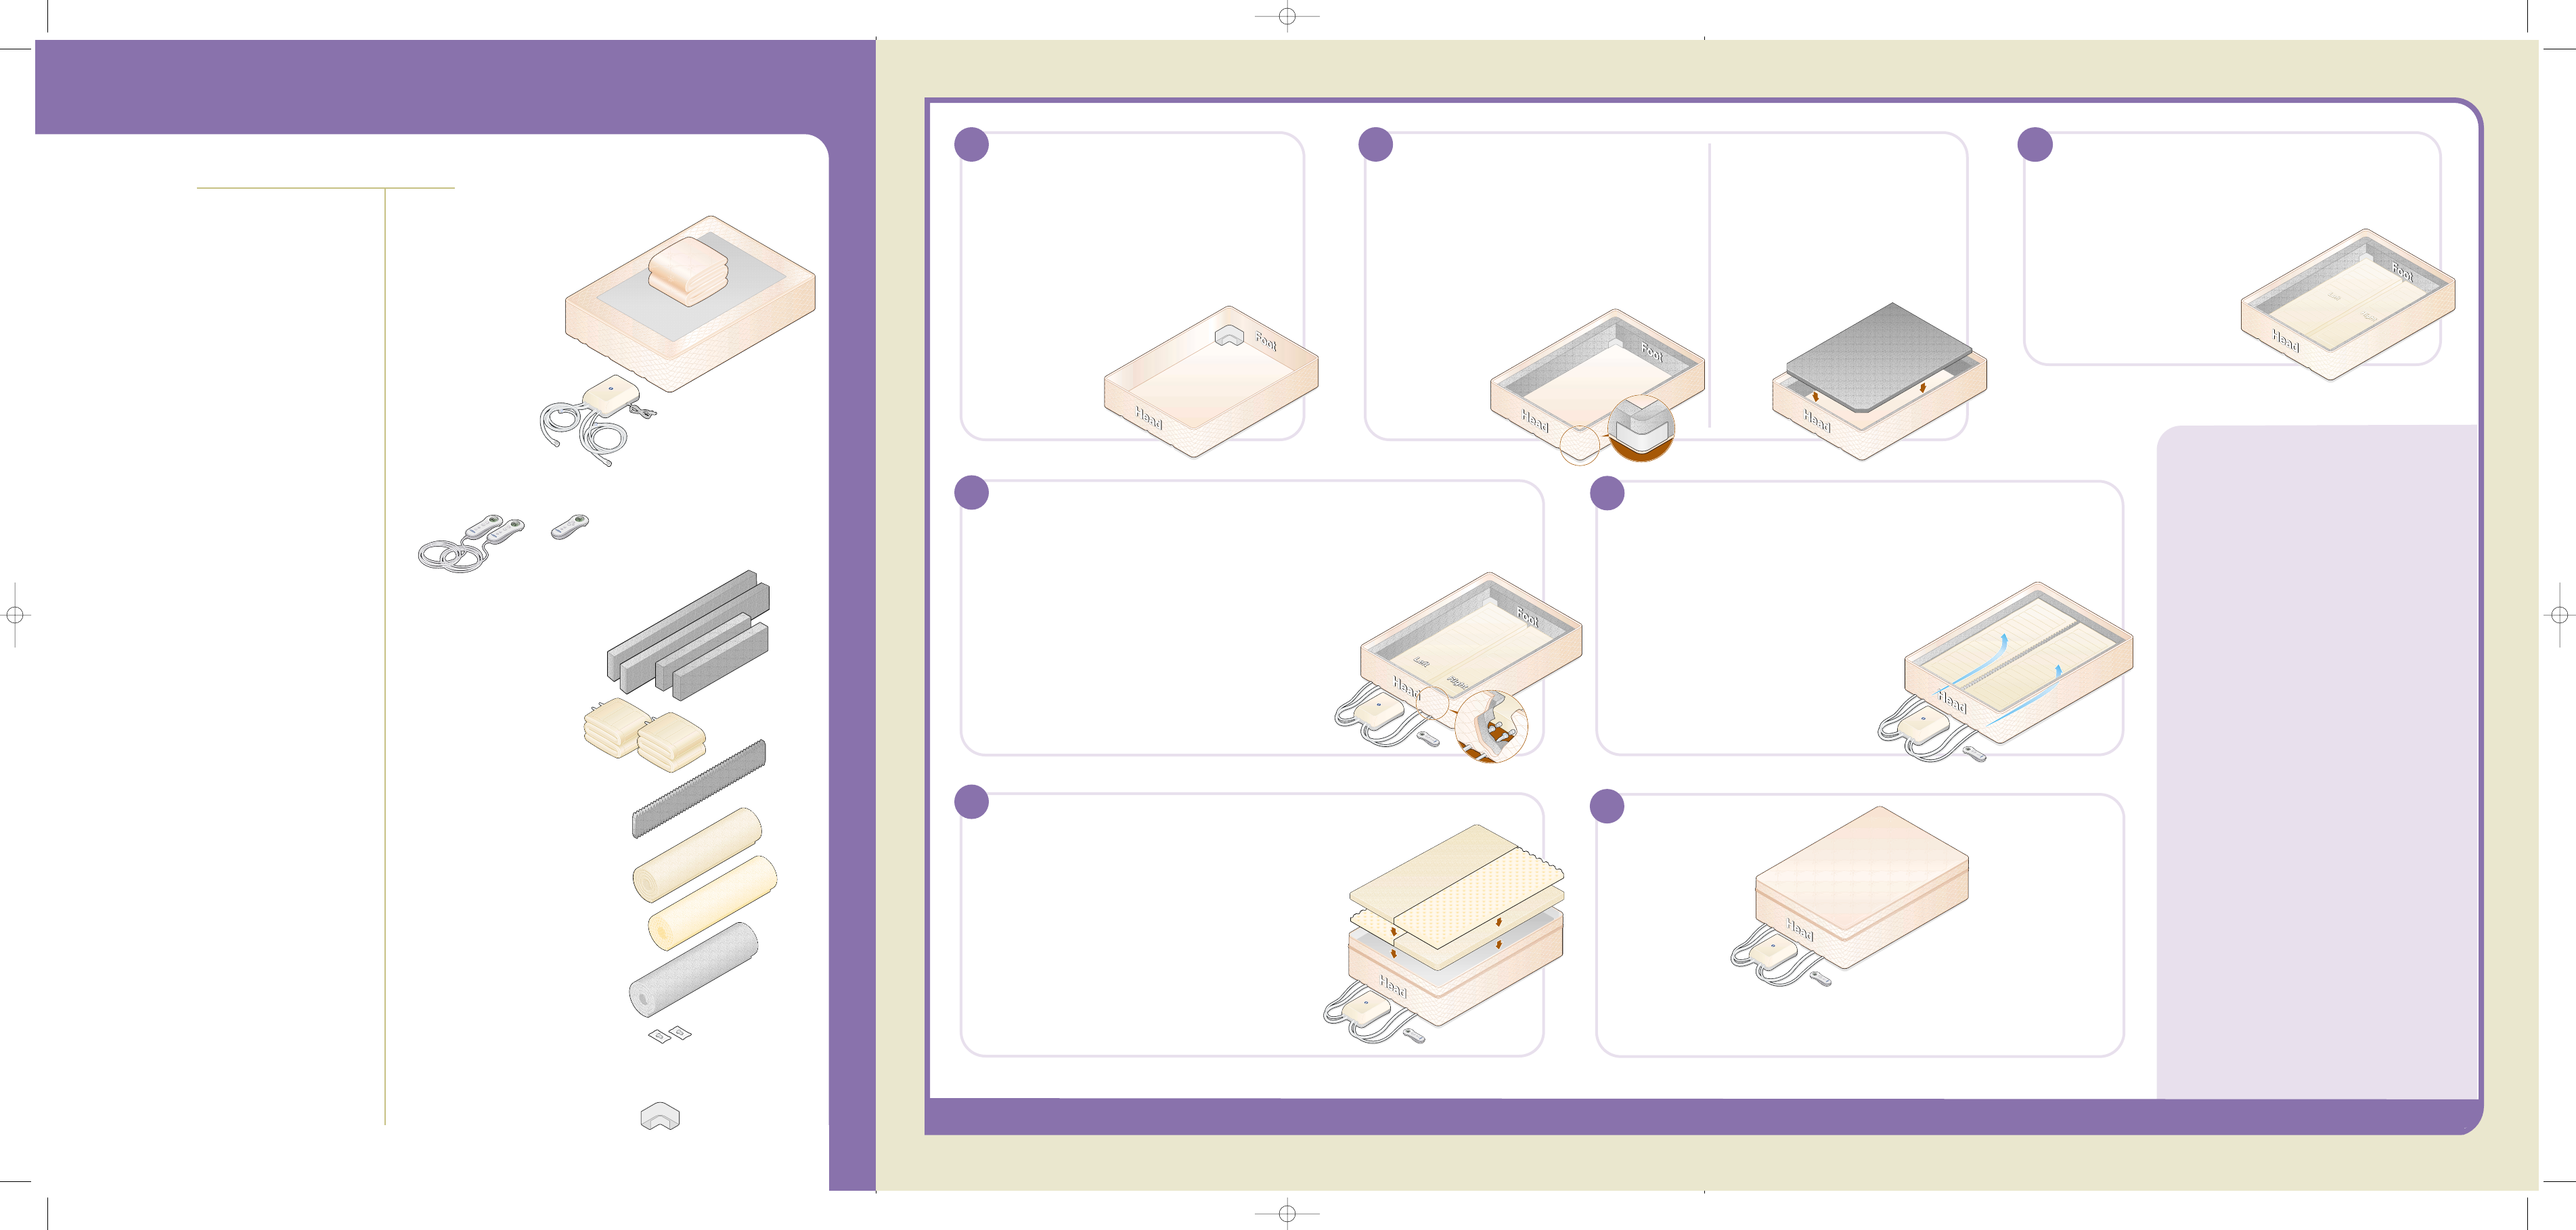
Mattress Assembly
Sleep Number®
Firmness Control™ system
(2 wired or 1 wireless)
contents
MATTRESS ASSEMBLY
▲
Position Mattress Cover
a) Place BOTTOM SECTION of mattress cover
(zipper side up) on top of the foundation or
bed platform.
b) Unzip the top portion and set it aside.
c) Holes in the bottom of the cover should
be at the head of the mattress and the
SLEEP NUMBER®bed label will be at the
foot of the mattress.
d) Place a Corner Lock™
in each corner of
the mattress
cover.
Install Foam Border Walls
a) Place the two long FOAM BORDER WALLS
along the left and right sides of the
Mattress Cover.
The ends of the Foam Border Walls should
fit snugly inside the Corner Lock™.
b) Place the shorter Foam Border Walls
at the head and foot of the bed.
c) Make sure the border
walls are connected
securely and
squarely.
123
45Inflate Air Chamber(s)
a) Press any button on the remote to activate the hand control. (If using the
wireless remote with L and R buttons, press L or R to choose a side.) Press
the ∆arrow several times to set the firmness to “20.” Inflation may take
about 10 minutes.
b) For dual chamber models, after the first chamber
is inflated, repeat for second chamber.
Then, insert the CENTER FOAM WALL
between the chambers, centering it
between the head and foot of the bed.
c) Zip on the top portion of the bottom
section and now the bottom
section is complete.
Install Air Chamber(s)
a) Lay the AIR CHAMBER(s) in the mattress
cover so the Hose Connector(s) are on the
bottom and face the head of the bed.
b) Connectors will align with the small
openings at the base of the
mattress cover.
Install Foam Base Pad
a) Carefully shake out the pad prior
to placing in position.
b) Place the FOAM BASE PAD inside
the mattress cover with the clipped
ends at the head of the bed.
The pad should nestle inside the
Foam Border Walls.
Dual chamber model shown.
Install Foam Comfort Pads
a) Set the DUVET section onto the bottom section
with the zipper up.
b) Carefully shake out pads prior to placing in position.
c) Place the FOAM COMFORT PADS inside the
Duvet section (3˝ Intralux™Pad is positioned
with the textured side up).
Each sleeper can customize their side of the mattress
by choosing how to position the foam pads. Place
the 1˝ Memory foam pad on top for a more firm,
supportive surface. Place the 3˝ Intralux™foam
pad on top for a more plush surface.
67Final Steps
a) Zip on the
duvet cover.
b) Move bed to
your desired
location.
You’re Done!
On the back you will find more information on
using the Firmness Control™system.
Q
A
Where are the Caps for Air Chamber(s)?
The caps are in the Firmness Control™system box.
Please store these in case you should ever want to
disassemble your bed and temporarily cap your
air chamber(s).
What if my Foam Comfort Pads appear
to be too small or irregular?
Gently shake the pads as you place them on your
mattress and they will recover to full size overnight.
What do I do if the motor doesn’t run?
Make sure the power cord is securely plugged into the
pump and the wall outlet. Check to see if the power
cord is plugged into an outlet which has power and
is not connected to an on/off wall switch.
Will my bed deflate if there is a power
surge or power loss?
No, your mattress will maintain its firmness. To protect
your Firmness Control™system, we do recommend using
a surge protector.
What if I notice a rubber smell from the
air chamber?
The odor you may smell is non-toxic and will fade
over time. To minimize the smell, allow the air
chamber to air out for a few hours and then lay
a couple of dryer sheets on top of the air chamber.
What if I feel like I’m rolling toward the
edge or toward the center of the mattress?
Although rare, these sensations could potentially be
experienced if one side of the mattress is set quite firm
and the other side quite soft. Call Customer Service for
a remedy to this situation if it is bothersome to you.
If you have any questions along the way, please look for the answer on our Web site: www.selectcomfort.com or call a Customer Service Representative at 1-800-472-7185.
If you are missing any
items, please e-mail
Customer Service at
customerservice@
selectcomfort.com or
call 1-800-472-7185.
Carefully check the contents of
your mattress boxes and compare
with the list below.
Mattress Cover
2 parts
• Top section (Duvet)
• Bottom section
Comfort
Control System™
Remote(s)
Varies by model.
All single chamber models include 1 remote only.
Wired remotes will be attached to the Firmness
Control™™ system.
Foam Border Walls
2 long, 2 short
Air Chamber(s)
2 for dual chamber models
1 for single chamber models
Center Foam Wall
Dual chamber models only
Foam Comfort Pads
1 of each for Twin size.
2 of each for Queen and King sizes.
• Memory Foam
• Intralux™Foam
Foam Base Pad
Caps for Air Chambers
2 Packages (Packaged inside the
Firmness Control™system box.)
Corner Lock™
Package of 4
Bottom Section
Bottom Section
Bottom Section
Top
Section
(Duvet)
Top
Section
(Duvet)
Top
Section
(Duvet)
Connect Firmness Control™system
a) Place the Firmness Control™system on the floor at the head of the bed.
Plug the power cord into the Firmness Control™system and then into an electrical
outlet. (You will hear several clicks indicating there is power.)
b) There are two hoses for each air chamber (one large and one small).
Pass the end of each hose through the small opening at the
base of the Mattress Cover and under the Foam Border
Wall to the corresponding chamber.
Connect the hose marked with “L” and the adjacent
smaller hose to the left chamber. Connect the other
two hoses to the right chamber.
c) Press hose connections together until they “click.”
Note:
When flipping the
reversible duvet,
stand at the side
of the bed and flip
from side to side.
You may need to
unzip the Duvet
section and
reposition the
foam topper pads
so your desired
pad is on top.
Insert2_JR 2/23/04 12:10 PM Page 2