SmartBridges DOLPHIN AirBridge, airPointPRO, and airPoint User Manual modification installation

SmartBridges Pte Ltd AirBridge, airPointPRO, and airPoint modification installation

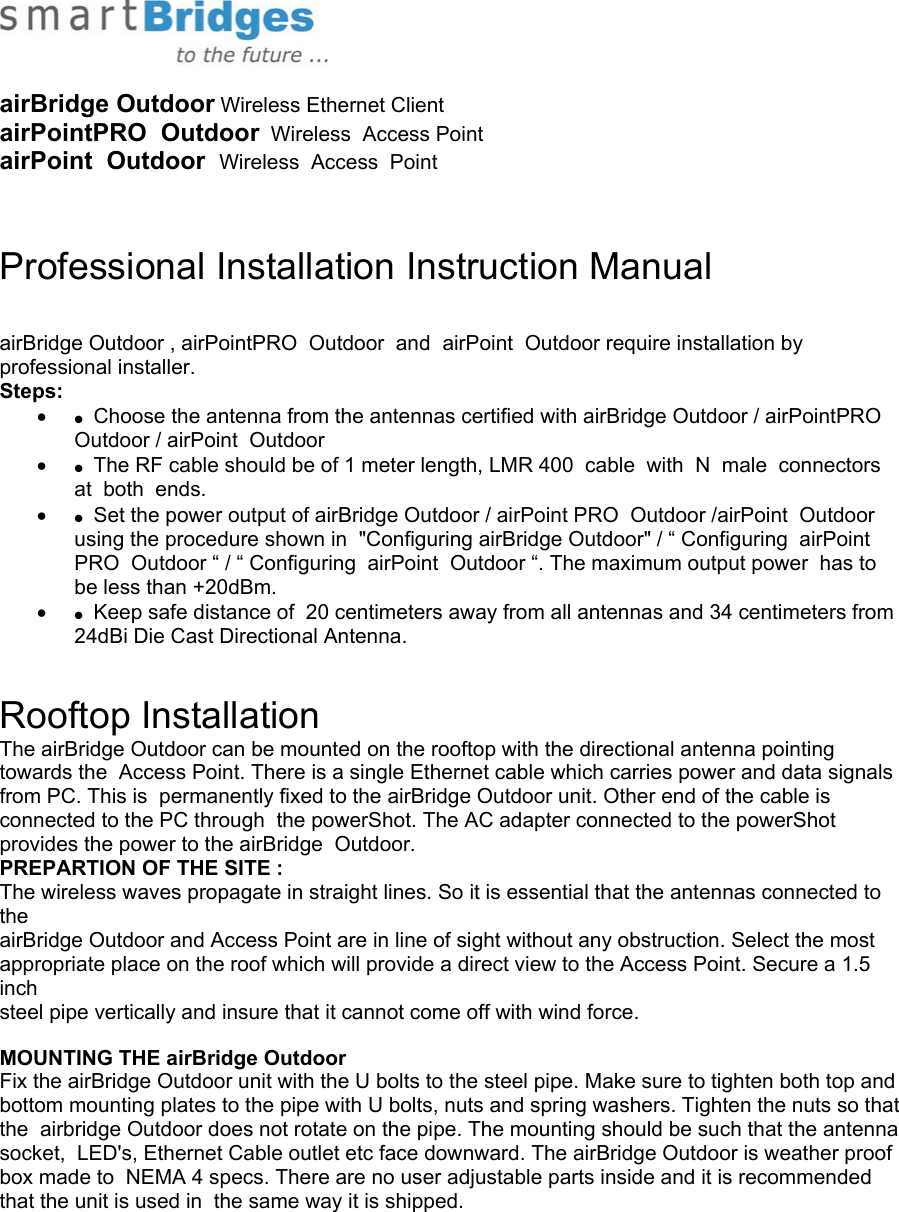
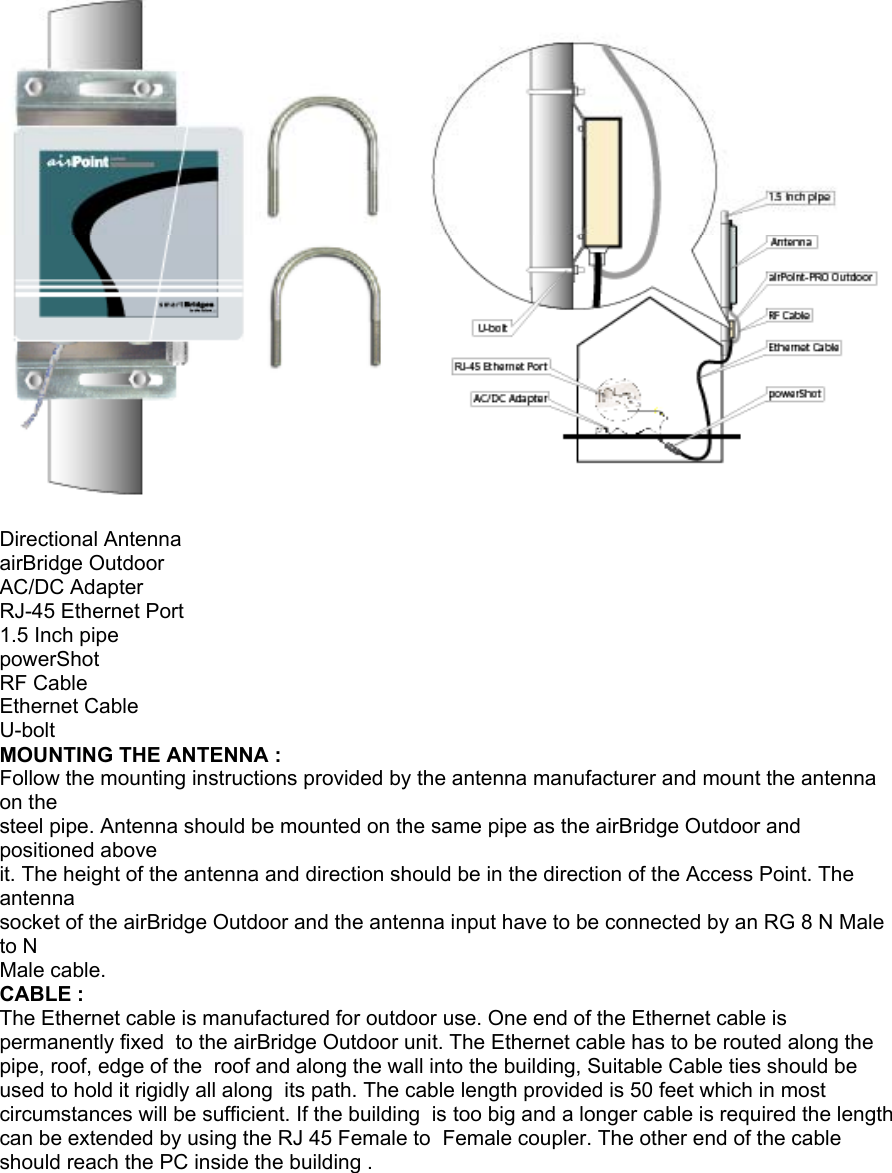
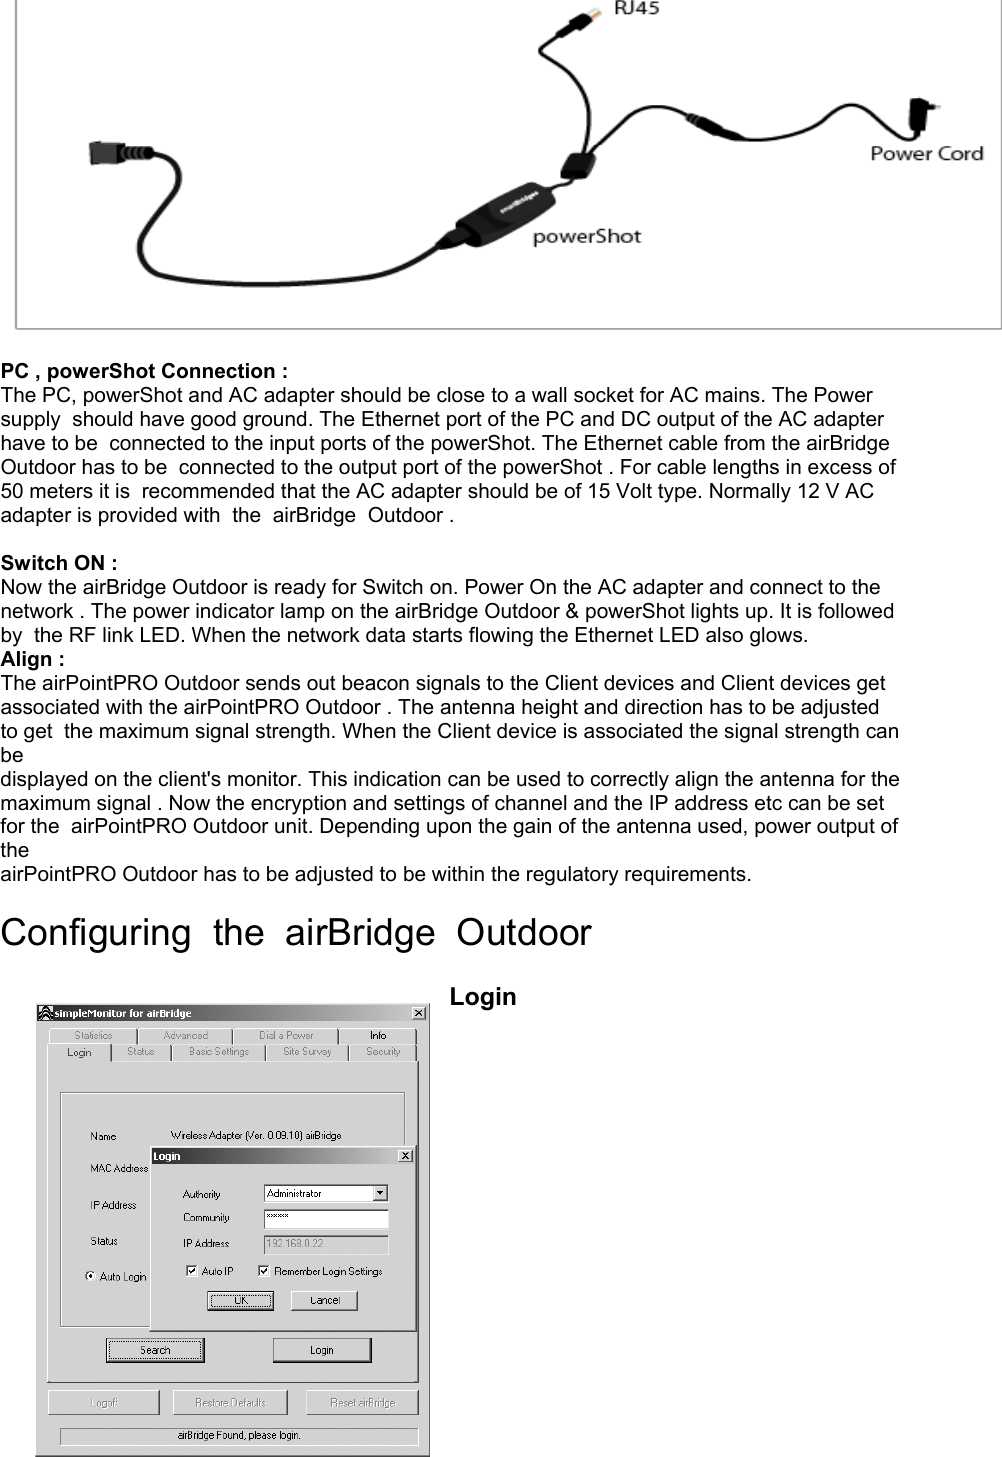
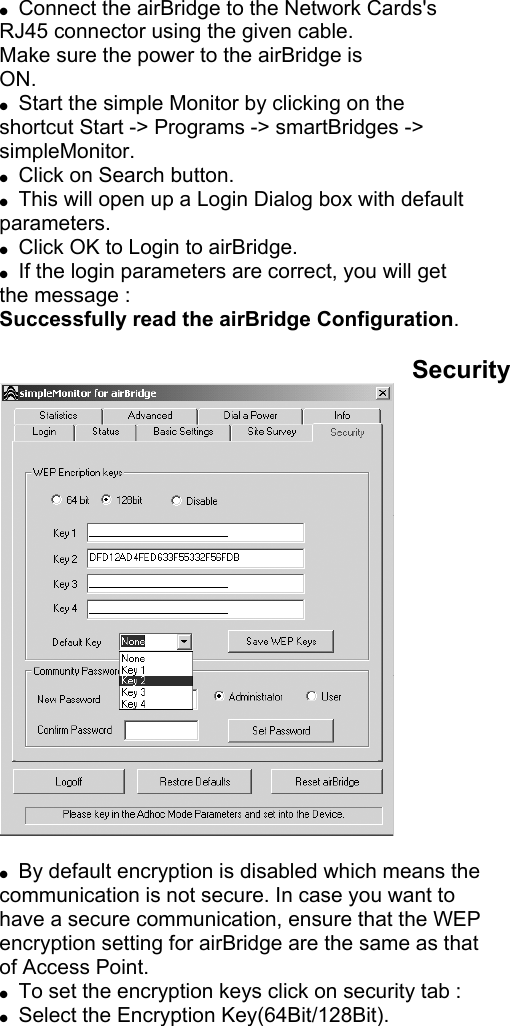
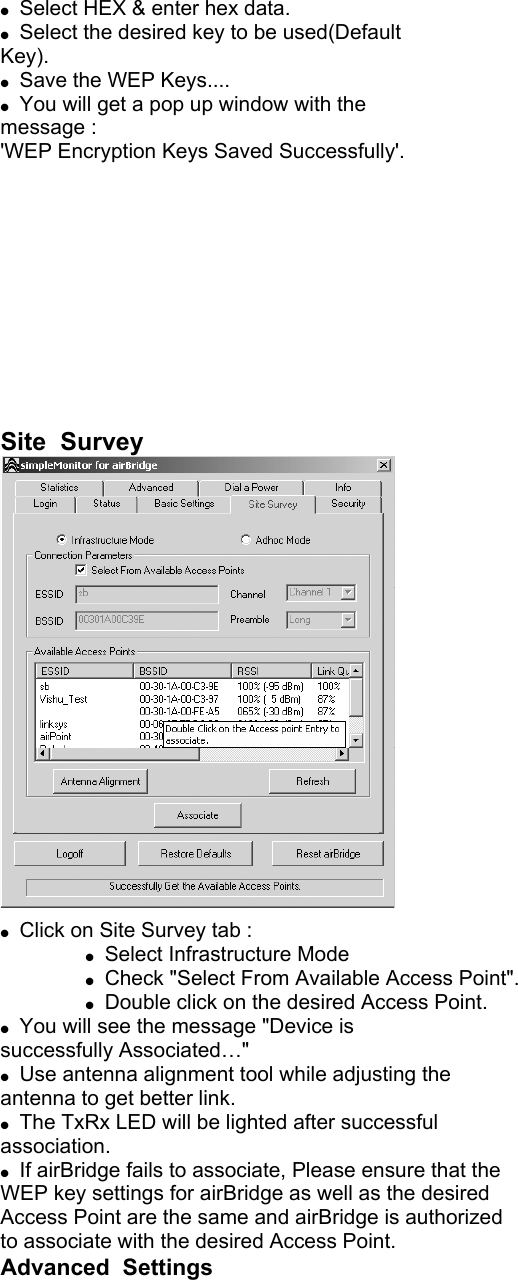
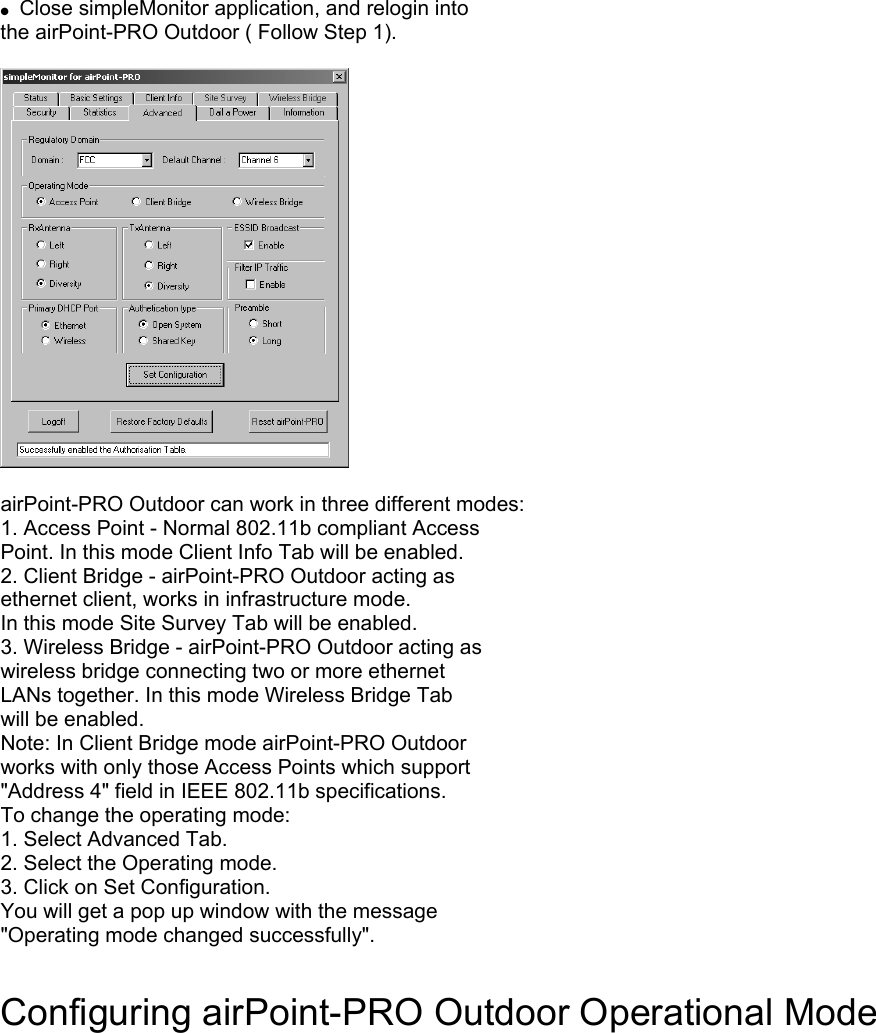
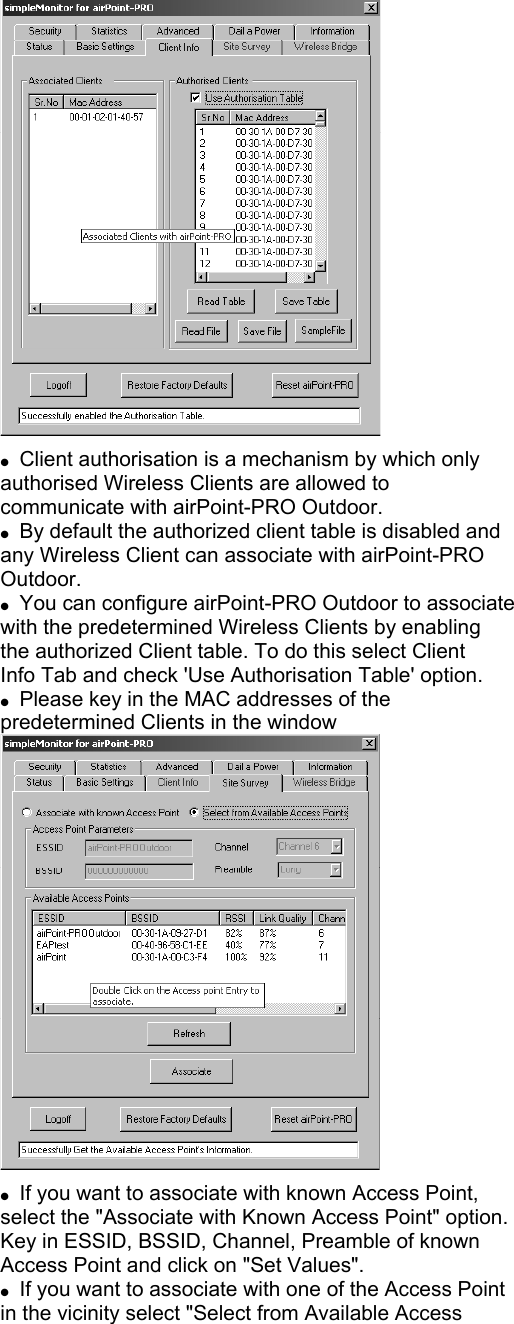
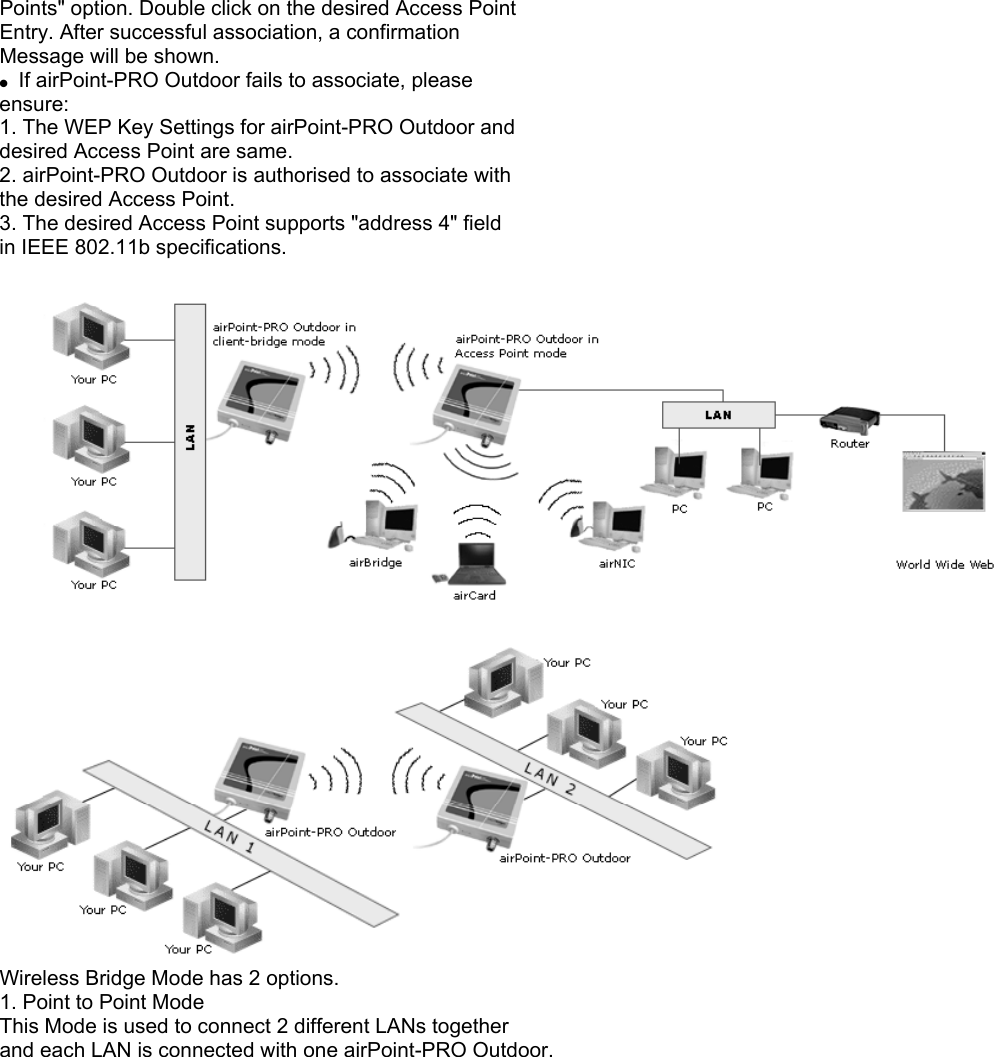
Professional Installation Manual

  airBridge Outdoor Wireless Ethernet Client          airPointPRO  Outdoor  Wireless  Access Point airPoint  Outdoor  Wireless  Access  Point   Professional Installation Instruction Manual  airBridge Outdoor , airPointPRO  Outdoor  and  airPoint  Outdoor require installation by professional installer. Steps: •    Choose the antenna from the antennas certified with airBridge Outdoor / airPointPRO  Outdoor / airPoint  Outdoor •    The RF cable should be of 1 meter length, LMR 400  cable  with  N  male  connectors  at  both  ends. •    Set the power output of airBridge Outdoor / airPoint PRO  Outdoor /airPoint  Outdoor using the procedure shown in  "Configuring airBridge Outdoor" / “ Configuring  airPoint PRO  Outdoor “ / “ Configuring  airPoint  Outdoor “. The maximum output power  has to be less than +20dBm. •    Keep safe distance of  20 centimeters away from all antennas and 34 centimeters from 24dBi Die Cast Directional Antenna.   Rooftop Installation The airBridge Outdoor can be mounted on the rooftop with the directional antenna pointing towards the  Access Point. There is a single Ethernet cable which carries power and data signals from PC. This is  permanently fixed to the airBridge Outdoor unit. Other end of the cable is connected to the PC through  the powerShot. The AC adapter connected to the powerShot provides the power to the airBridge  Outdoor. PREPARTION OF THE SITE : The wireless waves propagate in straight lines. So it is essential that the antennas connected to the airBridge Outdoor and Access Point are in line of sight without any obstruction. Select the most appropriate place on the roof which will provide a direct view to the Access Point. Secure a 1.5 inch steel pipe vertically and insure that it cannot come off with wind force.   MOUNTING THE airBridge Outdoor Fix the airBridge Outdoor unit with the U bolts to the steel pipe. Make sure to tighten both top and bottom mounting plates to the pipe with U bolts, nuts and spring washers. Tighten the nuts so that the  airbridge Outdoor does not rotate on the pipe. The mounting should be such that the antenna socket,  LED's, Ethernet Cable outlet etc face downward. The airBridge Outdoor is weather proof box made to  NEMA 4 specs. There are no user adjustable parts inside and it is recommended that the unit is used in  the same way it is shipped.
  Directional Antenna airBridge Outdoor AC/DC Adapter RJ-45 Ethernet Port 1.5 Inch pipe powerShot RF Cable Ethernet Cable U-bolt MOUNTING THE ANTENNA : Follow the mounting instructions provided by the antenna manufacturer and mount the antenna on the steel pipe. Antenna should be mounted on the same pipe as the airBridge Outdoor and positioned above it. The height of the antenna and direction should be in the direction of the Access Point. The antenna socket of the airBridge Outdoor and the antenna input have to be connected by an RG 8 N Male to N Male cable. CABLE : The Ethernet cable is manufactured for outdoor use. One end of the Ethernet cable is permanently fixed  to the airBridge Outdoor unit. The Ethernet cable has to be routed along the pipe, roof, edge of the  roof and along the wall into the building, Suitable Cable ties should be used to hold it rigidly all along  its path. The cable length provided is 50 feet which in most circumstances will be sufficient. If the building  is too big and a longer cable is required the length can be extended by using the RJ 45 Female to  Female coupler. The other end of the cable should reach the PC inside the building . airBridgeOutdoor
 PC , powerShot Connection : The PC, powerShot and AC adapter should be close to a wall socket for AC mains. The Power supply  should have good ground. The Ethernet port of the PC and DC output of the AC adapter have to be  connected to the input ports of the powerShot. The Ethernet cable from the airBridge Outdoor has to be  connected to the output port of the powerShot . For cable lengths in excess of 50 meters it is  recommended that the AC adapter should be of 15 Volt type. Normally 12 V AC adapter is provided with  the  airBridge  Outdoor .  Switch ON : Now the airBridge Outdoor is ready for Switch on. Power On the AC adapter and connect to the network . The power indicator lamp on the airBridge Outdoor & powerShot lights up. It is followed by  the RF link LED. When the network data starts flowing the Ethernet LED also glows. Align : The airPointPRO Outdoor sends out beacon signals to the Client devices and Client devices get associated with the airPointPRO Outdoor . The antenna height and direction has to be adjusted to get  the maximum signal strength. When the Client device is associated the signal strength can be displayed on the client's monitor. This indication can be used to correctly align the antenna for the maximum signal . Now the encryption and settings of channel and the IP address etc can be set for the  airPointPRO Outdoor unit. Depending upon the gain of the antenna used, power output of the airPointPRO Outdoor has to be adjusted to be within the regulatory requirements.  Configuring  the  airBridge  Outdoor   Login
           Connect the airBridge to the Network Cards's RJ45 connector using the given cable. Make sure the power to the airBridge is ON.   Start the simple Monitor by clicking on the shortcut Start -> Programs -> smartBridges -> simpleMonitor.   Click on Search button.   This will open up a Login Dialog box with default parameters.   Click OK to Login to airBridge.   If the login parameters are correct, you will get the message : Successfully read the airBridge Configuration.  Security     By default encryption is disabled which means the communication is not secure. In case you want to have a secure communication, ensure that the WEP encryption setting for airBridge are the same as that of Access Point.   To set the encryption keys click on security tab :   Select the Encryption Key(64Bit/128Bit).
  Select HEX & enter hex data.   Select the desired key to be used(Default Key).   Save the WEP Keys....   You will get a pop up window with the message : 'WEP Encryption Keys Saved Successfully'.            Site  Survey     Click on Site Survey tab :    Select Infrastructure Mode    Check "Select From Available Access Point".    Double click on the desired Access Point.   You will see the message "Device is successfully Associated…"   Use antenna alignment tool while adjusting the antenna to get better link.   The TxRx LED will be lighted after successful association.   If airBridge fails to associate, Please ensure that the WEP key settings for airBridge as well as the desired Access Point are the same and airBridge is authorized to associate with the desired Access Point. Advanced  Settings
    Change default values of Regulatory Domain & operational channel : 1. Select appropriate Regulatory Domain from Drop Down List. 2. Select appropriate Channel from the Channel Drop Down List, click on Set Default button to change the default settings for Regulatory Domain and Channel. 3. Specify appropriate values for Fragmentation and RTS Threshold (refer to user guide for more details). 4. Select authentication type from drop down list. 5. Click on set configuration button to save these parameters.  Dial  a  Power    Select antenna type from Drop Down List.   Specify Cable Loss value in the Edit box. The limits for this value are min 0.5 dB, max 10.0 dB.   Use slider control to adjust EIRP Output power from the airBridge unit. EIRP Output power is displayed in an Edit Box.   Click on Set EIRP button. This will change the radio transmit power
of the airBridge unit.   A message will be displayed after successful completion of this operation.  Restore Factory Default Settings If you forget the critical settings like WEP or Administrator Password of the airBridge, you can restore the airBridge Outdoor to the Factory Default Settings as, 1. Make sure that the Power to the airBridge Outdoor is ON. ( indicated by PWR LED ) 2. Locate and Press the Restore Defaults Button on powerShot-SB2811 continuously (The button is at the bottom side and can be accessed by a small pin). 3. The TxRx LED will dim its light intensity for few seconds. 4. Release the button after the TxRx LED restores back to its original bright intensity. 5. After restoring the Factory Default Settings, please configure the airBridge again.   Configuring the airPoint-PRO Outdoor   To configure the settings of airPoint-PRO   Outdoor, you need to use the Setup Software.   Insert the CD into CDROM drive. The CD will run automatically, Click on Install.   When the installation is completed successfully, you will be prompted to restart the computer. (It is advisable to restart the computer after Installation is completed). 1   Configuring airPoint-PRO Outdoor connected to Ethernet LAN  Connect the airPoint-PRO Outdoor to your normal LAN using straight Ethernet cable. Make sure the power to the  airPoint-PRO Outdoor is ON. By Default airPoint-PRO Outdoor runs a DHCP Client. So the IP Address will be acquired from the DHCP Server on the LAN  If your LAN doesn't have a DHCP server but instead you run the PCs with Static IPs then you need to assign a  Temporary IP Address to airPoint-PRO Outdoor in order to configure it (see Appendix A).   Configuring airPoint-PRO Outdoor using a standalone PC Connect the airPoint-PRO Outdoor to your PC using cross Ethernet cable. You can convert straight cable to cross using a  cross connector provided. Make sure the power to the airPoint-PRO Outdoor is ON. To use the simple Monitor for  configuring airPoint-PRO Outdoor, you must assign a temporary IP address to your computer and to the  airPoint-PRO Outdoor. (see Appendix B). For Windows 98 / ME / NT / 2000 / XP The Setup software is common to both airPoint-PRO and airPoint-PRO Outdoor and refered to as airPoint-PRO Software.   Start the simpleMonitor by clicking on the shortcut Start -> Programs -> smartBridges -> airPoint-PRO -> simpleMonitor.   Click on Search.   Select the airPoint-PRO Outdoor and enter the  community password as "public" (case sensitive) and  click on Login.   You will get the message 'Successfully read the  Configuration' in the message window.
  By default encryption is disabled which means the  communication is not secure. In case you want to have a  secure communication, ensure that the WEP encryption  keys are set.   To set the encryption keys click on security tab :   Select the Desired Encryption Key(64Bit/128Bit).   Select HEX & enter hex data (0~9, A~F).   Select the desired key to be used(Default Key).   Save the WEP Keys..     You will get a pop up window with the message 'WEP Encyption Keys Saved Successfully'.      Select the 'Basic Settings' Tab.   Enter the desired ESSID & Access Point Name, Channel and Rate in the respective tabs.   If you want to assign a new network settings to airPoint-PRO Outdoor, enter the IP Address, Subnet Mask and Default Gateway as per your Network Settings.   Click on Set Configuration to save the Configuration. Once the configuration is saved, you will be logged out of simple monitor.
  Close simpleMonitor application, and relogin into the airPoint-PRO Outdoor ( Follow Step 1).    airPoint-PRO Outdoor can work in three different modes: 1. Access Point - Normal 802.11b compliant Access Point. In this mode Client Info Tab will be enabled. 2. Client Bridge - airPoint-PRO Outdoor acting as ethernet client, works in infrastructure mode. In this mode Site Survey Tab will be enabled. 3. Wireless Bridge - airPoint-PRO Outdoor acting as wireless bridge connecting two or more ethernet LANs together. In this mode Wireless Bridge Tab will be enabled. Note: In Client Bridge mode airPoint-PRO Outdoor works with only those Access Points which support "Address 4" field in IEEE 802.11b specifications. To change the operating mode: 1. Select Advanced Tab. 2. Select the Operating mode. 3. Click on Set Configuration. You will get a pop up window with the message "Operating mode changed successfully".  Configuring airPoint-PRO Outdoor Operational Mode
    Client authorisation is a mechanism by which only authorised Wireless Clients are allowed to communicate with airPoint-PRO Outdoor.   By default the authorized client table is disabled and any Wireless Client can associate with airPoint-PRO Outdoor.   You can configure airPoint-PRO Outdoor to associate with the predetermined Wireless Clients by enabling the authorized Client table. To do this select Client Info Tab and check 'Use Authorisation Table' option.   Please key in the MAC addresses of the predetermined Clients in the window     If you want to associate with known Access Point, select the "Associate with Known Access Point" option. Key in ESSID, BSSID, Channel, Preamble of known Access Point and click on "Set Values".   If you want to associate with one of the Access Point in the vicinity select "Select from Available Access
Points" option. Double click on the desired Access Point Entry. After successful association, a confirmation Message will be shown.   If airPoint-PRO Outdoor fails to associate, please ensure: 1. The WEP Key Settings for airPoint-PRO Outdoor and desired Access Point are same. 2. airPoint-PRO Outdoor is authorised to associate with the desired Access Point. 3. The desired Access Point supports "address 4" field in IEEE 802.11b specifications.   Wireless Bridge Mode has 2 options. 1. Point to Point Mode This Mode is used to connect 2 different LANs together and each LAN is connected with one airPoint-PRO Outdoor.
    Login into airPoint-PRO Outdoor connected to LAN1. (Follow step 1 in configurating the airPoint-PRO Outdoor) .   Select "Wireless Bridge" Tab.   Select Point to Point Mode   Key in the MAC Address of airPoint-PRO Outdoor connected to LAN2.   Click "Set Parameters".   Similarly Key in the MAC Address of airPoint-PRO Outdoor connected to LAN1 into airPoint-PRO Outdoor  connected to LAN2.   Make sure that Operating Channel, and WEP Encryption settings are same for all the airPoint-PRO Outdoors. 2. Point to MultiPoint Mode. This Mode is used to connect more than 2 LANS together.   In this Mode every LAN is represented by the MAC Address of the airPoint-PRO Outdoor connected to it.   Login into airPoint-PRO connected to LAN1. (Follow step 1 in configurating the airPoint-PRO Outdoor) .   Select Wireless Bridge Tab, Select Point to MultiPoint Option.   Key in the MAC Addresses of all the airPoint-PRO Outdoors connected to LAN2 and LAN3.
  Click on 'Set Parameters'.   Similarly Login into airPoint-PRO Outdoors connected on the LAN2, and LAN3 and Key in the MAC  Addresses of other LANs in the Point to MultiPoint Mode.   Please make sure that Operating Channel, and WEP Encryption settings are same for all the airPoint-PRO  Outdoors.  Dial a Power This feature of airPoint-PRO Outdoor will allow you to control the radio transmit power of the airPoint- PRO Outdoor from the SimpleMonitor.   Select appropriate antenna type from drop down lists.   Specify Cable Loss value in the Edit box. The limits for this value are min 0.5 dB, max 10.0 dB.   Use slider control to adjust EIRP Output power from the airPoint-PRO Outdoor. EIRP Output power is displayed in the Display Box.   Click Set Power button. This will change the radio transmit power of the airPoint-PRO Outdoor unit.   It is recommended to operate the unit with minimum required power to reduce the interference to other installations.  Restore Factory Default Settings If you forget the critical settings like WEP or Administrator Password of the airPoint-PRO Outdoor, you can  restore the airPoint-PRO Outdoor to the Factory Default Settings as, 1. Make sure that the Power to the airPoint-PRO Outdoor is ON. ( indicated by PWR LED ) 2. Locate and Press the Restore Defaults Button on powerShot-SB2811 continuously (The button is at the bottom side and can be accessed by a small pin). 3. The TxRx LED will stop flashing for few seconds. 4. Release the button after the TxRx LED starts flashing again. 5. After restoring the Factory Default Settings, please configure the airPoint-PRO Outdoor again.

Navigation menu