SmartLabs 26742 LED PAR38 Light Bulb User Manual
SmartLabs, Inc. LED PAR38 Light Bulb Users Manual
Users Manual
®
INSTEON LED Bulb (PAR38) 2674-222
®
INSTEON LED Bulb (PAR38) 2674-222
Contents
Getting Started
INSTEON LED Bulb 4
Device Overview
Do Not Connect to a Dimmer
Leave Your Fixture On
Linking
INSTEON Links
Understanding Linking 6
Linking to the INSTEON Hub using the iOS or Android App 8
Linking with a Single-Button Controller 9
Linking with a Multi-Button Controller 10
Multi-Linking or Making a Scene 11
Unlinking from a Single-Button Controller 12
Unlinking from a Multi-Button Controller 13
Multi-Unlinking or Removing a Scene 14
Software-Only Features
Ramp Rate 16
Disable Linking on Power-up
Always-On Wiring
Always-On Wiring 18
Appendix
22
Troubleshooting 24
25
Product Warranty 26

3
Everything you need to quickly get up and running.
Getting Started
Everything you need to quickly get up and running.
Getting Started
4
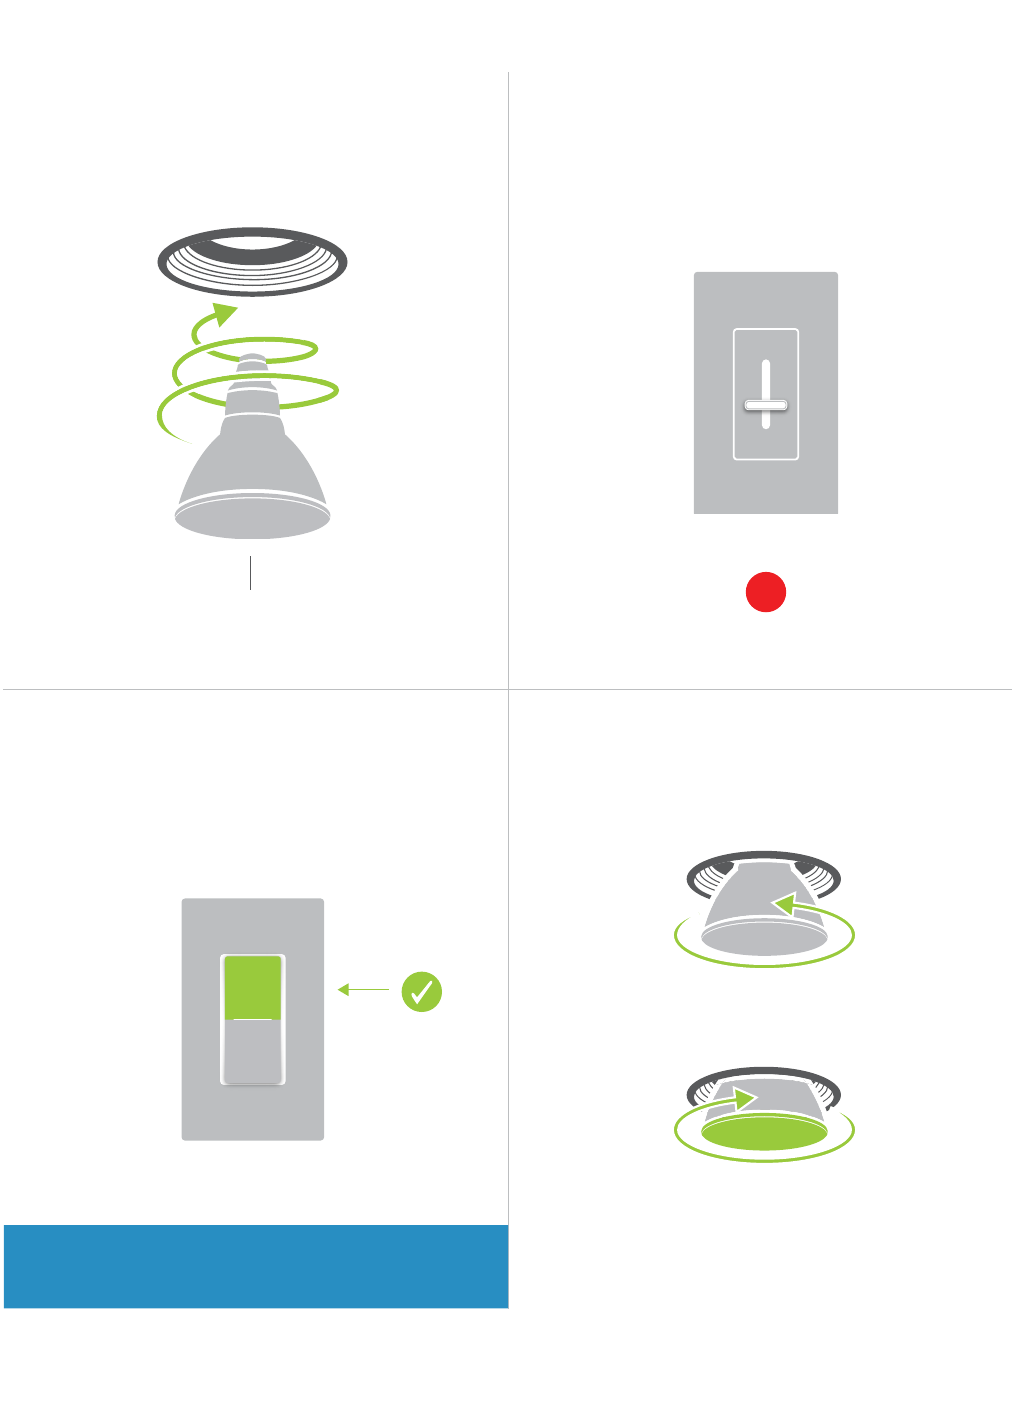
Device Overview Do Not Connect to a Dimmer
INSTEON LED Bulb
with the LED Bulb is lost.
INSTEON ID
Your LED Bulb does not have a set button.
X
Leave Your Fixture On Linking
?
ON

5
INSTEON Links
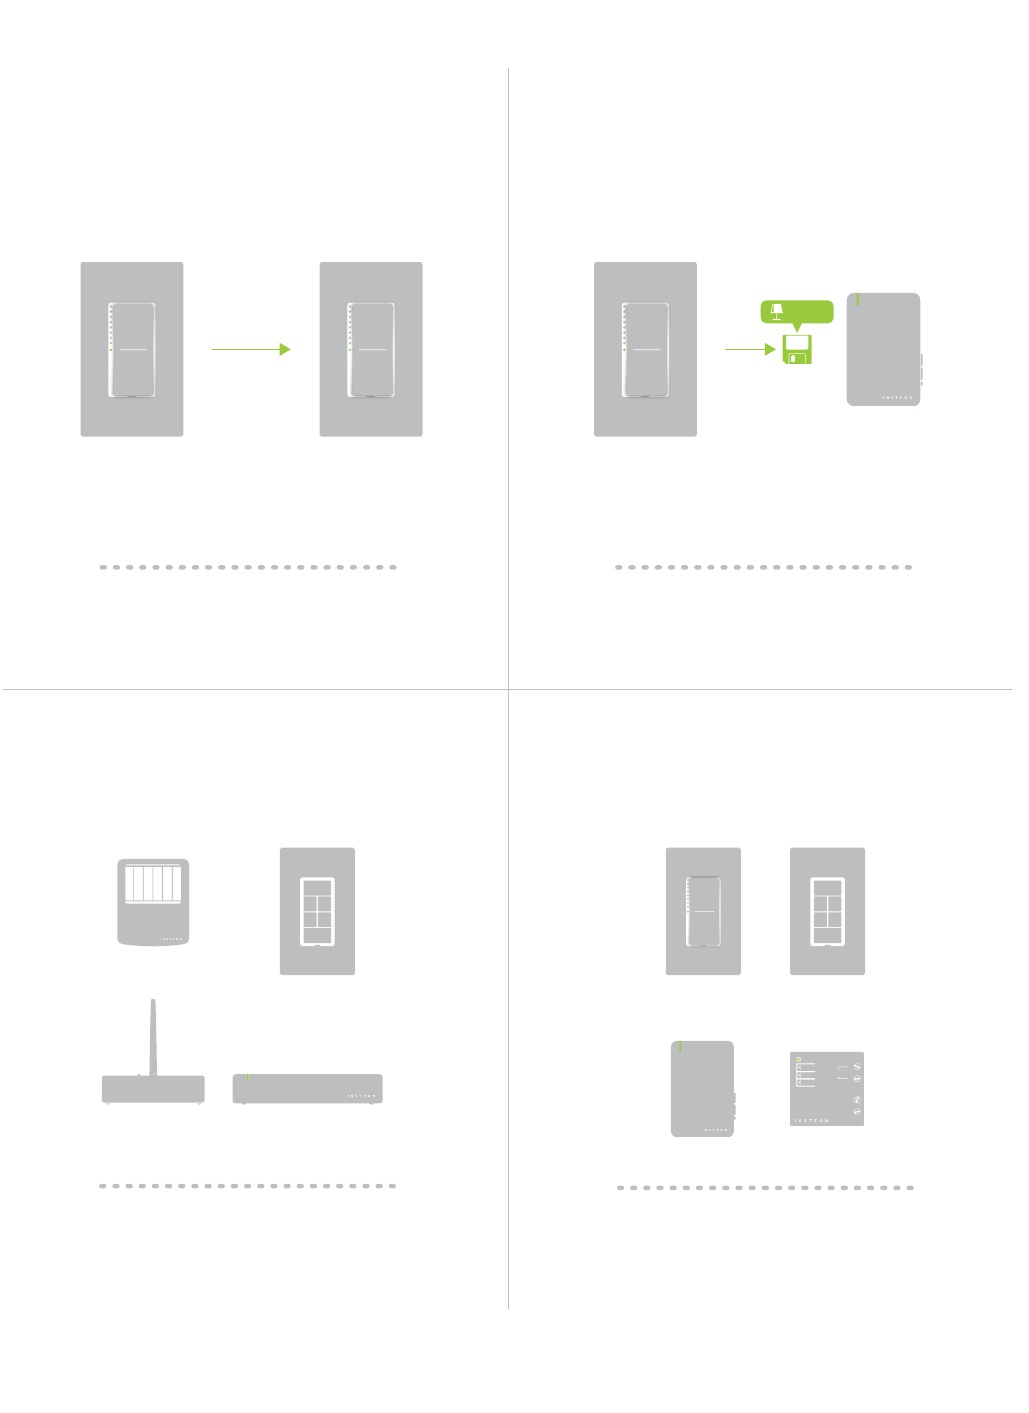
INSTEON devices can stand alone and function as a local switch or
dimmer, but their real power comes when they are connected together to
form a control system. Most INSTEON devices can control one another
and be the recipient of control. The process of associating multiple
INSTEON devices to one another is called linking.
INSTEON Links
6
The current state of the controlled device is
Switch A will turn Switch B on and off but
Switch B cannot turn Switch A on or off.
75% brightness.
A SwitchB Lamp Dimmer
®
75%
on or off are called controllers.
controller are called responders.
®
®
Neutral
On
Off
Set
N
N
Load L1
Line L
RespondersControllers
Links Remember a Device’s StateLinks are One-Way
Understanding Linking
®
®
7
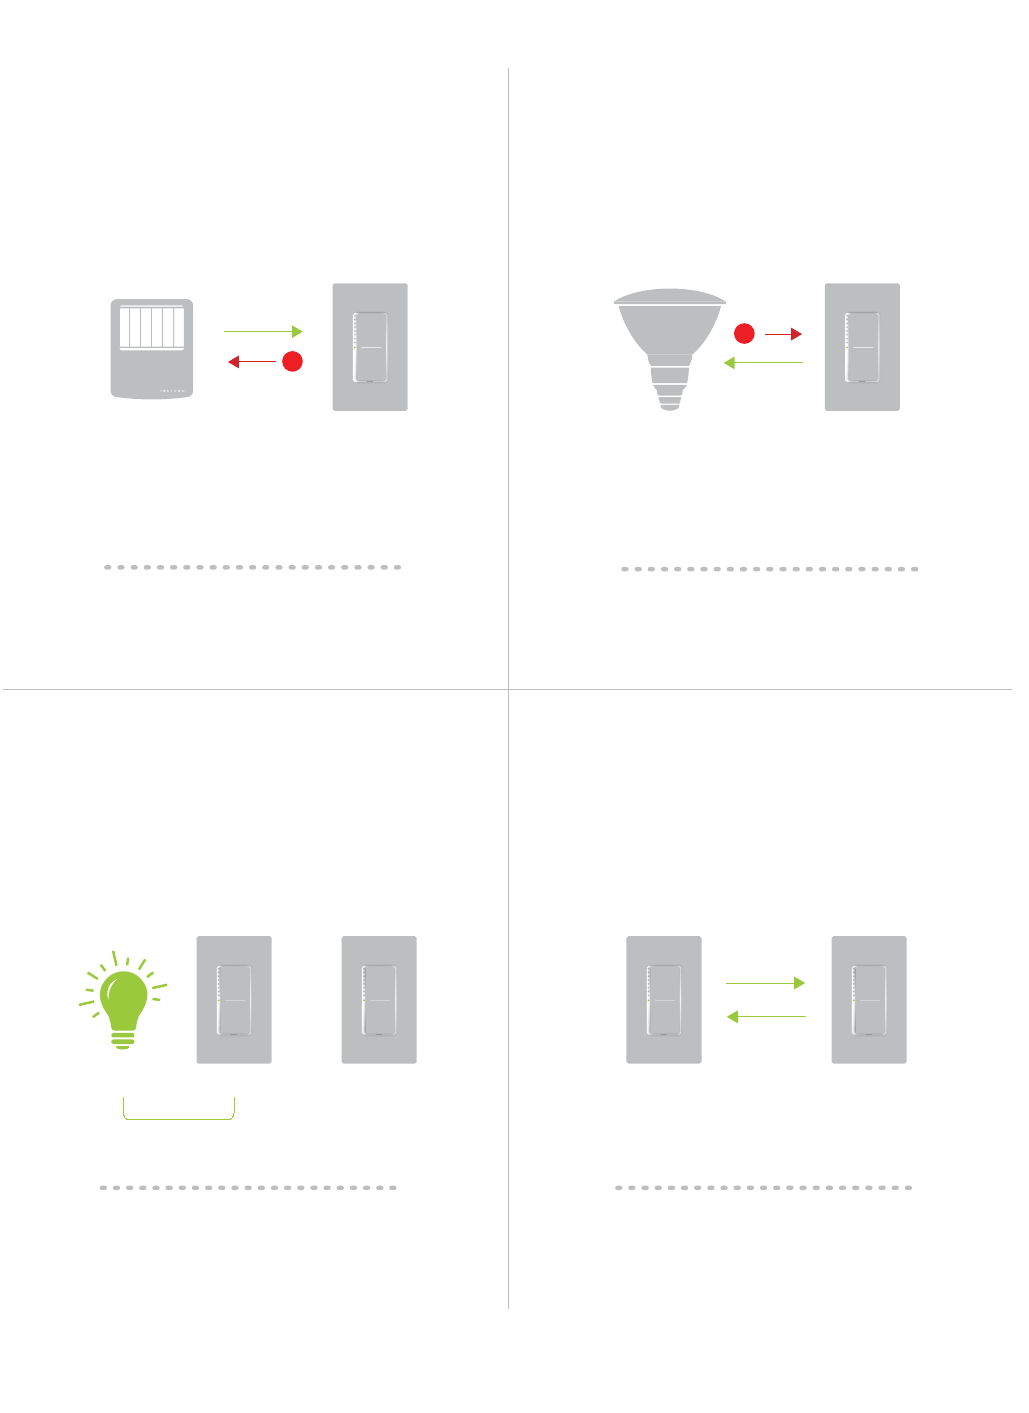
Controller-Only
other devices.
Sensor.
Responder-Only
responders to devices and scenes.
LED Bulb Dimmer Switch
X
Understanding Linking
Grouping Devices Use Cross Linking
cross linking.
each direction.
control one another and the connected
Link Switch A to Switch B and repeat to link
Switch B to Switch A.
A BLoad
Motion Sensor
®
X
Dimmer Switch
A B
8
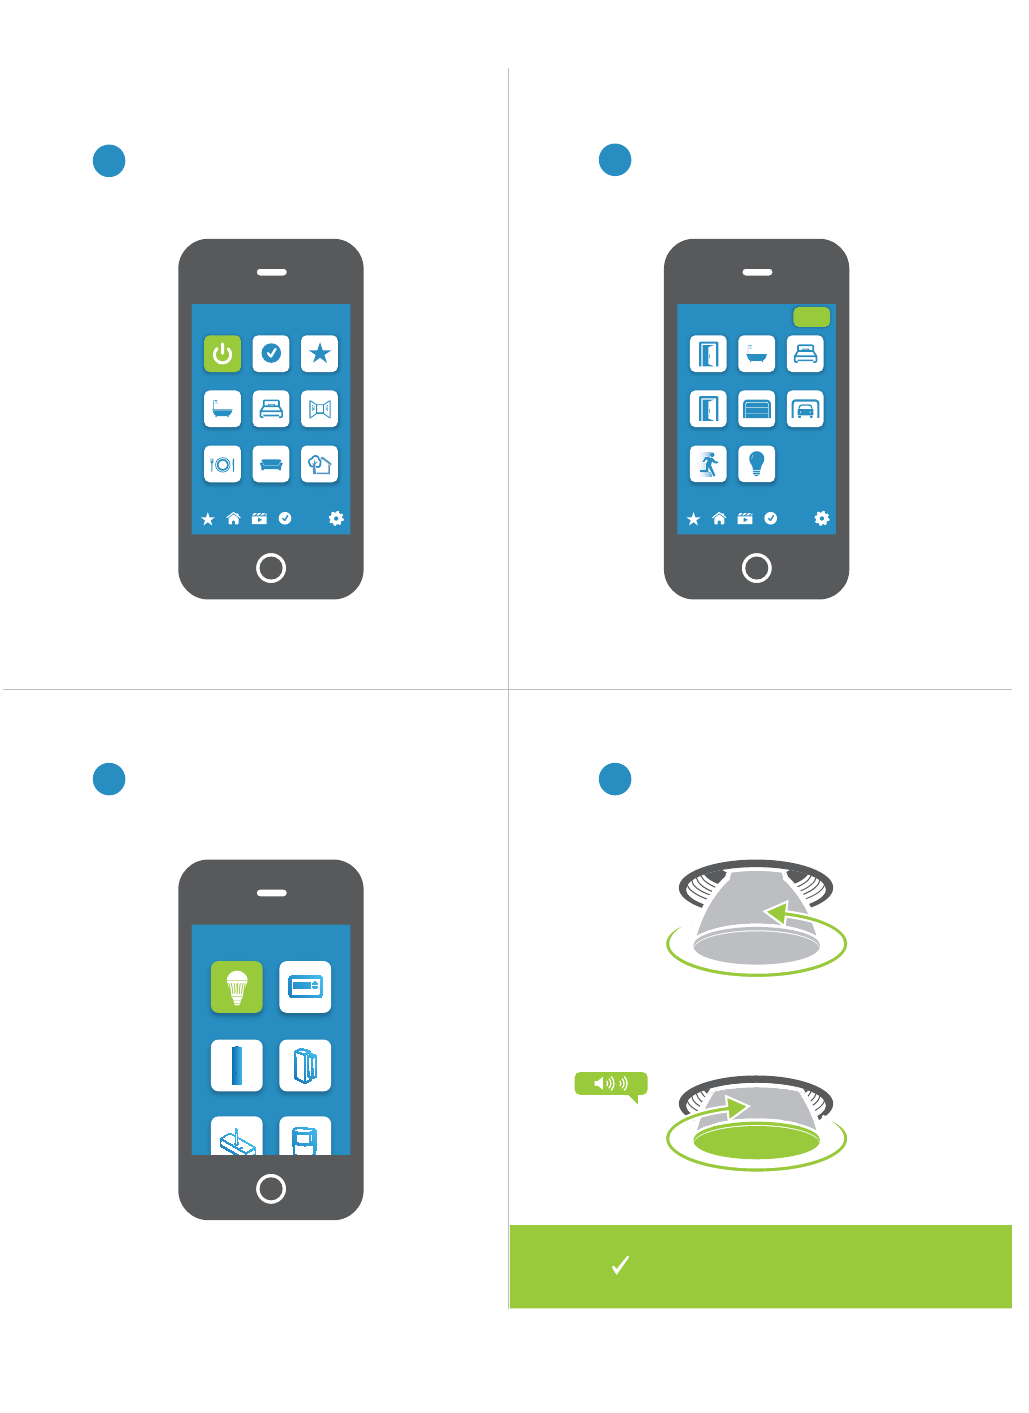
Linking to the INSTEON Hub using the iOS or Android App
2Tap the Add button.
1
3 4
devices.
and screw in the LED Bulb. The Bulb
Rooms
All Devices Check-In Favorites
Bathroom Bedroom Hallway
Kitchen Living Room Outside
72º
Add Device
LED Bulb Thermostat
Door Sensor Open/Close
Sensor
All Devices
Back Door Bathroom Bedroom
Font Door Garage Door Garage Light
Motion Sensor Outside Lights
72º
Add
You can now control your LED
9
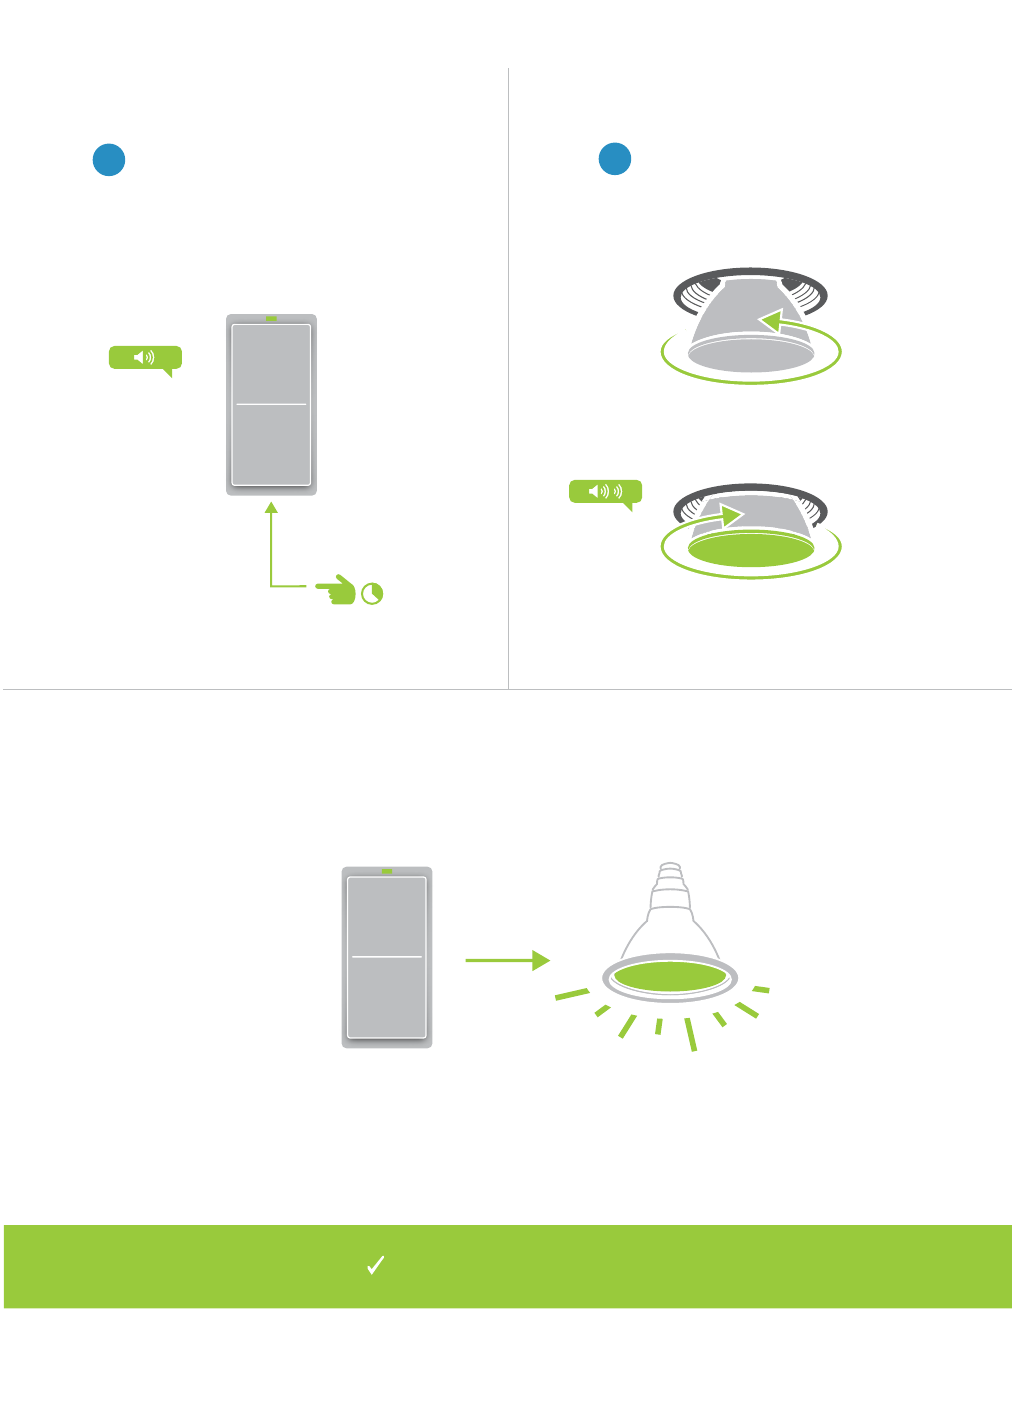
Linking with a Single-Button Controller
2
then screw in the LED Bulb. Your
1
and hold the set button until the
device beeps.
now control your LED Bulb.
10
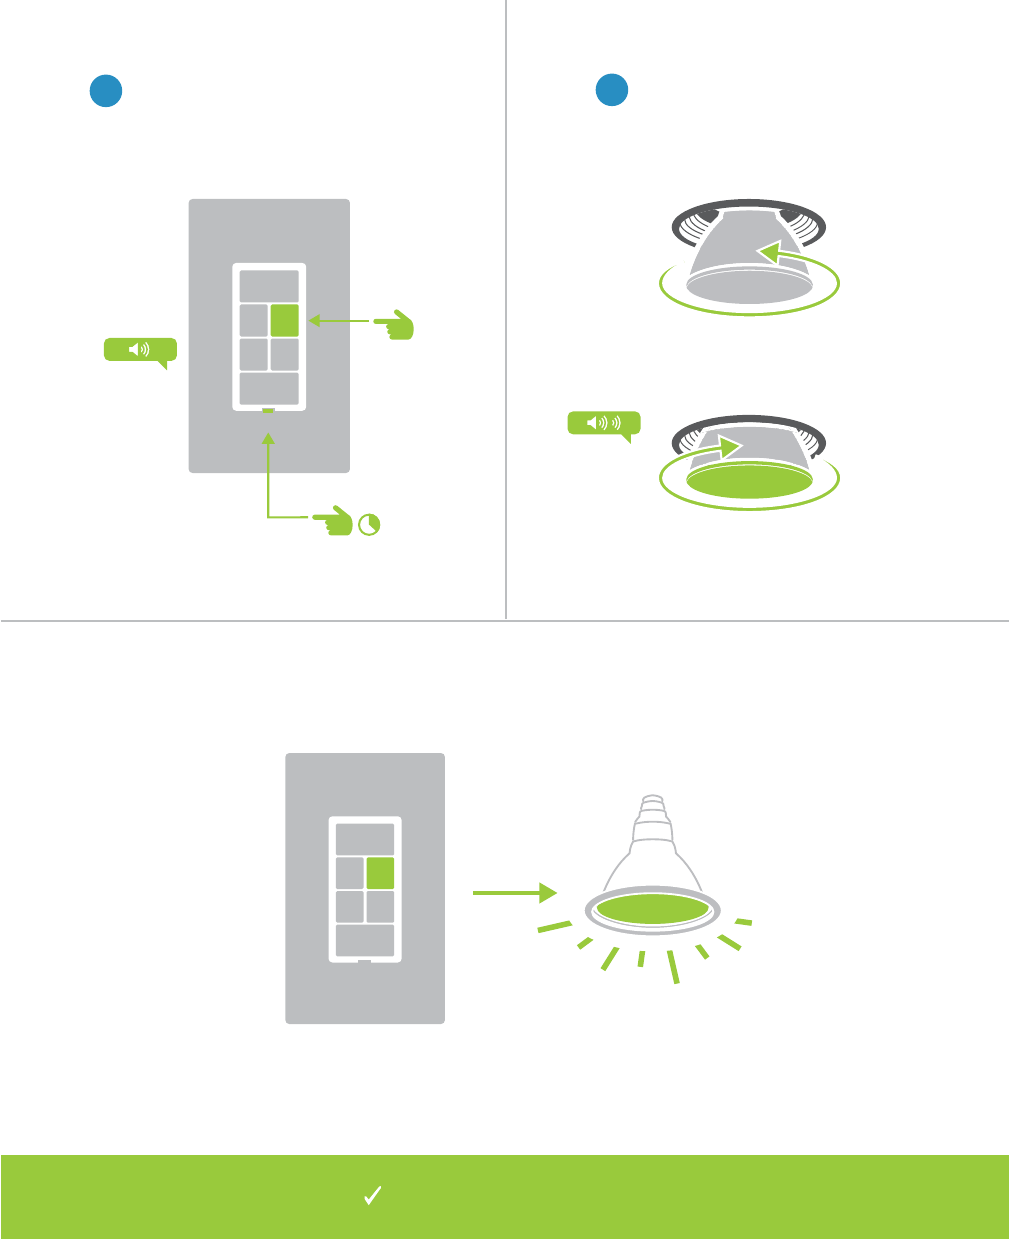
now control your LED Bulb.
A
B
Linking with a Multi-Button Controller
2
then screw in the LED Bulb. Your
1
the desired control button and
then press and hold the set button
until the device beeps.
11
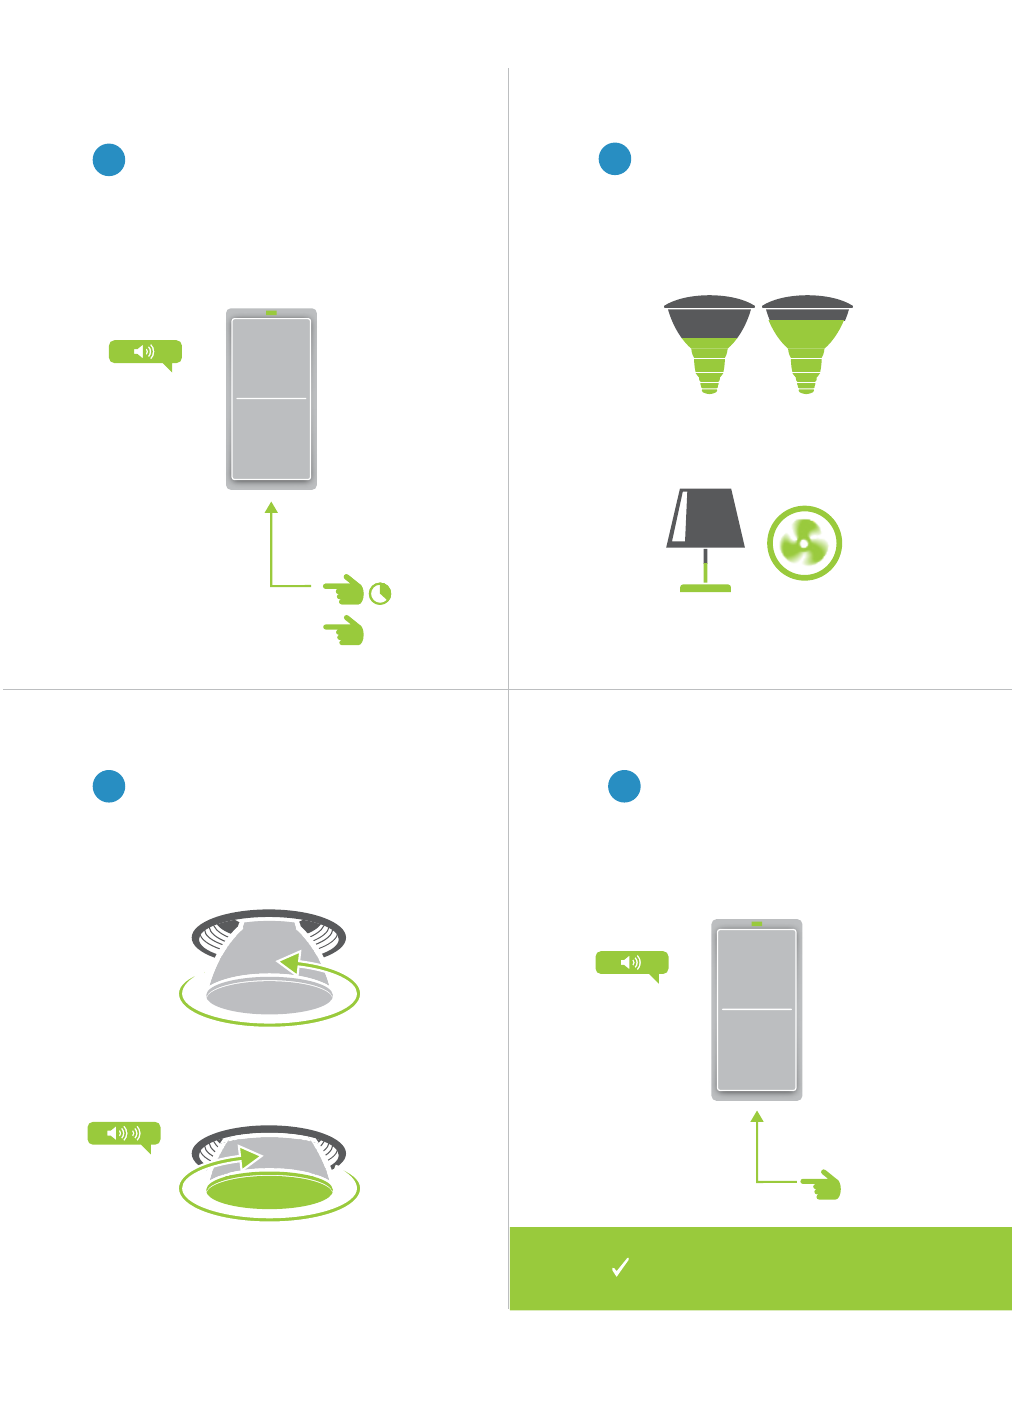
Multi-Linking or Making a Scene
2
3 4
LED Bulb
LED Bulb
Appliance
and hold the set button until they
Tap the set button on your
building your scene.
1
and hold the set button until the
button.
50% 72%
30% ON
A
B
now control your scene.
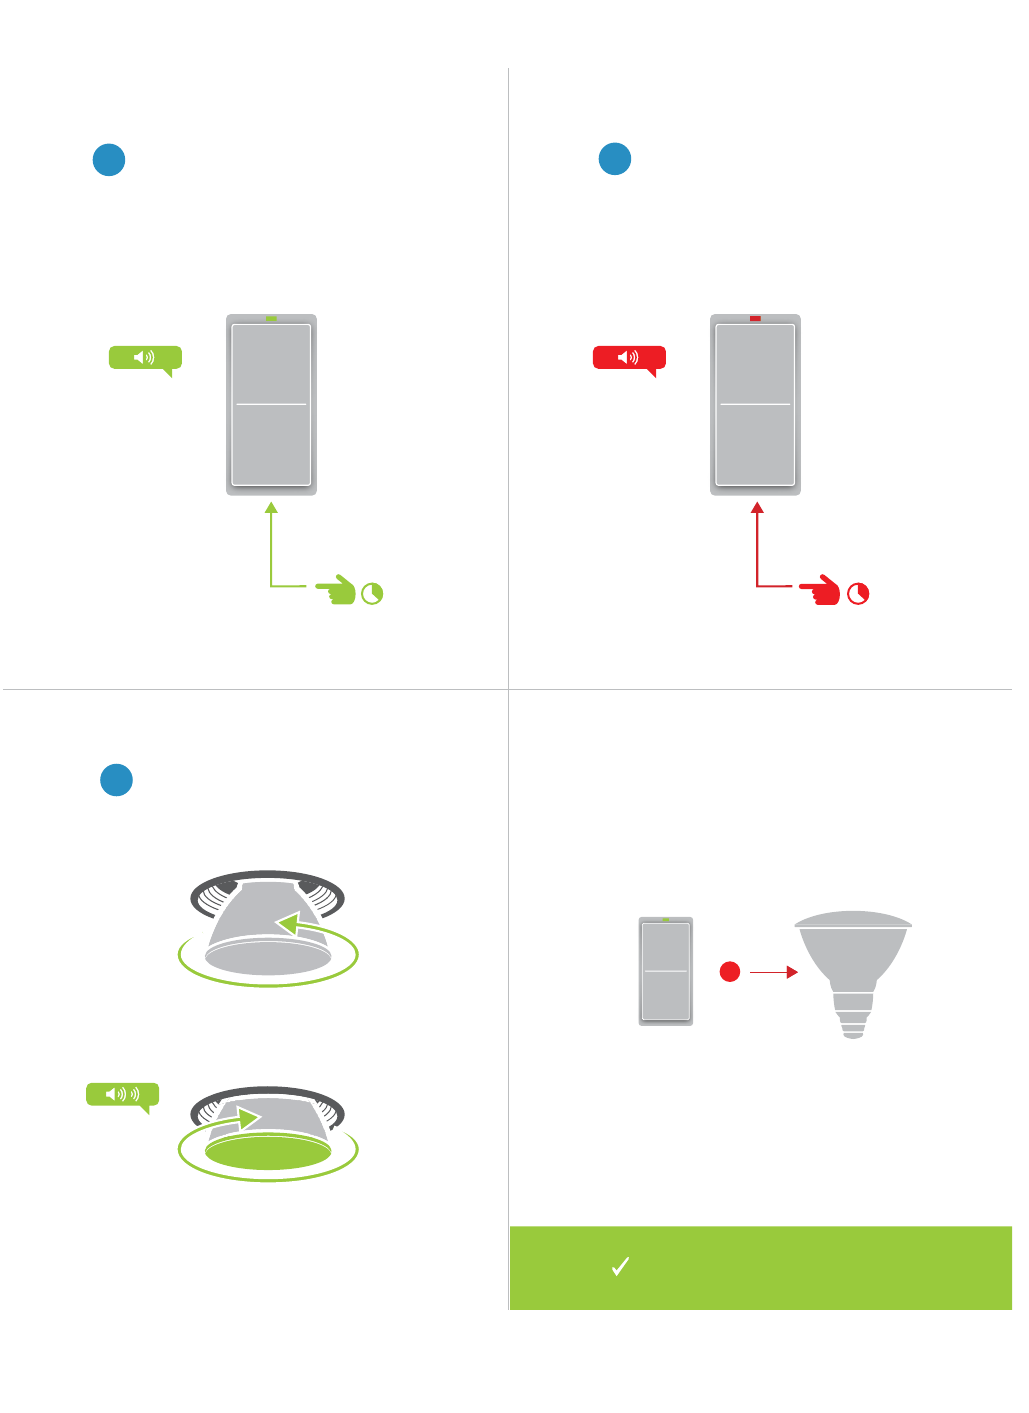
12
Unlinking from a Single-Button Controller
1
and hold the set button until the
device beeps.
2
again until the device beeps.
3
then screw in the LED Bulb. Your
X
longer control your LED Bulb.
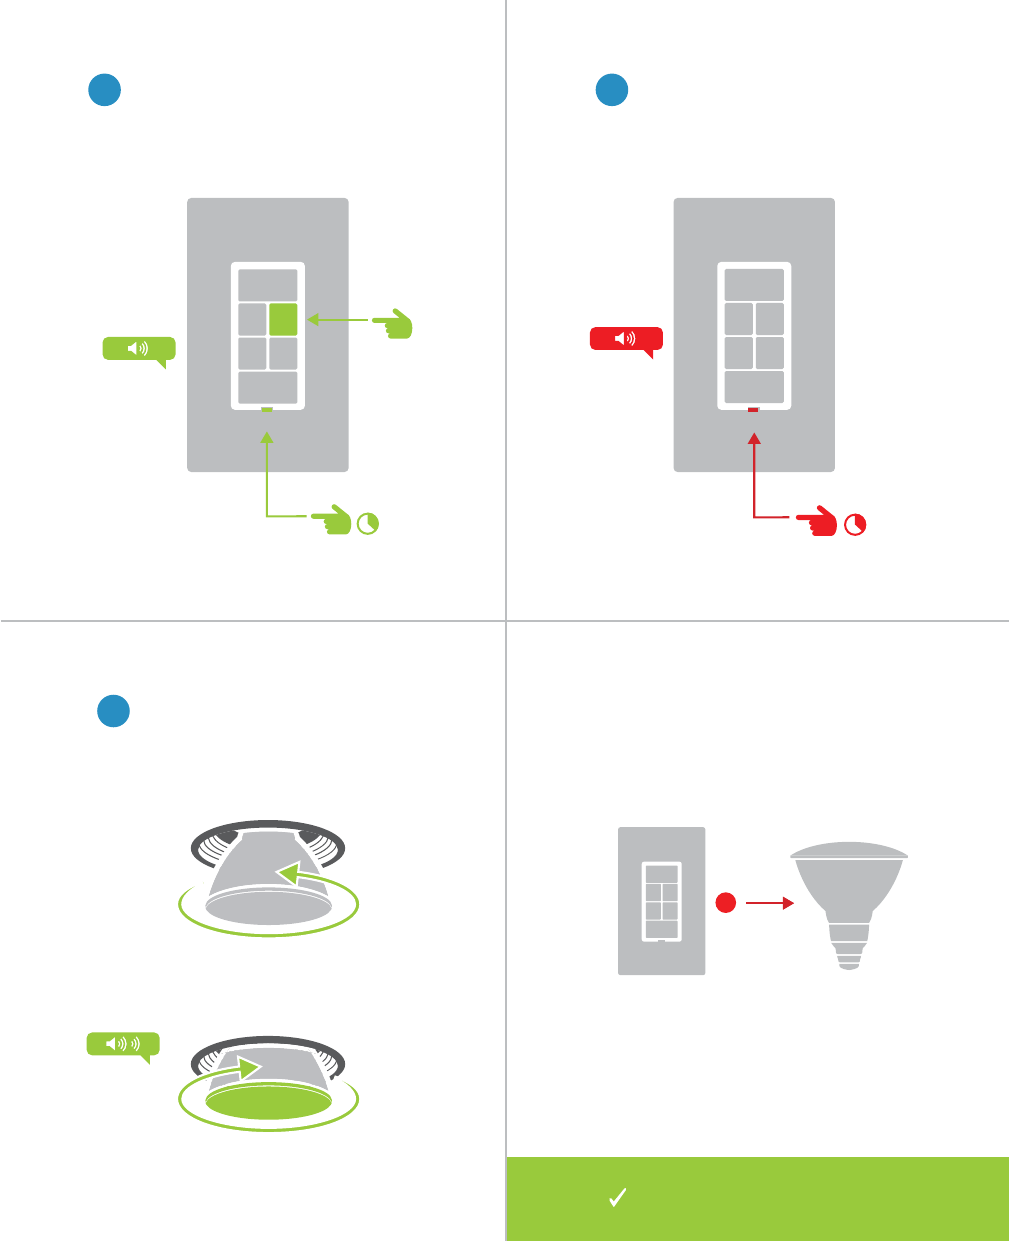
13
A
B
1
the desired control button and
then press and hold the set button
until the device beeps.
Unlinking from a Multi-Button Controller
2
again until the device beeps.
3
then unscrew and reinsert the LED
beep.
X
longer control your LED Bulb.
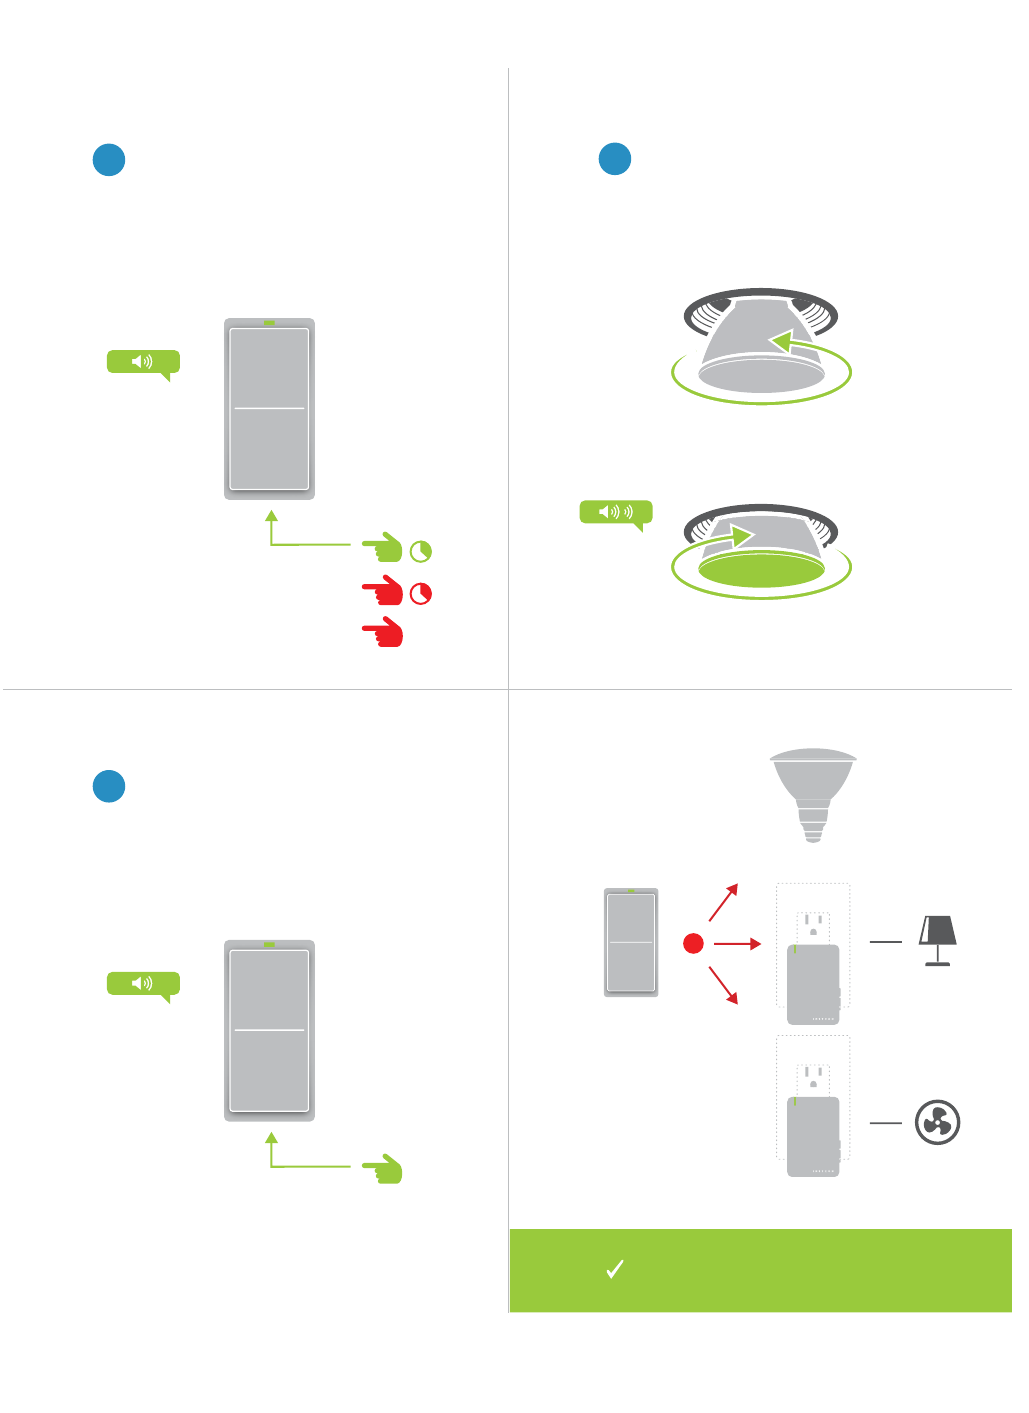
14
Multi-Unlinking or Removing a Scene
2
3
Tap the set button on your
1
and hold the set button until the
button.
X
®
®
A
B
C

15
Software-Only Features
Most INSTEON devices contain features that can only be enabled,
Software-Only Features
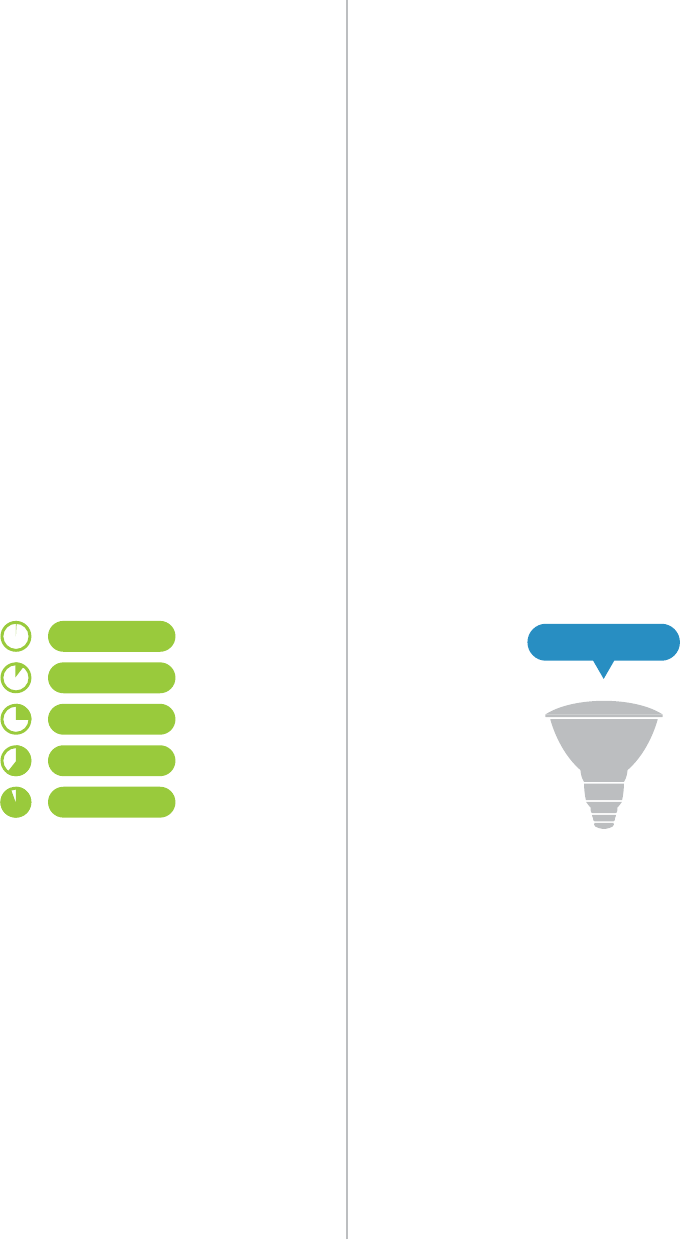
16
Software-Only Features
Ramp Rate Disable Linking on Power-up
Customize the speed at which the LED
Bulb fades on or off. Default is 0.5 seconds,
maximum duration of 8 minutes.
Prevents LED Bulb from entering linking
mode each time power is disconnected and
reapplied. Default is off.
0.5 Seconds
Instant
2 Seconds
5 Seconds
15 Seconds
LINKING

17
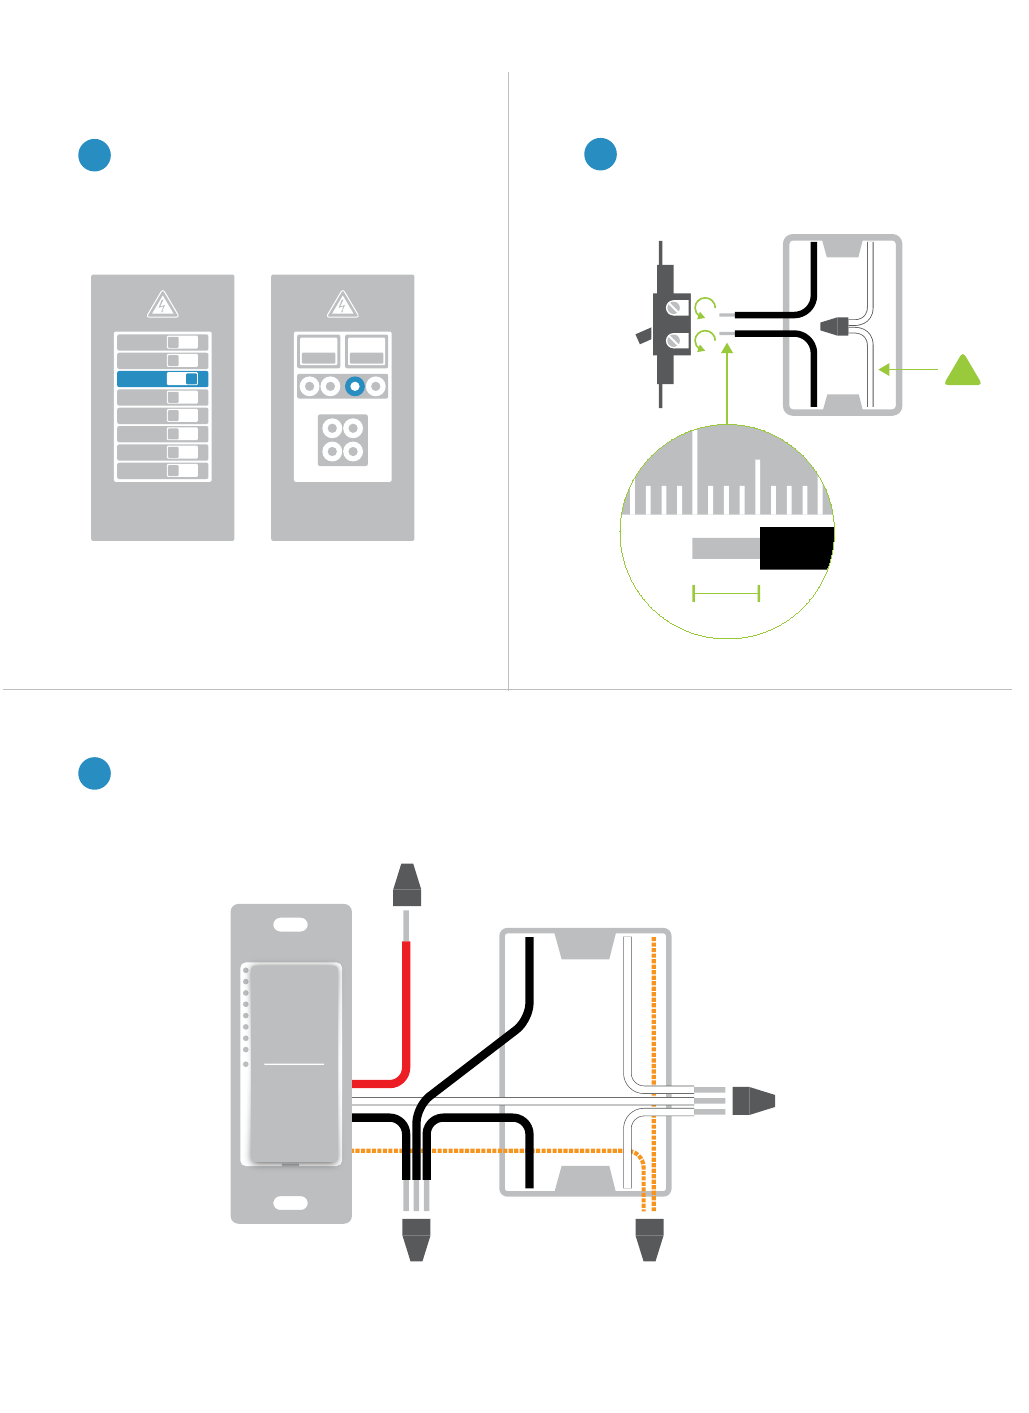
Always-On Wiring
controlled by a wall switch, you might consider wiring that wall switch as
power. Replacing the wall switch with an INSTEON Switch will provide full
control for any INSTEON device in your home.
Always-On Wiring
18
Always-On Wiring
2
contact support.
1
3
Turn off power to your switch at the
electrical service panel.
ON
ON
ON
ON
ON
ON
ON
OFF
ON ON
Circuit Breakers
or Neutral Wire
!
not used and, instead, capped. Verify that the wire nuts are secure and that no exposed copper
wire is visible except for the bare ground wire.
W
Neutral
Line
Load
Ground
1 2
19
Always-On Wiring
4
6 7
5
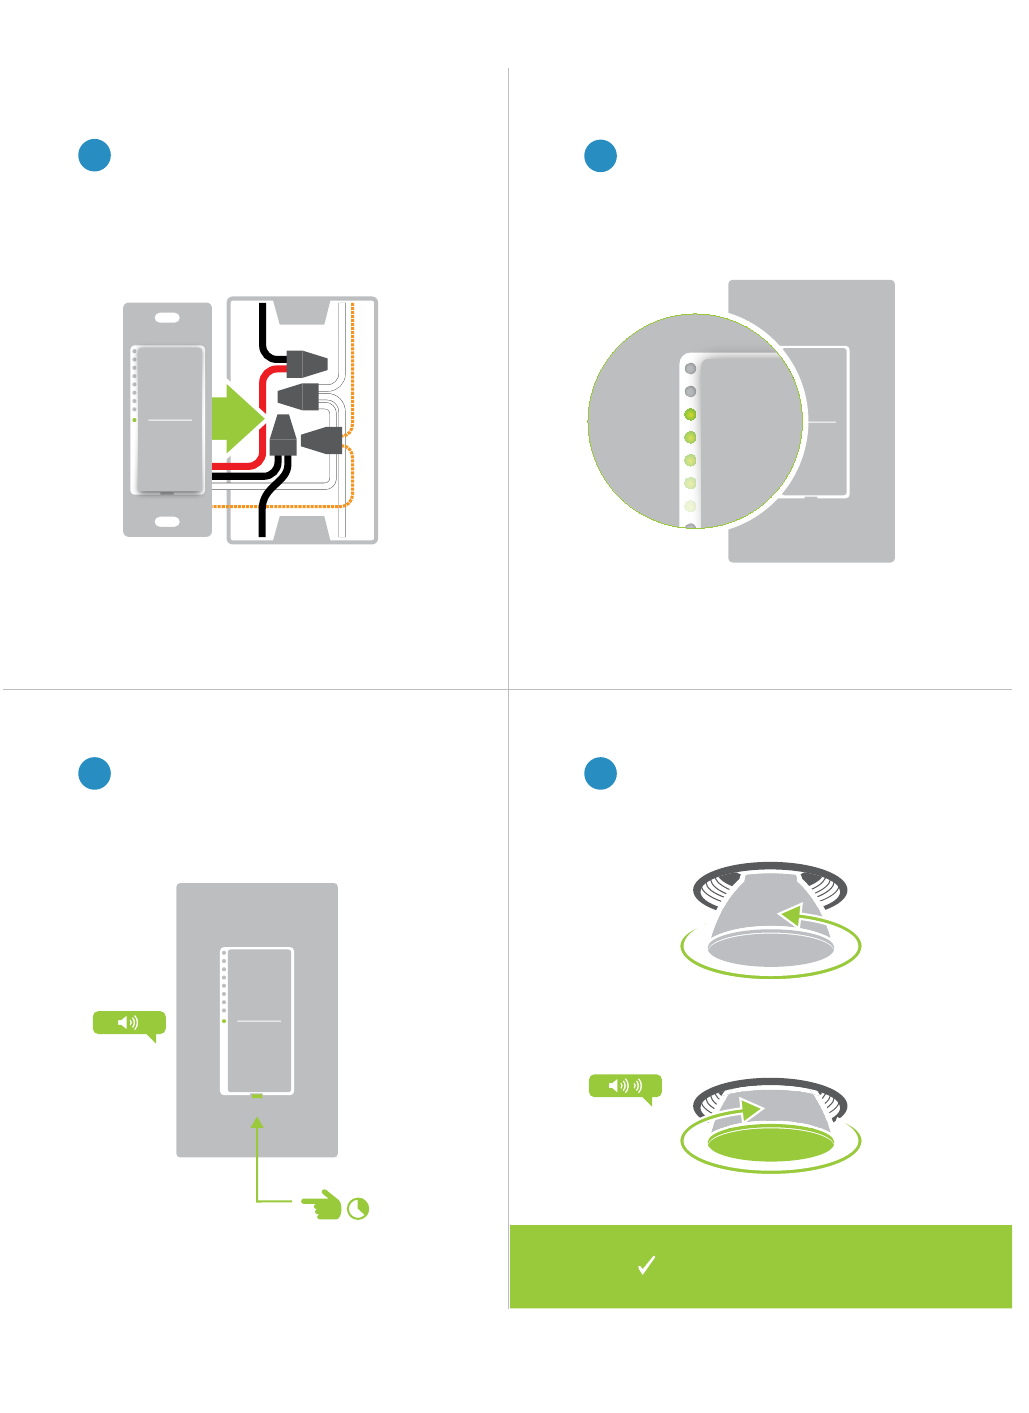
left and turn power on to the switch at
the circuit breaker panel.
Test your switch by tapping the paddle
not change but the status lights on the
switch will.
Your switch will now control
your LED Bulb
and reinsert. Your LED Bulb will
press and hold the set button until the
device beeps.

20
Appendix
Everything else you might need to know about your INSTEON product.
Appendix

21
INSTEON Glossary
Controller
Blinking LED turning on and off repeatedly
The speed at which the load fades on or off
The preset brightness level a device will return to when turned on
Link A one way association between a controller and responder
Linking
Unlinking
/ Unlinking
Load
Scene
Set Button
nodes can join the network without any installation procedure.
X10

22
General
Brand
813922013672 US
Warranty
INSTEON Features
Yes
Yes
No
Yes
400
Begin Brighten
End Brighten
Beep
400
No
Yes

23
Mechanical
Installation
Color White
Weight
183g
Indoors
Operation
880
83.40
Status LED None
32
Electrical
Supply Voltage
Local Control No
<0.75 Watt
24
Troubleshooting
LED Bulb won’t link to other INSTEON Devices
Try this:
•
•
•
LED Bulb is slow to respond
Bulb.
Try this:
•
their links using the standard unlinking procedure.
•
properties.
LED Bulb turned on or off by itself
Try this:
•
I want to factory reset my LED Bulb
Try this:
•
25
warranty
26
Product Warranty
Limited Warranty
Limitations