SmartSense by Digi ZPOINT Wireless Node User Manual
Schechter Tech LLC DBA TemperatureAlert Wireless Node
UserManual.wiki
>
SmartSense by Digi
>
ZPOINT User Manual
>
User Manual.pdf
Contents
1.
Manual.pdf
2.
User Manual.pdf
User Manual.pdf
Navigation menu
Upload a User Manual
Namespaces
Wiki Guide
HTML
PDF
Info
Views
User Manual
Discussion / Help
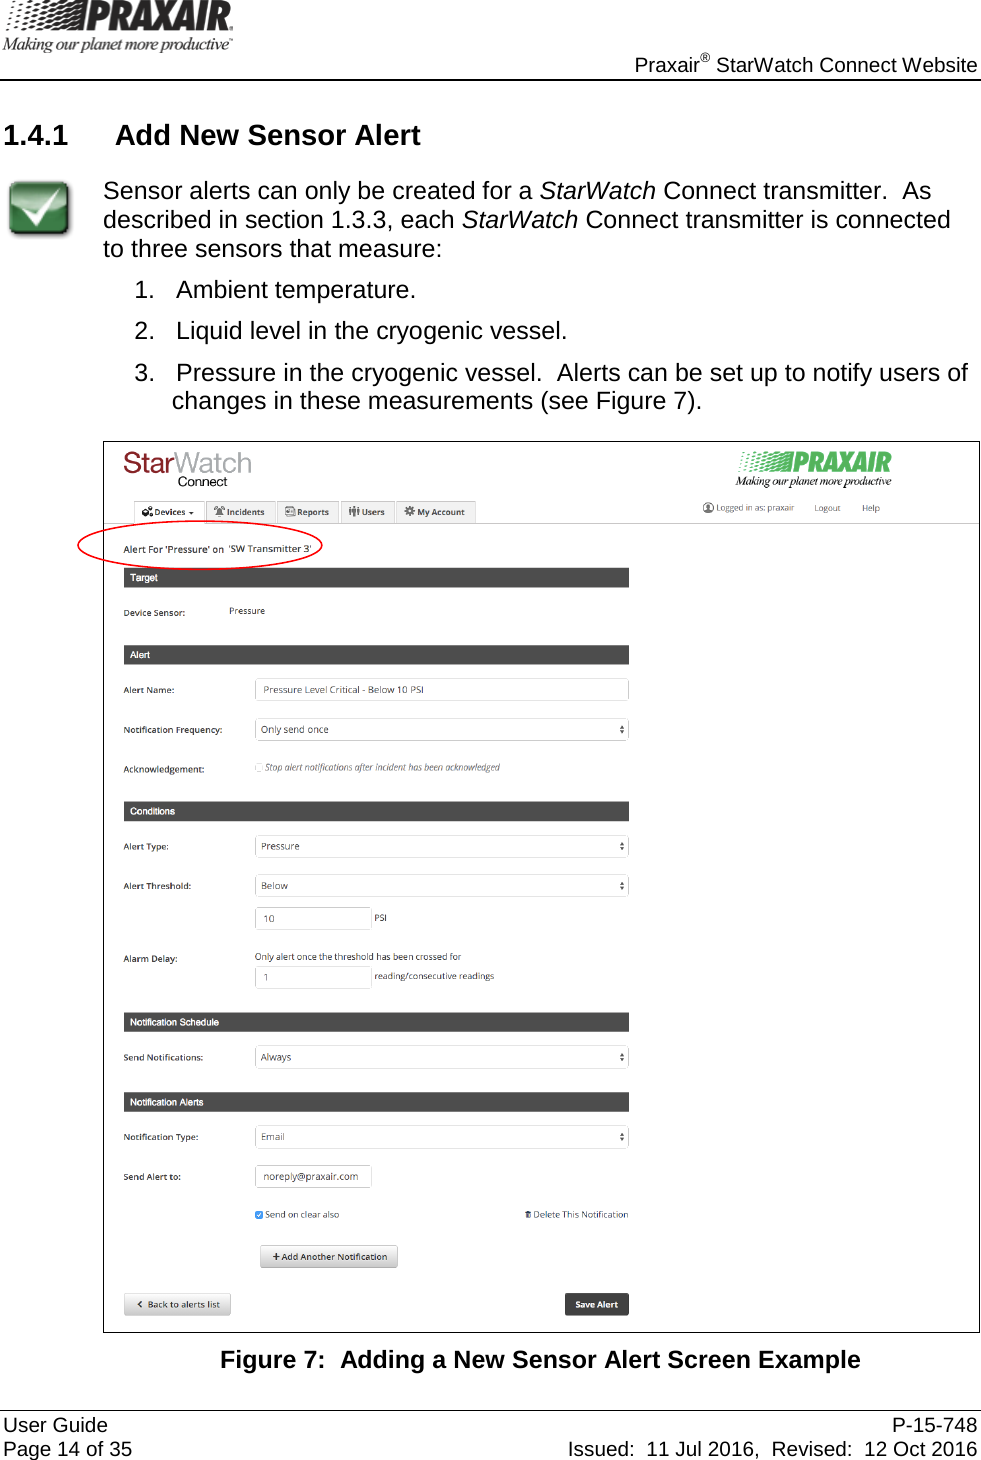
Navigation

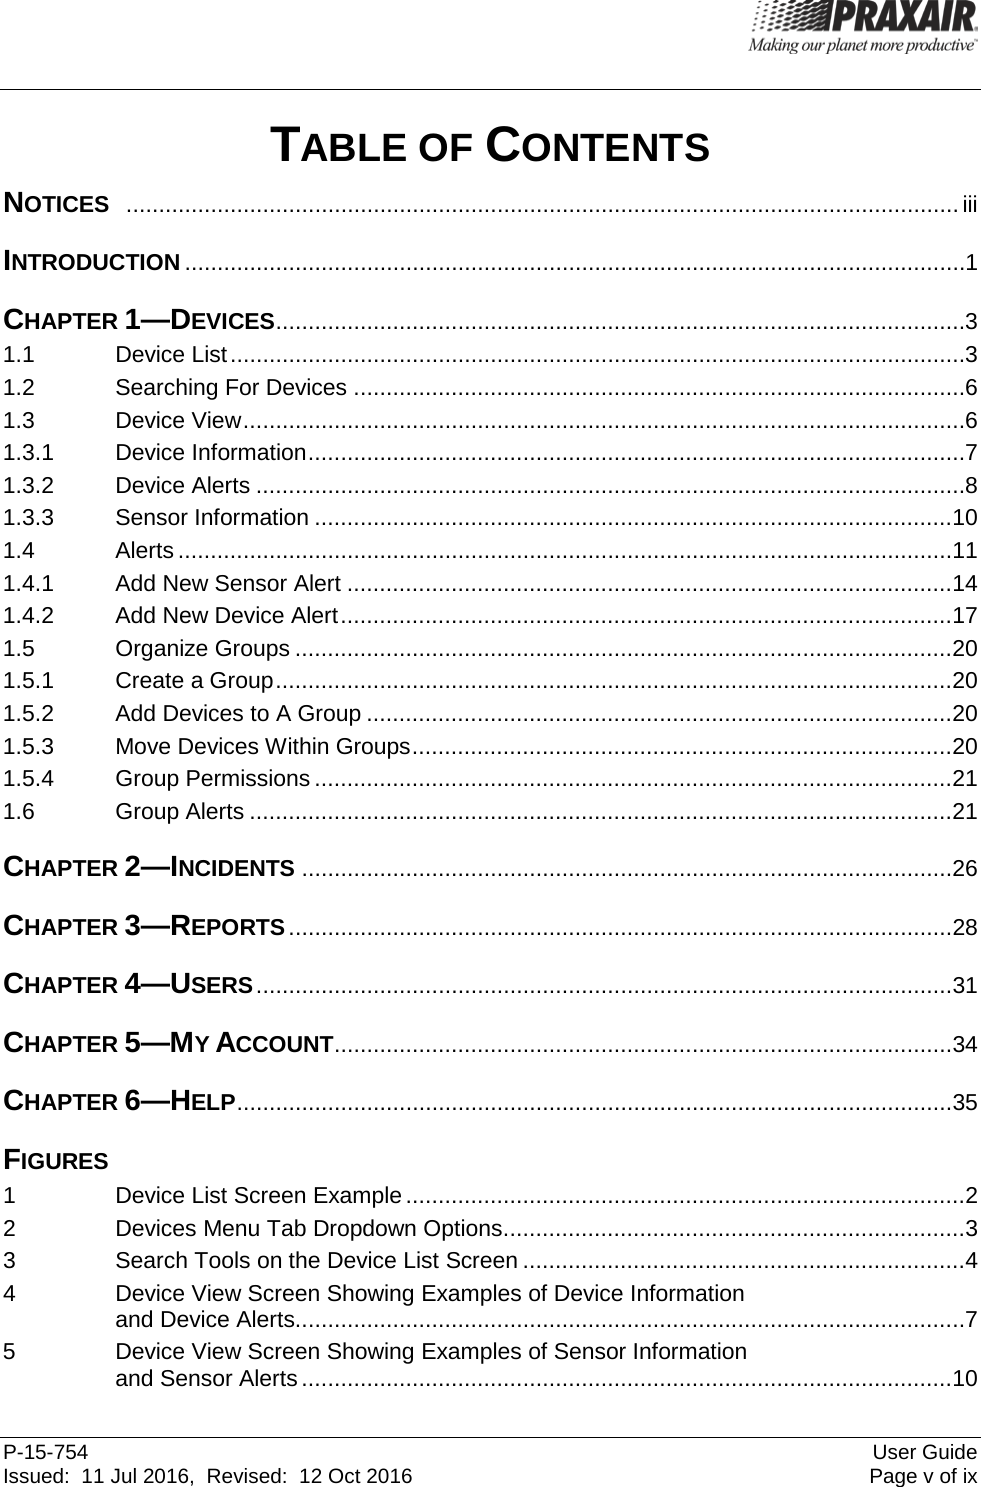
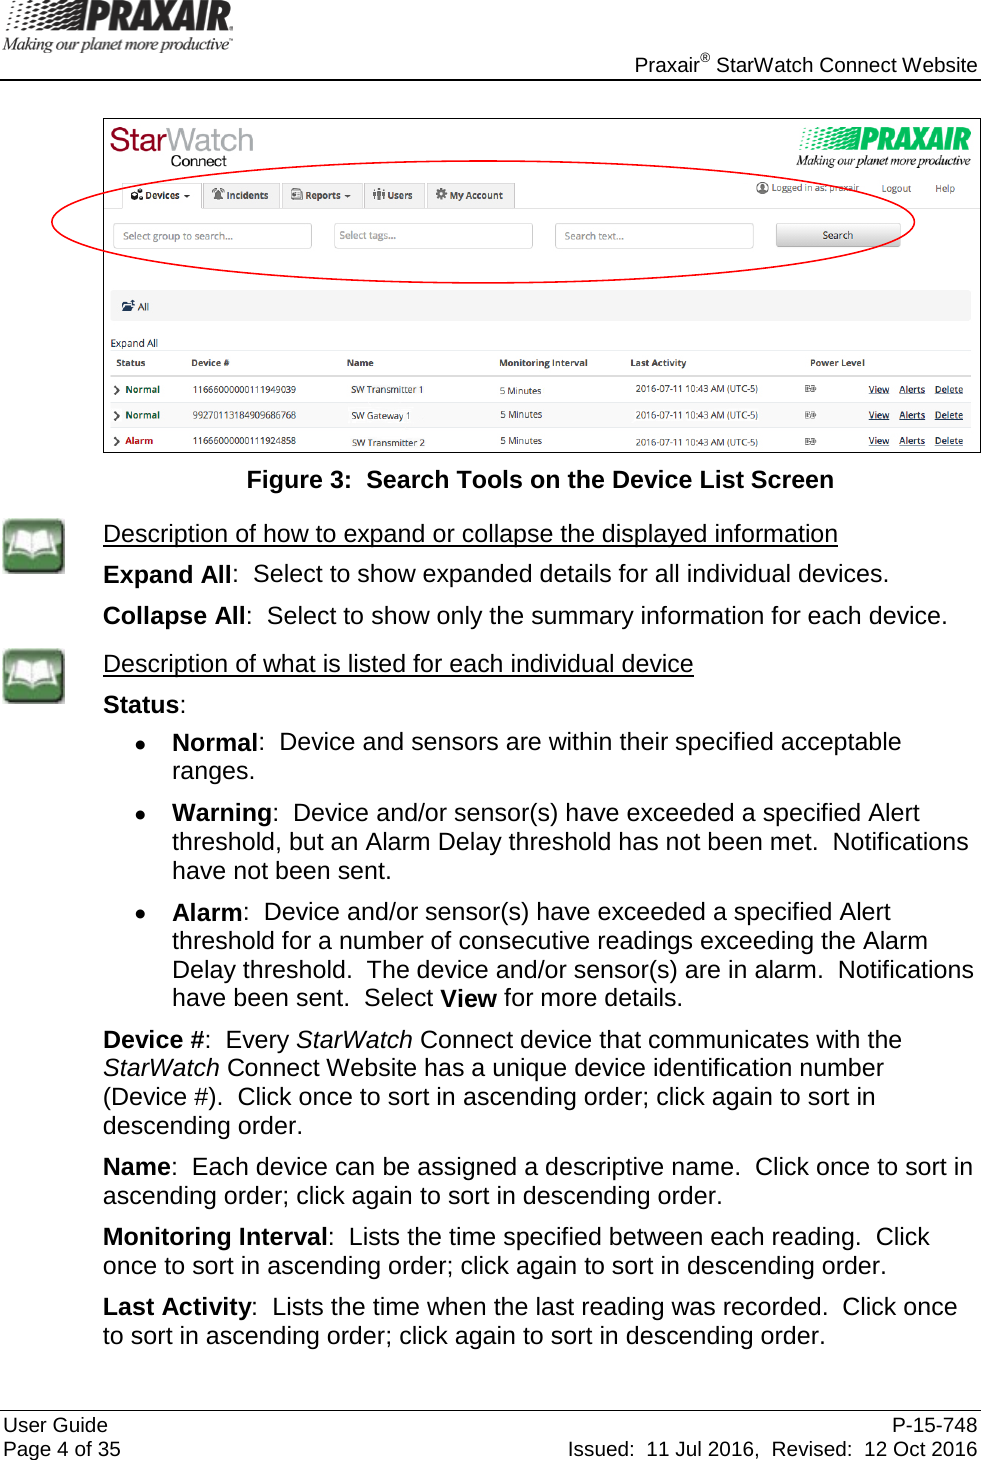
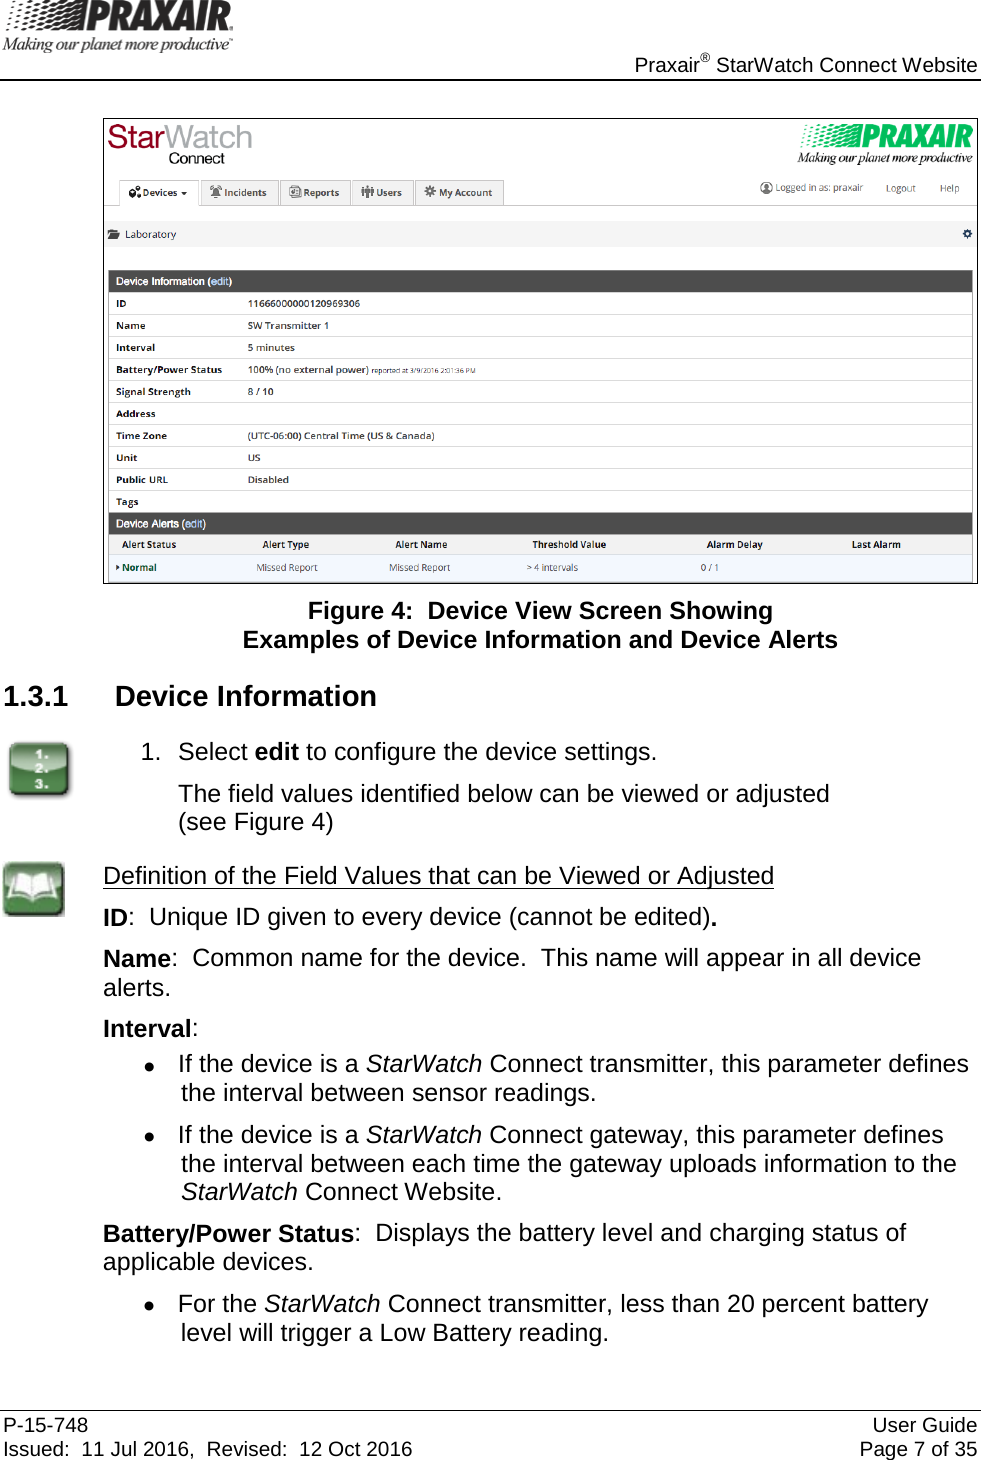

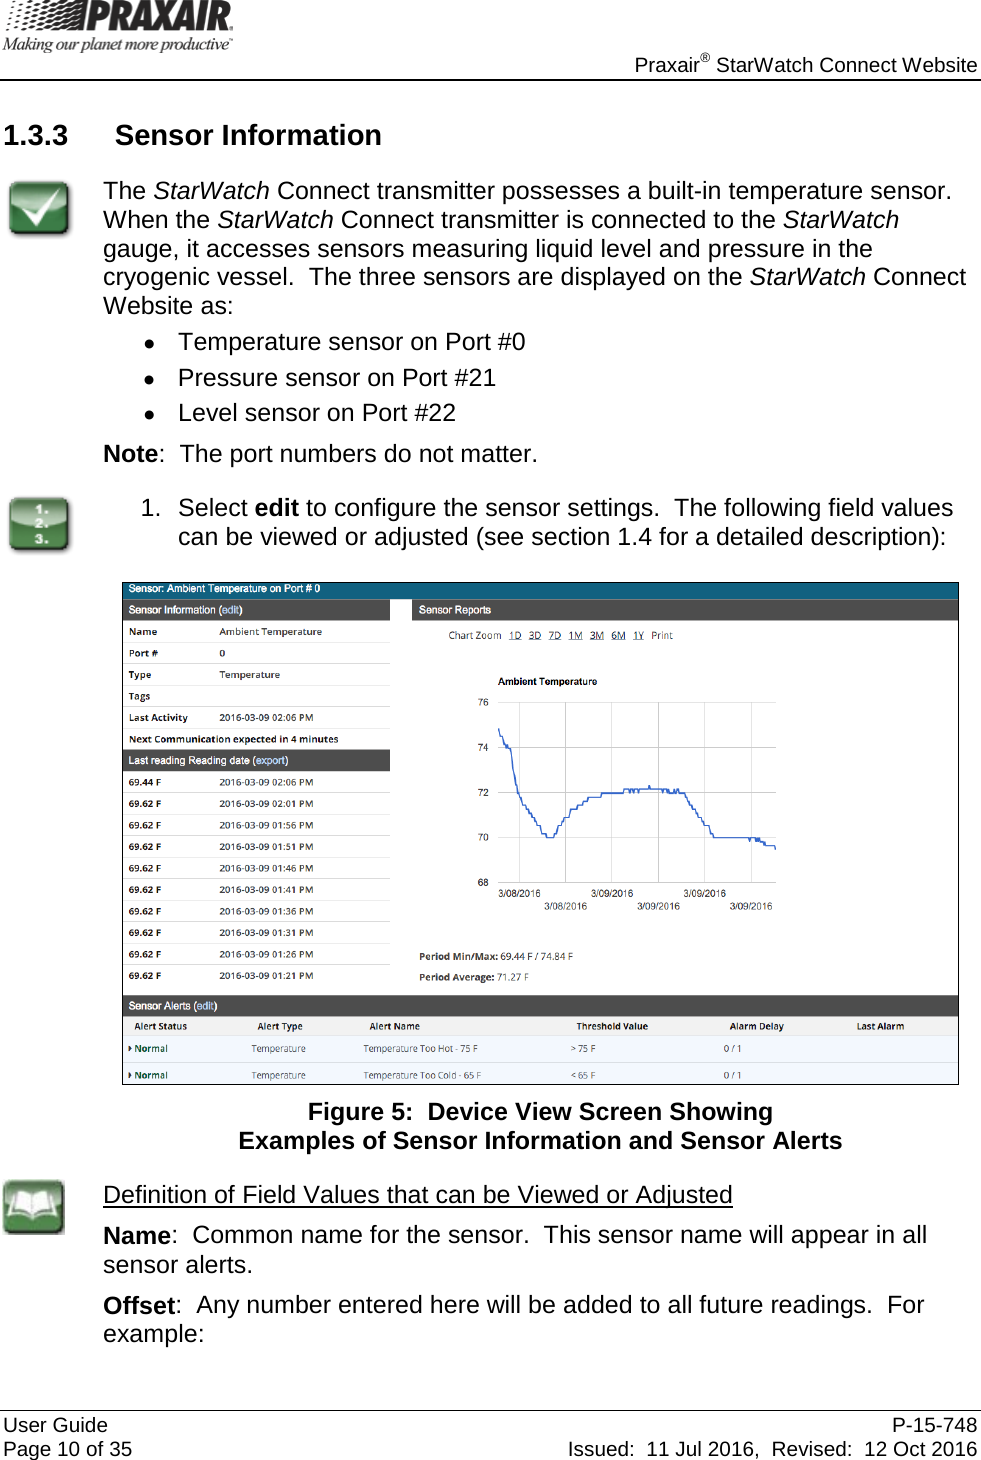
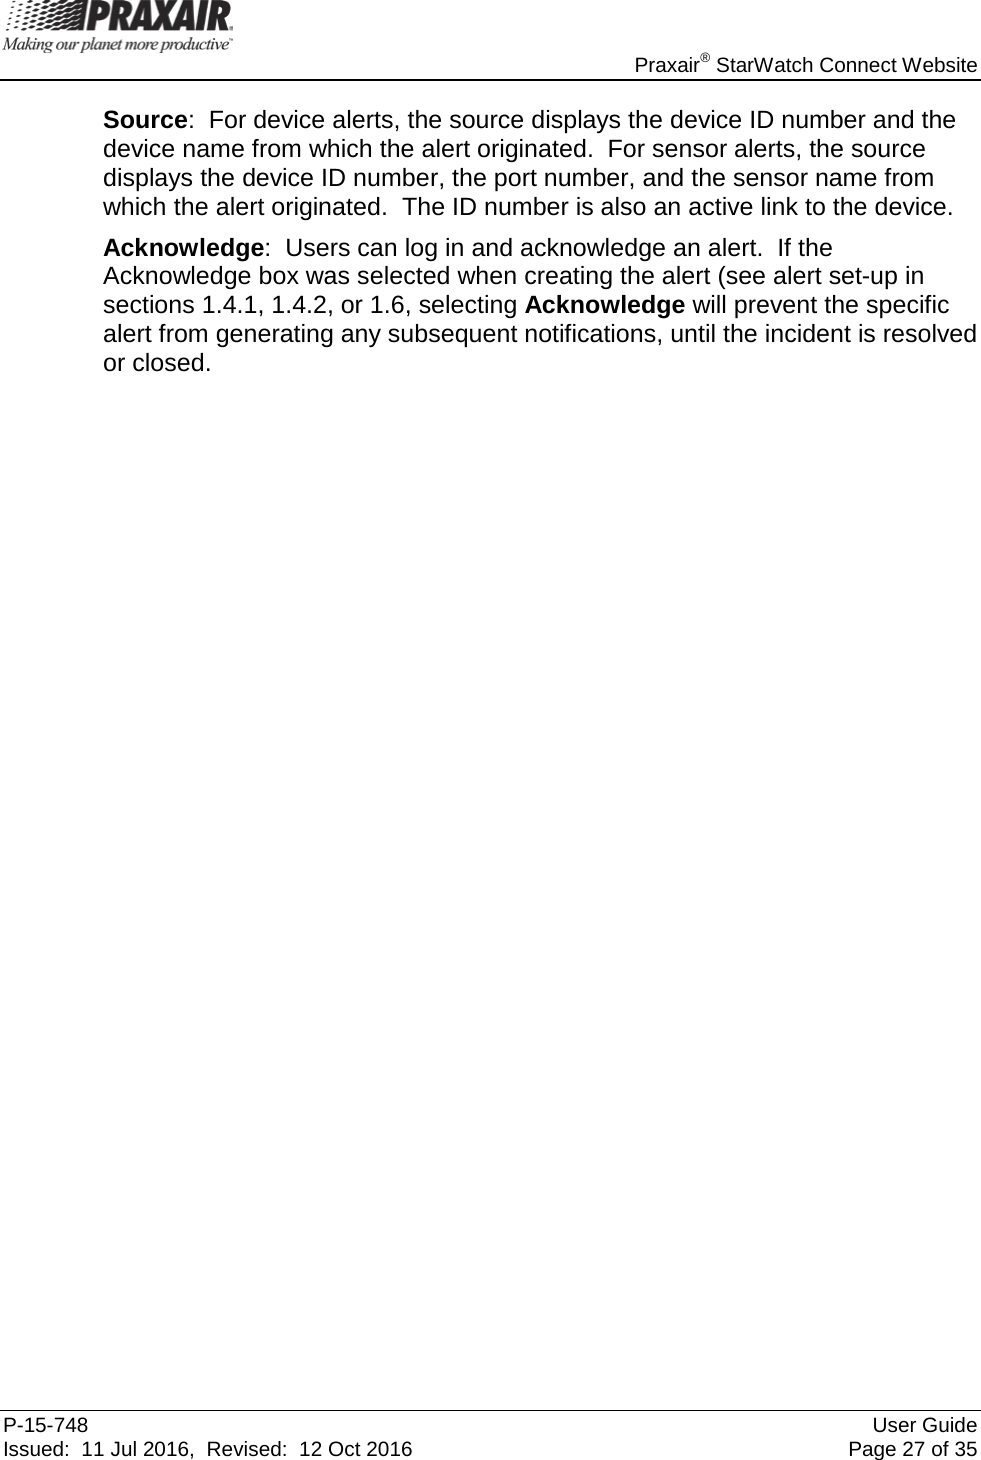
![Praxair® StarWatch Connect Website P-15-748 User Guide Issued: 11 Jul 2016, Revised: 12 Oct 2016 Page 11 of 35 • Entering 0 (default) will display the reading exactly as transmitted by the device. • Entering 5.2 will add 5.2 units to the transmitted readings. • Entering –3.3 will subtract 3.3 units from the transmitted readings. Tag: Tags can be applied to devices and sensors. Tags applied to sensors can be used to select which sensors belong to a group alert (see section 1.6 for how to set up a group alert). Sensor Reports: The graph can display historical data from the prior 1 day, 3 days, 7 days, 1 month, 3 months, 6 months, or 1 year. When choosing longer periods, such as 3 months, 6 months, and 1 year, sampled data will be used, and may not show all maximum and minimum values during that time-frame. Use the Export feature to view all sensor data. Sensor Readings: Displays the last 10 measurements and reading times for the sensor. Export: This option exports a sensor’s historical data as an Excel (.xls) file. Select a Start Date and End Date, and then click [Export]. Sensor Alerts: The Sensor Alerts Screen displays the status of all alerts created for that sensor. Sensor alerts display alarms if a sensor reading crosses a specified Threshold Value. The Sensor Alerts Screen displays the Alert Status, Alert Type, Alert Name, Threshold Value triggering the alert, Alarm Delay, and Last Alarm (see example in Figure 5). 1.4 Alerts Alerts notify users about changes in device functionality or sensor readings. The Alert Configuration Screens can be accessed in three different ways on the StarWatch Connect Website: Selecting on any of the following options will take you to an Alerts List Screen that displays the status of all the alerts created for that device and any sensors it possesses. An Alert List Screen example is shown in Figure 6. 1. From the Device List Screen, select Alerts next to any individual device (see section 1.1). OR From the Device View Screen (see Figure 4), select edit located above the Device Alerts window (see section 1.3.2). OR From the Device View Screen (see Figure 5), select edit located above the Sensor Alerts window (see section 1.3.3).](https://usermanual.wiki/SmartSense-by-Digi/ZPOINT.User-Manual-pdf/User-Guide-3597590-Page-17.png)
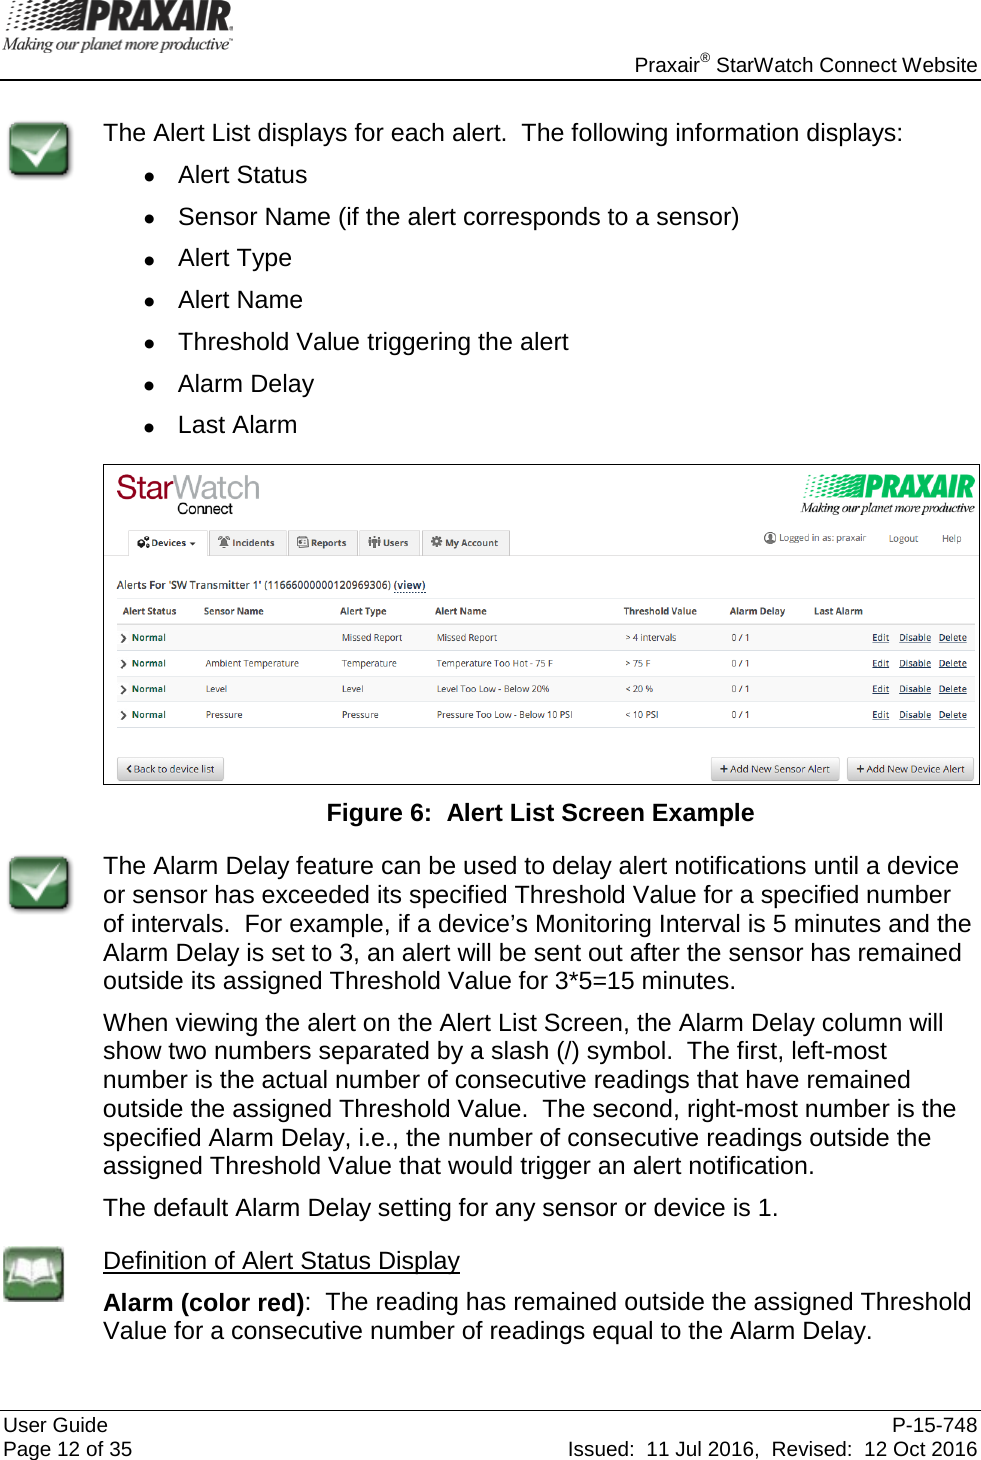
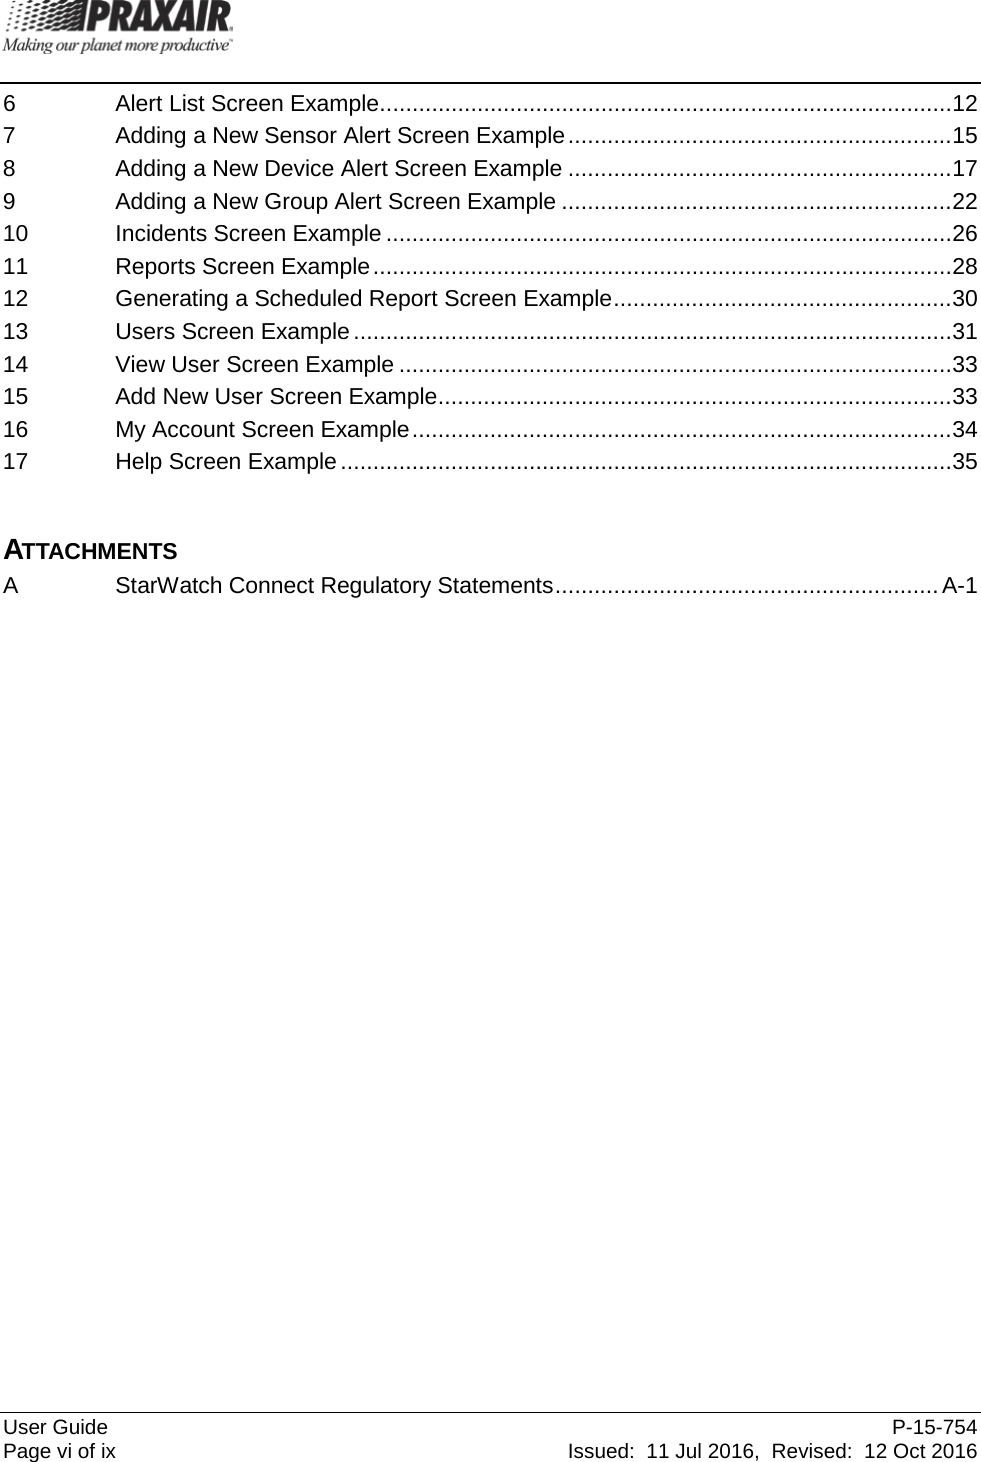
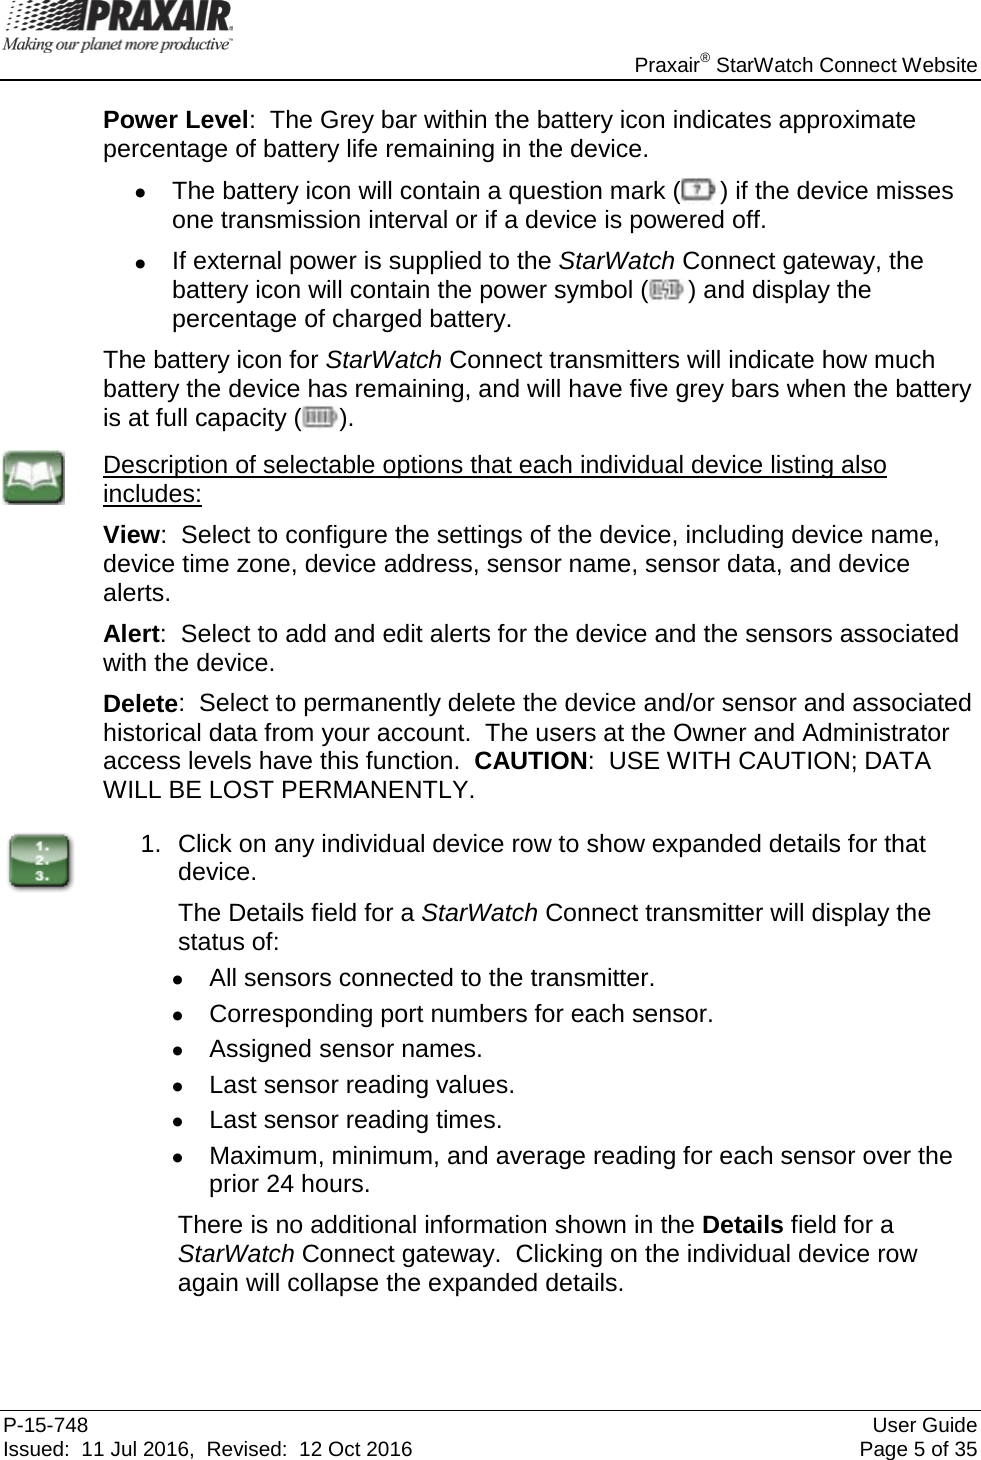
![Praxair® StarWatch Connect Website P-15-748 User Guide Issued: 11 Jul 2016, Revised: 12 Oct 2016 Page 13 of 35 Warning (color yellow) : The last reading was outside the assigned Threshold Value, but the consecutive number of readings outside the assigned Threshold Value is less than the Alarm Delay. Normal (color green) : The last reading was not outside the assigned Threshold Value. Definition of Options that the User can Select for Existing Alerts Edit: Select Edit to modify the alert settings. Users at Owner, Administrator, Editor and Sensor Alert Editor access level can use this function. Disable/Enable: • Select Disable to disable the alert without deleting it. Once disabled, the option will change to Enable. • Select Enable to enable the previously disabled alert. Once enabled, the option will change to Disable. When an alert is disabled, the alert status will change from Normal, Warning, or Alarm to Disabled. Users at Owner, Administrator, Editor, and Sensor Alert Editor access level can have these functions. Delete: Select Delete to permanently delete the alert. Users at Owner, Administrator, and Editor and Sensor Alert Editor access levels can perform these functions, while the Sensor Alert Editor access level can only delete sensor alerts. 1. Click on any individual alert row to show expanded details for that alert. The Details field will display the type of notification (SMS, email, or phone), the phone number or email address for the notification, and whether an additional notification should be sent once the reading is cleared (i.e., no longer outside the specified Threshold Value). 2. Select Send a Test Message to send a test notification to test if your notification method is correct. 3. Click on the individual alert row again to collapse the expanded details. The Alert List Screen also includes [+ Add New Sensor Alert] and [+ Add New Device Alert] buttons for a StarWatch Connect transmitter or gateway. These options are described in detail in sections 1.4.1 and 1.4.2.](https://usermanual.wiki/SmartSense-by-Digi/ZPOINT.User-Manual-pdf/User-Guide-3597590-Page-19.png)
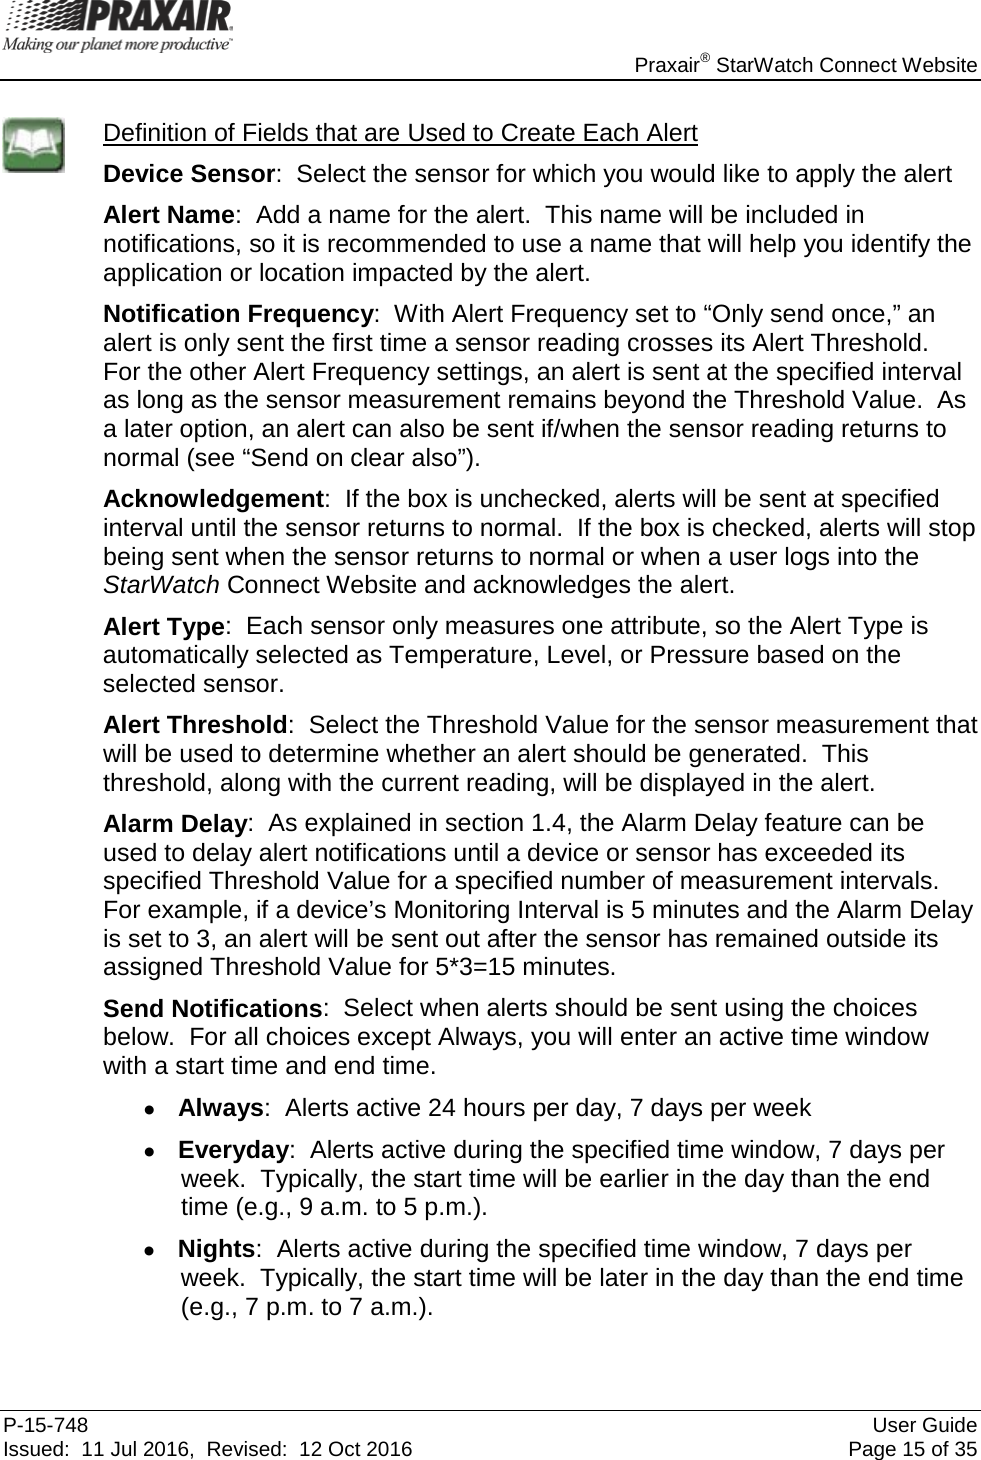
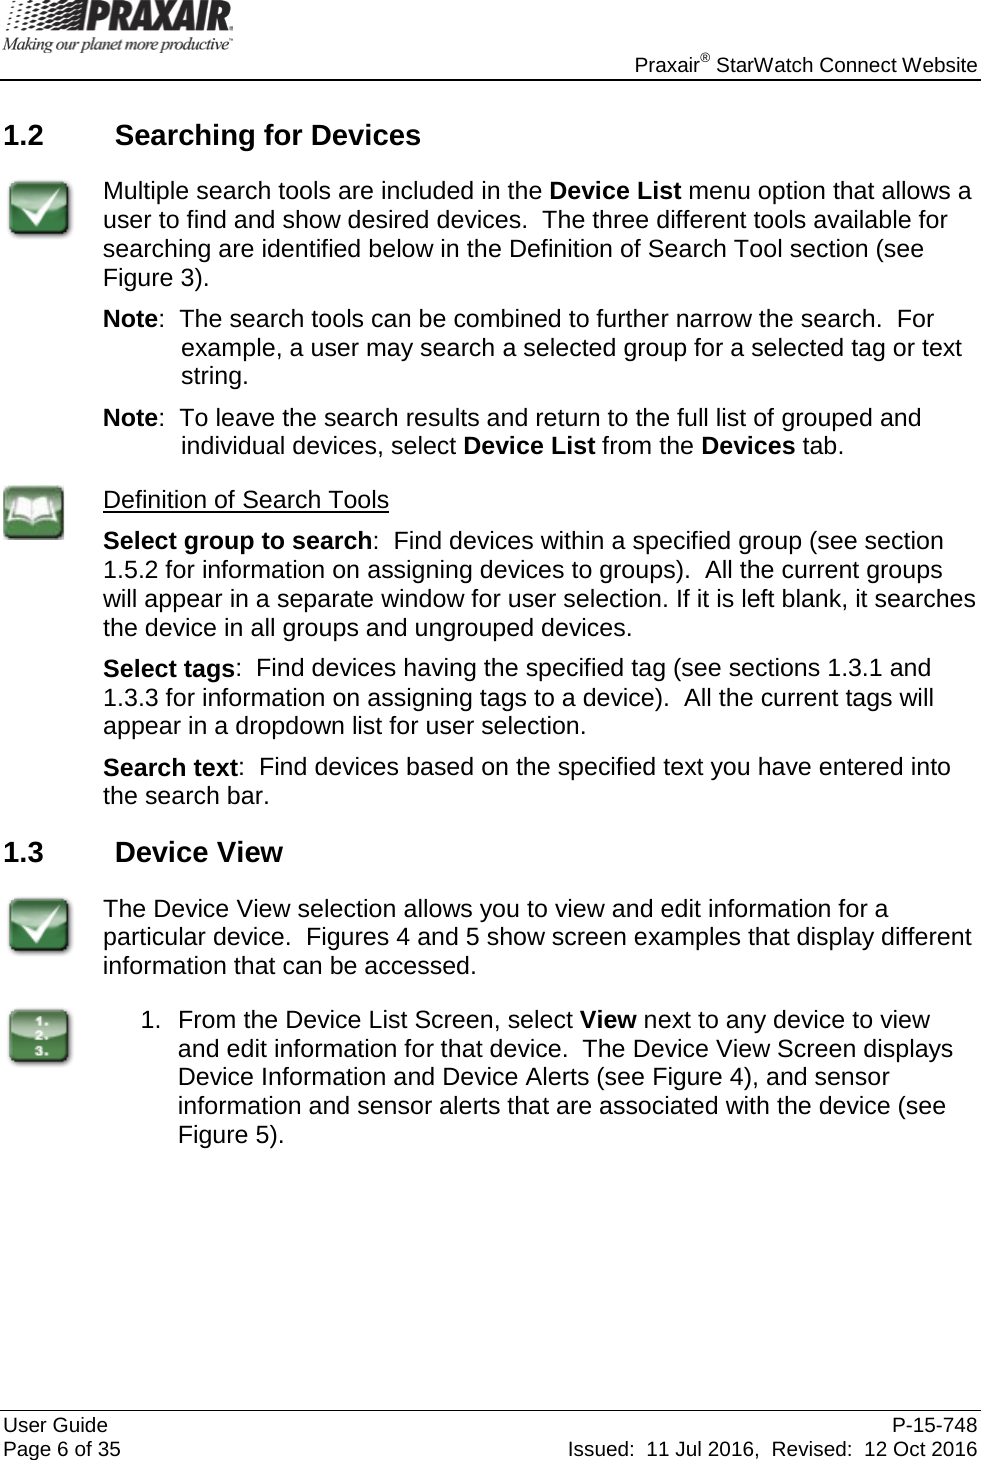
![Praxair® StarWatch Connect Website User Guide P-15-748 Page 16 of 35 Issued: 11 Jul 2016, Revised: 12 Oct 2016 • Nights and Weekends: Alerts are active during the specified time window for Monday through Friday plus all day Saturday and Sunday. Typically, the start time will be later in the day than the end time (e.g., 7 p.m. to 7 a.m.). • Weekdays: Alerts are active during the specified time window for Monday through Friday. Typically, the start time and time are selected to cover business hours (e.g., 8 a.m. to 5 p.m.). Notification Types: Alert notifications can be sent by phone, email, and SMS (text message). Send Alert To: Enter the phone number, cell phone number, and provider or email address for the recipient. Send on clear also: Check this box to have the alert clearance notification sent to the recipient once the sensor has returned back within its normal threshold. [+ Add Another Notification]: Click this button to add another notification recipient to the alert. Delete This Notification: Select to remove the recipient from the alert. [Save Alert]: Click this button to save the changes.](https://usermanual.wiki/SmartSense-by-Digi/ZPOINT.User-Manual-pdf/User-Guide-3597590-Page-22.png)
![Praxair® StarWatch Connect Website P-15-748 User Guide Issued: 11 Jul 2016, Revised: 12 Oct 2016 Page 19 of 35 • Always: Alerts active 24 hours per day, 7 days per week • Everyday: Alerts active during the specified time window, 7 days per week. Typically, the start time will be earlier in the day than the end time (e.g., 9 a.m. to 5 p.m.). • Nights: Alerts active during the specified time window, 7 days per week. Typically, the start time will be later in the day than the end time (e.g., 7 p.m. to 7 a.m.). • Nights and Weekends: Alerts are active during the specified time window for Monday through Friday plus all day Saturday and Sunday. Typically, the start time will be later in the day than the end time (e.g., 7 p.m. to 7 a.m.). • Weekdays: Alerts are active during the specified time window for Monday through Friday. Typically, the start time and time are selected to cover business hours (e.g., 8 a.m. to 5 p.m.). Notification Types: Alert notifications can be sent by phone, email, and SMS (text message). Send Alert To: Enter the phone number, cell phone number and provider, or email address for the recipient. Each phone number is entered as 10 digits. Each phone number, cell phone number, or e-mail address is entered as one alert notification. Send on clear also: Check this box to have the alert clearance notification sent to the recipient once the sensor has returned back within its normal threshold. [+ Add Another Notification]: Click this button to add another notification recipient to the alert. Delete This Notification: Select to remove the recipient from the alert. [Save Alert]: Click this button to save the changes.](https://usermanual.wiki/SmartSense-by-Digi/ZPOINT.User-Manual-pdf/User-Guide-3597590-Page-25.png)
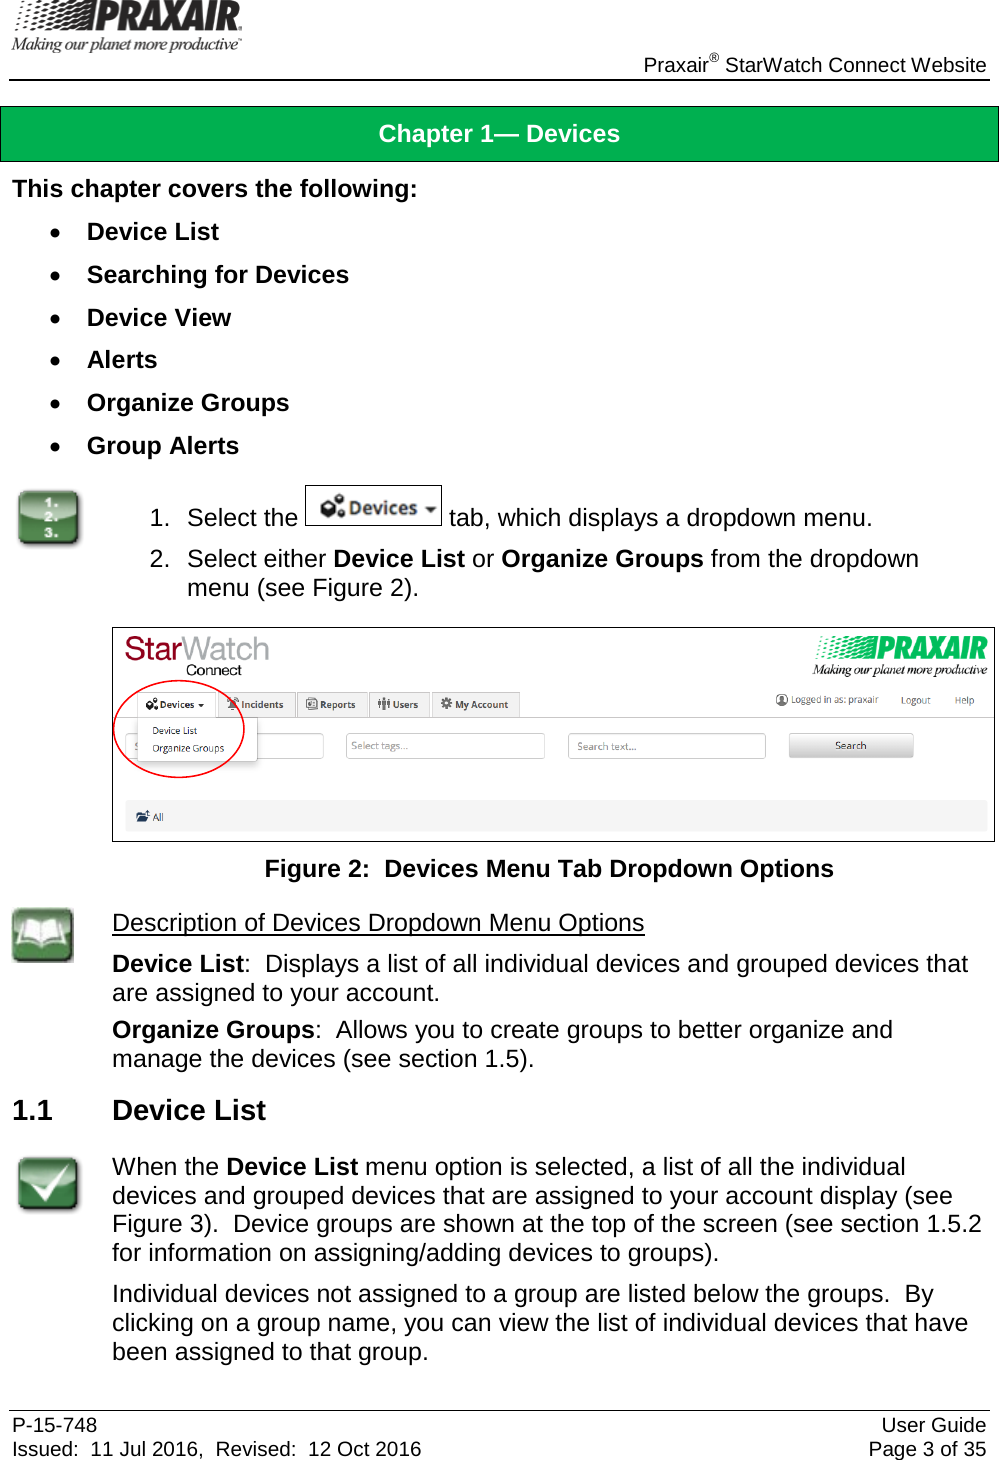
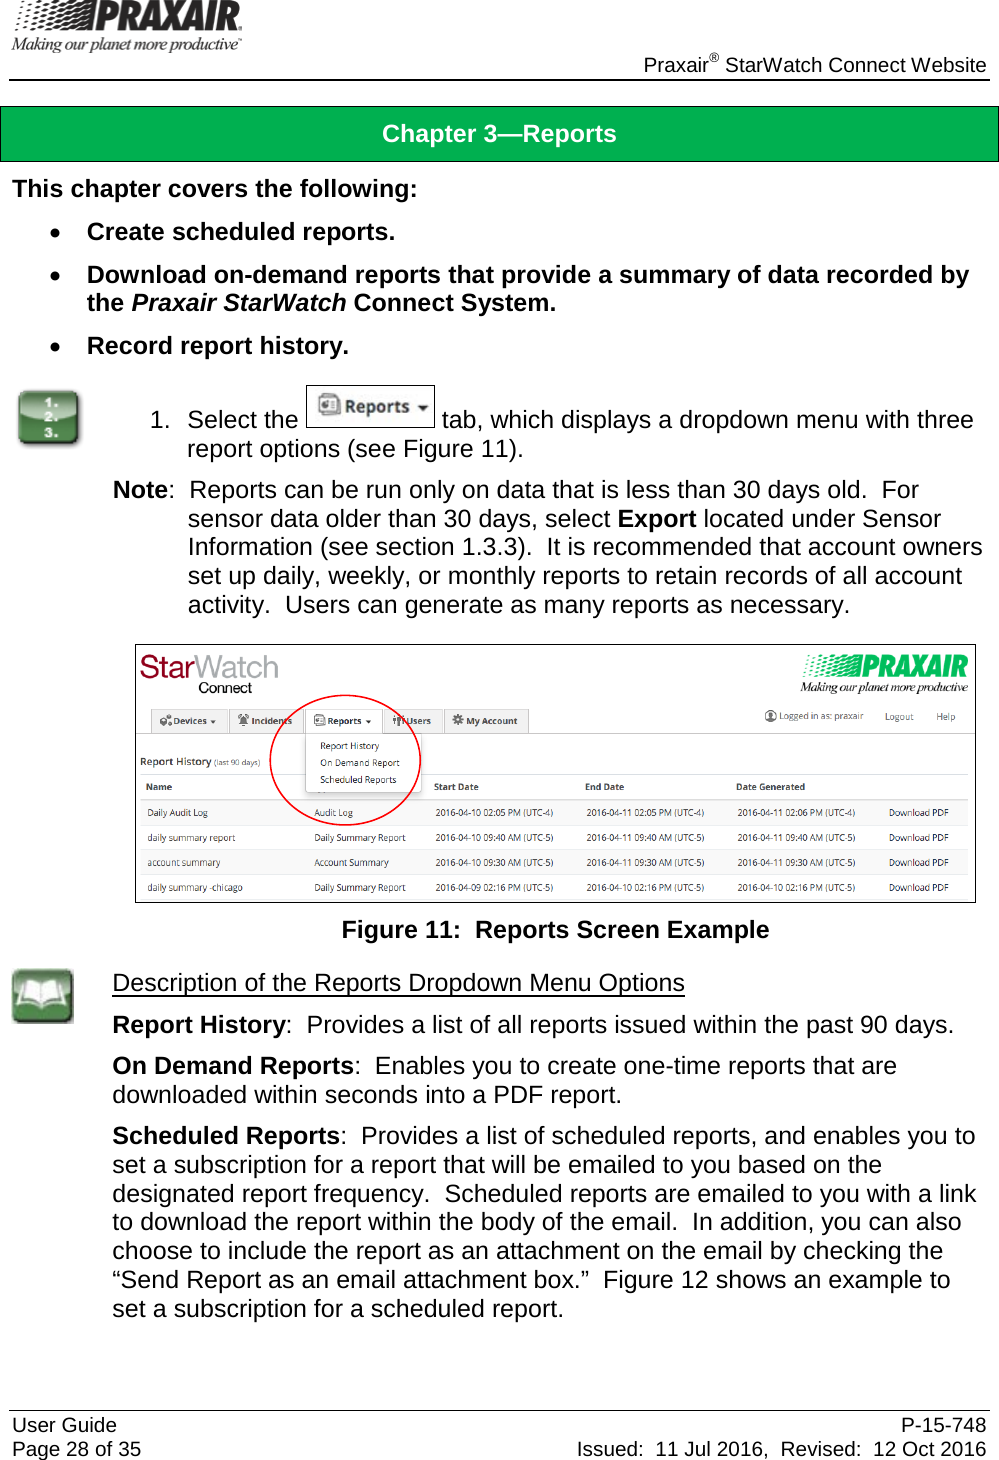
![Praxair® StarWatch Connect Website User Guide P-15-748 Page 20 of 35 Issued: 11 Jul 2016, Revised: 12 Oct 2016 1.5 Organize Groups Grouping is a powerful tool that you can use to organize all your devices for easier management. Shown in Figure 2, this tool is accessed by selecting Organize Groups from the Devices menu tab located near the top-left of the screen. 1.5.1 Create a Group 1. Select the tab, and then select Organize Groups. 2. Click [Create New Group] to create a group. • If the folder labeled “All” is highlighted, the group will be created in that folder. • If the folder corresponding to an existing group is highlighted, a sub-group will be created within that existing group. 3. Name your new group while the new folder is highlighted. You can rename the group at a later time by using the Rename button. 4. Select the group at any time, and click [Delete] to remove the group. If the deleted group has devices, the devices within the deleted group will be moved to the All bucket again. 1.5.2 Add Devices to a Group 1. Select Device List from the Devices tab (see section 1.1), and then click on the group which the device(s) will be added to. 2. Once you have selected the group, click [Add Devices]. 3. A selectable list of all devices within your account will appear. You can either scroll through the list to find the device(s) you want to add, or simply search for a device in the open-text search bar 1.5.3 Move Devices Within Groups 1. Select Device List from the Devices tab (see section 1.1) to find the device in the group, and then select View beside the device you want to move. 2. Click on the gear icon located in the upper left-hand corner of the Device Information view (see Figure 4). 3. Choose the group where you want to move the device. Selecting All returns the device to a general pool of devices not assigned to a group. 4. Click [Save] to move the device to the selected group.](https://usermanual.wiki/SmartSense-by-Digi/ZPOINT.User-Manual-pdf/User-Guide-3597590-Page-26.png)
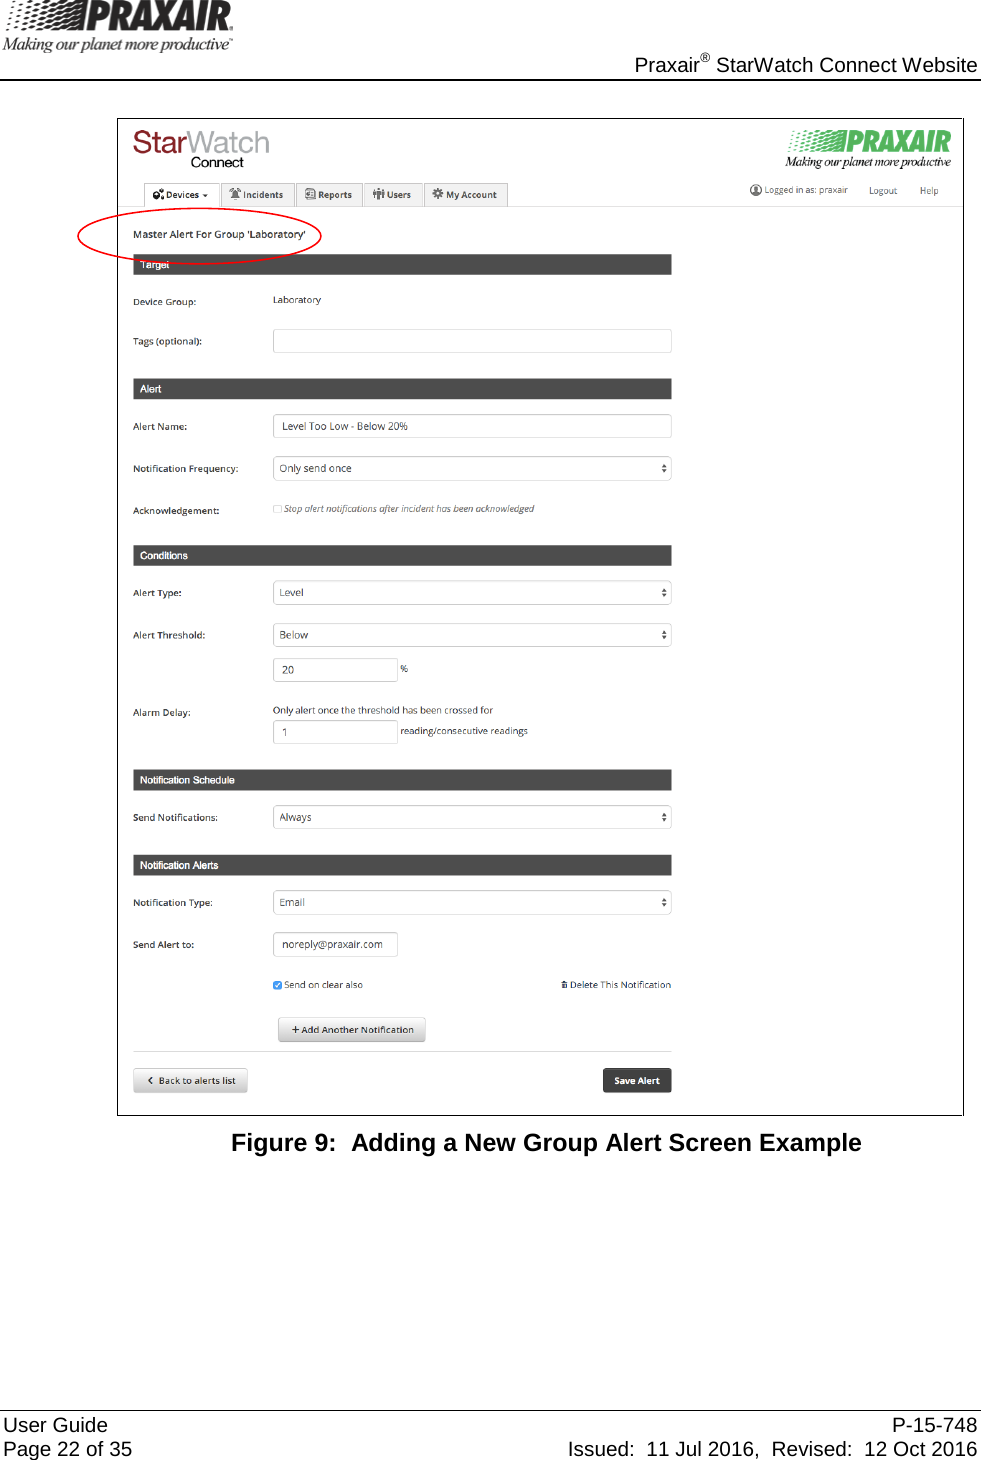
![Praxair® StarWatch Connect Website P-15-748 User Guide Issued: 11 Jul 2016, Revised: 12 Oct 2016 Page 21 of 35 1.5.4 Group Permissions Owners and administrators of the StarWatch Connect Website can restrict which groups a user is allowed to see. See section 4 for more details on user management. 1. Select the tab at the top of the screen. 2. Select View for the specific user. 3. Under Group Permissions, select edit, and then select the groups available to you. 1.6 Group Alerts A group alert is a single alert that applies to all devices or a subset of devices within a group. To create a group alert: 1. Select Device List from the Devices tab (see section 1.1), and then click on the group that contains the devices for the group alert. The resulting page will display all devices and sub-groups within the selected group. 2. Select Group Alerts located at the top, right side of the device list. The resulting page will display all existing group alerts for the selected group. 3. Click [Add New Alert]. The resulting page allows you to create the group alert by completing the following fields (see Figure 9)](https://usermanual.wiki/SmartSense-by-Digi/ZPOINT.User-Manual-pdf/User-Guide-3597590-Page-27.png)
![Praxair® StarWatch Connect Website P-15-748 User Guide Issued: 11 Jul 2016, Revised: 12 Oct 2016 Page 25 of 35 Send Alert To: Enter the phone number, cell phone number, and provider, or email address for the recipient. Each phone number is entered as 10 digits. Each phone number, cell phone number, or e-mail address is entered as one alert notification. Send on clear also: Check this box to have the alert clearance notification sent to the recipient once the sensor has returned back within its normal threshold. [Add Another Notification]: Click this button to add another notification recipient to the alert. Delete This Notification: Select to remove the recipient from the alert. [Save Alert]: Click this button to save the changes.](https://usermanual.wiki/SmartSense-by-Digi/ZPOINT.User-Manual-pdf/User-Guide-3597590-Page-31.png)
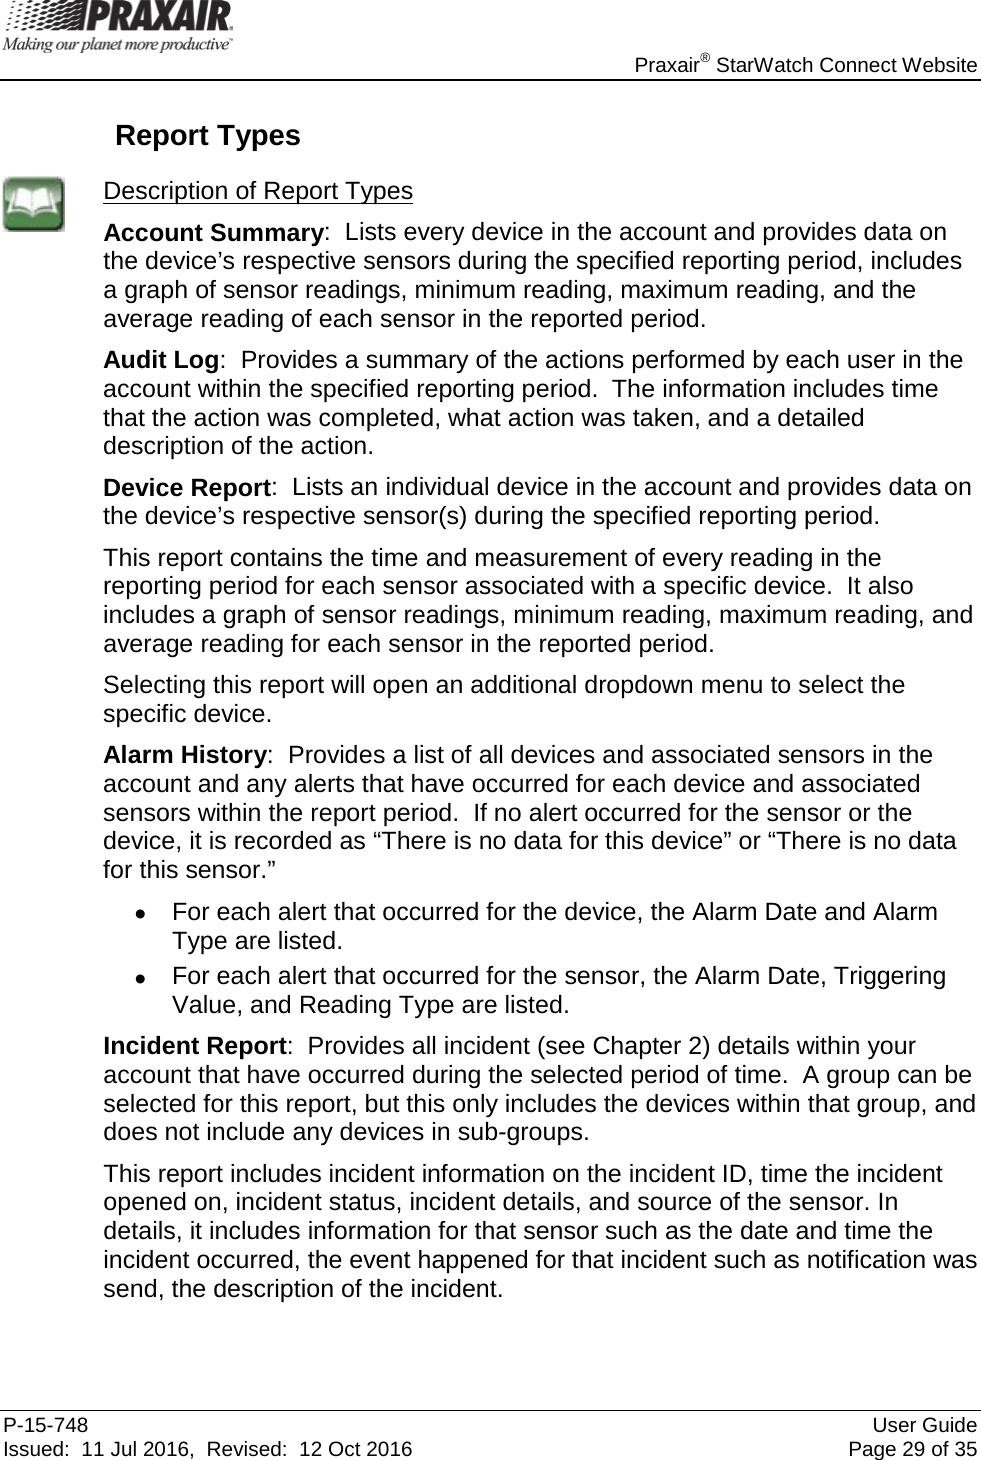
![Praxair® StarWatch Connect Website User Guide P-15-748 Page 30 of 35 Issued: 11 Jul 2016, Revised: 12 Oct 2016 Daily Summary Report: This report provides daily high, daily low, and daily average readings for each sensor in the selected group. Devices in sub-groups will not be included in your report. At least one reporting time must be selected to complete the report subscription saving process, but tags and notes can also be included to this report. The Scheduled Report screen displays information on the scheduled report, such as Report Type, Name given to this report, e-mail Address(es) which the report will be sent to, Report Frequency, Next Run Date/Time for the scheduled report, and Time Zone selected. Figure 12: Generating a Scheduled Report Screen Example Description of Scheduled Report Screen Items Name: Each report must be given a name during the report schedule creation. Email Address: The report will be sent to the email address(es) entered here. Multiple emails can be added as report recipients, and must separated by commas within this field. Report Frequency: Defines how often the report will be sent (Daily, Weekly, Monthly, or Once). Next Run Date/Time: Select when the next report will be sent out. A calendar tool will open. Select the date within the calendar. Click on the clock icon at the bottom of the calendar to select the time. Time Zone: Select the time zone used for the report. [Save Report Subscription]: Click this button to enable the report.](https://usermanual.wiki/SmartSense-by-Digi/ZPOINT.User-Manual-pdf/User-Guide-3597590-Page-36.png)
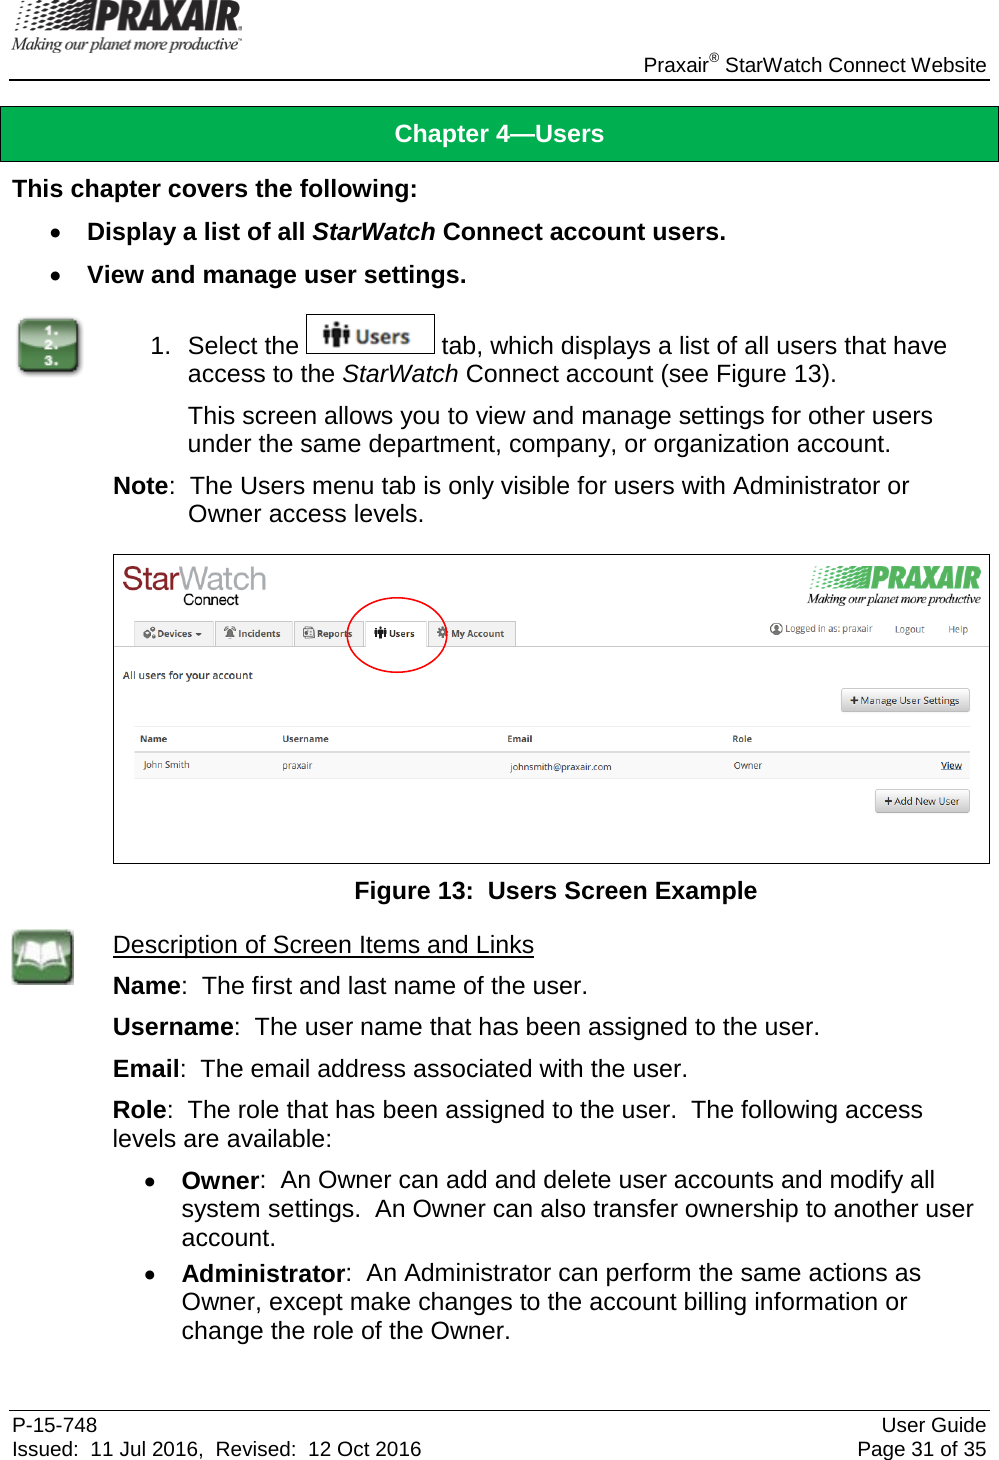
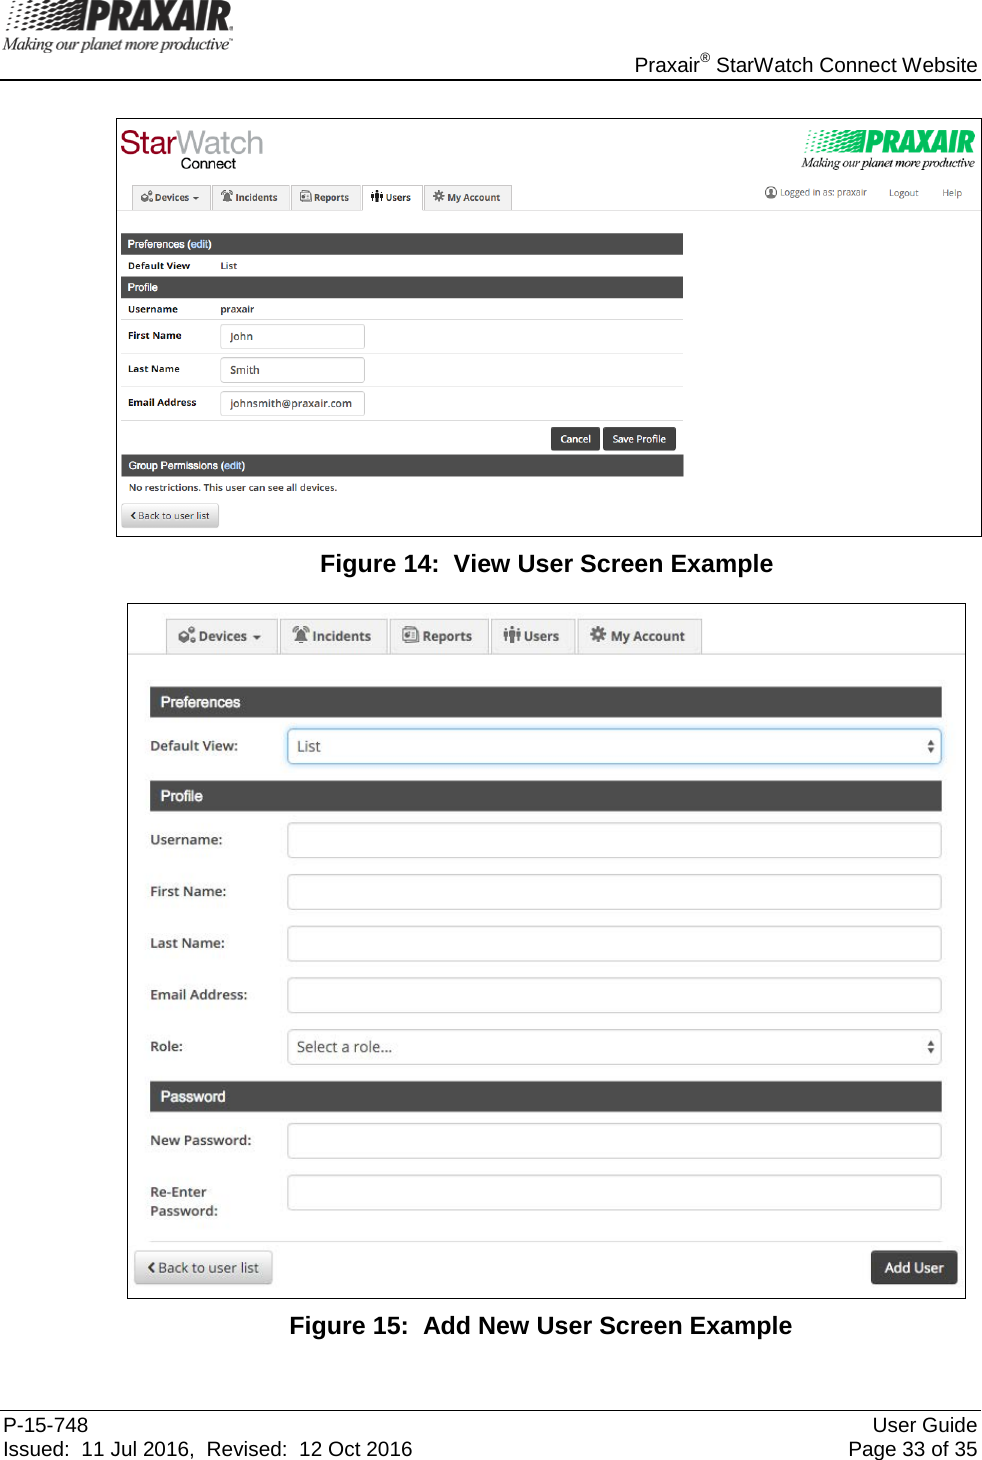
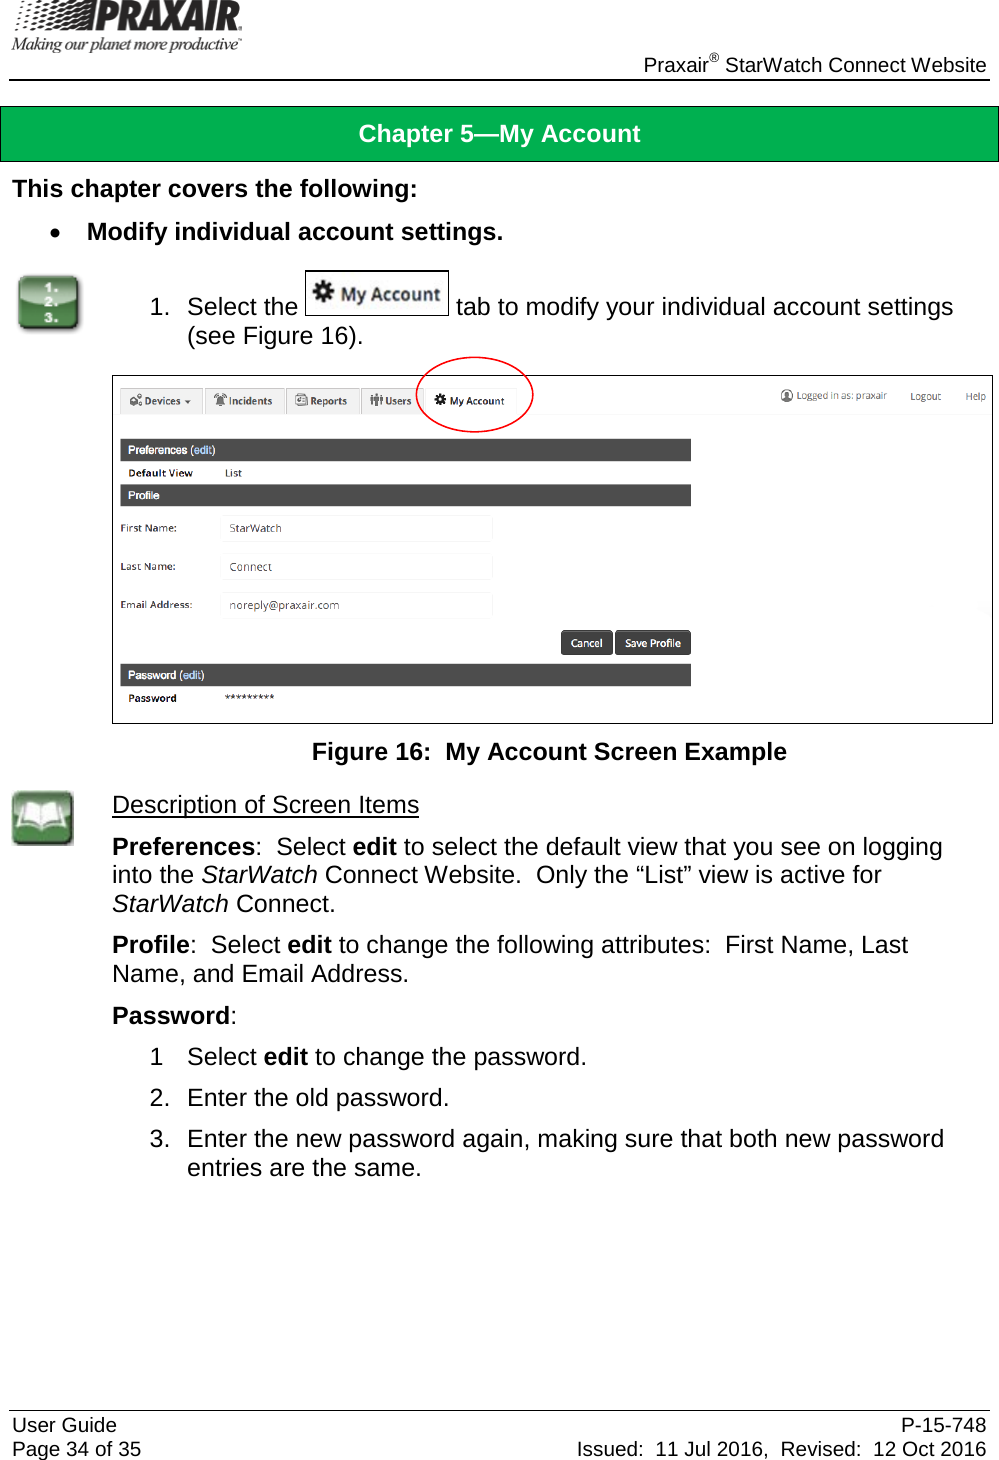
![Praxair® StarWatch Connect Website User Guide P-15-748 Page 32 of 35 Issued: 11 Jul 2016, Revised: 12 Oct 2016 • Editor: An Editor can view and modify most system settings, with the exception of deleting devices and sensors, and seeing or editing other users. • Sensor Alert Editor: A Sensor Alert Editor can view all assigned devices and modify sensor alerts for those devices. This user cannot modify device alerts. • Incident Responder: An Incident Responder can view all data for assigned devices and can edit incidents (change status, write notes, acknowledge), but cannot make changes outside of incidents. • Viewer: A Viewer can only view assigned devices. View: Select to edit a user’s preferences or profile (see Figure 14): • Preferences: Select edit to select the default view that the user sees on logging into the StarWatch Connect Website. Only the “List” view is active for StarWatch Connect. • Profile: Select edit to change the following attributes for the user: Username, First Name, Last Name, Email Address, and Role. • Group Permission: Select edit to select which device groups the user can access. Delete: Select to permanently delete a user and their access to the account. [Add New User]: Click this button to create a new user (see Figure 15): • Preferences: Select the default view that the user sees on logging into the StarWatch Connect Website. Only the “List” view is active for StarWatch Connect. • Profile: Enter the following attributes for the user: Username, First Name, Last Name, Email Address, and Role. • Password: Enter the new password and re-enter the password to confirm it. [+ Manager User Settings]: Click this button to change the maximum days for the password to change. Only the account owner has this funtion. • Max Password Age: Only the Owner and Administrator can set the maximum password age for all users. • Account Owner: Only the Owner can re-assign the Owner role.](https://usermanual.wiki/SmartSense-by-Digi/ZPOINT.User-Manual-pdf/User-Guide-3597590-Page-38.png)