SmartSense by Digi ZPOINT Wireless Node User Manual
Schechter Tech LLC DBA TemperatureAlert Wireless Node
Contents
- 1. Manual.pdf
- 2. User Manual.pdf
User Manual.pdf
P-15-754 Issued: 12 Oct 2016
User Guide
Praxair®
StarWatch
™
Connect Website

PRAXAIR® StarWatch™ Connect Website
Copyright 2016, Praxair Technology, Inc.
All rights reserved
Printed in the USA. 12 Oct 2016
Praxair, Inc. P-15-754
Technical Communications
175 East Park Drive
Tonawanda, NY 14150
Mail: P.O. Box 44
Tonawanda, NY 14151-0044
USA
www.praxair.com
info@praxair.com
Phone: 800-PRAXAIR
800-772-9247
716-879-2155
Fax: 800-772-9985
716-879-2146
Praxair Specialty Gases & Equipment
Web: www.PraxairDirect.com
Email: SpecialtyGases@Praxair.com
Technical/Customer Support
Call 1-877-PRAXAIR (1-877-772-9247),
and follow the voice prompts.
In an emergency, call 1-800-PRAXAIR (1-800-772-9247).

PRAXAIR® StarWatch™ Connect Website
P-15-754 User Guide
Issued: 11 Jul 2016, Revised: 12 Oct 2016 Page iii of ix
NOTICES
BUSINESS CONFIDENTIAL: This manual contains confidential and proprietary information of
Praxair, Inc. and is provided in confidence and solely for use in conjunction with the
PRAXAIR® StarWatch™ Connect Website. The manual may not be reproduced or its
contents disclosed to third parties without the prior written consent of Praxair, Inc.
DISCLAIMERS: All information referred to and/or included in this user guide is current as of the
issue/revision date of this manual. Praxair, Inc. makes no warranty or representation
with respect to the accuracy of the information or with respect to the suitability of the use
of such information outside Praxair, Inc., nor does Praxair, Inc. assume responsibility for
any injury or damage which may result, directly or indirectly, from the use of such
information.
This user guide could include technical inaccuracies or typographical errors. Changes
are made periodically to the information herein; these changes will be incorporated in
subsequent revisions of the manual. Praxair, Inc. reserves the right to make
improvements and/or changes to the product(s) and/or programs described in this
manual at any time and without notice.
TRADEMARKS: Praxair, Making our planet more productive, StarWatch, and the Flowing
Airstream design are trademarks or registered trademarks of Praxair Technology, Inc. in
the United States and/or other countries. Other trademarks used herein are trademarks
or registered trademarks of their respective owners.

User Guide P-15-754
Page iv of ix Issued: 11 Jul 2016, Revised: 12 Oct 2016

P-15-754 User Guide
Issued: 11 Jul 2016, Revised: 12 Oct 2016 Page v of ix
TABLE OF CONTENTS
NOTICES ................................................................................................................................ iii
INTRODUCTION ........................................................................................................................ 1
CHAPTER 1—DEVICES .......................................................................................................... 3
1.1 Device List ................................................................................................................. 3
1.2 Searching For Devices .............................................................................................. 6
1.3 Device View ............................................................................................................... 6
1.3.1 Device Information ..................................................................................................... 7
1.3.2 Device Alerts ............................................................................................................. 8
1.3.3 Sensor Information .................................................................................................. 10
1.4 Alerts ....................................................................................................................... 11
1.4.1 Add New Sensor Alert ............................................................................................. 14
1.4.2 Add New Device Alert .............................................................................................. 17
1.5 Organize Groups ..................................................................................................... 20
1.5.1 Create a Group ........................................................................................................ 20
1.5.2 Add Devices to A Group .......................................................................................... 20
1.5.3 Move Devices Within Groups ................................................................................... 20
1.5.4 Group Permissions .................................................................................................. 21
1.6 Group Alerts ............................................................................................................ 21
CHAPTER 2—INCIDENTS .................................................................................................... 26
CHAPTER 3—REPORTS ...................................................................................................... 28
CHAPTER 4—USERS ........................................................................................................... 31
CHAPTER 5—MY ACCOUNT ............................................................................................... 34
CHAPTER 6—HELP .............................................................................................................. 35
FIGURES
1 Device List Screen Example ...................................................................................... 2
2 Devices Menu Tab Dropdown Options ....................................................................... 3
3 Search Tools on the Device List Screen .................................................................... 4
4 Device View Screen Showing Examples of Device Information
and Device Alerts....................................................................................................... 7
5 Device View Screen Showing Examples of Sensor Information
and Sensor Alerts .................................................................................................... 10

User Guide P-15-754
Page vi of ix Issued: 11 Jul 2016, Revised: 12 Oct 2016
6 Alert List Screen Example ........................................................................................ 12
7 Adding a New Sensor Alert Screen Example ........................................................... 15
8 Adding a New Device Alert Screen Example ........................................................... 17
9 Adding a New Group Alert Screen Example ............................................................ 22
10 Incidents Screen Example ....................................................................................... 26
11 Reports Screen Example ......................................................................................... 28
12 Generating a Scheduled Report Screen Example .................................................... 30
13 Users Screen Example ............................................................................................ 31
14 View User Screen Example ..................................................................................... 33
15 Add New User Screen Example............................................................................... 33
16 My Account Screen Example ................................................................................... 34
17 Help Screen Example .............................................................................................. 35
ATTACHMENTS
A StarWatch Connect Regulatory Statements ........................................................... A-1

Praxair® StarWatch Connect Website
P-15-748 User Guide
Issued: 11 Jul 2016, Revised: 12 Oct 2016 Page 1 of 35
Praxair® StarWatch™ Connect Website User Guide
This guide covers the following topics:
• Introduction
• Devices
• Alerts
• Groups
• Incidents
• Reports
• Users
• My Accounts
Introduction
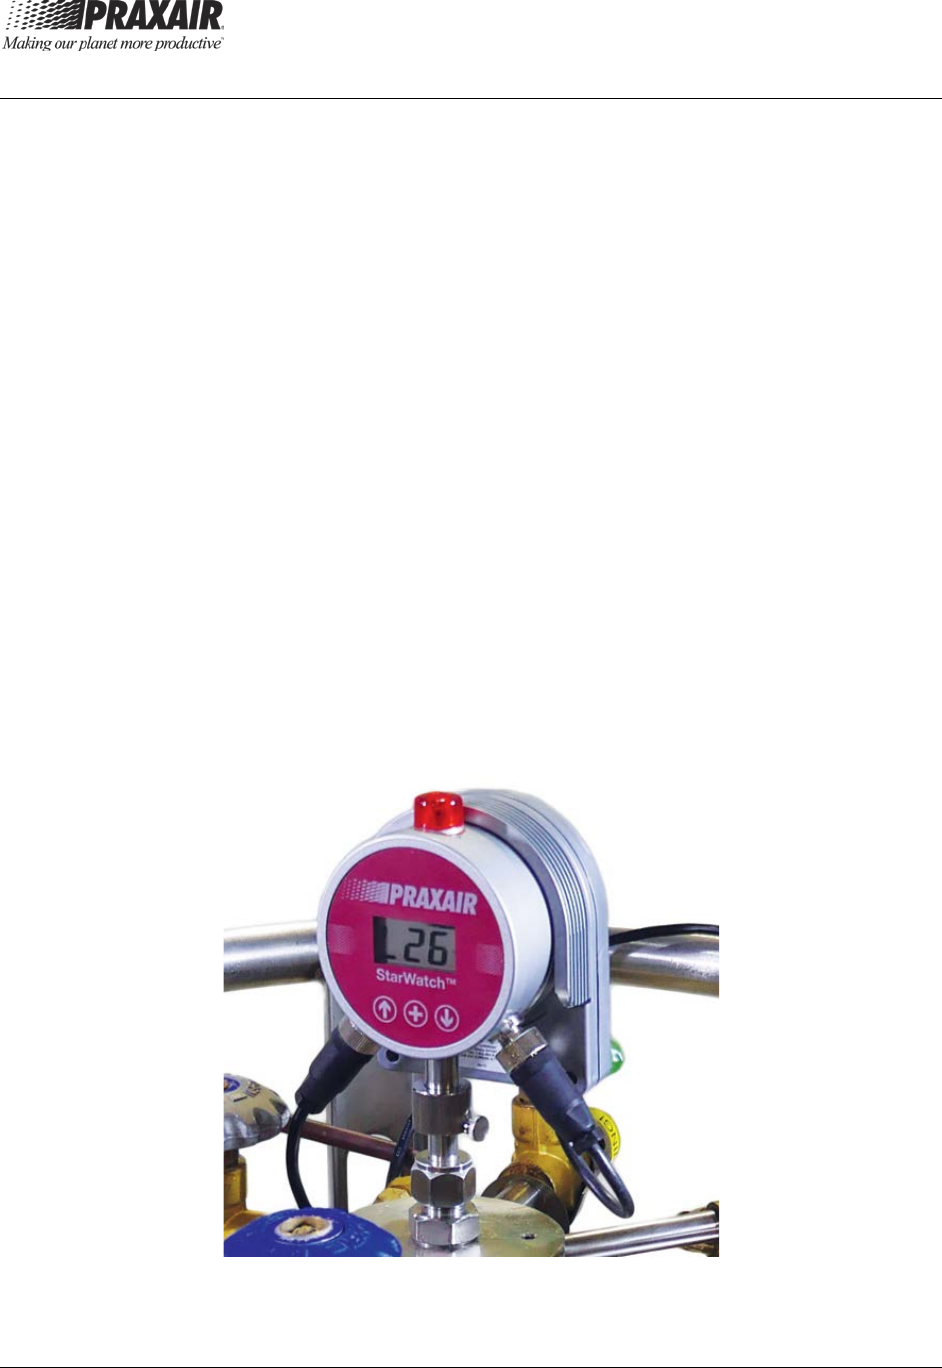
The Praxair StarWatch
™ Cryogenic Monitoring System measures and displays
the liquid level of any non-conducting cryogenic liquid including liquid nitrogen,
liquid oxygen, liquid argon, and liquid carbon dioxide. The system also
measures and displays the current pressure within a cryogenic container. The
StarWatch Connect system can connect with the StarWatch Cryogenic
Monitoring S
ystem and transfer the liquid level and pressure data to the sensor
cloud and the data is accessible through the website and mobile app. The
Praxair StarWatch Connect Website allows you to view liquid level and
pressure measurements on the cryogenic container installed with the
StarWatch Cryogenic Monitoring System, and configure the monitoring system
settings.
This system is accessed using the following URL:
http://praxair.myalertlist.com
1. Log into the StarWatch Connect Website using the credentials that were
provided separately. Once you have logged in, default settings display
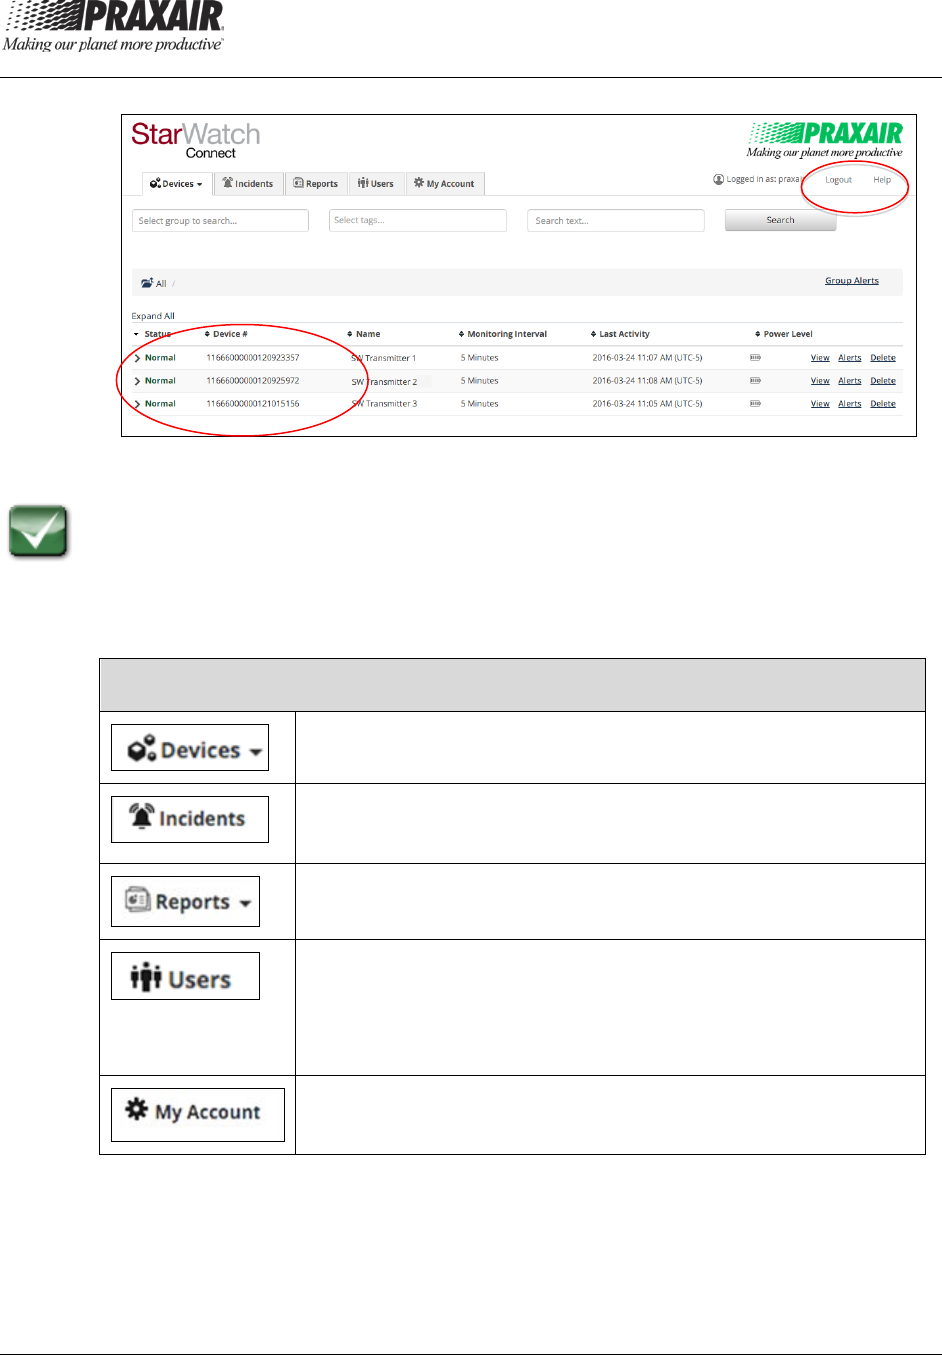
on the Device List Screen (see Figure 1 for an example).
Note: All individual and grouped StarWatch Connect devices assigned to your
StarWatch Connect account are listed on this screen.
Note: Select Logout to log out of the website. Select Help to access help
text. These options are located at the upper-right corner of the screen.
Praxair® StarWatch Connect Website
User Guide P-15-748
Page 2 of 35 Issued: 11 Jul 2016, Revised: 12 Oct 2016
Figure 1: Device List Screen Example
Depending on the level of user access, four or five menu tabs display at the
top of every screen.
Table 1 identifies these menu tabs, and describes each tab function. These
tabs allow you to quickly navigate to the different areas of the StarWatch
Connect Website.
Table 1: Menu Tabs
View assigned devices and update their settings.
View and manage current and historical incidents, which
include data about incidents within your account.
Export and configure device measurement reports.
View and manage settings for other users under the
same overall department, company, or organization
account. This menu tab is available only for users with
Administrator or Owner access levels.
Manage settings for his/her own account.

Praxair® StarWatch Connect Website
P-15-748 User Guide
Issued: 11 Jul 2016, Revised: 12 Oct 2016 Page 3 of 35
Chapter 1— Devices
This chapter covers the following:
• Device List
• Searching for Devices
• Device View
• Alerts
• Organize Groups
• Group Alerts
1. Select the tab, which displays a dropdown menu.
2. Select either Device List or Organize Groups from the dropdown
menu (see Figure 2).
Figure 2: Devices Menu Tab Dropdown Options
Description of Devices Dropdown Menu Options
Device List: Displays a list of all individual devices and grouped devices that
are assigned to your account.
Organize Groups: Allows you to create groups to better organize and
manage the devices (see section 1.5).
1.1 Device List
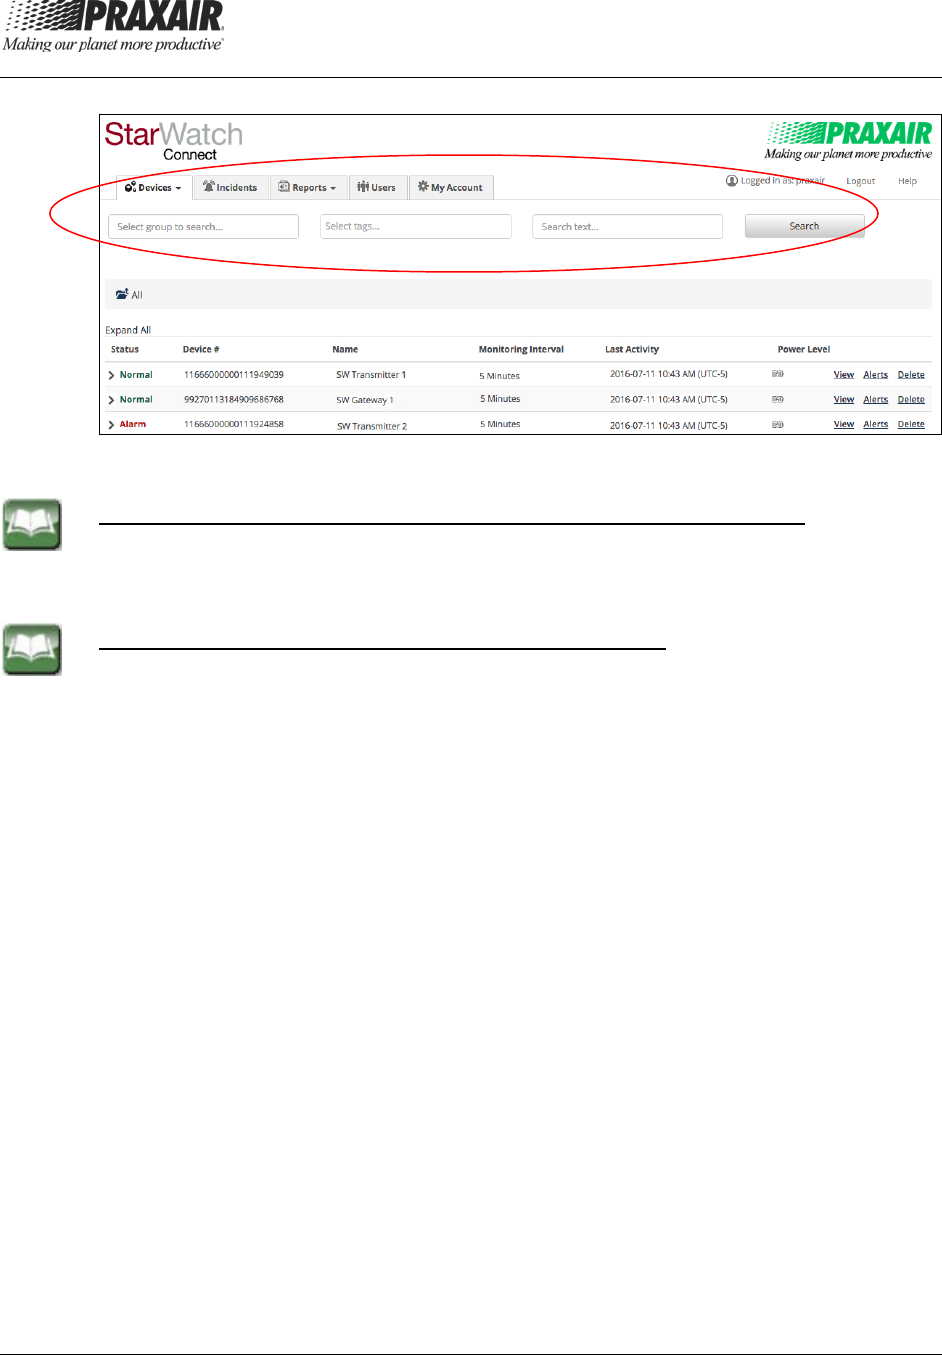
When the Device List menu option is selected, a list of all the individual
devices and grouped devices that are assigned to your account display (see
Figure 3). Device groups are shown at the top of the screen (see section 1.5.2
for information on assigning/adding devices to groups).
Individual devices not assigned to a group are listed below the groups. By
clicking on a group name, you can view the list of individual devices that have
been assigned to that group.
Praxair® StarWatch Connect Website
User Guide P-15-748
Page 4 of 35 Issued: 11 Jul 2016, Revised: 12 Oct 2016
Figure 3: Search Tools on the Device List Screen
Description of how to expand or collapse the displayed information
Expand All: Select to show expanded details for all individual devices.
Collapse All: Select to show only the summary information for each device.
Description of what is listed for each individual device
Status:
• Normal: Device and sensors are within their specified acceptable
ranges.
• Warning: Device and/or sensor(s) have exceeded a specified Alert
threshold, but an Alarm Delay threshold has not been met. Notifications
have not been sent.
• Alarm: Device and/or sensor(s) have exceeded a specified Alert
threshold for a number of consecutive readings exceeding the Alarm
Delay threshold. The device and/or sensor(s) are in alarm. Notifications
have been sent. Select View for more details.
Device #: Every StarWatch Connect device that communicates with the
StarWatch Connect Website has a unique device identification number
(Device #). Click once to sort in ascending order; click again to sort in
descending order.
Name: Each device can be assigned a descriptive name. Click once to sort in
ascending order; click again to sort in descending order.
Monitoring Interval: Lists the time specified between each reading. Click
once to sort in ascending order; click again to sort in descending order.
Last Activity: Lists the time when the last reading was recorded. Click once
to sort in ascending order; click again to sort in descending order.
Praxair® StarWatch Connect Website
P-15-748 User Guide
Issued: 11 Jul 2016, Revised: 12 Oct 2016 Page 5 of 35
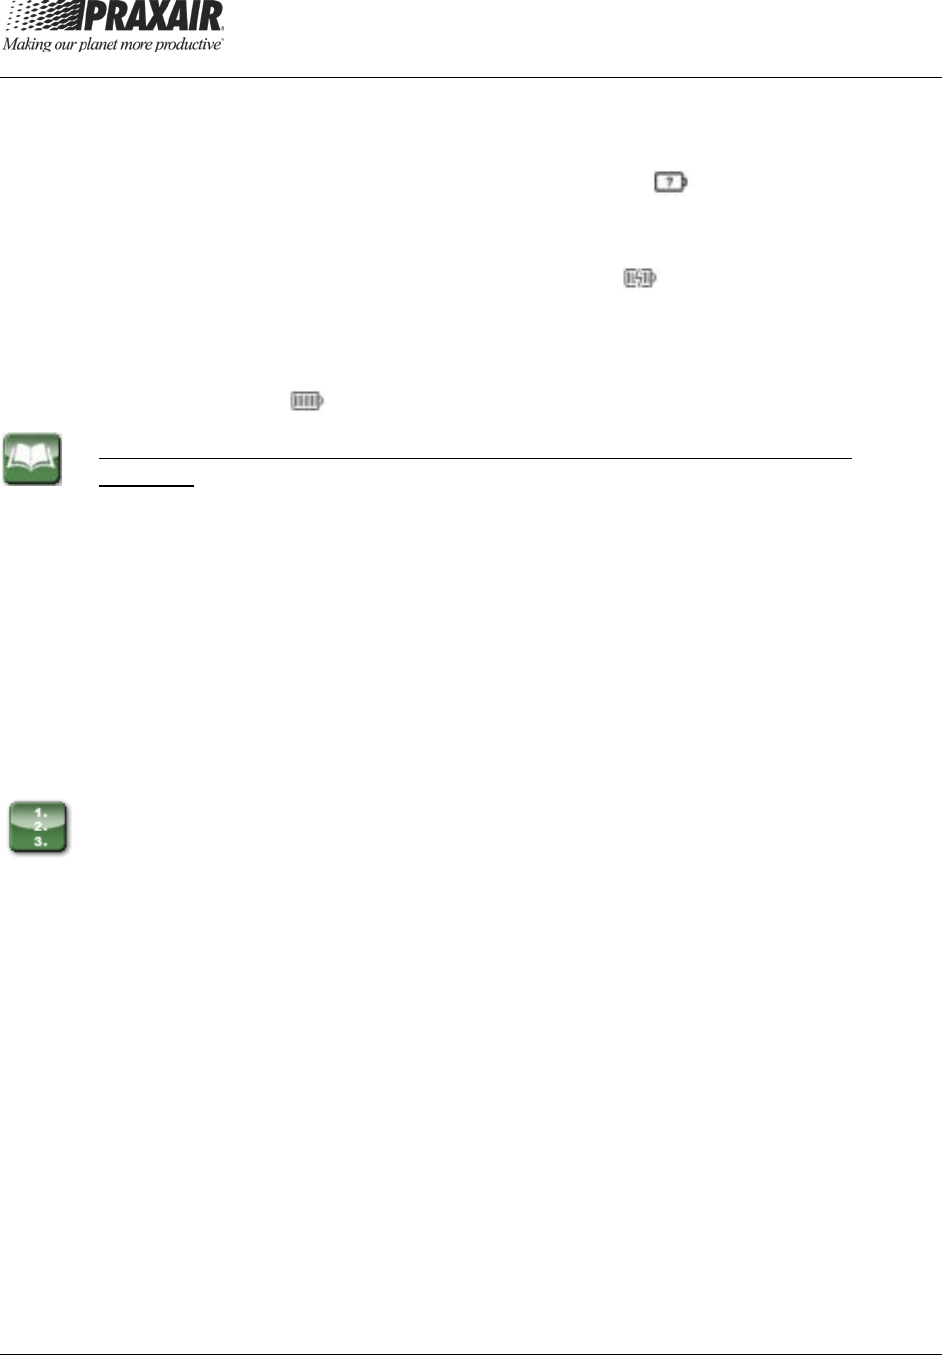
Power Level: The Grey bar within the battery icon indicates approximate
percentage of battery life remaining in the device.
• The battery icon will contain a question mark ( ) if the device misses
one transmission interval or if a device is powered off.
• If external power is supplied to the StarWatch Connect gateway, the
battery icon will contain the power symbol ( ) and display the
percentage of charged battery.
The battery icon for StarWatch Connect transmitters will indicate how much
battery the device has remaining, and will have five grey bars when the battery
is at full capacity ( ).
Description of selectable options that each individual device listing also
includes:
View: Select to configure the settings of the device, including device name,
device time zone, device address, sensor name, sensor data, and device
alerts.
Alert: Select to add and edit alerts for the device and the sensors associated
with the device.
Delete: Select to permanently delete the device and/or sensor and associated
historical data from your account. The users at the Owner and Administrator
access levels have this function. CAUTION: USE WITH CAUTION; DATA
WILL BE LOST PERMANENTLY.
1. Click on any individual device row to show expanded details for that
device.
The Details field for a StarWatch Connect transmitter will display the
status of:
• All sensors connected to the transmitter.
• Corresponding port numbers for each sensor.
• Assigned sensor names.
• Last sensor reading values.
• Last sensor reading times.
• Maximum, minimum, and average reading for each sensor over the
prior 24 hours.
There is no additional information shown in the Details field for a
StarWatch Connect gateway. Clicking on the individual device row
again will collapse the expanded details.
Praxair® StarWatch Connect Website
User Guide P-15-748
Page 6 of 35 Issued: 11 Jul 2016, Revised: 12 Oct 2016
1.2 Searching for Devices
Multiple search tools are included in the Device List menu option that allows a
user to find and show desired devices. The three different tools available for
searching are identified below in the Definition of Search Tool section (see
Figure 3).
Note: The search tools can be combined to further narrow the search. For
example, a user may search a selected group for a selected tag or text
string.
Note: To leave the search results and return to the full list of grouped and
individual devices, select Device List from the Devices tab.
Definition of Search Tools
Select group to search: Find devices within a specified group (see section
1.5.2 for information on assigning devices to groups). All the current groups
will appear in a separate window for user selection. If it is left blank, it searches
the device in all groups and ungrouped devices.
Select tags: Find devices having the specified tag (see sections 1.3.1 and
1.3.3 for information on assigning tags to a device). All the current tags will
appear in a dropdown list for user selection.
Search text: Find devices based on the specified text you have entered into
the search bar.
1.3 Device View
The Device View selection allows you to view and edit information for a
particular device. Figures 4 and 5 show screen examples that display different
information that can be accessed.
1. From the Device List Screen, select View next to any device to view
and edit information for that device. The Device View Screen displays
Device Information and Device Alerts (see Figure 4), and sensor
information and sensor alerts that are associated with the device (see
Figure 5).
Praxair® StarWatch Connect Website
P-15-748 User Guide
Issued: 11 Jul 2016, Revised: 12 Oct 2016 Page 7 of 35
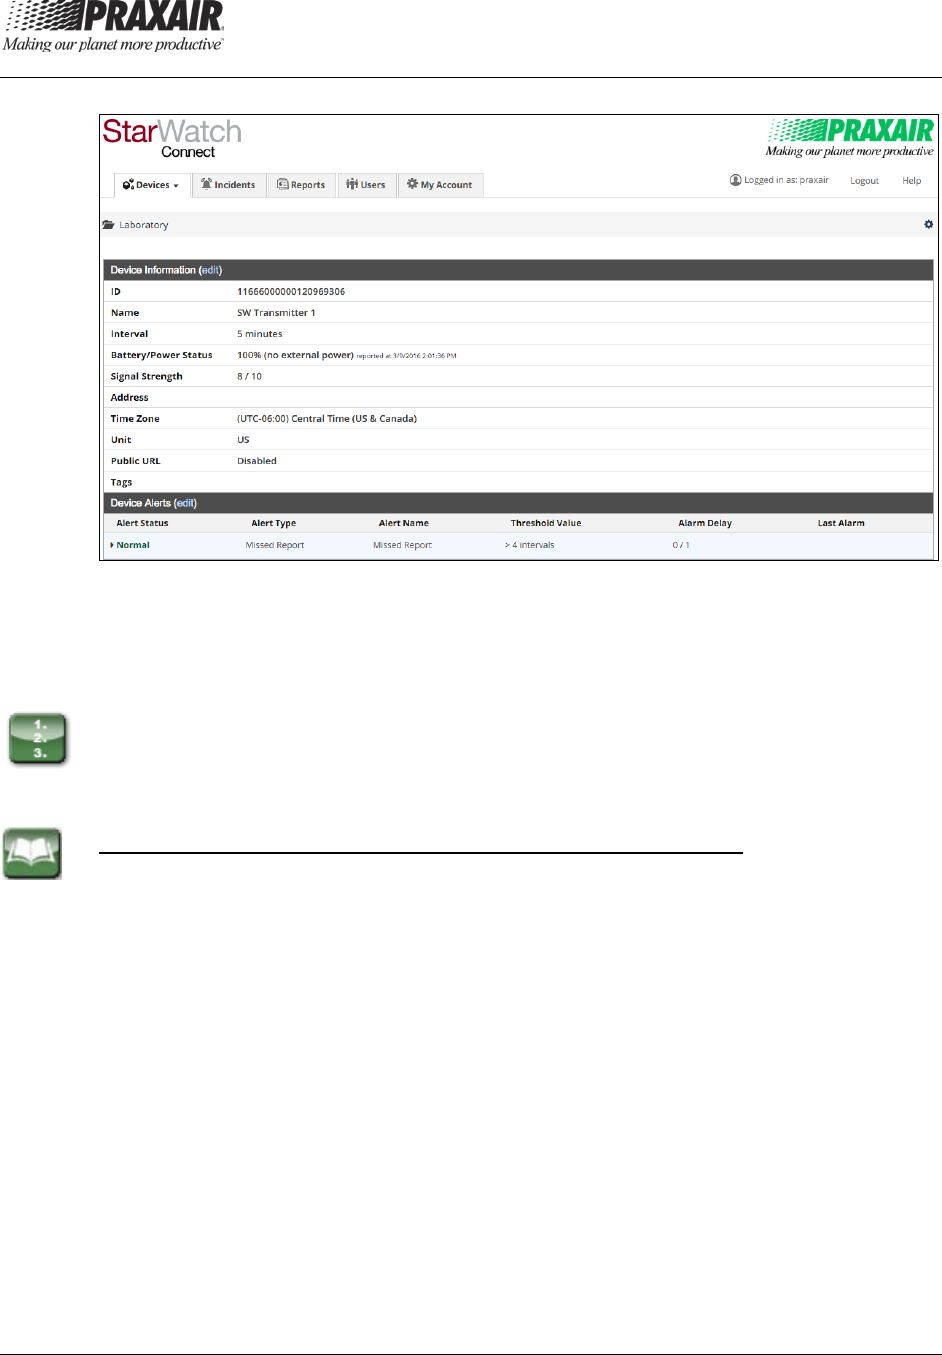
Figure 4: Device View Screen Showing
Examples of Device Information and Device Alerts
1.3.1 Device Information
1. Select edit to configure the device settings.
The field values identified below can be viewed or adjusted
(see Figure 4)
Definition of the Field Values that can be Viewed or Adjusted
ID: Unique ID given to every device (cannot be edited).
Name: Common name for the device. This name will appear in all device
alerts.
Interval:
• If the device is a StarWatch Connect transmitter, this parameter defines
the interval between sensor readings.
• If the device is a StarWatch Connect gateway, this parameter defines
the interval between each time the gateway uploads information to the
StarWatch Connect Website.
Battery/Power Status: Displays the battery level and charging status of
applicable devices.
• For the StarWatch Connect transmitter, less than 20 percent battery
level will trigger a Low Battery reading.
Praxair® StarWatch Connect Website
User Guide P-15-748
Page 8 of 35 Issued: 11 Jul 2016, Revised: 12 Oct 2016
• For the StarWatch Connect gateway, loss of AC power will trigger an
AC Power Lost reading.
The user can set up an alert that will notify him/her if a Low Battery reading or
AC Power Lost reading occurs.
Signal Strength:
• For the StarWatch Connect gateway, the numerical value that is
displayed represents the communication signal strength between the
gateway and cellular network.
• For the StarWatch Connect transmitter, the numerical value that is
displayed represents the communication signal strength between the
transmitter and its respective gateway.
Address: Enter the physical address or coordinates of the device.
Time Zone: Select the time zone of the device; the selection is worldwise. For
example:
• UTC-5:00 Eastern time (U.S. and Canada)
• UTC-6:00 Central time (U.S. and Canada)
• UTC-7:00 Mountain time (U.S. and Canada)
• UTC-8:00 Pacific time (U.S. and Canada)
Unit: Select the type of units to use—U.S. Customary (Fahrenheit) or Metric
(Celsius)—for the temperature sensor built into the StarWatch Connect
transmitter.
Public URL: If enabled, the link can be distributed to allow view-only access
to this specific device on a web browser.
Tags: Tags can be applied to devices and sensors. When tags are applied to
devices, they can be used to filter devices for easy searching (see section 1.2
for an overview of searching for devices). Tags applied to devices can be
used to select which devices belong to a group alert (see section 1.6 for how to
set up a group alert).
1.3.2 Device Alerts
The Device Alerts window displays the status of all alerts created for that
device. Device alerts assess the functionality of the monitoring device. The
Device Alerts window displays the Alert Status, Alert Type, Alert Name,
Threshold Value triggering the alert, Alarm Delay, and Last Alarm (see
Figure 4).
1. Select edit to configure the device alerts. See section 1.4 for a detailed
description.
Praxair® StarWatch Connect Website
P-15-748 User Guide
Issued: 11 Jul 2016, Revised: 12 Oct 2016 Page 9 of 35
Definition of the Available Alert Types for the StarWatch Connect Transmitter
Low Battery: The battery level has dropped below 20 percent.
Missed Report: The device has not reported to the StarWatch Connect
Website at the specified interval. Missed reports can be triggered by one of
the following reasons:
• The StarWatch gauge is on power conservation (PCO) Mode. No level
or pressure data can be transmitted to the StarWatch Connect Website.
• The cable between the StarWatch Connect transmitter and gauge is not
connected, or not connected well. No level or pressure data is
transmitted to the StarWatch Connect Website.
• Communication between the StarWatch Connect transmitter and
gateway is lost. Temperature, pressure, and level data will no longer be
transmitted to the StarWatch Connect Website; however, the gateway is
still reporting at the set interval.
• Communication between the StarWatch Connect gateway and cellular
network is lost. Temperature, pressure, and level data will no longer be
transmitted to the StarWatch Connect Website, and the gateway is not
reporting at the set interval.
Two alert types are available for StarWatch Connect gateway:
Power Monitor: External power to the device has been interrupted.
Missed Report: The device has not reported to the StarWatch Connect
Website at the specified interval. Missed reports can be triggered by one of
the following reasons:
• Communication between the StarWatch Connect gateway and cellular
network is lost.
• The StarWatch Connect gateway is failing to communicate with the
server.
• The StarWatch Connect gateway has become unplugged and the
backup battery has completely discharged.
• The StarWatch Connect gateway has been turned off and missed
reporting into the StarWatch Connect Website.
• There is a hardware failure that is causing the StarWatch Connect
gateway to miss reporting into the StarWatch Connect Website.
Praxair® StarWatch Connect Website
User Guide P-15-748
Page 10 of 35 Issued: 11 Jul 2016, Revised: 12 Oct 2016
1.3.3 Sensor Information
The StarWatch Connect transmitter possesses a built-in temperature sensor.
When the StarWatch Connect transmitter is connected to the StarWatch
gauge, it accesses sensors measuring liquid level and pressure in the
cryogenic vessel. The three sensors are displayed on the StarWatch Connect
Website as:
• Temperature sensor on Port #0
• Pressure sensor on Port #21
• Level sensor on Port #22
Note: The port numbers do not matter.
1. Select edit to configure the sensor settings. The following field values
can be viewed or adjusted (see section 1.4 for a detailed description):
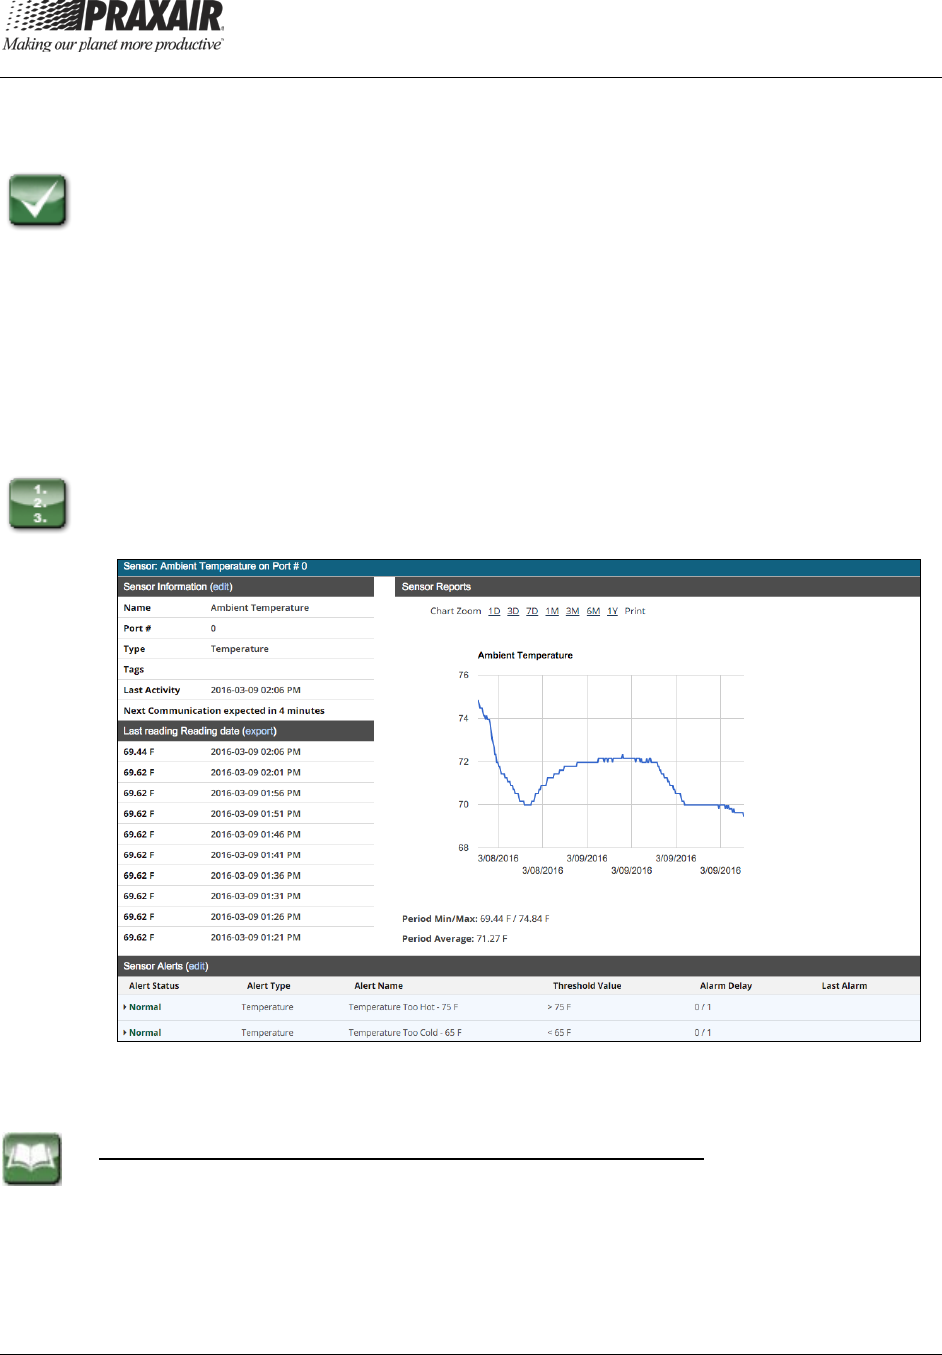
Figure 5: Device View Screen Showing
Examples of Sensor Information and Sensor Alerts
Definition of Field Values that can be Viewed or Adjusted
Name: Common name for the sensor. This sensor name will appear in all
sensor alerts.
Offset: Any number entered here will be added to all future readings. For
example:
Praxair® StarWatch Connect Website
P-15-748 User Guide
Issued: 11 Jul 2016, Revised: 12 Oct 2016 Page 11 of 35
• Entering 0 (default) will display the reading exactly as transmitted by the
device.
• Entering 5.2 will add 5.2 units to the transmitted readings.
• Entering –3.3 will subtract 3.3 units from the transmitted readings.
Tag: Tags can be applied to devices and sensors. Tags applied to sensors
can be used to select which sensors belong to a group alert (see section 1.6
for how to set up a group alert).
Sensor Reports: The graph can display historical data from the prior 1 day, 3
days, 7 days, 1 month, 3 months, 6 months, or 1 year. When choosing longer
periods, such as 3 months, 6 months, and 1 year, sampled data will be used,
and may not show all maximum and minimum values during that time-frame.
Use the Export feature to view all sensor data.
Sensor Readings: Displays the last 10 measurements and reading times for
the sensor.
Export: This option exports a sensor’s historical data as an Excel (.xls) file.
Select a Start Date and End Date, and then click [Export].
Sensor Alerts: The Sensor Alerts Screen displays the status of all alerts
created for that sensor. Sensor alerts display alarms if a sensor reading
crosses a specified Threshold Value. The Sensor Alerts Screen displays the
Alert Status, Alert Type, Alert Name, Threshold Value triggering the alert,
Alarm Delay, and Last Alarm (see example in Figure 5).
1.4 Alerts
Alerts notify users about changes in device functionality or sensor readings.
The Alert Configuration Screens can be accessed in three different ways on
the StarWatch Connect Website:
Selecting on any of the following options will take you to an Alerts List Screen
that displays the status of all the alerts created for that device and any sensors
it possesses. An Alert List Screen example is shown in Figure 6.
1. From the Device List Screen, select Alerts next to any individual device
(see section 1.1).
OR
From the Device View Screen (see Figure 4), select edit located above
the Device Alerts window (see section 1.3.2).
OR
From the Device View Screen (see Figure 5), select edit located above
the Sensor Alerts window (see section 1.3.3).
Praxair® StarWatch Connect Website
User Guide P-15-748
Page 12 of 35 Issued: 11 Jul 2016, Revised: 12 Oct 2016
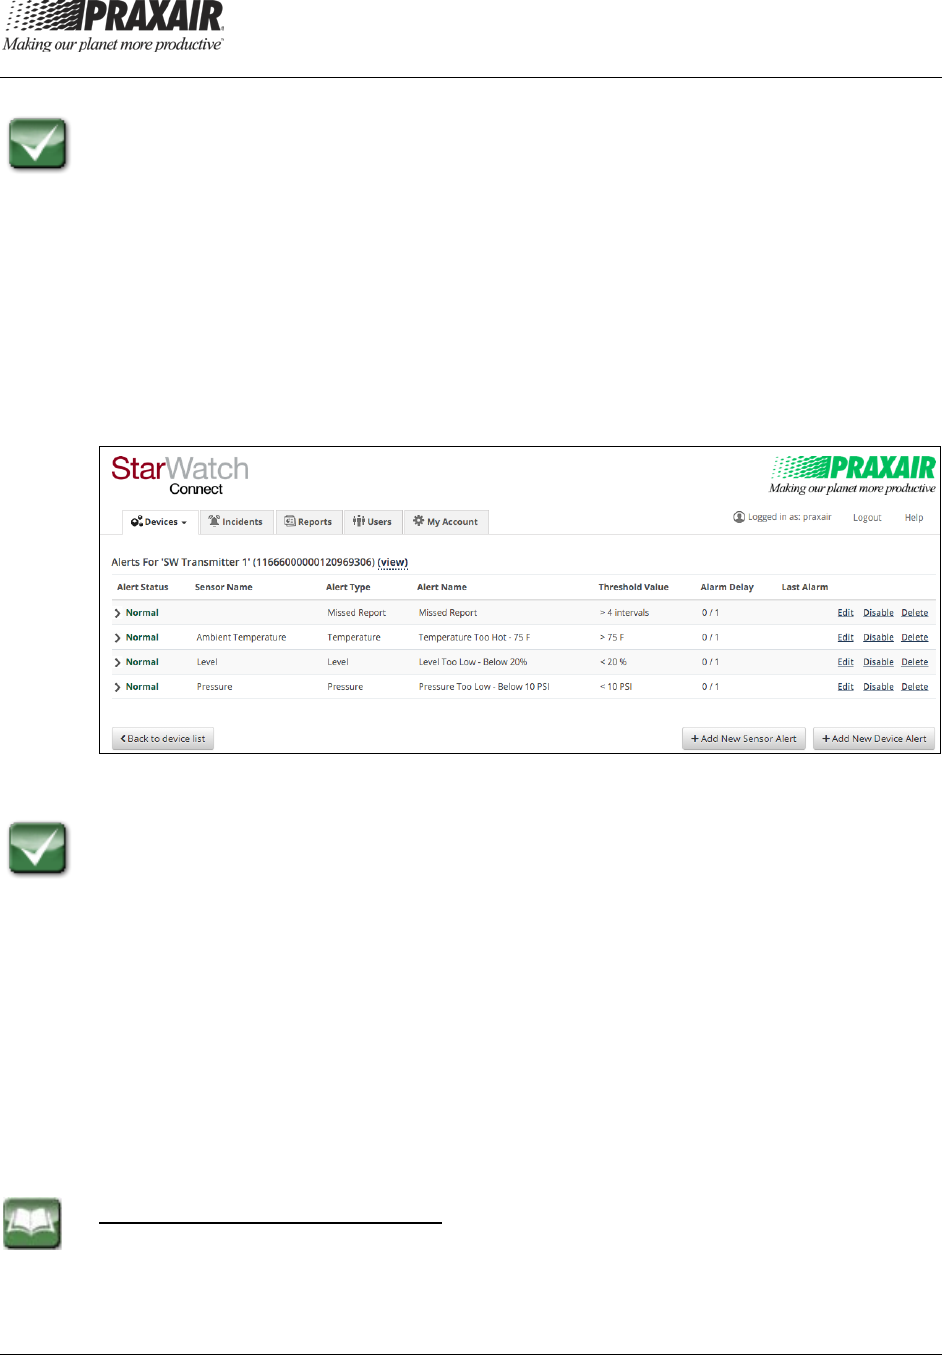
The Alert List displays for each alert. The following information displays:
• Alert Status
• Sensor Name (if the alert corresponds to a sensor)
• Alert Type
• Alert Name
• Threshold Value triggering the alert
• Alarm Delay
• Last Alarm
Figure 6: Alert List Screen Example
The Alarm Delay feature can be used to delay alert notifications until a device
or sensor has exceeded its specified Threshold Value for a specified number
of intervals. For example, if a device’s Monitoring Interval is 5 minutes and the
Alarm Delay is set to 3, an alert will be sent out after the sensor has remained
outside its assigned Threshold Value for 3*5=15 minutes.
When viewing the alert on the Alert List Screen, the Alarm Delay column will
show two numbers separated by a slash (/) symbol. The first, left-most
number is the actual number of consecutive readings that have remained
outside the assigned Threshold Value. The second, right-most number is the
specified Alarm Delay, i.e., the number of consecutive readings outside the
assigned Threshold Value that would trigger an alert notification.
The default Alarm Delay setting for any sensor or device is 1.
Definition of Alert Status Display
Alarm (color red): The reading has remained outside the assigned Threshold
Value for a consecutive number of readings equal to the Alarm Delay.
Praxair® StarWatch Connect Website
P-15-748 User Guide
Issued: 11 Jul 2016, Revised: 12 Oct 2016 Page 13 of 35
Warning (color yellow) : The last reading was outside the assigned
Threshold Value, but the consecutive number of readings outside the assigned
Threshold Value is less than the Alarm Delay.
Normal (color green) : The last reading was not outside the assigned
Threshold Value.
Definition of Options that the User can Select for Existing Alerts
Edit: Select Edit to modify the alert settings. Users at Owner, Administrator,
Editor and Sensor Alert Editor access level can use this function.
Disable/Enable:
• Select Disable to
disable the alert without deleting it. Once disabled, the
option will change to Enable.
• Select Enable to enable the previously disabled alert. Once enabled,
the option will change to Disable. When an alert is disabled, the alert
status will change from Normal, Warning, or Alarm to Disabled.
Users at Owner, Administrator, Editor, and Sensor Alert Editor access
level can have these functions.
Delete: Select Delete to permanently delete the alert. Users at Owner,
Administrator, and Editor and Sensor Alert Editor access levels can perform
these functions, while the Sensor Alert Editor access level can only delete
sensor alerts.
1. Click on any individual alert row to show expanded details for that alert.
The Details field will display the type of notification (SMS, email, or
phone), the phone number or email address for the notification, and
whether an additional notification should be sent once the reading is
cleared (i.e., no longer outside the specified Threshold Value).
2. Select Send a Test Message to send a test notification to test if your
notification method is correct.
3. Click on the individual alert row again to collapse the expanded details.
The Alert List Screen also includes [+ Add New Sensor Alert] and
[+ Add New Device Alert] buttons for a StarWatch Connect transmitter or
gateway. These options are described in detail in sections 1.4.1 and 1.4.2.
Praxair® StarWatch Connect Website
User Guide P-15-748
Page 14 of 35 Issued: 11 Jul 2016, Revised: 12 Oct 2016
1.4.1 Add New Sensor Alert
Sensor alerts can only be created for a StarWatch Connect transmitter. As
described in section 1.3.3, each StarWatch Connect transmitter is connected
to three sensors that measure:
1. Ambient temperature.
2. Liquid level in the cryogenic vessel.
3. Pressure in the cryogenic vessel. Alerts can be set up to notify users of
changes in these measurements (see Figure 7).
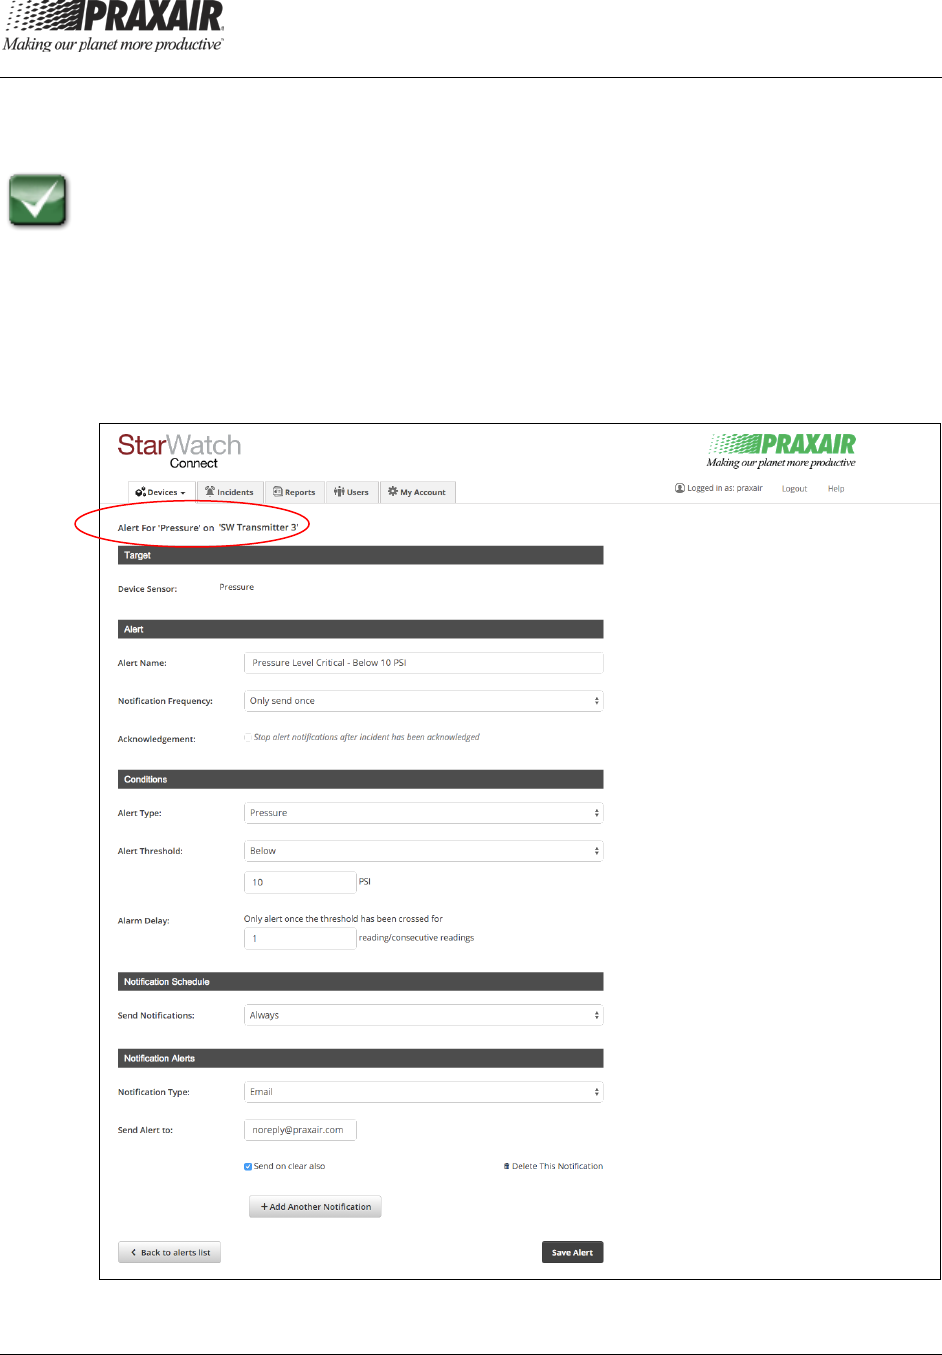
Figure 7: Adding a New Sensor Alert Screen Example

Praxair® StarWatch Connect Website
P-15-748 User Guide
Issued: 11 Jul 2016, Revised: 12 Oct 2016 Page 15 of 35
Definition of Fields that are Used to Create Each Alert
Device Sensor: Select the sensor for which you would like to apply the alert
Alert Name: Add a name for the alert. This name will be included in
notifications, so it is recommended to use a name that will help you identify the
application or location impacted by the alert.
Notification Frequency: With Alert Frequency set to “Only send once,” an
alert is only sent the first time a sensor reading crosses its Alert Threshold.
For the other Alert Frequency settings, an alert is sent at the specified interval
as long as the sensor measurement remains beyond the Threshold Value. As
a later option, an alert can also be sent if/when the sensor reading returns to
normal (see “Send on clear also”).
Acknowledgement: If the box is unchecked, alerts will be sent at specified
interval until the sensor returns to normal. If the box is checked, alerts will stop
being sent when the sensor returns to normal or when a user logs into the
StarWatch Connect Website and acknowledges the alert.
Alert Type: Each sensor only measures one attribute, so the Alert Type is
automatically selected as Temperature, Level, or Pressure based on the
selected sensor.
Alert Threshold: Select the T
hreshold Value for the sensor measurement that
will be used to determine whether an alert should be generated. This
threshold, along with the current reading, will be displayed in the alert.
Alarm Delay: As explained in section 1.4, the Alarm Delay feature can be
used to delay alert notifications until a device or sensor has exceeded its
specified Threshold Value for a specified number of measurement intervals.
For example, if a device’s Monitoring Interval is 5 minutes and the Alarm Delay
is set to 3, an alert will be sent out after the sensor has remained outside its
assigned Threshold Value for 5*3=15 minutes.
Send Notifications: Select when alerts should be sent using the choices
below. For all choices except Always, you will enter an active time window
with a start time and end time.
• Always: Alerts active 24 hours per day, 7 days per week
• Everyday: Alerts active during the specified time window, 7 days per
week. Typically, the start time will be earlier in the day than the end
time (e.g., 9 a.m. to 5 p.m.).
• Nights: Alerts active during the specified time window, 7 days per
week. Typically, the start time will be later in the day than the end time
(e.g., 7 p.m. to 7 a.m.).

Praxair® StarWatch Connect Website
User Guide P-15-748
Page 16 of 35 Issued: 11 Jul 2016, Revised: 12 Oct 2016
• Nights and Weekends: Alerts are active during the specified time
window for Monday through Friday plus all day Saturday and Sunday.
Typically, the start time will be later in the day than the end time (e.g.,
7 p.m. to 7 a.m.).
• Weekdays: Alerts are active during the specified time window for
Monday through Friday. Typically, the start time and time are selected
to cover business hours (e.g., 8 a.m. to 5 p.m.).
Notification Types: Alert notifications can be sent by phone, email, and SMS
(text message).
Send Alert To: Enter the phone number, cell phone number, and provider or
email address for the recipient.
Send on clear also: Check this box to have the alert clearance notification
sent to the recipient once the sensor has returned back within its normal
threshold.
[+ Add Another Notification]: Click this button to add another notification
recipient to the alert.
Delete This Notification: Select to remove the recipient from the alert.
[Save Alert]: Click this button to save the changes.
Praxair® StarWatch Connect Website
P-15-748 User Guide
Issued: 11 Jul 2016, Revised: 12 Oct 2016 Page 17 of 35
1.4.2 Add New Device Alert
Device alerts can be created for a StarWatch Connect transmitter or gateway.
Alerts can be set up to notify users of the power status of a device and whether
the device is communicating properly (see Alert Types) (see Figure 8).
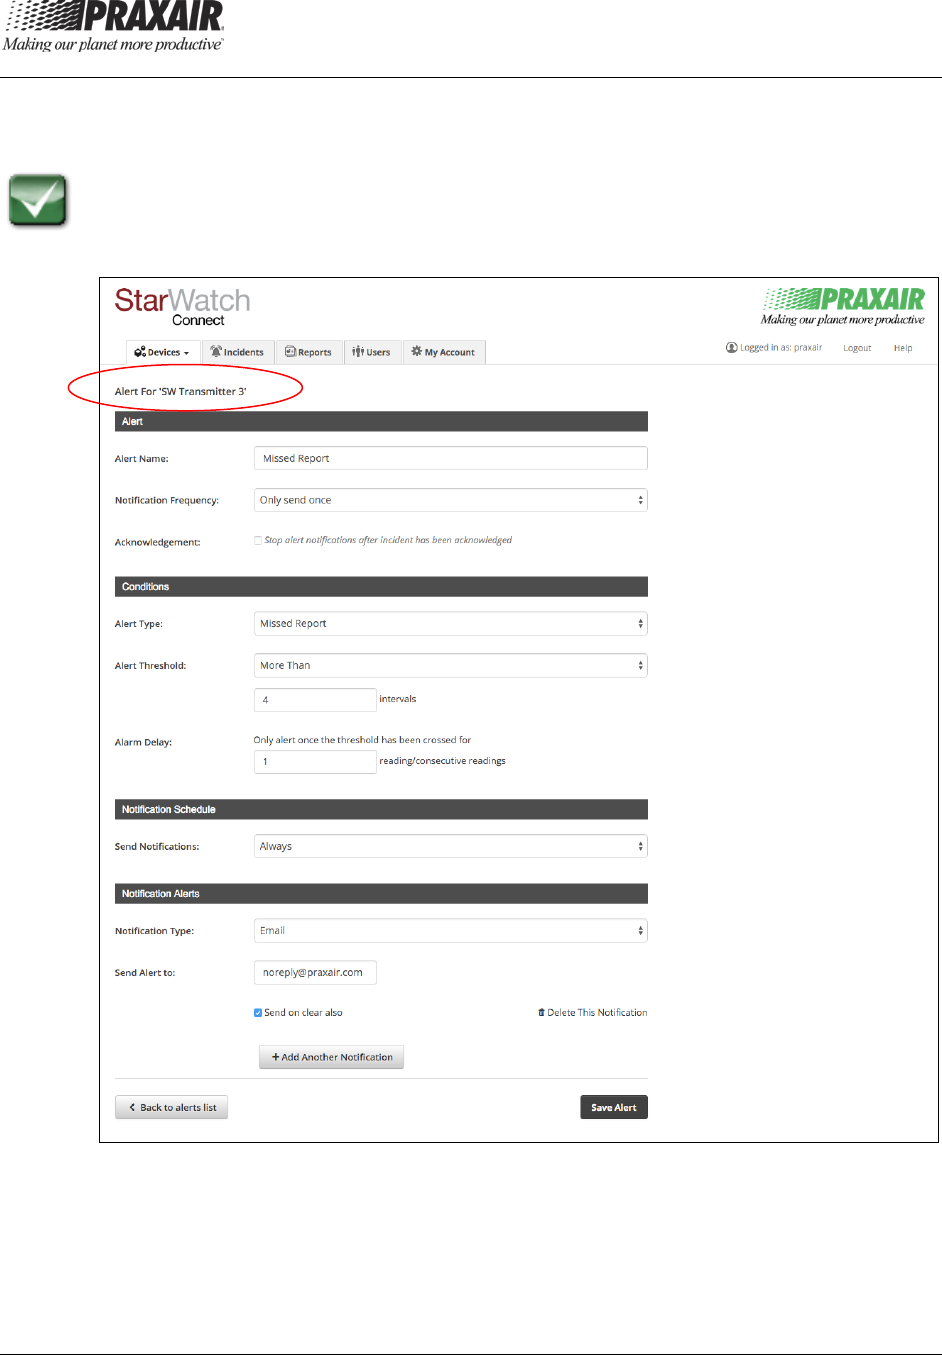
Figure 8: Adding a New Device Alert Screen Example

Praxair® StarWatch Connect Website
User Guide P-15-748
Page 18 of 35 Issued: 11 Jul 2016, Revised: 12 Oct 2016
Definition of Fields that are Used to Create Each Alert
Alert Name: Add a name for the alert. This name will be included in
notifications, so it is recommended to use a name that will help you identify the
application or location impacted by the alert.
Notification Frequency: With Alert Frequency set to “Only send once,” an
alert is only sent the first time the reading crosses the specified Alert
Threshold. For the other Alert Frequency settings, an alert is sent at the
specified interval as long as the reading remains beyond the Threshold Value.
As a later option, an alert can also be sent if/when the reading returns to
normal (see “Send on clear also”).
Acknowledgement: If the box is unchecked, alerts will be sent at a specified
interval until the reading returns to normal. If the box is checked, alerts will
stop being sent when the reading returns to normal or when a user logs into
the StarWatch Connect Website and acknowledges the alert.
Alert Type and Alert Threshold: The following alert types are available:
• Missed Report: Available for both StarWatch Connect gateway and
transmitter. An alert notification will be sent if the StarWatch Connect
Website fails to receive readings from a device for the number of
intervals specified in the Alert Threshold. The minimum number of
intervals is 4. For example, if a device’s Monitoring Interval is set to 5
minutes and the Alert Threshold is set to 4 intervals, the StarWatch
Connect Website will send an alert notification after 20 minutes of the
device not reporting.
• Power Monitor: Available for the StarWatch Connect gateway only.
An alert notification will be sent when the device has lost AC power and
is running on battery power.
• Low Battery: Available for the StarWatch Connect transmitter only. An
alert notification will be sent when the device has less than 20 percent
battery remaining.
Alarm Delay: As explained in section 1.4, the Alarm Delay feature can be
used to delay alert notifications until a device or sensor has exceeded its
specified Threshold Value for a specified number of measurement intervals.
For example, if a device’s Monitoring Interval is 5 minutes, the Missed Report
Alert Threshold is set to 4 intervals, and the Alarm Delay is set to 3, an alert
notification will be sent out after the device has failed to communicate with the
StarWatch Connect Website for (5*4)*3=60 minutes.
Send Notifications: Select when alerts should be sent using the choices
below. For all choices except Always, enter an active time window with a start
time and end time.

Praxair® StarWatch Connect Website
P-15-748 User Guide
Issued: 11 Jul 2016, Revised: 12 Oct 2016 Page 19 of 35
• Always: Alerts active 24 hours per day, 7 days per week
• Everyday: Alerts active during the specified time window, 7 days per
week. Typically, the start time will be earlier in the day than the end
time (e.g., 9 a.m. to 5 p.m.).
• Nights: Alerts active during the specified time window, 7 days per
week. Typically, the start time will be later in the day than the end time
(e.g., 7 p.m. to 7 a.m.).
• Nights and Weekends: Alerts are active during the specified time
window for Monday through Friday plus all day Saturday and Sunday.
Typically, the start time will be later in the day than the end time (e.g.,
7 p.m. to 7 a.m.).
• Weekdays: Alerts are active during the specified time window for
Monday through Friday. Typically, the start time and time are selected
to cover business hours (e.g., 8 a.m. to 5 p.m.).
Notification Types: Alert notifications can be sent by phone, email, and SMS
(text message).
Send Alert To: Enter the phone number, cell phone number and provider, or
email address for the recipient. Each phone number is entered as 10 digits.
Each phone number, cell phone number, or e-mail address is entered as one
alert notification.
Send on clear also: Check this box to have the alert clearance notification
sent to the recipient once the sensor has returned back within its normal
threshold.
[+ Add Another Notification]: Click this button to add another notification
recipient to the alert.
Delete This Notification: Select to remove the recipient from the alert.
[Save Alert]: Click this button to save the changes.
Praxair® StarWatch Connect Website
User Guide P-15-748
Page 20 of 35 Issued: 11 Jul 2016, Revised: 12 Oct 2016
1.5 Organize Groups
Grouping is a powerful tool that you can use to organize all your devices for
easier management. Shown in Figure 2, this tool is accessed by selecting
Organize Groups from the Devices menu tab located near the top-left of the
screen.
1.5.1 Create a Group
1. Select the tab, and then select Organize Groups.
2. Click [Create New Group] to create a group.
• If the folder labeled “All” is highlighted, the group will be created in
that folder.
• If the folder corresponding to an existing group is highlighted, a sub-
group will be created within that existing group.
3. Name your new group while the new folder is highlighted. You can
rename the group at a later time by using the Rename button.
4. Select the group at any time, and click [Delete] to remove the group. If
the deleted group has devices, the devices within the deleted group will
be moved to the All bucket again.
1.5.2 Add Devices to a Group
1. Select Device List from the Devices tab (see section 1.1), and then
click on the group which the device(s) will be added to.
2. Once you have selected the group, click [Add Devices].
3. A selectable list of all devices within your account will appear. You can
either scroll through the list to find the device(s) you want to add, or
simply search for a device in the open-text search bar
1.5.3 Move Devices Within Groups
1. Select Device List from the Devices tab (see section 1.1) to find the
device in the group, and then select View beside the device you want to
move.
2. Click on the gear icon located in the upper left-hand corner of the
Device Information view (see Figure 4).
3. Choose the group where you want to move the device. Selecting All
returns the device to a general pool of devices not assigned to a group.
4. Click [Save] to move the device to the selected group.
Praxair® StarWatch Connect Website
P-15-748 User Guide
Issued: 11 Jul 2016, Revised: 12 Oct 2016 Page 21 of 35
1.5.4 Group Permissions
Owners and administrators of the StarWatch Connect Website can restrict
which groups a user is allowed to see. See section 4 for more details on user
management.
1. Select the tab at the top of the screen.
2. Select View for the specific user.
3. Under Group Permissions, select edit, and then select the groups
available to you.
1.6 Group Alerts
A group alert is a single alert that applies to all devices or a subset of devices
within a group. To create a group alert:
1. Select Device List from the Devices tab (see section 1.1), and then
click on the group that contains the devices for the group alert. The
resulting page will display all devices and sub-groups within the
selected group.
2. Select Group Alerts located at the top, right side of the device list. The
resulting page will display all existing group alerts for the selected
group.
3. Click [Add New Alert]. The resulting page allows you to create the
group alert by completing the following fields (see Figure 9)
Praxair® StarWatch Connect Website
User Guide P-15-748
Page 22 of 35 Issued: 11 Jul 2016, Revised: 12 Oct 2016
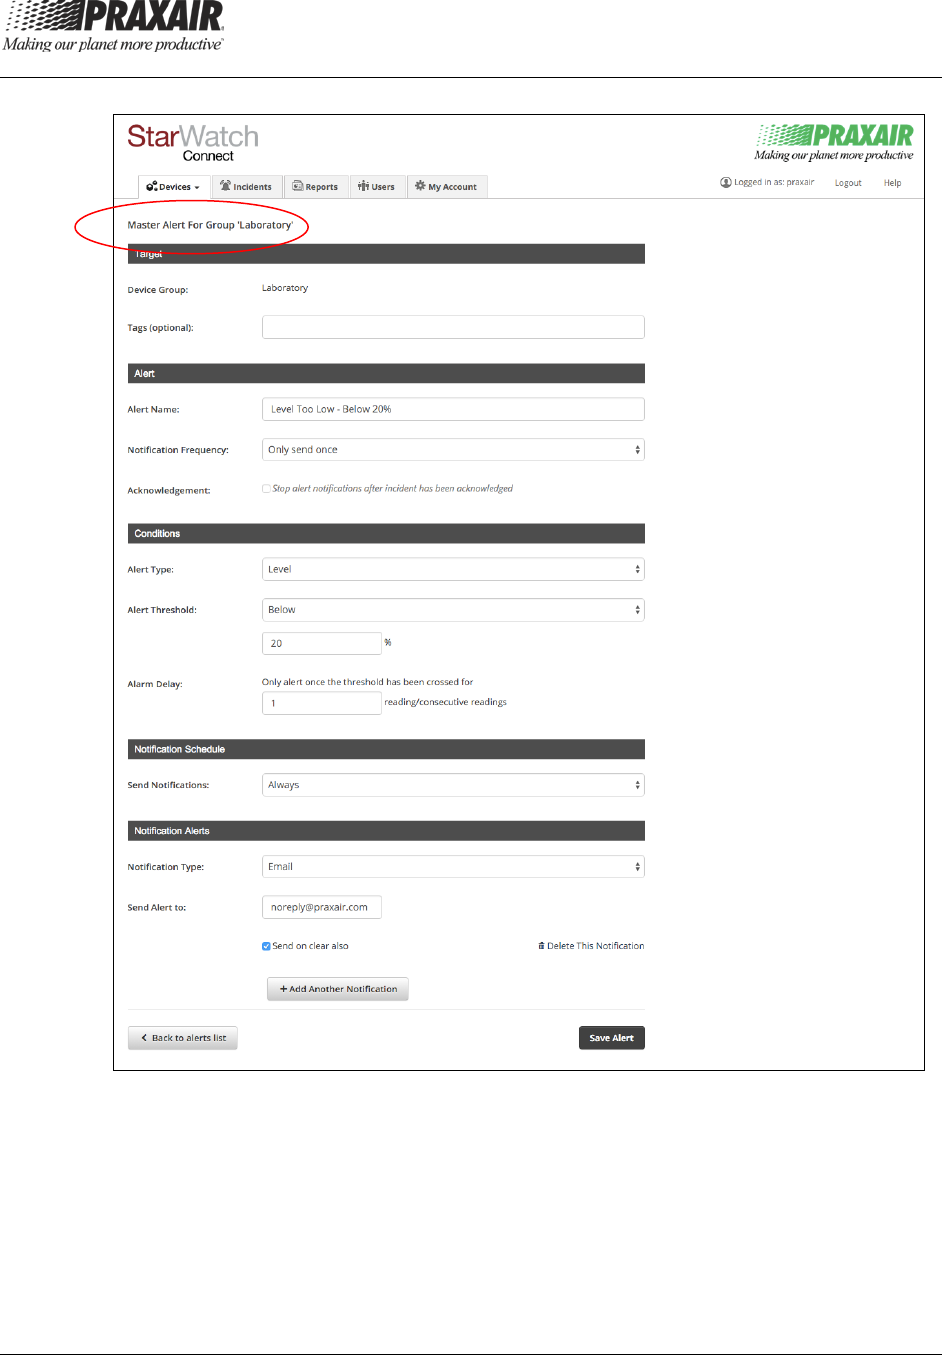
Figure 9: Adding a New Group Alert Screen Example

Praxair® StarWatch Connect Website
P-15-748 User Guide
Issued: 11 Jul 2016, Revised: 12 Oct 2016 Page 23 of 35
Definition of Fields that are Used to Create Each Alert
Device Group: This displays the name(s) of group(s) that the single alert will
be applied to.
Tags (optional) : As mentioned above, tags can be applied to devices (see
section 1.3.1) and sensors (see section 1.3.3). Adding tags to a group alert
will restrict the alert to only those devices or sensors within the group that
possesses the selected tag.
Alert Name: Add a name for the alert. This name will be included in
notifications, so it is recommended to use a name that will help you identify the
application or location impacted by the alert.
Notification Frequency: With Alert Frequency set to “Only send once,” an
alert is only sent the first time the reading crosses the specified Alert
Threshold. For the other Alert Frequency settings, an alert is sent at the
specified interval as long as the reading remains beyond the Threshold Value.
As a later option, an alert can also be sent if/when the reading returns to
normal (see All Clear).
Acknowledgement:
• If the box is unchecked, alerts will be sent at a specified interval until the
reading returns to normal.
• If the box is checked, alerts will stop being sent when the reading
returns to normal or when a user logs into the StarWatch Connect
Website and acknowledges the alert.
Alert Type and Alert Threshold: The following alert types are available:
• Level: Available for StarWatch Connect transmitters only. An alert
notification will be sent when the level sensor reading crosses the Alert
Threshold value.
• Low Battery: Available for StarWatch Connect transmitters only. An
alert notification will be sent when the device has less than 20 percent
battery remaining.
• Missed Report: Available for StarWatch Connect gateways and
transmitters. An alert notification will be sent if the StarWatch Connect
Website fails to receive readings from a device for the number of
intervals specified in the Alert Threshold. The minimum number of
intervals is 4. For example, if a device’s Monitoring Interval is set to 5
minutes and the Alert Threshold is set to 4 intervals, the StarWatch
Connect Website will send an alert notification after 20 minutes of the
device not reporting.

Praxair® StarWatch Connect Website
User Guide P-15-748
Page 24 of 35 Issued: 11 Jul 2016, Revised: 12 Oct 2016
• Power Monitor: Available for StarWatch Connect gateways only. An
alert notification will be sent when the device has lost AC power and is
running on battery power.
• Pressure: Available for StarWatch Connect transmitters only. An alert
notification will be sent when the pressure sensor reading crosses the
Alert Threshold value.
• Temperature: Available for StarWatch Connect transmitters only. An
alert notification will be sent when the temperature sensor reading
crosses the Alert Threshold value.
Alarm Delay: As explained in section 1.4, the Alarm Delay feature can be
used to delay alert notifications until a device or sensor has exceeded its
specified Threshold Value for a specified number of measurement intervals.
For example, if a device’s Monitoring Interval is 5 minutes, the Missed Report
Alert Threshold is set to 4 intervals, and the Alarm Delay is set to 3, an alert
notification will be sent out after the device has failed to communicate with the
StarWatch Connect Website for 5*4*3=60 minutes.
As another example, if a device’s Monitoring Interval is 5 minutes and the
Alarm Delay is set to 5, an alert will be sent out after a sensor has remained
outside its assigned Threshold Value for 5*5=25 minutes.
Send Notifications: Select when alerts should be sent using the choices
below. For all choices except Always, you will enter an active time window
with a start time and end time.
• Always: Alerts active 24 hours per day, 7 days per week.
• Everyday: Alerts active during the specified time window, 7 days per
week. Typically, the start time will be earlier in the day than the end
time (e.g., 9 a.m. to 5 p.m.).
• Nights: Alerts active during the specified time window, 7 days per
week. Typically, the start time will be later in the day than the end time
(e.g., 7 p.m. to 7 a.m.).
• Nights and Weekends: Alerts are active during the specified time
window for Monday through Friday plus all day Saturday and Sunday.
Typically, the start time will be later in the day than the end time (e.g.,
7 p.m. to 7 a.m.).
• Weekdays: Alerts are active during the specified time window for
Monday through Friday. Typically, the start time and time are selected
to cover business hours (e.g., 8 a.m. to 5 p.m.).
Notification Type: Alert notifications can be sent by phone, email, and SMS
(text message).

Praxair® StarWatch Connect Website
P-15-748 User Guide
Issued: 11 Jul 2016, Revised: 12 Oct 2016 Page 25 of 35
Send Alert To: Enter the phone number, cell phone number, and provider, or
email address for the recipient. Each phone number is entered as 10 digits.
Each phone number, cell phone number, or e-mail address is entered as one
alert notification.
Send on clear also: Check this box to have the alert clearance notification
sent to the recipient once the sensor has returned back within its normal
threshold.
[Add Another Notification]: Click this button to add another notification
recipient to the alert.
Delete This Notification: Select to remove the recipient from the alert.
[Save Alert]: Click this button to save the changes.

Praxair® StarWatch Connect Website
User Guide P-15-748
Page 26 of 35 Issued: 11 Jul 2016, Revised: 12 Oct 2016
Chapter 2— Incidents
This chapter covers the following:
• How to display a record log of all incidents.
1. Select the tab, which displays a record log of all incidents
(see Figure 10).
2. Click on the row for any incident to display expanded details.
Figure 10: Incidents Screen Example
Description of Details provided for each Incident
ID Number (#): Each incident is automatically assigned a unique number.
Opened On: The time and date that the incident first occurred.
Status: Current status of the incident. Incidents can be viewed in groups
according to their status – Open, Acknowledged, Resolved, and Closed using
the options located below the Status title (seeFigure 10).
• Open: The device or sensor is currently in alarm. If the alert that
generated the alarm has been deleted by the users at Owner,
Administrator, Editor, and Sensor Alerts Editor (sensor alerts only)
access level, the Incident will need to be closed manually.
• Acknowledged: A user logged in and manually acknowledged the
incident.
• Resolved: The device or sensor has returned to normal; the incident
self-corrected.
• Closed: A user logged in and manually closed the incident.
Incident Details: Displays the name of the alert that created the incident.

Praxair® StarWatch Connect Website
P-15-748 User Guide
Issued: 11 Jul 2016, Revised: 12 Oct 2016 Page 27 of 35
Source: For device alerts, the source displays the device ID number and the
device name from which the alert originated. For sensor alerts, the source
displays the device ID number, the port number, and the sensor name from
which the alert originated. The ID number is also an active link to the device.
Acknowledge: Users can log in and acknowledge an alert. If the
Acknowledge box was selected when creating the alert (see alert set-up in
sections 1.4.1, 1.4.2, or 1.6, selecting Acknowledge will prevent the specific
alert from generating any subsequent notifications, until the incident is resolved
or closed.
Praxair® StarWatch Connect Website
User Guide P-15-748
Page 28 of 35 Issued: 11 Jul 2016, Revised: 12 Oct 2016
Chapter 3—Reports
This chapter covers the following:
• Create scheduled reports.
• Download on-demand reports that provide a summary of data recorded by
the Praxair StarWatch Connect System.
• Record report history.
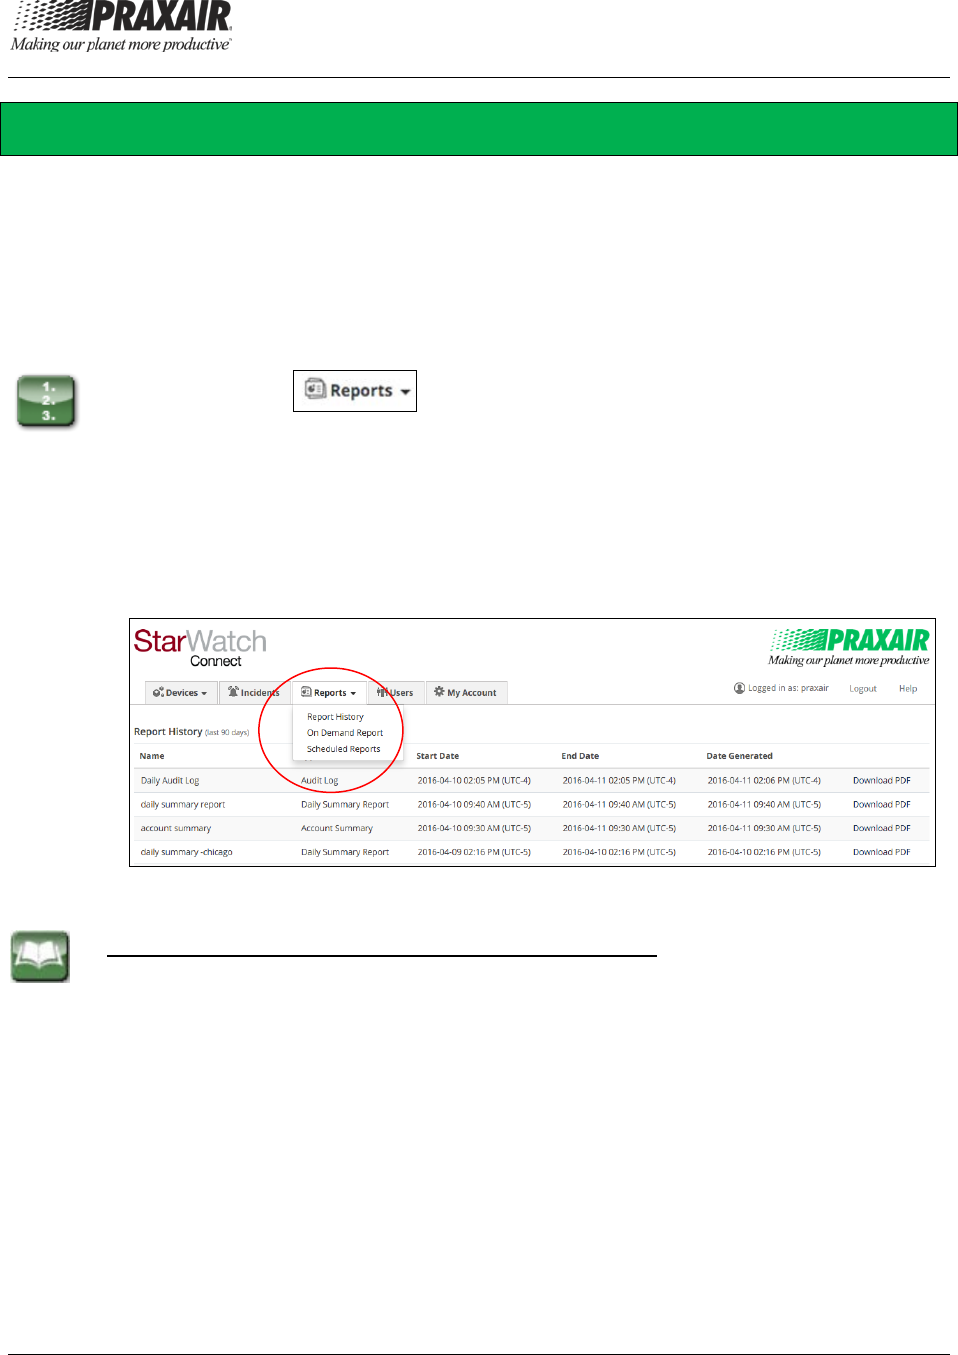
1. Select the tab, which displays a dropdown menu with three
report options (see Figure 11).
Note: Reports can be run only on data that is less than 30 days old. For
sensor data older than 30 days, select Export located under Sensor
Information (see section 1.3.3). It is recommended that account owners
set up daily, weekly, or monthly reports to retain records of all account
activity. Users can generate as many reports as necessary.
Figure 11: Reports Screen Example
Description of the Reports Dropdown Menu Options
Report History: Provides a list of all reports issued within the past 90 days.
On Demand Reports: Enables you to create one-time reports that are
downloaded within seconds into a PDF report.
Scheduled Reports: Provides a list of scheduled reports, and enables you to
set a subscription for a report that will be emailed to you based on the
designated report frequency. Scheduled reports are emailed to you with a link
to download the report within the body of the email. In addition, you can also
choose to include the report as an attachment on the email by checking the
“Send Report as an email attachment box.” Figure 12 shows an example to
set a subscription for a scheduled report.

Praxair® StarWatch Connect Website
P-15-748 User Guide
Issued: 11 Jul 2016, Revised: 12 Oct 2016 Page 29 of 35
Report Types
Description of Report Types
Account Summary: Lists every device in the account and provides data on
the device’s respective sensors during the specified reporting period, includes
a graph of sensor readings, minimum reading, maximum reading, and the
average reading of each sensor in the reported period.
Audit Log: Provides a summary of the actions performed by each user in the
account within the specified reporting period. The information includes time
that the action was completed, what action was taken, and a detailed
description of the action.
Device Report: Lists an individual device in the account and provides data on
the device’s respective sensor(s) during the specified reporting period.
This report contains the time and measurement of every reading in the
reporting period for each sensor associated with a specific device. It also
includes a graph of sensor readings, minimum reading, maximum reading, and
average reading for each sensor in the reported period.
Selecting this report will open an additional dropdown menu to select the
specific device.
Alarm History: Provides a list of all devices and associated sensors in the
account and any alerts that have occurred for each device and associated
sensors within the report period. If no alert occurred for the sensor or the
device, it is recorded as “There is no data for this device” or “There is no data
for this sensor.”
• For each alert that occurred for the device, the Alarm Date and Alarm
Type are listed.
• For each alert that occurred for the sensor, the Alarm Date, Triggering
Value, and Reading Type are listed.
Incident Report: Provides all incident (see Chapter 2) details within your
account that have occurred during the selected period of time. A group can be
selected for this report, but this only includes the devices within that group, and
does not include any devices in sub-groups.
This report includes incident information on the incident ID, time the incident
opened on, incident status, incident details, and source of the sensor. In
details, it includes information for that sensor such as the date and time the
incident occurred, the event happened fo
r that incident such as notification was
send, the description of the incident.
Praxair® StarWatch Connect Website
User Guide P-15-748
Page 30 of 35 Issued: 11 Jul 2016, Revised: 12 Oct 2016
Daily Summary Report: This report provides daily high, daily low, and daily
average readings for each sensor in the selected group. Devices in sub-
groups will not be included in your report. At least one reporting time must be
selected to complete the report subscription saving process, but tags and
notes can also be included to this report.
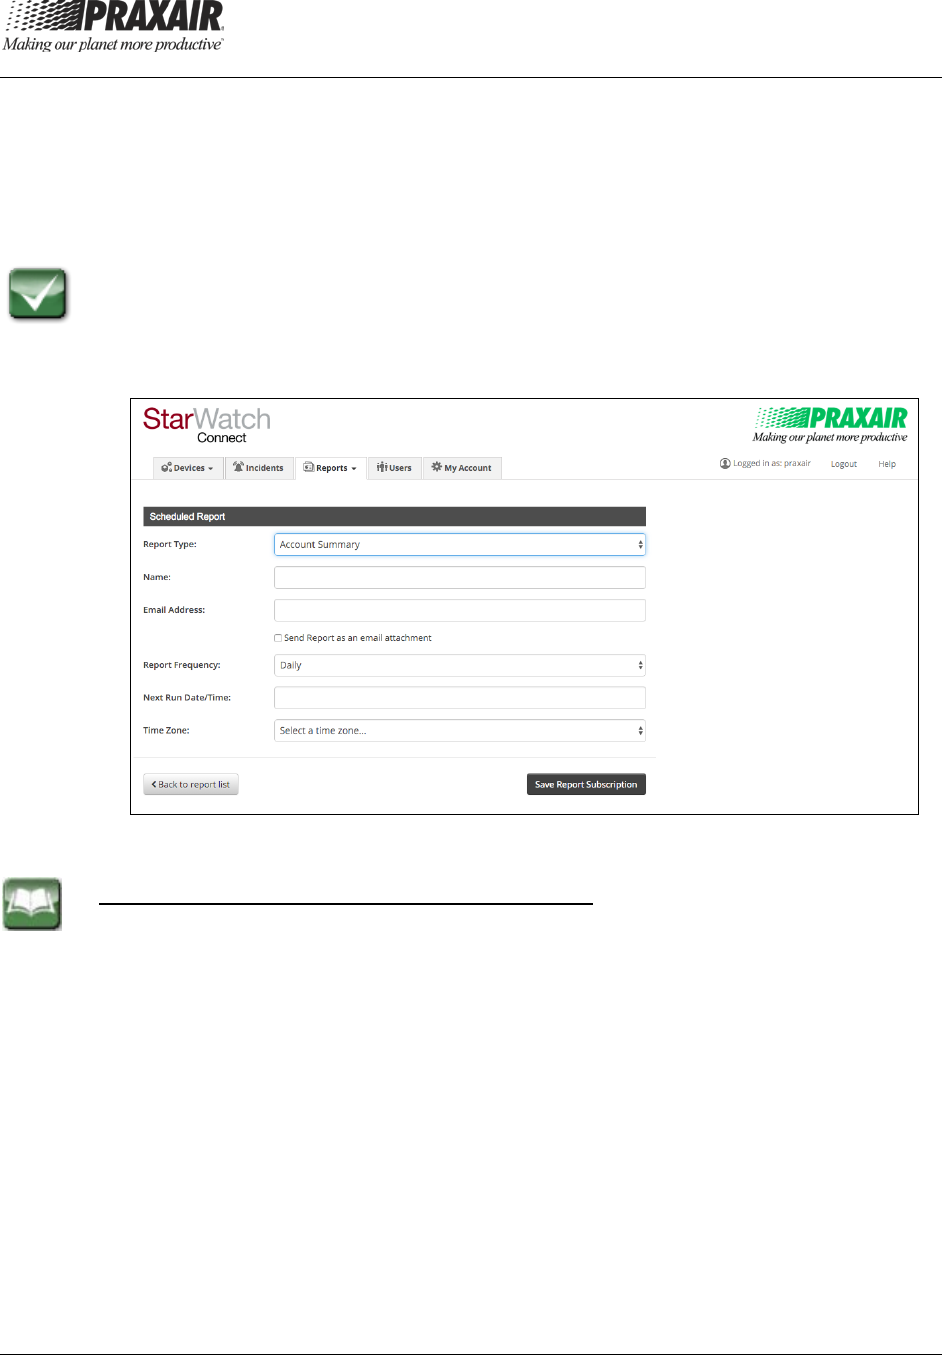
The Scheduled Report screen displays information on the scheduled report,
such as Report Type, Name given to this report, e-mail Address(es) which the
report will be sent to, Report Frequency, Next Run Date/Time for the
scheduled report, and Time Zone selected.
Figure 12: Generating a Scheduled Report Screen Example
Description of Scheduled Report Screen Items
Name: Each report must be given a name during the report schedule creation.
Email Address: The report will be sent to the email address(es) entered here.
Multiple emails can be added as report recipients, and must separated by
commas within this field.
Report Frequency: Defines how often the report will be sent (Daily, Weekly,
Monthly, or Once).
Next Run Date/Time: Select when the next report will be sent out. A calendar
tool will open. Select the date within the calendar. Click on the clock icon at
the bottom of the calendar to select the time.
Time Zone: Select the time zone used for the report.
[Save Report Subscription]: Click this button to enable the report.
Praxair® StarWatch Connect Website
P-15-748 User Guide
Issued: 11 Jul 2016, Revised: 12 Oct 2016 Page 31 of 35
Chapter 4—Users
This chapter covers the following:
• Display a list of all StarWatch Connect account users.
• View and manage user settings.
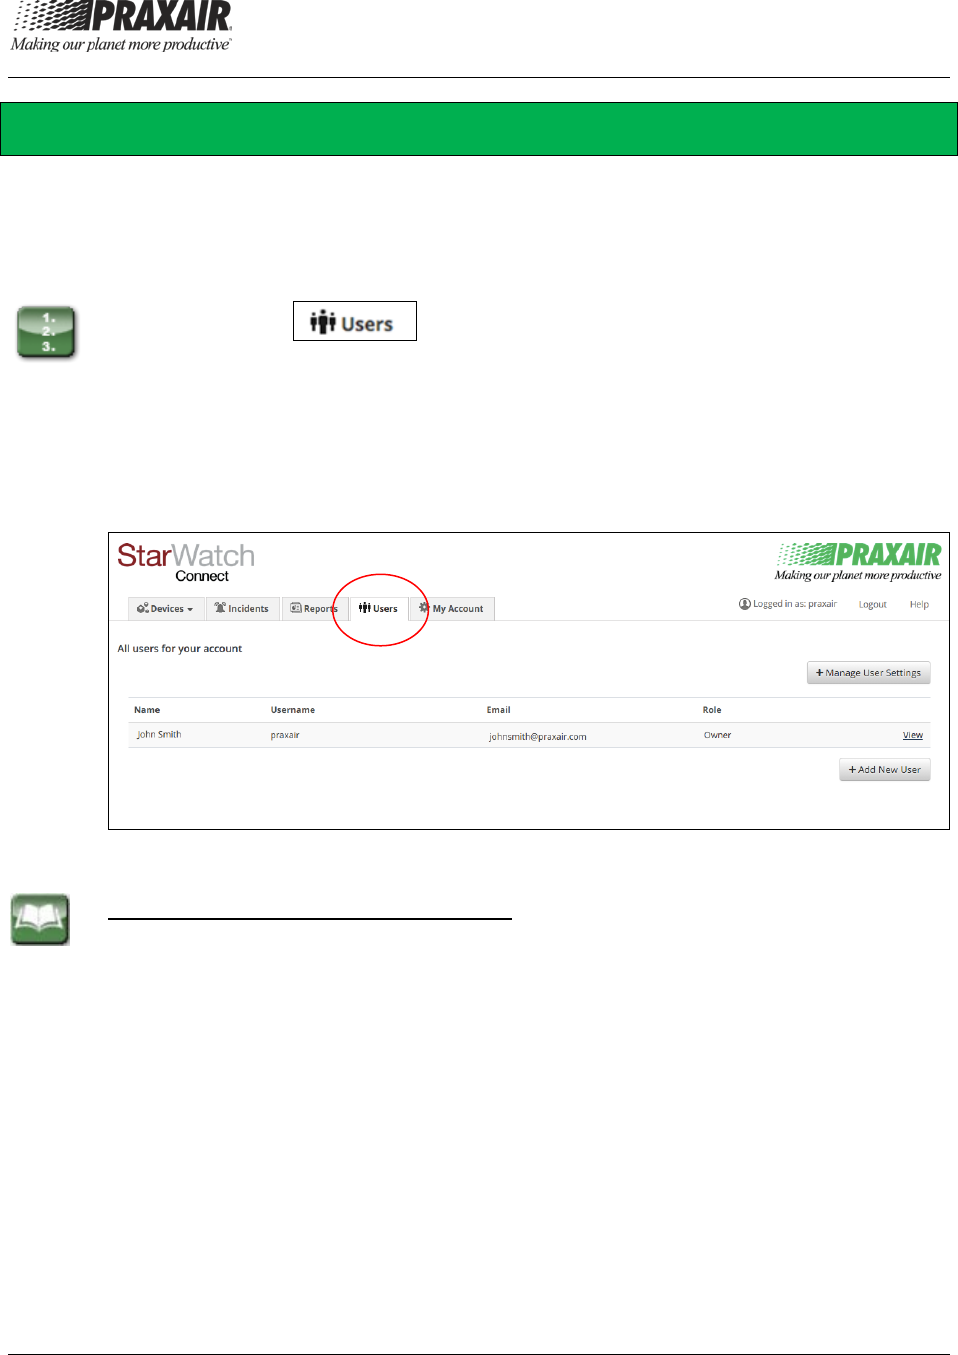
1. Select the tab, which displays a list of all users that have
access to the StarWatch Connect account (see Figure 13).
This screen allows you to view and manage settings for other users
under the same department, company, or organization account.
Note: The Users menu tab is only visible for users with Administrator or
Owner access levels.
Figure 13: Users Screen Example
Description of Screen Items and Links
Name: The first and last name of the user.
Username: The user name that has been assigned to the user.
Email: The email address associated with the user.
Role: The role that has been assigned to the user. The following access
levels are available:
• Owner: An Owner can add and delete user accounts and modify all
system settings. An Owner can also transfer ownership to another user
account.
• Administrator: An Administrator can perform the same actions as
Owner, except make changes to the account billing information or
change the role of the Owner.

Praxair® StarWatch Connect Website
User Guide P-15-748
Page 32 of 35 Issued: 11 Jul 2016, Revised: 12 Oct 2016
• Editor: An Editor can view and modify most system settings, with the
exception of deleting devices and sensors, and seeing or editing other
users.
• Sensor Alert Editor: A Sensor Alert Editor can view all assigned
devices and modify sensor alerts for those devices. This user cannot
modify device alerts.
• Incident Responder: An Incident Responder can view all data for
assigned devices and can edit incidents (change status, write notes,
acknowledge), but cannot make changes outside of incidents.
• Viewer: A Viewer can only view assigned devices.
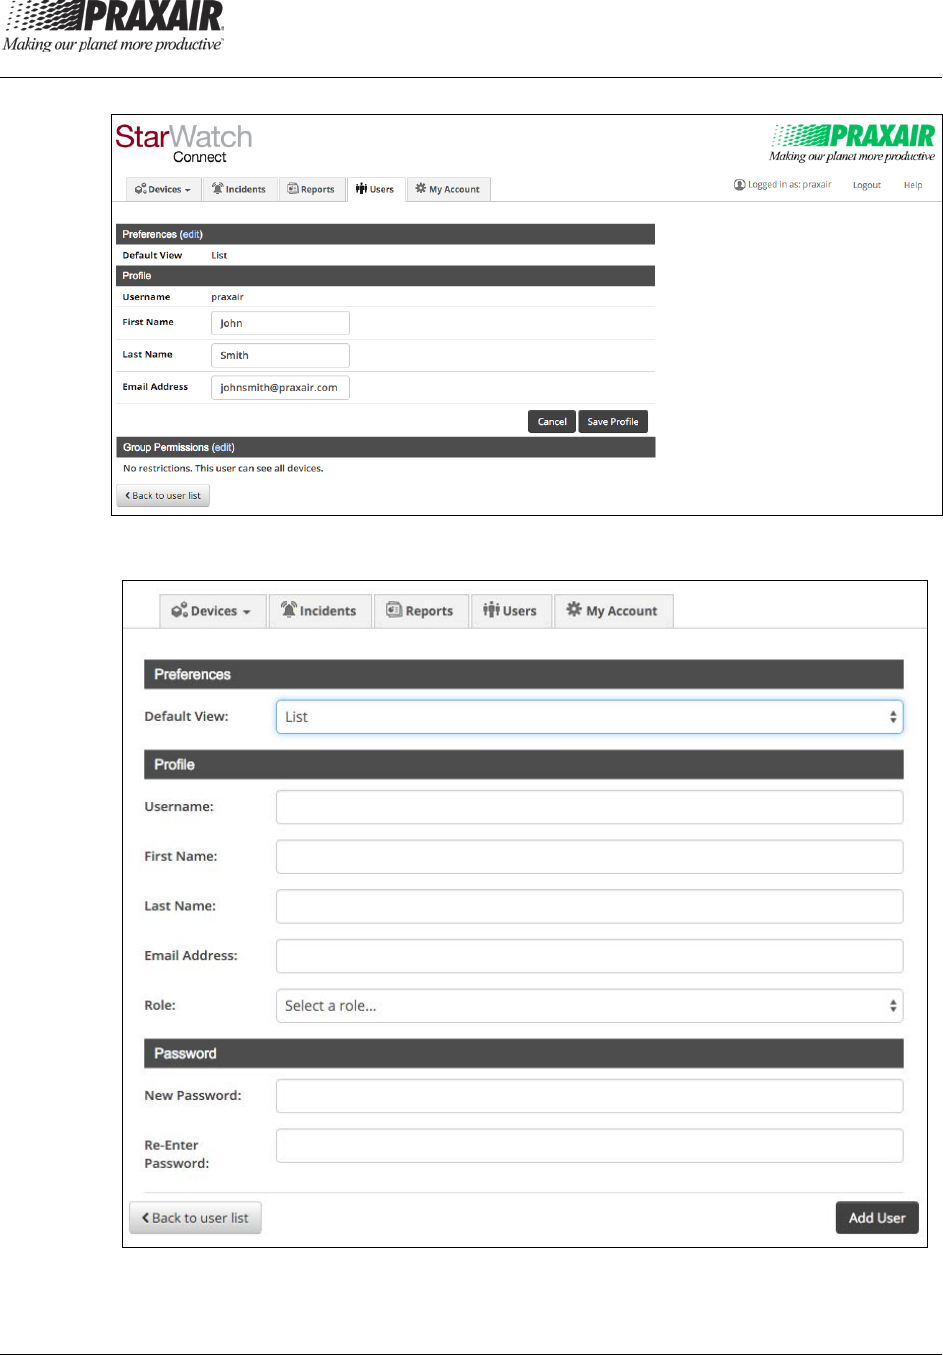
View: Select to edit a user’s preferences or profile (see Figure 14):
• Preferences: Select edit to select the default view that the user sees
on logging into the StarWatch Connect Website. Only the “List” view is
active for StarWatch Connect.
• Profile: Select edit to change the following attributes for the user:
Username, First Name, Last Name, Email Address, and Role.
• Group Permission: Select edit to select which device groups the user
can access.
Delete: Select to permanently delete a user and their access to the account.
[Add New User]: Click this button to create a new user (see Figure 15):
• Preferences: Select the default view that the user sees on logging into
the StarWatch Connect Website. Only the “List” view is active for
StarWatch Connect.
• Profile: Enter the following attributes for the user: Username, First
Name, Last Name, Email Address, and Role.
• Password: Enter the new password and re-enter the password to
confirm it.
[+ Manager User Settings]: Click this button to change the maximum days for
the password to change. Only the account owner has this funtion.
• Max Password Age: Only the Owner and Administrator can set the
maximum password age for all users.
• Account Owner: Only the Owner can re-assign the Owner role.
Praxair® StarWatch Connect Website
P-15-748 User Guide
Issued: 11 Jul 2016, Revised: 12 Oct 2016 Page 33 of 35
Figure 14: View User Screen Example
Figure 15: Add New User Screen Example

Praxair® StarWatch Connect Website
User Guide P-15-748
Page 34 of 35 Issued: 11 Jul 2016, Revised: 12 Oct 2016
Chapter 5—My Account
This chapter covers the following:
• Modify individual account settings.
1. Select the tab to modify your individual account settings
(see Figure 16).
Figure 16: My Account Screen Example
Description of Screen Items
Preferences: Select edit to select the default view that you see on logging
into the StarWatch Connect Website. Only the “List” view is active for
StarWatch Connect.
Profile: Select edit to change the following attributes: First Name, Last
Name, and Email Address.
Password:
1 Select edit to change the password.
2. Enter the old password.
3. Enter the new password again, making sure that both new password
entries are the same.
Praxair® StarWatch Connect Website
P-15-748 User Guide
Issued: 11 Jul 2016, Revised: 12 Oct 2016 Page 35 of 35
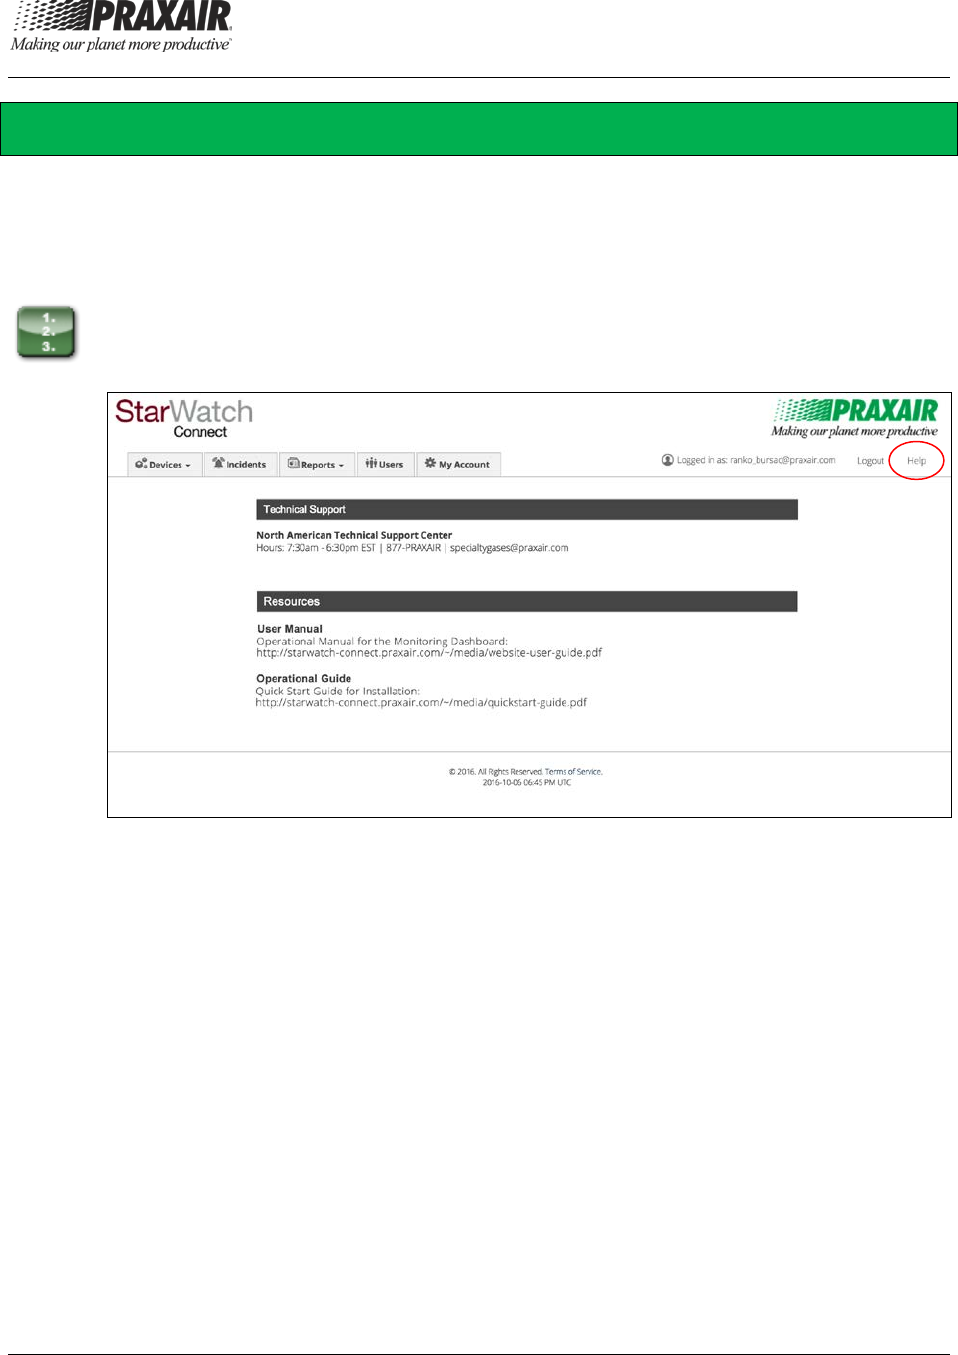
Chapter 6—Help
This chapter covers the following:
• How to Access Technical Support Information
• Resources for User Manual and Operational Guide.
1. Select Help, located at the upper-right corner of the screen, to access
technical support information (see Figure 17).
Figure 17: Help Screen Example

PRAXAIR® StarWatch™ Connect Website
P-15-754 User Guide
Issued: 11 Jul 2016, Revised: 12 Oct 2016
APPENDIX A—STARWATCH CONNECT
REGULATOR STATEMENT

Appendix A
User Guide P-15-754
Issued: 11 Jul 2016, Revised: 12 Oct 2016

PRAXAIR® StarWatch™ Connect Website
P-15-754 User Guide
Issued: 11 Jul 2016, Revised: 12 Oct 2016
StarWatch Connect Regulatory Statements
The following regulatory statements apply to the StarWatch Connect system, consisting of a (1) StarWatch Connect wireless transmitter (FCC
ID: SZ9ZPOINT; IC: 10940A-ZPOINT), (2) StarWatch Connect CDMA cellular gateway (FCC ID: RI7CE910-DUAL), and (3) StarWatch
Connect GSM cellular gateway (FCC ID: RI7HE910, S4GEM35XB; IC: 10940A-GWGSM). All statements below apply to all devices, unless
otherwise specified.
Federal Communications Commission (FCC) Statement:
This equipment has been tested and found to comply with the limits for a Class B digital device, pursuant to Part 15 of the FCC Rules. These
limits are designed to provide reasonable protection against harmful interference in a residential installation. This equipment generates, uses and
can radiate radio frequency energy and, if not installed and used in accordance with the instructions, may cause harmful interference to radio
communications. However, there is no guarantee that interference will not occur in a particular installation. If this equipment does cause harmful
interference to radio or television reception, which can be determined by turning the equipment off and on, the user is encouraged to try to correct
the interference by one of the following measures:
• Reorient or relocate the receiving antenna.
• Increase the separation between the equipment and receiver.
• Connect the equipment into an outlet on a circuit different from that to which the receiver is connected.
• Consult the dealer or an experienced radio/TV technician for help.
This device complies with Part 15 of the FCC Rules. Operation is subject to the following two conditions: (1) this device may not cause harmful
interference, and (2) this device must accept any interference received, including interference that may cause undesired operation.
FCC Caution:
Any changes or modifications not expressly approved by the party responsible for compliance could void the user’s authority to operate this
equipment.
Industry Canada (IC) Statement:
This device complies with Industry Canada licence-exempt RSS standard(s). Operation is subject to the following two conditions: (1) this device
may not cause interference, and (2) this device must accept any interference, including interference that may cause undesired operation of the
device.
Le présent appareil est conforme aux CNR d'Industrie Canada applicables aux appareils radio exempts de licence. L'exploitation est autorisée aux
deux conditions suivantes : (1) l'appareil ne doit pas produire de brouillage, et (2) l'appareil doit accepter tout brouillage radioélectrique subi,
même si le brouillage est susceptible d'en compromettre le fonctionnement.
StarWatch Connect wireless transmitter
This device has been designed to operate with the antennas listed below, and having a maximum gain of 2.5dBi. Antennas not included in this list
or having a gain greater than 2.5dBi are strictly prohibited for use with this device. The required antenna impedance is 50Ω.
• External 2.4GHz dipole, male RP-SMA antenna with maximum gain of 2.3dBi.
• External 900/1800/1900MHz omni CDMA male SMA antenna with maximum gain of 2.5dBi.
StarWatch Connect GSM cellular gateway
This device has been designed to operate with the antennas listed below, and having a maximum gain of 3.0dBi. Antennas not included in this list
or having a gain greater than 3.0dBi are strictly prohibited for use with this device. The required antenna impedance is 50Ω.
• External 2.4GHz dipole, male RP-SMA antenna with maximum gain of 2.3dBi.
• External 850/900/1800/1900MHz quad band omni GSM male SMA antenna with maximum gain of 3.0dBi.
To reduce potential radio interference to other users, the antenna type and its gain should be so chosen that the equivalent isotropically radiated
power (e.i.r.p.) is not more than that permitted for successful communication
WARNING!
FCC and IC Radiation Exposure Statement:
This equipment complies with FCC’s and IC’s RF radiation exposure limits set forth for an uncontrolled environment under the following
conditions:
1. This equipment should be installed and operated such that a minimum separation distance of 20cm is maintained between the radiator
(antenna) & user’s/nearby person’s body at all times.
2. This transmitter must not be co-located or operating in conjunction with any other antenna or transmitter.