Smiths Detection Ireland SD-E0001 Body Scanner User Manual
Smiths Detection Ireland Limited Body Scanner
User Manual
Operating Instructions
Initial Release v5.5
All rights reserved!
The reproduction, transmission or use of this document or its contents
is not permitted without express written authority. Offenders will be
liable for damages.
All rights, including rights created by patent grant or registration of a
utility model or design, are reserved. Technical modifications re-
served.
95591706 22/07/09 © smiths detection proprietary information
eqo
Milli metre-W ave People Screening Syste m

This document consists of the following modules:
95591706 22/07/09 © smiths detection proprietary information

Table of contents
Table of contents
General infor m ation................................................................................1
Preface.........................................................................................................................................................1
About these operating instructions..............................................................................................................2
Place to keep the documentation............................................................................................................2
Classification of the safety instructions...................................................................................................2
Classification of the indications...............................................................................................................3
Warning Signs Used................................................................................................................................4
Product D escription................................................................................7
Legal requirements......................................................................................................................................8
Proper use of the system.............................................................................................................................8
Use as agreed.........................................................................................................................................8
Obvious misuse.......................................................................................................................................8
Operating conditions....................................................................................................................................9
User group..............................................................................................................................................9
Climatic conditions .................................................................................................................................9
Scope of delivery...................................................................................................................................10
Components and connectors.................................................................................................................11
Description of the keyboard...................................................................................................................13
Safety instructions for operation...................................................................21
Startup...........................................................................................23
Switching on eqo........................................................................................................................................23
Login procedure.........................................................................................................................................24
Operation........................................................................................27
Description of the main screen..................................................................................................................27
Viewing window.....................................................................................................................................27
Title bar.................................................................................................................................................27
Scanning process.......................................................................................................................................29
Conducting the person into the scanning area......................................................................................29
Start the screening process..................................................................................................................29
Tag areas of interest.........................................................................................................................30
Review areas of interest...................................................................................................................30
Stop image capture...............................................................................................................................32
Finish the screening process.................................................................................................................32
Image enhancement features.....................................................................................................................33
Face-blur..............................................................................................................................................33
Brightness............................................................................................................................................33
Contrast................................................................................................................................................35
Zoom.....................................................................................................................................................35
Example scenarios.....................................................................................................................................37
Single scan with operator adding suspect tags.....................................................................................37
Pause and review..................................................................................................................................37
Add a tag, stop and review.....................................................................................................................37
Pause, review and resume ...................................................................................................................39
95591706 22/07/09 © smiths detection proprietary information 3

Table of contents
Sh utdo w n ........................................................................................41
Technical data....................................................................................45
Dimensions................................................................................................................................................46
FC C State m ent....................................................................................47
Appendix.........................................................................................49
Daily Test Procedure..................................................................................................................................49
Test card...............................................................................................................................................49
Test card example images................................................................................................................50
95591706 22/07/09 © smiths detection proprietary information
4

General information
General infor mation
Preface
These operating instructions will enable you, as the operator, to
operate the eqo system as intended.
These operating instructions do not, however, deal with the
detection of objects in millimetre-wave images.
Using the functions of your eqo effectively and being able to detect
threats requires a certain degree of expertise. It is possible to
acquire these skills by attending an eqo operator training session.
It is recommended that you read these instructions carefully prior
to using your eqo. In particular, please be sure to read the section
entitled "Safety instructions", which contains important
information concerning your safety.
95591706 22/07/09 © smiths detection proprietary information 1
General information
About these operating instructions
Place to keep the docu m e ntation
These operating instructions along with the referenced product
documents (min. 1 copy of each) should be stored next to the
operator’s workplace. This is to ensure that the operator can
access at any time the information he requires to perform her/his
work.
Classification of the safety instructions
Danger categories
The safety instructions in this manual are subdivided into three
danger categories. These categories differ with regard to the
severity of injuries that can result from the non-compliance with
the instructions:
D A N G E R
Indicates a directly threatening danger. Non-compliance
leads to the most severe injuries or death!
W A R NI N G
Indicates a possibly dangerous situation. Non-
compliance can lead to the most severe injuries or
death!
C A U TIO N
Indicates a possibly dangerous situation. Non-
compliance can lead to slight or minor injuries!
95591706 22/07/09 © smiths detection proprietary information
2

General information
Classification of the indications
In addition to the safety instructions, you will find the following
general notes and application tips:
Caution!
Indicates a possibly detrimental situation.
Non-compliance can lead to the damage of eqo!
Important!
Application tip or useful information for the user.
Text references
Example: (F 3) indicates a reference to page 3
95591706 22/07/09 © smiths detection proprietary information 3

General information
W arning Signs Used
Explanation of the warning signs displayed on the eqo system.
Sign M e a ning
H azard!
Observe the instructions in the documentation!
Electric!
Doors or panels marked by this symbol may only be
opened by personnel with the appropriate training!
95591706 22/07/09 © smiths detection proprietary information
4
Product Description
Product D escription
eqo has been developed to enhance the capability of security
screening personnel by enabling the detection of weapons,
explosives, or contraband hidden under clothing using millimetre-
wave technology.
The person to be screened stands with arms raised in the
screening area of eqo and turns through 360°. All objects located in
the screening area are scanned by means of millimetre-waves. The
system then processes this data. A two-dimensional image of the
person in the screening area is displayed on the local operator
station.
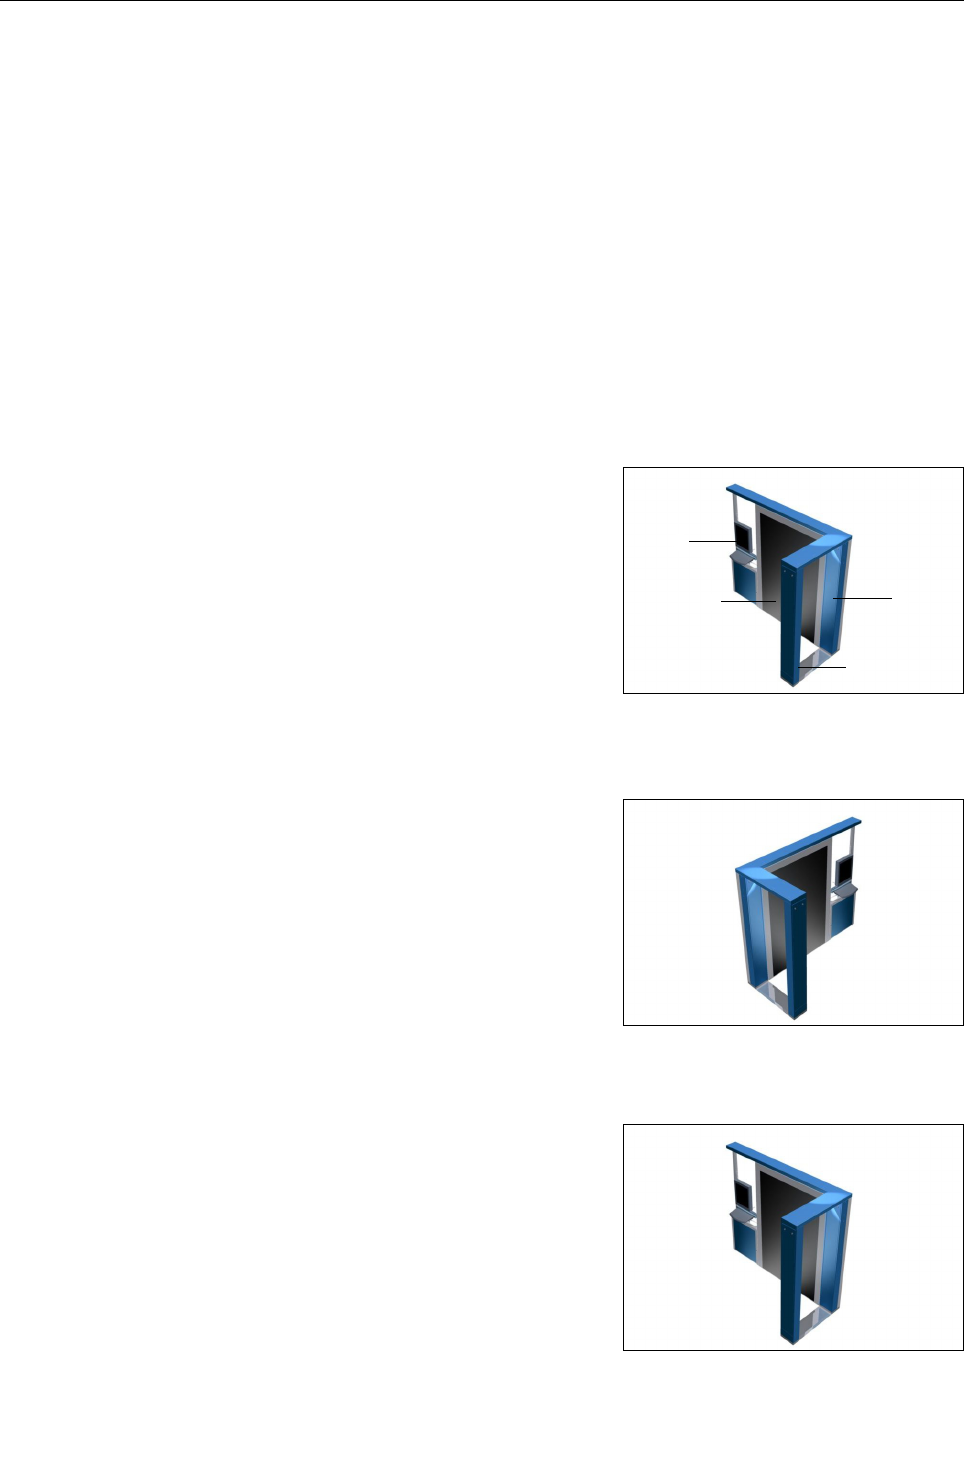
The system consists of three main modules (see Fig. 1), the local
operator station 1, the flat scanning panel 2, and an entrance
arch 3 containing the transceiver, digital receiver and the power
supply. The arch is attached at right-angles to the end of the flat
scanning panel.
Two different variants exist, a left-hand and a right-hand version.
The variants differ in the position of the flat scanning panel 2
which can be attached on either side of to the power supply pillar
4. Fig. 1 shows the right-hand version of the eqo, Fig. 2 the left-
hand version. The right-hand version is defined as the
configuration where the flat scanning panel is on the right-hand
side of the person who will be scanned as they enter the system
through the arch, and vice-versa for the left hand version.
Furthermore, the local operator station can be placed at two
different positions, either next to the flat scanning panel (see Fig.
3) or next to the arch.
95591706 22/07/09 © smiths detection proprietary information
Fig. 2: Left-hand version of the eqo system
Fig. 1: Main components of the eqo system
4
3
5
1
2
Fig. 3: Local operator station in position A

Product Description
Legal require m e nts
Before operating eqo, you must acquaint yourself with any local
accident prevention regulations!
Proper use of the syste m
Use as agreed
The only and exclusive purpose of the eqo is the screening of
persons using millimetre-waves by appropriately trained
personnel.
Important!
The functionality of the eqo system and its protection
can only be guaranteed as long as the unit is operated in
a manner described in the operating instructions. An
impairment or, at worst, a loss of protection can result if
eqo is used in a manner other than that described in the
operating instructions. Smiths Detection assumes no
liability for obvious or unintended misuse.
Obvious misuse
The components of the system may not be used for purposes other
than those described in this operating manual and in the
referenced product documents.
Operating conditions
User group
Caution!
The eqo system may only be activated and operated by
appropriately trained personnel!
Caution!
The national accident prevention regulations are to be
observed for all works.
The necessary know-how for operating eqo can be acquired by
attending an operator training course offered by Smiths Detection,
or its designated/authorised agents.
95591706 22/07/09 © smiths detection proprietary information
6

Product Description
Cli matic conditions
Operation Transport & Storage
Temperature 0°C to +40°C -20°C to +70°C
Relative Humidity 10% to 90%
(not condensing)
10% to 90%
(not condensing)
Protection class IEC
60529
IP 20 IP 20
Important!
The functionality of the eqo system can only be
guaranteed as long as the unit is operated or stored
within the climatic limits specified above and the
protection class according to IEC 60529 is observed.
Scope of delivery
eqo
local operator station with computer
flat screen monitor
keyboard
95591706 22/07/09 © smiths detection proprietary information 7
Product Description
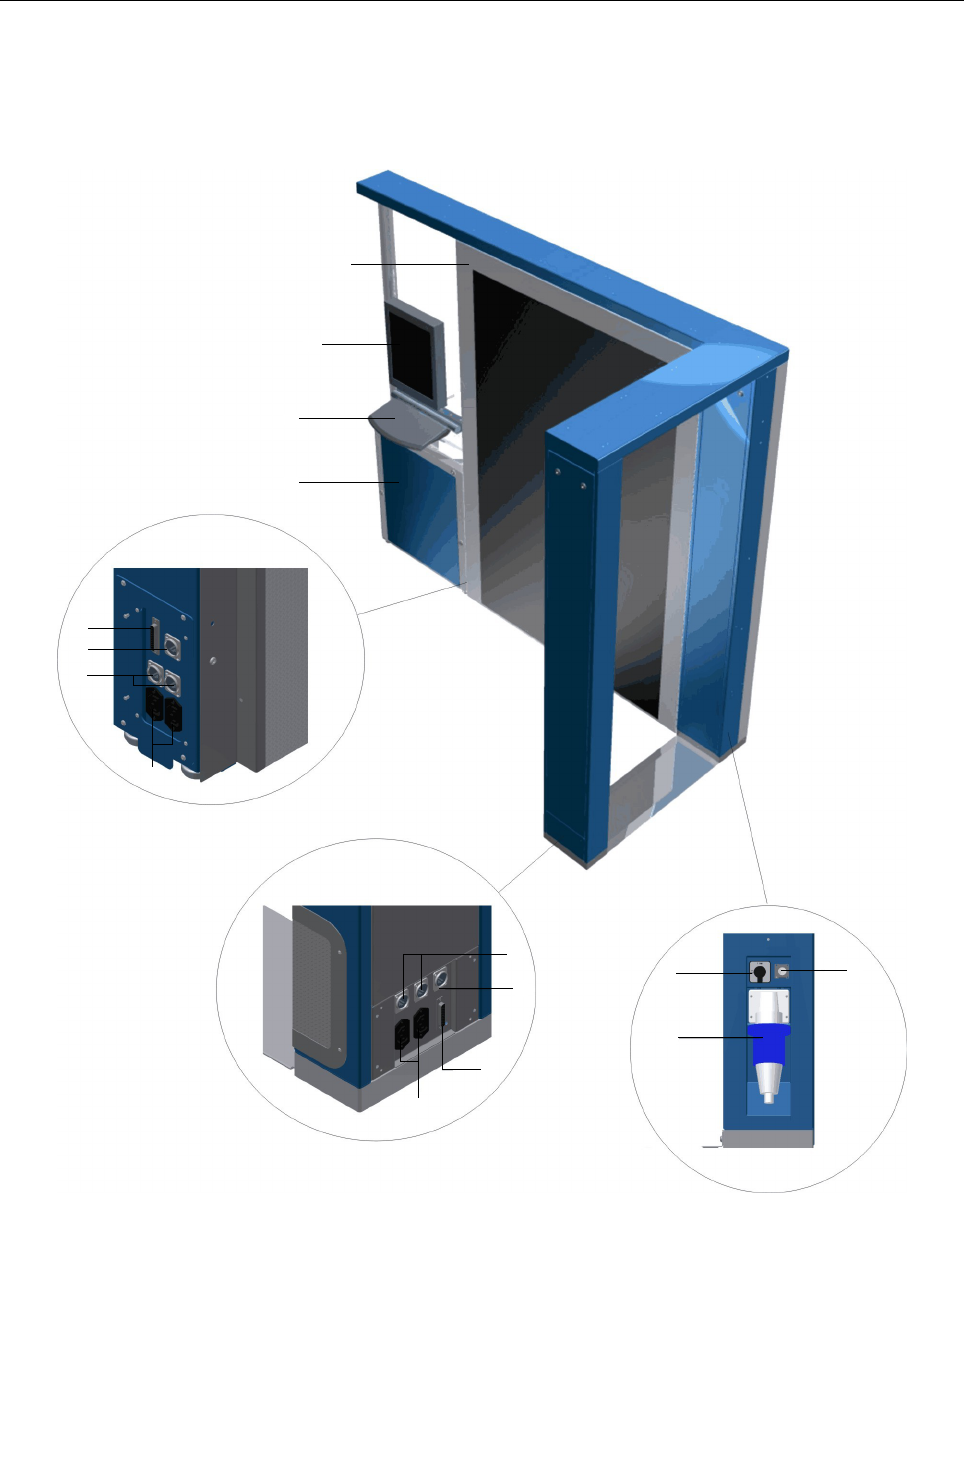
Co m p onents and connectors
95591706 22/07/09 © smiths detection proprietary information
Fig. 4: Components and Connectors of eqo
!
!
0
0
9
9
8
8
7
6
5
4
3
2
1
8

Product Description
N o. Description
1Flat scanning panel
2Mains power supply
socket
3Mains switch Mains ON/Off switch of the eqo
system; acts as a disconnecting
device.
4Network
connection point
(RJ45-Socket)
Network connection point to
customers network if required
5Flat screen monitor
6Keyboard
7local operator
station including
computer
8Data Connector (2 x
RJ45-Socket)
Connection points between main
system (digital receiver) and local
operator station (PC)
9Data Connector (1 x
RJ45-Socket)
Co nnection point between net work
connection point 4 and PC
0Data Connector
(25-way D-Sub-
Socket)
Connection point between local
operator station (PC) and main
system
!IEC Power Outlets (
IEC 60320-C14)
Power Outlets which provides power
from the mains power supply to the
PC and the flat screen monitor
95591706 22/07/09 © smiths detection proprietary information 9
Product Description
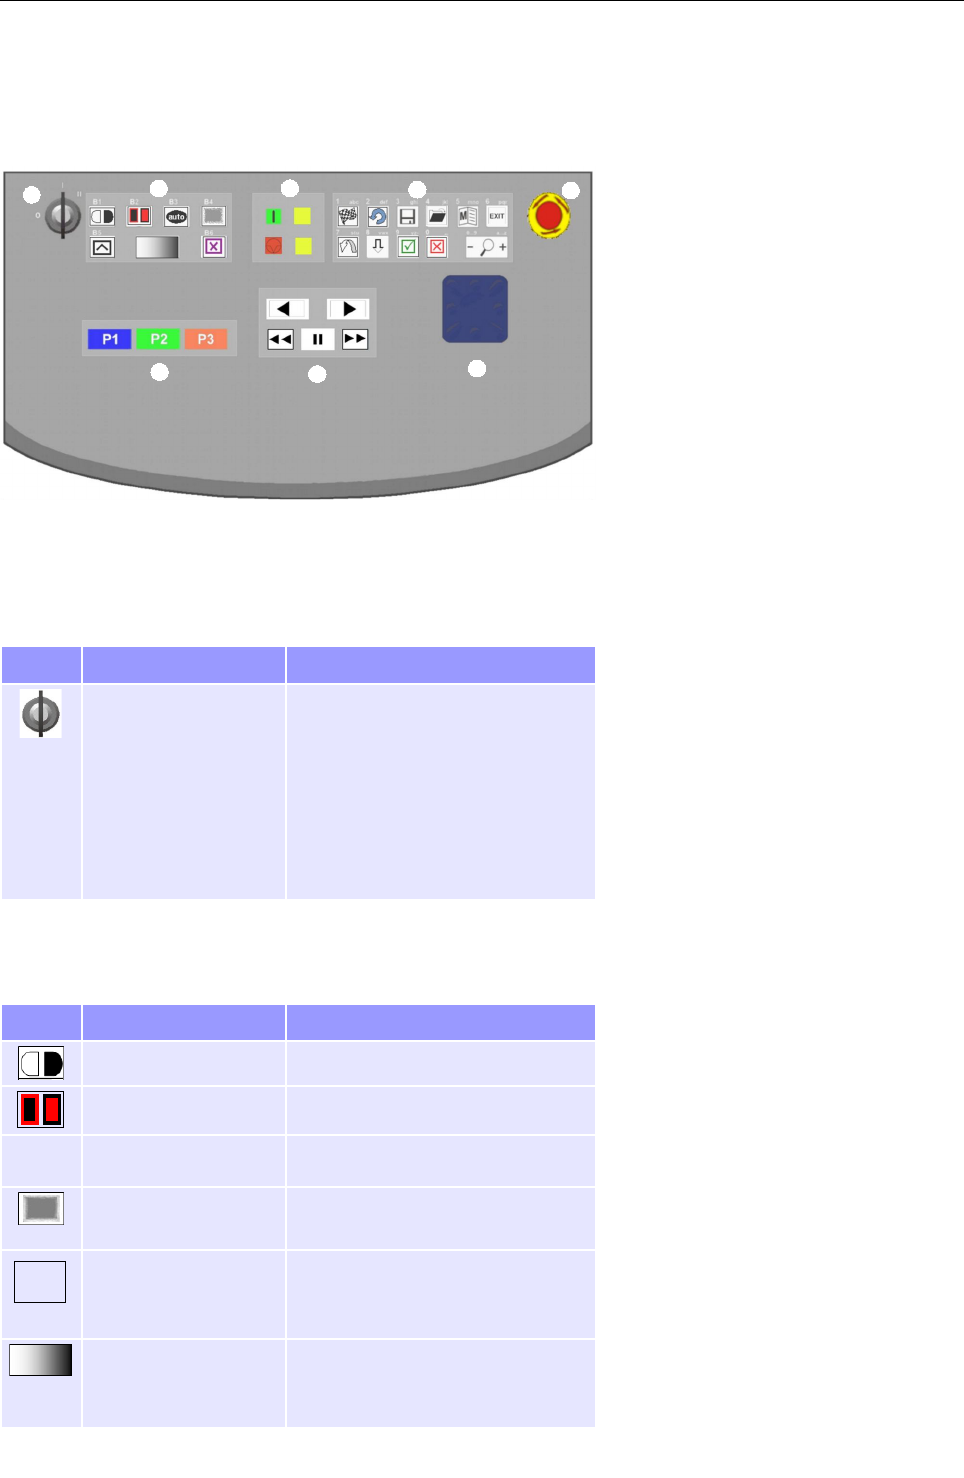
D escription of the keyboard
1 K ey s witch
Sy m bol N a m e D escription
Key switch Turn the key switch to the right
(into position II) in order to switch
on the unit. The key switch will
backslide automatically to
position I.
In order to switch the unit off,
turn the key switch to the left
(into position 0).
2 I mage filtering key panel
Sy m bol N a m e D escription
Invert Inverts the image colours.
N/A Not enabled in this version.
XN/A Not enabled in this version.
Blur Blurs the bottom half of the
image.
Contrast / Brightness
Selector
Pressing this key switches
between the adjustment of
brightness or contrast
Contrast / Brightness
Adjustment
Adjusts the image brightness or
contrast, depending on which one
is currently beeing adjusted.
95591706 22/07/09 © smiths detection proprietary information
10
Fig. 5: Keyboard
12345
6
7
8

Product Description
Sy m b ol N a m e D escription
Face blur Blurs the area around the face for
privacy reasons. Pressing the key
turns the face blurring feature
on/off.
3 Indicator panel
Sy m b ol N a m e D escription
KOperating indicator Indicates that the keyboard is
provided with power.
LWait indicator Indicates that the system is not
ready.
4 Function key panel
Sy m b ol N a m e D escription
Finish Completes the scanning procedure. After
pressing this key the unit is ready to start
with a new scanning procedure. r and
s will be enabled again. The current
sequence will be removed from memory.
N/A Not enabled in this version.
SSave Saves an image sequence to external USB,
first stopping the scan if necessary
TLoad Opens the image sequence load dialog
UMenu Opens the main menu
VExit Returns to the default image display
Jump Jumps between tags in the sequence
Tag / Clear Tag or clear tags in areas of interest in the
timeline. A new tag will appear yellow and
a cleared tag will appear black on the
timeline.
N/A Not enabled in this version
N/A Not enabled in this version
oSelector Switches between numbers and letters
95591706 22/07/09 © smiths detection proprietary information
11

Product Description
Important!
The function keys are not only used for the functions
explained above. When inside an input field the
lowercase numbers and letters [1 abc] ... [0 _.] written
above each function key are active. This gives the
operator the ability to enter letters and nu m b ers. The
nu m bers are used by default. To s witch between the
entry of letters and n u m bers press o .
5 E m ergency Stop S witch
Sy m bol N a m e D escription
Emergency Stop
Switch
When activated in an emergency
situation, it shuts off the electrical
power for the high frequency parts of
the eqo system. The computer will
shut down but still be powered by the
supply voltage and the 24 V auxiliary
supply.
6 N avigator
Sy m bol N a m e D escription
Navigator Navigates inside the menu structure
of a displayed menu
Important!
Move between adjacent items in screen menus or
windows by directing the navigator up or down.
If you direct the navigator to the right or to the left, you
change the entries or call up a selected menu item or
function.
You can delete wrong text entries by moving the cursor
to the left using the navigator.
95591706 22/07/09 © smiths detection proprietary information
12

Product Description
7 Control key panel
Sy m b ol N a m e D escription
wAdvance a single
frame
Press button once: Move scan
forwards by one frame
Hold button do wn for half a second
and release: Move scan forwards at
half pace.
xRewind a single
frame
Press button once: Move scan
backwards by one frame
Hold button do wn for half a second
and release: Move scan backwards at
half pace.
Scan forward Press button once: Move scan
forwards in normal time
Hold button do wn: Move scan
forwards at double speed
Scan backward Press button once: Move scan
backwards in normal time
Hold button do wn: Move scan
backwards at double speed
QPause Pauses the image playback. During a
scan process the image capture will
continue in the background.
95591706 22/07/09 © smiths detection proprietary information 13

Product Description
8 Priority key panel
Sy m bol N a m e D escription
rPriority Key 1 Within screen m essages and m e nus, the
key can have different functions:
Acknowledge a message with “OK”
Select a highlighted menu option
with “SELECT”
Accept a suggested function with
“YES”
Within the title bar:
Start the video capture for a male
scan.
sPriority Key 2 Within screen m essages and m e nus, the
key can have different functions:
Discard a selected menu option with
“CANCEL”
Reject a confirmation with “NO”
Within the title bar:
Start the video capture for a female
scan
tPriority Key 3 Stop the video capture during a
male/female scan
95591706 22/07/09 © smiths detection proprietary information
14

Safety instructions for operation
Safety instructions for operation
C A U TIO N
Risk of falling!
When walking through the arch there is a potential trip
hazard. Persons to be scanned should be made aware of
this!
95591706 22/07/09 © smiths detection proprietary information 15

Safety instructions for operation
95591706 22/07/09 © smiths detection proprietary information
16
Startup
Startup
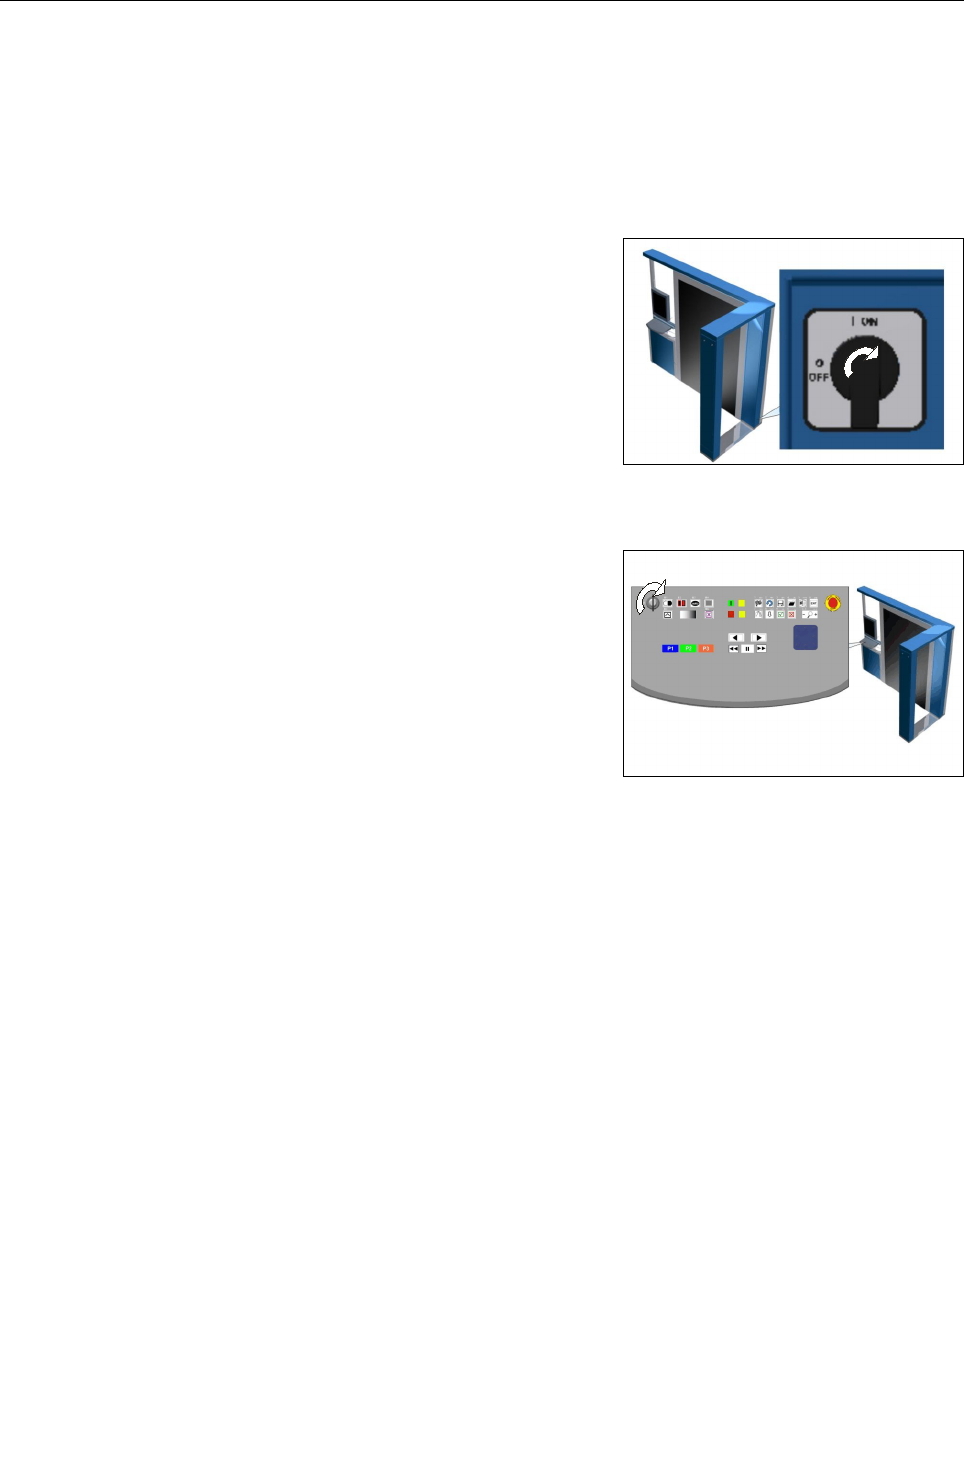
S witching on eqo
Turn the main switch of the eqo system clockwise into the ON
position (see Fig. 6). The unit is now ready to switch-on.
Turn the key switch of the eqo system clockwise (into position II)
in order to switch on the unit (see Fig. 7). The key switch will
backslide automatically to position I.
95591706 22/07/09 © smiths detection proprietary information
Fig. 6: Main switch
Fig. 7: Keyboard
17
Startup
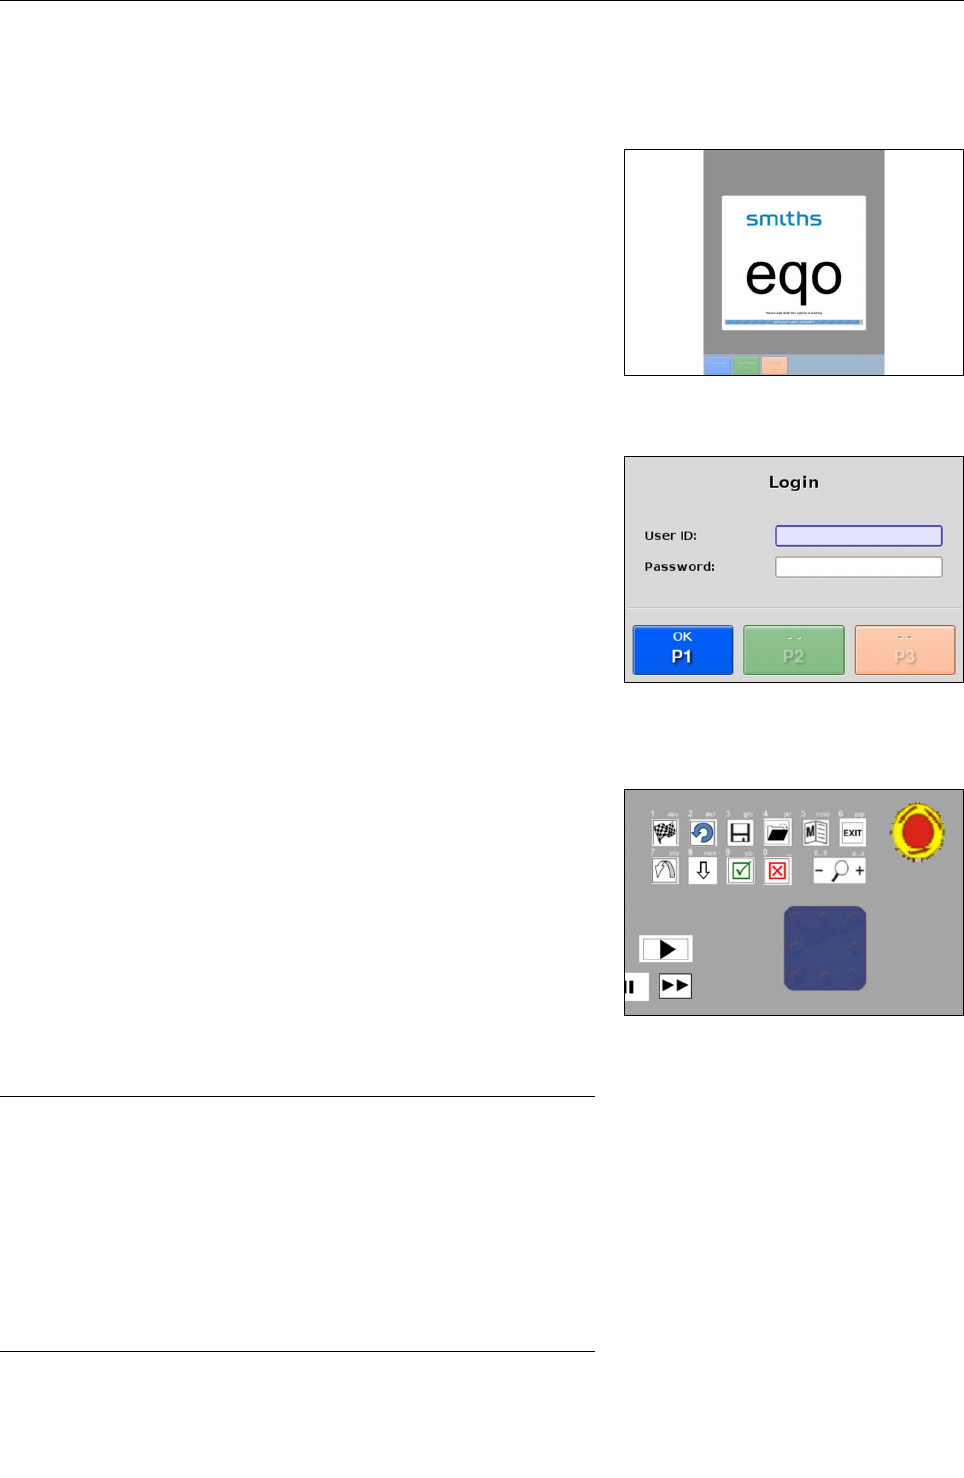
Login procedure
After the initial boot sequence, a splash screen will appear (see
Fig. 8) on the monitor, which will clear after approximately five
minutes when the system has started.
The splash screen is followed by the login screen (see Fig. 9).
Enter your login data by using the function keys (see Fig. 10).
The default user login is:
User-ID: 135
Pass w ord: 135
Important!
Inside an input field the lowercase numbers and letters
[1 abc] ... [0 _.] written above each function key are
active. This gives the operator the ability to enter letters
and nu m b ers. The n u m bers are used by default. To
s witch between the entry of letters and nu m b ers press
o .
You can delete wrong text entries by moving the cursor
to the left using the navigator.
95591706 22/07/09 © smiths detection proprietary information
Fig. 10: Function keys
Fig. 9: Login screen
18
Fig. 8: Splash screen
Startup
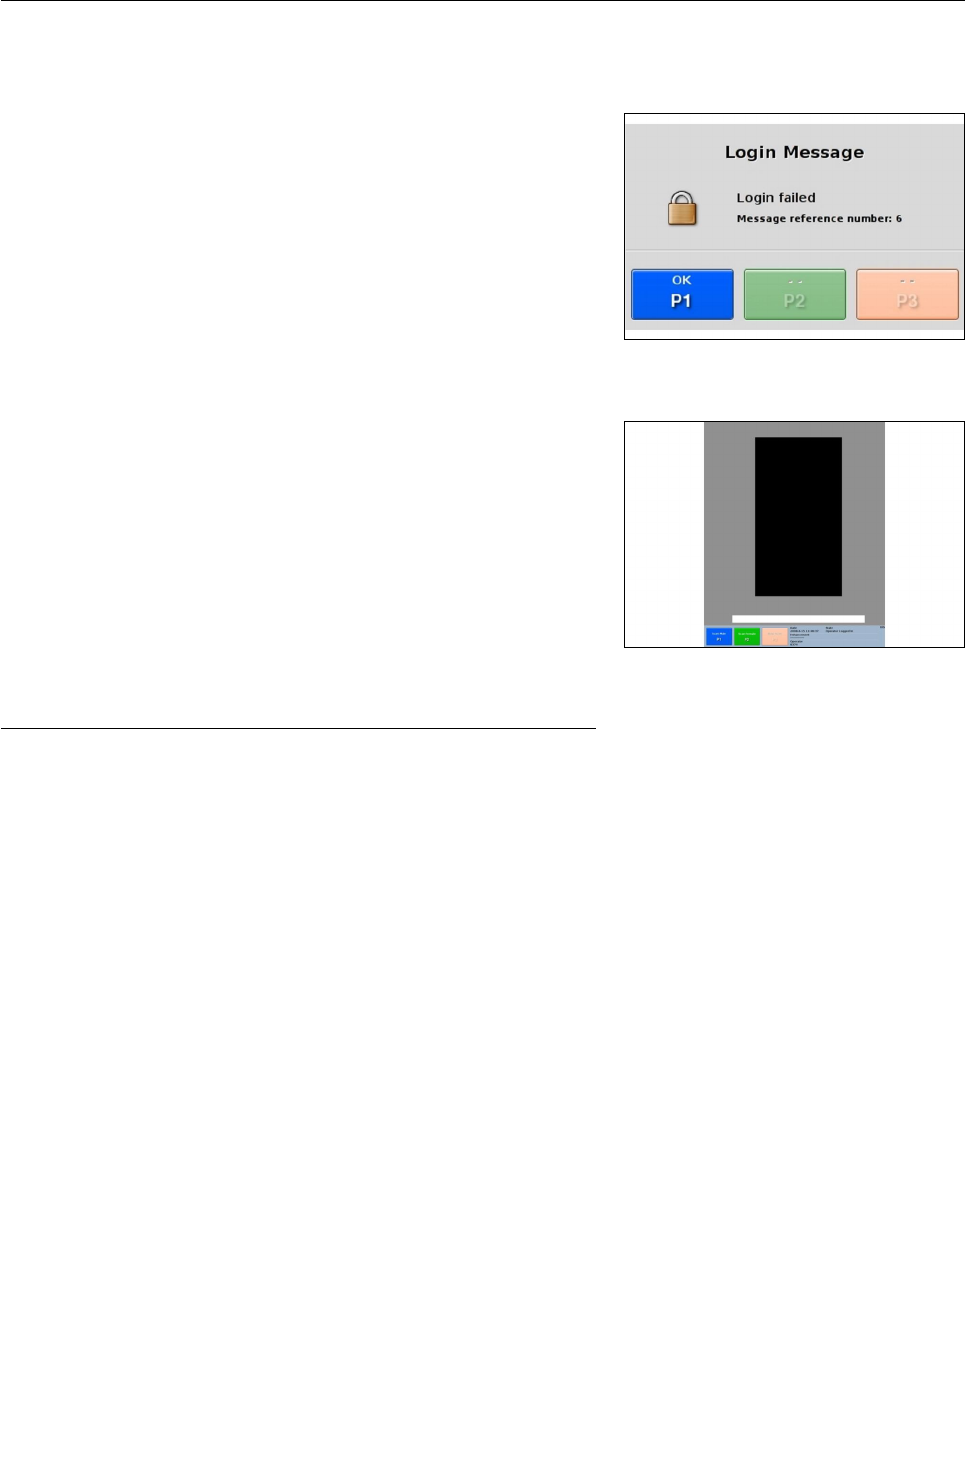
In the event of a failed log-in, Fig. 11 is displayed. Press r
on the keyboard to return to the log-in screen (see Fig. 9)
After a successful login, the main screen is displayed (see Fig. 12).
Important!
One should wait 5 minutes before performing scans, as
there is a “background collection” task initiated, which
needs to be completed, to enable the system to prepare
to capture images correctly. People should not be
allowed to stand in the scanning area during this 5
minute period.
95591706 22/07/09 © smiths detection proprietary information 19
Fig. 11: Login Failed screen
Fig. 12: Main screen

Startup
95591706 22/07/09 © smiths detection proprietary information
20
Operation
Operation
Description of the m ain screen
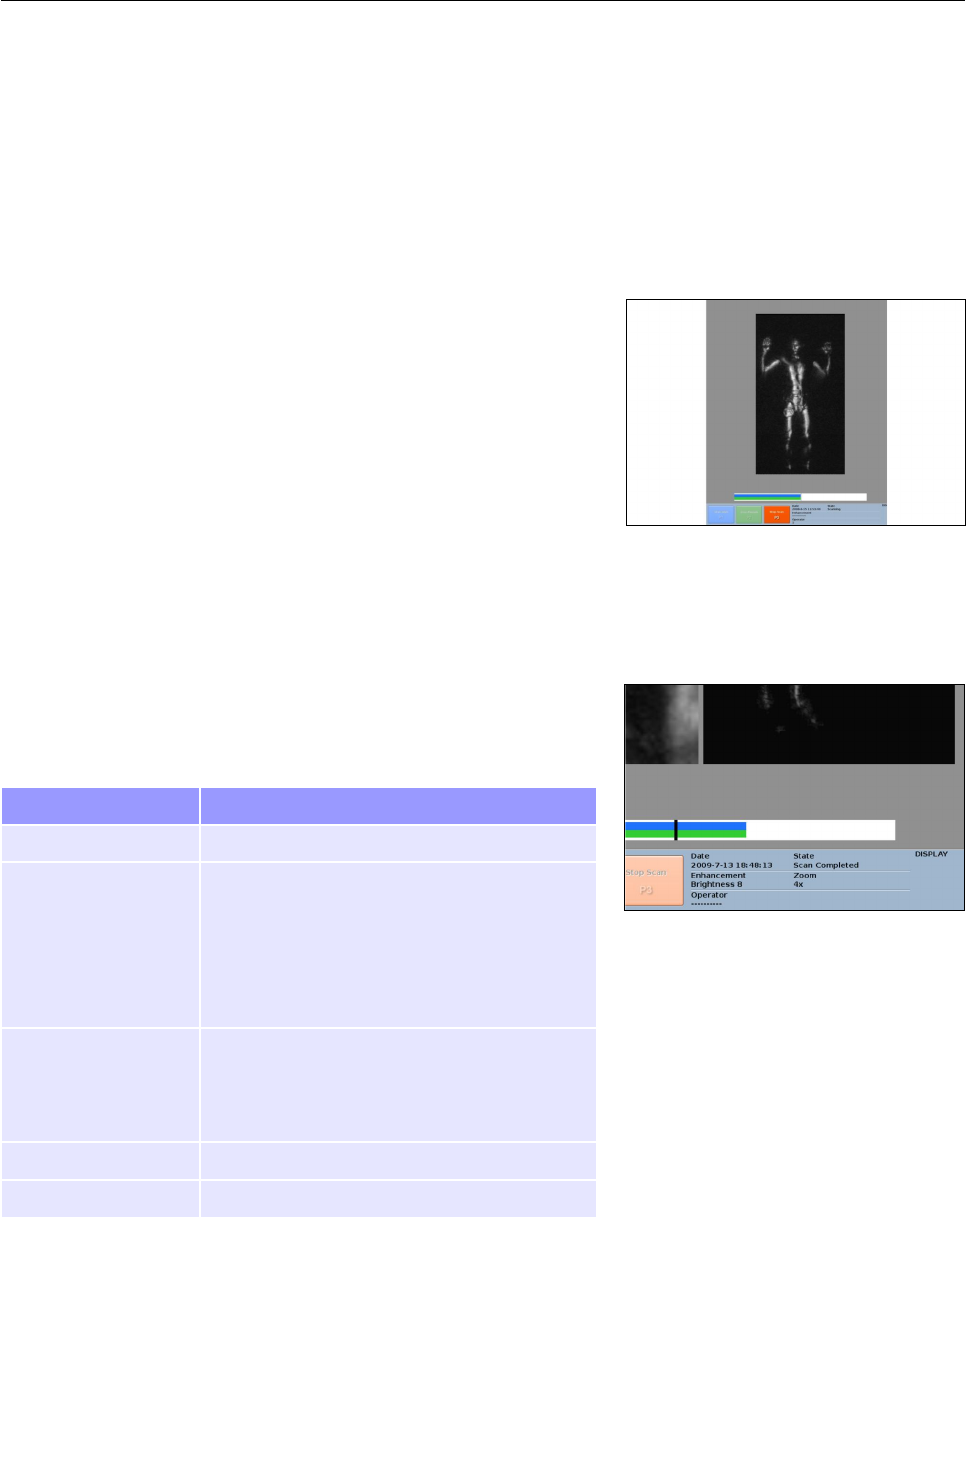
Vie wing windo w
The viewing window (see Fig. 13) displays an image of the current
data in real time. The time line at the base of the screen displays
the current length of the scan. A maximum scan will contain 30
seconds worth of image data. The blue bar shows the current
position of the LIVE scan. The green bar shows the amount of the
sequence that the operator has reviewed.
Title bar
The title bar of the viewing window (see Fig. 14) shows information
such as status, current enhancement functions, etc. as detailed in
the following table.
Sy m b ol D escription
Date/Time Current date and time
System State Ready
ScanningScan
Scan Completed
Error
Menu name – if the user is currently in a
menu.
Image Enhancement The current image enhancement function:
Zoom factor
Brightness
Contrast
Operator Name of the current user
Remote Users Not used in this version
95591706 22/07/09 © smiths detection proprietary information
Fig. 14: Title bar
21
Fig. 13: Viewing window
Operation
Scanning process
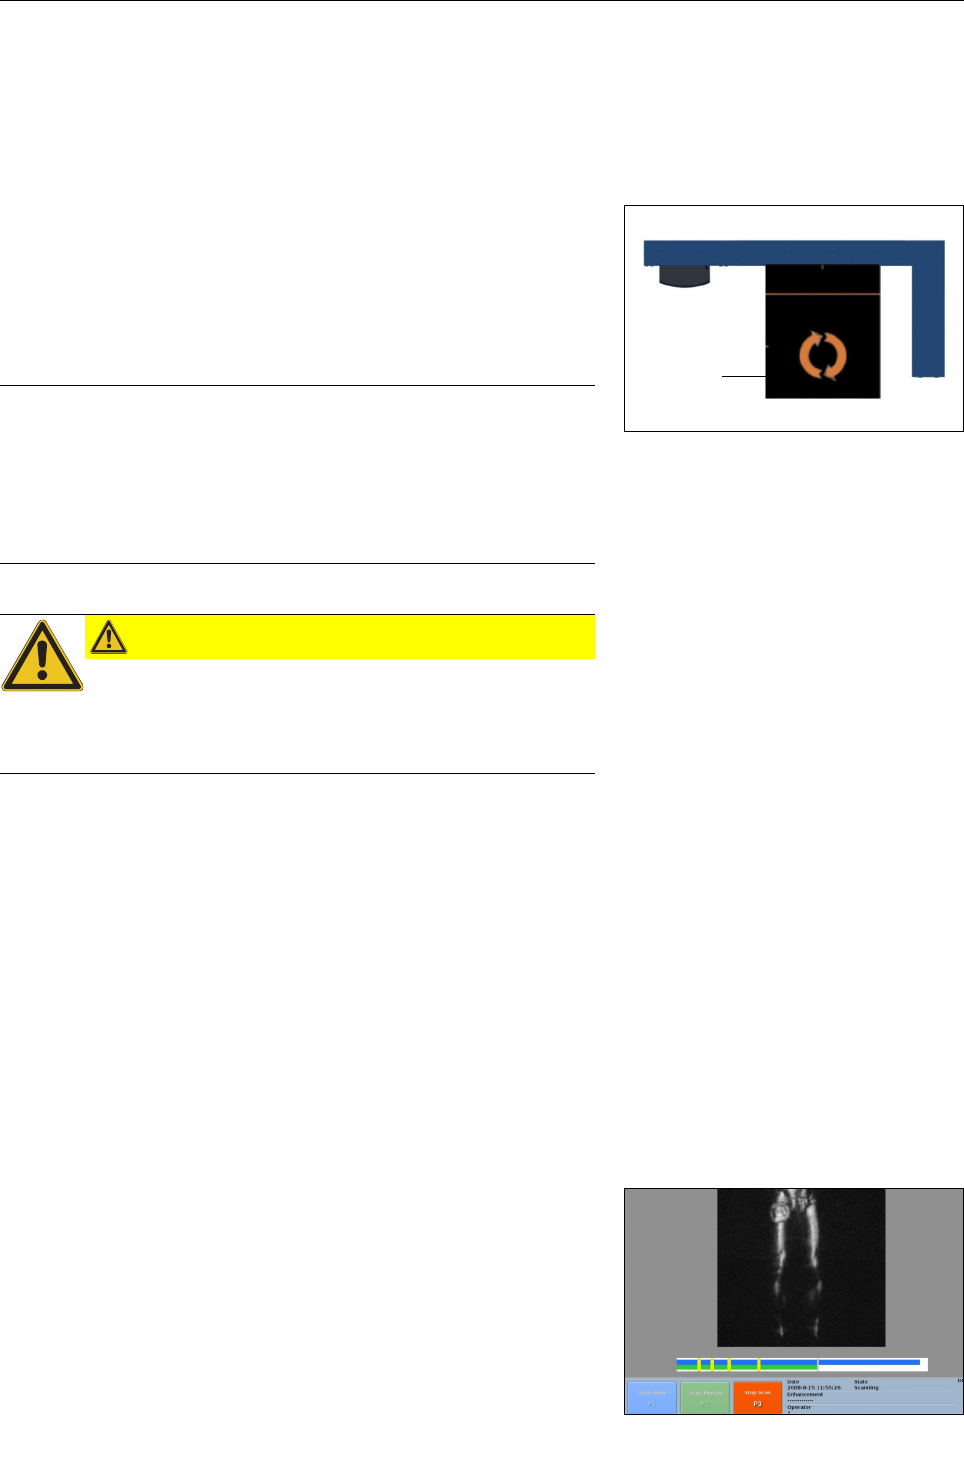
Conducting the person into the scanning area
Direct the person to be scanned inside the scanning area. The
optimum position for the person is marked by a symbol on the
floor. Instruct the person to be scanned to raise their arms. Fig.
15 shows a top view of the eqo including the operational area
1.
Important!
Remember that the minimum distance between the
person to be scanned and the flat scanning panel of the
eqo system is 30 cm. The person should stand at the
centre of the operational area as indicated by the
symbol on the floor.
C A U TIO N
Risk of falling!
When walking through the arch there is a potential trip
hazard. Persons to be scanned should be made aware of
this!
Start the screening process
Selecting either r or s begins the screening process.
This initiates the image capture. Fig. 21 shows the main screen.
Instruct the person to turn in slow motion through 360 degrees
with their arms raised (as shown in Fig. 21).
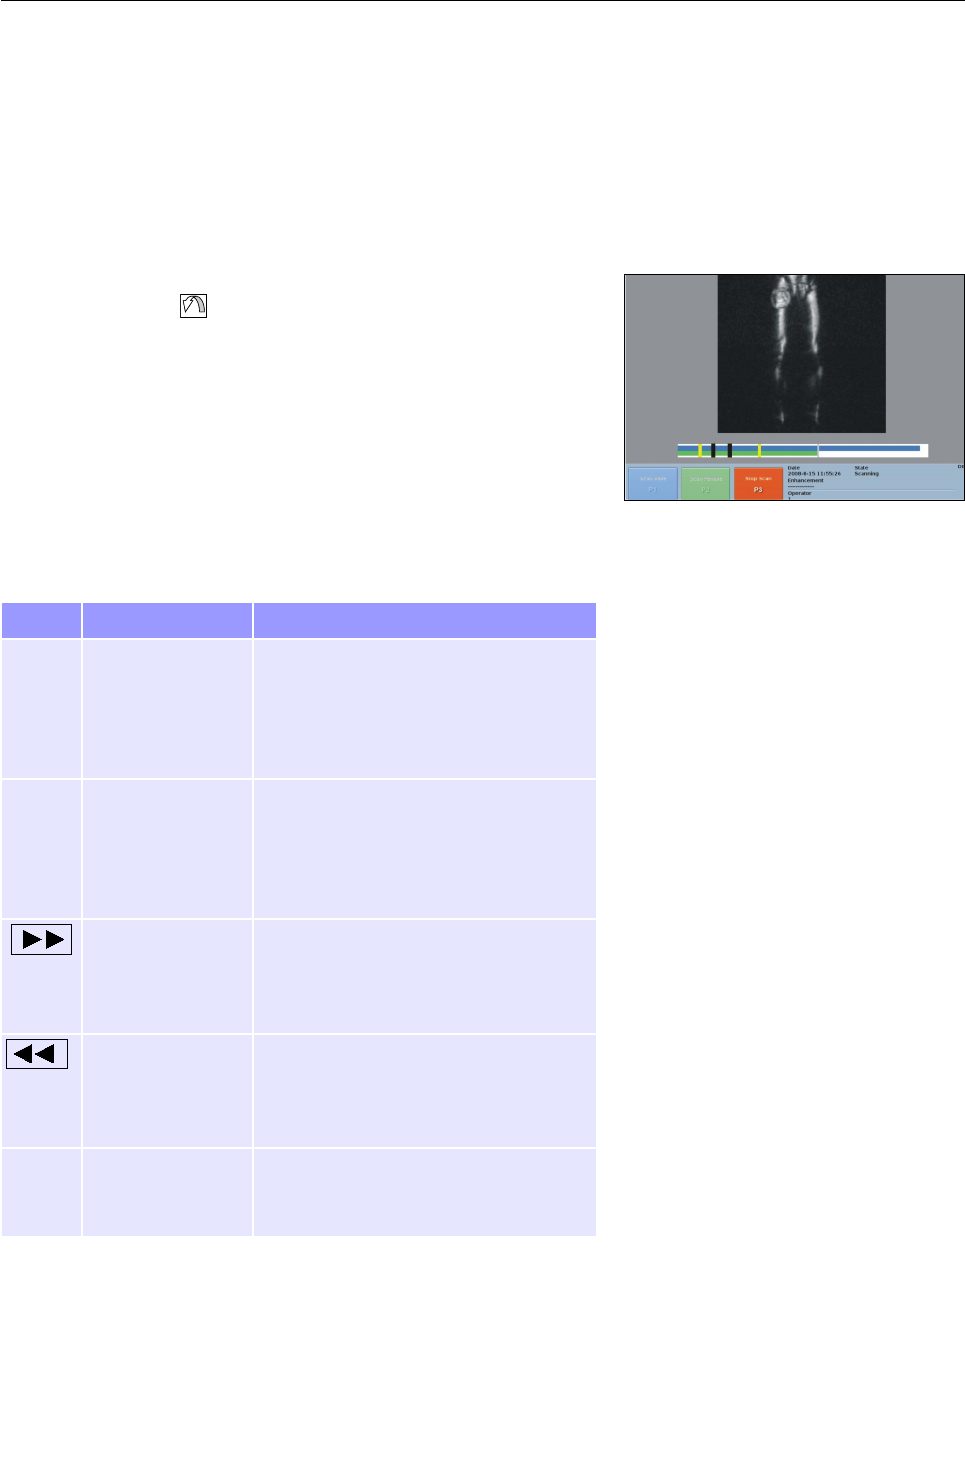
Tag areas of interest
Pushing the key w hile the image plays allows the operator to
m ark areas of interest w h ere potential threats are identified. Yellow
m arker positions in the green and blue bar identify these positions
in the image data (see Fig. 16). They can be used to quickly find
these positions in the retained image to playback that portion of the
image for further analysis.
95591706 22/07/09 © smiths detection proprietary information
22
Fig. 15: Top view of the scanning area
1
Fig. 16: Tagged areas of interest
Operation
Revie w areas of interest
To review areas of interest, the image playback must be paused,
either by pressing the Q key during a scan, or after a screening
process has been stopped by pressing t.
While the image playback is paused, it is possible to review areas of
interest by pressing . This will skip the tags in sequence, if there
have been any marked. After reviewing a tag, the operator can
clear the tag by pressing the key again. The tag will then appear
black on the ti meline (see Fig. 17).
Using the control keys allows the operator to move the image
backwards or forwards in the image sequence and in different
speeds on the timeline. The following table describes the usage of
the different control keys.
Sy m b ol N a m e D escription
wAdvance a single
frame
Press button once: Move scan
forwards by one frame
Hold button do wn for half a second
and release: Move scan forwards at
half pace.
xRewind a single
frame
Press button once: Move scan
backwards by one frame
Hold button do wn for half a second
and release: Move scan backwards at
half pace.
Scan forward Press button once: Move scan
forwards in normal time
Hold button do wn: Move scan
forwards at double speed
Scan backward Press button once: Move scan
backwards in normal time
Hold button do wn: Move scan
backwards at double speed
QPause Pauses the image playback. During a
scan process the image capture will
continue in the background.
95591706 22/07/09 © smiths detection proprietary information 23
Fig. 17: Cleared tags

Operation
Stop image capture
Press t to stop image capture. Image capture will also stop
after the maximum scanning time of 30 seconds has elapsed.
However this does not actually end the screening process. You
can continue to review previously tagged areas using the control
keys (F 13) and the function keys (F 11).
If no threat is detected, the person who has been scanned can
then be told that they are free to proceed.
In the case where a potential threat object has been identified,
any site specific standard operating procedure (SOP) should be
followed. For example a targeted pat-down should be
performed as indicated by the position of the threat on the
image.
Finish the screening process
Press the Finish key on the function key panel to end the
screening process.
This will clear the person displayed in the viewing window and
reset the timeline. Once the priority keys r and s are
available the system is ready to start a new screening process.
95591706 22/07/09 © smiths detection proprietary information
24
Operation
Image enhance m e nt features
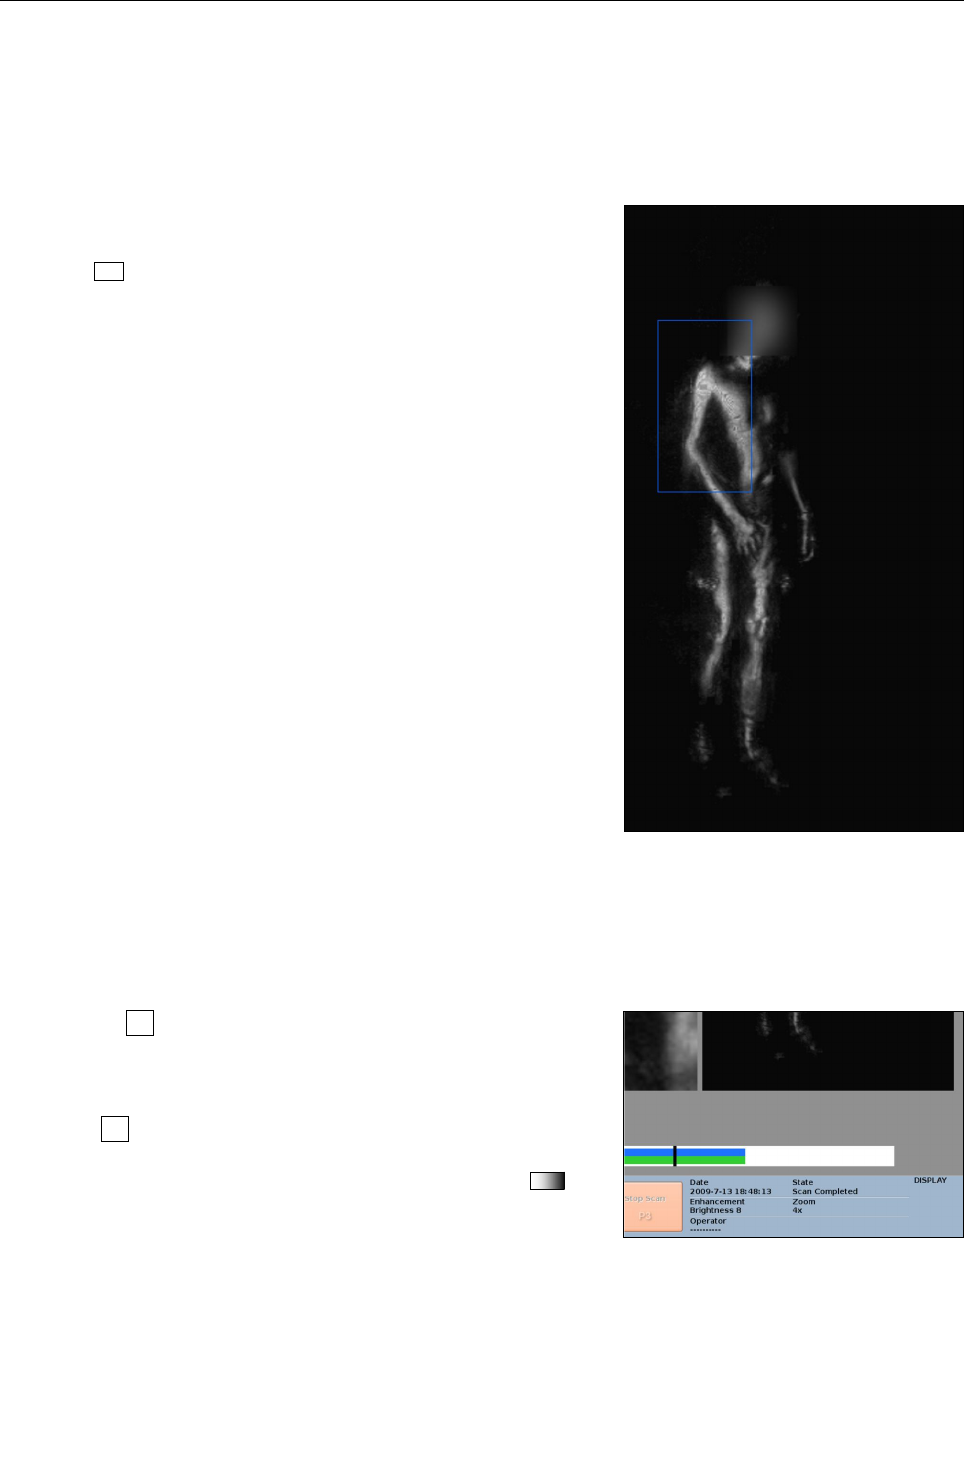
Face-blur
The face-blur feature is used to blur the areas around the face for
privacy reasons. It may be turned on/off by pressing the „face-
blur“-key . Fig. 18 shows an image with the face-blur feature
activated.
Brightness
Pressing the key switches between brightness and contrast
adjustment. Fig. 19 shows the title bar with activated brightness
adjustment.
Use the key to switch to brightness adjustment if necessary.
Press the „Contrast / Brightness Adjustment“ key to
increase/decrease the contrast of the displayed image in steps
of 8 from -64 to +64.
95591706 22/07/09 © smiths detection proprietary information 25
Fig. 18: Image display with activated face-blur
Fig. 19: Title bar

Operation
Contrast
Pressing the key switches between contrast and brightness
adjustment. Fig. 20 shows the title bar with activated contrast
adjustment.
Use the key to switch to contrast adjustment if necessary.
Press the „Contrast / Brightness Adjustment“ key to
increased/decreased in steps of 1 from -28 to +7.
Zoo m
When the magnifying glass key o is pressed the sreen splits in
two as shown in Fig. 21.
One frame shows the normal (non-zoomed) image, and the other
the zoomed image.The zoom factor can be increased / decreased
from 2x to 4x to 8x, by pressing o.
A blue box appears on the standard frame, and it may be moved
using the blue navigator key. This blue box indicates the region
which is to be zoomed in on.
95591706 22/07/09 © smiths detection proprietary information
26
Fig. 21: Image display with activated zoom
Fig. 20: Title bar

Operation
Exa m ple scenarios
Single scan with operator adding suspect tags
The operator starts a male scan by pressing r. The r
and s keys are then disabled and the t key is enabled.
The operator presses the key once during the live image for
each suspect item identified on the subject, which adds suspect
tags to the timeline.
The operator presses the stop key t.
The sequence is stopped and the image is not cleared until the
operator presses the finish key.
The suspect tags are dealt with as previously described
When the Finish key is pressed the r and s keys
are enabled once more.
Pause and revie w
The operator first starts a male scan by pressing r and
then pausing it by pressing the Q key.
After the Q key has been pressed the operator can then review
the static image.
When the operator presses the t key to stop the scan the
priority keys are disabled but the review functions are still
available to the operator.
The operator presses the Finish key and the priority keys
r and s are then enabled
Add a tag, stop and revie w
The operator starts a male scan by pressing the r key.
After the stop key t is pressed the image collection is
complete.
The operator then jumps to the section of the image that
contains the suspect tag by pressing the jump key.
During the review process the operator presses the key which
will then clear the tag on the timeline.
The operator then presses the Finish key to complete the
scan session.
95591706 22/07/09 © smiths detection proprietary information 27

Operation
Pause, review and resu m e
The operator starts a scan by pressing the r key.
The operator presses the Q key. The image is paused and
operator can then review the static image.
The operator presses Q again and the display is continued
from the point the operator paused the sequence.
The operator presses the stop key t to stop the live image
and enter the review mode.
The operator presses the Finish key to complete the
scanning procedure.
95591706 22/07/09 © smiths detection proprietary information
28
Shutdown
Shutdo w n
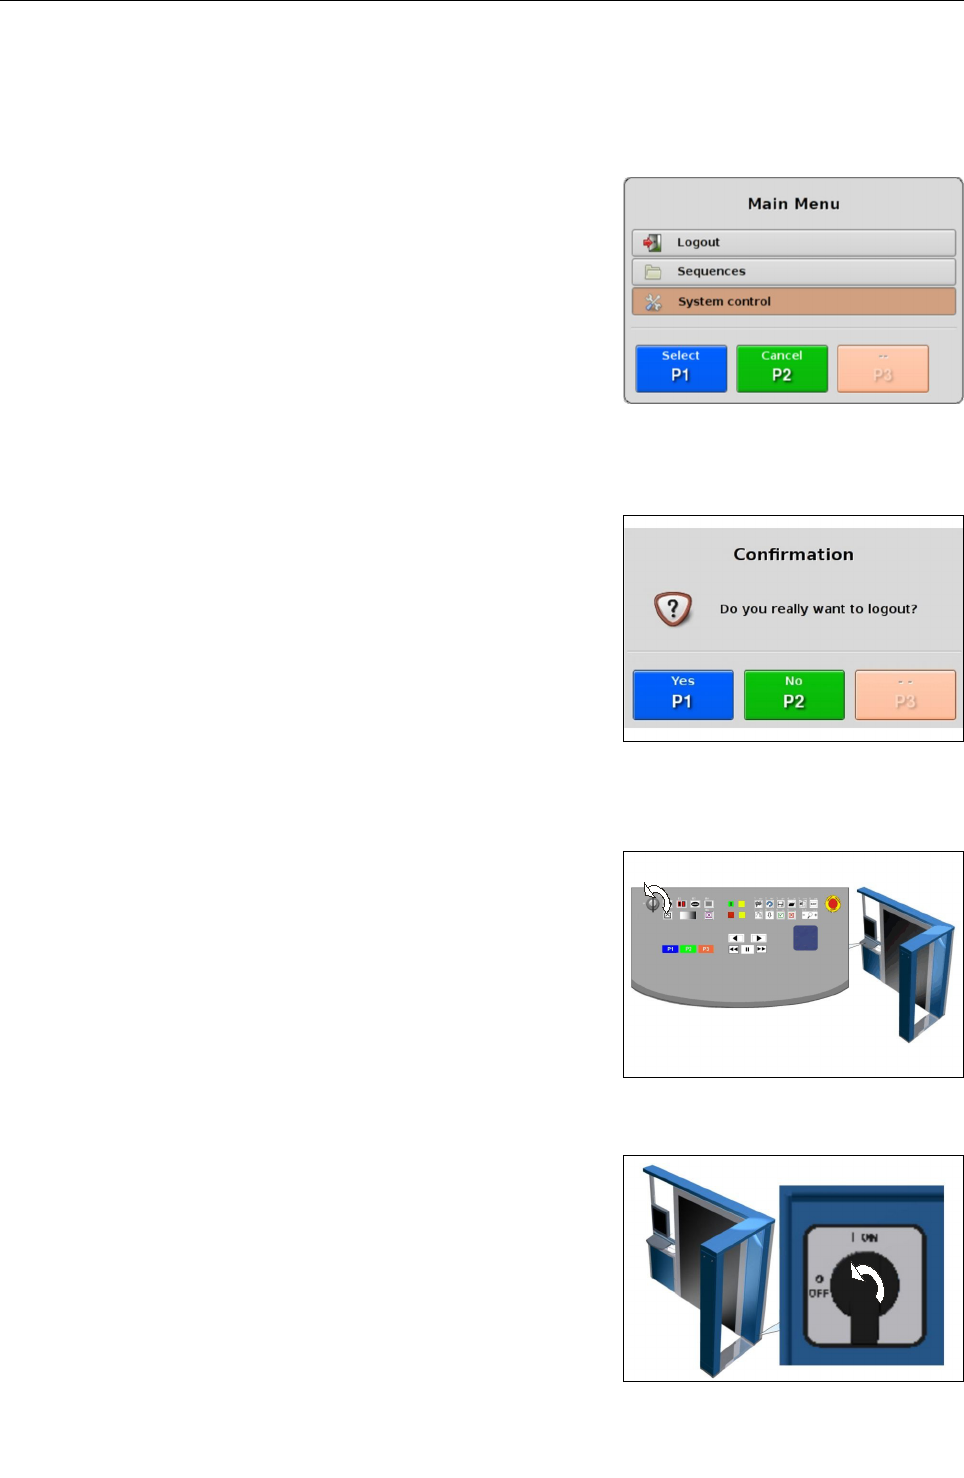
Press U and the m ain m e n u is displayed (see Fig. 22).
U se the navigator control on the keyboard (F 12) to select the
Logout m e n u ite m and confir m it by pressing r. Choosing
s will bring you back to the main screen. The logout
confirmation screen (see Fig. 23) is displayed.
Press r to confirm the logout process or s to cancel it
(see Fig. 23)
Turn the key switch to the left (into position 0) in order to switch
off the unit (see Fig. 24).
Turn the main switch to the left into position OFF (see Fig. 25).
95591706 22/07/09 © smiths detection proprietary information
Fig. 25: Main switch
Fig. 24: Keyboard
29
Fig. 23: Logout confirmation screen
Fig. 22: Main menu

Shutdown
95591706 22/07/09 © smiths detection proprietary information
30

Technical data
Technical data
Electrical data
Power Supply 100-240 VAC, N, PE
Power Consumption 1.36 kVA
Frequency 50 - 60 Hz
Fuse 2 x 10 A
Sound Pressure Level
Sound Pressure Level < 55 d B A
W eight
Weight < 400 kg
Te m peratures
Storage Temperature -20° C to + 70° C
Operating Temperature 0° C to +40° C
Enviro m ent
Relative Humidity (non-
condensing)
10% to 90%
Altitude 2 km max
95591706 22/07/09 © smiths detection proprietary information 31
Technical data
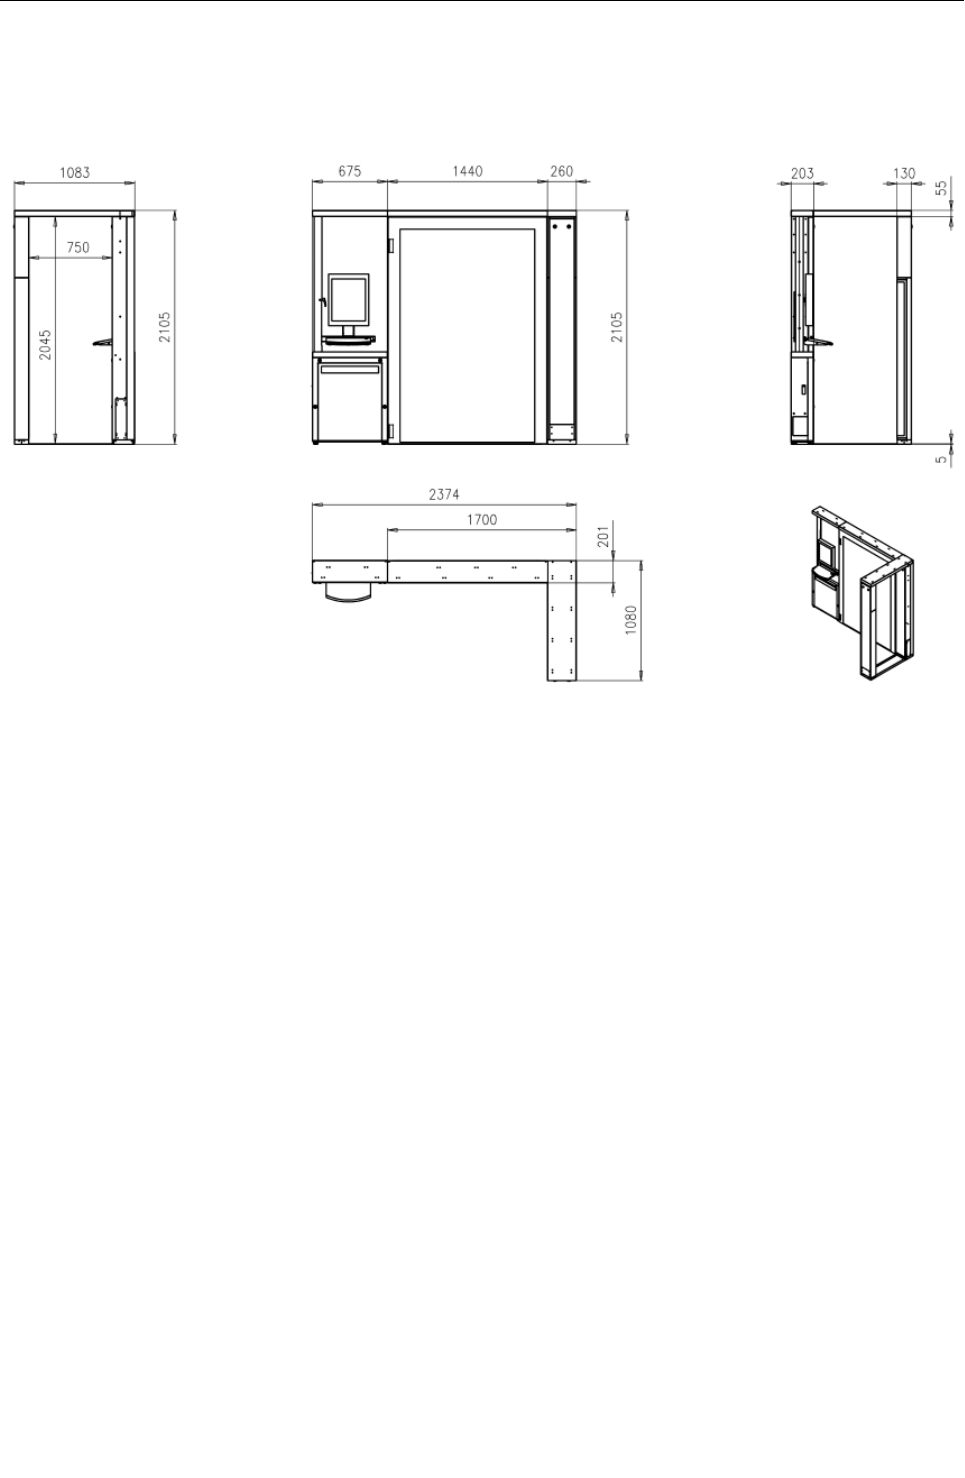
Di m e nsions
95591706 22/07/09 © smiths detection proprietary information
Fig. 26: Dimensions of the eqo system
32

FCC Statement
FCC State m ent
This device complies with Part 15 of the FCC Rules.
Operation is subject to the following two conditions:
(1) this device may not cause harmful interference, and
(2) this device must accept any interference received, including
interference that may cause undesired operation.
95591706 22/07/09 © smiths detection proprietary information 33

Appendix
Appendix
Daily Test Procedure
Test card
After starting eqo each morning, the operator is advised to perform
a test card scan. This is done using a specifically designed test card
(see Fig. 27). The card is manufactured from a plastic material
which is transparent to millimetre waves. Metal strips of different
widths are attached to the surface of the card. The number next to
each section signifies the width of each strip in that section and the
gap between adjacent metal strips.
During the test the operator holds the card vertically in front of the
system (i.e. in the orientation shown in Fig. 27), in the centre of the
scan volume (this is identified by the centre of the symbol on the
floor mat), at a height of approx. 1.5 m from the floor to the top of
the test card.
It is expected that at the centre of the scan volume, a properly
setup imager will be able to resolve lines (horizontal or vertical) of
6mm width. The results of the test will be different depending on
the distance from the panel and the location in the scanned
volume. Moving the test card closer to the panel should result in
the resolution of lines down to 4mm.
Important!
The card may need to be rotated in the vertical plane
(max. 10 degrees) to achieve optimum results.
The test procedure is as follows:
Start the system according to the procedure outlined in the
operator manual.
Allow the system to run for a minimum of 5 minutes after log on
- make sure there are no objects in the scan volume during this
time.
Rotate or tilt the card to achieve best image, as described
above.
Review the image after the test using and keys.
Make sure the number of lines on the image corresponds to the
number of lines in the test card.
95591706 22/07/09 © smiths detection proprietary information
Fig. 27: Test card
35
Appendix
Watch out for blurring or double lines in the image.
In the event of the image result not being acceptable, a system set-
up should be carried out by a suitably trained technician.
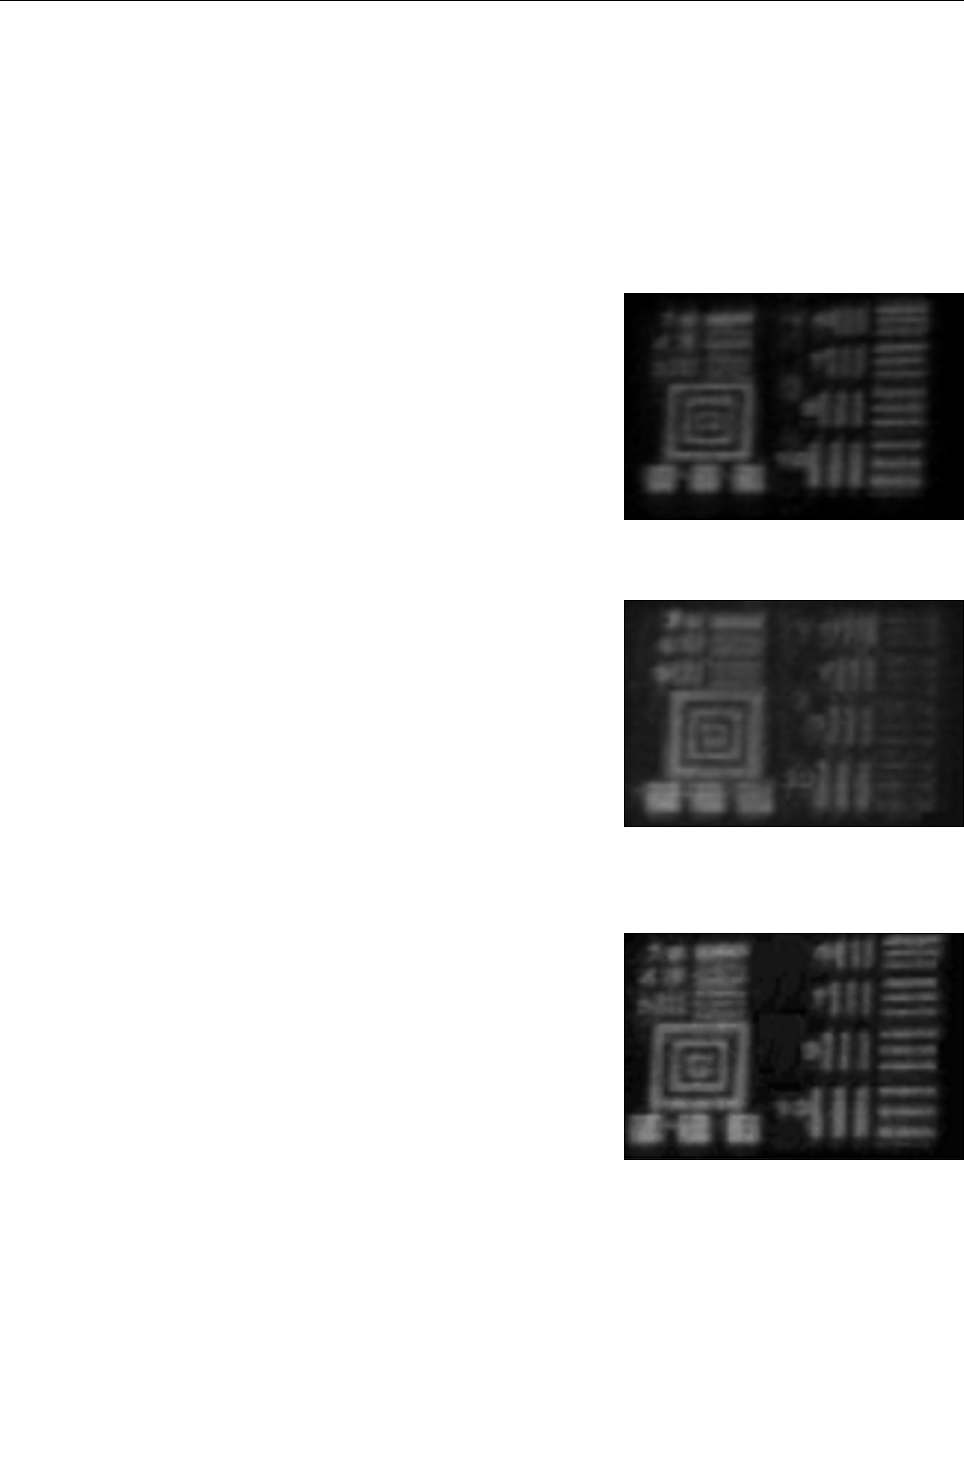
Test card exa m ple images
Fig. 28 shows an image where the test card is out of focus. The test
card has been placed too far away from the flat scanning panel.
Fig. 29 shows an image where the test card has been placed at an
incorrect angle to the flat scanning panel.
Fig. 30 shows an image where the test card has been positioned
correctly.
95591706 22/07/09 © smiths detection proprietary information
Fig. 28: Image with test card too far away
Fig. 29: Image with test card at incorrect angle
Fig. 30: Image with test card positioned
correctly
36