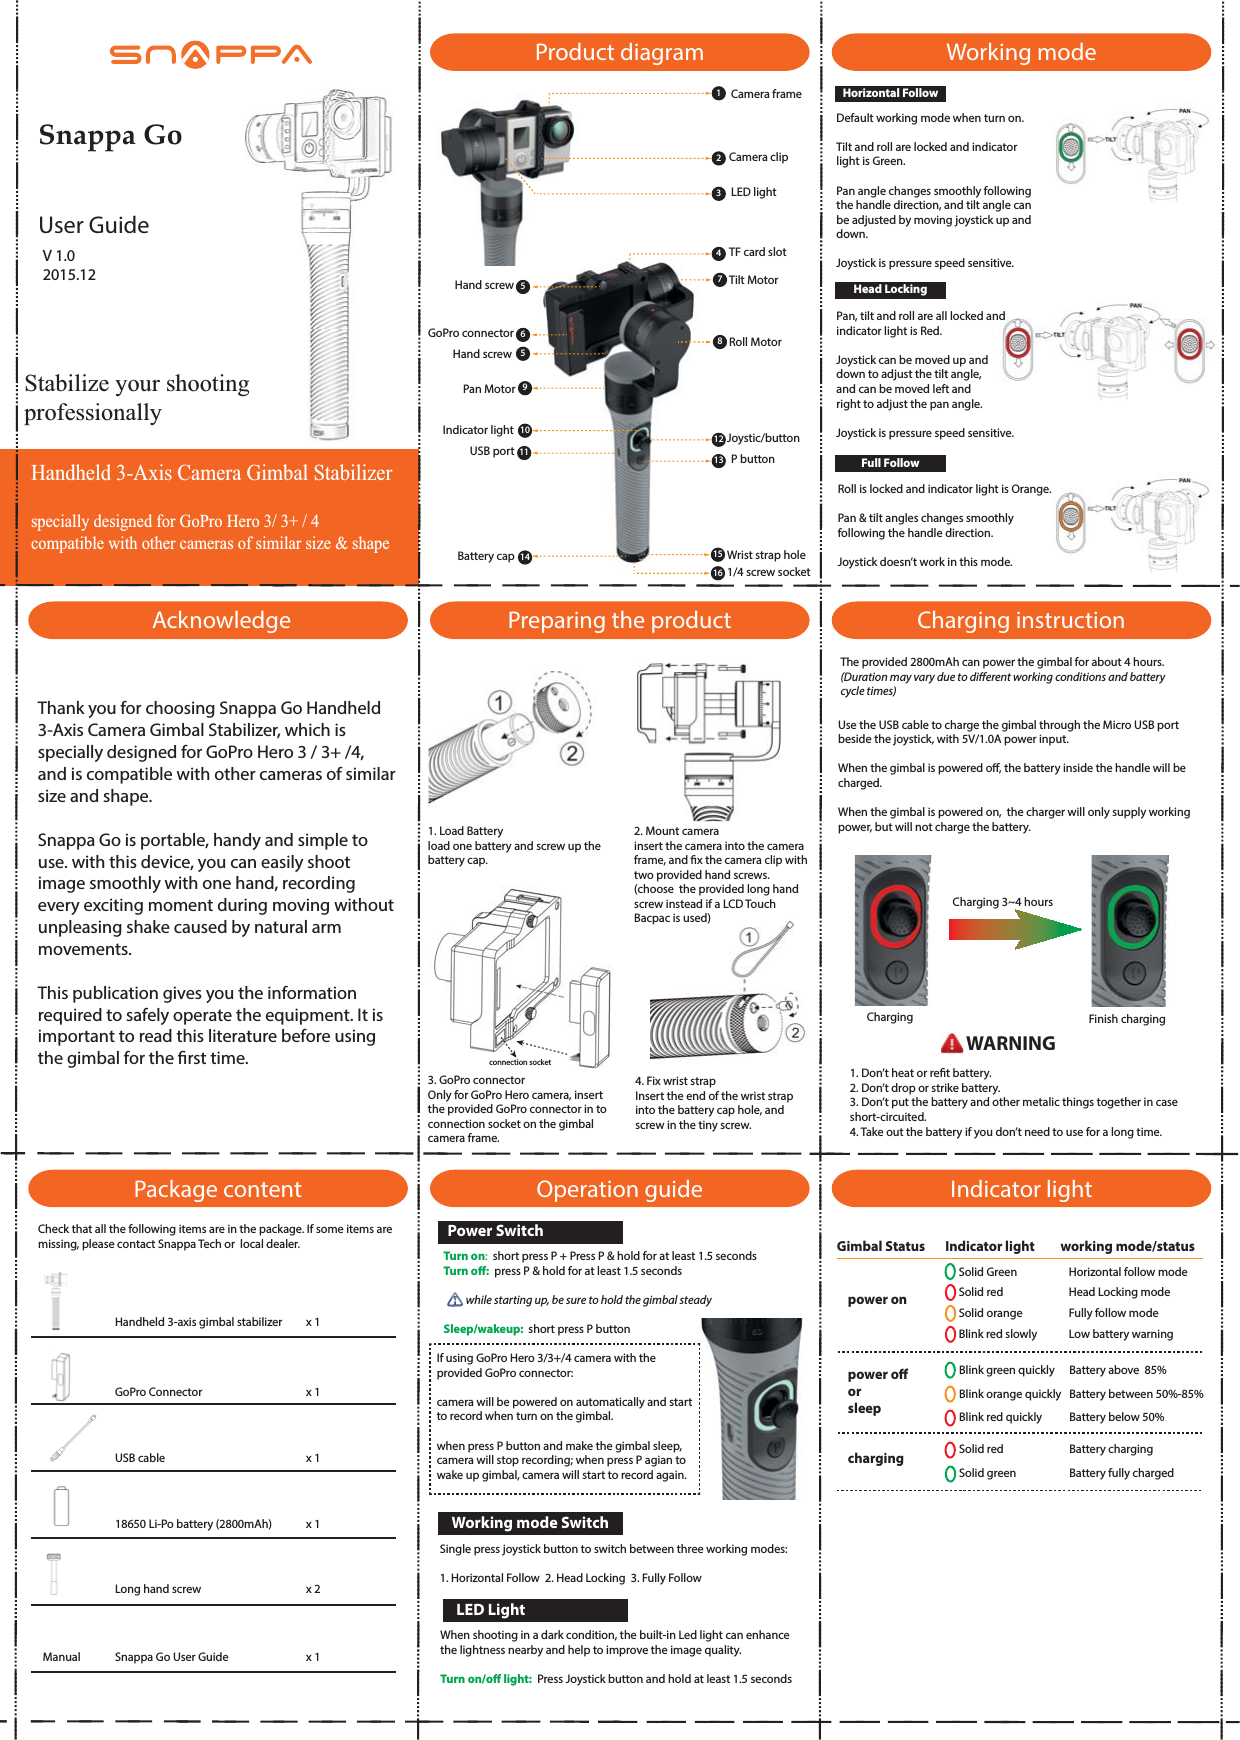
Snappa Technology SP001 Handheld 3-Axis Camera Gimbal Stabilizer User Manual SnappaGo User Guide EN V1 0

Snappa Technology Co., LTD Handheld 3-Axis Camera Gimbal Stabilizer SnappaGo User Guide EN V1 0

Contents

User Manual

Handheld 3-Axis Camera Gimbal Stabilizer specially designed for GoPro Hero 3/ 3+ / 4compatible with other cameras of similar size & shapeStabilize your shooting professionallyUser GuideSnappa GoAcknowledgeThank you for choosing Snappa Go Handheld 3-Axis Camera Gimbal Stabilizer, which is specially designed for GoPro Hero 3 / 3+ /4, and is compatible with other cameras of similar size and shape.Snappa Go is portable, handy and simple to use. with this device, you can easily shoot image smoothly with one hand, recording every exciting moment during moving without unpleasing shake caused by natural arm movements.This publication gives you the information required to safely operate the equipment. It is important to read this literature before using the gimbal for the rst time.Package contentProduct diagramPreparing the productOperation guide Indicator lightWorking modeCharging instruction1234561014 1516Camera frameCamera clipLED lightTF card slotJoystic/buttonP buttonWrist strap holeHand screwGoPro connectorHand screwIndicator lightUSB portBattery cap1/4 screw socket1. Load Batteryload one battery and screw up the battery cap.2. Mount camerainsert the camera into the camera frame, and x the camera clip with two provided hand screws. (choose  the provided long hand screw instead if a LCD Touch Bacpac is used)3. GoPro connectorOnly for GoPro Hero camera, insert the provided GoPro connector in to connection socket on the gimbal  camera frame.4. Fix wrist strapInsert the end of the wrist strap into the battery cap hole, and screw in the tiny screw.789Tilt MotorRoll MotorPan Motor5111213Turn on:  short press P + Press P & hold for at least 1.5 secondsTurn o:  press P & hold for at least 1.5 seconds          while starting up, be sure to hold the gimbal steadySleep/wakeup:  short press P buttonSingle press joystick button to switch between three working modes: 1. Horizontal Follow  2. Head Locking  3. Fully Followconnection socketIf using GoPro Hero 3/3+/4 camera with the provided GoPro connector:camera will be powered on automatically and start to record when turn on the gimbal.when press P button and make the gimbal sleep, camera will stop recording; when press P agian to wake up gimbal, camera will start to record again.Power SwitchWorking mode SwitchHorizontal FollowDefault working mode when turn on.Tilt and roll are locked and indicator light is Green.Pan angle changes smoothly following the handle direction, and tilt angle can be adjusted by moving joystick up and down.Joystick is pressure speed sensitive.Head LockingFull FollowPan, tilt and roll are all locked andindicator light is Red. Joystick can be moved up and down to adjust the tilt angle, and can be moved left and right to adjust the pan angle. Joystick is pressure speed sensitive.Roll is locked and indicator light is Orange.Pan & tilt angles changes smoothly following the handle direction.Joystick doesn’t work in this mode.Use the USB cable to charge the gimbal through the Micro USB port beside the joystick, with 5V/1.0A power input.When the gimbal is powered o, the battery inside the handle will be charged.When the gimbal is powered on,  the charger will only supply working power, but will not charge the battery.Check that all the following items are in the package. If some items are missing, please contact Snappa Tech or  local dealer. Handheld 3-axis gimbal stabilizerGoPro Connectorx 1x 118650 Li-Po battery (2800mAh)Snappa Go User GuideUSB cable x 1x 1Long hand screw x 2x 1LED LightWhen shooting in a dark condition, the built-in Led light can enhance the lightness nearby and help to improve the image quality.Turn on/o light:  Press Joystick button and hold at least 1.5 secondsCharging 3~4 hoursCharging Finish charging1. Don’t heat or ret battery.2. Don’t drop or strike battery.3. Don’t put the battery and other metalic things together in case short-circuited.4. Take out the battery if you don’t need to use for a long time.WARNINGGimbal Status       Indicator light         working mode/status power onSolid Green Horizontal follow modeHead Locking modeFully follow modeLow battery warningBattery between 50%-85%Battery above  85%Battery below 50%Battery chargingBattery fully chargedSolid redSolid orangeBlink red slowlyBlink green quicklyBlink orange quicklyBlink red quicklySolid redSolid greenpower oorsleepchargingManualV 1.02015.12The provided 2800mAh can power the gimbal for about 4 hours. (Duration may vary due to dierent working conditions and battery cycle times)
FCC Notice  This device complies with Part 15 of the FCC Rules. Operation is subject to the following two conditions: (1) This device may not cause harmful interference, and (2) this device must accept any interference received, including interference that may cause undesired operation.  NOTE 1: This equipment has been tested and found to comply with the limits for a Class B digital device, pursuant to part 15 of the FCC Rules. These limits are designed to provide reasonable protection against harmful interference in a residential installation. This equipment generates, uses and can radiate radio frequency energy and, if not installed and used in accordance with the instructions, may cause harmful interference to radio communications. However, there is no guarantee that interference will not occur in a particular installation. If this equipment does cause harmful interference to radio or television reception, which can be determined by turning the equipment off and on, the user is encouraged to try to correct the interference by one or more of the following measures: - Reorient or relocate the receiving antenna. - Increase the separation between the equipment and receiver. -Connect the equipment into an outlet on a circuit different from that to which the receiver is connected. -Consult the dealer or an experienced radio/TV technician for help.   NOTE 2: Any changes or modifications to this unit not expressly approved by the party responsible for compliance could void the user's authority to operate the equipment.

Navigation menu