Snappa Technology SP001 Handheld 3-Axis Camera Gimbal Stabilizer User Manual SnappaGo User Guide EN V1 0
Snappa Technology Co., LTD Handheld 3-Axis Camera Gimbal Stabilizer SnappaGo User Guide EN V1 0
Contents
- 1. Users Manual
- 2. User Manual
User Manual
Handheld 3-Axis Camera Gimbal Stabilizer
specially designed for GoPro Hero 3/ 3+ / 4
compatible with other cameras of similar size & shape
Stabilize your shooting
professionally
User Guide
Snappa Go
Acknowledge
Thank you for choosing Snappa Go Handheld
3-Axis Camera Gimbal Stabilizer, which is
specially designed for GoPro Hero 3 / 3+ /4,
and is compatible with other cameras of similar
size and shape.
Snappa Go is portable, handy and simple to
use. with this device, you can easily shoot
image smoothly with one hand, recording
every exciting moment during moving without
unpleasing shake caused by natural arm
movements.
This publication gives you the information
required to safely operate the equipment. It is
important to read this literature before using
the gimbal for the rst time.
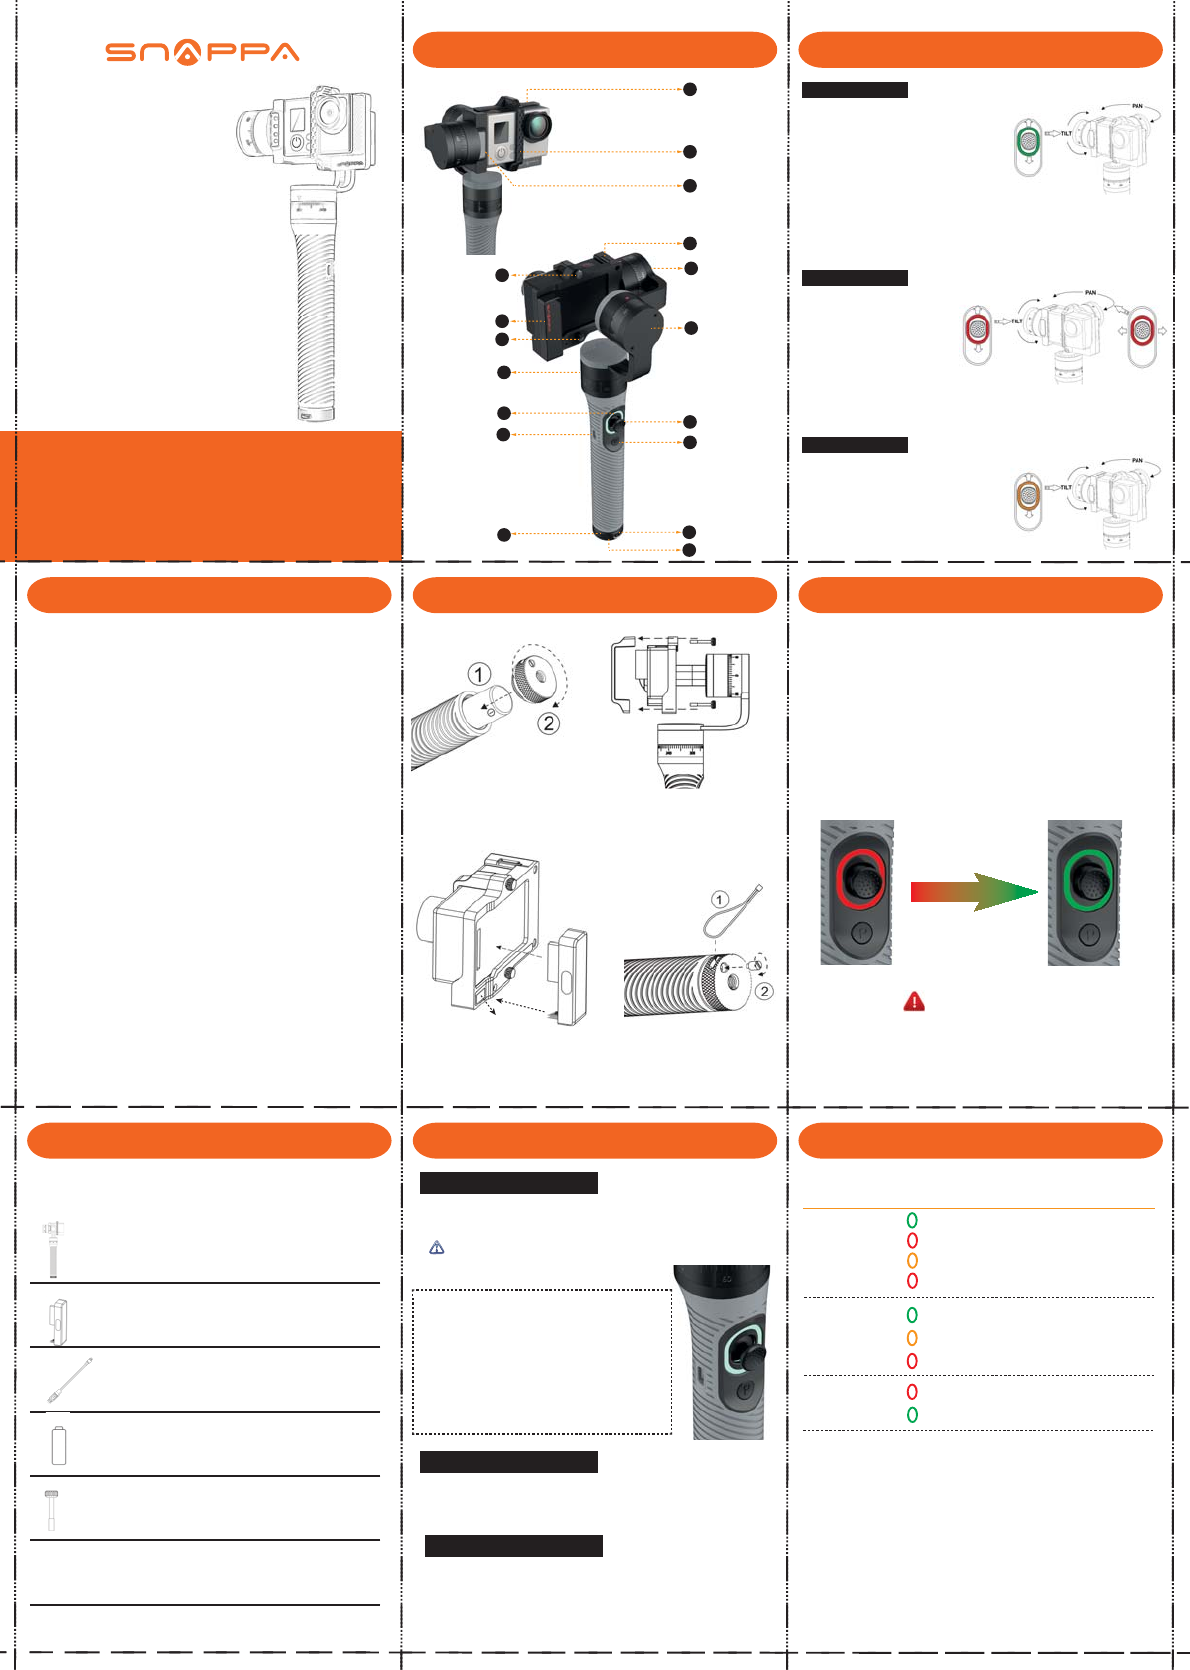
Package content
Product diagram
Preparing the product
Operation guide Indicator light
Working mode
Charging instruction
1
2
3
4
5
6
10
14 15
16
Camera frame
Camera clip
LED light
TF card slot
Joystic/button
P button
Wrist strap hole
Hand screw
GoPro connector
Hand screw
Indicator light
USB port
Battery cap
1/4 screw socket
1. Load Battery
load one battery and screw up the
battery cap.
2. Mount camera
insert the camera into the camera
frame, and x the camera clip with
two provided hand screws.
(choose the provided long hand
screw instead if a LCD Touch
Bacpac is used)
3. GoPro connector
Only for GoPro Hero camera, insert
the provided GoPro connector in to
connection socket on the gimbal
camera frame.
4. Fix wrist strap
Insert the end of the wrist strap
into the battery cap hole, and
screw in the tiny screw.
7
8
9
Tilt Motor
Roll Motor
Pan Motor
5
11
12
13
Turn on: short press P + Press P & hold for at least 1.5 seconds
Turn o: press P & hold for at least 1.5 seconds
while starting up, be sure to hold the gimbal steady
Sleep/wakeup: short press P button
Single press joystick button to switch between three working modes:
1. Horizontal Follow 2. Head Locking 3. Fully Follow
connection socket
If using GoPro Hero 3/3+/4 camera with the
provided GoPro connector:
camera will be powered on automatically and start
to record when turn on the gimbal.
when press P button and make the gimbal sleep,
camera will stop recording; when press P agian to
wake up gimbal, camera will start to record again.
Power Switch
Working mode Switch
Horizontal Follow
Default working mode when turn on.
Tilt and roll are locked and indicator
light is Green.
Pan angle changes smoothly following
the handle direction, and tilt angle can
be adjusted by moving joystick up and
down.
Joystick is pressure speed sensitive.
Head Locking
Full Follow
Pan, tilt and roll are all locked and
indicator light is Red.
Joystick can be moved up and
down to adjust the tilt angle,
and can be moved left and
right to adjust the pan angle.
Joystick is pressure speed sensitive.
Roll is locked and indicator light is Orange.
Pan & tilt angles changes smoothly
following the handle direction.
Joystick doesn’t work in this mode.
Use the USB cable to charge the gimbal through the Micro USB port
beside the joystick, with 5V/1.0A power input.
When the gimbal is powered o, the battery inside the handle will be
charged.
When the gimbal is powered on, the charger will only supply working
power, but will not charge the battery.
Check that all the following items are in the package. If some items are
missing, please contact Snappa Tech or local dealer.
Handheld 3-axis gimbal stabilizer
GoPro Connector
x 1
x 1
18650 Li-Po battery (2800mAh)
Snappa Go User Guide
USB cable x 1
x 1
Long hand screw x 2
x 1
LED Light
When shooting in a dark condition, the built-in Led light can enhance
the lightness nearby and help to improve the image quality.
Turn on/o light: Press Joystick button and hold at least 1.5 seconds
Charging 3~4 hours
Charging Finish charging
1. Don’t heat or ret battery.
2. Don’t drop or strike battery.
3. Don’t put the battery and other metalic things together in case
short-circuited.
4. Take out the battery if you don’t need to use for a long time.
WARNING
Gimbal Status Indicator light working mode/status
power on
Solid Green Horizontal follow mode
Head Locking mode
Fully follow mode
Low battery warning
Battery between 50%-85%
Battery above 85%
Battery below 50%
Battery charging
Battery fully charged
Solid red
Solid orange
Blink red slowly
Blink green quickly
Blink orange quickly
Blink red quickly
Solid red
Solid green
power o
or
sleep
charging
Manual
V 1.0
2015.12
The provided 2800mAh can power the gimbal for about 4 hours.
(Duration may vary due to dierent working conditions and battery
cycle times)
FCC Notice
This device complies with Part 15 of the FCC Rules. Operation is
subject to the following two conditions:
(1) This device may not cause harmful interference, and (2) this device must accept any
interference received, including interference that may cause undesired operation.
NOTE 1: This equipment has been tested and found to comply with the limits for a Class B digital
device, pursuant to part 15 of the FCC Rules. These limits are designed to provide reasonable
protection against harmful interference in a residential installation. This equipment generates, uses
and can radiate radio frequency energy and, if not installed and used in accordance with the
instructions, may cause harmful interference to radio communications. However, there is no
guarantee that interference will not occur in a particular installation. If this equipment does cause
harmful interference to radio or television reception, which can be determined by turning the
equipment off and on, the user is encouraged to try to correct the interference by one or more of
the following measures:
- Reorient or relocate the receiving antenna.
- Increase the separation between the equipment and receiver.
-Connect the equipment into an outlet on a circuit different from that to which the receiver is
connected.
-Consult the dealer or an experienced radio/TV technician for help.
NOTE 2: Any changes or modifications to this unit not expressly approved by the party
responsible for compliance could void the user's authority to operate the equipment.