Socket Mobile CHS2 Bluetooth Hand-Held Barcode Scanner User Manual Socket Mobile Cordless Hand Scanner User s Guide
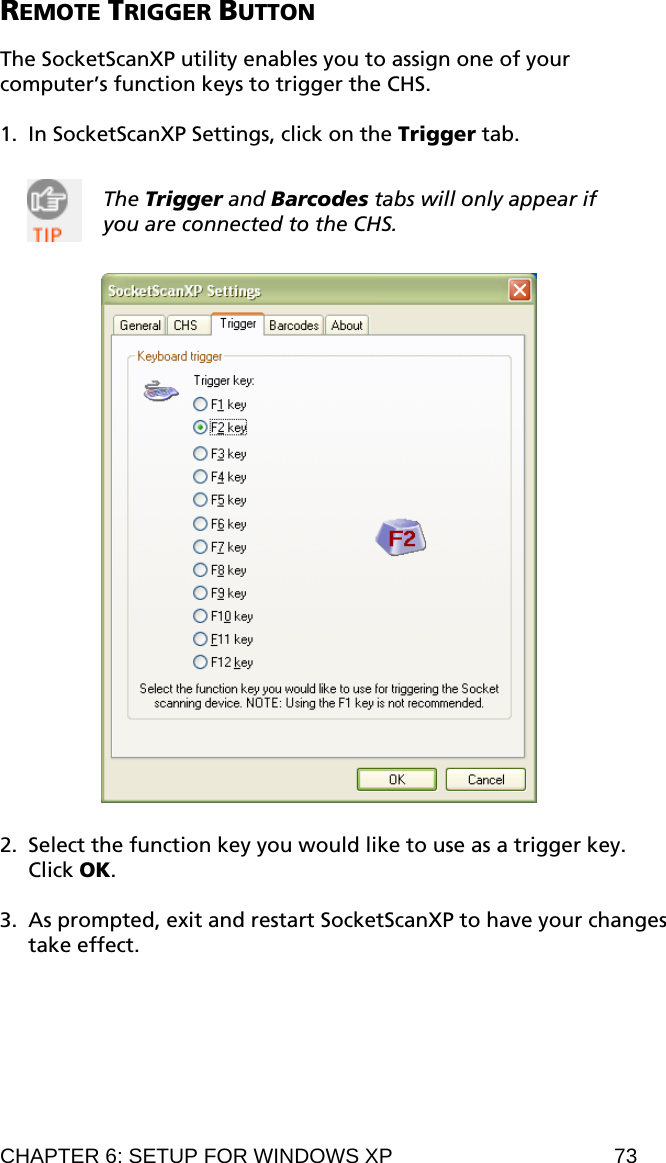
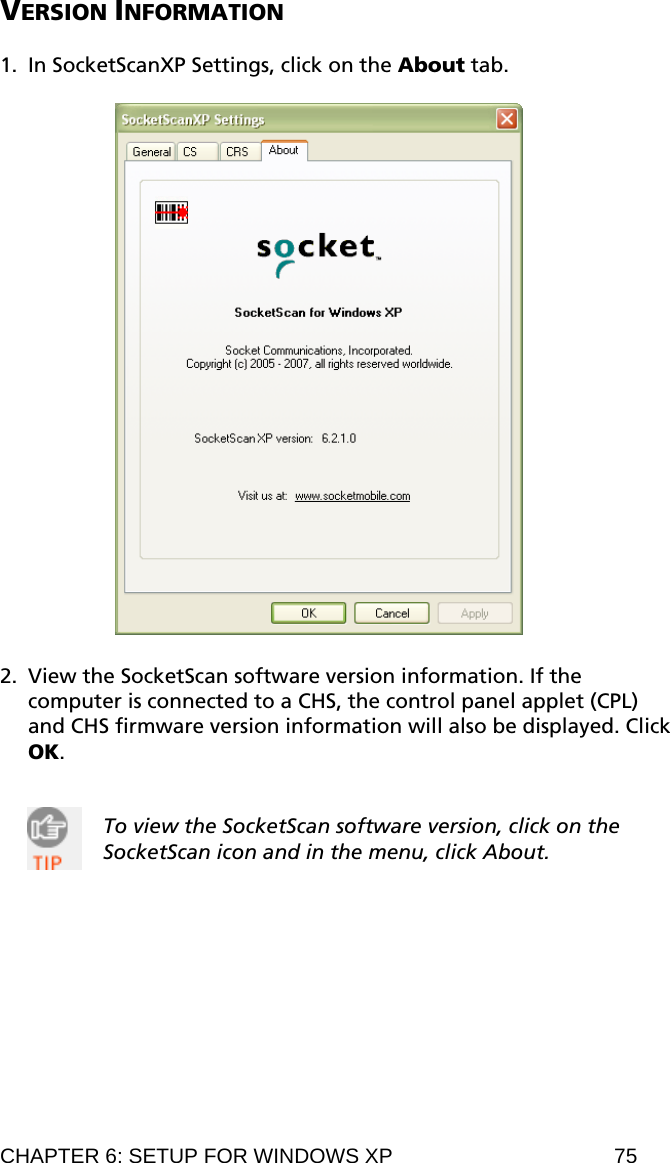
Socket Mobile, Inc. Bluetooth Hand-Held Barcode Scanner Socket Mobile Cordless Hand Scanner User s Guide
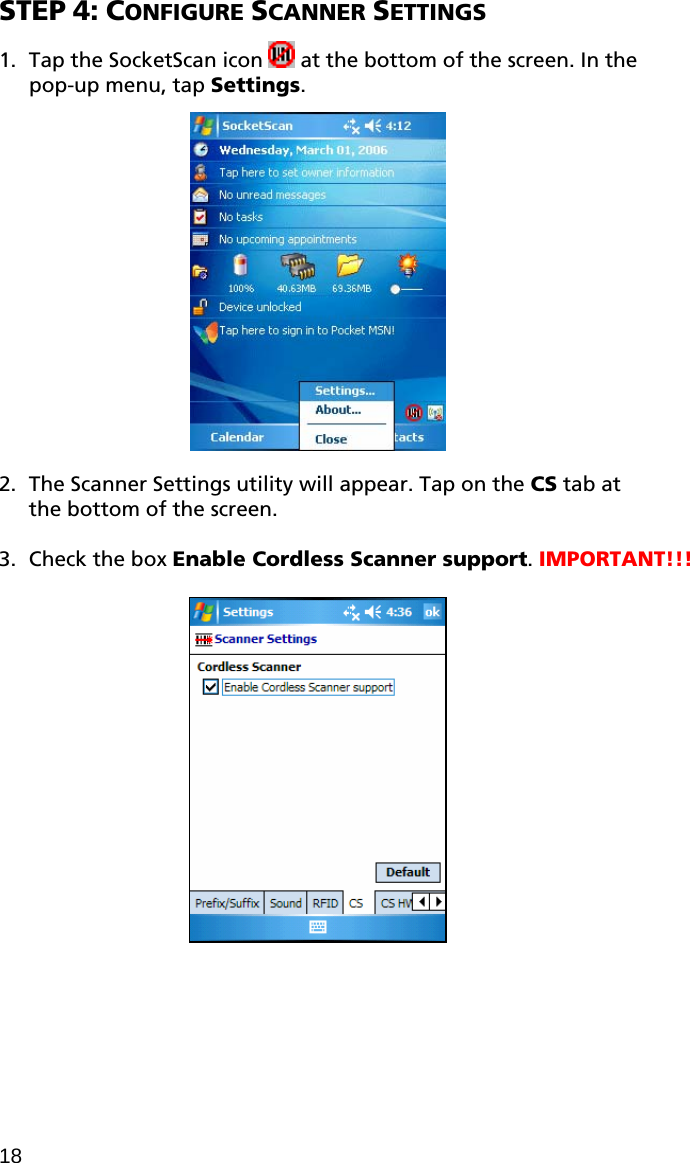
Contents
- 1. Manual
- 2. Users Manual
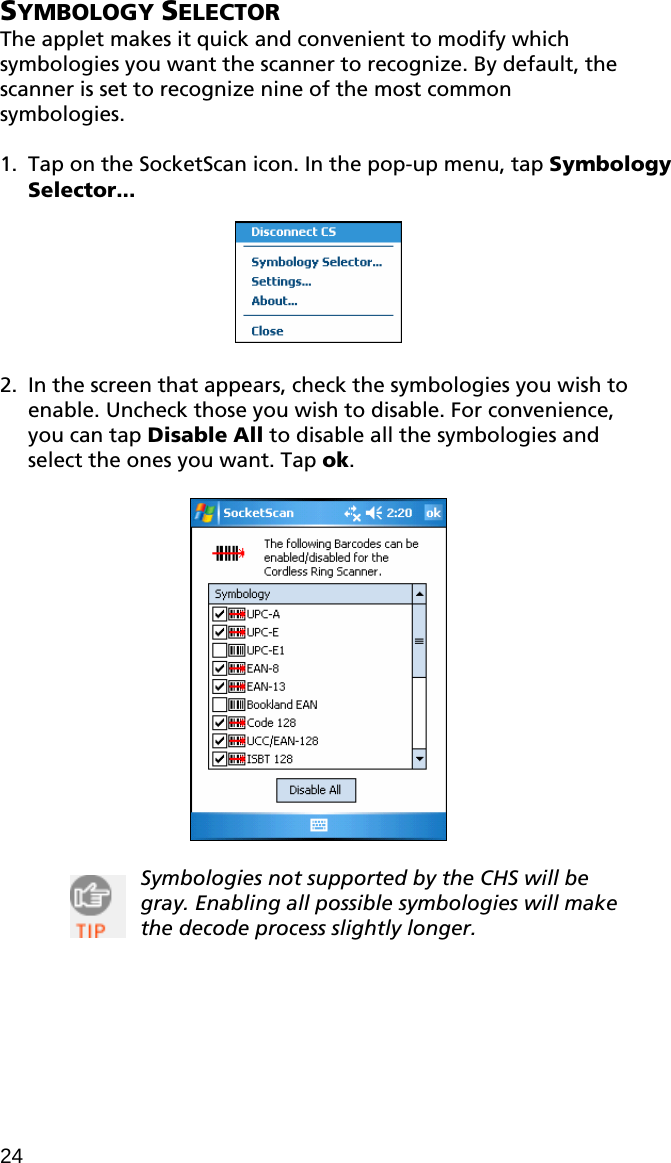
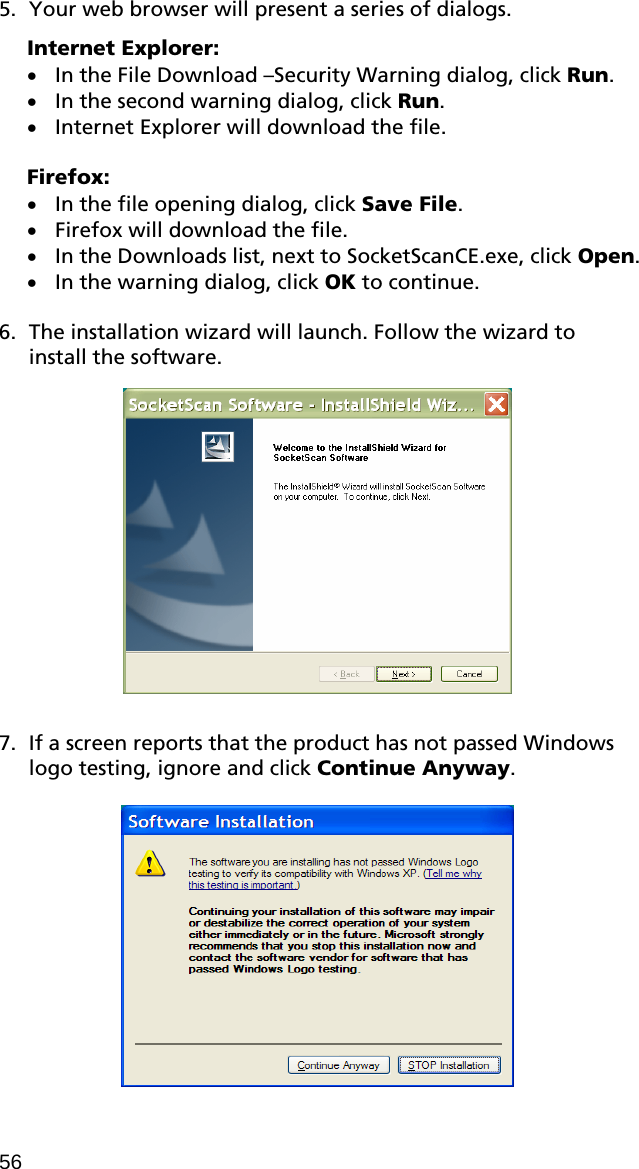
Manual
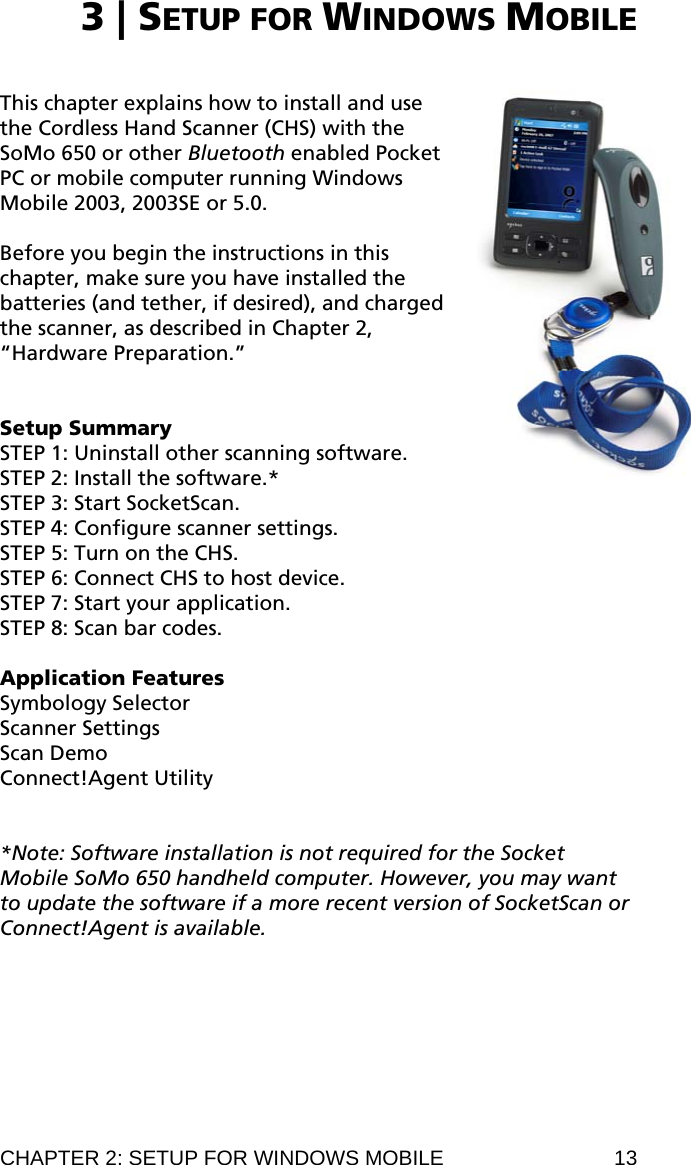


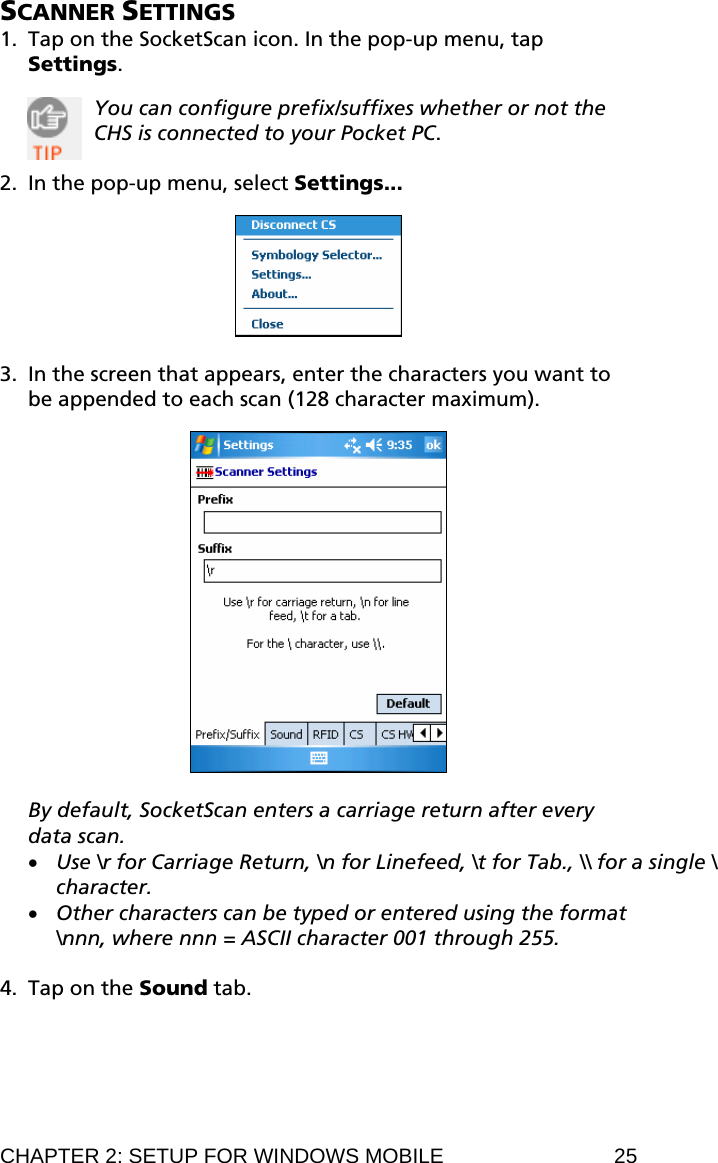
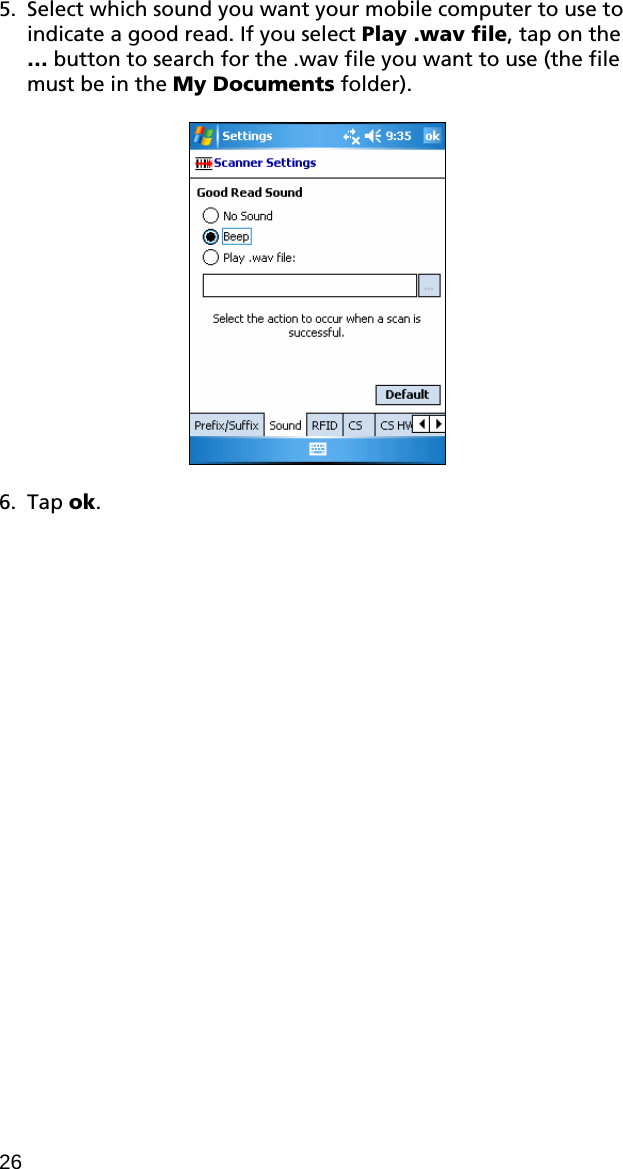
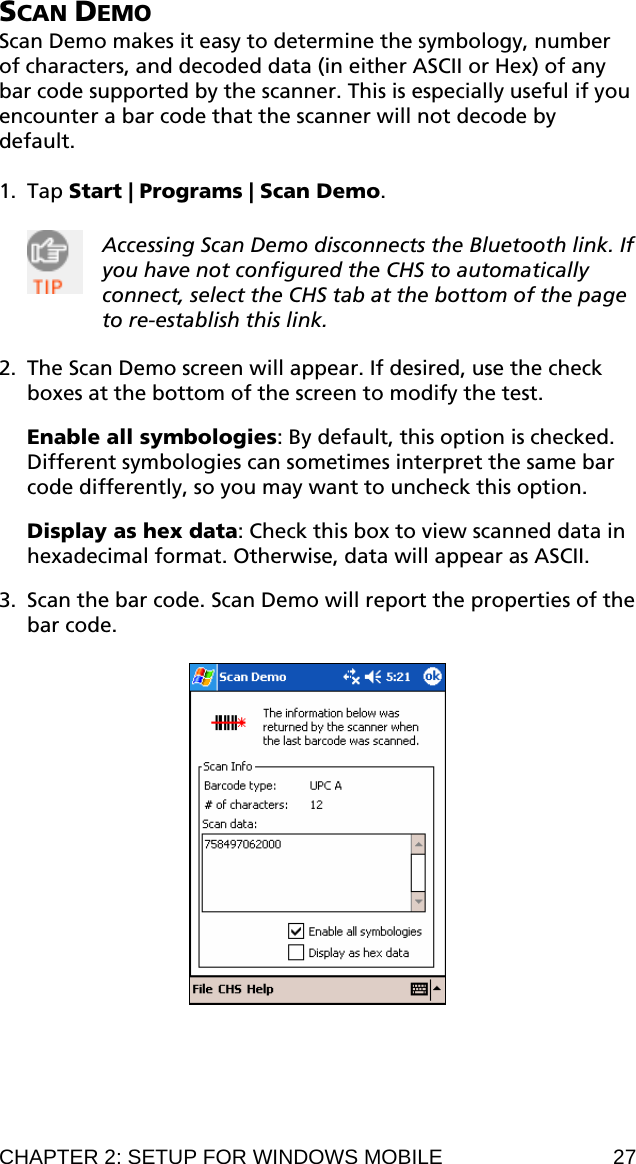


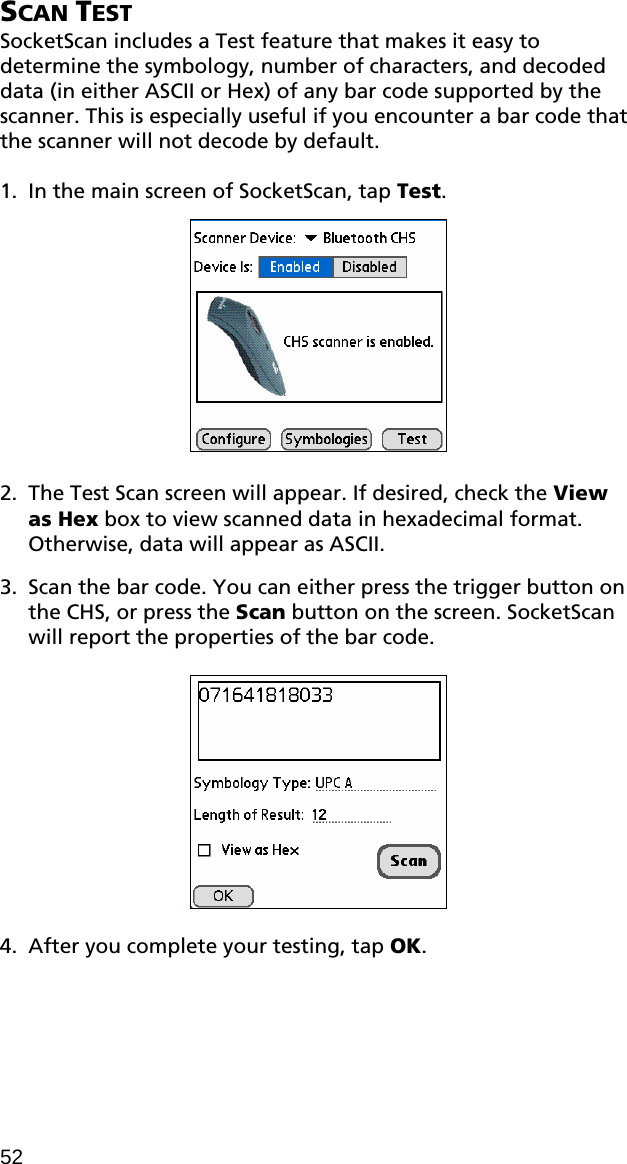
![• Keep PDA alive for: Select how long you would like the PDA to stay alive after the last scan. This feature allows you to scan data for several hours without touching the PDA, as long as you scan at least once before the time limit passes. Select System Default to keep your PDA alive for the amount of time set as default in the PDA’s system settings. • Insert Special: First tap in the Prefix or Suffix field to indicate where you would like to enter special data, such as a date stamp, time stamp, tab, etc. Then tap on the Insert Special drop-down menu and select the type of special data to enter. • Prefix: Tap to enter characters you would like appended before scanned data (128 character maximum). Besides special data items, only printable ASCII characters can be used. • Suffix: Tap to enter characters you would like appended after scanned data (128 character maximum). Besides special data items, only printable ASCII characters can be used. The default suffix is a carriage return [CR]. • Launch App: Check the box, then use the drop-down menu that appears to select an application that you would like SocketScan to automatically enter data into whenever you press the trigger button. The application will launch only when you are outside of SocketScan (i.e., SocketScan is running in the background). If you configured SocketScan to launch an application, whenever you scan data into a document, the data will only be entered after any existing data, no matter where you place the cursor. You will not be able to scan data into the middle of existing data. CHAPTER 5: SETUP FOR PALM 49](https://usermanual.wiki/Socket-Mobile/CHS2.Manual/User-Guide-895977-Page-49.png)

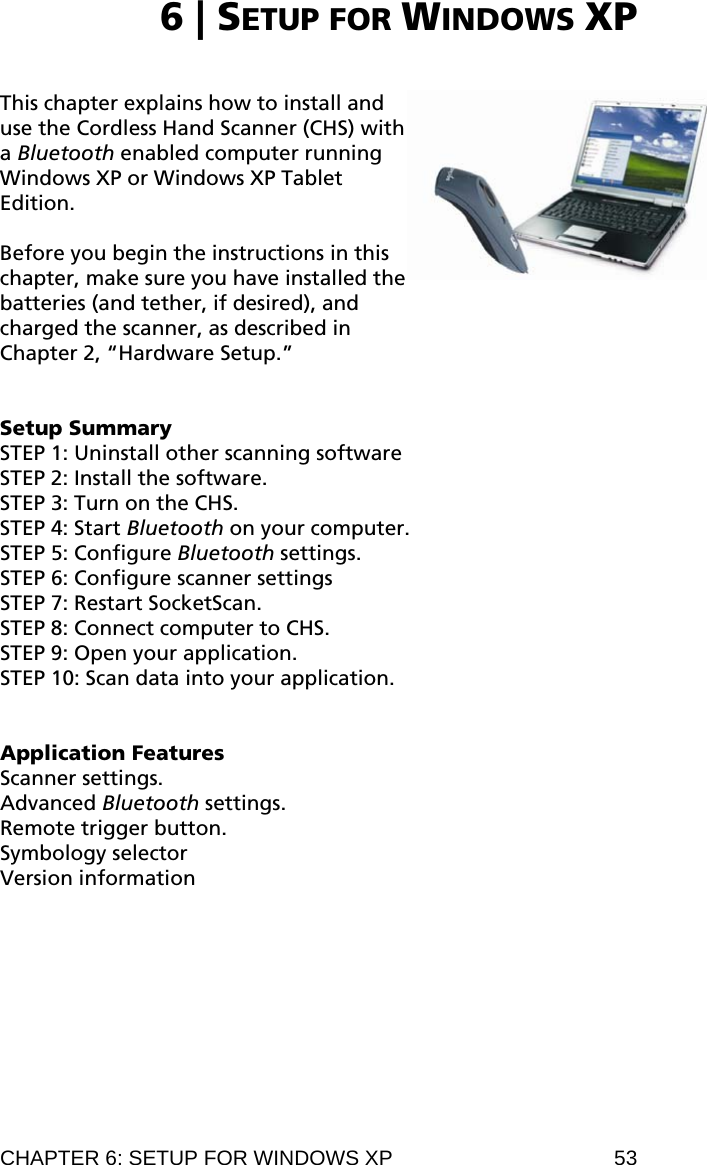
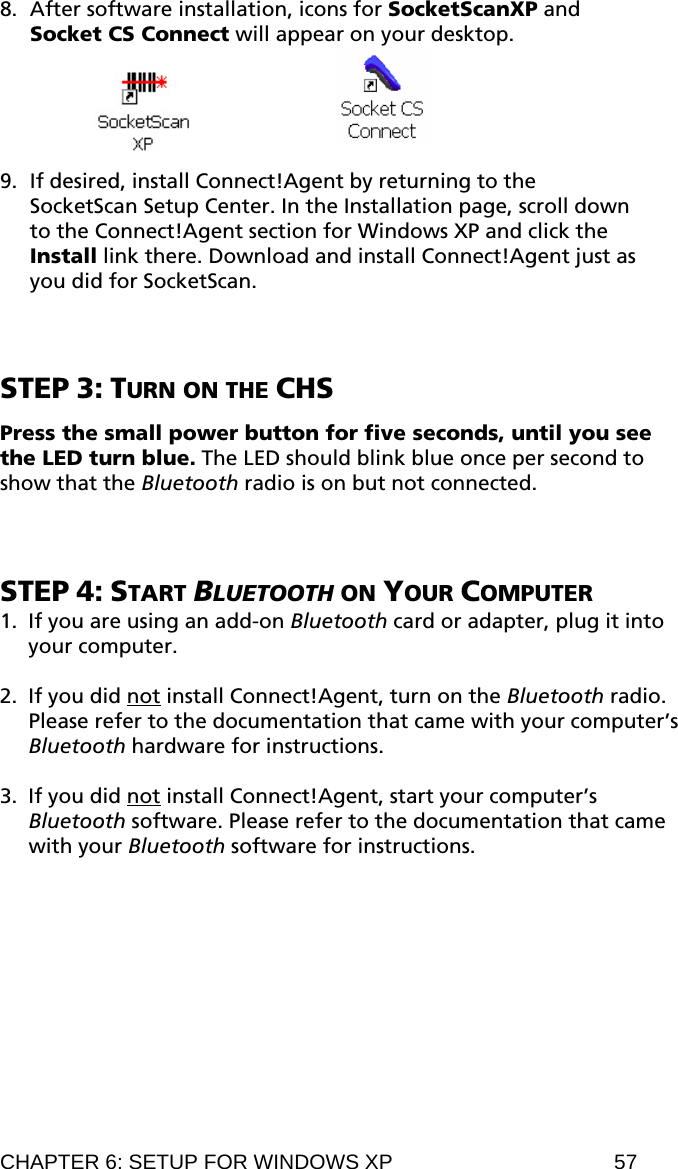
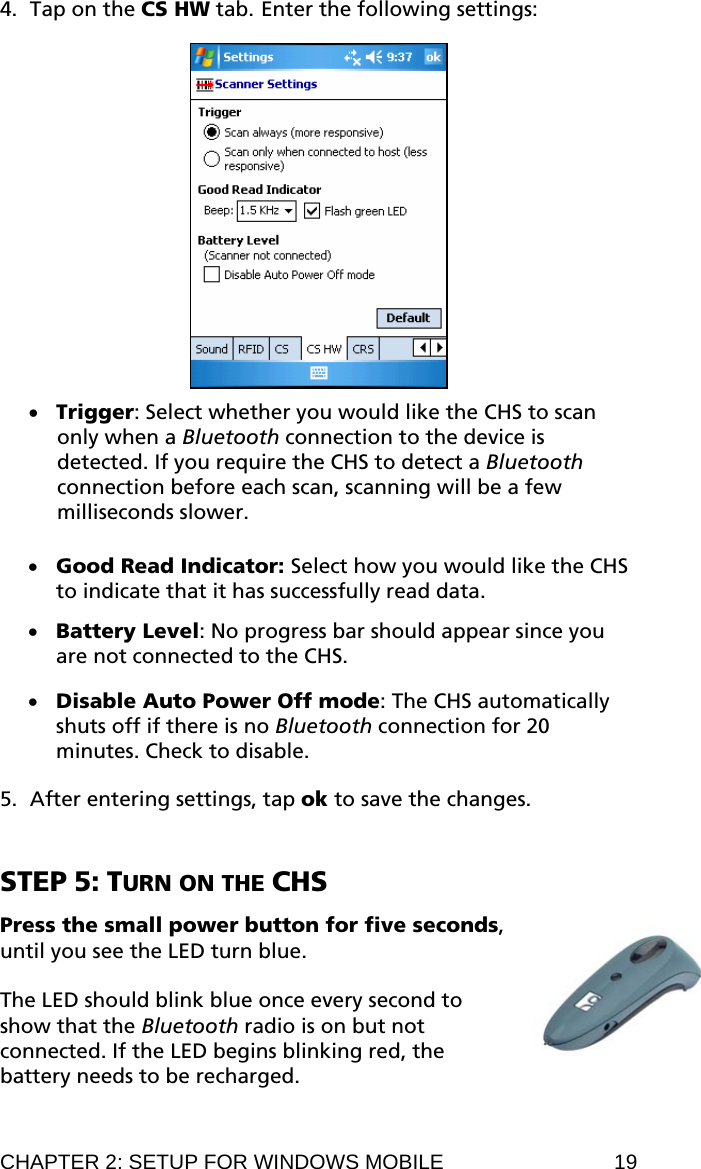
![STEP 5: CONFIGURE BLUETOOTH SETTINGS Skip this step if you installed Connect!Agent, which automatically configures the Bluetooth settings. Connect!Agent works only with the IVT and Microsoft stacks. If you will not be using Connect!Agent, follow the appropriate instructions for your Bluetooth stack. Configuration is only needed the first time you connect the CHS to your computer. SocketScan supports a generic Bluetooth COM port and may be able to connect to Bluetooth stacks on host mobile computers other than those listed. Refer to your Bluetooth software documentation for complete instructions. IVT BlueSoleil software: 1. In BlueSoleil, click My Bluetooth | Security. Check the box Set Default Passkey and enter the default PIN 1234 in the field below. 2. Double-click on the red ball to search for the Cordless Hand Scanner, which will appear as Socket CHS [xxxxxx]. The characters in brackets are the last 6 characters of the scanner’s Bluetooth MAC address. 58](https://usermanual.wiki/Socket-Mobile/CHS2.Manual/User-Guide-895977-Page-58.png)
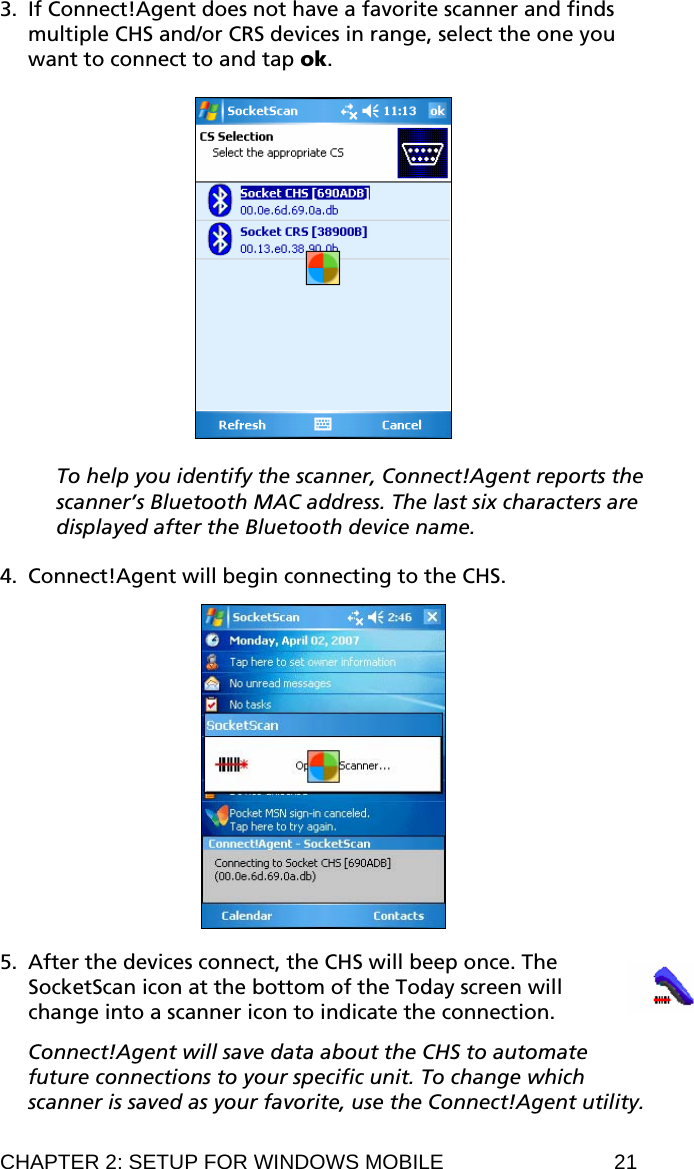
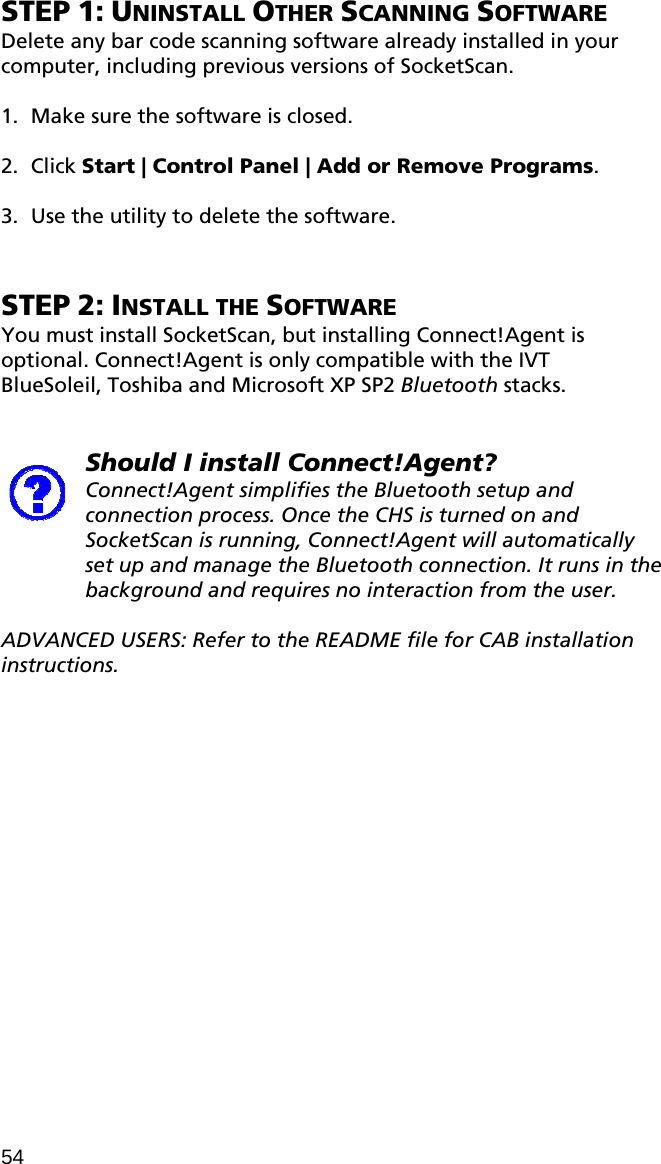
![Microsoft Windows XP Service Pack 2: 1. Use the Add Bluetooth Device Wizard to discover and connect to the CHS. Click on the Bluetooth icon in the task tray. In the pop-up menu, click Add a Bluetooth Device. 2. During the device discovery, the Cordless Hand Scanner will appear as Socket CHS [xxxxxx] The characters in brackets are the last 6 characters of the scanner’s Bluetooth MAC address. 3. In the passkey options screen, select the option Use the passkey found in the documentation and enter the default PIN 1234. 4. To indicate the connection, the CHS will beep once. 5. In the last screen of the Add Bluetooth Device Wizard, note the COM number of the Outgoing COM port. 60](https://usermanual.wiki/Socket-Mobile/CHS2.Manual/User-Guide-895977-Page-60.png)
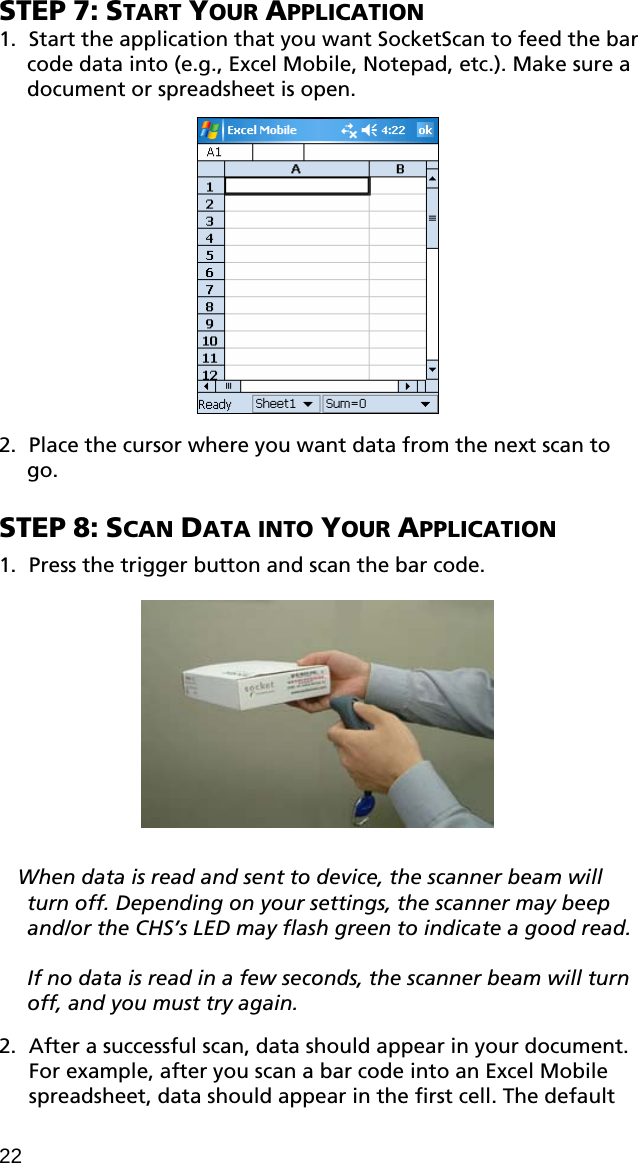
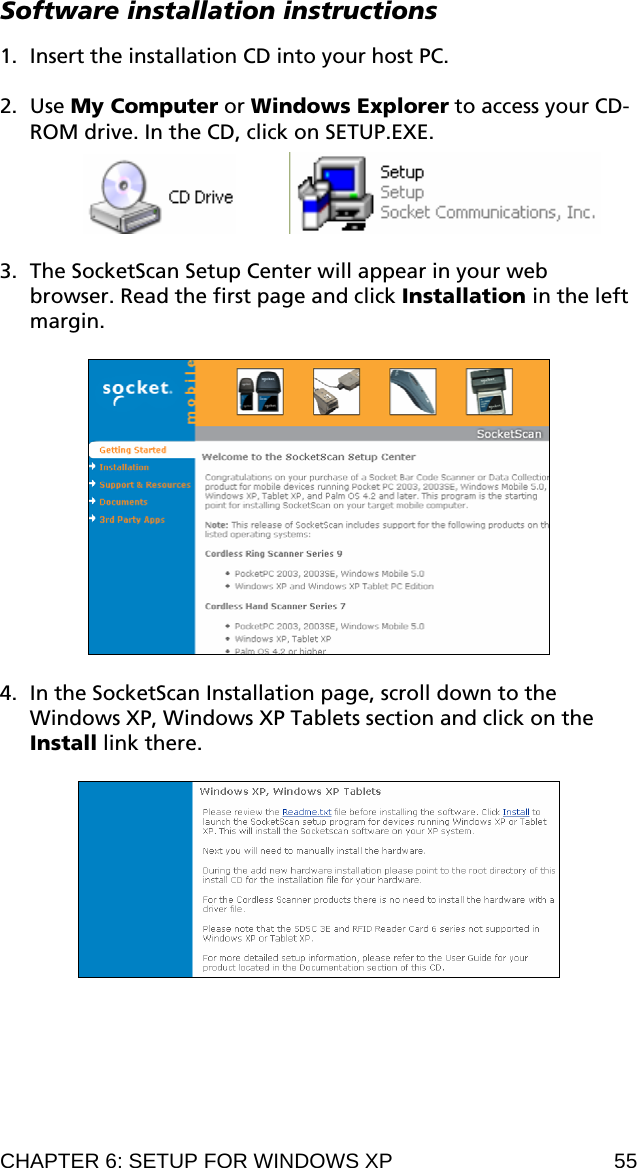
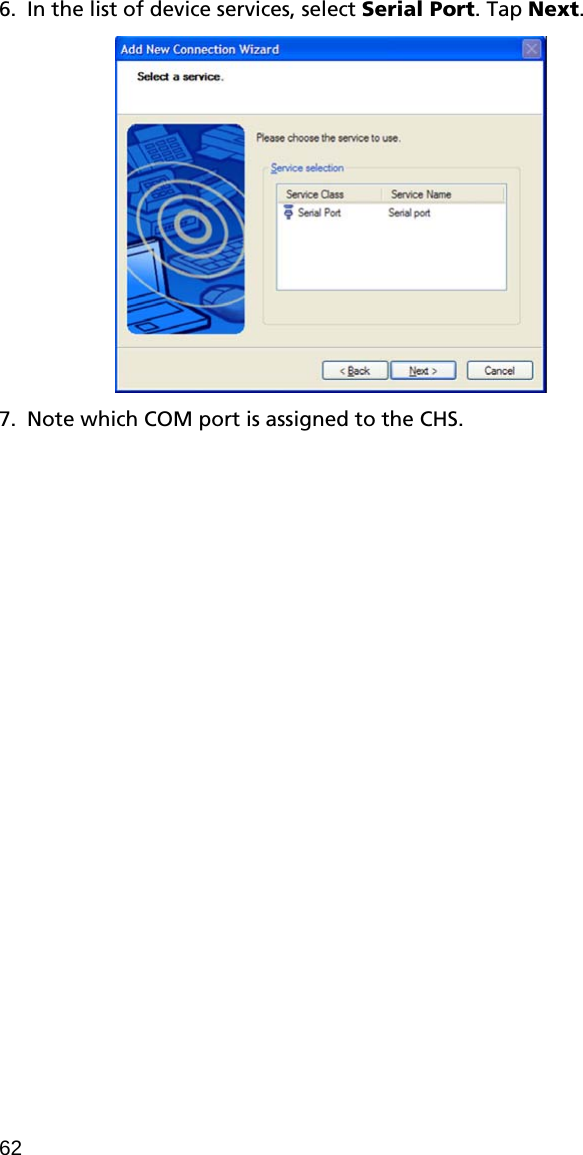
![Toshiba Bluetooth Stack: These instructions are based on a Motion Computing tablet. 1. Double-tap on the Bluetooth icon at the bottom of your screen. 2. In Bluetooth Settings, tap New Connection at the bottom of the screen. 3. The Add New Connection Wizard will launch. Select Custom Mode and tap Next. The tablet will begin searching for Bluetooth devices in range. 4. In the list of found devices, select Socket CHS [xxxxxx]. Tap Next. 5. If a passkey is requested, enter the default PIN 1234. Tap OK. To indicate the connection, the CHS will beep once. CHAPTER 6: SETUP FOR WINDOWS XP 61](https://usermanual.wiki/Socket-Mobile/CHS2.Manual/User-Guide-895977-Page-61.png)
![Broadcom (Widcomm) Bluetooth Stack: 1. Perform a Quick Connect to a Bluetooth Serial Port. Click the Bluetooth icon in the task tray. Click Quick Connect | Bluetooth Serial Port | Find Devices. It is essential to connect to the CHS via Quick Connect because this sets the CHS as your default Bluetooth serial device. 2. During the device search, the CHS will appear as Socket CHS [xxxxxx] The characters in brackets are the last 6 characters of the scanner’s Bluetooth MAC address. 3. If a passkey is requested, enter 1234. To indicate the connection, the CHS will beep once. By default, the Bluetooth software will ask you for the passkey each time you connect. To stop the automatic prompts, under Advanced Configuration, disable the Secure Connection requirement for both the Local Service and Client Application, then unpair the devices. Refer to the documentation for your Bluetooth hardware/software for complete instructions. CHAPTER 6: SETUP FOR WINDOWS XP 63](https://usermanual.wiki/Socket-Mobile/CHS2.Manual/User-Guide-895977-Page-63.png)