Socket Mobile D750 Bluetooth Barcode Scanner User Manual
Socket Mobile, Inc. Bluetooth Barcode Scanner Users Manual
UserManual.wiki
>
Socket Mobile
>
D750 User Manual
Users Manual
Navigation menu
Upload a User Manual
Namespaces
Wiki Guide
HTML
PDF
Info
Views
User Manual
Discussion / Help
Navigation
![Android: Connect Android Device in Basic Mode (HID) 1. Power on the scanner. Make sure the scanner is discoverable (unpaired).2. Touch Home | Menu | Settings | Wireless & Networks | Bluetooth settings3. Make sure the device has Bluetooth “On” and scan for devices.4. In the list of found devices, select Socket scanner [xxxxxx]. Tap Pair.5. The scanner will connect to the Android device.6. The scanner will beep once after it has connected and is ready to scan barcodes.BASIC MODE13](https://usermanual.wiki/Socket-Mobile/D750/User-Guide-2950234-Page-13.png)
![Apple: Connect Apple iOS Device or Mac OS Device Basic Mode (HID) In this mode the scanner works and behaves just like a keyboard. Therefore, scanner will work with Safari, Notes, and any other applications that supports an active cursor. 1. Power on the scanner. Make sure the scanner is discoverable (unpaired).2. Start a Bluetooth device search.• iOS: Tap Settings | General | Bluetooth. Turn on Bluetooth. A Bluetooth device search will begin.• Mac OS: Click System Preferences | Internet & Wireless | Bluetooth. In Bluetooth preferences, select the On checkbox. Click Set up New Device... A Bluetooth device search will begin.3. In the device list, tap on Scanner [xxxxxx]. Tap Pair.4. The Scanner will connect to the Apple device.5. The Scanner will beep once after it has connected and is ready to scan barcodes.14BASIC MODE](https://usermanual.wiki/Socket-Mobile/D750/User-Guide-2950234-Page-14.png)
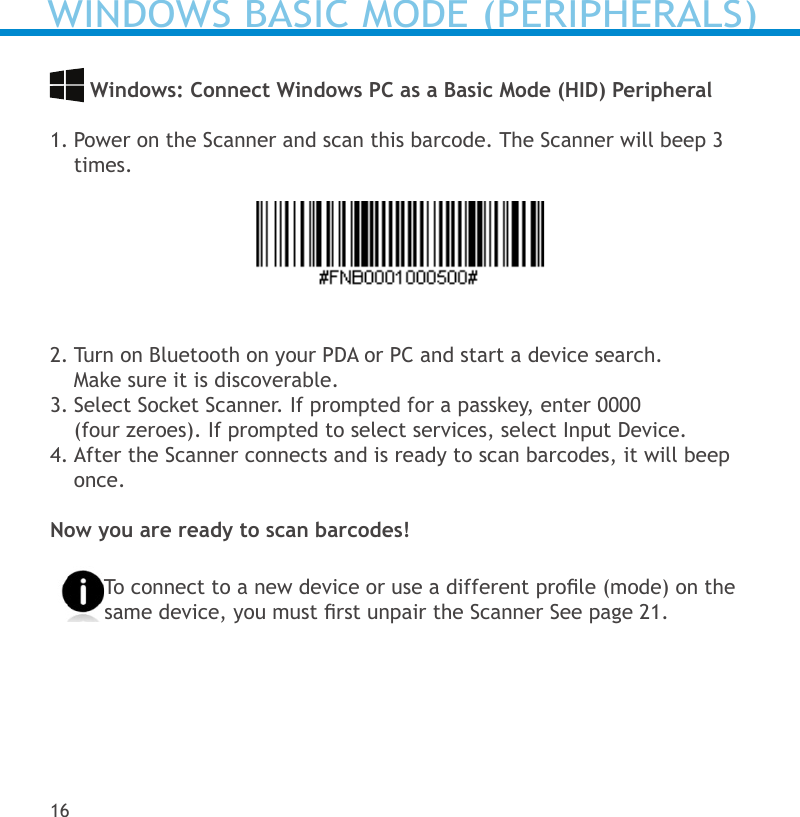
![Windows: Connect Windows PC Power on the Scanner. Make sure the Scanner is discoverable (unpaired). 1. Use your computer’s Bluetooth Settings to connect to the Scanner.2. Open Devices and Printers and select “Add a device”.3. In the device list, select Socket Scanner [xxxxxx]. Click Next.4. If a passkey is requested, enter 0000 (four zeroes). Click OK. Or Pair Now.5. Follow the remaining screens to complete the wizard.Note: On some computers the Scanner will have to be congured as Basic Mode (HID) Peripheral. If not successful, scan this special barcode and repeat the steps above.BASIC MODE15](https://usermanual.wiki/Socket-Mobile/D750/User-Guide-2950234-Page-15.png)
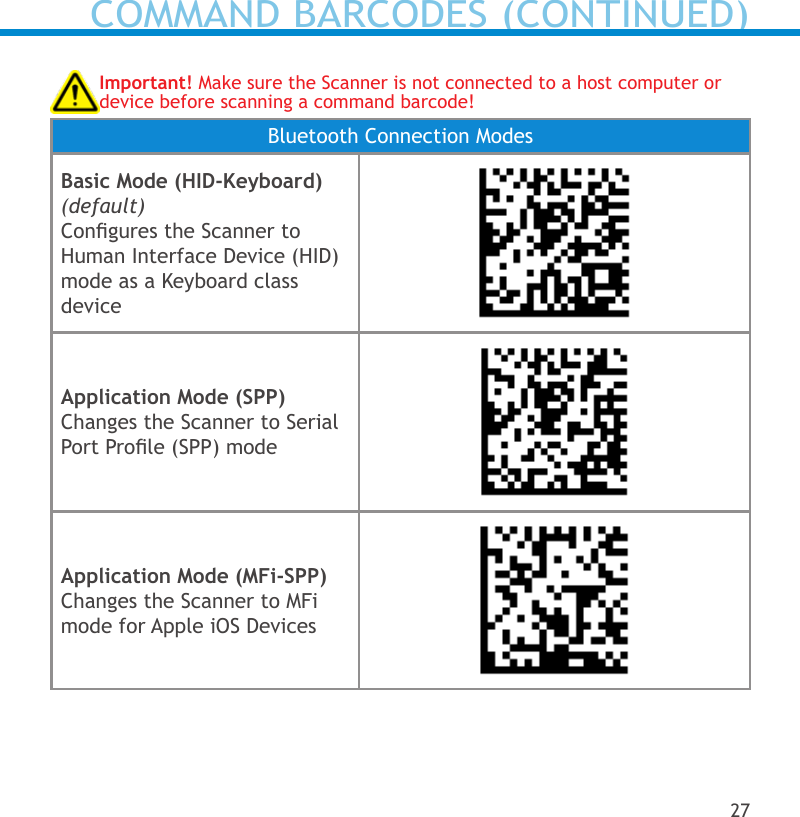
![Connect Android or Windows Mobile Device: Highly recommended, allows two-way communications with Android, Windows and Mobile Devices. SocketScan 10 software installation required.1. Power on the Scanner and scan this barcode. The Scanner will beep 3 times. Make sure the Scanner is discoverable (unpaired). 2. Turn Bluetooth on for your device. Go to Settings > Bluetooth. A Bluetooth Devices search will begin.3. Tap Socket Scanner[xxxxxx] in the list of Devices found. After a few seconds the “Not Paired” status will change to “Connected” or “Paired” and the Scanner Blue LED will start blinking every 3 seconds conrming the connection.You are now ready to scan barcodes using your Scanner-enabled Application.APPLICATION MODE (SPP)17](https://usermanual.wiki/Socket-Mobile/D750/User-Guide-2950234-Page-17.png)

![Connect Android device in Application Mode (SPP) 15. Select [On screen] button. 16. On the next screen, tap on the 7Qi or 7Xi button that is appropriate for your scanner button.17. Scan the barcode on the screen. The Scanner will beep 3 times.18. When notied of a pairing request, swipe the notication icon down then tap Pairing request. 19. On the next screen, tap Pair.20. The Scanner will beep once to indicate connected state and is ready to scan barcodes. Tap Back to close Socket EZ Pair. 21. If you are connecting a scanner which is not registered, a Scanner registration icon will appear on top of the screen. Swipe the icon down to open the registration pages. Follow the instructions to register your Scanner. Socket Mobile highly recommends that all customers register their products, but registration is not necessary.Now you are ready to scan barcodes!Note: If you are unable to scan the barcode on screen, please use the alternative Bluetooth Method to connect the Scanner; refer to the User Guide at Socket Mobile’s support web page.APPLICATION MODE (SPP)19](https://usermanual.wiki/Socket-Mobile/D750/User-Guide-2950234-Page-19.png)
![Connect Apple iOS device in MFi ModePlease check with your scanner application vendor or visit www.socketmobile.com/appstore to conrm your Scanner-enabled application supports the Scanner. If you are using the Scanner with an Apple iOS device and a Scanner-enabled Application that does not provide instructions how to connect with the Scanner, please use the following steps.1. Power on the Scanner. Make sure the Scanner is discoverable (unpaired).2. To change the prole to MFi mode scan this barcode. The Scanner will beep 3 times.Use with iPad, iPod touch, and iPhones.3. Turn on Bluetooth on the Apple device. Go to Settings > Bluetooth. A Bluetooth Devices search will begin.4. Tap Socket Scanner[xxxxxx] in the list of Devices found. After a few seconds the “Not Paired” status will change to “Connected” or “Paired” and the Scanner Blue LED will blink every 3 seconds conrming the connection.22APPLICATION MODE (MFI-SPP)](https://usermanual.wiki/Socket-Mobile/D750/User-Guide-2950234-Page-22.png)