Somfy Systems MCZ 900 Band ZWAVE Low Power Remote MCZ1 User Manual
Somfy Systems 900 Band ZWAVE Low Power Remote MCZ1
User Manual

0
Motorized Shades
Featuring Z-Wave Technology
Owner’s Manual
[images of all 3 remotes]
This application is for 900Band ZWAVE Low Power Remote Model #: MCZ1
FCC ID: DWNMCZ IC:12049A-MCZ

1
Contents
Getting to Know Your Remotes ........................................ 2
2-Button Remote ...................................................................................................................... 2
Single-Channel Remote ............................................................................................................. 3
Multi-Channel Remote .............................................................................................................. 4
Shade Program Button .............................................................................................................. 5
Getting Started (Quick Start Guide) .................................. 6
Getting Your Remote Ready ...................................................................................................... 6
Knowing Your Shade’s Limits and Home Position ..................................................................... 7
Controlling Your Shade ............................................................................................................. 8
Assigning Shades to Channels (Multi-Channel Only) ................................................................. 9
Adjusting Your Shade’s Limits and Home Position .......... 10
Adjusting the Upper Limit for a Single Shade .......................................................................... 11
Adjusting the Lower Limit for a Single Shade .......................................................................... 13
Adjusting the Home Position for a Single Shade ..................... Error! Bookmark not defined.15
Adjusting the Home Position for a Shade in a Group ......................................................... 1517
Pairing Your Remotes and Shades .............................. 1719
Pairing Your 2-Button or Single-Channel Remote ............................................................... 1820
Pairing Your Multi-Channel Remote ................................................................................... 2123
Integrating Your Shades with a Home Automation System2729
Step 1: (Exclude) Unlink Your Shades and Remotes ............................................................ 2830
Step 2: (Include) Add Your Shades and Remotes to the Home Automation System’s Network
............................................................................................................................................ 2931
Step 3: (Associate) Pair Secondary Remotes with Your Shades .......................................... 3032
Troubleshooting ......................................................... 3133
Glossary...................................................................... 3638
About Z-Wave ............................................................ 3840

2
Getting to Know Your Remotes
2-Button Remote
The 2-button remote can control up to 12 shades at once.
[remote front image with labels/arrows for buttons]
[remote back image with labels/arrows for buttons]

3
Single-Channel Remote
The single-channel remote can control up to 12 shades at once.
[remote front image with labels/arrows for buttons]
[remote back image with labels/arrows for buttons]

4
Multi-Channel Remote
The multi-channel remote can control up to 12 channels, with a maximum of 24
individual shades. (Think of a channel as a grouping of shades. Each channel can
include a single shade or multiple shades.)
[remote front image with labels/arrows for buttons]
[remote back image with labels/arrows for buttons]
<callout> Learn how to create groups and assign shades to channels on page X!

5
Shade Program Button
The program button on the shade’s headrail or motor end lets you move your
shade without a remote. It’s also used to perform various programming functions,
discussed later in this manual.
[images of shade button on cellular endcap and solar motor end]

6
Getting Started (Quick Start Guide)
Getting Your Remote Ready
For the 2-Button or Single-Channel Remote
Pull out the plastic strip on the back of the remote. Your remote is now ready to
use!
[images of both remotes]
For the Multi-Channel Remote
Inserting Batteries
1. Remove the battery door.
2. Insert 2 AAA batteries.
3. Replace the battery door.
[image of adding batteries]

7
Knowing Your Shade’s Limits and Home Position
To help you get started quickly and easily, we set your shade up with predefined
positions.
[image]
Upper Limit: The highest position your shade can reach. We pick
a position that gives you the best view and also protects your
shade from damage.
[image]
Lower Limit: The lowest position your shade can reach. This
matches the shade length you ordered.
[image]
Home Position: We set this to the midpoint of your shade, but
you can adjust it to any point between the upper and lower limits.
Not available with the two-button remote.
You can adjust each of these to fit the needs of your home—just follow the
instructions in the Adjusting Your Shade’s Limits and Home Position section.
8
Controlling Your Shade
We pre-programmed your remotes to operate your shades.
If the instructions below don’t work, refer to the Troubleshooting section on page X.
Note
If you have a multi-channel remote, you’ll need to select your channel before performing
any of the commands below.
Open Your Shade Completely
Press and release the UP button.
Close Your Shade Completely
Press and release the DOWN button.
Raise or Lower Your Shade
Press and hold the UP button to move the shade up.
Press and hold the DOWN button to move the shade down.
Releasing the button will stop the shade.
Stop Your Shade While It’s Moving
While your shade is moving up, press and release the DOWN button or the HOME
button.
While your shade is moving down, press and release the UP button or the HOME
button.
Move Your Shade to the Home or Favorite Position
Press and release the HOME button.
Not available with the two-button remote.

9
Assigning Shades to Channels (Multi-Channel Only)
If you bought your shades and multi-channel remote at the same time, your shades arrive
already paired with your multi-channel remote. However, you’ll need to assign each shade to a
channel (or multiple channels) to control them.
1. Press and hold the RIGHT/MENU button for 2 seconds to enter the menu.
2. Select CHANNEL.
3. Scroll up and down to select the shade you want to assign to a channel.
4. Scroll left and right to select the channel you want to assign the shade to.
5. Press and hold the RIGHT/MENU button for 2 seconds.
A checkmark will appear next to the shade.
6. Repeat steps 1–5 for each shade.
10
Adjusting Your Shade’s Limits and Home
Position
Use the instructions in this section to adjust your shade’s upper and lower limits or
home (favorite) position.
Note
If you don't press any buttons for 20 seconds while you're making these
adjustments, the remote will time out. If that happens, just start the process
over.
11
Adjusting the Upper Limit
Don’t attempt to move the upper limit to a position higher than the preset limit—
that could damage your shade or prematurely drain the batteries.
For the 2-Button or Single-Channel Remote
Before You Start
If you’re using your remote to control a group of shades, you’ll first need to
target the specific shade that you want to adjust the upper limit for. To do that,
perform the following steps first:
1. On the remote, press and release the program button on the back.
2. On the shade, press and hold the program button for 3 seconds.
The shade LED will flash green and the shade will jog.
[image of targeting process]
1. On the remote, press and release the UP button.
Wait until the shade reaches its preset upper limit.
2. Press and hold the UP and DOWN buttons at the same time for 3 seconds.
When the remote LED turns amber, release both buttons.
The shade will jog. This means you’ve entered programming mode.
3. Use the UP or DOWN buttons to move your shade to the new upper limit.
4. Press and hold the UP and DOWN buttons at the same time for 3 seconds.
When the remote LED turns amber, release both buttons.
The shade will jog. This means you've set your new upper limit!

12
For the Multi-Channel Remote
1. On the remote, press and hold the RIGHT/MENU button for 2 seconds to
enter the menu.
2. Select SETUP > LIMITS.
3. Press and hold the RIGHT/MENU button for 2 seconds to proceed past the
warning message.
4. Select the shade you want to set the upper limit for.
5. With UPPER selected, press and hold the RIGHT/MENU button for 2 seconds.
If the shade isn’t already at the current upper limit, it will move to that position and put
the shade into programming mode. If the shade is already at the current upper limit, it
will jog.
6. Use the UP and DOWN buttons to set your desired upper limit.
7. Press and release the RIGHT/MENU button to set the upper limit.
The shade will jog. This means you've set your new upper limit!
13
Adjusting the Lower Limit
Don’t attempt to move the lower limit to a position below the preset limit—that
could damage your shade or prematurely drain the batteries.
For the 2-Button or Single-Channel Remote
Before You Start
If you’re using your remote to control a group of shades, you’ll first need to
target the specific shade that you want to adjust the lower limit for. To do that,
perform the following steps first:
1. On the remote, press and release the program button on the back.
2. On the shade, press and hold the program button for 3 seconds.
The shade LED will flash green and the shade will jog.
[image of targeting process]
1. On the remote, press and release the DOWN button.
Wait until the shade reaches its preset lower limit.
2. Press and hold the UP and DOWN buttons at the same time for 3 seconds.
When the remote LED turns amber, release both buttons.
The shade will jog. This means you've entered programming mode.
3. Use the UP and DOWN buttons to move your shade to the new lower limit.
4. Press and hold the UP and DOWN buttons at the same time for 3 seconds.
When the remote LED turns amber, release both buttons.
The shade will jog. This means you've set your new lower limit!

14
For the Multi-Channel Remote
1. Press and hold the RIGHT/MENU button for 2 seconds to enter the menu.
2. Select SETUP > LIMITS.
3. Press and hold the RIGHT/MENU button for 2 seconds to proceed past the
warning message.
4. Select the shade you want to set the upper limit for.
5. Scroll to LOWER, then press and hold the RIGHT MENU button for 2 seconds.
If the shade isn’t already at the current lower limit, it will move to that position and put
the shade into programming mode. If the shade is already at the current upper limit, it
will jog.
6. Use the UP or DOWN buttons to set your desired lower limit.
Don’t attempt to move the lower limit to a position below the preset limit—that could
damage your shade or prematurely drain the batteries.
7. Press and release the RIGHT/MENU button to set the lower limit.
The shade will jog. This means you've set your new upper limit!
15
Adjusting the Home Position
Before you start, decide whether you want to adjust your upper or lower limit. If
you do, make those changes first—moving those limits will reset your home
position.
Remember that the home position isn’t available with the 2-button remote.
For the Single-Channel Remote
Before You Start
If you’re using your remote to control a group of shades, you’ll first need to
target the specific shade that you want to adjust the home position for. To do
that, perform the following steps first:
1. On the remote, press and release the program button on the back.
2. On the shade, press and hold the program button for 3 seconds.
The shade LED will flash green and the shade will jog.
[image of targeting process]
1. Find your single-channel remote and the 2-button remote for each shade in
the group. Make sure you know which 2-button remote controls which
shade.
2. On the back of the single-channel remote, press and release the program
button.
The remote LED will flash green.
3. On one shade in the group, press and hold the program button for 3 seconds.
When the LED flashes green, release the button.
The shade will jog.
4. On the 2-button remote for the shade you're adjusting, use the UP and
DOWN buttons to move the shade to your new home position.

16
5. On the single-channel remote, press and hold the HOME button for 3
seconds. When the remote LED turns amber, release the button.
The shade will jog. This means you've set your new home position on that shade!
6. Repeat steps 3–5 for the remaining shades in the group that you want to
adjust.
For the Multi-Channel Remote
1. Press and hold the RIGHT/MENU button for 2 seconds to enter the menu.
2. Select SETUP > SET HOME.
3. Select the shade you want to set the home position for.
4. Use the UP or DOWN buttons to move the shade to your new home position.
This can be anywhere between the upper and lower limits.
5. Press and hold the HOME button until the shade jogs.
6. You’ve set your new home position!
17
Pairing Your Remotes and Shades
We pre-programmed your remotes to operate your shades. However, you might
decide to adjust the pairing—for example, you might lose a remote and need to
pair a new one, or you might buy an additional remote after your initial purchase.
In cases like this, this section shows you how to pair remotes and shades for a
variety of control scenarios.
To make the instructions easy to follow, steps for the multi-channel remote are
split out into their own section.
Note
If you don't press any buttons for 20 seconds while you're making these
adjustments, the remote will time out. If that happens, just start the process
over.

18
Pairing Your 2-Button or Single-Channel Remote
The two-button and single-channel remote behave almost identically. The only
difference between these remotes is that the single-channel remote has a home
button, while the two-button remote doesn’t.
In this section, we cover pairing instructions for either the two-button or single-
channel remote. So while the remote images shown might not match the remote
your using, the steps will still work for you.
Pair a New Remote with a Single Shade
1. Reset the remote to make sure you start with a clean slate:
a. Press and hold the program button on the back of the remote for 15
seconds. When the LED stops flashing, release the button.
The remote LED will flash green, amber, red, and then turn off.
2. On the shade, press and hold the program button for 7 seconds. When the
LED flashes green and amber and the shade jogs, release the button.
The shade LED will turn solid amber and then turn off. The shade is now ready to be
paired with a new remote.
3. On the back of the remote, quickly press and release the program button
twice.
The remote LED will flash amber and green.
4. On the shade, press and hold the program button for 3 seconds. When the
LED flashes green, release the button.
The shade will jog once, and all LEDs will turn off. The shade is now paired with the
remote!

19
Pair a Remote with a Group of Shades
If you want to control a group of shades with one remote, follow these steps.
Before you start, decide which remote you want to control the group (known as
the group remote). Note that you won’t be able to control an individual shade with
the group remote after you perform these steps.
1. Remove the current pairing between the remote and shade:
a. Press and hold the program button on the back of the remote for 15
seconds. When the LED stops flashing, release the button.
The remote LED will flash green, amber, red, and then turn off.
b. On the shade associated with the remote, press and hold the program
button for 7 seconds. When the shade jogs, release the button.
c. Repeat steps a–b for each remote.
2. Pair the group remote with the shade group:
a. On the group remote, quickly press and release the program button on
the back twice.
The remote LED will flash amber and green.
b. On one of the shades in the group, press and hold the program button
for 3 seconds. When the LED flashes green, release the button.
The shade will jog once, and the shade LED will turn off. The shade is now paired
with the remote!
c. Repeat steps a–b for each shade in the group.
If you want to control each shade individually as well as in a group, follow the
steps in the next section.

20
Pair a Secondary Remote with a Single Shade in a Group of Shades
You might want to control a group of shades with a group (primary) remote, but
still be able to control each shade with an individual (secondary) remote. To do
that, follow these steps.
[image]
Primary Remote
Controls the group
[image]
Secondary Remote
Controls a single shade in the group
1. On the primary remote, quickly press and release the program button on the
back twice.
The remote LED will flash amber and green.
2. On the secondary remote, press and hold the program button on the back
for 3 seconds. When the LED flashes green, release the button.
The LEDs on the primary and secondary remotes will flash green and then turn off.
3. On the secondary remote, press and release the program button on the back.
The remote LED will flash green.
4. On the shade, press and hold the program button for 3 seconds. When the
LED flashes green, release the button.
The LED on the secondary remote will turn green, and the shade will jog once. Both the
primary and secondary remotes will now control the shade!
5. Repeat steps 1–4 for each shade you want to control with a secondary
remote.

21
Pairing Your Multi-Channel Remote
Pair a New Remote with a Single Shade
If you bought a new remote, or if you lost or damaged your old remote, follow
these steps to pair your shade with a new one.
1. Remove the current pairing between the remote and shade:
a. On the remote, press and hold the RIGHT/MENU button for 2 seconds
to enter the menu, then select ZWAVE > RESET > LIKE NEW.
b. On the shade associated with the remote, press and hold the program
button for 7 seconds. When the shade jogs, release the button.
2. Press and hold the RIGHT/MENU button for 2 seconds to enter the menu.
3. Select Z WAVE > INCLUDE.
The remote is now ready to be paired with the shade.
4. On the shade you want to pair, press and hold the program button for 3
seconds. When the LED flashes green, release the button.
The remote’s screen will indicate that the shade is now paired with the remote!
5. Assign the shade to a channel by following the steps on page X.

22
Pair a Remote with a Group of Shades
If your remote isn’t already paired with your shade group, or if you want to adjust
the group, follow these steps.
1. For each shade in the group, unlink the remote currently paired with it:
a. On the remote, press and hold the program button on the back for 15
seconds. When the LED stops flashing, release the button.
The LED will flash green, amber, red, and then turn off.
b. On the shade, press and hold the program button for 7 seconds. When
the LED flashes red, then release.
The shade will jog once.
2. On the multi-channel remote, select the channel you want to work with.
3. Press and hold the RIGHT/MENU button for 2 seconds to access the
programming options.
4. Scroll to ZWAVE and press and release the RIGHT/MENU button.
5. Scroll to INCLUDE and press and release the RIGHT/MENU button.
The screen will display “INCLUDE. PRESS DEVICE.”
6. On the shade you want to pair, press and hold the program button for 3
seconds.
The screen will display JOINED # SHADE #. The shade is now paired with the remote!
7. Repeat steps 2–6 for each shade in the group.
If you want to control each shade individually as well as in a group, follow the
steps in the next section.

23
Pair a Secondary Remote with a Single Shade in a Group of Shades
You might want to control shades as a group, but still be able to control each
shade individually with a secondary remote. To do that, follow these steps.
[image of multi-channel remote]
Primary Remote
Controls the group
[image of 2-button remote]
Secondary Remote
Controls a single shade in the group
1. On the primary remote, quickly press and release the program button on the
back twice.
2. On the secondary remote, press and hold the program button for 3 seconds.
When the LED flashes green, release the button.
The LED on the secondary remotes will flash green and then turn off.
3. On the secondary remote, press and release the program button on the back.
The LED will flash green.
4. On the shade, press and hold the program button for 3 seconds. When the
LED flashes green, release the button.
The LED on the secondary remote will turn green, and the shade will jog once. Both the primary and secondary remotes will
now control the shade!
5. Repeat steps 1–4 for each shade you want to control individually.
24
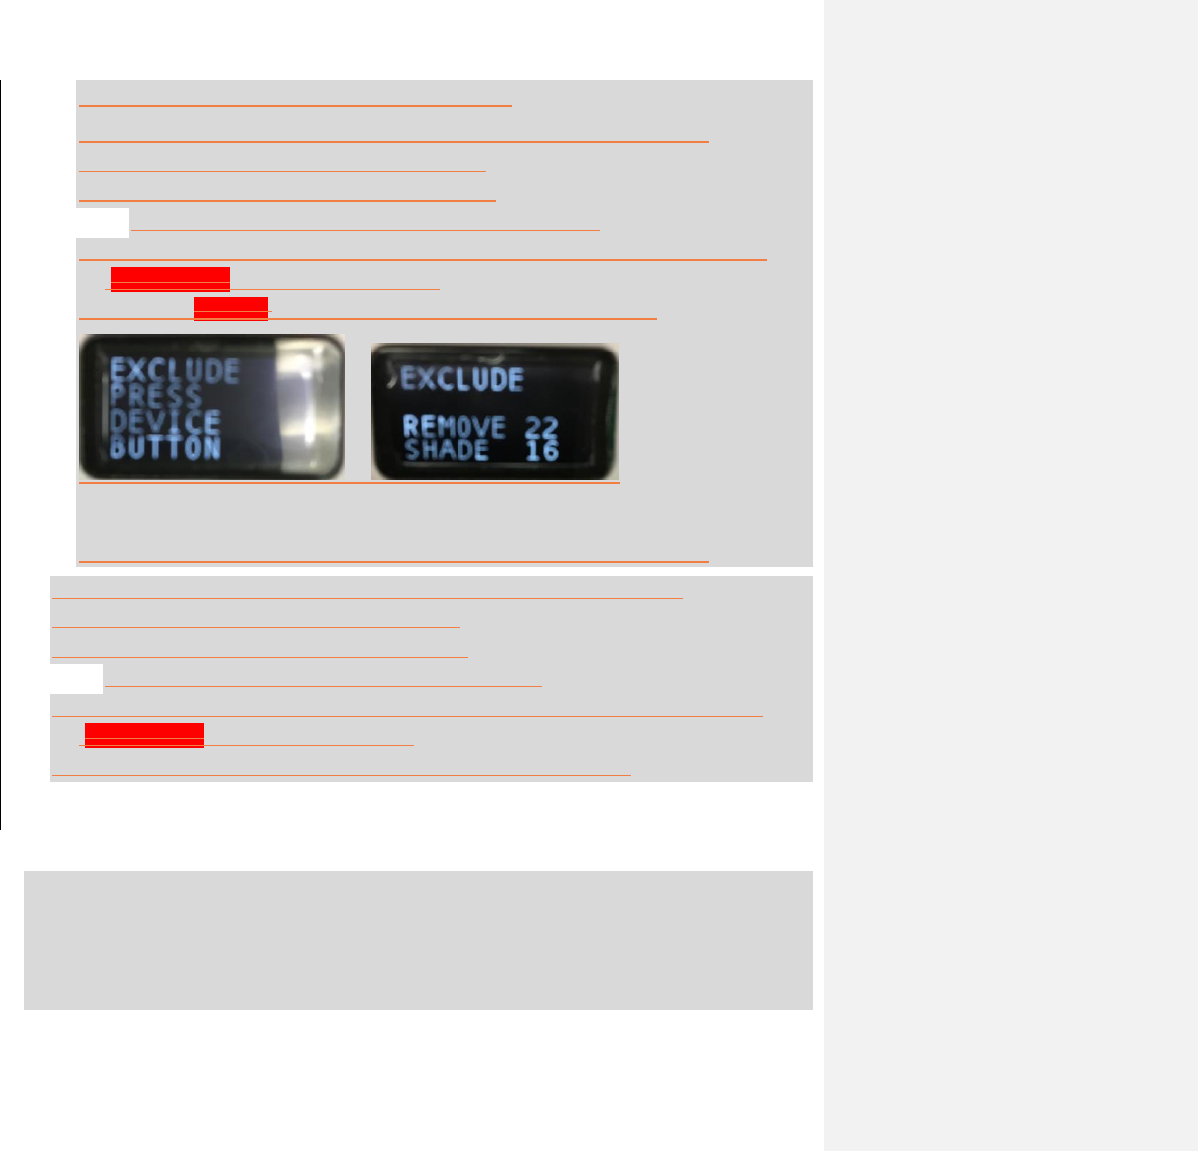
REMOVING A SHADE FROM THE CONTROLLER
1. Press and hold the menu/> button for two seconds to enter menu screen
2. Select Z WAVE by pressing the menu/> button
3. Select EXCLUDE by pressing the menu/> button
a. Remote is now listening and ready to remove a shade
4. On shade, press and hold the program button until the green light starts to flash
(approximately 3 seconds), then release.
5. Successful inclusion is indicated on screen showing shade removed
ADDING A SECONDARY REMOTE TO THE MULTI CHANNEL REMOTE
1. Press and hold the menu/> button for two seconds to enter menu screen
2. Select Z WAVE by pressing the menu/> button
3. Select INCLUDE by pressing the menu/> button
a. Remote is now listening and ready to add a shade
4. On REMOTE, press and hold the program button until the green light starts to flash
(approximately 3 seconds), then release.
5. Successful inclusion is indicated on screen showing REMOTE joined
Clear All Channels
If you want to clear all your current channel assignments and start over with
assigning shades to channels, follow the steps below. Clearing channels removes
the shades from the remote, but it doesn’t remove the shades from the network.

25
To add the shades back to the remote, see the Pairing Your Remote with a Single
Shade section.
1. Press and hold the menu/> button for two seconds to enter menu screen
2. Select CHANNEL by pressing menu/> button
3. There are two scrolling options,
a. Use the up and down arrow buttons to scroll thru the list of shades
b. Use the left and right arrow buttons to scroll thru the Channels.
4. Once you have selected the channel and the shade that is to be applied to that channel,
press and hold the menu/> button for two seconds until a check mark appears.
1. Press and hold the RIGHT/MENU button for 2 seconds to access the
programming options.
1. Scroll to SETUP and press and release the RIGHT/MENU button.
1. Scroll to CLR CHNLS and press and release the RIGHT/MENU button.
1. Scroll to CONFIRM and press the RIGHT/MENU button.
Pair a Multi-Channel Remote with an Existing Shade Network
If you bought a new multi-channel remote and want to pair it with a group of
shades that are currently controlled by a single-channel remote, follow these
steps.
1. [LEARN function]
2. .
3. .
26
Integrating Your Shades with a Home
Automation System
Your shades and remotes operate using Z-Wave radio technology, which allows
you to control your shades with many popular home automation systems.
To integrate your shades with a home automation system, you’ll perform 3 tasks:
1. Exclude: Unlink your shades and remotes.
2. Include: Add your shades and remotes to the home automation system’s
network.
3. Associate: Pair secondary remotes with your shades.
The following sections walk you through each task.
Note
If you don't press any buttons for 20 seconds while you're performing these
steps, the remote will time out. If that happens, just start the process over.

27
Step 1: (Exclude) Unlink Your Shades and Remotes
1. Unlink each 2-button or single-channel remote:
a. Press and hold the program button on the back of the remote for 15
seconds until the LED stops flashing.
The remote LED will flash green, amber, red, and then turn off.
2. Unlink your multi-channel remote:
a. Press and hold the RIGHT/MENU button for 2 seconds to access the
programming options.
b. Scroll to ZWAVE and press and release the RIGHT/MENU button.
c. Scroll to RESET and press and release the RIGHT/MENU button.
d. Scroll up to LIKE NEW? and press and release the RIGHT/MENU button.
3. On each shade, press and hold the program button for 7 seconds. When the
shade jogs, release the button.
All remotes are now unlinked from the shades. However, the shades’ upper, lower, and
home positions are still set.
28
Step 2: (Include) Add Your Shades and Remotes to
the Home Automation System’s Network
1. From your home automation system’s user interface, select the option to
enroll a new Z-Wave device.
See your home automation system’s instructions for details. In some cases, you might
need to choose “Other Z-Wave Supported Device” or “Lighting Devices.”
2. On one of your shades or remotes, press and hold the program button for 3
seconds. When the LED flashes green, release the button.
The shade or remote should appear as a found Z-Wave device in your home automation
system’s user interface.
3. Repeat steps 1–2 for each shade and remote.
4. If you have a multi-channel remote, [use the SHIFT function].
Note
You need to add the shades and remotes to your home automation system for
the integration process to work correctly.

29
Step 3: (Associate) Pair Secondary Remotes with
Your Shades
If you want to be able to control your shades with remotes as well as with your
home automation system, follow these steps.
For the 2-Button or Single-Channel Remote
1. On the remote, press and release the program button on the back.
The remote LED will flash green.
2. On the shade, press and hold the program button for 3 seconds. When the
LED flashes green, release the button.
The LEDs on the remote and shade will turn green, then turn off, and the shade will jog.
3. Repeat steps 1–2 for each shade you want to control with a remote.
For the Multi-Channel Remote
1. Primary- Exclude
2. Secondary-
3. .
30
Troubleshooting
I need to replace the batteries in my shade or
remote.
Replacing Batteries in the Shade
Insert 8 AA lithium batteries per battery case.
[image]
Replacing Batteries in the Two-Button or Single-Channel Remote
Insert a #CR2430 lithium coin battery.
[image]
Replacing Batteries in the Multi-Channel Remote
Insert 2 AAA batteries.
[image]
The programming steps aren’t working.
If you don't press any buttons for 20 seconds while you're programming your
remote or shade, the remote will time out. If that happens, just start the process
over.

31
My shade doesn’t respond when I press buttons on
my remote.
If the LED on the shade doesn’t light up when you press a button on the remote,
try replacing the battery in the remote first. You’ll need a #CR2430 lithium coin
battery.
If that doesn’t fix the issue, try replacing the batteries in the shade. You’ll need 8
AA lithium batteries per battery case.
The LED on my remote flashes when I press a
button.
If you press a button on your remote and the LED flashes:
Green: The battery in your remote is good.
Green and amber: The battery in your remote is low and will need to be
changed soon.
Green and red: Replace the battery in your remote with a #CR2430 lithium
coin battery.
The LED on my shade flashes when I press the
program button.
If you press the program button on your shade and the LED flashes:
Green: The batteries in your shade are good.
Amber: The batteries in your shade are low and will need to be changed
soon.

32
Red: Replace the batteries in your shade with 8 AA lithium batteries per
battery case.
My shade moves in the opposite direction of the
button I pressed on my remote.
If the UP and DOWN buttons on your remote are reversed, follow these steps to
switch them back.
1. Move the shade to any point between the upper and lower limits.
2. Press and release a directional button to set the shade in motion. Then press
and release the opposite directional button to stop the shade.
3. Press and hold the UP and DOWN buttons for 3 seconds. When the LED turns
amber, release both buttons.
The shade will jog, the remote LED will flash green, and the shade LED will flash green
and red.
4. Press and hold the UP and DOWN buttons for another 3 seconds. When the
LED turns amber, release both buttons.
The shade direction has now been reversed!
How can I tell whether a remote is primary or
secondary?
To tell whether a remote is primary or secondary, quickly press the program
button on the back of the remote twice. If the LED is:
Flashing amber and green: Primary remote
Solid red: Secondary remote
33
I want to unlink my shades and remotes.
To unlink your shades and remotes and start fresh, follow these steps.
Unlink All Shades from a Remote
For a 2-Button or Single-Channel Remote
1. On the remote, press and hold the program button on the back for 15
seconds. When the LED stops flashing, release the button.
The remote LED will flash green, amber, red, and then turn off. All shades are now
unlinked from the remote.
For a Multi-Channel Remote
1. ‘Exclude’
1.
2. .
3. .
Unlink All Remotes from a Shade Without Resetting the Shade’s
Limits
1. On the shade, press and hold the program button for 7 seconds. When the
shade jogs, release the button.
The shade LED will go from solid green to flashing green to flashing amber. All remotes
are now unlinked from the shade. However, the shade’s upper, lower, and home
positions are still set.

34
Unlink All Remotes from a Shade and Reset the Shade’s Limits
1. On the shade, press and hold the program button for 15 seconds. When the
shade jogs twice, release the button.
The shade LED will go from solid green to flashing green to flashing amber to rapidly
flashing red. All remotes are now unlinked from the shade. The shade’s upper, lower,
and home positions are now reset to their defaults.
My shade doesn’t go up or down as much as I want
it to.
If your shade doesn’t reach the upper or lower limit you want, call our customer
service team at 1-877-792-0002.

35
Glossary
Jog
Brief up-and-down movement of the shade.
Pairing Terminology
Exclude
Unlink your shades and remotes and from a home automation system. It is
an act of removing a shade or remte from the network it has been assigned
or belongs. The first step in integrating your shades with a home automation
system
Include
Add your shades and remotes together to be apart of or belonging to a
network and also to a home automation system. The second step in
integrating your shades with a home automation system.
Associate
Pair a shade with a secondary remoteIs the last step when setting up a stand-
alone system using our single channel and two button remotes as a group
control with individual controls. The last step in integrating your shades with
a home automation system.
Multi-Channel Remote Features
Channel
One of twelve “groups” of shades. The shades assigned to a channel are
operated at the same time. Each channel can include a single shade or
multiple shades. A shade can operate on one or multiple channels.

36
Find
A feature of the multi-channel remote that locates existing shades in a
network and adds the multi-channel remote as a secondary control.
Learn
A feature of the multi-channel remote that… an existing shade/control
network.
Z-Wave network
Primary and Secondary Remotes
Primary Remote
The remote that controls the other devices in your Z-Wave network, it can
include and exclude nodes from the Z-Wave network
Secondary Remote
A remote that has the functionality of a primary remote but with one
limitation: it cannot include or exclude nodes from the Z-Wave network
Z-Wave
A radio frequency protocol for communicating between smart devices.

37
About Z-Wave
Z-Wave is a wireless networking protocol for reliable, intelligent home control of all Z-Wave
compatible devices. This product can be included and operated in any Z-Wave network with
other Z-Wave certified devices from any other manufacturers and/or other applications.
The Z-Wave Alliance (www.z-wavealliance.com) provides a list of manufacturers of Z-Wave
compliant devices. Z-Wave was created by Sigma Designs, and more details on the technology
can be found at www.z-wave.com.
FCC Class B Notice
This device complies with Part 15 of the FCC Rules. Operation is subject to the following two
conditions:
1. This device may not cause harmful interference.
2. This device must accept any interference received, including interference that may
cause undesired operation.
Note: This equipment has been tested and found to comply with the limits for a Class B digital
device, pursuant to Part 15 of the FCC Rules. These limits are designed to provide reasonable
protection against harmful interference in a residential installation. This equipment generates,
uses, and can radiate radio frequency energy and, if not installed and used in accordance with
the instructions, may cause harmful interference to radio communications. However, there is
no guarantee that interference will not occur in a particular installation. If this equipment does
cause harmful interference to radio or television reception, which can be determined by
turning the equipment off and on, the user is encouraged to try to correct the interference by
one or more of the following measures:
Reorient or relocate the receiving antenna.
Increase the separation between the equipment and receiver.
Connect the equipment into an outlet on a circuit different from that to which the
receiver is connected.
Consult the dealer or an experienced radio/television technician for help.
Modifications: Any modifications made to this device that are not approved by Oracle may
void the authority granted to the user by the FCC to operate this equipment.
For advanced technical information, contact customer service at 1-877-792-0002.
Formatted: Space After: 6 pt

38
IC Statement
English:
This device complies with Industry Canada ’s license-exempt RSSs. Operation is subject to the following two
conditions:
(1) This device may not cause interference; and
(2) This device must accept any interference, including interference that may cause
undesired operation of the device.
French:
Le présent appareil est conforme aux CNR d'Industrie Canada applicables aux appareils radio exempts de
licence. L'exploitation est autorisée aux deux conditions suivantes : (1) l'appareil ne doit pas produire de
brouillage, et (2) l'utilisateur de l'appareil doit accepter tout brouillage radioélectrique subi, même si le
brouillage est susceptible d'en compromettre le fonctionnement.