Sonicwall 069 Access Point 802.11 a/b/g/n User Manual SonicPoint N GSG
Sonicwall, Inc. Access Point 802.11 a/b/g/n SonicPoint N GSG
Contents
- 1. Manual
- 2. revised user manual
Manual

Getting Started Guide
SonicWALL Network Security Appliances
NETWORK SECURITY
SonicPoint-N
PROTECTION AT THE SPEED OF BUSINESS™
SonicWALL SonicPoint Getting Started Guide Page 1
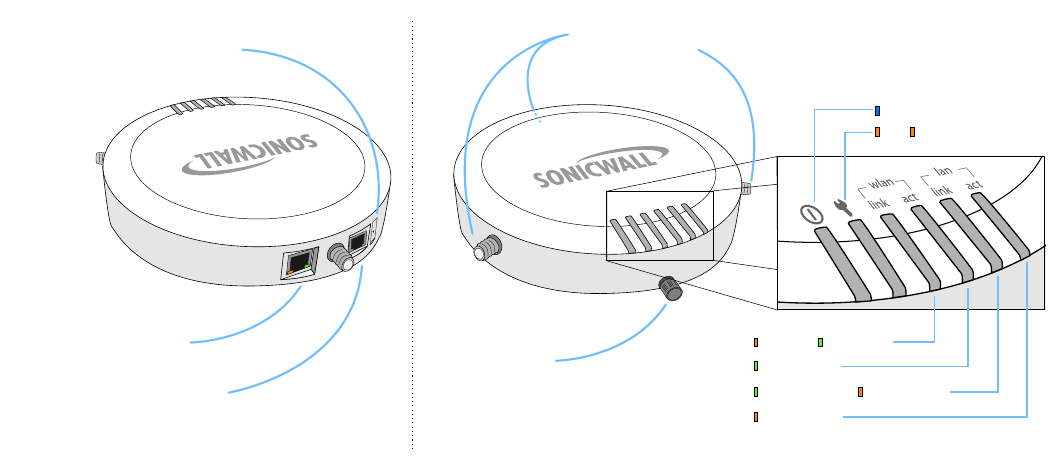
SonicPoint Front/Back Panels
Status LEDs
Power
Test SafeMode
Wireless B/GWireless N
Wireless Activity
100mbps Ethernet 10mbps Ethernet
Ethernet Activity
3
A
n
t
e
n
n
a
C
o
n
n
e
c
t
i
o
n
s
M
o
u
n
t
i
n
g
P
l
a
t
e
R
e
l
e
a
s
e
R
e
s
e
t
B
u
t
t
o
n
L
A
N
/
P
o
E
P
o
r
t
C
o
n
s
o
l
e
P
o
r
t
P
r
o
v
i
d
e
s
P
o
E
(
p
o
w
e
r
e
d
)
E
t
h
e
r
n
e
t
c
o
n
n
e
c
t
i
o
n
t
o
S
o
n
i
c
W
A
L
L
a
p
p
l
i
a
n
c
e
W
L
A
N
z
o
n
e
.
P
r
e
s
s
a
n
d
h
o
l
d
t
o
m
a
n
u
a
l
l
y
r
e
s
e
t
t
h
e
S
o
n
i
c
P
o
i
n
t
i
n
t
o
S
a
f
e
M
o
d
e
P
r
o
v
i
d
e
s
m
a
n
a
g
e
m
e
n
t
c
o
n
n
e
c
t
i
o
n
u
s
i
n
g
C
L
I
-
>
D
B
9
c
a
b
l
e
(
f
o
r
c
o
m
m
a
n
d
l
i
n
e
m
a
n
a
g
e
m
e
n
t
o
n
l
y
)
.
Page 2 SonicWALL Wireless Firewalling
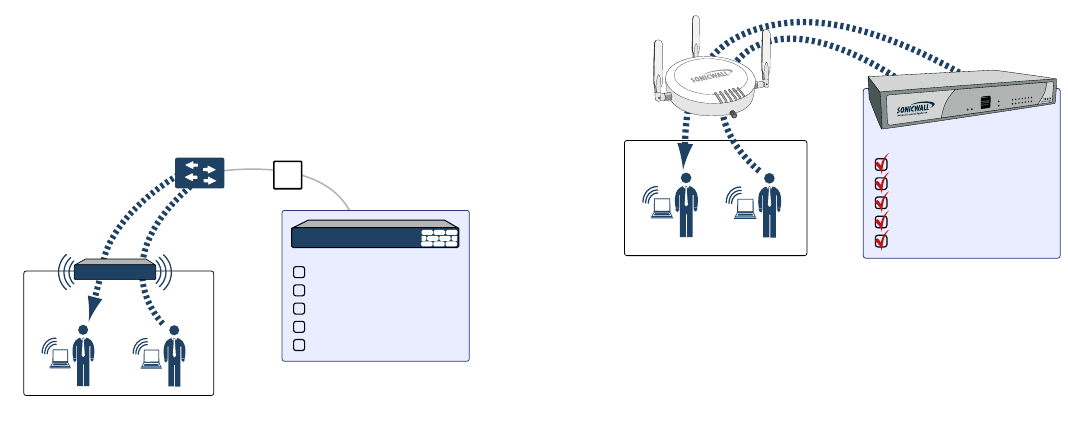
SonicWALL Wireless Firewalling
When a wireless device uses an access point to communicate
with a device on another subnet or on a completely different
network, traffic between the devices is forced to traverse the
network gateway. This traversal enables Unified Threat
Management (UTM) services to be enforced at the gateway.
Standard practice for wireless firewalling (where one wireless
client is communicating with another) bypasses many of the
critical UTM security services. The illustration below shows the
standard practice for wireless firewalling.
Many security products on the market share this potential
vulnerability when two users connected by a common hub or
wireless access point wish to exchange data.
SonicWALL addresses this security shortcoming by managing
the SonicPoint access points from the UTM appliance. This
allows complete control of the wireless space, including zone
enforcement of security services and complete firewalling
capabilities, as shown in the illustration below.
WLAN Zone
Security Services
?
Content Filtering Service
Client Anti-Virus Enforcement
Gateway Anti-Virus
Gateway Anti-Spyware
Intrusion Prevention Service
Other Security Appliance
WLAN Zone Security Services
SonicWALL
appliance
SonicWALL
SonicPoint
Content Filtering Service
Client Anti-Virus Enforcement
Gateway Anti-Virus
Gateway Anti-Spyware
Intrusion Prevention Service

Page 4 Check Package Contents
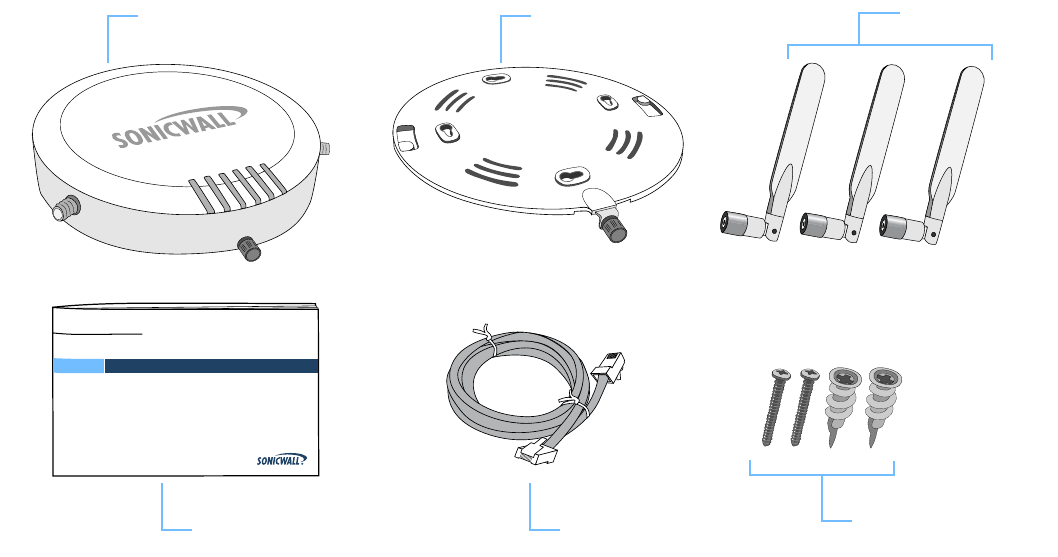
Check Package Contents
Before continuing, please ensure that your SonicPoint package
contains the following materials:
SonicPoint-N Appliance Mounting Plate Antennas (3)
Getting Started Guide Ethernet Cable Anchor/Screw Kit
Getting Started Guide
COMPREHENSIVE INTERNET SECURITY

SonicWALL SonicPoint Getting Started Guide Page 5
What You Need to Begin
• A SonicWALL SonicPoint
• A SonicWALL NSA series or E-Class NSA series security
appliance running SonicOS 3.2 or higher
• An active Internet connection
• An interface on the SonicWALL security appliance
configured to be used as a Wireless (WLAN) zone
• A location selected for placement of your SonicPoint such
as a wall or ceiling
• Clients capable of 802.11n wireless communications
Note: The full 802.11n spectrum can not be used if the
SonicPoint senses non-802.11n traffic, regardless of
whether those clients are connected to the SonicPoint.
This is an 802.11 draft-n protocol limitation, not a
SonicPoint hardware limitation.
Page 6

SonicWALL SonicPoint Getting Started Guide Page 7
Introduction to Secure Wireless
In this Section:
This section contains excerpts from the SonicWALL Secure Wireless Integrated Solutions Guide.
The content is meant to provide a brief introduction to Radio Frequency (RF) technology as it
pertains to different deployment scenarios.
•Wireless RF Introduction - page 8
•Placing Access Points - page 10
•Register for a Free Copy of the Secure Wireless Integrated Solutions Guide! - page 14
2
Page 8 Wireless RF Introduction
Wireless RF Introduction
There are currently four widely adopted standards for 802.11
wireless network types: a, b, g, and n. Although 802.11n is the
newest and highest capacity standard, each of the four
standards has its own strengths and weaknesses. This section
provides overviews of these standards.
The following section provides a brief overview of RF
technologies:
•Frequency Bands and Channels - page 8
•Data Rate and Useful Range - page 8
•802.11 Comparison Chart - page 9
•Radio Frequency Barriers - page 9
•RF Interference - page 9
Frequency Bands and Channels
To allow multiple separate wireless networks in a shared and
confined space, the RF medium is divided into channels. For
devices in the 5GHz range (802.11a), this means the possibility
of up to 23 discrete channels. For devices using the 2.4GHz
range (802.11b, 802.11g), the wireless space is limited to a
maximum of 14 overlapping channels. As a result of these
overlapping channels, 2.4GHz technology provides only a total
of three discrete channels.
The newer 802.11n technology does not fit into either of these
categories, as it is capable of using both 2.4GHz and 5GHz, but
is limited to 14 overlapping channels for backward compatibility.
Data Rate and Useful Range
Different 802.11 standards provide different signal
optimizations:
•802.11b – Provides long distance, although at a lower
maximum data rate (11Mbps per channel), than 802.11a/g/
n. In addition, the low data rate can only be used across 3
non-overlapping channels.
•802.11a – Provides a high maximum data rate per channel
with the trade-off of shorter useful range. This standard
shines in high-traffic applications because its 54Mbps rate
is available over each of the 23 non-overlapping channels
in the 5GHz range.
•802.11g – Provides a higher maximum data rate per
channel than 802.11b and a longer range than 802.11a.
However, because it resides in the 2.4GHz range, the
maximum data rate can only be used across three non-
overlapping channels.
•802.11n - Provides the highest maximum data rate per
channel, double the speed of any previous standard and
double the useful range. In addition, 802.11n commonly
offers Multiple Input Multiple Output (MIMO) technology to
further increase transmission rates. This standard is
capable of using both the 5GHz and 2.4GHz ranges
simultaneously for enhanced throughput.

SonicWALL SonicPoint Getting Started Guide Page 9
802.11 Comparison Chart
The following table compares signal characteristics as they
apply to the current 802.11 standards:
*Of the channels available with this technology, only three (3) are discrete.
Radio Frequency Barriers
Locating of RF barriers can be a painful part of the placement
process, but keep in mind that they can be used beneficially to
block signals where you don’t want coverage. The following
tables list common RF barrier types:
RF Interference
The following table lists several common sources of RF
interference:
*Most newer model microwave ovens have sufficient shielding to negate possible
RF interference.
802.11a 802.11b 802.11g 802.11n
USA Channels 23 11* 11* 11*
EU Channels 23 13* 13* 13*
Japan Channels 15 14* 14* 14*
Frequency Band 5GHz 2.4GHz 2.4GHz 2.4/5GHz
Max. Data Rate 54Mbps 11Mbps 11Mbps 180Mbps
Radius (Range) 90ft/25m 120ft/35m 120ft/35m 240ft/70m
Barrier Type RF Signal
Blocking
Open air Very Low
Glass, drywall, cube partitions Low
Stone floors and walls (brick/marble/granite) Medium
Concrete, security glass, stacked books/paper High
Metal, metal mesh (chicken wire), re-enforced
concrete, water Very High
Faraday cage Extremely High
Interference Source Possible RF
Interference Band(s)
Affected
2.4GHz phones Entire range (hundreds
of feet) 802.11b/g/n
Bluetooth devices Within 30 feet 802.11b/g/n
Microwave oven* Within 10-20 feet 802.11b/g/n
Scientific and medical
equipment Short distance, varies 802.11b/g/n
Off-network access
points Entire range All
RF reflective objects Long-range wireless
bridging All
Barrier Type RF Signal
Blocking
Page 10 Placing Access Points
Placing Access Points
Now let us take a look at some best practice examples of what
has been covered so far in this chapter. Physical placement of
an access point has a measurable effect on who can and
cannot access your wireless signal. Keeping outside users out
of your wireless range is often just as important as ensuring
your valid users have a strong wireless signal.
The following sections provide an overview of wireless access
point placement, signal strength, and signal direction in
common wireless deployment situations:
• Creating a Realistic Environment - page 10
•Making Hardware Decisions - page 10
•Upgrading to 802.11n Technology - page 11
•Solutions to RF Interference and Barriers - page 11
•Coverage and Bandwidth - page 13
Creating a Realistic Environment
Be realistic when preparing the site for a wireless site survey.
The best time to conduct a site survey is not on a weekend or
after hours, but during a normal work day when the office is
busy. It is a good idea to include elements such as people,
closed doors, wireless test labs, and other objects that could
alter or interfere with the RF signal.
Making Hardware Decisions
The first decision in hardware is the access point. While access
point technology (802.11a/b/g/n) is one factor in determining
your placement, based on distance served and bandwidth
needed, taking note of other hardware-based factors is just as
important. Some of the more important hardware decisions
include:
•Number of access points versus user density – How
many wireless clients are served by one access point? If
too many users are serviced by a single access point,
maximum transfer rates are reached and that point may
become a bottleneck for the whole system. This is an
example where deciding coverage only in terms of signal
range may not be ideal.
•Bandwidth – This goes hand-in-hand with user density,
but also takes into consideration user type. How much data
is moving upstream and downstream for a given type of
user?
•Ethernet / Power cabling – This is the point where
wireless is not actually wireless. Where are you running the
Ethernet cable to and how are you securing that cable?
Also think of power requirements; are outlets available at
your install points, or will you run power over the Ethernet
line using Power over Ethernet (PoE) injectors?
•Hubs / Switches / UTM – Your wireless deployment has to
tie back into your UTM appliance and LAN resources at
some point. In between, there could be dozens or
hundreds of switches and hubs. What speed is needed for
your Ethernet connection to accommodate the number of
SonicWALL SonicPoint Getting Started Guide Page 11
access points you are installing? Also think of where your
key networking devices are deployed and how they will
connect efficiently with your wireless appliances.
•Antennas – The standard antenna mounts used in
SonicWALL UTM wireless appliances and SonicPoint
access points provide administrators with the ability to use
third-party antennas. This chapter includes cases where,
for instance, directional antennas are used in place of
standard omnidirectional antennas.
Upgrading to 802.11n Technology
The following are a few infrastructure points to be aware of if
you are upgrading your current wireless network from 802.11a/
b/g technology:
•Upgrade your Ethernet connections – In most cases,
802.11n wireless hardware requires more bandwidth than a
single (or even dual) 10/100 Ethernet connection can
handle. Gigabit Ethernet connectivity between the WLAN
and the LAN is required to take full advantage of 802.11n
speed.
•Power up that PoE – Standard PoE injectors do not
provide enough power to drive the multiple radios in
802.11n equipment. If your current a/b/g solution makes
use of PoE, you will have to upgrade those power injectors
along with your new access points.
Solutions to RF Interference and Barriers
These days, finding an environment with no RF interference or
noise is fairly implausible. Only if you are setting up an office in
a secluded redwood grove can you count on RF interference to
be a non-issue. Even then, the redwood trees might just be
among those fitted with high-gain cellular antennas, an all-too-
common occurrence today. Regardless, you should expect to
deal with some level of signal interference in your deployment.
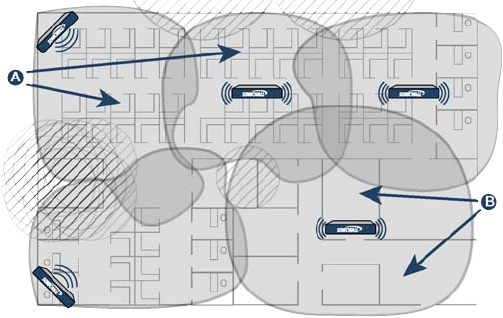
Location A – Rogue access points or wireless test lab:
•Problem – Wireless product test labs and other (non-
malicious) rogue access points are problems in many Wi-Fi
AC
B

Page 12 Placing Access Points
deployments. Even if the access points in question are
using different SSID nomenclature, channel overlapping is
almost sure to be a bandwidth buster for legitimate
wireless users.
•Solution – Either eliminate all rogue access points, or
force their owners to use a set channel that does not
overlap with your distributed wireless solution. For
dedicated wireless test labs, or areas that must be
secluded from RF noise, convert that specific area into a
Faraday cage, blocking a significant amount of wireless
signals from entering or leaving the room.
Note: The Faraday cage was developed by 19th century
inventor Michael Faraday. It demonstrates that a room
built of a conductive material will shield its contents
from electric or static electric currents. This effect also
exists for wireless radio transmissions, although to a
lesser extent.
Location B – Spectrum noise for 2.4 GHz and 5 GHz
•Problem – Your phone system is partially wireless and
uses the 2.4GHz spectrum. Whenever someone in the
office takes a call, wireless connection speed is reduced in
the surrounding area, and to top it off, callers often
complain of white noise during their conversation.
•Solution – Give VoIP a try. VoIP will work in tandem with
your wireless network, instead of against it. Another option
is to try a phone that uses a different spectrum, or to go
completely wired for your phone service. For more on
SonicWALL VoIP implementation and capabilities, refer to
the Configuring VoIP SonicOS feature module available at:
http://www.sonicwall.com/us/support
Location C – Off-network access points
•Problem – Your neighbors need wireless, too!
Unfortunately, the walls that separate you are made of
drywall. The result is that their wireless signals plus your
wireless signals equals client confusion and RF noise.
Wireless clients in this area may have trouble connecting
or keeping a connection if your channels overlap with those
of your neighbors.
•Solution – Overpowering your neighbors with high-gain
antennas is an option, but not a particularly neighborly one.
Instead, you could simply use a different channel for
wireless access points bordering this wall and ensure that
your neighbors do the same. Performance in some dual-
channel wireless devices may take a hit, but it is better
than dropped connections—or unhappy neighbors.
SonicWALL SonicPoint Getting Started Guide Page 13
Coverage and Bandwidth
In terms of wireless, “coverage” does not just refer to the
physical area covered by an RF signal; coverage also refers to
available bandwidth. The figure below illustrates the site survey
results of a typical small office where physical coverage is
excellent, yet bandwidth constraints are often an issue.
Location A – Cubicles
These access points are well placed. One is in the corner, using
a 90-degree antenna, and one is a ceiling-mounted unit with a
standard omnidirectional antenna. Because most users in this
area are hard-wired in cubicles, wireless demand is generally
not very high, so using a single access point for a large area is
an acceptable solution in terms of bandwidth.
Location B – Conference rooms
This access point is not well placed. Even though the single,
ceiling-mounted omnidirectional access point offers decent
physical coverage, this access point serves several conference
rooms. Combined, these rooms are designed to hold over 150
users at any given time. Because of the high user density, and
the fact that most of the users in this location are often using
wireless, having a single access point installed here is a poor
design choice.
A better choice for the conference room area would be to
dedicate a single access point to each large conference room,
using a lower transmit power to keep the signal within that
room. The smaller conference rooms could be served at a ratio
of one access point for every two conference rooms, depending
on user density. The illustration of the following page shows
optimal placement of access points serving the conference
room areas and unmanned front entry.
Location C – Conference rooms
These two access points are well placed, lowering the signal
strength (to limit reach) and splitting up the duty of covering
conference rooms among multiple access points. Because of
the high user density, and the fact that most of the users in this
location are often utilizing wireless, having multiple access
points in place is a good idea.
Page 14 Register for a Free Copy of the Secure Wireless Integrated Solutions Guide!
Location D – Front office / lobby
Wireless coverage is limited in this area since the front office is
more open to the public than other areas of the office. If this
company is using Virtual Access Points (VAPs) and has set up
an SSID for guest login and Web access, then coverage in this
area is more appropriate.
Register for a Free Copy of the Secure
Wireless Integrated Solutions Guide!
This wireless introduction is just a small portion of what is
included in the SonicWALL Secure Wireless Integrated
Solutions Guide. Look to this 512 page guide for a
comprehensive deployment solution for almost any situation
The first 1,000 customers to register
their SonicPoint appliance will
receive a FREE copy of the
SonicWALL Secure Wireless
Integrated Solutions Guide.
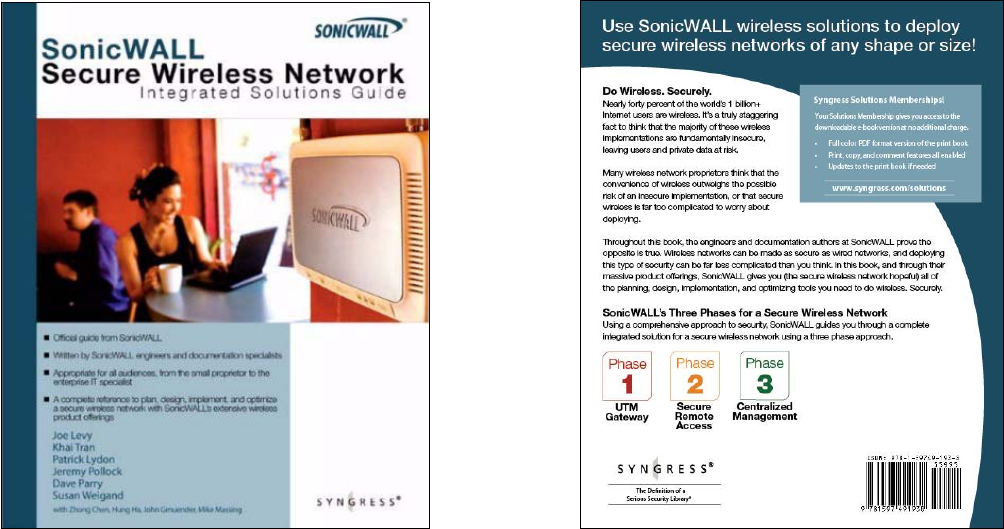
Nearly forty percent of the world’s 1
billion+ Internet users are wireless.
It’s a truly staggering fact to think
that the majority of these wireless
implementations are fundamentally
insecure, leaving users and private
data at risk.
Many wireless network proprietors think that the convenience of
wireless outweighs the possible risk of an insecure
implementation, or that secure wireless is far too complicated to
worry about deploying.
Throughout this book, the engineers and documentation
authors at SonicWALL prove the opposite is true. Wireless
networks can be made as secure as wired networks, and
deploying this type of security can be far less complicated than
you think. In this book, and through their massive product
offerings, SonicWALL gives you (the secure wireless network
hopeful) all of the planning, design, implementation, and
optimizing tools you need to do wireless. Securely.

SonicWALL SonicPoint Getting Started Guide Page 17
Registering Your Appliance
In this Section:
This section provides instructions for registering your SonicWALL SonicPoint appliance.
•Creating a MySonicWALL Account - page 18
•Registering and Licensing Your Appliance on MySonicWALL - page 18
Note: Registration is an important part of the setup process and is necessary to receive the benefits of SonicWALL security services,
firmware updates, and technical support.
3
Page 18 Creating a MySonicWALL Account
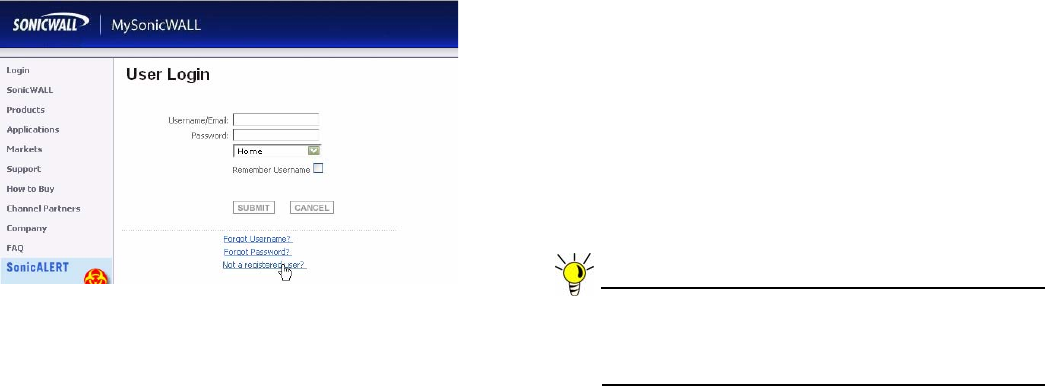
Creating a MySonicWALL Account
A MySonicWALL account is required for product registration. If
you already have an account, continue to the Registering and
Licensing Your Appliance on MySonicWALL section.
Perform the following steps to create a MySonicWALL account:
1. In your browser, navigate to www.mysonicwall.com.
2. In the login screen, click the Not a registered user? link.
3. Complete the Registration form and click Register.
4. Verify that the information is correct and click Submit.
5. In the screen confirming that your account was created,
click Continue.
Registering and Licensing Your Appliance
on MySonicWALL
This section contains the following subsections:
•Product Registration - page 18
•Use Security Services for Wireless Clients - page 19
•Trying or Purchasing Security Services - page 19
Product Registration
You must register your SonicWALL security appliance on
MySonicWALL to enable full functionality.
1. Login to your MySonicWALL account. If you do not have an
account, you can create one at www.mysonicwall.com.
2. On the main page, type the appliance serial number in
the Register A Product field. Then click Next.
3. On the My Products page, under Add New Product,
type the friendly name for the appliance, select the
Product Group if any, type the authentication code into
the appropriate text boxes, and then click Register.
4. On the Product Survey page, fill in the requested
information and then click Continue.
Tip: The first 1,000 customers to register their SonicPoint
will receive a coupon for a free copy of the SonicWALL
Secure Wireless Network: Integrated Solutions Guide.
See Introduction to Secure Wireless - page 7 for more.
SonicWALL SonicPoint Getting Started Guide Page 19
Use Security Services for Wireless Clients
Remember that any security services you have purchased for
your SonicWALL UTM appliance can also be applied to wireless
clients. Simply enable the security services on the WLAN zone,
or on a custom wireless zone and your wireless traffic will be
protected along with your wired traffic.
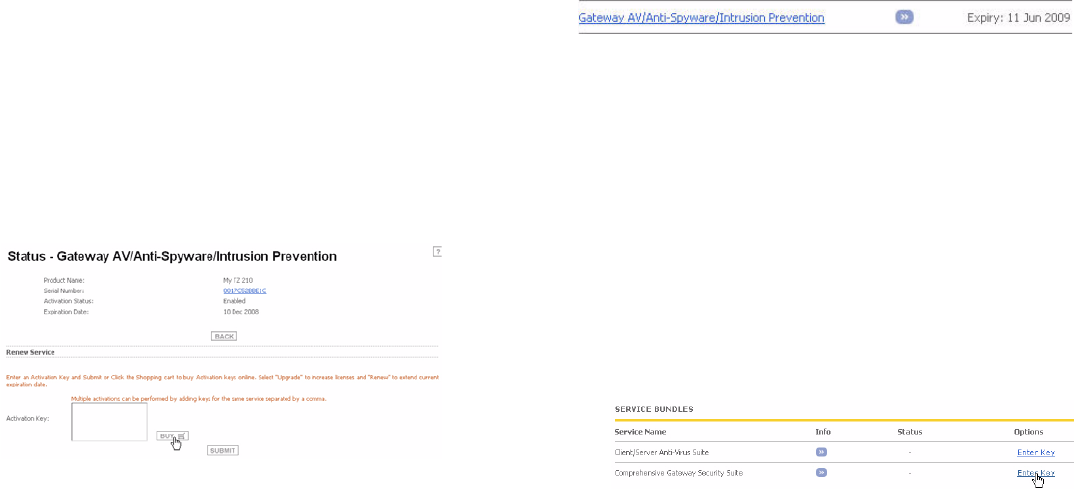
Trying or Purchasing Security Services
If you have not yet purchased a service subscription for your
SonicWALL UTM appliance, please speak with a sales
representative or visit mysonicwall.com to register for free trials.
To try a Free Trial of a service, click Try in the Service
Management page. To purchase a product or service, click
Buy Now in the Service Management page.
When activation is complete, MySonicWALL displays an
activation screen with service status and expiration information.
The service management screen also displays the product you
licensed.
You have successfully registered your SonicWALL appliance.
And now you need to enable Unified Threat Management
(UTM) security services. SonicWALL UTM security services are
not enabled by default.
If you recently purchased security services, you will receive an
activation key. This key is emailed to you after online
purchases, or is on the front of the certificate that was included
with your purchase.
To activate existing licenses, perform the following tasks:
1. Navigate to the My Products page and select the
registered product you want to manage.
2. Locate the product on the Service Management page and
click Enter Key in that row.
3. In the Activate Service page, type or paste your key into the
Activation Key field and then click Submit.

Page 20 Registering and Licensing Your Appliance on MySonicWALL
Once the service is activated, you will see an expiration date or
a license key string in the Status column on the Service
Management page.
You have successfully registered your SonicWALL appliance.
And now you need to enable Unified Threat Management
(UTM) security services. SonicWALL UTM security services are
not enabled by default.

SonicWALL SonicPoint Getting Started Guide Page 21
Configuring Your UTM Appliance for Wireless
In this Section:
This section provides instructions for configuring the SonicWALL UTM appliance to connect with your SonicWALL SonicPoint.
•An Introduction to Zones and Interfaces - page 22
•Configuring Wireless Access - page 22
Note: Registration is an important part of the setup process and is necessary to receive the benefits of SonicWALL security services,
firmware updates, and technical support.
4
Page 22 An Introduction to Zones and Interfaces
An Introduction to Zones and Interfaces
Zones split a network infrastructure into logical areas, each with
its own set of usage rules, security services, and policies. Most
networks include multiple definitions for zones, including those
for trusted, untrusted, public, encrypted, and wireless traffic.
Some basic (default) zone types include:
WAN—Untrusted resources outside your local network.
LAN—Trusted local network resources.f
WLAN—Local wireless network resources originating from
SonicWALL wireless enabled appliances.
DMZ—Local network assets that must be accessible from the
WAN zone (such as Web and FTP servers).
VPN—Trusted endpoints in an otherwise untrusted zone, such
as the WAN.
The security features and settings that zones carry are
enforced by binding a zone to one or more physical interfaces
(such as, X0, X1, or X2) on the SonicWALL UTM appliance.
The X1 and X0 interfaces are preconfigured as WAN and LAN
respectively. The remaining ports (X2-X6) are also LAN ports by
default, however, these ports can be configured to meet the
needs of your network, either by using basic zone types (WAN,
LAN, WLAN, DMZ, VPN) or configuring a custom zone type to
fit your network requirements (Gaming Console Zone, Wireless
Printer Zone, Wireless Ticket Scanner Zone, and more).
Configuring Wireless Access
This section describes how to configure SonicPoints with a
SonicWALL UTM appliance.
This section contains the following subsections:
•Configuring Provisioning Profiles - page 23
•Configuring a Wireless Zone - page 24
•Configuring the Network Interface - page 25
SonicWALL SonicPoints are wireless access points specially
engineered to work with SonicWALL security appliances.
Before you can manage SonicPoints in the Management
Interface, you must first:
• Configure your SonicPoint provisioning profiles
• Configure a Wireless zone
• Assign an interface to the Wireless zone
SonicWALL SonicPoint Getting Started Guide Page 23
Configuring Provisioning Profiles
SonicPoint Profile definitions include all of the settings that can
be configured on a SonicPoint, such as radio settings for the
2.4GHz and 5GHz radios, SSIDs, and channels of operation.
SonicPoint Profiles make it easy to apply these basic settings to
a Wireless zone, especially when each wireless zone contains
multiple SonicPoints.
When a SonicPoint is connected to a zone, it is automatically
provisioned with the profile assigned to that zone. SonicOS
includes a default SonicPoint profile, named SonicPoint.
To add a new profile:
1. Navigate to the SonicPoint > SonicPoints page in the
SonicOS interface.
2. Click Add SonicPointN below the list of SonicPoint
provisioning profiles.
3. The Add/Edit SonicPoint Profile window displays
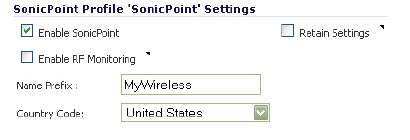
Settings
1. Select Enable SonicPoint.
2. Enter a Name Prefix to be used internally as the first part
of the name for each SonicPoint provisioned.
3. Select the Country Code for where the SonicPoints are
operating.
802.11n Radio
1. Select Enable Radio.
2. Optionally, select a schedule for the radio to be enabled
from the drop-down list. The most common work and
weekend hour schedules are pre-populated for selection.
3. Select a Radio Mode, to dictate the band(s) that the
SonicPoint will operate on. The default is
2.4GHz 802.11 n/g/b Mixed.
4. Enter an SSID. This is the access point name that will
appear in clients’ lists of available wireless connections.
5. Select a Primary Channel and Secondary Channel. You
may choose AutoChannel unless you have a reason to use
or avoid specific channels.
6. Under WEP/WPA Encryption, select the Authentication
Type for your wireless network. SonicWALL recommends
using WPA2 as the authentication type.
7. Fill in the fields specific to the authentication type that you
selected. The remaining fields change depending on the
selected authentication type.
Page 24 Configuring Wireless Access
8. Optionally, under ACL Enforcement, select Enable MAC
Filter List to enforce Access Control by allowing or
denying traffic from specific devices. Select a MAC
address object group from the Allow List or Deny List to
automatically allow or deny traffic to and from all devices
with MAC addresses in the group. The Deny List is
enforced before the Allow List.
Advanced
Configure the advanced radio settings for the 802.11g radio.
For most 802.11g advanced options, the default settings give
optimum performance. For a full description of the fields on this
tab, see the SonicOS Enhanced Administrator’s Guide.
When you are finished, click OK.
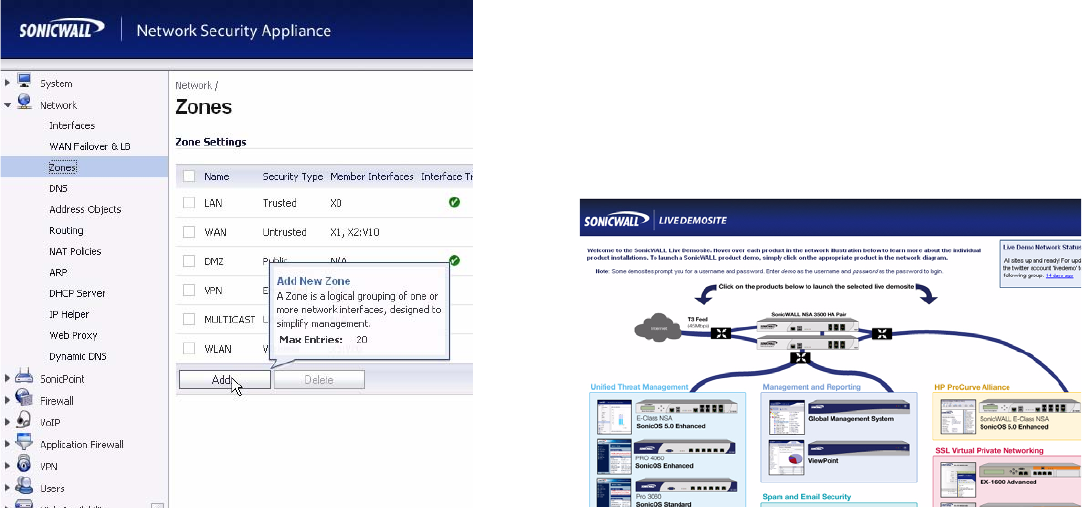
Configuring a Wireless Zone
You can configure a wireless zone on the Network > Zones
page. Typically, you will configure the WLAN zone for use with
SonicPoints.
1. On the Network > Zones page in the WLAN row, click the
icon in the Configure column.
2. Click on the General Tab.
3. Select the Allow Interface Trust setting to automate the
creation of Access Rules to allow traffic to flow between the
zone, regardless of which interfaces that zone is applied to.
For example, if the WLAN Zone has both the X2 and X3
interfaces assigned to it, selecting the Allow Interface
Trust checkbox on the WLAN Zone creates the necessary
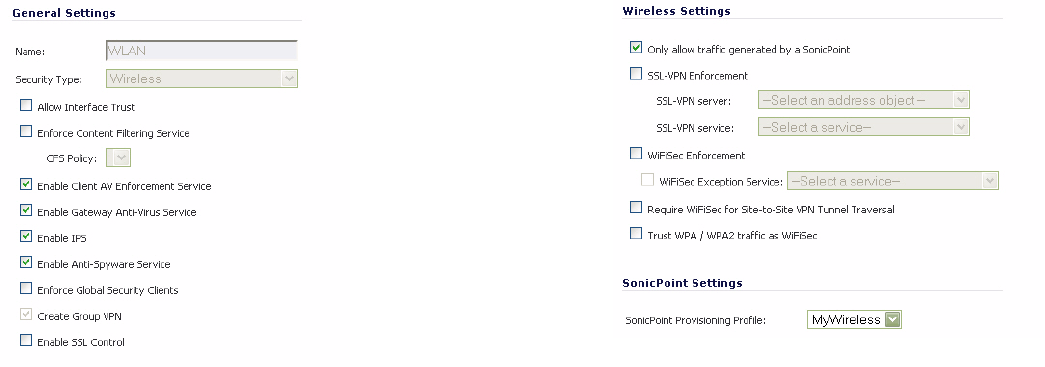
SonicWALL SonicPoint Getting Started Guide Page 25
Access Rules to allow hosts on these interfaces to
communicate with each other.
4. Select the checkboxes for the security services to enable
on this zone. Typically, you would enable Gateway Anti-
Virus, IPS, and Anti-Spyware. If your wireless clients are
all running SonicWALL Client Anti-Virus, select Enable
Client AV Enforcement Service.
5. Click on the Wireless Tab.
6. Select Only allow traffic generated by a SonicPoint to
allow only traffic from SonicWALL SonicPoints to enter the
WLAN Zone interface. This provides maximum security on
your WLAN.
7. Optionally, click the Guest Services tab to configure guest
Internet access solely, or in tandem with secured access.
For information about configuring Guest Services, see the
SonicOS Enhanced Administrator’s Guide.
8. When finished, click OK.
Configuring the Network Interface
Each SonicPoint or group of SonicPoints must be connected to
a network interface that is configured for Wireless. SonicOS
comes with a standard wireless zone (WLAN) that can be
applied to any available interface.
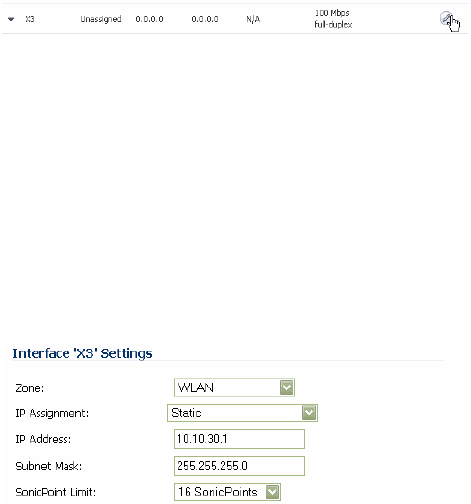
Page 26
Complete the following steps to configure a network interface
using the standard wireless (WLAN) zone:
1. Navigate to the Network > Interfaces page and click the
Configure button for the interface your SonicPoints will be
connected to.
2. Select WLAN for the Zone type.
3. Select Static for the IP Assignment.
4. Enter a static IP Address in the field. Any private IP is
appropriate for this field, as long at it does not interfere with
the IP address range of any of your other interfaces.
5. Enter a Subnet Mask. In our example 255.255.255.0 is an
appropriate mask.
6. Optionally, choose a SonicPoint Limit for this interface.
7. Optionally, choose to allow Management and User Login
mechanisms if they make sense in your deployment.
Remember that allowing login from a wireless zone can
pose a security threat, especially if you or your users have
not set strong passwords.

SonicWALL SonicPoint Getting Started Guide Page 27
Setting Up Your SonicPoint
In this Section:
This section describes how to connect and configure physical aspects of the SonicPoint including cabling and mounting.
•Installing Antennas - page 28
•Connecting Ethernet Cable - page 29
•Mounting on a Wall or Ceiling - page 30
•Verifying WAN (Internet) Connectivity - page 31
•Troubleshooting Tips - page 31
•Best Practices - page 32
•
Note: Registration is an important part of the setup process and is necessary to receive the benefits of SonicWALL security services,
firmware updates, and technical support.
5
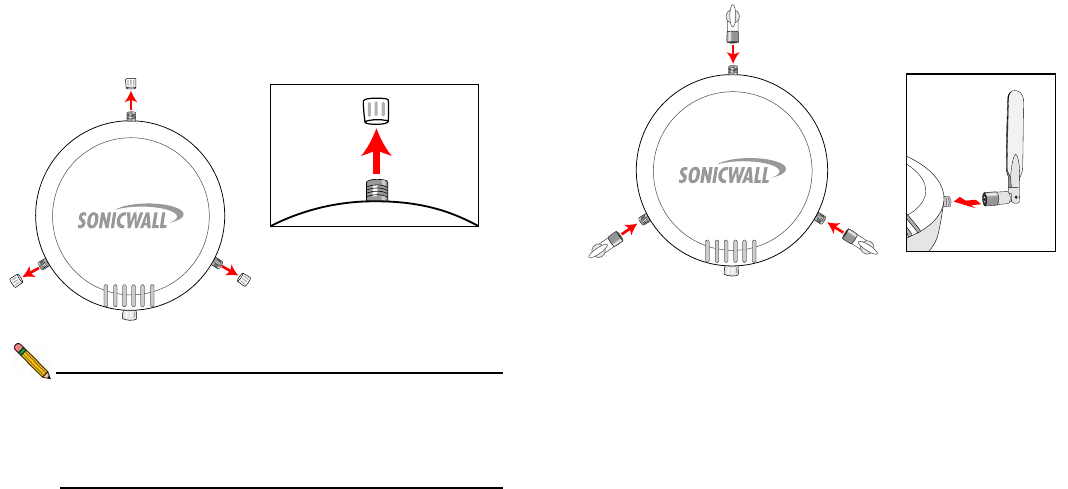
Page 28 Installing Antennas
Installing Antennas
This section describes installation of the included antennas. To
install the included antennas:
1. Remove the three plastic caps by unscrewing them in a
counter-clockwise motion.
Note: The SonicPoint is authorized to use a dipole antenna
with 4dBi or less. Only use antennas provided by
SonicWALL; otherwise your authority to use this unit
may be revoked. Be aware of the regulations in your
area before using other antennas with the SonicPoint.
2. Remove the antennas from the bag and place one on each
connector.
3. Finger tighten the fittings.
4. Adjust the antennas for best radio reception. In most
cases, the antennas should be pointing straight up and
perpendicular to the SonicPoint.
The circular design of the SonicPoint aides in creating a strong
tri-directional wireless signal pattern. In most cases, leaving the
antennas straight up (as indicated in the illustration) will provide
the best overall coverage. Be aware, however, that certain
areas, such as the areas directly below the SonicPoint, may
have weaker reception.
SonicWALL SonicPoint Getting Started Guide Page 29
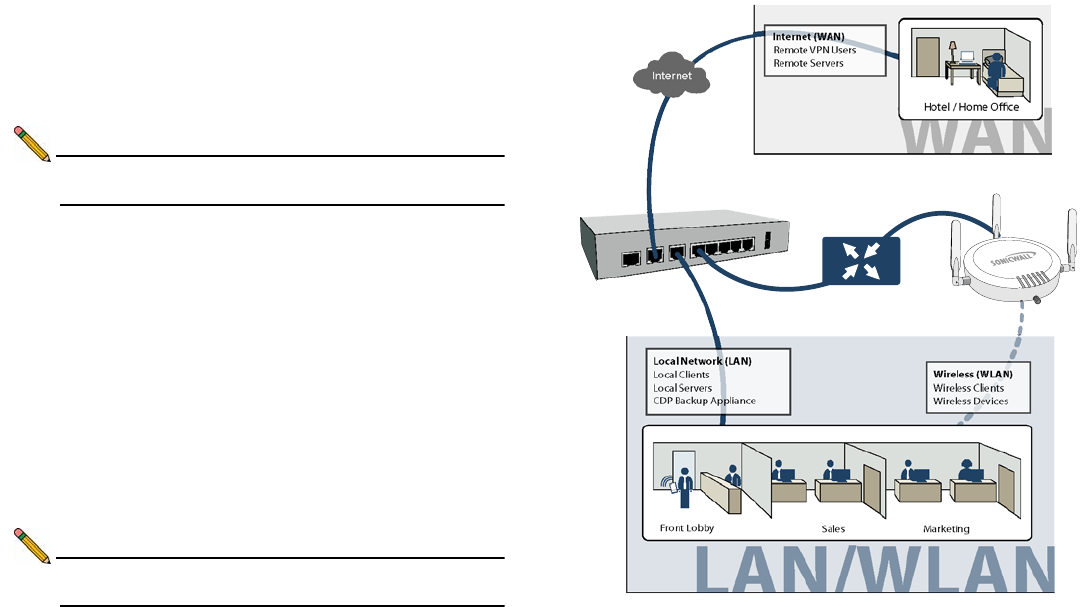
Connecting Ethernet Cable
You do not need to plug a separate power cord into the
SonicPoint. The SonicPoint obtains power through the Ethernet
cable inserted into its LAN port for enhanced deployment
flexibility. PoE can be provided using the SonicWALL PoE line
injector, or by using a third-party PoE powered switch.
Note: For more information on the SonicWALL PoE Injector,
visit <http://www.sonicwall.com/products>.
Connecting Ethernet With the SonicWALL PoE
Complete the following steps to connect a SonicPoint using the
SonicWALL Poe Injector:
1. Plug the power cord of the SonicWALL PoE injector into the
power outlet.
2. Using Ethernet cable, connect the Data in port on the
SonicWALL PoE Injector to the WLAN zone interface that
you created earlier.
3. Using Ethernet cable, connect the Data and Power out
port on the SonicWALL PoE injector to the LAN port on the
back of your SonicPoint.
The link LED lights up to indicate an active connection
Note: It takes approximately one minute for the SonicWALL
security appliance to auto-provision the SonicPoint.
Wireless Clients
Wireless Devices
Wireless (WLAN)
Hotel / Home Oce
Front Lobby Sales Marketing
X1 WAN
X0 LAN
X2 WLAN
LAN
PoE Injector
or PoE Switch
Page 30 Mounting on a Wall or Ceiling
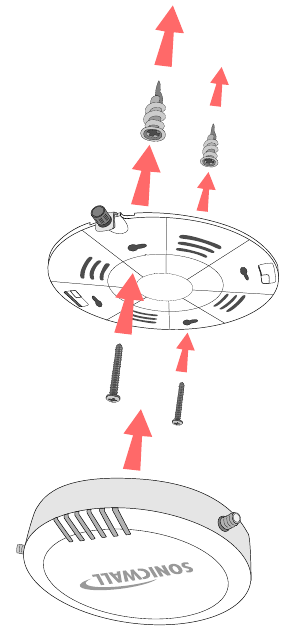
Mounting on a Wall or Ceiling
The SonicPoint ships with a mounting plate and E-Z Anchor /
Screw Kit to facilitate simple mounting to most interior surfaces.
Complete the following steps to mount the SonicPoint:
1. Remove the mounting plate from the bottom of the
SonicPoint and place the plate on the location you wish to
mount the SonicPoint.
2. Using a pencil, mark the location of two of the locking
screw holes. The holes you mark should be directly across
from each other, not adjacent to each other.
3. Screw the larger anchor screws into the wall or ceiling in
the locations you marked until the face of the screw is flush
with the surface.
4. Screw the smaller phillips-head screws into the anchors,
leaving enough space between the screw head and the
anchor surface to fit the mounting plate underneath.
5. Place the mounting place over the screws and turn to lock.
The plate should fit snugly after turning. Tighten the
standard phillips screws if needed.
6. Place the SonicPoint onto the mounting plate and turn
clockwise until it locks into place.
7. Push in and turn the mounting screw clockwise until firm.
SonicWALL SonicPoint Getting Started Guide Page 31
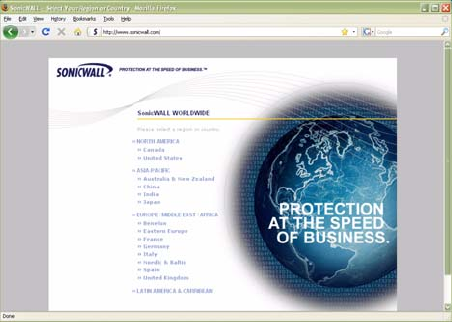
Verifying WAN (Internet) Connectivity
Complete the following steps to confirm your Internet
connectivity:
1. Connect a client computer to the wireless access point by
selecting the appropriate SSID.
2. Launch your Web browser.
3. Enter “http://www.sonicwall.com” in the address bar and
press Enter on the keyboard. The SonicWALL website
displays. If you are unable to browse to a Website, see
“Troubleshooting Tips” on page 31.
Troubleshooting Tips
If the SonicPoint locates a peer SonicOS device, the two units
perform an encrypted exchange and the profile assigned to the
relevant wireless zone is used to automatically configure
(provision) the newly added SonicPoint unit.
Your SonicPoint should automatically display in the list on the
Wireless > SonicPoints page of the management interface for
the SonicWALL security appliance managing the SonicPoint. If
it does not:
• Check that the SonicPoint is properly connected to the
SonicWALL security appliance.
• Make sure the SonicPoint is connected to an interface that
is configured as part of a Wireless zone (WLAN by default).
• In the SonicOS user interface on the SonicPoint >
SonicPoints page, click the Synchronize SonicPoints
button. The SonicWALL appliance downloads a SonicPoint
image from the SonicWALL back-end server.
• Ensure that the SonicPoint is connected to a 802.11n
compliant PoE powered ethernet connection. Ensure that
you have a PoE-capable switch, or that a PoE injector is
used to power the Ethernet connection going to the
SonicPoint appliance.
Page 32 Best Practices
Best Practices
This section outlines some best-practice guidelines for
SonicPoint installations, including Layer 2 and 3 network
provisioning requirements and recommended UTM and switch
hardware.
Layer 2 and Layer 3 Considerations
SonicWALL uses two proprietary protocols, SDP and SSPP,
neither of which can be routed across a Layer 3 device. Any
SonicPoint that is deployed must have an Ethernet connection
back to the provisioning SonicWALL UTM appliance, in the
same broadcast domain/network. In addition, with regards to
communication protocols, you must ensure that:
part3
• The SonicWALL UTM appliance has an interface or
subinterface in the same VLAN/broadcast domain as the
SonicPoint.
• SonicPoints are able to reach the DHCP scope on the
SonicWALL UTM appliance (other DHCP servers cannot
be present on the same VLAN/broadcast domain).
Wiring Considerations
When wiring for a new deployment, make sure all wiring is
CAT5, CAT5e, or CAT6 end to end. If using existing wiring, it is
always a good idea to double check that your cable runs meet
these specs as well. With regards to cable length, due to
signaling limitations in 802.3af and Ethernet, cable runs cannot
go over 100 meters between the PoE switch and SonicPoint.
When planning cable runs, also take into account that PoE
power loss increases with the length of the cable. Signal loss in
hard-wired cables can be up to 16%. If SonicPoints on long
cable runs are experiencing difficulties, they may very well
require more power.
Tested Switches
The following switches have been tested to function in
SonicPoint deployments. Review this section for compatibility
and caveats.
•Cisco Systems – Most Cisco switches are tested to work
with SonicPoint deployments, although SonicWALL does
not recommend deployments using the “Cisco Express”
switch line.
•Netgear PoE switches – SonicWALL does not
recommend deploying SonicPoints using these switches.
•D-Link PoE switches – Disable all proprietary broadcast-
control/storm-control mechanisms. These interfere with the
provisioning and acquisition mechanisms in the
SonicPoint.
•Dell – Configure Spanning Tree Protocol (STP) for fast
start on SonicPoint ports.
•Extreme – Configure STP for fast start on SonicPoint
ports.
•Foundry – Configure STP for fast start on SonicPoint
ports.
•HP ProCurve – Configure STP for fast start on SonicPoint
ports.
SonicWALL SonicPoint Getting Started Guide Page 33
Site Survey and Planning
The site survey is an important final step before actual
implementation begins. The next few paragraphs are meant as
a short review of the site survey and planning concepts covered
earlier in this book. For a full overview of site survey and
planning, refer to the SonicWALL Secure Wireless Integrated
Solutions Guide. A free copy of this document is available for a
limited time for all registered SonicPoint users.
Site Survey - Conduct a full site-walk with a wireless spectrum
scanner in all areas in which SonicPoints will be deployed; note
any existing AP’s and the channels on which they are
broadcasting. SonicWALL currently recommends using Fluke or
AirMagnet products to conduct full site surveys. You may also
wish to try out NetStumbler or MiniStumbler, which are free site
surveying tools.
Cabling - When planning, make sure you note the distance of
cable runs from where the SonicPoint will be mounted. This
must be 100 meters or less. If you are not using PoE switches,
you will also need to account for the power adapter or PoE
injector for the SonicPoints.
Signal Control - Be wary of broadcasting your wireless signal
into areas that you do not control. Check for areas where
unauthorized people might be able to access the signal and
tune the SonicPoints accordingly.
Bandwidth and Connectivity - Plan for up to 15 to 20 users for
each SonicPoint. For roaming users, plan to tune the power on
each SonicPoint so that the signal overlap is minimal. Multiple
SonicPoints broadcasting the same SSID in areas with
significant overlap can cause ongoing client connectivity issues.
Timed Use - Use the scheduling feature in SonicOS Enhanced
to shut down SonicPoints when not in use—it is recommended
that you do not operate your SonicPoints during non-business
hours (nights and weekends).
Page 34 Best Practices

SonicWALL SonicPoint Getting Started Guide Page 35
Support and Training Options
In this Section:
This section provides overviews of customer support and training options for SonicWALL appliances.
•Customer Support - page 36
•Knowledge Portal - page 36
•Onboard Help - page 37
•SonicWALL Live Product Demos - page 37
•User Forums - page 38
•Training - page 39
•Related Documentation - page 40
•SonicWALL Secure Wireless Network Integrated Solutions Guide - page 41
6
Page 36 Customer Support
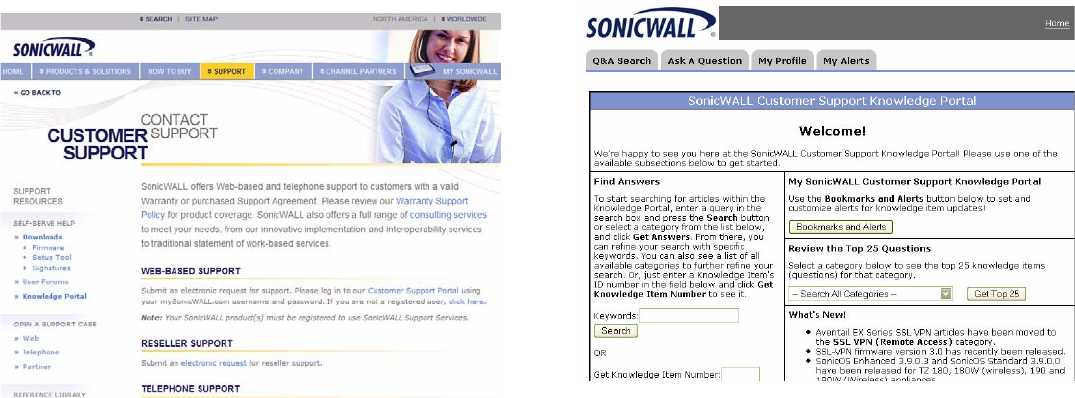
Customer Support
SonicWALL offers Web-based and telephone support to
customers who have a valid Warranty or who purchased a
Support Contract. Please review our Warranty Support Policy
for product coverage. SonicWALL also offers a full range of
consulting services to meet your needs, from our innovative
implementation services to traditional statement of work-based
services.
For further information, visit:
<http://www.sonicwall.com/us/support/contact.html>
Knowledge Portal
The Knowledge Portal allows users to search for SonicWALL
documents based on the following types of search tools:
•Browse
• Search for keywords
• Full-text search
For further information, navigate to the Support > Knowledge
Portal page at:
<http://www.mysonicwall.com/>
SonicWALL SonicPoint Getting Started Guide Page 37
Onboard Help
SonicOS features a dynamic Onboard Help in the form of
helpful tooltips that appear over various elements of the GUI
when the mouse hovers over them. Elements that display these
tooltips include text fields, radio buttons, and checkboxes.
SonicWALL Live Product Demos
The SonicWALL Live Demo Site provides free test drives of
SonicWALL security products and services through interactive
live product installations:
• Unified Threat Management Platform
• Secure Cellular Wireless
• Continuous Data Protection
• SSL VPN Secure Remote Access
• Content Filtering
• Secure Wireless Solutions
• Email Security
• SonicWALL GMS and ViewPoint
For further information, visit:
<http://livedemo.sonicwall.com/>

Page 38 User Forums
User Forums
The SonicWALL User Forums is a resource that provides users
the ability to communicate and discuss a variety of security and
appliance subject matters. In this forum, the following
categories are available for users:
• Content Security Manager topics
• Continuous Data Protection topics
• Email Security topics
• Firewall topics
• Network Anti-Virus topics
• Security Services and Content Filtering topics
• SonicWALL GMS and Viewpoint topics
• SonicPoint and Wireless topics
• SSL VPN topics
• TZ 210 / Wireless WAN - 3G Capability topics
• VPN Client topics
• VPN site-to-site and interoperability topics
For further information, visit:
<https://forum.sonicwall.com/>
SonicWALL SonicPoint Getting Started Guide Page 39
Training
SonicWALL offers an extensive sales and technical training
curriculum for Network Administrators, Security Experts and
SonicWALL Medallion Partners who need to enhance their
knowledge and maximize their investment in SonicWALL
Products and Security Applications. SonicWALL Training
provides the following resources for its customers:
• E-Training
• Instructor-Led Training
• Custom Training
• Technical Certification
• Authorized Training Partners
For further information, visit:
<http://www.sonicwall.com/us/training.html>
Page 40 Related Documentation
Related Documentation
See the following related documents for more information:
• SonicOS Enhanced Administrator’s Guide
• SonicOS Enhanced Release Notes
• SonicOS Enhanced Feature Modules
• Dashboard
• High Availability
• Multiple Admin
• NAT Load Balancing
• Packet Capture
• Radio Frequency Monitoring
• Single Sign-On
• SSL Control
• Virtual Access Points
• SonicWALL GMS 5.0 Administrator’s Guide
• SonicWALL GVC 4.0 Administrator’s Guide
• SonicWALL ViewPoint 5.0 Administrator’s Guide
• SonicWALL GAV 4.0 Administrator’s Guide
• SonicWALL IPS 2.0 Administrator’s Guide
• SonicWALL Anti-Spyware Administrator’s Guide
• SonicWALL CFS Administrator’s Guide
For further information, visit:
<http://www.sonicwall.com/us/support.html>
SonicWALL SonicPoint Getting Started Guide Page 41
SonicWALL Secure Wireless Network
Integrated Solutions Guide
The Official Guide to SonicWALL’s market-leading wireless
networking and security devices.
This 512 page book is available in hardcopy. Order the book
directly from Elsevier Publishing at:
<http://www.elsevier.com>
Page 42 SonicWALL Secure Wireless Network Integrated Solutions Guide

SonicWALL SonicPoint Getting Started Guide Page 43
Product Safety and Regulatory Information
In this Section:
This section provides regulatory, trademark, and copyright information.
•Safety and Regulatory Information for the SonicWALL SonicPoint Wireless Appliance - page 44
•Safety and Regulatory Information in German for the SonicWALL SonicPoint Wireless Appliance - page 45
•FCC Part 15 Class B Notice for the SonicWALL SonicPoint Wireless Appliance - page 46
•FCC RF Radiation Exposure Statement - page 46
•Copyright Notice - page 48
•Trademarks - page 48
7

Page 44 Safety and Regulatory Information for the SonicWALL SonicPoint Wireless Appliance
Safety and Regulatory Information for the
SonicWALL SonicPoint Wireless
Appliance
Mounting the SonicWALL
•Mount in a location away from direct sunlight and sources
of heat. A maximum ambient temperature of 104º F (40º C)
is recommended.
•Route cables away from power lines, fluorescent lighting
fixtures, and sources of noise such as radios, transmitters,
and broadband amplifiers
•The included power cord is intended for use in North
America only. For European Union (EU) customers, a power
cord is not included.
• Ensure that no water or excessive moisture can enter the
unit.
•Allow unrestricted airflow around the unit and through the
vents on the side of the unit. A minimum of 1 inch
(25.44mm) clearance is recommended.
•Consideration must be given to the connection of the
equipment to the supply circuit and the effect of over-
loading the circuits has minimal impact on overcurrent
protection and supply wiring. Appropriate consideration
of equipment nameplate ratings must be used when
addressing this concern.
Cable Connections
All Ethernet and RS232 (Console) cables are designed for intra-
building connection to other equipment. Do not connect these
ports directly to communication wiring or other wiring that exits
the building where the SonicWALL is located.
Power Supply Information
If the power supply is missing from your SonicWALL product
package, please contact SonicWALL Technical Support at 408-
752-7819 for a replacement. This product should only be used
with a UL listed power supply marked “Class 2” or “LPS”, with an
output rated 48 VDC, minimum 0.35 A.
Regulatory Model/Type Product Name
APL21-069 SonicPoint NF
SonicWALL SonicPoint Getting Started Guide Page 45
Safety and Regulatory Information in
German for the SonicWALL SonicPoint
Wireless Appliance
Weitere Hinweise zur Montage
•Wählen Sie für die Montage einen Ort, der keinem direkten
Sonnenlicht ausgesetzt ist und sich nicht in der Nähe von
Wärmequellen befindet. Die Umgebungstemperatur darf
nicht mehr als 40 °C betragen.
•Führen Sie die Kabel nicht entlang von Stromleitungen,
Leuchtstoffröhren und Störquellen wie Funksendern oder
Breitbandverstärkern.
•Das beigefügte Netzkabel ist nur für den Betrieb in
Nordamerika vergesehen. Für Kunden in der Europäischen
Union ist kein Kabel beigefügt.
•Stellen Sie sicher, dass das Gerät vor Wasser und hoher
Luftfeuchtigkeit geschützt ist.
•Stellen Sie sicher, dass die Luft um das Gerät herum
zirkulieren kann und die Lüftungsschlitze an der Seite des
Gehäuses frei sind. Hier ist ein Belüftungsabstand von
mindestens 26 mm einzuhalten.
• Vergewissern Sie sich, dass das Gerät sicher im Rack
befestigt ist.
Kabelverbindungen
Alle Ethernet- und RS232-C-Kabel eignen sich für die
Verbindung von Geräten in Innenräumen. Schließen Sie an die
Anschlüsse der SonicWALL keine Kabel an, die aus dem
Gebäude herausgeführt werden, in dem sich das Gerät befindet.
Informationen zur Stromversorgung
Sollte das Netzteil nicht im Lieferumfang der SonicWALL
enthalten sein, wenden Sie sich diesbezüglich an den
technischen Support von SonicWALL (Tel.: +1-408-752-7819).
Dieses Produkt darf nur in Verbindung mit einem nach den
Normen der Underwriter Laboratories, USA als „UL-gelistet“
zugelassenen Netzteil der Kategorie „Class 2“ oder „LPS“
verwendet werden. Ausgang: 48 VDC Gleichsspannung, mind.
0,35 A.

Page 47 FCC Part 15 Class B Notice for the SonicWALL SonicPoint Wireless Appliance
FCC Part 15 Class B Notice for the
SonicWALL SonicPoint Wireless
Appliance
NOTE: This equipment was tested and found to comply with the limits
for a Class B digital device, pursuant to Part 15 of the FCC Rules. These
limits are designed to provide reasonable protection against harmful
interference in a residential installation. This equipment generates,
uses, and can radiate radio frequency energy. And, if not installed and
used in accordance with the instructions, may cause harmful
interference to radio communications. However, there is no guarantee
that interference will not occur in a particular installation. If the
equipment does cause harmful interference to radio or television
reception, which can be determined by turning the equipment off and on,
the user is encouraged to try and correct the interference using one or
more of the following measures:
• Reorient or relocate the receiving antenna.
• Increase the separation between the equipment and the receiver.
• Connect the equipment into an outlet on a circuit different from the
receiver connection.
• Consult SonicWALL for assistance.
Complies with EN55022 Class B and CISPR22 Class B.
*Refer to the label on the bottom of the unit for device information
including Class A or Class B FCC information.
FCC Caution: Any changes or modifications not expressly approved by
the party responsible for compliance could void the user's authority to
operate this equipment.
For operation within 5.15 ~ 5.25GHz frequency range, it is restricted to
indoor environment.
FCC and IC RF Radiation Exposure Statement
This equipment complies with FCC and IC RF radiation exposure limits
set forth for an uncontrolled environment. This equipment should be
installed and operated with a minimum distance of 20 centimeters (7.9
inches) between the radiator (antenna) and your body. This transmitter
must not be co-located or operating in conjunction with any other
antenna or transmitter.
For more information regarding the above statement, please contact
SonicWALL, Inc. at:
1143 Borregas Avenue
Sunnyvale, CA, 94089-1306
1-408-745-9600
North American Authorized Channels
SonicWALL declares that the APL21-069 (FCC ID: QWU-069)
(IC: 4408A-069) when sold in US or Canada is limited to CH1~CH11 by
specified firmware controlled in the USA.
Canadian Radio Frequency Emissions Statement
This Class B digital apparatus complies with Canadian ICES-003.
Cet appareil numérique de la classe B est conforme à la norme NMB-
003 du Canada.
Industry Canada Statement
This device complies with RSS-210 of the Industry Canada Rules.
Operation is subject to the following two conditions:
FCC and IC
(1) This device may not cause harmful interference, and (2) this device
must accept any interference received, including interference that may
cause undesired operation.
Caution:
The device for the band 5150-5250 MHz is only for indoor usage to
reduce potential for harmful interference to co-channel mobile satellite
systems.
This device has been designed to operate with an antenna having a
maximum gain of 4 dBm. Antenna having a higher gain is strictly
prohibited per regulations of Industry Canada. The required antenna
impedance is 50 ohms.
SonicPoint_N_GSG.book Page 47 Monday, February 2, 2009 2:50 PM

SonicWALL SonicPoint Getting Started Guide Page 47
This device is a 2.4 GHz wideband transmission system (transceiver),
intended for use in all EU member states and EFTA countries, except in
France and Italy where restrictive use applies.
In Italy the end-user should apply for a license at the national spectrum
authorities in order to obtain authorization to use the device for setting
up outdoor radio links and/or for supplying public access to
telecommunications and/or network services.
This device may not be used for setting up outdoor radio links in France
and in some areas the RF output power may be limited to 10 mW EIRP
in the frequency range of 2454 – 2483.5 MHz. For detailed information
the end-user should contact the national spectrum authority in France.
Declaration of Conformity
Certificate #: EU00170-A
I, the undersigned, hereby declare that the equipment specified above
conforms to the above Directives and Standards. Quality control
procedures will ensure series production of equipment will be compliant.
Application of council
Directive 2004/108/EC (EMC)
2006/95/EC (LVD)
1999/5/EC (R&TTE)
Standard(s) to which
conformity is declared EN 55022 (1998) +A1 +A2 Class B
EN 55024 (1998) +A2 +A2
EN 61000-3-2 (2000) +A2
EN 61000-3-3 (1995) A2
EN 60950-1 (2001) +A11
National Deviations: AR, AT, AU, BE, CA, CH,
CN, CZ, DE, DK, FI, FR, GB, GR, HU, IL, IN, IT,
JP, KE, KR, MY, NL, NO, PL, SE, SG, SI, SK, US
EN 300 328-1/-2 (2003)
EN 301 893 1.3.1
EN 301 893 1.4.1
EN50385 : (2002)
Manufacturer/
Responsible Party SonicWALL, Inc.
1143 Borregas Avenue
Sunnyvale, CA 94089 USA
Type of Equipment Information Technology Equipment
Internet Security (Firewall/VPN) Appliance, with
802.11b/g/n Wireless Router Tabletop with
external power supply.
Type Numbers APL21-070
May be Marketed as SonicPoint NF
Signature /s/ John Gmuender__________
V.P. Engineering
Date _1/23/09_

Page 48 FCC Part 15 Class B Notice for the SonicWALL SonicPoint Wireless Appliance
SonicWALL tímto prohlašuje, že tento APL21-069 je ve shodě se základními požadavky a
dalšími příslušnými ustanoveními směrnice 1999/5/ES.
Undertegnede SonicWALL erklærer herved, at følgende udstyr APL21-069 overholder de
væsentlige krav og øvrige relevante krav i direktiv 1999/5/EF.
Hiermit erklärt SonicWALL, dass sich das Gerät APL21-069 in Übereinstimmung mit den
grundlegenden Anforderungen und den übrigen einschlägigen Bestimmungen der
Richtlinie 1999/5/EG bendet.
Käesolevaga kinnitab SonicWALL seadme APL21-069 vastavust direktiivi 1999/5/EÜ
põhinõuetele ja nimetatud direktiivist tulenevatele teistele asjakohastele sätetele.
Hereby, SonicWALL, declares that this APL21-069 is in compliance with the essential
requirements and other relevant provisions of Directive 1999/5/EC.
Por medio de la presente SonicWALL declara que el APL21-069 cumple con los requisitos
esenciales y cualesquiera otras disposiciones aplicables o exigibles de la Directiva
1999/5/CE.
ΜΕ ΤΗΝ ΠΑΡΟΥΣΑ SonicWALL ΔΗΛΩΝΕΙ ΟΤΙ APL21-069 ΣΥΜΜΟΡΦΩΝΕΤΑΙ ΠΡΟΣ ΤΙΣ
ΟΥΣΙΩΔΕΙΣ ΑΠΑΙΤΗΣΕΙΣ ΚΑΙ ΤΙΣ ΛΟΙΠΕΣ ΣΧΕΤΙΚΕΣ ΔΙΑΤΑΞΕΙΣ ΤΗΣ ΟΔΗΓΙΑΣ 1999/5/ΕΚ.
Par la présente SonicWALL déclare que l'appareil APL21-069 est conforme aux exigences
essentielles et aux autres dispositions pertinentes de la directive 1999/5/CE.
Con la presente SonicWALL dichiara che questo APL21-069 è conforme ai requisiti
essenziali ed alle altre disposizioni pertinenti stabilite dalla direttiva 1999/5/CE.
Ar šo SonicWALL deklarē, ka APL21-069 atbilst Direktīvas 1999/5/EK būtiskajām prasībām
un citiem ar to saistītajiem noteikumiem.
Šiuo SonicWALL deklaruoja, kad šis APL21-069 atitinka esminius reikalavimus ir kitas
1999/5/EB Direktyvos nuostatas.
Hierbij verklaart SonicWALL dat het toestel APL21-069 in overeenstemming is met de
essentiële eisen en de andere relevante bepalingen van richtlijn 1999/5/EG.
Hawnhekk, SonicWALL, jiddikjara li dan APL21-069 jikkonforma mal-ħtiġijiet essenzjali u
ma provvedimenti oħrajn relevanti li hemm d-Dirrettiva 1999/5/EC.
Alulírott, SonicWALL nyilatkozom, hogy a APL21-069 megfelel a vonatkozó alapvetõ
követelményeknek és az 1999/5/EC irányelv egyéb elõírásainak.
Niniejszym SonicWALL oświadcza, że APL21-069 jest zgodny z zasadniczymi wymogami
oraz pozostałymi stosownymi postanowieniami Dyrektywy 1999/5/EC.
SonicWALL declara que este APL21-069 está conforme com os requisitos essenciais e
outras disposições da Directiva 1999/5/CE.
SonicWALL izjavlja, da je ta APL21-069 v skladu z bistvenimi zahtevami in ostalimi
relevantnimi določili direktive 1999/5/ES.
SonicWALL týmto vyhlasuje, že APL21-069 spĺňa základné požiadavky a všetky príslušné
ustanovenia Smernice 1999/5/ES.
SonicWALL vakuuttaa täten että APL21-069 tyyppinen laite on direktiivin 1999/5/EY
oleellisten vaatimusten ja sitä koskevien direktiivin muiden ehtojen mukainen.
Härmed intygar SonicWALL att denna APL21-069 står I överensstämmelse med de
väsentliga egenskapskrav och övriga relevanta bestämmelser som framgår av direktiv
1999/5/EG.
SonicWALL SonicPoint Getting Started Guide Page 49
Copyright Notice
© 2009 SonicWALL, Inc.
All rights reserved.
Under the copyright laws, this manual or the software described within,
cannot be copied, in whole or part, without the written consent of the
manufacturer, except in the normal use of the software to make a
backup copy. The same proprietary and copyright notices must be
affixed to any permitted copies as were affixed to the original. This
exception does not allow copies to be made for others, whether or not
sold, but all of the material purchased (with all backup copies) can be
sold, given, or loaned to another person. Under the law, copying
includes translating into another language or format.
Specifications and descriptions subject to change without notice.
Trademarks
SonicWALL is a registered trademark of SonicWALL, Inc.
Microsoft Windows 98, Windows Vista, Windows 2000, Windows XP,
Windows Server 2003, Internet Explorer, and Active Directory are
trademarks or registered trademarks of Microsoft Corporation.
Other product and company names mentioned herein may be
trademarks and/or registered trademarks of their respective companies
and are the sole property of their respective manufacturers.
Page 50 Trademarks

©2008SonicWALL,Inc.is aregisteredtrademarkofSonicWALL,Inc.Otherproductnamesmentionedhereinmaybetrademarksand/orregisteredtrademarks of their respective companies. Specications and descriptions subject to change without notice.
SonicWALL, Inc.
1143 Borregas Avenue T +1 408.745.9600
www.sonicwall.com
SunnyvaleCA94089-1306 F+1408.745.9300
P/N 232-001620-50
Rev A 11/08