Sonos CR001 Controller for Digital Music Distribution System User Manual
Sonos, Inc. Controller for Digital Music Distribution System
Sonos >
Contents
- 1. Users Manual 1 of 2
- 2. Users Manual 2 of 2
Users Manual 1 of 2

Sonos Digital Music System
User Guide
TM

Sonos Digital Music System User Guide.
For use with the Sonos ZonePlayer ZP100 (including Sonos System Setup software CD-ROM) and the
Sonos Controller CR100.
THIS DOCUMENT CONTAINS INFORMATION THAT IS SUBJECT TO CHANGE WITHOUT NOTICE. No
part of this publication may be reproduced or transmitted in any form or by any means, electronic or
mechanical, including but not limited to photocopying, recording, information retrieval systems, or
computer network without the written permission of Sonos, Inc.
Sonos, Sonosnet, and all Sonos logos are trademarks of Sonos, Inc.
Macintosh® and Mac OS® are trademarks of Apple Computer, Inc., registered in the U.S. and other countries.
Windows® XP and Windows® 2000 are either registered trademarks or trademarks of Microsoft Corporation
in the United States and/or other countries.
This product includes technology owned by Microsoft Corporation and under a license from Microsoft
Licensing, GP. Use or distribution of such technology outside of this product is prohibited without a license
from Microsoft Corporation and/or Microsoft Licensing, GP as applicable.
MPEG Layer-3 audio decoding technology licensed from Fraunhofer IIS and Thomson.
Sonos uses MSNTP software, which was developed by N.M. Maclaren at the University of Cambridge.
© Copyright, N.M. Maclaren, 1996, 1997, 2000; © Copyright, University of Cambridge, 1996, 1997, 2000.
All other products and services mentioned may be trademarks or service marks of their respective owners.
© 2004-2005 by Sonos, Inc. All rights reserved.
Please visit our Web site at www.sonos.com for the latest product news.
For the latest product documentation, go to http://sonos.com/support and click Documents.
Version: 0504
April, 2005

Contents
Chapter 1 The Sonos Digital Music System
Your Computer Network . . . . . . . . . . . . . . . . . . . . . . . . . . . . . . . . . . . . . . . . . . . . . . . . . . . . . . . . . . 1-2
Sonos Online Services . . . . . . . . . . . . . . . . . . . . . . . . . . . . . . . . . . . . . . . . . . . . . . . . . . . . . . . . . . . . . 1-3
Technical Support . . . . . . . . . . . . . . . . . . . . . . . . . . . . . . . . . . . . . . . . . . . . . . . . . . . . . . . . . . . . . . . . . 1-4
Chapter 2 ZonePlayer Setup and Operation
Where to Begin . . . . . . . . . . . . . . . . . . . . . . . . . . . . . . . . . . . . . . . . . . . . . . . . . . . . . . . . . . . . . . . . . . . . 2-1
1-2-3 Setup . . . . . . . . . . . . . . . . . . . . . . . . . . . . . . . . . . . . . . . . . . . . . . . . . . . . . . . . . . . . . . . . . . . . . . . . 2-1
ZonePlayer ZP100 Front . . . . . . . . . . . . . . . . . . . . . . . . . . . . . . . . . . . . . . . . . . . . . . . . . . . . . . . . . . . 2-2
Rear Panel Connectors . . . . . . . . . . . . . . . . . . . . . . . . . . . . . . . . . . . . . . . . . . . . . . . . . . . . . . . . . . . . 2-3
Adding More ZonePlayers . . . . . . . . . . . . . . . . . . . . . . . . . . . . . . . . . . . . . . . . . . . . . . . . . . . . . . . . . 2-7
Chapter 3 Windows® Setup and Operation
Installing the Desktop Controller Software . . . . . . . . . . . . . . . . . . . . . . . . . . . . . . . . . . . . . . . . 3-2
Renaming a ZonePlayer . . . . . . . . . . . . . . . . . . . . . . . . . . . . . . . . . . . . . . . . . . . . . . . . . . . . . . . . . . . 3-6
Playback Controls . . . . . . . . . . . . . . . . . . . . . . . . . . . . . . . . . . . . . . . . . . . . . . . . . . . . . . . . . . . . . . . . . 3-8
Controlling the Volume . . . . . . . . . . . . . . . . . . . . . . . . . . . . . . . . . . . . . . . . . . . . . . . . . . . . . . . . . . . 3-9
Adjusting ZonePlayer Sound Settings . . . . . . . . . . . . . . . . . . . . . . . . . . . . . . . . . . . . . . . . . . . .3-10
Managing Your Zones . . . . . . . . . . . . . . . . . . . . . . . . . . . . . . . . . . . . . . . . . . . . . . . . . . . . . . . . . . . .3-10
Making Music Selections . . . . . . . . . . . . . . . . . . . . . . . . . . . . . . . . . . . . . . . . . . . . . . . . . . . . . . . . .3-13
The Music Queue . . . . . . . . . . . . . . . . . . . . . . . . . . . . . . . . . . . . . . . . . . . . . . . . . . . . . . . . . . . . . . . . .3-14
Sonos Playlists . . . . . . . . . . . . . . . . . . . . . . . . . . . . . . . . . . . . . . . . . . . . . . . . . . . . . . . . . . . . . . . . . . . .3-17
Internet Radio . . . . . . . . . . . . . . . . . . . . . . . . . . . . . . . . . . . . . . . . . . . . . . . . . . . . . . . . . . . . . . . . . . . .3-18
Connecting Line-In Sources . . . . . . . . . . . . . . . . . . . . . . . . . . . . . . . . . . . . . . . . . . . . . . . . . . . . . .3-20
Managing Music Folders . . . . . . . . . . . . . . . . . . . . . . . . . . . . . . . . . . . . . . . . . . . . . . . . . . . . . . . . .3-21
Getting Software Updates . . . . . . . . . . . . . . . . . . . . . . . . . . . . . . . . . . . . . . . . . . . . . . . . . . . . . . . .3-24
Sonos System Registration . . . . . . . . . . . . . . . . . . . . . . . . . . . . . . . . . . . . . . . . . . . . . . . . . . . . . . .3-27
Turning Off All ZonePlayers . . . . . . . . . . . . . . . . . . . . . . . . . . . . . . . . . . . . . . . . . . . . . . . . . . . . . .3-27
Resetting Your Desktop Controller Software . . . . . . . . . . . . . . . . . . . . . . . . . . . . . . . . . . . . .3-27
Chapter 4 Macintosh® OS X Setup and Operation
Installing the Sonos Setup Assistant Software . . . . . . . . . . . . . . . . . . . . . . . . . . . . . . . . . . . . 4-1

ii
The Sonos Assistant Main Menu . . . . . . . . . . . . . . . . . . . . . . . . . . . . . . . . . . . . . . . . . . . . . . . . . . 4-4
Renaming a ZonePlayer . . . . . . . . . . . . . . . . . . . . . . . . . . . . . . . . . . . . . . . . . . . . . . . . . . . . . . . . . . . 4-5
Changing Your Preferences . . . . . . . . . . . . . . . . . . . . . . . . . . . . . . . . . . . . . . . . . . . . . . . . . . . . . . . 4-6
Updating Your Sonos Assistant Software . . . . . . . . . . . . . . . . . . . . . . . . . . . . . . . . . . . . . . . . . 4-7
Managing Music Folders . . . . . . . . . . . . . . . . . . . . . . . . . . . . . . . . . . . . . . . . . . . . . . . . . . . . . . . . . . 4-7
Chapter 5 Using Your Sonos Controller
Using the Controller . . . . . . . . . . . . . . . . . . . . . . . . . . . . . . . . . . . . . . . . . . . . . . . . . . . . . . . . . . . . . . . 5-2
Controlling the Volume . . . . . . . . . . . . . . . . . . . . . . . . . . . . . . . . . . . . . . . . . . . . . . . . . . . . . . . . . . . 5-5
Managing Your Zones . . . . . . . . . . . . . . . . . . . . . . . . . . . . . . . . . . . . . . . . . . . . . . . . . . . . . . . . . . . . 5-7
Making Music Selections . . . . . . . . . . . . . . . . . . . . . . . . . . . . . . . . . . . . . . . . . . . . . . . . . . . . . . . . . 5-11
The Music Queue . . . . . . . . . . . . . . . . . . . . . . . . . . . . . . . . . . . . . . . . . . . . . . . . . . . . . . . . . . . . . . . . . 5-11
Creating and Managing Sonos Playlists . . . . . . . . . . . . . . . . . . . . . . . . . . . . . . . . . . . . . . . . . . 5-15
Internet Radio . . . . . . . . . . . . . . . . . . . . . . . . . . . . . . . . . . . . . . . . . . . . . . . . . . . . . . . . . . . . . . . . . . . . 5-16
System Settings . . . . . . . . . . . . . . . . . . . . . . . . . . . . . . . . . . . . . . . . . . . . . . . . . . . . . . . . . . . . . . . . . . 5-17
Adjusting the Sound Settings for a ZonePlayer . . . . . . . . . . . . . . . . . . . . . . . . . . . . . . . . . . 5-18
Managing Your Music Folders . . . . . . . . . . . . . . . . . . . . . . . . . . . . . . . . . . . . . . . . . . . . . . . . . . . 5-19
Renaming a ZonePlayer . . . . . . . . . . . . . . . . . . . . . . . . . . . . . . . . . . . . . . . . . . . . . . . . . . . . . . . . . . 5-23
Adjusting Your Controller’s Settings . . . . . . . . . . . . . . . . . . . . . . . . . . . . . . . . . . . . . . . . . . . . . 5-24
Getting Software Updates . . . . . . . . . . . . . . . . . . . . . . . . . . . . . . . . . . . . . . . . . . . . . . . . . . . . . . . . 5-27
Advanced Settings . . . . . . . . . . . . . . . . . . . . . . . . . . . . . . . . . . . . . . . . . . . . . . . . . . . . . . . . . . . . . . . 5-29
Battery Charging . . . . . . . . . . . . . . . . . . . . . . . . . . . . . . . . . . . . . . . . . . . . . . . . . . . . . . . . . . . . . . . . . 5-31
Appendix A Installation Tips and Basic Troubleshooting
Basic Troubleshooting . . . . . . . . . . . . . . . . . . . . . . . . . . . . . . . . . . . . . . . . . . . . . . . . . . . . . . . . . . . . A-1
About Your Music System . . . . . . . . . . . . . . . . . . . . . . . . . . . . . . . . . . . . . . . . . . . . . . . . . . . . . . . . . A-7
Support Diagnostics . . . . . . . . . . . . . . . . . . . . . . . . . . . . . . . . . . . . . . . . . . . . . . . . . . . . . . . . . . . . . . . A-8
Appendix B Sonos Device Specifications
Sonos ZonePlayer ZP100 . . . . . . . . . . . . . . . . . . . . . . . . . . . . . . . . . . . . . . . . . . . . . . . . . . . . . . . . . . B-1
Sonos Controller CR100 . . . . . . . . . . . . . . . . . . . . . . . . . . . . . . . . . . . . . . . . . . . . . . . . . . . . . . . . . . . B-3
Appendix C System Setup-Without Windows® or Macintosh® OS X
Setup Using the Sonos Controller . . . . . . . . . . . . . . . . . . . . . . . . . . . . . . . . . . . . . . . . . . . . . . . . . C-2

The Sonos Digital Music System
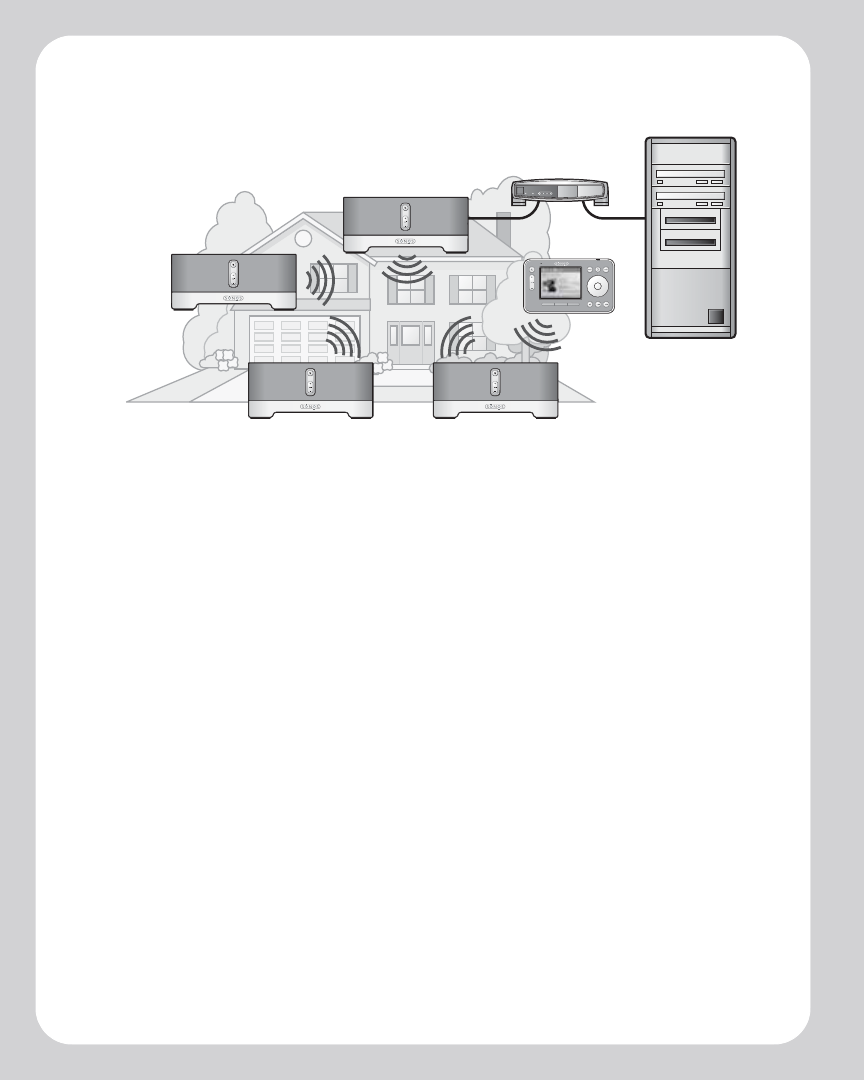
It's the first and only multi-room digital music system with a wireless, full-color LCD
screen Controller. This means you can now enjoy all your digital music, all over your
home, and control it all from the palm of your hand.
With a Sonos Digital Music System you don't need a computer in every room, a music
server, or a wireless computer network. Just a Sonos ZonePlayer and speakers in the
rooms of your choice, and a Sonos Controller in hand to access all your digital music -
no matter where it’s stored.
Now you really can store your music wherever you please - on your computer, music
server, network-attached storage (NAS) box, or even an external source like a CD player.
Best of all, you can listen to music wherever you have Sonos ZonePlayers - in the
bedroom, on the deck, or both.
Key Benefits
With a Sonos Digital Music System you can:
• Enjoy digital music in every room in your house - including outside
• Access your entire digital music collection easily using the Controller’s full-color
LCD screen and scroll wheel
• Control all your music and all your rooms from anywhere - wirelessly
• Play the same song in different rooms or different songs in different rooms
• Get great sound in every room
Sonos Digital Music System Components
• Sonos ZonePlayer ZP100, including the Sonos System Setup Software CD-ROM
• Sonos Controller CR100
Chapter 1
TM
Sonos Digital Music System User Guide1-2
During setup, a unique Household ID is assigned to your Sonos Digital Music System.
This ensures that your system operates independently and securely even if there are
other Sonos Digital Music Systems in your neighborhood.
Your Computer Network
To play the digital music files stored on your computer, your computer network must
meet the following requirements:
Network requirements
• You must have an Ethernet network interface connection in your computer. If
you do not have one, you will need to buy and install a Network Interface Card
(NIC) before proceeding.
• DSL/cable modem, or LAN-based, high-speed Internet connection recom-
mended.
• If you have a cable or DSL modem connected directly to your computer, you
should have a router connected between your modem and your computer
to maintain your computer’s security. If you do not have a router, you should buy
and install one before proceeding.

Chapter 1: The Sonos Digital Music System 1-3
System requirements
• 500 MHz processor or better
• 128 MB RAM minimum/256 MB RAM recommended
• Network hardware as described above
Compatible operating systems
•Windows® XP
• Windows® 2000
•Macintosh® OS X
Compatible playlist formats
•Rhapsody™
•iTunes®
• Musicmatch™
•Windows Media Player®
• WinAmp®
Compatible play formats
•MP3
• WMA (not including lossless)
•AAC (MPEG4)
• WAV (uncompressed)
• AIFF (uncompressed)
• FLAC (lossless)
• Ogg Vorbis
Sonos Online Services
•For the latest Sonos Digital Music System information, go to www.sonos.com.
•For product service and support, and the latest user documentation, go to
http://support.sonos.com.
Sonos Digital Music System User Guide1-4
Technical Support
•Web site: For help with troubleshooting and support issues, visit our Web site at
http://support.sonos.com
•Telephone: (800) 680-2345
Documentation Conventions
Important Safety Information for the Sonos ZonePlayer
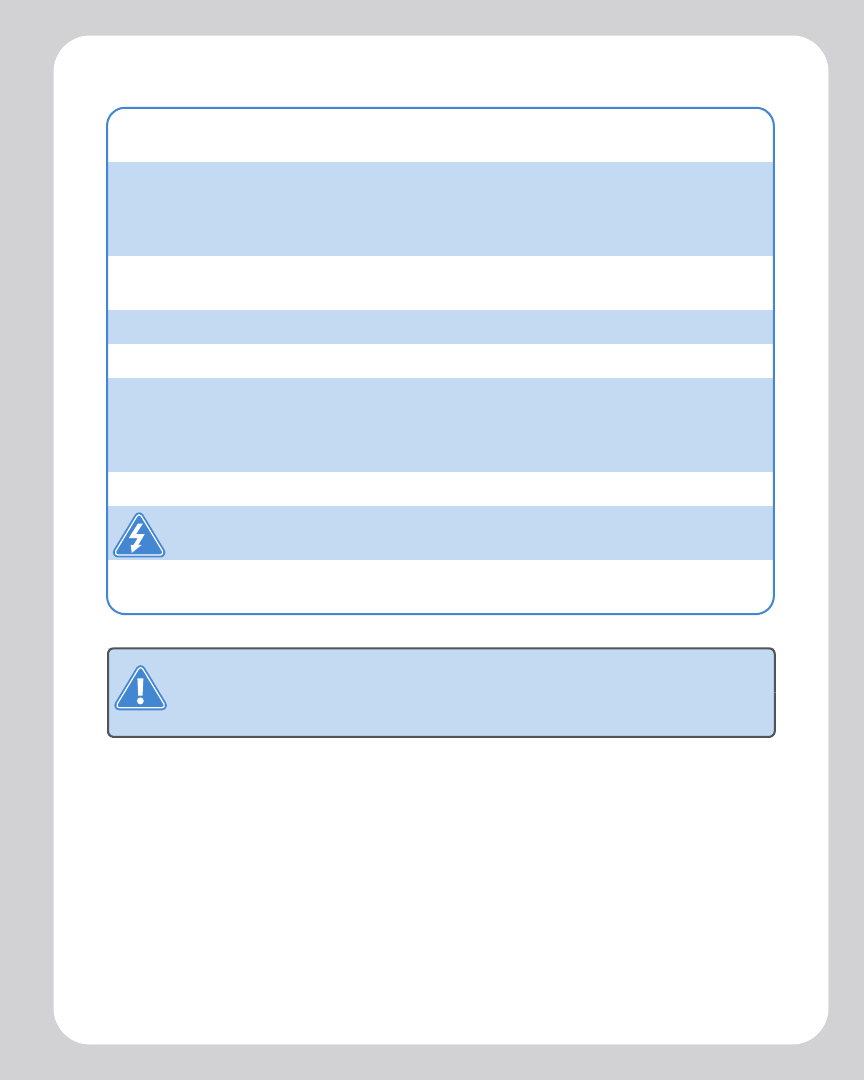
These symbols may appear in your Sonos Digital Music System documentation.
Caution. This label warns against dangerous practices that may result in
possible system failure or damage to the equipment.
Warning. This label warns against dangerous practices that will result in
personal injury or possible system failure.
Note. Notes contain helpful suggestions or important information that should
be emphasized.
1. Read these instructions.
2. Keep these instructions.
3. Heed all warnings.
4. Follow all instructions.
5. Do not use this apparatus near water.
6. Clean only with dry cloth.
7. Do not block any ventilation openings. Install in accordance with the manufacturer´s instructions.
Chapter 1: The Sonos Digital Music System 1-5
8. Do not install near any heat sources such as radiators, heat registers, stoves, or other apparatus
(including amplifiers) that produce heat.
9. Do not defeat the safety purpose of the polarized or grounding-type plug. A polarized plug has
two blades with one wider than the other. A grounding-type plug has two blades and a third
grounding prong. The wide blade or the third prong are provided for your safety. If the provided
plug does not fit into your outlet, consult an electrician for replacement of the obsolete outlet.
10. Protect the power cord from being walked on or pinched, particularly at plugs, convenience
receptacles, and the point where they exit from the apparatus.
11. Only use attachments/accessories specified by the manufacturer.
12. Unplug this apparatus during lightning storms or when unused for long periods of time.
13. Refer all servicing to qualified service personnel. Servicing is required when the apparatus has
been damaged in any way, such as power-supply cord or plug is damaged, liquid has been spilled or
objects have fallen into the apparatus, the apparatus has been exposed to rain or moisture, does not
operate normally, or has been dropped.
14. The Mains plug should be readily available to disconnect the equipment.
15. Warning: To reduce the risk of fire or electric shock, do not expose this apparatus to
rain or moisture.
16. Do not expose apparatus to dripping or splashing and do not place objects filled with liquids,
such as vases, on the apparatus.
Caution Household cleaners or solvents can damage the finish on your ZonePlayers
or Controllers. Clean only with a dry soft cloth.

Sonos Digital Music System User Guide1-6
USA
This equipment has been tested and found to comply with the limits for a Class B
digital device, pursuant to part 15 of the FCC Rules. These limits are designed to
provide reasonable protection against harmful interference in a residential installation.
This equipment generates, uses and can radiate radio frequency energy and, if not
installed and used in accordance with the instructions, may cause harmful interference
to radio communications. However, there is no guarantee that interference will not
occur in a particular installation. If this equipment does cause harmful interference to
radio or television reception, which can be determined by turning the equipment off
and on, the user is encouraged to try to correct the interference by one or more of the
following measures:
• Reorient or relocate the receiving antenna.
• Increase the separation between the equipment and receiver.
• Connect the equipment into an outlet on a circuit different from that to which
the receiver is connected.
• Consult the dealer or an experienced audio technician for help. Modifications
not expressly approved by the manufacturer may void the user's authority to
operate the equipment under FCC rules.
Canada
This Class B digital apparatus complies with Canadian ICES-003 and RSS-210.
Industry Canada
The installer of this radio equipment must ensure that the antenna is located or
pointed such that it does not emit RF field in excess of Health Canada limits for the
general population; consult Safety Code 6, obtainable from Health Canada’s Web site
www.hc-sc.gc.ca/rpb.
Europe
This product complies with the requirements of the R&TTE Directive (99-EC-5).
RF Exposure Requirements
To comply with FCC and EU exposure essential requirements, a minimum separation
distance of 20cm (8 inches) is required between the equipment and the body of the
user or nearby persons.
Attention. In France, operation is limited to indoor use within the band
2.454-2.4835 GHz.
ZonePlayer Setup and Operation
ZonePlayer Package Contents
• Sonos ZonePlayer ZP100
• Sonos System Setup software CD-ROM
• Ethernet (network) cable
•Power cord
•Setup Instructions
Where to Begin
Carefully unpack your Sonos ZonePlayer(s). Then follow the step-by-step instructions
on the following pages to ensure that you set up your speakers and your ZonePlayer(s)
correctly.
1-2-3 Setup
It takes just 3 steps to get your Sonos Digital Music System up and running:
Connect speakers to your ZonePlayer
Connect the first Sonos ZonePlayer (with Ethernet cable supplied) to your home
network
Install the computer software (or use a Controller) to configure your music system
Note: If you should experience any difficulty during the setup process, see
Appendix A for additional help.
1
2
3
Chapter 2
Sonos Digital Music System User Guide2-2
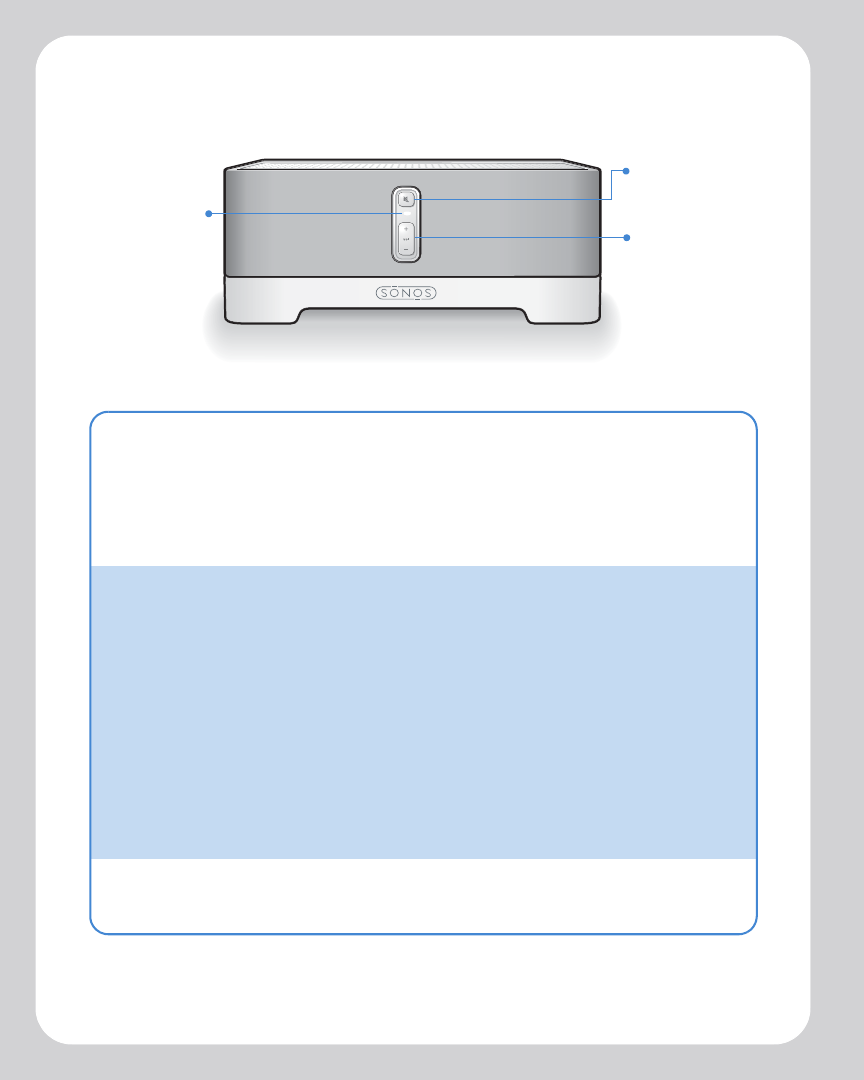
ZonePlayer ZP100 Front
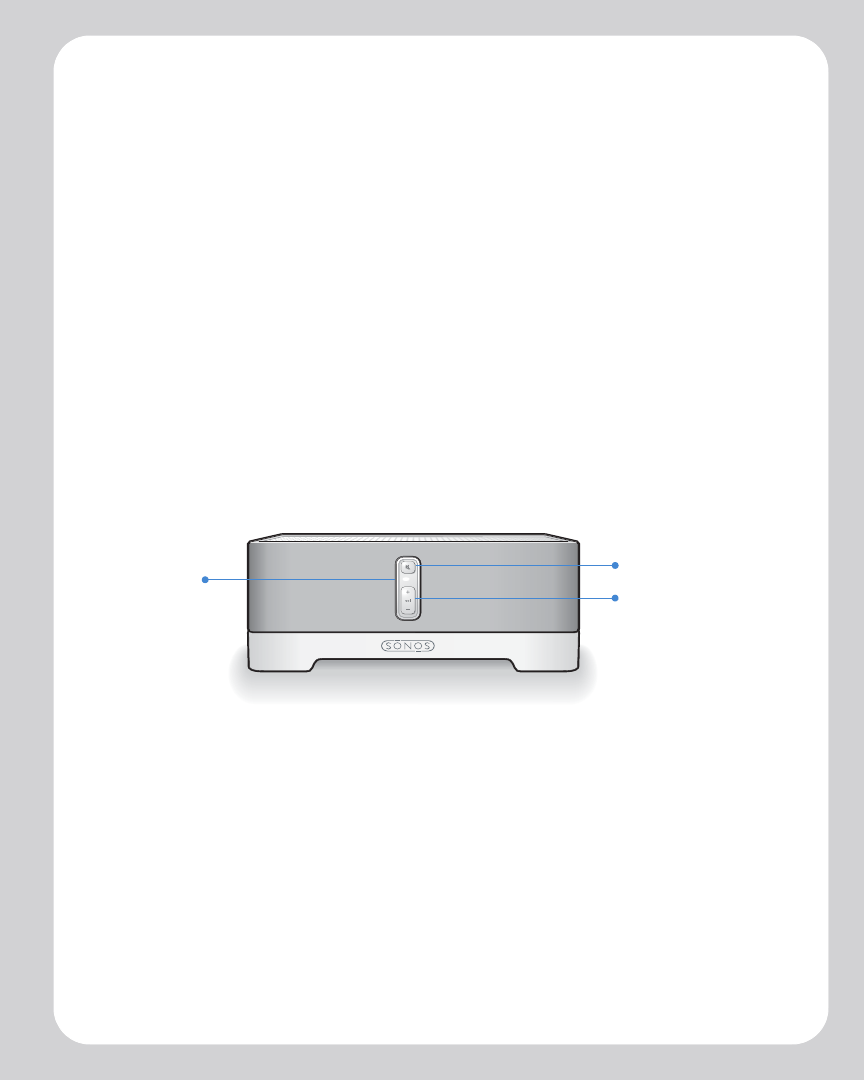
ZonePlayer status indicator • Indicator flashes white when powering up or
connecting to your Sonos Digital Music System.
• Indicator is solid white when powered up and
connected to your Sonos Digital Music System.
• See "ZonePlayer LED Explanations" on page A-5 for
additional status indications.
Mute button To mute/unmute this ZonePlayer: Press the Mute
button to mute or unmute this ZonePlayer.
To mute/unmute all ZonePlayers: Press and hold the
Mute button for 3 seconds to mute all ZonePlayers in
your household. Press and hold for 3 seconds to unmute
all ZonePlayers.
Mute button indicator:
• Lights solid green when sound is muted (and
ZonePlayer Status LED is solid white).
• Flashes green rapidly when household mute is about
to take place.
• Flashes green slowly when ZonePlayer is connecting
to your music system.
Volume up (+)
Volume down (-)
Press these buttons to adjust the volume up and down.
ZonePlayer
status
indicator
Mute button
Volume up (+)
Volume down (-)
Chapter 2: ZonePlayer Setup and Operation 2-3
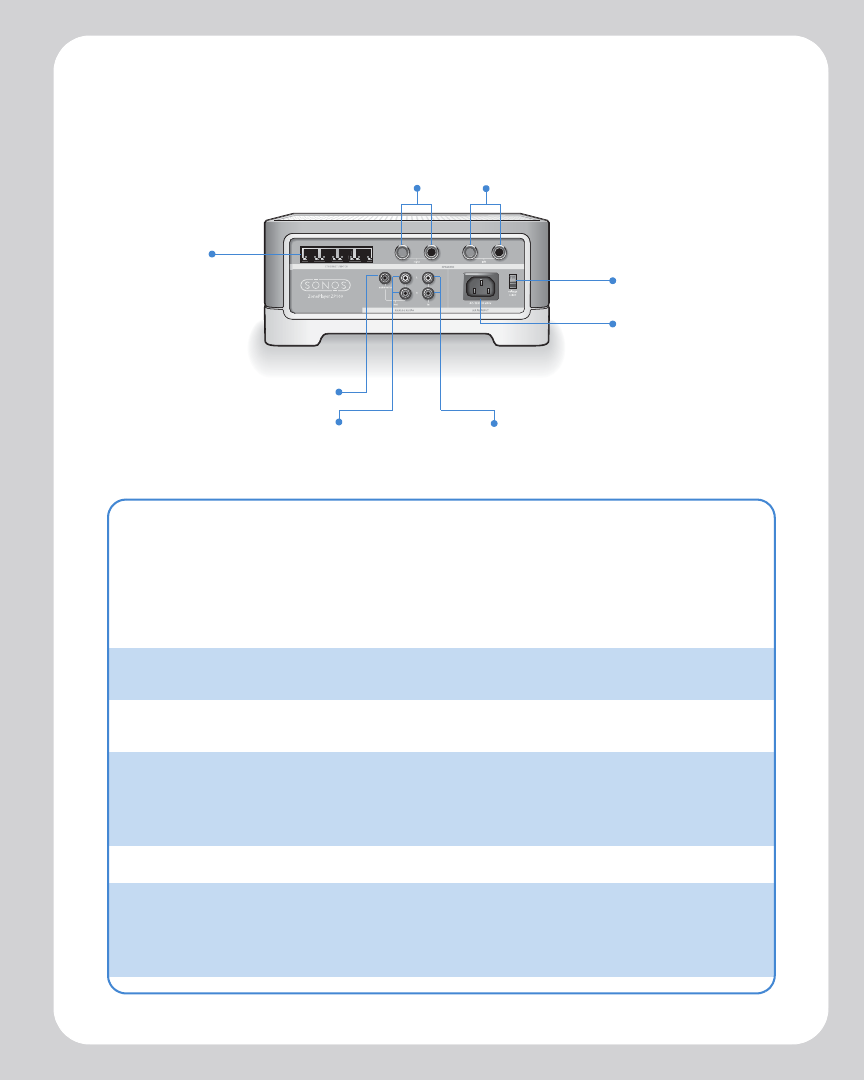
Rear Panel Connectors
Ethernet switch connectors (4) Use Category 5 Ethernet cable to connect to a router,
computer, or additional network device such as a
network-attached storage (NAS) device.
LED indicators:
• Green (link connection)
• Flashing Yellow (network activity)
Right speaker terminals Use high-quality speaker wire to connect the right
speaker to the ZonePlayer.
Left speaker terminals Use high-quality speaker wire to connect the left
speaker to the ZonePlayer.
Voltage select
(AC 115/230 V)
Up position=AC 115 V, 120 V nominal (U.S./Canadian
factory setting)
Down position=230 V, 240 V nominal (European factory
setting)
AC power (mains) input Use the supplied power cord to connect to power outlet.
Analog audio outputs (variable) You may use a standard RCA audio cable to connect the
ZonePlayer’s analog audio outputs to the audio inputs
on a separate audio component, such as an amplifier or
your home theater receiver.
Ethernet
switch
connectors
Right speaker
terminals
Left speaker
terminals
Voltage select
115V/230V
AC power (Mains)
input
Analog audio inputsAnalog audio outputs
Subwoofer output
Sonos Digital Music System User Guide2-4
Set Up Speakers and Apply Power
Follow the directions below to connect your speakers to the Sonos ZonePlayer ZP100.
Your speaker’s power rating should be at least 75W for 8 Ohm speakers and at least
150W for 4 Ohm speakers. Do not connect speakers rated at less than 4 Ohms.
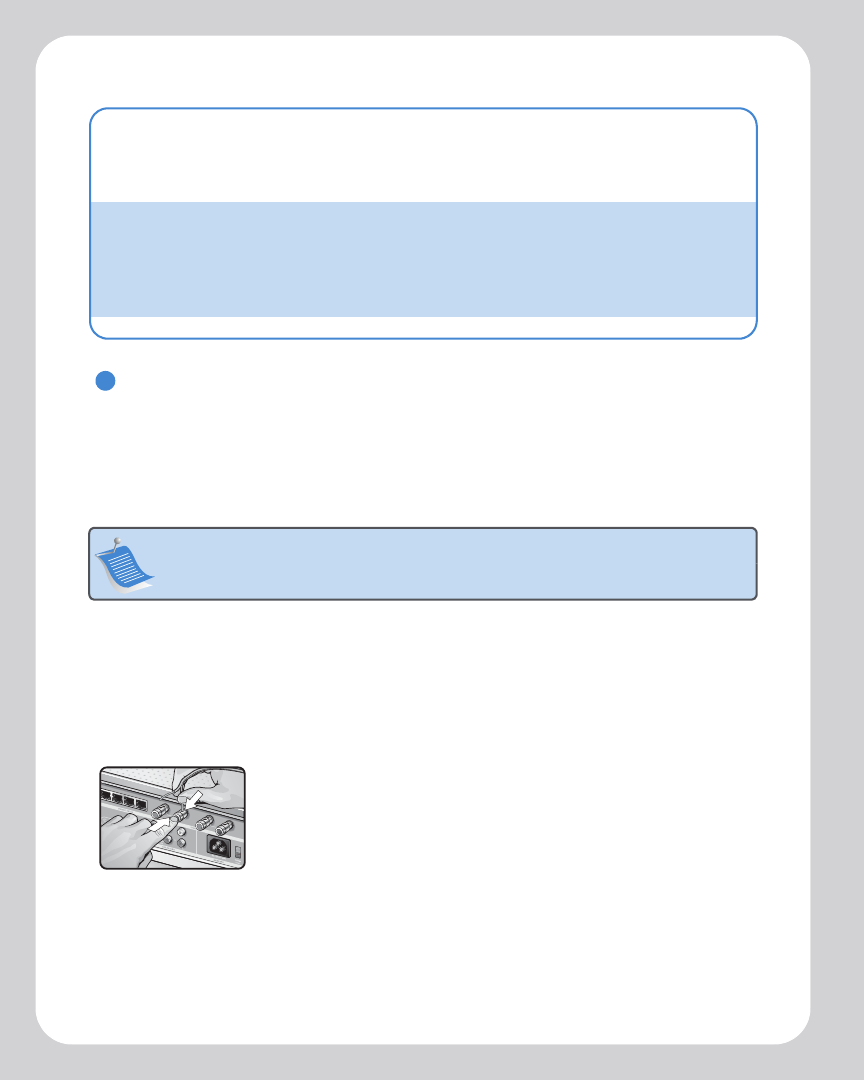
To install speaker wire into the connector posts
1. When making connections, ensure that none of the strands of your speaker wire
come in contact with an adjoining terminal on the rear panel.
2. Use your thumb or finger to firmly push the spring-loaded speaker connector post
inward to reveal the connection hole.
3. Insert the stripped end of the speaker wire into the hole,
then release. The stripped portion should be caught firmly
in the connector post.
4. Repeat to install the other speaker wires.
5. Attach the power cord to the ZonePlayer and plug into a wall outlet.
Analog audio inputs You may use a standard RCA audio cable to connect the
ZonePlayer’s analog audio inputs to the audio outputs
from a separate audio component, such as a CD player
or a portable music player.
Subwoofer output
Note: If you disconnect your
subwoofer, make sure to also
disconnect the subwoofer’s cable
from the ZonePlayer output.
You may connect a powered subwoofer to this output
using a standard RCA cable. The system will detect when
a cable is connected to the subwoofer output and adjust
the crossover frequency automatically.
Note: Be sure to connect the red ( + ) and black ( - ) terminals from each speaker to
the corresponding terminals on the ZonePlayer. Mismatching of polarities will result
in weak central sound, and a distorted sense of sound direction.
1
Chapter 2: ZonePlayer Setup and Operation 2-5
The Mute button indicator (green) and the ZonePlayer Status indicator (white) will
begin to flash. (If this ZonePlayer was previously connected to another Sonos Digital
Music System, the ZonePlayer Status indicator may light solid white instead.)
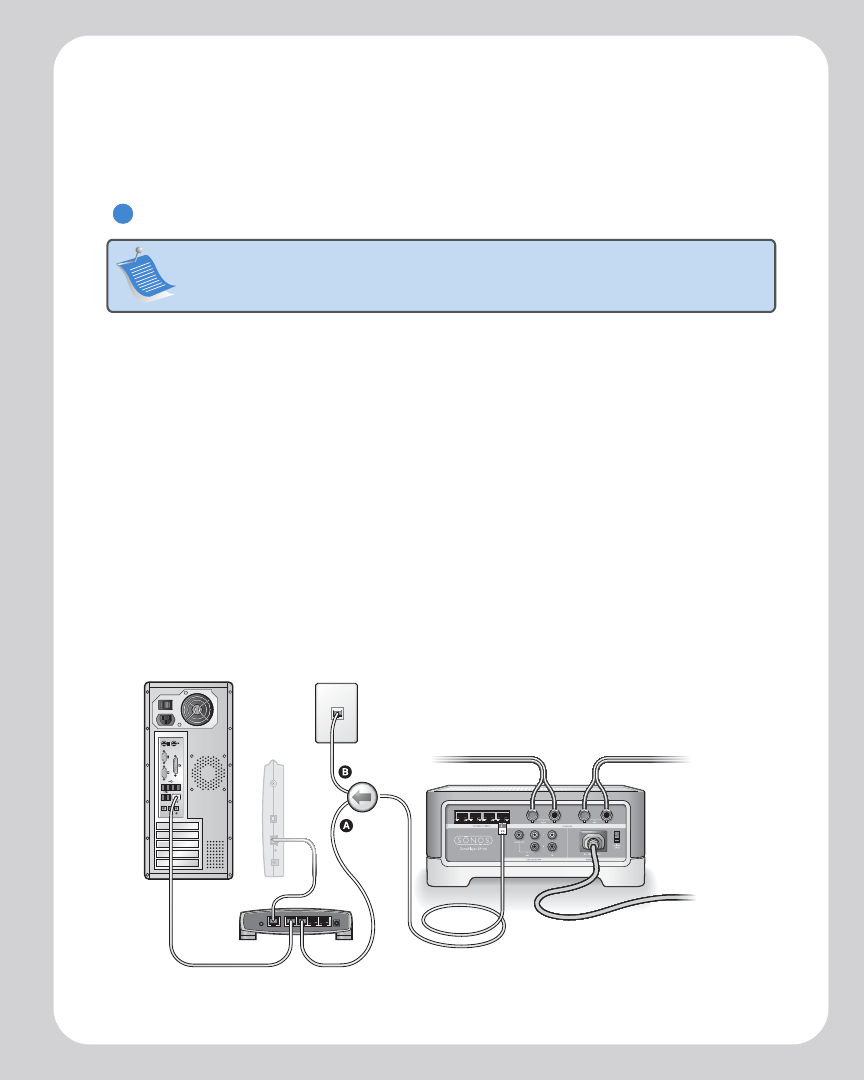
Connect First ZonePlayer
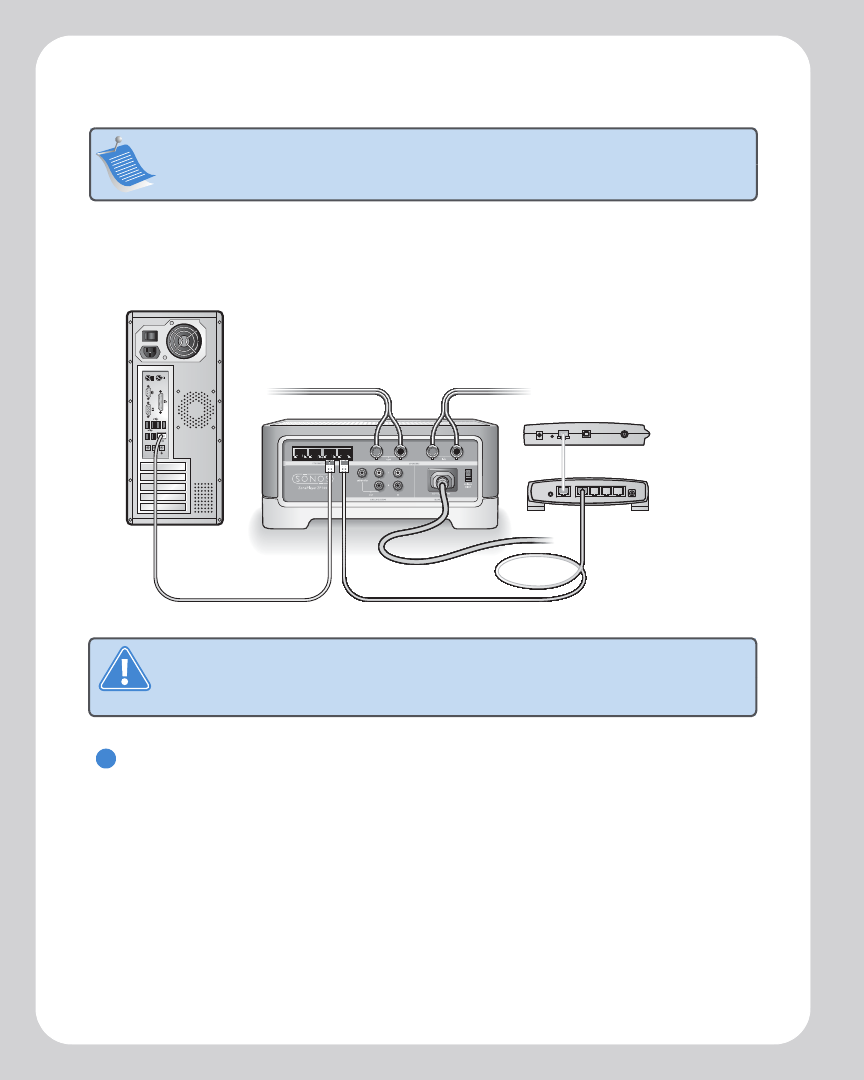
1. Connect the Ethernet cable from an open port on your router to any of the four (4)
Ethernet switch connectors on the back of your ZonePlayer (see A in the diagram
below).
•If your modem is currently plugged into the only network interface con-
nector on your computer, you should install a router before continuing. If
you don’t have a router, go to http://faq.sonos.com/norouter for instruc-
tions.
Or,
If you have structured (built-in) wiring that connects to a router located elsewhere
in your home, you can connect the Ethernet cable from a live wall plate into one of
the four Ethernet switch connectors on the back of your ZonePlayer (see B in the
diagram below).
Note: The first ZonePlayer you install must connect to your home network using a
standard Ethernet cable (supplied). If your computer only has a wireless connection,
go to http://faq.sonos.com/wireless for assistance.
2
2
Cable/DSL
modem Structured
Wiring
Router
Sonos Digital Music System User Guide2-6
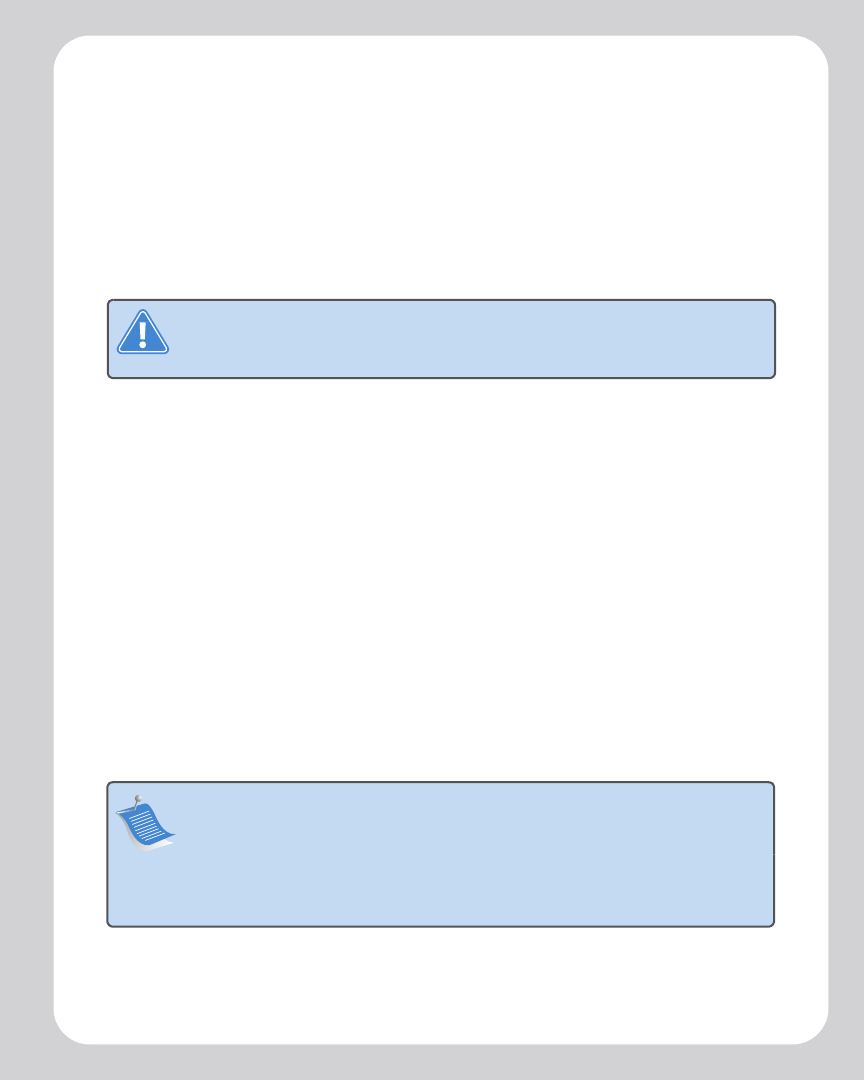
2. If you don’t have an open port on your router, you can disconnect your computer
from the router and connect it to the ZonePlayer instead. Then you can connect
the ZonePlayer into the router port the computer was previously plugged into.
Install Software
Once your ZonePlayer is powered, you are ready to install the software. The Sonos
System Setup software will guide you through the process of initializing your
ZonePlayer(s) and setting up access to your music files.
• If your operating system is Windows® XP or Windows® 2000, turn to Chapter 3.
• If your operating system is Macintosh® OS X, turn to Chapter 4.
• If you have a different operating system or do not wish to install software, turn
to Appendix C.
Note: To maintain your computer’s security, do not connect the ZonePlayer
directly to your cable/DSL modem.
Caution Do not place any items on top of your ZonePlayer. This may impede the air
flow and cause your ZonePlayer to overheat.
Cable/DSL
modem
Router
3
Chapter 2: ZonePlayer Setup and Operation 2-7
Adding More ZonePlayers
After your Sonos Digital Music System is up and running, you can add more
ZonePlayers to your Sonos Digital Music System any time. Decide upon the best
locations for your additional ZonePlayers. If your house has structured (built-in) wiring,
you can make a wired connection to the additional ZonePlayers. If you don’t have
structured wiring, our built-in wireless technology is ideal for you.
When and why should I use a wireless connection?
The Sonos Digital Music system uses a built-in wireless connection to communicate
between the various ZonePlayers. You can place ZonePlayers anywhere you wish
without physically connecting them to your computer network, as long as they are
within transmitting range (up to 100 ft. depending upon your home’s layout). This
means that you do not need to go to the effort of installing cables, and you can change
the location of your ZonePlayer at any time.
Use wireless connections when:
• You do not want to install network cables
• You may want to move the location of the ZonePlayer
• There is enough signal strength for the ZonePlayer to transmit and receive data
reliably
Caution Do not place any items on top of your ZonePlayer. This may impede the air
flow and cause your ZonePlayer to overheat.
Note: Thick walls, microwave ovens, and the presence of other wireless devices can
interfere with or block the wireless network signals from your Sonos Digital Music
System. If you are experiencing difficulty, it is advisable to relocate the ZonePlayer,
change the wireless channel your music system is operating on, or make a wired
connection (Ethernet cable) either from your router to the ZonePlayer, or from one
ZonePlayer to another. For more information on wireless connections, go to http://
support.sonos.com.

Sonos Digital Music System User Guide2-8
To add a ZonePlayer
1. Place the ZonePlayer in the room you have selected.
2. Attach speakers to your ZonePlayer.
3. If you are making a wired connection, connect a standard Ethernet cable from
either your router, another ZonePlayer, or a ‘live’ network wall plate to any of the
Ethernet switch connections on the back of the new ZonePlayer.
If you are making a wireless connection, skip this step and continue on to step 4.
4. Attach the supplied power cord to your ZonePlayer and plug into a wall outlet.
The Mute indicator (green) and the ZonePlayer Status indicator (white) will begin to
flash. (If this ZonePlayer was previously connected to another Sonos Digital Music
System, the ZonePlayer Status indicator may light solid white instead.)
5. Choose one of the following options and then follow the on-screen instructions:
•Use the Sonos Controller to add the ZonePlayer to your Sonos Digital Music Sys-
tem by selecting System Settings→Add a ZonePlayer from the Music menu.
Or,
•Use the Desktop Controller software (Windows users) to add the ZonePlayer to
your Sonos Digital Music System by selecting Zones→Zone Setup→Add.
Or,
•Use the Sonos Setup Assistant software (Macintosh users) to add the ZonePlayer
to your Sonos Digital Music System by selecting Set up ZonePlayers→Add
from the Main Menu.
During the setup process, you will be asked to press and release the Mute and Volume
Up buttons simultaneously on the ZonePlayer you are adding to the Sonos Digital
Music System.
• You may release the buttons as soon as the Mute indicator (green) and the Zone-
Player Status indicator (white) start to blink alternately (this takes approximately
one second).
• When the ZonePlayer has been successfully added to your music system, the
Mute indicator will go out and the ZonePlayer Status indicator will change to
solid white.

Windows® Setup and Operation
Now that you have connected your first ZonePlayer, you are ready to install the Sonos
Desktop Controller (DCR) software which will guide you through the process of
configuring your music system and setting up access to your music files. The Desktop
Controller software is compatible with Windows® 2000, Windows® XP, or later
operating systems.
If you have digital music files stored on a computer or other device on your home
network such as network-attached storage (NAS), the computer directories or folders
that contain your music files must be shared so that the Sonos Digital Music System can
access them. During setup the Desktop Controller software will automatically enable
Windows file sharing for your computer.
For easy setup, you should install the Desktop Controller software on every Windows
computer in your network that contains music files. However, if you wish to access
music stored on a computer where file sharing is not enabled and the Desktop
Controller software is not installed, review our FAQ Web site (http://faq.sonos.com/
sharing) for information.
The Sonos Desktop Controller Software
The Sonos Digital Music System includes Desktop Controller software which allows
you to control your Sonos Digital Music System from your desktop. It includes easy-to-
use wizards for setup and music sharing so that the music folders on your hard drive
can be shared across all ZonePlayers. Once your Sonos music system is set up, it’s as
easy as choosing a zone to play music in, making music selection(s), and pressing Play.
Chapter 3
Sonos Digital Music System User Guide3-2
Installing the Desktop Controller Software
1. Insert the Sonos System Setup CD-ROM (included with your ZonePlayer) and
follow the on-screen instructions.
2. Click Finish when the Installation Wizard is complete. Remove the Sonos System
Setup CD-ROM from the CD-ROM drive.
Note: Firewall software such as Norton Internet Security™, McAfee™ Personal
Firewall, ZoneAlarm®, or Windows® Service Pack 2 can block the operation of your
Sonos Desktop Controller software. During installation, you may see prompts from
your firewall software indicating that the Sonos application is attempting to perform
certain operations. You should always allow full access to the Sonos application.
You may also need to change the settings of your firewall software to ensure that
Windows file sharing is not blocked. Go to our Web site at http//faq.sonos.com/
firewall for detailed instructions.
If the Desktop Controller software
does not start automatically, run
“d:\setup.exe”, replacing “d” with your
CD-ROM drive’s letter as needed.
Chapter 3: Windows® Setup and Operation 3-3
Starting the Sonos Setup Wizard
1. Start the Sonos Desktop Controller software.
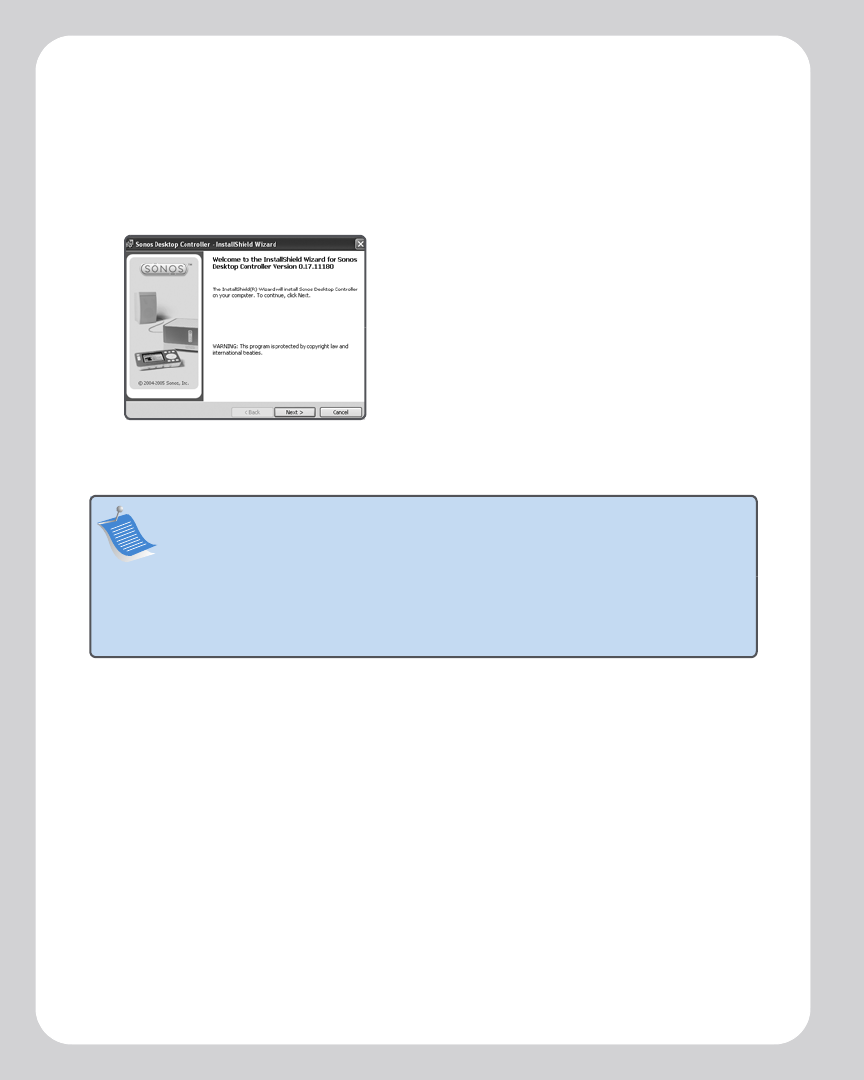
The Sonos Setup Wizard Welcome screen appears.
2. Click Next.
3. When instructed, press and release the Mute and Volume Up buttons
simultaneously on the ZonePlayer you are connecting. (Remember, the first
ZonePlayer you install must connect to your home network using a standard
Ethernet cable).
You may release the buttons as soon as the Mute indicator (green) and the
ZonePlayer Status indicator (white) start to blink alternately. This takes
approximately one second.
ZonePlayer
status
indicator
Mute button
Volume up (+)
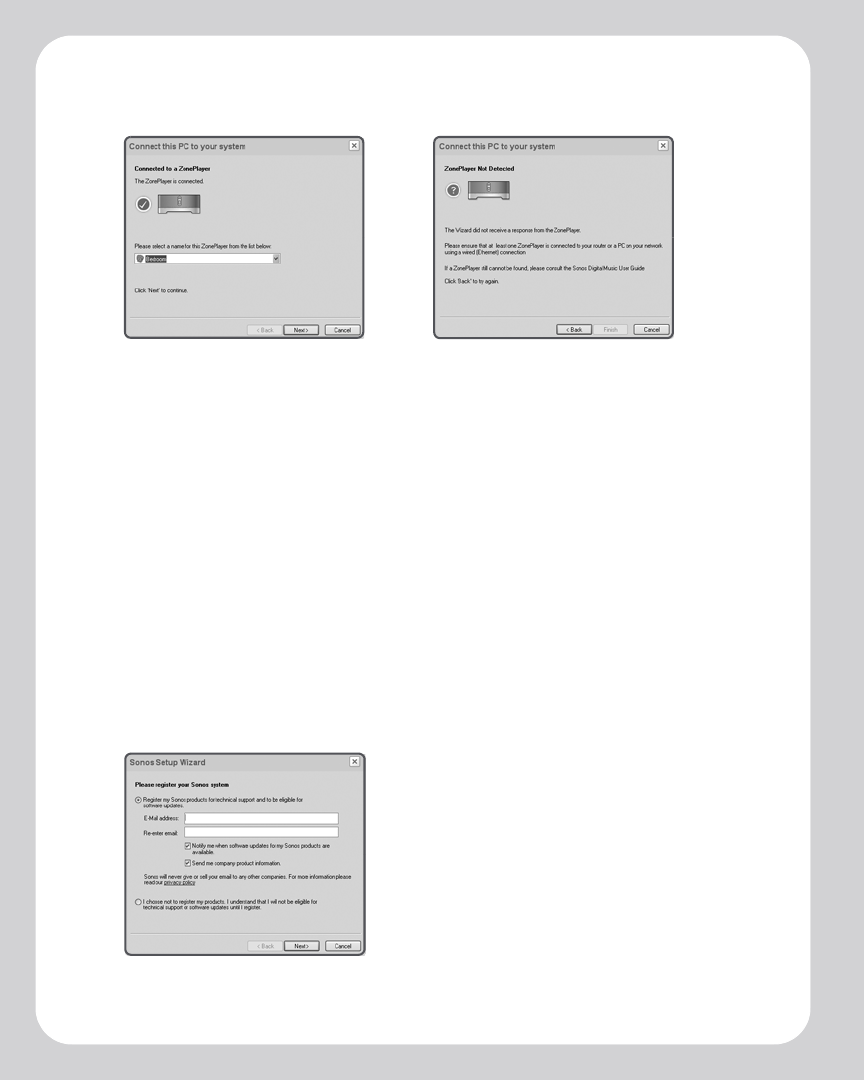
Once the ZonePlayer is successfully connected, the
ZonePlayer Status indicator will stop flashing and
change to solid white (normal operation), and the
Mute indicator will go off.
Sonos Digital Music System User Guide3-4
4. Select a name for your ZonePlayer from the list, and then click Next.
5. Choose one of the following options:
• If you wish to set up more ZonePlayers, select Yes, I want to add more Zone-
Players, click Next, and repeat step 3. You can add additional wired or wireless
ZonePlayers to your music system in any order.
• If you do not wish to add more, select No, I do not wish to add another Zone-
Player at this time, and click Next.
6. During the setup process, you will be asked to register your Sonos Digital Music
System. Your registration information is necessary in order for us to be able to
provide you with technical support and software upgrades.
ZonePlayer added successfully ZonePlayer not added
Consult the troubleshooting section
of this user guide for assistance
Sonos will never give or sell your
e-mail address to other companies

Chapter 3: Windows® Setup and Operation 3-5
7. To set up access to your music folders, select Yes, s e t u p my music now when
prompted, and then click Next.
8. Click Add a Share.
9. Choose one of the following options:
• To add a folder stored on this computer, select Add music stored on this PC
and then select a folder you have music stored in (all subfolders will automatical-
ly be added).
Or,
• To add music stored on a different computer or a NAS device, select Add music
stored in folders that are currently shared on my network.
a. Select a folder from the list or type the path name.
b. If this folder is not shared anonymously, type the user name and password
of a user with rights to access this music folder, and click Next.
c. Click Finish.
10. If you purchased a Sonos Controller, you are now ready to add it to your music
system. If it is not yet fully charged, plug the Sonos Controller into the power
adapter and follow the on-screen prompts to add the Controller to your music
system. You can use your Controller while it charges.
During this process, you will be asked to press and release the Mute and Volume
Up buttons simultaneously on one of the ZonePlayers you just set up in order to
add the Controller to your music system. You may release the buttons as soon as
the Mute indicator (green) and the ZonePlayer Status indicator (white) start to
blink alternately. This takes approximately one second.
11. When you see the message System is Now Setup, touch the OK button.

Sonos Digital Music System User Guide3-6
Adding More ZonePlayers
You can add more ZonePlayers to your Sonos Digital Music System any time by
selecting Zones→Zone Setup→Add. Turn to Chapter 2 if you’d like help with the
placement and setup of your new ZonePlayer(s).
Renaming a ZonePlayer
If you name a ZonePlayer incorrectly, or if you move your ZonePlayer to another room,
you can rename it to suit your preference.
1. From the Zones menu, click Zone Setup.
2. Select the ZonePlayer you wish to change, and click Rename.
3. Select a name from the drop-down list, or type a new name for this ZonePlayer in
the Zone Name field, and then click Next.
4. Click Finish.
Chapter 3: Windows® Setup and Operation 3-7
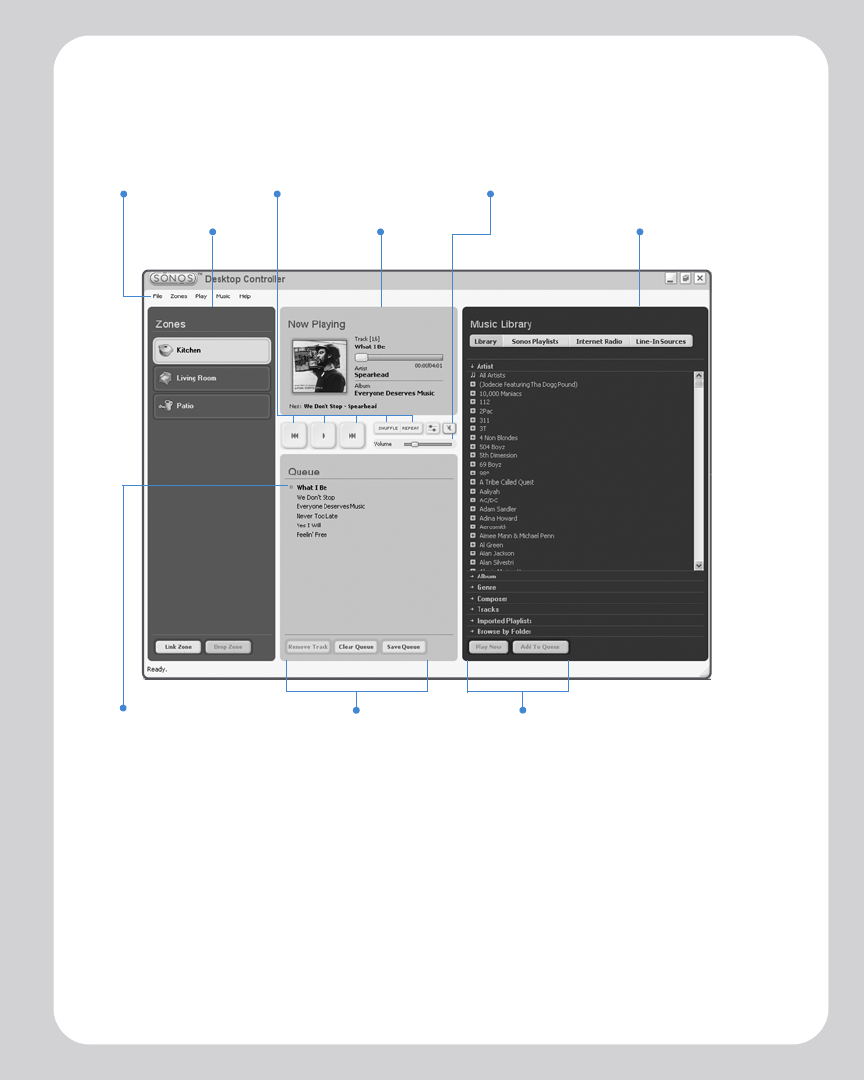
The Desktop Controller Main Menu
You can select an action using the following method(s):
• Click the appropriate action button
• Select an action from the Menu bar
• Highlight a selection and then right-click
Menu bar
Zones pane Music Library paneNow Playing pane
Playback controls
Music queue
controls
Music selection
controls
Queue pane
Volume controls
Sonos Digital Music System User Guide3-8
Playback Controls
The Now Playing pane displays track information for the music you are currently
listening to. You can control the music settings for the current selection using the
playback controls below:
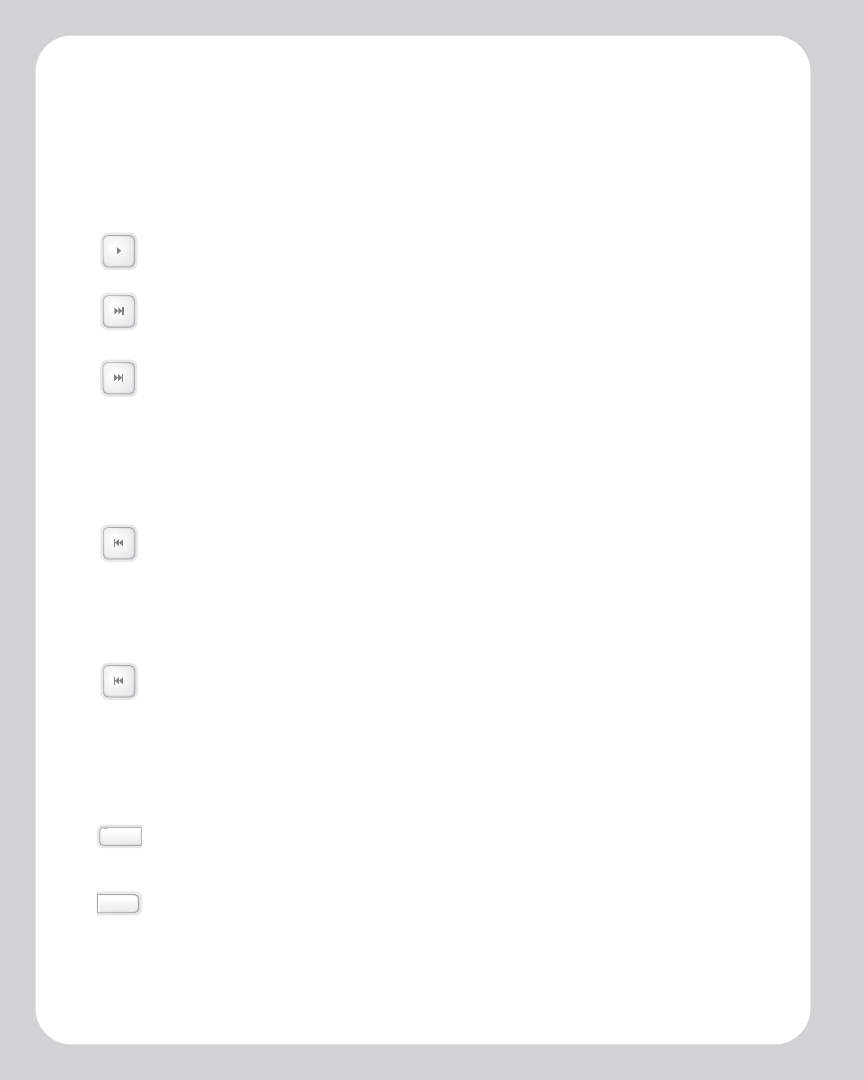
Play/Pause
Toggles between playing and pausing the current track.
Next (single-click)
Click Next to jump to the start of the next track in the queue.
Fast forward (long press)
Click and hold down the Next button, or click and drag the progress bar to
move forward through the current track. The music playback jumps to the
new position when the button is released (while you are seeking, the song
continues to play at the normal rate.) When the play indicator reaches the end
of the track, play stops.
Previous (single-click)
Click this button to move backward. If you are more than 3 seconds into the
track, Previous jumps to the start of the current track. If you are less than 3
seconds into the track, this button jumps to the start of the previous track (if
no previous track exists, you are returned to the start of the current track.)
Rewind (long press)
Click and hold down the Previous button, or click and drag the progress bar
to move backward through the current track. When the start of the track is
reached, the play indicator stops. The music playback jumps to the new
position when the button is released (while you are seeking, the song
continues to play.)
Shuffle
Click Shuffle to play the tracks in the music queue in a random order.
Repeat
Click Repeat to repeat the queue list after the last track has finished.
SHUFFLE
REPEAT
Chapter 3: Windows® Setup and Operation 3-9
Controlling the Volume
You can control the volume for an individual zone, or for a zone group if you have
joined more than one room together. The volume change affects the zone or zone
group currently highlighted in the Zones pane.
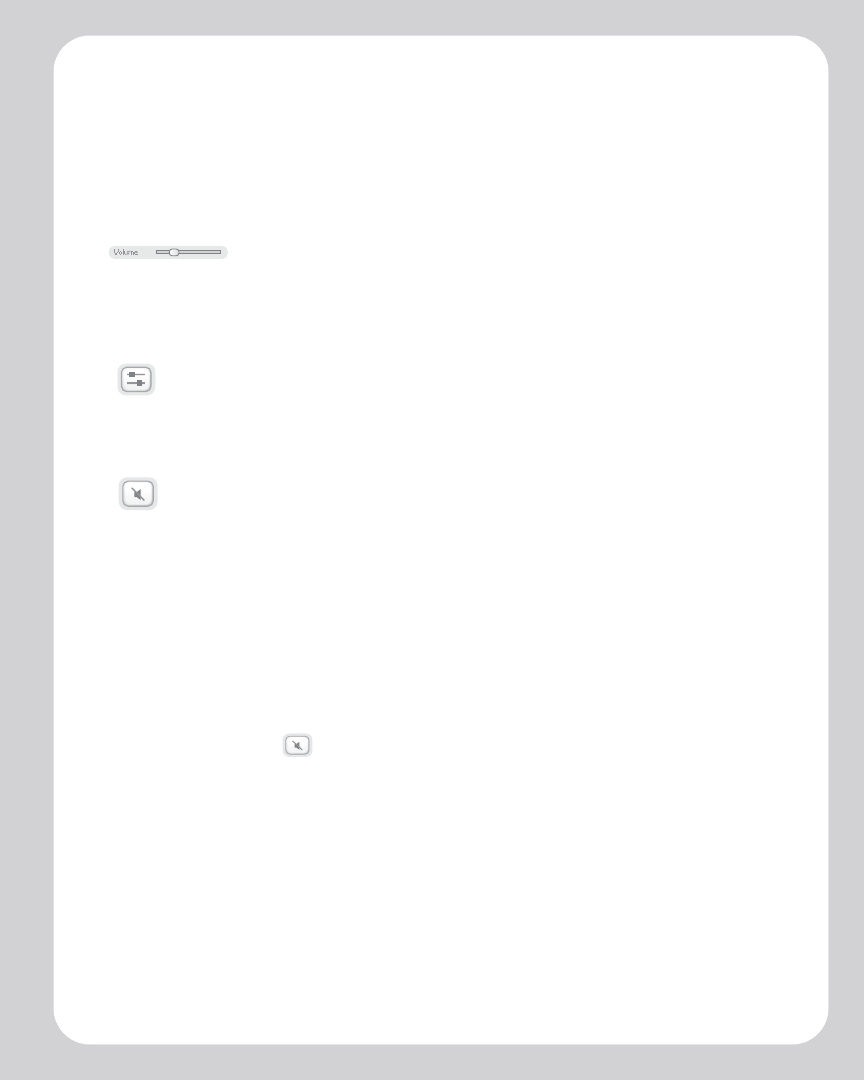
Volume Control
Click or drag the volume control bar to increase (+) or decrease (-) the volume. If a zone
group is highlighted in the Zones pane, the volume applies to all zones in the group. If
a single zone is highlighted, the volume applies to that zone only.
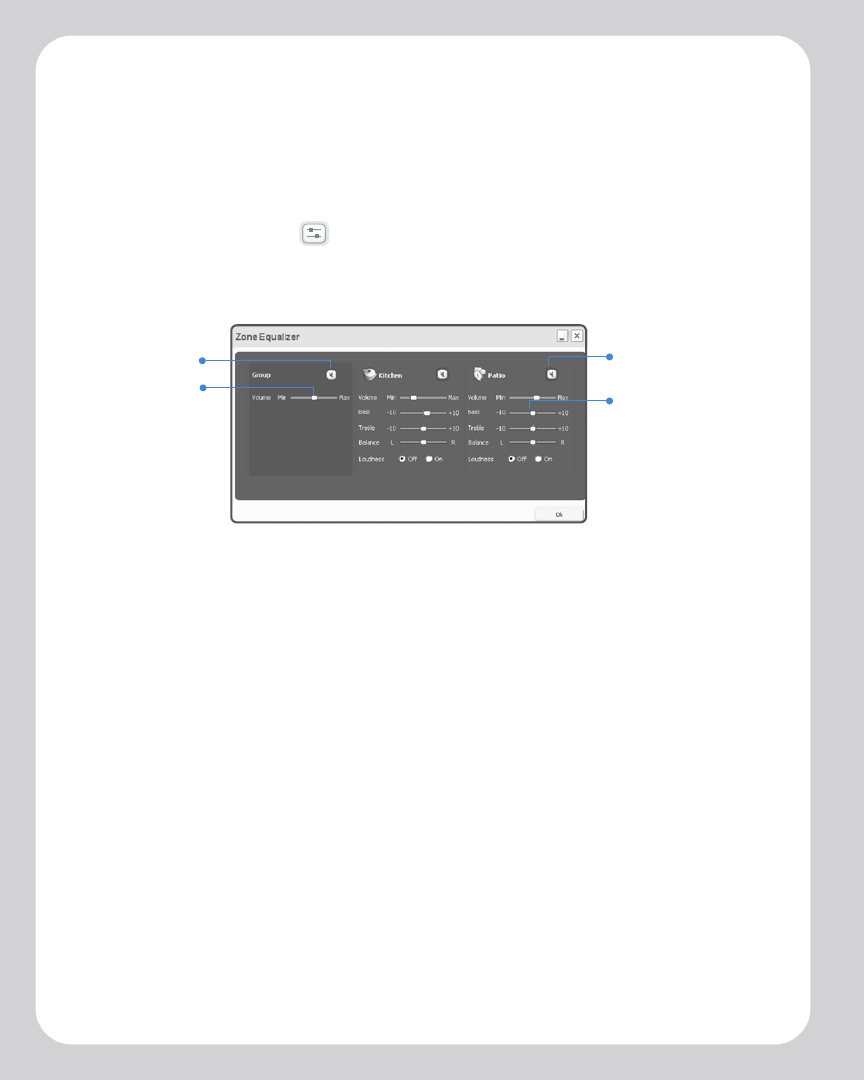
Equalizer
Click the Equalizer button to adjust the sound settings for a ZonePlayer, or to adjust
the volume controls for an individual zone within a zone group.
Mute
Click the Mute button to mute the sound in a zone (if you have a zone group, all zones
in the zone group are affected).
To mute a zone or zone group
1. From the Zones pane, click to highlight the zone you want to mute.
2. Choose one of the following options:
•Click the Mute button. To unmute, click the Mute button again.
Or,
•From the Play menu, click Mute Selected Group. To unmute, click Unmute
Selected Group.
3. To mute all the ZonePlayers in your household, click Mute Whole House from the
Play menu. To unmute all the Zoneplayers, click Unmute Whole House from
the Play menu.
Sonos Digital Music System User Guide3-10
Adjusting ZonePlayer Sound Settings
You can change the sound settings (treble, bass, loudness, balance, or volume) for each
individual ZonePlayer.
1. Choose one of the following options:
•Click the Equalizer button displayed in the Now Playing pane.
Or,
• Select Equalizer from the Play menu.
2. Click and drag the white adjustment control to adjust the bass, treble, volume, or
balance settings. To mute a zone or zone group, or to adjust the loudness setting,
click the appropriate button.
• To change the volume for a zone group, use the group volume control on the left.
• If you have two or more zones in a group, use the Equalizer screen to adjust the
volume for each zone individually.
Managing Your Zones
The Zones pane allows you to view the music currently playing in any zone in your
house. You can play a different song in each zone, or you can group zones together to
play the same music when you are having a party or anytime you want the same music
selection to play in more than one room. Zones can be managed from either the
Zones pane or the Zones menu. From either of these, you can:
• See an alphabetical list of the zones in your house
• Link zones together to form a zone group
• Drop a zone from a zone group
Zone
adjustment
control
Group volume
control
Group mute
button Zone mute
button
Chapter 3: Windows® Setup and Operation 3-11
Music will continue to play while you browse your zone settings.
The current zone is highlighted on your screen. The music selections you make will
play in the highlighted zone.
Zone groups
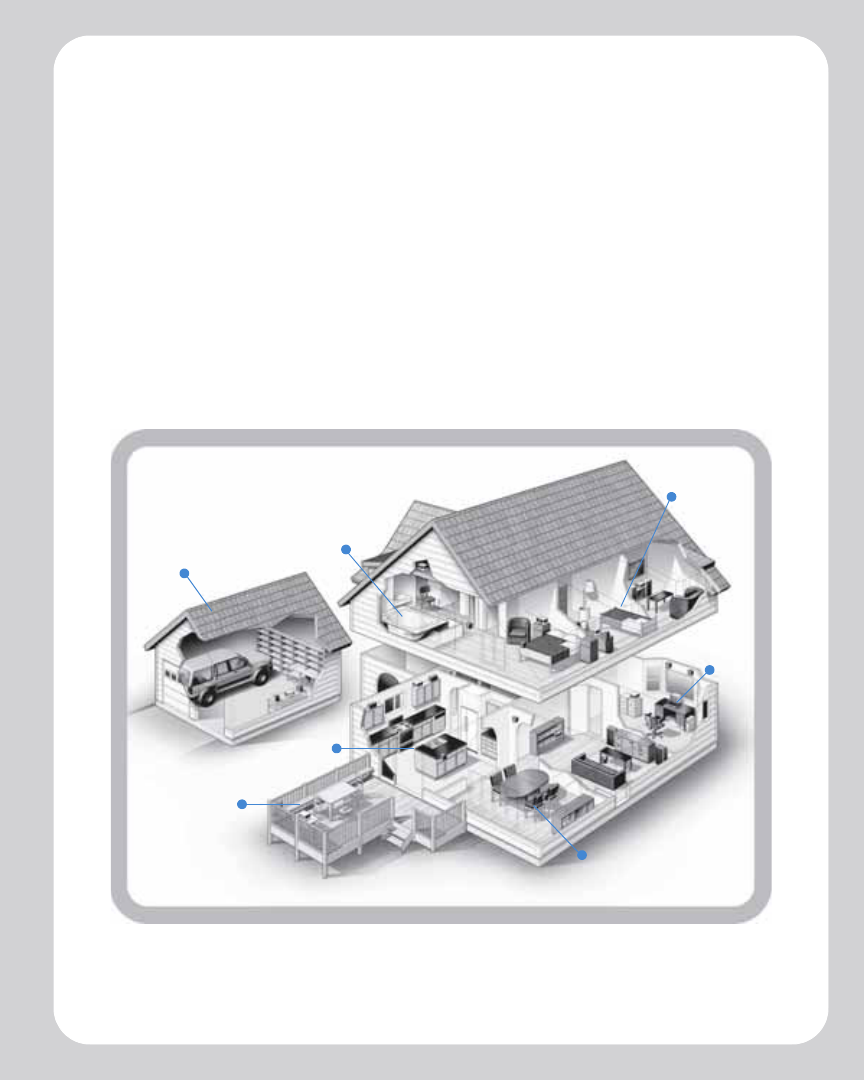
A zone can be grouped together with any other zone(s) to form a zone group. This will
cause all the zones in the zone group to play the same music. You can link or drop
zones from a zone group while the music is playing. You can also link all the
ZonePlayers in your house with one touch by selecting All Zones-Party Mode.
Sonos in
the garage.
Sonos in the
bathroom.
Sonos in the
bedrooms.
Sonos on
the deck.
Sonos in the
dining room.
Sonos in
the office.
Sonos in
the kitchen.
Sonos Digital Music System User Guide3-12
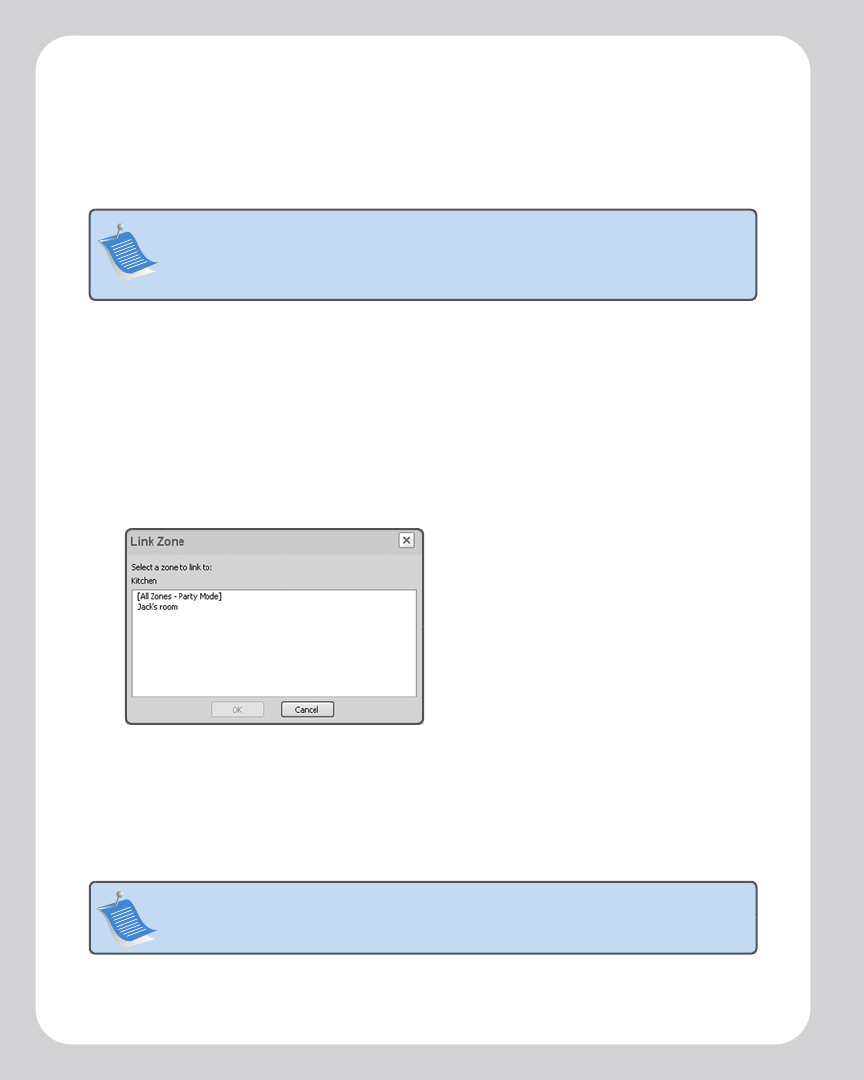
To link a zone to a zone group
You can create a zone group first and then select music to play, or you can add a zone
to a zone group where music is already playing.
1. From the Zones pane, highlight the zone you want to link another zone or zone
group to.
2. Choose one of the following options:
• Click Link Zone.
Or,
•From the Zones menu, click Link Zone.
3. Select a zone to add to the group, and click OK. If you want to join all the zones in
your house to this music queue, select All Zones-Party Mode. All of your
ZonePlayers will then play the same music until you drop the zones from the
zone group.
Note: Any zones you link will automatically drop their current music queue and
begin to play the music queue from the highlighted zone. You may sometimes
want to save your music queue before linking a zone. See "To create a Sonos
playlist" on page 3-17.
Note: The order in which you add a zone makes a difference. If you select Link
Zone from a zone where there is no music playing, any zone you link to it will also be
silent.
Chapter 3: Windows® Setup and Operation 3-13
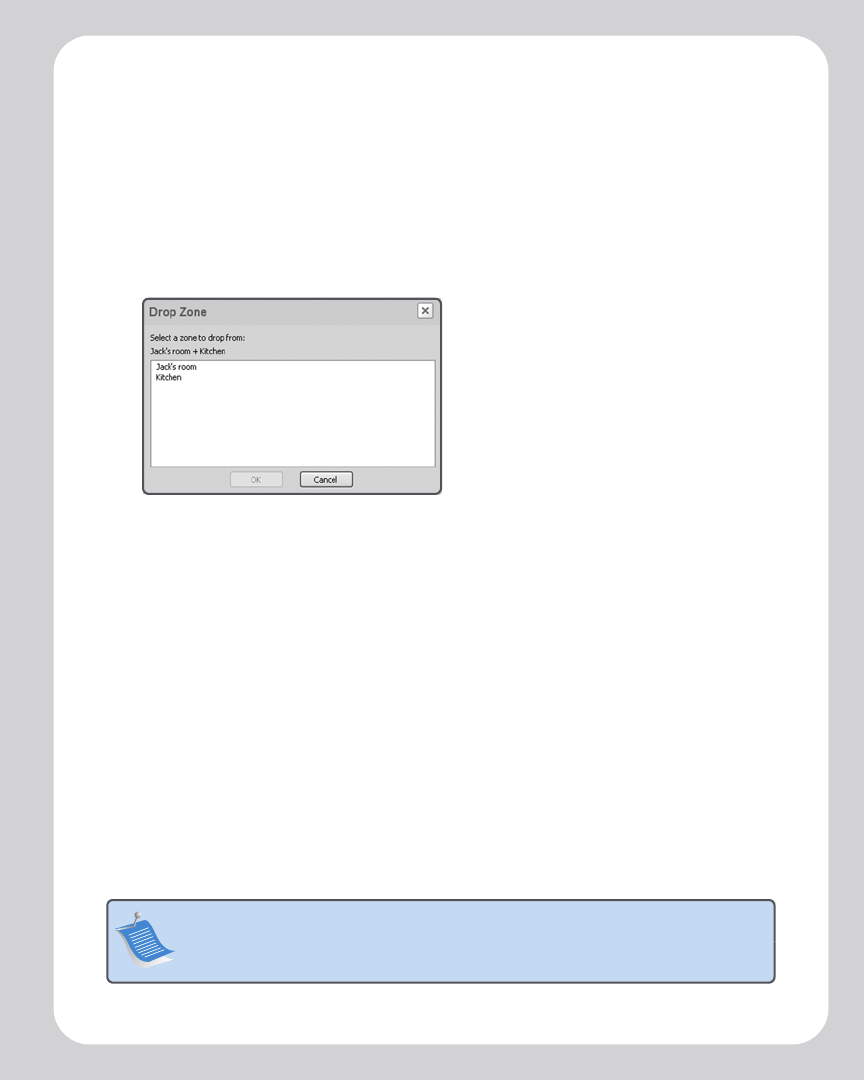
To drop a zone from your zone group
1. From the Zones pane, highlight the zone group you want to change.
2. Choose one of the following options:
• Click Drop Zone.
Or,
•From the Zones menu, click Drop Zone.
3. Select the zone you want to unlink from the group, and click OK.
The zone that’s removed from the zone group stops playing music. The other
rooms in the zone group continue unaffected.
Making Music Selections
Use the Music Library pane to select the music you wish to play. You can select from
any of the following music sources:
• Library (shared folders on your network)
• Music services
• Sonos playlists (music queues you have saved for future play)
• Internet Radio
• Line-In Sources (external device such as a CD player or a portable music player)
Note: The music you select will play in the zone or zone group that is highlighted
in the Zones pane.
Sonos Digital Music System User Guide3-14
Managing your music library
Your music library can include digital music located anywhere on your home network
such as:
• shared folders on your computer
• shared folders on another computer in your network
• network-attached storage (NAS) devices
The Sonos Digital Music System does not change music or playlist files created by other
applications; these files are always treated as “read-only”.
The Music Queue
As you make music selections, they are added to a list of tracks called a music queue.
You can create a different music queue for each zone in your house, or you can create a
zone group and play the same music across multiple zones. A play indicator appears to
the left of the track currently playing in the music queue. When the current track ends,
the next track in the queue starts to play, and play continues down through the list
until the queue is completed. When you add tracks to a queue, they are placed at the
end of the queue.
Browsing and selecting music
You can browse the Music Library in various ways. You can make a broad music
selection like play all available music by a particular artist, or make a specific selection
like play a single track on a specified album. Your search and selection choices include:
•Artist
•Album
•Genre
• Composer
•Tracks
Note: You can add tracks to a music queue while listening to other music.
Chapter 3: Windows® Setup and Operation 3-15
• Imported Playlists
• Browse by Folder
To select from your music library
1. From the Zones pane, click to highlight the zone you want to play music in.
2. Choose one of the following options:
•From the Music Library pane, click the Library tab.
Or,
•From the Music menu, click Music Library.
3. Use the mouse to move through the list until you reach the choice you want. To
play all songs by an artist, on an album, or in a genre, highlight the selection and
click Play Now to play the music now, or Add to Queue to add it to the end of
your music queue. Click to expand the music tree for any selection.
If you’ve created Sonos playlists (music queues you have saved), you can browse these
playlists using the Sonos Playlists tab. See "Sonos Playlists" on page 3-17 for more
information.
Managing your music queue
Once you have added tracks to a queue, you can make changes to the music queue
using the playback buttons, the Play menu options, or the queue control buttons. You
can:
• Remove a track from the queue
• Clear the entire music queue
•Click the Shuffle button to play the tracks in the music queue in a random order
•Click the Repeat button to repeat the music queue after the last track has fin-
ished
• Save a queue as a Sonos playlist
Note: If a computer on your network is turned off or is in standby mode, the
music folders on that computer will be unavailable to the Sonos Digital
Music System until the computer is turned back on.
Sonos Digital Music System User Guide3-16
To remove a track from the music queue
1. From the Queue pane, click to highlight the song you want to remove from the
music queue.
2. Choose one of the following options:
•Click Remove Track.
Or,
• Select Queue→Remove Track from the Play menu.
The track disappears from the queue list.
To clear the music queue
1. Choose one of the following options:
•Click Clear Queue from the bottom of the Queue pane.
Or,
•Click Queue→Clear Queue from the Play menu.
2. Click Yes to confirm.
This will clear the entire queue and stop the music from playing.
To change the play mode
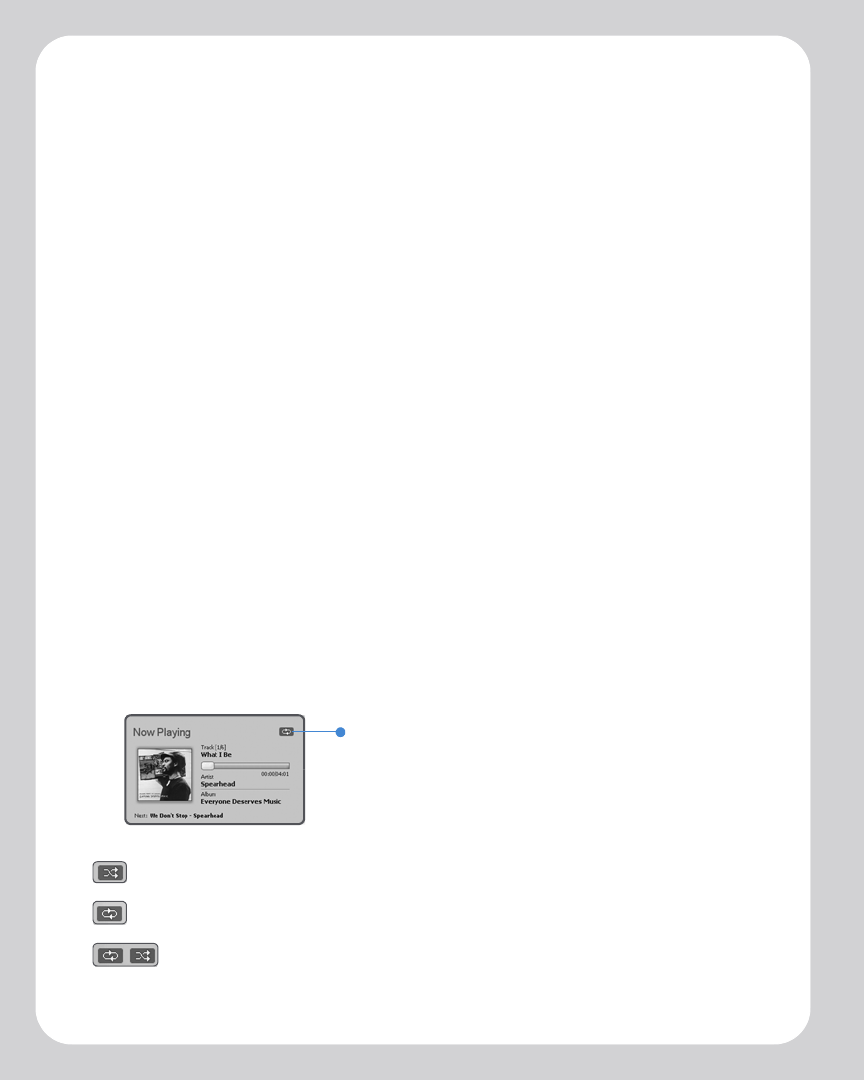
1. Click the Shuffle or Repeat buttons displayed in the Now Playing pane to
change the play mode.
The selected play mode appears as an icon in the Now Playing pane.
Shuffle
Repeat
Repeat/Shuffle
Play mode icon
Chapter 3: Windows® Setup and Operation 3-17
Sonos Playlists
Sonos playlists are music queues you create and save for future listening. For example,
you might want to create a jazz playlist, a party playlist, or an easy listening playlist.
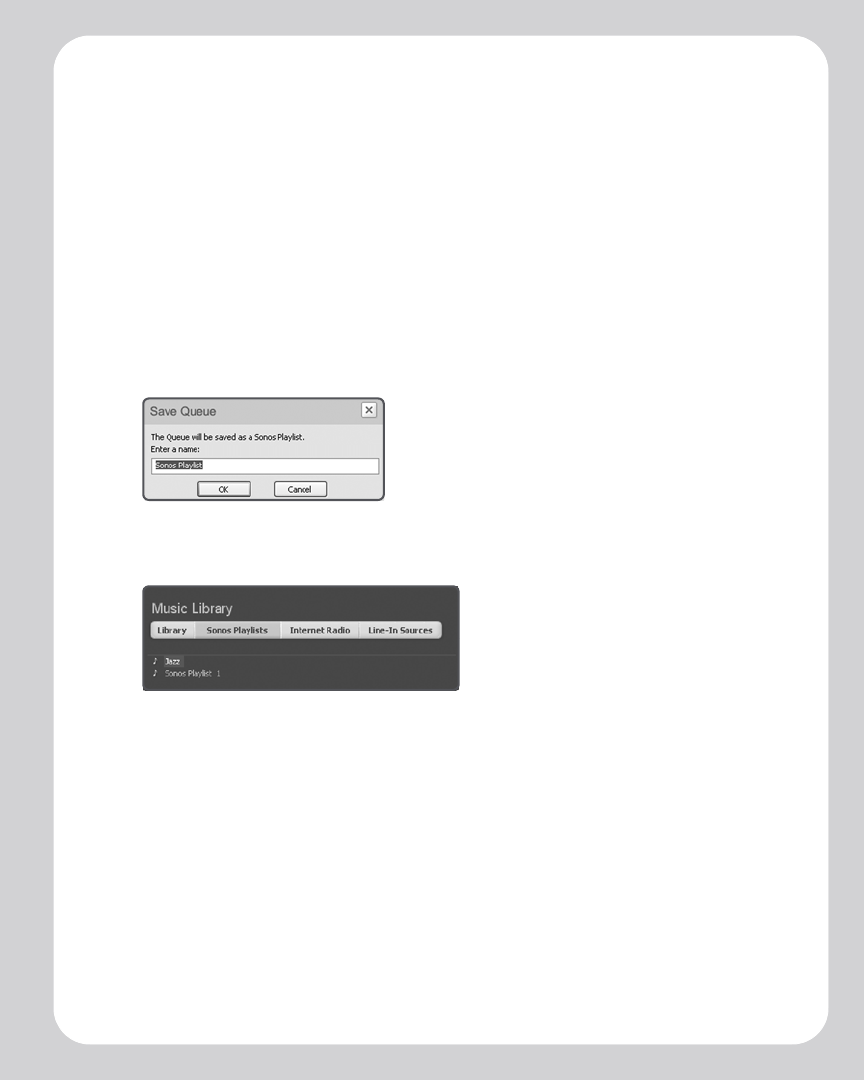
To create a Sonos playlist
1. Create a music queue by selecting music tracks from your music library.
2. Choose one of the following options:
•From the Queue pane, click Save Queue.
Or,
•Click Queue→Save Queue as Sonos Playlist from the Play menu.
3. Type a name for the new Sonos playlist, and click OK. This queue will now be
accessible from the Sonos Playlists tab.
4. To play a saved queue, click the desired playlist from the Sonos Playlists tab and
click Play Now to start the playlist immediately, or Add to Queue to add it to the
end of your current music queue.
To delete a Sonos playlist
1. From the Sonos Playlists tab, highlight the playlist you want to delete.
2. Choose one of the following options:
•Click Delete.
Or,
•Click Delete Sonos Playlist from the Music menu.
Sonos Digital Music System User Guide3-18
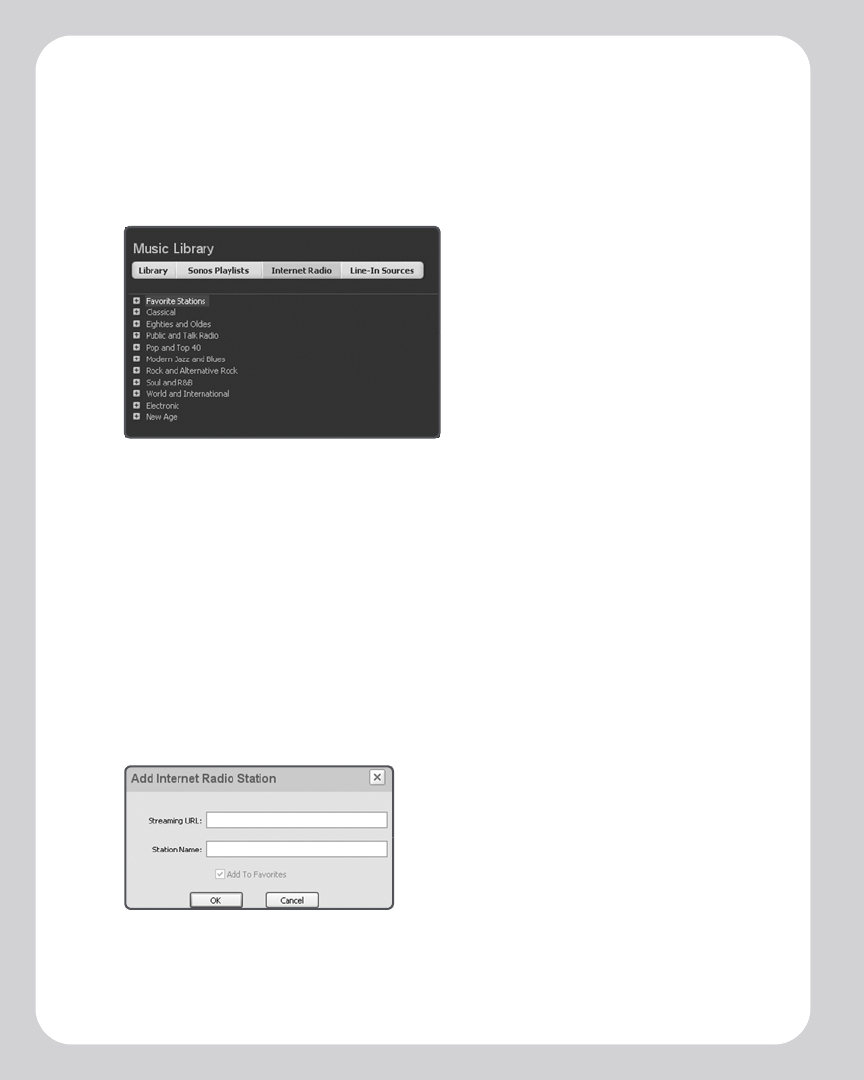
Internet Radio
The Internet Radio tab provides a list of third-party streaming MP3 broadcasts for you
to select from. Simply select the zone you want to listen in, select a radio station from
the list, and then click Play Now.
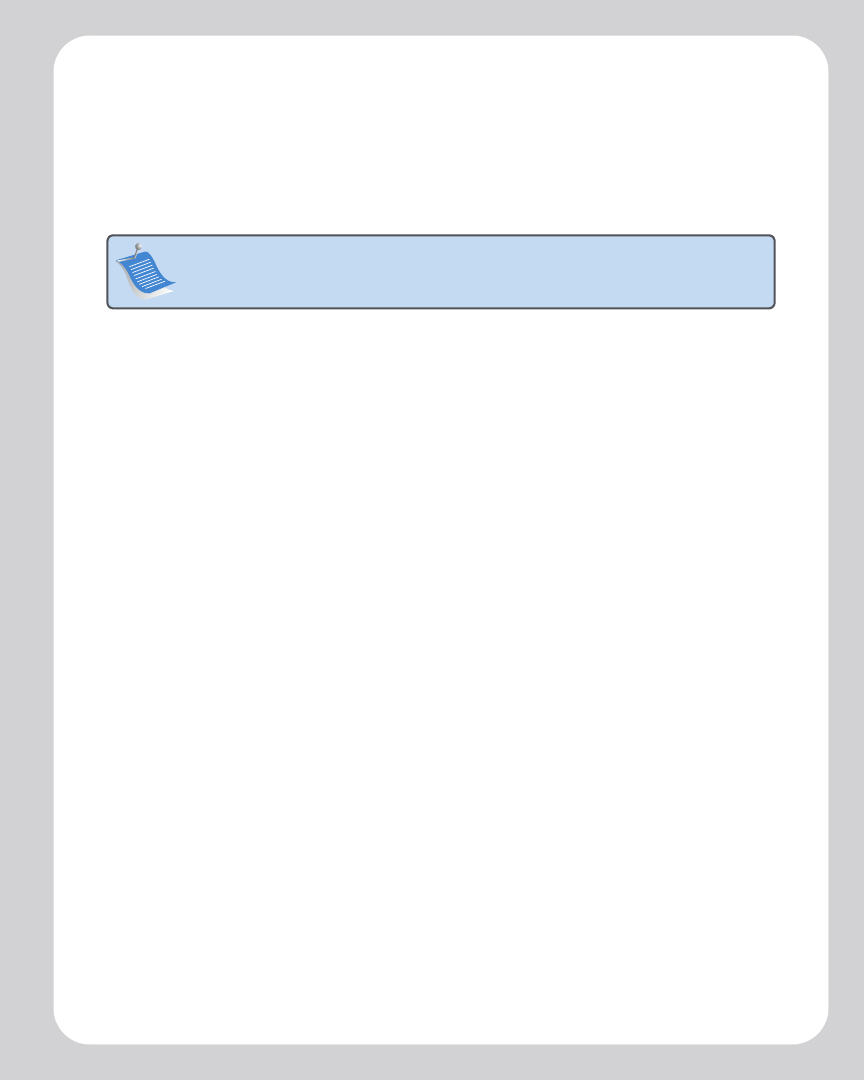
To add an Internet radio station
You can add a radio station that does not appear in your pre-configured list. You must
know the streaming URL, and the station must use the streaming MP3 broadcast
format. This station will be added to your Favorites list.
1. Click the Internet Radio tab.
2. Choose one of the following options:
•Click Add New.
Or,
•Click Add New Internet Radio Station from the Music menu.
3. Type the streaming URL for the radio station you want to add to your station list.
Chapter 3: Windows® Setup and Operation 3-19
4. Type the radio station’s name in the Station Name field, and click OK.
The new radio station is added to your Favorites list, not to the Sonos-supplied
Internet radio station list.
To edit a radio station
1. Click the Internet Radio tab.
2. Click to highlight an Internet radio station, and then click Edit.
3. Change the streaming URL, the station name, or click Add to Favorites to add the
station to your Favorites list, and click OK.
To add a station to your Favorites list
You can add any of the pre-configured radio stations to your Favorites list. The
station is duplicated in your Favorites folder, not moved from the original Internet
Radio list. Highlight a station from the Internet radio list and then choose one of
the following options:
•Click Add to Favorites.
Or,
• Select Edit Internet Radio Station and click Add to Favorites.
To delete a station from your Favorites list
1. From the Internet Radio tab, highlight the station you want to delete from your
Favorites Stations list.
2. Choose one of the following options:
•Click Delete.
Or,
• Select Remove Station from Favorites from the Music menu.
3. Click Yes to confirm.
Note: You can only edit the streaming URL or station name for radio stations that
are in your Favorites list. However you can always add a radio station to your
Favorites list using the Edit option.
Sonos Digital Music System User Guide3-20
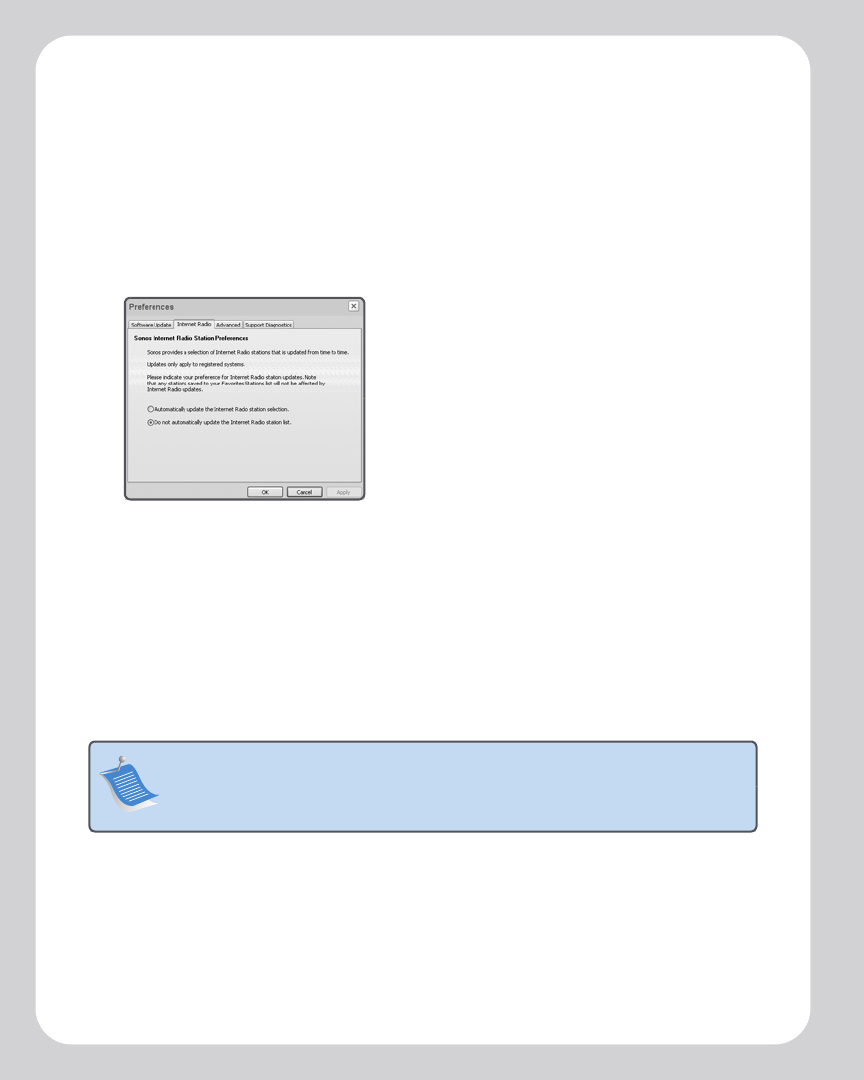
To set Internet radio preferences
You can receive automatic radio station updates whenever Sonos releases a new list.
Your music system must be registered in order to receive updates. If you have not yet
registered, see "Sonos System Registration" on page 3-27.
1. From the File menu, select Preferences.
2. Click the Internet Radio tab.
3. Select the desired setting, and click OK.
Connecting Line-In Sources
You can play music from an external source device such as a CD player or a portable
music player that is connected to your Sonos Digital Music System.
Note: You can listen to music from an external device in any zone, and use the
Sonos Digital Music System to control the volume settings. However, you must
control the playback (forward, pause, etc.) from the line-in source. If you have WMA
encoding selected, you will notice a slight delay before the music starts to play.
Chapter 3: Windows® Setup and Operation 3-21
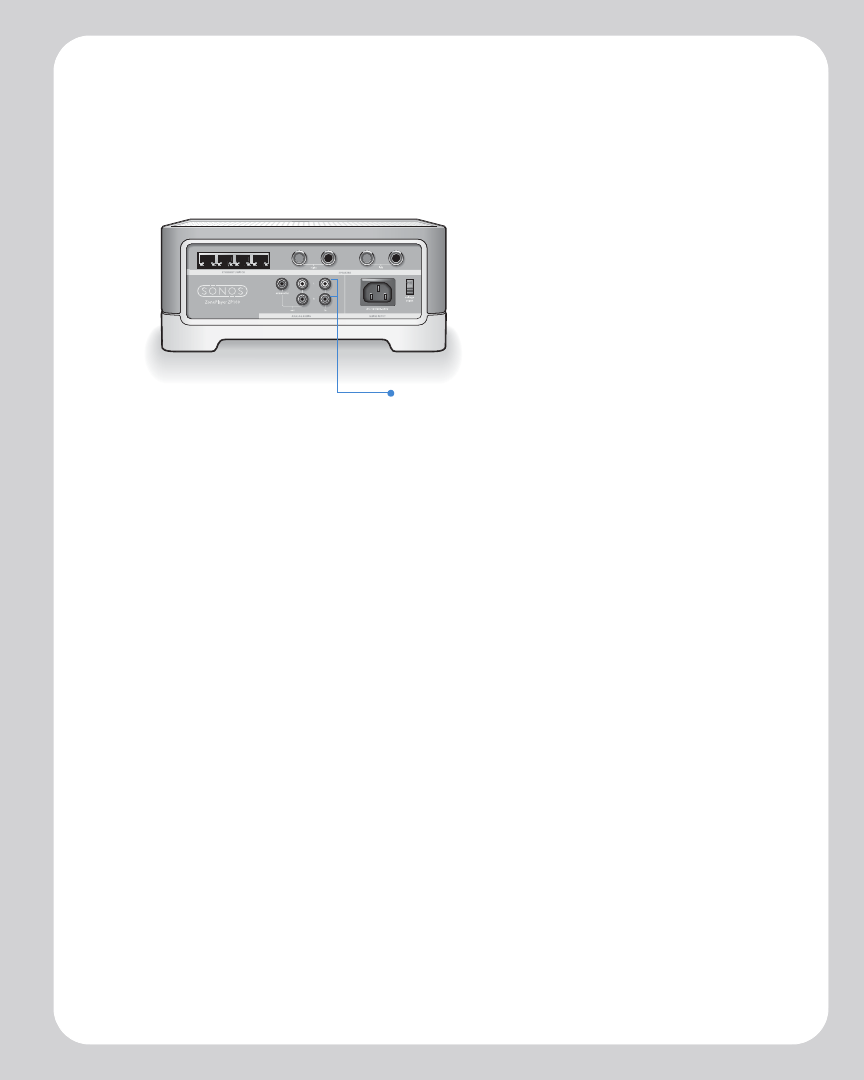
1. Use a standard RCA cable to plug the external source into the analog Audio In
connections on the back of your ZonePlayer. The source device will automatically
be detected.
2. From the Music Library pane, click the Line-In Sources tab.
3. Highlight the line-in source you wish to play music from, and click Play Now.
Managing Music Folders
The Sonos Digital Music System can play music from any compatible networked
computer or network-attached storage (NAS) device where you have shared music
folders stored. During the setup process, you are guided through the process of
accessing these shared music folders. Over time, you may wish to add or remove music
folders from this list.
These music folders are indexed by the Sonos Digital Music System so that you can
view your music by categories. If you add new music to a folder that has already been
indexed, you can update your music index to add this music to your library.
Analog audio in
Sonos Digital Music System User Guide3-22
To add a shared folder
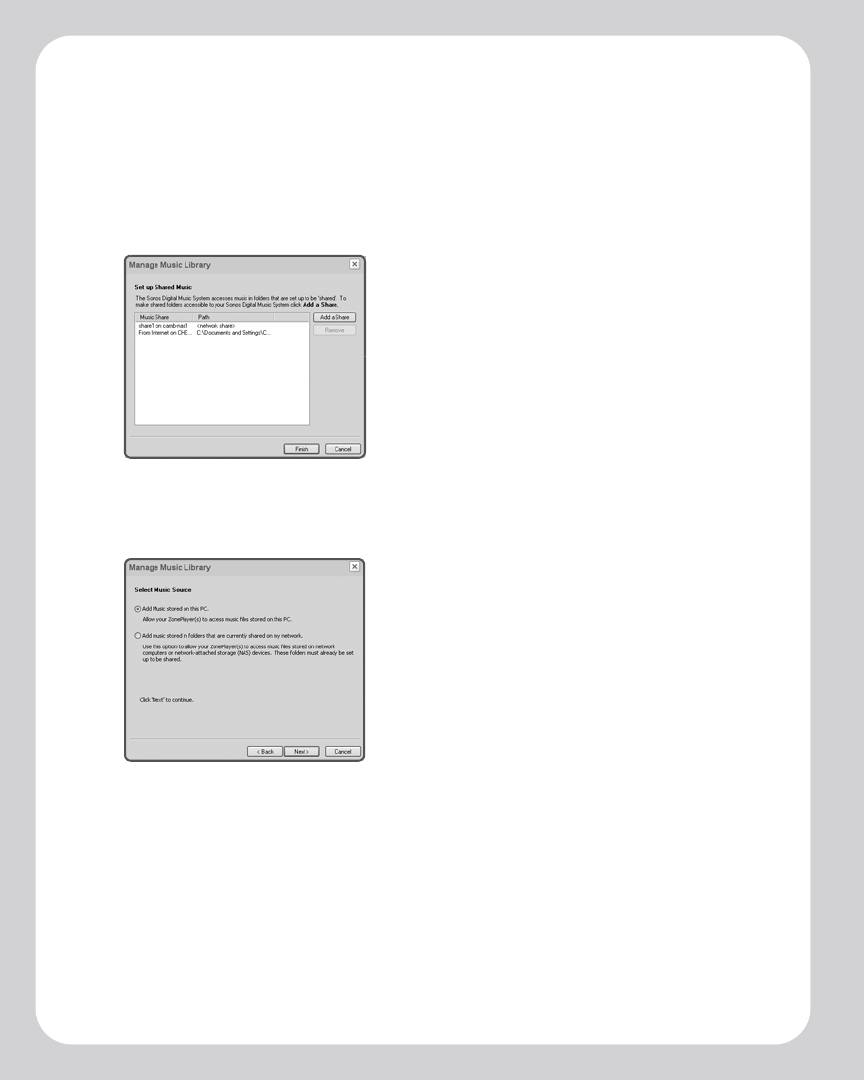
1. From the Music menu, select Music Library Setup.
The shared music folders that are currently available to your Sonos Digital Music
System appear.
2. Click Add a Share.
3. Choose one of the following options:
• To add music that is stored on this computer, select Add music stored on this
PC, and click Next.
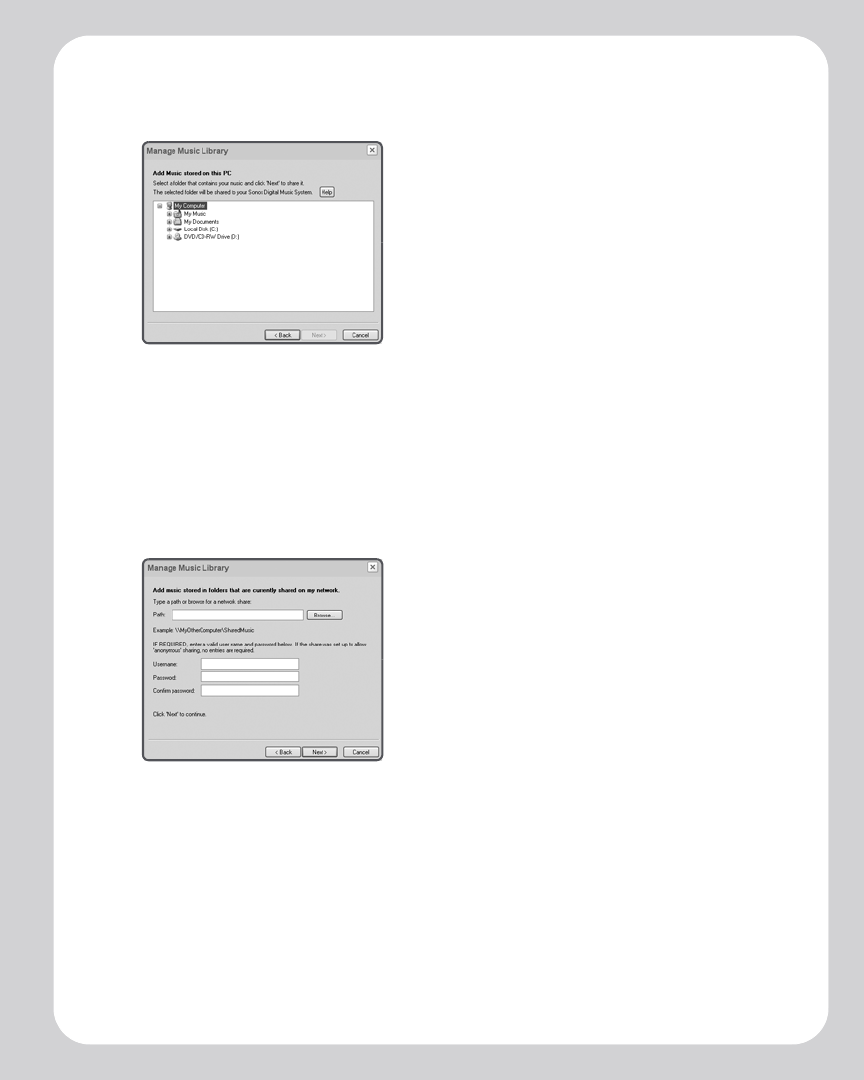
Chapter 3: Windows® Setup and Operation 3-23
a. Click to highlight a music folder, and then click Next.
b. Click Next to confirm.
c. Click Finish when you have no more folders to add.
• To add music stored on a remote computer or a NAS device, select Add music
stored in folders that are currently shared on my network.
a. Type a network path for the music folder, or click Browse to search for it.
b. If it is not shared anonymously, enter the user name and password, and
click Next.
c. Click OK to confirm.
d. Click Finish when you have no more folders to add.

Sonos Digital Music System User Guide3-24
To remove a shared folder
1. From the Music Library Setup screen, highlight the share you want to remove
from the list, and click Remove.
2. Click Yes to confirm.
To update your music index
If you add new music to a folder that is already indexed, you can update your music
index to add this music to your library.
1. From the Music menu, select Update Music Index Now.
2. Click Yes to confirm.
The message, "updating music index" appears at the bottom of the screen. When the
update is complete, the message "ready" appears.
Getting Software Updates
Sonos provides software updates for your music system in order to improve
performance and add features. Your music system must be registered in order to
receive software updates. If you have not yet registered, see "Sonos System
Registration" on page 3-27.
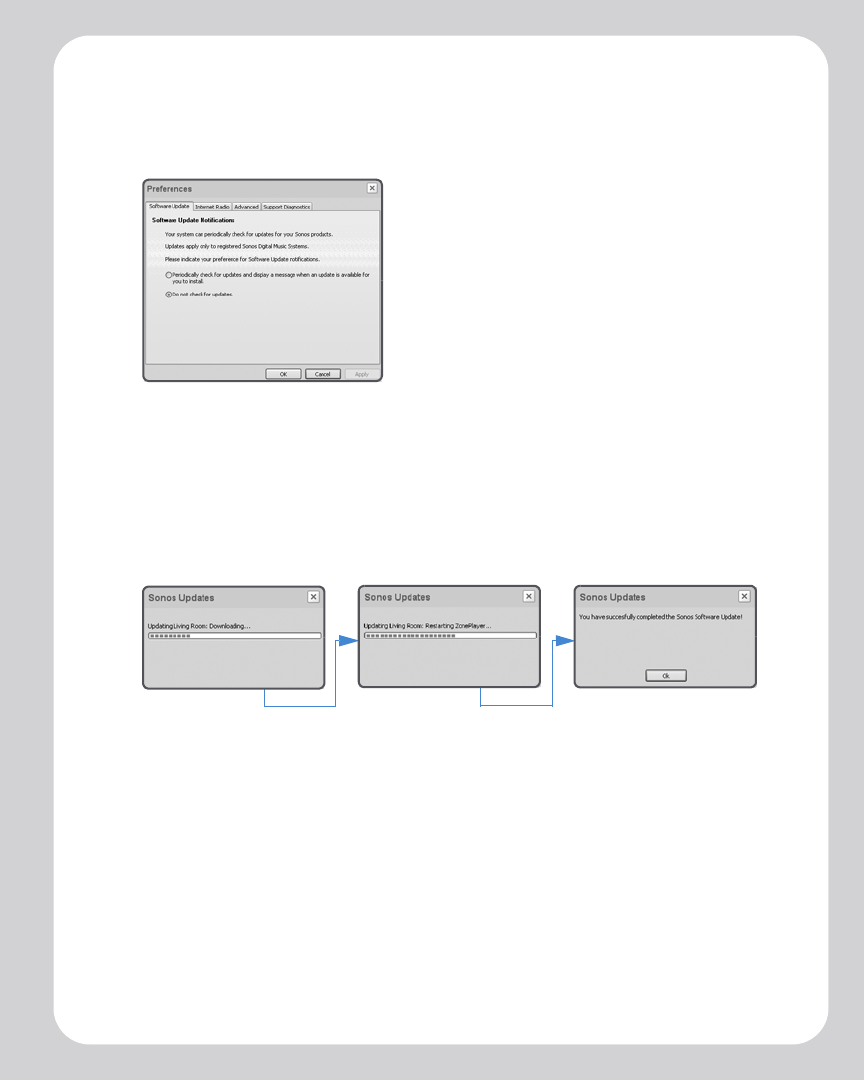
There are two options available:
• Periodically check for updates and send a message when an update is available.
A message window will appear when you start the Desktop Controller software
indicating there are updates available.
• Do not notify me when updates or notifications are available.
Chapter 3: Windows® Setup and Operation 3-25
To set software update preferences
1. From the File menu, select Preferences. The Software Update tab is displayed.
2. Select the desired setting, and click OK.
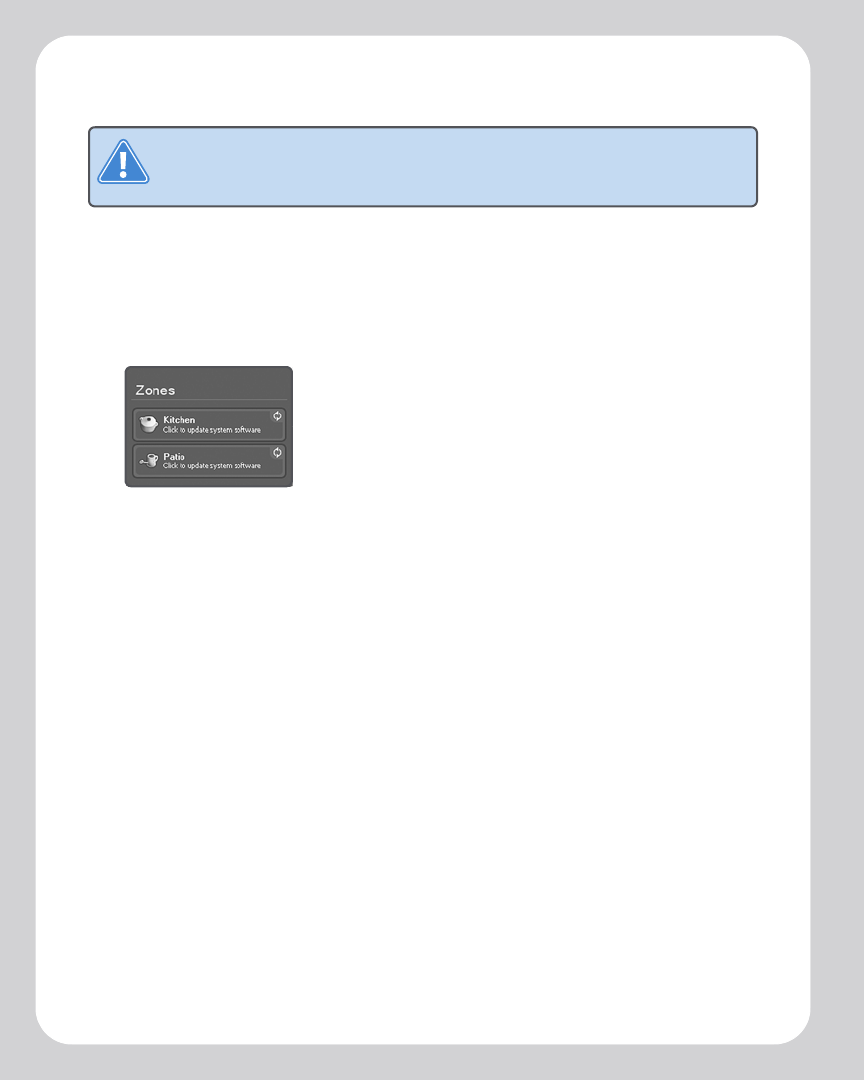
To download software updates
1. From the Help menu, select Check for Updates.
2. If there are updates available, click Update Now to download.
Your ZonePlayers and computer software will be updated as all Sonos components
must carry the same software version number. This process may take several minutes
per device, depending upon your network connection. Your Sonos Desktop
Controller software window will automatically close and then re-open during the
update process. You must then update your Controller as well by following the on-
screen prompts.
If your software is up to date, the message
"Your Sonos Digital Music System is up to date.
No updates are required" will appear instead.
Sonos Digital Music System User Guide3-26
ZonePlayer(s) software updates
If a ZonePlayer’s software version gets out of sync from the rest of your Sonos Digital
Music System components, you will see the following message displayed in the Zones
pane:
Click Yes to begin the software update process.
Advanced Preferences
Upon occasion, it may become necessary to adjust some of the default settings for
your Sonos Digital Music System. The Advanced Preferences menu option allows you
to change the wireless channel your Sonos Digital Music System operates on, as well as
change the encoding method for line-in source devices you may connect to your
music system.
Selecting a different wireless channel
The Sonos Digital Music System selects the optimal radio frequency channel during
setup. However, if you have other wireless devices using this channel, you may want to
switch the Sonos Digital Music System to another channel to avoid conflicts, as
conflicts may cause audio drop-outs.
1. From the File menu, select Preferences.
2. Click the Advanced tab.
3. Select another wireless channel from the Wireless Channel list, and click OK.
Caution Do not disconnect power from your ZonePlayer(s), or in any way disable
your Sonos Digital Music System while this process is running. Contact Sonos
Customer Support if an error occurs.
One or more ZonePlayers may need to be
updated if you purchase a new ZonePlayer with
a later software version, or if you plug in a
ZonePlayer that was not in use when you
performed your last software update.

Chapter 3: Windows® Setup and Operation 3-27
It may take several seconds for the switch to take effect. If you have music playing, a
short music dropout will occur during the wireless channel change.
Line-in encoding
If you have line-in music sources attached to a ZonePlayer, line-in encoding determines
how the Sonos Digital Music System will encode the audio coming in from these
sources. WMA encoding is the high-quality system default. For the highest quality
sound you can select WAV uncompressed encoding (this selection requires more
network bandwidth than WMA compressed audio).
1. From the File menu, select Preferences.
2. Click the Advanced tab.
3. Select WMA or WAV from the Line-In Encoding list, and click OK. When WMA is
selected, you will notice a slight delay before the music starts to play.
Sonos System Registration
During the setup process, you are asked to register your Sonos Digital Music System. If
you did not register at that time, you can register now by selecting Help→Sonos
System Registration. Registering your music system allows you to receive
technical support as well as software upgrades. At no time is any of your
information provided to other companies.
Turning Off All ZonePlayers
If you want to stop your Sonos Digital Music System from playing music, press Pause
All from the Play menu. All of your ZonePlayers will remain off until you touch Play
to restart each zone or zone group.
Resetting Your Desktop Controller Software
If you want to join your computer to a different Sonos Digital Music System, you must
reset your Desktop Controller.
1. Select Reset Desktop Controller from the Help menu.
2. Click Yes.

Sonos Digital Music System User Guide3-28
Your Desktop Controller window will automatically close. The next time you start the
Desktop Controller software, the Setup Wizard will appear to prompt you through the
setup process. If you are joining your computer to an existing Sonos Digital Music
System, you do not have to press the Mute and Volume Up buttons on every
ZonePlayer again - just one that is connected to your system via an Ethernet cable.

Macintosh® OS X Setup and
Operation
The Sonos Setup Assistant
Now that you have connected your first ZonePlayer, you are ready to install the Sonos
Assistant. The Sonos Setup Assistant software for Macintosh will guide you through the
process of configuring your music system and setting up access to your music files.
If you have digital music files stored on a Macintosh computer or other device on your
home network such as network-attached storage (NAS), the computer directories or
folders that contain your music files must be shared so that the Sonos Digital Music
System can access them. During setup, the Sonos Setup Assistant software will guide
you through the process of enabling Windows file sharing on your Macintosh computer
if it is not already enabled.
For easy setup, you should install the Setup Assistant software on every Macintosh
computer in your network that contains music files. However, if you wish to access
music stored on a computer where file sharing is not enabled and the Setup Assistant
software is not installed, review our FAQ Web site (http://faq.sonos.com/sharing) for
information.
Installing the Sonos Setup Assistant Software
1. Insert the Sonos System Setup CD-ROM (included with your ZonePlayer ZP100).
2. Double-click the icon, and follow the on-screen instructions.
Chapter 4
Sonos Digital Music System User Guide4-2
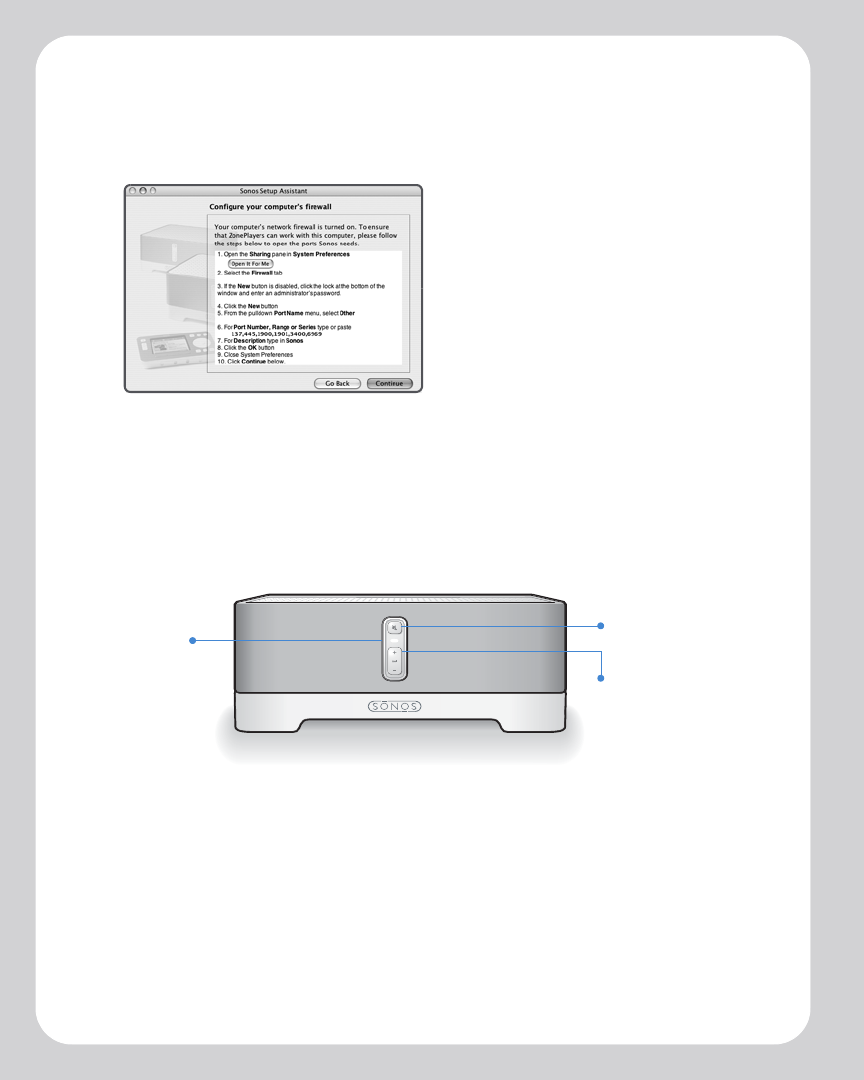
3. During the setup process, you will be asked to configure your Macintosh’s firewall.
Follow the on-screen instructions, and then click Continue.
4. During the setup process, you will be asked to press and release the Mute and
Volume Up buttons simultaneously on the ZonePlayer you are adding to your
music system.You may release the buttons as soon as the Mute indicator (green)
and the ZonePlayer Status indicator (white) start to blink alternately. This takes
approximately one second.
5. Choose a ZonePlayer name from the pop-up menu, and then click Continue.
ZonePlayer
status
indicator
Mute button
Volume up (+)
Once the ZonePlayer is successfully added to your music
system, the ZonePlayer Status indicator will stop flashing
and change to solid white (normal operation), and the Mute
indicator will go off.

Chapter 4: Macintosh® OS X Setup and Operation 4-3
6. Choose one of the following options:
• If you have another ZonePlayer to set up now, choose Yes, I want to add anoth-
er ZonePlayer and click Continue.
• If you don’t want to set up another ZonePlayer, choose I do not want to add an-
other ZonePlayer at this time, and click Continue.
7. You are now ready to set up access to your music folders. Choose Yes, se t u p my
music now, and click Continue.
Where is your music stored?
You will be asked where your music is stored. The setup steps will vary depending
upon where your music folders are located. Follow the instructions that correspond to
your storage location(s) in order to complete the setup process.
• Depending upon where your music is stored, you may be asked to provide an
administrator name and password to allow access to your music folders.
• If your Macintosh computer does not have Windows Sharing enabled, the Sonos
Setup Assistant will guide you through the process of enabling it. Your music
files are never copied from their current locations - your folders are simply
shared out so they can be accessed by your Sonos Digital Music System.
Connecting your Controller
Once setup is complete, if you purchased a Sonos Controller you can add it to your
music system now.
1. Plug your Sonos Controller into the AC adapter and follow the on-screen prompts
to add the Controller to your music system.
During this process, you will be asked to press and release the Mute and the
Volume Up buttons simultaneously on one of the ZonePlayers you have set up.
You may release the buttons as soon as the Mute indicator (green) and the
ZonePlayer Status indicator (white) start to blink alternately. This takes
approximately one second.
2. When you see the message, System is Now Setup touch the OK button.
Sonos Digital Music System User Guide4-4
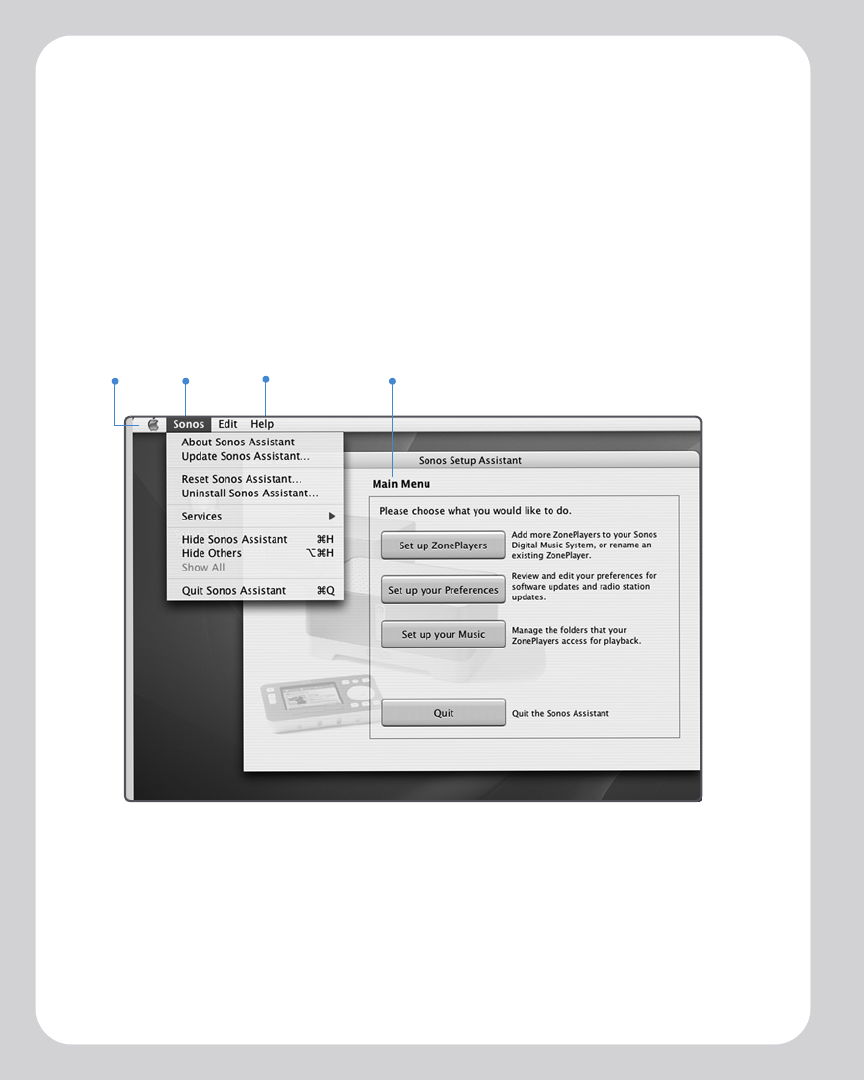
The Sonos Assistant Main Menu
Once setup is complete, open the Sonos Assistant any time you wish to:
• Add more ZonePlayers
• Rename a ZonePlayer
• Change your preferences for software updates or Internet radio
• Add or remove access to your shared music folders
• Reset the Sonos Assistant
Adding More ZonePlayers
You can add more ZonePlayers to your Sonos Digital Music System any time by
selecting Set up ZonePlayers from the Main Menu. Turn to Chapter 2 if you’d like help
with the placement and setup of your new ZonePlayer(s).
Sonos
menu
Main
menu
Menu
bar
Help
menu
Chapter 4: Macintosh® OS X Setup and Operation 4-5
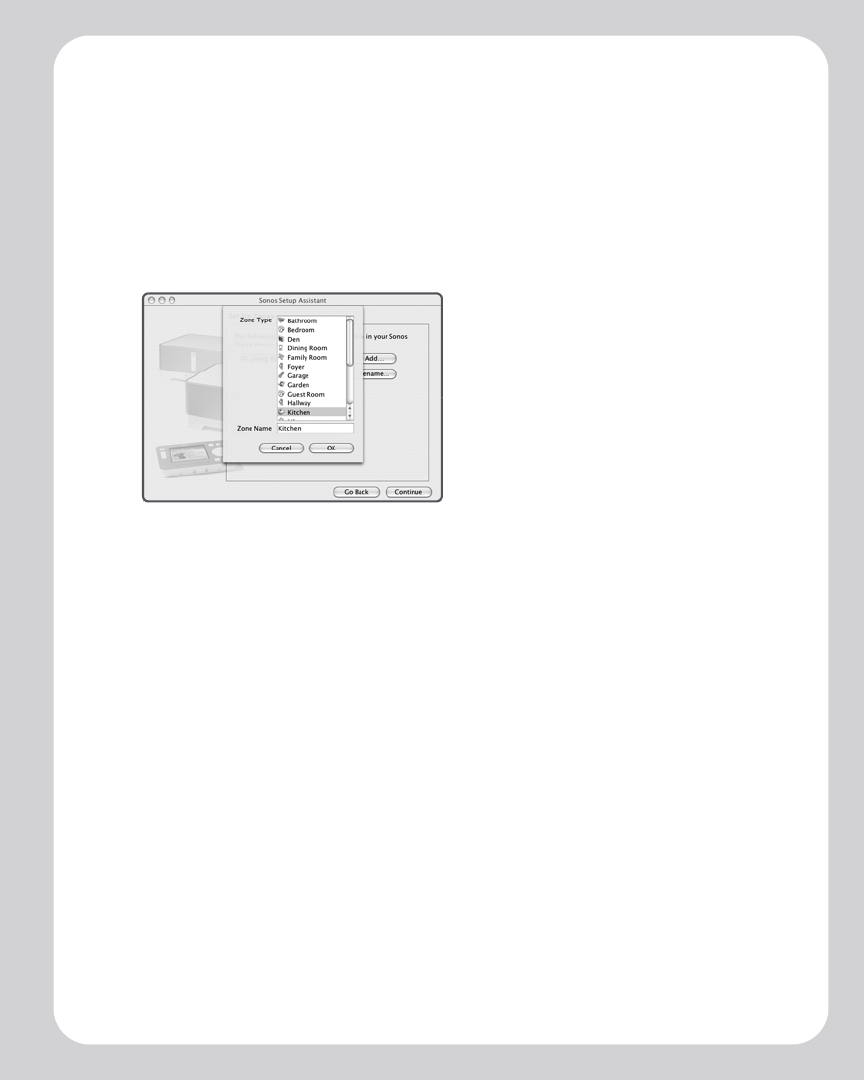
Renaming a ZonePlayer
If you name a ZonePlayer incorrectly, or if you move your ZonePlayer to another room,
you can rename it to suit your preference.
1. From the Main Menu, click Set up ZonePlayers.
2. Highlight the ZonePlayer you wish to change, and click Rename.
3. Choose a name from the list, or type a new name for this ZonePlayer in the Zone
Name field, and then click OK.
4. Click Continue.
Sonos Digital Music System User Guide4-6
Changing Your Preferences
Upon occasion, it may become necessary to adjust some of the default settings for
your Sonos Digital Music System.
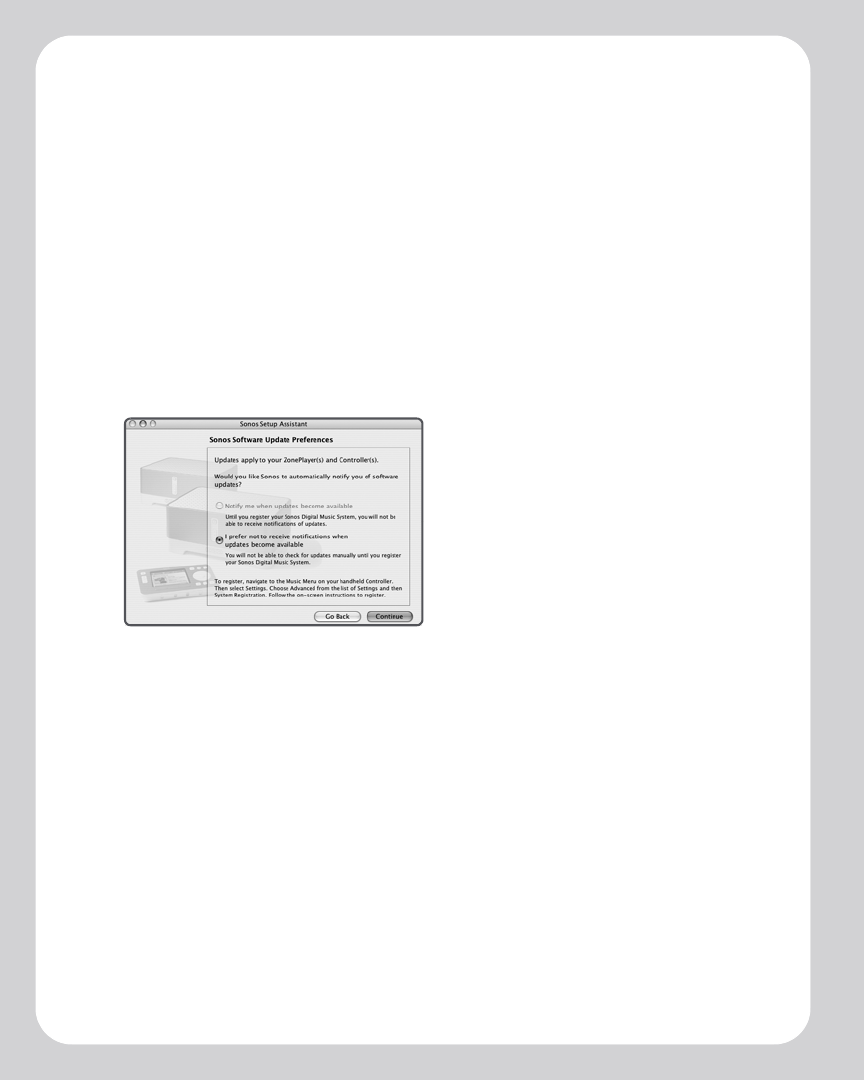
Software update preferences
Sonos provides software updates for your music system in order to improve
performance and add features. Your music system must be registered in order to
receive these software updates. If you have not yet registered, see "System registration"
on page 5-29.
1. From the Main Menu, select Set up your Preferences.
2. Choose one of the following options:
• Select Notify me when updates become available. A message will appear on
your Sonos Controller to indicate there are updates available.
Or,
• Select I prefer not to receive notifications when updates become available.
You should periodically check for updates using your Controller.
Chapter 4: Macintosh® OS X Setup and Operation 4-7
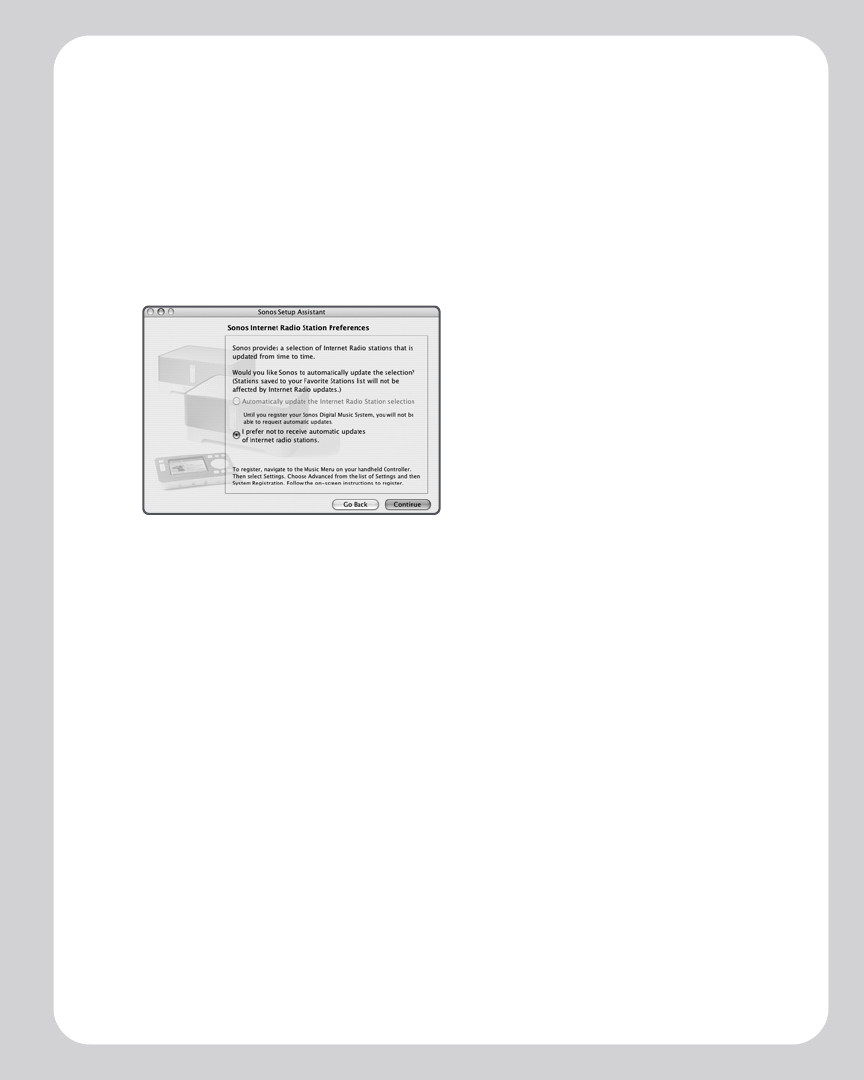
Internet radio preferences
You can receive automatic radio station updates whenever Sonos releases a new list.
Your music system must be registered in order to receive updates. Change your
preference option by following the steps below:
1. From the Main Menu, choose Set up your Preferences.
2. Click Continue to display the Internet Radio Station Preferences screen.
3. Select the desired setting, and click Continue.
Updating Your Sonos Assistant Software
You can check for updates to the Sonos Assistant software by choosing Update Sonos
Assistant from the Sonos menu. This option will automatically take you to the Sonos
Support Web site where a message displays indicating whether or not there is a later
version available for you to download.
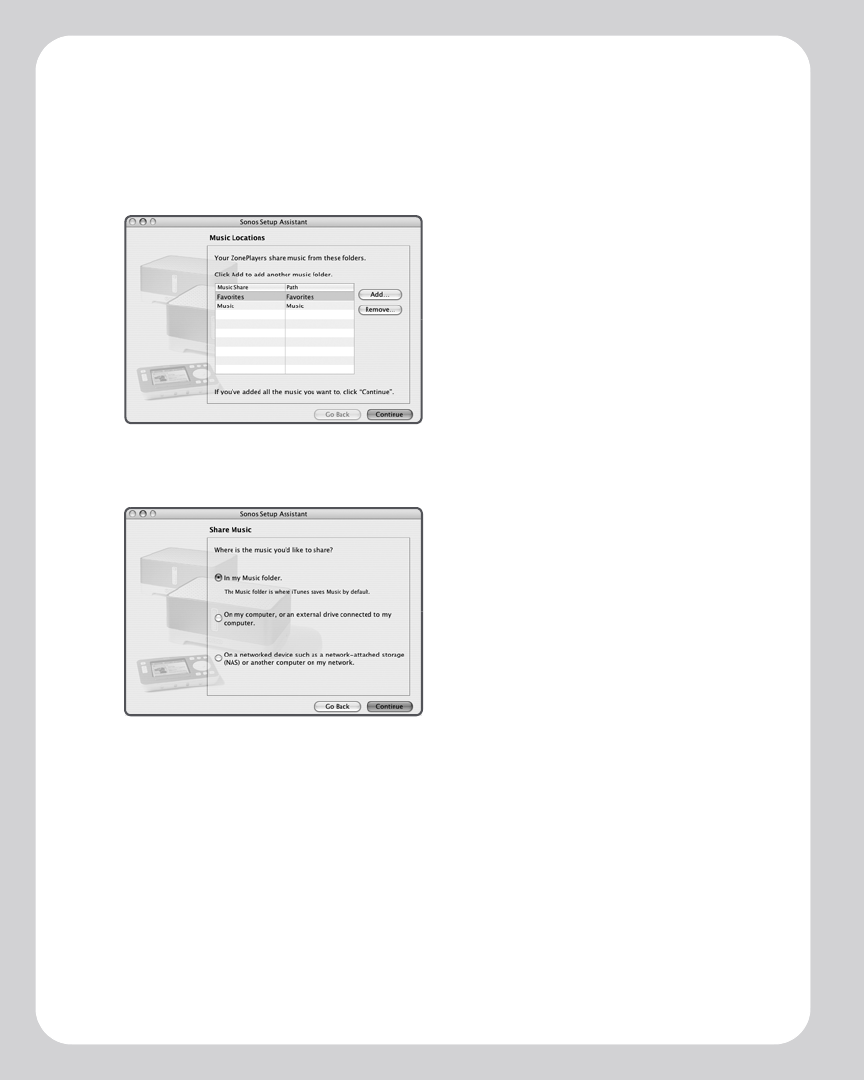
Managing Music Folders
The Sonos Digital Music System can play music from any compatible network
computer or network-attached storage device where you have shared music folders
stored. During the setup process, you are guided through the process of accessing
these shared music folders. Over time, you may wish to add or remove music folders
from this list.
Sonos Digital Music System User Guide4-8
To add a shared music folder to the list
1. From the Main Menu, choose Set up your music.
2. The music folders that are currently being accessed are displayed.
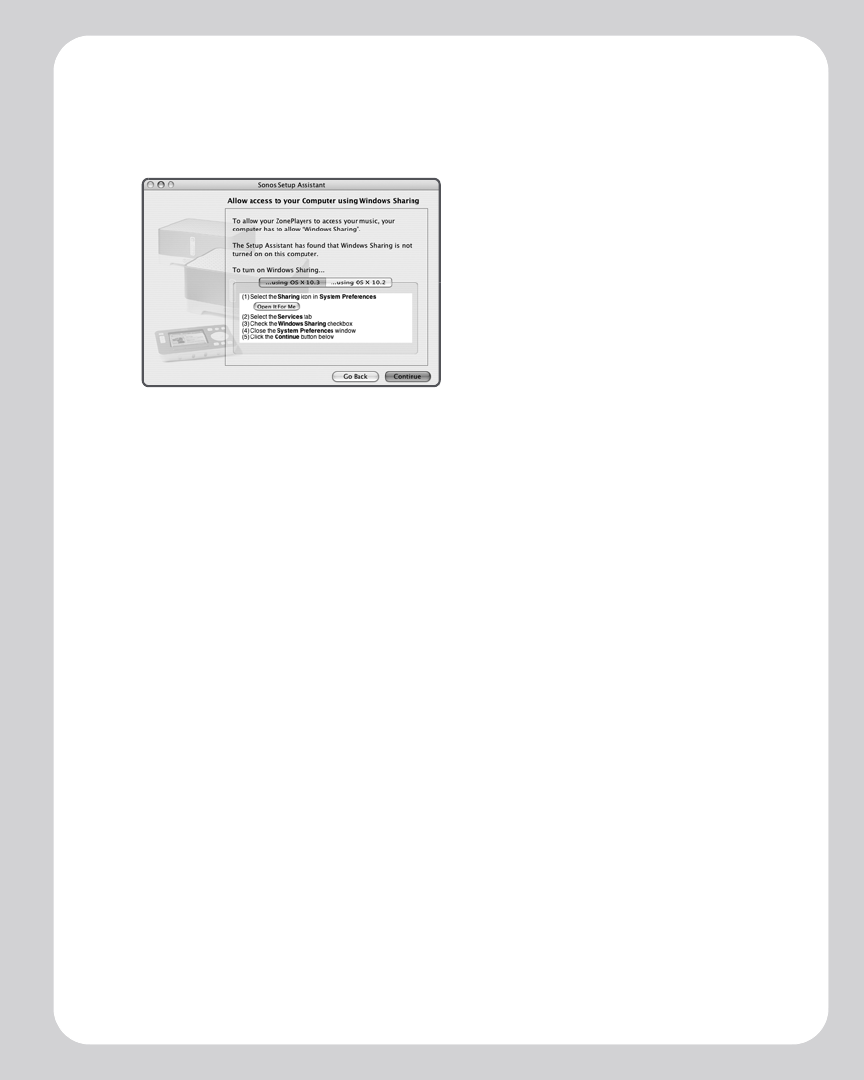
3. Click Add.
•If you select In My Music Folder, click Continue and then turn to "If you have
music stored in your music folder..." on page 4-9.
•If you select On My Computer, click Continue, and then turn to "If you have mu-
sic stored elsewhere on your computer..." on page 4-9.
• If you select On a networked device such as network-attached storage or
another computer, click Continue and then turn to "If you have music stored
on the network..." on page 4-10.
Chapter 4: Macintosh® OS X Setup and Operation 4-9
If you have music stored in your music folder...
1. Provide an administrator name and password, and then click Continue.
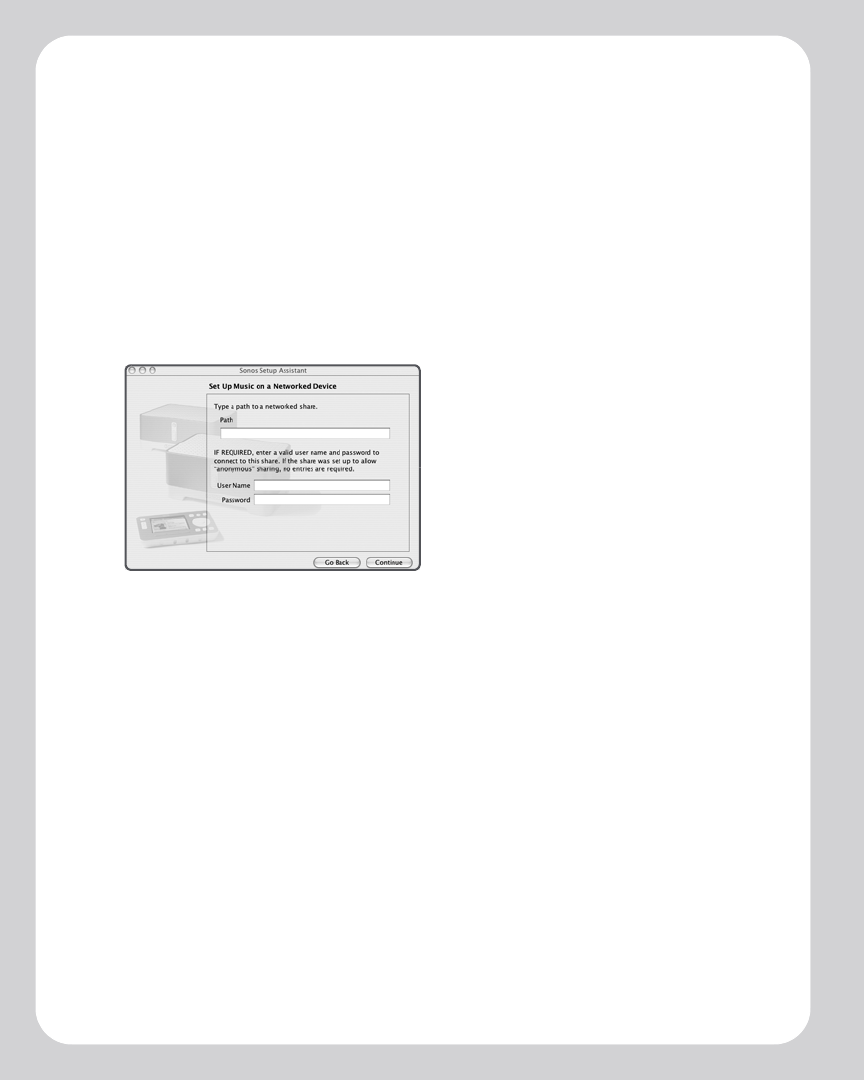
2. If your computer does not currently allow Windows Sharing, you will be prompted
to enable it.
• If your operating system is 10.3, press the Open It For Me button and follow the
on-screen instructions.
• If your operating system is 10.2, click the Using OS X 10.2 tab and follow the on-
screen instructions.
3. Click Continue.
4. Choose one of the following options:
•Click Add to add another music folder.
Or,
•Click Continue if you have no more music folders to add.
If you have music stored elsewhere on your computer...
1. Click Browse to choose a music folder, and then click Continue.
2. If required, you may be asked to provide an administrator name and password.
3. If this device does not currently allow Windows Sharing, you will be prompted to
enable it.
• If your operating system is 10.3, press the Open It For Me button and follow the
on-screen instructions.
• If your operating system is 10.2, click the Using OS X 10.2 tab and follow the on-
screen instructions.
If Windows Sharing is already
enabled on your computer, this
screen will not appear
Sonos Digital Music System User Guide4-10
4. Choose one of the following options:
•Click Add to add another music folder.
Or,
•Click Continue if you have no more music folders to add.
If you have music stored on the network...
1. Type the path name for the music folder and, if necessary, the user name and
password of a user with rights to access this networked device, and click
Continue.
2. Click Continue.
3. Choose one of the following options:
•Click Add to add another music folder.
Or,
•Click Continue if you have no more music shares to add.
To remove a shared music folder from the list
1. From the Main Menu, choose Set up your music.
2. Highlight the folder you want to stop accessing music from, and click Remove.
3. Click Remove to confirm.
4. You may be asked to provide an administrator name and password.
5. Click Continue when you have no more folders to remove from the list.

Chapter 4: Macintosh® OS X Setup and Operation 4-11
Resetting the Sonos Assistant
If you want to join your Macintosh computer to a different Sonos Digital Music System,
you must reset your Sonos Assistant.
1. Choose Reset Sonos Assistant from the Sonos menu.
2. Click Reset.
3. Click Quit.
The next time you start the Sonos Assistant software, the Setup Wizard will appear to
prompt you through the setup process. If you are joining this computer to an existing
music system, you do not have to press the Mute and Volume Up buttons on every
ZonePlayer again - just one that is connected to your system via an Ethernet cable.
Uninstalling the Sonos Assistant
If at some point you wish to completely remove the Sonos Assistant from your
Macintosh computer, choose Uninstall Sonos Assistant from the Sonos menu. The
Sonos Digital Music System will no longer be able to access music from this computer.

Sonos Digital Music System User Guide4-12

Using Your Sonos Controller
Sonos puts the control of all your music and all your rooms in the palm of your hand.
With a Sonos Controller in hand, you'll have instant access to your entire digital music
collection, no matter where it's stored. And because it's wireless, you can control the
music and where it's being played from any room in your house - with no pointing or
line of sight requirements. That means no more moving from room to room to turn on,
change, or turn off the music throughout your home.
The full-color LCD screen and intuitive scroll wheel make everything from browsing
songs to choosing zones incredibly easy. Simply choose a zone to play music in, make
your music selection(s), and touch Play.
Features
• Wireless control over all your music and all your zones from anywhere
• Intuitive control over your music and zones with full-color LCD screen and scroll
wheel that makes it simple to:
•browse songs
• queue up tracks and playlists
• select Internet radio stations
• choose zones
• control volume, playback and system settings
Controller Package Contents
• Sonos Controller CR100
• AC adapter with power cord
•Setup Instructions
Chapter 5
TM
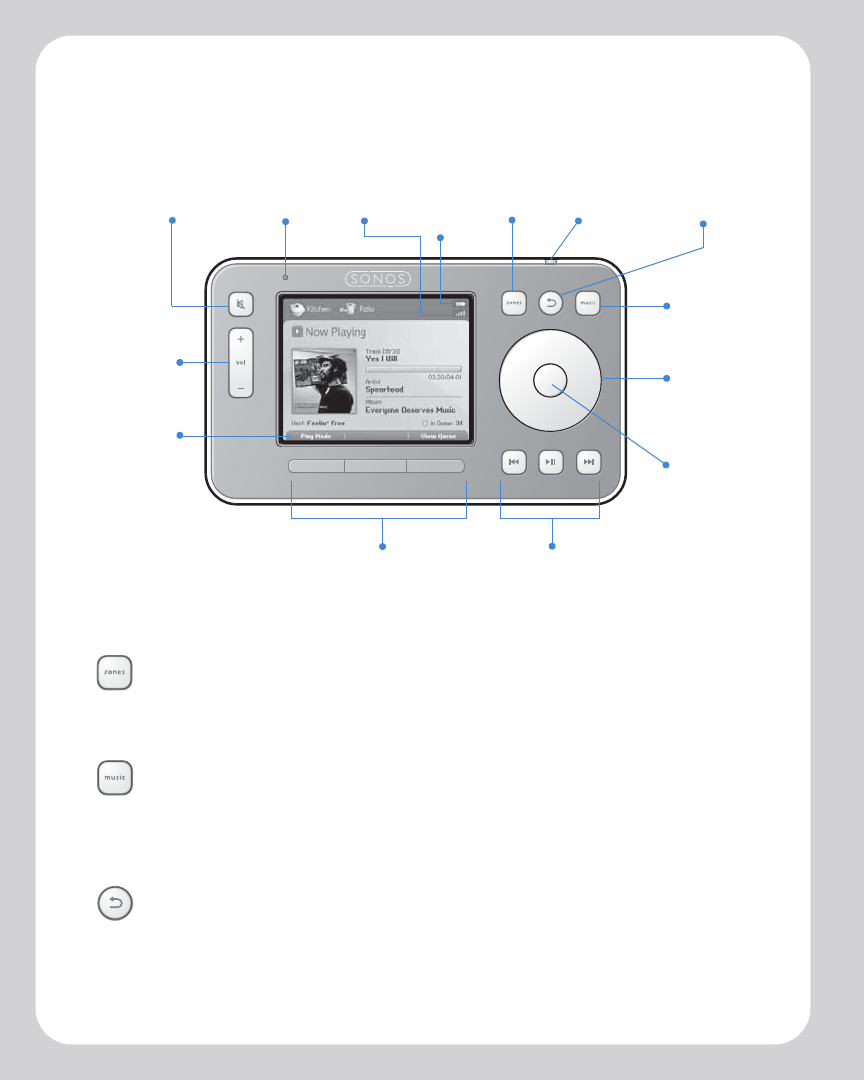
Sonos Digital Music System User Guide5-2
Using the Controller
Navigation
Zones. Use the Zones button to select a zone to play music in, or to view the
music selections playing in each zone. You can also use this button to create
or modify zone groups any time you want to share the same music across
multiple zones.
Music. Use the Music button to browse or select music. From the Music
menu you can select new music to play, manage your music queues, access
playlists, and change the default settings for a Sonos ZonePlayer or Controller.
The Music button will also toggle you between the Music menu and the Now
Playing screen.
Back. Use the Back button to return to the previous screen in the selected
menu (zone or music).
Battery
charge
indicator
Mute
button
Volume
up(+)
down (-)
Music
button
Scroll
wheel
Back
button
Battery status
indicator light
Zones
button
Labels for
soft
buttons
Soft buttons Playback controls
Light
sensor
OK button
Wireless
indicator
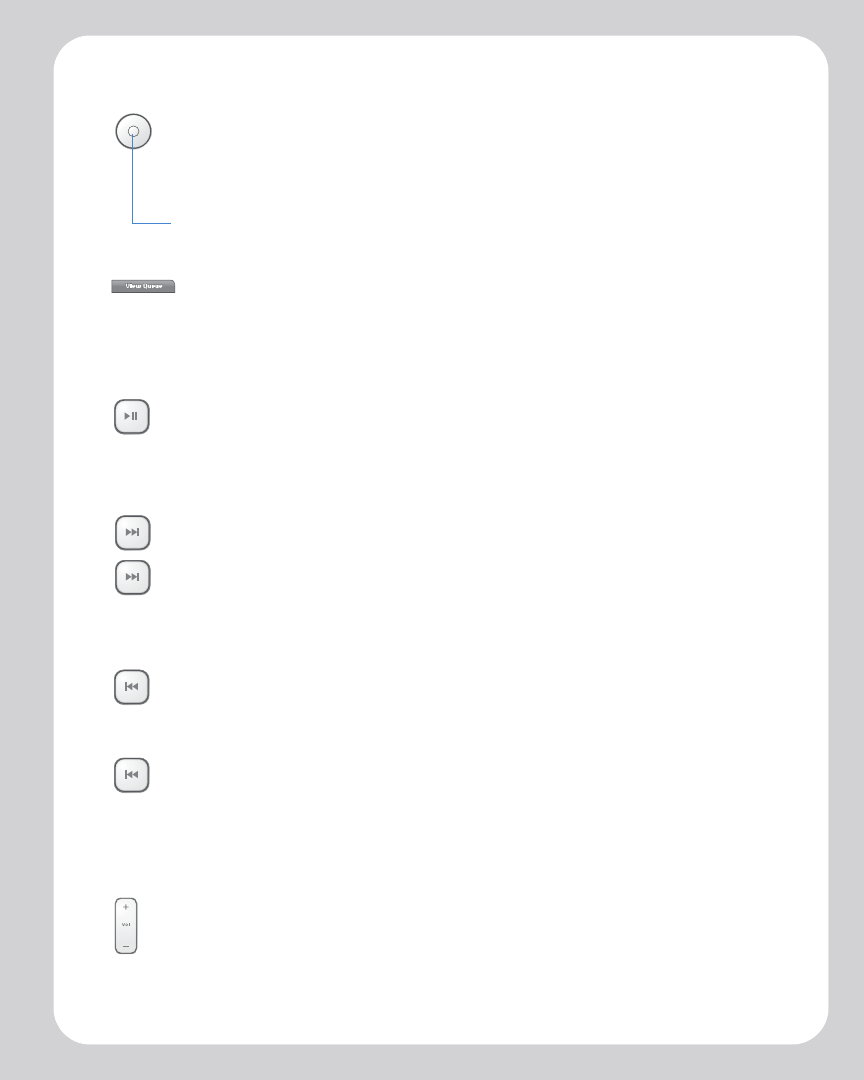
Chapter 5: Using Your Sonos Controller 5-3
Scroll wheel. The scroll wheel is used to navigate through a displayed list
whenever one is present on the Controller screen. Use your thumb or finger
to "turn" the wheel clockwise to scroll down through the list, and
counterclockwise to scroll up through the list.
OK button. Touch the "OK" button located in the center of the scroll wheel to
make selections.
Soft buttons. The soft button functions change to reflect the available actions
for the Controller screen currently displayed. The action for each button
appears above it (for example View Queue or Add to Queue).
Playback
Play/pause. Toggles between playing and pausing the current track.
However, when browsing music sources, if you highlight a playable item
(track, album, artist, playlist) and press Play, the highlighted music item is
added to the end of the music queue and begins to play immediately. This
occurs whether the current track is in Play or Pause mode.
Next (short press). Jumps to the start of the next track in the music queue.
Fast forward (long press). Pressing and holding this button moves you
forward through the current track. The music playback jumps to the new
position when the button is released (while the button is held down, the song
continues to play at the normal rate).
Previous (short press). If you are more than 3 seconds into the track, this
button jumps to the start of the current track; if you are less than 3 seconds
into the track, this button jumps to the start of the previous track.
Rewind (long press). Pressing and holding this button moves you backward
through the current track. The music playback jumps to the new position
when the button is released (while the button is held down, the song
continues to play at the normal rate).
Volume
Volume controls. Use the volume control buttons to increase (+) or
decrease (-) the volume in any zone, or across a zone group.
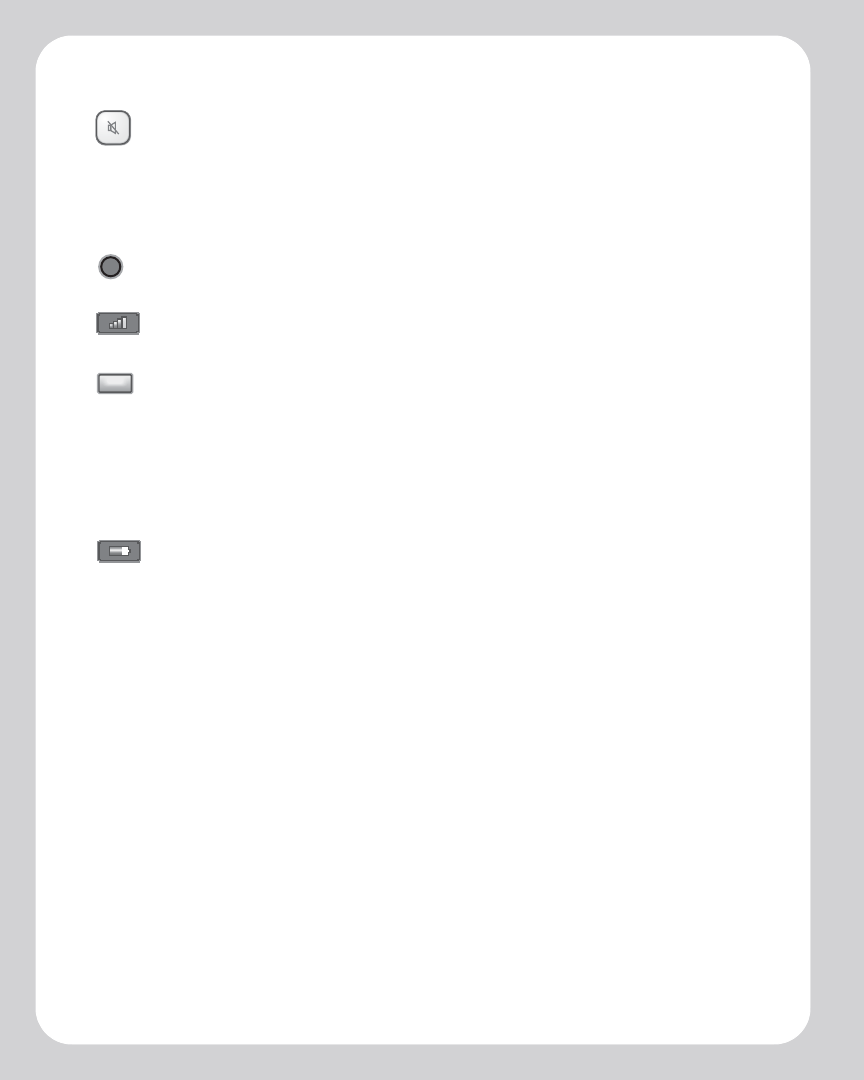
Sonos Digital Music System User Guide5-4
Mute. Use the Mute button to temporarily silence the music in a zone (within
a zone group, the mute button automatically mutes the last room where
volume controls were adjusted.) Touch the Mute button again to unmute. To
mute all zones in the house, press and hold the Mute button for 3 seconds.
Controller sensors and indicators
Light sensor. The light sensor automatically turns on the button backlights
based upon the lighting conditions of the environment.
Wireless signal strength indicator. Displays at the top of each screen to
indicate the current strength of the Controller’s wireless signal.
Battery status indicator light. Indicates the status of the battery charge:
•Lights red when the battery gets low, indicating that the Controller needs to
be charged.
•Lights amber while the Controller is charging.
•Lights green when the Controller finishes charging.
• Unlit when your Controller is charged and not connected to the AC adapter.
Battery charge indicator. Displays at the top of each screen to indicate the
Controller’s remaining battery charge.
Motion sensor. The Controller has a motion sensor to automatically wake your
Controller when motion is detected. Use the Motion Sensor setting on the
Controller Settings menu to disable this feature.
Sleep modes
Light sleep. Your Controller will go into light sleep to preserve the battery life when it is
unused for a specified period of time. The screen will turn off until motion is detected
or a button is pressed. Use the Sleep Timer Docked (Controller is connected to power
supply) and Undocked (Controller is not connected to a power supply) settings to
select the amount of time after which your Controller will enter light sleep.
Deep sleep. Your Controller will go into deep sleep to preserve the battery life when it is
unused for a specified period of time. When your Controller wakes from deep sleep -
either from the motion sensor or from a button touch - it will go through a restart cycle
that takes several seconds. Use the Deep Sleep Timer setting to select the amount of
time after which your Controller will enter deep sleep.

Chapter 5: Using Your Sonos Controller 5-5
Turn off Controller
Use this setting to put your Controller into deep sleep anytime it will not be in use for
an extended period of time, or when you are transporting your Controller to another
destination. This setting puts the Controller into deep sleep mode immediately rather
than waiting for the deep sleep timer setting to be reached. The Controller cannot be
turned off while it is connected to the AC adapter or charging cradle.
Resetting Your Controller
If your Controller’s screen should freeze, press and hold the Mute and Music
buttons simultaneously on the Controller for approximately 3 seconds. The Controller
will restart momentarily.
Factory reset
If you want to join your Controller to a different Sonos Digital Music System, you must
factory reset your Controller. Select System Settings→Controller
Settings→Advanced Settings→Factory Reset from the Music menu.
The Welcome screen will appear on your Controller to prompt you through the setup
process. To add your Controller to a Sonos Digital Music System that is already set up,
you will be prompted to press and release the Mute and Volume Up buttons
simultaneously on any ZonePlayer that is part of your music system.
Controlling the Volume
The Volume panel appears temporarily on your Controller screen when you press the
Volume or Mute buttons. Highlight the zone or zone group you want to adjust before
touching the volume control buttons.
If you have two or more zones grouped together, the Group Volume bar displays at the
top. You can adjust the Group Volume bar to control the volume proportionately for
the whole zone group, or select an individual zone to adjust the volume setting in just
that zone.