Sonos CR001 Controller for Digital Music Distribution System User Manual
Sonos, Inc. Controller for Digital Music Distribution System
Sonos >
Contents
- 1. Users Manual 1 of 2
- 2. Users Manual 2 of 2
Users Manual 2 of 2
Sonos Digital Music System User Guide5-6
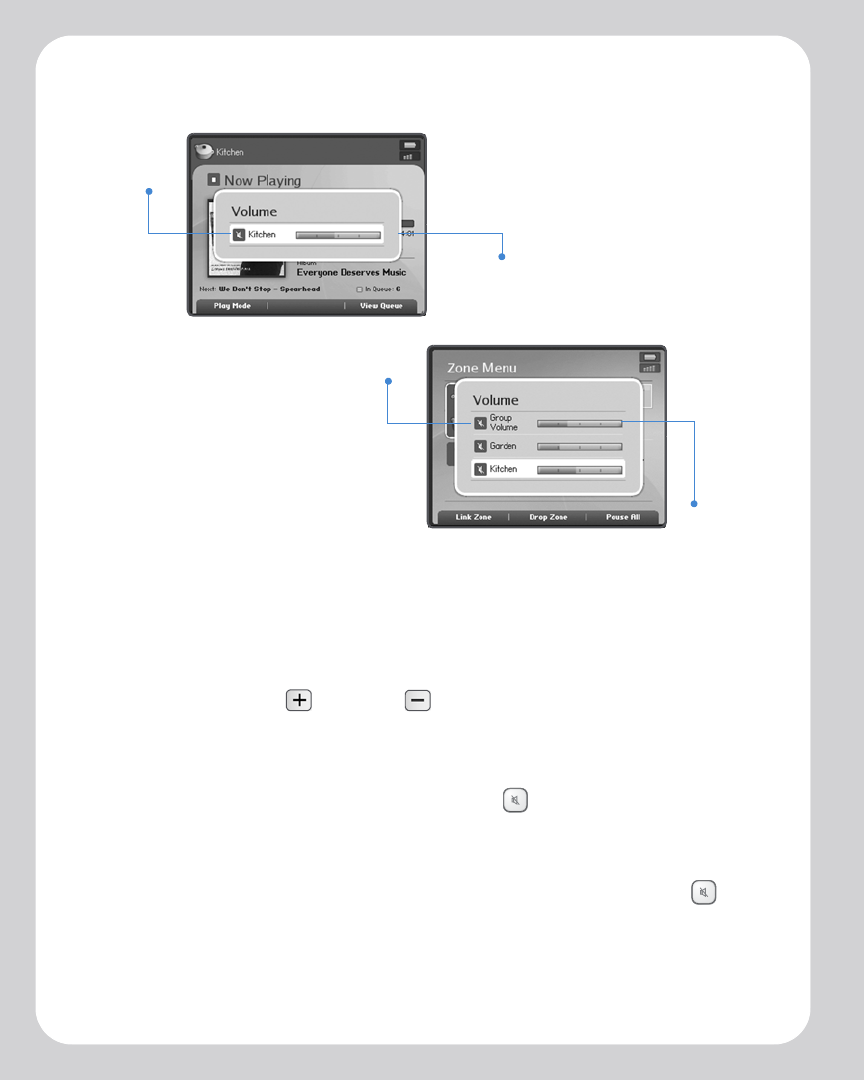
To adjust volume or mute zones
1. From the Zone menu, use the scroll wheel to select the zone you want to change
the volume settings for.
2. Use the Volume Up and Down buttons to change the volume to the
desired level.
3. Touch OK, and the Volume panel disappears.
4. To mute a zone or a zone group, touch the Mute button (within a zone group,
the mute button automatically mutes the last room where volume controls were
adjusted.) Touch the Mute button again to unmute.
5. To mute all the ZonePlayers in your household, touch and hold the Mute
button for 3 seconds. Touch and hold again for 3 seconds to unmute all
ZonePlayers.
The volume panel appears over the
current screen. Volume can be
controlled for a zone group or for an
individual zone.
Single zone
volume bar
Group
volume
bar
Mute
indicator
Mute
indicator
Chapter 5: Using Your Sonos Controller 5-7
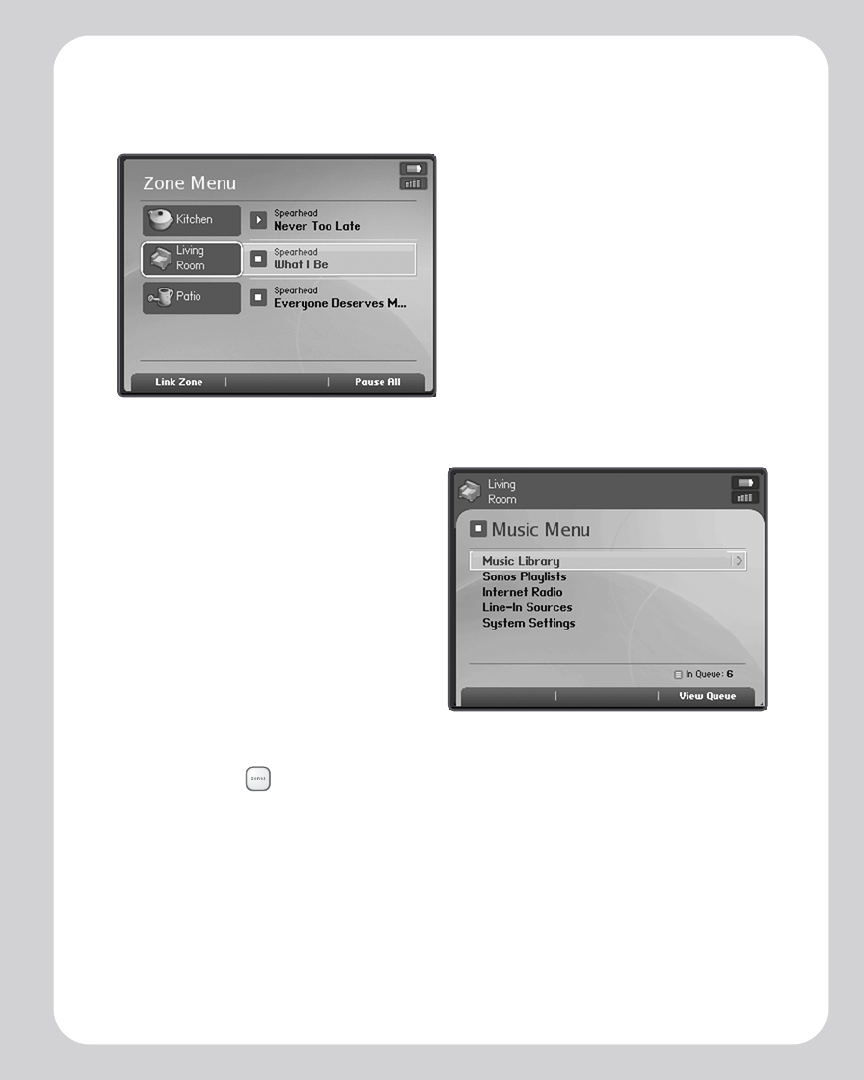
The Controller Main Menus
Zone menu
• View zones
• Select zones
• Link or drop zones in a zone group
• Pause all ZonePlayers
Music menu
• Music Library
• Sonos Playlists
• Internet Radio
• Line-In Music Sources
•System Settings
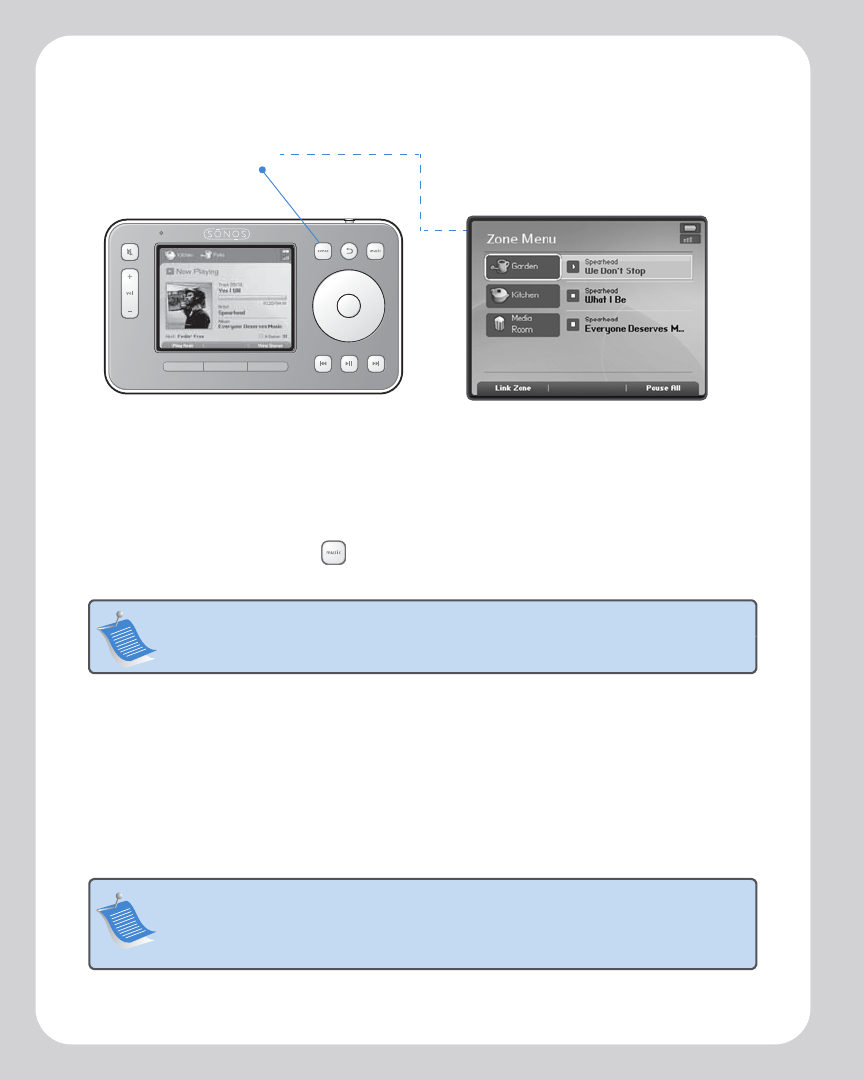
Managing Your Zones
Touch the Zones button on your Controller to display the Zone menu where you
can view the music selections playing in each room. From this menu, you can:
• See an alphabetical list of the zones in your household, along with the music cur-
rently playing in each zone
• Group zones together to play the same music across zones (create a zone group)
• Drop a zone from a zone group
• Pause all ZonePlayers in your household
Sonos Digital Music System User Guide5-8
Music will continue to play while you browse the Zone menu.
Music you select will play in the zone you highlight on the Zone menu. Use the scroll
wheel to highlight a zone, and touch OK. The Now Playing window appears. You can
then touch the Music button to change the music selection for this zone.
Zone groups
Two or more zones can be grouped together to form a zone group, which allows you
to play the same music across zones. You can also link all the ZonePlayers in your house
with one touch by selecting All Zones-Party Mode. You can add and drop zones from
a zone group while your music is playing.
Note: The currently selected zone will always show at the top of your Controller
screen so you can see which zone you are making changes to.
Note: Any zones you add to a group will automatically drop their current music
queue and begin to play the music that is playing in the zone group. You may
sometimes want to save your music queue as a Sonos playlist before linking zones.
See "To save a music queue as a Sonos playlist" on page 5-15.
Zones button
Touch the Zones button to view the music
playing in each room
Chapter 5: Using Your Sonos Controller 5-9
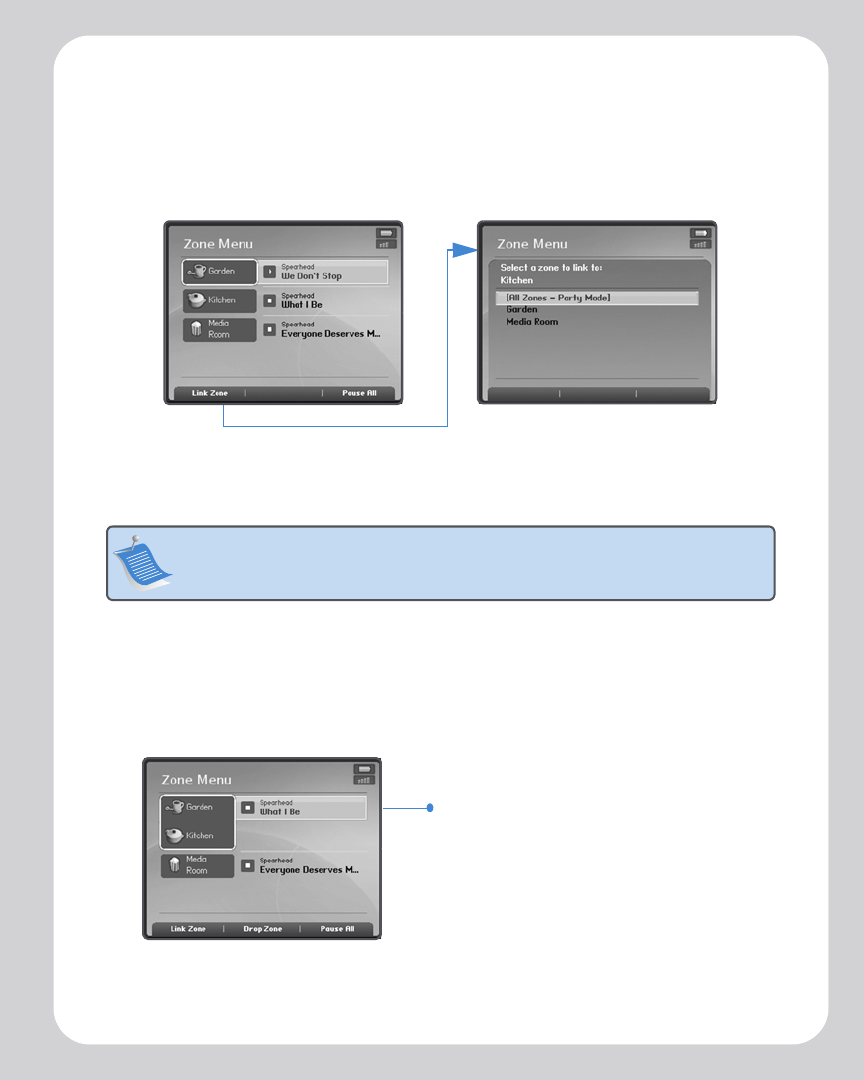
To add a zone to a zone group
1. Touch the Zones button on your Controller.
2. Highlight the zone or zone group you want to add a zone to, and touch Link
Zone.
3. Highlight the zone you want to add to the group, and touch OK. If you want to
join all the zones in your house to this music queue, select All Zones-Party Mode.
All of your ZonePlayers will then play the same music until you drop the
zones from the zone group.
Note: The order in which you add a zone makes a difference. If you select Link
Zone from a zone where there is no music playing, any zone you link to it will also be
silent.
Select zone to add to
group
Select zone where desired
music is playing
Kitchen and Garden make up a zone group
The music queue from the added zone is
automatically replaced by the music queue from the
zone or zone group it was linked to so that both
zones play the same music

Sonos Digital Music System User Guide5-10
To drop a room from your zone group
1. Touch the Zones button on your Controller.
2. Use the scroll wheel to highlight the zone group you want to change, and touch
Drop Zone.
3. Highlight the zone you want to drop from the group, and touch OK. The room
that’s removed from the zone group stops playing music. The other zones in the
zone group continue unaffected.
To turn off all ZonePlayers
If you want to stop your Sonos Digital Music System from playing music, press Pause
All from the Zones menu. All of your ZonePlayers will remain off until you touch Play
to restart each zone or zone group.
Select zone
to drop from
group
Chapter 5: Using Your Sonos Controller 5-11
Making Music Selections
Browsing your music library
You can browse for songs in a number of different ways. Using the Controller, you can
make broad music selections like play all available music by a particular artist, or you can
make specific selections like play a single track by a particular artist on a specified album.
Selection choices include:
•Artist
•Album
• Composer
•Genre
•Tracks
• Imported Playlists
• Browse by Folder
The Music Queue
When you make music selections, they are added to a list of tracks called a music queue.
You can create a different music queue for each zone in your house, or you can create a
zone group and play the same music across multiple zones. A play indicator appears to
the left of the currently playing track. When the current track ends, the next track in the
queue starts to play, and play continues down through the list until the queue is
completed. When you add tracks to a queue, they are placed at the end of the queue.
Note: If a computer on your network is turned off or is in "standby" mode, the
music folders on that computer are unavailable to the Sonos Digital Music System
until the computer is turned back on.
Note: You can add tracks to the music queue while other tracks in the queue are
playing.
Sonos Digital Music System User Guide5-12
To select from your music library
1. From the Zone menu, highlight the zone where you want to play music, and then
touch the Music button.
2. Select Music Library, and touch OK.
3. Use the scroll wheel to browse the music library, and then highlight a selection.
4. Choose one of the following options:
•Touch the Play button to play now.
Or,
•Touch Add to Queue to add the selection to the end of your music queue.
Or,
•Touch OK to drill down through the menu structure for more choices if an artist,
album, composer, genre or folder is selected.
If you select by artist, all of your music by this artist is added to the music queue. To play
a specific track by a particular artist, select Music Library→Artist and then touch OK
to drill down through the menu structure until you see the track you want to play.
Note: The music you select will play in the zone or zone group that is currently
showing at the top of your Controller screen.
Play
indicator
Chapter 5: Using Your Sonos Controller 5-13
If you’ve created Sonos playlists (tracks you’ve organized into lists), you can play them
anytime by selecting Sonos Playlists from the Music menu. For more information, see
"To save a music queue as a Sonos playlist" on page 5-15.
5. Touch the Back button at any time to return to the previous music screen.
Managing your music queue
• You can delete a track from the queue, or clear the entire queue.
• You can highlight a track in the queue list and touch OK to make it play now (the
album art for this track then appears in the Now Playing window if it was saved
with the track).
• You can save a music queue as a Sonos playlist.
• From the Now Playing screen, you can select Play Mode to cause the songs in
the music queue to play in a different order.
Note: If you have WAV files in your music collection, they are only available for
browsing and/or selection via Track or Browse by Folder, as WAV files do not
contain detailed information such as artist, title and genre.
Note: Remember, the music you select will play in the zone or zone group that is
currently showing at the top of your screen. To change zones, touch the Zones
button.
Once you have added selections to a music
queue, you can make changes to the queue
list by selecting the View Queue soft button.
Sonos Digital Music System User Guide5-14
To remove a track from the music queue
1. Touch View Queue.
2. Use the scroll wheel to highlight the song you want to remove from the queue.
3. Touch Remove/Clear.
4. Select Remove Track, and touch OK.
The song disappears from the queue list.
To clear the music queue
1. Touch Remove/Clear from the View Queue window.
2. Select Clear Queue, and touch OK.
This will clear the entire queue and the music will stop playing.
To change the play mode
1. From the Zones menu, touch OK to display the Now Playing screen.
2. Touch Play Mode.
3. Use the scroll wheel to select a play mode, and touch OK.
Play mode icon
Chapter 5: Using Your Sonos Controller 5-15
The selected play mode appears as an icon on the Now Playing screen.
Shuffle. Plays the tracks in the music queue in a random order.
Repeat. Repeats the music queue after the last track has finished.
Shuffle/Repeat. Shows that both play modes are activated.
Creating and Managing Sonos Playlists
Sonos playlists are music queues you save for future listening. For example, you might
want to create a jazz playlist, a party playlist, or an easy listening playlist.
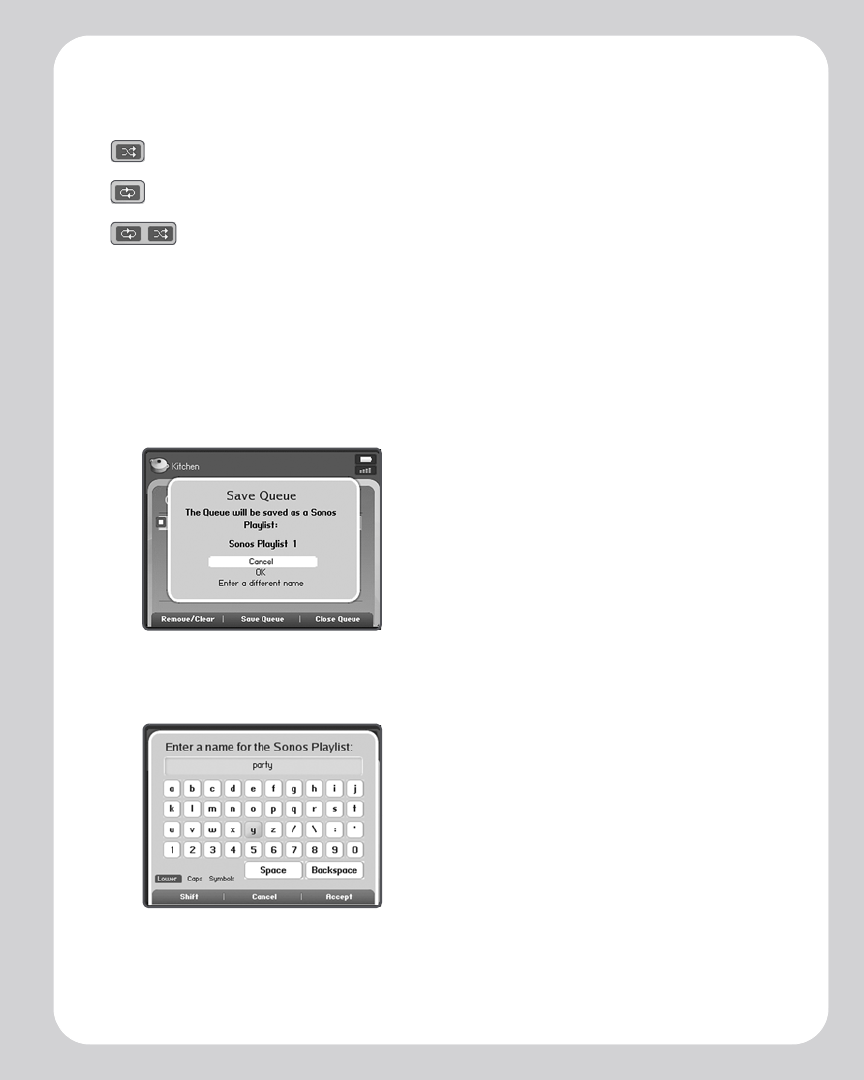
To save a music queue as a Sonos playlist
1. From the View Queue window, touch Save Queue.
2. Select OK to save the playlist using the name displayed, or select Enter a
Different Name and use the keyboard to type another name such as jazz or party.
3. Touch OK after each letter entry, and then Accept when finished.
Sonos Digital Music System User Guide5-16
You can access these saved Sonos playlists later from the Music menu.
To delete a Sonos playlist
1. From the Music menu, highlight Sonos Playlists, and touch OK.
2. Use the scroll wheel to highlight the playlist you want to delete, and touch Delete
Playlist.
3. Highlight Yes to confirm, and touch OK.
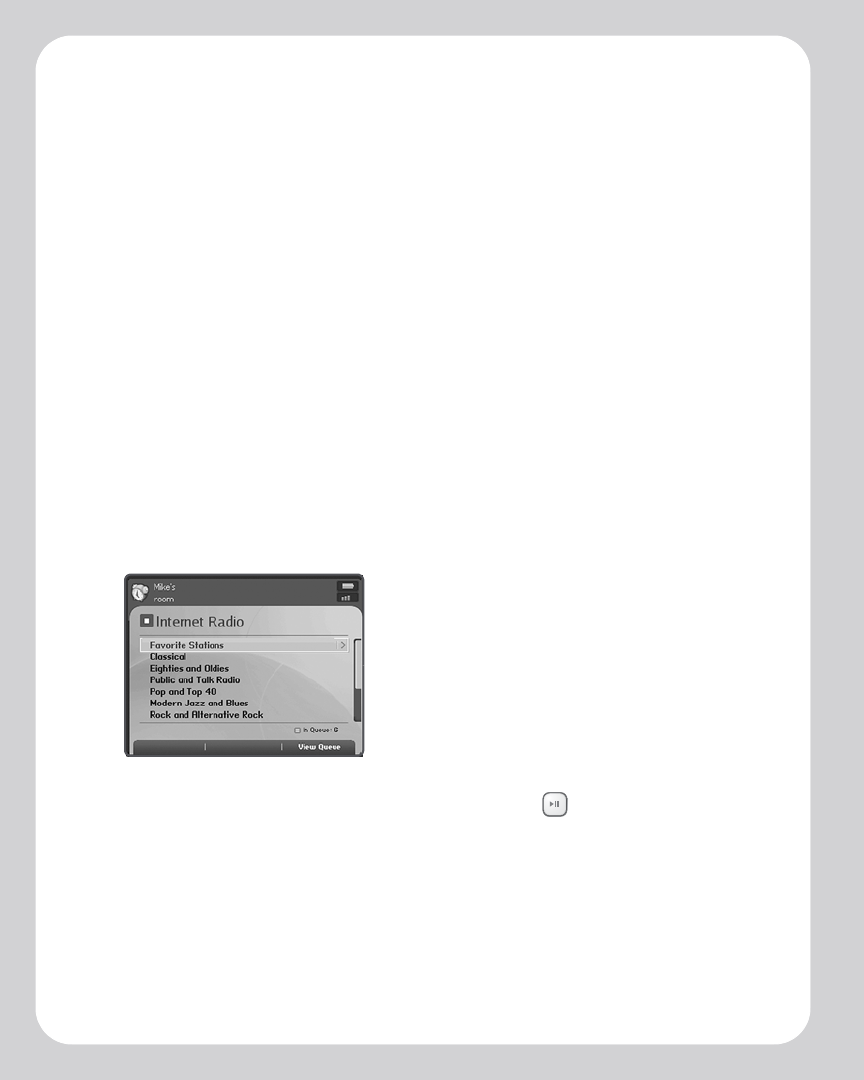
Internet Radio
Sonos provides you with a selection of third-party streaming MP3 broadcasts, grouped
by category. You can add additional radio stations using the Sonos Desktop Controller
software. These additional stations are placed in your Favorite Stations folder.
1. From the Music menu, select Internet Radio.
2. Select the radio station category you want to choose from, and touch OK.
3. Select a radio station from the list, and touch the Play button. It immediately
begins to play in the zone you have currently selected.
Chapter 5: Using Your Sonos Controller 5-17
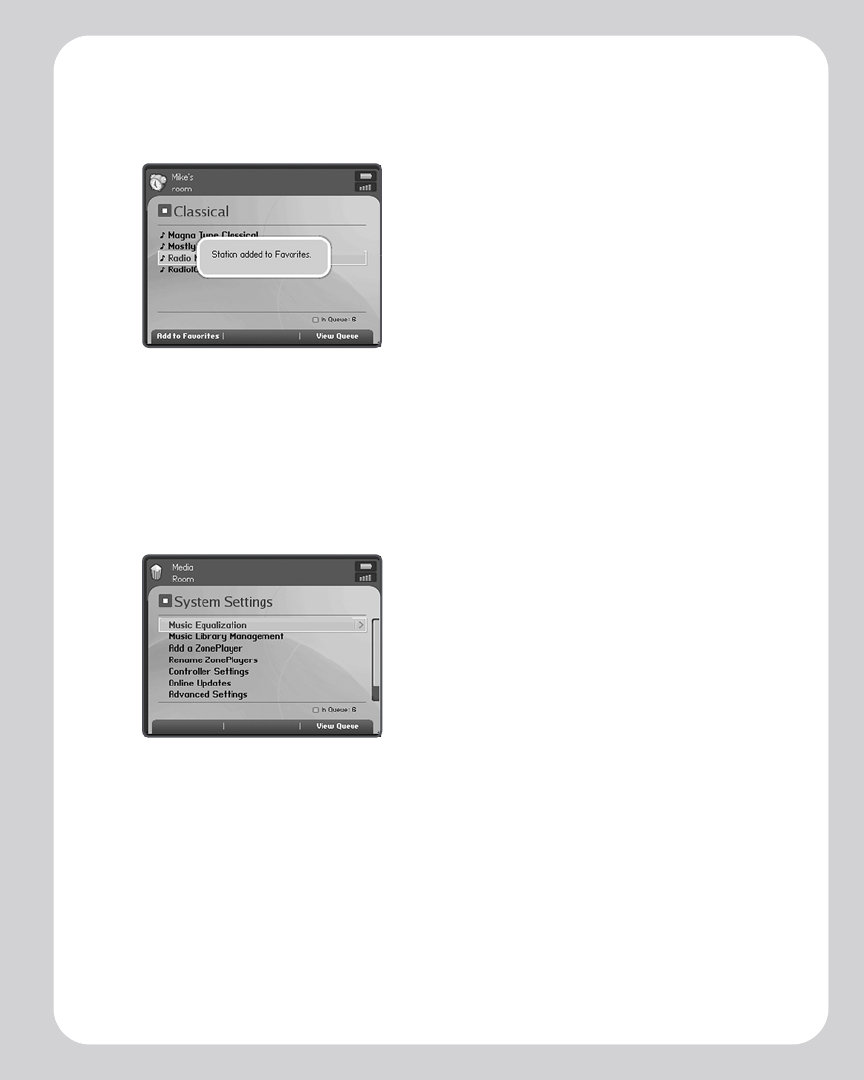
4. To add a radio station from the preset list to your Favorite Stations folder, touch
Add to Favorites.
5. To add a radio station that does not appear in the Sonos supplied list, use the
Desktop Controller software. See "To add an Internet radio station" on page 3-18
for additional information.
System Settings
You can control many of the settings and preferences for the Sonos Digital Music
System using your Controller.
Music equalization. Control a ZonePlayer’s sound settings.
Music library management. Manage your shared music folders.
Add a ZonePlayer. Add new ZonePlayers to your Sonos Digital Music System.
Rename ZonePlayers. Change the name of a ZonePlayer.
Controller settings. Adjust the preference settings for your Controller.
Online updates. Search for and download software updates for your Sonos Digital
Music System. If you have not yet registered your music system, you will be
prompted to register before you can download updates.
Sonos Digital Music System User Guide5-18
Advanced settings. The following advanced settings may be changed when
necessary. Detailed information for each option is presented later in this chapter.
•System registration. If you did not register your music system during the setup
process, you can use this option to register later.
•Auto check for system updates. This preference option allows Sonos to auto-
matically check for you on the availability of system updates.
•Auto update Internet radio station list. This preference option allows Sonos to
automatically update your Internet radio station list.
•Line-in encoding. Set the encoding for external music sources to WMA (de-
fault) or WAV.
•Wireless channel. Change the wireless channel used by your Sonos Digital Mu-
sic System.
About your Digital Music System. Display detailed information regarding your
Sonos Digital Music System.
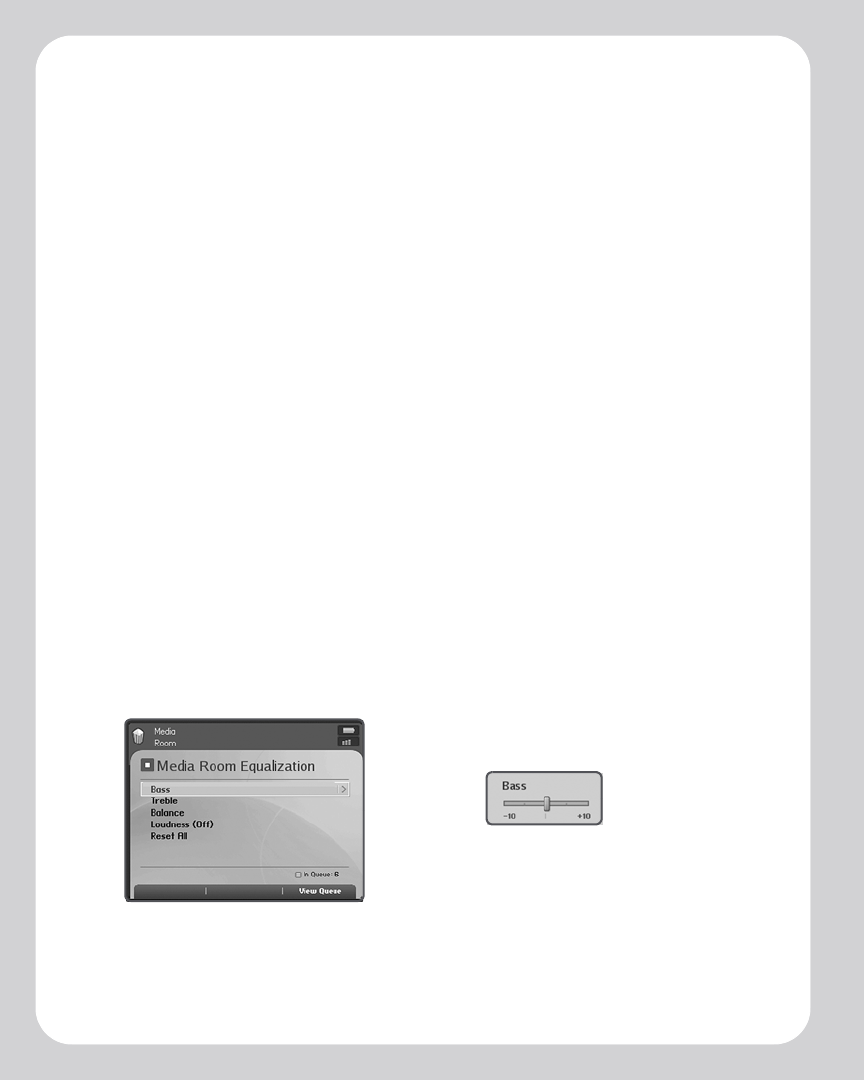
Adjusting the Sound Settings for a ZonePlayer
You can change the sound settings (treble, bass, loudness, or balance) for each
individual ZonePlayer.
1. From the Music menu, select System Settings→Music Equalization, and touch
OK.
2. Use the scroll wheel to highlight the zone where you wish to change the settings,
and touch OK.
3. Highlight the setting you wish to change, and touch OK.
A control slide appears on
top of the current screen
Chapter 5: Using Your Sonos Controller 5-19
4. Use the scroll wheel to make adjustments to the control slide that appears on the
screen, and then touch OK.
5. If at any time you wish to change the settings for a ZonePlayer back to their
original default values, select Reset All.
Managing Your Music Folders
You can add or remove the shared folders Sonos accesses music from at any time. You
may need to make changes if you add a computer to your home network, or if you
move shared folders from one location to another.
If you add new music to a folder that is already indexed, you can simply update your
music index to add this music to your library.
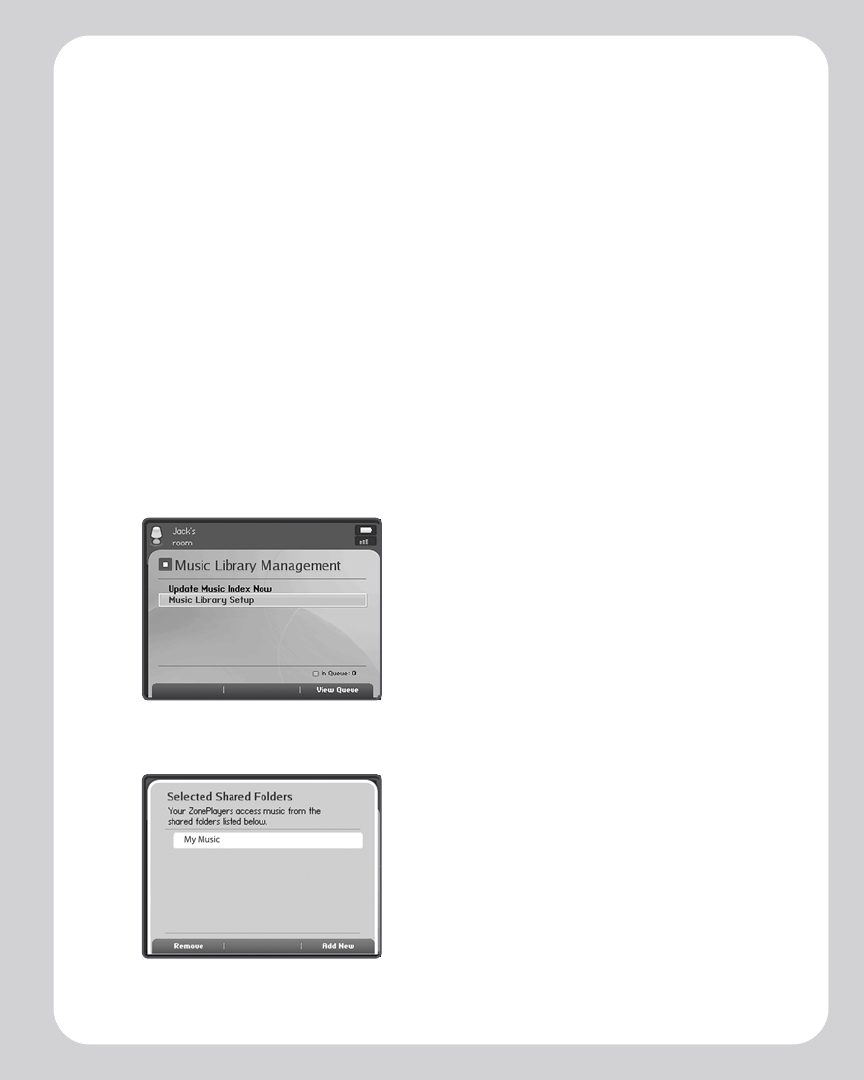
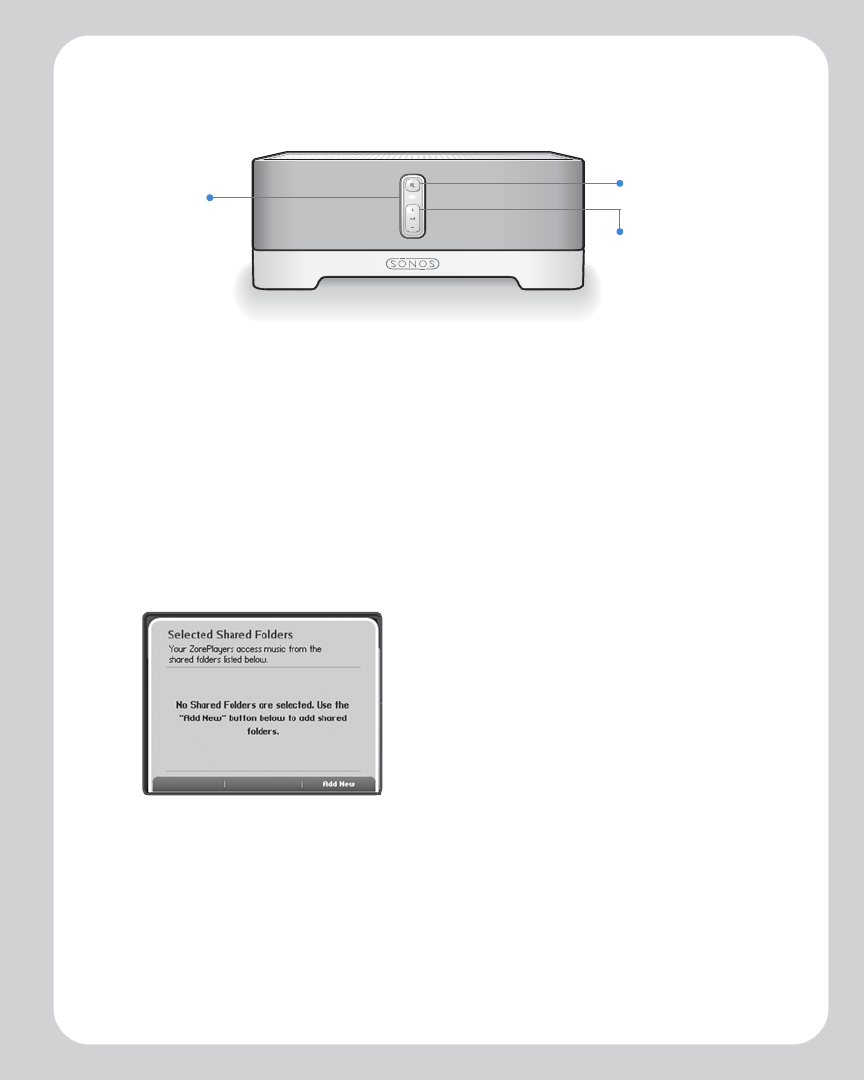
To view your shared folders
1. From the Music menu, use the scroll wheel to highlight System Settings.
2. Highlight Music Library Management, and touch OK.
3. Highlight Music Library Setup, and touch OK.
Sonos Digital Music System User Guide5-20
The shared music folders that are currently accessible to your Sonos Digital Music
System are displayed.
To add a new shared folder
1. To make another shared folder available to your Sonos Digital Music System,
touch Add New from the Selected Shared Folders screen. Your network will be
scanned for shared folders that your system is not currently accessing.
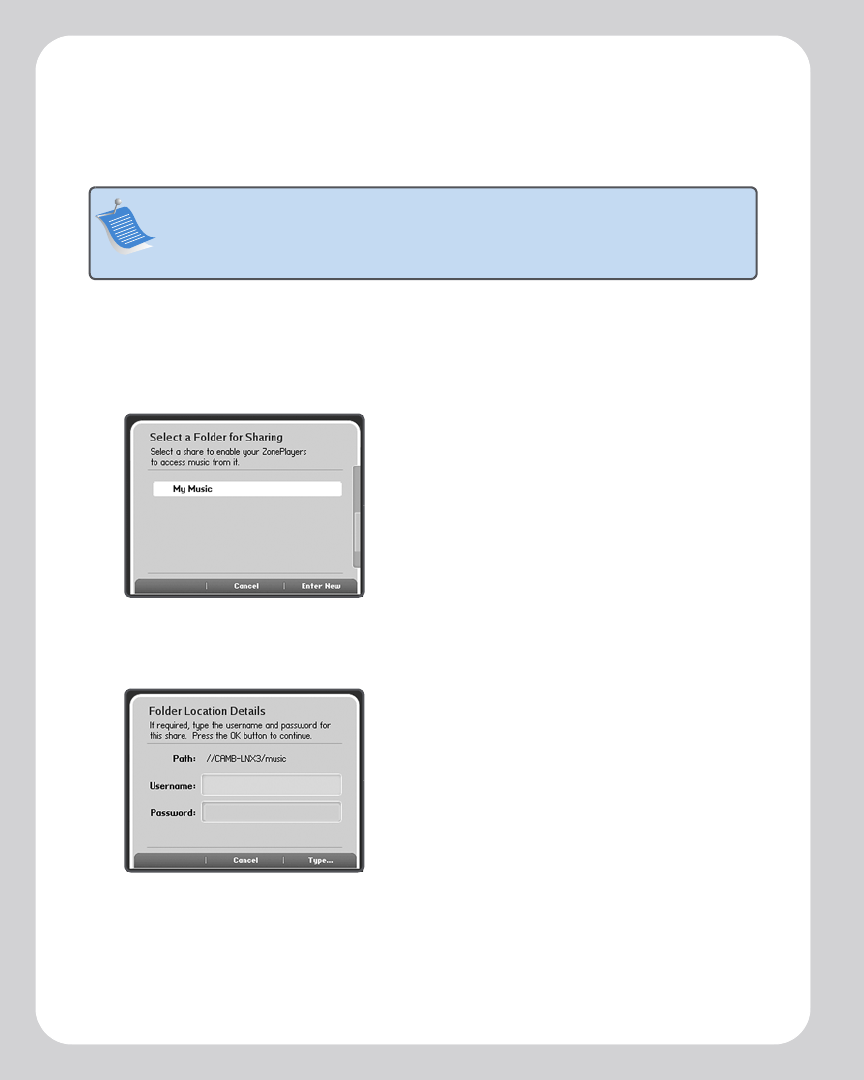
2. To select a shared folder from the displayed list, use the scroll wheel to highlight a
shared folder, and touch the OK button.
3. If this shared folder does not require a username and password, touch OK and the
selected folder is added to your music system. If this shared folder requires a
username and password, continue on to step 4.
Note: If a computer on your network is turned off or is in standby mode, the music
folders on that computer are unavailable to the Sonos Digital Music System until the
computer is turned back on.
Chapter 5: Using Your Sonos Controller 5-21
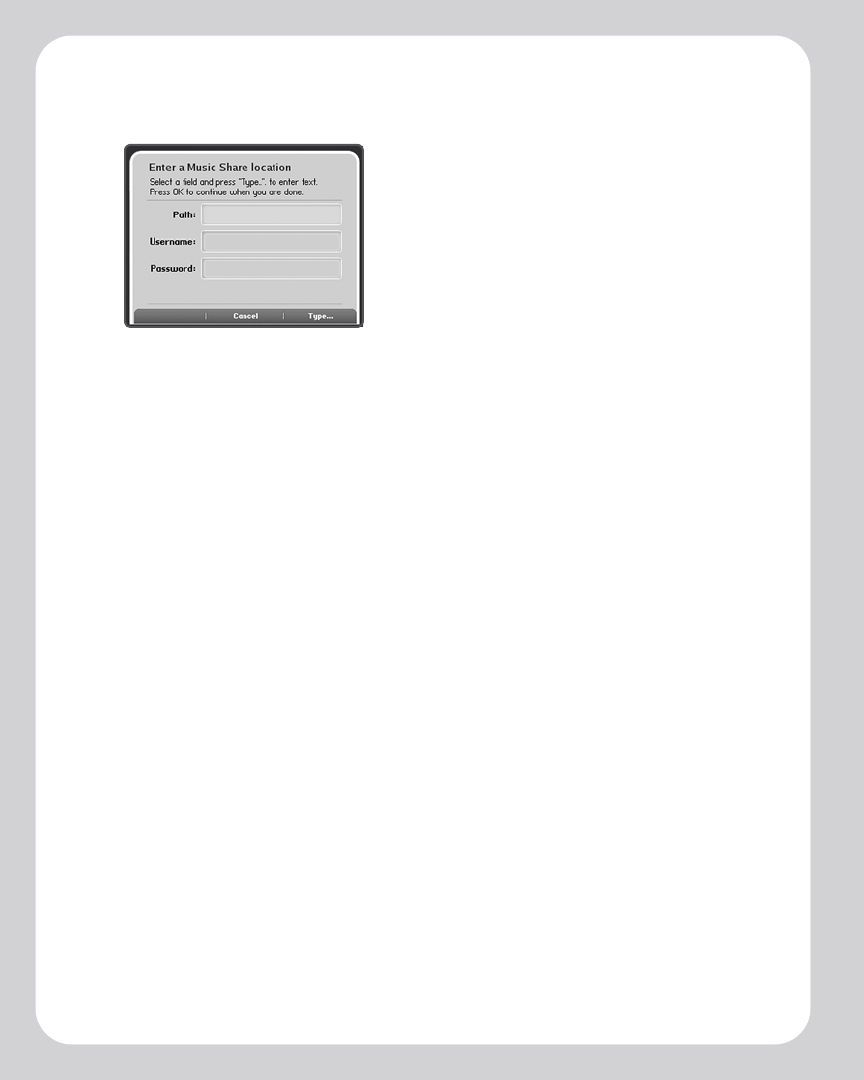
4. Touch Type... to enter a user name.
5. Type the name of a user with permission to access this shared folder, and touch
Accept.
6. Use the scroll wheel to highlight the Password field and touch Type...
7. Type the password associated with this user, and touch Accept.
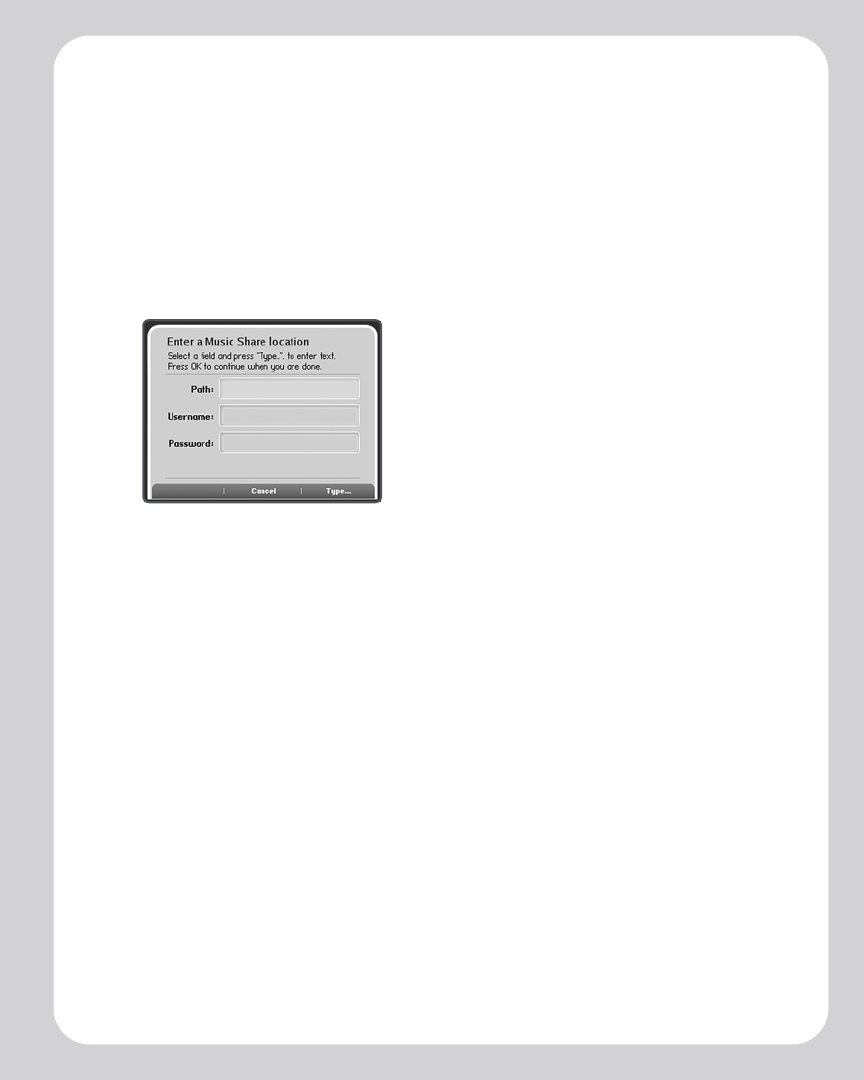
8. To add a shared folder that is not currently displayed in the list, touch Add New,
and then Enter New.
9. Touch Type to enter the path for this folder, and then touch Accept.
10. Tou ch OK.
If the folder is not shared anonymously, you will need to enter a username and
password.
11. Use the scroll wheel to highlight the Username field and touch Type.
12. Type the name of a user with permission to access this folder, and then touch
Accept.
13. Use the scroll wheel to highlight the Password field and touch Type.
14. Type the password associated with this user, and then touch Accept.
15. Tou ch OK to confirm.
To stop accessing a shared folder
1. From the Music menu, select System Settings→Music Library
Management→Music Library Setup, and touch OK.
The shared music folders that are currently accessible to your Sonos Digital Music
System are displayed.
Sonos Digital Music System User Guide5-22
2. Use the scroll wheel to select the folder you wish to stop using, and touch
Remove.
3. Touch OK to confirm.
Your original folder will remain untouched on your computer. However you will no
longer be able to access it from the Sonos Digital Music System.
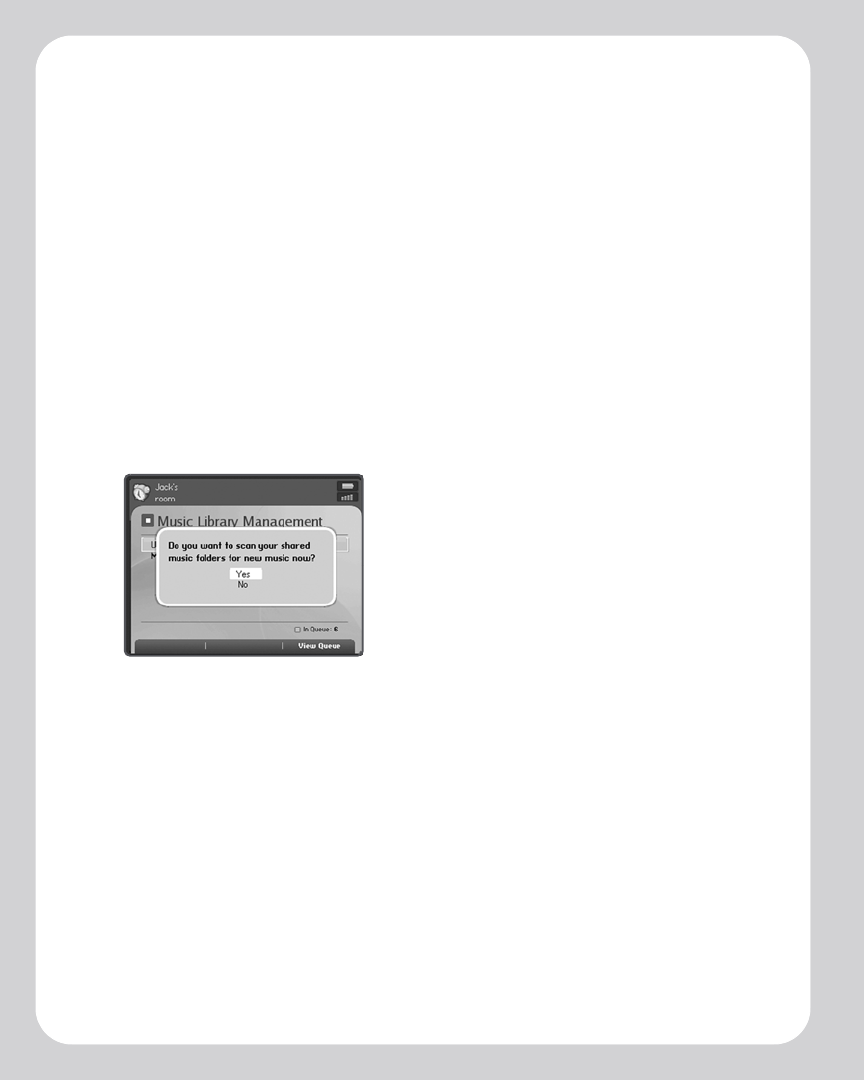
To update your music index
During the setup process, all of your available music shares are indexed for easy
selection. If you add new music to a folder that has already been indexed, you can
update your music index to add this music to your library.
1. From the Music menu, select System Settings, and touch OK.
2. Use the scroll wheel to highlight Music Library Management→Update Music
Index Now, and touch OK.
3. Highlight Yes, and touch OK.
The message, "updating music index" appears at the bottom of your Controller screen.
When the message disappears, your new music is available.
Adding More ZonePlayers
You can add more ZonePlayers to your Sonos Digital Music System any time by
selecting System Settings→Add a ZonePlayer from the Music menu. Turn to
Chapter 2 if you’d like help with the placement and setup of your new ZonePlayer(s).
Chapter 5: Using Your Sonos Controller 5-23
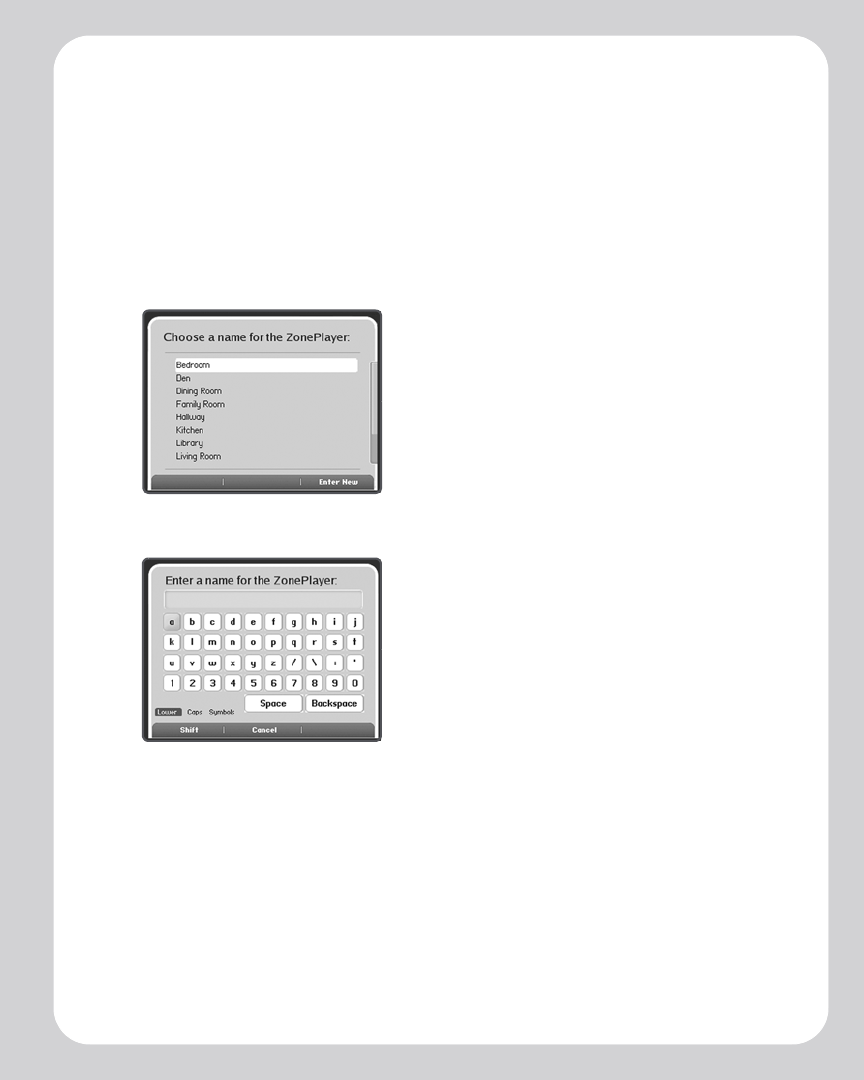
Renaming a ZonePlayer
1. From the Music menu, select System Settings→Rename ZonePlayers and
touch OK.
2. Use the scroll wheel to highlight the ZonePlayer name you wish to change, and
touch OK.
3. Use the scroll wheel to select a new name from the list, and then touch OK.
4. You can also type a unique name by selecting Enter New.
5. Use the scroll wheel to select each letter, touching OK after each entry.
6. Touch Accept to accept the new name, or touch Cancel to leave the screen
without making a change.

Sonos Digital Music System User Guide5-24
Adjusting Your Controller’s Settings
There are several settings you can change on your Sonos Controller to suit your
household preferences.
From the Music menu, select System Settings→Controller Settings and then use
the scroll wheel to highlight the setting you wish to change.
Click sound. Adjust this setting to turn the Controller’s scroll wheel “clicking” on or
off.
Sleep timer undocked. Use this setting to select the amount of time after which
your Controller enters light sleep mode when not connected to a power supply.
The screen will turn off until motion is detected or a button is pressed.
Sleep timer docked. Use this setting to select the amount of time after which your
Controller enters light sleep mode when plugged into the adapter. Because the
Controller is connected to a power supply during this time, you can set this sleep
timer significantly higher than the undocked sleep timer setting.
Motion sensor. Use this setting to turn the motion sensor on or off. The motion
sensor automatically wakes your Controller when motion is detected.
Chapter 5: Using Your Sonos Controller 5-25
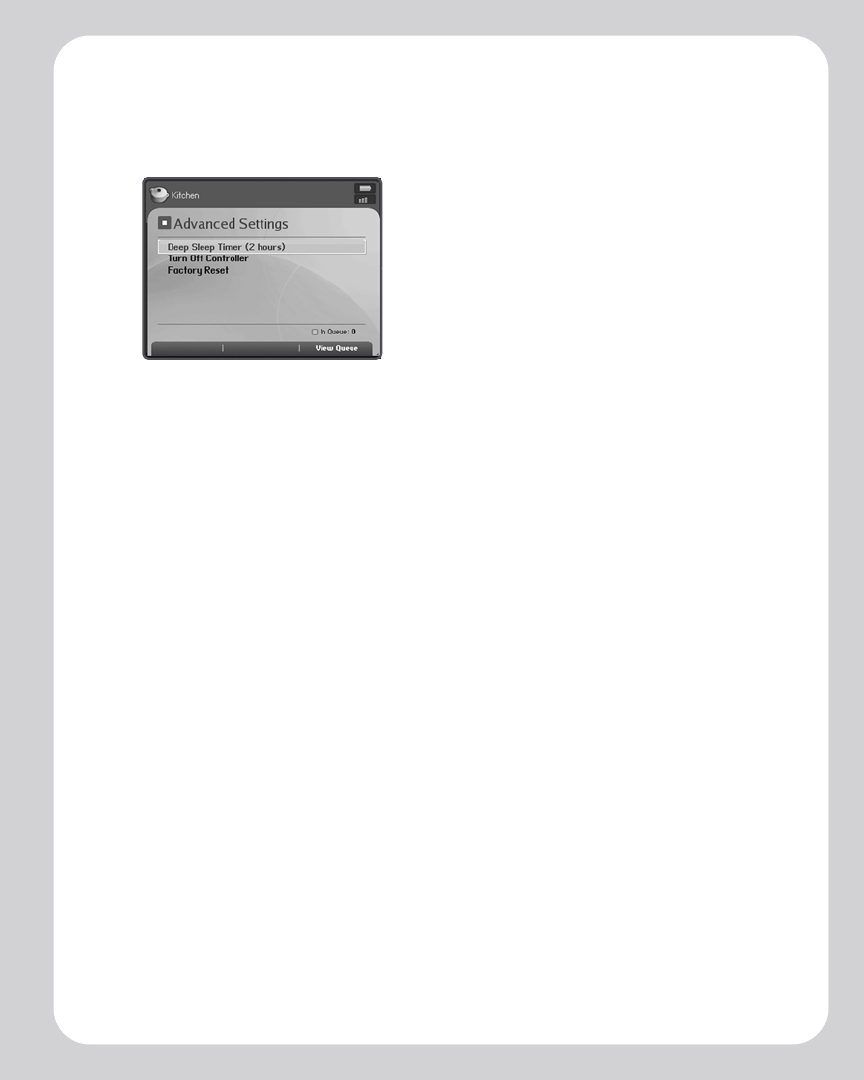
Advanced settings. The Advanced Settings menu provides you with 3 additional
menu choices:
• Deep sleep timer. Use this setting to set the deep sleep timer (2, 4, 8, or 12
hours) for your Controller. Your Controller will go into deep sleep to preserve the
battery life when it is unused for this specified period of time. When your Con-
troller wakes from deep sleep - either from the motion sensor or from a button
touch - it will go through a restart cycle which takes several seconds.
• Turn off Controller. Use this setting to put your Controller into deep sleep any
time it will not be in use for an extended period of time, or when you are trans-
porting your Controller to another destination. This setting puts the Controller
into deep sleep mode immediately rather than waiting for the deep sleep timer
setting to be reached. The Controller cannot be turned off while it is con-
nected to the AC adapter.
•Factory reset. Use this setting to return the Controller to its original factory set-
tings. This will disconnect the Controller from your Sonos Digital Music System
entirely (you can add it again at any time.) This may be necessary if the Controller
gets associated to the wrong music system during setup, or if you wish to join
your Controller to another Sonos Digital Music System.
Sonos Digital Music System User Guide5-26
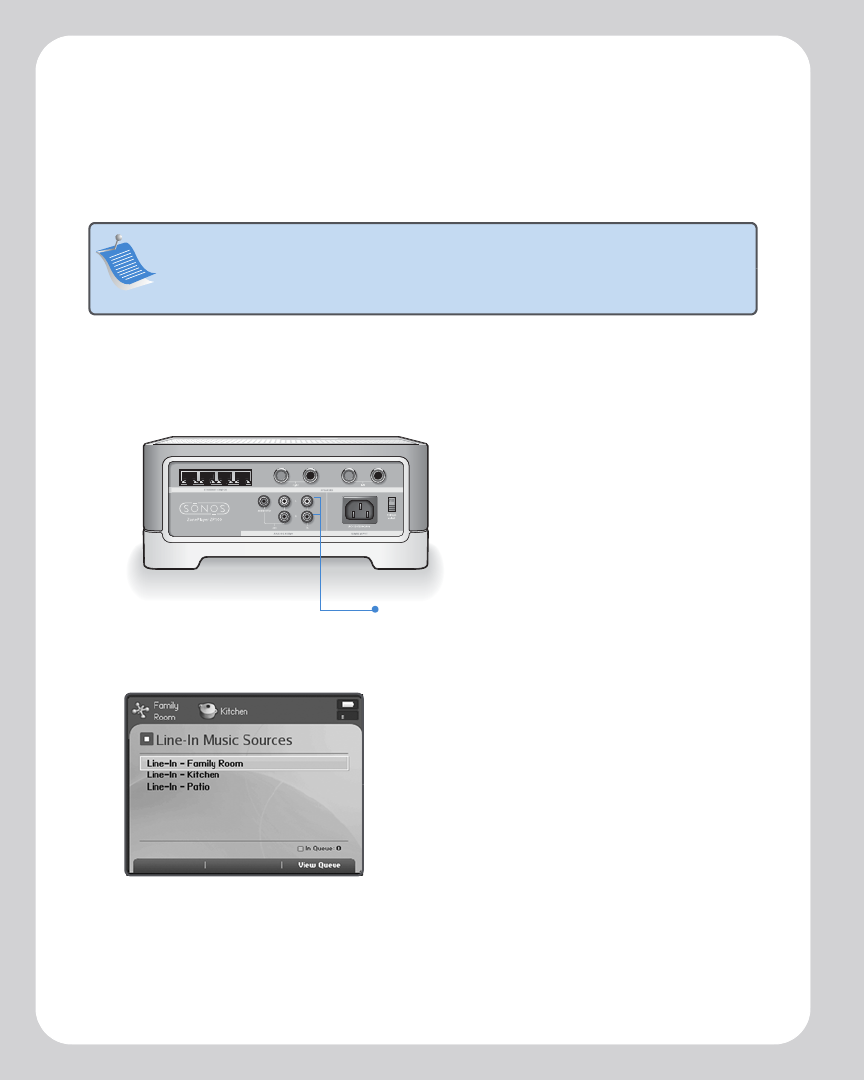
Connecting a Line-In Music Source
You can play music from an external line-in music source such as a CD player or
portable music player that is connected to your Sonos Digital Music System.
To connect a line-in music source
1. Use a standard RCA cable to connect the outputs from the external source to the
Audio in connections on the back of your ZonePlayer.
2. From the Music menu, select Line-In Sources and touch OK.
3. Use the scroll wheel to select the zone where the external source is connected,
and touch OK.
Note: You can listen to music from an external device in any zone, and use the
Sonos Digital Music System to control the volume settings. However, you must
control the playback (forward, pause, etc.) from the line-in source. If you have WMA
encoding selected, you will notice a slight delay before the music starts to play.
Analog audio in
Chapter 5: Using Your Sonos Controller 5-27
Getting Software Updates
Sonos periodically provides you with software updates to improve performance or to
add new features. Your music system must be registered in order to receive updates.
There are two preference options available:
• Do not automatically check for updates. From the Music menu, you should pe-
riodically select System Settings→Online Updates to check for software up-
dates.
• Send a message when an update is available. (To change your preference set-
ting, see "Auto check for software updates" on page 5-29.) The message, "Up-
date Available" will appear on the System Settings menu next to Online
Updates to indicate there are new Sonos updates available.
1. Touch OK to contact Sonos.
2. If there is an update available, select Yes to begin the update process.
Your ZonePlayers and the Controller will be updated together as all Sonos components
must carry the same software version number. This process may take several minutes
per device, depending upon your network connection. Because this process can run
unattended, Sonos recommends you start the update when you will be away from
your Sonos Digital Music System for a period of time. If you have the Desktop
Controller software installed, you will have to update it the next time you start the
application.
Caution Do not disconnect power from your ZonePlayer(s), or in any way disable
your Sonos Digital Music System while this process is running. Contact Sonos
Customer Support if an error occurs.
Sonos Digital Music System User Guide5-28
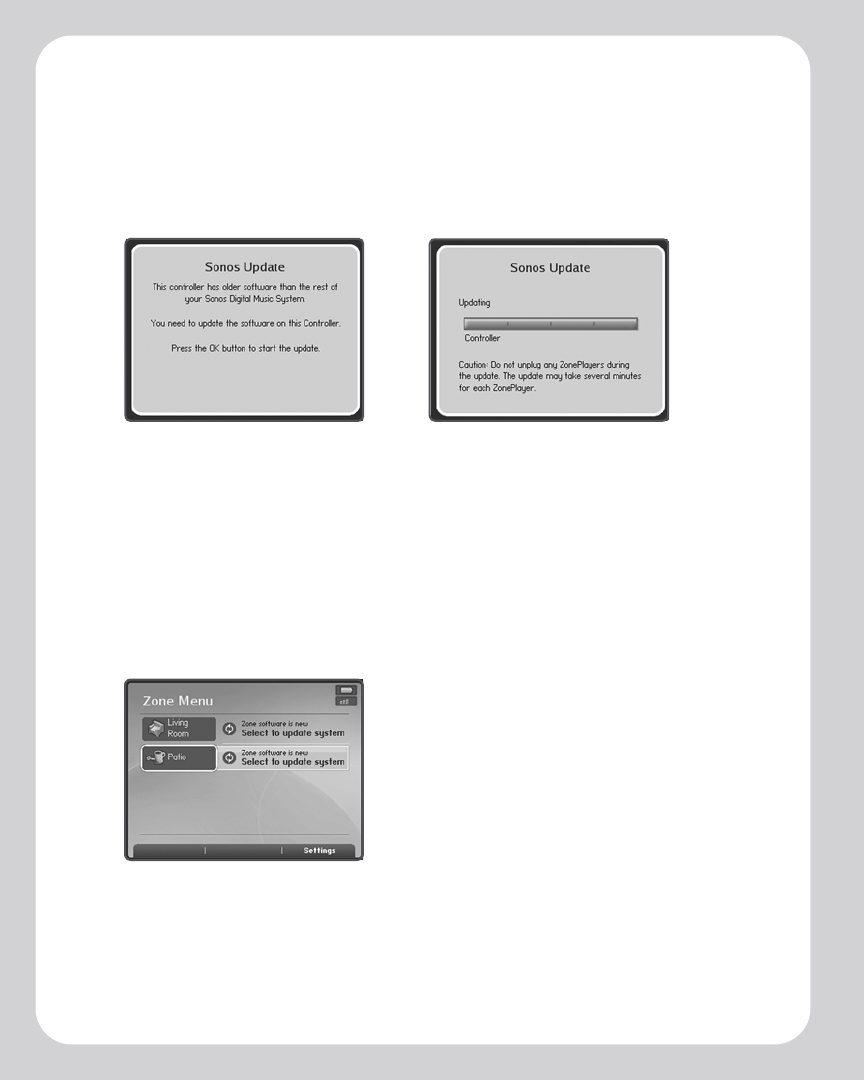
Controller software updates
In the event that your Controller’s software version gets out of sync from the rest of
your Sonos Digital Music System components, you will see the following message
displayed on your Controller screen the next time you use it:
This Controller will be unavailable for use until you perform a software update to bring
the Controller up to date. This situation will occur if you perform a software update
from another Controller, or from the Desktop Controller software.
ZonePlayer(s) software updates
If a ZonePlayer’s software version gets out of sync from the rest of your Sonos Digital
Music System components, you will see the following message displayed on your
Zones menu:
Touch OK to begin the software update process.
One or more ZonePlayers may need to be updated if
you purchase a new ZonePlayer with a later software
version, or if you plug in a ZonePlayer that was not in
use when you performed your last software update.
You will also see this message if you have already
updated your music system using the Controller. This
message will indicate that the Desktop Controller
software needs to be updated.
Chapter 5: Using Your Sonos Controller 5-29
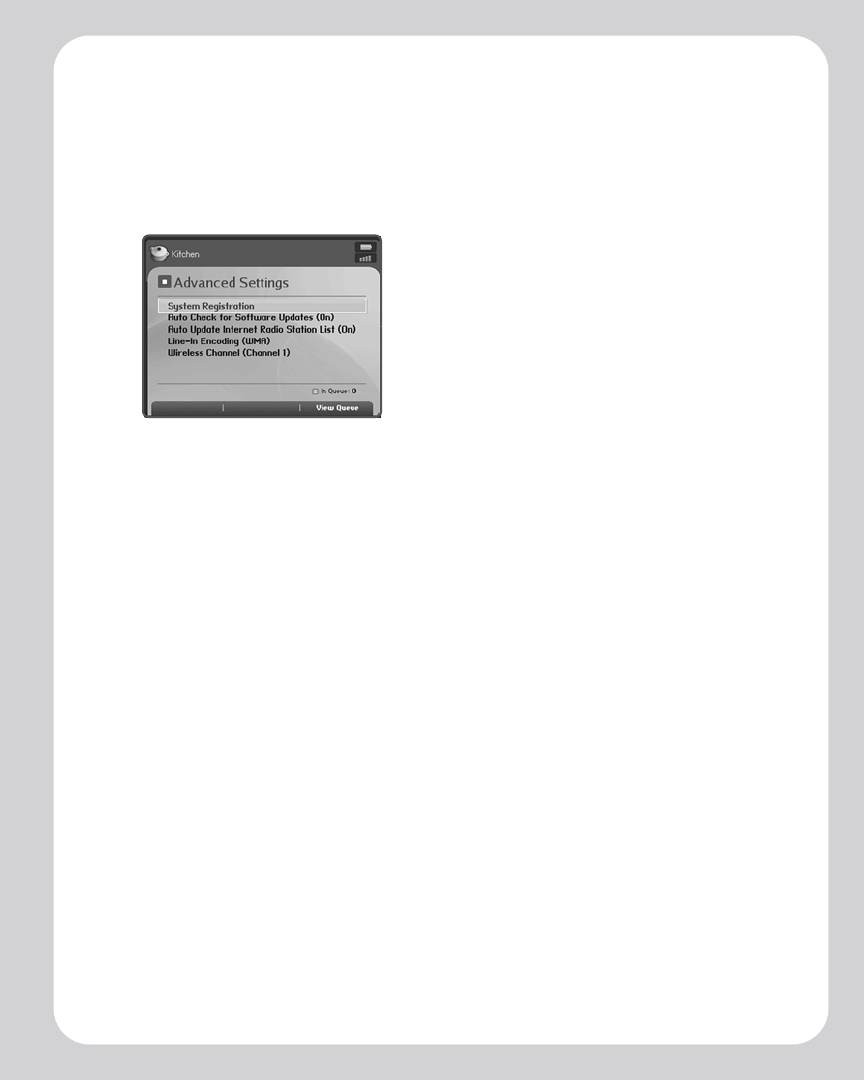
Advanced Settings
Upon occasion, it may be necessary to adjust some of the settings for your Sonos
Digital Music System. You can also use the Advanced Settings menu to register your
music system if you have not yet registered it.
System registration
During the setup process, you are asked to register your Sonos Digital Music System. If
you did not register at that time, you can register now. Registering your music system
allows you to receive technical support as well as software upgrades. At no time is
any of your information provided to other companies.
1. From the Music menu, select System Settings.
2. Select Advanced Settings→System Registration.
Auto check for software updates
Sonos can automatically check your system for available software updates. Your music
system must be registered in order to receive software updates. Change your
preference by following the steps below.
1. From the Music menu, select System Settings.
2. Select Advanced Settings→Auto Check for Software Updates.
3. Select On to turn auto checking on, or Off to turn auto checking off, and then click
OK.

Sonos Digital Music System User Guide5-30
Auto update Internet radio station list
You can receive automatic radio station updates whenever Sonos releases a new list.
Your music system must be registered in order to receive updates. Change your
preference by following the steps below.
1. From the Music menu, select System Settings.
2. Select Advanced Settings→Auto Update Internet Radio Station List.
3. Select On to turn auto update on, or Off to turn auto update off, and then click
OK.
Line-in encoding
If you have line-in music sources attached to a ZonePlayer, line-in encoding determines
how the Sonos Digital Music System will encode the audio coming in from these
sources. WMA encoding is the high-quality system default. For the highest quality
sound you can select WAV uncompressed encoding (this selection requires more
network bandwidth than WMA compressed audio).
1. From the Music menu select System Settings.
2. Select Advanced Settings →Line-In Encoding.
3. Use the scroll wheel to select WAV or WMA encoding, and touch OK. When WMA
is selected, you will notice a slight delay before the music starts to play.
Wireless channel
The Sonos Digital Music System selects the optimal radio frequency channel during
setup. However, if you have other wireless devices using this channel, you may want to
switch the Sonos Digital Music System to another channel to avoid conflicts, as
conflicts may cause audio drop-outs.
1. From the Music menu select System Settings.
2. Select Advanced Settings →Wireless Channel.
Use the scroll wheel to select a different wireless channel, and touch OK.
It may take several seconds for the switch to take effect. If you have music playing, a
short music dropout will occur during the wireless channel change.
Chapter 5: Using Your Sonos Controller 5-31
Battery Charging
Your Controller can be recharged by plugging it into the AC adapter supplied with your
Controller. The battery charge indicator on your Controller will show you when it is
time to recharge the Controller. If the battery charge gets very low, the battery status
indicator light will light red. Be sure to recharge using only the AC adapter supplied with
your Sonos Controller.
Battery Replacement
After several years (depending upon usage), the battery on your Controller may not
hold a charge as long as it once did. Because of the Controller’s splash-resistant design,
the battery on the Controller must be factory-replaced. Return it to the Sonos Service
Center where it will be promptly replaced and returned to you. Go to
http://support.sonos.com for instructions and battery replacement cost.
Caution Use only the supplied power adapter to charge the Controller’s battery.
Using another adapter will damage your Controller and void your product
warranty.
Caution Danger of explosion if battery is incorrectly replaced. Replace only with the
same or equivalent type. Return to Sonos or an authorized Sonos service center for
replacement.

Sonos Digital Music System User Guide5-32
Installation Tips and Basic
Troubleshooting
Basic Troubleshooting
If a problem occurs, first check the solutions listed below. If you are unable to remedy
the problem by following these hints, go to the Sonos Service Center at http://
support.sonos.com, or telephone us at (800) 680-2345.
Warning Under no circumstances should you try to repair the system yourself, as
this will invalidate the warranty. Do not open the system as there is a risk of electric
shock.
Problem Solution
The ZonePlayer Status
indicator is not lit and no
sound is produced when unit
is plugged in.
Check the insertion of the power cord plug.
The ZonePlayer Status
indicator is lit, but there is no
sound.
• Make sure speakers are connected securely.
• Make sure volume is set to a suitable level.
• Make sure MUTE is not on.
Sound is produced from only
one speaker.
• Make sure speaker is connected securely.
• Make sure balance control is set correctly.
A
Sonos Digital Music System User GuideA-2
Problem Solution
The ZonePlayer does not
operate properly.
• Check to ensure that the ZonePlayer Status indicator
on the front of the ZonePlayer is illuminated and solid
white.
• Check to ensure that the green link light is lit on the
Ethernet switch on the rear panel of the ZonePlayer
that is wired into your network.
• Move the Controller closer to the ZonePlayer.
• Check to ensure there are no obstacles to impede
wireless operation.
• The ZonePlayer may need to be reset. Disconnect the
power cord for 5 seconds and then reconnect. Wait for
the ZonePlayer to restart.
• If none of these work, the ZonePlayer may need to be
factory reset. Disconnect power and then reconnect
while pressing and holding the Mute button until the
amber light begins to flash.
Note: You should not factory reset all of your ZonePlayers at
once or all preferences and playlists will be lost.
The Controller screen is
frozen.
Your Controller may need to be reset. Press and hold the
Mute and Music buttons simultaneously on the
Controller for approximately 3 seconds. The Controller will
reset itself momentarily.
The Controller screen is not
displaying proper zones, or
displays the message,
"Searching for ZonePlayers..."
• Make sure at least one ZonePlayer is plugged in and its
Status indicator is illuminated solid white.
• Move the Controller closer to the ZonePlayer.
• Your Controller may be configured to work with a
different Sonos Digital Music System. Disconnect the
Controller from your music system, and then re-add it.
To disconnect the Controller:
• Touch System Settings→Controller
Settings→Advanced Settings→Factory Reset from
the Music menu.
Or,
• If the message "Searching for ZonePlayers" is displayed,
touch Settings→Factory Reset.
Appendix A: Installation Tips and Basic Troubleshooting A-3
Problem Solution
The ZonePlayer Status
indicator changes to solid
amber.
This indicates that the ZonePlayer is experiencing an
overheat condition.
• Check the ZonePlayer vents for adequate cooling
• Check for speaker shorts
• Mute ZonePlayer or unplug it for several minutes to
allow it to cool
The ZonePlayer has stopped
playing music. The
ZonePlayer Status indicator
lights are flashing (long
amber, short white, repeat)
If the inadequate cooling condition (above) is not
remedied, the ZonePlayer will automatically mute itself to
prevent damage to the ZonePlayer.
• Check the ZonePlayer vents for adequate cooling
• Check for speaker shorts
• Leave ZonePlayer muted or unplug it for several
minutes to allow it to cool
Cannot access Internet radio,
online updates, or system
registration.
• Your firewall may be blocking outgoing connections to
the Internet. Ensure the firewall allows access to the
Internet for the Ethernet MAC addresses of your Sonos
components.
• Your firewall may be configured so that Sonos
components cannot obtain an IP address. If so, your
ZonePlayers and Controllers will display an IP address
in the 169.254.xxx.yyy range even though there is a
router/DHCP server on the network.The DHCP server
built in to some routers may be configured to supply IP
addresses only to devices with specific permitted
Ethernet MAC addresses. If you have configured your
router in this way, you will need to grant permission to
the Ethernet MAC address of each Sonos component
(including the Controller) before setting up your
system. Go to http://faq.sonos.com/dhcp for more
information.
Sonos Digital Music System User GuideA-4
Problem Solution
Why is there a delay when I
play music from an external
music source?
If WMA is selected as the encoding method for your line-in
music source, you will notice a slight delay before the
music starts to play.
The wrong album art, or no
album art appears.
Please visit our Website at http://faq.sonos.com/art for
details on how album art is located and displayed.
When I use my 2.4 GHz
cordless phone, the music
stops.
• Change the wireless channel your Sonos Digital Music
System is operating on by selecting System
Settings→Advanced Settings→Wireless Channel.
The Controller does not work
in some parts of my home.
• Move the Controller closer to a ZonePlayer
• Change the wireless channel by selecting System
Settings→Advanced Settings→Wireless Channel.
Some Internet radio stations
do not play.
Internet radio stations are broadcasts provided by 3rd
parties. Problems related to the reliability of stations
should be directed to the broadcaster directly. Go to
http://faq.sonos.com/radio for additional information.
Some of my music is not
showing in my music library.
• Some music formats are not currently supported by
the Sonos Digital Music System. Unsupported format
files do not display in your music library.
• If you recently added music to your computer or to
another networked device, you may need to update
your Sonos music index. To update the music index
from your Controller, see "To update your music index"
on page 5-22. To update from the DCR, see "To update
your music index" on page 3-24.

Appendix A: Installation Tips and Basic Troubleshooting A-5
ZonePlayer LED Explanations
State Mute Button
Indicator
ZonePlayer
Status
Indicator
Additional
Information
Powered up,
connected to a
Sonos Digital Music
System
Off Solid white
Muted room Solid green Solid white
Muted whole house Flashing green
to solid green
Solid white
Powering up
(booting)
Off Flashing white
Powered up, not
connected to a
Sonos Digital Music
System
Flashing green Flashing white Flashing in unison
Looking for a Sonos
Digital Music
System
Flashing green Flashing white Flashing alternately
Powering up in reset
mode
Off Flashing amber
Sonos Digital Music System User GuideA-6
State Mute Button
Indicator
ZonePlayer
Status
Indicator
Additional
Information
ZonePlayer
overheat warning
Solid amber The ZonePlayer is
beginning to experience
an inadequate cooling
condition and will reduce
to 75% volume
• Check the ZonePlayer
vents for adequate
cooling
• Check for speaker
shorts
• Mute the sound or
unplug the ZonePlayer
for several minutes to
allow it to cool
ZonePlayer
overheat shutdown
(mute)
Long amber,
short white,
repeat
If the inadequate cooling
condition (above) is not
remedied, the ZonePlayer
will automatically mute
itself to prevent damage
to the ZonePlayer
Diagnostics mode Solid or flashing
red
You may be instructed to
enter Diagnostics mode
by a technician when you
call Customer Support to
report a problem.
If you inadvertently enter
diagnostics mode, touch
the Mute button to exit.
Appendix A: Installation Tips and Basic Troubleshooting A-7
About Your Music System
If you make a call to Sonos Customer Support, you may be asked for specific details
regarding your Sonos Digital Music System. You can find this information by choosing
one of the following options:
•From the Sonos Controller Music menu, select System Settings→About Your
Digital Music System.
Or,
•From the Sonos Desktop Controller menu bar, select Help→About Sonos Desk-
top Controller.
Or,
•From the Sonos Setup Assistant menu bar, select Sonos→About Sonos
Assistant.

Sonos Digital Music System User GuideA-8
Support Diagnostics
Support Diagnostics should only be accessed when you are talking with a Sonos
Support representative (800-680-2345). For general Sonos support information, go to
http://sonos.com/support.
From the Desktop Controller software:
1. Click File →Preferences →Support Diagnostics.
2. Click Submit Diagnostics if you are instructed to do so by your Sonos Support
representative.
From the Sonos Assistant software:
1. From the Sonos menu, click About Sonos Assistant.
2. Click the Setup Assistant icon, and then click the Upload Diagnostics pop-up.
3. Click Submit if you are instructed to do so by your Sonos Support representative.
Sonos Device Specifications
Sonos ZonePlayer ZP100
Feature Description
Audio Section
Rated Output 50W min RMS per channel (8 Ohms, 20-20kHz,
THD+N < 0.02%)
Speaker Connections Spring binding posts
Line In Auto-detecting RCA type
Line Out RCA type, variable audio output
Subwoofer Output Auto-detecting RCA type, 80 Hz crossover
Music Access
File Types Supported
(44.1 kHz)
MP3, WMA, AAC (MPEG4), WAV, AIFF, FLAC, Ogg Vorbis
Note: Firmware upgradable to support future audio formats.
DRM-encrypted files not currently supported.
File Storage Supported Windows 2000, Windows XP or later, including Windows XP
Media Center; Macintosh OS X or later; network-attached
storage (NAS) devices supporting CIFS
Internet Radio Streaming MP3
B
TM
Sonos Digital Music System User GuideB-2
* All specifications subject to change without notice.
Feature Description
Ethernet Connection 4-port switch, 10/100 Mbps, auto MDI/MDIX
Wireless Connectivity Sonosnet™, a secure peer-to-peer wireless mesh network
General
Power Supply AC 120/240, 50-60 Hz, user-switchable
Front Panel Buttons Volume and Mute
Front Panel LED Indicators ZonePlayer Status and Mute Status
Dimensions 10.2” x 8.2” x 4.4” (260 x 209.5 x 113 mm)
Weight 10 lbs. (4.5 kg)
Operating Temperature 32 º to 104º F (0º to 40º C)
Finish Die-cast matte aluminum enclosure on light gray base
Appendix B: Sonos Device Specifications B-3
Sonos Controller CR100
* All specifications subject to change without notice.
Feature Description
Display and User Interface
Screen Type 3.5” (diagonal) color LCD with LED backlighting
Screen Resolution 240 x 320 (QVGA)
Browse Control Touch-sensitive scroll wheel with center-mounted selector
button
Function Buttons 9 backlit buttons, 3 soft-selector buttons below screen
Indicators Wireless signal strength and battery charge indicator (on-
screen), battery status indicator LEDs
Power/Connections
Battery Type
Battery Charging Time
Rechargeable Li-ION Polymer, factory replaceable
2 hours to full charge
DC Charger Input 100-240 VAC, 50/60 Hz Output 6 VDC, 3.8 A
Auxiliary Power Connection Bottom-mounted charger contacts
Wireless Connectivity Sonosnet™, a secure peer-to-peer wireless mesh network
General
Dimensions 6.5” x 3.8” x 0.95” (165mm x 97mm x 24.5mm)
Weight 12.5 oz. (360 g)
Finish Metal cladding on light gray enclosure, splash-resistant

Sonos Digital Music System User GuideB-4
System Setup-Without Windows®
or Macintosh® OS X
If your operating system is not Windows XP, Windows 2000, or Macintosh OS X 10.2 or
later, you can use the Sonos Controller to configure your music system and set up
access to your music files. The Sonos Digital Music System will recognize many
standard shared folders on your computer. For additional information, visit our Web
site at http://faq.sonos.com/shares.
If you have digital music files stored on a computer or other device on your home
network such as network-attached storage (NAS), the computer directories or folders
that contain these music files must be shared so that the Sonos Digital Music System
can access them. Before you begin, enable file sharing on each computer that holds the
music files you want to access.
Note: If you have just purchased a new Sonos Controller CR100, you should charge
the battery. Connect your Sonos Controller to the power adapter using the adapter
cable (see the Controller Quick Setup Instructions.) You can use your Controller
while it is charging.
C
Sonos Digital Music System User GuideC-2
Setup Using the Sonos Controller
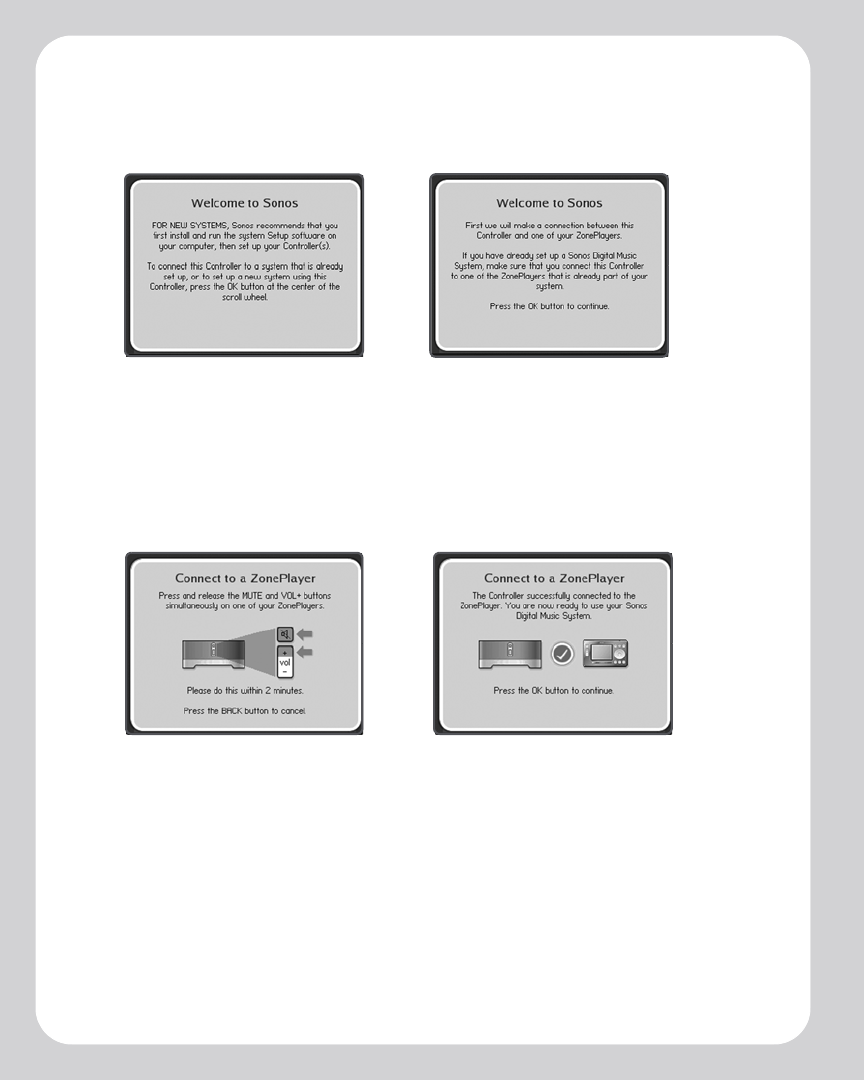
1. From the Welcome screen, touch OK to begin the setup process.
2. Follow the Controller’s on-screen prompts to connect and then name your
ZonePlayer.
Successful connection
Press and release the Mute and Volume
Up buttons simultaneously on this
ZonePlayer. You may release the buttons
as soon as the Mute indicator (green) and
the ZonePlayer Status indicator (white)
start to blink alternately.
Appendix C: System Setup-Without Windows® or Macintosh® OS X C-3
3. Touch OK.
4. When you see the message System is Now Setup, touch OK.
5. Touch the Music button, and then select System Settings →Music Library
Management →Music Library Setup.
6. Touch Add New.
ZonePlayer
status
indicator
Mute button
Volume up (+)
Once the ZonePlayer is successfully connected, the
ZonePlayer Status indicator will stop flashing and
change to solid white (normal operation), and the
Mute indicator will go off.
Sonos Digital Music System User GuideC-4
7. Touch Enter New.
8. Touch Type to enter the path for this folder, and then touch Accept.
9. Touch OK.
If the folder is not shared anonymously, you will need to enter a username and
password.
10. Use the scroll wheel to highlight the Username field and touch Type.
11. Type the name of a user with permission to access this folder, and then touch
Accept.
12. Use the scroll wheel to highlight the Password field and touch Type.
13. Type the password associated with this user, and then touch Accept.
14. To add another ZonePlayer to your music system, turn to "Adding More
ZonePlayers" on page 2-7.
Turn to Chapter 5 to read more about the features and functions of your Sonos
Controller.

Index
A
about your music system A-7
add Internet radio station 3-18
add shared folders 3-22, 4-8, 5-20
add to Favorites 3-19, 5-17
add ZonePlayer 2-8, 3-6, 5-22
adjust Controller settings 5-24
adjust sound settings 3-10, 5-18
adjust volume 3-9, 5-6
advanced preferences 3-26
advanced settings 5-29
analog audio in, ZonePlayer 2-4
analog audio out, ZonePlayer 2-3
audio specifications B-1
auto check for software updates 5-29
auto update Internet radio stations 5-30
B
balance control 3-10, 5-18
battery charge indicator 5-4
battery charging time, Controller B-3
battery charging, Controller 5-31, C-1
battery replacement, Controller 5-31
battery status indicator 5-4
battery type, Controller B-3
browse control, Controller B-3
browsing music library 3-14, 5-11
C
charger, Controller B-3
clear music queue 3-16, 5-14
click sound setting, Controller 5-24
connect line-in music source 3-20, 5-26

Sonos Digital Music System User GuideI-2
connecting computer cable 2-5
connecting first ZonePlayer 2-5
connectors, rear panel ZonePlayer 2-3
Controller advanced settings 5-25
Controller deep sleep 5-4
Controller reset 5-5
Controller screen frozen A-2
Controller settings 5-24
Controller specifications B-3
Controller, turning off 5-25
create Sonos playlist 3-17, 5-15
D
deep sleep 5-4
deep sleep timer 5-25
delete radio station 3-19
delete Sonos playlist 3-17, 5-16
Desktop Controller software installation 3-2
Desktop Controller, using 3-7
device specifications B-1
diagnostics mode A-6
dimensions, ZonePlayer B-2
download software updates 3-25
drop zone 3-13, 5-10
E
edit radio station 3-19
equalizer button 3-9
Ethernet cable 2-5, 3-3
Ethernet connection B-2
Ethernet switch connectors 2-3
F
factory reset 3-27, 5-5
factory reset Zoneplayer A-2
factory reset, Controller 5-25, A-2
features, Controller 5-1
Index I-3
file storage supported B-1
file types supported B-1
first ZonePlayer connection 2-5
front panel indicators, ZonePlayer B-2
I
index music 3-24, 5-22
installation, DCR 3-2
installing Sonos Setup Assistant 4-1
installing speakers 2-4
Internet radio 3-18, 5-16
Internet radio preferences 3-20
L
left speaker terminals 2-3
light sensor 5-4
light sleep 5-4
line in, ZonePlayer B-1
line out, ZonePlayer B-1
line-in encoding 3-27, 5-30
line-in music source 3-20, 5-26
link zones 3-12, 5-9
M
Macintosh setup 4-1
mains input, ZonePlayer 2-3
manage shared folders 3-21, 4-7, 5-19
managing zones 3-10, 5-7
motion sensor 5-4, 5-24
music access B-1
music delay, troubleshooting A-4
music library 3-14, 5-11
music not showing, troubleshooting A-4
music queue 3-14, 5-11
music selection 3-13, 5-11
mute all 3-9, 5-6
mute all ZonePlayers 2-2

Sonos Digital Music System User GuideI-4
mute button indicator 2-2
mute button, DCR 3-9
mute button, ZonePlayer 2-2
mute zones 3-9, 5-6
N
network requirements 1-2
no music, troubleshooting A-3
O
online services, Sonos 1-3
operating systems 1-3
operating systems, alternate C-1
operating temperature specifications, ZonePlayer B-2
overheat condition, ZonePlayer A-3
P
package contents, Controller 5-1
package contents, ZonePlayer 2-1
party mode 3-12, 5-9
pause all, Controller 5-10
play formats 1-3
play mode 3-16, 5-14
playback controls, DCR 3-8
playlist formats 1-3
power supply, ZonePlayer B-2
power, ZonePlayer 2-3
preferences, Sonos Assistant 4-6
preferences-Internet radio 3-20
preferences-software updates 3-25
R
radio stations, troubleshooting A-4
rated output, ZonePlayer B-1
rear panel connectors, ZonePlayer 2-3
registration 3-27, 5-29
re-index music 3-24, 5-22

Index I-5
remove track 3-16, 5-14
rename ZonePlayer 3-6, 4-5, 5-23
repeat 5-15
reset Controller 5-5, A-2
reset Desktop Controller 3-27
reset ZonePlayer A-2
reset, Sonos Assistant 4-11
right speaker terminals 2-3
S
safety information 1-4
screen resolution, Controller B-3
screen type, Controller B-3
searching for ZonePlayers error A-2
select from music library 5-12
selecting music 3-15, 5-12
setting up your Macintosh 4-1
setting up, Windows 3-1
settings, Controller A-2
setup and operation, alternate C-1
setup using Controller C-1
setup, where to begin 2-1
setup, Windows XP/2000 3-1
shared folders 5-19, C-1
shared folders, Windows 3-1, 4-1
shuffle 5-15
shuffle/repeat 5-15
sleep modes, Controller 5-4
sleep timer docked 5-4, 5-24
sleep timer undocked 5-4, 5-24
software update preferences 3-25
software updates 3-24, 4-7, 5-27
solid amber ZonePlayer status indicator A-6
Sonos Assistant preferences 4-6
Sonos playlist, add 5-15
Sonos playlist, delete 5-16
Sonos playlists 3-17, 5-15

Sonos Digital Music System User GuideI-6
Sonos Setup Assistant 4-1
Sonosnet B-2
speaker connections, ZonePlayer B-1
speaker connector posts 2-4
speaker setup 2-4
specifications, Controller B-3
specifications, ZonePlayer B-1
standby mode 3-15
status indicator, ZonePlayer 2-2
stop accessing shared folder 3-24, 4-10, 5-21
stop system 3-27
stop system, Controller 5-10
submit diagnostics A-8
subwoofer output 2-4, B-1
support diagnostics A-8
system registration 3-27, 5-29
system requirements 1-3
system settings, Controller 5-17
T
technical support 1-4
troubleshooting A-1
troubleshooting, Controller A-2
troubleshooting, music library A-4
troubleshooting, no sound A-1
troubleshooting, ZonePlayer A-2
turn off Controller 5-5, 5-25
turn off music system 3-27, 5-10
U
update music index 3-24, 5-22
update wireless channel 3-26, 5-30
updates, Sonos Assistant 4-7
using the Controller 5-2
using the DCR interface 3-7
using the Sonos Assistant 4-4

Index I-7
V
view shared folders 5-19
voltage select 2-3
volume control 3-9, 5-5
W
WAV files 3-27, 5-30
weight B-2, B-3
where to begin 2-1
Windows XP/2000 setup 3-1
wired vs. wireless 2-7
wireless channel 3-26, 5-30
wireless connectivity B-2
wireless signal strength 5-4
WMA 5-30, A-4
wrong album art A-4
Y
your computer network 1-2
Z
zone groups 3-11, 5-8
zone management 3-10, 5-7
ZonePlayer dimensions B-2
ZonePlayer front panel 2-2
zoneplayer not working A-2
ZonePlayer overheat shutdown A-6
ZonePlayer overheat warning A-6
ZonePlayer reset A-2
ZonePlayer setup 2-1
ZonePlayer specifications B-1
ZonePlayer status indicator 2-2
ZonePlayer stopped A-3
ZonePlayer weight B-2
ZonePlayer, add 2-7

Sonos Digital Music System User GuideI-8