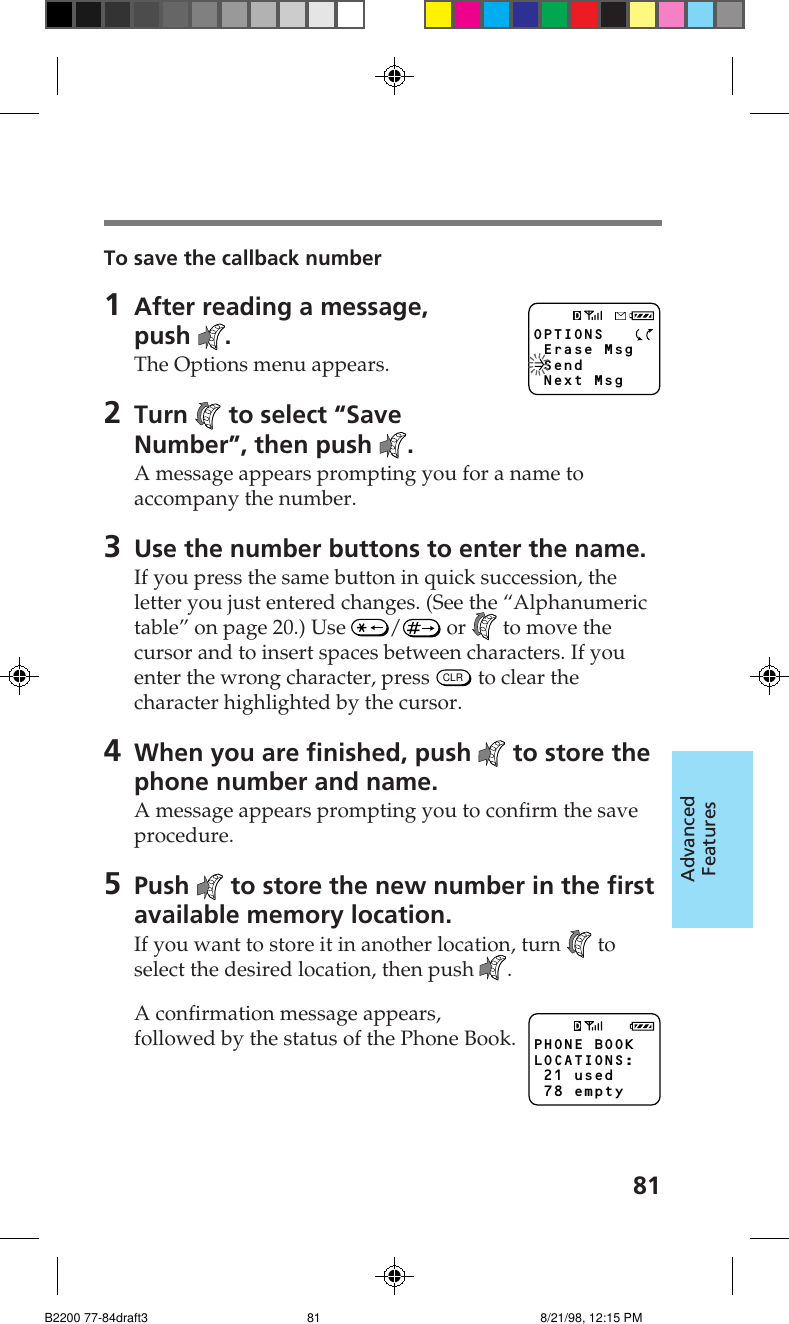
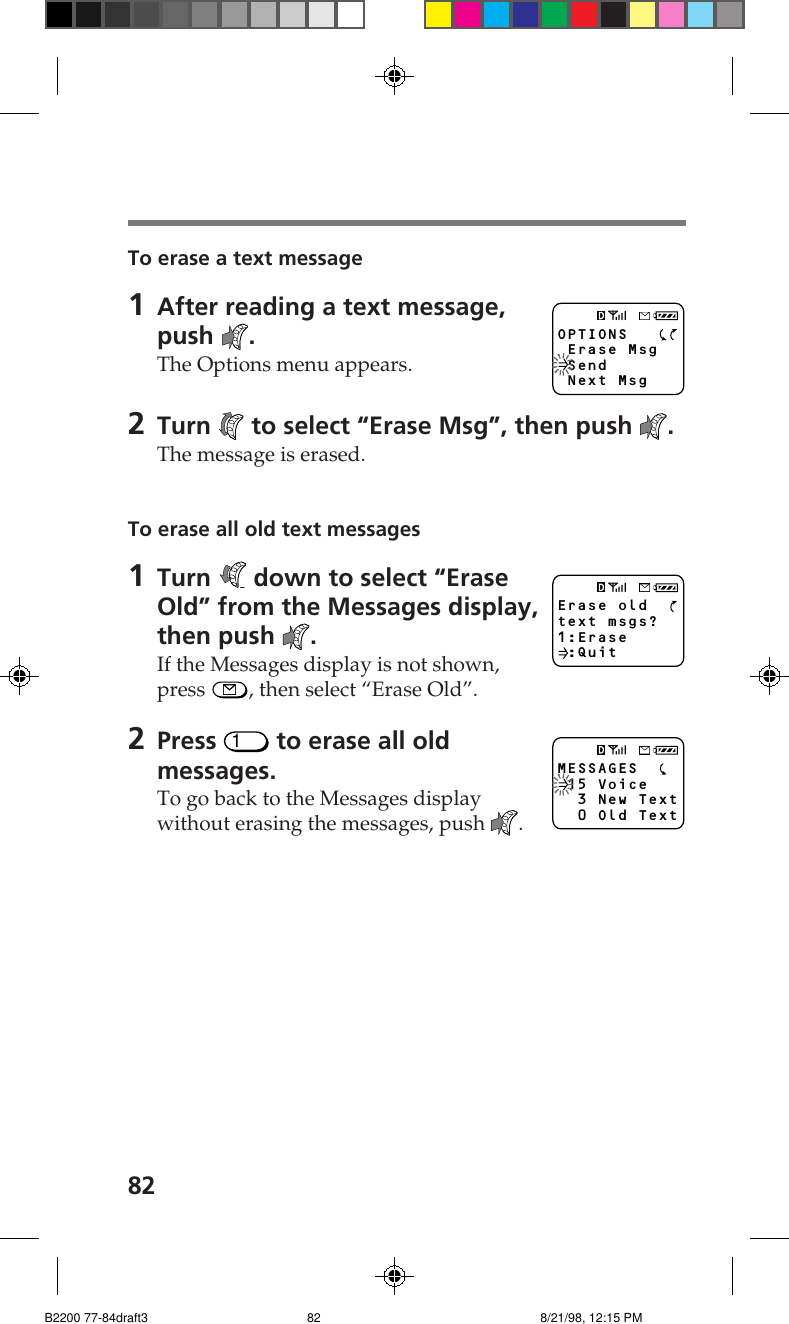
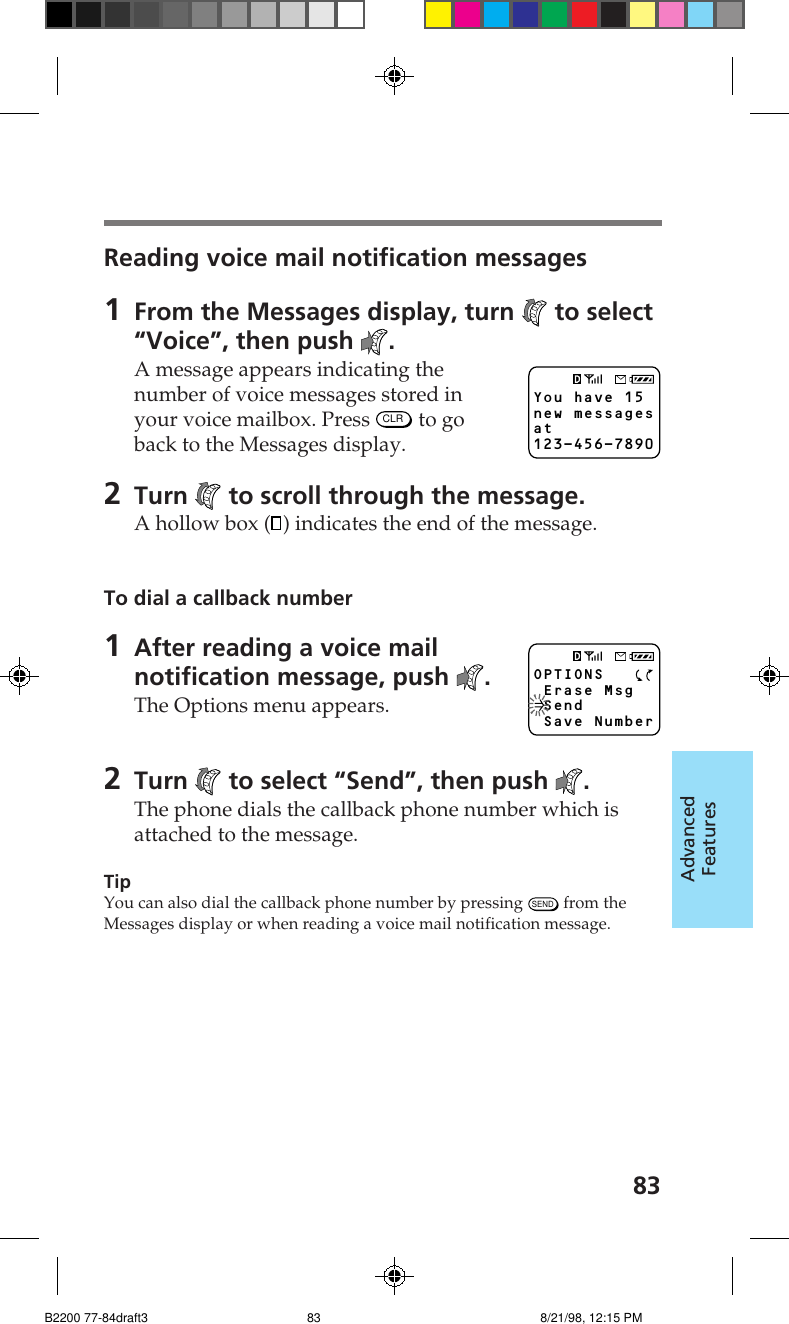
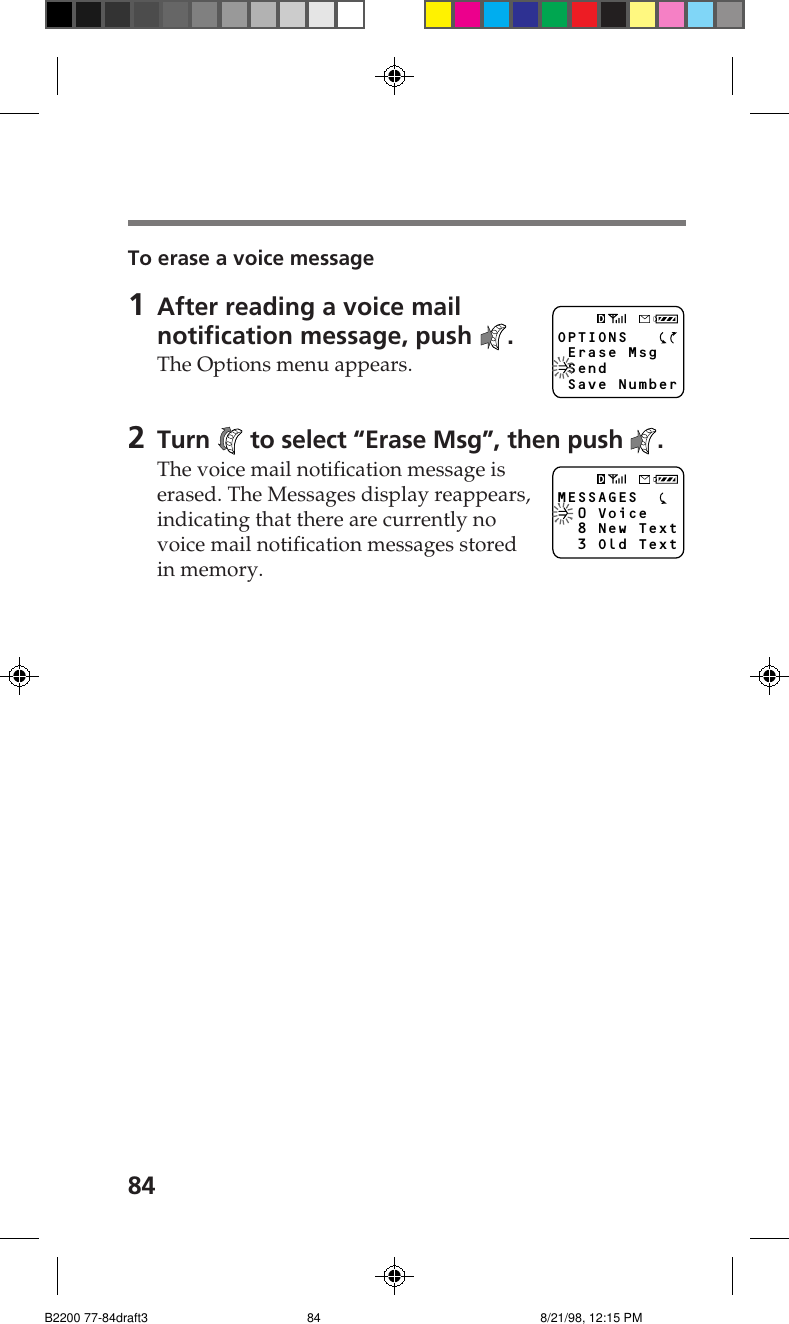
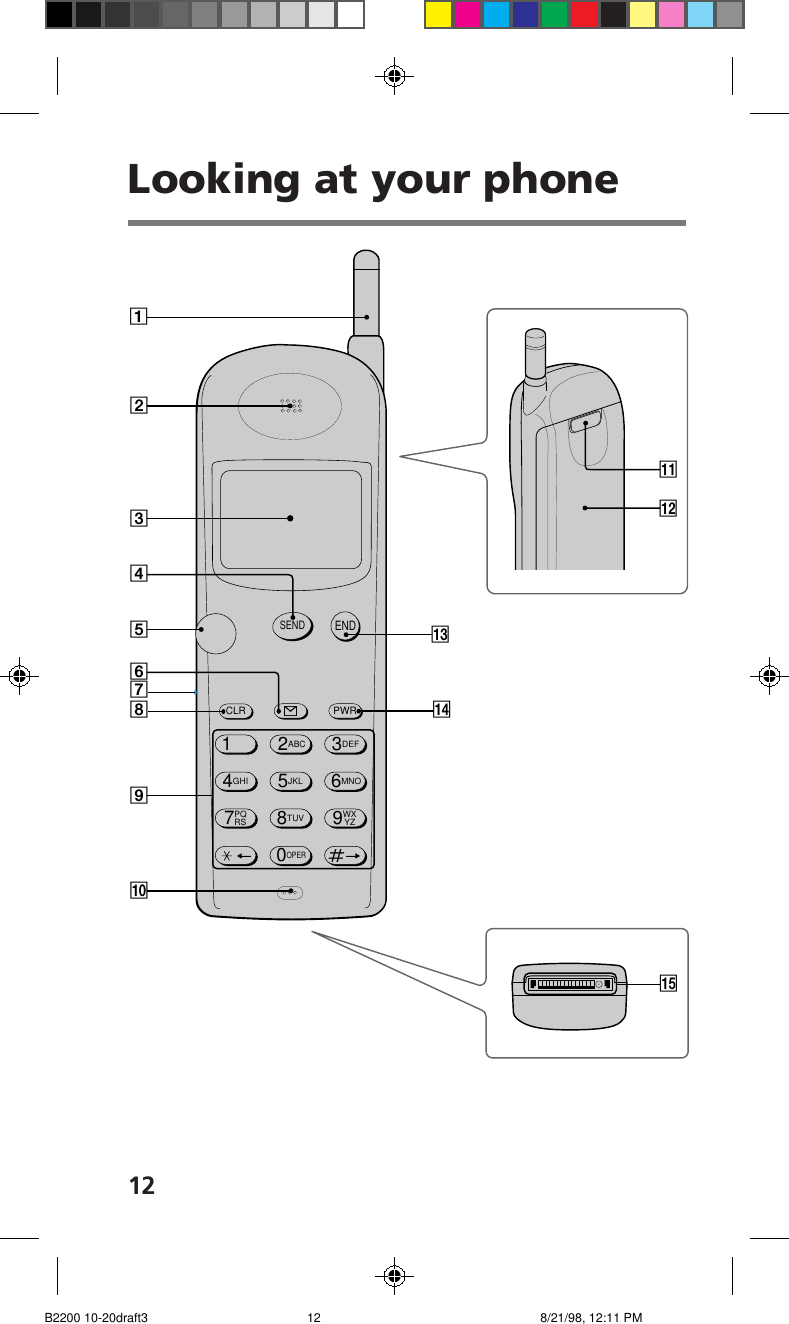
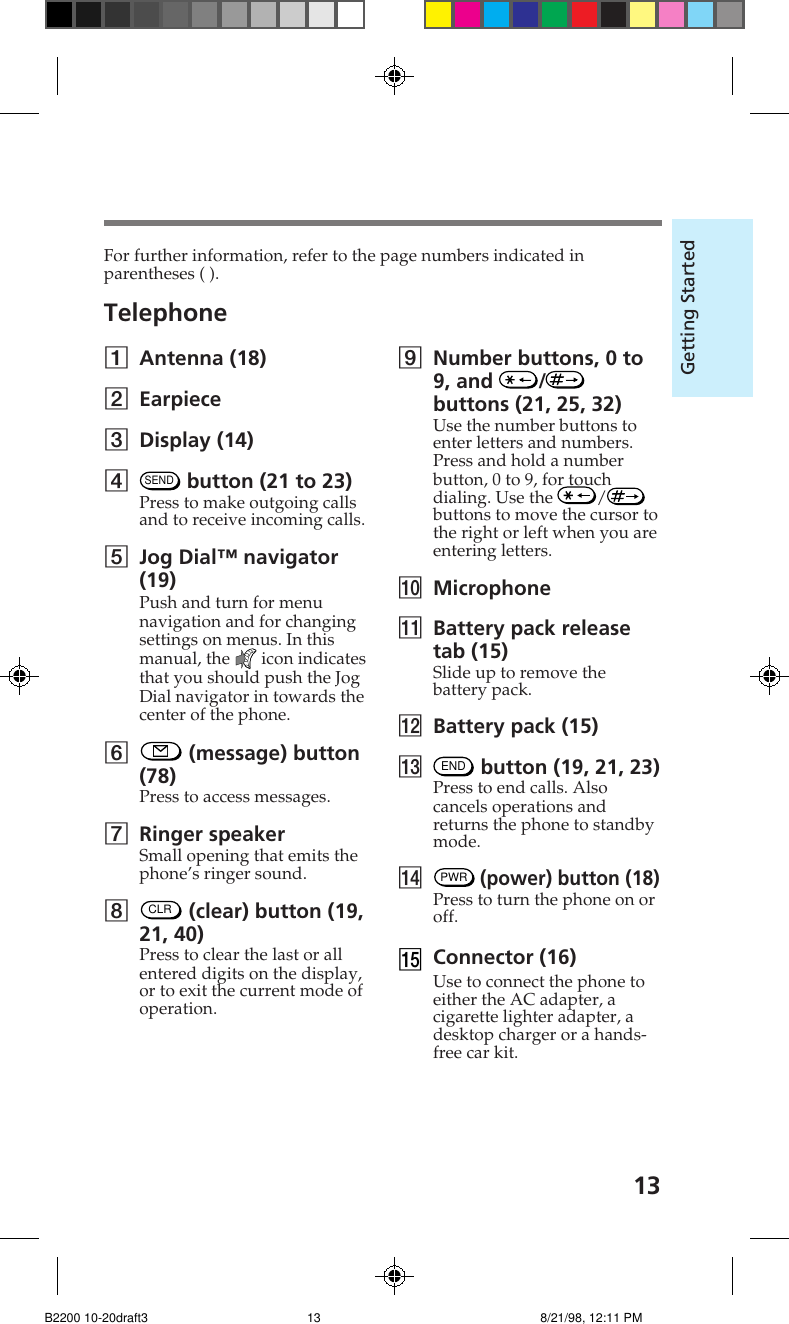
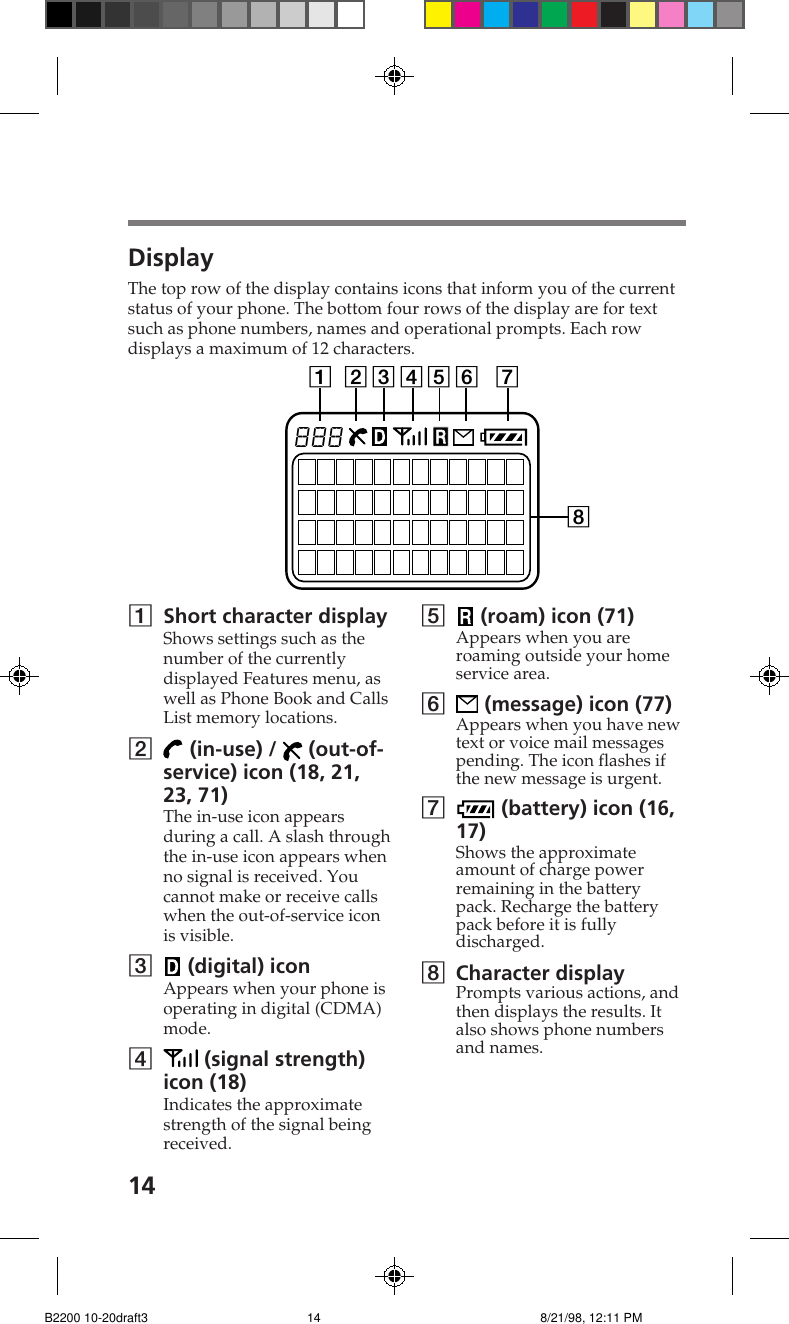
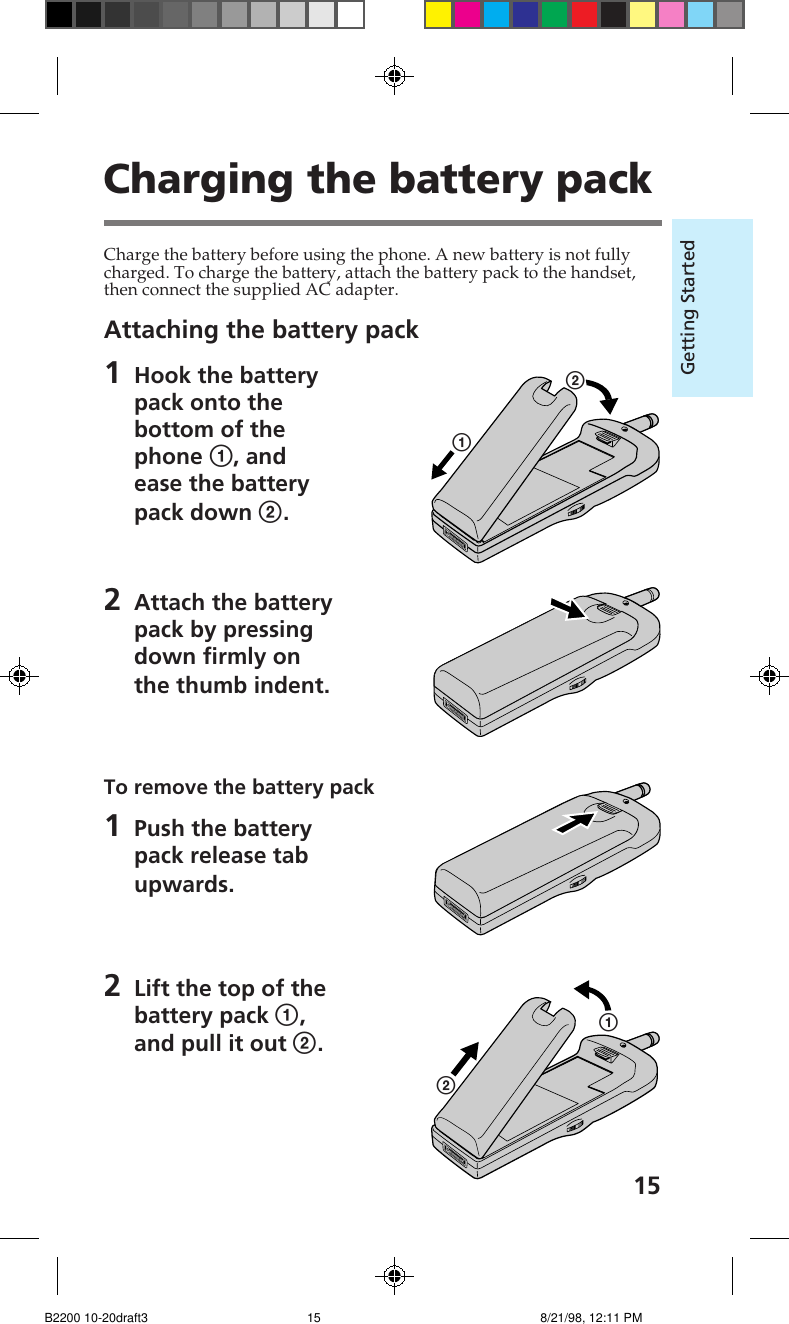
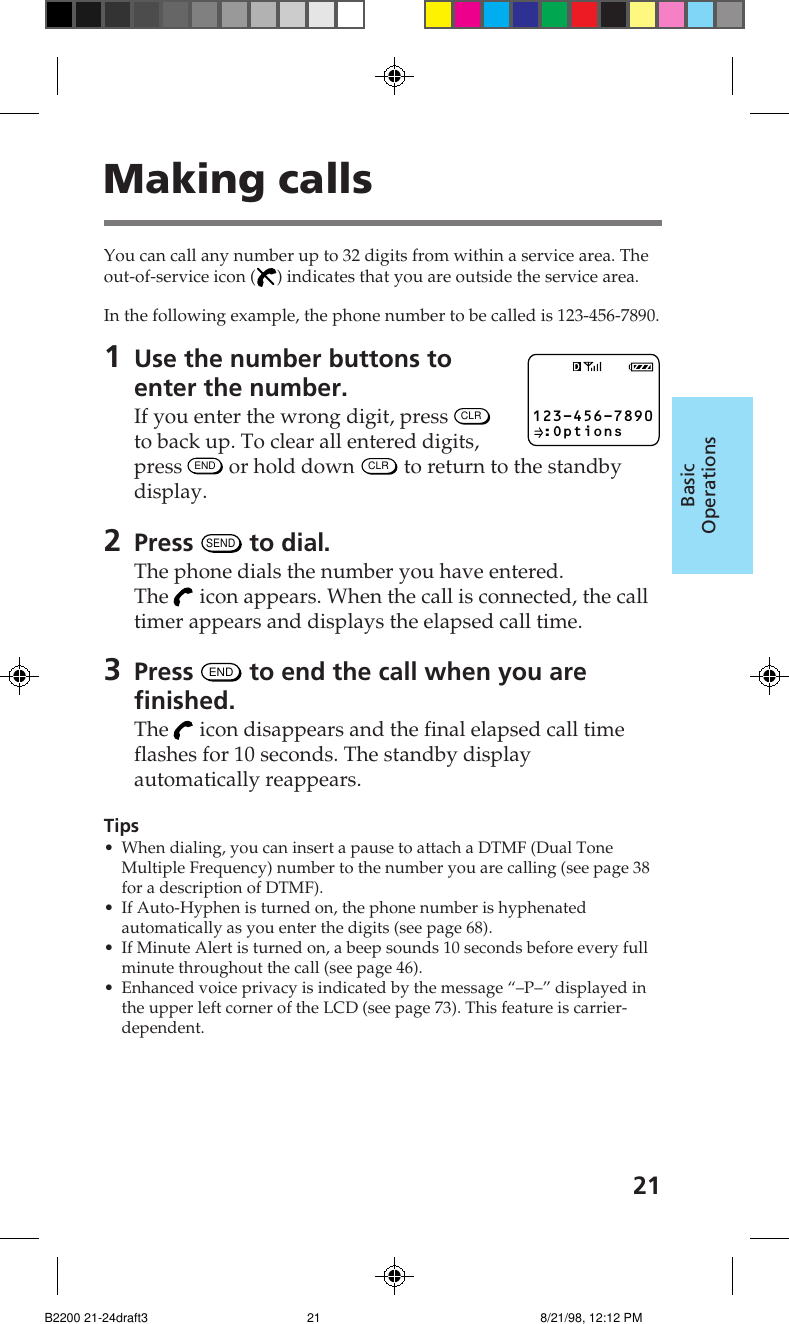
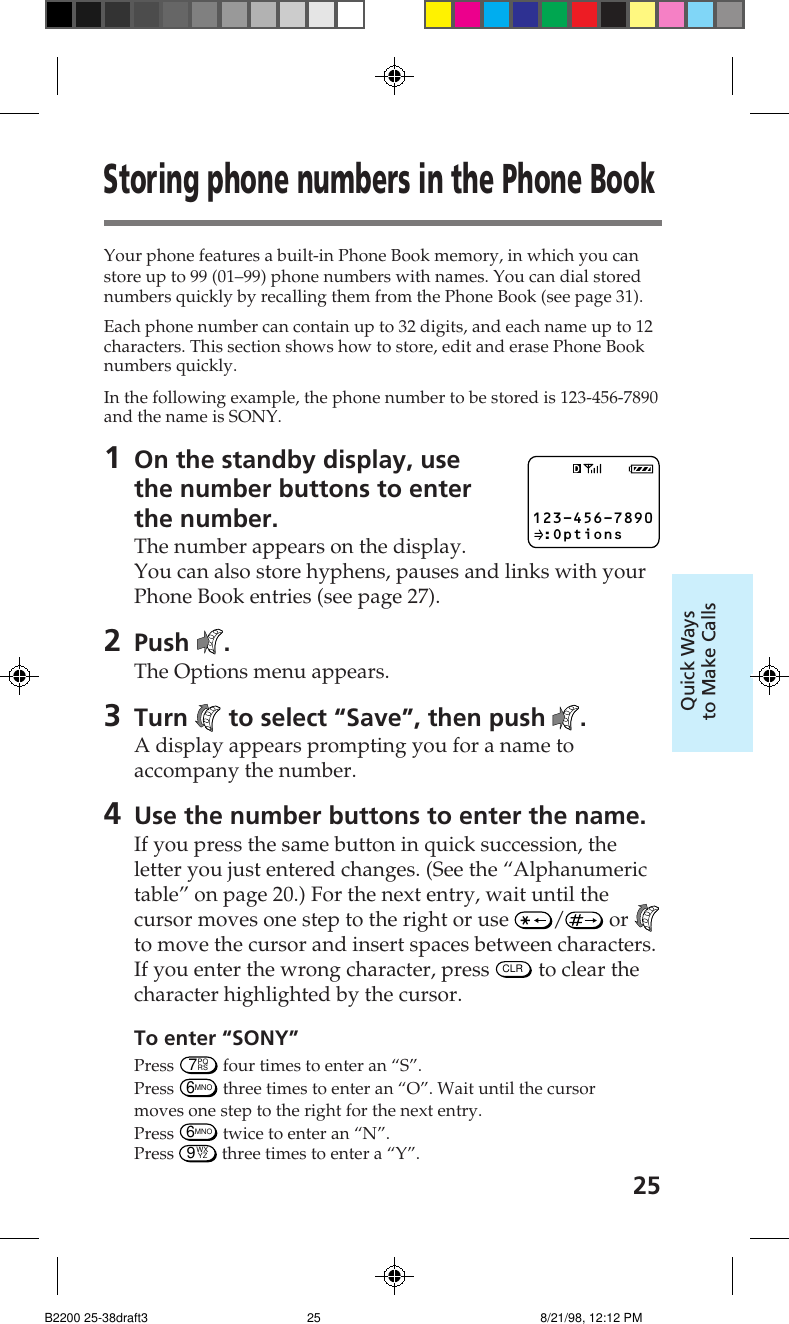
Sony Electronics CMDB4 Dual-Band Analog/PCS Phone (AMPS/CDMA) User Manual
Sony Electronics Inc Dual-Band Analog/PCS Phone (AMPS/CDMA) Users Manual
UserManual.wiki
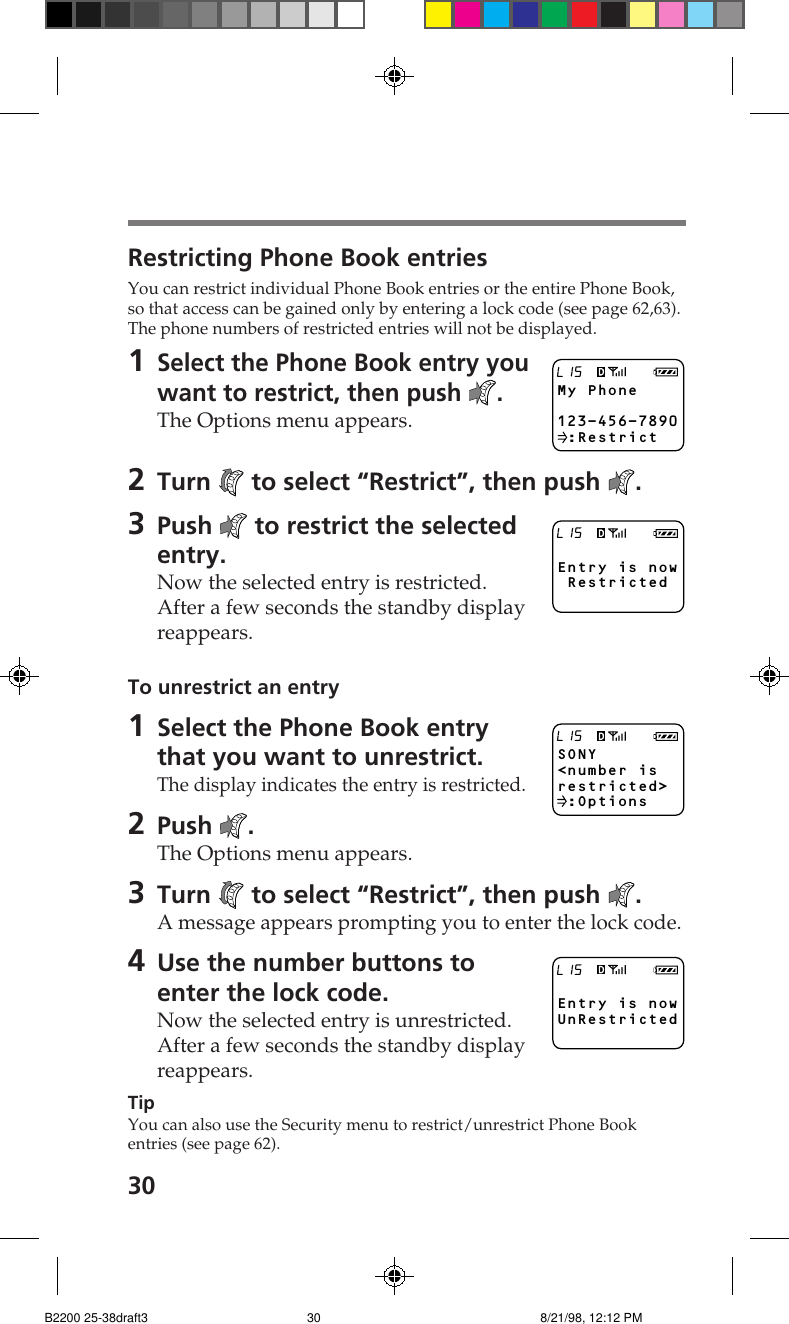
>
Sony Electronics
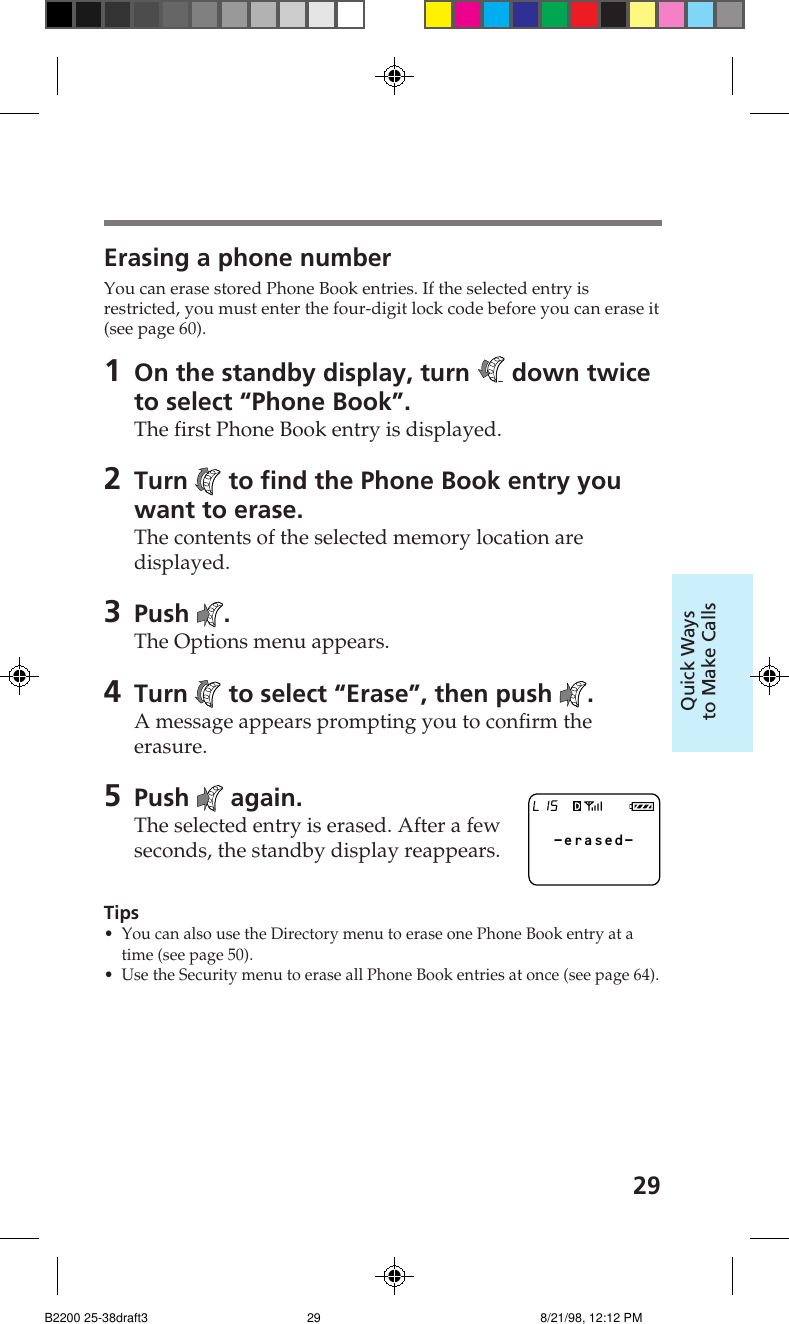
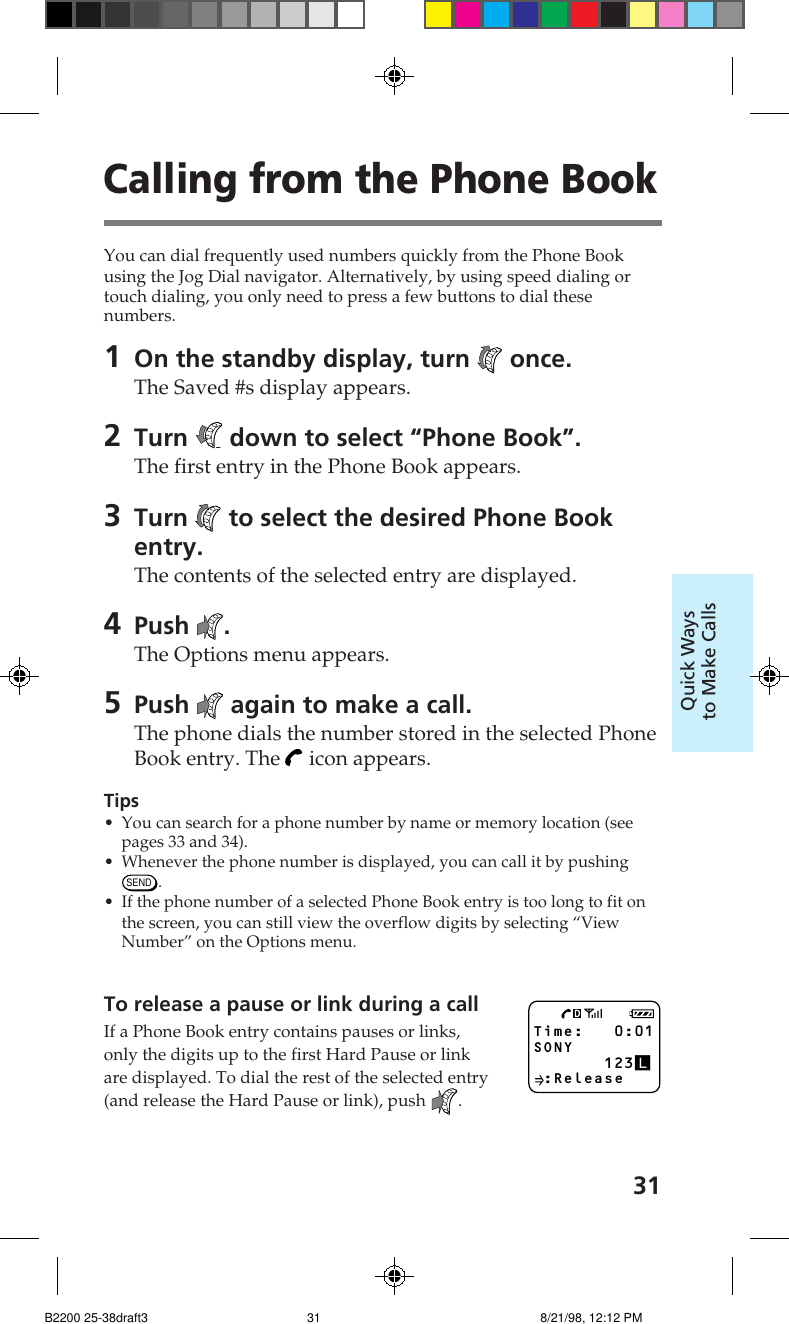
>
CMDB4 User Manual
Users Manual
Navigation menu
Upload a User Manual
Namespaces
Wiki Guide
HTML
PDF
Info
Views
User Manual
Discussion / Help
Navigation


![39AdvancedFeaturesYou can use the Features menus to activate the special features of yourphone (e.g., backlighting or display).Menu structureThe phone uses a hierarchical on-screen menu structure for setting andediting parameters. For a comprehensive list of submenus andcorresponding settings, see “List of menu items” on pages 86 and 87.Viewing and selecting menu optionsThe Jog Dial navigator makes it easy to navigate the phone’s menus. Theprocedure to view and select menu options is common to most of theFeatures menus (see page 86). These menus are also accessible during acall. The following example shows how to set the backlight.1On the standby display, push to select“Features”.If the standby display is not shown,press END or hold down CLR, then push to display the Features menu. Thearrow and the menu number flash,indicating which menu will be selectedby pushing (in this case the Sounds menu [F–1]).2Turn to select “Display”, then push .The Display menu appears. The arrow and the last digitof the submenu number flash, indicating whichsubmenu will be selected by pushing (in this case theBanner menu [F61]).About the Features menusMy Phone12:34P 12/25 :Saved #s :FeaturesFEATURES Sounds Timers DirectoryF-1SOUNDS Ringer Vol Mute/UnMute Keybeep VolF11Standby display Main (Features) menu SubmenuFEATURES Sounds Timers DirectoryF-1/ /B2200 39-55draft3 8/21/98, 12:12 PM39](https://usermanual.wiki/Sony-Electronics/CMDB4/User-Guide-11875-Page-39.png)
![41AdvancedFeaturesYou can adjust the volume of the ringer, keybeepand earpiece on the Sounds menu. You can alsoselect the type of sounds heard when the phonerings and when you press buttons. (See page 39 forinstructions on how to reach the Sounds menu.)Adjusting the ringer volume [F11]1Push to select “Ringer Vol.”from the Sounds menu.The Ringer Vol. menu appears.2Turn up to raise the ringer volume, anddown to lower it.You can select from five ringer volume settings: “off”,“low”, “med.” (medium), “high” and “escalate”.3Push to enter the new setting.The standby display reappears.If you turn off the ringer volumeThe message “–Ringer Off–” is displayed at the topof the screen when the standby display appears.TipIf you set the ringer volume to “escalate”, the telephone rings twice at alow volume, then once at medium volume and thereafter at a high volume.To mute the ringerWhen you are unable to take a call (e.g., during a meeting) turn –down to quickly mute the ringer. The unanswered call will be stored inthe Calls List.Notes•Only the current call is muted; turn – down to mute each additional call.•To adjust the ringer volume without muting the ringer, turn + up toactivate the ringer adjustment, then turn as desired.•To mute the microphone during a call push and hold (see page 22).Adjusting the volume-Ringer Off-12:34P 12/25 :Saved #s :FeaturesSOUNDS Ringer Vol Mute/UnMute Keybeep VolF11RINGER VOL. HIGH :Choices :To SetF11Sounds menuB2200 39-55draft3 8/21/98, 12:13 PM41](https://usermanual.wiki/Sony-Electronics/CMDB4/User-Guide-11875-Page-41.png)
![42Muting/unmuting the microphone [F12]You can mute/unmute the phone during a call directly, without usingthe Sounds menu, by pushing and holding . You can also mute/unmute the microphone during a call using the Sounds menu. Thisfeature is disabled in standby mode.1During a call, push to select“Sounds” from the Featuresmenu.The Sounds menu appears.2Push to select “Mute/UnMute”.The following display appears. Now themicrophone is muted.3To unmute the microphone,push and hold for one second.The Features menu appears for a momentand the microphone is now unmuted.Adjusting the keybeep volume [F13]You can adjust the volume of the beep that sounds when you press a button.1Turn to select “KeybeepVol” from the Sounds menu,then push .The Keybeep Vol menu appears.2Turn up to raise the keybeep volume, anddown to lower it.You can select from four keybeep volume settings: “off”,“low”, “med.” (medium) and “high”.3Push to enter the new setting.The standby display reappears.MUTED: 1:21Hold downto (un)muteFEATURES Sounds Timers DirectoryF-1KEYBEEP VOL HIGH :Choices :To SetF13B2200 39-55draft3 8/21/98, 12:13 PM42](https://usermanual.wiki/Sony-Electronics/CMDB4/User-Guide-11875-Page-42.png)
![43AdvancedFeaturesAdjusting the earpiece volume [F14]You can adjust the earpiece volume during a call by turning . Youcan also adjust the speaker volume using the Sounds menu.1Turn to select “Earpiece Vol”from the Sounds menu, thenpush .The Earpiece Vol menu appears.2Turn up to raise the earpiece volume,and down to lower it.You can select from seven earpiece volume settings, from“1” to “7”. A higher number indicates higher volume.3Push to enter the new setting.The standby display reappears.Setting the ringer type [F15]You can set the type of beep that sounds for an incoming call.1Turn to select “Ringer Type”from the Sounds menu, thenpush .The Ringer Type menu appears.2Turn to select the ringer type.You can select from five different ringer settings.The ringer sounds every time you turn .3Push to enter the new setting.The standby display reappears.RINGER TYPE STANDARD :Choices :To SetF15EARPIECE VOL 7 :Choices To SetF14B2200 39-55draft3 8/21/98, 12:13 PM43](https://usermanual.wiki/Sony-Electronics/CMDB4/User-Guide-11875-Page-43.png)
![44Setting the keybeep type [F16]You can set the beep that sounds when you press a button to either atone or a click. Tones sound similar to DTMF tones and clicks areindicated by single beeps.1Turn to select “Key Sound”from the Sounds menu, thenpush .The Key Sound menu appears.2Turn to select the keybeep type.You can select “tones” or “clicks”.3Push to enter the new setting.The standby display reappears.NoteDTMF tones are sent to the other party during a call even if you set thekeybeep type to “clicks”.Setting the keybeep length [F17]You can set the length of the beep that sounds when you press a button.This setting affects both the keybeep feedback and DTMF transmissiontones. The phone sends a short DTMF burst (default) or plays every toneof the DTMF signal as long as the key is held down.1Turn to select “BeepLength” from the Soundsmenu, then push .The Beep Length menu appears.2Turn to select the keybeep length.You can select “standard” or “long”.3Push to enter the new setting.The standby display reappears.F16KEY SOUND TONES :Choices :To SetF16BEEP LENGTH STANDARD :Choices :To SetF17B2200 39-55draft3 8/21/98, 12:13 PM44](https://usermanual.wiki/Sony-Electronics/CMDB4/User-Guide-11875-Page-44.png)
![45AdvancedFeaturesYou can check call durations on the Timers menu.You can also set the phone to alert you everyminute of a call and make the phone turn itself offautomatically.Checking the duration of all calls [F21]You can view the total duration of all calls. This information cannot bereset.1Turn to select “All Calls”from the Timers menu, thenpush .The All Calls display appears.2Push to go back to the standby display.Checking and resetting the duration of recentcalls [F22]You can view the total duration of the most recent calls.1Turn to select “Recent Calls”from the Timers menu, thenpush .The Recent Calls display appears.2Press 1 to reset, or holddown CLR to go back to thestandby display.If you choose to reset, the counter ofrecent calls and the corresponding durations are reset.Checking and setting the timersTIMERS All Calls RecentCalls MinuteAlertF21ALL CALLS 150m58s 90 calls :DoneF21RECENT CALLS 45m30s 20 calls1:To ResetF22 -reset- F22Timers menuB2200 39-55draft3 8/21/98, 12:13 PM45](https://usermanual.wiki/Sony-Electronics/CMDB4/User-Guide-11875-Page-45.png)
![46Setting the minute alert [F23]You can set the phone to alert you ten seconds before every full minute.1Turn to select “MinuteAlert” from the Timers menu,then push .The Minute Alert menu appears.2Turn to select “on” or “off”.3Push to enter the new setting.The standby display reappears.MINUTE ALERT OFF :Choices :To SetF23FB2200 39-55draft3 8/21/98, 12:13 PM46](https://usermanual.wiki/Sony-Electronics/CMDB4/User-Guide-11875-Page-46.png)
![47AdvancedFeaturesSetting the phone to automatically turn off [F24]You can set the phone to automatically turn itself off after a specifiedduration.1Turn to select “Auto-Off”from the Timers menu, thenpush .The Auto-Off menu appears.2Turn to select the duration before thephone powers off automatically.You can select from five settings: “never”, “in 3 hours”,“in 2 hours”, “in 1 hour” and “in 30 mins”. If you select“never”, the phone does not turn itself off automatically.3Push to enter the new setting.If you set the phone to power off in 30minutes, for example, the followingdisplay appears.Notes• If you press any button or operate the Jog Dial navigator, the timer isreset and the countdown starts over.• The phone does not turn itself off automatically during a call.• If the Auto-Off timer is set, the phone turns off after a user-specifiedduration and the countdown “Off:xx:xx:xx” is displayed.• Once the phone turns off, the setting will revert to “never”.Phone will turn off in 30 minutes.F24FAUTO-OFF NEVER :Choices :To SetF24FB2200 39-55draft3 8/21/98, 12:13 PM47](https://usermanual.wiki/Sony-Electronics/CMDB4/User-Guide-11875-Page-47.png)
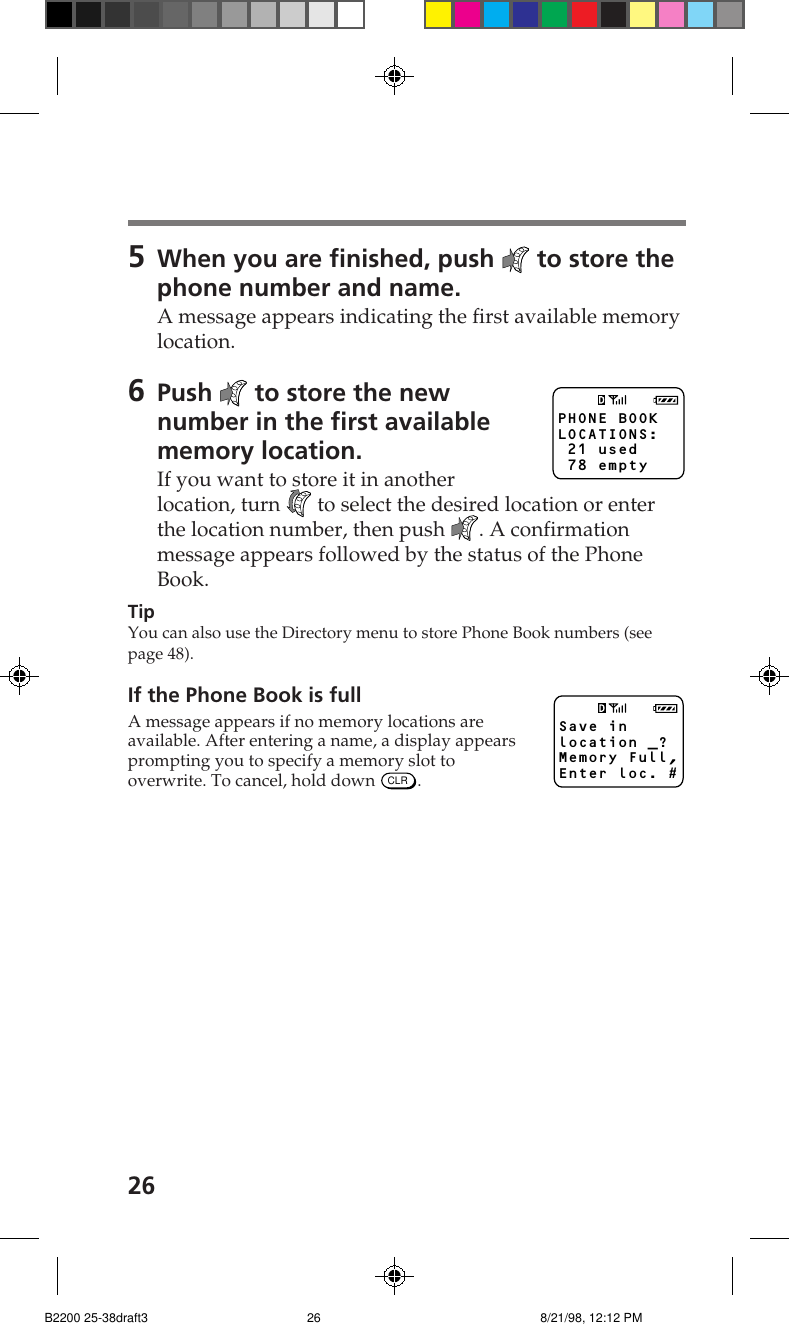
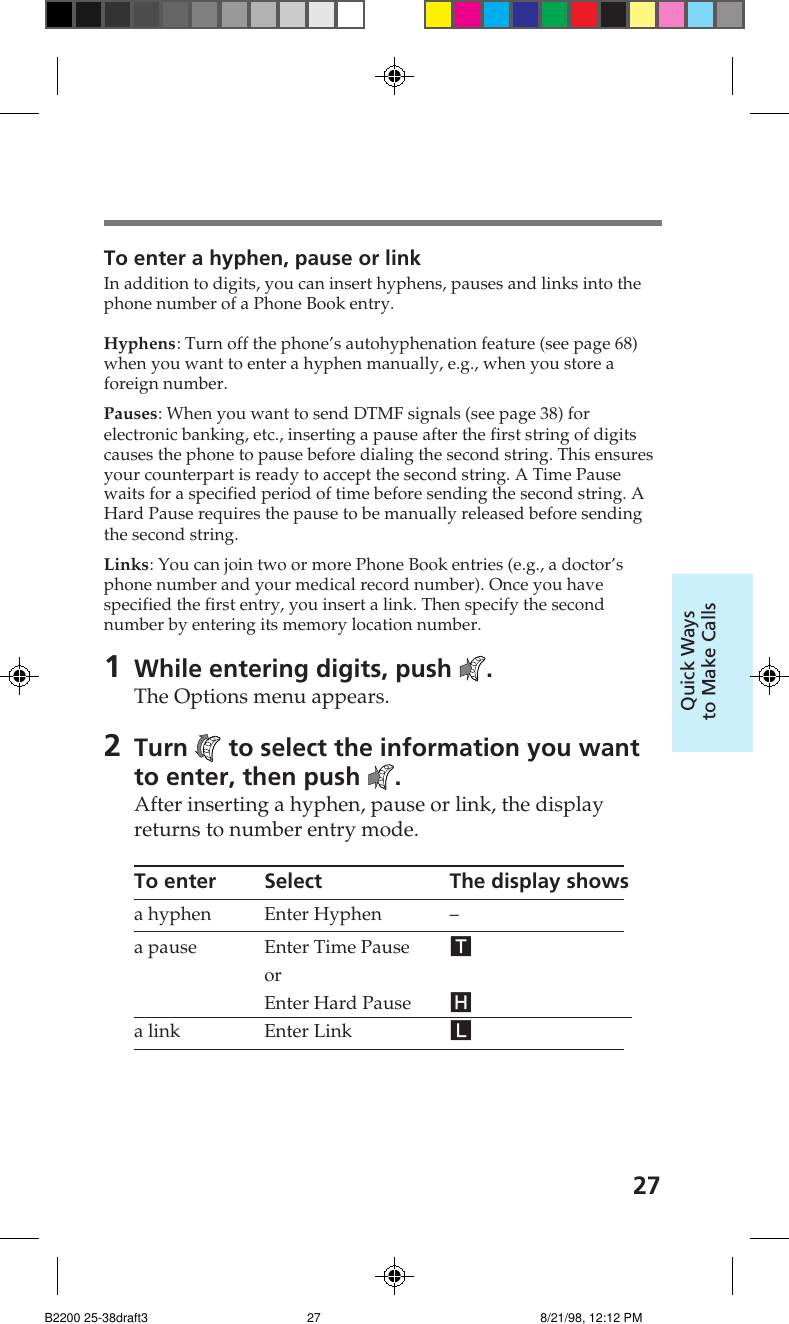
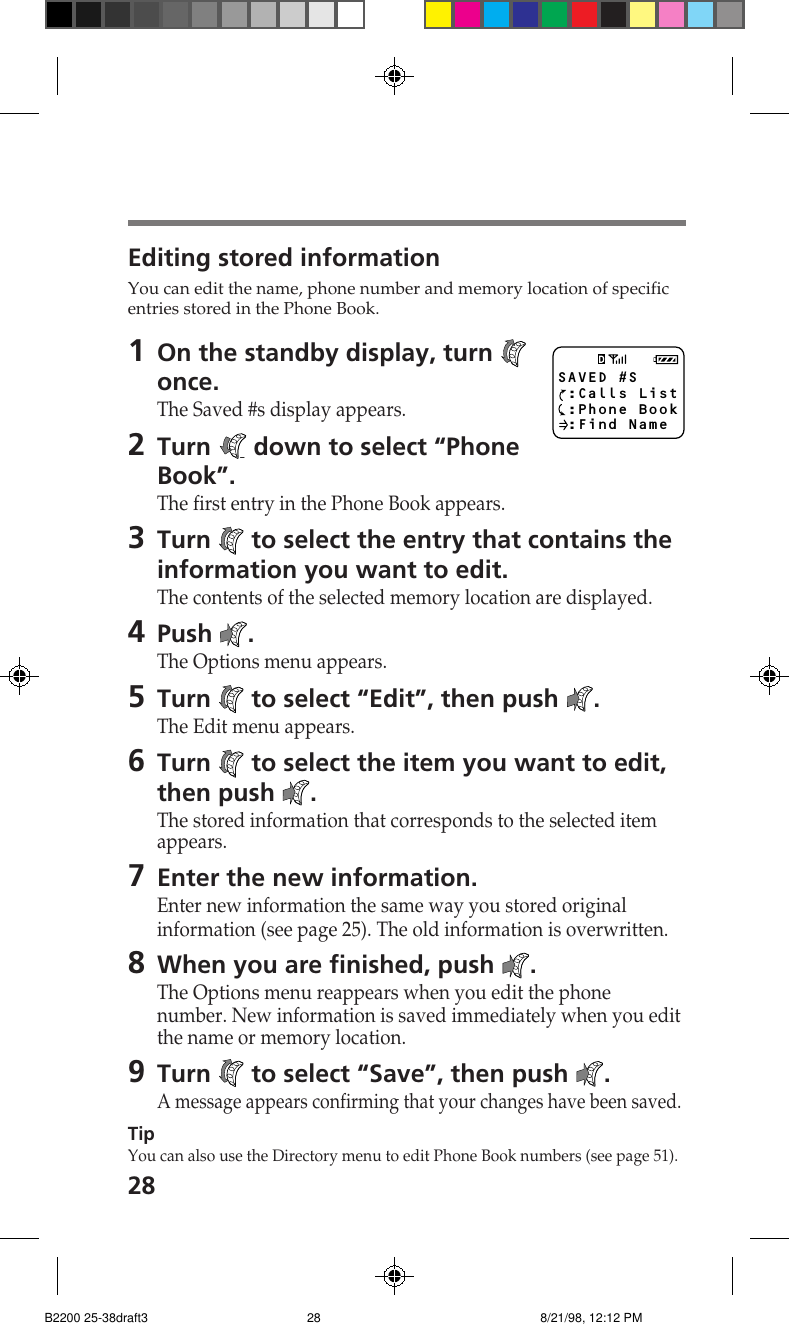
![48You can use the Directory menu to check yourphone number, as well as store, erase and editphone numbers and names in the Phone Book.You can also use this menu to view the Calls List.Checking your phone number [F31]1Push to select “My Number”from the Directory menu.The My Phone # display appears,showing your phone’s number.2Push to exit this feature.The standby display reappears.Storing phone numbers [F32]For quick and easy dialing, the Phone Book allows you to store up to 99phone numbers.1Turn to select “Save” fromthe Directory menu, thenpush .The following display appears.2Use the number buttons to enter the phonenumber, then push .The Options menu appears. (See the “Alphanumerictable” on page 20.)3Turn to select “Save”, then push .A display appears prompting you for a name toaccompany the number.Enter number to save and then for next step.F32Using the DirectoryDIRECTORY My Number Save EraseF31MY PHONE #123-456-7890 :DoneF31Directory menuB2200 39-55draft3 8/21/98, 12:13 PM48](https://usermanual.wiki/Sony-Electronics/CMDB4/User-Guide-11875-Page-48.png)
![50 -erased- L15 to findentry toerase thento select.F33Erasing a phone number [F33]You can erase stored Phone Book entries. If the selected entry is restricted,you must enter the four-digit lock code to erase it (see page 60).1Turn to select “Erase” from the Directorymenu, then push .The following display appears,prompting you for the Phone Bookentry to be erased.2Turn to select the entry you want toerase, then push .A message appears prompting you to confirm that theselected Phone Book entry should be erased. You canalso use the number buttons to select the entry to beerased.3Push again.The selected entry is erased. After a fewseconds, the standby display reappears.Tips• You can also use the Options menu to erase one Phone Book entry at a time(see page 29).• Use the Security menu to erase all Phone Book entries at once (see page 64).B2200 39-55draft3 8/21/98, 12:13 PM50](https://usermanual.wiki/Sony-Electronics/CMDB4/User-Guide-11875-Page-50.png)
![51AdvancedFeaturesEditing stored information [F34]You can edit the name, phone number and memory location of specificentries stored in the Phone Book. If the selected entry is restricted, youmust enter the four-digit lock code to edit it (see page 60).1Turn to select “Edit” from theDirectory menu, then push .The following display appears,prompting you for the Phone Bookentry to be edited.2Turn to select the entry that contains theinformation you want to edit.You can also use the number buttons to select the entry tobe edited. A message appears prompting you to confirmthat the selected Phone Book entry should be edited.3Push again.The Edit menu appears.4Turn to select the item you want tochange, then push .You can change the name, phone number or memorylocation by selecting “Name”, “Phone #” or “Location #”respectively. The stored information that corresponds tothe selected item appears.5Enter the new information.The old information is overwritten.6When you are finished, push .A display appears confirming that your changes havebeen saved.TipYou can also use the Options menu to edit Phone Book entries (see page 28). to findentry to edit then to selectF34B2200 39-55draft3 8/21/98, 12:13 PM51](https://usermanual.wiki/Sony-Electronics/CMDB4/User-Guide-11875-Page-51.png)
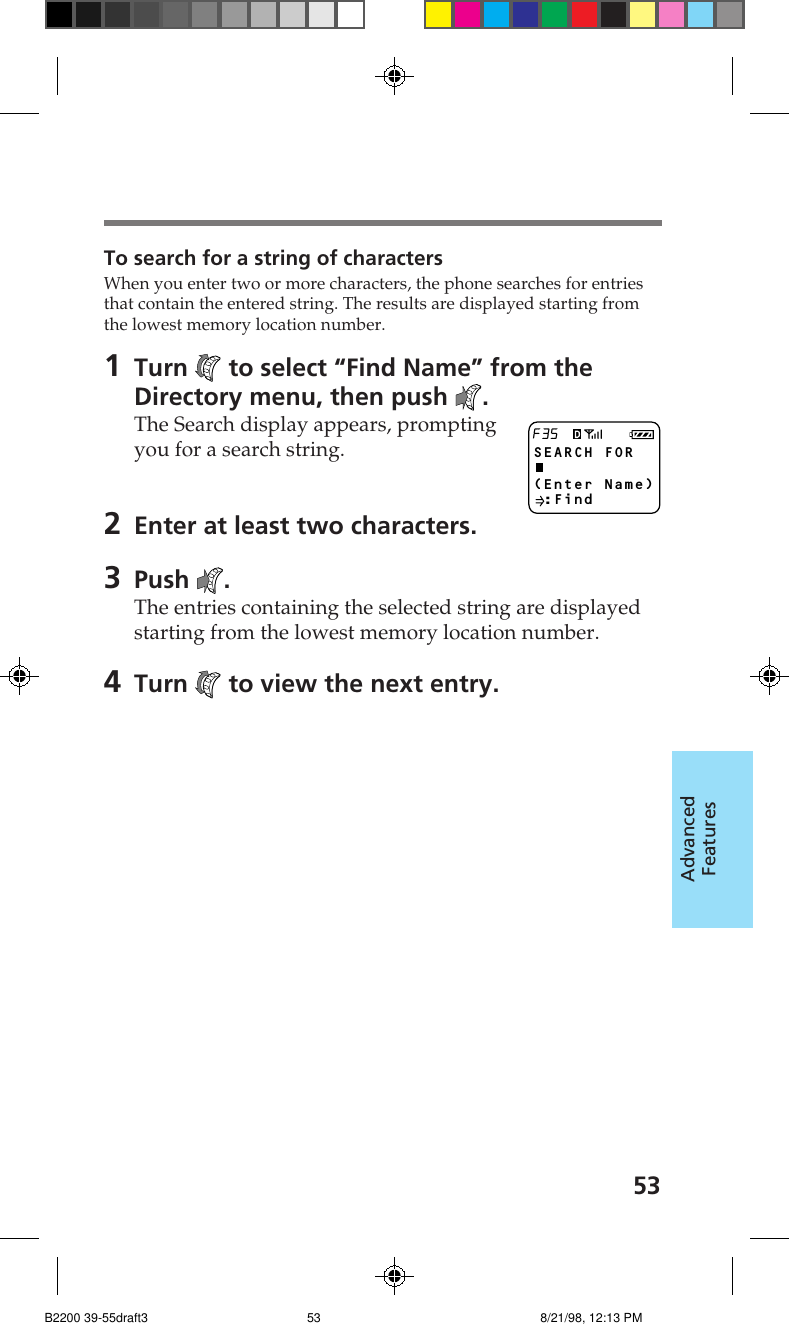
![52Searching the Phone Book by name [F35]You can find name entries in the Phone Book by searchingalphabetically or for a string of characters.TipYou can also use the Options menu to search the Phone Book by names(see pages 33 and 34).To search alphabeticallyWhen you enter only one character, the phone lists all entries that beginwith the entered character.1Turn to select “Find Name” from theDirectory menu, then push .The Search display appears, promptingyou for a search string.2Enter only the first letter of the name youwant to find.3Push .All Phone Book entries that begin with the enteredcharacter are displayed alphabetically.4Turn to view the next entry.SEARCH FOR(Enter Name) :FindF35B2200 39-55draft3 8/21/98, 12:13 PM52](https://usermanual.wiki/Sony-Electronics/CMDB4/User-Guide-11875-Page-52.png)
![54Searching the Phone Book by memory location [F36]1Turn to select “Phone Book” from theDirectory menu, then push .A display appears prompting you for a search string.2Use the number buttons to enter thememory location number.The Phone Book entry that matches thesearch string is displayed. If theselected entry is empty, the displayshows the message “Phone Bookstorage location XX is empty”. After afew seconds, the standby display reappears.Tips• You can also use the Options menu to find Phone Book memorylocations (see page 34).• You can also turn to scroll through the entire Phone Book instead ofentering the memory location number in step 2.Phone Bookstoragelocation 15is empty.L15B2200 39-55draft3 8/21/98, 12:13 PM54](https://usermanual.wiki/Sony-Electronics/CMDB4/User-Guide-11875-Page-54.png)
![55AdvancedFeatures for calls list. Then to get each call's timeF37Calling...SONY123-456-7890C06Viewing the Calls List [F37]You can view Calls List entries easily.1Turn to select “Calls List” from theDirectory menu, then push .The following display appears,allowing you to view the Calls List. Ifthe Calls List is empty, the displayshows the message “Calls List isempty”.2Turn to view the Calls List entries.The most recent entry is displayed first. To view the restof the ten most recent entries, turn .TipYou can also view the Calls List from the standby display (see page 36).To place a callPress SEND in step 2. You can also push to go tothe Options menu, then select “Send” and push .B2200 39-55draft3 8/21/98, 12:13 PM55](https://usermanual.wiki/Sony-Electronics/CMDB4/User-Guide-11875-Page-55.png)
![56Miscellaneous extra featuresOn the Extras menu, you can set the phone toenable touch dialing, redial automatically andanswer incoming calls automatically or at the pressof any button. You can also use this menu to lockthe keypad and to jot down phone numbers.Preventing accidental operation [F41]You can lock the keypad from the standby display or using the phone’smenus. Locking the keypad offers low-level security. For example, itdisables accidental dialing when you keep the phone in your pocket.Keyguard will remain active until the keypad is manually unlocked.1From the standby display push and hold .orFrom the Extras menu turn to select“Keyguard”, then push .The following message appears.After a few seconds, the standby displayreappears. The keypad lock icon ( ) andthe text “Keyguard On” indicates that thekeypad is locked.To unlock the keypadTo turn the Keyguard off, press 1, 2ABC and 3DEF in quicksuccession.To answer an incoming call when the keypad is lockedJust press SEND. You do not need to unlock the keypad. When the call isended, the phone automatically reverts to Keyguard On.Tips• You can lock the keypad even when the phone itself is locked (see page 60).• The keybeeps are turned off when the keypad is locked.• To activate the backlight while Keyguard is on, press and hold .Keypad is now guarded. Press "123" to unlockF41My Phone 12:34P 12/25 Keyguard OnEXTRAS Key Guard Touch Dial Auto-RetryF41Extras menuB2200 56-76draft3 8/21/98, 12:13 PM56](https://usermanual.wiki/Sony-Electronics/CMDB4/User-Guide-11875-Page-56.png)
![57AdvancedFeaturesActivating touch dialing [F42]If you want to use the touch dialing feature (see page 32), set to “on”.1Turn to select “Touch Dial”from the Extras menu, thenpush .The Touch Dial menu appears.2Turn to select “on” or “off”.3Push to enter the new setting.The standby display reappears.Setting the phone to redial automatically [F43]You can set the interval for redialing. If the attempt to dial isunsuccessful, the phone tries to redial it up to five times.1Turn to select “Auto-Retry”from the Extras menu, thenpush .The Auto-Retry menu appears.2Turn to select the interval setting.You can select “off”, “on 60 secs”, “on 30 secs” or “on 10secs”. If you select “off”, the phone does not try to redialautomatically.3Push to enter the new setting.The standby display reappears.AUTO-RETRY OFF :Choices :To SetF43TOUCH DIAL ON :Choices :To SetF42B2200 56-76draft3 8/21/98, 12:13 PM57](https://usermanual.wiki/Sony-Electronics/CMDB4/User-Guide-11875-Page-57.png)
![58Setting the phone to answer automatically [F44]You can set the phone to answer calls automatically. If you turn auto-answering on, the phone answers incoming calls on the second ringwhen the phone is used in conjunction with a Sony Hands-Free Car Kit.1Turn to select “Auto-Answer”from the Extras menu, thenpush .The Auto-Answer menu appears.2Turn to select “on” or “off”.3Push to enter the new setting.The standby display reappears.The message “–AutoAnswer–” isdisplayed on the standby display onlywhen you select “on” and the phone is inthe hands-free car kit.Setting all buttons to answer incoming calls [F45]You can have all buttons (except PWR) answer incoming calls by turningthis feature on.1Turn to select “Any KeyAnsw” from the Extras menu,then push .The Any Key Answ menu appears.2Turn to select “on” or “off”.3Push to enter the new setting.The standby display reappears.ANY KEY ANSW ON :Choices :To SetF45AUTO-ANSWER OFF :Choices :To SetF44My Phone-AutoAnswer- :Saved #s :FeaturesB2200 56-76draft3 8/21/98, 12:13 PM58](https://usermanual.wiki/Sony-Electronics/CMDB4/User-Guide-11875-Page-58.png)
![59AdvancedFeaturesSCRATCH PAD (enter number) :OptionsF46OPTIONS Enter Pause Store&Exit Enter LinkUsing the scratch pad [F46]Your phone has a scratch pad feature, which is useful for writing downphone numbers temporarily. The phone does not send DTMF toneswhen you enter digits to the scratch pad.1Turn to select “Scratch Pad” from theExtras menu, then push .The Scratch Pad display appears,prompting you to enter a phone number.2Use the number buttons to enter the digits.3Push .The Options menu appears. Besides storing digits, youcan enter hyphens, pauses and links (see page 27).4Turn to select “Store&Exit”,then push .The information is stored as a scratchpad entry in the Calls List. When theCalls List reaches more than 10 listitems, the oldest entries will be deletedas needed to make room for new entries.B2200 56-76draft3 8/21/98, 12:13 PM59](https://usermanual.wiki/Sony-Electronics/CMDB4/User-Guide-11875-Page-59.png)
![60You can restrict unauthorized access to yourphone and the information it holds. In addition, onthe Security menu, you can reset menu settings todefault and store emergency numbers. Unlikeother items on the Features menu, accessing theSecurity menu requires a lock code when youselect it from the Features menu.A typical default lock code is either the last fourdigits of your phone number or 0000.Preventing others from using your phone [F51]This option lets you set when the phone will be locked. When the phoneis locked, carrying out most operations requires entering the lock code,however, you can still answer incoming calls and dial 911 or otherstored emergency numbers.1Push to select “Lock Phone”from the Security menu.The Lock Phone menu appears.2Turn to select when the phone will belocked.You can select “never”, “on power-up” or “right now”. Ifyou select “never”, the phone is available for use at anytime without a lock code. If you select “on power-up”,the phone is locked every time you turn it on.3Push to enter the newsetting.The standby display reappears. Themessage “ :Unlock” indicates that thephone is locked.To unlock the phoneOn the standby display, push . When prompted, enter the lock code.SECURITY Lock Phone New Code Restrict #F51LOCK PHONE NEVER :Choices :To SetF51My Phone12:34P 12/25 :UnlockSecurity menuSECURITYEnter codefor access. CODE: ----F-5Setting security optionsvB2200 56-76draft3 8/21/98, 12:14 PM60](https://usermanual.wiki/Sony-Electronics/CMDB4/User-Guide-11875-Page-60.png)
![61AdvancedFeaturesSetting a new lock code [F52]The lock code must be entered every time you want to unlock the phoneand also when you want to access restricted numbers.1Turn to select “New Code”from the Security menu, thenpush .The Enter New Code display appearsprompting you to enter a new lock code.2Use the number buttons to enter a lock code.The lock code must be exactly four digits long.3Push to store the new lockcode in memory.A confirmation display appears.IMPORTANTKeep a record of your lock code. If you forget it, contact your serviceprovider.New lock code is 2345F52ENTER NEW CODE: ---- :Save CodeF52B2200 56-76draft3 8/21/98, 12:14 PM61](https://usermanual.wiki/Sony-Electronics/CMDB4/User-Guide-11875-Page-61.png)
![62Entry is nowUnRestrictedL15Restricting a Phone Book entry [F53]You can restrict access to individual Phone Book entries.1Turn to select “Restrict #” from theSecurity menu, then push .The following display appears,prompting you to specify the PhoneBook entry to be restricted.2Turn to select the Phone Book entry thatyou want to restrict.3Push to restrict the selectedentry.Now the selected entry is restricted.To unrestrict an entryFollow the procedure for restricting an entry onthe previous page to select the entry you want tounrestrict.Notes• The phone number of a restricted entry is not displayed when you viewthe Phone Book and make a call.• Restricted entries are not listed or displayed after a digit string search(see pages 34 and 53).• Calling, editing and erasing a restricted entry requires the four-digit lockcode.TipYou can also use the Options menu to restrict/unrestrict Phone Bookentries (see page 30). for all book entries or enter the location #.F53Entry is now RestrictedL15B2200 56-76draft3 8/21/98, 12:14 PM62](https://usermanual.wiki/Sony-Electronics/CMDB4/User-Guide-11875-Page-62.png)
![63AdvancedFeaturesRESTRICT ALL OFF :Choices :To SetF54Restricting all Phone Book entries [F54]You can restrict access to all Phone Book entries. All operations thatinvolve Phone Book entries require the four-digit lock code (see page 60).1Turn to select “Restrict All”from the Security menu, thenpush .The Restrict All menu appears.2Turn to set restriction of all Phone Bookentries on or off.3Push to enter the new setting.The standby display reappears.NoteIf you restricted some entries by using “Restrict #”, they are still restrictedwhen you turn off “Restrict All”.B2200 56-76draft3 8/21/98, 12:14 PM63](https://usermanual.wiki/Sony-Electronics/CMDB4/User-Guide-11875-Page-63.png)
![64Reverting to default settings [F55]You can reset all menu settings to the defaults. This does not affectPhone Book or Calls List entries.1Turn to select “Master Reset”from the Security menu, thenpush .The Master Reset display appears.2Press 1 to revert to the factorydefaults, or push to keep thecurrent settings.If you revert to the factory defaults, allyour custom menu settings are erased.Erasing all Phone Book entries [F56]You can erase all Phone Book entries at once.1Turn to select “Erase Book”from the Security menu, thenpush .The Erase Book display appears.2Press 1 to erase all Phone Book entries, orpush to quit without erasing.If you erase all entries, the followingdisplay appears.ERASE BOOK1:To ErasePhone Book :QuitF56 -erased-F56MASTER RESET1:To ResetAll Settings :QuitF55 -reset- F55B2200 56-76draft3 8/21/98, 12:14 PM64](https://usermanual.wiki/Sony-Electronics/CMDB4/User-Guide-11875-Page-64.png)
![65AdvancedFeaturesEMERGENCY #1 (empty) :Other #'s :Edit #F58Erasing all Calls List entries [F57]You can erase all Calls List entries at once.1Turn to select “Erase Calls”from the Security menu, thenpush .The Erase Calls display appears.2Press 1 to erase all Calls List entries, orpush to quit without erasing.If you erase all entries, the followingdisplay appears.Storing emergency numbers [F58]You can use the Security menu to store up to three emergency numbersother than 911 (which you cannot erase). You can call these numberseven when the phone is locked.1Turn to select “Emergency #”from the Security menu, thenpush .The first Emergency # display appears.2Turn to select the emergency memorylocation, then push .A message appears prompting you to enter the phonenumber for the emergency entry.3Use the number buttons to enter the number.4Push to store the emergency number.The entered emergency number is stored in memory. Tostore other emergency numbers, repeat the above procedure.To go back to the standby display, hold down CLR. -erased-F57ERASE CALLS1:To EraseCalls List :QuitF57B2200 56-76draft3 8/21/98, 12:14 PM65](https://usermanual.wiki/Sony-Electronics/CMDB4/User-Guide-11875-Page-65.png)
![66Setting display optionsYou can use the features on the Display menu tochange the appearance of the on-screen display.Setting the banner [F61]You can change what the banner reads.1Push to select “Banner” fromthe Display menu.The Banner display appears. The currentbanner text is displayed.2Push again to start editing.A message prompts you to enter a new banner.3Use the number buttons and to enter thenew banner text.The banner can be up to 12 characters long. For detailson character entry, see the “Alphanumeric table” onpage 20.4Push to save the new banner.The standby display reappears. Your new banner isdisplayed.DISPLAY Banner Backlight Auto-HyphenF61BANNER----SONY---- :EditF61Display menuB2200 56-76draft3 8/21/98, 12:14 PM66](https://usermanual.wiki/Sony-Electronics/CMDB4/User-Guide-11875-Page-66.png)
![67AdvancedFeaturesSetting the backlight [F62]You can adjust the duration of the backlight on the display and keypad.1Turn to select “Backlight”from the Display menu, thenpush .The Backlight menu appears.2Turn to select how long the backlight ison after the last press of a button.You can select “for 15 secs”, “for 7 secs” or “off”. If thephone is used in conjunction with a hands-free car kit, acigarette lighter adapter or a single- or dual-slot batterycharger, the added option of “always on” leaves thebacklight on.3Push to enter the new setting.The standby display reappears.TipYour phone has two backlight settings: one in charging mode and one inbattery mode. The factory setting for charging mode is “always on”. Forfaster charging, you may want to change the setting.BACKLIGHT FOR 7 SECS :Choices :To SetF62B2200 56-76draft3 8/21/98, 12:14 PM67](https://usermanual.wiki/Sony-Electronics/CMDB4/User-Guide-11875-Page-67.png)
![68Setting autohyphenation [F63]You can turn the autohyphenation feature on and off. If you turn it on,entered numbers are hyphenated according to the North AmericanNumbering Plan (eleven digits which include a long distance identifier,a three-digit area code, a three-digit community code and a four-digitlocation code, e.g., 9-999-999-9999).1Turn to select “Auto-Hyphen”from the Display menu, thenpush .The Auto-Hyphen menu appears.2Turn to select “on” or “off”.3Push to enter the new setting.The standby display reappears.Sorting the Phone Book [F64]You can determine how the Phone Book will be displayed and also setthe phone to sort the entries either alphabetically or by memory location.1Turn to select “Sort Book”from the Display menu, thenpush .The Sort Book menu appears.2Turn to set the sorting preferences.You can choose to sort the Phone Book “by Loc. #” (bylocation) or “alphabetic” (alphabetically).3Push to enter the new setting.The standby display reappears.SORT BOOK BY LOC. # :Choices :To SetF64AUTO-HYPHEN ON :Choices :To SetF63B2200 56-76draft3 8/21/98, 12:14 PM68](https://usermanual.wiki/Sony-Electronics/CMDB4/User-Guide-11875-Page-68.png)
![69AdvancedFeaturesMENU LENGTH LONG :Choices :To SetF66Setting your phone’s language [F65]See page 20 for information regarding the Language selection menu.Setting the menu length [F66]You can set the menu length (long or short). The short menu displaysonly the most common items on the Features menu; the long menudisplays all items.1Turn to select “Menu Length”from the Display menu, thenpush .The Menu Length menu appears.2Turn to set the menu length.You can select “short” or “long”.3Push to enter the new setting.The standby display reappears.Items on the short menuThe short menu contains the following items:• Ringer Vol. (see page 41)• My Number (see page 48)• Saved #s (see pages 31, 33, 36)• Lock Phone (see page 60)• Long Menu (see pages 86)NoteThe item “Saved #s” contains the items “Find Name” (see page 33), “PhoneBook” (see page 31) and “Calls List” (see page 36).To return to the long menuOn the short menu, turn to select “Long Menu”, then push .B2200 56-76draft3 8/21/98, 12:14 PM69](https://usermanual.wiki/Sony-Electronics/CMDB4/User-Guide-11875-Page-69.png)
![70NETWORK Roam Alert Drop Alert Priv. AlertF71Network menuNETWORK Set Analog Roam Alert Drop AlertF71SET ANALOG Automatic :Choices :To SetF71Roaming rate appliesDigitalFeatures OffAdjusting network settingsOn the Network menu, you can set the phone toalert you when the roaming status changes, whena call is dropped, or when enhanced voice privacyis lost. You can set how NAM’s (NumberAssignment Modules) are switched, and alsoactivate new services. NAM’s are phone identifiernumbers associated specifically with your phone.For example, you may have both a business phonenumber and also a personal phone numberassociated with your phone.Setting the phone’s mode [F71]You can determine whether your dual-band phone switches to analogmode when you roam off the Network. You have three options:• Automatic (digital or analog) searches for digital service first, thenanalog service if digital could not be found.• Disabled (digital only).• Until OFF (analog only until phone is turned off).1Push to select “Set Analog”from the Network menu.The Set Analog menu appears.2Turn to select “disabled”,“until OFF”, or “automatic”.3Push to enter the new setting.A message appears corresponding to themode selected. After a moment, the“Looking for Service” screen is displayed.When service has been established, aservice area message is displayed followed by thestandby screen.B2200 56-76draft3 8/21/98, 12:14 PM70](https://usermanual.wiki/Sony-Electronics/CMDB4/User-Guide-11875-Page-70.png)
![71AdvancedFeaturesROAM ALERT OFF :Choices :To SetF72 Entering Roam Service Area Leaving Service AreaMy PhoneAnalog Roam :Saved #s :FeaturesSetting the roaming alert [F72]Your phone is roaming when you use it outside of the home area.Roaming access to a different carrier and the types of calls you can makevaries with the agreement between your “home” carrier and the currentserving carrier. Check with your service provider for details aboutroaming in a specific area.1Push to select “Roam Alert”from the Network menu.The Roam Alert menu appears.2Turn to select “on” or “off”.3Push to enter the new setting.The standby display reappears.When you enter another service areaThe roaming icon (R) appears on the display. Abeep accompanies the icon if you have turned theroam alert on.If you leave any valid service areaThe following display appears, indicating that youare outside the area serviced by your “home”carrier or other valid service areas. The out-of-service icon ( ) also appears.If you are in an analog roaming areaThe message “Analog Roam” is displayed on thestandby display. This message indicates that youare outside your home area, and that you are in ananalog service area.B2200 56-76draft3 8/21/98, 12:14 PM71](https://usermanual.wiki/Sony-Electronics/CMDB4/User-Guide-11875-Page-71.png)
![72DROP ALERT OFF :Choices :To SetF73Time: 1:30SIGNAL FADED Please Try Again.Setting the drop alert [F73]If the signal fades, your phone may drop the ongoing call. You canchoose to be alerted by an audible alarm when a call is dropped.1Turn to select “Drop Alert”from the Network menu, thenpush .The Drop Alert menu appears.2Turn to select “on” or “off”.3Push to enter the new setting.The standby display reappears.When a call is droppedThe following display appears. A beep will soundif you have turned the drop alert on.B2200 56-76draft3 8/21/98, 12:14 PM72](https://usermanual.wiki/Sony-Electronics/CMDB4/User-Guide-11875-Page-72.png)
![73AdvancedFeaturesSetting the voice privacy alert [F74]A display appears to indicate if enhanced voice privacy is lost during acall. You can choose to have an audible alarm accompany this display.1Turn to select “Priv. Alert”from the Network menu, thenpush .The Priv. Alert menu appears.2Turn to select “on” or “off”.3Push to enter the new setting.The standby display reappears.If enhanced voice privacy is lostA display appears advising you that enhancedvoice privacy is not available. A beep will sound ifyou have turned the voice privacy alert on.When enhanced voice privacy is regainedA display appears notifying you that enhancedvoice privacy is once again available. A beepaccompanies the display when enhanced voiceprivacy is regained and you have turned the voiceprivacy alert on.NoteThe network automatically turns on enhanced voice privacy if it isavailable. You do not have to change your phone settings. For details,contact your service provider.PRIV. ALERT OFF :Choices :To SetF74Time: 1:30Enhanced Privacy is available-P-B2200 56-76draft3 8/21/98, 12:14 PM73](https://usermanual.wiki/Sony-Electronics/CMDB4/User-Guide-11875-Page-73.png)
![74AUTO-N.A.M. OFF :Choices :To SetF75SET-N.A.M. 1 NAM #1 :Choices :To SetF76Switching NAM’s automatically [F75]Your phone allows you to store up to two NAM’s (Number AssignmentModules). To add or remove NAM’s, contact your service provider whowill change the NAM’s for you. You can set the phone to switch betweenthem automatically. The phone switches from one NAM to the other if itenters a service provider’s coverage area that matches one of your NAMsettings. To switch manually, see “Switching NAM’s manually” below.1Turn to select “Auto-N.A.M.”from the Network menu, thenpush .The Auto-N.A.M. menu appears.2Turn to set automatic switching on or off.3Push to enter the new setting.The standby display reappears.Switching NAM’s manually [F76]If automatic switching is turned off, you can configure the phone formanual switching between the two NAM’s. You must switch from oneNAM to the other if the phone enters a service provider’s coverage areathat matches the other NAM setting. To set the phone to switchautomatically, see “Switching NAM’s automatically” above.1Turn to select “Set-N.A.M.”from the Network menu, thenpush .The Set-N.A.M. menu appears.2Turn to switch between the two NAM’s.The display alternately shows the name and the numberof the selected NAM.3Push to enter the new setting.The standby display reappears.B2200 56-76draft3 8/21/98, 12:14 PM74](https://usermanual.wiki/Sony-Electronics/CMDB4/User-Guide-11875-Page-74.png)
![75AdvancedFeaturesTime: 0:01 Activation <star code>Time: 4:20 Activationhas failed :RetryAttempt to activate Block A?1:YesF77ACTIVATION on Block A :Choices :To SetF77Searching...Activation <star code>F77Activating phone services (OTASP) [F77]You can use the OTASP (Over-The-Air Service Provisioning) activationfeature to self-activate your phone with a new service. Contact yourservice provider to see if this service is available in your area.1Turn to select “Activation”from the Network menu, thenpush .The Activation menu appears.2Turn to select which system block toactivate the service on, then push .The following display appears,prompting you for confirmation. To goback one step, press CLR. To cancelactivation and return to the standbydisplay, press END.3Press 1 to confirm.The phone calls up a service provider.When a service provider is contacted, thefollowing display appears, and you areconnected to an operator. Whenactivation is complete, the confirmationdisplay appears followed by the standbydisplay.If activation failsThe following display appears. Push to retry,or press END to return to the standby display.B2200 56-76draft3 8/21/98, 12:14 PM75](https://usermanual.wiki/Sony-Electronics/CMDB4/User-Guide-11875-Page-75.png)
![76System Preference [F78]Activate the “Home Only” option to ensure that while you are in yourhome system area, your phone will bypass any other system’s signalthat may be stronger than your home system’s signal. This option willhelp you to avoid higher costs or other calling problems.1Turn to select “System Pref.”from the Network menu, thenpush .The System Pref. menu appears.2Turn to select “Standard” or “HomeOnly”.3Push to enter the new setting.The standby display reappears.NETWORK Activation Force Call System PrefF78B2200 56-76draft3 8/21/98, 12:14 PM76](https://usermanual.wiki/Sony-Electronics/CMDB4/User-Guide-11875-Page-76.png)