Sony Electronics CMSB200 Dual-Band (Analog/PCS) Phone (AMPS/CDMA) User Manual
Sony Electronics Inc Dual-Band (Analog/PCS) Phone (AMPS/CDMA) Users Manual
UserManual.wiki
>
Sony Electronics
>
CMSB200 User Manual
Users Manual
Navigation menu
Upload a User Manual
Namespaces
Wiki Guide
HTML
PDF
Info
Views
User Manual
Discussion / Help
Navigation


![16Quick Tips and FeaturesHere is a list of your phone’s features which simplify your calling experience.MAKING CALLSCalling displayed phonenumbersSpeed dialingTouch dialingAutomatic redialSearching for a phonenumber to callMuting the microphoneCall prefixingViewing long phonenumbersEmergency numbers• Push SEND to call a phone number anytimeit’s displayed on the screen.• Your phone is able to speed dial phonenumbers stored in your Phone Book:Enter the memory location number andpress [send].• Your phone is able to dial at the touch ofthe memory location number: Enter the memory location number, butkeep pressure on the last digit untilconnecting appears on the display.• Need to get through to a difficult number?Set your phone to automatically redial untilsuccessful!• There are several ways to search for aphone number:- Scroll through your entire Phone Book orCalls List- Quick alphabetic search- Alphabetic search- Number search• Push and hold Jog Dial to quickly mute andunmute the microphone during a call.• Quickly add a prefix to local numbersstored in your Phone Book. This is helpfulwhen you’re traveling outside your areacode.• If a number is too long to fit on the screen,view the overflow digits by selecting ViewNumber on the Options menu.• You can call 911 and your three storedemergency numbers even if your phone islocked or calls are limited.SB200 12-21 navigate 4/9/99, 2:21 PM16](https://usermanual.wiki/Sony-Electronics/CMSB200/User-Guide-39905-Page-16.png)
![17NavigatingRECEIVING CALLSAnyKey AnswerSetting your phone toanswer callsautomaticallyMuting the ringer•You can set your phone to answerincoming calls with any key except PWR.• A Hands-Free Car Kit ia a handyaccessories that allows you to set yourphone to answer calls automatically onthe second ring.• Quickly mute the ringer by turning JogDial down or pressing the [end] key.SB200 12-21 navigate 4/9/99, 2:21 PM17](https://usermanual.wiki/Sony-Electronics/CMSB200/User-Guide-39905-Page-17.png)
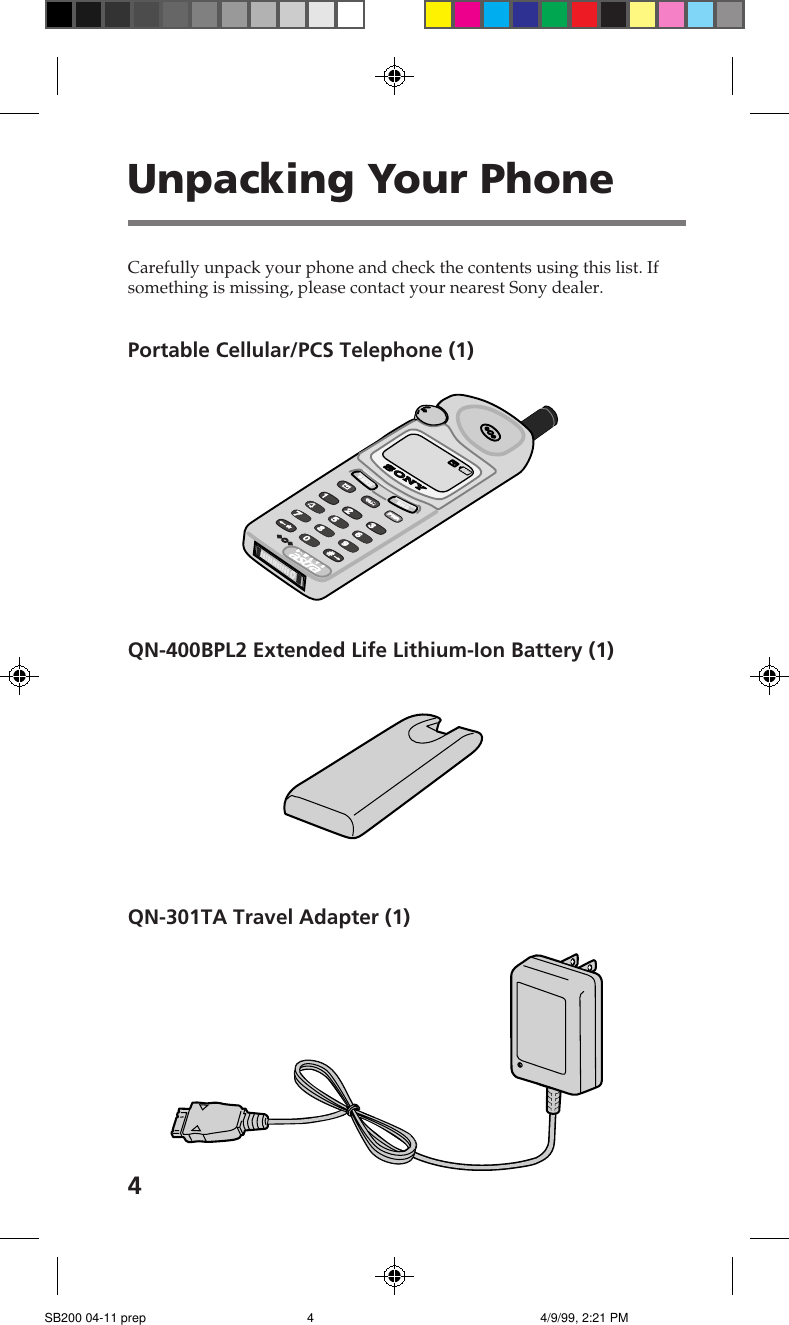
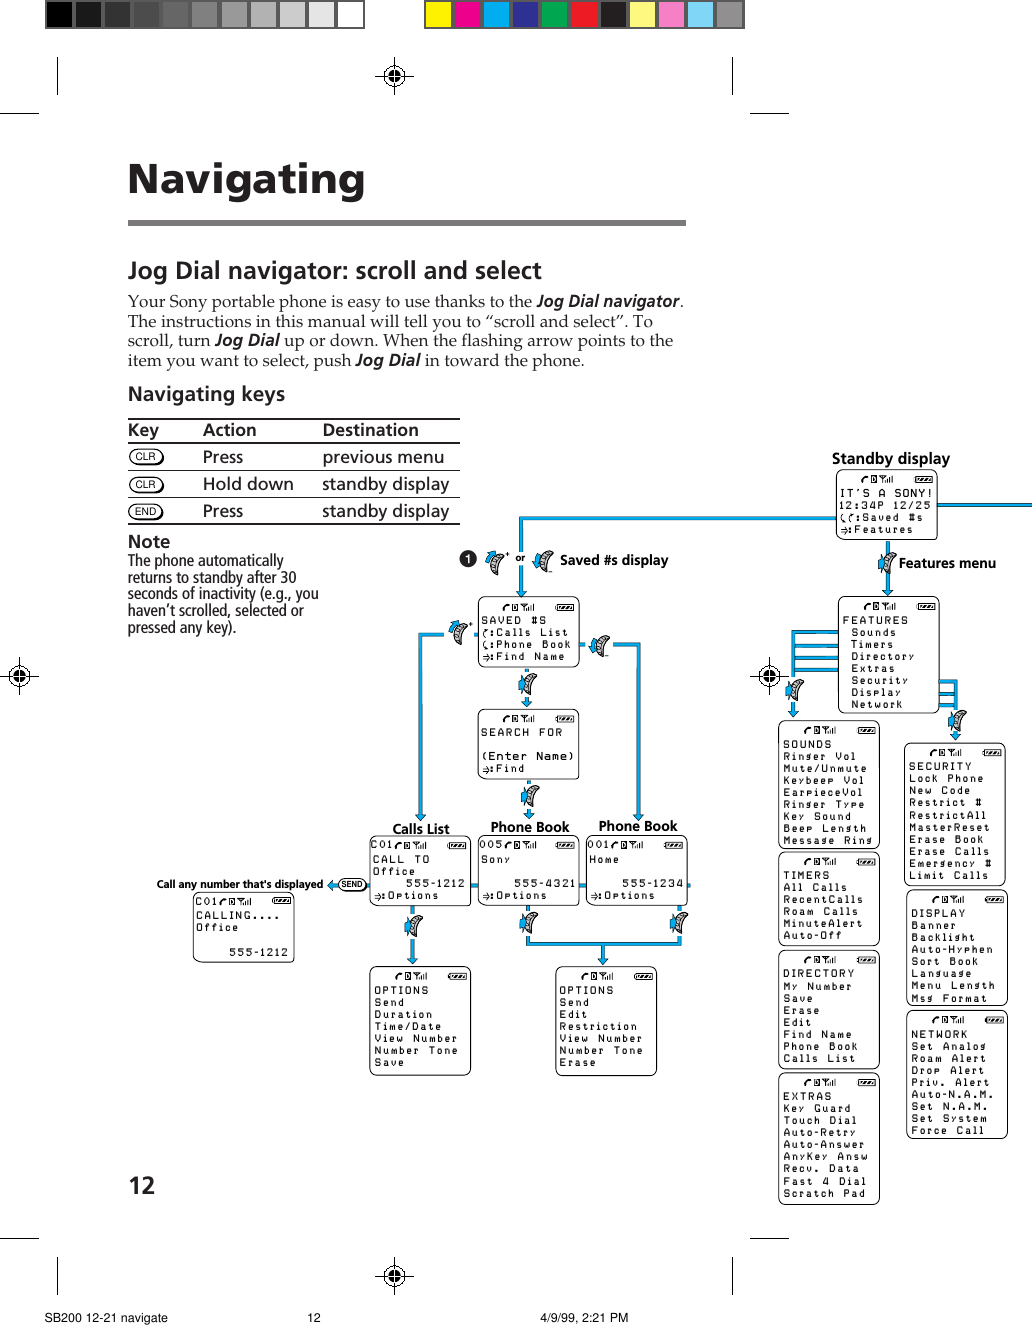
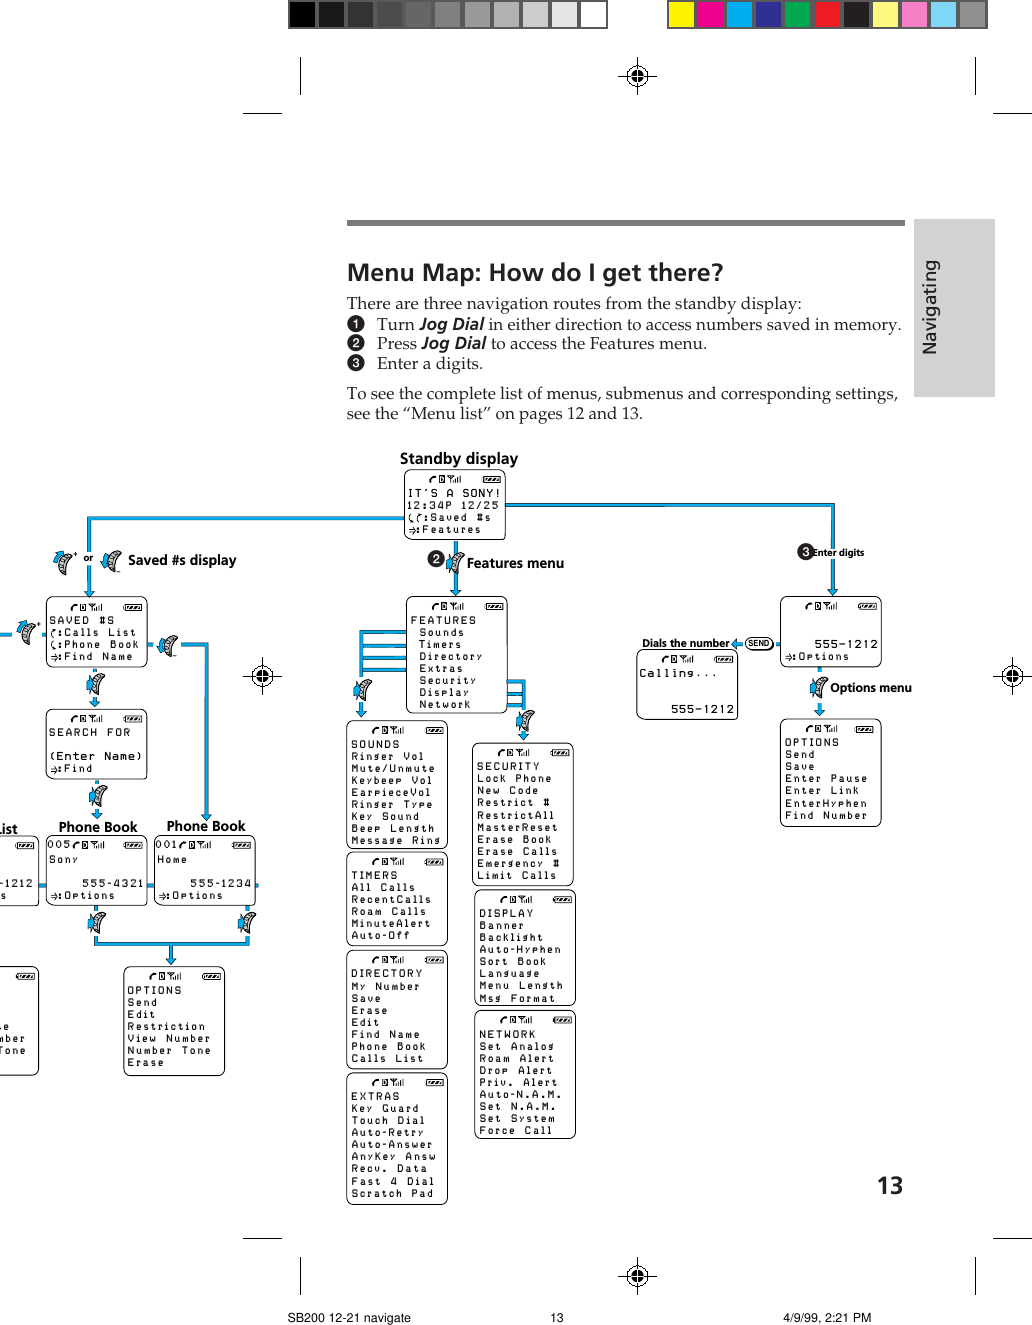
![18PHONE FEATURES and FUNCTIONSNavigatingStored informationBacklight• Quick menu accessEach menu item can be accessed quicklyfrom the standby display by pushing JogDial, entering the menu item number, thenpressing Jog Dial again.• Previous menuPress [clr] to quickly go back to theprevious menu.• Return to standbyPress [end] or hold down [clr] to quicklyreturn to standby.The display automatically returns tostandby after 30 seconds of inactivity.• Phone Book (permanent storage ofinformation)Your phone can store up to 199 entries.You can make calls from your Phone Book.You can view your Phone Book from thestandby display or the Directory menu.• Calls List (temporary information)Your phone stores a list of your 10 mostrecent calls.You can make calls from your Calls List.You can save information from your CallsList to your Phone Book.You can view the Calls List from thestandby display or from the Directory menu.• DTMF signalsYou can store DTMF signals in your PhoneBook and send them automatically.• Your phone has two backlight settings: onein charging mode and one in battery mode.For faster charging while in charging mode,you may want to change the setting fromalways on (which is set at the factory).• You can activate the backlight whileKeyGuard is on:Push and hold Jog Dial.SB200 12-21 navigate 4/9/99, 2:21 PM18](https://usermanual.wiki/Sony-Electronics/CMSB200/User-Guide-39905-Page-18.png)
![19Navigating• Turn Jog Dial up or down to quickly adjustthe earpiece volume during a call.• Turn Jog Dial up or down to quickly adjustthe ringer volume while the phone isringing.• Turn Jog Dial down or press [end] when thephone is ringing to mute the ringer.• Press and hold Jog Dial to mute themicrophone during a call.• Push and hold Jog Dial to quickly lock thekeypad.• You can lock the keypad even when thephone itself is locked.• The keypad unlocks when you answer acall then relocks when the call is finished.• Keyguard prevents the keys fromaccidentally being pushed. This isparticularly helpful when you transportyour phone.• Lock phone prevents anyone from usingyour phone unless a security code isentered. This is important not only toensure phone calls are made with yourpermission, but also to ensure the privacyof information contained in your phone’smemory.• Limit calls doesn’t lock the keys or thephone, but allows you to limit the calls thatcan be made from your phone.VolumeLocking the keypadKeyguard vs lock phonevs limit callsSB200 12-21 navigate 4/9/99, 2:21 PM19](https://usermanual.wiki/Sony-Electronics/CMSB200/User-Guide-39905-Page-19.png)
![32Searching the Phone BookInformation stored in your Phone Book is sorted either alphabetically (thefirst character of the memory location) or numerically by memory locationnumber. So, one way to search your Phone Book is to simply scroll usingthe Jog Dial. No matter how your Phone Book is sorted, you can findinformation quickly by searching alphabetically, by memory location orphone number. Once a Phone Book entry is displayed, you can call it bypressing SEND or Jog Dial twice.Searching your Phone Book alphabeticallyQuick alphabetic Phone Book recallIf your Phone Book is sorted alphabetically, you can search using thephone’s keypad. For example, when viewing your Phone Book, press [2]and entries that begin with “A” are displayed. Press [7] four times todisplay entries that begin with “S”. If no entries that begin with thatletter, it looks for the next letter on the key. If there aren’t any entries forany of the letters on the key, it searches for the first letter of the next key.Once the phone displays an entry, you can use Jog Dial to scroll up ordown from there.Alphabetic searchYou can search alphabetically using as little as 1 character or as many as12 characters. Search from standby mode or from the Directory menu.From standby mode1 Turn Jog Dial once toselect Saved #s.2 Push Jog Dial to selectFind Name.A message prompts you for asearch string.From the Directory menu1 Scroll and select Directoryfrom the Features menu.2 Scroll and select FindName.A message prompts you for asearch string.3 Enter the first character of the name you want to find (twoor more consecutive characters is best), then push Jog Dial.• If you entered only one character, all Phone Book entries thatbegin with that character are displayed alphabetically.• If you entered two or more characters, all Phone Book entriesthat contain those consecutive characters are displayed startingfrom the lowest memory location number.4 Scroll to view the list of matched character(s).SB200 29-36 phonebook 4/9/99, 2:21 PM32](https://usermanual.wiki/Sony-Electronics/CMSB200/User-Guide-39905-Page-32.png)