Sony Group 14798212X Wireless LAN Module User Manual TDM NC1
Sony Corporation Wireless LAN Module TDM NC1
UserManual.wiki
>
Sony Group
>
14798212X User Manual
Manual
Navigation menu
Upload a User Manual
Namespaces
Wiki Guide
HTML
PDF
Info
Views
User Manual
Discussion / Help
Navigation
![Getting Started11GBThe “M-crew Server SETUP” window will appear.1) Click to display the M-crew Server Installation instructions.2) Click to start up the WLAN Setup Assistant.3) Click to display the TDM-NC1 Operating Instructions (this manual).Notes• If the window does not open, double-click the CD-ROM Setup.exe icon.• When the installation is still in progress, do not interrupt the operation or take CD-ROM out of the CD-ROM drive. Doing so may render it impossible to install the software thereafter.The “Auto Play” window appears, click [Run setup.exe] to install the program. Then, the “User Account Control” (UAC) window appears, click [Allow]. If you click [Cancel], you will not be able to start the installation.3Select the language to be used.4Click [M-crew Server setup].The installation starts. Follow the on-screen instructions.Notes• If “.NET Framework” (2.0 or higher) is not installed on your computer, the “.NET Framework Installer” window appears. Click [Install] to install “.NET Framework 2.0” and follow the displayed instructions.• A warning window may appear during installation of Windows Media Format SDK 9.5.To continue installing, click [OK]. For details, refer to the Mcrew Server Installation instructions “Installing M-crew Server”.5After the installation is completed, click [Reboot] to restart your computer.After restarting your computer, the “AUTO LINK FOLDER SETUP” window appears automatically.For Windows Vista users341)2)3)](https://usermanual.wiki/Sony-Group/14798212X/User-Guide-783890-Page-11.png)
![12GBWhen the AUTO LINK FOLDER settings are completed, all supportable music files in the folder and the sub folder that exist on the path indicated in the window are automatically imported to M-crew Server.If many songs are stored on your computer, loading time may take longer.NoteIf the “AUTO LINK FOLDER SETUP” window does not automatically appear after rebooting, click [Start] - [All Programs] - [Mcrew Server] - [TOOLS] – [AUTO LINK] in that order. In this case, [Next] and [Skip] become [OK] and [Cancel].1Click to place a check next to the directory path that contains the files to be loaded.Click again to remove checks next to paths that are not to be loaded.TipSub-folders of the selected folder are also subject to the AUTO LINK function.2Click [Next].The music files located in the checked directory path(s) are loaded automatically.The “User Account Control” (UAC) window appears, click [Allow]. If you click [Cancel], you will not be able to start the installation.NoteAll supportable music files that exist in the path indicated in the window are automatically imported to M-crew Server.If the “Windows Security Alert” window appearsClick [Unblock] to unblock the program.Make sure that the “M-crew Server task tray icon” appears in [Name], then click [Unblock]. If you click [Keep Blocking], you will be unable to use M-crew Server. For details, refer to “Registering the TDM-NC1 on your computer manually” in the M-crew Server Installation instructions.In some cases, the “Windows Security Alert” window appears in “STEP 4: Making the Windows Firewall Settings” (page 13).STEP 3: Making the AUTO LINK FOLDER SettingsFor Windows Vista users](https://usermanual.wiki/Sony-Group/14798212X/User-Guide-783890-Page-12.png)
![Getting Started13GBThis setting opens the Windows Firewall so you can enjoy music files stored on your computer via the unit.The “ICF SETTINGS” window appears.NoteIf the “ICF SETTINGS” window does not automatically appear, click [Start] – [All Programs] - [Mcrew Server] - [TOOLS] - [ICF Settings] in that order.The “User Account Control” (UAC) window appears, click [Allow]. If you click [Cancel], you will not be able to start the installation.1Click [Enable].“Enable” or “Disable” appears for each item. If “Disable” appears, click [Enable] repeatedly until “Enable” appears for all status items.2Click [Close].The “Security software Firewall setting guide” window appears automatically.If commercially available anti-virus software is installed on your computer, this setting opens the Firewall.The “Security software Firewall setting guide” window appears.If the security software is not installed on your computer, click [Close] then go to STEP 6.1Click your security software.The web browser is activated, and the setting guide of your security software appears. If your security software is not on the list, click [Other security software].NoteTo display the guide (web browser), your computer needs to be connected to the Internet.2Follow the on-screen message.NoteAfter installing the M-crew Server, the task tray icon appears on the taskbar (page 35).STEP 4: Making the Windows Firewall SettingsFor Windows Vista usersSTEP 5: Making the Security Software Firewall Settings](https://usermanual.wiki/Sony-Group/14798212X/User-Guide-783890-Page-13.png)
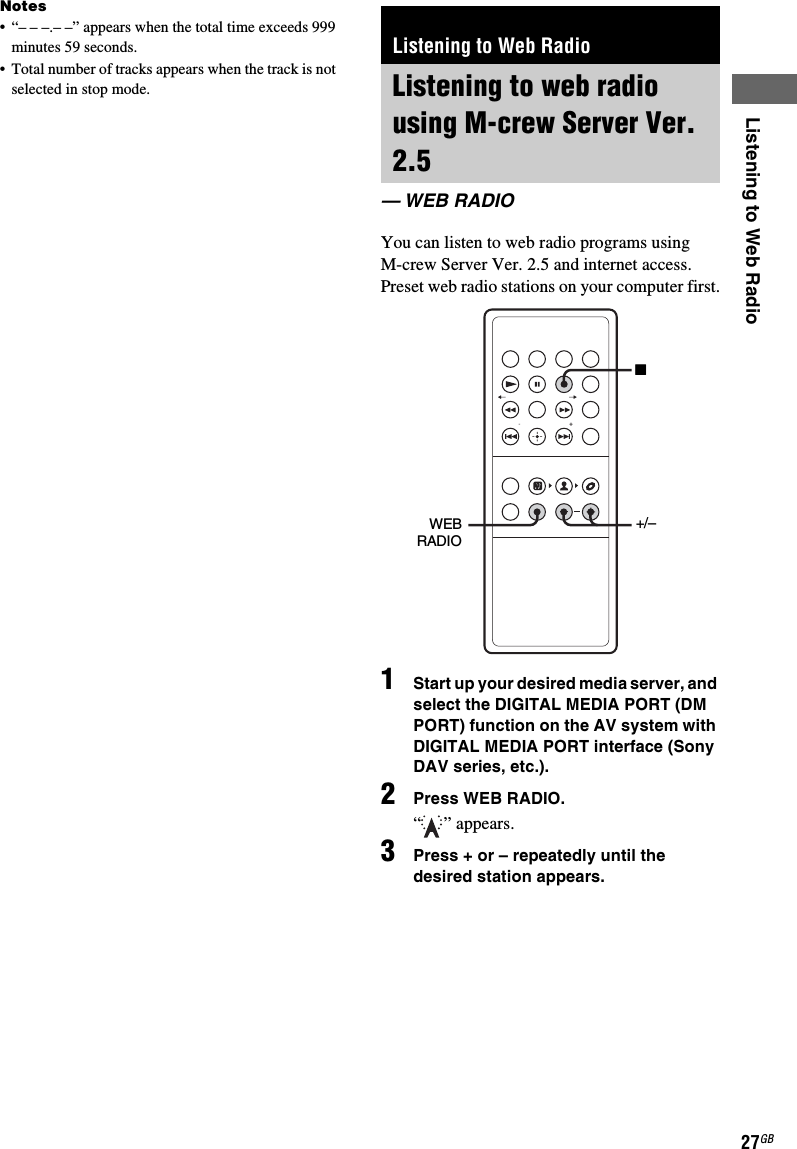
![18GBCase C: Wireless connection (setting up by the computer)1Connect the unit to the network using a wired connection.Connect the unit to your wireless LAN router (hub) or directly to the LAN port of the computer. Use the network cable (not supplied). Check that the WIRELESS/WIRED selector on the unit is set to WIRED.Notes• When using the unit with a fixed IP address, refer to “Advanced Network Settings” (page 30).• When connecting the unit to the computer directly, set the IP address of computer to “Automatic Private IP Addressing”. After turning on the computer, “Configuring” appears in the unit display window for a few minutes.• In some cases, a message indicating that the connection is limited, or not available, will appear in the lower right portion of the computer; however, the unit will operate normally.2Turn on the AV system, and set the AV system’s function to DMPORT.3Confirm the settings of your wireless system.Check the following items of your wireless LAN router to set the same information for the TDM-NC1.SSID: _________________________________Security mode: ________________________Key: __________________________________Key No. (when using WEP): ____________Tips• For details on how to check the wireless LAN router settings, refer to the operation manual of your wireless LAN router.• In some case, SSID name and wireless network key numbers/characters are written on the wireless LAN router.• Check that your wireless LAN router uses the latest firmware version. For details, refer to the operation manual of your wireless LAN router.4Press MENU.5Press . or > repeatedly until “SETUP BY PC?”appears, then press ENTER.The IP address appears in the display.6Start up the “WLAN Setup Assistant” on your computer.Select [Start] - [All Programs] - [M-crew Server] - [TOOLS] - [WLAN Setup Assistant].7Press [NEXT].Wait a moment for Internet Explorer to start up.NoteIf the web browser (Internet Explorer) does not start up automatically, start up the web browser manually, and enter the IP address displayed on the unit in the address bar of the web browser.8Enter the word “root” in the box marked “User name”. Leave the box marked “Password” blank, and click [OK] to login.9Select the language.WIRELESSWIREDNetwork cable (not supplied)To wireless LAN router (hub)To LAN portWIRELESS/WIRED selector](https://usermanual.wiki/Sony-Group/14798212X/User-Guide-783890-Page-18.png)
![Getting Started19GB10 Click “Wireless LAN Setup” in the Menu on your computer.11 Enter the SSID, Security mode and wireless network key that you checked in step 1, and click [Setup].Tips• When using wireless network key (WEP Key), check that the wireless LAN router Key No. and the above setting match.• In most cases, only one wireless network key (WEP Key) number is required, in which case add this to “WEP Key No. 1”.12 Click “Restart Audio Client” in the Menu.13 Click [Restart].14 Set the WIRELESS/WIRED selector to WIRELESS.Go to STEP 8 (page 19).1Make sure the display message of the unit.The message “Configuring” appears, then “Loading” follows and then disappears. Go to step 4.If “SERVER?” appears, go to step 2.Notes• If “Check Net” appears, check the network settings in STEP 7. Or, the wireless signal may be weak or out of range, move the unit closer to the wireless access point.• If “No Server” appears, do the following;– Make sure the Firewall setting are correct.– Restart the M-crew Server software.– Restart your computer.– Execute “DataBaseClear.exe” to initialize the database (usually located in C:\Program Files\Mcrewserver).– Input the wireless network key numbers/characters again.• If the “Configuring” or “Loading” messages do not disappear after a few minutes, or other messages mentioned above appear, see page 34.2Press ENTER.STEP 8: Checking the Operation./>ENTER+/–N](https://usermanual.wiki/Sony-Group/14798212X/User-Guide-783890-Page-19.png)
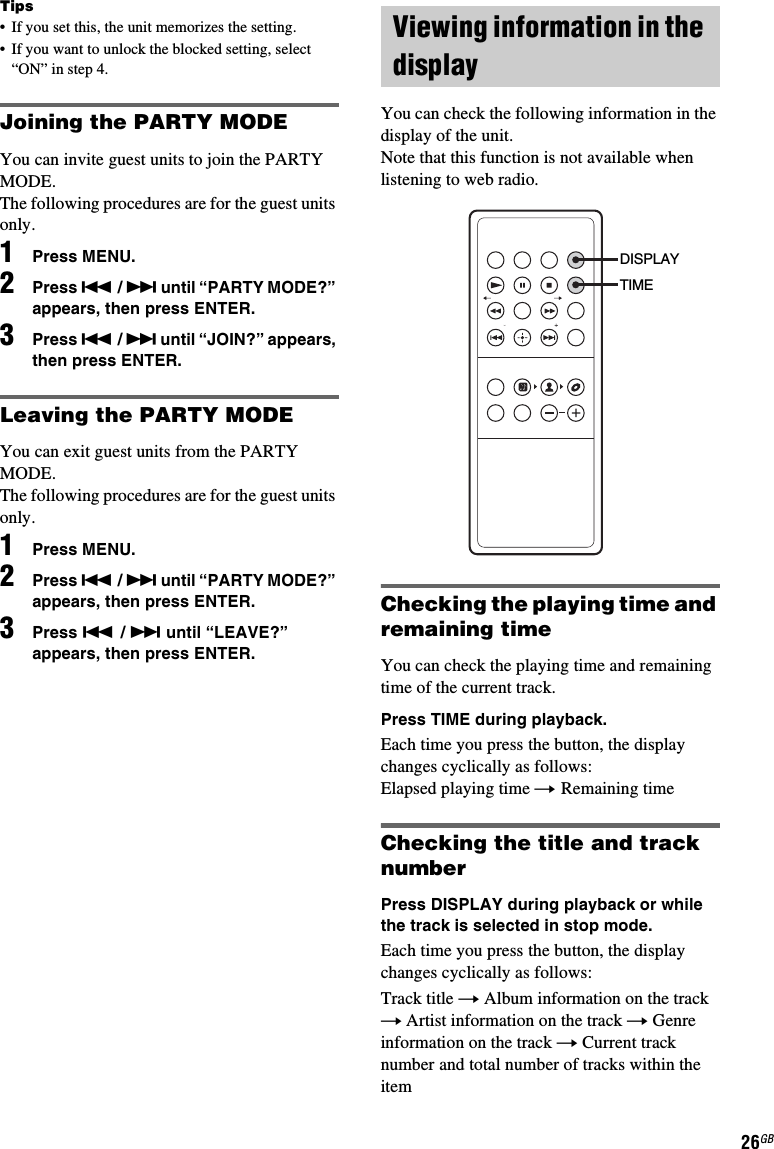
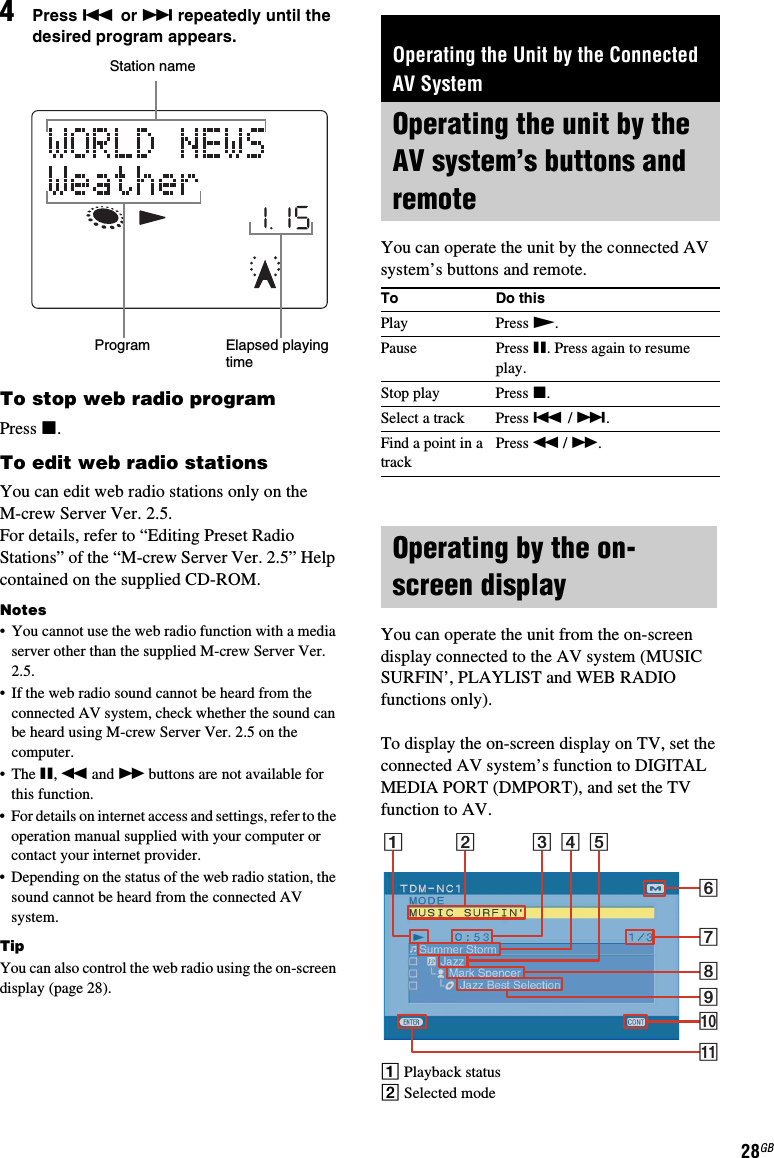
![Operating the Unit by the Connected AV System29GB3Elapsed time4Track name5Genre name6M-crew server status (this icon appears during connecting M-crew Server)7Currently playing track number/total number of tracks8Artist name9Album nameq; Current settings (SHUF: Shuffle, CONT: Continue, : Repeat all, : Repeat one)qa Album nameTo enjoy MUSIC SURFIN’ using the on-screen display1Press X/x to select [MODE].2Press ENTER to open the list.3Press X/x to select [MUSIC SURFIN’] from the list, then press ENTER.4Press X/x to select search criteria (GENRE, ARTIST or ALBUM).5Press ENTER to open the list.6Press X/x to select a desired item.7Press ENTER to start playback.To enjoy PLAYLIST using the on-screen display1Press X/x to select [MODE].2Press ENTER to open the list.3Press X/x to select [PLAYLIST] from the list, then press ENTER.4Press X/x to select desired playlist.5Press ENTER to start playback.NoteYou cannot edit playlists using the on-screen display.To enjoy WEB RADIO using the on-screen display1Press X/x to select [MODE].2Press ENTER to open the list.3Press X/x to select [WEB RADIO] from the list, then press ENTER.4Press X/x to select desired web radio program.5Press ENTER to start the program.NoteYou cannot edit web radio programs using the on-screen display.To Do thisMove a cursor Press X/x.Confirm Press ENTER.Cancel Press RETURN.](https://usermanual.wiki/Sony-Group/14798212X/User-Guide-783890-Page-29.png)
![32GBWhen the unit is connected to your computer after installing the M-crew Server Ver. 2.5 software, the unit is registered automatically on your computer.Register the unit on your computer manually for higher security.1Select “REGISTER?” in the network menu (page 30), then press ENTER.The count down display appears in the display of the unit.2Click [Start] – [All programs] – [M-crew Server] – [TOOLS] – [EQUIPMENT LIST] in that order to display the screen on the M-crew Server Ver. 2.5.For details, see the “M-crew Server Ver. 2.5” Installation instructions included on the supplied CD-ROM.3During displaying the count down display, set “Equipment selection mode” to “Manual”, and then click [Add] on your computer.The registration starts.“Complete!” appears in the display of the unit when the registration is completed.Notes• When the registration is incomplete, “Incomplete!” appears in the display of the unit.• Step 3 must be performed within 5 minutes after performing step 1.1Select “NET INFO?” in the network menu (page 30), then press ENTER.2Press . or > repeatedly to select the item that you want to check, then press ENTER.Each time you press ENTER, the display changes cyclically as follows:NET TYPE? t AUTO* t IP ADDRESS? t IP address* t SUBNET MASK? t Subnet mask* t GATEWAY? t Default Gateway* t MAC ADDRESS? t MAC address t SERVER NAME? t Connected server* t MY NAME? t Name assigned** The display may differ depending on the settings.Registering the TDM-NC1 on your computer manuallyChecking network settings](https://usermanual.wiki/Sony-Group/14798212X/User-Guide-783890-Page-32.png)
![34GB• Make sure not to place the unit too far from the wireless LAN router.• Check your wireless LAN connection environment. You cannot use CH 12 and 13 (for European customers).• If the electric wave is crossed with other wireless LAN waves, change the wireless channel.• Check for obstacles (metallic wall, etc.) installed between the wireless access point and the unit. These obstacles shorten the wave’s reach length.• When using the PARTY MODE, using IEEE802.11g (wireless)/100BASE-TX (wired) for LAN connection is suggested.If the unit still does not operate properly after performing the above measures, reset the unit as follows:While the unit is ‘on’ (the unit is connected to an AV system), press RESET on the bottom of the unit using a fine-tipped tool (e.g. pencil, etc.).The unit is reset to the factory settings. You should set the settings you made.If a message appears while using the unit, follow the procedures below to correct the problem.NetworkCannot Play• Start up M-crew Server Ver. 2.5 and click [ERROR LOG] in the LAUNCHER window, or right-click the M-crew Server task tray icon* and select “ERROR LOG VIEWER”, then check the error log.• The track cannot be played in the following cases:– Sampling rate is other than 32 kHz, 44.1 kHz, 48 kHz.– The track is not being streamed by linear PCM.– The track is other than one channel or two channel.– The track sampling bits are other than 16 bits.– The server status is busy.Check Net• Check that the network cable between the unit and the hub or router is firmly connected.• Check that the hub or router is turned on.• Set the wireless LAN router channel to any channel from CH1 to CH11. For details, refer to the operation manual of your wireless LAN router.IP Conflict• Set the IP addresses of the unit and other devices on the network so that there is no duplication (page 31).No Item• Register the track as instructed by the operation manual of the connected server.• Follow the procedure below and reconnect to the server.1. Press MENU.2. Select “SERVER?” in the network menu (page 30), then press ENTER.3. Press ./> repeatedly to select the desired media server, then press ENTER.Messages](https://usermanual.wiki/Sony-Group/14798212X/User-Guide-783890-Page-34.png)
![Troubleshooting35GBNo Server/No response• Restart the computer.• Check the WIRELESS/WIRED selector on the unit.• Start up the server. M-crew Server Ver. 2.5 can be started up by the following method:Right-click the M-crew Server task tray icon*, then click [Start Music Service] in the menu.• M-crew Server Ver. 2.5 may not be recognizing the unit. Follow the procedure below and check whether M-crew Server Ver. 2.5 is recognizing the unit:1. Click [Start] – [All Programs] – [M-crew Server] – [TOOLS] – [EQUIPMENT LIST] in that order.2. If the unit is not present in the list that appears in step 1, device registration must be performed. For details, see the “M-crew Server Ver. 2.5” Help or “M-crew Server Ver. 2.5” Installation instructions within M-crew Server Ver. 2.5.• When setting a firewall other than that provided with the OS, refer to Troubleshooting in the “M-crew Server Ver. 2.5” Installation instructions included on the supplied CD-ROM.• Perform the TCP/IP settings and wireless settings correctly for the unit and the computer (page 31).• You may not have input the correct wireless network key. Try to input the wireless network key numbers/characters again.Press MENU• Follow the procedure below and reconnect to the server.1. Press MENU.2. Select “SERVER?” in the network menu (page 30), then press ENTER.3. Press ./> repeatedly to select the desired media server, then press ENTER.Server Err• Follow the procedure below and reconnect to the server.1. Press MENU.2. Select “SERVER?” in the network menu (page 30), then press ENTER.3. Press ./> repeatedly to select the desired media server, then press ENTER.Server Close• Start up the server. M-crew Server Ver. 2.5 can be started up by the following method:Right-click the M-crew Server task tray icon*, then click [Start Music Service] in the menu.• When you want to change the computer’s network settings, restart the server on your computer. This message disappears after a short time.WebRadio Err• Register a station that can be played back on M-crew Server Ver. 2.5.• Connection may be difficult depending on the internet line status. Wait a bit and then perform the operation again.* M-crew Server task tray icon is .](https://usermanual.wiki/Sony-Group/14798212X/User-Guide-783890-Page-35.png)
![36GBConfigure the unit to communicate on your wireless LAN network.For how to display the wireless setup windows, see page 18.Basic setup windowYou can make the basic network settings here.1Select an IP address acquisition method from the pull-down menu.To acquire it from the DHCP server automatically, select [Auto (DHCP)]. To enter it manually, select [Manual (Static IP)].TipIf your wireless LAN router supports DHCP, select [Auto (DHCP)].2When you select [Auto (DHCP)] in 1, setup is automatically completed.When you select [Manual (Static IP)], you need to enter appropriate values by yourself.Tips• When you select [Auto (DHCP)], you cannot change the assigned values.• When you select [Manual (Static IP)], see the operating instructions for the values to be entered.• Enter decimal numbers from 0 to 255 for an IP address.3The MAC address of the unit is displayed.4The My Name of the unit is displayed.The name you set on the unit appears. You can also edit/change the name here.TipYou can assign a name to the unit. The name appears in M-crew Server.5Cancel the settings.6Click the button to confirm the set values.If any of the set values is incorrect, a window appears.Click [Setup] to show the set values. Correct them if necessary.Wireless LAN setup windowYou can make wireless LAN settings here.1Enter the network name (SSID) of the wireless LAN router.Be sure to enter the one used for your wireless LAN router.“SSID” is an ID used to identify a wireless network.2From the pull-down menu, select the security mode for your wireless LAN router.Select one of the following;No securityWEP 64bitsWEP 128bitsWPA (TKIP)WPA (AES)WPA2 (TKIP)WPA2 (AES)3Enter a security key when you select [WEP 64bits] or [WEP 128bits] in 2.Select the security key number and enter the security key for your wireless LAN router.Enter either characters or hexadecimal numbers for the security key.The security keys should be arbitrary characters and numbers.The length of the security keys differs depending on the security mode you select. See the table below.Additional InformationExplanation of wireless setup windows125463132546](https://usermanual.wiki/Sony-Group/14798212X/User-Guide-783890-Page-36.png)
![Additional Information37GBInput method/Number of the characters for security key4Enter a pre-shared key when you select [WPA(TKIP)], [WPA(AES)], [WPA2(TKIP)], or [WPA2(AES)] in 2.Enter the pre-shared key for your wireless LAN router.The length of the key should be 8 to 64 characters.If you input 64 characters, enter hexadecimal numbers (0 to 9, A to F, a to f).Input method/Number of the characters for pre-shared key5Cancel the settings.6Click the button to confirm the set values.If any of the set values is incorrect, a window appears.Click [Setup] to show the set values. Correct them if necessary.Notes• Use a security key or a pre-shared key that cannot be easily guessed.• Periodically change the security key and the pre-shared key to ensure the network security.Firmware update windowUpdate the firmware for the unit.1The version of the current firmware is displayed.2Select the firmware file you want to update.Click [Browse] to show the window for selecting the firmware.3Click the button to update.When you click the button, the firmware confirmation window appears.If you select the right firmware, updating starts. The unit restarts automatically when the update is completed.If you select an incorrect firmware, click [Retry] and select the correct one.Notes• Do not restart, pull out the cable, or turn off the power of the connected AV system while updating the firmware.• Check the following website for the unit firmware updates;USA:http://esupport.sony.com/?ref=http%3A//www.sony.com/index.phpCanada:http://www.sony.ca/sonyca/view/english/warranty/consumer_support.shtmlEurope:http://support.sony-europe.com/main/main.asp?l=enWEP 64bits WEP 128bitsCharacters 5 (one-byte alphanumerics and/or symbols)13 (one-byte alphanumerics and/or symbols)Hexadecimal numbers10 (0 to 9, A to F, a to f)26 (0 to 9, A to F, a to f)Characters 8 to 63 (one-byte alphanumerics and symbols)Hexadecimal numbers64 (0 to 9, A to F, a to f)132](https://usermanual.wiki/Sony-Group/14798212X/User-Guide-783890-Page-37.png)
![38GBAdministrator setup windowSet a user name and a password, or change the password you previously set.1Enter a user name.The maximum length of the user name should be 16 characters.2Enter the current password.For security reasons, do not use the same password as one you use for important items.The maximum length of the password should be 16 characters.3Enter a new password.Enter the new password again to confirm.The maximum length of the new password should be 16 characters.4Cancel the settings.5Click the button to confirm the set values.If any of the set values is incorrect, a window appears.Click [Setup] to show the set values. Correct the values if necessary.Restart audio client windowRestart the unit to apply your settings.TipThe settings will not become effective unless you restart the unit.21543](https://usermanual.wiki/Sony-Group/14798212X/User-Guide-783890-Page-38.png)