Sony Group 14798212X Wireless LAN Module User Manual TDM NC1
Sony Corporation Wireless LAN Module TDM NC1
Manual
Operating Instructions Mode d’emploi Manual de instrucciones
Bedienungsanleitung Gebruiksaanwijzing Istruzioni per l’uso
Bruksanvisning Instrukcja obsługi Brugsanvisning
Käyttöohjeet Instruções de operação
Wireless Network Audio Adapter
3-198-676-11(1)
©2007 Sony Corporation
TDM-NC1
2GB
This product is to be used indoor only.
Do not install the appliance in a confined space, such
as a bookcase or built-in cabinet.
The nameplate is located on the bottom exterior.
CAUTION
Danger of explosion if battery is incorrectly replaced.
Replace only with the same or equivalent type
recommended by the manufacturer. Discard used
batteries according to the manufacturer’s instructions.
Don’t throw away the battery with
general house waste, dispose of it
correctly as chemical waste.
Batteries or batteries installed apparatus shall not be
exposed to excessive heat such as sunshine, fire or the
like.
Notice for the customers in Europe
Hereby, Sony Corporation, declares that this TDM-
NC1 Wireless Network Audio Adapter is in
compliance with the essential requirements and other
relevant provisions of Directive 1999/5/EC. For
details, please access to the following URL;
http://www.compliance.sony.de/
This product is intended to be used in the following
countries;
United Kingdom, Republic of Ireland, Federal
Republic of Germany, Republic of Poland, Republic of
Hungary, Czech Republic, Slovak Republic, Republic
of Italy, Kingdom of Sweden, Kingdom of Denmark,
Republic of Finland, Kingdom of Norway, Republic of
Lithuania, Republic of Latvia, Republic of Estonia,
Kingdom of the Netherlands, Spain, Hellenic
Republic, Romania, Republic of Slovenia, French
Republic, Kingdom of Belgium, Republic of Portugal,
Swiss Confederation, Republic of Austria, Republic of
Turkey
Disposal of Old Electrical &
Electronic Equipment
(Applicable in the European
Union and other European
countries with separate
collection systems)
This symbol on the product or on its packaging
indicates that this product shall not be treated as
household waste. Instead it shall be handed over to the
applicable collection point for the recycling of
electrical and electronic equipment. By ensuring this
product is disposed of correctly, you will help prevent
potential negative consequences for the environment
and human health, which could otherwise be caused by
inappropriate waste handling of this product. The
recycling of materials will help to conserve natural
resources. For more detailed information about
recycling of this product, please contact your local
Civic Office, your household waste disposal service or
the shop where you purchased the product.
Notice for the customers in the U.S.A.
Owner’s Record
The model and serial numbers are located on the
bottom of the unit. Record the serial number in the
space provided below. Refer to them whenever you
call upon your Sony dealer regarding this product.
Model No. TDM-NC1
Serial No. ______________
This transmitter must not be co-located or operated in
conjunction with any other antenna or transmitter.
This equipment complies with FCC radiation exposure
limits set forth for uncontrolled equipment and meets
the FCC radio frequency (RF) Exposure Guidelines in
Supplement C to OET65. This equipment should be
installed and operated with at least 20cm and more
between the radiator and person’s body (excluding
extremities: hands, wrists, feet and ankles).
WARNING
This equipment has been tested and found to comply
with the limits for a Class B digital device, pursuant to
Part 15 of the FCC Rules. These limits are designed to
provide reasonable protection against harmful
interference in a residential installation. This
equipment generates, uses, and can radiate radio
frequency energy and, if not installed and used in
accordance with the instructions, may cause harmful
interference to radio communications. However, there
is no guarantee that interference will not occur in a
particular installation. If this equipment does cause
harmful interference to radio or television reception,
which can be determined by turning the equipment off
and on, the user is encouraged to try to correct the
interference by one or more of the following measures:
– Reorient or relocate the receiving antenna.
– Increase the separation between the equipment and
receiver.
– Connect the equipment into an outlet on a circuit
different from that to which the receiver is
connected.
– Consult the dealer or an experienced radio/TV
technician for help.
WARNING

3GB
CAUTION
You are cautioned that any changes or modifications
not expressly approved in this manual could void your
authority to operate this equipment.
FCC RECOMMEND
The shielded interface cable recommended in this
manual must be used with this equipment in order to
comply with the limits for a digital device pursuant to
Subpart B of Part 15 of FCC Rules.
If you have any questions about this product, you may
call;
Sony Customer Information Services Center
1-800-222-7669 or http://www.sony.com/
The Number below is for the FCC related matters only.
Regulatory Information
Notice for the customers in Canada
This class B digital apparatus complies with Canadian
ICES-003.
This device complies with RSS-Gen of IC Rules.
Operation is subject to the following two conditions:
(1) this device may not cause interference, and (2) this
device must accept any interference, including
interference that may cause undesired operation of this
device.
This equipment complies with IC radiation exposure
limits set forth for uncontrolled equipment and meets
RSS-102 of the IC radio frequency (RF) Exposure
rules. This equipment should be installed and operated
with at least 20cm and more between the radiator and
person’s body (excluding extremities: hands, wrists,
feet and ankles).
On Copyrights
• M-crew Server and the M-crew Server logo are
trademarks or registered trademarks of Sony
Corporation.
• Microsoft, Windows, Windows Vista and Windows
Media are trademarks or registered trademarks of
Microsoft Corporation in the United States and/or
other countries.
• All other trademarks and registered trademarks are
trademarks or registered trademarks of their
respective holders. In this manual, TM and ® marks
are not specified.
• Adobe, the Adobe logo, and Reader are either
registered trademarks or trademarks of Adobe
Systems Incorporated in the United States and/or
other countries.
Declaration of Conformity
Trade Name: SONY
Model No.: TDM-NC1
Responsible Party: Sony Electronics Inc.
Address:
16530 Via Esprillo,
San Diego, CA 92127 U.S.A.
Telephone No.: 858-942-2230
This device complies with Part 15 of the FCC Rules.
Operation is subject to the following two
conditions.:
(1) This device may not cause harmful interference,
and (2) this device must accept any interference
received, including interference that may cause
undesired operation.
For the state of California, USA only
Perchlorate Material - special handling may apply,
see www.dtsc.ca.gov/hazardouswaste/perchlorate
Perchlorate Material: Lithium battery contains
perchlorate

4GB
About TDM-NC1 manual....................... 5
Overview ................................................ 6
Getting Started
STEP 1: Checking supplied items...... 10
STEP 2: Installing the supplied M-crew
Server Ver. 2.5 software................. 10
STEP 3: Making the AUTO LINK
FOLDER Settings .......................... 12
STEP 4: Making the Windows Firewall
Settings........................................... 13
STEP 5: Making the Security Software
Firewall Settings............................. 13
STEP 6: Installing the TDM-NC1...... 14
STEP 7: Connecting the TDM-NC1 to
the network..................................... 16
STEP 8: Checking the Operation ....... 19
Listening to Music
Registering tracks to the M-crew Server
Ver. 2.5........................................... 21
Listening to music stored on your
computer......................................... 21
— MUSIC SURFIN’
Listening to music in a playlist............. 23
— PLAYLIST
Listening to music in a favorite playlist 24
— FAVORITE PLAYLIST
Registration/FAVORITE
PLAYLIST Play
Listening to the same music in different
rooms.............................................. 25
— PARTY MODE
Viewing information in the display...... 26
Listening to Web Radio
Listening to web radio using M-crew
Server Ver. 2.5 ............................... 27
— WEB RADIO
Operating the Unit by the
Connected AV System
Operating the unit by the AV system’s
buttons and remote ......................... 28
Operating by the on-screen display.......28
Advanced Network Settings
Using the network menu .......................30
Selecting another server ........................30
Making network settings manually.......31
Restarting the network unit...................31
Naming the unit
(My Name function) .......................31
Registering the TDM-NC1 on your
computer manually .........................32
Checking network settings....................32
Troubleshooting
Problems and remedies .........................33
Messages ...............................................34
Additional Information
Explanation of wireless setup windows 36
Glossary ................................................39
Precautions ............................................40
Specifications ........................................40
List of button locations and reference
pages ...............................................41
Table of Contents
Check the following website for TDM-NC1’s
latest information, FAQ (Frequently Asked
Questions), and firmware updates;
USA:
http://esupport.sony.com/?ref=http%3A//
www.sony.com/index.php
Canada:
http://www.sony.ca/sonyca/view/english/
warranty/consumer_support.shtml
Europe:
http://support.sony-europe.com/main/
main.asp?l=en

5GB
TDM-NC1 contains the following manuals.
Refer to them as required by the operation.
TDM-NC1 Quick Setup Guide
This guide explains how to install M-crew
Server and setup the TDM-NC1.
TDM-NC1 Operating Instructions
(this manual)
This manual is included on the supplied CD-
ROM.
It explains the operations of the TDM-NC1
itself.
This manual mainly explains operations using
the remote.
“M-crew Server Ver. 2.5”
Installation instructions
This Installation instructions is included on the
supplied CD-ROM.
It explains how to install the supplied “M-crew
Server Ver. 2.5” software on your computer.
“M-crew Server Ver. 2.5” Help
This help manual can be used only after the “M-
crew Server Ver. 2.5” software is installed.
It explains the operations of the “M-crew Server
Ver. 2.5” software which is included on the
same CD-ROM.
About TDM-NC1 manual
6GB
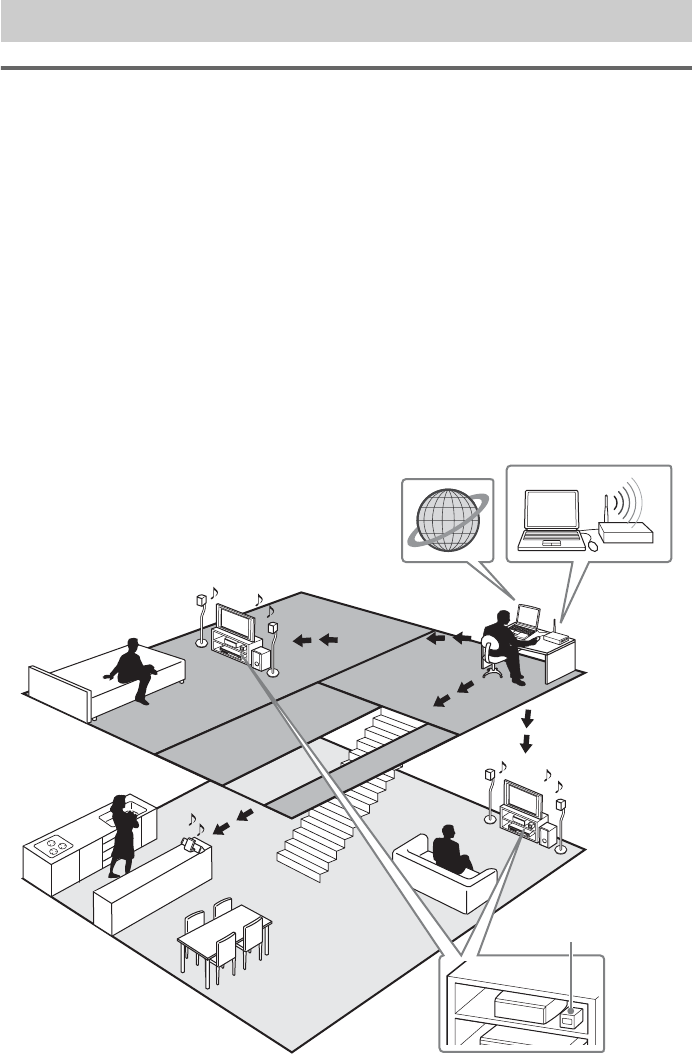
Enjoying music stored on your computer
You can enjoy the following functions by connecting the TDM-NC1 and an AV system with DIGITAL
MEDIA PORT interface (Sony DAV series, etc.).
• You can listen to music stored on your computer by operating the unit.
• You can use MUSIC SURFIN’ to easily enjoy tracks registered to M-crew Server* (page 21).
• You can register the current track to your favorite playlist and play tracks using quick and easy
remote operations (page 23).
• For the computers with internet connections, you can also enjoy listening to web radio (page 27).
• If you have more than one TDM-NC1/CPF-IX001, you can enjoy listening to the same music in
different rooms (PARTY MODE, page 25).
• You can control the unit with an AV system’s remote and the buttons on the system for basic
operations (play, stop, etc.) (page 22).
• You can select music from the TV connected to an AV system (On-screen display function,
page 28).
* M-crew Server software is a computer application for enjoying music files stored on a computer
using the unit.
Overview
Internet
TDM-NC1

7GB
Note
If you perform an operation (recording, file importing, using other applications, etc.) that places a load on the server
PC while playing back a track registered to the server PC, the sound may skip. In addition, the sound may also skip
depending on the network status.
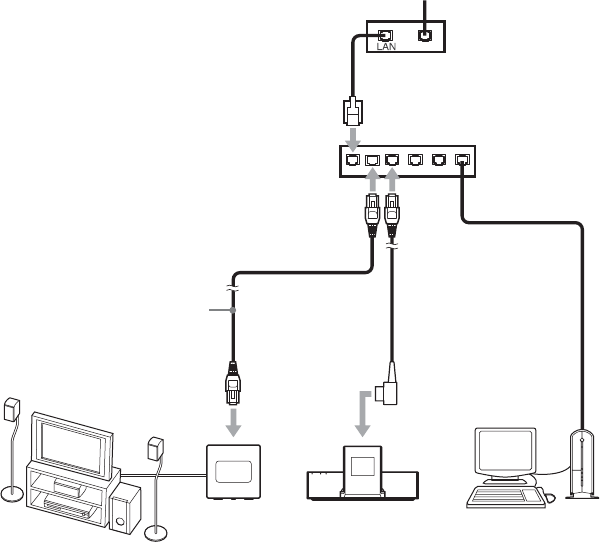
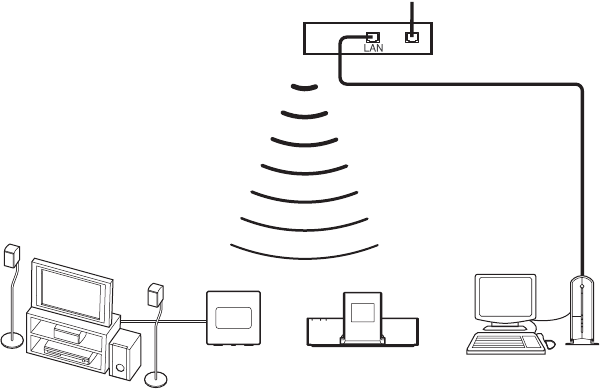
Connecting the unit to the network
You can connect the unit to your computer using the Ethernet port of your computer, a router with a
built-in network switch, a network switching device, or wireless LAN router.
The connection method may vary depending on your network. Connection with a personal computer is
described here as an example.
Required equipment and accessories (not supplied)
• Personal computer* (Windows Vista Ultimate, Windows Vista Business, Windows Vista Home
Premium, Windows Vista Home Basic, Windows XP Home Edition (SP2 or higher), Windows XP
Professional (SP2 or higher), Windows XP Media Center Edition 2004 (SP2 or higher), Windows
XP Media Center Edition 2005 (SP2 or higher)). For further required specification details, refer to
the M-crew Server Installation instructions.
• Wireless access point (For wireless connection. Compatible with IEEE 802.11g/b. TDM-NC1
cannot use a wireless ad-hoc network.)
• Ethernet cable (For wired connection. TDM-NC1 is compatible with cross cable and straight cable.)
• AV system with DIGITAL MEDIA PORT interface (Sony DAV series, etc.)
* TDM-NC1 is not compatible with Microsoft Windows 3.1, Windows 95, Windows 98, Windows
Me, Windows NT, Windows 2000 Professional, Windows XP (prior to SP2), Windows Vista Starter
Edition or Windows Vista Enterprise.
8GB
Wired connection
Example: DSL or cable modem equipped with a built-in router (without
network switch ports)
Internet
DSL or cable
modem with a
built-in router*
Hub
Network cable
(not supplied)
To LAN port
TDM-NC1 CPF-IX001 Computer
* Connections may vary depending on your network.
AV system
(DAV, etc.)
9GB
Wireless connection
Example: Wireless LAN router and DSL or cable modem
Internet
DSL or cable modem with a
built-in wireless LAN router
and wireless access point*
* Connections may vary depending on your network.
If your modem does not have a wireless LAN router, you need a wireless access point.
TDM-NC1 CPF-IX001 Computer
AV system
(DAV, etc.)

10GB
The setup procedure is below.
Check the Supplied Items
(STEP 1)
m
Install M-crew Server
(STEP 2 – 3)
m
Make the Windows Firewall Settings
(STEP 4)
m
Make the Software Firewall Settings
(STEP 5)
m
Set up TDM-NC1
(STEP 6 – 7)
m
Check the Operations
(STEP 8)
You must first install the supplied M-crew
Server Ver. 2.5 software on your computer.
For details on the installation, refer to the
“M-crew Server Ver. 2.5” Installation
instructions contained on the supplied CD-
ROM.
Installation may take some time depending on
the environment. A progress bar is displayed
while installation is underway. Wait until the
installation is finished.
Note for NAS-CZ1/CPF-IX001 users
Install M-crew Server Ver. 2.5 without uninstalling
M-crew Server Ver. 1.0 or 2.0. The contents
information can be used even after installing M-crew
Server Ver. 2.5.
1Turn on your computer and login as an
administrator.
Wait for Windows to load.
2Insert the supplied CD-ROM into the
CD-ROM drive of your computer.
Getting Started
STEP 1: Checking
supplied items
Unit
Remote (RM-ANU010) with battery
TDM-NC1 Operating Instructions/M-crew Server Ver.
2.5 software CD-ROM
Quick Setup Guide
STEP 2: Installing the
supplied M-crew Server
Ver. 2.5 software
M-crew Server
Ver. 2.5 software
CD-ROM
Getting Started
11GB
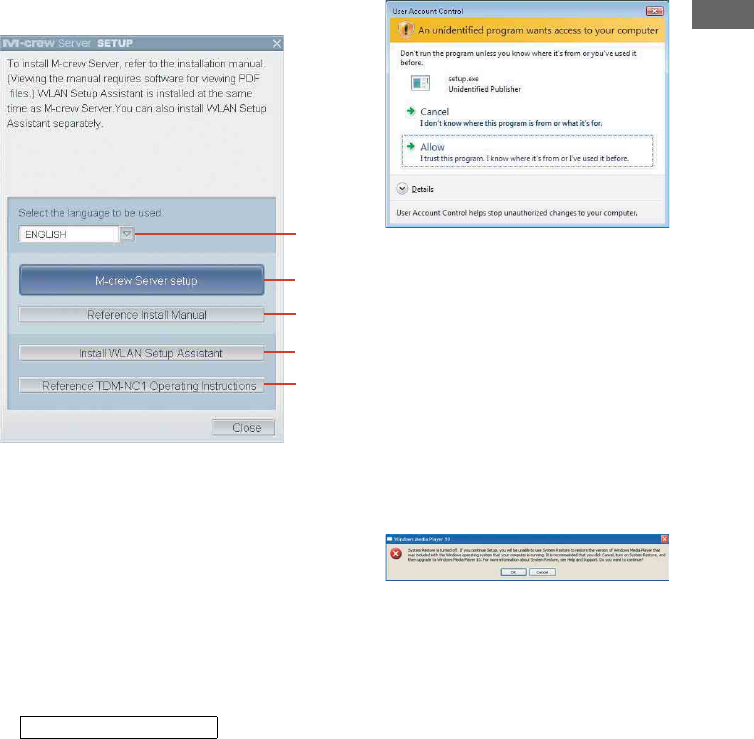
The “M-crew Server SETUP” window will
appear.
1) Click to display the M-crew Server Installation
instructions.
2) Click to start up the WLAN Setup Assistant.
3) Click to display the TDM-NC1 Operating
Instructions (this manual).
Notes
• If the window does not open, double-click the
CD-ROM Setup.exe icon.
• When the installation is still in progress, do not
interrupt the operation or take CD-ROM out of
the CD-ROM drive. Doing so may render it
impossible to install the software thereafter.
The “Auto Play” window appears, click [Run
setup.exe] to install the program. Then, the “User
Account Control” (UAC) window appears, click
[Allow]. If you click [Cancel], you will not be
able to start the installation.
3Select the language to be used.
4Click [M-crew Server setup].
The installation starts. Follow the on-screen
instructions.
Notes
• If “.NET Framework” (2.0 or higher) is not
installed on your computer, the “.NET
Framework Installer” window appears. Click
[Install] to install “.NET Framework 2.0” and
follow the displayed instructions.
• A warning window may appear during
installation of Windows Media Format SDK
9.5.
To continue installing, click [OK]. For details,
refer to the Mcrew Server Installation
instructions “Installing M-crew Server”.
5After the installation is completed,
click [Reboot] to restart your computer.
After restarting your computer, the “AUTO
LINK FOLDER SETUP” window appears
automatically.
For Windows Vista users
3
4
1)
2)
3)
12GB
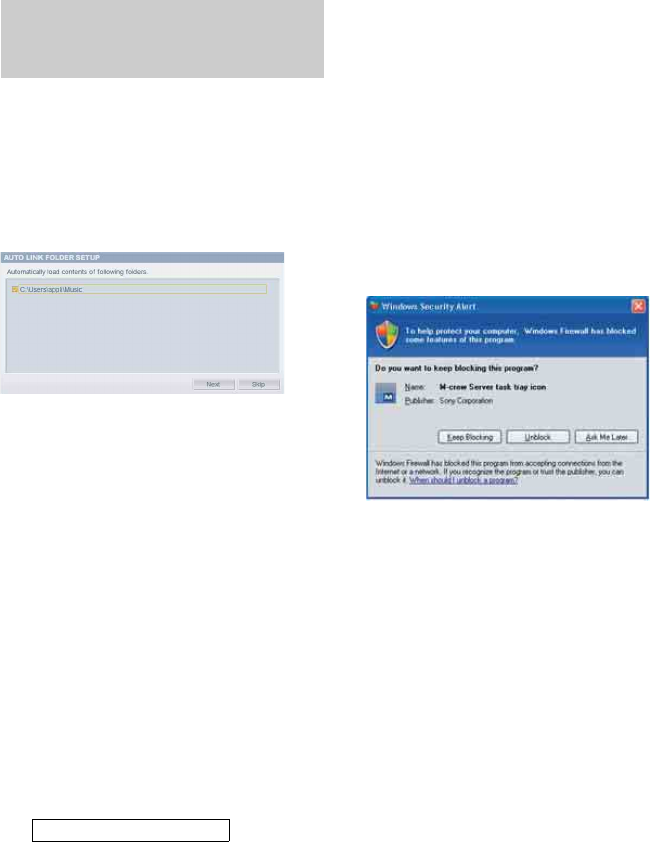
When the AUTO LINK FOLDER settings are
completed, all supportable music files in the
folder and the sub folder that exist on the path
indicated in the window are automatically
imported to M-crew Server.
If many songs are stored on your computer,
loading time may take longer.
Note
If the “AUTO LINK FOLDER SETUP” window does
not automatically appear after rebooting, click [Start] -
[All Programs] - [Mcrew Server] - [TOOLS] – [AUTO
LINK] in that order. In this case, [Next] and [Skip]
become [OK] and [Cancel].
1Click to place a check next to the
directory path that contains the files to
be loaded.
Click again to remove checks next to paths
that are not to be loaded.
Tip
Sub-folders of the selected folder are also subject
to the AUTO LINK function.
2Click [Next].
The music files located in the checked
directory path(s) are loaded automatically.
The “User Account Control” (UAC) window
appears, click [Allow]. If you click [Cancel], you
will not be able to start the installation.
Note
All supportable music files that exist in the path
indicated in the window are automatically
imported to M-crew Server.
If the “Windows Security Alert”
window appears
Click [Unblock] to unblock the program.
Make sure that the “M-crew Server task tray
icon” appears in [Name], then click [Unblock].
If you click [Keep Blocking], you will be unable
to use M-crew Server. For details, refer to
“Registering the TDM-NC1 on your computer
manually” in the M-crew Server Installation
instructions.
In some cases, the “Windows Security Alert”
window appears in “STEP 4: Making the
Windows Firewall Settings” (page 13).
STEP 3: Making the AUTO
LINK FOLDER Settings
For Windows Vista users
Getting Started
13GB
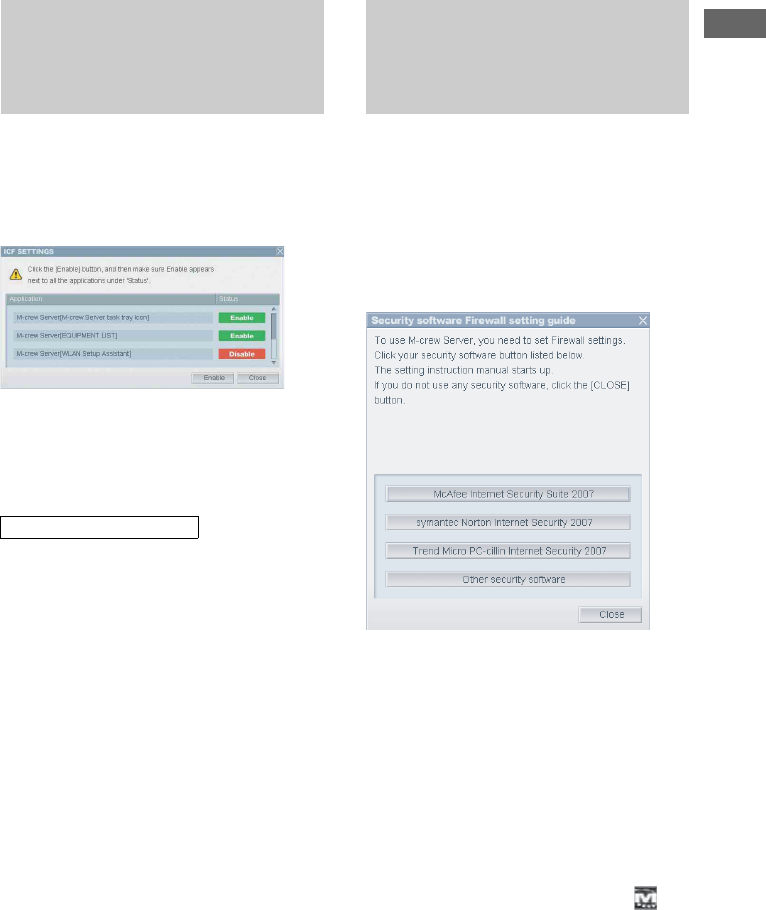
This setting opens the Windows Firewall so you
can enjoy music files stored on your computer
via the unit.
The “ICF SETTINGS” window appears.
Note
If the “ICF SETTINGS” window does not
automatically appear, click [Start] – [All Programs] -
[Mcrew Server] - [TOOLS] - [ICF Settings] in that
order.
The “User Account Control” (UAC) window appears,
click [Allow]. If you click [Cancel], you will not be
able to start the installation.
1Click [Enable].
“Enable” or “Disable” appears for each
item. If “Disable” appears, click [Enable]
repeatedly until “Enable” appears for all
status items.
2Click [Close].
The “Security software Firewall setting
guide” window appears automatically.
If commercially available anti-virus software is
installed on your computer, this setting opens
the Firewall.
The “Security software Firewall setting guide”
window appears.
If the security software is not installed on your
computer, click [Close] then go to STEP 6.
1Click your security software.
The web browser is activated, and the
setting guide of your security software
appears. If your security software is not on
the list, click [Other security software].
Note
To display the guide (web browser), your
computer needs to be connected to the Internet.
2Follow the on-screen message.
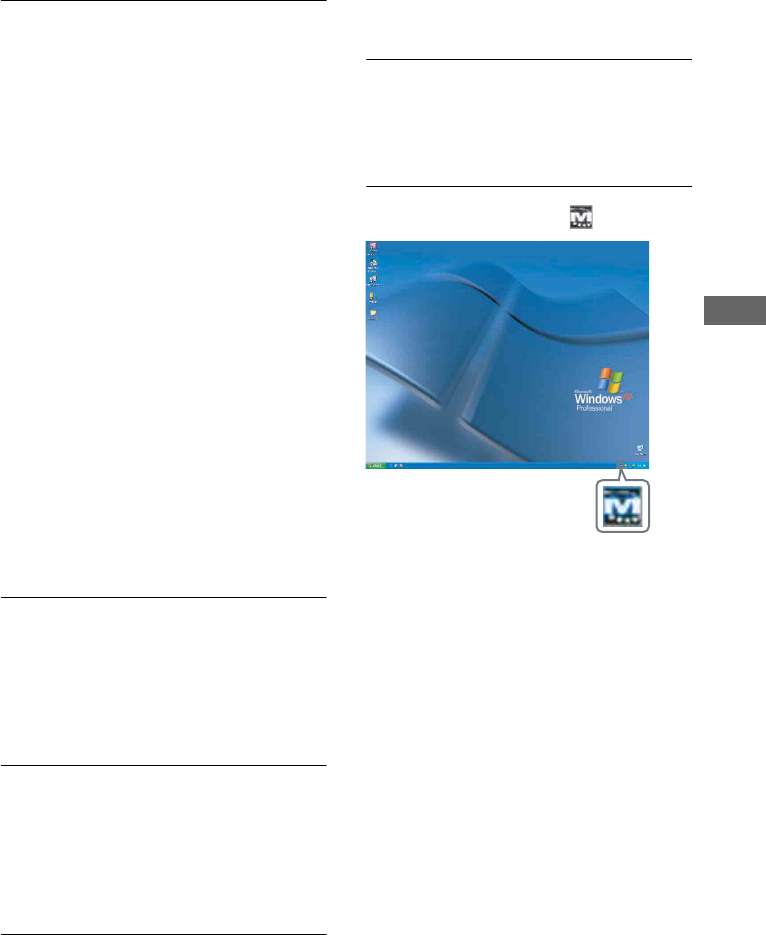
Note
After installing the M-crew Server, the task
tray icon appears on the taskbar (page 35).
STEP 4: Making the
Windows Firewall
Settings
For Windows Vista users
STEP 5: Making the
Security Software
Firewall Settings
14GB
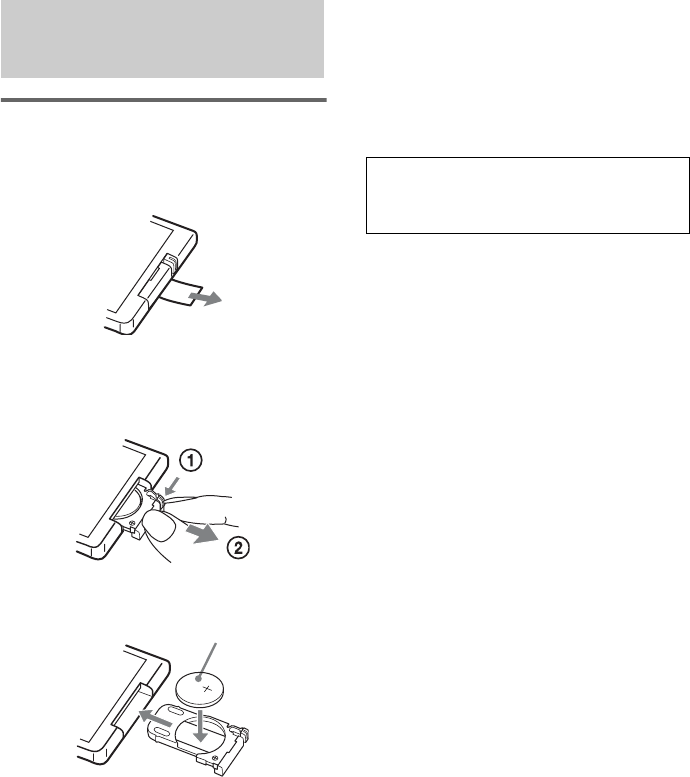
Preparing the remote
Pull out the insulating sheet to allow power
to flow from the battery.
The remote already contains a battery.
To replace the battery in the
remote
1Slide out and remove the battery case.
2Insert a new lithium battery CR2025 with the
+ side facing up.
3Slide the battery case back in.
Note
If you do not use the remote for a long period of time,
remove the battery to avoid possible damage from
battery leakage and corrosion.
Notes on lithium battery
• Keep the lithium battery out of the reach of children.
Should the battery be swallowed, immediately
consult a doctor.
• Wipe the battery with a dry cloth to assure a good
contact.
• Be sure to observe the correct polarity when
installing the battery.
• Do not hold the battery with metallic tweezers,
otherwise a short-circuit may occur.
Tip
When the remote can no longer operate the TDM-NC1,
replace the battery with a new one.
STEP 6: Installing the
TDM-NC1
A lithium battery CR2025
WARNING
Battery may explode if you mistreated.
Do not recharge, disassemble or dispose of in fire.
Getting Started
15GB
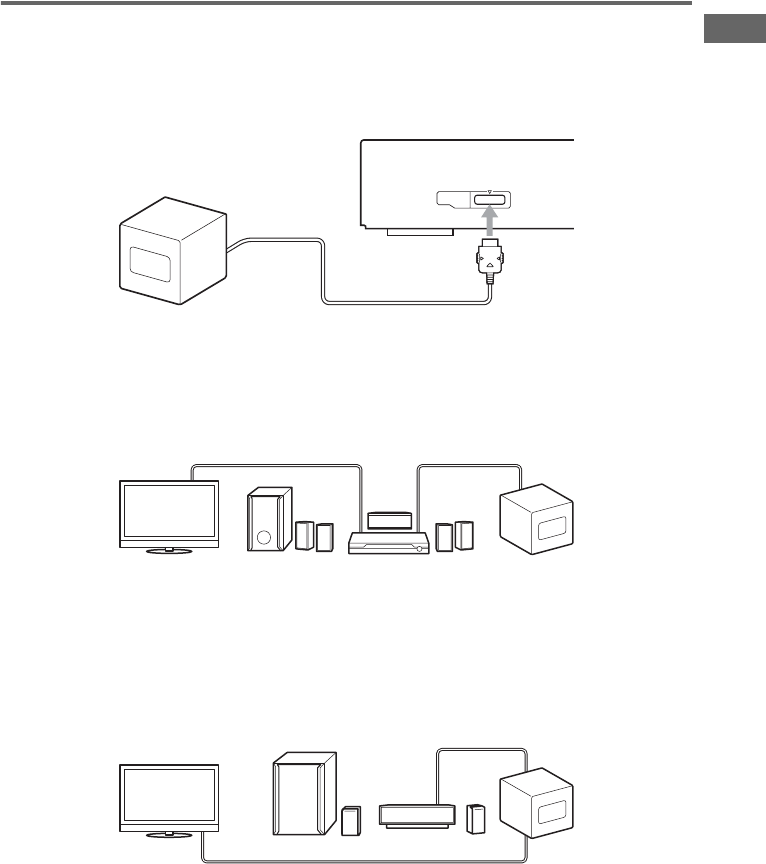
Installing the TDM-NC1
Connect the DIGITAL MEDIA PORT of the unit to an AV system with DIGITAL MEDIA PORT interface (Sony
DAV series, etc.).
Connection examples
Connecting to an AV system which can output video signals when the system is
in DMPORT function
Connecting to an AV system which cannot output video signals when the
system is in DMPORT function
Connect a video cable (not supplied) to the VIDEO OUT jack of the unit. Refer to the user’s guide of
your AV system for further information.
Notes
• The unit turns on/off automatically whenever the connected AV system turns on/off.
• When connecting a video cable to a TV that has a SCART (EURO AV) jack, use a commercially available
conversion connector.
• When connecting a video cable (not supplied) to the VIDEO OUT jack of the unit, no image is output from the
DIGITAL MEDIA PORT cable of the unit.
DMPORT
AV system with DIGITAL MEDIA
PORT interface (back panel)
TDM-NC1
DIGITAL MEDIA
PORT cable
TDM-NC1
Video cable
(not supplied)
TV AV system (Sony DAV series,
STR series, etc.)
DIGITAL MEDIA
PORT cable
TDM-NC1
AV system (Sony
HT series, etc.)
TV
Video cable (not supplied)
16GB
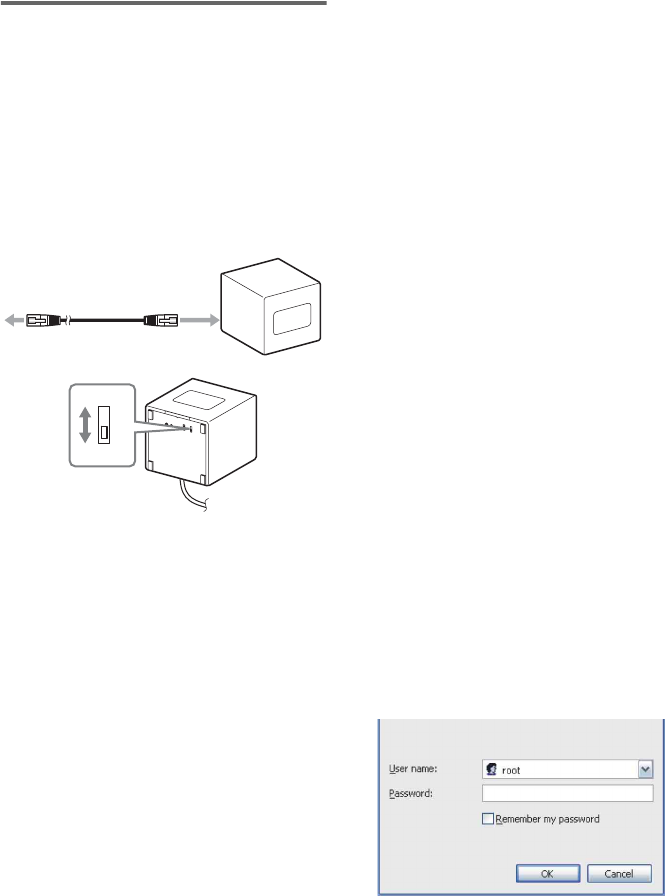
To connect/disconnect the unit
Connecting
1Connect the DIGITAL MEDIA PORT cable
of this unit to the AV system with DIGITAL
MEDIA PORT interface (Sony DAV series,
etc.). Make sure the AV system is turned off
before connecting.
Note
According to your area’s TV system, switch the
NTSC/PAL selector on the bottom of the unit.
2Turn on the AV system connected to the
unit, and switch the AV system function to
DMPORT.
Disconnecting
Before disconnecting, turn off the AV system.
Otherwise, this unit cannot backup settings
correctly.
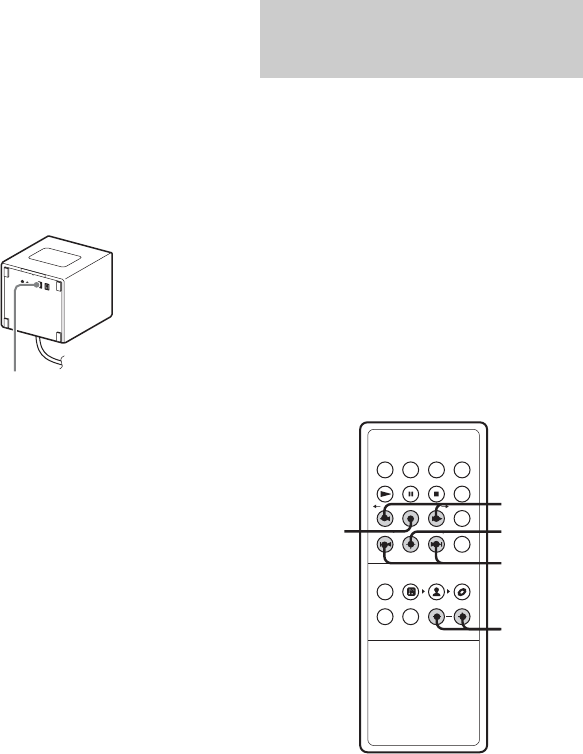
Select your desired network setting from the
following three options.
– Wired setting , select Case A.
– Wireless setting (but the unit is not installed
near computer) , select Case B.
Note
You can set up the wireless setting by starting your
computer web browser. See Case C (page 18). Also, if
your wireless access point settings are applied under
one of the following settings, you need to select Case
C.
– If you set wireless network key (WEP key) to other
than “WEP key No. 1”.
– If you set the access point’s SSID not to transmit
(stealth mode).
NTSC/PAL
selector
STEP 7: Connecting the
TDM-NC1 to the network
+/–
./>
ENTER
MENU
m/M
Getting Started
17GB
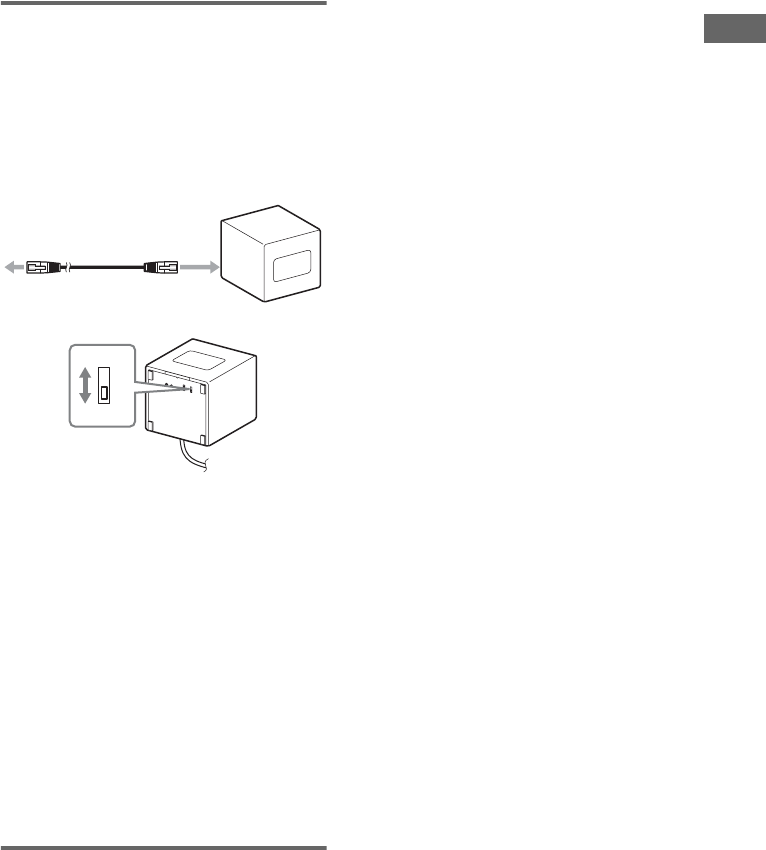
Case A: Wired connection
1Connect the unit to the network using a
wired connection.
Connect the unit to your router (hub) or
directly to the LAN port of the computer.
Use the network cable (not supplied).
Check that the WIRELESS/WIRED
selector on the unit is set to WIRED.
Notes
• When using the unit with a fixed IP address,
refer to “Advanced Network Settings”
(page 30).
• When connecting the unit to the computer
directly, set the IP address of computer to
“Automatic Private IP Addressing”. After
turning on the computer, “Configuring” appears
in the unit display window for a few minutes.
• In some cases, a message indicating that the
connection is limited, or not available, will
appear in the lower right portion of the
computer; however, the unit will operate
normally.
2Turn on the AV system.
3Go to STEP 8 (page 19).
Case B: Wireless connection
(setting up by the unit)
1Set the WIRELESS/WIRED selector on
the unit to WIRELESS.
2Turn on the AV system, and set the AV
system’s function to DMPORT.
3Confirm the settings of your wireless
system.
Check the following items of your wireless
LAN router to set the same information for
the TDM-NC1.
SSID:
_________________________________
Key:
__________________________________
Tips
• For details on how to check the wireless LAN
router settings, refer to the operation manual of
your wireless LAN router.
• In some case, SSID name and wireless network
key numbers/characters are often written on the
wireless LAN router.
• Check that your wireless LAN router uses the
latest firmware version. For details, refer to the
operation manual of your wireless LAN router.
4Press MENU.
5Press . or > repeatedly until “Wi-
Fi SETUP?” appears in the unit display
window, then press ENTER.
“SSID?” appears.
6Press ENTER.
“Searching” appears.
7Press . or > repeatedly until your
wireless LAN router SSID name
appears, then press ENTER.
If you set the wireless network key in the
wireless LAN setting, “KEY?” appears.
Press ENTER.
If you do not set the wireless network key,
the unit restarts, go to STEP 8.
8Enter the wireless network key
numbers/characters.
Use . / > to choose the character,
m / M to skip entered digits.
Also you can choose letter types using +/–.
Letter types changes as shown below:
9Press ENTER.
The unit restarts, go to STEP 8 (page 19).
Note
If you set wireless network key (WEP key) to
other than “WEP key No. 1”, you need to select
the Case C connection (page 18).
WIRELESS
WIRED
Network cable
(not supplied)
To router (hub)
or LAN port of
the computer
To LAN port
WIRELESS/
WIRED selector
Upper case y lower case
YY
space y symbol y number
18GB
Case C: Wireless connection
(setting up by the computer)
1Connect the unit to the network using a
wired connection.
Connect the unit to your wireless LAN
router (hub) or directly to the LAN port of
the computer. Use the network cable (not
supplied). Check that the WIRELESS/
WIRED selector on the unit is set to
WIRED.
Notes
• When using the unit with a fixed IP address,
refer to “Advanced Network Settings”
(page 30).
• When connecting the unit to the computer
directly, set the IP address of computer to
“Automatic Private IP Addressing”. After
turning on the computer, “Configuring” appears
in the unit display window for a few minutes.
• In some cases, a message indicating that the
connection is limited, or not available, will
appear in the lower right portion of the
computer; however, the unit will operate
normally.
2Turn on the AV system, and set the AV
system’s function to DMPORT.
3Confirm the settings of your wireless
system.
Check the following items of your wireless
LAN router to set the same information for
the TDM-NC1.
SSID:
_________________________________
Security mode: ________________________
Key:
__________________________________
Key No. (when using WEP):
____________
Tips
• For details on how to check the wireless LAN
router settings, refer to the operation manual of
your wireless LAN router.
• In some case, SSID name and wireless network
key numbers/characters are written on the
wireless LAN router.
• Check that your wireless LAN router uses the
latest firmware version. For details, refer to the
operation manual of your wireless LAN router.
4Press MENU.
5Press . or > repeatedly until
“SETUP BY PC?”appears, then press
ENTER.
The IP address appears in the display.
6Start up the “WLAN Setup Assistant”
on your computer.
Select [Start] - [All Programs] - [M-crew
Server] - [TOOLS] - [WLAN Setup
Assistant].
7Press [NEXT].
Wait a moment for Internet Explorer to start
up.
Note
If the web browser (Internet Explorer) does not
start up automatically, start up the web browser
manually, and enter the IP address displayed on
the unit in the address bar of the web browser.
8Enter the word “root” in the box
marked “User name”. Leave the box
marked “Password” blank, and click
[OK] to login.
9Select the language.
WIRELESS
WIRED
Network cable
(not supplied)
To wireless LAN
router (hub)
To LAN port
WIRELESS/
WIRED selector
Getting Started
19GB
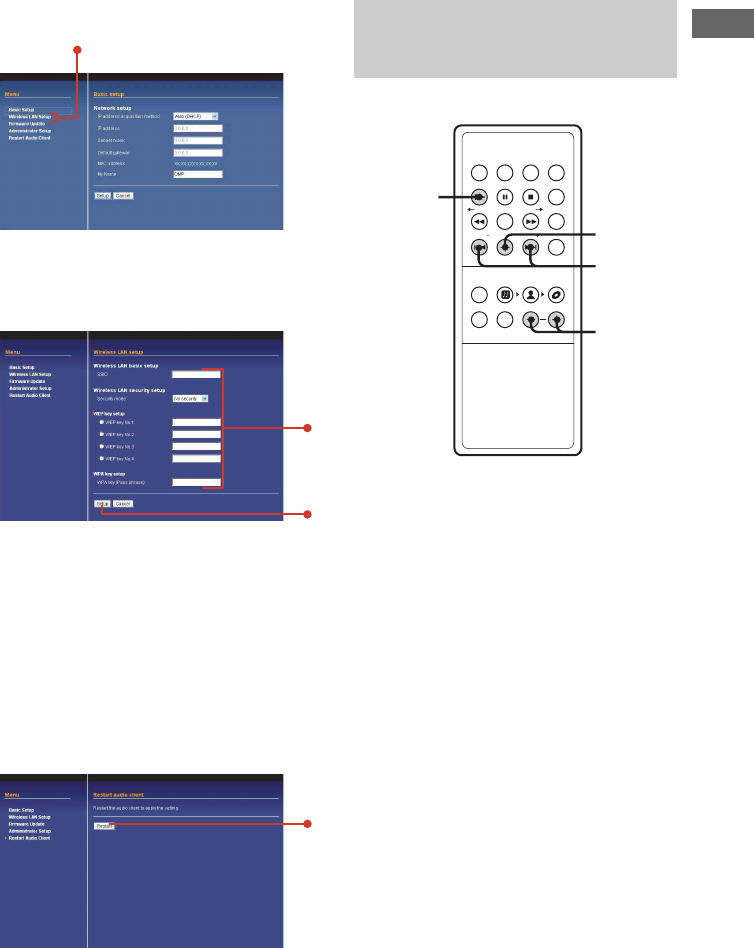
10 Click “Wireless LAN Setup” in the
Menu on your computer.
11 Enter the SSID, Security mode and
wireless network key that you checked
in step 1, and click [Setup].
Tips
• When using wireless network key (WEP Key),
check that the wireless LAN router Key No. and
the above setting match.
• In most cases, only one wireless network key
(WEP Key) number is required, in which case
add this to “WEP Key No. 1”.
12 Click “Restart Audio Client” in the
Menu.
13 Click [Restart].
14 Set the WIRELESS/WIRED selector to
WIRELESS.
Go to STEP 8 (page 19).
1Make sure the display message of the
unit.
The message “Configuring” appears, then
“Loading” follows and then disappears. Go
to step 4.
If “SERVER?” appears, go to step 2.
Notes
• If “Check Net” appears, check the network
settings in STEP 7. Or, the wireless signal may
be weak or out of range, move the unit closer to
the wireless access point.
• If “No Server” appears, do the following;
– Make sure the Firewall setting are correct.
– Restart the M-crew Server software.
– Restart your computer.
– Execute “DataBaseClear.exe” to initialize
the database (usually located in C:\Program
Files\Mcrewserver).
– Input the wireless network key numbers/
characters again.
• If the “Configuring” or “Loading” messages do
not disappear after a few minutes, or other
messages mentioned above appear, see page 34.
2Press ENTER.
STEP 8: Checking the
Operation
./>
ENTER
+/–
N
20GB
3Press . or > repeatedly until
“Mcrew Server v2 on XXXX (your
computer name)” appears, then press
ENTER.
4Press N and check that music or
sample music is played.
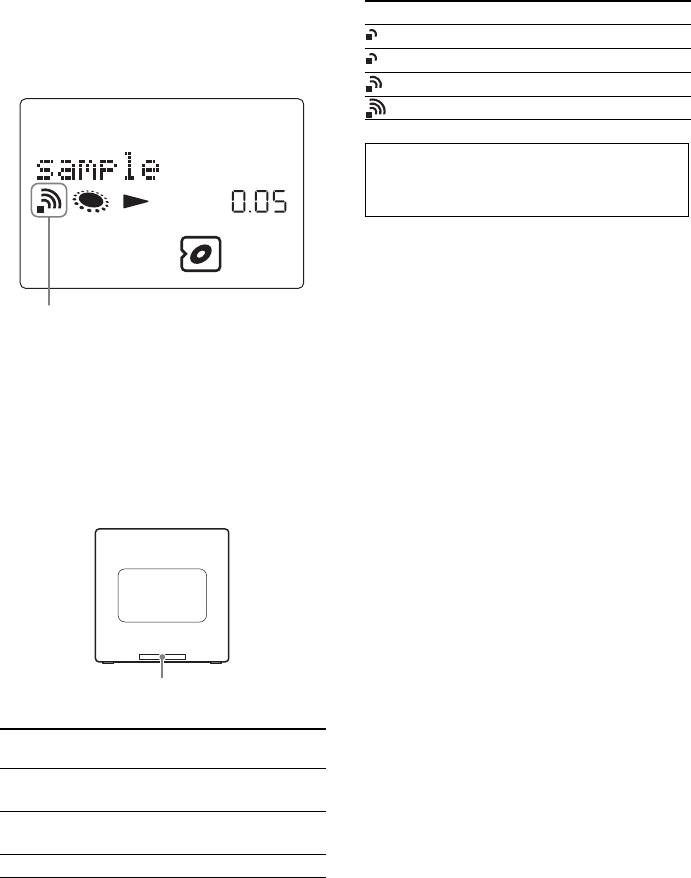
Notes
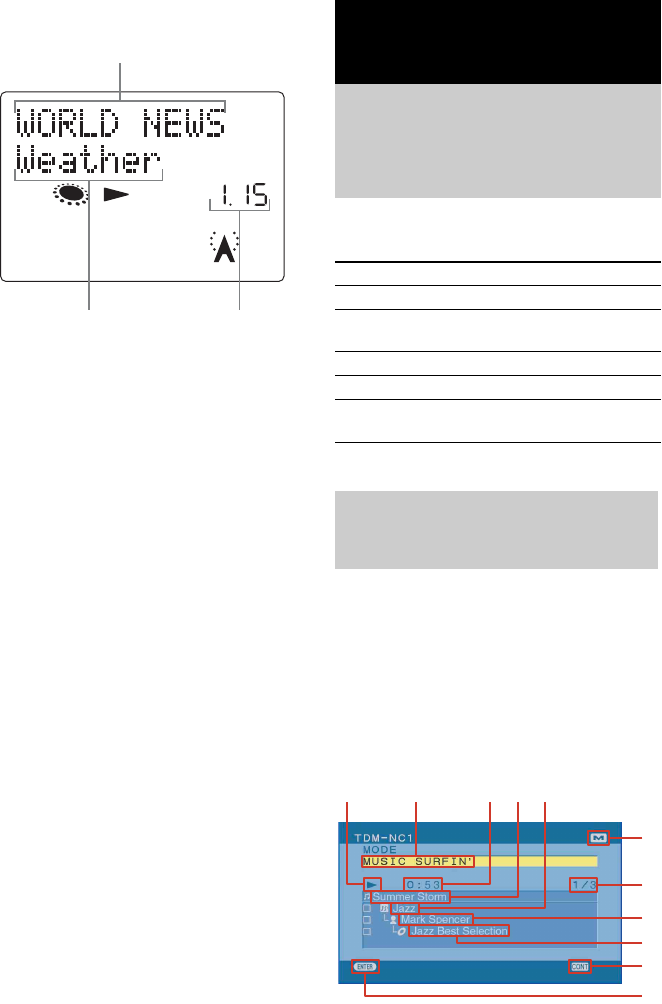
• When playing the sample music, the unit display is
shown below.
* M-crew Server software is a computer application
for enjoying music files stored on a computer
using the unit.
• If no sound is heard, check if the connected AV
system’s volume is set to zero, or the AV system’s
function is set to other than DMPORT.
• If you have a problem, see “Troubleshooting”
(page 33).
To check the network status
Tip
You can check the wireless strength on the display.
When the signal is weak or out of range, move the unit
and the wireless LAN router closer together, or remove
any obstacles between them.
Network
illumination
System status
Flashes slowly The unit is communicating with
the server.
Lights up The network function is being
used.
Flashes quickly An error has occurred.
*
Network illumination
Display Communication status
Flashes: Out of range
Lights steadily: Weak
Medium
Excellent
You are now finished setting up your TDM-NC1.
For further information, see the “M-crew Server
Ver. 2.5” Help.
Listening to Music
21GB
You can register and store audio data from an
audio CD or audio data from the hard disk drive
of your computer to the M-crew Server Ver. 2.5.
You can then listen to the music registered to the
M-crew Server Ver. 2.5 through the connected
AV system with DIGITAL MEDIA PORT
interface (Sony DAV series, etc.).
For details on registering audio data, refer to the
“M-crew Server Ver. 2.5” Help contained on the
supplied CD-ROM.
You can listen to music stored on your computer
through the connected AV system. You can
easily search for the desired track by using
GENRE, ARTIST or ALBUM (MUSIC
SURFIN’). Make sure you have registered audio
data to the media server.
1Start up your desired media server, and
select the DIGITAL MEDIA PORT (DM
PORT) function on the AV system.
2Select the searching criteria using
GENRE, ARTIST or ALBUM.
Playback starts when you press the button.
Tip
You can also search for tracks using a combination of
the Genre, Artist and Album modes.
To listen to all tracks
Press ALL.
Listening to Music
Registering tracks to the
M-crew Server Ver. 2.5
Listening to music stored
on your computer
— MUSIC SURFIN’
N
+/–
./>
m/M
REPEAT
ALL
X
PLAY MODE
x
Searching
criteria
Select To
(Genre mode) listen to items sorted
according to the genre
information of the tracks.
(Artist mode) listen to items sorted
according to the artist
information of the tracks.
(Album mode) listen to items sorted
according to the album
information of the tracks.
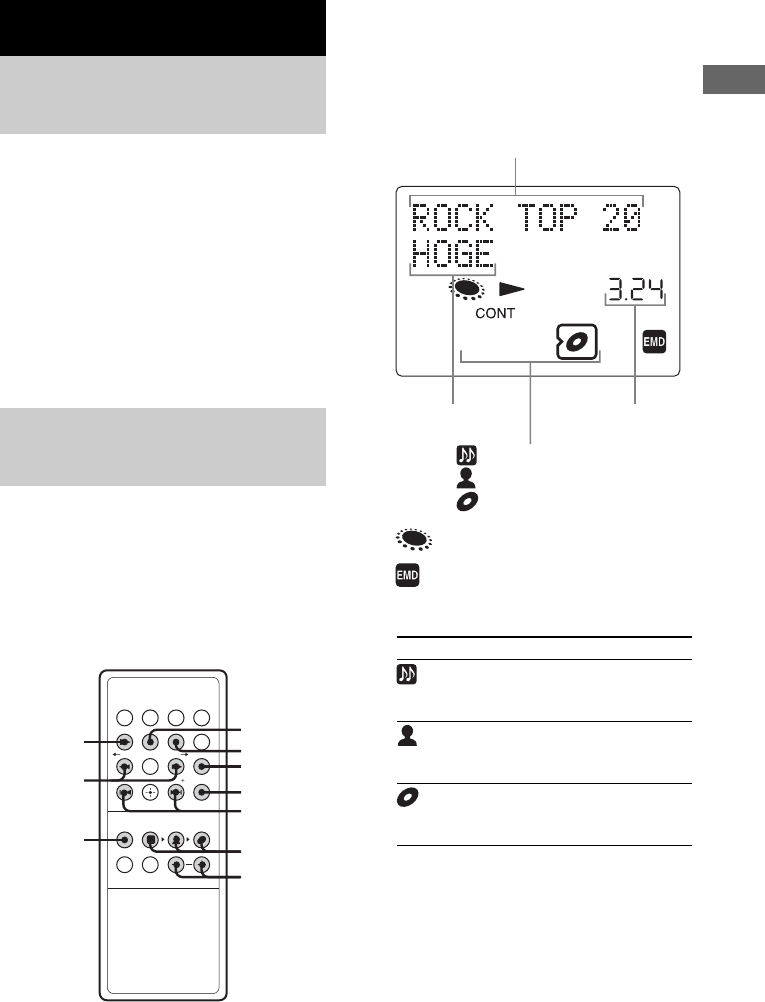
(Album mode)
(Artist mode)
Item name
(Genre mode)
Track name Elapsed playing time*
Lights up when connected with
M-crew Server Ver. 2.5.
* Displays the total time when stopped.
Lights up when playing a copyright
protected track.

22GB
To listen to tracks related to the
current track
Example:
•Press ARTIST to listen to tracks by the
same artist.
Only tracks by the artist of the current track
are played.
•Press GENRE or ALBUM.
You can also narrow the search by genre
and album during playback in the same
manner.
To narrow the search criteria when
searching for tracks (Narrow Search)
Example:
To search for a track on an album by artist on the
server.
1Press ARTIST repeatedly until the name of
your favorite artist appears.
2Press ALBUM repeatedly until the album
title that contains the track you are
searching for appears.
3Press . or > repeatedly to select the
desired track.
Note
Some time may be required before playback starts
depending on the number of tracks registered to the
server.
Other operations
Note
The X and m/M buttons may not work for some
tracks when using a server other than M-crew Server
Ver. 2.5.
To Do this
Play Press N.
Stop play Press x.
Pause Press X. Press again to resume
play.
Select an item Hold down or press + or –
repeatedly. You can select icon
items that have a border. “Item”
refers to the genre in Genre mode,
the artist in Artist mode, or the
album in Album mode.
Select a track Press . or > repeatedly.
Find a point in a
track
Keep pressing m or M during
playback and release it at the
desired point. You can also move
forward and backward in a track
while playback is paused.
Play repeatedly
(Repeat Play)
Press REPEAT repeatedly during
playback until “REP” or “REP1”
appears.
REP: For all tracks.
REP1: For a single track only.
To cancel Repeat Play, press
REPEAT repeatedly until both
“REP” and “REP1” disappear.
Play all tracks in
all items
Press PLAY MODE repeatedly
until “CONT” appears.
Play all tracks
only in the
selected item in
random order
Press PLAY MODE repeatedly
until “SHUF” appears.
Play all tracks
only in the
selected item
Press PLAY MODE repeatedly
until both “CONT” and “SHUF”
disappear.
Adjust the
volume
Press +/–.
To Do this
Listening to Music
23GB
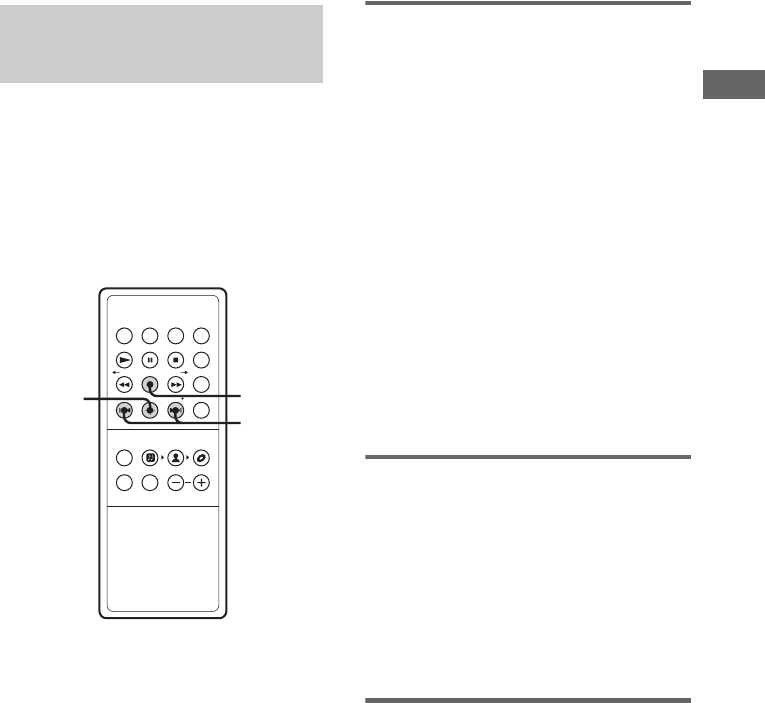
What is a PLAYLIST?
A playlist is a list created to play tracks stored on
M-crew Server Ver. 2.5 using the unit.
You can listen to tracks registered to the M-crew
Server Ver. 2.5 playlist.
1Start up your desired media server, and
select the DIGITAL MEDIA PORT (DM
PORT) function on the AV system with
DIGITAL MEDIA PORT interface (Sony
DAV series, etc.).
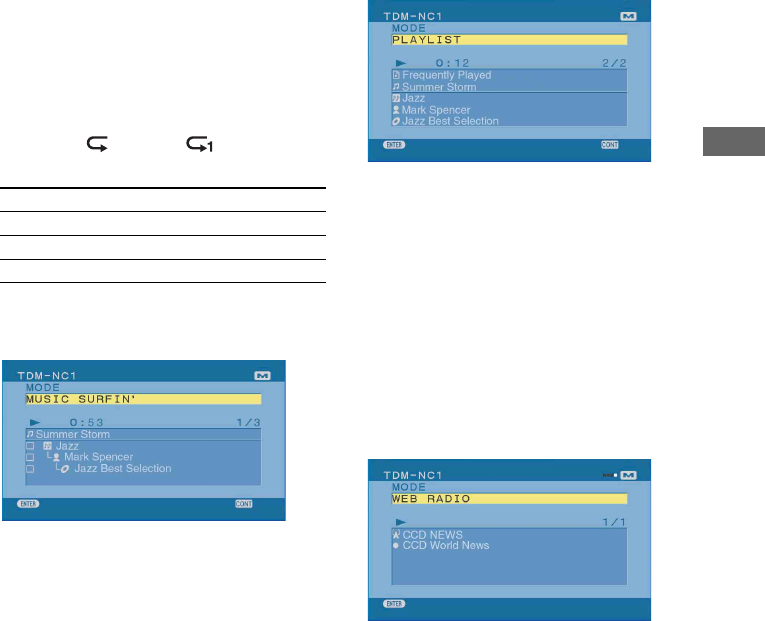
2Press PLAYLIST.
“ (Playlist mode)” appears and the
playback starts.
3Press + or – repeatedly to select a
playlist you want to play.
Note
Some time you may not be able to use the Playlist
mode with a media server other than the supplied
M-crew Server Ver. 2.5.
Tip
You can also enjoy the playlist mode using the on-
screen display. You can select the desired playlist and
tracks directly (page 28).
To use playlists effectively
A Listening to music in a playlist as a
simple playlist1)2)
When the unit first connects to M-crew Server
Ver. 2.5, tracks that meet certain conditions are
automatically registered in the following
playlists. These Simple Playlist music files are
automatically updated.
• The 30 tracks most recently loaded from CDs
or imported (Newly Registered)
• The top 30 tracks in terms of number of times
played (Frequently Played)
• The top 30 tracks most recently played
(Recently Played)
B Listening to music in a playlist you have
created3)
You can create your own playlist on M-crew
Server Ver. 2.5 and register your favorite tracks.
For details, see “Creating a New Playlist” in the
“M-crew Server Ver. 2.5” Help.
C Listening to music in a favorite playlist
(FAVORITE PLAYLIST)3)
When playing a favorite track registered in
M-crew Server Ver. 2.5 using the unit, you can
register the track in the FAVORITE PLAYLIST
simply by pressing FAVORITE ADD on the
remote.
1) The number of tracks that can be registered varies
according to the conditions set on M-crew Server
Ver. 2.5.
2) The unit does not support the Never Played playlist.
3) Up to a maximum of 100 tracks.
Listening to music in a
playlist
—PLAYLIST
+/–
PLAYLIST
24GB
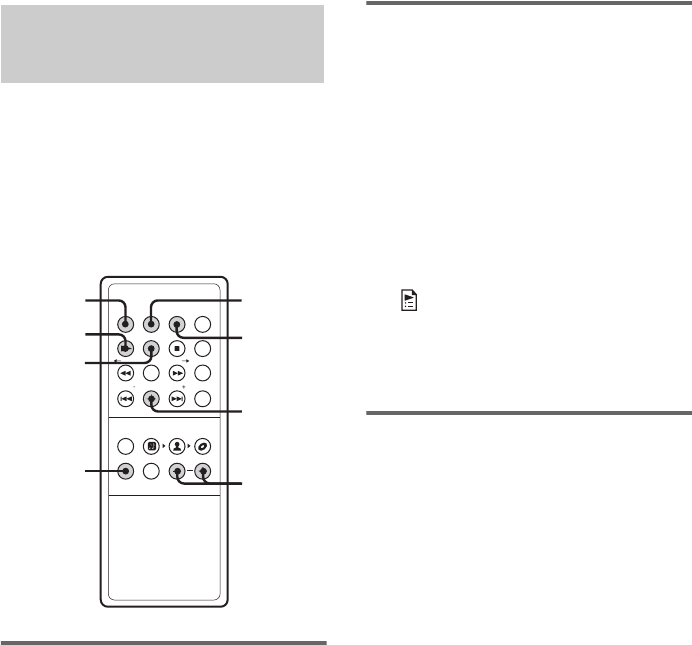
What is a FAVORITE PLAYLIST?
You can register the current track to your
favorite playlist and play tracks using quick and
easy remote commander operations. Each
favorite playlist can contain up to 100 tracks.
Registering tracks to a
favorite playlist
1During the playback or play pause of
the desired track, press FAVORITE
ADD.
“FAVORITE” appears.
2After “FAVORITE” disappears, repeat
step 1 to register the desired tracks.
Playing favorite playlist
1Start up your desired media server, and
select the DIGITAL MEDIA PORT (DM
PORT) function on the AV system with
DIGITAL MEDIA PORT interface (Sony
DAV series, etc.).
2Press FAVORITE CALL.
Playback starts.
Tips
• You can also play the favorite playlist through the
following procedure:
1Press PLAYLIST.
“ (Playlist mode)” appears.
2Press + or – repeatedly until “FAVORITE”
appears.
• You can also play a favorite playlist using the on-
screen display (page 28).
Deleting tracks from a
favorite playlist
1Press N or X to play or pause the
track you want to delete from a favorite
playlist.
2Press FAVORITE DEL.
“DELETE?” appears.
3Press ENTER.
“Deleting” appears, then “Complete!”
appears.
Notes
• If you edit a track in an item that is registered to a
FAVORITE PLAYLIST on your computer, the track
is erased from the FAVORITE PLAYLIST
automatically (except when you changed the track
name).
• During the playback of a track in a favorite playlist,
you cannot press FAVORITE ADD to register the
track to a favorite playlist.
• When you press FAVORITE DEL, the track is
erased from the FAVORITE PLAYLIST but remains
in the MUSIC LIBRARY on your computer.
• You cannot edit a favorite playlist using the on-
screen display.
Listening to music in a
favorite playlist
— FAVORITE PLAYLIST Registration/
FAVORITE PLAYLIST Play
FAVORITE
DEL
FAVORITE
CALL
PLAYLIST
FAVORITE
ADD
N
ENTER
X
+/–
Listening to Music
25GB
If you have more than one TDM-NC1/CPF-
IX001, you can enjoy listening to the same
music in different rooms.
Register one TDM-NC1/CPF-IX001 as the
‘host’ unit, and the other(s) TDM-NC1/CPF-
IX001 can play the same music as ‘guest’
unit(s).
Notes
• If you use CPF-IX001, you need to perform firmware
updates from the following Sony websites:
USA:
http://esupport.sony.com/?ref=http%3A//
www.sony.com/index.php
Canada:
http://www.sony.ca/sonyca/view/english/warranty/
consumer_support.shtml
Europe:
http://support.sony-europe.com/main/main.asp?l=en
• You cannot use the WEB RADIO function in
PARTY MODE.
• Guest unit operations are restricted.
• You can add up to four guest units, but depending on
the connection environment, the number of
connectable guest units may be fewer.
• Depending on the environment, some guest units
may lag in playback or cannot play. If this occurs,
remove those guest units.
Using the PARTY MODE
1Turn on the connected AV system with
DIGITAL MEDIA PORT interface (Sony
DAV series, etc.) in each room.
2Make sure each unit is connected to
the network.
3Make sure the host unit is connected to
the media server in stop mode.
The following steps 4-7 are the for the host
unit only.
4Press MENU.
5Press . / > until “PARTY MODE?”
appears, then press ENTER.
“START?” appears.
6Press ENTER.
“Searching” appears. Wait until
“Searching” disappears.
Stopping the PARTY MODE
The following procedures are for the host unit
only.
1Press MENU.
2Press . / > until “PARTY MODE?”
appears, then press ENTER.
“END?” appears.
3Press ENTER.
Blocking guest units from
joining the PARTY MODE
You can block some guest units from joining the
PARTY MODE. The default setting is
unblocked.
The following procedures are for the guest units
unit which you want to block.
1Press MENU.
2Press . / > until “PARTY MODE?”
appears, then press ENTER.
3Press . / > until “AUTO JOIN?”
appears, then press ENTER.
4Press . / > until “OFF” appears,
then press ENTER.
Listening to the same
music in different rooms
— PARTY MODE
./>
MENU
ENTER

26GB
Tips
• If you set this, the unit memorizes the setting.
• If you want to unlock the blocked setting, select
“ON” in step 4.
Joining the PARTY MODE
You can invite guest units to join the PARTY
MODE.
The following procedures are for the guest units
only.
1Press MENU.
2Press . / > until “PARTY MODE?”
appears, then press ENTER.
3Press . / > until “JOIN?” appears,
then press ENTER.
Leaving the PARTY MODE
You can exit guest units from the PARTY
MODE.
The following procedures are for the guest units
only.
1Press MENU.
2Press . / > until “PARTY MODE?”
appears, then press ENTER.
3Press . / > until “LEAVE?”
appears, then press ENTER.
You can check the following information in the
display of the unit.
Note that this function is not available when
listening to web radio.
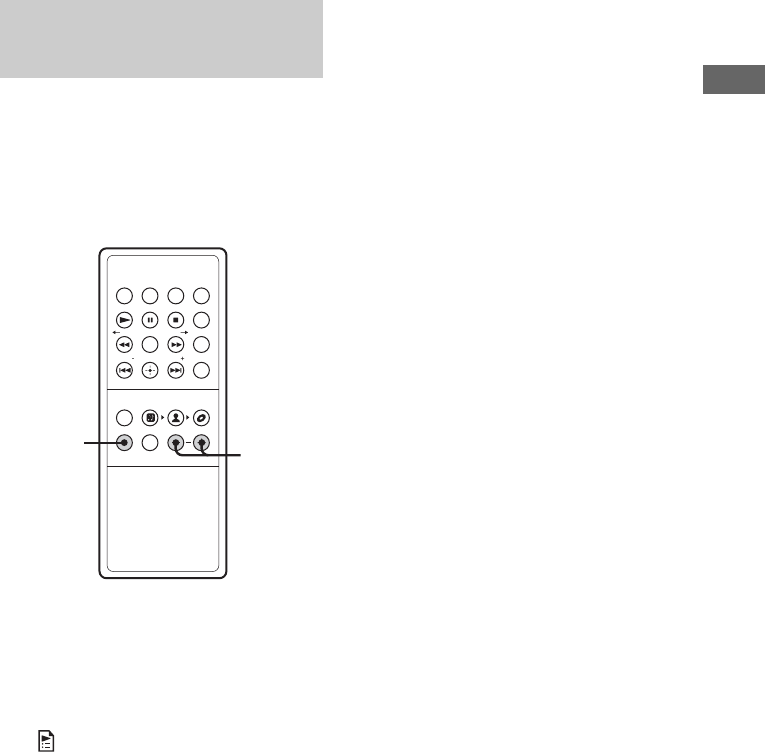
Checking the playing time and
remaining time
You can check the playing time and remaining
time of the current track.
Press TIME during playback.
Each time you press the button, the display
changes cyclically as follows:
Elapsed playing time t Remaining time
Checking the title and track
number
Press DISPLAY during playback or while
the track is selected in stop mode.
Each time you press the button, the display
changes cyclically as follows:
Track title t Album information on the track
t Artist information on the track t Genre
information on the track t Current track
number and total number of tracks within the
item
Viewing information in the
display
DISPLAY
TIME
Listening to Web Radio
27GB
Notes
• “– – –.– –” appears when the total time exceeds 999
minutes 59 seconds.
• Total number of tracks appears when the track is not
selected in stop mode.
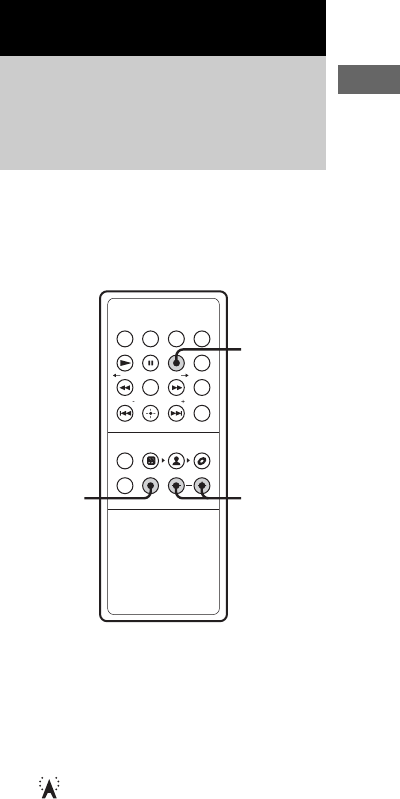
You can listen to web radio programs using
M-crew Server Ver. 2.5 and internet access.
Preset web radio stations on your computer first.
1Start up your desired media server, and
select the DIGITAL MEDIA PORT (DM
PORT) function on the AV system with
DIGITAL MEDIA PORT interface (Sony
DAV series, etc.).
2Press WEB RADIO.
“ ” appears.
3Press + or – repeatedly until the
desired station appears.
Listening to Web Radio
Listening to web radio
using M-crew Server Ver.
2.5
— WEB RADIO
+/–
WEB
RADIO
x
28GB
4Press . or > repeatedly until the
desired program appears.
To stop web radio program
Press x.
To edit web radio stations
You can edit web radio stations only on the
M-crew Server Ver. 2.5.
For details, refer to “Editing Preset Radio
Stations” of the “M-crew Server Ver. 2.5” Help
contained on the supplied CD-ROM.
Notes
• You cannot use the web radio function with a media
server other than the supplied M-crew Server Ver.
2.5.
• If the web radio sound cannot be heard from the
connected AV system, check whether the sound can
be heard using M-crew Server Ver. 2.5 on the
computer.
• The X, m and M buttons are not available for
this function.
• For details on internet access and settings, refer to the
operation manual supplied with your computer or
contact your internet provider.
• Depending on the status of the web radio station, the
sound cannot be heard from the connected AV
system.
Tip
You can also control the web radio using the on-screen
display (page 28).
You can operate the unit by the connected AV
system’s buttons and remote.
You can operate the unit from the on-screen
display connected to the AV system (MUSIC
SURFIN’, PLAYLIST and WEB RADIO
functions only).
To display the on-screen display on TV, set the
connected AV system’s function to DIGITAL
MEDIA PORT (DMPORT), and set the TV
function to AV.
1Playback status
2Selected mode
Station name
Program Elapsed playing
time
Operating the Unit by the Connected
AV System
Operating the unit by the
AV system’s buttons and
remote
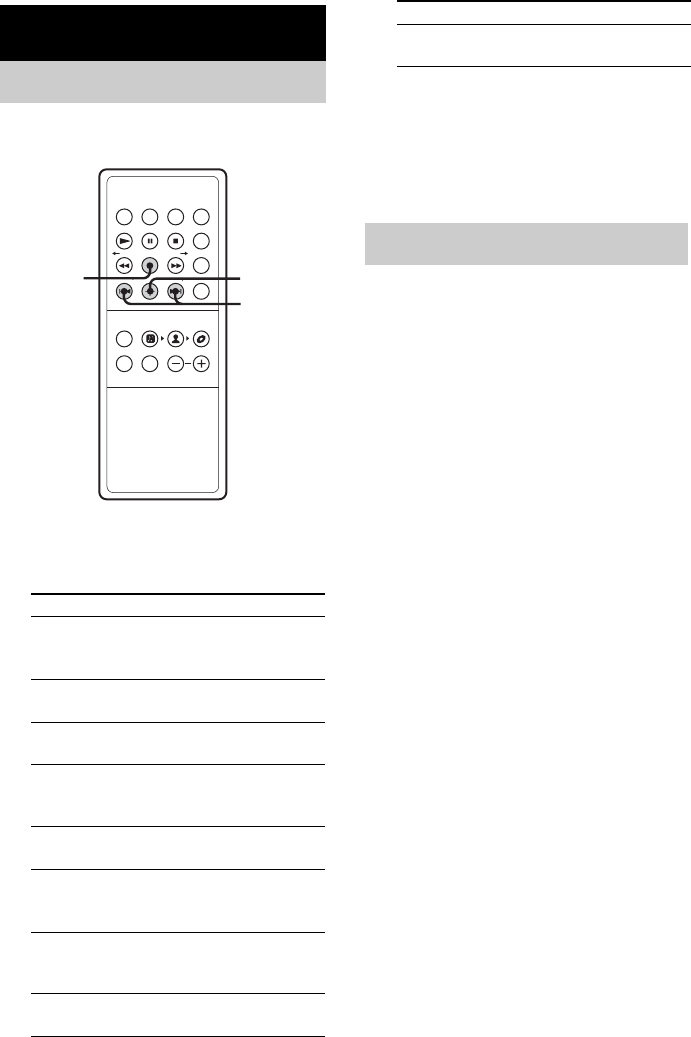
To Do this
Play Press N.
Pause Press X. Press again to resume
play.
Stop play Press x.
Select a track Press . / >.
Find a point in a
track
Press m / M.
Operating by the on-
screen display
6
43521
8
9
7
0
q
a
Operating the Unit by the Connected AV System
29GB
3Elapsed time
4Track name
5Genre name
6M-crew server status (this icon appears during
connecting M-crew Server)
7Currently playing track number/total number of
tracks
8Artist name
9Album name
q; Current settings (SHUF: Shuffle, CONT:
Continue, : Repeat all, : Repeat one)
qa Album name
To enjoy MUSIC SURFIN’ using
the on-screen display
1Press X/x to select [MODE].
2Press ENTER to open the list.
3Press X/x to select [MUSIC SURFIN’] from
the list, then press ENTER.
4Press X/x to select search criteria (GENRE,
ARTIST or ALBUM).
5Press ENTER to open the list.
6Press X/x to select a desired item.
7Press ENTER to start playback.
To enjoy PLAYLIST using the on-
screen display
1Press X/x to select [MODE].
2Press ENTER to open the list.
3Press X/x to select [PLAYLIST] from the list,
then press ENTER.
4Press X/x to select desired playlist.
5Press ENTER to start playback.
Note
You cannot edit playlists using the on-screen display.
To enjoy WEB RADIO using the
on-screen display
1Press X/x to select [MODE].
2Press ENTER to open the list.
3Press X/x to select [WEB RADIO] from the
list, then press ENTER.
4Press X/x to select desired web radio
program.
5Press ENTER to start the program.
Note
You cannot edit web radio programs using the on-
screen display.
To Do this
Move a cursor Press X/x.
Confirm Press ENTER.
Cancel Press RETURN.
30GB
By using the network menu, you can make
various settings on network.
1Press MENU.
2Press . or > repeatedly to select
the item that you want to set.
3Press ENTER.
To turn off the network menu
Press MENU repeatedly until you exit the
network menu.
1Select “SERVER?” in the network
menu (page 30), then press ENTER.
2Press . or > repeatedly to select
the desired media server, then press
ENTER.
Note
You can select the server from up to 10 servers.
Advanced Network Settings
Using the network menu
Item See
PARTY MODE? “Listening to the same
music in different rooms”
(page 25).
SERVER? “Selecting another server”
(page 30).
NET SETUP? “Making network settings
manually” (page 31).
Wi-Fi SETUP? “Case B: Wireless
connection (setting up by
the unit)” (page 17).
RESTART? “Restarting the network
unit” (page 31).
SETUP BY PC? “Case C: Wireless
connection (setting up by
the computer)” (page 18).
REGISTER? “Registering the TDM-
NC1 on your computer
manually” (page 32).
NET INFO? “Checking network
settings” (page 32).
./>
ENTER
MENU
VERSION? (Confirm the TDM-NC1
firmware version).
Selecting another server
Item See

Advanced Network Settings
31GB
By default the TDM-NC1 acquires an IP address
automatically. Use the following procedure to
specify an IP address, if necessary. Note that
when the TDM-NC1 is used in an environment
containing a router with DHCP, you should not
need to specify the IP address of the TDM-NC1.
1Select “NET SETUP?” in the network
menu (page 30), then press ENTER.
2Press . or > repeatedly until
“NET TYPE?” appears, then press
ENTER.
3Press . or > repeatedly until
“MANUAL?” appears, then press
ENTER.
“IP ADDRESS?” appears.
4Press ENTER again.
The currently set IP address appears.
5Press . or > repeatedly to enter
the numeric values of the IP address.
Press m or M repeatedly to select the
digit that you want to set.
6Press ENTER.
“SUBNET MASK?” appears.
7Press ENTER again.
The currently set subnet mask appears.
8Press . or > repeatedly to enter
the numeric values of the subnet mask.
Press m or M repeatedly to select the
digit that you want to set.
9Press ENTER.
“GATEWAY?” appears.
10 Press ENTER again.
The current default gateway appears.
11 Press . or > repeatedly to enter
the numeric values of the default
gateway.
Press m or M repeatedly to select the
digit that you want to set.
12 Press ENTER.
13 Turn off the connected AV system with
DIGITAL MEDIA PORT interface (Sony
DAV series, etc.).
14 Turn on the connected AV system.
To return to the automatic
setting
1Select “NET SETUP?” in the network menu
(page 30), then press ENTER.
2Press . or > repeatedly until “NET
TYPE?” appears, then press ENTER.
3Press . or > repeatedly until “AUTO?”
appears, then press ENTER.
4Turn off the connected AV system.
5Turn on the connected AV system.
Select “RESTART?” in the network menu
(page 30), then press ENTER.
You can name the units for identification. After
naming a unit, the name will appear in the M-
crew Server.
1Press MENU.
2Press . / > until “NET SETUP?”
appears, then press ENTER.
3Press . / > until “MY NAME?”
appears, then press ENTER.
4Press . / > to select a desired
name from the preset names, then
press ENTER.
Tip
You can also create an original name. Refer to
“Additional Information” (page 36).
Making network settings
manually
Restarting the network
unit
Naming the unit
(My Name function)

32GB
When the unit is connected to your computer
after installing the M-crew Server Ver. 2.5
software, the unit is registered automatically on
your computer.
Register the unit on your computer manually for
higher security.
1Select “REGISTER?” in the network
menu (page 30), then press ENTER.
The count down display appears in the
display of the unit.
2Click [Start] – [All programs] – [M-crew
Server] – [TOOLS] – [EQUIPMENT
LIST] in that order to display the screen
on the M-crew Server Ver. 2.5.
For details, see the “M-crew Server Ver.
2.5” Installation instructions included on
the supplied CD-ROM.
3During displaying the count down
display, set “Equipment selection
mode” to “Manual”, and then click
[Add] on your computer.
The registration starts.
“Complete!” appears in the display of the
unit when the registration is completed.
Notes
• When the registration is incomplete, “Incomplete!”
appears in the display of the unit.
• Step 3 must be performed within 5 minutes after
performing step 1.
1Select “NET INFO?” in the network
menu (page 30), then press ENTER.
2Press . or > repeatedly to select
the item that you want to check, then
press ENTER.
Each time you press ENTER, the display
changes cyclically as follows:
NET TYPE? t AUTO* t
IP ADDRESS? t IP address* t
SUBNET MASK? t Subnet mask* t
GATEWAY? t Default Gateway* t
MAC ADDRESS? t MAC address t
SERVER NAME? t Connected server*
t MY NAME? t Name assigned*
* The display may differ depending on the
settings.
Registering the TDM-NC1
on your computer
manually
Checking network
settings

Troubleshooting
33GB
Should you encounter a problem with your
system, do the following:
1Make sure the DIGITAL MEDIA PORT cable
of the unit is connected to the AV system
with DIGITAL MEDIA PORT interface (Sony
DAV series, etc.).
2Find your problem in the troubleshooting
checklist below and take the indicated
corrective action.
If the problem persists after doing all of the
above, consult your nearest Sony dealer.
Note that if service personnel changes some
parts during repair, these parts may be retained.
When bringing the system in for repairs, be sure
to bring in the entire system.
This product is a system product, and the entire
system is needed to determine the location
requiring repair.
General
There is no sound.
• Check the connections.
• Check the connected AV system’s volume.
There is severe hum or noise.
• Move the unit away from the source of noise.
The remote does not function.
• Remove the obstacle.
• Move the remote closer to the unit.
• Replace the CR2025 battery.
• Locate the unit away from the fluorescent light.
Network
The desired server cannot be found.
• Restart the computer.
• Check the WIRELESS/WIRED selector on the
network unit.
• Check the network settings on your computer.
• Start up the server you want to use on your
computer.
• Check the network settings on the unit side.
• Set the router or hub again correctly. For details,
see the instruction manual of the router or hub.
• When setting a firewall other than that provided
with the OS, refer to Troubleshooting in the “M-
crew Server Ver. 2.5” Installation instructions
included on the supplied CD-ROM.
• Reduce the number of servers that can be
connected to 10 servers or less (page 30).
• Follow the procedure below and reconnect to the
server.
1. Press MENU.
2. Select “SERVER?” in the network menu
(page 30), then press ENTER.
3. Press ./> repeatedly to select the
desired media server, then press ENTER.
Tracks registered to a server cannot be
selected by the unit.
• Track selection, playback and other operations on
the unit side may not be possible for servers other
than M-crew Server Ver. 2.5.
The sound skips.
• Sound skipping may occur in the following cases:
– When music is being recorded onto the server
– When the computer is running many
applications
– When the network status is crowded
– When multiple unit systems are performing
playback simultaneously
• When the computer and the wireless LAN router
are connected by a wireless connection, change it
to a wired connection.
• When the wireless LAN router and the unit are
connected by a wireless connection, position the
unit as close to the wireless LAN router as
possible.
Track names are not displayed.
• Some types of input characters cannot be
displayed by the unit, even if they can be
registered and displayed on the server.
Operation commands take time.
• Depending on the condition of the server, it may
take a while until operation proceeds. For
example, when there is no response after pressing
m/M, keep pressing m/M for a while.
Afterwards, operation should begin.
Wireless connection does not work well.
• Check that the wireless settings (SSID, Security
mode, wireless network key) match the settings of
your wireless LAN router.
• Check that your wireless LAN router uses the
latest firmware version. If it is not the latest
version, updating the firmware may improve the
communication quality. For details, refer to the
operation manual of your wireless LAN router.
• Make sure not to place the unit in a metallic TV
stand, etc.
Troubleshooting
Problems and remedies

34GB
• Make sure not to place the unit too far from the
wireless LAN router.
• Check your wireless LAN connection
environment. You cannot use CH 12 and 13 (for
European customers).
• If the electric wave is crossed with other wireless
LAN waves, change the wireless channel.
• Check for obstacles (metallic wall, etc.) installed
between the wireless access point and the unit.
These obstacles shorten the wave’s reach length.
• When using the PARTY MODE, using
IEEE802.11g (wireless)/100BASE-TX (wired)
for LAN connection is suggested.
If the unit still does not operate
properly after performing the
above measures, reset the unit
as follows:
While the unit is ‘on’ (the unit is connected to
an AV system), press RESET on the bottom of
the unit using a fine-tipped tool (e.g. pencil,
etc.).
The unit is reset to the factory settings. You should
set the settings you made.
If a message appears while using the unit, follow
the procedures below to correct the problem.
Network
Cannot Play
• Start up M-crew Server Ver. 2.5 and click
[ERROR LOG] in the LAUNCHER window, or
right-click the M-crew Server task tray icon* and
select “ERROR LOG VIEWER”, then check the
error log.
• The track cannot be played in the following cases:
– Sampling rate is other than 32 kHz, 44.1 kHz,
48 kHz.
– The track is not being streamed by linear PCM.
– The track is other than one channel or two
channel.
– The track sampling bits are other than 16 bits.
– The server status is busy.
Check Net
• Check that the network cable between the unit and
the hub or router is firmly connected.
• Check that the hub or router is turned on.
• Set the wireless LAN router channel to any
channel from CH1 to CH11. For details, refer to
the operation manual of your wireless LAN
router.
IP Conflict
• Set the IP addresses of the unit and other devices
on the network so that there is no duplication
(page 31).
No Item
• Register the track as instructed by the operation
manual of the connected server.
• Follow the procedure below and reconnect to the
server.
1. Press MENU.
2. Select “SERVER?” in the network menu
(page 30), then press ENTER.
3. Press ./> repeatedly to select the
desired media server, then press ENTER.
Messages
Troubleshooting
35GB
No Server/No response
• Restart the computer.
• Check the WIRELESS/WIRED selector on the
unit.
• Start up the server. M-crew Server Ver. 2.5 can be
started up by the following method:
Right-click the M-crew Server task tray icon*,
then click [Start Music Service] in the menu.
• M-crew Server Ver. 2.5 may not be recognizing
the unit. Follow the procedure below and check
whether M-crew Server Ver. 2.5 is recognizing
the unit:
1. Click [Start] – [All Programs] – [M-crew
Server] – [TOOLS] – [EQUIPMENT LIST] in
that order.
2. If the unit is not present in the list that appears
in step 1, device registration must be
performed. For details, see the “M-crew Server
Ver. 2.5” Help or “M-crew Server Ver. 2.5”
Installation instructions within M-crew Server
Ver. 2.5.
• When setting a firewall other than that provided
with the OS, refer to Troubleshooting in the “M-
crew Server Ver. 2.5” Installation instructions
included on the supplied CD-ROM.
• Perform the TCP/IP settings and wireless settings
correctly for the unit and the computer (page 31).
• You may not have input the correct wireless
network key. Try to input the wireless network
key numbers/characters again.
Press MENU
• Follow the procedure below and reconnect to the
server.
1. Press MENU.
2. Select “SERVER?” in the network menu
(page 30), then press ENTER.
3. Press ./> repeatedly to select the
desired media server, then press ENTER.
Server Err
• Follow the procedure below and reconnect to the
server.
1. Press MENU.
2. Select “SERVER?” in the network menu
(page 30), then press ENTER.
3. Press ./> repeatedly to select the
desired media server, then press ENTER.
Server Close
• Start up the server. M-crew Server Ver. 2.5 can be
started up by the following method:
Right-click the M-crew Server task tray icon*,
then click [Start Music Service] in the menu.
• When you want to change the computer’s network
settings, restart the server on your computer. This
message disappears after a short time.
WebRadio Err
• Register a station that can be played back on M-
crew Server Ver. 2.5.
• Connection may be difficult depending on the
internet line status. Wait a bit and then perform the
operation again.
* M-crew Server task tray icon is .
36GB
Configure the unit to communicate on your
wireless LAN network.
For how to display the wireless setup windows,
see page 18.
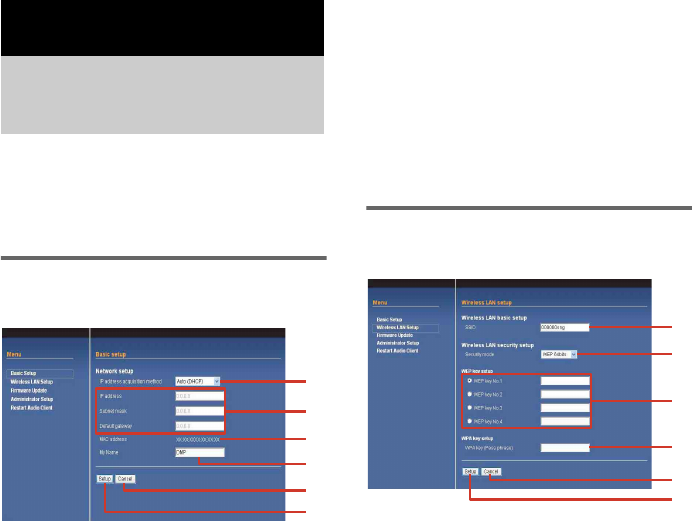
Basic setup window
You can make the basic network settings here.
1Select an IP address acquisition method
from the pull-down menu.
To acquire it from the DHCP server automatically,
select [Auto (DHCP)]. To enter it manually, select
[Manual (Static IP)].
Tip
If your wireless LAN router supports DHCP, select
[Auto (DHCP)].
2When you select [Auto (DHCP)] in 1, setup
is automatically completed.
When you select [Manual (Static IP)], you need to
enter appropriate values by yourself.
Tips
• When you select [Auto (DHCP)], you cannot change
the assigned values.
• When you select [Manual (Static IP)], see the
operating instructions for the values to be entered.
• Enter decimal numbers from 0 to 255 for an IP
address.
3The MAC address of the unit is displayed.
4The My Name of the unit is displayed.
The name you set on the unit appears. You can also
edit/change the name here.
Tip
You can assign a name to the unit. The name appears
in M-crew Server.
5Cancel the settings.
6Click the button to confirm the set values.
If any of the set values is incorrect, a window
appears.
Click [Setup] to show the set values. Correct them if
necessary.
Wireless LAN setup window
You can make wireless LAN settings here.
1Enter the network name (SSID) of the
wireless LAN router.
Be sure to enter the one used for your wireless LAN
router.
“SSID” is an ID used to identify a wireless network.
2From the pull-down menu, select the
security mode for your wireless LAN router.
Select one of the following;
No security
WEP 64bits
WEP 128bits
WPA (TKIP)
WPA (AES)
WPA2 (TKIP)
WPA2 (AES)
3Enter a security key when you select [WEP
64bits] or [WEP 128bits] in 2.
Select the security key number and enter the
security key for your wireless LAN router.
Enter either characters or hexadecimal numbers for
the security key.
The security keys should be arbitrary characters and
numbers.
The length of the security keys differs depending on
the security mode you select. See the table below.
Additional Information
Explanation of wireless
setup windows
1
2
5
4
6
3
1
3
2
5
4
6
Additional Information
37GB
Input method/Number of the characters
for security key
4Enter a pre-shared key when you select
[WPA(TKIP)], [WPA(AES)], [WPA2(TKIP)],
or [WPA2(AES)] in 2.
Enter the pre-shared key for your wireless LAN
router.
The length of the key should be 8 to 64 characters.
If you input 64 characters, enter hexadecimal
numbers (0 to 9, A to F, a to f).
Input method/Number of the characters
for pre-shared key
5Cancel the settings.
6Click the button to confirm the set values.
If any of the set values is incorrect, a window
appears.
Click [Setup] to show the set values. Correct them if
necessary.
Notes
• Use a security key or a pre-shared key that cannot be
easily guessed.
• Periodically change the security key and the pre-
shared key to ensure the network security.
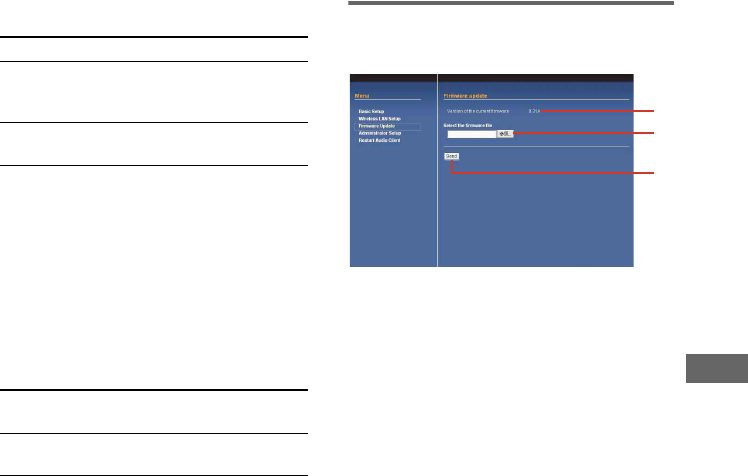
Firmware update window
Update the firmware for the unit.
1The version of the current firmware is
displayed.
2Select the firmware file you want to update.
Click [Browse] to show the window for selecting
the firmware.
3Click the button to update.
When you click the button, the firmware
confirmation window appears.
If you select the right firmware, updating starts. The
unit restarts automatically when the update is
completed.
If you select an incorrect firmware, click [Retry]
and select the correct one.
Notes
• Do not restart, pull out the cable, or turn off the
power of the connected AV system while updating
the firmware.
• Check the following website for the unit firmware
updates;
USA:
http://esupport.sony.com/?ref=http%3A//
www.sony.com/index.php
Canada:
http://www.sony.ca/sonyca/view/english/warranty/
consumer_support.shtml
Europe:
http://support.sony-europe.com/main/main.asp?l=en
WEP 64bits WEP 128bits
Characters 5 (one-byte
alphanumerics
and/or symbols)
13 (one-byte
alphanumerics
and/or symbols)
Hexadecimal
numbers
10 (0 to 9, A to
F, a to f)
26 (0 to 9, A to
F, a to f)
Characters 8 to 63 (one-byte alphanumerics
and symbols)
Hexadecimal
numbers
64 (0 to 9, A to F, a to f)
1
3
2
38GB
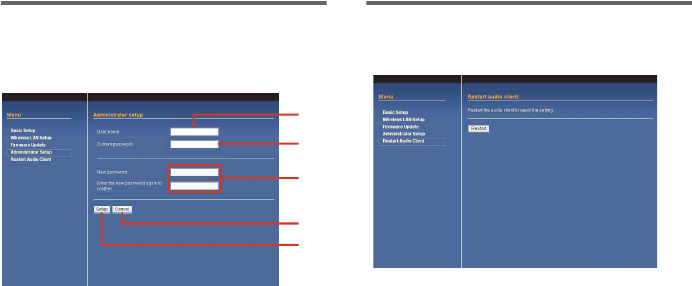
Administrator setup window
Set a user name and a password, or change the
password you previously set.
1Enter a user name.
The maximum length of the user name should be 16
characters.
2Enter the current password.
For security reasons, do not use the same password
as one you use for important items.
The maximum length of the password should be 16
characters.
3Enter a new password.
Enter the new password again to confirm.
The maximum length of the new password should
be 16 characters.
4Cancel the settings.
5Click the button to confirm the set values.
If any of the set values is incorrect, a window
appears.
Click [Setup] to show the set values. Correct the
values if necessary.
Restart audio client window
Restart the unit to apply your settings.
Tip
The settings will not become effective unless you
restart the unit.
2
1
5
4
3

Additional Information
39GB
AES (Advanced Encryption Standard)
An encryption protocol employed by the
wireless LAN encryption systems WPA and
WPA2. AES has more advanced security
functions than TKIP.
Default gateway
When communicating with devices that exist on
a different network, the data is first transferred
to a node (relay point) called a gateway.
However, when the gateway to which the data
should be transmitted is not known, the data is
transferred to the most typical node called the
default gateway.
DHCP (Dynamic Host Configuration
Protocol)
A system for automatically allocating
configuration data required for an Internet
connection.
IP address
IP addresses usually comprise four groups of up
to three digits each, separated by a period (such
as 192.168.239.1). All devices on a network
must have an IP address.
MAC address (Media Access Control
Address)
A unique number set to identify a network
interface on a network. A unique address is
assigned to each interface connected to a
network.
SSID (Service Set Identifier)
The name used by a wireless LAN to identify a
specific network. The same SSID is set for both
the wireless LAN router and the device with
wireless LAN functions, and wireless
communication is possible between devices
with matching SSID.
Subnet mask
Part of an IP address that identifies the subnet, a
smaller group on the network.
TKIP (Temporal Key Integrity
Protocol)
An encryption protocol employed by the
wireless LAN encryption systems WPA and
WPA2. TKIP prevents decoding of encryption
keys and spoofing, and has more advanced
security functions than WEP.
WEP (Wired Equivalent Privacy)
A data encryption system employed by wireless
LAN. WEP technology uses the same 64-bit or
128-bit encryption key for both devices
communicating over a wireless LAN to prevent
data from being decoded by other devices.
WPA (Wi-Fi Protected Access)
The wireless LAN encryption standard
advocated by the wireless LAN industry group
Wi-Fi Alliance. The WPA standard features
stronger security than WEP.
WPA2 (Wi-Fi Protected Access 2)
The new wireless LAN encryption standard
advocated by the wireless LAN industry group
Wi-Fi Alliance. The WPA2 standard features
even stronger security than WPA.
Glossary

40GB
On safety
Should any solid object or liquid fall into the system,
unplug the system and have it checked by qualified
personnel before operating it any further.
On placement
• Do not place the unit in an inclined position.
• Do not place the unit in locations where it is;
– Extremely hot or cold
– Dusty or dirty
– Very humid
– Subject to vibrations
– Subject to direct sunlight.
– Subject to microwave.
• Use caution when placing the unit on surfaces that
have been specially treated (with wax, oil, polish,
etc.) as staining or discoloration of the surface may
result.
On heat buildup
• Although the unit heats up during operation, this is
not a malfunction.
• Place the unit in a location with adequate ventilation
to prevent heat buildup in the unit.
If you have any questions or problems concerning your
unit, please consult your nearest Sony dealer.
Cleaning the unit
Clean the unit, panel and controls with a soft cloth
slightly moistened with mild detergent solution. Do not
use any type of abrasive pad, scouring powder or
solvent such as thinner, benzine or alcohol.
Output
Audio: 1 Vrms (stereo, via
DIGITAL MEDIA PORT)
Video: 1 Vp-p 75 ohms (VIDEO
OUT output jack or via
DIGITAL MEDIA PORT)
Network
Wired: Modular jack 10 BASE-T/
100 BASE TX
Wireless: Standard: IEEE802.11b/g
Channels: CH1 to CH11
General
Power requirements: DC IN: 5 V, 700 mA (via
DIGITAL MEDIA PORT)
Dimensions (w/h/d): Approx. 75 × 76 × 75 mm
(3 × 3 × 3 inches)
Mass: Approx. 0.3 kg
(0.6 1b 1 oz)
Design and specifications are subject to change
without notice.
Precautions Specifications
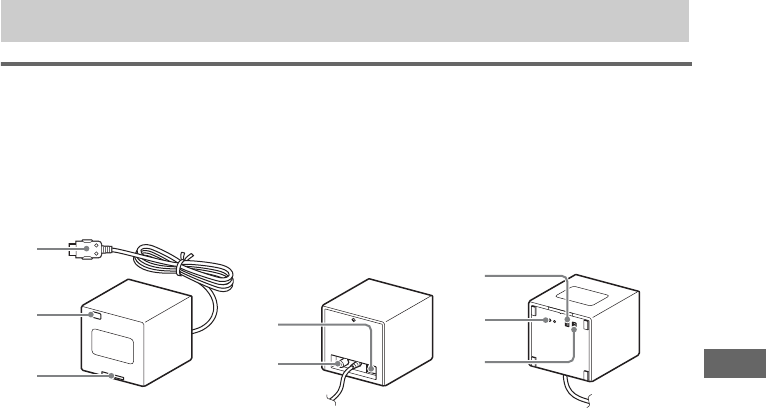
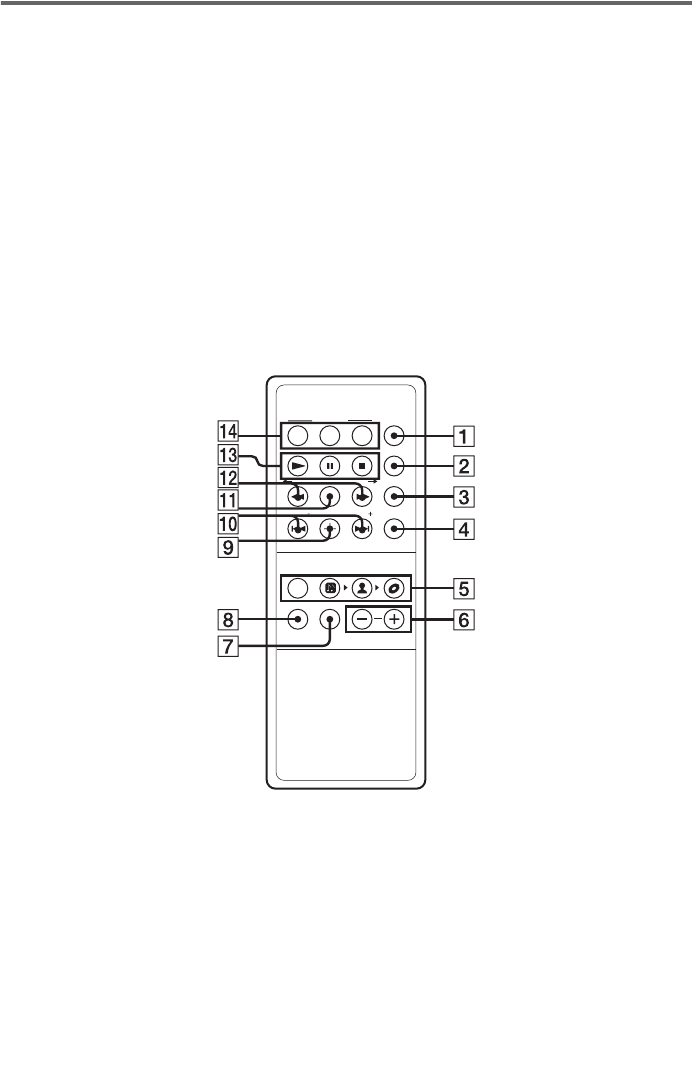
42GB
Remote control
Buttons for network unit
1 DISPLAY (30)
2 TIME (30)
3 REPEAT (21)
4 PLAY MODE (21)
MUSIC SURFIN’
5 ALL (21)
5 GENRE (21)
5 ARTIST (21)
5 ALBUM (21)
6 +/– (select item) (16, 19, 21, 23, 24, 27)
7 WEB RADIO (27)
8 PLAYLIST (23, 24)
9 ENTER (16, 19, 24, 25, 30)
q; ./> (go back/go forward) (16, 19, 21, 25,
27, 30)
qa MENU (16, 25, 30)
qs m/M (rewind/fast forward) (16, 21)
qd N (play) (19, 21, 24)
qd X (pause) (21, 24)
qd x (stop) (21, 27)
FAVORITE
qf CALL (24)
qf ADD (24)
qf DEL (24)