Sony Group 1492549 DWAM83 Wireless Audio Module User Manual earphone Use Manual 2013 12 09
Sony Corporation DWAM83 Wireless Audio Module earphone Use Manual 2013 12 09
Contents
- 1. 1492549- user manual 2013.7.31
- 2. 1492549-User Manual 2013.12.09
- 3. earphone Use Manual 2013.12.09
earphone Use Manual 2013.12.09
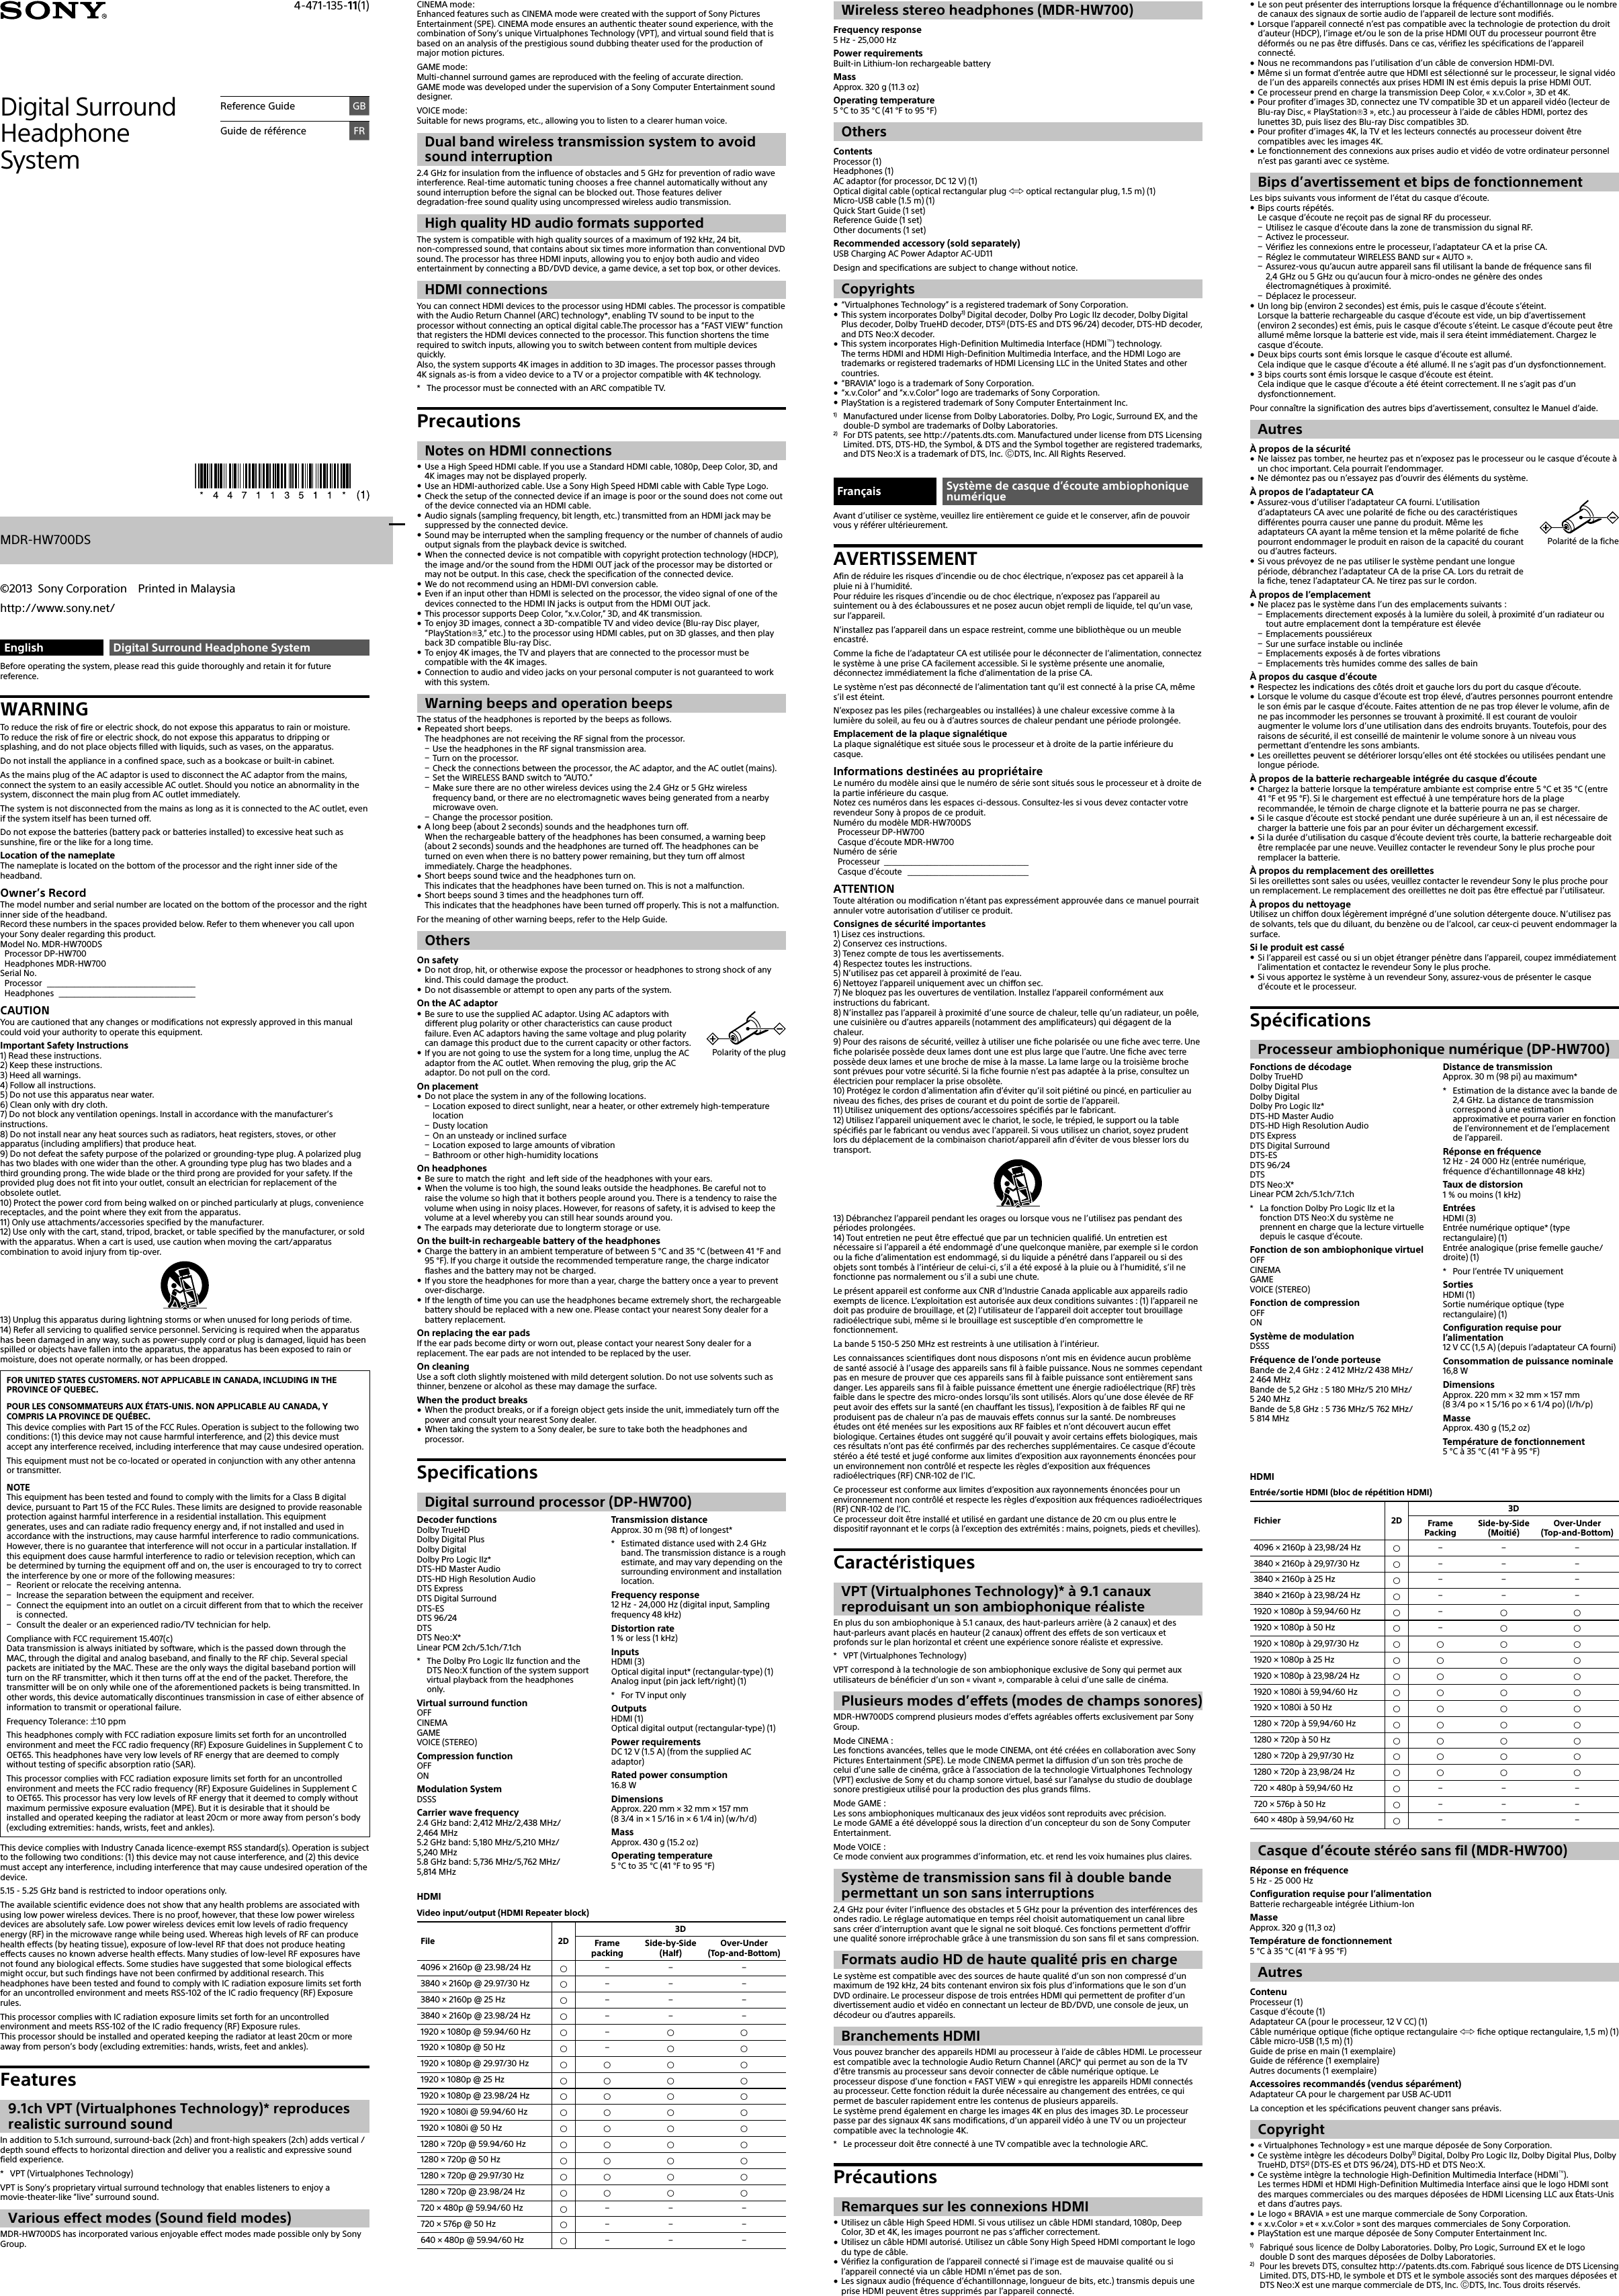
![A BCDEnglishLocation and Function of PartsMDR-HW700 Headphones (Figure )Setting items SettingsLEF Level: Adjusts the volume level of the subwoofer channel.1)Switchable between –6 dB and +6 dB.A/V Sync: You can adjust the sound when the image and the sound are not in sync.Adjustable between 0 msec and 300 msec.Dual Mono: Selects a channel when receiving a multiplex broadcast signal.TV+HP Audio Out: Selects simultaneous audio output to a TV speaker and the headphones.2)Control for HDMI: Selects the Control for HDMI function.HDMI Pass Through: Selects the HDMI Pass Through function.Front Display Mode: Selects how to show the front display of the processor.Reset Resets the settings.1) This item is not displayed when VOICE or OFF is selected for EFFECT.2) In the case of [On], set the audio output setting on the TV to “TV speaker” to output audio simultaneously.Status screen (Figure )The current status appears when [Status:] is selected on the Menu screen.Items MeaningsDecode: Identifies the audio format of the audio input signal.Audio CH: Identifies the channel composition of the audio input signal.Matrix: Identifies the matrix decoder function selected.Input: Identifies the input selected.Effect: Identifies the effect function selected.Compression: Reports whether the compression function is on or off.Center Level: Reports the volume level of the center channel.LEF level: Reports the volume level of the subwoofer channel.Wireless: Identifies the wireless frequency used.Headphones: Identifies the battery power of the headphones remaining (High/Middle/Low). ˎThe menu or status screen turns off automatically when no operation has been attempted for about 30 seconds. ˎFor details on the menu and status items, refer to the Help Guide.Using HDMI devices efficientlyIf you connect the processor with Sony products supporting the Control for HDMI function, you can also turn off the processor when you turn off the TV, you can listen to the TV sound simply by connecting an HDMI cable, or the input of the processor can be switched automatically when you start playback on the device connected to the processor. To use the Control for HDMI function on the processor, set [Control for HDMI] to [On] on the menu.TroubleshootingIf you run into any problems using this headphone system, use the following checklist. Please refer to the Quick Start Guide (supplied separately) and the Help Guide, also. Should any problem persist, consult your nearest Sony dealer.No sound ˎCheck the connections between the processor and the AV devices. ˎIf the optical digital output jack of a digital device is connected to the TV (OPT) OUT (THROUGH) jack of the processor, re-connect it to the TV (OPT) IN jack of the processor. ˎTurn on the AV devices connected to the processor, and start the playback again. ˎTurn on the processor. ˎCheck that the INPUT button on the processor is set to the device you want to listen to. ˎIf you have connected the headphone jack of the AV device to either of the LINE IN (L/R) jacks of the processor, raise the volume level on the connected AV device. ˎTurn on the headphones again. ˎRaise the headphone volume. ˎCharge the battery of the headphones. If the power indicator is still off after you have charged the battery, take the headphones to your nearest Sony dealer.No sound (When devices are connected to the HDMI jacks) ˎUse an HDMI-authorized cable. Use a Sony High Speed HDMI cable with Cable Type Logo. ˎYou are playing programs that are protected by copyright protection technology (HDCP) and are prohibited to be output via digital jacks (SACD, DVD audio discs, etc.). In this case, connect the processor with the device using an analog audio cable, and listen to them. ˎThe audio signal is not being input to the processor directly.Connect the devices via the HDMI input jack of the processor, or connect the device to the OPT/LINE IN input jack of the processor. ˎWhen the CONTROL FOR HDMI switch of the processor is set to MODE1, the audio output setting on the TV must not be set to “TV speaker.” To output sound from this system, select a setting other than “TV speaker.” ˎTurn on the headphones or processor again.No sound, no video ˎUse an HDMI-authorized cable. Use a Sony High Speed HDMI cable with Cable Type Logo. ˎWhen you switch sound from a TV to an AV amplifier, or when you put the headphones on when sound is being output from a TV, the TV screen becomes blank and sound is muted for a moment. This is not a malfunction. ˎMake sure that the processor is turned on.If the processor is turned off, the pass-through function does not work. Therefore, the video and audio signal from the connected device is not input to the TV. Turn on the processor, or set it to standby mode.No TV sound can be heard on the system. ˎIn the case of connection type A shown in the Quick Start Guide ēIf your TV is compatible with ARC, set the processor to standby mode first, and then set the CONTROL FOR HDMI switch on the processor to “MODE1,” and select “TV” with the INPUT button. Then, turn on the Control for HDMI function and the ARC setting on the TV. ēIf your TV is not compatible with ARC, check the connection of the optical digital cable or the analog audio cable between the TV and the processor. Check the audio output setting on the TV, also. If you have connected them using an optical digital cable, changing the setting will improve the situation. ˎIn the case of connection type B shown in the Quick Start Guide ēCheck the connection of the optical digital cable or the analog audio cable between the TV and the processor. Check the audio output setting on the TV, also.No sound is output from a TV or AV amplifier connected to the HDMI OUT jack of the processor. ˎWhen sound is output from the headphones, an audio signal is not output from the HDMI OUT jack. If you want to listen via a TV or AV amplifier, set the system to standby mode. ˎSet the audio output setting to “TV speaker” on the TV.No sound from the device connected to the AV amplifier is heard on the system. ˎIn the case of connection type B shown in the Quick Start Guide, you can hear sound from the devices connected to the AV amplifier on the AV amplifier or a TV only. If you want to hear them on this system, connect the device to the processor using an optical digital cable or an analog audio cable.The CONTROL FOR HDMI switch is set to “MODE1,” but the headphone volume cannot be adjusted from a TV. ˎThe volume of the headphones of the system cannot be adjusted using the remote control of a TV. Adjust the volume using the VOL control on the right-side housing of the headphones.The Control for HDMI function (“BRAVIA” Sync) does not work. ˎIf you are not using an AV amplifier with the processor, set the processor to standby mode first, and then set the CONTROL FOR HDMI switch to “MODE1.” If [Control for HDMI] on the menu of the processor is set to [Off], the Control for HDMI function does not work. In the case of “MODE2,” the Control for HDMI function is limited.The TV is turned on, but the processor does not turn on automatically. ˎThe CONTROL FOR HDMI switch is set to “MODE2.” ˎCheck the audio output settings on the TV. The processor turns on or off in conjunction with the audio output settings on the TV. If sound was being output from the TV speaker when you turned off the TV last time, the processor will not turn on even if you turn on the TV.The power off interlock function does not work. ˎSet the TV so that the devices connected to the TV are turned off automatically when the TV is turned off. For details, refer to the manual supplied with your TV.The processor turns off when you turn off the TV. ˎIf [Control for HDMI] on the menu of the processor is set to [On], the power off interlock function works. If you turn off the TV, the processor enters standby mode and its power indicator turns from green to orange. ˎWhen the CONTROL FOR HDMI switch is set to “MODE1,” and [HDMI Pass Through] is set to [Auto] on the menu, when the TV is turned off, the HDMI Pass Through function is disabled after about 20 seconds. For details, refer to the Help Guide.The Control for HDMI function does not work properly. ˎCheck the HDMI connection. ˎSet up the Control for HDMI function on the TV. For details, refer to the manual supplied with your TV. ˎMake sure the connected device is compatible with “BRAVIA” Sync. ˎCheck the Control for HDMI settings on the connected device. For details, refer to the manual supplied with the connected device. ˎMake sure that [Control for HDMI] is set to [On] on the menu of the processor.When you connect an AV amplifier to the processor, set the processor to standby mode first, and then set the CONTROL FOR HDMI switch to “MODE2.” In the Control for HDMI function, only one set of AV amplifier or equivalent devices can be connected to the processor. ˎThe Control for HDMI setting has not been changed even though you changed the CONTROL FOR HDMI switch position.Changing the CONTROL FOR HDMI switch position is not effected when the processor is turned on. Set the processor in standby mode before you operate the CONTROL FOR HDMI switch.Distorted or intermittent sound (sometimes with noise) ˎCharge the battery of the headphones. If the power indicator is still off after you charge the battery, take the headphones to your nearest Sony dealer. ˎMake sure there are no other wireless devices using the 2.4 GHz or 5 GHz wireless frequency band, or there are no electromagnetic waves being generated from a nearby microwave oven. ˎChange the position of the processor. ˎWhen “ANALOG” is selected with the INPUT button, change the ATT (LINE IN) switch on the processor to “–8 dB.” ˎIf you connect the headphone jack of the AV device to either of the LINE IN (L/R) jacks of the processor, raise the volume level on the connected AV device. ˎTry other positions of the WIRELESS BAND switch.When the WIRELESS BAND switch is set to “AUTO,” and the channel changes automatically, sound may cut out momentarily. This is not a malfunction.Low sound ˎWhen “ANALOG” is selected with the INPUT button, change the ATT (LINE IN) switch on the processor to “0 dB.” ˎIf you connect the headphone jack of the AV device to either of the LINE IN (L/R) jacks of the processor, raise the volume level on the connected AV device. ˎRaise the headphone volume.The surround sound effect is not obtained ˎSelect “CINEMA” or “GAME” for the sound field mode. ˎThe sound being played is not a multi-channel signal. ˎDepending on the audio output setting on the TV or HDMI device, multi-channel signals are down-mixed to 2-channel to be output. In this case, change the setting on the device so that a multi-channel signal is output. ˎSet [TV+HP Audio OUT] to [Off] on the menu of the processor.If it is set to [On], the audio output from the device connected to the processor is influenced by the TV specifications. If the TV has stereo speakers, the audio output from the connected device becomes stereo (2-channel), the same as that of the TV, even if you are playing multi-channel software.The MATRIX indicator does not turn on, or flashes. ˎSelect “CINEMA” or “GAME” for the sound field mode. ˎThe matrix decoder may not work, depending on the format of the audio input to the processor. In this case, the MATRIX indicator flashes.The battery cannot be charged; the charge indicator flashes. ˎCheck the connections between the headphones, the micro-USB cable, and the computer. ˎUse the micro-USB cable supplied with the system. ˎThere is something wrong with the rechargeable battery. Consult your nearest Sony dealer. ˎCharge the battery in an ambient temperature range of between 5°C and 35°C (between 41°F and 95°F).No signal is output from the TV (OPT) OUT (THROUGH) jack of the processor. ˎConnect the processor to a power source. ˎStart playback on the optical digital device connected to the TV (OPT) IN jack.Beeps are heard from the headphones. ˎCheck the headphones, referring to “Warning beeps and operation beeps” in “Precautions.”No sound from either the TV or the headphones ˎSet [TV+HP Audio Out] to [On] on the menu of the processor. Then, set the audio output setting to “TV speaker” on the TV. Tactile dot (to distinguish the left side)Be sure to match the right and left side of the headphones with your ears. Power indicatorThis indicator lights up in green when the power is on. / (power) buttonPress the button for about 1 second to turn the headphones on or off.TipThe headphones turn on when you put them on, and turn off when you remove them (auto power on function). Charge indicatorThis indicator lights up in red while the headphones are being charged. Micro-USB jack (for charging the battery only)Connect the micro-USB cable supplied to this jack to charge the headphones. MENU/ENTER switchPress the switch to display the menu of the system on the screen of a TV connected to the processor. Slide the switch up or down to select a setting item on the menu, and press it to enter the selection. Then, slide the switch up or down again to select the option. INPUT buttonAllows you to select an input. VOL (volume) controlAdjusts the volume. EFFECT buttonAllows you to select a sound field.DP-HW700 Processor (Figure ) HDMI IN 1/IN 2/IN 3 jacksThese jacks input HDMI signals. HDMI OUT jackOutputs HDMI signals. This jack is compatible with ARC (Audio Return Channel). TV (OPT) IN/OUT (THROUGH) jacksInputs or outputs optical digital audio signals. LINE IN (L/R) jacksThese jacks input analog audio signals. DC IN 12V jackConnect the AC adaptor supplied to this jack. / (power) button (power on/standby/power off)The processor turns on or enters standby mode alternately as you press the button. Hold the button down for 3 seconds to turn off the processor completely (power off). INPUT buttonAllows you to select an input. EFFECT/ buttonAllows you to select a sound field.Allows you to select an item on the menu. MATRIX/ buttonAllows you to select a matrix decoder*.Allows you to select an item on the menu.* You can select a matrix decoder when the sound field mode is “CINEMA” or “GAME.” The matrix decoder function expands an audio input signal format up to 9.1-channel surround format. For details, refer to the Help Guide. COMPRESSION/MENU/ENTER buttonAllows you to select a dynamic range.Hold this button down for about 2 seconds to display the menu on the screen of a TV connected to the processor. When you are using the menu, press this button to enter the selection. COMPRESSION indicatorThe indicator lights up when the compression function is set to on. MATRIX indicatorsThe indicator of the matrix decoder selected lights up (or flashes). EFFECT indicatorsThe indicator of the sound field mode selected lights up. INPUT indicatorsThe indicator of the input selected lights up. 2CH/Multi CH indicators2CH or Multi CH lights up according to the input signal (stereo or multi-channel). Power indicatorThis indicator lights up in green when the power is turned on, in orange in standby mode, and goes off when the power is turned off. CONTROL FOR HDMI switchSet this switch to accommodate the type of HDMI devices you want to connect to the processor.NoteChanging the CONTROL FOR HDMI switch position is not effected when the processor is on. Turn off the processor or set it in standby mode before you operate the CONTROL FOR HDMI switch. WIRELESS BAND switchSelects the frequency band you want to use. When you select AUTO, an optimum frequency band is selected automatically (default setting).NoteMake sure that you select 2.4 GHz when you use the processor outdoors. ATT (LINE IN) switchSet this switch to 0dB if the volume is too low for analog output.Using the menuYou can make settings or check the current status of the system on the menu displayed on the screen of a TV connected to the processor. Using the menu on the processor (See also Figure )1 Switch the input on the TV to which the processor is connected.2 Press and hold the COMPRESSION/MENU/ENTER button until the menu is displayed on the TV screen.3 Select a setting item using the MATRIX/ or EFFECT/ buttons, and then press the COMPRESSION/MENU/ENTER button.4 Select the desired option using the MATRIX/ or EFFECT/ buttons, and then press the COMPRESSION/MENU/ENTER button.Using the menu on the headphones (See also Figure )1 Switch the input on the TV to which the processor is connected.2 Turn on the headphones, and press the MENU/ENTER switch to display the menu on the TV screen.3 Select a setting item by sliding the MENU/ENTER switch up or down, and then press the MENU/ENTER switch.4 Select the desired option by sliding the MENU/ENTER switch up or down, and then press the MENU/ENTER switch.Menu screen (Figure )Setting items SettingsExit Turns off the menu.Status: Displays the status of the system.Center Level: Adjusts the volume level of the center channel.1)Switchable between 0 dB and +8 dB.The menu screen does not appear on the TV. ˎSelect the input to which the processor is connected on the TV.The menu screen is displayed only when you select the input to which the processor is connected. ˎCheck the connection between the TV and the processor. ˎOn some TVs, it may take a while until the menu is displayed on the TV screen.FrançaisEmplacement et fonction des élémentsCasque d’écoute MDR-HW700 (Figure ) Point tactile (permettant d’identifier le côté gauche)Assurez-vous de respecter les côtés droit et gauche lors du port du casque d’écoute. Témoin d’alimentationCe témoin s’allume en vert lorsque l’appareil est sous tension. Bouton / (alimentation)Appuyez sur le bouton pendant environ 1 seconde pour allumer ou éteindre le casque d’écoute.ConseilLe casque d’écoute s’allume lorsque vous le portez et s’éteint lorsque vous le retirez (fonction de mise sous tension automatique). Témoin de chargeCe témoin s’allume en rouge lorsque le casque d’écoute est en cours de chargement. Prise micro-USB (pour le chargement de la batterie uniquement)Branchez le câble micro-USB fourni à cette prise pour charger le casque d’écoute. Commutateur MENU/ENTERAppuyez sur le commutateur pour afficher le menu du système sur l’écran d’une TV connectée au processeur. Déplacez le commutateur vers le haut ou vers le bas pour sélectionner un élément de réglage du menu, puis appuyez pour entrer la sélection. Ensuite, déplacez de nouveau le commutateur vers le haut ou vers le bas pour sélectionner l’option. Bouton INPUTPermet de sélectionner une entrée. Contrôle VOL (volume)Permet de régler le volume. Bouton EFFECTPermet de sélectionner un champ sonore.Processeur DP-HW700 (Figure ) Prises HDMI IN 1/IN 2/IN 3Ces prises correspondent aux signaux d’entrée HDMI. Prise HDMI OUTPermet l’émission de signaux HDMI. Cette prise est compatible avec la technologie ARC (Audio Return Channel). Prises TV (OPT) IN/OUT (THROUGH)Permettent l’entrée ou la sortie de signaux audio numériques optiques. Prises LINE IN (L/R)Ces prises permettent l’entrée de signaux audio analogiques. Prise DC IN 12VBranchez l’adaptateur CA fourni à cette prise. Bouton / (alimentation) (mise sous tension/veille/mise hors tension)Le processeur s’allume ou passe en mode veille alternativement lorsque vous appuyez sur le bouton. Maintenez le bouton appuyé pendant 3 secondes pour éteindre complètement le processeur (mise hors tension). Bouton INPUTPermet de sélectionner une entrée. Bouton EFFECT/Permet de sélectionner un champ sonore.Permet de sélectionner un élément du menu. Bouton MATRIX/Permet de sélectionner un décodeur matriciel.*Permet de sélectionner un élément du menu.* Vous pouvez sélectionner un décodeur matriciel lorsque le mode de champ sonore est «CINEMA» ou «GAME». La fonction de décodeur matriciel étend un format de signal d’entrée audio en un format ambiophonique à 9.1 canaux. Pour plus de détails, consultez le Manuel d’aide. Bouton COMPRESSION/MENU/ENTERPermet de sélectionner une plage dynamique.Appuyez sur ce bouton pendant environ 2 secondes pour afficher à l’écran le menu d’une TV connectée au processeur. Lorsque vous utilisez le menu, appuyez sur ce bouton pour entrer la sélection. Témoin COMPRESSIONLe témoin s’allume lorsque la fonction de compression est activée. Témoins MATRIXLe témoin du décodeur matriciel sélectionné s’allume (ou clignote). Témoins EFFECTLe témoin du mode de champ sonore sélectionné s’allume. Témoins INPUTL’indicateur de l’entrée sélectionnée s’allume. Témoins 2CH/Multi CH2CH ou Multi CH s’allume, en fonction du signal d’entrée (stéréo ou multi-canal). Témoin d’alimentationCe témoin s’allume en vert lorsque l’alimentation est activée, en orange en mode veille et s’éteint lorsque l’alimentation est coupée. Commutateur CONTROL FOR HDMIRéglez ce commutateur en fonction du type d’appareils HDMI que vous souhaitez connecter au processeur.RemarqueModifier la position du commutateur CONTROL FOR HDMI est sans effet lorsque le processeur est activé. Éteignez le processeur ou réglez-le en mode veille avant d’actionner le commutateur CONTROL FOR HDMI. Commutateur WIRELESS BANDPermet de sélectionner la bande de fréquence que vous souhaitez utiliser. Lorsque vous sélectionnez AUTO, la bande de fréquence optimale est sélectionnée automatiquement (réglage par défaut).RemarqueAssurez-vous de sélectionner 2,4GHz lorsque vous utilisez le processeur à l’extérieur. Commutateur ATT (LINE IN)Réglez ce commutateur sur 0dB si le volume est trop faible pour la sortie analogique.Utilisation du menuVous pouvez effectuer des réglages ou consulter l’état actuel du système sur le menu qui s’affiche sur l’écran d’une TV connectée au processeur. Utilisation du menu sur le processeur (Voir également la Figure )1 Réglez l’entrée de la TV à laquelle le processeur est connecté.2 Maintenez le bouton COMPRESSION/MENU/ENTER enfoncé jusqu’à ce que le menu s’affiche sur l’écran de la TV.3 Sélectionnez un élément de réglage à l’aide des bouton MATRIX/ ou bouton EFFECT/, puis appuyez sur le bouton COMPRESSION/MENU/ENTER.4 Sélectionnez l’option désirée à l’aide des bouton MATRIX/ ou bouton EFFECT/, puis appuyez sur le bouton COMPRESSION/MENU/ENTER.Utilisation du menu du casque d’écoute (Voir également la Figure )1 Réglez l’entrée de la TV à laquelle le processeur est connecté.2 Allumez le casque d’écoute et appuyez sur le commutateur MENU/ENTER pour afficher le menu sur l’écran de la TV.3 Sélectionnez un élément de réglage en déplaçant le commutateur MENU/ENTER vers le haut ou vers le bas, puis appuyez sur le commutateur MENU/ENTER.4 Sélectionnez l’option souhaitée en déplaçant le commutateur MENU/ENTER vers le haut ou vers le bas, puis appuyez sur le commutateur MENU/ENTER.Écran du menu (Figure )Éléments de réglage RéglagesExit Éteint le menu.Status: Affiche l’état du système.Center Level: Ajuste le niveau du volume du canal central.1)Réglage possible entre 0dB et +8dB.LEF Level: Permet de régler le volume sonore du canal du caisson d’extrêmes basses.1)Réglage possible entre -6dB et +6dB.A/V Sync: Vous pouvez ajuster le son lorsque l’image et le son sont désynchronisés.Réglage possible entre 0ms et 300ms.Dual Mono: Permet de sélectionner un canal lors de la réception d’un signal de diffusion multiplexé.TV+HP Audio Out: Sélectionne simultanément la sortie audio vers les haut-parleurs d’une TV et le casque d’écoute.2)Control for HDMI: Sélectionne la fonction Commande pour HDMI.HDMI Pass Through: Sélectionne la fonction HDMI Pass Through.Front Display Mode: Sélectionne comment afficher l’affichage frontal du processeur.Reset Réinitialise les réglages.1) Cet élément ne s’affiche pas lorsque VOICE ou OFF est sélectionné pour EFFECT.2) Si le réglage est [On], réglez la sortie audio de la TV sur «haut-parleur de la TV» pour émettre un signal audio simultanément.Écran de l’état (Figure )L’état actuel apparaît lorsque [Status:] est sélectionné sur l’écran Menu.Éléments SignificationDecode: Identifie le format audio du signal d’entrée audio.Audio CH: Identifie la composition du canal du signal d’entrée audio.Matrix: Identifie la fonction de décodeur matriciel sélectionnée.Input: Identifie l’entrée sélectionnée.Effect: Identifie la fonction de l’effet sélectionné.Compression: Indique si la fonction de compression est activée ou désactivée.Center Level: Indique le niveau du volume du canal central.LEF level: Indique le niveau du volume du canal du caisson d’extrêmes basses.Wireless: Identifie la fréquence sans fil utilisée.Headphones: Identifie la capacité restante de la batterie du casque d’écoute (High/Middle/Low). ˎL’écran du menu ou de l’état s’éteint automatiquement lorsqu’aucune opération n’a été initiée pendant environ 30 secondes. ˎPour plus de détails sur les éléments du menu et de l’état, consultez le manuel d’aide.Utilisation efficace des périphériques HDMISi vous connectez le processeur à des produits Sony qui prennent en charge la fonction Commande pour HDMI, vous pouvez également éteindre le processeur en même temps que la TV, vous pouvez écouter le son de la TV en connectant simplement un câble HDMI et vous pouvez changer automatiquement l’entrée du processeur lorsque vous démarrez la lecture sur le périphérique connecté au processeur. Pour utiliser la fonction Commande pour HDMI sur le processeur, réglez [Control for HDMI] sur [On] sur le menu.DépannageSi vous rencontrez des problèmes au cours de l’utilisation de ce système de casque d’écoute, utilisez la liste de vérification suivante. Veuillez consulter le Guide de prise en main (fourni séparément) ainsi que le Manuel d’aide. Si cela ne permet pas la résolution des problèmes, veuillez consulter le revendeur Sony le plus proche.Aucun son ˎVérifiez les connexions entre le processeur et les appareils AV. ˎSi la prise de sortie numérique optique d’un appareil numérique est branchée à la prise TV (OPT) OUT (THROUGH) du processeur, rebranchez-la à la prise TV (OPT) IN du processeur. ˎActivez les appareils AV connectés au processeur et relancez la lecture. ˎActivez le processeur. ˎVérifiez que le bouton INPUT du processeur est réglé sur l’appareil que vous souhaitez utiliser. ˎSi vous avez branché la prise du casque d’écoute de l’appareil AV sur l’une des prises LINE IN (L/R) du processeur, augmentez le niveau du volume de l’appareil AV connecté. ˎAllumez de nouveau le casque d’écoute. ˎAugmentez le volume du casque d’écoute. ˎChargez la batterie du casque d’écoute. Si le témoin d’alimentation est toujours éteint après le chargement de la batterie, apportez votre casque d’écoute au revendeur Sony le plus proche.Aucun son (lorsque les appareils sont connectés aux prises HDMI) ˎUtilisez un câble HDMI autorisé. Utilisez un câble HDMI Sony High Speed comportant le logo du type de câble. ˎVous lisez des programmes protégés par la technologie de protection des droits d’auteur (HDCP) et qui ne peuvent pas être émis via des prises numériques (SACD, DVD, disques audio, etc.). Dans ce cas, connectez le processeur à l’appareil à l’aide d’un câble audio analogique pour pouvoir l’utiliser. ˎLe signal audio n’est pas transmis directement au processeur.Branchez les appareils via la prise d’entrée HDMI du processeur ou branchez l’appareil à la prise d’entrée OPT/LINE IN du processeur. ˎLorsque le commutateur CONTROL FOR HDMI du processeur est réglé sur MODE1, le réglage de la sortie audio de la TV ne doit pas être défini sur «haut-parleur de la TV». Pour émettre du son depuis ce système, sélectionnez un autre réglage que «haut-parleur de la TV». ˎRallumez le casque d’écoute ou le processeur.Aucun son, pas de vidéo ˎUtilisez un câble HDMI autorisé. Utilisez un câble HDMI Sony High Speed comportant le logo du type de câble. ˎLorsque le réglage du son passe d’une TV à un amplificateur AV ou lorsque vous allumez le casque d’écoute lorsque du son est émis par la TV, l’écran et le son sont désactivés pendant un instant. Il ne s’agit pas d’un dysfonctionnement. ˎAssurez-vous que le processeur est désactivé.Si le processeur est désactivé, la fonction pass-through ne fonctionne pas. Ainsi, les signaux vidéo et audio de l’appareil connecté ne sont pas émis vers la TV. Activez le processeur ou réglez-le en mode veille.Aucun son de la TV n’est émis par le système. ˎDans le cas de la connexion de type A indiquée dans le Guide de prise en main ēSi votre télévision est compatible avec la technologie ARC, réglez tout d’abord le processeur en mode veille, puis définissez le commutateur CONTROL FOR HDMI du processeur sur «MODE1», puis sélectionnez «TV» avec le bouton INPUT. Ensuite, activez la fonction Commande pour HDMI et le réglage ARC sur la TV. ēSi votre TV n’est pas compatible avec la technologie ARC, vérifiez le branchement du câble numérique optique ou du câble audio analogique entre la TV et le processeur. Vérifiez également le réglage de la sortie audio sur la TV. Si le branchement est effectué à l’aide d’un câble numérique optique, la modification du réglage pourra améliorer la situation. ˎDans le cas de la connexion de type B indiquée dans le Guide de prise en main ēVérifiez le branchement du câble numérique optique ou le câble audio analogique entre la TV et le processeur. Vérifiez également le réglage de la sortie audio sur la TV.Aucun son n’est émis depuis la TV ou l’amplificateur AV branché à la prise HDMI OUT du processeur. ˎLorsque du son est émis depuis le casque d’écoute, aucun signal audio n’est émis depuis la prise HDMI OUT. Si vous souhaitez écouter du son via une TV ou un amplificateur AV, réglez le système en mode veille. ˎDéfinissez le réglage de la sortie audio sur «haut-parleur TV» sur la TV.Aucun son de l’appareil connecté à l’amplificateur AV n’est émis sur le système. ˎDans le cas de la connexion de type B indiquée dans le Guide de prise en main, vous pouvez entendre le son des appareils connectés à l’amplificateur AV sur l’amplificateur AV ou simplement sur une TV. Si vous souhaitez les utiliser sur ce système, connectez les appareils sur le processeur à l’aide d’un câble numérique optique ou d’un câble audio analogique.Le commutateur CONTROL FOR HDMI est défini sur «MODE1» mais le volume du casque d’écoute ne peut pas être réglé depuis une TV. ˎLe volume du casque d’écoute du système ne peut pas être réglé à l’aide de la télécommande d’une TV. Réglez le volume à l’aide du contrôle VOL situé sur le boîtier droit du casque d’écoute.La fonction Commande pour HDMI («BRAVIA» Sync) ne fonctionne pas. ˎSi vous n’utilisez pas d’amplificateur AV avec le processeur, réglez tout d’abord le processeur en mode veille, puis réglez le commutateur CONTROL FOR HDMI sur «MODE1». Si [Control for HDMI] du menu du processeur est réglé sur [Off], la fonction Commande HDMI ne fonctionne pas. Si le réglage est «MODE2», la fonction Commande pour HDMI est limitée.La TV est sous tension, mais le processeur ne s’allume pas automatiquement. ˎLe commutateur CONTROL FOR HDMI est réglé sur «MODE2». ˎVérifiez les réglages de la sortie audio sur la TV. Le processeur s’allume ou s’éteint en fonction des réglages de la sortie audio de la TV. Si le son était émis depuis le haut-parleur de la TV, lorsque la TV a été éteinte pour la dernière fois, le processeur ne s’allumera pas même lorsque vous allumez la TV.La fonction de verrouillage de la mise hors tension ne fonctionne pas. ˎRéglez la TV de sorte que les appareils qui y sont connectés soient éteints automatiquement en même temps que la TV. Pour plus de détails, consultez le manuel fourni avec votre TV.Le processeur s’éteint lorsque vous éteignez la TV. ˎSi [Control for HDMI] du menu du processeur est réglé sur [On], la fonction de verrouillage de la mise hors tension fonctionne. Si vous désactivez la TV, le processeur entre en mode veille et son témoin d’alimentation passe du vert à l’orange. ˎSi le commutateur CONTROL FOR HDMI est réglé sur «MODE1» et que [HDMI Pass Through] est réglé sur [Auto] sur le menu, lorsque la TV est éteinte, la fonction HDMI Pass Through est désactivée après environ 20 secondes. Pour plus de détails, consultez le Manuel d’aide.La fonction Commande pour HDMI ne fonctionne pas correctement. ˎVérifiez les branchements HDMI. ˎRéglez la fonction Commande pour HDMI sur la TV. Pour plus de détails, consultez le manuel fourni avec votre TV. ˎAssurez-vous que l’appareil connecté est compatible avec «BRAVIA» Sync. ˎVérifiez les réglages de la Commande pour HDMI sur l’appareil connecté. Pour plus de détails consultez le manuel fourni avec l’appareil connecté. ˎAssurez-vous que [Control for HDMI] est réglé sur [On] sur le menu du processeur.Lorsqu’un amplificateur AV est connecté au processeur, réglez tout d’abord ce dernier en mode veille, puis réglez le commutateur CONTROL FOR HDMI sur «MODE2». Avec la fonction Commande pour HDMI, il n’est possible de connecter qu’un seul amplificateur AV ou appareil équivalent au processeur. ˎLe réglage de Commande pour HDMI n’a pas été modifié, même si vous avez changé la position du commutateur CONTROL FOR HDMI.Changer la position du commutateur CONTROL FOR HDMI est sans effet lorsque le processeur est activé. Réglez le processeur en mode veille avant d’actionner le commutateur CONTROL FOR HDMI.Son distordu ou intermittent (comportant parfois du bruit) ˎChargez la batterie du casque d’écoute. Si le témoin d’alimentation est toujours éteint après le chargement de la batterie, apportez votre casque d’écoute au revendeur Sony le plus proche. ˎAssurez-vous qu’aucun autre appareil sans fil utilisant la bande de fréquence sans fil 2,4GHz ou 5GHz ou qu’aucun four à micro-ondes ne génère des ondes électromagnétiques à proximité. ˎDéplacez le processeur. ˎLorsque «ANALOG» est sélectionné avec le bouton INPUT, placez le commutateur ATT (LINE IN) du processeur sur «–8 dB». ˎSi vous branchez la prise du casque d’écoute de l’appareil AV sur l’une des prises LINE IN (L/R) du processeur, augmentez le volume sonore de l’appareil AV connecté. ˎEssayez d’autres positions du commutateur WIRELESS BAND.Lorsque le commutateur WIRELESS BAND est réglé sur «AUTO» et que le canal change automatiquement, le son pourra être temporairement interrompu. Il ne s’agit pas d’un dysfonctionnement.Volume sonore faible ˎLorsque «ANALOG» est sélectionné avec le bouton INPUT, placez le commutateur ATT (LINE IN) du processeur sur «0 dB». ˎSi vous branchez la prise du casque d’écoute de l’appareil AV sur l’une des prises LINE IN (L/R) du processeur, augmentez le volume sonore de l’appareil AV connecté. ˎAugmentez le volume du casque d’écoute.Pas d’effet de son ambiophonique ˎSélectionnez «CINEMA» ou «GAME» dans le mode de champ sonore. ˎLe son lu n’est pas un signal multicanal. ˎSelon le réglage de la sortie audio de la TV ou de l’appareil HDMI, les signaux multicanaux font l’objet d’une réduction par mixage à 2 canaux pour être émis. Dans ce cas, modifiez le réglage de l’appareil pour pouvoir émettre un signal multicanal. ˎRéglez [TV+HP Audio OUT] sur [Off] sur le menu du processeur.S’il est réglé sur [On], la sortie audio provenant de l’appareil connecté au processeur dépend des spécifications de la TV. Si la TV dispose de haut-parleurs stéréo, la sortie audio de l’appareil connecté devient stéréo (2 canaux) comme celle de la TV, même si vous utilisez un logiciel multicanal.Le témoin MATRIX ne s’allume pas ou clignote. ˎSélectionnez «CINEMA» ou «GAME» dans le mode de champ sonore. ˎLe décodeur matriciel pourra ne pas fonctionner en fonction du format du son transmis au processeur. Dans ce cas, le témoin MATRIX clignote.La batterie ne charge pas, le témoin de charge clignote. ˎVérifiez les connexions entre le casque d’écoute, le câble micro-USB et l’ordinateur. ˎUtilisez le câble micro-USB fourni avec le système. ˎLa batterie rechargeable présente une anomalie. Contactez le revendeur Sony le plus proche. ˎChargez la batterie lorsque la température ambiante est comprise entre 5°C et 35°C (entre 41°F et 95°F).Aucun signal n’est émis par la prise TV (OPT) OUT (THROUGH) du processeur. ˎConnectez le processeur à une source d’alimentation. ˎDémarrez la lecture sur l’appareil numérique optique branché à la prise TV (OPT) IN.Des bips retentissent dans le casque d’écoute. ˎVérifiez le casque d’écoute en consultant le paragraphe «Bips d’avertissement et bips de fonctionnement» dans la section «Précautions».Aucun son n’est émis depuis la TV ou le casque d’écoute. ˎRéglez [TV+HP Audio Out] sur [On] sur le menu du processeur. Définissez ensuite le réglage de la sortie audio sur «haut-parleur TV» sur la TV.L’écran de menu ne s’affiche pas sur la TV. ˎSélectionnez l’entrée à laquelle le processeur est branché sur la TV.L’écran de menu ne s’affiche que lorsque vous sélectionnez l’entrée à laquelle le processeur est branché. ˎVérifiez la connexion entre la TV et le processeur. ˎLe menu peut ne pas s’afficher immédiatement sur l’écran de certaines TV.](https://usermanual.wiki/Sony-Group/1492549.earphone-Use-Manual-2013-12-09/User-Guide-2136941-Page-2.png)