Sony Group CBEH1700 Computer Entertainment System User Manual
Sony Corporation Computer Entertainment System
UserManual.wiki
>
Sony Group
>
CBEH1700 User Manual
User Manual
Navigation menu
Upload a User Manual
Namespaces
Wiki Guide
HTML
PDF
Info
Views
User Manual
Discussion / Help
Navigation

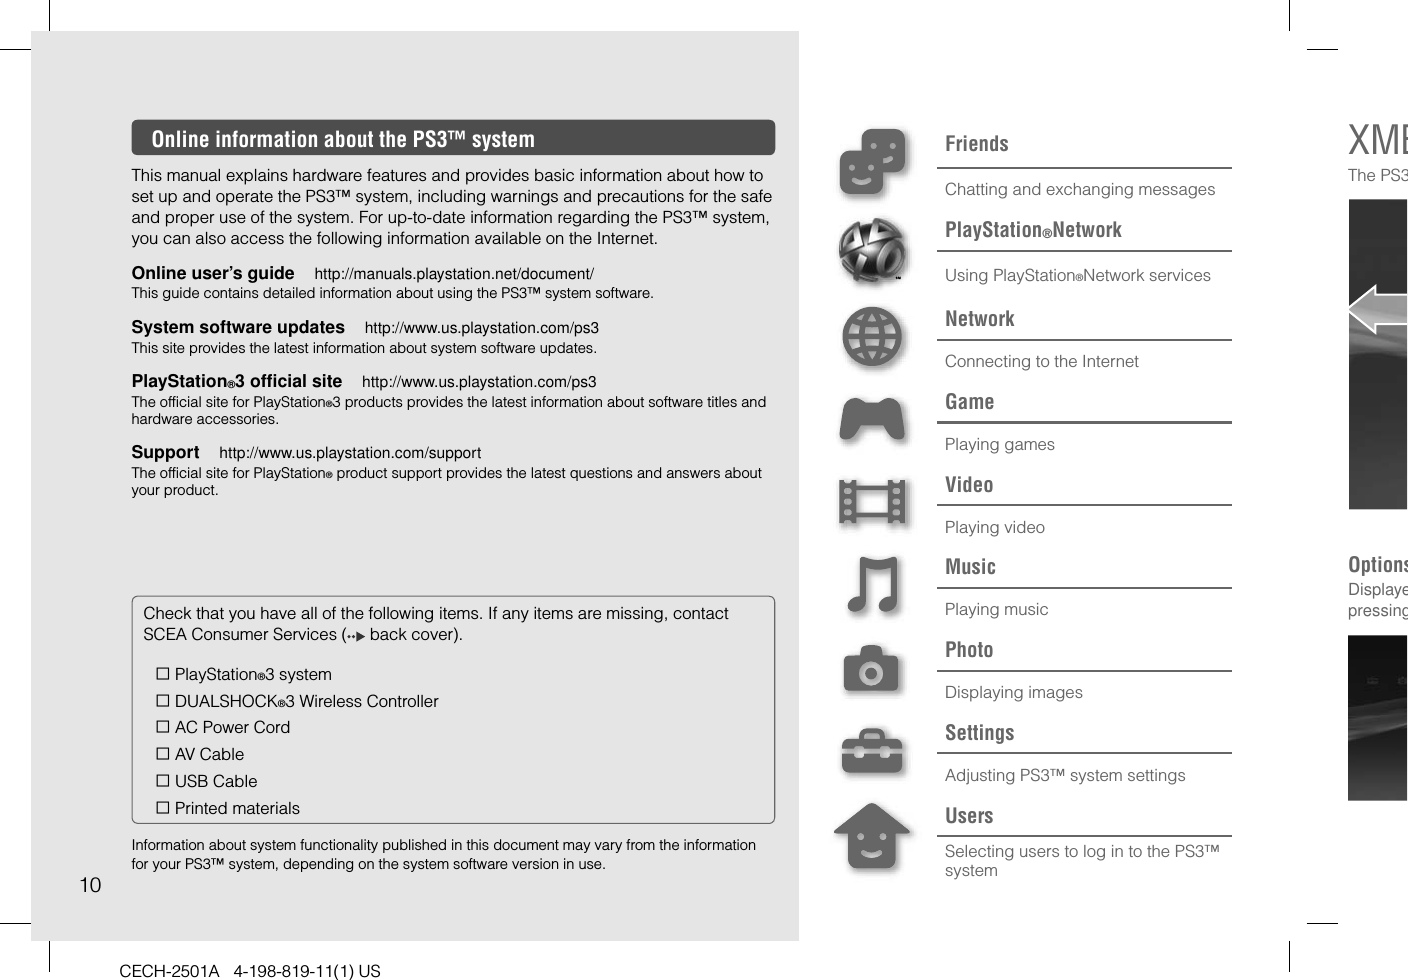
![6CECH-2501A 4-198-819-11(1) USPrecautions Do not where t Do not extendmay ca When cimage faint im* Excep Parentsand resNoteWire Stop usdiscomWireles The vibinjuriesbones,injury, dDUALSto [Off] Avoid pabout 3 Note thdisableselect [ When uthe folloaccide– BefoBefore using this product, carefully read all the precautions.SafetyThis product has been designed with the highest concern for safety. However, any electrical device, if used improperly, has the potential for causing fire, electrical shock or personal injury. To help ensure accident-free operation, follow these guidelines: Observe all warnings, precautions and instructions. Regularly inspect the AC power cord for damage. Stop use, unplug the AC power cord from the electrical outlet and disconnect any other cables immediately if the device functions in an abnormal manner, produces unusual sounds or smells or becomes too hot to touch. For more information on product safety and support, visit our website ( back cover).Use and handling Use in a well-lit area and keep as far away as possible from the television screen. Avoid prolonged use of the PS3™ system and wireless controller. Stop using the system immediately if you begin to feel tired or if you experience discomfort or pain in your hands or arms while operating the wireless controller. If the condition persists, consult a doctor. If you experience any of the following health problems, discontinue use of the system immediately. If symptoms persist, consult with your physician.− Dizziness, nausea, fatigue or symptoms similar to motion sickness− Discomfort or pain in a part of the body, such as eyes, ears, hands or arms Keep the system and accessories, including cable ties and fasteners, out of the reach of small children. Do not connect cables other than a USB cable while the system is turned on (power indicator is lit solid green). Any TV or component connected to the system must be functioning properly and free of defects. If a TV or component connected to the system is faulty or defective, it may cause damage to the TV or component, or to the system itself. As with all electrical products, connection to faulty or defective components, or the failure to connect to a properly wired outlet, may cause sparking and pose a fire hazard. Do not touch the system or connected cables or accessories during an electrical storm. Do not use the system or accessories near water. Do not allow liquid, small particles or other foreign objects to get into the system or accessories. Do not touch the connectors of the system or accessories. Do not expose the system or accessories to dust, smoke or steam. Also, do not place the system in an area subject to excessive dust or cigarette smoke. Dust build-up or cigarette smoke residue on the internal components (such as the lens) may cause the system to malfunction. Do not expose the system or accessories to high temperatures, high humidity or direct sunlight. Do not place the system or accessories on surfaces that are unstable, tilted or subject to vibration. Do not set the system other than in the vertical or horizontal position. When setting the system in the vertical position, use the vertical stand (sold separately) for this model of the system. Also, do not change the position of the system while it is turned on. Be careful when carrying the system. If you do not have a good grip, the system may drop causing potential damage or injury. Do not move or change the position of the system with a disc inserted. The vibration may result in scratching of the disc or the system. Do not turn off the system while data is being saved on or loaded from the hard disk. Do not stand on or put objects on the system, and do not stack the system with other devices.](https://usermanual.wiki/Sony-Group/CBEH1700/User-Guide-1294321-Page-6.png)
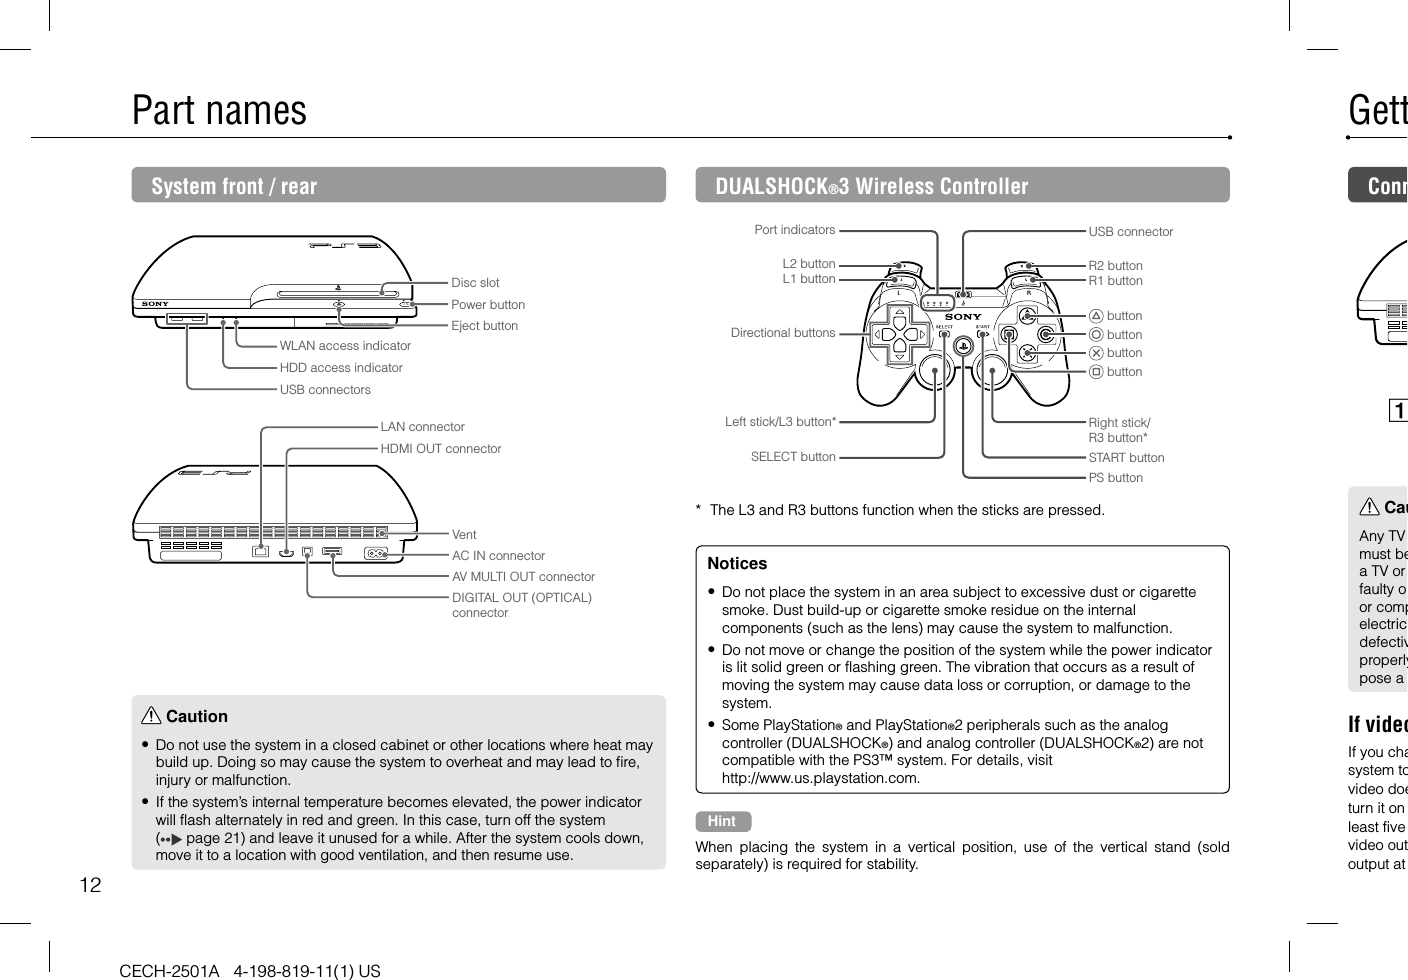
![7PrecautionsCECH-2501A 4-198-819-11(1) USUS Do not place the system and connected accessories on the floor or in a place where they may cause someone to trip or stumble. Do not allow bodily contact with the system or air from the system vents for an extended period of time while in use. Extended contact under these conditions may cause low-temperature burns. When connecting the system to a plasma or projection* TV, do not leave a still image on the TV screen for an extended period of time, as this may leave a faint image permanently on the screen.* Except LCD screen types Parents are encouraged to monitor children in online activities to ensure safe and responsible Internet usage.Notes on safety when using the DUALSHOCK®3 Wireless Controller* Stop using the system immediately if you begin to feel tired or if you experience discomfort or pain in your hands or arms while operating the DUALSHOCK®3 Wireless Controller. If the condition persists, consult a doctor. The vibration function of the DUALSHOCK®3 Wireless Controller can aggravate injuries. Do not use the vibration function if you have any ailment or injury to the bones, joints or muscles of your hands or arms. If you have an ailment or an injury, do not play software titles that contain the vibration function using the DUALSHOCK®3 Wireless Controller unless you have set the vibration function to [Off]. Avoid prolonged use of the DUALSHOCK®3 Wireless Controller. Take a break at about 30-minute intervals. Note that some software titles set the vibration function to [On] by default. To disable the vibration function, press the PS button of the controller, and then select [Controller Settings] [Vibration Function] [Off] When using the motion sensor function of the wireless controller, be cautious of the following points. If the controller hits a person or object, this may cause accidental injury or damage.– Before using, check that there is plenty of space around you.– When using the controller, grip it firmly to make sure it cannot slip out of your hand.– If using a controller that is connected to the PS3™ system with a USB cable, make sure there is enough space for the cable so that the cable will not hit a person or object. Also, take care to avoid pulling the cable out of the PS3™ system while using the controller.* These notes also apply to other controllers.VentsDo not block any vents. To maintain good ventilation, follow the guidelines below: Place the system at least 10 cm (4 in) away from a wall surface. Do not place on a carpet or rug with long fibers. Do not place in a narrow or cramped space. Do not cover with cloth. Do not allow dust to build up on the vents.AC power cord use Any TV or component connected to the system must be functioning properly and free of defects. If a TV or component is faulty or defective, it may cause damage to the TV or component, or to the system itself. As with all electrical products, connection to faulty or defective components, or the failure to connect to a properly wired outlet, may cause sparking and pose a fire hazard. Do not plug the AC power cord for the system into an electrical outlet until you have made all other connections. Make sure the TV or other component is unplugged from the electrical outlet prior to connecting it to the system. To help ensure safe operation, regularly inspect the AC power cord. If damaged, stop use immediately and contact SCEA Consumer Services ( back cover). Do not use a power cord other than the supplied AC power cord. Do not modify the cord.operly aulty or em itself. nents, or nd pose n he o, do not ke. Dust as the umidity tilted or When on of the he The the hard tem with](https://usermanual.wiki/Sony-Group/CBEH1700/User-Guide-1294321-Page-7.png)


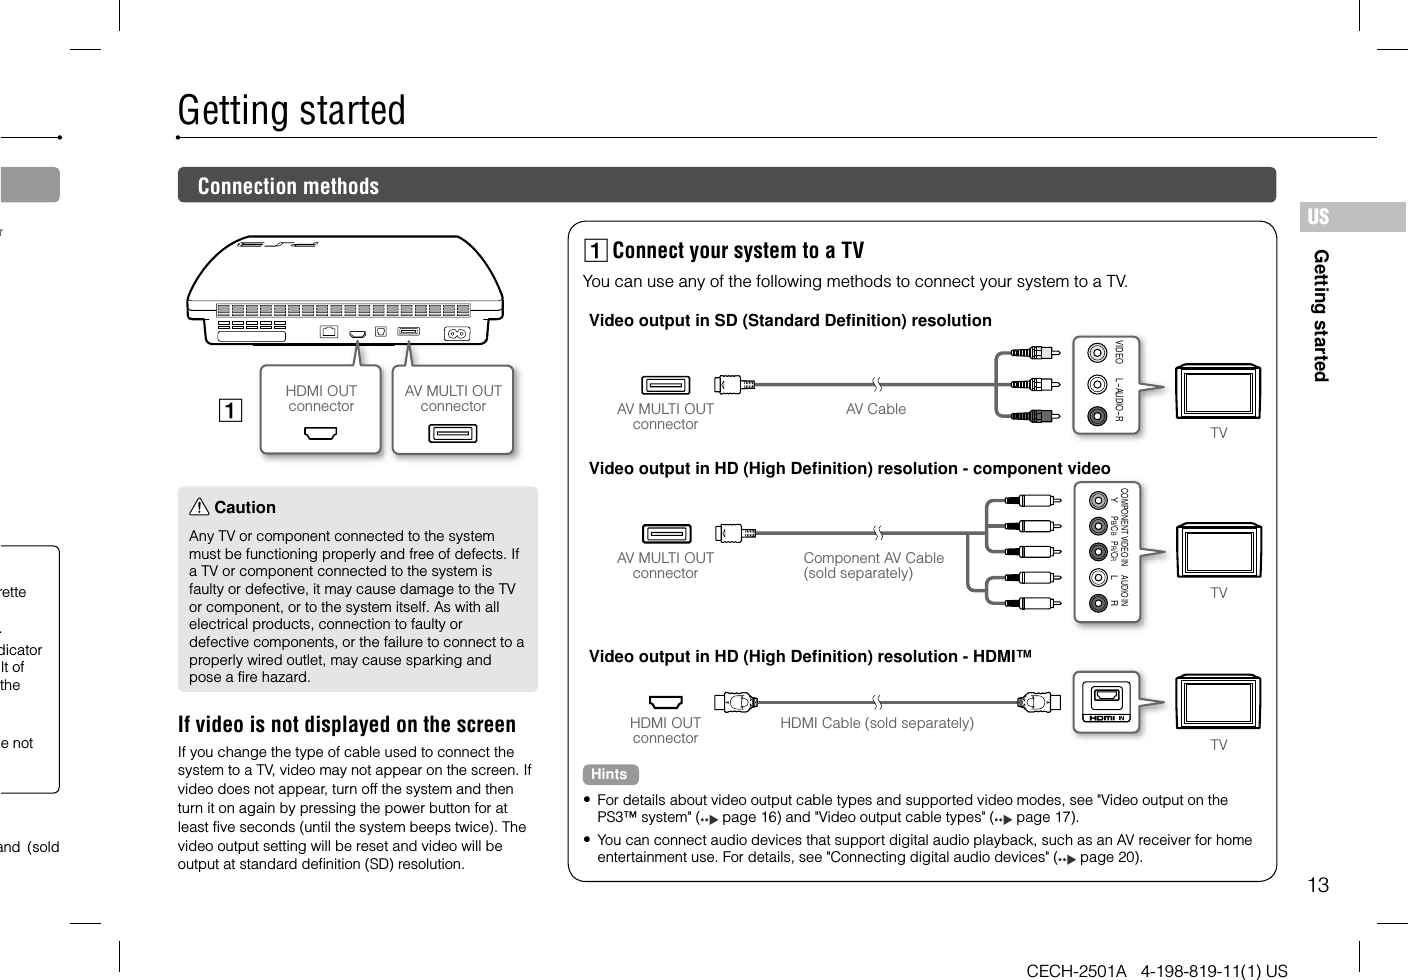
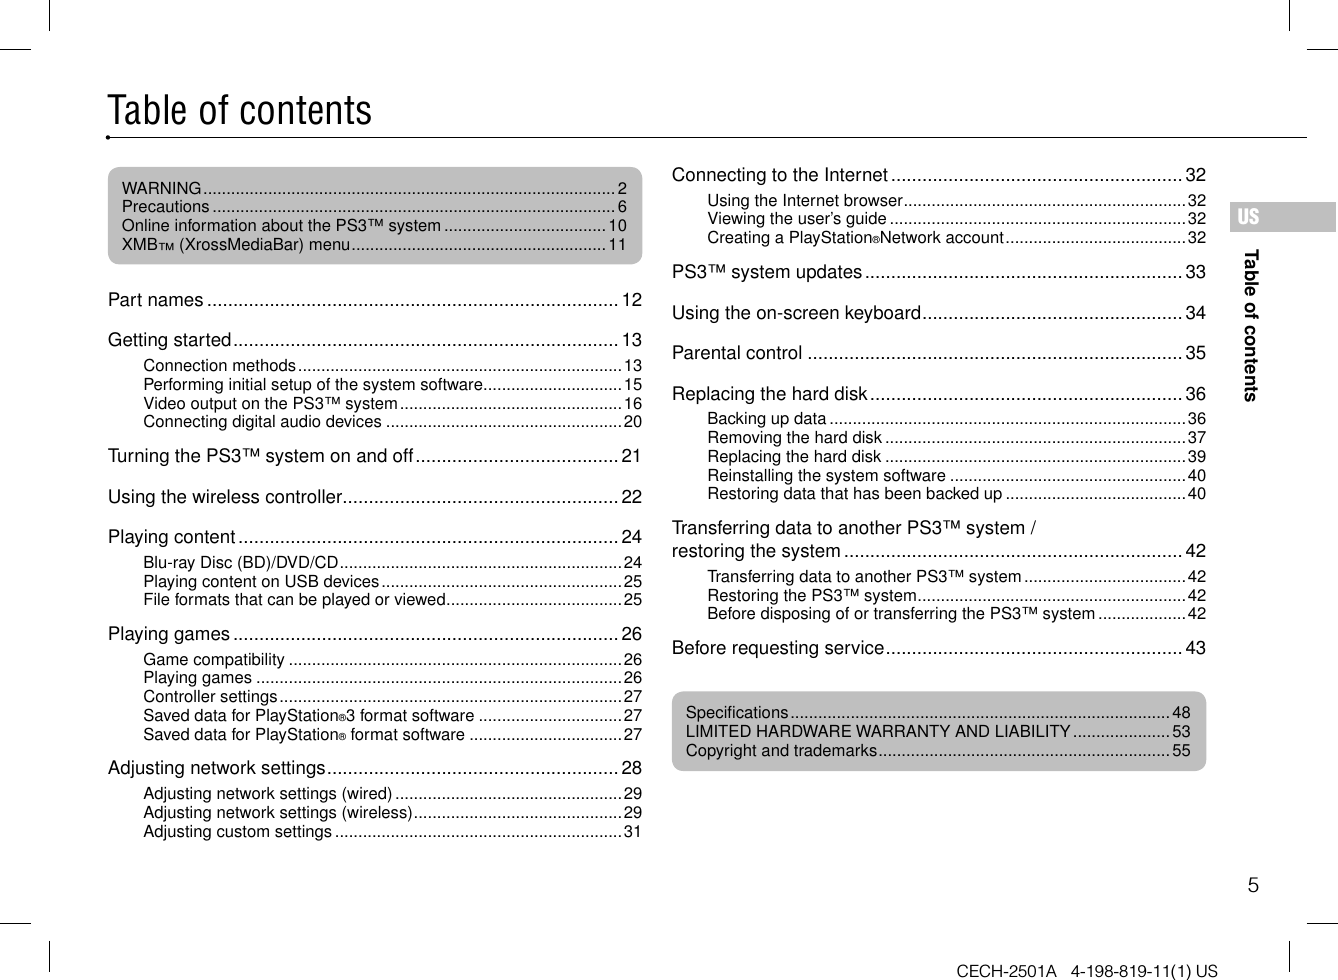
![15Getting startedCECH-2501A 4-198-819-11(1) USUScable. ible ire e ther to Performing initial setup of the system softwareAfter turning on the system, perform initial setup.1 Turn on the TV, and then switch the video input of the TV to match the input connector used by the PS3™ system. 2 Press the power button. The power indicator turns green and the picture is displayed on the TV screen. Power buttonPower indicator3 Connect the wireless controller to the system using a USB cable.4 Press the PS button on the controller. The system will recognize the controller. After it has recognized the controller, the initial setup screen will be displayed.5 Perform initial setup.Follow the on-screen instructions to enter settings for system language, time zone, date and time, and user name. The screen for setting up the Internet connection will be displayed. When connecting using an Ethernet cable, basic settings will be selected automatically if you follow the on-screen instructions. When connecting over a wireless LAN, follow the instructions in "Adjusting network settings (wireless)" ( page 29) to set up the connection. After the settings have been completed, the XMB™ menu ( page 11) will be displayed on the TV screen. Hints When using an HDMI cable to connect the system to the TV, a screen for changing the video output resolution will be displayed during initial setup. If you select [Yes] on the screen and then press the button, the optimal output resolution will be selected automatically. For details on entering text, see "Using the on-screen keyboard" ( page 34). Settings entered during initial setup can be changed under (Settings) or (Users). For details, refer to the online user’s guide (http://manuals.playstation.net/document/).](https://usermanual.wiki/Sony-Group/CBEH1700/User-Guide-1294321-Page-15.png)
![16Getting startedCECH-2501A 4-198-819-11(1) USVideo output on the PS3™ systemThe PS3™ system can output two types of resolution: HD and SD. Refer to the instruction manual for the TV in use to check which video mode is supported.HD (High Definition) SD (Standard Definition)Video mode *11080p 1080i 720p 480p 480i *2Aspect ratio 16:9 16:9 16:9 16:9 4:3 16:9 4:3*1 This number indicates the number of scan lines. Note that "i" stands for "interlace" and "p" stands for "progressive". Using progressive results in high-quality video with minimal flickering.*2 The video output setting on the system will display as [Standard (NTSC)].Screens showing the difference in resolutionHD screen SD screenVideThe resoin use.HDMI C(sold seCompon(sold seS VIDEO(sold seAV Cabl(supplie*1 DepenIf a devaudio cCopyrigDigital *2 Connevideo a*3 The vid](https://usermanual.wiki/Sony-Group/CBEH1700/User-Guide-1294321-Page-16.png)
![17Getting startedCECH-2501A 4-198-819-11(1) USUSde is deo with Video output cable typesThe resolution displayed on the TV varies depending on the input connectors on the TV and the type of cable in use. Select a cable to match the TV in use.Cable type Input connector on the TV Supported video modes*¹HDMI Cable*² (sold separately) HDMI IN connector 1080p / 1080i / 720p / 480pComponent AV Cable (sold separately)Component VIDEO IN connector YLRPR/CRPB/CBCOMPONENT VIDEO IN AUDIO IN 1080p / 1080i / 720p / 480p / 480i*3S VIDEO Cable (sold separately) S VIDEO IN connector S VIDEO L-AUD I O-R 480i*3AV Cable (supplied)VIDEO IN connector (composite) VIDEO L-AUD I O-R 480i*3*1 Depending on the type of TV or content to be played, some video modes may not be supported.If a device that is not compatible with the HDCP (High-bandwidth Digital Content Protection) standard is connected to the system using an HDMI cable, video and/or audio cannot be output from the system.Copyright-protected Blu-ray video discs can only be output at 1080p using an HDMI cable connected to a device that is compatible with the HDCP (Highband-width Digital Content Protection) standard.*2 Connect the system to the TV using an HDMI cable (sold separately). An HDMI cable can output both video and audio and enables you to enjoy digital-quality video and audio.*3 The video output setting on the system will display as [Standard (NTSC)].](https://usermanual.wiki/Sony-Group/CBEH1700/User-Guide-1294321-Page-17.png)
![18Getting startedCECH-2501A 4-198-819-11(1) USAdjusting video output settingsDepending on the type of cables and the connectors used, you may need to adjust the PS3™ system's video output settings to display video at HD resolutions ( page 16) on a TV.If video is not displayed Switch the video input of the TV to match the input connector used to connect to the system. Turn off the system, and then turn it on again by pressing the power button for at least five seconds (until the system beeps twice). The video output setting will be reset and video will be output at standard definition (SD) resolution.1 Select (Settings) (Display Settings) [Video Output Settings], and then press the button.2 Select the input connector ( page 17) in use on the TV, and then press the button.If you select [HDMI], you will have the option to choose [Automatic] or [Custom] on the next screen. In most cases, select [Automatic], and video output settings will be completed automatically.If you select [AV MULTI / SCART], you must choose the type of output signal on the next screen. In most cases, select [Y Pb/Cb Pr/Cr].3 Confirm the screen, and then press the button.If you changed the connector in step 2, a screen for confirming the change will be displayed.4 Confirm the settings, select [Yes], and then press the button.If you changed the connector in step 2, a screen for confirming the settings will be displayed.5 Select the resolutions supported by the TV, and then press the button.The resolution displayed on the TV varies depending on the input connector and the type of cable used ( page 17). The highest resolution you selected will be used for video output. Depending on the connector selected in step 2, this screen may not be displayed.6 ConDepein ste7 SeleIf youthe TIf youautomwill n8 ConThe v](https://usermanual.wiki/Sony-Group/CBEH1700/User-Guide-1294321-Page-18.png)
![19Getting startedCECH-2501A 4-198-819-11(1) USUSchange button.settings ss the nnector u be 6 Confirm the settings, select [Yes], and then press the button.Depending on the connector selected in step 2 and the resolutions selected in step 5, this screen may not be displayed.7 Select the type of TV, and then press the button.If you selected [Standard (NTSC)] or [480p] in step 5, a screen for selecting the TV screen size will be displayed. Adjust the setting to match the TV in use.If you selected [720p] or a higher resolution in step 5, the TV type will automatically be set to 16:9 and the screen for selecting the TV screen size will not be displayed.8 Confirm the settings, and then press the button.The video output settings will be saved on the system.9 Adjust audio output settings.Continue on to adjust audio output settings. Adjust settings to match the TV or audio device in use.If you select [HDMI], you will have the option to choose [Automatic] or [Manual] on the next screen. In most cases, select [Automatic]. If using a cable other than an HDMI cable to output audio from the TV, select [Audio Input Connector / SCART / AV MULTI]. If using an optical digital cable to output audio, select [Digital Out (Optical)] and choose the output format on the next screen.10 Confirm the settings, and then press the button.The audio output settings will be saved on the system.Hints You can adjust audio output settings under (Settings) (Sound Settings) [Audio Output Settings]. If the TV in use supports 3D stereoscopic display, a screen for setting the TV’s screen resolution will be displayed after step 2. Follow the on-screen instructions to adjust the settings. Connect the PS3™ system to a TV that supports 3D stereoscopic display using an HDMI cable.](https://usermanual.wiki/Sony-Group/CBEH1700/User-Guide-1294321-Page-19.png)
![20Getting startedCECH-2501A 4-198-819-11(1) USConnecting digital audio devicesYou can connect audio devices that support digital audio playback, such as an AV receiver for home entertainment use.Audio output on the PS3™ systemThe supported channels may vary depending on the output connector to be used.PS3™ system output connectors Channels that can be used for output2 Ch. 5.1 Ch. 7.1 Ch.AV MULTI OUT connector DIGITAL OUT (OPTICAL) connector HDMI OUT connector Hints When connecting a digital audio device to the system, go to (Settings) (Sound Settings) [Audio Output Settings], and then adjust the settings as necessary for the audio device. For simultaneous audio output from multiple connectors, go to (Settings) (Sound Settings) [Audio Multi-Output], and set the option to [On]. The system can output both audio and video through an HDMI cable. If both the TV and the audio device have HDMI connectors, you can output the TV picture to the TV through a connected audio device. If a device is connected to the PS3™ system via an HDMI cable, do not turn off the device while the system is turned on (power indicator is lit solid green), as doing so may cause sound distortion or produce abnormal sounds.Examples when connecting an audio device An HDMI cable or optical digital cable can be used to connect an audio device to the PS3™ system.HDMI cable Optical digital cableHDMI cable (sold separately)Digital audio device Optical digital cable for audio (sold separately)Video output cable for the TV in use ( page 17) HDMI cable (sold separately)TV TVDigital audio device](https://usermanual.wiki/Sony-Group/CBEH1700/User-Guide-1294321-Page-20.png)

![25Playing contentCECH-2501A 4-198-819-11(1) USUSf the om the buttonPlaying content on USB devicesYou can connect external devices, such as devices that are compatible with USB Mass Storage Class, using a USB cable. Devices can be connected while the system is turned on. Refer also to the instructions supplied with the device.1 Connect the USB device.An icon is displayed on the screen.External device such as a digital camera2 Select the icon, and then press the button.A list of playable content is displayed.Notices Do not remove USB devices or turn off the system while data is being saved, loaded or deleted. Doing so may cause data loss or corruption. When using a USB flash drive with a write-protect switch, do not operate the switch when the device is connected to the system. Doing so may cause data loss or corruption.File formats that can be played or viewedFile formats that can be played or viewed on this system include ATRAC™, MP3, AAC, JPEG and MPEG-4. For the latest information, refer to the online user’s guide (http://manuals.playstation.net/document/).Hints Only files that are playable or viewable on the PS3™ system are displayed in the column for the compatible category (Example: Image data is displayed under (Photo)). Depending on the storage media, only a subset of the folders on the media may be displayed. If you select [Display All] from the options menu ( page 11), all folders saved on the media will be displayed.NoticeFor information on backing up files saved on the hard disk, see "Backing up data" ( page 36).](https://usermanual.wiki/Sony-Group/CBEH1700/User-Guide-1294321-Page-25.png)
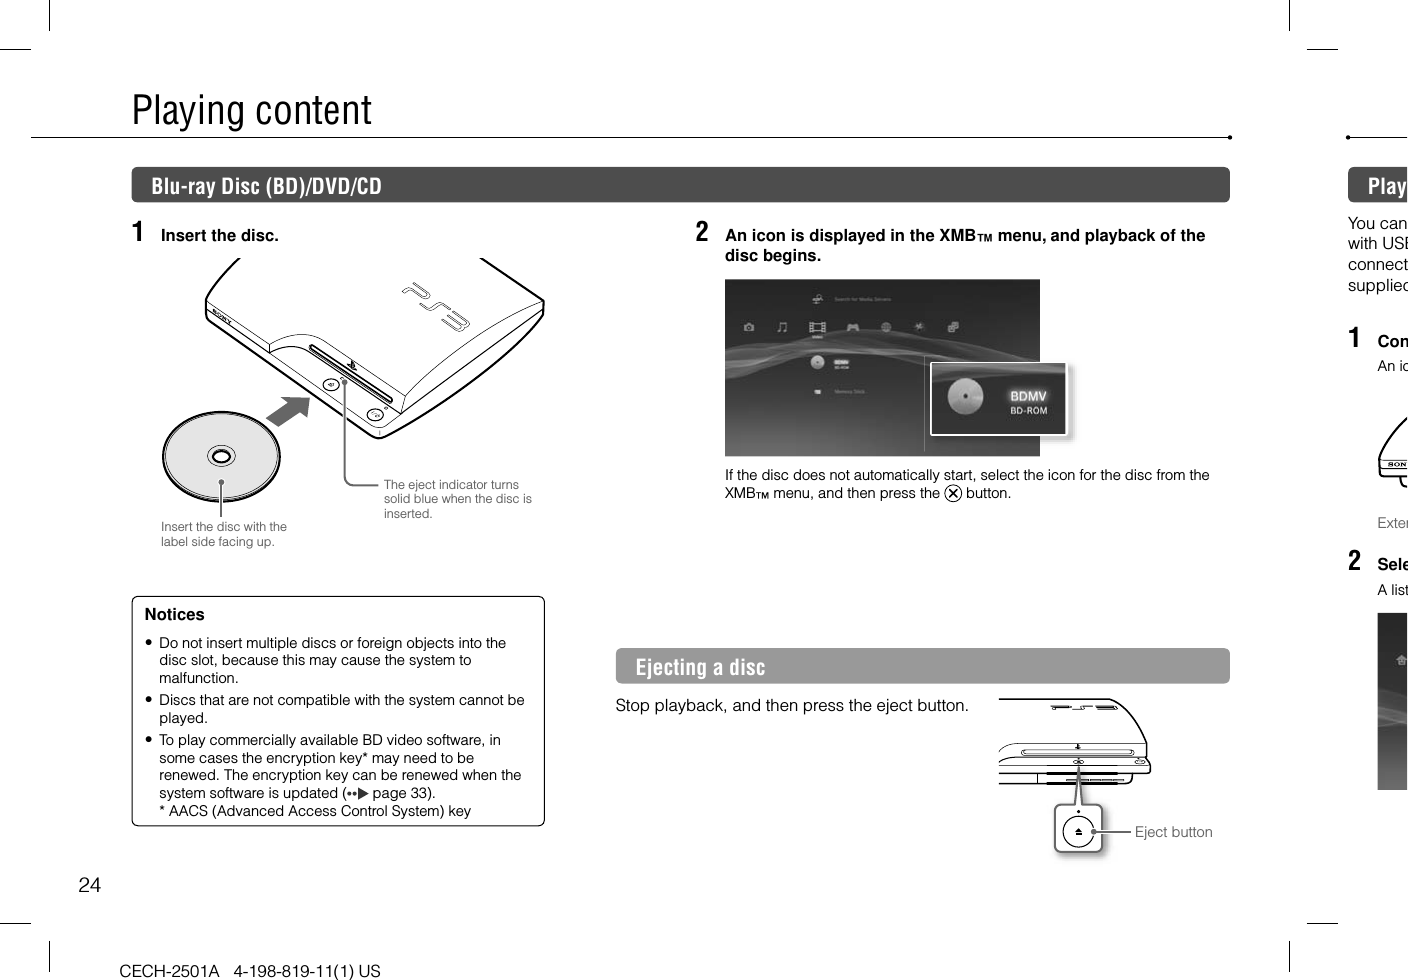
![26CECH-2501A 4-198-819-11(1) USPlaying gamesGame compatibilityPlayStation®3 format softwareCan be played on this system *PlayStation® format softwarePlayStation®2 format software Cannot be played on this system* Operation of all PlayStation® format software titles is not guaranteed. Visit http://www.us.playstation.com for the latest information on software that can be played on this system.Playing gamesThis model of the PlayStation®3 system is designed to play PlayStation®3 format software and has limited backward compatibility. This system is not compatible with and will not play PlayStation®2 format software. Some PlayStation® format software may play on this system. For more information, visit www.us.playstation.com.Starting a gameWhen you insert the disc, the game starts automatically.Insert the disc with the label side facing up.The eject indicator turns solid blue when the disc is inserted.NoticeDo not insert multiple discs or foreign objects into the disc slot, because this may cause the system to malfunction.Quitting a gameDuring gameplay, press the PS button on the wireless controller. Then select (Game) (Quit Game) to quit the game.HintDepending on the type of software, such as PlayStation® format software, (Quit Game) may not be displayed when the PS button is pressed. In this case, select [Quit Game] from the screen that is displayed.ContYou can(AccessReassignControlleControlleVibration* You caHintYou can cPS buttonor select SaveSaved dhard disUtility).SaveTo save memoryNoticeThis sysif you cwill not](https://usermanual.wiki/Sony-Group/CBEH1700/User-Guide-1294321-Page-26.png)
![27Playing gamesCECH-2501A 4-198-819-11(1) USUSe this Then this Controller settingsYou can change controller settings by selecting (Settings) (Accessory Settings).Reassign ControllersIf a controller port or number is specified by the software, you can use this setting to assign the appropriate controller port or number.*Controller Vibration FunctionYou can set the vibration function to on or off. It is set to [On] by default.* You cannot assign controller port 2-D using this system.HintYou can change settings for the controller during gameplay by pressing the PS button. Select (Settings) (Accessory Settings) in the XMB™ screen, or select [Controller Settings] from the screen that is displayed.Saved data for PlayStation®3 format softwareSaved data for PlayStation®3 format software is saved on the system’s hard disk. The data is displayed under (Game) (Saved Data Utility).Saved data for PlayStation® format softwareTo save data from PlayStation® format software, you must create internal memory cards on the hard disk and assign the cards to slots.NoticeThis system does not support playback of PlayStation®2 format software. Even if you create an internal memory card for PlayStation®2 format software, you will not be able to use it to play games. Creating internal memory cards1 Select (Game) (Memory Card Utility (PS/PS2)), and then press the button.2 Select (Create New Internal Memory Card), and then press the button. 3 Select [Internal Memory Card (PS)], and then press the button.Follow the on-screen instructions to complete the operation.Assigning slots1 Select (Game) (Memory Card Utility (PS/PS2)), and then press the button.2 Select the internal memory card that you want to use, and then press the button. Select [Assign Slots], and then assign [Slot 1] or [Slot 2].Hints Depending on the software, slots may be preassigned. For details, refer to the instructions supplied with the software. You can assign slots during gameplay. Press the PS button on the wireless controller, and then select [Assign Slots] from the screen that is displayed.](https://usermanual.wiki/Sony-Group/CBEH1700/User-Guide-1294321-Page-27.png)
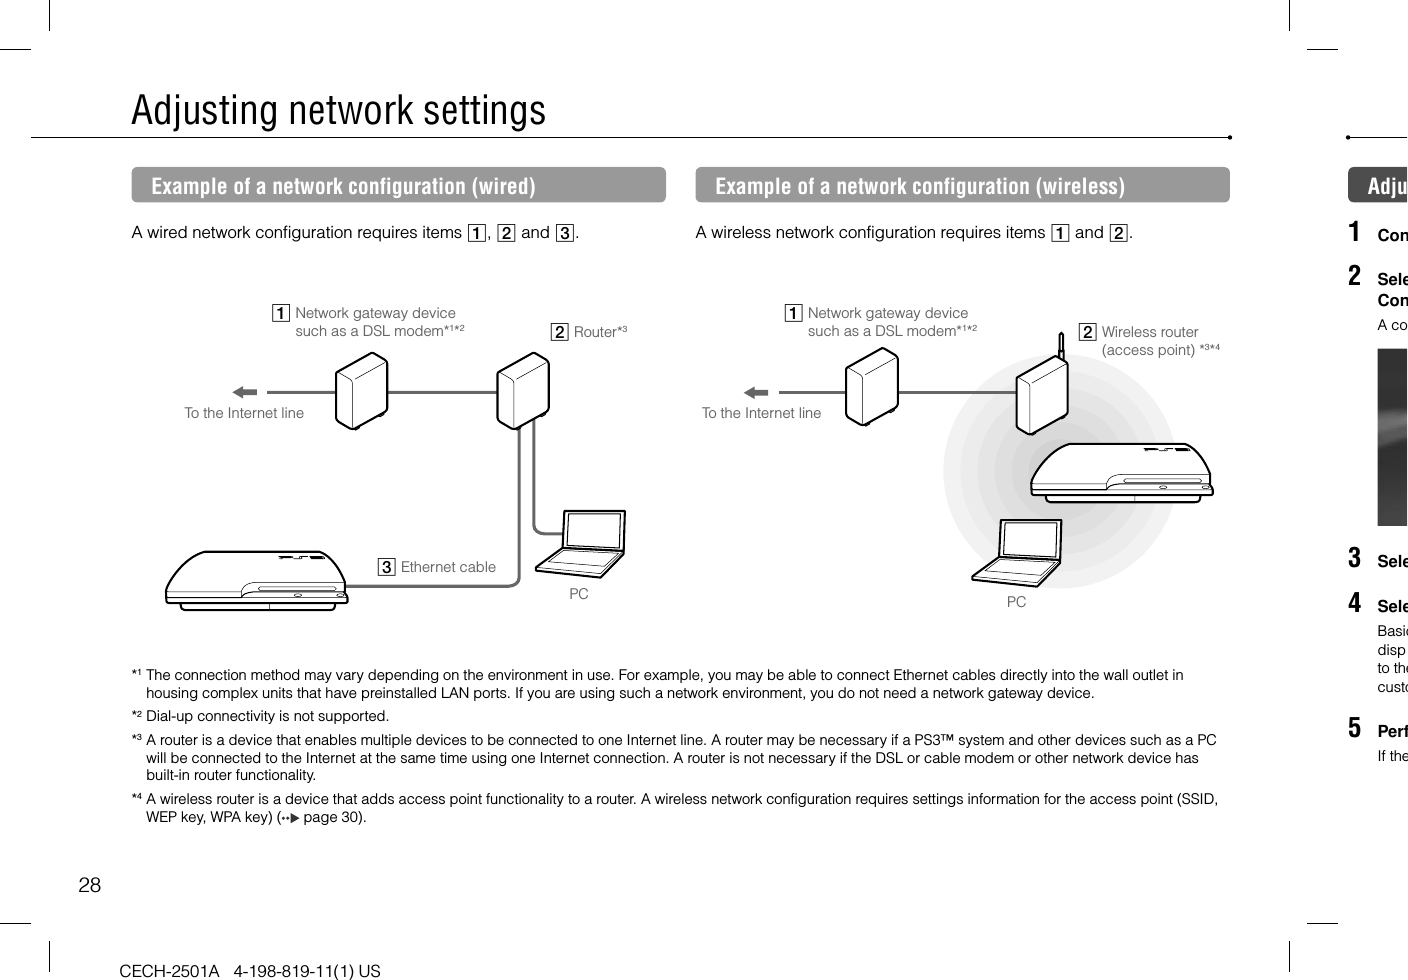
![29Adjusting network settingsCECH-2501A 4-198-819-11(1) USUSin as a PC has t (SSID, outer oint) *3*4Adjusting network settings (wired)1 Connect an Ethernet cable (sold separately) to the system.2 Select (Settings) (Network Settings) [Internet Connection Settings], and then press the button.A confirmation message about the Ethernet cable is displayed.3 Select [OK], and then press the button.4 Select [Easy], and then press the button.Basic settings are adjusted automatically, and a list of the settings is displayed. If the list is not displayed, you must adjust custom settings. Refer to the instructions supplied by your Internet service provider to adjust the custom settings ( page 31). 5 Perform the Internet connection test.If the connection is successful, you will be able to connect to the Internet.Adjusting network settings (wireless)1 Check that an Ethernet cable is not connected to the system.2 Select (Settings) (Network Settings) [Internet Connection Settings], and then press the button.A confirmation message about the Ethernet cable is displayed.3 Select [OK], and then press the button.4 Select [Easy], and then press the button.Basic settings are adjusted automatically.5 Select [Wireless], and then press the button.](https://usermanual.wiki/Sony-Group/CBEH1700/User-Guide-1294321-Page-29.png)
![30Adjusting network settingsCECH-2501A 4-198-819-11(1) US6 Adjust wireless LAN settings. Select the access point that you want to use. You can usually select [Scan] and choose an access point within range of your system. Scan System scans for a nearby access point. Select the access point that you want to use. Enter Manually Specify the access point by entering its SSID manually.Automatic*Use the automatic setting feature of the access point.You can follow the on-screen instructions to complete the required settings automatically.AOSS™Buffalo, Inc.* For information on access points that support automatic setup (AOSS™), contact the access point manufacturers.7 Adjust the security settings for the wireless network.Enter the encryption key for the access point. If you selected [Automatic] in step 6, this screen will not be displayed. None Encryption key is not set.WEP Enter the encryption key. The encryption key field will display an asterisk (*) for each character you enter.WPA-PSK/WPA2-PSK8 Check the settings.A list of the settings is displayed. If the list is not displayed, you must adjust custom settings. Refer to the instructions supplied by your Internet service provider to adjust the custom settings ( page 31). 9 Perform the Internet connection test.If the connection is successful, you will be able to connect to the Internet.Hints SSID and WEP/WPA keys are types of security information that are required when connecting to an access point. If you do not have this information, contact the person who set up or maintains the access point. Depending on the access point you use, you may need the MAC address for the PS3™ system when connecting to the Internet. You can find the MAC address for the PS3™ system by going to (Settings) (System Settings) [System Information]. When connecting to the Internet wirelessly, signal interference may occur depending on the usage condition of the wireless network devices. If the Internet data transfer speed is decreased or the wireless controller does not function properly, try using a wired Internet connection.AdjuIn certaiautomatalso folloEtherneSpecify usually sIP AddSpecify Internet.you useAutomatiManualPPPoEDHCP hSpecify DNS SeSpecify service AutomatiManual](https://usermanual.wiki/Sony-Group/CBEH1700/User-Guide-1294321-Page-30.png)
![31Adjusting network settingsCECH-2501A 4-198-819-11(1) USUSuired n, ess for AC m cur he es not Adjusting custom settingsIn certain network environments, some settings may not be adjusted automatically by selecting [Easy]. Refer to the information below and also follow the on-screen instructions to adjust custom settings. Ethernet operation modeSpecify the Ethernet data transfer rate and operation method. You can usually select [Auto-Detect].IP Address SettingSpecify the method for obtaining an IP address when connecting to the Internet. The method varies depending on the Internet service provider you use. Automatic Use the IP address allocated by the DHCP server.Manual Enter the IP address manually.PPPoE Connect to the Internet using PPPoE. Enter the user name and password supplied by your Internet service provider.DHCP host nameSpecify the DHCP server host name. You can usually select [Do Not Set].DNS Setting Specify the DNS server. The method varies depending on the Internet service provider you use. Automatic System acquires the DNS server address automatically.ManualEnter the DNS server address manually. Enter the IP addresses of the primary and secondary DNS servers that are supplied by your Internet service provider.MTUSpecify the MTU value used when transmitting data. You can usually select [Automatic]. Proxy Server Specify the proxy server to be used. You can usually select [Do Not Use].UPnP Enable or disable UPnP (Universal Plug and Play). You can usually select [Enable]. HintIf [UPnP] is set to [Disable], online communication may be restricted when using the voice / video chat feature or communication features in games.](https://usermanual.wiki/Sony-Group/CBEH1700/User-Guide-1294321-Page-31.png)
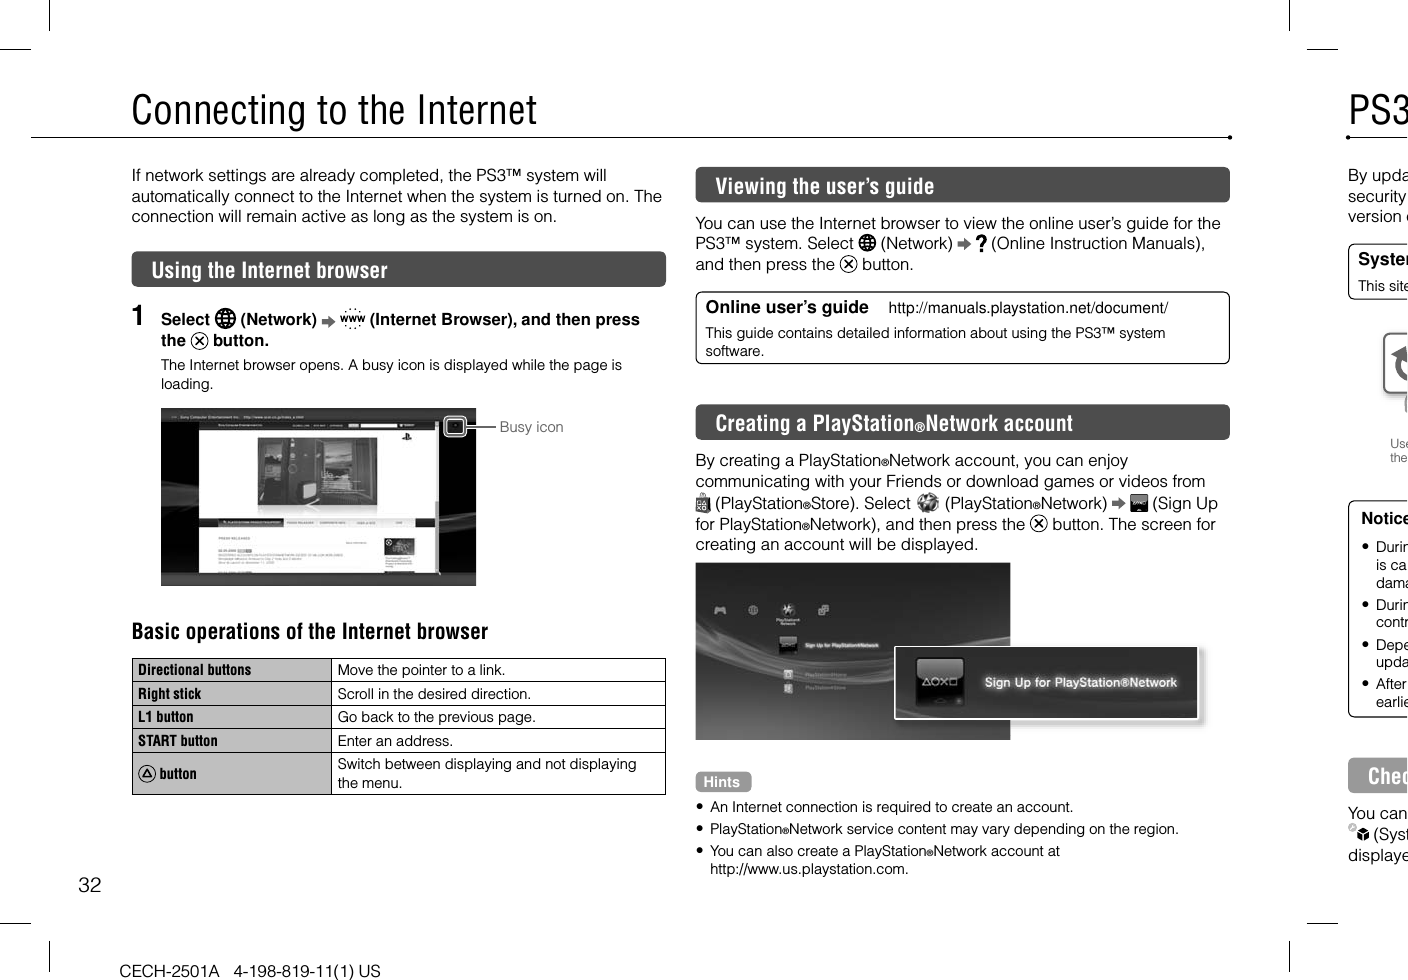
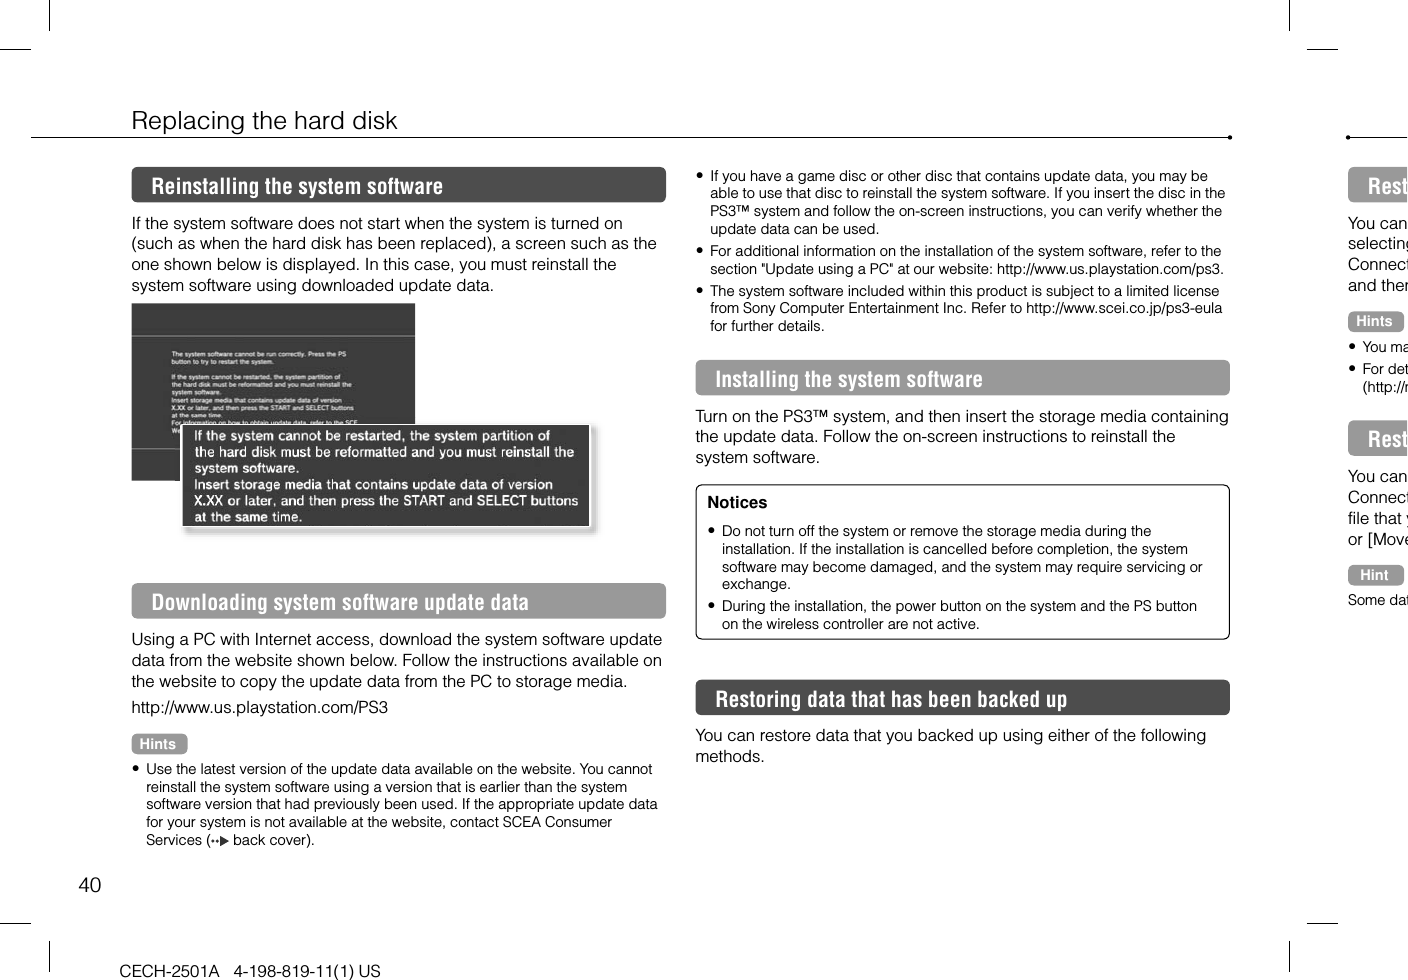
![33CECH-2501A 4-198-819-11(1) USUSfor the uals), from gn Up een for n.PS3™ system updatesPS3™ system updatesBy updating the PS3™ system software, you can add features and/or security patches. Frequently update your system to use the latest version of the system software.System software updates http://www.us.playstation.com/ps3This site provides the latest information about system software updates.Use the update data to overwrite the existing system software.The system software is updated.Notices During an update, do not turn off the system or remove media. If an update is cancelled before completion, the system software may become damaged, and the system may require servicing or exchange. During an update, the power button on the system and PS button of the controller are inactive. Depending on the content, you may not be able to play without first updating the system software. After you have updated the system software, you cannot go back to an earlier version.Checking the system software versionYou can check system version information by selecting (Settings) (System Settings) [System Information]. The current version is displayed in the [System Software] field.Update methodsYou can perform an update in any of the ways described below.Network updateYou can update by downloading the update data from the Internet. The latest update is automatically downloaded.Select (Settings) (System Update) [Update via Internet].Update using storage mediaYou can update using the update data saved on a USB flash drive or other media.Select (Settings) (System Update) [Update via Storage Media].Update using disc mediaUpdate data may also be contained in some game discs and other types of disc media. When you play a disc that contains update data, a screen will be displayed to guide you through the update process.HintIf you cannot perform an update in any of the ways described above, contact SCEA Consumer Services ( back cover).](https://usermanual.wiki/Sony-Group/CBEH1700/User-Guide-1294321-Page-33.png)
![34CECH-2501A 4-198-819-11(1) USUsing the on-screen keyboardCursor Displays predictive optionsOperation keys Displays when predictive mode is onInput mode displayText entry fieldEntering textThe following steps explain how to enter text, using the word "fun" as an example.1 Select [f] on the keyboard, and then press the button.Repeat this step for the characters [u] and [n].2 Select [Enter], and then press the button.The characters you entered are confirmed.3 Select [Enter], and then press the button again.The text is entered and the keyboard closes.Hints For details about using the on-screen keyboard, refer to the online user’s guide (http://manuals.playstation.net/document/). You can also enter text using a USB keyboard or Bluetooth®-compatible keyboard (both sold separately). With the on-screen keyboard displayed, press any key on the connected keyboard to start entering text.List of keysKeys that are displayed vary depending on the input mode and other conditions.Keys ExplanationInserts a line breakMoves the cursorDeletes the character to the left of the cursorInserts a spaceSwitches the input modeConfirms characters that have been typed and then closes the keyboardSwitches to the mini-size keyboard / Inserts a symbol or emoticon / Switches the type of characters to be entered / Copies or pastes textPareThe PS3feature ta parentFor morehttp://wwChanYou cancontent A passwa passwThe pasPareYou canSettingsOff11-1The comand the Examplewith a leYou candownloathen predisplay](https://usermanual.wiki/Sony-Group/CBEH1700/User-Guide-1294321-Page-34.png)
![35CECH-2501A 4-198-819-11(1) USUSr’s guide e ed, press other rsord and eredParental controlParental controlThe PS3™ system includes a parental control feature. You can use this feature to set a password and limit the playback of content restricted by a parental control level (games, videos and other content) for children. For more information on parental control settings, visit http://www.us.playstation.com.Changing the security settingsYou can set a parental control level for games or Blu-ray Discs or other content under (Settings) (Security Settings).A password is required to change parental control settings. You can set a password under (Security Settings) [Change Password].The password is set to "0000" in the default settings.Parental control levels for gamesYou can set the parental control level for games under (Security Settings) [Parental Control]. Select from [Off] or one of 11 levels.Off Play any content regardless of parental control level.11-1 Set the parental control level based on the number. Note that the lower the number, the tighter the restriction.The combination of the parental control levels of both the PS3™ system and the content determine whether the content can be played. Example: If the parental control level of the system is set to [7], content with a level from [1] to [7] can be played on the system.You can see the parental control level of a game or video that you downloaded from (PlayStation®Store). Select the game or video, and then press the button. From the options menu, select [Information] to display a screen with the parental control level.Game rating marksMost game packaging displays a symbol to indicate the age group that is appropriate to play the game. The symbols correspond to the parental control levels set on the games as shown below.Age groupGame parental control level 2345910Based on information at time of publication. For more information, visit http://www.us.playstation.com/support. For the latest information about the ESRB rating system, visit http://www.esrb.org.Other security settingsYou can set parental control limitations on content other than games under (Security Settings), as described below.BD Parental ControlWhen playing a BD with parental control settings, restrict playback based on the age you have set. The lower the setting, the tighter the restriction.DVD parental controlWhen playing a DVD with parental control settings, restrict playback based on the level you have set.Select from [Off] or one of eight levels.The lower the number, the tighter the restriction.Internet Browser Start ControlRestrict the ability to start the Internet Browser with a password. HintFor information about parental control settings for PlayStation®Network content and services, visit http://www.us.playstation.com/support.](https://usermanual.wiki/Sony-Group/CBEH1700/User-Guide-1294321-Page-35.png)
![36CECH-2501A 4-198-819-11(1) USReplacing the hard diskYou can replace the hard disk that is installed in the PS3™ system. Caution Remove the hard disk in a location out of the reach of small children to help prevent accidental swallowing of small parts such as screws. The inside of the system is hot directly after use. Allow time for the system to cool down before starting to remove the hard disk. Be careful not to injure yourself when removing or handling the screw cover or the hard disk. Be sure to reattach the screw cover and the HDD bay cover before turning the PS3™ system on. If these covers are not attached, heat may build up inside the system. To attach or remove screws, use an appropriate crosshead screwdriver. If the size does not match, the groove on the screw’s head may be damaged.Notices All hard disks, including a PS3™ system’s hard disk, must be reformatted before use in a PS3™ system. It is recommended that you regularly back up data on the hard disk. If for any reason software or data loss or corruption occurs, it may not be possible to restore or repair the software or data. Sony Computer Entertainment Inc. and its subsidiaries and affiliates will not be liable for damage or injury related to software or data loss or corruption. You can back up data stored on the hard disk to a USB mass storage device and restore data that has been backed up. For details, see "Backing up data" ( page 36). Improper removal or installation of a hard disk may cause damage to your PS3™ system or loss of data, and may void your PS3™ system’s hardware warranty. SCEA shall not be liable for any resulting damages, including any damages to your hard disk. User assumes all risks and liabilities associated with using a replacement hard disk, including any incompatibility or interoperability problems with the PS3™ system. Services will not be provided on any non-PS3™ system hard disks. To help protect your personal information, be sure to clear passwords for all PlayStation®Network accounts before submitting the PS3™ system for service. To clear a password, select (PlayStation®Network) (Sign In), and then from the screen that is displayed, clear the [Save Password] checkbox. Note that if [Sign In Automatically (Auto Sign-In)] is set, the icon for (Sign In) will no longer be displayed. In that case, you must first clear the auto sign-in option. To clear the auto sign-in option, select (PlayStation®Network) (Account Management), press the button, and then select [Auto Sign-In Off] from the options menu. After the auto sign-in option is turned off, proceed with the password clearing process.Backing up dataYou can back up data that is saved on the hard disk using either of the following methods.NoticeIt is recreason initializethe softand affidata losBackYou canstorage (Systeminstructiosome coHintYou may data that move theFor detail(http://maBackThe folloor moveselect [Cvideo fileFile typeSaved dor photo](https://usermanual.wiki/Sony-Group/CBEH1700/User-Guide-1294321-Page-36.png)
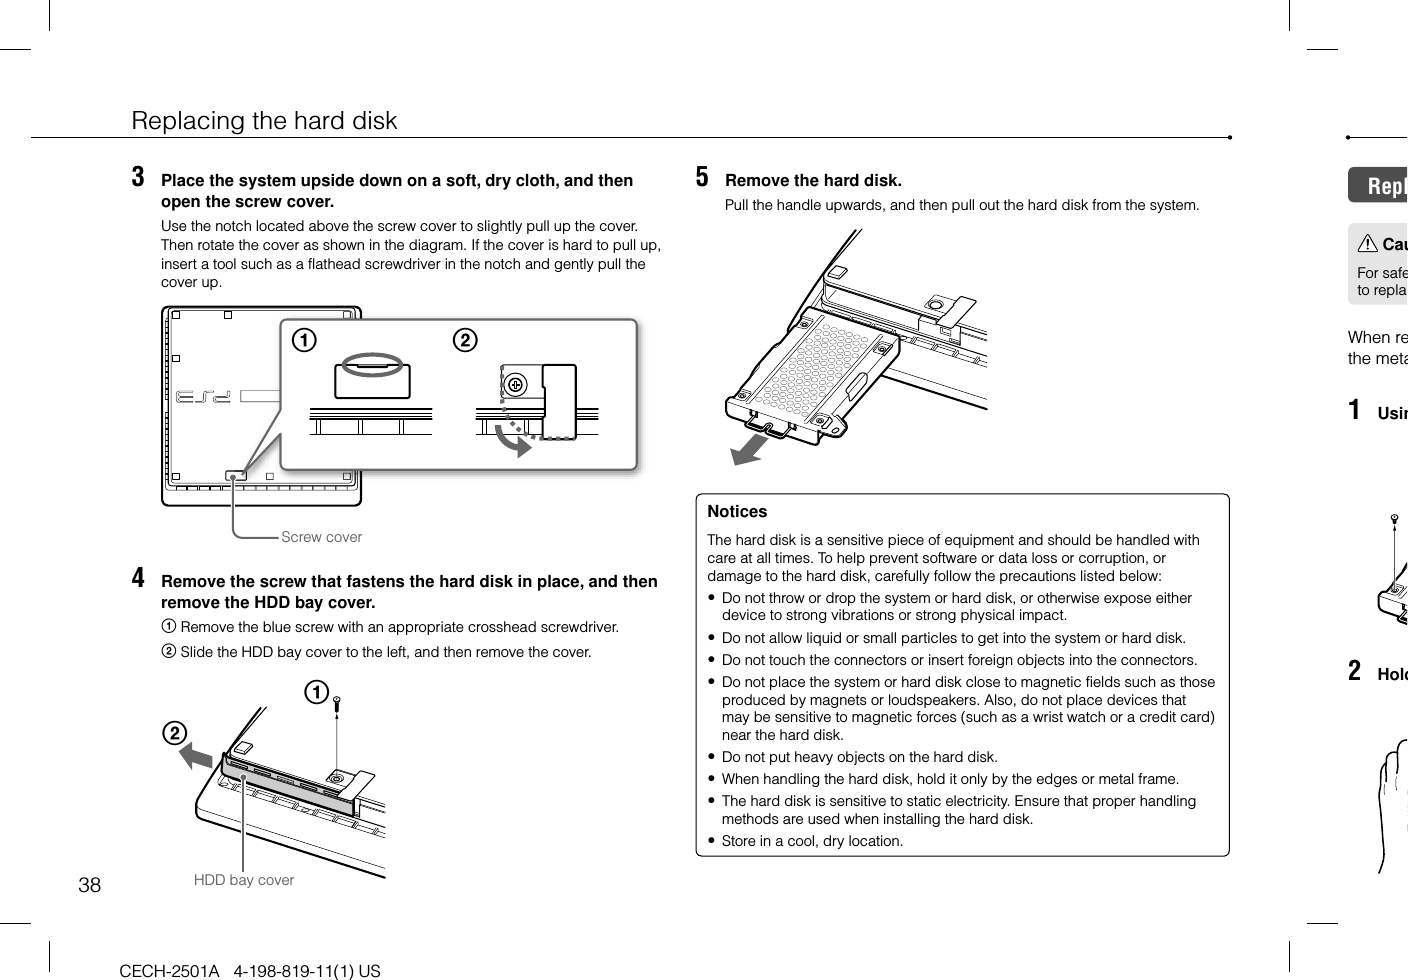
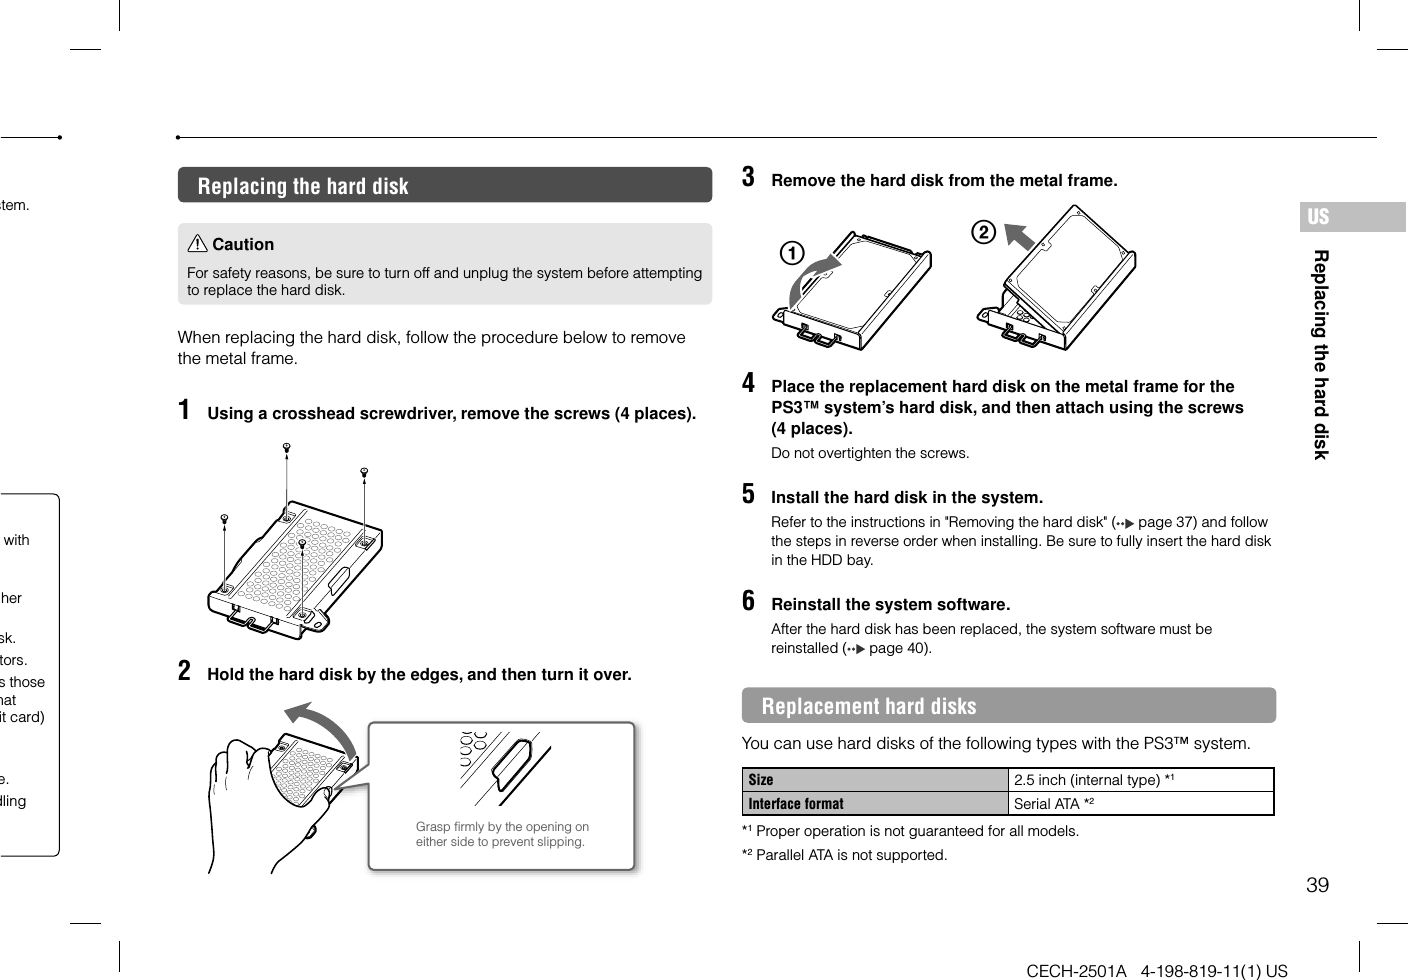
![37Replacing the hard diskCECH-2501A 4-198-819-11(1) USUSatted If for for e acking your dware ng any ociated s for all r (Sign word] e icon st clear er the r of the NoticeIt is recommended that you regularly back up data on the hard disk. If for any reason software or data loss or corruption occurs or the hard disk must be initialized during authorized service, it may not be possible to restore or repair the software or data. Sony Computer Entertainment Inc. and its subsidiaries and affiliates will not be held liable for damage or injury related to software or data loss or corruption.Backing up data in a single operationYou can back up data that is saved on the hard disk to a USB mass storage device in a single operation. Select (Settings) (System Settings) [Backup Utility], and then follow the on-screen instructions to perform this operation. You may not be able to back up some content, including some types of copyright-protected data.HintYou may not be able to use the backup utility to restore some data. For important data that cannot be backed up, it is recommended that you selectively copy or move the data to a USB storage device before you use the backup utility feature. For details on the backup utility feature, refer to the online user’s guide (http://manuals.playstation.net/document/).Backing up selected dataThe following file types saved on the system’s hard disk can be copied or moved to a USB device. Select the file, press the button, and then select [Copy] or [Move] from the options menu. For some types of video files, you may need to select [Back Up] instead.File type Back up destinationSaved data from games; video, music or photo files USB mass storage device (USB flash drive, etc.)Hints Some data cannot be copied, moved or backed up. By using a card reader/writer (USB connector type, sold separately), you can back up files saved on the hard disk to storage media such as a Memory Stick™ or an SD Memory Card.Removing the hard disk Caution For safety reasons, be sure to turn off and unplug the system before attempting to remove the hard disk. The system may not be stable when placed upside down. Be careful not to injure yourself when removing the screw.1 Press the power button to turn off the system. The power indicator turns solid red and the system enters standby mode. 2 Unplug the AC power cord, and then disconnect the other cables from the system.For safety reasons, remove the plug for the power cord from the electrical outlet, and then detach the other cables.](https://usermanual.wiki/Sony-Group/CBEH1700/User-Guide-1294321-Page-37.png)
![41Replacing the hard diskCECH-2501A 4-198-819-11(1) USUSay be sc in the ether the er to the om/ps3.license ps3-eula ntaining e em ng or utton wing Restoring data in a single operationYou can restore data that you backed up in a single operation by selecting (Settings) (System Settings) [Backup Utility]. Connect the USB mass storage device that contains the backup data, and then follow the on-screen instructions to perform this operation.Hints You may not be able to use the backup utility to restore some data. For details on the backup utility feature, refer to the online user’s guide (http://manuals.playstation.net/document/).Restoring selected dataYou can manually restore files using the options menu for the file. Connect the USB mass storage device that contains the file, select the file that you want to restore, and then press the button. Select [Copy] or [Move] from the options menu.HintSome data cannot be copied, moved or backed up.](https://usermanual.wiki/Sony-Group/CBEH1700/User-Guide-1294321-Page-41.png)
![42CECH-2501A 4-198-819-11(1) USTransferring data to another PS3™ system / restoring the systemTransferring data to another PS3™ systemYou can transfer data that is saved on the hard disk of one PS3™ system (the source system) to the hard disk of another PS3™ system (the destination system) by selecting (Settings) (System Settings) [Data Transfer Utility]. NoticeWhen you perform this operation, all of the data that is stored on the PS3™ system that will receive the data (the destination system) will be deleted.For details on how to use the utility and its limitations, refer to the online user’s guide (http://manuals.playstation.net/document/).Restoring the PS3™ system Notices If you restore the default settings or restore the PS3™ system, changes to the settings cannot be undone. Data loss or corruption is the responsibility of the user. Do not turn off the PS3™ system during this operation. If the operation is cancelled before completion, the system software may become damaged, and the system may require servicing or exchange. During this operation, the power button on the system and the PS button on the wireless controller are not active. You cannot use this feature to go back to an earlier version of the system software. Restoring default settingsYou can restore from the current settings under (Settings) to the default settings by selecting (Settings) (System Settings) [Restore Default Settings].After you complete the operation and restart the system, the initial setup screen will be displayed. Follow the on-screen instructions to perform initial setup of the system software ( page 15).Deleting data on the hard disk driveYou can delete all data on the system’s hard disk and restore from the current settings under (Settings) to the default settings by selecting (Settings) (System Settings) [Restore PS3™ System]. You can shorten the time required to perform this operation by selecting [Quick Format] from the list of hard disk format options. It is recommended that you select [Full Format] when formatting a hard disk that contains important or sensitive data. After you complete the operation and restart the system, the initial setup screen will be displayed. Follow the on-screen instructions to perform initial setup of the system software ( page 15).Before disposing of or transferring the PS3™ systemBefore disposing of the system, it is recommended that personal information and other data of similar nature be deleted. To delete data, go to (Settings) (System Settings) [Restore PS3™ System].It is recommended that you select [Full Format] when the screen for selecting a hard disk format method is displayed during system restoration. Although formatting time can be reduced by using [Quick Format], it might be possible to restore erased data in some cases if a special tool is used.](https://usermanual.wiki/Sony-Group/CBEH1700/User-Guide-1294321-Page-42.png)
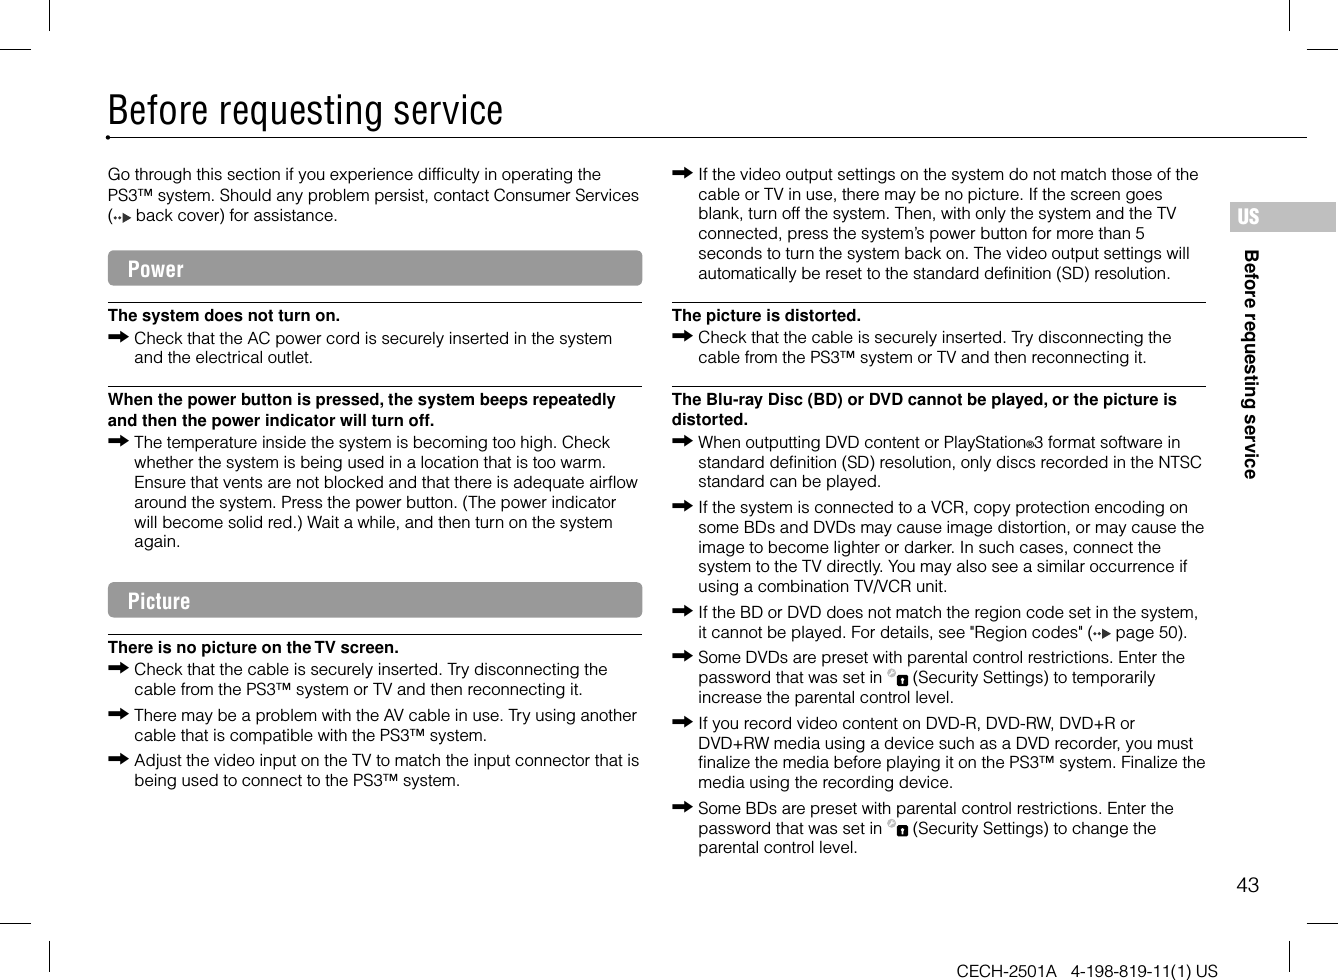
![44Before requesting serviceCECH-2501A 4-198-819-11(1) USIf yothe radju(NetwFor dsuppThe mesdisplayeIf yodevicmustdevic (For dsuppIf yoChecThe mesdisplayeEnteknowprovThe WebCertmay Disc The sysRemThe BD may be disc-locked. Enter the password that was set when the disc was created.See also the notices under "Playable discs" ( page 49).Certain BDs cannot be played.To play commercially available BD video software, the encryption key for AACS (Advanced Access Control System) may need to be renewed. To renew the key, you must update the system software.The size of the video image and the TV screen do not match.The settings of the connected TV and the video output settings of the system may not match. Check the following items: Check that the system’s settings under (Settings) (Display Settings) [Video Output Settings] are correct. Check that the settings of the connected TV are correct. For details, refer to the instructions supplied with your TV.With some video content, the screen size cannot be changed.The screen color does not seem right.If set to the default setting, the background color changes as the time, day and month changes.AudioThere is no sound.Check that the muting function on the TV or speakers is turned off. Also check that the volume is at the appropriate level.If an audio device is connected, check the settings of the device. For details, refer to the instructions supplied with the audio device.There may be a problem with the AV cable. Try using another cable that is compatible with the PS3™ system.Some software do not support digital audio output.If the system’s audio output settings do not match the AV cable or device in use, the system may not produce sound. Check that the system’s settings under (Settings) (Sound Settings) [Audio Output Settings] are correct.Some content that support Dolby Digital, DTS, and other formats may not produce audio from all channels.Music files do not play.Playback methods may be limited for some music files that are distributed via the Internet. In such cases, it may not be possible to play the content on the PS3™ system.NetworkA connection to the network cannot be established.If using a wired connection, check that the Ethernet cable is securely connected.Check that the network settings are correct. Refer to the instructions supplied by your Internet service provider or in the software manual to make the correct network settings.The message [An error occurred during communication with the server. This is a DNS error. (80710102)] is displayed during the Internet connection test.If you connect the system to a modem that does not have a router feature (bridge modem), you may need to set PPPoE settings. Select (Settings) (Network Settings) [Internet Connection Settings] [Custom] to start configuring the Internet connection. Continue adjusting settings until you see the IP address setting screen. Select [PPPoE], and then enter the user name and password provided by your Internet service provider.](https://usermanual.wiki/Sony-Group/CBEH1700/User-Guide-1294321-Page-44.png)
![45Before requesting serviceCECH-2501A 4-198-819-11(1) USUSIf you connect your system to a router, complete initial settings on the router first. After completing the settings on the router, try to adjust the network settings again by selecting (Settings) (Network Settings) [Internet Connection Settings] [Easy] again. For details about the router settings, refer to the instructions supplied with your router.The message [The attempt to obtain an IP address timed out.] is displayed during the Internet connection test.If you disconnected the Ethernet cable that is used to connect to a device such as a PC, and then reconnected it to the system, you must restart both your system and the modem. After restarting both devices, update your network settings by selecting (Settings) (Network Settings) [Internet Connection Settings] [Easy]. For details about restarting your modem, refer to the instructions supplied with your modem.If you are using a wireless connection, the WEP key may be wrong. Check that you have the correct WEP key, and then enter it again.The message [The PPPoE user name or password is not correct.] is displayed during the Internet connection test.Enter the correct user name and password for PPPoE. If you do not know the user name and password, contact your Internet service provider.The Web page does not display properly.Certain content, such as content that requires specialized software, may not display properly on some Web pages.Disc Media and USB DevicesThe system does not recognize the disc.Remove the disc and reinsert it.If the disc has a label, insert it with the label side up.Check whether the disc is scratched or dirty. If dirty, wipe it gently with a soft cloth.See also the notices under "Playable discs" ( page 49).The disc cannot be removed.Press the eject button for 10 seconds or longer to force the disc to eject. After removing and before reinserting a disc into the system, turn off the system, and then turn on the system again to resume use.The system does not recognize the USB device, or the USB device does not operate properly.Check that the device is inserted correctly.The connected device may not be usable with the system.Try using a different USB connector on the PS3™ system. The device may not be recognized depending on the combination of USB connectors in use.In some cases, the system may not recognize the device if an external USB hub is used and more than the allotted number of devices are connected. Try removing unused devices.When connecting a USB device, the message [An unknown USB device has been connected.] is displayed.The connected device may not be compatible with the system or software application.The device may be compatible with specific software only. Use software that is compatible with the device.There may be too many USB hubs connected. Try removing a USB hub.ble or at the ) mats are sible to ructions manual h the he router s. ernet address e and](https://usermanual.wiki/Sony-Group/CBEH1700/User-Guide-1294321-Page-45.png)
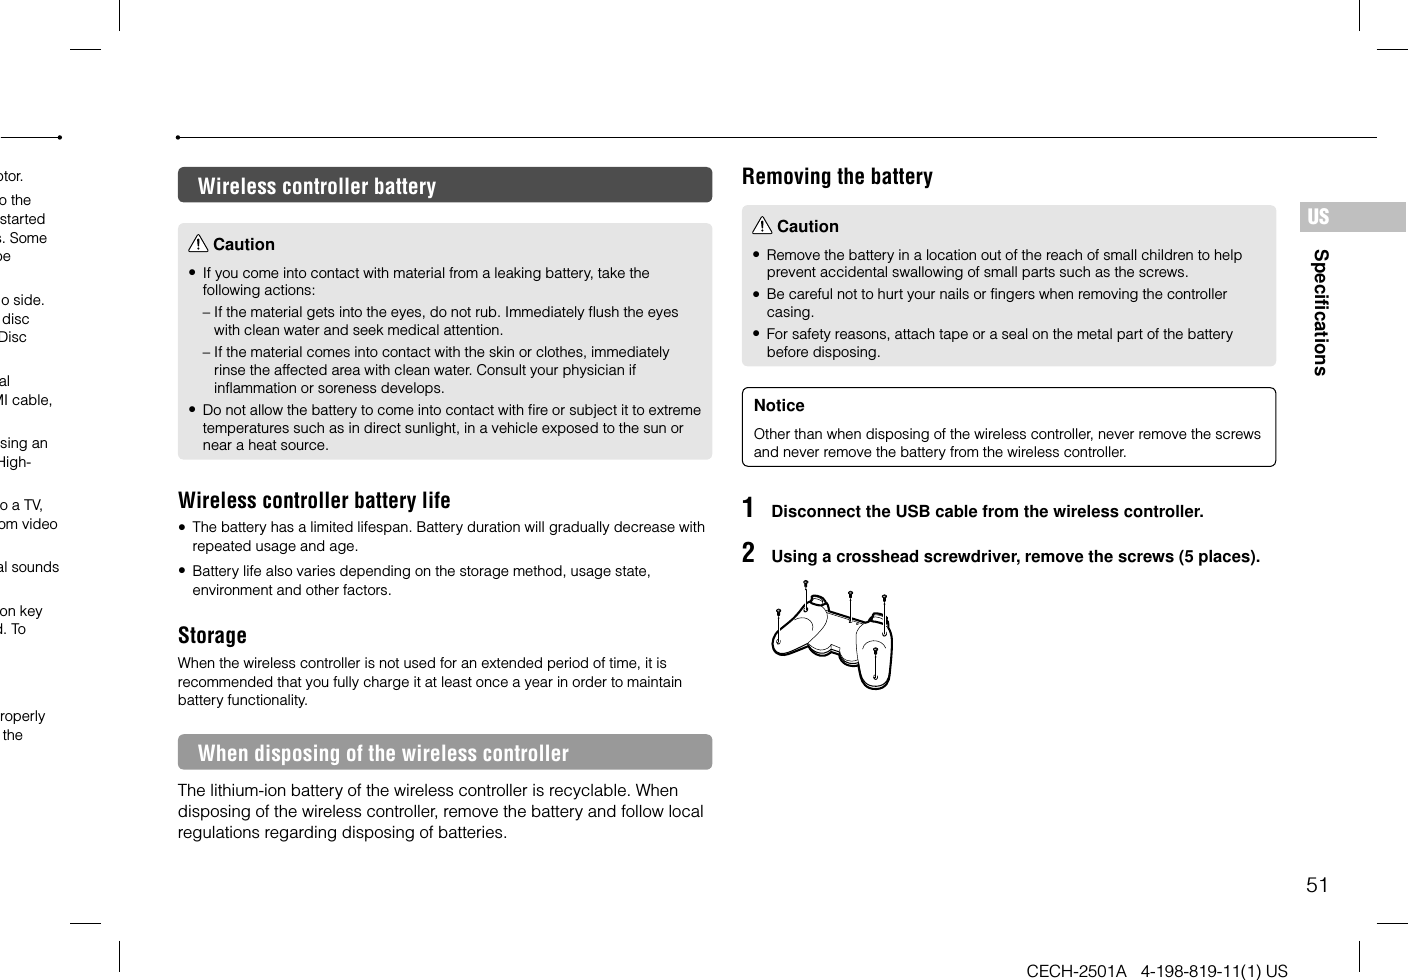
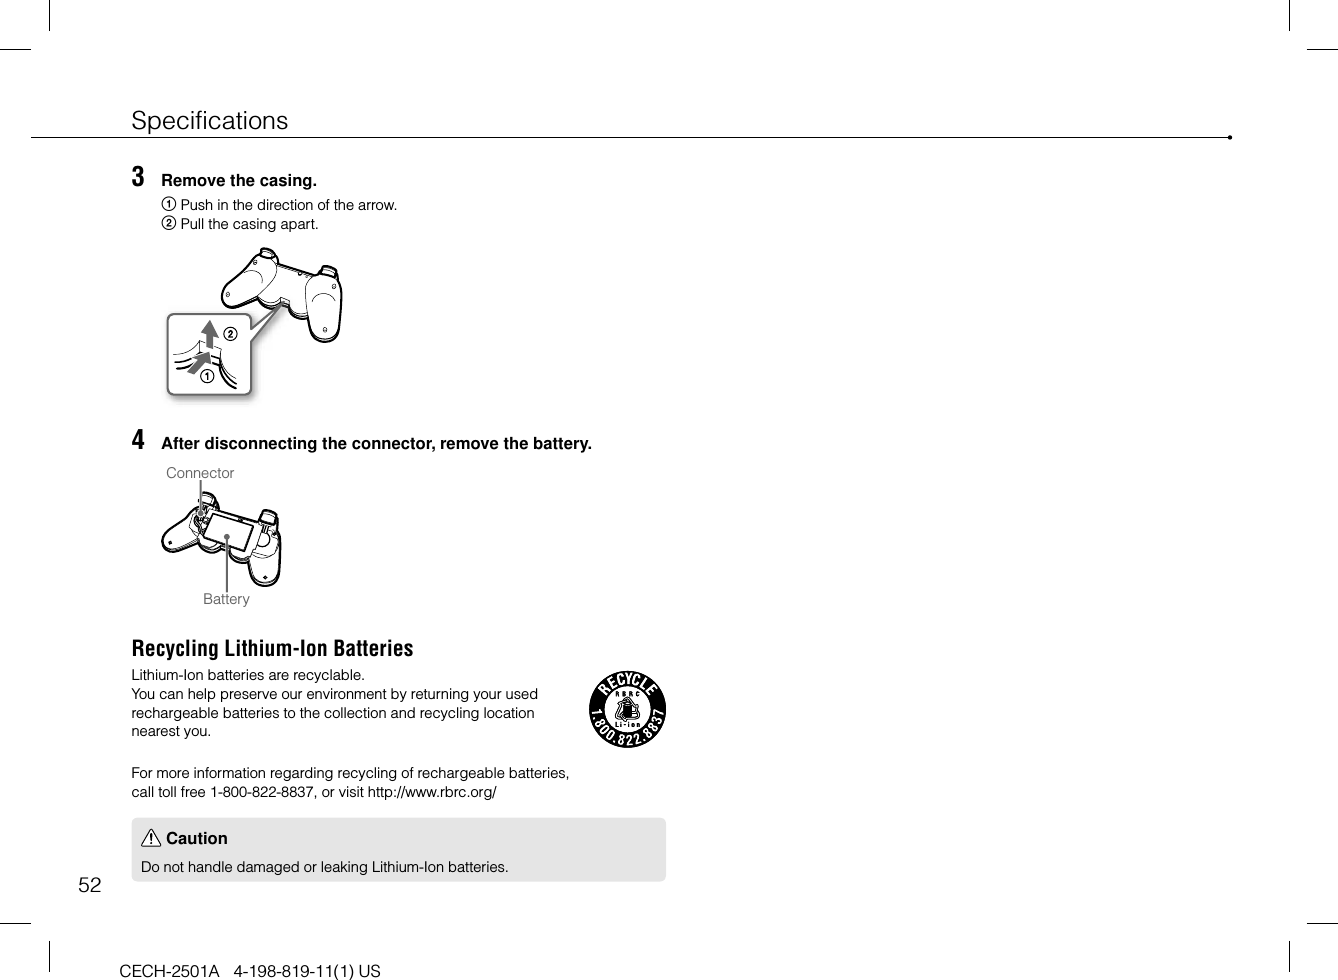
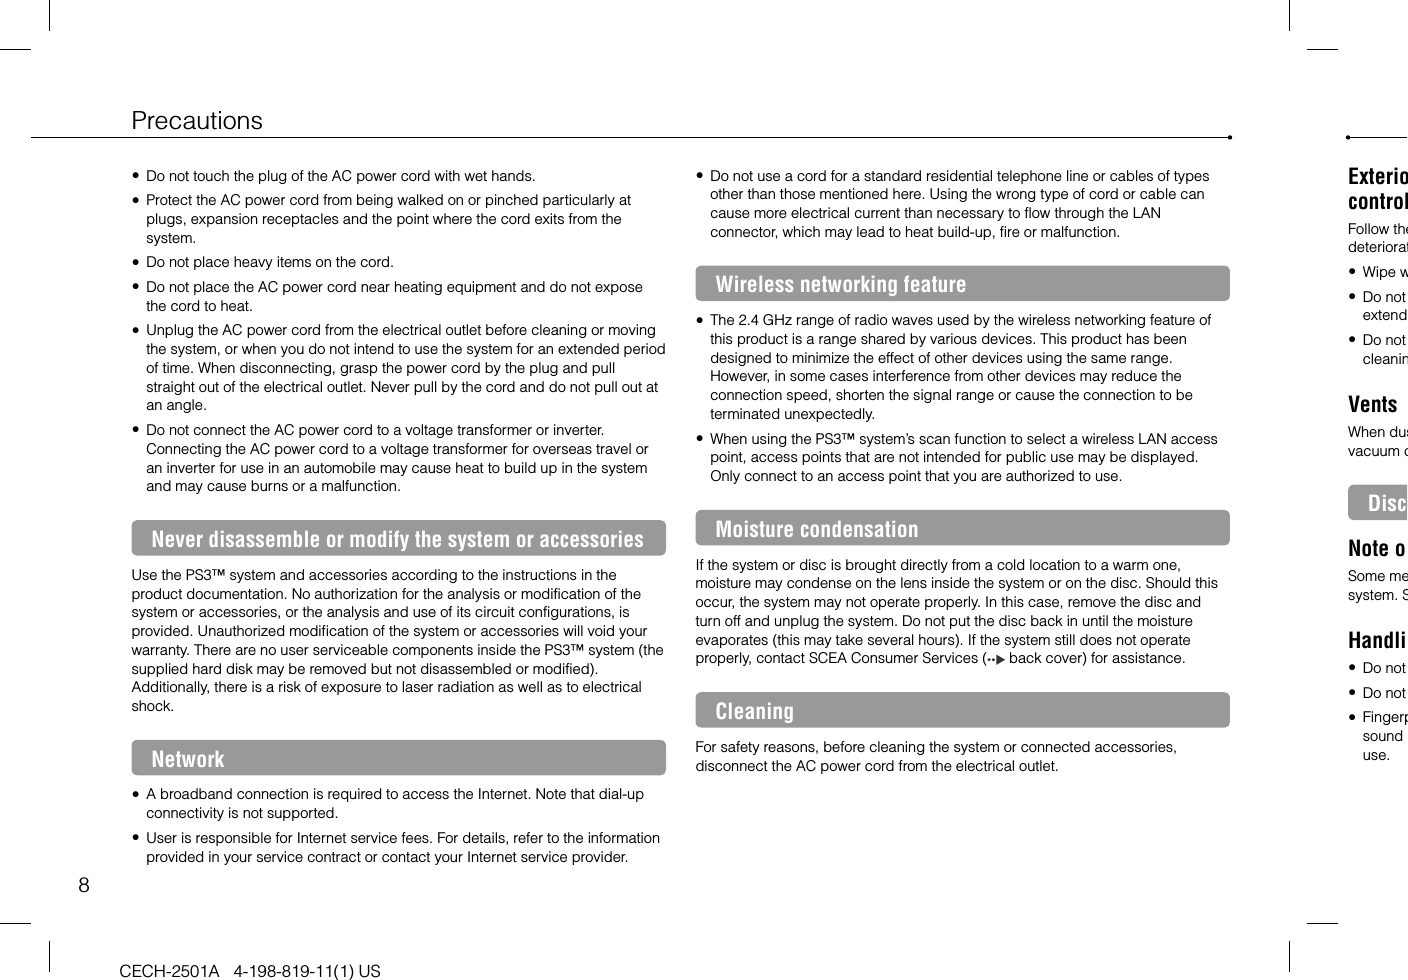
![46Before requesting serviceCECH-2501A 4-198-819-11(1) USOtheThe sysWheas in(withthe sMoveDepeaudinoiseFurthotheYou forgIf you [RHowresetThe sysWhewarmThe scrChecwith If yotry d then PlaySdataWireless controllerThe wireless controller does not function.When using the wireless controller, you must pair it with the system and assign a controller number. With the system turned on (power indicator is lit solid green), connect the system and the controller using the USB cable, and then press the PS button on the controller.The controller number may have been cleared. Press the PS button on the controller to reassign the number.With some software, you may need to use a specified controller number. Refer to the manual for the software in use.Check the charge level of the wireless controller battery. When the controller is used in wireless mode, it will not function if the battery does not have any charge left. Charge the battery by connecting the controller to the system with the USB cable.If you cannot use the controller even after checking the items above, try resetting the wireless controller by pushing the reset button on the controller rear with a thin-tipped object such as a pen.Reset buttonThe wireless controller operates in an abnormal manner.Try resetting the wireless controller by pushing the reset button on the controller rear with a thin-tipped object such as a pen.The wireless controller does not vibrate.Check that you are using a DUALSHOCK®3 Wireless Controller.The SIXAXIS® Wireless Controller does not vibrate.Try selecting (Settings) (Accessory Settings) [Controller Vibration Function], and then setting [Vibration Function] to [On].The software may not support the vibration function. Refer to the instruction manual for the software. For software downloaded from (PlayStation®Store), refer to the compatibility notice information included in the software’s online description.The response to button operations is slow.The response speed may be slow on an LCD display or PC display. This is not a malfunction.The battery does not charge or does not fully recharge.The battery can only be charged when the system is turned on. (The power indicator on the system front is lit solid green.)See "Wireless controller battery" ( page 51).The battery charge does not last long.The battery may be wearing out. Battery charge duration will gradually decrease with repeated usage and age. See "Wireless controller battery" ( page 51).Even when the wireless controller is not being used, it loses its charge over time.The controller’s battery slowly loses its charge even when the controller is not in use. It is recommended that you charge the controller frequently.](https://usermanual.wiki/Sony-Group/CBEH1700/User-Guide-1294321-Page-46.png)
![47Before requesting serviceCECH-2501A 4-198-819-11(1) USUSOther issuesThe system makes noise.When using the system in a location where heat can build up, such as in an enclosed AV cabinet, on carpet or a cushion, or near a wall (within 10cm of the wall), the internal fan will rotate rapidly to reduce the system’s temperature and this may generate increased noise. Move the system to a location with good ventilation.Depending on how a disc is being used, such as when copying an audio CD to the hard disk or starting software from a disc, disc noise may be louder than normal. Furthermore, some software may cause more disc noise than others.You forgot your password for security settings.If you restore the system using (Settings) (System Settings) [Restore Default Settings], your password will return to "0000". However, note that all settings other than the password will also be reset. Once these settings are reset, they cannot be recovered.The system is warm.When the system is being used or is turned on, it may become warm. This is not a malfunction.The screen freezes during gameplay.Check whether the disc is scratched or dirty. If dirty, wipe it gently with a soft cloth.If you have game data for PlayStation®3 format software installed, try deleting the game data and reinstalling the software. Select (Game) (Game Data Utility), press the button, and then delete the game data from the options menu. Next, reinstall the PlayStation®3 format software. Be careful not to delete the saved data for the game.The screen is frozen. The system does not operate.Disconnect all accessories such as USB devices from the system, and then restart the system. Pressing the power button for 15 seconds or longer will force the system to turn off (enter standby mode). After the system turns off, turn it on again.The power indicator is flashing red and green alternately.The interior of the system may have become too warm. This is typically due to the operating environment. Check whether the system is being used in a warm location. Ensure that vents are not blocked and that adequate airflow exists around the system. Continuing to use the system in the above condition will cause it to stop functioning. Turn the system off and leave it unused until it cools down. After the system cools down, turn it on again.The system does not recognize content.The content may be of a format that is not supported by the system. Content of types not supported by the system will not be recognized. For information on supported formats, refer to the online user’s guide (http://manuals.playstation.net/document/).ontroller On]. the d from ation display. on. less s its e he](https://usermanual.wiki/Sony-Group/CBEH1700/User-Guide-1294321-Page-47.png)
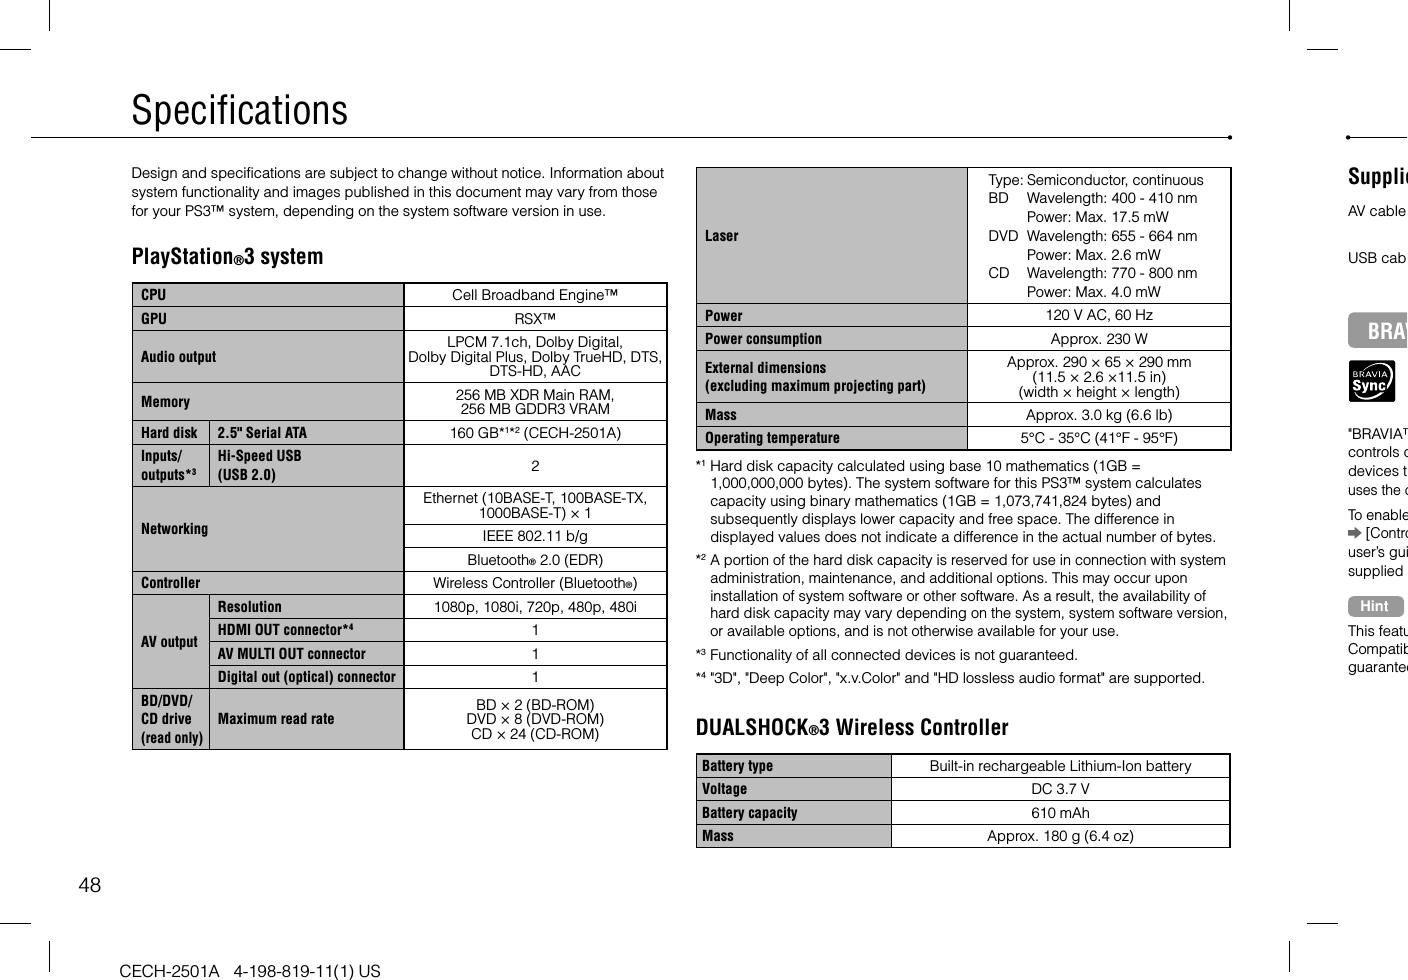
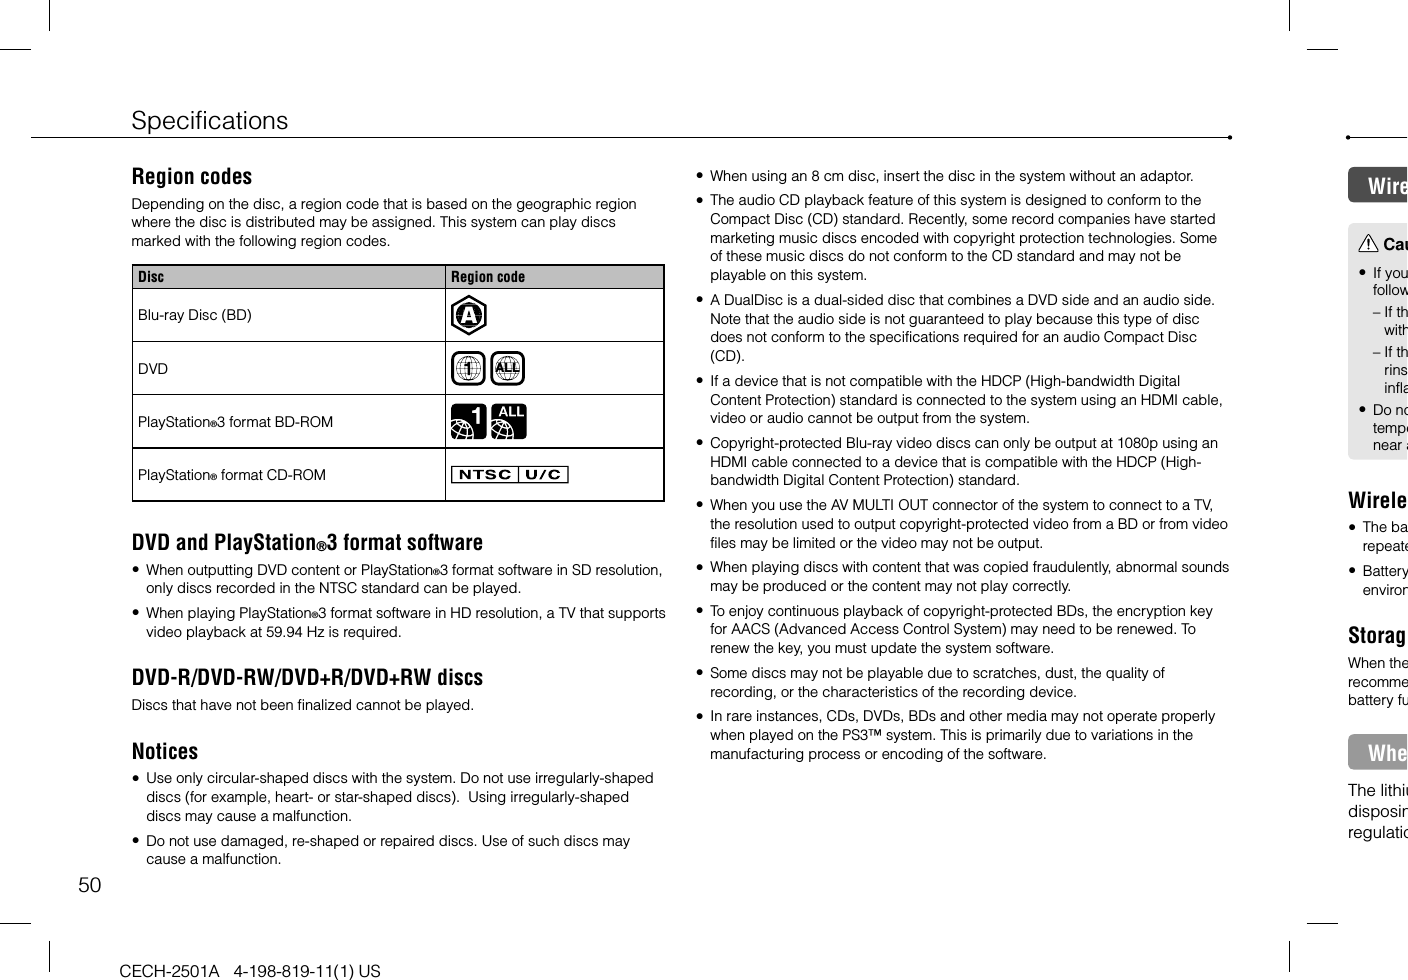
![49CECH-2501A 4-198-819-11(1) USSpecificationsUSnuous0 nm4 nm0 nmmmh) )F)lates n f bytes.h system on ility of e version, orted.erySupplied AV cable and USB cableAV cable Company: SONYPart No.: 1-834-231-11USB cable Company: SONYPart No.: 1-833-625-12BRAVIA™ Sync"BRAVIA™ Sync" is a Sony product feature that allows you to use the remote controls of BRAVIA™ televisions (Sony Corporation products) to operate various devices that are connected to each other through HDMI cables. BRAVIA™ Sync uses the control signals that are transferred through the HDMI connections.To enable the BRAVIA™ Sync feature, go to (Settings) (System Settings) [Control for HDMI], and set the option to [On]. For details, refer to the online user’s guide (http://manuals.playstation.net/document/) and the instructions supplied with the BRAVIA™ products in use.HintThis feature can only be used on devices that support the BRAVIA™ Sync feature. Compatibility with all devices that comply with the HDMI CEC specification is not guaranteed.Playable discsFor additional information on compatible media types, visit our website at http://www.us.playstation.com.Blu-ray Disc (BD)PlayStation®3 format BD-ROMBD-ROMBD-RBD-RE*1DVDDVD-ROMDVD+R/RWDVD-R/RWAVCHDDSD DiscCDPlayStation® format CD-ROM*2CD-DA (audio CD)*3CD-R/RW*1 Playback of BD-RE ver. 1.0 discs is not supported.*2 This model of the PlayStation®3 system is designed to play PlayStation®3 format software and has limited backward compatibility. This system is not compatible with and will not play PlayStation®2 format software. Some PlayStation® format software may play on this system. For more information, visit www.us.playstation.com.*3 Playback of Super Audio CDs is not supported.](https://usermanual.wiki/Sony-Group/CBEH1700/User-Guide-1294321-Page-49.png)