Sony Group DCCFMT3 Low Power FM Transmitter User Manual DCC FMT3
Sony Corporation Low Power FM Transmitter DCC FMT3
User Manual
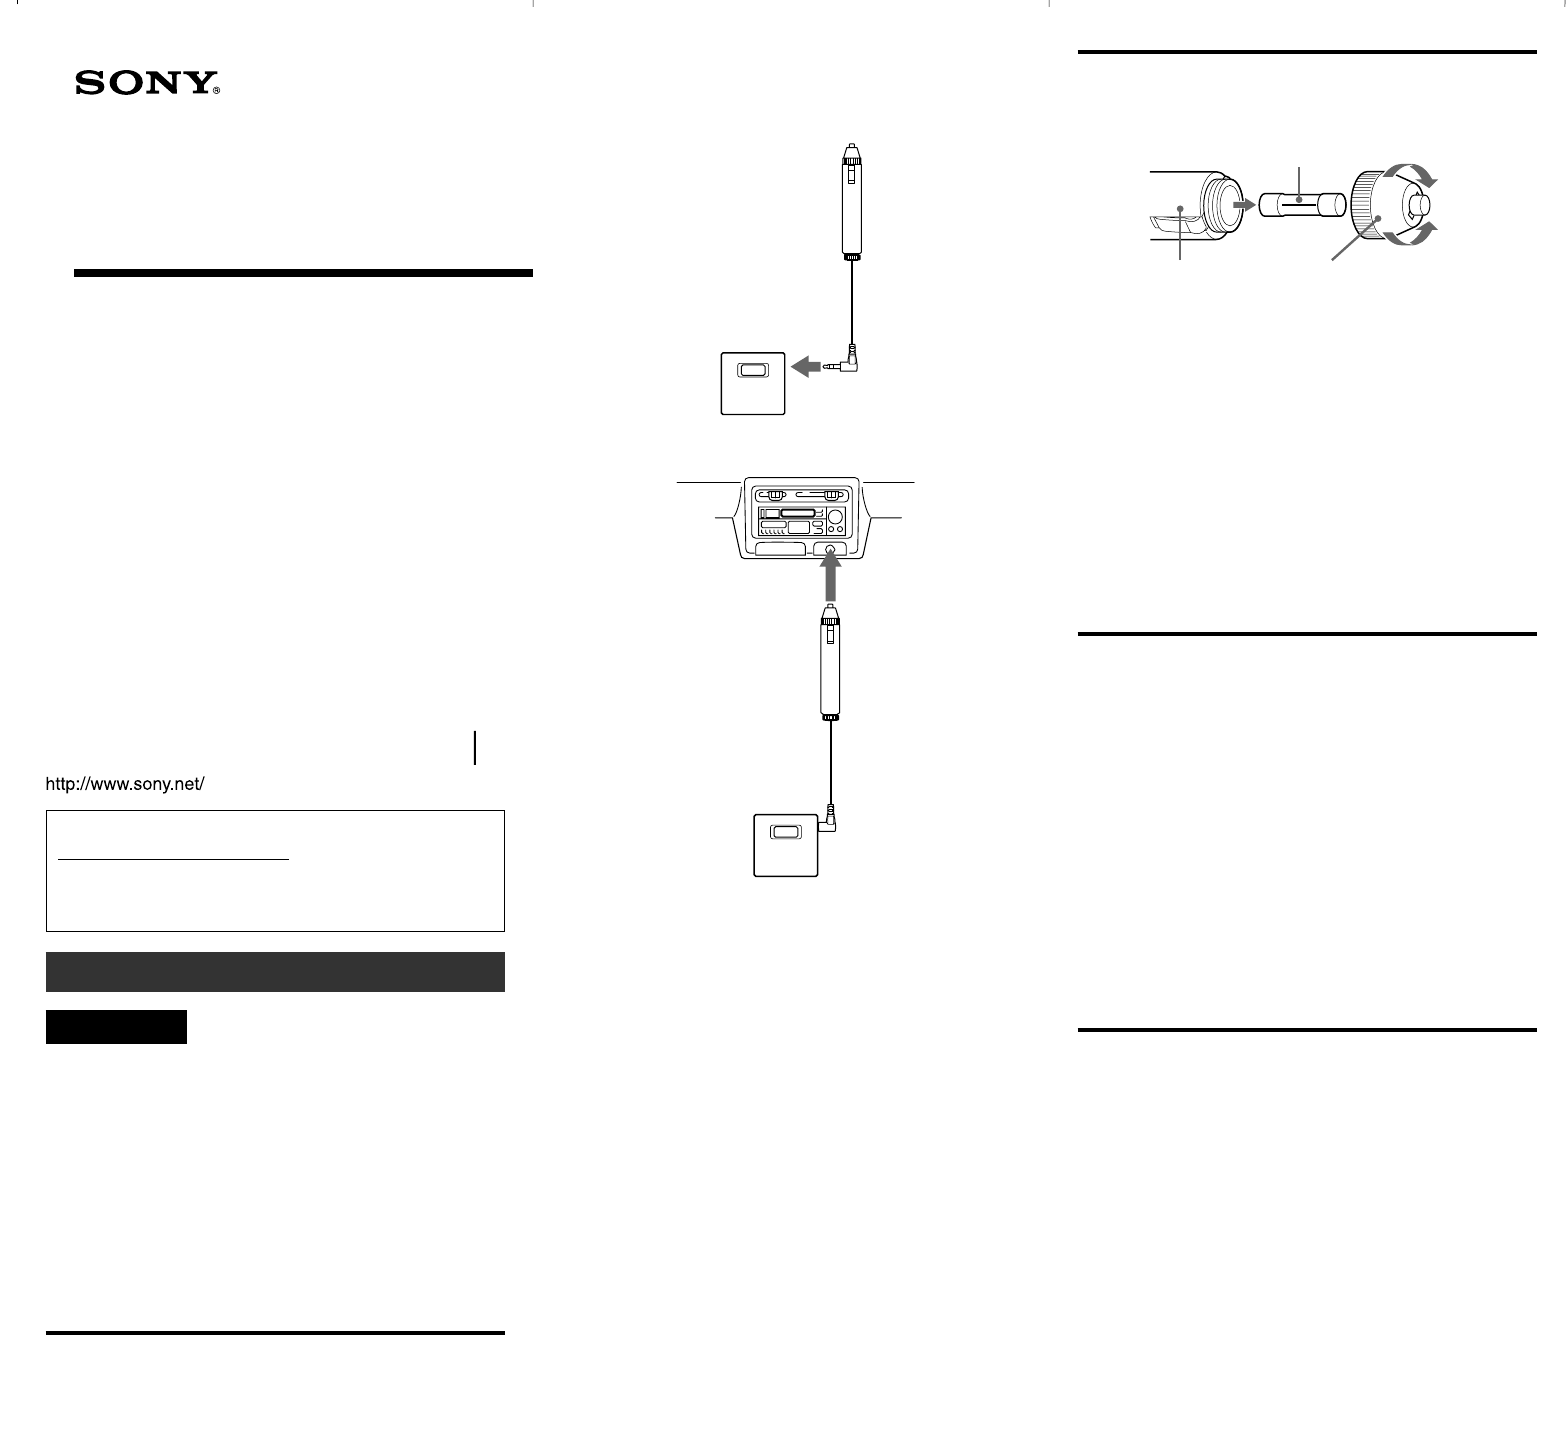
2Connect the stereo mini plug to the headphone jack on the portable
audio device.
If your portable audio device has separate settings for headphone and LINE
OUT, set the portable audio device to the headphone setting. Sound may be
distorted if it is connected to LINE OUT.
3Insert this transmitter (this unit) into the cigarette lighter socket.
4Start playback on the portable audio device.
Notes
•Do not activate any bass boost or equalizer function on the portable audio
device. Refer to the operating instructions supplied with the portable audio
device.
•Set the volume control of the portable audio device as high as possible, but
not so high that the audio signal becomes distorted. If sound is still low,
turn the volume up on the car radio.
5Route the antenna cable inside the car for best audio reception from
this unit.
The method to install the antenna cable will depend on your car
type. Find the position that provides the best reception, and then
install the cable.
About the antenna cable magnet
The antenna cable is supplied with a magnet attached at the end. It
is used to anchor the cable to a metal part of the car, such as a
passenger’s seat rail (see illustration below). The magnet prevents
the antenna cable from moving (which causes unstable audio
reception from this unit), or getting caught on anything (for
example, when getting in or out of the car). Fixing the cable’s
position also stabilizes it’s location for the best reception from this
unit.
Note
Be careful to line the cable so that it will not interfere with driving, become
entangled with passenger movements, or be damaged by seat adjustments,
etc.
<Example of using the magnet of the antenna for stable installation>
2-636-433-11(1)
Operating Instructions
Mode d’emploi
Manual de instrucciones
FM Transmitter
for Car Radio
©2005 Sony Corporation Printed in China
DCC-FMT3
For customers who purchased this product in the USA
Please register this product on line at
http://www.sony.com/productregistration.
Proper registration will enable us to send you periodic mailings about new
products, services, and other important announcements.
Registering your product will also allow us to contact you in the unlikely
event that the product needs adjustment or modification. Thank you.
English
WARNING
To reduce the risk of fire or electric shock, do not expose this
apparatus to rain or moisture.
To avoid electrical shock, do not open the cabinet. Refer servicing to qualified
personnel only.
Do not install the appliance in a confined space, such as a bookcase or built-in
cabinet.
To reduce the risk of fire or electric shock, do not place objects filled with
liquids, such as vases, on the apparatus..
You are cautioned that any changes or modifications not expressly approved in
this manual could void your authority to operate this equipment.
Note
This device complies with Part 15 of the FCC rules and RSS-210 of the IC rules.
Operation is subject to the following two conditions: (1) this device may not
cause interference, and (2) this device must accept any interference, including
interference that may cause undesired operation of the device.
Features
With this unit, you can enjoy listening to audio played on portable audio devices
through a car FM radio. Music from portable audio devices such as an HDD,
flash memory, MD or CD WALKMAN*, etc., is transmitted to the car’s FM
radio via FM radio waves.
Stable clear sound
•Using the flexible transmitting antenna cable, it is possible to transmit a stable
FM radio wave in any kind of car. The flexible transmitting antenna cable has a
magnet to anchor itself to a metal part inside the car.
• Digital frequency selection, rather than analog, assures a more stable and clear
transmission.
Easy operation with the frequency select dial
Select from 12 FM radio frequencies (channels) to transmit.
Fuse replacement
If this unit does not work correctly, check the fuse in the cigarette lighter plug.
If the fuse is blown, replace it.
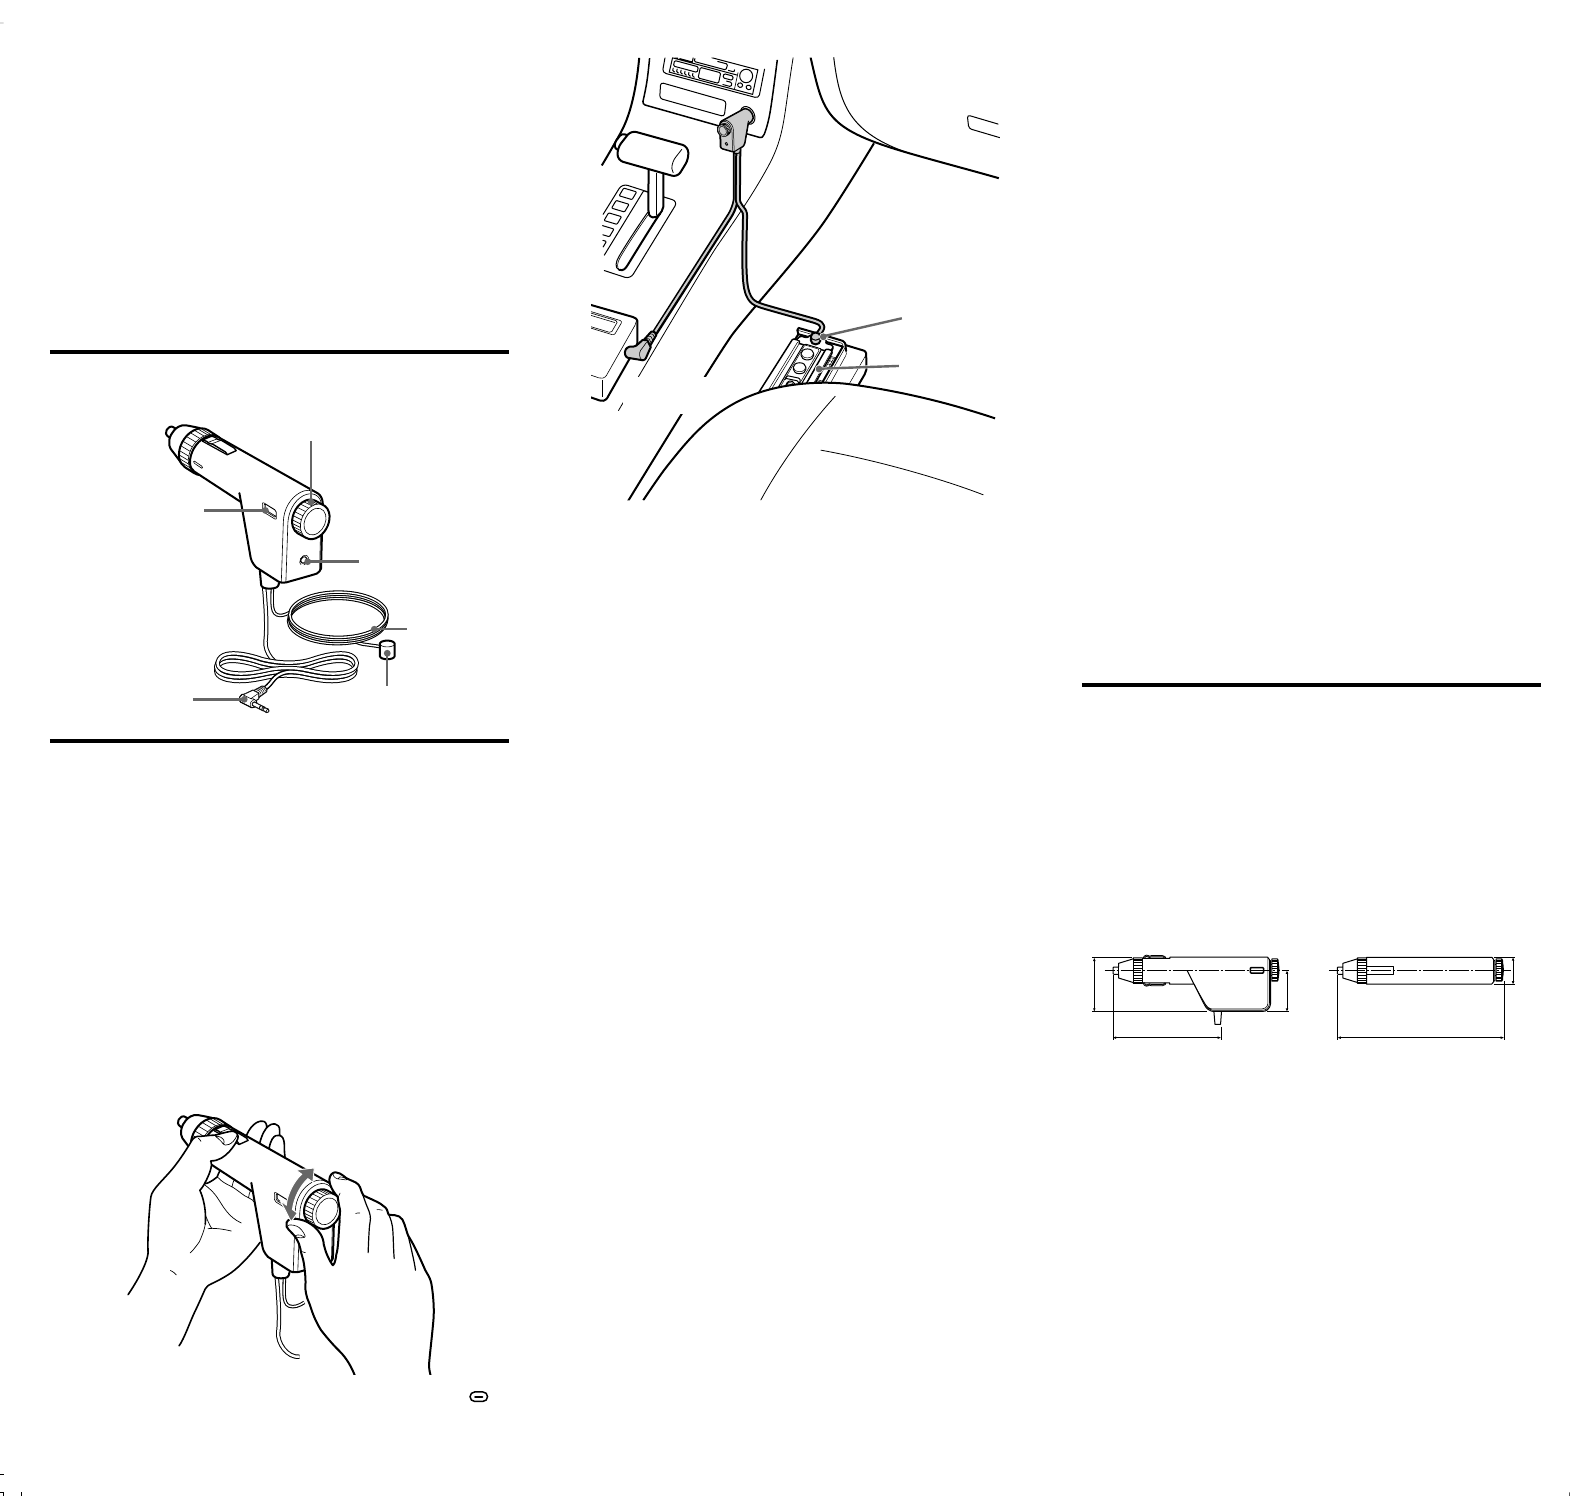
1Pull this unit out of the cigarette lighter socket.
2Detach the end of the plug by turning it counter-clockwise.
3Take out the fuse.
4Check the fuse.
If the fuse is blown, go to Step 5.
If no fuse is blown, go to Step 6.
5Install a new fuse.
Use a fuse of the correct amperage, as stated on the fuse compartment of this
unit (1 A, 125 V, 20 mm).
6Insert the fuse.
7Reattach the end of the plug by turning it clockwise firmly.
Notes
•Use of a higher amperage fuse may cause serious damage or fire.
•Do not use a piece of wire instead of a fuse.
•If the replaced fuse blows again, consult your dealer.
Precautions
•Do not attempt to connect this unit, or to operate this unit, a portable audio
device, or a car radio while driving or waiting at a traffic signal. Park in a safe
place first.
•Unplug this unit from the cigarette lighter socket whenever the engine of the
car is not running. Depending on the car type, even if the ignition key is off, the
power supply may not turn off automatically. In this case, this may cause
unnecessary car battery consumption.
•When not in use, unplug this unit from the cigarette lighter socket and store in a
safe place where it will not interfere with your driving or become entangled in
parts of the car interior (seat, door, etc.).
•Be sure to fully secure the portable audio device connected to the unit to avoid
moving when braking.
•Route the antenna cable or signal cable properly so that they will not interfere
with your driving or become entangled in parts of the car interior (seat, door,
etc.).
•Never yank or pull the antenna cable or signal cable. This may cause
malfunctions or wire breaks.
•Do not drop or hit the unit. This may cause malfunctions.
•This unit may become warm while using. This is not a malfunction.
Troubleshooting
Should any problem persist after you have made the following checks, consult
your nearest Sony dealer.
There is no sound from the portable audio device to the car radio.
❒This unit is not fully plugged into the cigarette lighter socket.
c Insert this unit correctly and securely.
❒This unit is not fully connected to the portable audio device.
c Connect this unit correctly and securely.
❒The transmission frequency of the unit and the FM car radio do not coincide.
c Set both the unit and the FM car radio to the same frequency.
❒There is no sound from the connecting portable audio device.
c Start playback on the portable audio device.
c Set the volume control of the portable audio device as high as possible but
not so high that the audio signal becomes distorted.
The volume is low.
❒The volume of the portable audio device is set too low.
c Set the volume control of the portable audio device as high as possible but
not so high that the audio signal becomes distorted.
If sound is still low, turn the volume up on the car radio.
The sound is distorted.
❒The input signal is too high.
c If you connected to the LINE OUT jack on the portable audio device,
disconnect and reconnect to the headphone jack.
❒The bass boost function on the portable audio device is on.
c Cancel the bass boost function.
Noise is generated
Fuse
Cigarette lighter
plug
End of the
plug
to tighten
to remove
Portable audio
device
4Démarrez la lecture sur
Remarques
•N’activez pas la fonction
l’appareil audio branché.
l’appareil audio raccordé.
•Réglez la commande du v
aussi élevé que possible, m
le son est encore faible, au
5Faites passer le câble d’a
améliorer la réception de
L’installation du câble d’an
l’installation pour trouver la
dans l’illustration ci-dessou
Afin d’empêcher l’instabilit
lorsque le câble d’antenne s
d’antenne dans une voiture)
l’extrémité du câble d’anten
<Exemple de positionne
l’antenne de l’autoradio
Utilisez l’exemple de base ci-de
obtenir la meilleure réception po
Remarques
•Faites passer le câble d’antenn
de l’appareil est mauvaise. Ce
• Pour plus de détails sur l’ante
d’emploi du véhicule.
•Si l’aimant est fixé à proximit
glissières de sièges, vérifiez q
risque d’entraîner une rupture
•Lors de la mise en place du câ
cartes de crédit personnelles d
appareil.
Si la réception de l
Si la réception de l’appareil est
essayez d’appliquer les solution
Après l’installation, la réce
vous vous déplacez.
c Dans certains endroits (par
etc.), la réception FM risqu
sont installés dans un tel en
puissante lorsque vous rou
Dans ce cas, réglez de nou
fréquence libre dans un end
meilleures.
c La réception de l’appareil s
Les conditions de réception
déplacez. Si une autre émis
cet appareil lorsque vous v
appareil à une autre fréque
c Des interférences ou des pa
D’autres émissions FM ou
interférer avec la réception
Dans ce cas, réglez l’autor
susceptible d’être perturbé
Remarques
AVERTISSEMENT
Pour éviter tout risque d’incendie ou de choc électrique, n’exposez
pas l’appareil à la pluie ou à l’humidité.
Pour éviter tout choc électrique, n’ouvrez pas le boîtier. Confiez l’entretien à un
technicien qualifié exclusivement.
N’installez pas l’appareil dans un espace confiné, tel qu’une bibliothèque ou une
armoire encastrée.
Pour éviter tout risque d’incendie ou de choc électrique, ne placez pas d’objets
remplis de liquide, tels que des vases, sur l’appareil.
Nous vous mettons en garde contre le fait que tout changement ou modification
non expressément approuvé dans le présent manuel peut invalider votre droit à
utiliser cet appareil.
Remarque
Cet appareil est conforme à la partie 15 de la réglementation FCC et à la règle IC
RSS-210.
Son utilisation est autorisée seulement aux conditions suivantes : (1) il ne doit pas
produire de brouillage et (2) l’utilisateur du dispositif doit être prêt à accepter tout
brouillage radioeléctrique reçu, même si ce brouillage est susceptible de
compromettre le fonctionnement du dispositif.
Caractéristiques
Cet appareil vous permet d’écouter des programmes avec des appareils audio
portables par l’intermédiaire d’un autoradio FM. La musique provenant
d’appareils portables tels qu’un lecteur HDD, une mémoire flash, un MD ou CD
WALKMAN*, etc., est transmise à l’autoradio du véhicule par les ondes radio
FM.
Son clair et stable
• Grâce à l’antenne de transmission flexible, il est possible de transmettre une
onde radio FM stable à tout véhicule, quel qu’il soit.
• Une sélection numérique des fréquences, au lieu d’une sélection analogique,
permet une transmission plus stable et claire.
Utilisation facile grâce à la molette de sélection des fréquences
Choix de 12 fréquences radio FM (canaux) pour la transmission.
Pas de piles sèches
Cet appareil se branche sur une batterie de voiture 12 V ou 24 V CC (allume-
cigare) disponible dans la majorité des voitures et camions.
*«WALKMAN » est une marque déposée par Sony Corporation pour
représenter les produits stéréo dotés d’un casque/d’écouteurs.
Identification des pièces
Raccordements
Réglez l’autoradio
1Réglez une fréquence FM sur votre autoradio.
2Sélectionnez une fréquence qui ne reçoit pas d’émissions dans la
liste ci-dessous.
88,1 MHz, 88,3 MHz, 88,5 MHz, 88,7 MHz, 88,9 MHz, 106,7 MHz,
106,9 MHz, 107,1 MHz, 107,3 MHz, 107,5 MHz, 107,7 MHz, 107,9 MHz
Les conditions de réception peuvent changer au fur et à mesure que vous
vous déplacez. Si la fréquence sélectionnée devient occupée par un signal
d’émission, sélectionnez une autre fréquence libre.
Remarques
•Pour plus de détails sur les réglages de l’autoradio, reportez-vous au mode
d’emploi de celui-ci.
•Baissez le volume avant de régler l’autoradio.
Voyant POWER
Câble
d’antenne
Fenêtre d’affichage
des fréquences
Molette de séletion des
fréquences
Minifiche stéréo
Français
Magnet
Portable audio
device
to a cigarette
lighter socket
Note
Be careful to line the cable so that it will not interfere with driving, become
entangled with passenger movements, or be damaged by seat adjustments,
etc.
<Example of using the magnet of the antenna for stable installation>
Use the above basic example as a general guideline. Adjust the antenna for the
best reception, depending on your car.
Notes
•Route the antenna cable close to the car antenna. This may help to improve the
reception from this unit.
•For details about the car radio antenna, refer to the car operating instructions.
• If the magnet is attached near movable objects, such as doors or seat rails, make
sure that the antenna cable does not become entangled. This may cause the wire
to break.
•Do not leave floppy disks or personal credit cards with magnetic coding near
the antenna cable magnet.
If the reception from this unit declines
If the reception from this unit declines, even though it was good at the frequency
set in the beginning, solve the problem referring to the following remedies,
according to your circumstances.
After setup, reception from this unit declines while driving.
c FM broadcast reception may be poor in certain locations, such as
underground parking, behind tall buildings, etc. If the car radio and this unit
were set up in such a location; due to poor FM broadcast reception, the
frequency you set for this unit may be already occupied. If so, the occupying
FM broadcast station is received when its reception conditions improve (as
you drive) resulting in interference with this unit’s same set frequency. In
this case, reset the car radio and this unit to another open frequency in a
location where the FM broadcast reception is better.
Reception from this unit is disrupted when you move to a new
location.
c FM broadcast reception conditions vary from one location to another. After
setting an open frequency in one location, as you move to other areas, that
frequency may become occupied by a broadcast station’s signal. In this case,
reset the frequency on both the car radio and this unit to another open
frequency.
Interference or noise occurs.
c Other FM broadcasts or non-licensed broadcastings in a city area may
interfere with the reception of the frequency set for this unit. In this case, set
the car radio and this unit to a less-influenced frequency.
Notes
•Do not attempt to connect this unit, or to operate this unit, a portable audio
device, or a car radio while driving or waiting at a traffic signal. Park in a safe
place first.
•Plug securely into the cigarette lighter socket.
•This unit may not fit, depending on the location or shape of the cigarette lighter
socket.
• Route the antenna cable and the audio cable (with the stereo mini plug at its
end) in a manner that does not interfere with your driving, and is out of the
reach of children.
•Install this unit in a manner that will not hinder the airbag function in an
emergency.
Features
With this unit, you can enjoy listening to audio played on portable audio devices
through a car FM radio. Music from portable audio devices such as an HDD,
flash memory, MD or CD WALKMAN*, etc., is transmitted to the car’s FM
radio via FM radio waves.
Stable clear sound
•Using the flexible transmitting antenna cable, it is possible to transmit a stable
FM radio wave in any kind of car. The flexible transmitting antenna cable has a
magnet to anchor itself to a metal part inside the car.
• Digital frequency selection, rather than analog, assures a more stable and clear
transmission.
Easy operation with the frequency select dial
Select from 12 FM radio frequencies (channels) to transmit.
Compact design
This unit is designed for installation in the cigarette lighter socket.
This unit is designed so as its protruding part is in one direction only, and when
installed can be rotated in order to avoid any obstructions around the cigarette
lighter socket.
No dry batteries
This unit connects to a 12 V or 24 V DC car battery (cigarette lighter socket),
available in many types of cars and trucks.
*“WALKMAN” is a registered trademark of Sony Corporation to represent
Headphone Stereo products.
Identifying the parts
Connections
Set the car radio
1Set your car radio to FM.
2Select a channel that does not get good FM broadcast reception
from the list below.
88.1 MHz, 88.3 MHz, 88.5 MHz, 88.7 MHz, 88.9 MHz, 106.7 MHz,
106.9 MHz, 107.1 MHz, 107.3 MHz, 107.5 MHz, 107.7 MHz, 107.9 MHz
The FM broadcast reception conditions may change as your location changes.
If the selected frequency becomes occupied by a broadcast signal, select
another open frequency.
Notes
• For details about car radio settings, refer to the car radio operating instructions.
• Turn the car radio volume down before setting the car radio.
Install the unit
1Rotate the frequency select dial to select the same frequency that
you set on the car radio.
The selected frequency appears in the frequency display window. The
mark appears at the transition point between a low frequency band
(88.1 MHz~88.9 MHz) and a high frequency band (106.7 MHz~107.9 MHz).
The mark is a border between high frequency and low frequency.
The volume is low.
❒The volume of the portable audio device is set too low.
c Set the volume control of the portable audio device as high as possible but
not so high that the audio signal becomes distorted.
If sound is still low, turn the volume up on the car radio.
The sound is distorted.
❒The input signal is too high.
c If you connected to the LINE OUT jack on the portable audio device,
disconnect and reconnect to the headphone jack.
❒The bass boost function on the portable audio device is on.
c Cancel the bass boost function.
Noise is generated.
❒The frequency of the unit does not coincide with the FM car radio.
c Set the unit and the FM car radio to the same frequency.
❒The reception from this unit is not good.
c Route the antenna cable for the unit inside the car. Position the antenna close
to the car antenna, or stabilize the antenna cable with the magnet to the
passenger’s seat rail, and so on. This may help to improve the reception
from this unit.
❒The FM car radio receives a broadcast signal.
c Select an empty frequency (a non-broadcast frequency, indicated by a static
hissing sound).
❒The selected frequency is occupied or the signal is jammed.
c Select another open or frequency which is less influenced by jamming (a
non-broadcast frequency, indicated by a static hissing sound).
The sound is interrupted.
❒The signal is jammed locally.
c Select another frequency which is less influenced by jamming (a non-
broadcast frequency, indicated by a static hissing sound).
The Power lamp does not light.
❒This unit is not completely plugged into the cigarette lighter socket.
c Insert this unit correctly and securely.
❒Depending on the car type, the engine must be started for electric current to
flow to the cigarette lighter socket.
c Start the engine.
❒The fuse is blown.
c Replace the fuse.
Specifications
Transmission system
multiplex stereo
Transmission frequency
88.1 MHz, 88.3 MHz, 88.5 MHz, 88.7 MHz, 88.9 MHz, 106.7 MHz,
106.9 MHz, 107.1 MHz, 107.3 MHz, 107.5 MHz, 107.7 MHz, 107.9 MHz
Electric strength
less than 250 µV/m (3 m)
Power voltage
DC 12/24 V (only for negative # grounded cars)
Input
ø3.5 mm (stereo mini plug)
Dimensions
Signal cable length
Approx.1 m (3.3 ft)
Antenna cable length
Approx.1.5 m (4.9 ft)
Mass
Approx. 40 g (1.42 oz) (without cables)
Supplied accessories
Operating Instructions (1)
Warranty Card (1)
Design and specifications are subject to change without notice.
Unit: mm
Frequency select dial
POWER lamp
Magnet
Antenna cable
Stereo mini plug
Frequency display
window
41
81
31
123
21
fréquence libre dans un end
meilleures.
c La réception de l’appareil s
Les conditions de réception
déplacez. Si une autre émis
cet appareil lorsque vous v
appareil à une autre fréque
c Des interférences ou des pa
D’autres émissions FM ou
interférer avec la réception
Dans ce cas, réglez l’autor
susceptible d’être perturbé
Remarques
•N’essayez pas de brancher cet
audio portable ou un autoradi
Parquez-vous d’abord dans un
•Branchez correctement l’appa
•Il est possible que cet apparei
forme de l’allume-cigare.
• Faites cheminer le câble d’ant
conduire et qu’il soit hors de p
• Faites cheminer les câbles de
•Installez l’appareil de sorte qu
d’urgence.
Remplacem
Si cet appareil ne fonctionne pa
cigare.
Si le fusible a fondu, remplacez
1Retirez cet appareil de l’
2Détachez l’extrémité de
des aiguilles d’une mont
3Retirez le fusible.
4Vérifiez le fusible.
Si le fusible a fondu, passez
Si le fusible n’a pas fondu, p
5Installez un nouveau fus
Utilisez un fusible dont l’am
fusibles de cet appareil (1 A
6Insérez le fusible.
7Remettez en place l’extr
dans le sens des aiguille
Remarques
•Lorsque vous remplacez le fu
correct, comme indiqué dans
20 mm)
•L’utilisation d’un fusible d’am
importants ou un incendie.
•N’utilisez pas un morceau de
•Si le fusible remplacé fond de
gq
2Sélectionnez une fréquence qui ne reçoit pas d’émissions dans la
liste ci-dessous.
88,1 MHz, 88,3 MHz, 88,5 MHz, 88,7 MHz, 88,9 MHz, 106,7 MHz,
106,9 MHz, 107,1 MHz, 107,3 MHz, 107,5 MHz, 107,7 MHz, 107,9 MHz
Les conditions de réception peuvent changer au fur et à mesure que vous
vous déplacez. Si la fréquence sélectionnée devient occupée par un signal
d’émission, sélectionnez une autre fréquence libre.
Remarques
•Pour plus de détails sur les réglages de l’autoradio, reportez-vous au mode
d’emploi de celui-ci.
•Baissez le volume avant de régler l’autoradio.
Installez l’appareil
1Faites tourner la molette de sélection des fréquences pour
sélectionner la même fréquence que celle réglée sur l’autoradio.
La fréquence sélectionnée s’affiche dans la fenêtre d’affichage des
fréquences. La marque apparaît au point de transition entre une bande
basse fréquence (88,1 MHz~88,9 MHz) et une bande haute fréquence
(106,7 MHz~107,9 MHz).
Considérez la marque comme une limite entre les fréquences hautes et les
fréquences basses.
2Raccordez la minifiche stéréo à la prise casque de l’appareil audio
portable.
Il se peut que le son soit déformé si elle est raccordée à la prise LINE OUT
de l’appareil audio portable, étant donné que le signal d’entrée vers cet
appareil est trop élevé.
3Insérez l’appareil dans l’allume-cigare.
Appareil audio
portable
vers un allume-cigare
Allume-cigare
Appareil audio
portable
Magnet
Seat rail
Portable audio
device