Sony Group GTKXB60 Home Audio System User Manual 010COV indb
Sony Corporation Home Audio System 010COV indb
Contents
- 1. TempConfidential_UC2 Fred_Fabio_IM_UC2_4697227111_c2 2017-03-17
- 2. TempConfidential_UC2 Fred_Fabio_IM_UC2_FR_4697227111_Anki 2017-03-17
TempConfidential_UC2 Fred_Fabio_IM_UC2_4697227111_c2 2017-03-17

GTK-XB60/XB90.4-697-227-11(1)GTK-XB60/XB90.4-697-227-11(1)
GTK-XB60/XB90
Home Audio System
Système audio de
salon
Operating Instructions GB
Mode d’emploi FR
Manual de instrucciones ES
4-697-227-11(1)
©2017 Sony Corporation
Printed in China/Imprimé en Chine
2GB
GTK-XB60/XB90.4-697-227-11(1)GTK-XB60/XB90.4-697-227-11(1)
WARNING
To reduce the risk of fire or electric
shock, do not expose this apparatus to
rain or moisture.
To reduce the risk of fire, do not cover the
ventilation opening of the appliance with
newspapers, tablecloths, curtains, etc.
Do not expose the appliance to naked
flame sources (for example, lighted
candles).
To reduce the risk of fire or electric shock,
do not expose this appliance to dripping
or splashing, and do not place objects
filled with liquids, such as vases, on the
appliance.
As the main plug is used to disconnect
the unit from the mains, connect the unit
to an easily accessible AC outlet. Should
you notice an abnormality in the unit,
disconnect the main plug from the AC
outlet immediately.
Do not install the appliance in a confined
space, such as a bookcase or built-in
cabinet.
Do not expose batteries or appliances
with battery-installed to excessive heat,
such as sunshine and fire.
The unit is not disconnected from the
mains as long as it is connected to the
AC outlet, even if the unit itself has been
turned off.
Indoor use only.
Notice for the customers in the USA
Owner’s Record
The model and serial numbers are
located on the rear of the unit. Record
these numbers in the space provided
below. Refer to them whenever you call
upon your Sony dealer regarding this
product.
Model No.
Serial No.
Important Safety Instructions
1) Read these instructions.
2) Keep these instructions.
3) Heed all warnings.
4) Follow all instructions.
5) Do not use this apparatus near water.
6) Clean only with dry cloth.
7) Do not block any ventilation
openings. Install in accordance with
the manufacturer’s instructions.
8) Do not install near any heat sources
such as radiators, heat registers,
stoves, or other apparatus (including
amplifiers) that produce heat.
9) Do not defeat the safety purpose
of the polarized or grounding-type
plug. A polarized plug has two
blades with one wider than the
other. A grounding type plug has
two blades and a third grounding
prong. The wide blade or the third
prong are provided for your safety.
If the provided plug does not fit into
your outlet, consult an electrician for
replacement of the obsolete outlet.
10) Protect the power cord from being
walked on or pinched particularly at
plugs, convenience receptacles, and
the point where they exit from the
apparatus.
11) Only use attachments/accessories
specified by the manufacturer.
12) Use only with the cart,
stand, tripod, bracket,
or table specified by
the manufacturer, or
sold with the apparatus.
When a cart is used, use caution
when moving the cart/apparatus
combination to avoid injury from tip-
over.
13) Unplug this apparatus during
lightning storms or when unused for
long periods of time.
14) Refer all servicing to qualified service
personnel. Servicing is required when
the apparatus has been damaged in
any way, such as power-supply cord
or plug is damaged, liquid has been
spilled or objects have fallen into the
apparatus, the apparatus has been
exposed to rain or moisture, does
not operate normally, or has been
dropped.
This symbol is intended
to alert the user to the
presence of uninsulated
“dangerous voltage”
within the product’s
enclosure that may be of
sufficient magnitude to
constitute a risk of electric
shock to persons.
This symbol is intended
to alert the user
to the presence of
important operating and
maintenance (servicing)
instructions in the
literature accompanying
the appliance.
NOTE:
This equipment has been tested and
found to comply with the limits for
a Class B digital device, pursuant to
Part 15 of the FCC Rules. These limits
are designed to provide reasonable
protection against harmful interference
in a residential installation. This
equipment generates, uses and can
radiate radio frequency energy and, if
not installed and used in accordance
with the instructions, may cause harmful
interference to radio communications.
However, there is no guarantee that
interference will not occur in a particular
installation. If this equipment does
cause harmful interference to radio
or television reception, which can be
determined by turning the equipment off
and on, the user is encouraged to try to
correct the interference by one or more
of the following measures:
Reorient or relocate the receiving
antenna.
Increase the separation between the
equipment and receiver.
Connect the equipment into an outlet
on a circuit different from that to
which the receiver is connected.
Consult the dealer or an experienced
radio/TV technician for help.
3GB
GTK-XB60/XB90.4-697-227-11(1)GTK-XB60/XB90.4-697-227-11(1)
Important Safety Instructions
1) Read these instructions.
2) Keep these instructions.
3) Heed all warnings.
4) Follow all instructions.
5) Do not use this apparatus near water.
6) Clean only with dry cloth.
7) Do not block any ventilation
openings. Install in accordance with
the manufacturer’s instructions.
8) Do not install near any heat sources
such as radiators, heat registers,
stoves, or other apparatus (including
amplifiers) that produce heat.
9) Do not defeat the safety purpose
of the polarized or grounding-type
plug. A polarized plug has two
blades with one wider than the
other. A grounding type plug has
two blades and a third grounding
prong. The wide blade or the third
prong are provided for your safety.
If the provided plug does not fit into
your outlet, consult an electrician for
replacement of the obsolete outlet.
10) Protect the power cord from being
walked on or pinched particularly at
plugs, convenience receptacles, and
the point where they exit from the
apparatus.
11) Only use attachments/accessories
specified by the manufacturer.
12) Use only with the cart,
stand, tripod, bracket,
or table specified by
the manufacturer, or
sold with the apparatus.
When a cart is used, use caution
when moving the cart/apparatus
combination to avoid injury from tip-
over.
13) Unplug this apparatus during
lightning storms or when unused for
long periods of time.
14) Refer all servicing to qualified service
personnel. Servicing is required when
the apparatus has been damaged in
any way, such as power-supply cord
or plug is damaged, liquid has been
spilled or objects have fallen into the
apparatus, the apparatus has been
exposed to rain or moisture, does
not operate normally, or has been
dropped.
This symbol is intended
to alert the user to the
presence of uninsulated
“dangerous voltage”
within the product’s
enclosure that may be of
sufficient magnitude to
constitute a risk of electric
shock to persons.
This symbol is intended
to alert the user
to the presence of
important operating and
maintenance (servicing)
instructions in the
literature accompanying
the appliance.
NOTE:
This equipment has been tested and
found to comply with the limits for
a Class B digital device, pursuant to
Part 15 of the FCC Rules. These limits
are designed to provide reasonable
protection against harmful interference
in a residential installation. This
equipment generates, uses and can
radiate radio frequency energy and, if
not installed and used in accordance
with the instructions, may cause harmful
interference to radio communications.
However, there is no guarantee that
interference will not occur in a particular
installation. If this equipment does
cause harmful interference to radio
or television reception, which can be
determined by turning the equipment off
and on, the user is encouraged to try to
correct the interference by one or more
of the following measures:
Reorient or relocate the receiving
antenna.
Increase the separation between the
equipment and receiver.
Connect the equipment into an outlet
on a circuit different from that to
which the receiver is connected.
Consult the dealer or an experienced
radio/TV technician for help.
CAUTION
You are cautioned that any changes or
modifications not expressly approved in
this manual could void your authority to
operate this equipment.
This equipment must not be co-located
or operated in conjunction with any other
antenna or transmitter.
This equipment complies with FCC
radiation exposure limits set forth for an
uncontrolled environment and meets
the FCC radio frequency (RF) Exposure
Guidelines. This equipment has very low
levels of RF energy that is deemed to
comply without maximum permissive
exposure evaluation (MPE).
For customers in Canada
This device complies with Industry
Canada’s licence-exempt RSSs.
Operation is subject to the following two
conditions:
(1) This device may not cause
interference; and
(2) This device must accept any
interference, including interference
that may cause undesired operation
of the device.
This equipment complies with IC
radiation exposure limits set forth for an
uncontrolled environment and meets
RSS-102 of the IC radio frequency (RF)
Exposure rules. This equipment has very
low levels of RF energy that is deemed
to comply without maximum permissive
exposure evaluation (MPE).
GB

4GB
GTK-XB60/XB90.4-697-227-11(1)
This system is designed to be used
for the following purposes:
• Playing back music sources
on USB devices or BLUETOOTH
devices
• Enjoying social gatherings with
the “Party Chain” or speaker add
function
About this manual
• Some illustrations are presented as
conceptual drawings, and may be
different from the actual products.
• The instructions in this manual are
for models GTK-XB60 and GTK-XB90.
The GTK-XB60 is used for illustrative
purposes unless otherwise noted.

5GB
GTK-XB60/XB90.4-697-227-11(1)
Table of Contents
About this manual ..................... 4
Guide to parts and controls ......6
Getting Started
Turning on the system ............ 10
Carrying the system ................ 10
Placing the system
horizontally ............................... 11
About the power
management ............................ 11
Charging the battery ................ 11
USB Device
Before using the USB device ....13
Playing a file .............................13
BLUETOOTH connection
Pairing this system with a
BLUETOOTH device ...................15
One Touch BLUETOOTH
Connection by NFC ...................17
Listening to music on a
BLUETOOTH device .................. 18
About the BLUETOOTH
wireless technology .................20
Playing back with high quality
sound codec (AAC/LDAC™) ....20
Setting the BLUETOOTH
standby mode ..........................21
Turning on or off the
BLUETOOTH signal ....................21
Using “Sony | Music Center”
and “Fiestable” via
BLUETOOTH connection .......... 22
Sound Adjustment
Adjusting the sound ................ 23
Other Operations
Enjoying wired playback using
multiple systems (Wired Party
Chain function) ........................ 24
Enjoying wireless playback
using multiple systems
(Wireless Party Chain
function) .................................. 27
Listening to music wirelessly
with two systems (Speaker
add function) ........................... 28
Enjoying music with the
Speaker Lights .........................30
Enjoying hands-free calls ........30
Using an optional
equipment ................................31
Using an optional
microphone ............................. 32
Setting the automatic
standby function ..................... 32
Saving the battery power ........ 32
Additional Information
Information about
compatible devices ................. 33
Troubleshooting ...................... 33
Precautions .............................. 37
Specifications ...........................39
License and Trademark
Notice ....................................... 41
6GB
GTK-XB60/XB90.4-697-227-11(1)GTK-XB60/XB90.4-697-227-11(1)
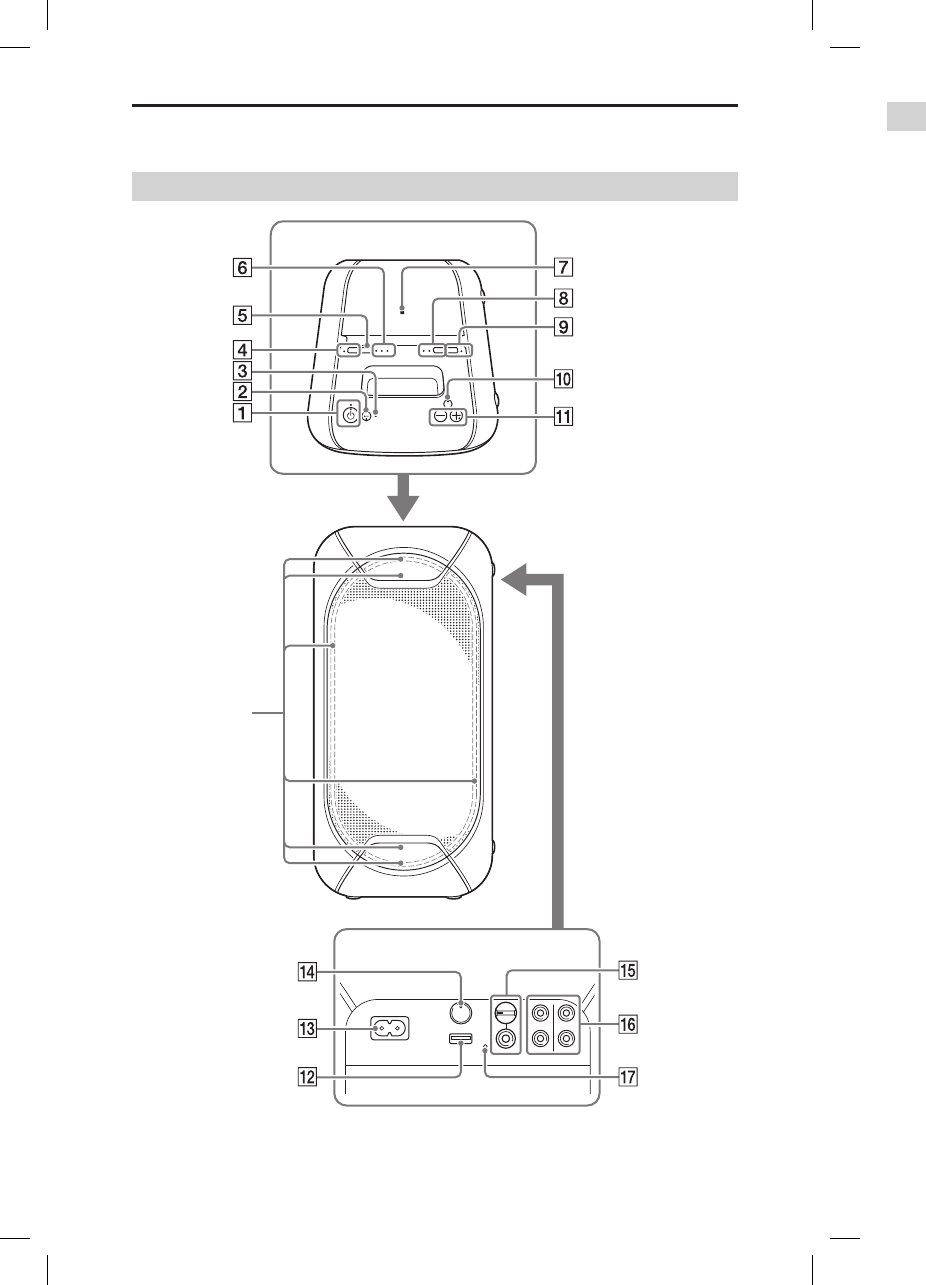
Guide to parts and controls
GTK-XB60
Top
Rear
* Do not look directly at the light-emitting parts when the Speaker Lights are turned on.
Speaker Lights*
(page30)
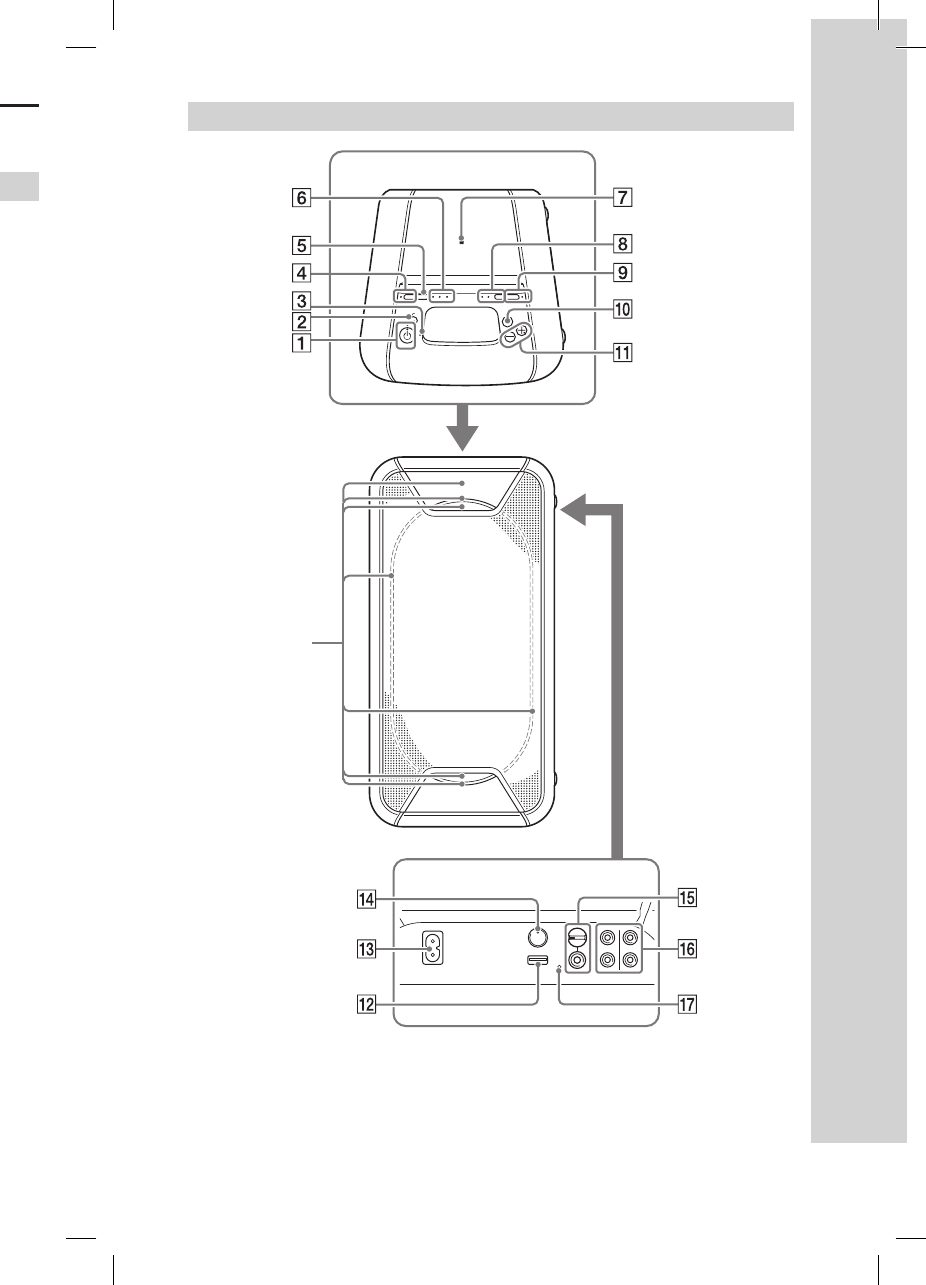
GTK-XB90
Speaker Lights*
(page30)
Top
Rear
* Do not look directly at the light-emitting parts when the Speaker Lights are turned on.
7GB
GTK-XB60/XB90.4-697-227-11(1)GTK-XB60/XB90.4-697-227-11(1)
Guide to parts and controls
GTK-XB60
Top
Rear
* Do not look directly at the light-emitting parts when the Speaker Lights are turned on.
GTK-XB90
Speaker Lights*
(page30)
Top
Rear
* Do not look directly at the light-emitting parts when the Speaker Lights are turned on.

8GB
GTK-XB60/XB90.4-697-227-11(1)GTK-XB60/XB90.4-697-227-11(1)
(power) button
Press to turn on or off the system.
(power) indicator
— Lights up in green while the
system is turned on.
— Lights up in amber while the
system is turned off, and when
the BLUETOOTH standby mode is
turned on.
CHARGE indicator (page11)
Lights up in amber while the
battery is charging.
(play/pause)/ (call)* button
— Press to play/pause music.
— Press to receive/end a call
when using the hands-
free call function with your
BLUETOOTH-connected mobile
phone (page30).
Built-in microphone
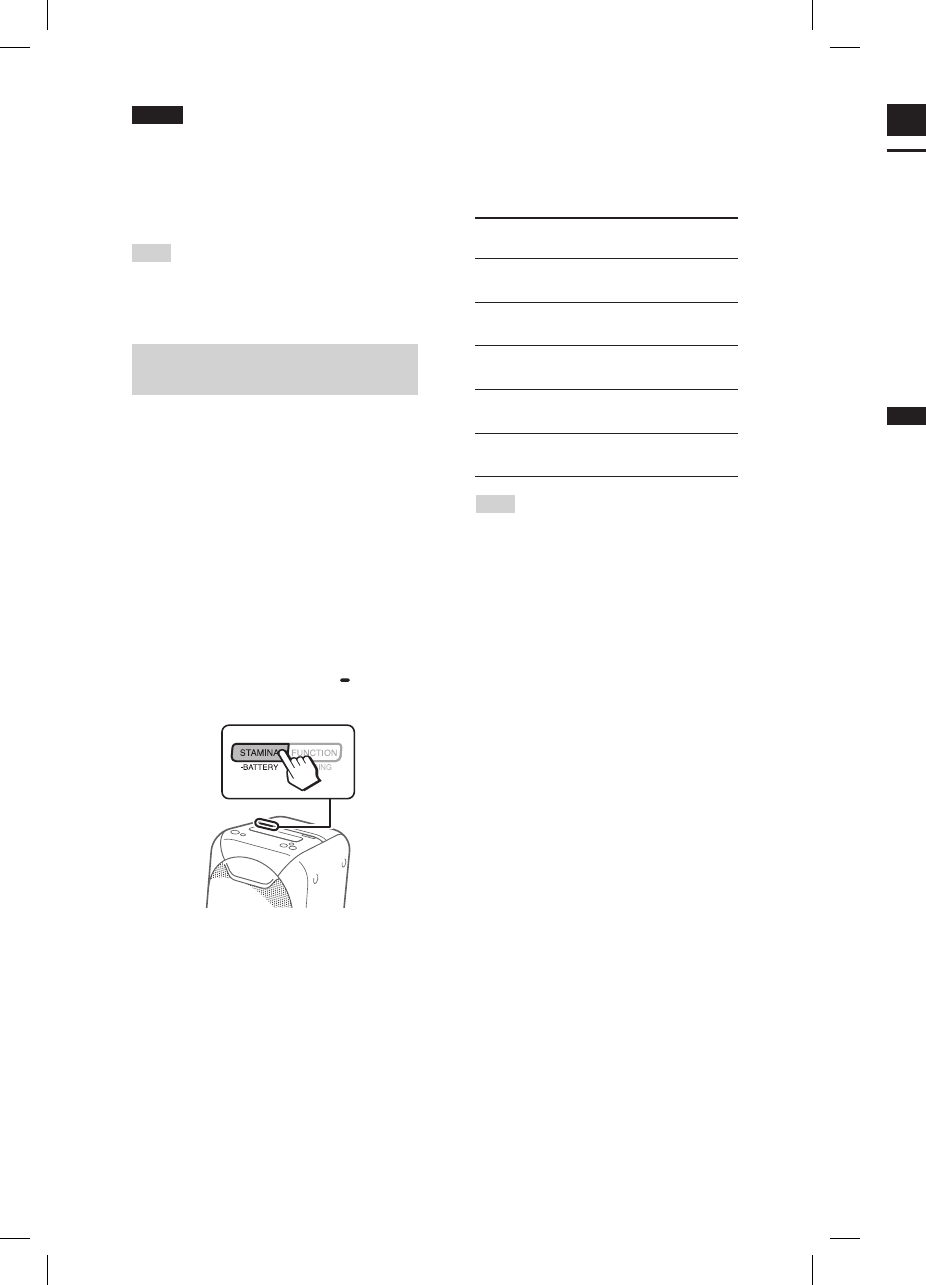
STAMINA BATTERY button
— Press to turn on the power-
saving mode (STAMINA mode)
when using the built-in battery
(page32).
— Hold down to check the
remaining battery level
(page12).
STAMINA BATTERY indicator
Lights up while STAMINA mode is
active (page32).
FUNCTION PAIRING button
— Press repeatedly to select the
BLUETOOTH, USB or Audio In
function.
— When the BLUETOOTH function
is selected, hold down to
activate BLUETOOTH pairing.
— Press to stop the built-in sound
demonstration.
(BLUETOOTH) indicator
(page20)
USB indicator (page13)
AUDIO IN indicator (page31)
(N-Mark) (page17)
ADD button (page28)
ADD L/R indicators (page28)
W.PARTY CHAIN LIGHT button
— Press to turn the Wireless Party
Chain function on (page27).
— Hold down for more than
3seconds to turn the speaker
lights on/off (page30).
W.PARTY CHAIN LIGHT indicator
Lights up when the Wireless
Party Chain function is in use
(page27).
EXTRA BASS button
— Press to generate more dynamic
sound (page23).
— Hold down for more than
3seconds while AC power cord
is connected to play back the
built-in sound demonstration.
EXTRA BASS indicator
Lights up when the EXTRA BASS
function is turned on (page23).
Volume +*/– buttons
Press to adjust the volume.
(USB) port
Use to connect a USB device.
AC IN jack (page10)
PARTY CHAIN button (page26)
PARTY CHAIN indicator
(page26)
MIC jack (page32)
MIC LEVEL (MIN/MAX) knob
(page32)
Audio output and input jacks
Use an audio cord (not supplied)
to make either connection as
follows:
•AUDIO/PARTY CHAIN OUT L/R
jacks
— Connect to the audio
input jacks of an optional
equipment.
— Connect to another audio
system to enjoy the Wired
Party Chain function
(page24).
•AUDIO/PARTY CHAIN IN L/R
jacks
— Connect to the audio output
jacks of a TV or an audio/
video equipment. The sound is
output through this system.
— Connect to another audio
system to enjoy the Wired
Party Chain function
(page24).
RESET button
* The / button and the volume +
button have a tactile dot. Use the tactile
dot as a reference when operating the
system.
Indicator statuses
The statuses of the indicators on the
unit are shown in the illustrations as
follows.
Indicator status Illustration
Flashing
Lit up
Turned off
9GB
GTK-XB60/XB90.4-697-227-11(1)GTK-XB60/XB90.4-697-227-11(1)
(N-Mark) (page17)
ADD button (page28)
ADD L/R indicators (page28)
W.PARTY CHAIN LIGHT button
— Press to turn the Wireless Party
Chain function on (page27).
— Hold down for more than
3seconds to turn the speaker
lights on/off (page30).
W.PARTY CHAIN LIGHT indicator
Lights up when the Wireless
Party Chain function is in use
(page27).
EXTRA BASS button
— Press to generate more dynamic
sound (page23).
— Hold down for more than
3seconds while AC power cord
is connected to play back the
built-in sound demonstration.
EXTRA BASS indicator
Lights up when the EXTRA BASS
function is turned on (page23).
Volume +*/– buttons
Press to adjust the volume.
(USB) port
Use to connect a USB device.
AC IN jack (page10)
PARTY CHAIN button (page26)
PARTY CHAIN indicator
(page26)
MIC jack (page32)
MIC LEVEL (MIN/MAX) knob
(page32)
Audio output and input jacks
Use an audio cord (not supplied)
to make either connection as
follows:
•AUDIO/PARTY CHAIN OUT L/R
jacks
— Connect to the audio
input jacks of an optional
equipment.
— Connect to another audio
system to enjoy the Wired
Party Chain function
(page24).
•AUDIO/PARTY CHAIN IN L/R
jacks
— Connect to the audio output
jacks of a TV or an audio/
video equipment. The sound is
output through this system.
— Connect to another audio
system to enjoy the Wired
Party Chain function
(page24).
RESET button
* The / button and the volume +
button have a tactile dot. Use the tactile
dot as a reference when operating the
system.
Indicator statuses
The statuses of the indicators on the
unit are shown in the illustrations as
follows.
Indicator status Illustration
Flashing
Lit up
Turned off
10GB
GTK-XB60/XB90.4-697-227-11(1)GTK-XB60/XB90.4-697-227-11(1)
Getting Started
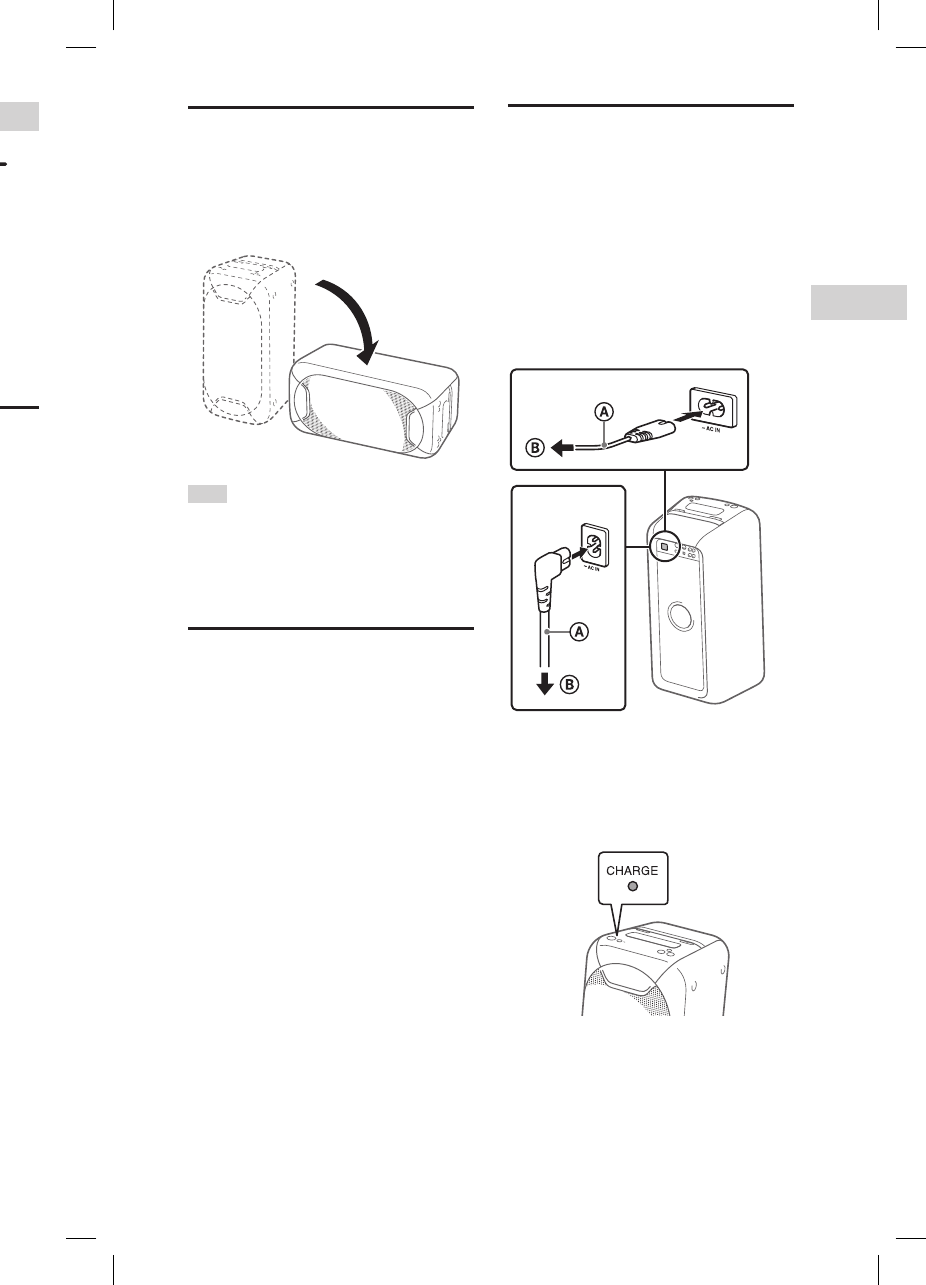
Turning on the system
1
Connect the AC power cord
(supplied) to the AC IN jack on
the rear of the unit, and then
to the wall outlet.
GTK-XB60
GTK-XB90
AC power cord (supplied)
To wall outlet
The system is turned on in the
demonstration mode and the
demonstration starts automatically.
2
Press to turn on the system.
The indicator lights up in green.
Hint
The system can be used with the built-in
battery instead of connecting the AC power
cord (supplied) to a wall outlet if you have
charged the battery before use. For details,
see “Charging the battery” (page11).
Deactivating the demonstration
Hold down W.PARTY CHAIN
LIGHT for more than 3seconds
while the demonstration is
performed.
The demonstration ends and the
system enters the standby mode.
When you hold down W.PARTY CHAIN
LIGHT during the standby mode, or
when you disconnect and reconnect
the AC power cord, the system enters
the demonstration mode.
Carrying the system
Before carrying the system, disconnect
all the cords.
Note
Correct hand placement while carrying the
system is very important to avoid personal
injury and/or property damage.
Placing the system
horizontally
You can also place the system horizontally
as illustrated below. (Place the rubber feet
side down.)
Hint
When you change the orientation of the
system, the tweeters that output sound for
the left and right channels are switched
to the upper two units automatically (for
GTK-XB90 only).
About the power
management
• By default, this system is set to turn
off automatically in about 15minutes
when there is no operation, and no
audio signal is detected. For details,
see “Setting the automatic standby
function” (page32).
• You can reduce the power
consumption using STAMINA mode.
For details, see “Saving the battery
power” (page32).
11GB
Getting Started
GTK-XB60/XB90.4-697-227-11(1)GTK-XB60/XB90.4-697-227-11(1)
Deactivating the demonstration
Hold down W.PARTY CHAIN
LIGHT for more than 3seconds
while the demonstration is
performed.
The demonstration ends and the
system enters the standby mode.
When you hold down W.PARTY CHAIN
LIGHT during the standby mode, or
when you disconnect and reconnect
the AC power cord, the system enters
the demonstration mode.
Carrying the system
Before carrying the system, disconnect
all the cords.
Note
Correct hand placement while carrying the
system is very important to avoid personal
injury and/or property damage.
Placing the system
horizontally
You can also place the system horizontally
as illustrated below. (Place the rubber feet
side down.)
Hint
When you change the orientation of the
system, the tweeters that output sound for
the left and right channels are switched
to the upper two units automatically (for
GTK-XB90 only).
About the power
management
• By default, this system is set to turn
off automatically in about 15minutes
when there is no operation, and no
audio signal is detected. For details,
see “Setting the automatic standby
function” (page32).
• You can reduce the power
consumption using STAMINA mode.
For details, see “Saving the battery
power” (page32).
Charging the battery
The system can be used with the
built-in battery (rechargeable) instead
of connecting the AC power cord to
a wall outlet if the battery has been
sufficiently charged.
Connect the AC power cord
(supplied) to the AC IN jack on
the rear of the unit, and then to
the wall outlet.
GTK-XB90
GTK-XB60
AC power cord (supplied)
To wall outlet
The CHARGE indicator will light up in
amber. Charging will be completed in
about 3.5 hours and the indicator will
turn off.
12GB
GTK-XB60/XB90.4-697-227-11(1)GTK-XB60/XB90.4-697-227-11(1)
Notes
• It may take longer to charge the battery
depending on the conditions of use.
• Even if you do not intend to use the
system for a long time, charge the battery
to its full capacity once every six months
to maintain its performance.
Hint
You can operate the system while it is
charging.
Checking the battery level of the
rechargeable battery
You can check the remaining battery
level via voice guidance when using
the system with the built-in battery.
You can also check the battery
level using “Sony | Music Center”
(page22).
1
Press to turn on the system.
Make sure that the AC power cord
is not connected to a wall outlet.
You can only check the battery
level when using the built-in
battery.
2
Hold down STAMINA
BATTERY.
3
The voice guidance message
is heard and the CHARGE
indicator flashes as follows
according to the remaining
battery level.
Message
(battery level)
Indicator
flashes
“Fully charged”
(80% – 100%)
4 times
“About 70%”
(60% – 79%)
3 times
“About 50%”
(30% – 59%)
2 times
“About 20%”
(11% – 29%)
Once
“Please charge”
(less than 10%)
Continuously
Hint
“Please charge” is output automatically
when the remaining battery level is less
than 10%.
USB Device
Before using the USB
device
For compatible USB devices, see
“Information about compatible
devices” (page33).
When using Apple devices with
this system, connect them via a
BLUETOOTH connection (page15).
Using Apple devices via a USB
connection is not supported.
Notes
• When USB cable connection is necessary,
use the USB cable supplied with the USB
device. See the operating instructions
supplied with the USB device for details
on the operation method.
• Do not connect the system and the USB
device through a USB hub.
• When the USB device is connected, the
system reads all the files on the USB
device. If there are many folders or files on
the USB device, it may take a long time to
finish reading the USB device.
• With some connected USB devices, there
may be a delay before an operation is
performed by this system.
• Compatibility with all encoding/writing
software cannot be guaranteed. If audio
files on the USB device were originally
encoded with incompatible software,
those files may produce noise or
interrupted audio, or may not play at all.
• This system does not necessarily support
all the functions provided in a connected
USB device.
13GB
GTK-XB60/XB90.4-697-227-11(1)GTK-XB60/XB90.4-697-227-11(1)
USB Device
3
The voice guidance message
is heard and the CHARGE
indicator flashes as follows
according to the remaining
battery level.
Message
(battery level)
Indicator
flashes
“Fully charged”
(80% – 100%)
4 times
“About 70%”
(60% – 79%)
3 times
“About 50%”
(30% – 59%)
2 times
“About 20%”
(11% – 29%)
Once
“Please charge”
(less than 10%)
Continuously
Hint
“Please charge” is output automatically
when the remaining battery level is less
than 10%.
USB Device
Before using the USB
device
For compatible USB devices, see
“Information about compatible
devices” (page33).
When using Apple devices with
this system, connect them via a
BLUETOOTH connection (page15).
Using Apple devices via a USB
connection is not supported.
Notes
• When USB cable connection is necessary,
use the USB cable supplied with the USB
device. See the operating instructions
supplied with the USB device for details
on the operation method.
• Do not connect the system and the USB
device through a USB hub.
• When the USB device is connected, the
system reads all the files on the USB
device. If there are many folders or files on
the USB device, it may take a long time to
finish reading the USB device.
• With some connected USB devices, there
may be a delay before an operation is
performed by this system.
• Compatibility with all encoding/writing
software cannot be guaranteed. If audio
files on the USB device were originally
encoded with incompatible software,
those files may produce noise or
interrupted audio, or may not play at all.
• This system does not necessarily support
all the functions provided in a connected
USB device.
To use the system as a battery
charger
You can use the system as a battery
charger for USB devices that have a
rechargeable function.
Connect the USB device to the (USB)
port.
The charging begins when the USB
device is connected to the (USB)
port. For details, refer to the operating
instructions of your USB device.
Playing a file
The following audio file formats are
supported:
—MP3: file extension “.mp3”
—WMA: file extension “.wma”
1
Press FUNCTION PAIRING
repeatedly until the USB
indicator on the unit lights up.
2
Connect the USB device to the
(USB) port.
3
Press / to start playback.
You can control playback
operations and select music easily
from a list of music on the USB
device using “Sony | Music Center”
(page22).
4
Press the volume +/– buttons
to adjust the volume.

14GB
GTK-XB60/XB90.4-697-227-11(1)
Other operations
To Do this
Pause
playback
Press /. To
resume play, press
/ again.
Play back the
next song
Press / twice.
Play back the
previous song
Press / for
three times.
Notes
• This system cannot play audio files on the
USB device in the following cases;
— when the total number of audio files on
a USB device exceeds 999.
— when the number of folders on a USB
device exceeds 256 (including the
“ROOT” folder and empty folders).
These numbers may vary depending on
the file and folder structure. Do not save
other types of files or unnecessary folders
on a USB device that has audio files.
• The system can play back to a depth of 8
folders only.
• Folders that have no audio files are
skipped.
• Note that even when the file name has
the correct file extension, if the actual
file differs, the system may emit noise or
malfunction.
15GB
BLUETOOTH connection
GTK-XB60/XB90.4-697-227-11(1)
BLUETOOTH connection
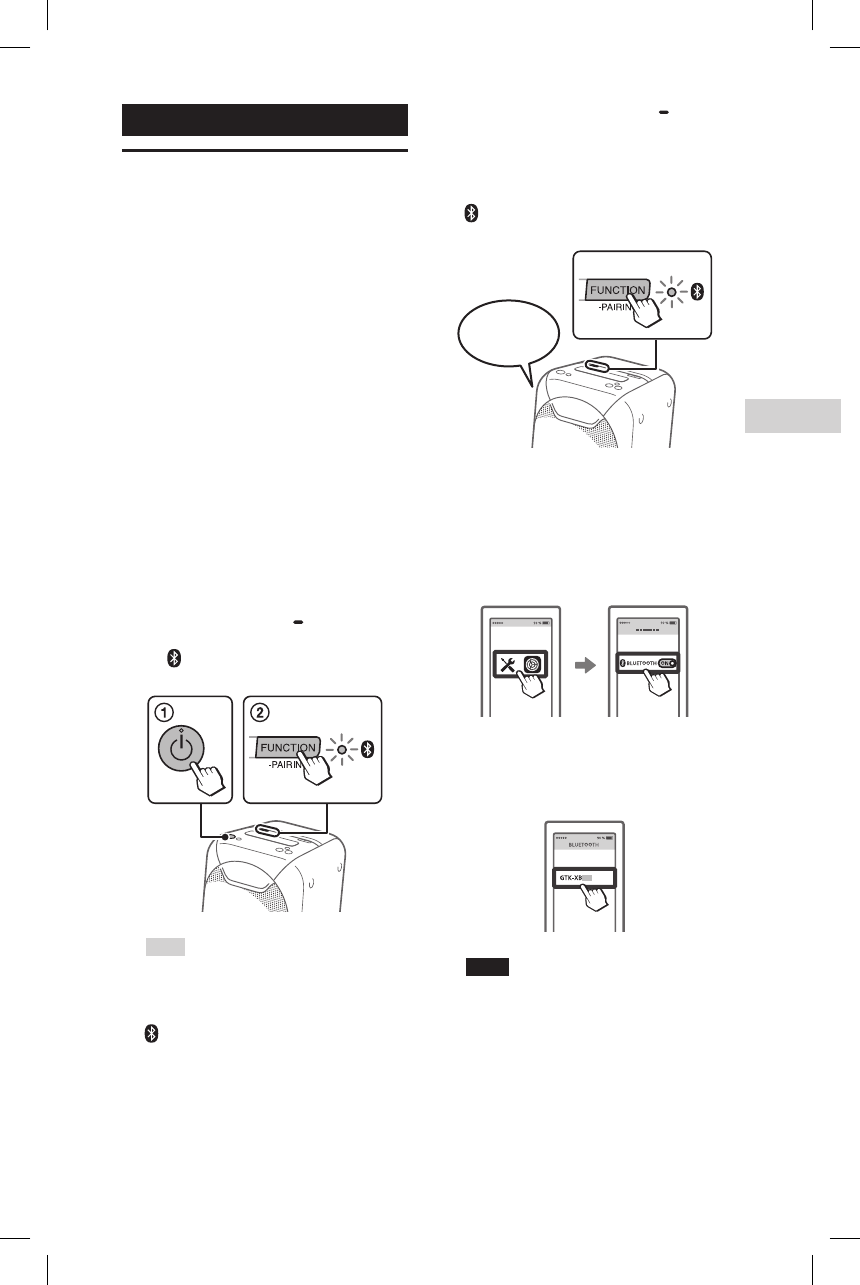
Pairing this system with
a BLUETOOTH device
Pairing is an operation in which
BLUETOOTH devices register each
other beforehand. Once the pairing
operation has been performed, it does
not need to be performed again for
those devices.
If your device is an NFC-compatible
smartphone, the manual pairing
procedure is not necessary. (See “One
Touch BLUETOOTH Connection by NFC”
(page17).)
1
Place the BLUETOOTH device
within 1meter (3 feet) from
the system.
2
Select the BLUETOOTH
function.
Press to turn on the system.
Press FUNCTION PAIRING
repeatedly until the
(BLUETOOTH) indicator on
the unit flashes slowly.
Hint
When there is no pairing information
on the system (for example, when
you use the BLUETOOTH function
for the first time after purchase), the
(BLUETOOTH) indicator flashes quickly
and the system enters the pairing mode
automatically. In this case, proceed to
step 4.
3
Hold down FUNCTION
PAIRING for more than
3seconds.
Voice guidance (“Bluetooth
pairing”) will be output and the
(BLUETOOTH) indicator will flash
quickly.
4
Turn on the BLUETOOTH
function on the BLUETOOTH
device.
For details, refer to the operating
instructions of your BLUETOOTH
device.
5
Select “GTK-XB60” or
“GTK-XB90” on the display of
the BLUETOOTH device.
Note
If passkey is required on the BLUETOOTH
device, enter “0000.” “Passkey” may
be called “Passcode,” “PIN code,” “PIN
number,” or “Password.”
Bluetooth
pairing
16GB
GTK-XB60/XB90.4-697-227-11(1)GTK-XB60/XB90.4-697-227-11(1)
One Touch BLUETOOTH
Connection by NFC
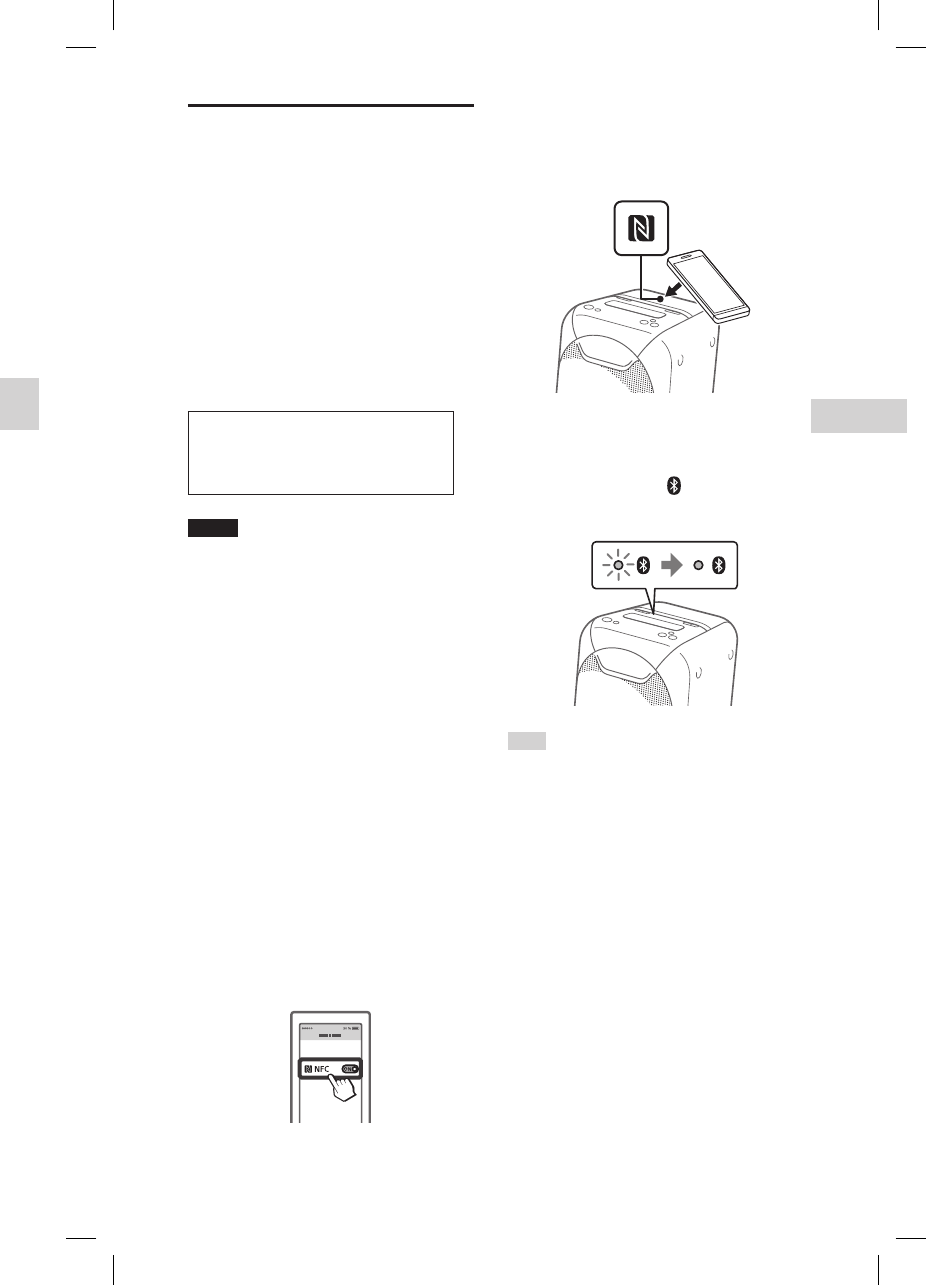
NFC (Near Field Communication) is
a technology enabling short-range
wireless communication between
various devices, such as smartphones
and IC tags.
When you touch the system with an
NFC-compatible smartphone, the
system automatically:
—turns on in the BLUETOOTH function.
—completes the pairing and
BLUETOOTH connection.
Compatible smartphones
Smartphones with a built-in NFC
function (OS: Android™ 2.3.3 or
later, excluding Android 3.x)
Notes
• The system can only recognize and
connect to one NFC-compatible
smartphone at a time. If you try to connect
another NFC-compatible smartphone
to the system, the currently connected
NFC-compatible smartphone will be
disconnected.
• Depending on your NFC-compatible
smartphone, you may need to perform the
following steps on your NFC-compatible
smartphone in advance.
— Turn on the NFC function. For details,
refer to the operating instructions of
the NFC-compatible smartphone.
— If your NFC-compatible smartphone
has an OS version that is older than
Android 4.1.x, download and start
the “NFC Easy Connect” application.
“NFC Easy Connect” is a free application
for Android smartphones that can be
obtained from Google Play™. (The
application may not be available in
some countries/regions.)
1
Turn on the NFC function of a
BLUETOOTH device, such as a
smartphone or tablet.
6
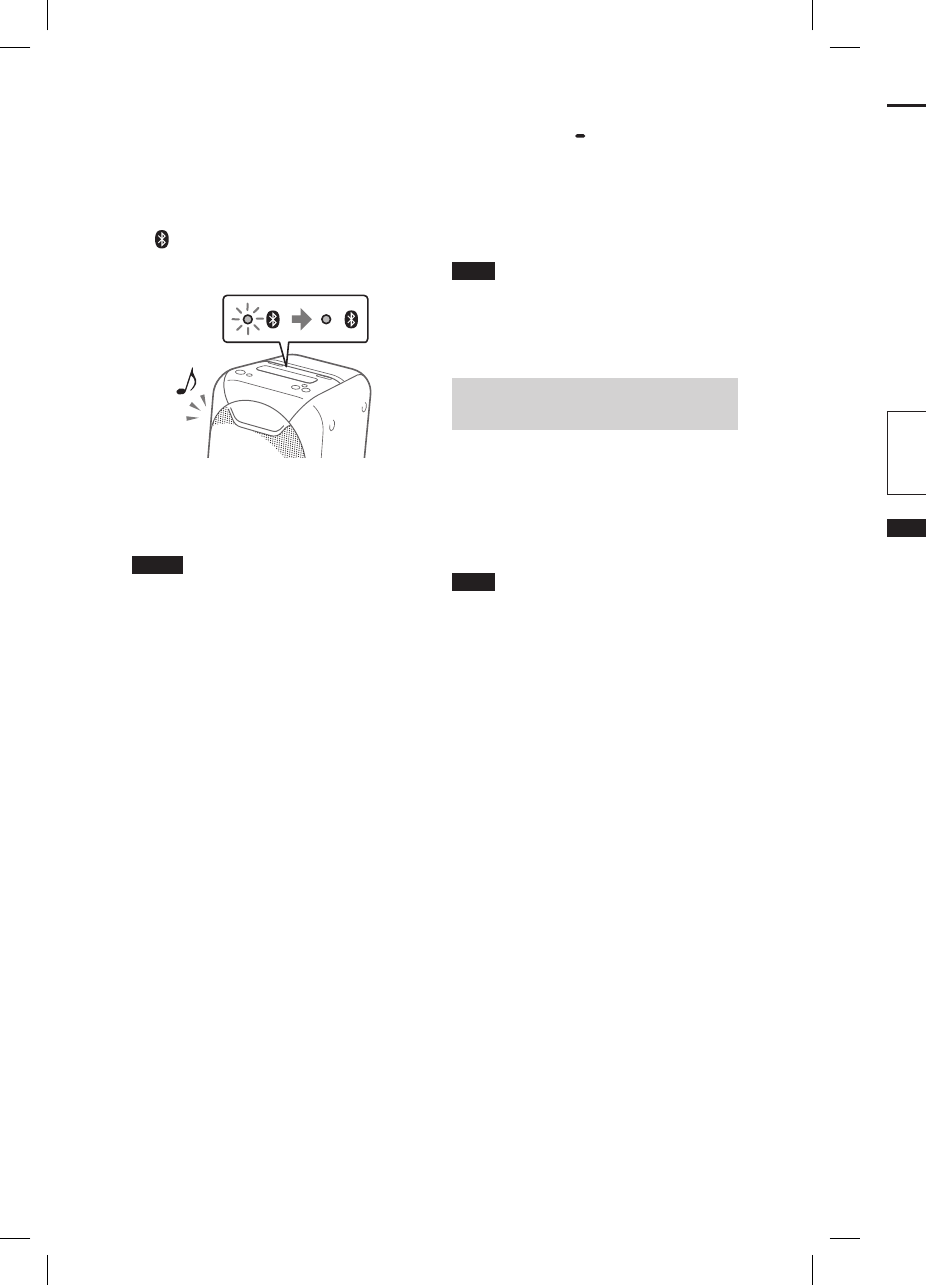
Make sure that a BLUETOOTH
connection has been
established.
Once a BLUETOOTH connection
is established, the system will
emit a notification sound, and the
(BLUETOOTH) indicator on the
unit will stop flashing and remain
lit up.
Depending on the BLUETOOTH
device, connection may start
automatically after pairing is
completed.
Notes
• You can pair up to 8 BLUETOOTH devices.
If the 9th BLUETOOTH device is paired, the
oldest paired device will be deleted.
• If you want to pair with another
BLUETOOTH device, repeat steps 1 to 6.
• If the last connected BLUETOOTH device
is nearby, a BLUETOOTH connection will
be established automatically and the
BLUETOOTH indicator will light up. If you
want to connect another BLUETOOTH
device, turn off the BLUETOOTH function
on the connected device or turn off the
power on the connected device.
To cancel the pairing operation
Press FUNCTION PAIRING.
To terminate the BLUETOOTH
connection
Turn off the BLUETOOTH function on
the connected device.
Note
Depending on the BLUETOOTH device, the
BLUETOOTH connection may be terminated
automatically when you stop playback.
Erasing all the pairing
registration information
To erase all of the pairing registration
information, the system needs to
be restored to the factory default
settings. See “Restoring the system
to the factory default settings”
(page37).
Note
Once all the pairing information on the
system has been erased, iPhone/iPod touch
may not be able to connect to the system.
In this case, delete the pairing information
for the system from iPhone/iPod touch, and
then perform the pairing procedure again.
17GB
BLUETOOTH connection
GTK-XB60/XB90.4-697-227-11(1)GTK-XB60/XB90.4-697-227-11(1)
One Touch BLUETOOTH
Connection by NFC
NFC (Near Field Communication) is
a technology enabling short-range
wireless communication between
various devices, such as smartphones
and IC tags.
When you touch the system with an
NFC-compatible smartphone, the
system automatically:
—turns on in the BLUETOOTH function.
—completes the pairing and
BLUETOOTH connection.
Compatible smartphones
Smartphones with a built-in NFC
function (OS: Android™ 2.3.3 or
later, excluding Android 3.x)
Notes
• The system can only recognize and
connect to one NFC-compatible
smartphone at a time. If you try to connect
another NFC-compatible smartphone
to the system, the currently connected
NFC-compatible smartphone will be
disconnected.
• Depending on your NFC-compatible
smartphone, you may need to perform the
following steps on your NFC-compatible
smartphone in advance.
— Turn on the NFC function. For details,
refer to the operating instructions of
the NFC-compatible smartphone.
— If your NFC-compatible smartphone
has an OS version that is older than
Android 4.1.x, download and start
the “NFC Easy Connect” application.
“NFC Easy Connect” is a free application
for Android smartphones that can be
obtained from Google Play™. (The
application may not be available in
some countries/regions.)
1
Turn on the NFC function of a
BLUETOOTH device, such as a
smartphone or tablet.
2
Touch the BLUETOOTH device
to the N-Mark on the unit
until the BLUETOOTH device
responds to the system.
Complete the connection by
following the instructions displayed
on the BLUETOOTH device.
When the BLUETOOTH connection
is established, the (BLUETOOTH)
indicator on the unit stops flashing
and remains lit.
Hint
If pairing and the BLUETOOTH connection
fail, perform the following.
— Remove the case from the smartphone
if using a commercially available
smartphone case.
— Touch the smartphone to the N-Mark on
the unit again.
— Relaunch the “NFC Easy Connect”
application.
— Unlock the screen of the BLUETOOTH
device.
To cancel the pairing operation
Press FUNCTION PAIRING.
To terminate the BLUETOOTH
connection
Turn off the BLUETOOTH function on
the connected device.
Note
Depending on the BLUETOOTH device, the
BLUETOOTH connection may be terminated
automatically when you stop playback.
Erasing all the pairing
registration information
To erase all of the pairing registration
information, the system needs to
be restored to the factory default
settings. See “Restoring the system
to the factory default settings”
(page37).
Note
Once all the pairing information on the
system has been erased, iPhone/iPod touch
may not be able to connect to the system.
In this case, delete the pairing information
for the system from iPhone/iPod touch, and
then perform the pairing procedure again.

18GB
GTK-XB60/XB90.4-697-227-11(1)GTK-XB60/XB90.4-697-227-11(1)
2
Start playback of an audio
source on the BLUETOOTH
device.
For details, refer to the operating
instructions of your BLUETOOTH
device.
You can also use / on the
system to play back/pause the
music.
3
Adjust the volume.
Adjust the volume of the
BLUETOOTH device first. If the
volume level is still too low, adjust
the volume level on the system
using the volume +/– buttons.
BLUETOOTH
device
To terminate the BLUETOOTH
connection
Touch the BLUETOOTH device to the
N-Mark on the unit again.
Erasing all the pairing
registration information
To erase all of the pairing registration
information, the system needs to
be restored to the factory default
settings. See “Restoring the system
to the factory default settings”
(page37).
Note
Once all the pairing information on the
system has been erased, iPhone/iPod touch
may not be able to connect to the system.
In this case, delete the pairing information
for the system from iPhone/iPod touch, and
then perform the pairing procedure again.
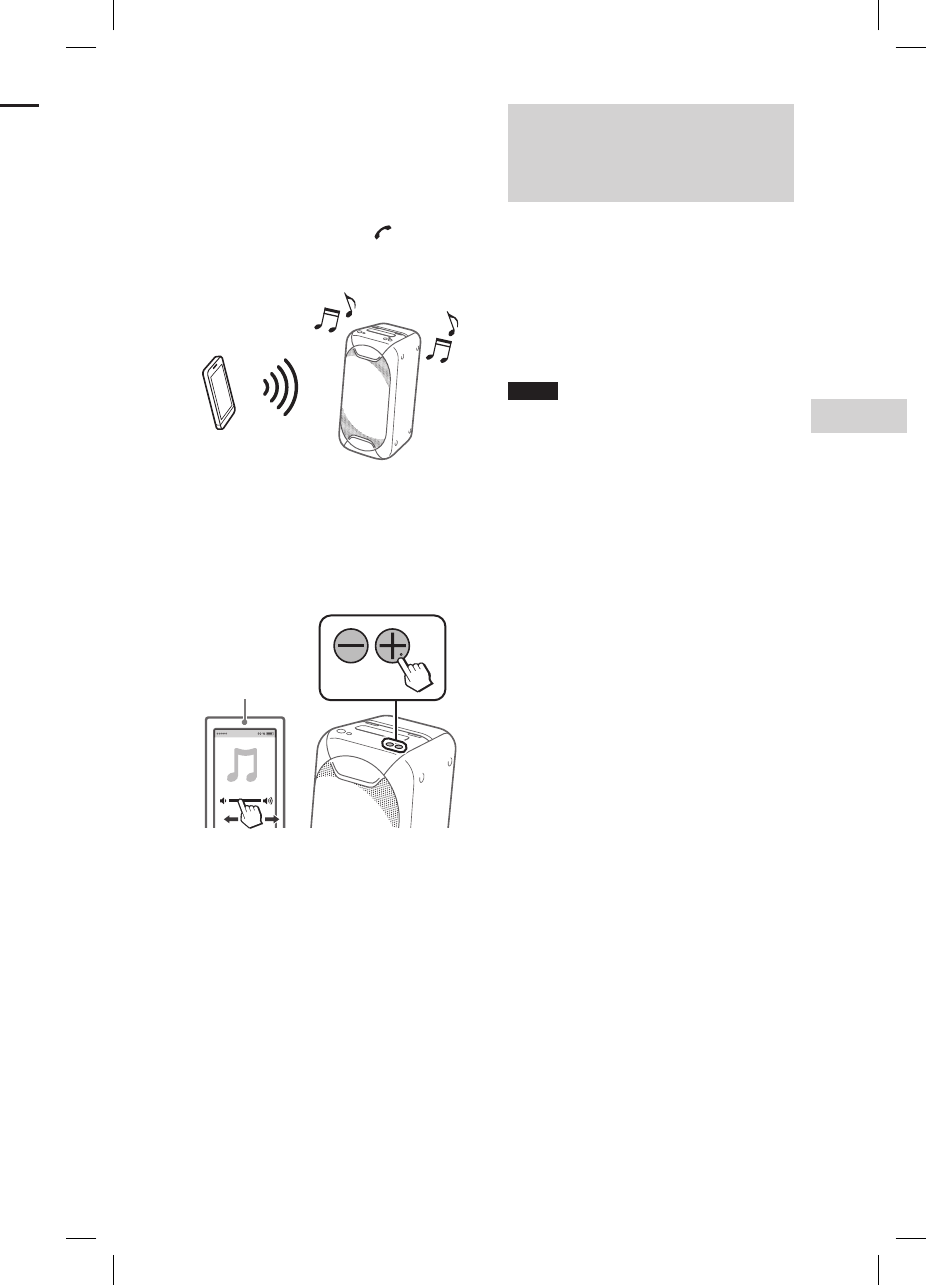
Listening to music on a
BLUETOOTH device
You can enjoy listening to music on a
connected BLUETOOTH device via the
system using AVRCP.
Check the following before playing
music:
—The BLUETOOTH function of the
BLUETOOTH device is turned on.
—Pairing has been completed
(page15).
1
Press FUNCTION PAIRING
repeatedly until the
(BLUETOOTH) indicator on
the unit lights up.
The last connected BLUETOOTH
device will be connected
automatically.
Note
If the (BLUETOOTH) indicator flashes,
the BLUETOOTH connection hasn’t
been established. In this case, complete
the pairing procedure and establish a
BLUETOOTH connection.
19GB
BLUETOOTH connection
GTK-XB60/XB90.4-697-227-11(1)GTK-XB60/XB90.4-697-227-11(1)
2
Start playback of an audio
source on the BLUETOOTH
device.
For details, refer to the operating
instructions of your BLUETOOTH
device.
You can also use / on the
system to play back/pause the
music.
3
Adjust the volume.
Adjust the volume of the
BLUETOOTH device first. If the
volume level is still too low, adjust
the volume level on the system
using the volume +/– buttons.
BLUETOOTH
device
Switching between BLUETOOTH
devices connected to the system
at the same time (Multipoint
connection)
Up to 3 BLUETOOTH devices can be
connected to the system at the same
time.
While playing back an audio source
from one of the connected devices,
you can switch the BLUETOOTH
input device by operating another
connected device to start playback.
Notes
• You cannot use this function when using
the hands-free call function, speaker add
function, or Wireless Party Chain function.
• Depending on the BLUETOOTH devices,
you may not be able to make 3
BLUETOOTH connections at the same
time.
Listening to music on a
BLUETOOTH device
You can enjoy listening to music on a
connected BLUETOOTH device via the
system using AVRCP.
Check the following before playing
music:
—The BLUETOOTH function of the
BLUETOOTH device is turned on.
—Pairing has been completed
(page15).
1
Press FUNCTION PAIRING
repeatedly until the
(BLUETOOTH) indicator on
the unit lights up.
The last connected BLUETOOTH
device will be connected
automatically.
Note
If the (BLUETOOTH) indicator flashes,
the BLUETOOTH connection hasn’t
been established. In this case, complete
the pairing procedure and establish a
BLUETOOTH connection.
20GB
GTK-XB60/XB90.4-697-227-11(1)GTK-XB60/XB90.4-697-227-11(1)
LDAC is an audio coding
technology developed by Sony,
that enables the transmission
of High-Resolution (Hi-Res)
Audio content, even over a
BLUETOOTH connection. Unlike
other BLUETOOTH compatible
coding technologies, such as
SBC, it operates without any
down-conversion of the Hi-Res
Audio content1). It also allows
approximately three times more
data2) than the other technologies,
for transmitting over a
BLUETOOTH wireless network with
unprecedented sound quality using
efficient coding and optimized data
bundling.
1) Excluding DSD format contents.
2) In comparison with SBC (Sub Band
Codec), when the bit rate of 990 kbps
(96/48 kHz) or 909 kbps (88.2/44.1 kHz)
is selected.
About the BLUETOOTH
wireless technology
BLUETOOTH wireless technology is a
short-range wireless technology that
enables wireless data communication
between digital devices. BLUETOOTH
wireless technology operates within a
range of about 10 meters (33 feet).
Supported BLUETOOTH version,
profiles and codecs
For details, see “BLUETOOTH section”
(page39).
(BLUETOOTH) indicator
The (BLUETOOTH) indicator on the
unit lights up or flashes in blue to
show the BLUETOOTH status.
System status Indicator status
BLUETOOTH
standby
Flashing slowly
BLUETOOTH
pairing
Flashing quickly
BLUETOOTH
connection is
established
Lit up
Playing back with high
quality sound codec
(AAC/LDAC™)
This system can receive data in the
AAC or LDAC codec format from a
BLUETOOTH device. It provides a
playback with higher sound quality.
You can select an audio codec option
from the following two settings
by using “Sony | Music Center”
(page22). The default setting of
this system is “AUTO.”
• AUTO: The system detects the codec
used on the source device and
automatically selects the optimal
codec from “SBC,” “AAC*” or “LDAC*.”
• SBC: “SBC” is always applied
regardless of the codec used on the
source device.
* Available only when the codec is
supported by your BLUETOOTH device.
To apply the changes of the setting,
you need to terminate the BLUETOOTH
connection (page16), and then
perform the BLUETOOTH connection
again.
Note
You can enjoy higher sound quality
when the source device is compatible
with AAC/LDAC and this function is set
to “AUTO.” However, the sound may be
interrupted depending on the conditions
of the BLUETOOTH communication. If this
happens, set the function to “SBC.”
21GB
BLUETOOTH connection
GTK-XB60/XB90.4-697-227-11(1)GTK-XB60/XB90.4-697-227-11(1)
LDAC is an audio coding
technology developed by Sony,
that enables the transmission
of High-Resolution (Hi-Res)
Audio content, even over a
BLUETOOTH connection. Unlike
other BLUETOOTH compatible
coding technologies, such as
SBC, it operates without any
down-conversion of the Hi-Res
Audio content1). It also allows
approximately three times more
data2) than the other technologies,
for transmitting over a
BLUETOOTH wireless network with
unprecedented sound quality using
efficient coding and optimized data
bundling.
1) Excluding DSD format contents.
2) In comparison with SBC (Sub Band
Codec), when the bit rate of 990 kbps
(96/48 kHz) or 909 kbps (88.2/44.1 kHz)
is selected.
Setting the BLUETOOTH
standby mode
The BLUETOOTH standby mode
enables the system to turn on
automatically when you establish
the BLUETOOTH connection with a
BLUETOOTH device. This setting is
turned off by default.
This setting can only be configured by
using “Sony | Music Center.” For details
on “Sony | Music Center,” see “Using
“Sony | Music Center” and “Fiestable”
via BLUETOOTH connection”
(page22).
Note
The BLUETOOTH function can only be set to
on while the AC power cord is connected.
Hint
Disable the BLUETOOTH standby mode to
reduce the power consumption in standby
mode (eco mode).
Turning on or off the
BLUETOOTH signal
You can connect to the system
from a paired BLUETOOTH device
in all functions when the system’s
BLUETOOTH signal is set to on. This
setting is turned on by default.
Hold down STAMINA BATTERY
and W.PARTY CHAIN LIGHT for
more than 5 seconds to turn off
the BLUETOOTH signal.
AUDIO IN indicator will flash once.
Notes
• You cannot perform the following
operations when you turn off the
BLUETOOTH signal:
— Pairing and/or connecting with
BLUETOOTH device
— Using “Sony | Music Center” via
BLUETOOTH connection
• To turn on the BLUETOOTH signal, repeat
the procedure shown above. When the
BLUETOOTH signal turns on, the AUDIO IN
indicator flashes 3 times.
Playing back with high
quality sound codec
(AAC/LDAC™)
This system can receive data in the
AAC or LDAC codec format from a
BLUETOOTH device. It provides a
playback with higher sound quality.
You can select an audio codec option
from the following two settings
by using “Sony | Music Center”
(page22). The default setting of
this system is “AUTO.”
• AUTO: The system detects the codec
used on the source device and
automatically selects the optimal
codec from “SBC,” “AAC*” or “LDAC*.”
• SBC: “SBC” is always applied
regardless of the codec used on the
source device.
* Available only when the codec is
supported by your BLUETOOTH device.
To apply the changes of the setting,
you need to terminate the BLUETOOTH
connection (page16), and then
perform the BLUETOOTH connection
again.
Note
You can enjoy higher sound quality
when the source device is compatible
with AAC/LDAC and this function is set
to “AUTO.” However, the sound may be
interrupted depending on the conditions
of the BLUETOOTH communication. If this
happens, set the function to “SBC.”
22GB
GTK-XB60/XB90.4-697-227-11(1)GTK-XB60/XB90.4-697-227-11(1)
Sound Adjustment
Adjusting the sound
To Do this
Adjust the
volume
Press the volume +/–
buttons.
Generate
a more
dynamic
sound
Press EXTRA BASS.
The EXTRA BASS
indicator lights up
in red while the
EXTRA BASS function is
turned on.
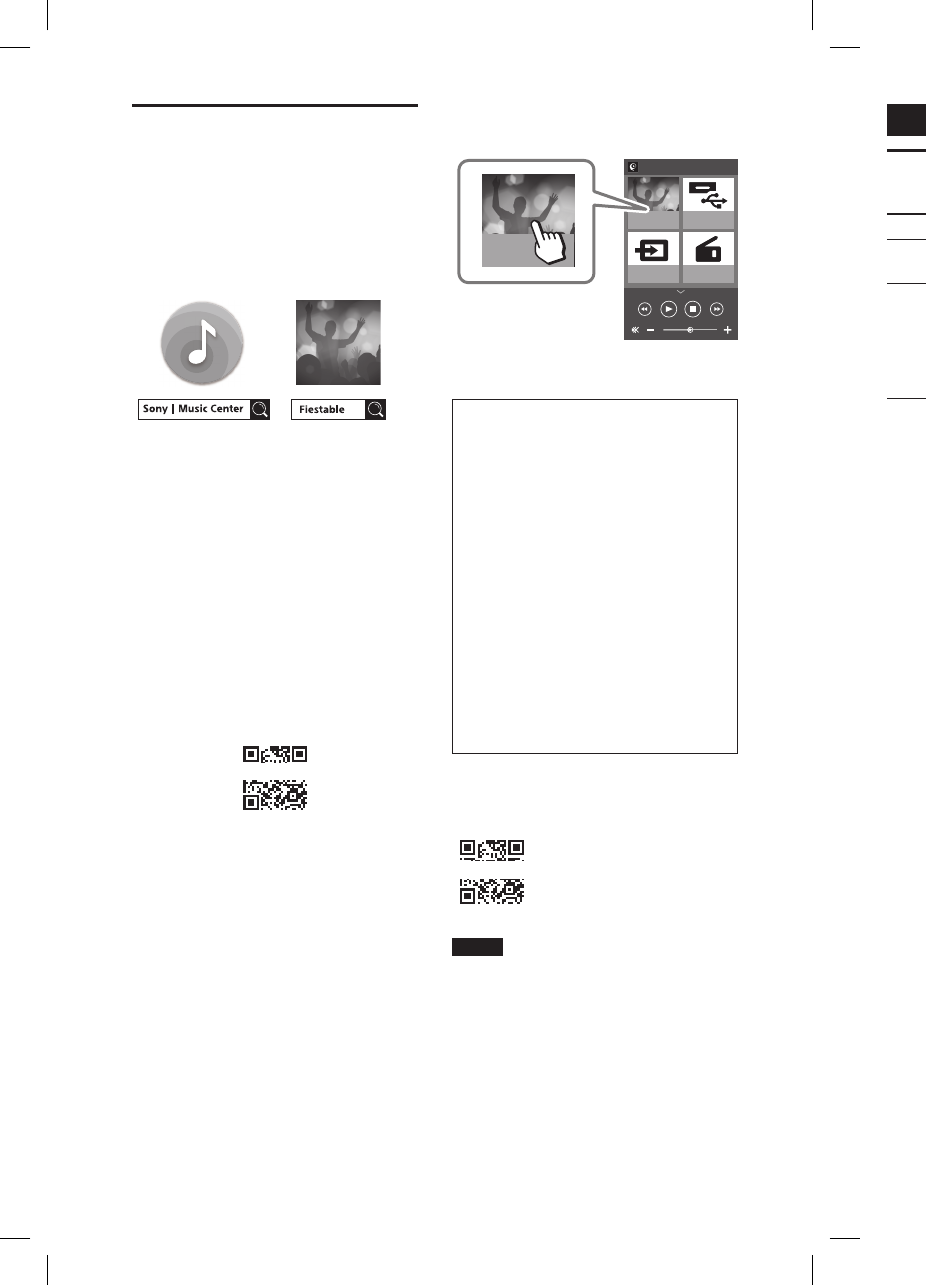
Using “Sony | Music
Center” and “Fiestable”
via BLUETOOTH
connection
About App
You can control the system more
flexibly and enjoy it in new ways using
the free Apps “Sony | Music Center”
and “Fiestable” on your smartphone/
iPhone. “Sony | Music Center” and
“Fiestable” are available in both
Google Play and the App Store.
1
Search for
“Sony | Music Center” and
download the App to your
smartphone/iPhone.
You can also download the App
by scanning the two-dimensional
code below.
2
Establish a BLUETOOTH
connection between
the system and your
smartphone/iPhone.
For details on BLUETOOTH
connection, see “Pairing this
system with a BLUETOOTH device”
(page15) or “One Touch
BLUETOOTH Connection by NFC”
(page17).
3
Launch “Sony | Music Center”
and download “Fiestable.”
You can also download “Fiestable”
from the App Store or Google Play.
What you can do with
“Sony | Music Center”:
• Play back music on a USB device and
set play modes
• Balance the sound using preset EQs or
custom EQs
• Change the sound effect using
DJ EFFECT
• Control multiple systems when using
the Wireless Party Chain or speaker
add function
• Check the battery level
• Configure the various settings for the
system
What you can do with “Fiestable”:
• DJ Control
• Illumination
• Motion Control
Refer to “Sony | Music Center” Help
for more details.
http://xxxxxxxxxxxxxxxxxxxxxx
Notes
• If the “Sony | Music Center” application
does not work properly, terminate the
BLUETOOTH connection (page16),
then perform the BLUETOOTH connection
again so that the BLUETOOTH connection
functions normally.
• What you can control with
“Sony | Music Center” varies depending on
the connected device.
• The specification and design of the
application may change without notice.
dummy
dummy
23GB
Sound Adjustment
GTK-XB60/XB90.4-697-227-11(1)GTK-XB60/XB90.4-697-227-11(1)
Sound Adjustment
Adjusting the sound
To Do this
Adjust the
volume
Press the volume +/–
buttons.
Generate
a more
dynamic
sound
Press EXTRA BASS.
The EXTRA BASS
indicator lights up
in red while the
EXTRA BASS function is
turned on.
3
Launch “Sony | Music Center”
and download “Fiestable.”
You can also download “Fiestable”
from the App Store or Google Play.
What you can do with
“Sony | Music Center”:
• Play back music on a USB device and
set play modes
• Balance the sound using preset EQs or
custom EQs
• Change the sound effect using
DJ EFFECT
• Control multiple systems when using
the Wireless Party Chain or speaker
add function
• Check the battery level
• Configure the various settings for the
system
What you can do with “Fiestable”:
• DJ Control
• Illumination
• Motion Control
Refer to “Sony | Music Center” Help
for more details.
http://xxxxxxxxxxxxxxxxxxxxxx
Notes
• If the “Sony | Music Center” application
does not work properly, terminate the
BLUETOOTH connection (page16),
then perform the BLUETOOTH connection
again so that the BLUETOOTH connection
functions normally.
• What you can control with
“Sony | Music Center” varies depending on
the connected device.
• The specification and design of the
application may change without notice.

24GB
GTK-XB60/XB90.4-697-227-11(1)GTK-XB60/XB90.4-697-227-11(1)
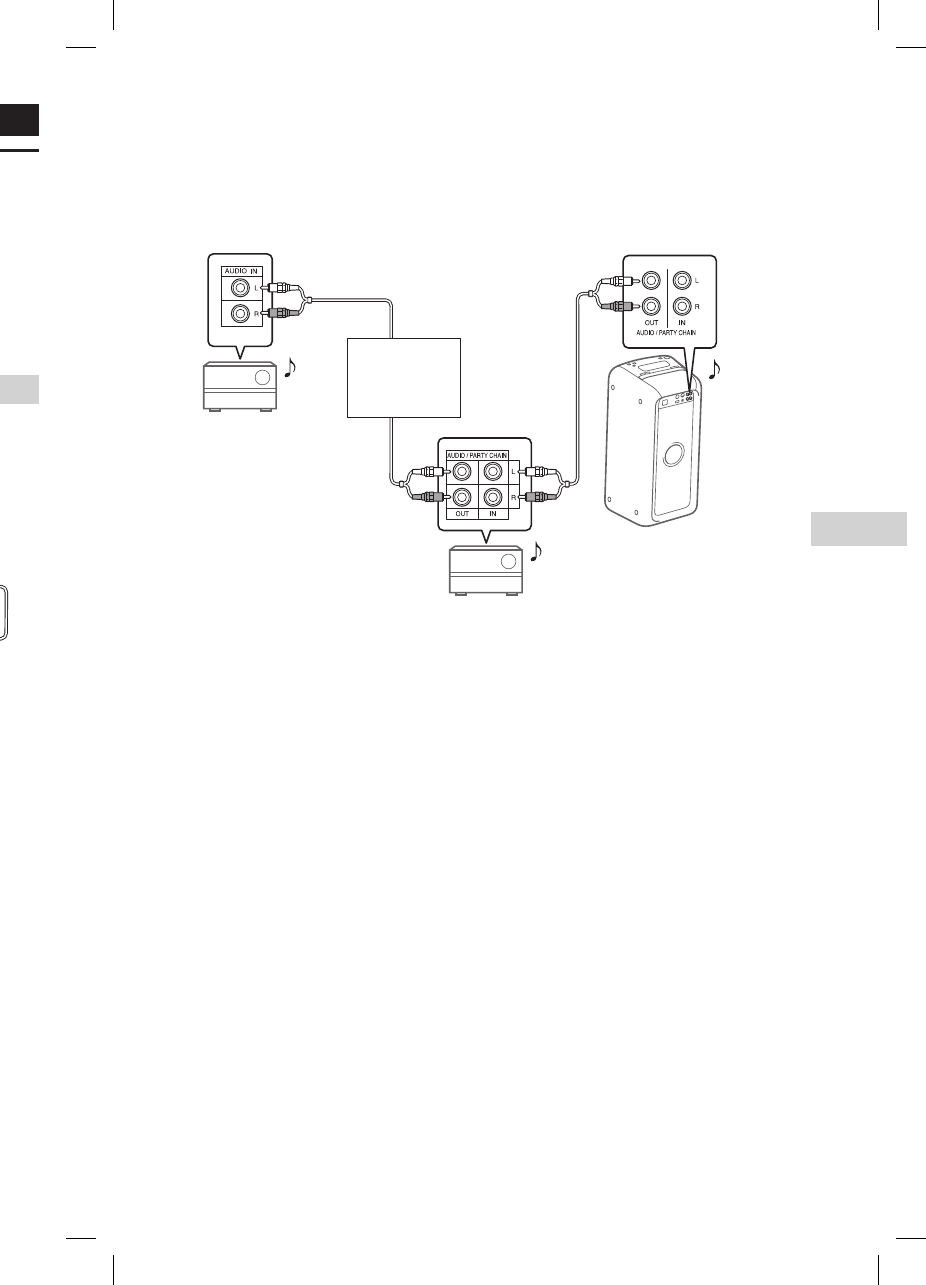
Other Operations
Enjoying wired playback using multiple systems
(Wired Party Chain function)
You can connect multiple audio systems in a chain to create a more interesting
party environment and to produce higher sound output.
An activated system in the chain will be the “Party Host” and share the music.
Other systems will become “Party Guests” and play the same music as that being
played by the “Party Host.”
Setting up the Wired Party Chain
Set up a Wired Party Chain by connecting all the systems using audio cords (not
supplied).
Before connecting the cords, be sure to turn off the system and disconnect the AC
power cord.
If all the systems are equipped with the Wired Party Chain function
Second system
Last system
Continue the
connection
until the last
system.
Example: When connecting using this system as the first system
First system
• Any system can become a Party Host. You can change the Party Host to another
system in the chain. For details, see “To select a new Party Host” (page26).
• Make sure that the (BLUETOOTH) function or USB function is selected. When
the Audio In function is selected, this feature cannot be used.
Note
You do not need to connect the last system to the first system. In this case, only the first
system can become a Party Host.
If one of the systems is not equipped with the Wired Party Chain function
Second system
Last system
Continue the
connection
until the last
system.
Connect the system that is not equipped with the Wired Party Chain function as
the last system. Be sure to select the Audio In function on the last system. In this
configuration, the sound from the last system may lag behind others.
Example: When connecting using this system as the first system
First system
• The last system is not connected to the first system.
• You must select the first system as Party Host so that all systems are playing the
same music when Wired Party Chain function is activated.
25GB
Other Operations
GTK-XB60/XB90.4-697-227-11(1)GTK-XB60/XB90.4-697-227-11(1)
Other Operations
Enjoying wired playback using multiple systems
(Wired Party Chain function)
You can connect multiple audio systems in a chain to create a more interesting
party environment and to produce higher sound output.
An activated system in the chain will be the “Party Host” and share the music.
Other systems will become “Party Guests” and play the same music as that being
played by the “Party Host.”
Setting up the Wired Party Chain
Set up a Wired Party Chain by connecting all the systems using audio cords (not
supplied).
Before connecting the cords, be sure to turn off the system and disconnect the AC
power cord.
If all the systems are equipped with the Wired Party Chain function
Second system
Last system
Continue the
connection
until the last
system.
Example: When connecting using this system as the first system
First system
• Any system can become a Party Host. You can change the Party Host to another
system in the chain. For details, see “To select a new Party Host” (page26).
• Make sure that the (BLUETOOTH) function or USB function is selected. When
the Audio In function is selected, this feature cannot be used.
Note
You do not need to connect the last system to the first system. In this case, only the first
system can become a Party Host.
If one of the systems is not equipped with the Wired Party Chain function
Second system
Last system
Continue the
connection
until the last
system.
Connect the system that is not equipped with the Wired Party Chain function as
the last system. Be sure to select the Audio In function on the last system. In this
configuration, the sound from the last system may lag behind others.
Example: When connecting using this system as the first system
First system
• The last system is not connected to the first system.
• You must select the first system as Party Host so that all systems are playing the
same music when Wired Party Chain function is activated.

26GB
GTK-XB60/XB90.4-697-227-11(1)GTK-XB60/XB90.4-697-227-11(1)
Enjoying the Wired Party Chain
1
Turn on all the systems.
2
Adjust the volume on each
system.
3
Activate the Wired Party
Chain function on the system
to be used as the Party Host.
Example: When using this system
as the Party Host
Press FUNCTION PAIRING
repeatedly to select the
function you want.
When you connect using
(page24), do not select the
Audio In function. If you select
this function, sound cannot be
output.
Start playback and then press
PARTY CHAIN on the rear of the
unit.
The PARTY CHAIN indicator
lights up. The Party Host starts
the Wired Party Chain, and other
systems become Party Guests
automatically. All systems play
the same music as that being
played by the Party Host.
Notes
• Depending on the total unit of systems
you have connected, Party Guests may
take some time to start playing the music.
• Changing the volume level and sound
effect on the Party Host will not affect the
output on the Party Guests.
• For detailed operation on other systems,
refer to the operating instructions of the
systems.
To select a new Party Host
Only when you connect using
(page24), you can select a new
Party Host. Repeat step 3 of “Enjoying
the Wired Party Chain” on the system
to be used as a new Party Host. The
current Party Host becomes Party
Guest automatically. All systems play
the same music as that being played
by the new Party Host.
Notes
• You can select another system as the new
Party Host only after the Wired Party Chain
function of all the systems in the chain
has been activated.
• If the selected system does not become a
new Party Host after a few seconds, repeat
step 3 of “Enjoying the Wired Party Chain.”
To deactivate the Wired Party Chain
Press PARTY CHAIN on the Party Host.
Note
If the Wired Party Chain function is not
deactivated after a few seconds, press
PARTY CHAIN on the Party Host again.
Party Chain indicator
The PARTY CHAIN indicator on the
unit lights up or flashes to show the
system status.
System status Indicator status
Party Host Lit up
Party Guest Flashing
Enjoying wireless
playback using multiple
systems (Wireless Party
Chain function)
You can connect multiple audio
systems in a chain via BLUETOOTH
connection if all the systems are
equipped with the Wireless Party
Chain function. This function allows
you to create a more exciting party
environment and to produce higher
sound output without a cable
connection.
The first system in the chain to be
activated becomes the “Party Host”
and shares the music. Other systems
become “Party Guests” and play the
same music as that being played by
the “Party Host.”
Setting up and enjoying the
Wireless Party Chain
Example: setting the GTK-XB60 or
GTK-XB90 as the first system (Party
Host)
1
Set the first system as the
Party Host.
Press FUNCTION PAIRING
repeatedly until the
(BLUETOOTH) indicator lights
up.
Connect the BLUETOOTH device
to the system via BLUETOOTH
connection.
Press W.PARTY CHAIN LIGHT
on the unit.
The W.PARTY CHAIN LIGHT
indicator will start flashing
and the system will enter the
Wireless Party Chain mode.

27GB
Other Operations
GTK-XB60/XB90.4-697-227-11(1)GTK-XB60/XB90.4-697-227-11(1)
To select a new Party Host
Only when you connect using
(page24), you can select a new
Party Host. Repeat step 3 of “Enjoying
the Wired Party Chain” on the system
to be used as a new Party Host. The
current Party Host becomes Party
Guest automatically. All systems play
the same music as that being played
by the new Party Host.
Notes
• You can select another system as the new
Party Host only after the Wired Party Chain
function of all the systems in the chain
has been activated.
• If the selected system does not become a
new Party Host after a few seconds, repeat
step 3 of “Enjoying the Wired Party Chain.”
To deactivate the Wired Party Chain
Press PARTY CHAIN on the Party Host.
Note
If the Wired Party Chain function is not
deactivated after a few seconds, press
PARTY CHAIN on the Party Host again.
Party Chain indicator
The PARTY CHAIN indicator on the
unit lights up or flashes to show the
system status.
System status Indicator status
Party Host Lit up
Party Guest Flashing
Enjoying wireless
playback using multiple
systems (Wireless Party
Chain function)
You can connect multiple audio
systems in a chain via BLUETOOTH
connection if all the systems are
equipped with the Wireless Party
Chain function. This function allows
you to create a more exciting party
environment and to produce higher
sound output without a cable
connection.
The first system in the chain to be
activated becomes the “Party Host”
and shares the music. Other systems
become “Party Guests” and play the
same music as that being played by
the “Party Host.”
Setting up and enjoying the
Wireless Party Chain
Example: setting the GTK-XB60 or
GTK-XB90 as the first system (Party
Host)
1
Set the first system as the
Party Host.
Press FUNCTION PAIRING
repeatedly until the
(BLUETOOTH) indicator lights
up.
Connect the BLUETOOTH device
to the system via BLUETOOTH
connection.
Press W.PARTY CHAIN LIGHT
on the unit.
The W.PARTY CHAIN LIGHT
indicator will start flashing
and the system will enter the
Wireless Party Chain mode.
2
Set the second system as a
Party Guest.
Press FUNCTION PAIRING on
the second system repeatedly
until the (BLUETOOTH)
indicator lights up.
Press W.PARTY CHAIN LIGHT
on the second system.
The second system will be set as
a Party Guest.
Make sure that the
W.PARTY CHAIN LIGHT
indicators on both the Party
Host and Party Guest stop
flashing and remain lit up.
Note
The Wireless Party Chain function is
canceled in the following situations.
— There is no operation within 1minute
after the Party Host is set in step 1.
— W.PARTY CHAIN LIGHT is pressed
on the Party Host before step 2 is
completed.
3
Set the third or more systems
as Party Guests.
Repeat step 2.
4
Start playing back an audio
source on the Party Host.
To deactivate the Wireless Party
Chain
Press W.PARTY CHAIN LIGHT on the
Party Host.
Hint
To deactivate only one of the Party Guests
and keep the rest of the Wireless Party
Chain, press W.PARTY CHAIN LIGHT on the
Party Guest you want to deactivate.
Wireless Party Chain indicator
The W.PARTY CHAIN LIGHT indicator
on the unit lights up or flashes to
show the system status.
System status Indicator status
Party Host Lit up
Party Guest Flashing

28GB
GTK-XB60/XB90.4-697-227-11(1)GTK-XB60/XB90.4-697-227-11(1)
Listening to music
wirelessly with two
systems (Speaker add
function)
To use this function, two
GTK-XB60/XB90 systems are required.
By connecting two GTK-XB60/XB90
systems via BLUETOOTH wireless
technology, you can enjoy music in
a more powerful way. You can also
select an audio output between
double mode (in which the two
systems play the same sound) and
stereo mode (stereo sound).
In the following steps, the two
systems are described as “system ”
(or master system) and “system .”
Activating the speaker add
function
1
Bring two GTK-XB60/XB90
systems within 1 meter (3
feet) of each other.
2
Press FUNCTION PAIRING
on system repeatedly until
the (BLUETOOTH) indicator
on the unit lights up.
3
Press ADD on system .
The ADD L/R indicators will flash
and the system will enter the
speaker add mode.
4
Press FUNCTION PAIRING
on system repeatedly until
the (BLUETOOTH) indicator
on the unit lights up.
5
Press ADD on system . The
ADD L/R indicators on the
unit will flash.
Then the L/R indicators on both
systems change their status
from flashing to lit while the
(BLUETOOTH) indicator on
system is turned off.
Hint
When the connection by the speaker
add function is established very quickly,
the L/R indicators on system may
light up directly without flashing.
6
Hold down ADD on system
repeatedly to select the
output mode.
The ADD L/R indicators on both
systems show the current output
mode.
Each time you hold down ADD, the
output mode changes as follows.
: Stereo mode (R ch/L ch)
: Stereo mode (L ch/R ch)
: Double mode
(stereo/stereo)
Hint
To change the output mode, operate
system (master system), on which
you have activated the speaker add
mode.
29GB
Other Operations
GTK-XB60/XB90.4-697-227-11(1)GTK-XB60/XB90.4-697-227-11(1)
4
Press FUNCTION PAIRING
on system repeatedly until
the (BLUETOOTH) indicator
on the unit lights up.
5
Press ADD on system . The
ADD L/R indicators on the
unit will flash.
Then the L/R indicators on both
systems change their status
from flashing to lit while the
(BLUETOOTH) indicator on
system is turned off.
Hint
When the connection by the speaker
add function is established very quickly,
the L/R indicators on system may
light up directly without flashing.
6
Hold down ADD on system
repeatedly to select the
output mode.
The ADD L/R indicators on both
systems show the current output
mode.
Each time you hold down ADD, the
output mode changes as follows.
: Stereo mode (R ch/L ch)
: Stereo mode (L ch/R ch)
: Double mode
(stereo/stereo)
Hint
To change the output mode, operate
system (master system), on which
you have activated the speaker add
mode.
Playing music with two systems
1
Activate the pairing mode on
system , and then perform
the BLUETOOTH connection
with a BLUETOOTH device.
For details on the pairing, see
“Pairing this system with a
BLUETOOTH device” (page15)
or “One Touch BLUETOOTH
Connection by NFC” (page17).
Make sure to pair the BLUETOOTH
device with system (master
system).
2
Start playback on the
BLUETOOTH device, and
adjust the volume.
For details, see “Listening to
music on a BLUETOOTH device”
(page18).
Volume adjustments made on
either one of the systems are also
reflected on the other system.
Notes
• If any other BLUETOOTH device(s), such
as a BLUETOOTH mouse or BLUETOOTH
keyboard, is connected to the BLUETOOTH
device that is connecting with the system,
there may be distorted sound or noise in
the system output. In this case, terminate
the BLUETOOTH connection between the
BLUETOOTH device and other BLUETOOTH
device(s).
• If you reset one of the two systems while
using the speaker add function, make
sure to turn off the other system. If you
do not turn off the other system before
restarting the speaker add function, there
may be problems in making a BLUETOOTH
connection and outputting sound.
To deactivate the speaker add
function
Press ADD until the ADD L/R indicators
are turned off.
Hint
Unless you deactivate the function, the
system will try to establish the last made
connection next time you turn on the
system.
30GB
GTK-XB60/XB90.4-697-227-11(1)GTK-XB60/XB90.4-697-227-11(1)
Enjoying music with the
Speaker Lights
The Speaker Lights are turned on by
default.
You can also select various light
modes such as the following by using
“Sony | Music Center” (page22).
• RAVE: a light mode suitable for
dance music with a lot of flashing
• CHILL: a light mode suitable for
relaxing music
• RANDOM FLASH OFF: a light mode
without flash suitable for all music,
including dance music
• HOT: a light mode of warm color
• COOL: a light mode of cool color
• STROBE: a light mode with an
electronic flash of white color
To turn off the Speaker Lights
Hold down W.PARTY CHAIN LIGHT.
To turn on the Speaker Lights, hold
down W.PARTY CHAIN LIGHT again.
Note
If the illumination brightness is glaring,
switch on the room lights or turn off the
illumination.
Enjoying hands-free calls
You can enjoy hands-free calls with
a BLUETOOTH mobile phone that
supports HFP (Hands-free Profile) or
HSP (Headset Profile).
Only normal calls are supported. Calls
via LINE, Skype, and other apps are not
supported.
To use this function, make sure that
a BLUETOOTH connection has been
established.
Receiving a call
1
Press / when a call is
incoming.
When an incoming call arrives,
playback pauses and the system
emits a ring tone.
GTK-XB60 GTK-XB90
Built-in microphone
Note
If you hold down / when a call is
incoming, the call will be rejected.
2
Talk into the system’s built-in
microphone.
3
Press / to end the call.
Making a call
1
Make a call by operating the
connected BLUETOOTH mobile
phone.
When you make a call, playback
will pause and the system will emit
a dial tone.
2
Talk into the system’s built-in
microphone when the other
party answers the call.
3
Press / to end the call.
Note
If you hold down / while talking, the
phone call output will be switched from
the system to the speaker on your mobile
phone.
Hints
• If your BLUETOOTH mobile phone
supports both HFP and HSP, set it to HFP.
• If you were listening to music before the
call, playback will resume when the call
ends.
• Operations may vary depending on the
BLUETOOTH mobile phone. Refer to the
operating instructions for your mobile
phone.
31GB
Other Operations
GTK-XB60/XB90.4-697-227-11(1)GTK-XB60/XB90.4-697-227-11(1)
Enjoying hands-free calls
You can enjoy hands-free calls with
a BLUETOOTH mobile phone that
supports HFP (Hands-free Profile) or
HSP (Headset Profile).
Only normal calls are supported. Calls
via LINE, Skype, and other apps are not
supported.
To use this function, make sure that
a BLUETOOTH connection has been
established.
Receiving a call
1
Press / when a call is
incoming.
When an incoming call arrives,
playback pauses and the system
emits a ring tone.
GTK-XB60 GTK-XB90
Built-in microphone
Note
If you hold down / when a call is
incoming, the call will be rejected.
2
Talk into the system’s built-in
microphone.
3
Press / to end the call.
Making a call
1
Make a call by operating the
connected BLUETOOTH mobile
phone.
When you make a call, playback
will pause and the system will emit
a dial tone.
2
Talk into the system’s built-in
microphone when the other
party answers the call.
3
Press / to end the call.
Note
If you hold down / while talking, the
phone call output will be switched from
the system to the speaker on your mobile
phone.
Hints
• If your BLUETOOTH mobile phone
supports both HFP and HSP, set it to HFP.
• If you were listening to music before the
call, playback will resume when the call
ends.
• Operations may vary depending on the
BLUETOOTH mobile phone. Refer to the
operating instructions for your mobile
phone.
Using an optional
equipment
1
Connect an optional
equipment (i.e. WALKMAN®,
smartphone, TV, DVD player,
IC recorder, etc.) to the
AUDIO/PARTY CHAIN IN L/R
jacks on the unit using an
audio cord (not supplied).
2
Press FUNCTION PAIRING
repeatedly until the AUDIO IN
indicator on the unit lights up.
3
Start playback on the
connected equipment.
4
Adjust the volume.
Adjust the volume of the
connected equipment first. If the
volume level is still too low, adjust
the volume level on the system
using the volume +/– buttons.
Note
The system may enter standby mode
automatically if the volume level of the
connected equipment is too low. In this
case, increase the volume level of the
equipment. To turn off the automatic
standby function, see “Setting the automatic
standby function” (page32).
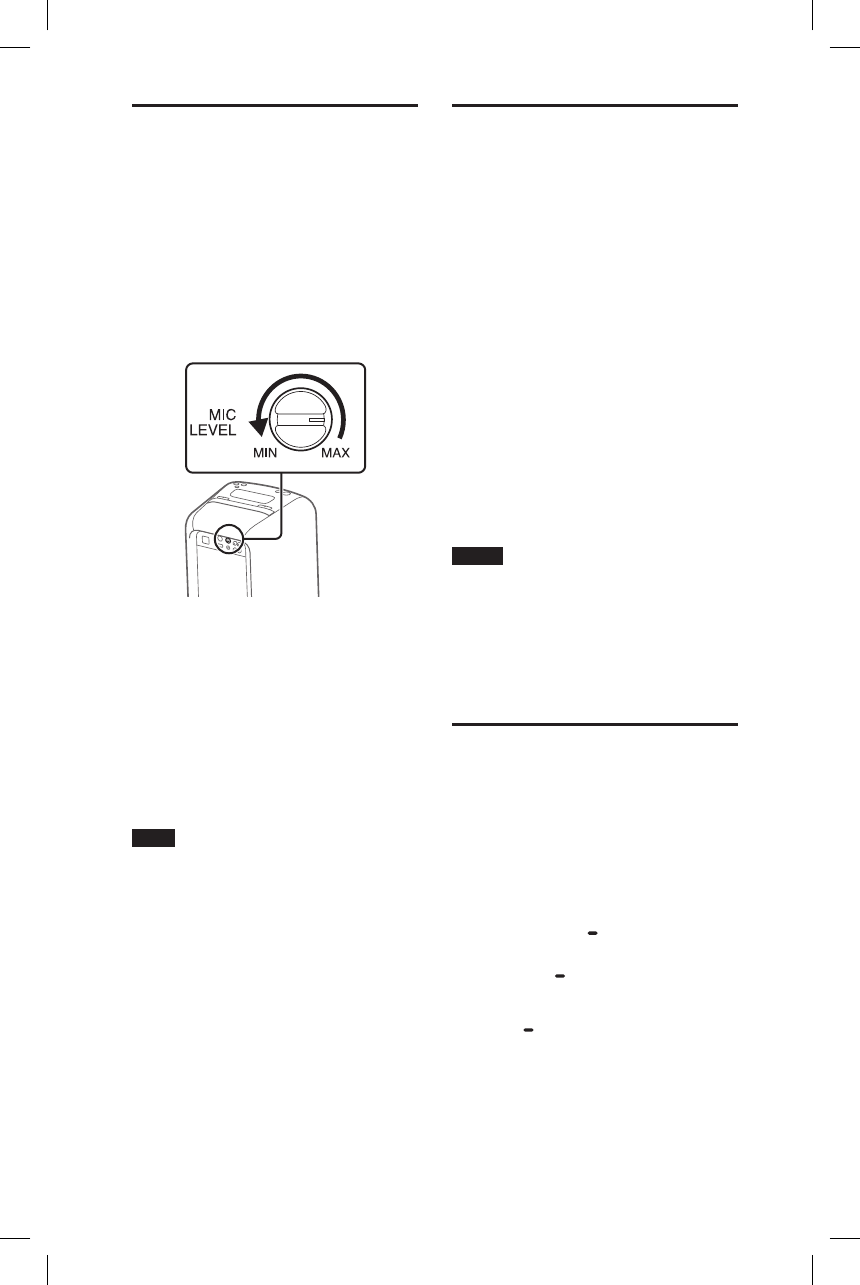
32GB
GTK-XB60/XB90.4-697-227-11(1)
Using an optional
microphone
You can output your voice from the
system by connecting a dynamic
microphone with a normal plug (not
supplied).
1
Turn the MIC LEVEL knob
to MIN to reduce the
microphone volume level.
2
Connect an optional
microphone to the MIC jack
on the unit.
3
Adjust the volume using the
MIC LEVEL knob.
4
Speak or sing into the
connected microphone.
Note
When using the Wireless Party Chain or
speaker add function, sound from the
microphone is only output from the system
to which the microphone is connected.
Setting the automatic
standby function
By default, this system is set to turn
off automatically in about 15 minutes
when there is no operation or audio
signal output.
To turn off the function, hold
down for more than 3 seconds
while the system is turned on.
To turn on the function, repeat the
procedure.
You can also configure this setting
and make sure whether this
function is turned on or off by using
“Sony | Music Center.” For details on
“Sony | Music Center,” see “Using
“Sony | Music Center” and “Fiestable”
via BLUETOOTH connection”
(page22).
Notes
• The system may enter standby mode
automatically if the volume level of the
connected equipment is too low. In this
case, increase the volume level of the
equipment.
• The system doesn’t enter standby mode
when the MIC jack is in use.
Saving the battery
power
You can save power and use the
system for longer periods of time by
turning on the STAMINA mode when
using the system with the built-in
battery (rechargeable).
Press STAMINA BATTERY to
turn on the STAMINA mode.
The STAMINA BATTERY indicator will
light up.
To deactivate the function, press
STAMINA BATTERY again.

33GB
Additional Information
GTK-XB60/XB90.4-697-227-11(1)
Additional Information
Information about
compatible devices
About supported USB devices
• This system supports USB Mass
Storage Class only.
• This system supports FAT formatted
USB devices only (except exFAT).
• Some USB devices may not work
with this system.
About BLUETOOTH communication
for iPhone and iPod touch
Made for
• iPhone 7 Plus
• iPhone 7
• iPhone SE
• iPhone 6s Plus
• iPhone 6s
• iPhone 6 Plus
• iPhone 6
• iPhone 5s
• iPhone 5c
• iPhone 5
• iPhone 4s
• iPod touch (6th generation)
• iPod touch (5th generation)
Websites for compatible devices
Check the websites below for the
latest information about compatible
BLUETOOTH devices.
For customers in the USA:
http://esupport.sony.com/
For customers in Canada:
http://esupport.sony.com/CA
For customers in Europe:
http://www.sony.eu/support
For customers in Latin America:
http://esupport.sony.com/LA
For customers in other countries/
regions:
http://www.sony-asia.com/support
Troubleshooting
If a problem occurs while operating
the system, follow the steps described
below before consulting your nearest
Sony dealer. If an error message
appears, be sure to make a note of the
contents for reference.
1
Check to see if the
problem is listed in this
“Troubleshooting” section.
2
Check the following customer
support websites.
For customers in the USA:
http://esupport.sony.com/
For customers in Canada:
http://esupport.sony.com/CA
For customers in Europe:
http://www.sony.eu/support
For customers in Latin America:
http://esupport.sony.com/LA
For customers in other countries/
regions:
http://www.sony-asia.com/
support
You will find the latest support
information and a FAQ at these
websites.
Note that if the service personnel
changes some parts during repair,
these parts may be retained.
General
The system does not turn on.
• Check that the AC power cord is
connected securely.
The system has entered standby
mode.
• This is not a malfunction. The system
enters standby mode automatically
in about 15minutes when there is
no operation or audio signal output
(page32).

34GB
GTK-XB60/XB90.4-697-227-11(1)GTK-XB60/XB90.4-697-227-11(1)
Files cannot be played back.
• USB devices formatted with file
systems other than FAT16 or FAT32
are unsupported.*
• If you use a partitioned USB device,
only files on the first partition can be
played back.
• Files that are encrypted or protected
by passwords cannot be played
back.
• Files with DRM (Digital Rights
Management) copyright protection
cannot be played back by this
system.
* This system supports FAT16 and FAT32,
but some USB storage devices may not
support all of these FAT. For details,
refer to the operating instructions of
each USB storage device or contact the
manufacturer.
BLUETOOTH device
Pairing cannot be performed.
• Move the BLUETOOTH device closer
to the system.
• Pairing may not be possible if other
BLUETOOTH devices are present
around the system. In this case, turn
off the other BLUETOOTH devices.
• Make sure to enter the correct
passkey when selecting the
system’s name (this system) on the
BLUETOOTH device.
The BLUETOOTH device cannot detect
the system.
• Set the BLUETOOTH signal to on
(page21).
There is no sound.
• Adjust the volume.
• Check the connection of the optional
equipment, if any.
• Turn on the connected equipment.
• Disconnect the AC power cord, then
reconnect the AC power cord and
turn on the system.
There is severe hum or noise.
• Move the system away from sources
of noise.
• Connect the system to a different
wall outlet.
• Install a noise filter (commercially
available) to the AC power cord.
• Turn off surrounding electrical
equipment.
There is acoustic feedback.
• Reduce the volume.
USB device
The connected USB device cannot be
charged.
• Make sure the USB device is
connected securely.
The USB device does not work
properly.
• If you connect an unsupported
USB device, the following problems
may occur. See “Information about
compatible devices” (page33).
—The USB device is not recognized.
—Playback is not possible.
—The sound skips.
—There is noise.
—A distorted sound is output.
There is no sound.
• The USB device is not connected
correctly. Turn off the system, then
reconnect the USB device.
There is noise, skipping, or distorted
sound.
• You are using an unsupported USB
device. See “Information about
compatible devices” (page33).
• Turn off the system and reconnect
the USB device, then turn on the
system.
• The music data itself contains noise,
or the sound is distorted. Noise may
have been entered during music
creation process using the computer.
Create the music data again.
• The bit rate used when encoding an
audio file was low. Send an audio
file with higher bit rates to the USB
device.
The USB device is not recognized.
• Turn off the system and reconnect
the USB device, then turn on the
system.
• You are using an unsupported USB
device. See “Information about
compatible devices” (page33).
• The USB device is not working
properly. Refer to the operating
instructions of the USB device on
how to deal with this problem.
Playback does not start.
• Turn off the system and reconnect
the USB device, then turn on the
system.
• You are using an unsupported USB
device. See “Information about
compatible devices” (page33).
Playback does not start from the first
file.
• Set the play mode to normal play
mode using “Sony | Music Center”
(page22).

35GB
Additional Information
GTK-XB60/XB90.4-697-227-11(1)GTK-XB60/XB90.4-697-227-11(1)
Files cannot be played back.
• USB devices formatted with file
systems other than FAT16 or FAT32
are unsupported.*
• If you use a partitioned USB device,
only files on the first partition can be
played back.
• Files that are encrypted or protected
by passwords cannot be played
back.
• Files with DRM (Digital Rights
Management) copyright protection
cannot be played back by this
system.
* This system supports FAT16 and FAT32,
but some USB storage devices may not
support all of these FAT. For details,
refer to the operating instructions of
each USB storage device or contact the
manufacturer.
BLUETOOTH device
Pairing cannot be performed.
• Move the BLUETOOTH device closer
to the system.
• Pairing may not be possible if other
BLUETOOTH devices are present
around the system. In this case, turn
off the other BLUETOOTH devices.
• Make sure to enter the correct
passkey when selecting the
system’s name (this system) on the
BLUETOOTH device.
The BLUETOOTH device cannot detect
the system.
• Set the BLUETOOTH signal to on
(page21).
Connection is not possible.
• The BLUETOOTH device you
attempted to connect does not
support the A2DP profile, and
cannot be connected with the
system.
• Enable the BLUETOOTH function of
the BLUETOOTH device.
• Establish a connection from the
BLUETOOTH device.
• The pairing registration information
has been erased. Perform the
pairing operation again.
• Erase the pairing registration
information of the BLUETOOTH
device by restoring the system to
factory default settings (page37)
and perform the pairing operation
again (page15).
• Once all the pairing information
on the system has been erased,
iPhone/iPod touch may not be able
to connect to the system. In this
case, delete pairing information of
the system on iPhone/iPod touch,
and then perform the pairing
procedure again.
The sound skips or fluctuates, or the
connection is lost.
• The system and the BLUETOOTH
device are too far apart.
• If there are obstacles between the
system and your BLUETOOTH device,
remove or avoid the obstacles.
• If there is equipment that generates
electromagnetic radiation, such as
a wireless LAN, other BLUETOOTH
device, or a microwave oven nearby,
move them away.
The sound of your BLUETOOTH device
cannot be heard on this system.
• Increase the volume on your
BLUETOOTH device first, then adjust
the volume using the volume +/–
buttons.
There is noise, skipping, or distorted
sound.
• You are using an unsupported USB
device. See “Information about
compatible devices” (page33).
• Turn off the system and reconnect
the USB device, then turn on the
system.
• The music data itself contains noise,
or the sound is distorted. Noise may
have been entered during music
creation process using the computer.
Create the music data again.
• The bit rate used when encoding an
audio file was low. Send an audio
file with higher bit rates to the USB
device.
The USB device is not recognized.
• Turn off the system and reconnect
the USB device, then turn on the
system.
• You are using an unsupported USB
device. See “Information about
compatible devices” (page33).
• The USB device is not working
properly. Refer to the operating
instructions of the USB device on
how to deal with this problem.
Playback does not start.
• Turn off the system and reconnect
the USB device, then turn on the
system.
• You are using an unsupported USB
device. See “Information about
compatible devices” (page33).
Playback does not start from the first
file.
• Set the play mode to normal play
mode using “Sony | Music Center”
(page22).
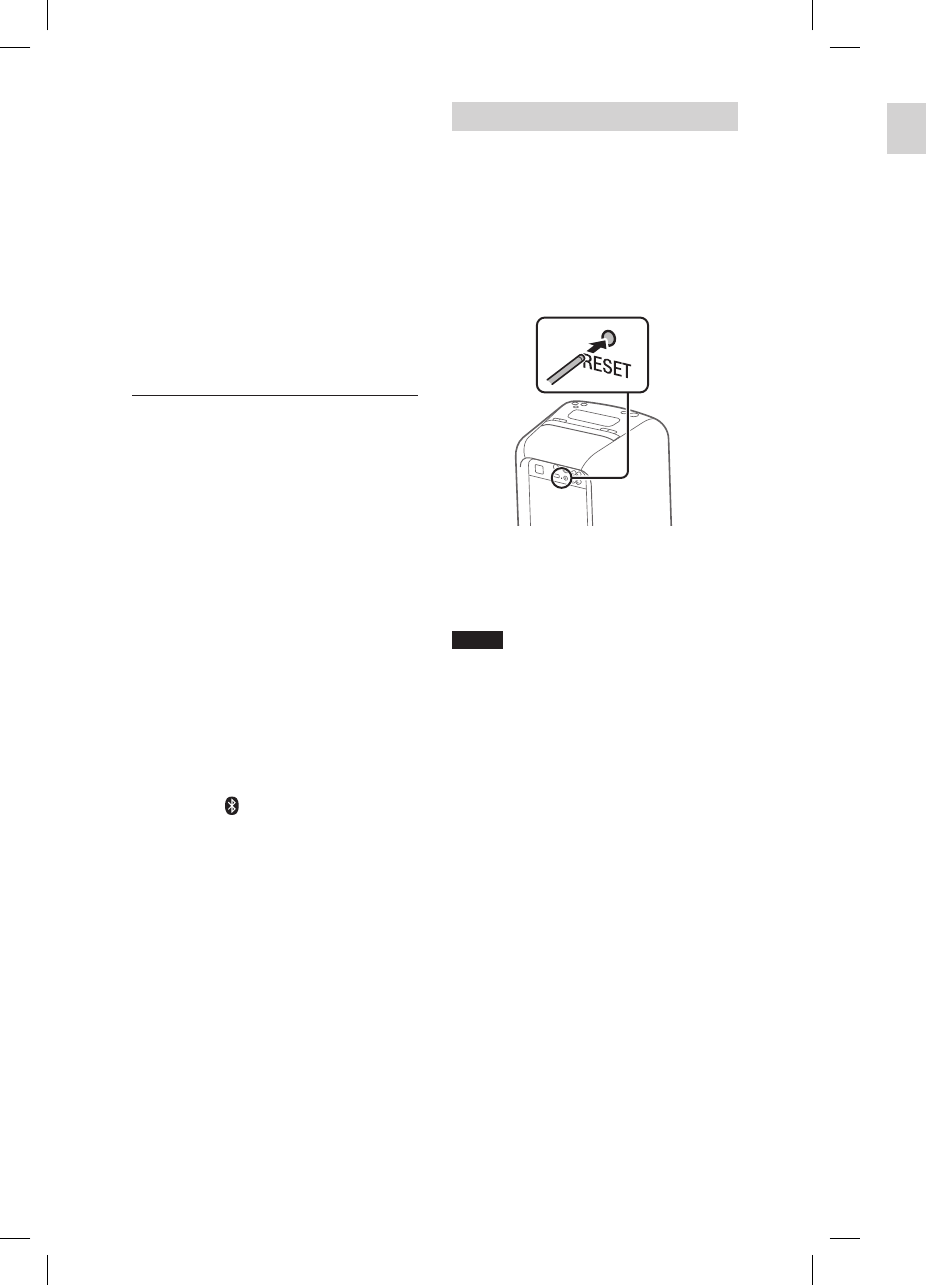
36GB
GTK-XB60/XB90.4-697-227-11(1)GTK-XB60/XB90.4-697-227-11(1)
Restoring the system to the
factory default settings
If the system still does not operate
properly, restore it to the factory
default settings.
1
Disconnect and reconnect the
AC power cord, and then turn
on the system.
2
Hold down FUNCTION
PAIRING and the volume
– button for more than
5seconds.
After the , (BLUETOOTH),
USB, and AUDIO IN indicators on
the unit flash 2 times, all user-
configured settings, such as the
pairing registration information, are
restored to factory default settings.
There is severe hum, noise, or
distorted sound.
• If there are obstacles between the
system and your BLUETOOTH device,
remove or avoid the obstacles.
• If there is equipment that generates
electromagnetic radiation, such as
a wireless LAN, other BLUETOOTH
device, or a microwave oven nearby,
move them away.
• Turn down the volume of the
connected BLUETOOTH device.
Party Chain and speaker add
function
Wired Party Chain function cannot be
activated.
• Check the connections (page24).
• Make sure the audio cords are
connected correctly.
• Select the function other than the
Audio In function (page26).
Wired Party Chain function does not
work properly.
• Turn off the system. Then, turn it
back on again to activate the Wired
Party Chain function.
Unable to connect a BLUETOOTH
device with the system in the speaker
add function.
• After connecting two
GTK-XB60/XB90 systems, perform
the pairing procedure between a
BLUETOOTH device and the system
where the (BLUETOOTH) indicator
is flashing. Then perform the
BLUETOOTH connection.
Resetting the system
If the system doesn’t respond and
cannot be operated despite the
power being on, turn off and reset the
system using the RESET button.
1
Press RESET on the rear of
the unit with a pin or other
pointed object.
The system will turn off.
2
Press to turn the system
back on.
Notes
• If the system doesn’t turn back on, consult
your Sony dealer.
• Pairing information is not deleted when
you press RESET.
37GB
Additional Information
GTK-XB60/XB90.4-697-227-11(1)GTK-XB60/XB90.4-697-227-11(1)
Restoring the system to the
factory default settings
If the system still does not operate
properly, restore it to the factory
default settings.
1
Disconnect and reconnect the
AC power cord, and then turn
on the system.
2
Hold down FUNCTION
PAIRING and the volume
– button for more than
5seconds.
After the , (BLUETOOTH),
USB, and AUDIO IN indicators on
the unit flash 2 times, all user-
configured settings, such as the
pairing registration information, are
restored to factory default settings.
Precautions
On safety
• Completely disconnect the AC power cord
(mains lead) from the wall outlet (mains) if
it is not going to be used for an extended
period of time. When unplugging the unit,
always grip the plug. Never pull the cord
itself.
• Should any solid object or liquid get into
the system, unplug the system, and have
it checked by qualified personnel before
operating it again.
• AC power cord must be changed only at
the qualified service shop.
On placement
• Do not place the system in an inclined
position or in locations that are extremely
hot, cold, dusty, dirty, or humid or lacking
adequate ventilation, or subject to
vibration, direct sunlight or a bright light.
• Be careful when placing the system on
surfaces that have been specially treated
(for example, wax, oil, polish) as staining
or discoloration of the surface may result.
• Make sure not to splash water on the unit.
This unit is not waterproof.
On heat buildup
• Heat buildup on the system during
operation is normal and is not a cause for
alarm.
• Do not touch the cabinet if it has been
used continuously at a high volume
because the cabinet may have become
hot.
• Do not obstruct the ventilation holes.
On the speaker system
The built-in speaker system is not
magnetically shielded, and the picture on
nearby TV sets may become magnetically
distorted. In this situation, turn off the TV,
wait 15 to 30 minutes, and turn it back on.
If there is no improvement, move the
system far away from the TV.
Cleaning the cabinet
Clean this system with a soft cloth slightly
moistened with a mild detergent solution.
Do not use any type of abrasive pad,
scouring powder, or solvent, such as thinner,
benzine, or alcohol.
Resetting the system
If the system doesn’t respond and
cannot be operated despite the
power being on, turn off and reset the
system using the RESET button.
1
Press RESET on the rear of
the unit with a pin or other
pointed object.
The system will turn off.
2
Press to turn the system
back on.
Notes
• If the system doesn’t turn back on, consult
your Sony dealer.
• Pairing information is not deleted when
you press RESET.

38GB
GTK-XB60/XB90.4-697-227-11(1)GTK-XB60/XB90.4-697-227-11(1)
Specifications
AUDIO POWER SPECIFICATIONS
POWER OUTPUT AND TOTAL HARMONIC
DISTORTION:
(The United States model only)
Left/Right Channel:
With 3ohms loads, both channels
driven, from 120 10,000Hz; rated
30watts per channel minimum
RMS power, with no more than
0.7% total harmonic distortion from
250milliwatts to rated output.
Speaker section
GTK-XB60:
Tweeter: 50mm (2in) × 2, cone type
Woofer: 130mm (5/ in) × 2, cone type
GTK-XB90:
Tweeter: 60mm (2/ in) × 3, cone type
Woofer: 180mm (7in) × 2, cone type
Inputs
AUDIO/PARTY CHAIN IN L/R:
Voltage xxV, impedance xxkilohms
MIC:
Sensitivity: xxmV, impedance
xxkilohms
Outputs
AUDIO/PARTY CHAIN OUT L/R:
Voltage xxV, impedance xxohms
USB section and supported
audio formats
(USB) port:
Type A, maximum current 2.1A
Supported bit rate:
MP3 (MPEG1 Audio Layer-3):
32kbps 320kbps, VBR
WMA: 32kbps 192kbps, VBR
Sampling frequencies:
MP3 (MPEG1 Audio Layer-3):
32/44.1/48 kHz
WMA: 44.1 kHz
On BLUETOOTH Communication
• BLUETOOTH devices should be used
within approximately 10 meters (33 feet)
(unobstructed distance) of each other.
The effective communication range may
become shorter under the following
conditions.
— When a person, metal object, wall
or other obstruction is between the
devices with a BLUETOOTH connection
— Locations where a wireless LAN is
installed
— Around microwave ovens that are in
use
— Locations where other electromagnetic
waves are generated
• BLUETOOTH devices and wireless LAN
(IEEE 802.11b/g) equipment use the
same frequency band (2.4 GHz). When
using your BLUETOOTH device near
a device with wireless LAN capability,
electromagnetic interference may occur.
This could result in lower data transfer
rates, noise, or inability to connect. If this
happens, try the following remedies:
— Use this system at least 10 meters
(33 feet) away from the wireless LAN
equipment.
— Turn off the power to the wireless
LAN equipment when using your
BLUETOOTH device within 10 meters
(33 feet).
— Use this system and BLUETOOTH device
as closer to each other as possible.
• The radio waves broadcast by this system
may interfere with the operation of some
medical devices. Since this interference
may result in malfunction, always turn off
the power on this system and BLUETOOTH
device in the following locations:
— In hospitals, on trains, in airplanes,
at gas stations, and any place where
flammable gases may be present
— Near automatic doors or fire alarms
• This system supports security
functions that comply with BLUETOOTH
specifications to ensure secure
connections during communication using
BLUETOOTH technology. However, this
security may be insufficient depending
on the setting contents and other factors,
so always be careful when performing
communication using BLUETOOTH
technology.
• Sony cannot be held liable in any way
for damages or other loss resulting from
information leaks during communication
using BLUETOOTH technology.
• BLUETOOTH communication is not
necessarily guaranteed with all
BLUETOOTH devices that have the same
profile as this system.
• BLUETOOTH devices connected with this
system must comply with the BLUETOOTH
specification prescribed by the Bluetooth
SIG, Inc., and must be certified to comply.
However, even when a device complies
with the BLUETOOTH specification, there
may be cases where the characteristics or
specifications of the BLUETOOTH device
make it impossible to connect, or may
result in different control methods, display
or operation.
• Noise may occur or the audio may
cut off depending on the BLUETOOTH
device connected with this system,
the communications environment, or
surrounding conditions.
39GB
Additional Information
GTK-XB60/XB90.4-697-227-11(1)GTK-XB60/XB90.4-697-227-11(1)
Specifications
AUDIO POWER SPECIFICATIONS
POWER OUTPUT AND TOTAL HARMONIC
DISTORTION:
(The United States model only)
Left/Right Channel:
With 3ohms loads, both channels
driven, from 120 10,000Hz; rated
30watts per channel minimum
RMS power, with no more than
0.7% total harmonic distortion from
250milliwatts to rated output.
Speaker section
GTK-XB60:
Tweeter: 50mm (2in) × 2, cone type
Woofer: 130mm (5/ in) × 2, cone type
GTK-XB90:
Tweeter: 60mm (2/ in) × 3, cone type
Woofer: 180mm (7in) × 2, cone type
Inputs
AUDIO/PARTY CHAIN IN L/R:
Voltage xxV, impedance xxkilohms
MIC:
Sensitivity: xxmV, impedance
xxkilohms
Outputs
AUDIO/PARTY CHAIN OUT L/R:
Voltage xxV, impedance xxohms
USB section and supported
audio formats
(USB) port:
Type A, maximum current 2.1A
Supported bit rate:
MP3 (MPEG1 Audio Layer-3):
32kbps 320kbps, VBR
WMA: 32kbps 192kbps, VBR
Sampling frequencies:
MP3 (MPEG1 Audio Layer-3):
32/44.1/48 kHz
WMA: 44.1 kHz
BLUETOOTH section
Communication system:
BLUETOOTH Standard version 4.2
Output:
BLUETOOTH Standard Power Class 2
Maximum communication range:
Line of sight approx. 10 m (33 feet)1)
Frequency band:
2.4 GHz band (2.4000 GHz –
2.4835GHz)
Modulation method:
FHSS (Freq Hopping Spread
Spectrum)
Compatible BLUETOOTH profiles2):
A2DP (Advanced Audio Distribution
Profile)
AVRCP (Audio Video Remote Control
Profile)
BLE (Bluetooth Low Energy)
HFP (Hands-free Profile)
HSP (Headset Profile)
SPP (Serial Port Profile)
Supported codecs:
SBC (Sub Band Codec)
AAC (Advanced Audio Coding)
LDAC
1)
The actual range will vary depending on
factors such as obstacles between devices,
magnetic fields around a microwave oven,
static electricity, reception sensitivity,
antenna’s performance, operating system,
software application, etc.
2) BLUETOOTH standard profiles indicate the
purpose of BLUETOOTH communication
between devices.
• Sony cannot be held liable in any way
for damages or other loss resulting from
information leaks during communication
using BLUETOOTH technology.
• BLUETOOTH communication is not
necessarily guaranteed with all
BLUETOOTH devices that have the same
profile as this system.
• BLUETOOTH devices connected with this
system must comply with the BLUETOOTH
specification prescribed by the Bluetooth
SIG, Inc., and must be certified to comply.
However, even when a device complies
with the BLUETOOTH specification, there
may be cases where the characteristics or
specifications of the BLUETOOTH device
make it impossible to connect, or may
result in different control methods, display
or operation.
• Noise may occur or the audio may
cut off depending on the BLUETOOTH
device connected with this system,
the communications environment, or
surrounding conditions.

40GB
GTK-XB60/XB90.4-697-227-11(1)GTK-XB60/XB90.4-697-227-11(1)
Usage life of the lithium-ion
battery
The times given below will be shorter if
you charge and discharge the battery
repeatedly.
When STAMINA mode is turned off:
Speaker Lights
On Off
GTK-XB60 12hours1)/
3hours2)
14hours1)/
3.5hours2)
GTK-XB90 12hours1)/
3hours2)
21hours1)/
3.5hours2)
When STAMINA mode is turned on3):
Speaker Lights
On Off
GTK-XB60 13hours1)/
5hours2)
14hours1)/
5.5hours2)
GTK-XB90 15hours1)/
5hours2)
21hours1)/
5.5hours2)
1) Measured using a predetermined music
source with the volume level of the
system set to 70 dB. The stated time
may vary depending on the ambient
temperature and conditions of use.
2) Measured using a predetermined music
source with the volume level of the
system set to the maximum.
3) The given times may vary depending on
the playback content.
General
Power requirements:
GTK-XB60/GTK-XB90:
AC 120V, 60Hz
Power consumption:
GTK-XB60: 35W
GTK-XB90: 40W
Standby power consumption:
GTK-XB60:
When BLUETOOTH standby mode is
set to off: xxW (eco mode)
When BLUETOOTH standby mode is
set to on: xxW (all wireless network
ports on)
GTK-XB90:
When BLUETOOTH standby mode is
set to off: xxW (eco mode)
When BLUETOOTH standby mode is
set to on: xxW (all wireless network
ports on)
Dimensions (W/H/D) (Approx.):
GTK-XB60:
265mm × 549mm × 276mm
(10/in × 21 /in × 10/in)
GTK-XB90:
336mm × 670mm × 330mm
(13/in × 26/in × 13in)
Mass (Approx.):
GTK-XB60: 8kg (30lb 14oz)
GTK-XB90: 14kg (17lb 11oz)
Quantity of the system:
1 piece
Supplied accessories:
AC power cord (1)
Design and specifications are subject to
change without notice.
License and Trademark
Notice
• MPEG Layer-3 audio coding
technology and patents licensed
from Fraunhofer IIS and Thomson.
• Windows Media is either a registered
trademark or trademark of Microsoft
Corporation in the United States
and/or other countries.
• This product is protected by
certain intellectual property rights
of Microsoft Corporation. Use or
distribution of such technology
outside of this product is prohibited
without a license from Microsoft or
an authorized Microsoft subsidiary.
• The BLUETOOTH® word mark and
logos are registered trademarks
owned by Bluetooth SIG, Inc. and
any use of such marks by Sony
Corporation is under license. Other
trademarks and trade names are
those of their respective owners.
• The N-Mark is a trademark or
registered trademark of NFC Forum,
Inc. in the United States and in other
countries.
• Google Play and Android are
trademarks of Google Inc.
• LDAC™ and LDAC logo are
trademarks of Sony Corporation.

41GB
Additional Information
GTK-XB60/XB90.4-697-227-11(1)GTK-XB60/XB90.4-697-227-11(1)
General
Power requirements:
GTK-XB60/GTK-XB90:
AC 120V, 60Hz
Power consumption:
GTK-XB60: 35W
GTK-XB90: 40W
Standby power consumption:
GTK-XB60:
When BLUETOOTH standby mode is
set to off: xxW (eco mode)
When BLUETOOTH standby mode is
set to on: xxW (all wireless network
ports on)
GTK-XB90:
When BLUETOOTH standby mode is
set to off: xxW (eco mode)
When BLUETOOTH standby mode is
set to on: xxW (all wireless network
ports on)
Dimensions (W/H/D) (Approx.):
GTK-XB60:
265mm × 549mm × 276mm
(10/in × 21 /in × 10/in)
GTK-XB90:
336mm × 670mm × 330mm
(13/in × 26/in × 13in)
Mass (Approx.):
GTK-XB60: 8kg (30lb 14oz)
GTK-XB90: 14kg (17lb 11oz)
Quantity of the system:
1 piece
Supplied accessories:
AC power cord (1)
Design and specifications are subject to
change without notice.
License and Trademark
Notice
• MPEG Layer-3 audio coding
technology and patents licensed
from Fraunhofer IIS and Thomson.
• Windows Media is either a registered
trademark or trademark of Microsoft
Corporation in the United States
and/or other countries.
• This product is protected by
certain intellectual property rights
of Microsoft Corporation. Use or
distribution of such technology
outside of this product is prohibited
without a license from Microsoft or
an authorized Microsoft subsidiary.
• The BLUETOOTH® word mark and
logos are registered trademarks
owned by Bluetooth SIG, Inc. and
any use of such marks by Sony
Corporation is under license. Other
trademarks and trade names are
those of their respective owners.
• The N-Mark is a trademark or
registered trademark of NFC Forum,
Inc. in the United States and in other
countries.
• Google Play and Android are
trademarks of Google Inc.
• LDAC™ and LDAC logo are
trademarks of Sony Corporation.
• Apple, the Apple logo, iPhone, and
iPod touch are trademarks of Apple
Inc., registered in the U.S. and other
countries. App Store is a service
mark of Apple Inc.
• “Made for iPod” and “Made for
iPhone” mean that an electronic
accessory has been designed to
connect specifically to iPod or
iPhone, respectively, and has been
certified by the developer to meet
Apple performance standards. Apple
is not responsible for the operation
of this device or its compliance with
safety and regulatory standards.
Please note that the use of this
accessory with iPod or iPhone may
affect wireless performance.
• WALKMAN and WALKMAN logo
are registered trademarks of Sony
Corporation.
• All other trademarks and registered
trademarks are of their respective
holders. In this manual, TM and ®
marks are not specified.