Sony Group PCG57AL Notebook Personal Computer with WLAN User Manual Ventana QuickStart
Sony Corporation Notebook Personal Computer with WLAN Ventana QuickStart
User manual
REVIEW COVER SHEET
Ventana Documentation:
Quick Start Review
Product Title: VAIO® Notebook Documentation
Coordinator: Sandi Garza
Phone Number: 408-955-5737
Fax Number: 408-955-6287
E-mail: sandi.garza@am.sony.com
Alternate Contact: Karen Biederman
E-mail: karen.biederman@am.sony.com
Please review and return your changes no later than: Monday, Jan. 13, 2003 @ 5
pm (PST).
Distribute to:
• Alioto, Gina
• Aoki, Rumiko
• Araki, Michiko
• Capobianco, Anthony
• Fife, Ed
• Garay, Rome
• Hayashi, Jucca
• Iio, Sakurako
• Jenkins, Eric
• Joaquin, Michael –
• Okamoto, Mariko
• Omori, Keith
• Rindegard, Johan
• Takizawa, Tatsuya
• Wang, John
Approved as is:
Approved with
changes as noted:
Signature: ________________
Date: ___________________
Comments: ______________
________________________
________________________
________________________
________________________
________________________
________________________
________________________
________________________
________________________
________________________
________________________

VAIO® Computer
Quick Start
PCG-XX Series
Draft 1
Draft 1

3
Contents
Notice to Users............................................5
Setting Up ..................................................15
Unpacking Your Computer .......................................16
Applying Ergonomics ...............................................18
Locating Controls and Ports......................................19
Getting Started ..........................................25
Turning On Your Computer......................................26
Using the Touch Pad .................................................30
Registering Your Computer ......................................31
Locating Your VAIO Computer User Guide ............32
Setting Up A Dial-Up Connection ............................34
Turning Off Your Computer .....................................36
Expanding Your Computing Power.........39
Upgrading Memory...................................................40
Locating Preinstalled Programs ................................40
Using the Application Recovery and
System Recovery CDs ..............................41
Application and System Recovery CDs....................42
Draft 1

VAIO® Computer Quick Start
4
Using Your Recovery CDs .......................................42
Caring for Your Computer........................49
Storing Your Computer ............................................50
Using Cables and Connections .................................50
Cleaning Your Computer..........................................51
Handling the LCD Screen.........................................51
Troubleshooting........................................53
Troubleshooting Your Computer (Windows XP).....54
Troubleshooting Your Computer (Windows 2000)..59
Support Options ........................................................63
Index...........................................................65
Draft 1
5
Notice to Users
© 2003 Sony Electronics Inc. All rights
reserved. This manual and the software
described herein, in whole or in part, may not
be reproduced, translated, or reduced to any
machine-readable form without prior written
approval.
SONY ELECTRONICS INC. PROVIDES NO
WARRANTY WITH REGARD TO THIS
MANUAL, THE SOFTWARE, OR OTHER
INFORMATION CONTAINED HEREIN
AND HEREBY EXPRESSLY DISCLAIMS
ANY IMPLIED WARRANTIES OF
MERCHANTABILITY OR FITNESS FOR
ANY PARTICULAR PURPOSE WITH
REGARD TO THIS MANUAL, THE
SOFTWARE, OR SUCH OTHER
INFORMATION. IN NO EVENT SHALL
SONY ELECTRONICS INC. BE LIABLE
FOR ANY INCIDENTAL,
CONSEQUENTIAL, OR SPECIAL
DAMAGES, WHETHER BASED ON TORT,
CONTRACT, OR OTHERWISE, ARISING
OUT OF OR IN CONNECTION WITH THIS
MANUAL, THE SOFTWARE, OR OTHER
INFORMATION CONTAINED HEREIN OR
THE USE THEREOF.
Sony Electronics Inc. reserves the right to make
any modification to this manual or the
information contained herein at any time
without notice. The software described herein is
governed by the terms of a separate user license
agreement.
This product contains software owned by Sony
and licensed by third parties. Use of such
software is subject to the terms and conditions
of license agreements enclosed with this
product. Some of the software may not be
transported or used outside the United States.
Software specifications are subject to change
without notice and may not necessarily be
identical to current retail versions.
Updates and additions to software may require
an additional charge. Subscriptions to online
service providers may require a fee and credit
card information. Financial services may
require prior arrangements with participating
financial institutions.
The International ENERGY STAR® Office
Equipment Program is an international program
that promotes energy saving through the use of
computers and other office equipment. The
program backs the development and
dissemination of products with functions that
effectively reduce energy consumption. It is an
open system in which business proprietors can
participate voluntarily. The targeted products
are office equipment such as computers,
displays, printers, facsimiles and copiers. Their
standards and logos are uniform among
As an ENERGY
STAR® Partner, Sony
Corporation has
determined that this
product meets the
ENERGY STAR®
guidelines for energy
efficiency.
Draft 1
VAIO® Computer Quick Start
6
participating nations. ENERGY STAR is a U.S.
registered mark.
Sony, DVgate, Handycam, i.LINK, Mavica,
MagicGate™ Memory Stick, Memory Stick,
MovieShaker, VAIO, and the VAIO logo are
trademarks of Sony Corporation. Microsoft,
Windows Media, Windows, Windows NT, and
the Windows logo are registered trademarks of
Microsoft Corporation. Intel, SpeedStep, and
Pentium are trademarks or registered
trademarks of Intel Corporation. PS/2 is a
registered trademark of IBM. Acrobat Reader,
Photoshop, Photoshop Elements, and Premiere
are trademarks of Adobe Systems Incorporated.
PowerPanel is a trademark of Phoenix
Technologies Ltd.
This product incorporates copyright protection
technology that is protected by method claims
of certain U.S. patents and other intellectual
property rights owned by Macrovision
Corporation and other rights owners. Use of
this copyright protection technology must be
authorized by Macrovision Corporation, and is
intended for home and other limited viewing
uses only unless otherwise authorized by
Macrovision Corporation. Reverse engineering
or disassembly is prohibited. i.LINK is a
trademark of Sony used only to designate that a
product contains an IEEE 1394 connection. The
i.LINK connection may vary, depending on the
software applications, operating system, and
compatible i.LINK devices. All products with
an i.LINK connection may not communicate
with each other. Please refer to the
documentation that came with your compatible
i.LINK device for information on operating
conditions and proper connection. Before
connecting compatible i.LINK PC peripherals
to your system, such as a CD-RW or hard disk
drive, confirm their operating system
compatibility and required operating
conditions. All other trademarks are trademarks
of their respective owners.
End User / Product
Activation Requirements
Certain software product(s) included with this
computer may include features such as copy
protection and content management technology.
Use of the software product(s) requires
agreement to applicable end user agreements
and full compliance with applicable product
activation procedures. Product activation
procedures and privacy policies will be detailed
during initial launch of the software product(s),
or upon certain reinstallations of the software
product(s) or reconfiguration of the computer,
and may be completed by Internet or telephone
(toll charges may apply).
Owner’s Record
The model number and serial number are
located on the bottom of your Sony VAIO
computer. Refer to the model and serial number
when you call your Sony Service Center.
Model Number: PCG-571L
Serial Number:________________________
The Wireless LAN
functionality*,
which is
incorporated into
selected models
only, has passed Wi-
Fi certification and
complies with the
interoperability
specifications
established by
WECA (Wireless
Ethernet
Compatibility
Alliance).
* Selected models may come with a PC
Card.
Draft 1
Notice to Users
7
Safety Information
WARNING
❑To prevent fire or shock hazard, do not
expose your computer to rain or moisture.
❑To avoid electrical shock, do not open the
cabinet. Refer servicing to qualified
personnel only.
❑Never install modem or telephone wiring
during a lightning storm.
❑Never install telephone jacks in wet
locations unless the jack is specifically
designed for wet locations.
❑Never touch uninsulated telephone wire
or terminals unless the telephone line has
been disconnected at the network
interface.
❑Use caution when installing or modifying
telephone lines.
❑Avoid using the modem during an
electrical storm.
❑Do not use the modem or a telephone to
report a gas leak in the vicinity of the leak.
❑A socket outlet should be as close as
possible to the unit and easily accessible.
❑i.LINK, PC Card, and USB connectors are
not supplied with Limited Power Sources.
.
AVERTISSEMENT
❑Pour prévenir tout risque d’incendie ou
d’électrocution, garder cet appareil à
l’abri de la pluie et de l’humidité.
❑Pour prévenir tout risque d’électrocution,
ne pas ouvrir le châssis de cet appareil et
ne confier son entretien qu’à une personne
qualifiée.
❑Ne jamais effectuer l’installation de fil
modem ou téléphone durant un orage
électrique.
❑Ne jamais effectuer l’installation d’une
prise téléphonique dans un endroit
mouillé à moins que la prise soit conçue à
cet effet.
❑Ne jamais toucher un fil téléphonique à
découvert ou un terminal à moins que la
To change the backup battery,
please contact your nearest Sony
Service Center.
Caution: The use of optical
instruments with this product
will increase eye hazard. As the
laser beam used in this product
is harmful to the eyes, do not
attempt to disassemble the
cabinet. Refer servicing to
qualified personnel only.
(For CD-RW/DVD Combo
Drive, CD-ROM drive,
DVD-ROM drive) Danger:
Visible and invisible laser
radiation when open. Avoid
direct exposure to beam.
Caution: To reduce the risk of
fire, use only No. 26 AWG or
larger telecommunication line
cord.
Draft 1
VAIO® Computer Quick Start
8
ligne téléphonique n’ait été débranche de
l’interface réseau.
❑Soyez très prudent lorsque vous installez
ou modifiez les lignes téléphoniques.
❑Évitez d’utiliser le modem durant un
orage électrique.
❑N'utilisez pas le modem ni le téléphone
pour prévenir d'une fuite de gaz quand
vous êtes près de la fuite.
❑L’appareil doit être le plus près possible
d’une prise murale pour en faciliter
l’accès.
❑Des connecteurs i.LINK, PC Card, et
USB ne sont pas fournis avec des Sources
d’Énergie Limitées.
If you have questions about this product, you
can reach the Sony Customer Information
Service Center at 1-888-4-SONY-PC; or write
to the Sony Customer Information Service
Center at 12451 Gateway Blvd., Ft. Myers, FL
33913 or find Sony Customer Service on the
Web at: http://www.sony.com/pcsupport.
Regulatory Information
Declaration of Conformity
This equipment has been tested and found to
comply with the limits for a Class B digital
device, pursuant to Part 15 of the Rules. These
limits are designed to provide reasonable
protection against harmful interference in a
residential installation. This equipment
generates, uses, and can radiate radio frequency
energy and, if not installed and used in
accordance with the instructions, may cause
Pour changer la pile de
rechange, veuillez contacter
votre centre de service Sony le
plus près.
Avertissement: L'utilisation
d'instruments optiques avec ce
produit augmente les risques
pour les yeux. Puisque le
faisceau laser utilisé dans ce
produit est dommageable pour
les yeux, ne tentez pas de
désassembler le boîtier.
Adressez-vous à un agent de
service qualifié.
(Pour le lecteur Combo de
CD-RW/DVD, le lecteur CD-
ROM, le lecteur DVD-ROM)
Danger: Radiation laser visible
et invisible si ouvert. Évitez
l’exposition directe au faisceau.
Attention : Afin de réduire les
risques d'incendie, n'utilisez
qu'un cordon de communication
N0. 26 AWG ou plus gros.
Trade Name: Sony
Model No.: PCG-571L
Responsible Party: Sony Electronics
Inc.
Address: 680 Kinderkamack
Road
Oradell, NJ 07649
Telephone:
(For FCC-related
matters only.)
201-930-6972
This device complies with Part 15 of the
FCC rules. Operation is subject to the
following two conditions:
(1) This device may not cause harmful
interference, and
(2) this device must accept any interference
received, including interference that may
cause undesired operation.
Draft 1

Notice to Users
9
harmful interference to radio communications.
However, there is no guarantee that interference
will not occur in a particular installation. If this
equipment does cause harmful interference to
radio or television reception, which can be
determined by turning the equipment off and
on, the user is encouraged to try to correct the
interference by one or more of the following
measures:
❑Reorient or relocate the receiving antenna.
❑Increase the separation between the
equipment and the receiver.
❑Connect the equipment to an outlet on a
circuit different from that to which the
receiver is connected.
❑Consult the dealer or an experienced
radio/TV technician for help.
You are cautioned that any changes or
modifications to the computer not expressly
approved in this manual could void your
authority to operate this equipment.
Only peripherals (computer input/output
devices, terminals, printers, etc.) that comply
with FCC Class B limits may be attached to this
computer product. Operation with non-
compliant peripherals is likely to result in
interference to radio and television reception.
All cables used to connect peripherals must be
shielded and grounded. Operation with cables
connected to peripherals that are not shielded
and grounded may result in interference to radio
and television reception.
FCC Part 68
This equipment complies with Part 68 of the
FCC rules and the requirements adopted by the
ACTA. On the bottom of this equipment is a
label that contains, among other information, a
product identifier in the format
US:AAAEQ##TXXXX. If requested, this
information must be provided to the telephone
company.
This modem uses the USOC RJ11C telephone
jack.
A telephone plug and jack used to connect this
equipment to the premises wiring and telephone
network must comply with the applicable FCC
Part 68 rules and requirements adopted by the
ACTA.
The REN is used to determine the number of
devices which may be connected to the
telephone line. Excessive RENs on a telephone
line may result in the devices not ringing in
response to an incoming call. In most, but not
all areas, the sum of RENs should not exceed
five (5.0). To be certain of the number of
devices that may be connected to a line, as
determined by the total RENs, contact the
telephone company. For products approved
after July 23, 2001, the REN for this product is
part of the product identifier that has the format
US: AAAEQ##TXXXX. The digits represented
by ## are the REN without a decimal point
(e.g., 03 is a REN of 0.3). For earlier products,
the REN is separately shown on the label.
If this equipment causes harm to the telephone
network, the telephone company will notify you
in advance that temporary discontinuance of
service may be required. But if advance notice
is not practical, the telephone company will
notify the customer as soon as possible. Also,
you will be advised of your right to file a
complaint with the FCC if you believe it is
necessary.
The telephone company may make changes in
its facilities, equipment, operations, or
procedures that could affect the operation of the
equipment. If this happens, the telephone
company will provide advance notice in order
for you to make the necessary modifications in
order to maintain uninterrupted service.
If trouble is experienced with this equipment,
for repair or warranty information, please
Draft 1

Draft 1
VAIO® Computer Quick Start
10
contact 1-888-4-SONY-PC (1-888-476-6972),
or write to the Sony Customer Information
Service Center, One Sony Drive, Park Ridge,
NJ 07656. If the equipment is causing harm to
the telephone network, the telephone company
may request that you disconnect the equipment
until the problem is resolved.
Repair of this equipment should be made only
by a Sony Service Center or Sony authorized
agent. For the Sony Service Center nearest you,
call 1-888-4-SONY-PC (1-888-476-6972).
Connection to party line service is subject to
state tariffs. Contact the state public utility
commission, public service commission, or
corporation commission for information.
If your home has specially wired alarm
equipment connected to the telephone line,
ensure the installation of this equipment does
not disable your alarm equipment. If you have
questions about what will disable alarm
equipment, consult your telephone company or
a qualified installer.
Use a surge arrestor to protect against electrical
surges.
FCC Radio Frequency
Exposure (United States)
The available scientific evidence does not show that any
health problems are associated with using low power
wireless devices. There is no proof, however, that these
low power wireless devices are absolutely safe. Low
power Wireless devices emit low levels of radio
frequency energy (RF) in the microwave range while
being used. Whereas high levels of RF can produce
health effects (by heating tissue), exposure to low level
RF that does not produce heating effects causes no
known adverse health effects. Many studies of low level
RF exposures have not found any biological effects.
Some studies have suggested that some biological
effects might occur, but such findings have not been
confirmed by additional research. The Notebook
Computer (PCG-571L) has been tested and found to
comply with the Federal Communications Commission
(FCC) guidelines on radio frequency energy (RF)
exposures. The maximum SAR levels tested for the
Notebook Computer (PCG-571L) has been shown to be
0.0285 W/kg at Body in condition of right side of display
at a middle channel of band.
Users are not permitted to make changes or
modify the system in any way.
IC RSS-210 (Canada)
Operation is subject to the following two
conditions: (1) this device may not cause
interference, and (2) this device must accept
any interference, including interference that
may cause undesired operation of the device.
To prevent radio interference to the licensed
service, this device is intended to be operated
indoors and away from windows to provide
maximum shielding. Equipment (or its transmit
antenna) that is installed outdoors is subject to
licensing.
The term “IC:” before the
certification/registration number only signifies
that the Industry Canada technical
specifications were met.
The installer of this radio equipment must ensure that the
antenna is located or pointed such that it does not emit
RF field in excess of Health Canada limits for the general
population; consult Safety Code 6, obtainable from
Health Canada’s website www.hc-sc.gc.ca/rpb”
L’utilisation de ce dispositif est autorisée
seulement aux conditions suivantes: (1) il ne
doit pas produire de brouillage et (2)
l’utilisateur du dispositif doit être prêt à
accepter tout brouillage radioélectrique reçu,
même si ce brouillage est susceptible de
compromettre le fonctionnement du dispositif.
Pour empêcher que cet appareil cause du
brouillage au service faisant l’objet d’une
licence, il doit être utilisé à l’interieur et devrait
être placé loin des fenêtres afin de fournir un
écran de blindage maximal. Si le matériel (ou
son antenne d’émission) est installé a
l’exterieur, il doit faire l’objet d’une licence.
L’expression “IC:” avant le numéro

d’homologation/enregistrement signifie
seulement que les spécifications techniques
d’Industrie Canada ont été respectées.
The installer of this radio equipment must ensure that the
antenna is located or pointed such that it does not emit
RF field in excess of Health Canada limits for the general
population; consult Safety Code 6, obtainable from
Health Canada’s website www.hc-sc.gc.ca/rpb**
Telephone Consumer
Protection Act of 1991
(United States)
The Telephone Consumer Protection Act of
1991 makes it unlawful for any person to use a
computer or other electronic device, including
FAX machines, to send any message unless
such message clearly contains in a margin at the
top or bottom of each transmitted page or on the
first page of the transmission, the date and time
it is sent and an identification of the business or
*[ product name (model name) ],
[ value ], [ position ] will be
replaced.
**Above Gray lines will be
translated to French.
Notice to Users
11
other entity, or other individual sending the
message, and the telephone number of the
sending machine or such business, other entity,
or individual. (The telephone number provided
may not be a 900 number or any other number
for which charges exceed local or long-distance
transmission charges.)
In order to program this information into your
facsimile machine, see your fax software
documentation.
Telephone Consumer
Guidelines (Canada)
Please refer to your telephone directory under
‘Privacy Issues’ and/or ‘Terms of Service.’ For
more detailed information, please contact:
CRTC
Terrasses de la Chaudière, Tour centrale
1 promenade du Portage, 5 étage Hull
PQ K1A 0N2.
This Class B digital apparatus complies with
Canadian ICES-003.
Cet appareil numérique de la classe B est
conforme à la norme NMB-003 du Canada.
RECYCLING LITHIUM ION
BATTERIES
RECYCLING
LITHIUM-ION
BATTERIES
Lithium-Ion
batteries are
recyclable.
You can help
preserve our
environment by
returning your used
rechargeable
batteries to the
collection and
recycling location
nearest you.
For more information regarding recycling of
rechargeable batteries, call toll free 1-800-
822-8837, or visit http://www.rbrc.org/.
Caution: Do not handle damaged or leaking
Lithium-Ion batteries.
Draft 1
VAIO® Computer Quick Start
12
RECYCLAGE DES
ACCUMULATEURS AUX
IONS DE LITHIUM
RECYCLAGE DES
ACCUMULATEU
RS AUX IONS DE
LITHIUM
Les accumulateurs
aux ions de lithium
sont recyclables.
Vous pouvez
contribuer à
préserver
l’environnement en
rapportant les piles
usées dans un point
de collection et
recyclage le plus
proche.
Pour plus d’informations sur le recyclage
des accumulateurs, téléphonez le numéro
gratuit 1-800-822-8837 (Etats-Units et
Canada uniquement), ou visitez
http://www.rbrc.org/.
Avertissment: Ne pas utiliser des
accumulateurs aux ions de lithium qui sont
endommagées ou qui fuient.
Do not handle damaged or
leaking lithium ion batteries.
Danger of explosion if battery is
incorrectly replaced. Replace
only with the same or equivalent
type recommended by the
manufacturer. Discard used
batteries according to the
manufacturer’s instructions.
The battery pack used in this
device may present a fire or
chemical burn hazard if
mistreated. Do not disassemble,
heat above 140°F (60°C) or
incinerate. Dispose of used
battery promptly. Keep away
from children.
Ne pas utiliser des batteries au
lithium ionisé qui sont
endommagées ou qui fuient.
Une batterie non conforme
présente un danger d'explosion.
La remplacer seulement par une
batterie identique ou de type
équivalent recommandé par le
fabricant. Évacuer les batteries
usées selon les directives du
fabricant.
La manutention incorrecte du
module de batterie de cet
appareil présente un risque
d'incendie ou de brûlures
chimiques. Ne pas démonter,
incinérer ou exposer à une
température de plus de 60°C.
Évacuer promptement la
batterie usée. Garder hors de
portée des enfants.
Draft 1

Notice to Users
13
INDUSTRY CANADA NOTICE
NOTICE: The Industry Canada label identifies
certified equipment. This certification means
that the equipment meets certain
telecommunications network protective,
operational and safety requirements as
prescribed in the appropriate Terminal
Equipment Technical Requirements
document(s). The Department does not
guarantee the equipment will operate to the
user’s satisfaction.
Before installing this equipment, users should
ensure that it is permissible to be connected to
the facilities of the local telecommunications
company. The equipment must also be installed
using an acceptable method of connection.
The customer should be aware that compliance
with the above conditions may not prevent
degradation of service in some situations.
Repairs to certified equipment should be
coordinated by a representative designated by
the supplier. Equipment malfunctions or any
repairs or alterations made by the user to this
equipment may give the telecommunications
company cause to request that the user
disconnect the equipment.
Users should ensure for their own protection
that the electrical ground connections of the
power utility, telephone lines and internal
metallic water pipe system, if present, are
connected together. This precaution may be
particularly important in rural areas.
Caution: Users should not attempt to make such
connections themselves, but should contact the
appropriate electric inspection authority, or
electrician, as appropriate.
NOTICE: The Ringer Equivalency Number
(REN) assigned to each terminal device
provides an indication of the maximum number
of terminals allowed to be connected to a
telephone interface. The termination on an
interface may consist of any combination of
devices subject only to the requirement that the
sum of the RENs of all the devices does not
exceed 5. The REN for this equipment is 0.2.
AVIS DE L’INDUSTRIE
CANADA
AVIS: L’étiquette d’Industrie Canada identifie
le matériel homologué.
Cette étiquette certifie que le matériel est
conforme aux normes de protection,
d’exploitation et de sécurité des réseaux de
télécommunications, comme le prescrivent les
documents concernant les exigences techniques
relatives au matériel terminal. Le Ministère
n’assure toutefois pas que le matériel
fonctionnera à la satisfaction de l’utilisateur.
Avant d’installer ce matériel, l’utilisateur doit
s’assurer qu’il est permis de le raccorder aux
installations de l’entreprise locale de
télécommunication. Le matériel doit également
être installé en suivant une méthode acceptée de
raccordement. L’abonné ne doit pas oublier
qu’il est possible que la conformité aux
conditions énoncées ci-dessus n’empêche pas la
dégradation du service dans certaines
situations.
Les réparations de matériel homologué doivent
être coordonnées par un représentant désigné
par le fournisseur. L’entreprise de
télécommunications peut demander à
l’utilisateur de débrancher un appareil à la suite
de réparations ou de modifications effectuées
par l’utilisateur ou à cause de mauvais
fonctionnement.
Pour sa propre protection, l’utilisateur doit
s’assurer que tous les fils de mise à la terre de la
source d’énergie électrique, des lignes
téléphoniques et des canalisations d’eau
métalliques, s’il y en a, sont raccordés
ensemble. Cette précaution est particulièrement
importante dans les régions rurales.
Draft 1
VAIO® Computer Quick Start
14
Avertissement: L’utilisateur ne doit pas tenter
de faire ces raccordements lui-même; il doit
avoir recours à un service d’inspection des
installations électriques, ou à un électricien,
selon le cas.
AVIS: L’indice d’équivalence de la sonnerie
(IES) assigné à chaque dispositif terminal
indique le nombre maximal de terminaux qui
peuvent être raccordés à une interface.
La terminaison d’une interface téléphonique
peut consister en une combination de quelques
dispositifs, à la seule condition que la somme
d’indices d’équivalence de la sonnerie de tous
les dispositifs n’excède pas 5. L’indice
d’équivalence de la sonnerie de ce matériel est
de 0.2.
CD-RW/DVD-ROM Laser
Diode Properties
Laser Output: XX µW (CD)
XX µW (DVD)
Wave Length: XX nm (CD)
XX nm (DVD)
The use of optical instruments
with this product will increase
eye hazard. As the laser beam
used in this product is harmful
to the eyes, do not attempt to
disassemble the drive cabinet.
Refer servicing to qualified
personnel only.
Visible and invisible laser
radiation when open. Avoid
direct exposure to beam.
Draft 1


VAIO® Computer Quick Start
16
Unpacking Your Computer
Documents
❑VAIO® Computer User Guide — A searchable on-screen help file that
contains detailed information on how to use your new computer. See
“Locating Your VAIO Computer User Guide” on page 33 for more
information.
❑VAIO® Computer Quick Start — Contains information on unpacking and
setting up your computer for immediate use.
❑VAIO® Computer Specifications (Windows® XP) — An on-screen file
that details the hardware specifications and lists the installed programs on
your computer. See “Locating Your VAIO Computer User Guide” on
page 33 for more information.
❑VAIO® Computer Specifications (Windows® 2000) — A printed sheet
that details your computer's hardware specifications.
❑Microsoft® Windows® guide — Explains how to use the basic features of
the Microsoft® Windows® operating system installed on your computer.
Main Unit
AC Adapter
Rechargeable Battery Power Cord
Draft 1

Unpacking Your Computer
17
Software CDs
❑Depending on the model you purchased, additional program CDs may be
included with your computer.
Recovery CDs
❑Application Recovery CDs — Enables you to reinstall individual programs
and device drivers.
❑System Recovery CDs — Enables you to restore the operating system and
programs that shipped with your computer. This CD restores your computer
to its original factory settings, so user data and programs installed since you
started using your computer will be lost.
Draft 1

VAIO® Computer Quick Start
18
Applying Ergonomics
Your computer is a portable device and can be used in a variety of environments.
Whenever possible, you should apply the following ergonomic considerations:
❑Position of your computer — Place the computer directly in front of you as
you work. Keep your forearms horizontal, with your wrists in a neutral,
comfortable position while using the keyboard, touch pad, or external
mouse. Let your upper arms hang naturally at your sides. Take breaks during
sessions with your computer. Excessive use of the computer may strain
muscles or tendons.
❑Furniture and posture — Sit in a chair with good back support and
armrests. Adjust the level of the chair so your feet are flat on the floor. A
footrest may make you more comfortable. Sit in a relaxed, upright posture
and avoid slouching forward or leaning far backward.
❑Viewing angle of the computer’s display — Tilt the display to find the best
viewing angle. Also try adjusting the brightness setting of the display.
Following these suggestions can reduce eye strain and muscle fatigue.
❑Lighting — Choose a location where windows and lights do not create glare
or reflection on the display. Use indirect lighting to avoid bright spots on the
display. You can purchase accessories for your display that help reduce
glare. Proper lighting adds to your comfort and work effectiveness.
❑Placement of an external display — When using an external display, set
the display at a comfortable viewing distance. Make sure the display screen
is at eye level or slightly lower when you are sitting in front of the monitor.
Draft 1
Locating Controls and Ports
19
Locating Controls and Ports
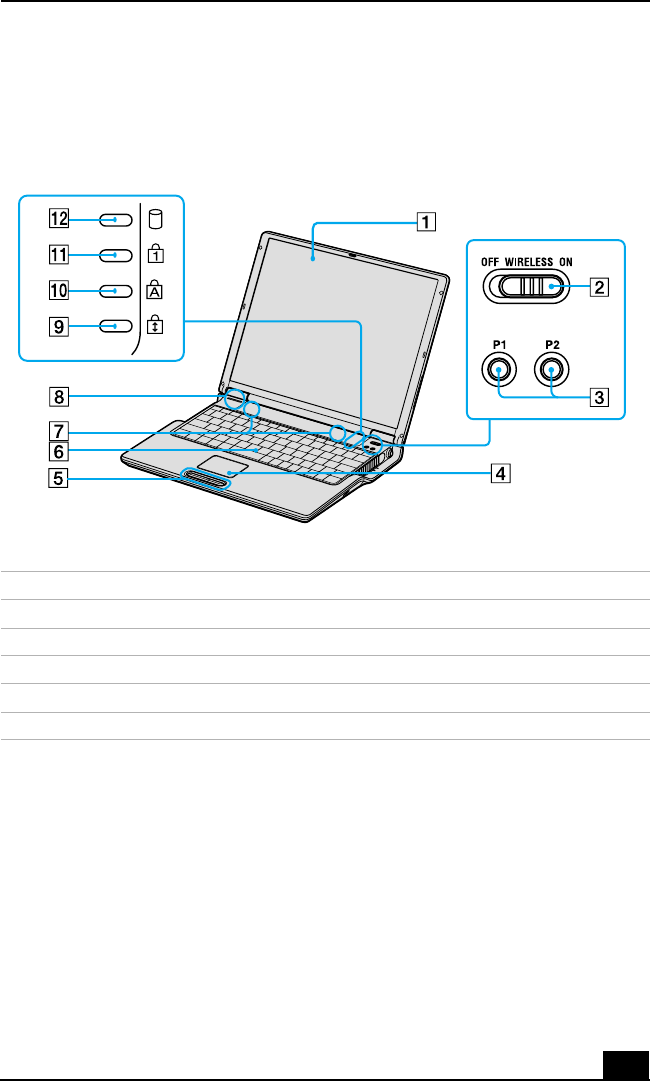
Front
1Computer screen (LCD) 7Speakers
2Wireless LAN switch 8Model number
3PPK buttons??? 9 Scroll lock indicator
4Touch pad 10 Caps lock indicator
5Left and right buttons 11 Num lock indicator
6Keyboard 12 Hard disk drive indicator
Draft 1
VAIO® Computer Quick Start
20
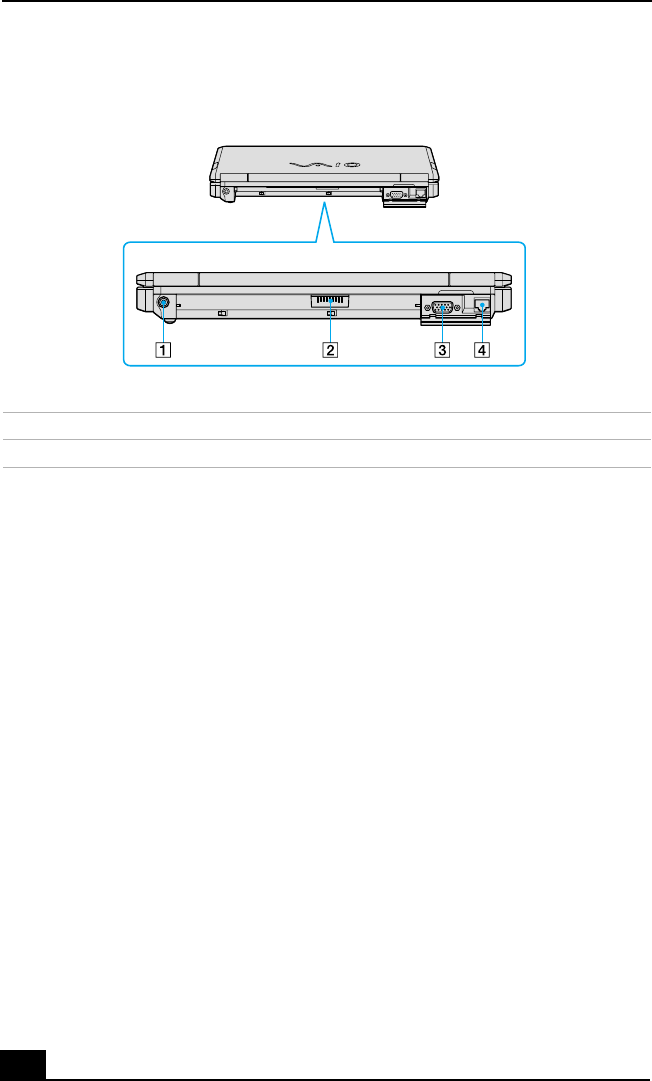
Back
1DC IN port 3Monitor (VGA) port
2Battery port 4Network (Ethernet) port
Draft 1
Locating Controls and Ports
21
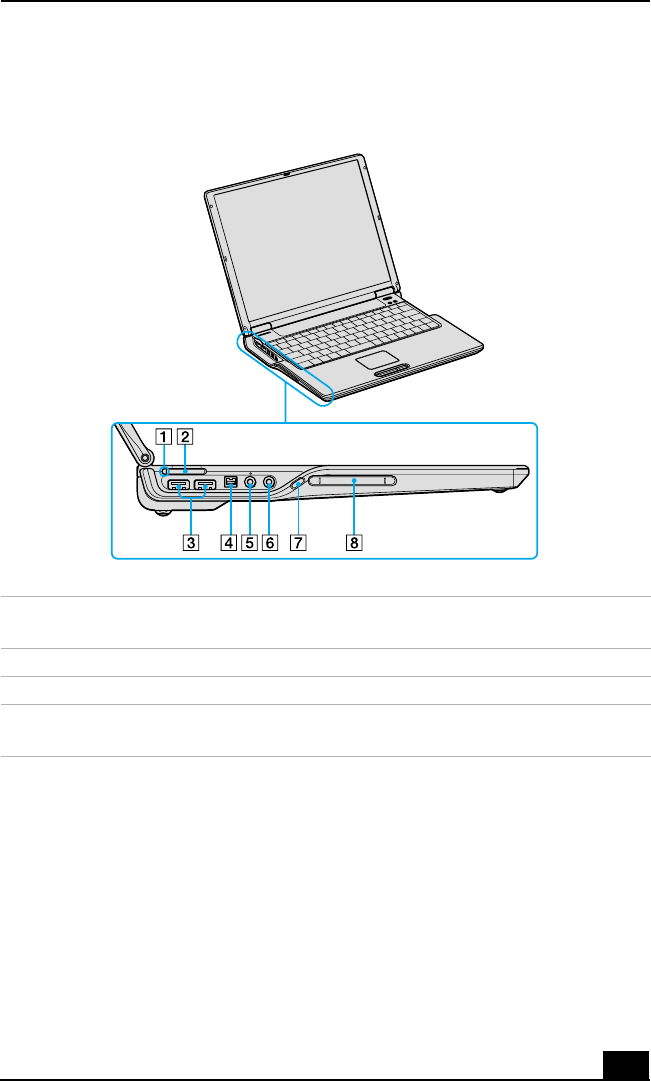
Left
1Memory Stick®
media indicator 5Microphone jack
2Memory Stick® media slot 6Headphone jack
3USB 2.0 ports 7PC Card slot eject button
4i.LINK® (IEEE 1394)
S400 port 8PC Card slot
Draft 1
VAIO® Computer Quick Start
22
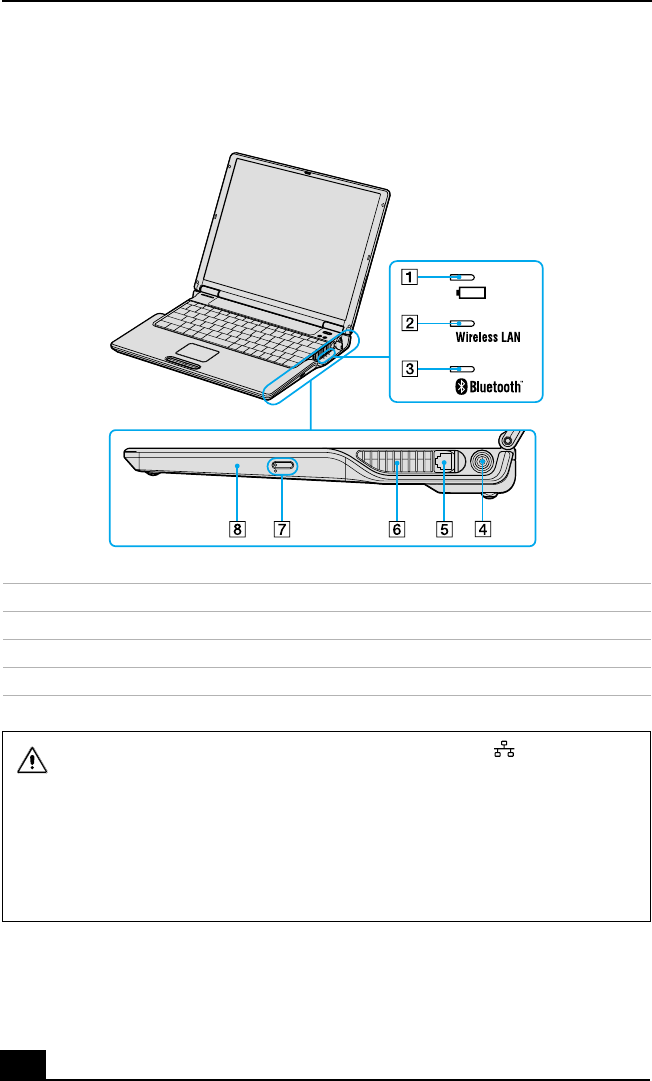
Right
1Battery indicator 5Modem jack
2Wireless LAN indicator 6Air Vent
3Bluetooth™ indicator 7Optical drive eject button
4Power button 8Optical drive
Only connect 10BASE-T or 100BASE-TX cables to the Network
(Ethernet) port. Do not connect any other type of network cable or any
telephone line to this port. Connecting cables other than those listed above
may result in an electric current overload and could cause a malfunction,
excessive heat, or fire in the port. To connect the unit to a network, refer to
your on-screen VAIO® Computer User Guide or contact your network
administrator. See “Locating Your VAIO Computer User Guide” for more
information.
Draft 1
Locating Controls and Ports
23
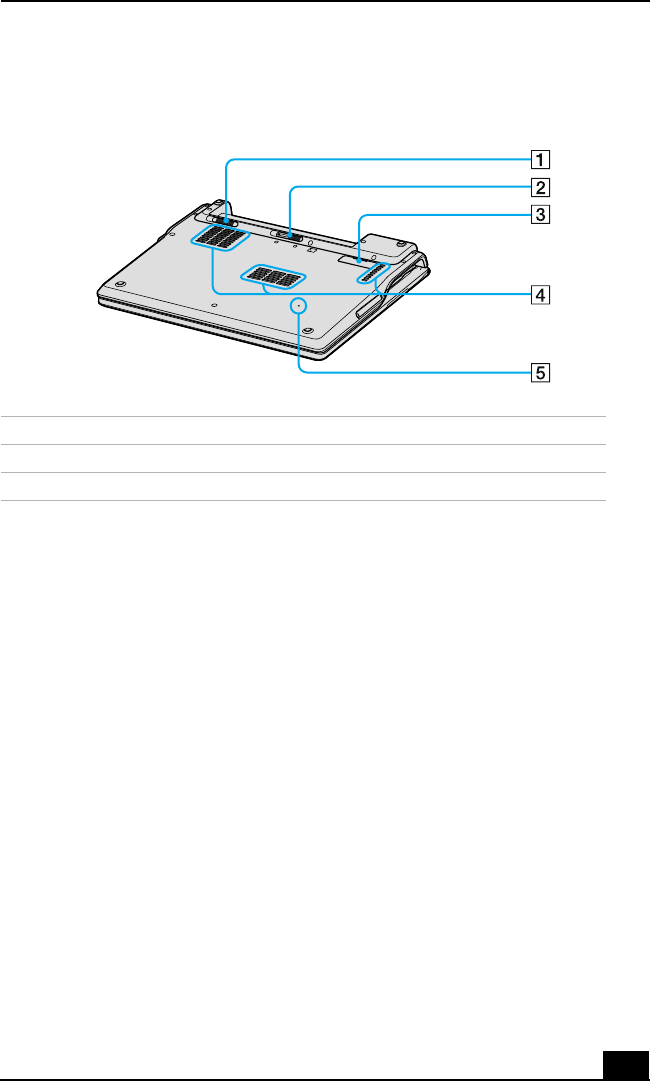
Bottom
1UNLOCK/LOCK latch 4Ventilation fan
2UNLOCK latch 5Reset button
3Port replicator connector
Draft 1

VAIO® Computer Quick Start
24
Draft 1

25
Getting Started
This section helps you get your computer running and registered, so you
can take advantage of Sony’s many support options. You’ll also learn how
to locate your on-screen VAIO® Computer User Guide, which contains
step-by-step instructions for operating your computer.
❑Turning On Your Computer
❑Using the Touch Pad
❑Registering Your Computer
❑Locating Your VAIO Computer User Guide
❑Setting Up A Dial-Up Connection
❑Turning Off Your Computer
Draft 1
VAIO® Computer Quick Start
26
Turning On Your Computer
To use your computer immediately, use the supplied AC adapter as a power
source. Your supplied battery is not charged when you unpack it, however, you
can begin charging it when you use your AC adapter. See “Powering Your
Computer” in your on-screen VAIO® Computer User Guide for more
information about using batteries. See also “Locating Your VAIO Computer User
Guide” on page 32.
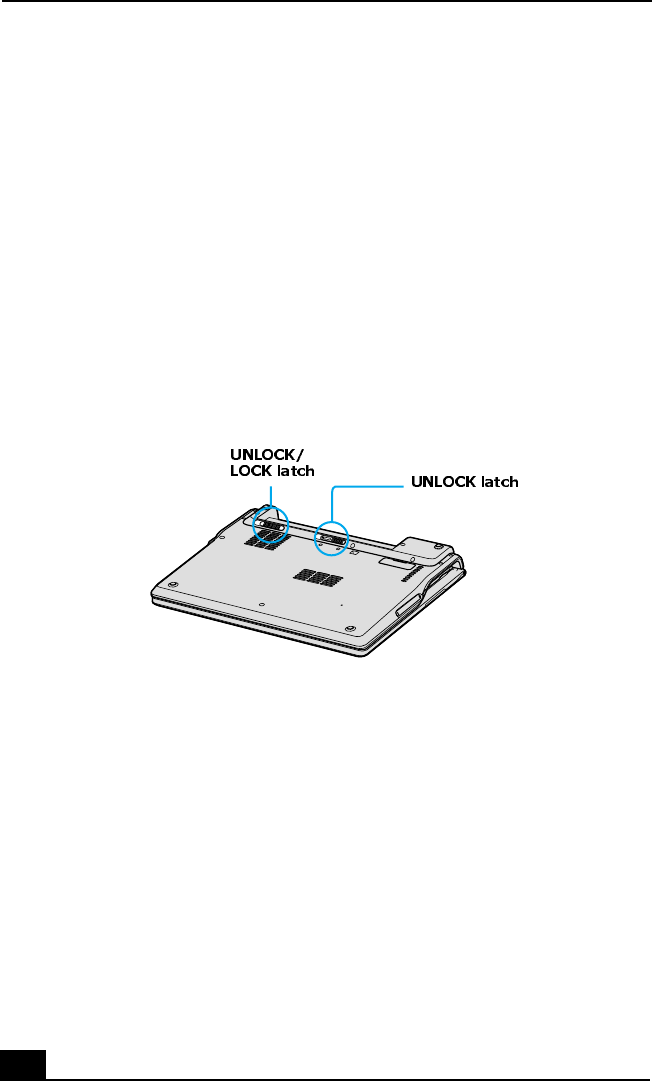
To charge the battery
1Move the UNLOCK/LOCK latch on the bottom of the computer to the
UNLOCK position.
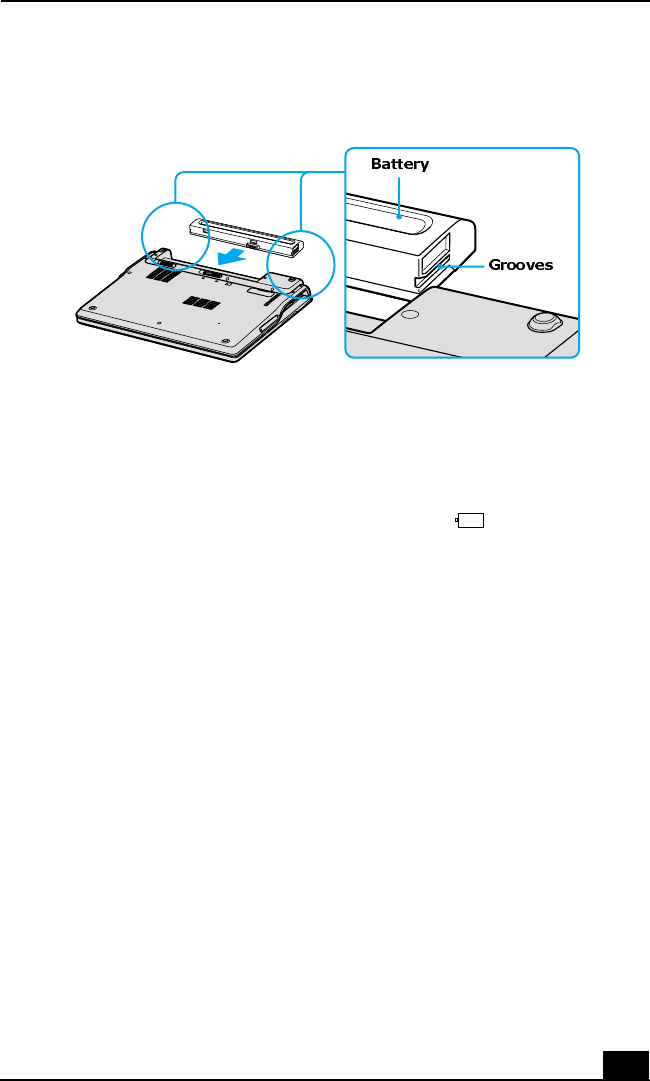
2Align the grooves and tabs on the battery with the tabs and notches on the
back of the computer, and slide the battery toward the computer until it
clicks into place.
UNLOCK/LOCK Latch
Draft 1
Turning On Your Computer
27
3Move the UNLOCK/LOCK latch into the LOCK position to secure the
battery on the computer.
4Connect the AC adapter to the computer. See “To connect the AC adapter.”
Once you connect the AC adapter to the computer, the battery begins to charge
whether the computer is on or off. The battery indicator shows the battery
status. The indicator blinks as the battery charges. See “Powering Your
Computer” in your on-screen VAIO® Computer User Guide for more
information.
Inserting the Battery
Draft 1
VAIO® Computer Quick Start
28
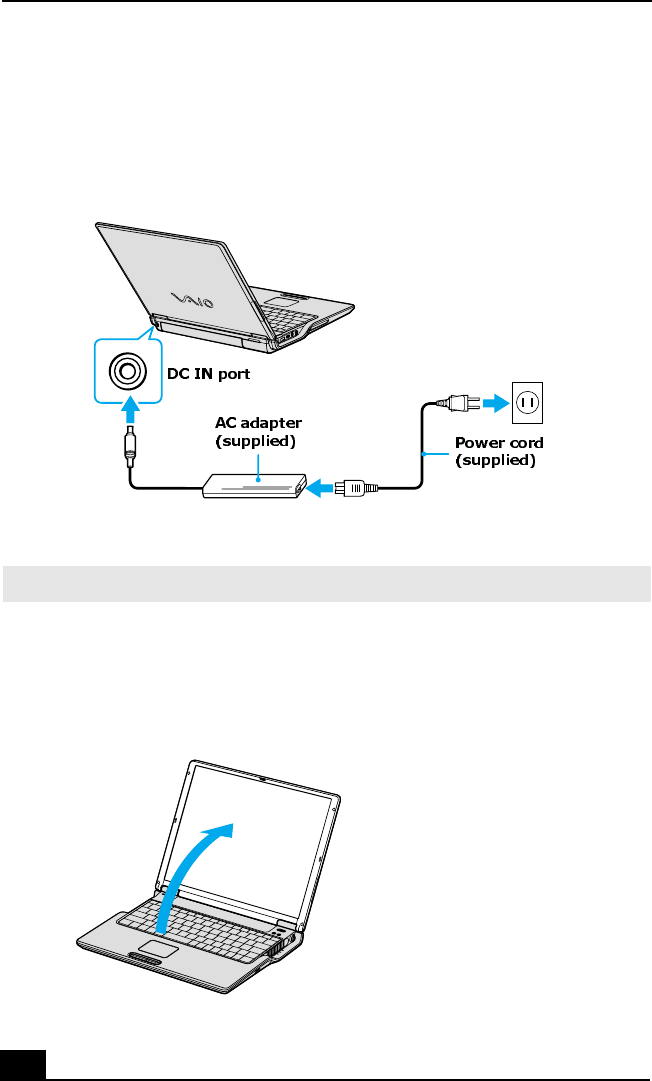
To connect the AC adapter
1Plug the AC adapter cable into the DC IN port.
2Plug the power cord into the AC adapter and an AC outlet.
.
To open and turn on the computer
1Lift the cover while holding the bottom of the computer firmly.
Connecting the AC Adapter to the Computer
✍Use only the supplied AC adapter with your computer.
Opening the Computer
Draft 1
Turning On Your Computer
29
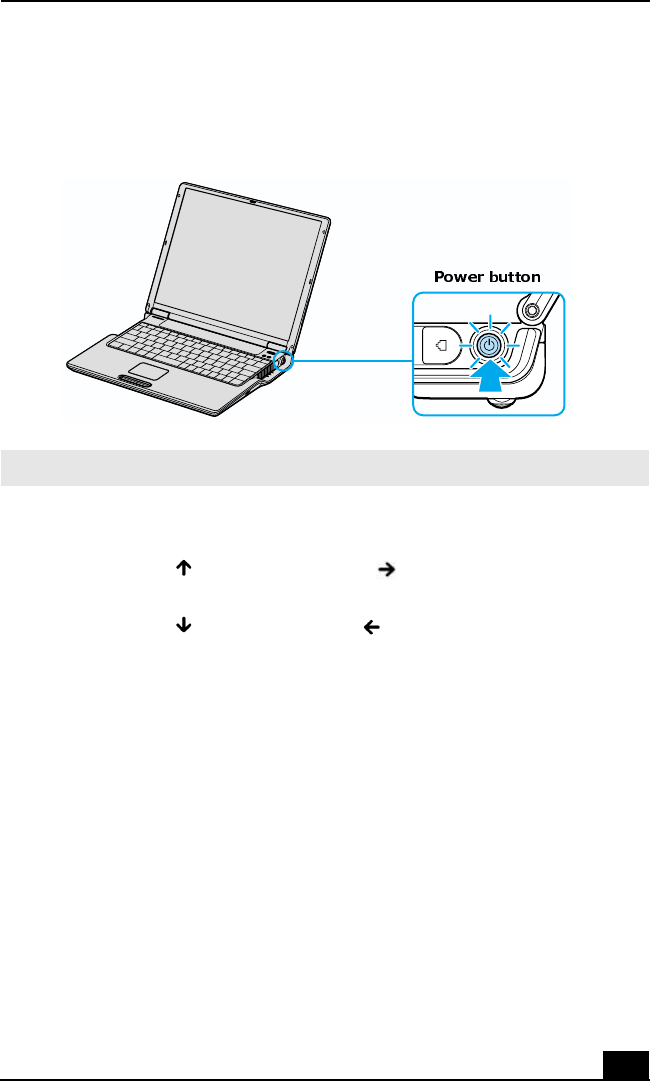
2Press the power button until the green power indicator lights up.
3If necessary, adjust the brightness controls for the LCD display as follows:
❑To increase brightness, press the Fn+F5 keys, and then press the Up
Arrow key or Right Arrow key .
❑To decrease brightness, press the Fn+F5 keys, and then press the Down
Arrow key or Left Arrow key .
Turning on the Computer
✍If you continue to press the power button, the computer turns off.
Draft 1
VAIO® Computer Quick Start
30
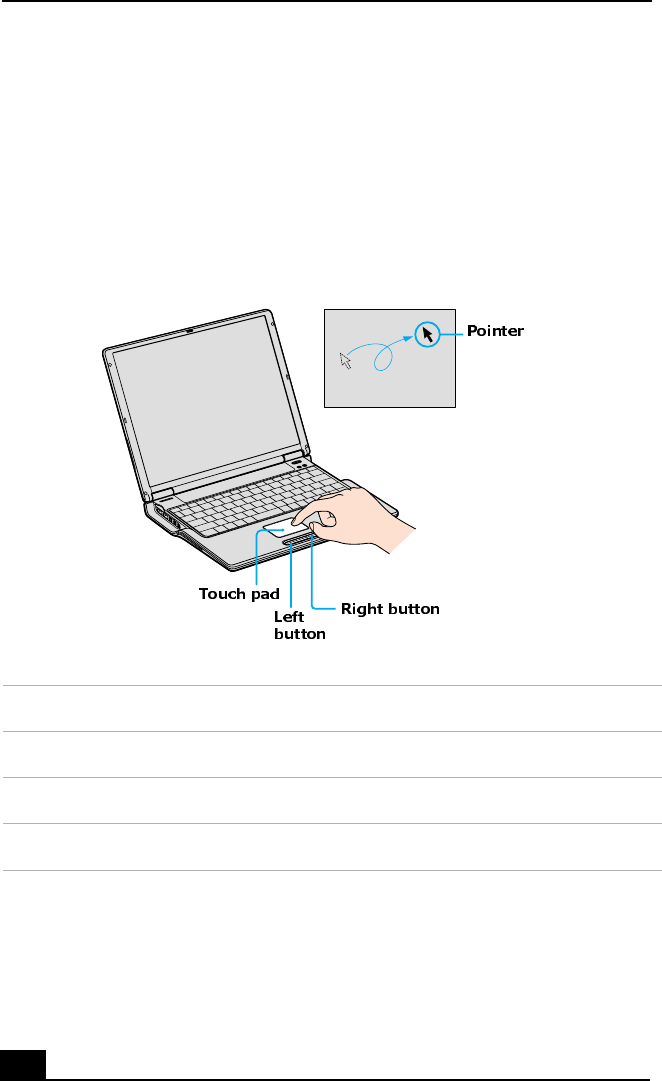
Using the Touch Pad
The computer contains a pointing device called a touch pad. You can point to,
select, drag, and scroll objects on the screen using the built-in touch pad.
Describing the touch pad
Locating the Touch Pad
Touch Pad Action Description
Sliding one finger Equivalent to using a mouse to place the pointer on an item.
Tapping once Equivalent to pressing the left button once.
Tapping twice Equivalent to pressing the left button twice.
Draft 1

Using the Touch Pad
31
Registering Your Computer
Take advantage of Sony’s commitment to quality customer support and receive
these benefits by registering your computer:
❑Sony Customer Support — Talk to a support representative to troubleshoot
problems you may have with your computer.
❑Limited Warranty Extension — Protect your investment. See the Warranty
Card for more details.
❑Product Information Notification — By giving Sony your contact
information, you will enable Sony to reach you regarding performance
updates and upgrades.
Sliding one finger
while pressing the
left button
Equivalent to using the mouse to drag an item.
Moving your finger
along the right edge
of the touch pad
Equivalent to scrolling vertically. (The scroll function is
available only with programs that support a touch pad scroll
feature.)
Moving your finger
along the bottom to
scroll horizontally
Equivalent to scrolling horizontally. (The scroll function is
available only with programs that support a touch pad scroll
feature.)
✍You are prompted to register your computer the first time you turn on the unit.
Follow the on-screen instructions to complete the registration process. If you are not
able to register your computer during the first session, you are provided with
additional registration opportunities later.
Touch Pad Action Description
Draft 1
VAIO® Computer Quick Start
32
Locating Your VAIO Computer User Guide
The on-screen VAIO® Computer User Guide is a searchable help file that
contains detailed information on how to use your new computer. Some of the
topics in your on-screen VAIO® Computer User Guide include the following:
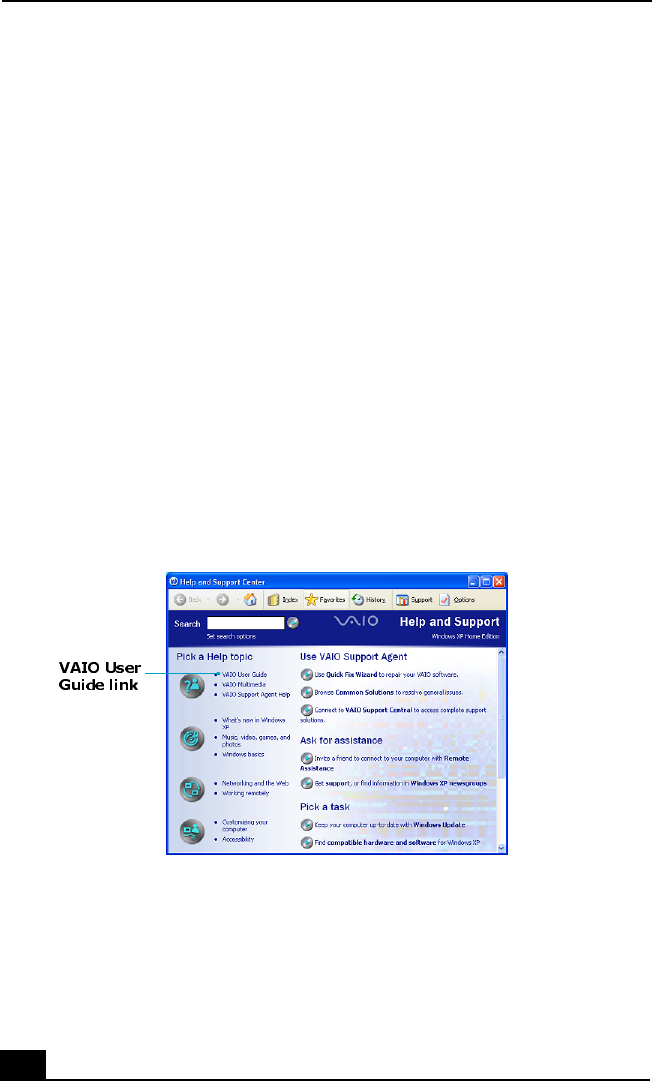
To open the user guide (Windows XP)
1Click Start on the Windows® taskbar, and then click Help and Support.
The Help and Support Center window appears, displaying information
about your VAIO® computer and Microsoft® Windows® operating system.
2Click VAIO Us er Gu ide in the Pick a Help topic column. A second Help
and Support Center window appears, which offers information about your
computer.
•Batteries •PC Cards and Floppy Disks
•Internet and Networking •Optical Drives
•CDs and DVDs •Port Replicators (if applicable)
•Printing •Audio/Video
• Features • Preinstalled Programs
• Mice and Keyboards • Memory
Locating the VAIO User Guide (Windows XP)
Draft 1
Locating Your VAIO Computer User Guide
33
To open the user guide (Windows 2000)
❑Click Start on the Windows® taskbar, point to VAIO Help Center and click
VA IO User Gu ide . The VAIO User Guide appears.
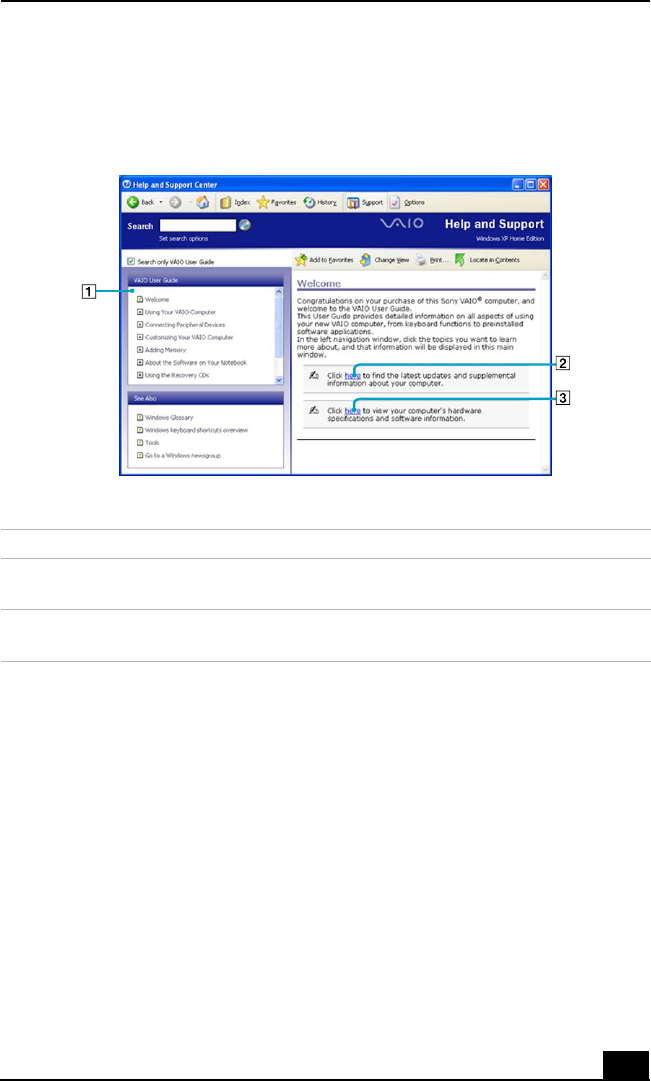
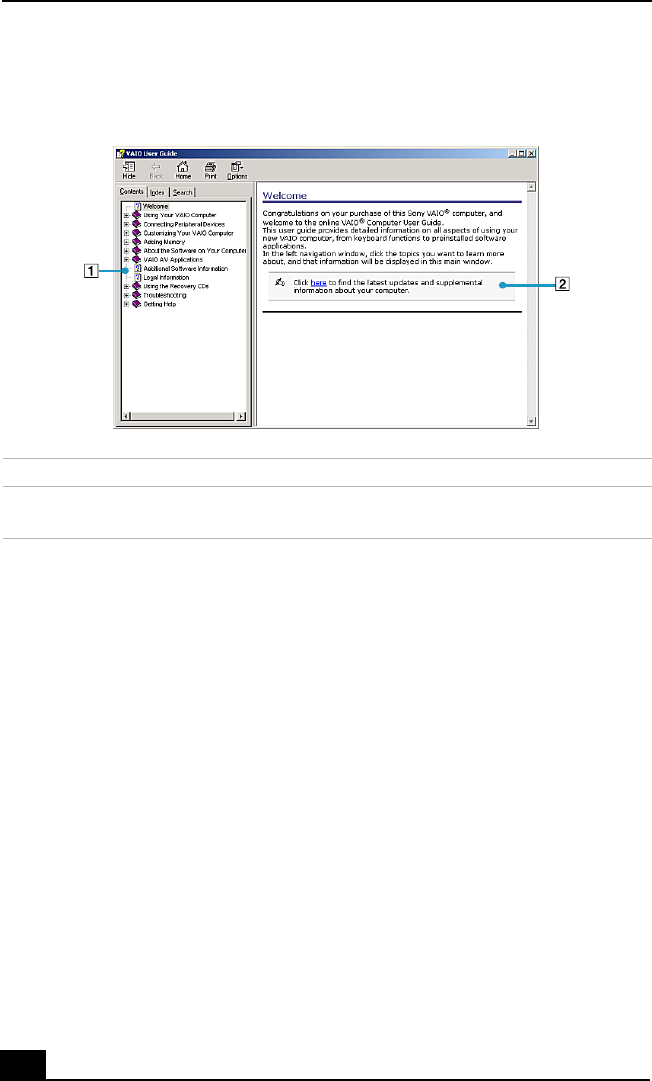
VAIO User Guide Window (Windows XP)
1User guide table of contents List of computer help topics
2Link to Electronic Flyer List of updates and supplemental
information
3Link to VAIO Computer
Specifications
List of specifications and programs.
Draft 1
VAIO® Computer Quick Start
34
Setting Up A Dial-Up Connection
This section describes the basic steps for setting up your dial-up connection. The
Connection Wizard guides you through the process of choosing an Internet
Service Provider (ISP) or setting up an existing account, and connecting to the
Internet.
To set up a dial-up connection (Windows XP)
1Connect a telephone cable to your computer. See “Setting up a dial-up
Internet connection” in the Internet and Network Connections chapter of
your on-screen VAIO® Computer User Guide.
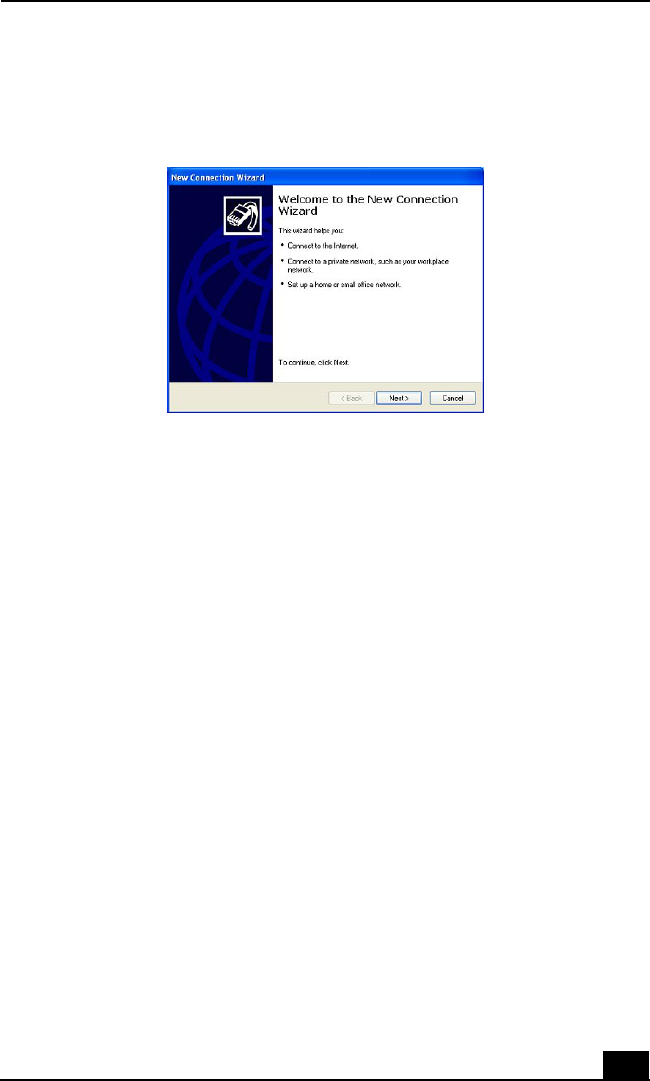
2Click Start, point to All Programs, Accessories, Communications, and
then click New Connection Wizard. The New Connection Wizard
appears.
VAIO User Guide (Windows 2000)
1User guide table of contents List of computer help topics
2Link to Electronic Flyer List of updates and supplemental
information
Draft 1
Setting Up A Dial-Up Connection
35
3Click Next.
4If it is not already selected, click Connect to the Internet.
5Click Next.
6Follow the on-screen instructions.
New Connection Wizard
Draft 1

VAIO® Computer Quick Start
36
To set up a dial-up connection (Windows 2000)
1Click Start, point to Programs, Accessories, Communications, and then
click Internet Connection Wizard. The Internet Connection Wizard
window appears.
2Follow the on-screen instructions to finish setting up your Internet
connection.
Turning Off Your Computer
Using the power button to turn off your computer may result in loss of data.
Follow the steps below to properly turn off your computer and avoid losing data.
To turn off your computer
1Close all operations.
2Click Start on the Windows® taskbar.
3(Windows XP) Click Turn Off Computer at the bottom of the Start menu
to display the Turn off computer window, and select Turn Off.
(Windows 2000) Click Shut Down at the bottom of the Start menu to
display the Shut Down Windows window, and select Shut Down.
Internet Connection Wizard
✍Respond to any prompts warning you to save documents.
Draft 1

Turning Off Your Computer
37
4Wait for your computer to turn off automatically. The computer is off when
the power indicator turns off.
✍During a period of inactivity, you can conserve battery life by using power saving
modes. See “Controlling Power Management” in the VAIO® Computer User Guide
for more information.
✍If you are unable to turn off the computer, press the power button and hold it. This
operation may result in data loss.
Draft 1

VAIO® Computer Quick Start
38
Draft 1


VAIO® Computer Quick Start
40
Upgrading Memory
Depending on the configuration you purchased, your computer may accept
additional memory modules. For information about installation procedures, refer
to the on-screen VAIO® Computer User Guide and print those relevant steps. See
“Locating Your VAIO Computer User Guide” on page 32.
The specifications supplied with your computer (either on-screen for Windows
XP or printed for Windows 2000) list the amount of installed memory and
required memory modules for upgrades.
Locating Preinstalled Programs
Your computer comes with a variety of preinstalled audio/video programs. The
following sources offer a list of preinstalled programs, descriptions, and
information:
❑VAIO® Computer User Guide — The Preinstalled Programs chapter of
your on-screen VAIO® Computer User Guide contains a list of programs,
descriptions, and support information. See “Locating Your VAIO Computer
User Guide” on page 32 for more information.
❑VAIO® Computer Specifications (Windows XP) — The on-screen file
details your computer’s hardware specifications and lists preinstalled
programs, descriptions, and support information. See “Locating Your VAIO
Computer User Guide” on page 32 for more information.
❑All Programs (Windows XP) — The All Programs menu, which you can
access from the Start menu, contains a list of all the preinstalled programs on
your computer.
❑Programs (Windows 2000) — The Programs menu, which you can access
from the Start menu, contains a list of all the preinstalled programs on your
computer.
Draft 1


VAIO® Computer Quick Start
42
Application and System Recovery CDs
Your computer comes with the following Application Recovery and System
Recovery CDs. You will need an optical drive to use these recovery CDs. If your
computer does not come with an optical drive, use an external optical drive.
Application Recovery CDs
Sony Electronics Inc.
These CDs enable you to reinstall individual programs and device drivers if they
become corrupted or are erased.
System Recovery CDs
Sony Electronics Inc.
These CDs enable you to restore the operating system and programs that shipped
with your computer if they become corrupted or are erased. These CDs restore
your computer to its original factory settings, so user data and programs installed
since you started using your computer will be lost.
Using Your Recovery CDs
The following sections describe how to use the Application Recovery and
System Recovery utilities.
❑Using the Application Recovery CDs
❑Using the System Recovery CDs
Using the Application Recovery CDs
The Application Recovery CDs enable you to reinstall individual programs and
device drivers, and to repair programs if they become corrupted or are erased.
Reinstalling an individual program or device driver may correct a problem you
are experiencing with your computer, peripheral hardware, or software. You may
not need to reinstall the entire contents of your hard disk. To reinstall all the
programs that shipped with your computer, use the System Recovery CDs. See
“Using the System Recovery CDs” for more information.
✍Your computer must have a Microsoft® Windows® operating system to run the
Application Recovery CD utility.
Draft 1

Using Your Recovery CDs
43
To reinstall programs with the Application Recovery CDs
1Turn on your computer. If your computer is already on, close all open
programs.
2Logon to the Microsoft® Windows® desktop.
3Insert Sony Application Recovery CD No. 1 into your computer’s optical
drive. The Application Recovery utility starts automatically.
4Click OK in the VAIO welcome window. The Sony Application Recovery
Program window appears.
5Double-click the Software folder. Icons representing the original,
preinstalled programs are displayed.
6Double-click the application you want to restore. The program’s installation
wizard begins.
7Follow the on-screen instructions to complete the recovery process.
To reinstall device drivers using Windows XP operating system
(For Windows® XP systems only) The Microsoft® Windows® XP operating
system is capable of reinstalling the original factory-installed device drivers,
without using the Application Recovery CD(s).
1Click Start in the Windows taskbar, then right-click My Computer. A
shortcut menu appears.
2Click Properties. The System Properties dialog box appears.
3From the Hardware tab, click the Device Manager button.
4Right-click to select the unknown device1 or the device that requires the
driver installation and click Update Driver from the shortcut menu. The
Hardware Update Wizard appears.
✍Your system may include one or more Application Recovery CDs. If you have more
than one Application Recovery CD, insert the first CD (CD No. 1) to run the
Application Recovery program. You may be prompted to insert the next CD,
depending on the application you wish to restore.
1 Unknown devices are identified by a yellow question mark. A device that has a driver
problem is identified by a yellow exclamation mark.
Draft 1

VAIO® Computer Quick Start
44
5Follow the on-screen instructions to locate the device and reinstall the
appropriate device driver.
To reinstall device drivers with the Application Recovery CDs
1Logon to the Microsoft® Windows® desktop.
2Insert Application Recovery CD No. 1 into your computer’s optical drive.
The VAIO welcome window appears. Click OK, then click Quit to close the
Sony Application Recovery utility. (Leave the CD in the optical drive.)
3Click Start on the Windows® taskbar, and right-click My Computer. A
shortcut menu appears.
4Click Properties. The System Properties dialog box appears.
5Click the Hardware tab, and click Device Manager.
6Right-click the unknown device1 or the device that requires the driver
installation, and click Update Driver from the shortcut menu. The
Hardware Update Wizard appears.
7In the Hardware Update Wizard, click to select Install from a list or
specific location (Advanced).
8Click Next.
9Click to cancel the Search removable media (floppy, CD-ROM...) option.
10 Click to select the Include this location in the search check box.
11 Click Browse. The Browse For Folder dialog box appears.
✍If Windows® XP does not reinstall the device driver(s), follow the steps in the next
section to reinstall the device driver(s) using the Application Recovery CD(s).
✍Your system includes one or more Application Recovery CDs. Insert Application
Recovery CD No. 1 to start the application or driver recovery process. You are
prompted to insert the next CD(s), depending on the application or driver you want
to restore.
1 Unknown devices are identified by a yellow question mark. A device that has a driver
problem is identified by a yellow exclamation mark.
Draft 1
Using Your Recovery CDs
45
12 Navigate to the optical drive, and click to select the Application Recovery
CD. The CD contents are displayed.
13 Click the folder name of the device in which you want to reinstall, and click
OK. The Hardware Update Wizard appears.
14 Click Next, and select the device folder. The Microsoft® Windows®
operating system automatically reinstalls the device driver(s) from the
Application Recovery CD.
15 Click Finish, and remove the Application Recovery CD from the optical
drive.
16 Turn off your computer by clicking Start, and then Turn off computer.
17 Wait 30 seconds, and turn on your computer.
If you have any questions about using the Application Recovery CD(s), visit
http://www.sony.com/pcsupport.
Using the System Recovery CDs
The System Recovery CDs enable you to format your hard disk drive and restore
the operating system and all original, preinstalled programs. If the operating
system or programs become corrupted or are erased, you can restore your
computer to the original factory settings.
You may not need to reinstall the entire contents of your hard drive. If you
experience a problem with your computer, reinstalling an individual device
driver or program may correct the problem. Use the Application Recovery CDs
to reinstall individual programs and device drivers. See “Using the Application
Recovery CDs” for more information.
The System Recovery CDs contain a backup copy of all the programs originally
installed on your hard disk. It can be used only to recover the hard disk of the
Sony computer you purchased.
When you successfully complete your system recovery, you are prompted to
complete the Windows® registration process.
The System Recovery process removes all programs that you may have
installed since you started using your computer. Reinstall any program
that was not included with the computer when you purchased it.
Draft 1

VAIO® Computer Quick Start
46
System Recovery options
❑Default System Drive Recovery — All data on Drive C is deleted. The
factory default settings and programs are restored on this drive only.
❑Change Partition Size and Recover — All partitions, custom installations,
and changes are removed from the hard drive. You can set the partition sizes
for both Drive C and Drive D. The original, preinstalled operating system
and programs are restored.
❑Factory Default Settings Recovery — All data and partitions are removed
from the hard drive. All original factory settings, the operating system, and
preinstalled programs are restored.
To use the System Recovery CDs
Your system may take a few minutes to load necessary files. A blue screen may
appear during the downloading process.
Your system may include one or more System Recovery CDs. If you have more
than one System Recovery CD, insert the first CD (CD No. 1) to run the System
Recovery program. You will be prompted to insert the next CD(s) once the
information from the first CD has been installed.
1Press the disc eject button to open the optical disc drive and extend the disc
tray.
2Insert the Sony System Recovery CD No. 1 into the optical drive, and close
the drive. The first CD must be in the drive before you restart your computer.
3(Windows XP) Turn off your computer by clicking Start, Turn off
computer, and selecting Turn Off.
(Windows 2000) Turn off your computer by clicking Start, Shut Down, and
selecting Shut Down.
4Wait at least 30 seconds, and turn on your computer. The System Recovery
utility restarts from the optical drive. Your screen displays the downloading
progress, “Starting VAIO Recovery Utility.”
5When the VAIO System Recovery Utility wizard appears, click Next.
6The Notes on Use window appears. Click Next.
The System Recovery utility does not back up your system’s data. If you
wish to retain your system data, perform a backup to an external media.
Draft 1
Using Your Recovery CDs
47
7On the Main Menu - Product Recovery window, select the appropriate
option to recover your system.
8Follow the on-screen instructions to complete the recovery process.
After recovering your system using the System Recovery CD(s), you may be
prompted to insert your Application Recovery CD(s) after restarting Windows.
Use the Application Recovery CD(s) to complete full restoration of your system.
If your computer does not start from the Recovery CD
1Press the power button and hold it for more than four seconds to turn off the
computer.
2Turn on the computer. When the Sony logo is displayed, press the F2 key.
The BIOS Setup Utility appears.
3Press the right arrow key to select the Exit menu.
4Press the down arrow key to select Get Default Values, and press Enter.
The Setup Confirmation window appears.
5Press Enter again to select Yes.
6Make sure Exit (Save Changes) is selected, and then press Enter. The
Setup Confirmation window appears again.
7Make sure Yes is selected, and press Enter. The computer restarts from the
Recovery CD.
After recovering your system using the System Recovery CDs, you may be
prompted to insert your Application Recovery CDs after restarting the Windows
operating system. Insert the Application Recovery CD to automatically complete
recovery of your system.
✍The recovery process takes approximately 30 to 60 minutes to complete.
✍If you have more than one System Recovery CD, insert the first CD to run the
System Recovery program. You are prompted to insert the second CD once the
information from the first CD has been installed.
The recovery process takes 30 to 60 minutes to complete.
Draft 1

VAIO® Computer Quick Start
48
Draft 1


VAIO® Computer Quick Start
50
Storing Your Computer
❑Do not use or store your computer in a location subject to:
❑Heat sources, such as radiators or air ducts
❑Direct sunlight
❑Excessive dust
❑Moisture or rain
❑Mechanical vibration or shock
❑Strong magnets or speakers that are not magnetically shielded
❑Ambient temperature higher than 95ºF (35ºC) or less than 40ºF (5ºC)
❑High humidity
❑Do not place electronic equipment near your computer. When running, the
computer’s electromagnetic field may cause other electronic equipment in
close proximity to malfunction.
❑Provide adequate air circulation to prevent internal heat buildup. Do not
place your computer on porous surfaces such as rugs or blankets, or near
materials such as curtains or draperies that may block ventilation. Leave a
space of at least 8 inches (20 cm) behind the back of the computer.
❑If the computer is brought directly from a cold location to a warm one,
moisture may condense inside your computer. In this case, allow at least one
hour before turning on your computer. If any problems occur, unplug your
computer, and contact your Sony Service Center.
❑The computer uses high-frequency radio signals and may interfere with
radio or TV reception. Should this occur, move the computer a suitable
distance away from the radio or TV.
❑Do not drop the computer or place heavy objects on top of the computer.
Using Cables and Connections
❑Use only specified peripheral equipment and interface cables.
❑Do not use cut or damaged connection cables.
❑If the telephone company makes a service call to your home or office and
determines that your computer is responsible for a problem, the telephone
company may bill you for the service call. Also, if you do not disconnect
your computer when it is adversely affecting a telephone line, the telephone
Draft 1

Cleaning Your Computer
51
company has the right to disconnect your service until you correct the
problem.
Cleaning Your Computer
❑Clean the computer with a soft, dry cloth or a soft cloth lightly moistened
with a mild detergent solution. Do not use any type of abrasive pad, scouring
powder, or solvent such as alcohol or benzine, as these may damage the
finish of your computer. You can use canned compressed air specifically for
computer to remove dust.
❑If a solid object falls onto the computer or a liquid leaks into the computer,
immediately turn off and unplug the computer. It is best to have the
computer checked by qualified personnel before you use it again.
❑Avoid rubbing the LCD screen as this can damage the screen. Use a soft, dry
cloth to wipe the LCD screen or canned compressed air.
❑Always disconnect the power cord before cleaning the computer.
Handling the LCD Screen
❑Direct sunlight can damage the LCD. Be careful when using the computer
near a window.
❑Do not scratch the LCD or exert pressure on it. This can cause a malfunction.
❑Using the computer in low temperature conditions may produce a residual
image on the screen. This is not a malfunction. When the computer returns to
normal temperature, the screen returns to normal.
❑The screen becomes warm during operation. This is normal and does not
indicate a malfunction.
❑The LCD is manufactured using high-precision technology. You may,
however, see tiny black points and/or bright points (red, blue, or green) that
continuously appear on the LCD. This is a normal result of the
manufacturing process and does not indicate a malfunction.
Draft 1

VAIO® Computer Quick Start
52
Draft 1

53
Troubleshooting
This section describes how to solve some basic problems you may
encounter when using your computer. For more troubleshooting topics
refer to the VAIO® Computer User Guide. Many problems have simple
solutions, so refer to these sources before you contact Sony Computing
Support (http://www.sony.com/pcsupport).
❑Troubleshooting Your Computer (Windows XP)
❑Troubleshooting Your Computer (Windows 2000)
❑Support Options
Draft 1

VAIO® Computer Quick Start
54
Troubleshooting Your Computer (Windows XP)
What do I do if my computer won’t start?
❑Make sure the computer is securely plugged into a power source and turned
on. Make sure the power indicator shows the power is on.
❑Make sure the battery is inserted properly and charged.
❑Make sure the floppy disk drive (if applicable) is empty.
❑If the computer is plugged into a power strip or uninterruptible power supply
(UPS), make sure the power strip or UPS is turned on and working.
❑If you are using an external display, make sure it is plugged into a power
source and turned on. Make sure the brightness and contrast controls are
adjusted correctly. See the guide that came with your display for details.
❑Disconnect the AC adapter and remove the battery. Wait one minute.
Reattach the AC adapter and reinsert the battery. Turn on the power.
❑Condensation may cause the computer to malfunction. If this occurs, do not
use the computer for at least one hour.
❑If the computer still does not turn on, follow these steps:
1Unplug the power cord and remove the battery.
2Use a thin, straight object (such as a paper clip) to press the reset button.
3Reinsert the power cord and the battery.
4Turn on the computer.
What do I do if a BIOS error appears when my computer starts?
If the message “Press <F1> to resume, <F2> to setup” appears at the bottom of
the screen, follow these steps:
1Press F2. The BIOS Setup menu appears.
2Set the date (month/day/year). Press Enter.
3Press the Down Arrow key to select System Time, and then set the time
(hour: minute: second). Press Enter.
4Press the Right Arrow key to select the Exit tab, and then press the
Down Arrow key to select Get Default Values. The message Load
default values for all SETUP items appears.
Draft 1
Troubleshooting Your Computer (Windows XP)
55
5Press Enter. The Setup Confirmation window appears.
6Select Yes, and press Enter.
7Select Exit (Save Changes), and press Enter. The Setup Confirmation
window appears again.
8Select Yes, and press Enter. The computer restarts.
What do I do if the message “Operating system not found” appears when my
computer starts, and why won’t Windows start?
❑Make sure the computer does not have a “non-bootable” floppy disk in the
floppy disk drive (if applicable).
❑If a non-bootable floppy disk is in the drive:
1Remove the floppy disk.
2Restart the computer and confirm that the Microsoft® Windows®
operating system starts properly.
❑If Windows still does not start, follow these steps to initialize the BIOS:
1If there is a disk in the floppy disk drive, then remove it.
2Turn off the computer.
3Remove any peripheral devices connected to the computer.
4Restart the computer.
5Press F2 when the Sony logo appears. The BIOS Setup window
appears.
6Press the Right Arrow key to select the Exit menu.
7Press the Down Arrow key to select Get Default Values. The
message Load default values for all SETUP items appears.
8Press Enter. The Setup Confirmation window appears.
9Select Yes, and press Enter.
✍If this occurs on a regular basis, contact Sony Computing Support
(http://www.sony.com/pcsupport).
Draft 1

VAIO® Computer Quick Start
56
10 Select Exit (Save Changes), and press Enter. The Setup Confirmation
window appears again.
11 Select Yes, and press Enter. The computer restarts.
If your computer continues to display the message “Operating system not found,”
and Windows does not start, use your supplied System Recovery CDs to restore
the programs that shipped with your computer. See “Using the System Recovery
CDs” for more information.
Why does my computer stop responding? Why can’t I turn off my computer?
It is best to turn off your computer using the Turn Off Computer option on the
Microsoft® Windows® Start menu, located on the taskbar. Using other methods,
including those listed below, may result in loss of unsaved data.
❑Click Start on the Windows® taskbar, select Turn Off Computer, and then
click Turn Off.
❑If your computer does not turn off, press the Ctrl+Alt+Delete keys
simultaneously. When the Windows Task Manager dialog box appears,
click Turn Off from the Shut Down menu.
❑If your computer still does not turn off, press and hold the power button or
slide and hold the power switch until the computer turns off.
❑If your computer stops responding while playing a CD or DVD, press the
Ctrl+Alt+Delete keys simultaneously. You can turn off the computer from
the Windows Task Manager.
❑Remove the AC adapter and battery.
Why won’t my computer enter Standby or Hibernate mode?
Your computer’s operating system may become unstable if the operating mode is
changed before the computer completely enters Standby or Hibernate mode.
To restore the computer to normal operating stability:
The System Recovery CD restores your computer to its original state, so
user data and applications will be lost.
✍Pressing the Ctrl+Alt+Delete keys simultaneously or turning off the computer with
the power button or switch may cause loss of data.
Draft 1
Troubleshooting Your Computer (Windows XP)
57
1Close all open programs.
2Restart the computer. Follow these steps:
1Press the Windows key .
2Press U.
3Press R to select restart.
3If the computer does not restart, follow these steps:
1Press the Ctrl+Alt+Delete keys simultaneously. The Windows Task
Manager window appears.
2Press and release Alt to highlight the menu bar, and press the Right
Arrow key to select Shut Down.
3Press Enter.
4Press R to select restart.
4If this procedure does not work, press and hold the power button or slide and
hold the power switch until the computer turns off.
Why is the sound of my computer’s fan so loud?
The computer’s fan may be running at a high speed to cool the CPU. By lowering
the CPU speed, you also lower the speed and noise level of the computer’s fan. If
your computer comes with the PowerPanel™ utility1, use it to lower the CPU
speed. If your computer does not come with the PowerPanel utility, use the power
schemes to lower the CPU speed.
To lower the CPU speed using the PowerPanel utility:
1On the Windows® taskbar, right-click either the CPU icon or Profile
icon , depending on the model you purchased.
2Select Edit/Create Profiles. The AC Power Profile Editor window
appears.
3Double-click System to open the System submenu if it is not already open.
4Double-click Thermal Control Strategy - Performance, and select Quiet.
5Restart your computer.
1 Available on selected models.
Draft 1

VAIO® Computer Quick Start
58
To lower the CPU speed using the power schemes:
1Click Start on the Windows® taskbar, and click Control Panel.
2Click Performance and Maintenance, and click Power Options. The
Power Options Properties window appears.
3Select Portable/Laptop in the Power schemes box.
4Click Apply.
5Click OK.
Why does the System Properties dialog box display a slower CPU speed than
the maximum?
This is normal. Because your computer’s CPU utilizes a type of CPU speed
controlling technology for power conservation purposes, System Properties may
display the CPU’s current speed instead of the maximum speed.
Why don’t my changes appear on the computer screen (LCD)?
You may need to refresh the computer screen. Press the Windows key and
press D twice.
✍See PowerPanel Help for more information.
Draft 1

Troubleshooting Your Computer (Windows 2000)
59
Troubleshooting Your Computer (Windows 2000)
What do I do if my computer won’t start?
❑Make sure the computer is securely plugged into a power source and turned
on. Make sure the power indicator shows the power is on.
❑Make sure the battery is inserted properly and charged.
❑Make sure the floppy disk drive (if applicable) is empty.
❑If the computer is plugged into a power strip or uninterruptible power supply
(UPS), make sure the power strip or UPS is turned on and working.
❑If you are using an external display, make sure it is plugged into a power
source and turned on. Make sure the brightness and contrast controls are
adjusted correctly. See the guide that came with your display for details.
❑Disconnect the AC adapter and remove the battery. Wait one minute.
Reattach the AC adapter and reinsert the battery. Turn on the power.
❑Condensation may cause the computer to malfunction. If this occurs, do not
use the computer for at least one hour.
❑If the computer still does not turn on, follow these steps:
1Unplug the power cord and remove the battery.
2(For models with a reset button) Use a thin, straight object (such as a
paper clip) to press the reset button.
3Reinsert the power cord and the battery.
4Turn on the computer.
What do I do if a BIOS error appears when my computer starts?
If the message “Press <F1> to resume, <F2> to setup” appears at the bottom of
the screen, follow these steps:
1Press F2. The BIOS Setup menu appears.
2Set the date (month/day/year). Press Enter.
3Press the Down Arrow key to select System Time, and then set the time
(hour: minute: second). Press Enter.
Draft 1

VAIO® Computer Quick Start
60
4Press the Right Arrow key to select the Exit tab, and then press the
Down Arrow key to select Get Default Values. The message Load
default values for all SETUP items appears.
5Press Enter. The Setup Confirmation window appears.
6Select Yes, and press Enter.
7Select Exit (Save Changes), and press Enter. The Setup Confirmation
window appears again.
8Select Yes, and press Enter. The computer restarts.
What do I do if the message, “Operating system not found” appears when my
computer starts, and why won’t Windows start?
❑Make sure the computer does not have a “non-bootable” floppy disk in the
floppy disk drive (if applicable).
❑If a non-bootable floppy disk is in the drive:
1Remove the floppy disk.
2Restart the computer and confirm that the Microsoft® Windows®
operating system starts properly.
❑If Windows still does not start, follow these steps to initialize the BIOS:
1If there is a disk in the floppy disk drive, then remove it.
2Turn off the computer.
3Remove any peripheral devices connected to the computer.
4Restart the computer.
5Press F2 when the Sony logo appears. The BIOS Setup window
appears.
6Press the Right Arrow key to select the Exit menu.
7Press the Down Arrow key to select Get Default Values. The
message Load default values for all SETUP items appears.
8Press Enter. The Setup Confirmation window appears.
✍If this occurs on a regular basis, contact Sony Computing Support
(http://www.sony.com/pcsupport).
Draft 1

Troubleshooting Your Computer (Windows 2000)
61
9Select Yes, and press Enter.
10 Select Exit (Save Changes), and press Enter. The Setup Confirmation
window appears again.
11 Select Yes, and press Enter. The computer restarts.
If your computer continues to display the message “Operating system not found,”
and Windows does not start, use your supplied System Recovery CDs to restore
the programs that shipped with your computer. See “Using the System Recovery
CDs” on page 45 for more information.
Why does my computer stop responding? Why can’t I turn off my computer?
It is best to turn off your computer using the Turn Off Computer option on the
Microsoft® Windows® Start menu, located on the taskbar. Using other methods,
including those listed below, may result in loss of unsaved data.
❑Click Start on the Windows® taskbar, and select Shut Down. When the
Shut Down Windows window appears, make sure Shut down is selected,
and click OK.
❑If your computer does not turn off, press the Ctrl+Alt+Delete keys
simultaneously. When the Windows Security dialog box appears, click
Shut Down, and select Shut Down again from the Shut Down Windows
window.
❑If your computer still does not turn off, press and hold the power button or
slide and hold the power switch until the computer shuts down.
❑If your computer stops responding while playing a CD or DVD, press the
Ctrl+Alt+Delete keys simultaneously. You can turn off the computer from
the Windows Security dialog box.
❑Remove the AC adapter and battery.
The System Recovery CD restores your computer to its original state, so
user data and applications will be lost.
✍Pressing the Ctrl+Alt+Delete keys simultaneously or turning off the computer with
the power button or switch may cause loss of data.
Draft 1

VAIO® Computer Quick Start
62
Why won’t my computer enter Standby or Hibernate mode?
Your computer’s operating system may become unstable if the operating mode is
changed before the computer completely enters Standby or Hibernate mode.
To restore the computer to normal operating stability:
1Close all open programs.
2Restart the computer. Follow these steps:
1Press the Windows key .
2Press U.
3Press R to select restart.
4Press Enter.
3If the computer does not restart, follow these steps:
1Press the Ctrl+Alt+Delete keys simultaneously. The Windows
Security dialog box appears.
2Press the Right Arrow key to select Shut Down.
3Press Enter.
4Press R to select restart.
5Press Enter.
4If this procedure does not work, press and hold the power button or slide and
hold the power switch until the computer shuts down.
Why don’t my changes appear on the computer screen (LCD)?
You may need to refresh the computer screen. Press the Windows key and
press D twice.
Draft 1

Support Options
63
Support Options
If you have questions about your computer or the preinstalled programs, refer to
the following sources for answers in the sequence listed below.
1 VAIO® Computer User Guide
The on-screen VAIO® Computer User Guide and the printed VAIO®
Computer Quick Start provide information on how to maximize your
computer capabilities and solve common problems.
2 Program Guides and Help Files
The preinstalled programs on your computer may come with individual
help guides. These guides are stored on the hard disk as on-screen Help
files. You can find the Help files from the Help menu under the specific
program.
3 Operating System Online Support
Your computer comes preinstalled with a Microsoft® Windows®
operating system. For operating system support, you can visit Microsoft®
customer support at: http://support.microsoft.com/directory/.
4 VAIO Support Agent
You can find VAIO Support Agent by clicking Start and All Programs
(Programs for Windows® 2000) and VAIO Support and VAIO Support
Agent. Using advanced diagnostic technology, Sony’s VAIO Support
Agent runs scheduled protections of your programs, network settings, and
other important program settings. When your program is protected, you
can use VAIO Support Agent to repair program problems by restoring the
program to any of the previously protected states.
5 Sony Computing Support
This service provides instant access to information on commonly
encountered problems. Type a description of the problem and the
Knowledge Database searches for the corresponding solutions online.
You can visit Sony Computing Support at:
http://www.sony.com/pcsupport.
Draft 1

VAIO® Computer Quick Start
64
Draft 1

65
Index
A
AC adapter 26
connecting 28
Application Recovery CD 42
B
battery
charging 26
indicator 22
port 20
UNLOCK/LOCK latch 23
brightness control 29
buttons
left 19
power 22
right 19
C
caps lock 19
computer
cables 50
care 49
cleaning 51
controls and connectors 19
LCD screen 51
online support 63
specifications 16
specifications (online) 33
storage 50
troubleshooting 54, 59
turning off 36
turning on 26
unpacking 16
updates 33, 34
connecting
dial-up 34
controls 19
brightness 29
D
DC IN port 20
dial-up connection 34
E
Electronic Flyer 33, 34
Energy Star 5
Ethernet port 20
F
faxes
laws governing 10
H
handling the LCD screen 51
hard disk drive
indicator 19
headphone jack 21
help 32, 53
I
i.LINK port 21
indicators
battery 22
caps lock 19
hard disk drive 19
Memory Stick media 21
num lock 19
scroll lock 19
Wireless LAN 22
Draft 1

VAIO® Computer Quick Start
66
input devices 9
interference 9
internal speaker 19
Internet connection 34
J
jacks
headphone 21
microphone 21
modem jack 22
K
keyboard 19
L
LCD screen
handling 51
locating 19
M
maintenance 51
manual 32
Memory Stick media
indicator 21
slot 21
microphone jack 21
model number 19
modem
laws governing 10
modem jack 22
Monitor (VGA) port 20
Monitor port 20
N
network connector 20
num lock 19
O
online support 63
online user guide 32
output devices 9
P
PC Card slot 21
eject button 21
phone
laws governing 10
ports
battery 20
DC IN 20
i.LINK 21
USB 21
VGA (monitor) 20
power button 29
power source 26
programs
locating 40
R
radio interference 9
Recovery CDs 42
regulatory information 8
reset button 23
restoring data 42
S
scroll lock indicator 19
shutting down computer 36
software
locating 40
specifications 16
specifications (online) 33
starting computer 26
startup problems 37
support
Sony 53
System Recovery CD 45
T
technical support 53
telephone line jack 22
touchpad 19
using 30
troubleshooting 54, 59
startup 37
turning off computer 36
Draft 1


http://www.sony.com/vaio
Printed in Japan © 2003 Sony Electronics Inc. 4-671-720-11
Draft 1