Sony Group PCWADE50 5.0 GHz WLAN Converter - UNII User Manual PCWA DE50
Sony Corporation 5.0 GHz WLAN Converter - UNII PCWA DE50
Contents
Users Manual 3
PCWA-DE50
Sony Corporation ©2003 Printed in Japan
4-669-392-11(1)
5GHz
Wireless LAN Converter
Troubleshooting Guide
This document provides solutions to most common
problems and users have with their Wireless LAN Converter.
Please refer to this guide before contacting Sony
Customer Information Services.
Case 1 Starting the PCWA-DE50 Setup Utility results only
in the message “Converter not detected. Do you
want to see Online Help?”.
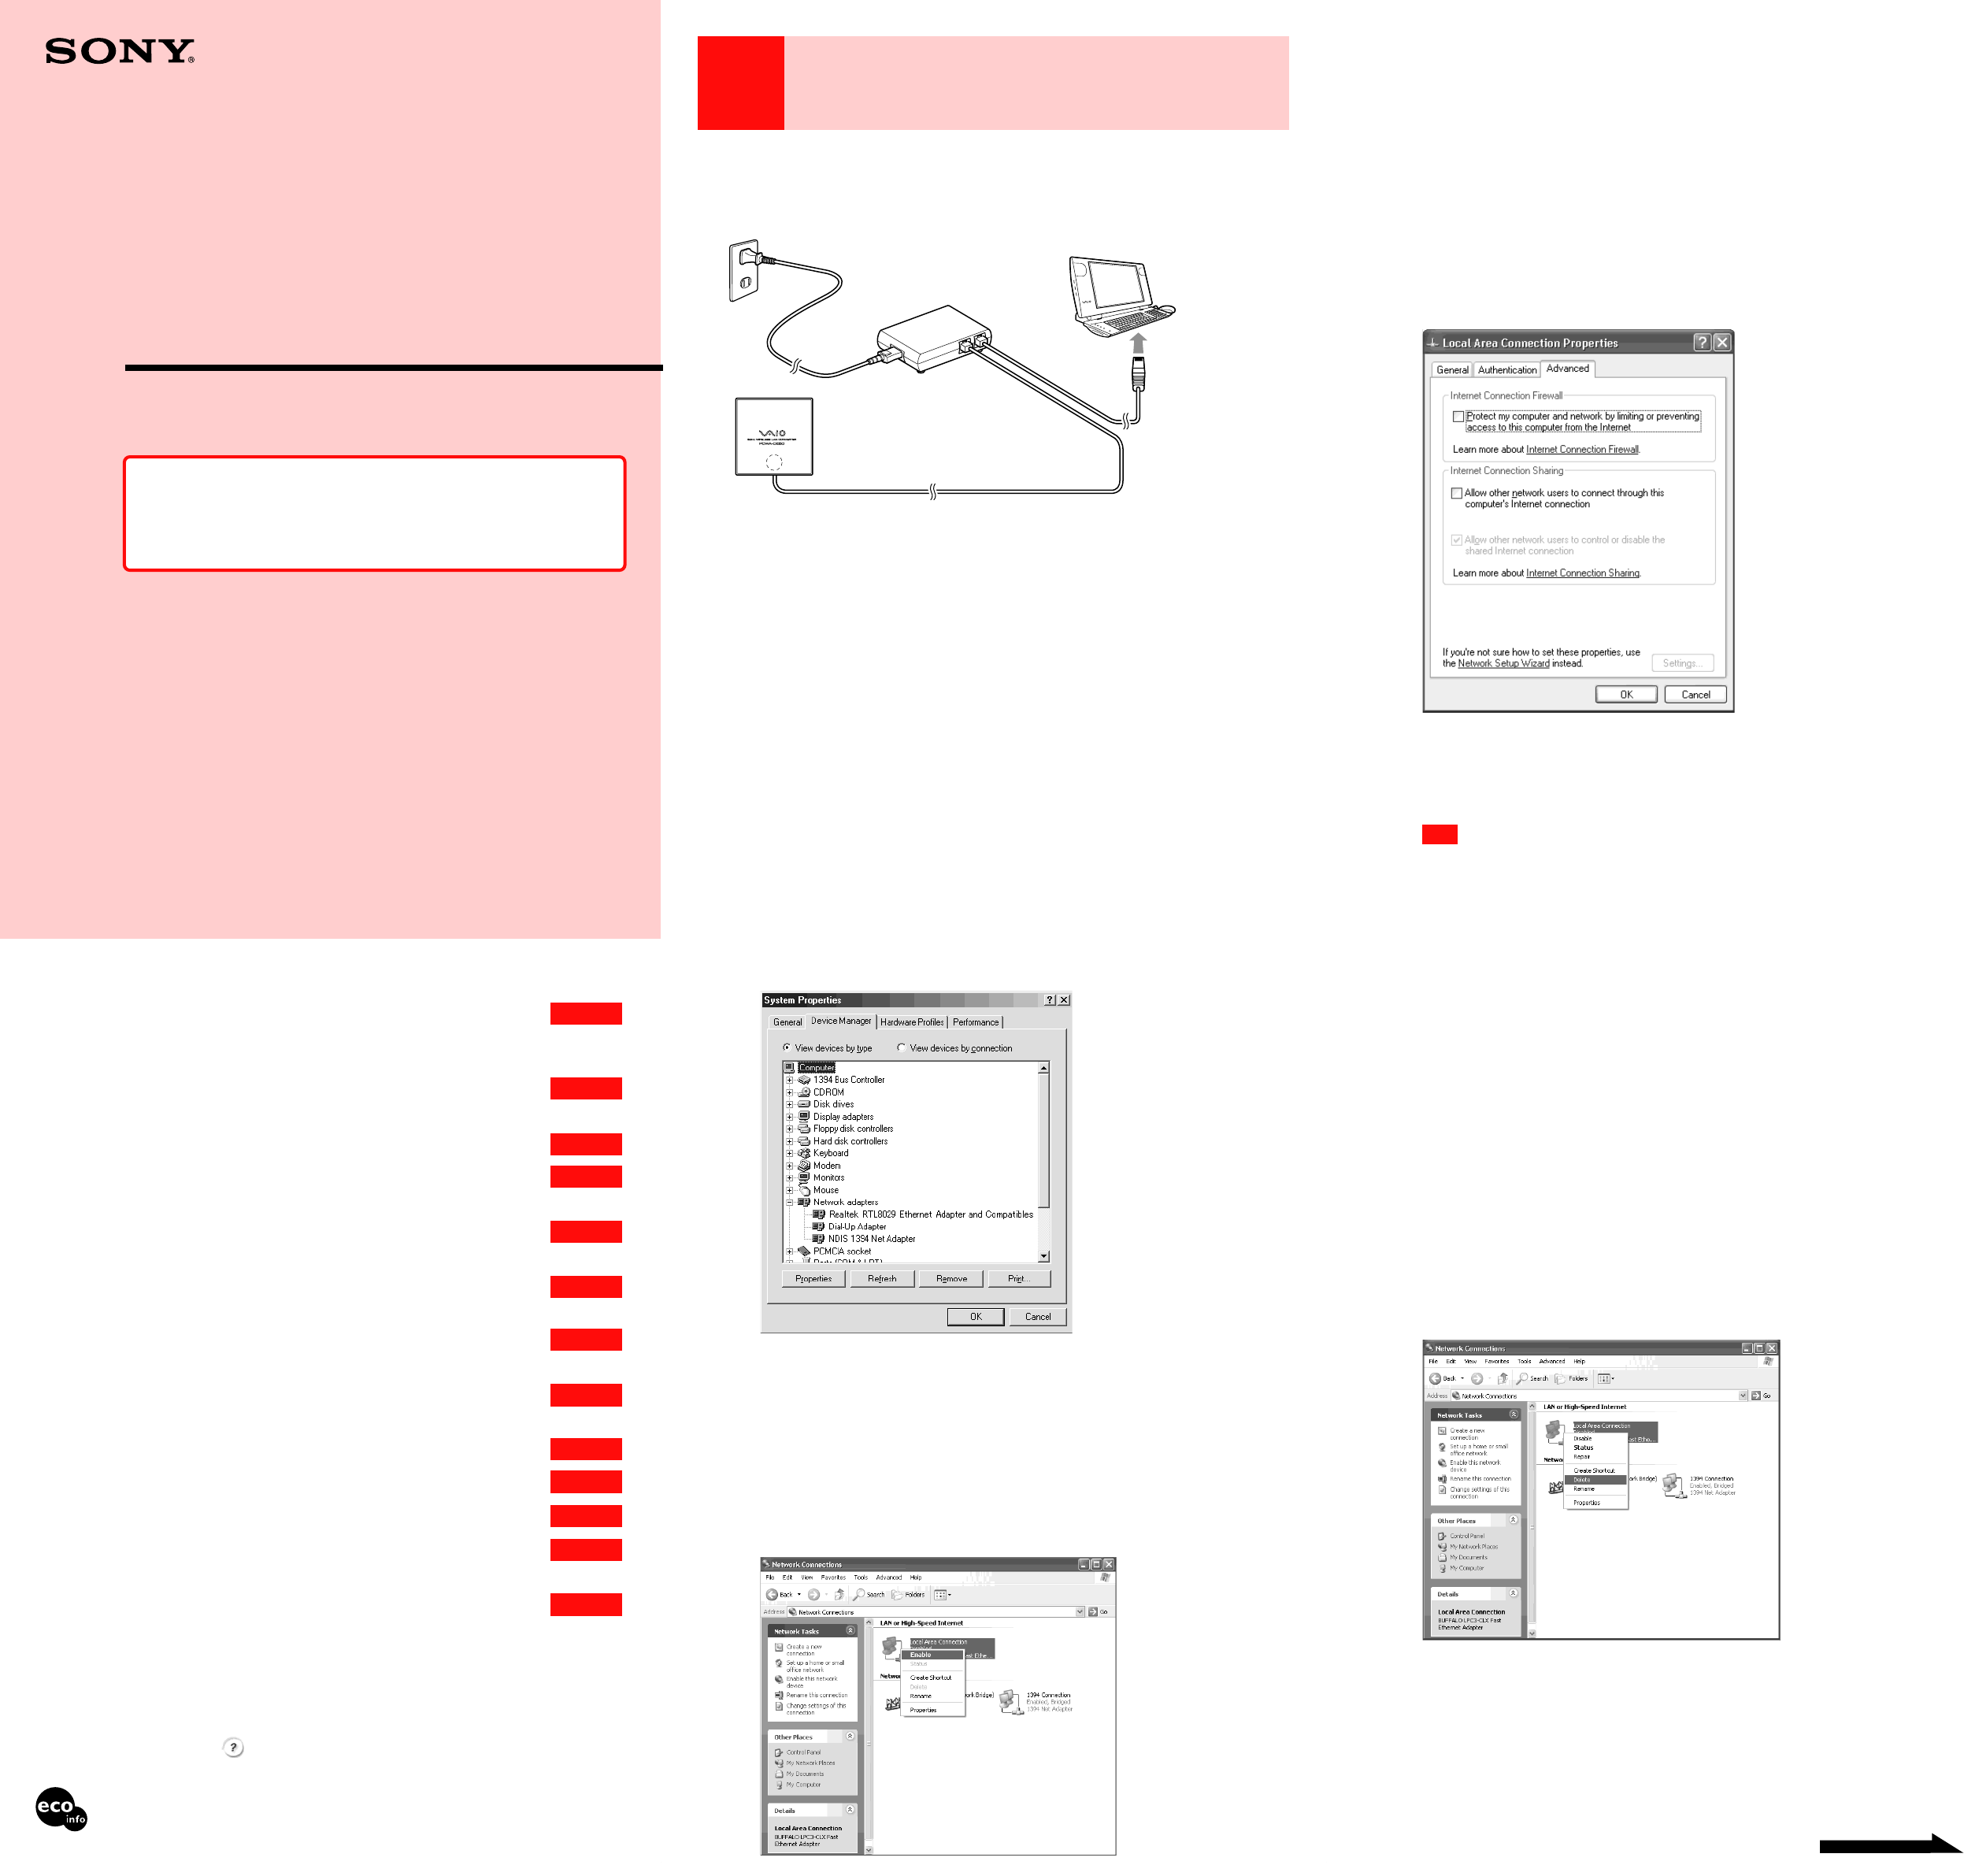
1Is the Wireless LAN Converter connected correctly to the
computer?
Check the connections between the Wireless LAN Converter and computer, the Wireless Unit and
Power Unit, and the Power Unit and power outlet.
z Hints
• When power is supplied to the Wireless LAN Converter, the STATUS indicator will be lit or flashing.
However, if the indicator has been set to OFF in the Wireless LAN Converter Setup Page (Advanced Setup),
the indicator will only operate in special cases.
• When the Wireless LAN Converter is connected to a computer or other device, the LINK/ACT indicator
will flash.
• You may need to wait for a few seconds to see the Converter in the PCWA-DE50 Setup Utility.
2Is the Ethernet device inside the computer enabled?
Check whether the Ethernet device inside the computer is enabled.
Windows 98, Windows Me models
1
Right-click “My Computer” on the Desktop, and select “Properties” from the menu
that appears.
2
In the “System Properties” dialog box, click the “Device Manager” tab.
3
Click “Network Adapters” to bring up a list of adapters, and verify that the Ethernet
adapter that you are using is enabled.
z Hint
You can also call up detailed information by right-clicking the adapter name and selecting “Properties”
from the menu that appears.
Windows 2000, Windows XP models
1
With Windows 2000, click “Start”, point to “Settings”, and click “Network and Dial-up
Connections” to bring up the “Network and Dial-up Connections” screen.
With Windows XP, click “Start”, point to “Connect To” and click “Show all connections” to
bring up the “Network Connections” screen.
2
Right-click the Wireless Network Connection icon to be connected and select
“Enable” if this is available from the menu. (The illustration shows the Windows XP
screen.)
Continued on next page
3If the computer connected to the Wireless LAN Converter is
running Windows XP, has the Internet Connection Firewall
function been enabled?
If the Internet Connection Firewall function is enabled, communication may not be possible.
Follow the procedure below to check or change the settings.
1
Click “Start”, point to “Connect To”, and click “Show all connections”.
2
Right-click the Wireless Network Connection icon to be connected, and click
“Properties”.
3
Click the “Advanced” tab and (if selected) deselect the “Protect my computer and
network by limiting or preventing access to this computer from the Internet” check
box.
4
Click “OK”.
z Hint
Refer to Windows XP Online Help for details about the Internet Connection Firewall.
Note
Take appropriate precautions to ensure security when the Internet Connection Firewall function is
disabled. Except when configuring the Wireless LAN Converter or Access Point, it is strongly
recommended that you enable the Internet Connection Firewall function at all times.
4When using virus scanning or network security software, has
a personal firewall function been enabled?
Virus scanning and network security software sometimes includes a function called a “personal
firewall” that is designed to prevent illegal access by outside entities. Depending on the software,
the security level of this function may be initially set to a high level. If this high security level
setting is in effect, it may be impossible to connect to a network. In this case, lower the security
level in order to permit the network connection. For details, refer to the instruction manual and
online help for your software.
5If the computer connected to the Wireless LAN Converter is
running Windows XP, is the Ethernet interface set up to act as
a network bridge?
Confirm that the Ethernet network connection is not acting as a network bridge.
1
Click “Start”, point to “Connect To”, and click “Show all connections”.
2
Confirm that the Ethernet network connection is not acting as a network bridge.
3
If the Ethernet network connection is configured as a network bridge, right-click the
local area connection icon, and click “Remove from Bridge”.
z Hint
If “Remove from Bridge” is not shown on the shortcut menu, the Ethernet connection is not acting as a
network bridge.
• Starting the PCWA-DE50 Setup Utility results only in the message
“Converter not detected. Do you want to see Online Help?”. ........ Case 1
• When starting the PCWA-DE50 Setup Utility, the message
“Failed to open Converter Setup Page. Do you want to see
Online Help?” appears. ................................................................. Case 2
• When starting the PCWA-DE50 Setup Utility,
the “IP Address Setup” screen appears. ....................................... Case 3
• Cannot display Wireless LAN Converter Setup Page. .................. Case 4
• On the Wireless LAN Converter Setup Page, the Encryption
(WEP) key input field cannot be used. .......................................... Case 5
• STATUS indicator is slowly flashing white, but communication with
Access Point is not possible. ......................................................... Case 6
• Can no longer connect after Access Point settings
were changed. ............................................................................... Case 7
• Can no longer connect after access control
(MAC address filtering) of Access Point was enabled................... Case 8
• Cannot communicate with device other than the computer
used for setup................................................................................ Case 9
• Forgot settings/Want to reset. .......................................................
Case 10
• What are the factory default settings? ...........................................
Case 11
• What are the STATUS indicator functions?...................................
Case 12
• What are the Wireless LAN Converter functions
and how can I make advanced settings? ......................................
Case 13
The Troubleshooting Guide for the PCWA-DE50 Setup Utility can also be referred to as part of Online
Help. To display Online Help, click “Start”, point to “Programs” (when using Windows XP, select “All
Programs”), and click “Wireless LAN”, “PCWA-DE50 Setup Help”.
Instructions for using the Wireless LAN Converter Setup Page can also be referred to as part of Online
Help that appears when clicking .
Printed on 100% recycled paper using VOC (Volatile Organic Compound)-free vegetable oil
based ink.
Power cord
Power Unit
Wireless Unit
Wireless Unit cable
Ethernet cable
(not included)
Reset Switch
Case 2 When starting the PCWA-DE50 Setup Utility, the
message “Failed to open Converter Setup Page.
Do you want to see Online Help?” appears.
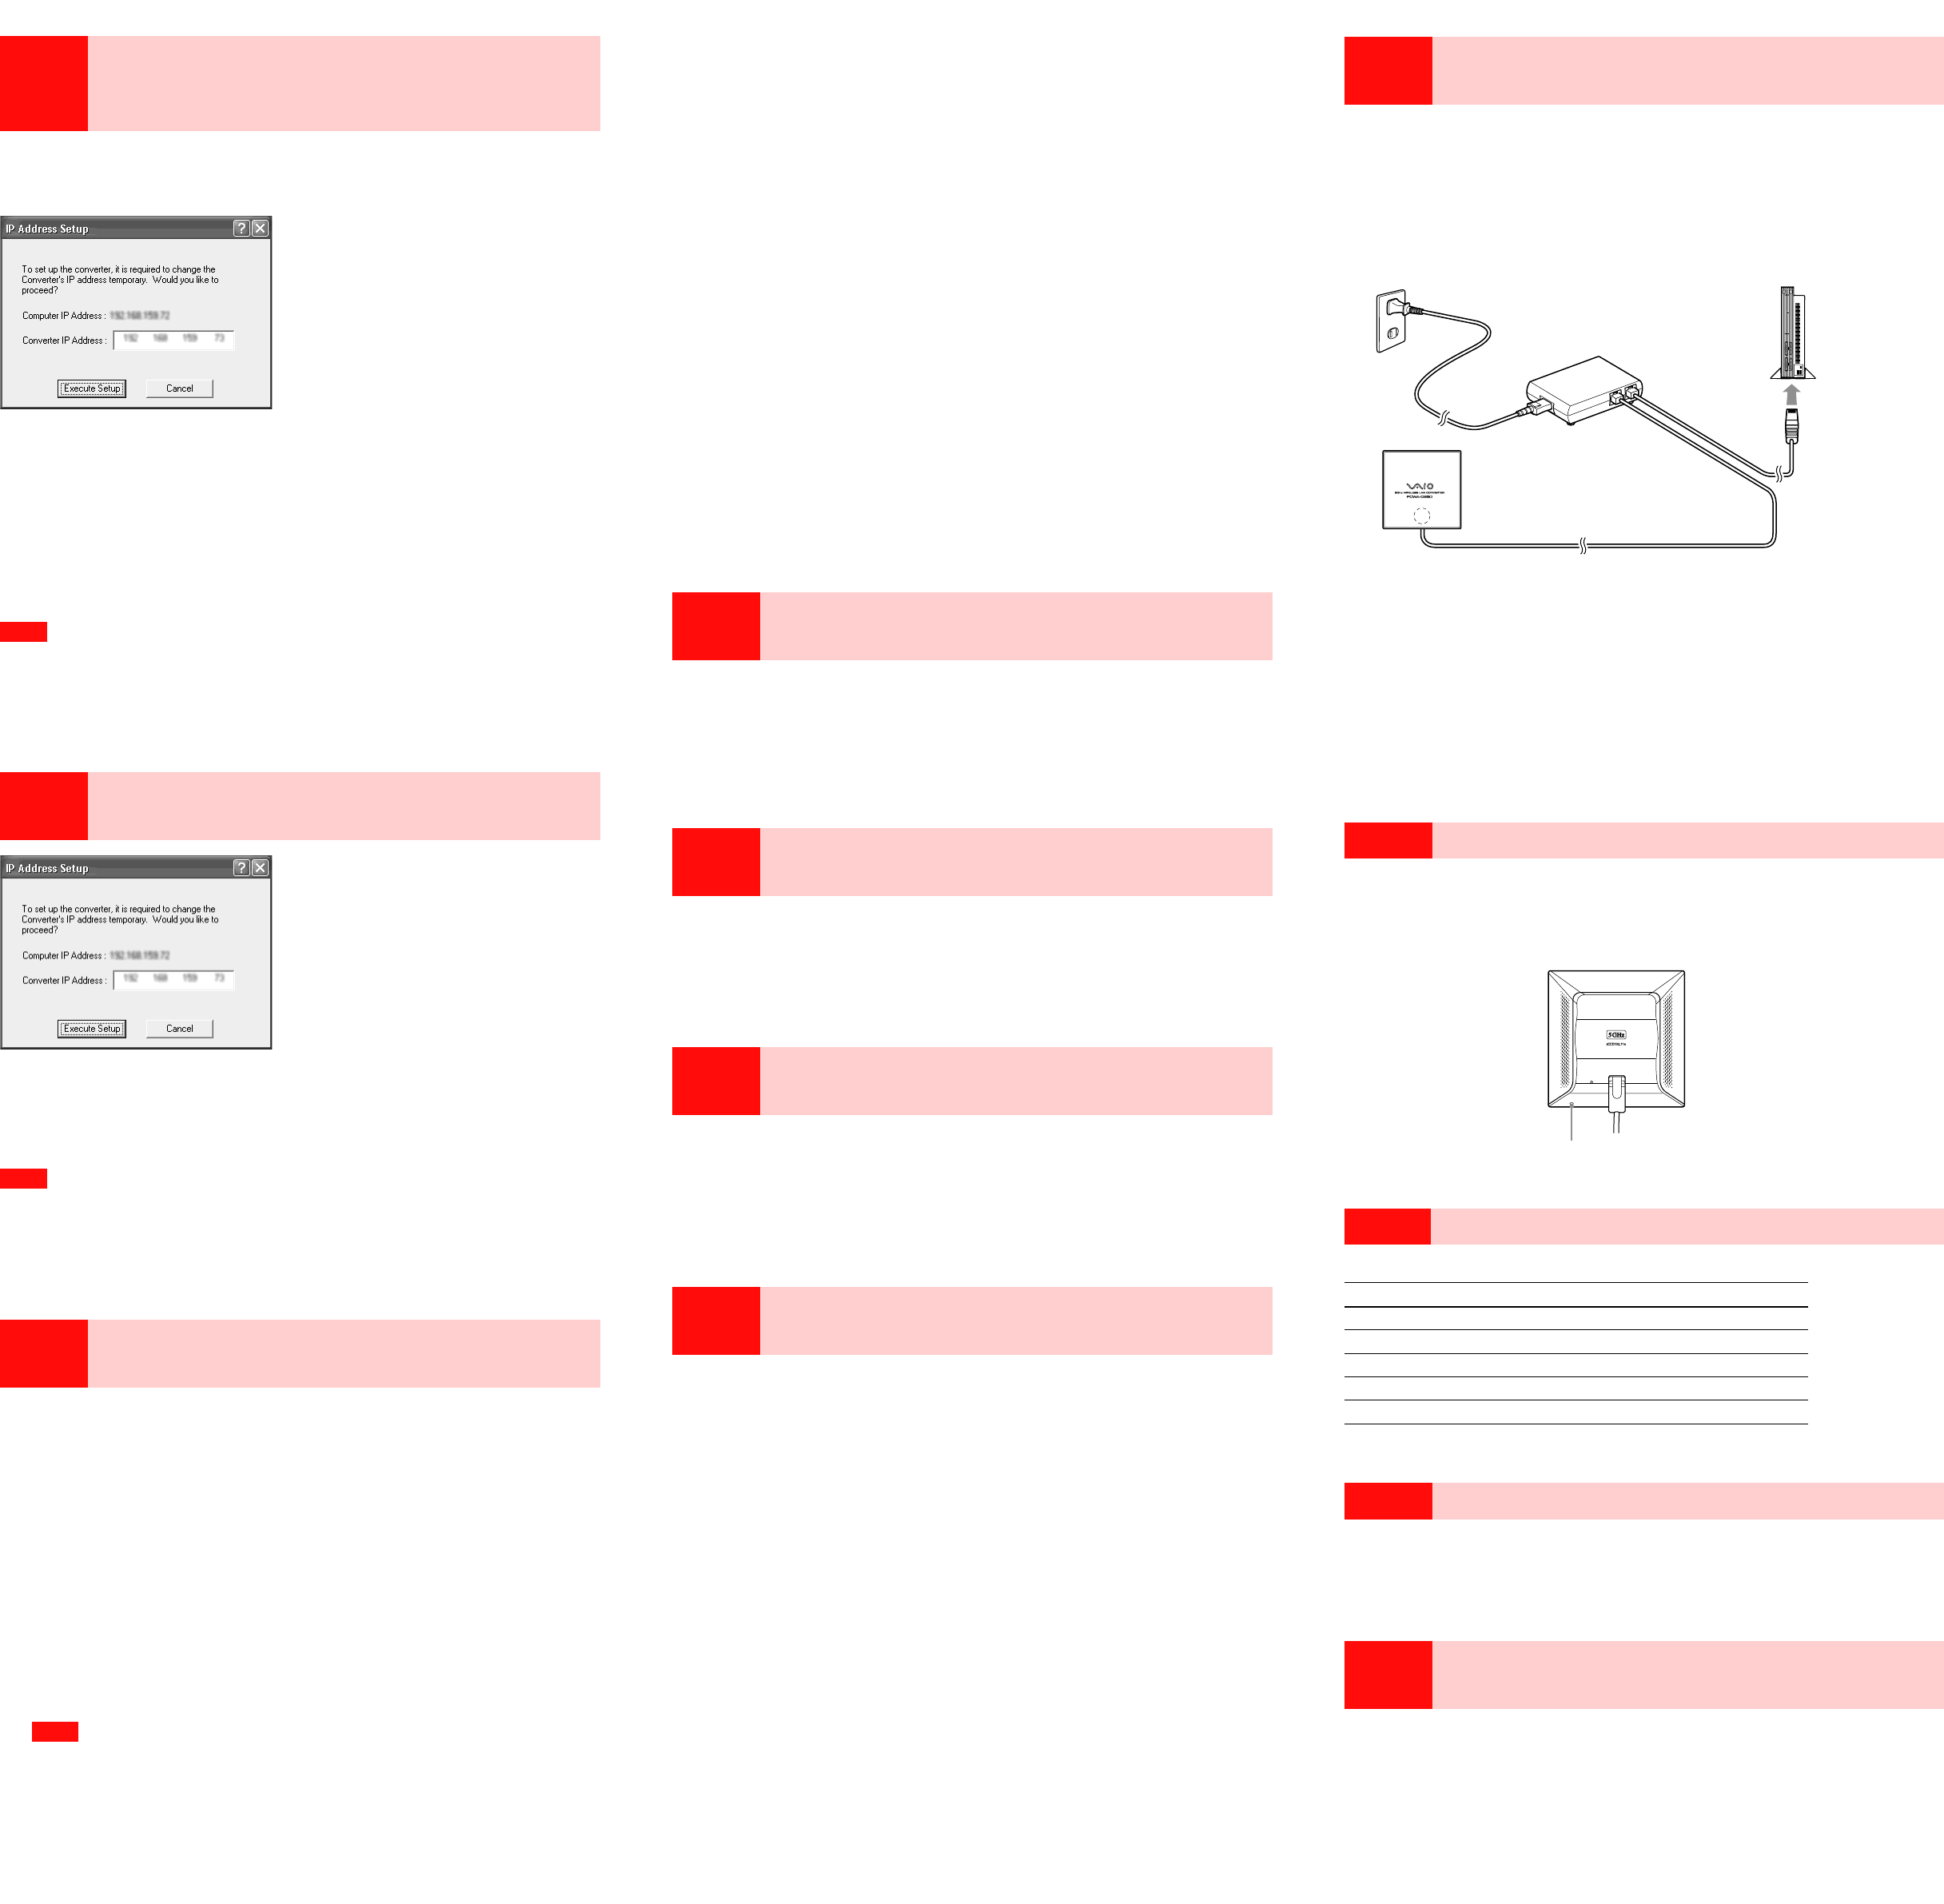
Did the “IP Address Setup” screen appear?
If the IP address of the computer connected to the Wireless LAN Converter and the IP address of the
Wireless LAN Converter cannot communicate with each other, the following screen appears.
If you click “Cancel” on this screen, the Wireless LAN Converter Setup Page cannot be displayed.
1
Click “Start”, point to “Programs” (when using Windows XP, select “All Programs”),
and click “Wireless LAN”, “PCWA-DE50 Setup” to start the PCWA-DE50 Setup
Utility once more.
2
When the “IP Address Setup” screen appears, verify that the contents of the screen
are acceptable, and then click “Execute Setup”.
The IP address of the Wireless LAN Converter is temporarily changed, so that the computer
can open the Wireless LAN Converter Setup Page.
Note
If the computer connected to the Wireless LAN Converter is also connected to another network, make sure that the
changed IP address will not duplicate the address of any device on that network.
z Hint
When you turn off or restart the Wireless LAN Converter, the IP address will revert to the original setting.
Case 3 When starting the PCWA-DE50 Setup Utility, the
“IP Address Setup” screen appears.
If the IP address of the computer connected to the Wireless LAN Converter and the IP address of the
Wireless LAN Converter cannot communicate with each other, the screen above appears.
Verify that the indicated IP address is acceptabl‹¸ and click “Execute Setup”.
The IP address of the Wireless LAN Converter is temporarily changed, so that the computer can open
the Wireless LAN Converter Setup Page.
Note
If the computer connected to the Wireless LAN Converter is also connected to another network, make sure that the
changed IP address will not duplicate the address of any device on that network.
z Hint
When you turn off or restart the Wireless LAN Converter, the IP address will revert to the original setting.
Case 4 Cannot display Wireless LAN Converter Setup
Page.
1Is the temporary address assigned to the Wireless LAN
Converter used by another device or computer on the
network?
1
Disconnect and reconnect the power cord or the Wireless Unit cable to restart the
Wireless LAN Converter.
2
Start the PCWA-DE50 Setup Utility.
3
In the “IP Address Setup” screen, replace the current converter IP address with an
unused address, and then click “Execute Setup”.
2Is the Web browser of the computer used for the Wireless
LAN Converter setup configured to use a proxy server?
Make sure that no proxy setting is enabled for the IP address of the Wireless LAN Converter.
Note
While the proxy server setting is disabled, it may not be possible to display other Web pages except the
Wireless LAN Converter Setup Page.
Example 1: Using Microsoft Internet Explorer
1
From the “Tools” menu, click “Internet Options”.
The “Internet Options” dialog box appears.
2
Under the “Connections” tab, click “LAN Settings”.
The “Local Area Network (LAN) Settings” dialog box appears.
3
If “Use a proxy server for your LAN (These settings will not apply to dial-up or VPN
connections).” is checked, remove the check mark and click “OK”.
4
When the Wireless LAN Converter setup is complete, return the proxy setting to the
original condition.
Example 2: Using Netscape
1
Start the Web browser on the computer used for the Wireless LAN Converter setup.
2
From the “Edit” menu, select “Preferences”.
3
Under “Category”, click “Advanced” and click the “Proxies” button.
4
Select “Direct connection to the Internet” and click “OK”.
5
When the Wireless LAN Converter setup is complete, return the proxy setting to the
original condition.
Case 5 On the Wireless LAN Converter Setup Page, the
Encryption (WEP) key input field cannot be used.
Have you selected “Enabled” under “Encryption (WEP)”?
The Encryption (WEP) key input field becomes available only if the “Enabled” setting has been
selected. Set “Encryption (WEP)” to “Enabled”, select the “Key Length”, and then enter the Encryption
(WEP) key in the input field. The prescribed length of the string depends on the “Key Length” setting.
Check the indication above the input field.
Case 6
The STATUS indicator is slowly flashing white, but
communication with the Access Point is not possible.
Has the Encryption (WEP) key been input correctly?
Even if the Network Name (SSID) matches, incorrect input for the Encryption (WEP) key will prevent
communication with the Access Point. Check the Encryption (WEP) key setting of the Access Point
and re-enter the correct Encryption (WEP) key for the Wireless LAN Converter.
Case 7 Can no longer connect after Access Point
settings were changed.
Was the Wireless LAN Converter also configured for the new
settings?
If settings such as Network Name (SSID) and Encryption (WEP) key were changed, the Wireless LAN
Converter must also be configured to match the new settings. Refer to Procedure 6 in the separate
Quick Start Guide to change the settings of the Wireless LAN Converter.
Case 8 Can no longer connect after access control (MAC
address filtering) of Access Point was enabled.
The Wireless LAN Converter communicates using the MAC address (hardware address) of the device
connected via the Ethernet interface. (For example, if the Wireless LAN Converter is connected to a
computer, the MAC address of that computer will be used.) When setting up access control at the
Access Point, enter this MAC address.
Case 9 Cannot communicate with device other than the
computer used for setup.
1Has the device been set up correctly for use on a network?
Configure the required settings to enable of the device on a network. For details, refer to the
documentation of the device.
2Has the device been connected correctly to the Wireless LAN
Converter?
Verify that connections have been established as shown below.
3Have you waited a few moments when changing the
connection from the computer used for setup to the other
device?
After disconnecting the cable from the computer used for setup, do not plug it immediately into
the new device. Wait at least 10 seconds before plugging it in.
z Hint
The device information accumulated in the computer takes about 10 seconds to be deleted.
Case 10
Forgot settings/Want to reset.
With power to the Wireless LAN Converter turned on, use the end of a paper clip or a similar object to
hold down the reset switch located on the bottom of the Wireless LAN Converter. Release the switch
when the STATUS indicator starts to flash red.
The Wireless LAN Converter restarts automatically, and all settings revert to the factory defaults.
Configure the Wireless LAN Converter again as needed.
Case 11
What are the factory default settings?
The factory default settings are as follows.
Item Setting
Network Name (SSID) Blank (not set)
Encryption (WEP) Disabled
Connection Mode Access Point Network
IP Address Setting Obtain an IP address automatically (DHCP)
STATUS Indicator (LED) ON
Case 12
What are the STATUS indicator functions?
The STATUS indicator has various indication patterns that show the operation status of the Wireless
LAN Converter. For details, refer to Read This First (overleaf) or to the PCWA-DE50 Setup Utility
Help.
Case 13
Want are the Wireless LAN Converter functions
and how can I make advanced settings?
Click “Start”, point to “Programs” (“All Programs” when using Windows XP), “Wireless LAN”,
and click “PCWA-DE50 Setup Help”.
Online Help appears.
z Hint
For updates and connection information, refer to product information and Q&A search at the Sony Online Support
(http://www.sony.com/wirelesslansupport).
Power cord
Power Unit
Wireless Unit
Wireless Unit cable
Ethernet cable
(not included)