Sony Group PEGUX50 Personal Entertainment Organizer User Manual 1
Sony Corporation Personal Entertainment Organizer Users Manual 1
UserManual.wiki
>
Sony Group
>
PEGUX50 User Manual
>
Users Manual 1
Contents
1.
Users Manual 1
2.
Users Manual 2
3.
Users Manual 3
Users Manual 1
Navigation menu
Upload a User Manual
Namespaces
Wiki Guide
HTML
PDF
Info
Views
User Manual
Discussion / Help
Navigation

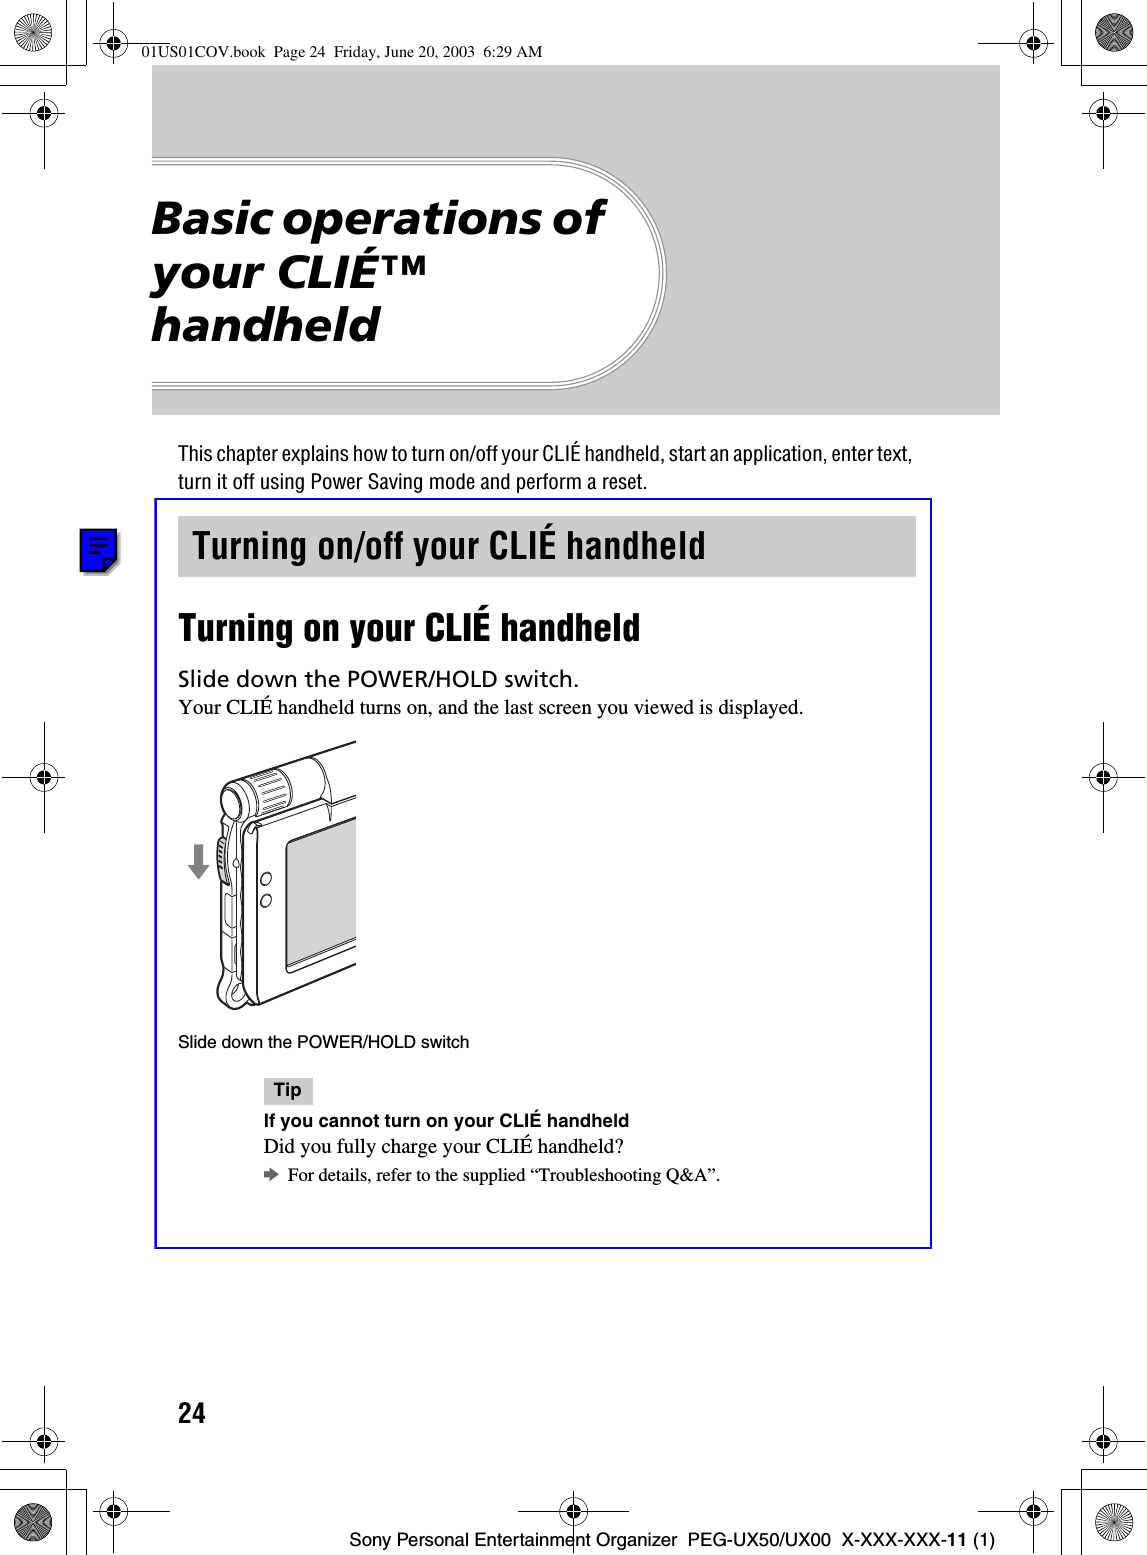
![13Sony Personal Entertainment Organizer PEG-UX50/UX00 X-XXX-XXX-11 (1)Setting up your CLIÉ™ handheld5Tap the box next to [Set Time].The Set Time dialog box is displayed.TipYou can reconfigure the date and time settings in the Preferences screen.bFor details, refer to “Customizing your CLIÉ™ handheld (Preferences): Setting up the Date & Time preferences” in the supplied “Handbook”.6Tap v or V to set the current time.Tap each box to set the hour and minute.7Tap [OK].The current time is set and the Setup screen is displayed.8Tap the box next to [Set Date].The Set Date screen is displayed.9Tap b or B to select the current year.Continued on next page• • • • • • • • • • • • • • • • • • • • •01US05SET.fm Page 13 Friday, June 20, 2003 1:27 PM](https://usermanual.wiki/Sony-Group/PEGUX50.Users-Manual-1/User-Guide-343052-Page-14.png)
![14Sony Personal Entertainment Organizer PEG-UX50/UX00 X-XXX-XXX-11 (1)10 Tap the current month, then tap the current date.The Set Date screen closes.11 Tap the box next to [Time Zone].The Set Time Zone screen is displayed.12 Tap the region to set the time zone, then tap [OK].13 Tap V next to [Daylight Saving] and select [On] or [Off].01US01COV.book Page 14 Friday, June 20, 2003 6:29 AM](https://usermanual.wiki/Sony-Group/PEGUX50.Users-Manual-1/User-Guide-343052-Page-15.png)
![15Sony Personal Entertainment Organizer PEG-UX50/UX00 X-XXX-XXX-11 (1)Setting up your CLIÉ™ handheldThe initial setup is complete.14 Tap [Next].15 Tap [Next] and [Done].TipWhen you tap [Next] in the Enter Data screen, you can proceed to Graffiti 2 Demo.bFor details on Graffiti 2 Demo, refer to "Entering text on your CLIÉ™ handheld: Using Graffiti® 2 to enter text" in the supplied "Handbook". The CLIE 3D Launcher is displayed.b01US01COV.book Page 15 Friday, June 20, 2003 6:29 AM](https://usermanual.wiki/Sony-Group/PEGUX50.Users-Manual-1/User-Guide-343052-Page-16.png)
![17Sony Personal Entertainment Organizer PEG-UX50/UX00 X-XXX-XXX-11 (1)Setting up your CLIÉ™ handheldNotes• Do not simply copy the Palm™ Desktop for CLIÉ folder from the supplied Installation CD-ROM to your computer. To install the software properly, follow the installation procedure described below.• If you use Windows 2000 Professional or Windows XP, log on with a User Name in the Administrators group before installing the software.• If you have more than one CLIÉ handheld and the old version of Palm™Desktop for CLIÉ has already been installed on your computer, follow the installation procedure below to overwrite the old version.* If you are using PEG-N710C Series or PEG-S300 Series, refer to your CLIÉ handheld support website. (Refer to the URL shown on the back cover of this manual.)bFor details, refer to “Transferring data from another CLIÉ™ handheld” in the supplied “Handbook”.1Quit all applications running on Windows®.2Insert the supplied Installation CD-ROM into the CD-ROM drive of your computer.The Installation Launcher window is displayed.3Click [Install] for Palm™ Desktop for CLIÉ.The setup program starts and the InstallShield Wizard window is displayed.4Click [Next].The Select Synchronization Application window is displayed.5Select the software you will use to synchronize your CLIÉ handheld with your computer.If you select [Synchronize with Palm Desktop for CLIÉ], Intellisync Litewill not be installed. If you select [Synchronize with Microsoft Outlook or Lotus Organizer], both Palm™ Desktop for CLIÉ and Intellisync Litewill be installed.6Click [Next].The Setup Type window is displayed.7Select the setup type [Complete] or [Custom] and the destination folder if you select [Custom].8Click [Next].The Select User window is displayed.Continued on next page• • • • • • • • • • • • • • • • • • • • •01US01COV.book Page 17 Friday, June 20, 2003 6:29 AM](https://usermanual.wiki/Sony-Group/PEGUX50.Users-Manual-1/User-Guide-343052-Page-18.png)
![18Sony Personal Entertainment Organizer PEG-UX50/UX00 X-XXX-XXX-11 (1)Installation of Palm™ Desktop for CLIÉ on your computer is complete.9Enter a user name in the Select User window.You can enter any user name you prefer.NoteIf you have more than one CLIÉ handheldEnter a user name that is different from the one you use for another CLIÉ handheld.If you set an identical user name to multiple CLIÉ handhelds, errors may occur.TipIf you want to transfer data between CLIÉ handheldsRefer to “Transferring data from another CLIÉ™ handheld” in the supplied “Handbook”.10 Click [Next].The Connections window is displayed.11 Select [USB] or [Serial Port], depending on how you want to connect your CLIÉ handheld to your computer.12 Click [Next].The Ready to Install the Program window is displayed.13 Click [Install].Palm™ Desktop for CLIÉ installation starts.14 Click [Finish].01US01COV.book Page 18 Friday, June 20, 2003 6:29 AM](https://usermanual.wiki/Sony-Group/PEGUX50.Users-Manual-1/User-Guide-343052-Page-19.png)
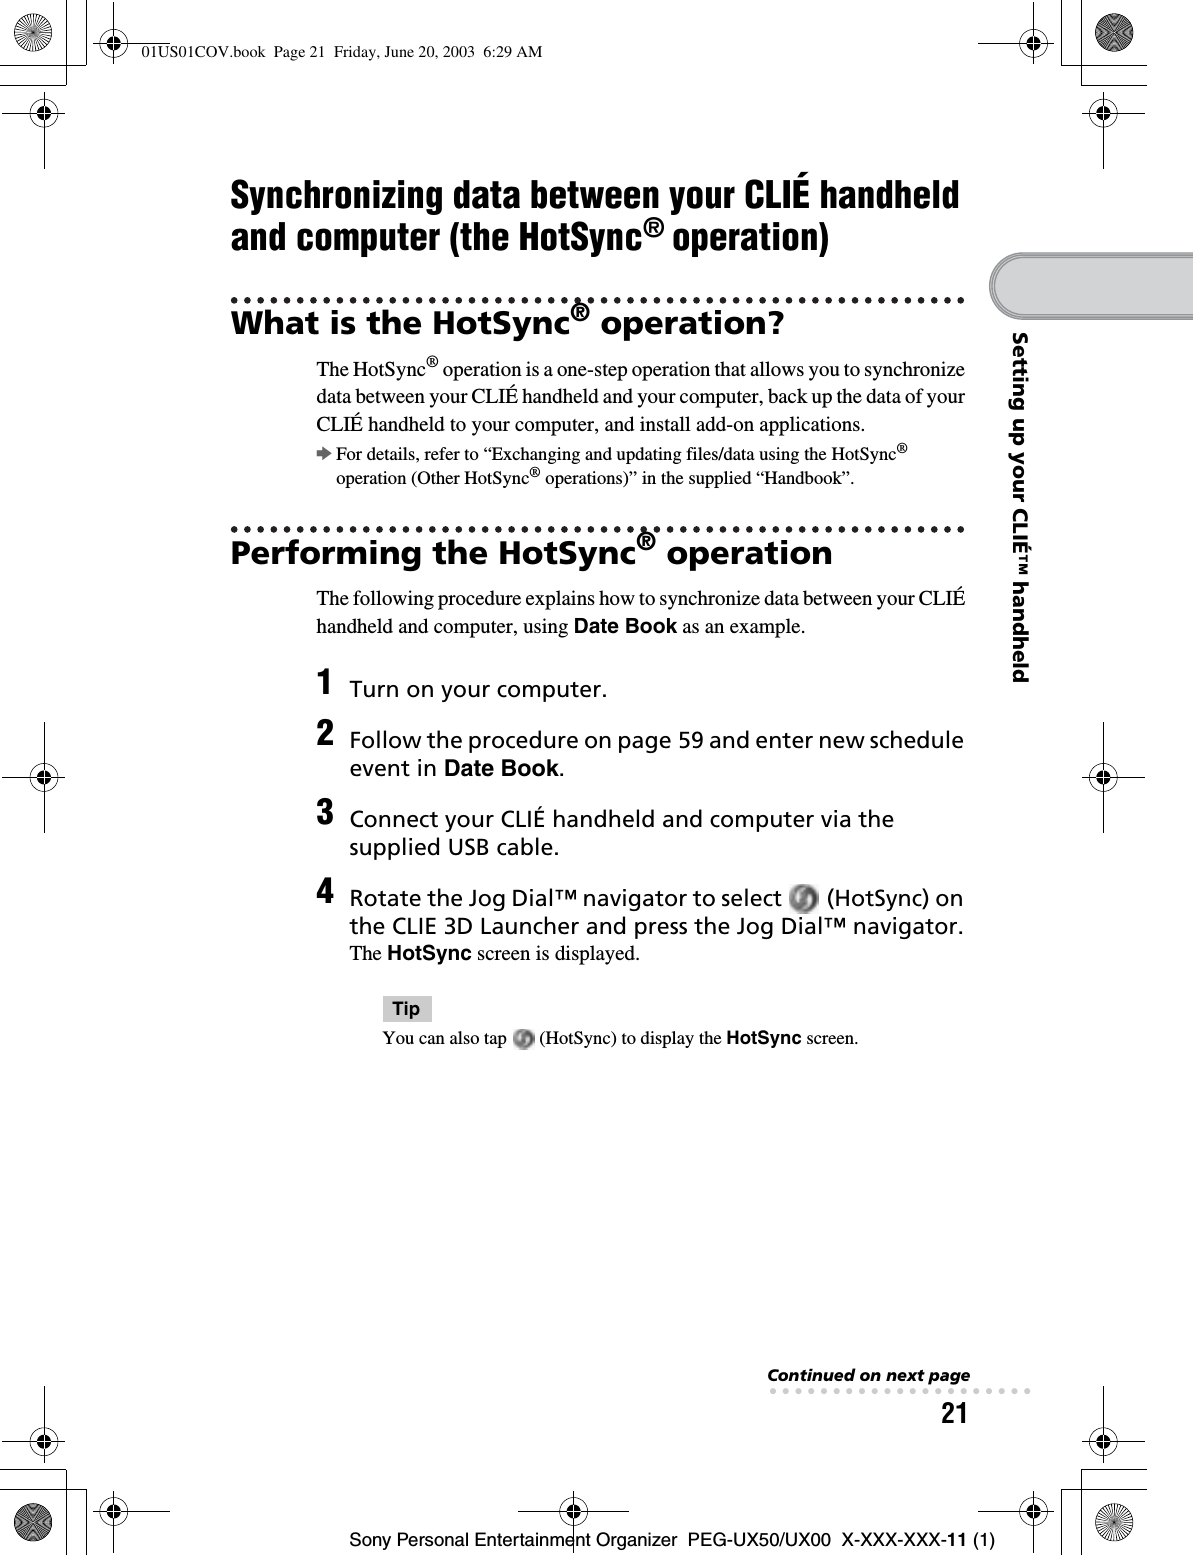
![20Sony Personal Entertainment Organizer PEG-UX50/UX00 X-XXX-XXX-11 (1)Step 3: Entering a user name for your CLIÉ handheldSetup is complete.1Rotate the Jog Dial™ navigator to select (HotSync) on the CLIE 3D Launcher and press the Jog Dial™ navigator.The HotSync screen is displayed.TipYou can also tap (HotSync) to display the HotSync screen.2Tap (HotSync) in the HotSync screen.The HotSync® operation starts and the installation for the required software starts automatically.3Click [OK] in the Users window of your computer.A beep sounds and the HotSync® operation starts.Your user name entered for Palm™ Desktop for CLIÉ is also registered in your CLIÉ handheld.When the setup is complete, “HotSync operation complete.” will be displayed on your CLIÉ handheld.4Click [OK] on the computer window.01US01COV.book Page 20 Friday, June 20, 2003 6:29 AM](https://usermanual.wiki/Sony-Group/PEGUX50.Users-Manual-1/User-Guide-343052-Page-21.png)
![22Sony Personal Entertainment Organizer PEG-UX50/UX00 X-XXX-XXX-11 (1)5Tap (HotSync) in the HotSync screen.The HotSync® operation starts.When the HotSync® operation is complete, the following screen is displayed.6Double-click (Palm Desktop for CLIÉ) on the Windows desktop.Palm™ Desktop for CLIÉ starts and the Date Book window is displayed. If you select the same date you entered in Step 2, you will see that schedule.TipYou can also click [Start], select [Programs] (for Windows XP, select [All Programs])-[Sony handheld], and click [Palm Desktop for CLIÉ] to start the software.01US01COV.book Page 22 Friday, June 20, 2003 6:29 AM](https://usermanual.wiki/Sony-Group/PEGUX50.Users-Manual-1/User-Guide-343052-Page-23.png)

![29Sony Personal Entertainment Organizer PEG-UX50/UX00 X-XXX-XXX-11 (1)Basic operations of your CLIÉ™ handheldThere are five ways to enter text into your CLIÉ handheld. You can use whichever is the most comfortable for you.zHardware keyboard (page 103)You can enter text using the hardware keyboard in the same way as your computer’s keyboard. This is useful when you want to enter lots of text.zHandwriting systemThere are two ways of using the handwriting system.bFor details, refer to “Entering text on your CLIÉ™ handheld” in the supplid “Handbook”.Graffiti® 2 You can enter text using a stroke recognition program, Graffiti® 2.Decuma InputYou can enter text using Decuma Input, which converts your handwriting into typed text as you write.zOn-screen keyboardYou can enter text by tapping the on-screen keyboard.bFor details, refer to “Entering text on your CLIÉ™ handheld: Using the on-screen keyboard to enter text” in the supplied “Handbook”.zThe HotSync® operation with a computerYou can enter text using your computer keyboard and then performing the HotSync® operation. The text data is transferred from your computer to your CLIÉ handheld using Palm™ Desktop for CLIÉ.bFor details, refer to [Help] in Palm™ Desktop for CLIÉ.Entering text01US01COV.book Page 29 Friday, June 20, 2003 6:29 AM](https://usermanual.wiki/Sony-Group/PEGUX50.Users-Manual-1/User-Guide-343052-Page-30.png)
![30Sony Personal Entertainment Organizer PEG-UX50/UX00 X-XXX-XXX-11 (1)To use your CLIÉ handheld over an extended period of time, you can save the battery power of your CLIÉ handheld by using Power Saving mode when turning off your CLIÉ handheld. Normally, the battery power is consumed even when your CLIÉ handheld is turned off so that data will not be lost. However, in Power Saving mode, data is stored on a storage area that requires no power, thus prolonging battery life.Notes• Turning on/off your CLIÉ handheld in Power Saving mode requires a bit more time than usual.• Never press the RESET button while Power Saving mode is saving or restoring data.Turning off your CLIÉ handheld (Power Saving mode)Turning off your CLIÉ handheld using Power Saving mode1Select (Prefs) in the CLIE 3D Launcher to start Preferences.The Preferences screen is displayed.2Tap at the top right of the screen and select [Power Saving].The Power Saving screen is displayed.3Tap [Turn Off].The Turn off dialog box is displayed.Continued on next page• • • • • • • • • • • • • • • • • • • • •01US01COV.book Page 30 Friday, June 20, 2003 6:29 AM](https://usermanual.wiki/Sony-Group/PEGUX50.Users-Manual-1/User-Guide-343052-Page-31.png)
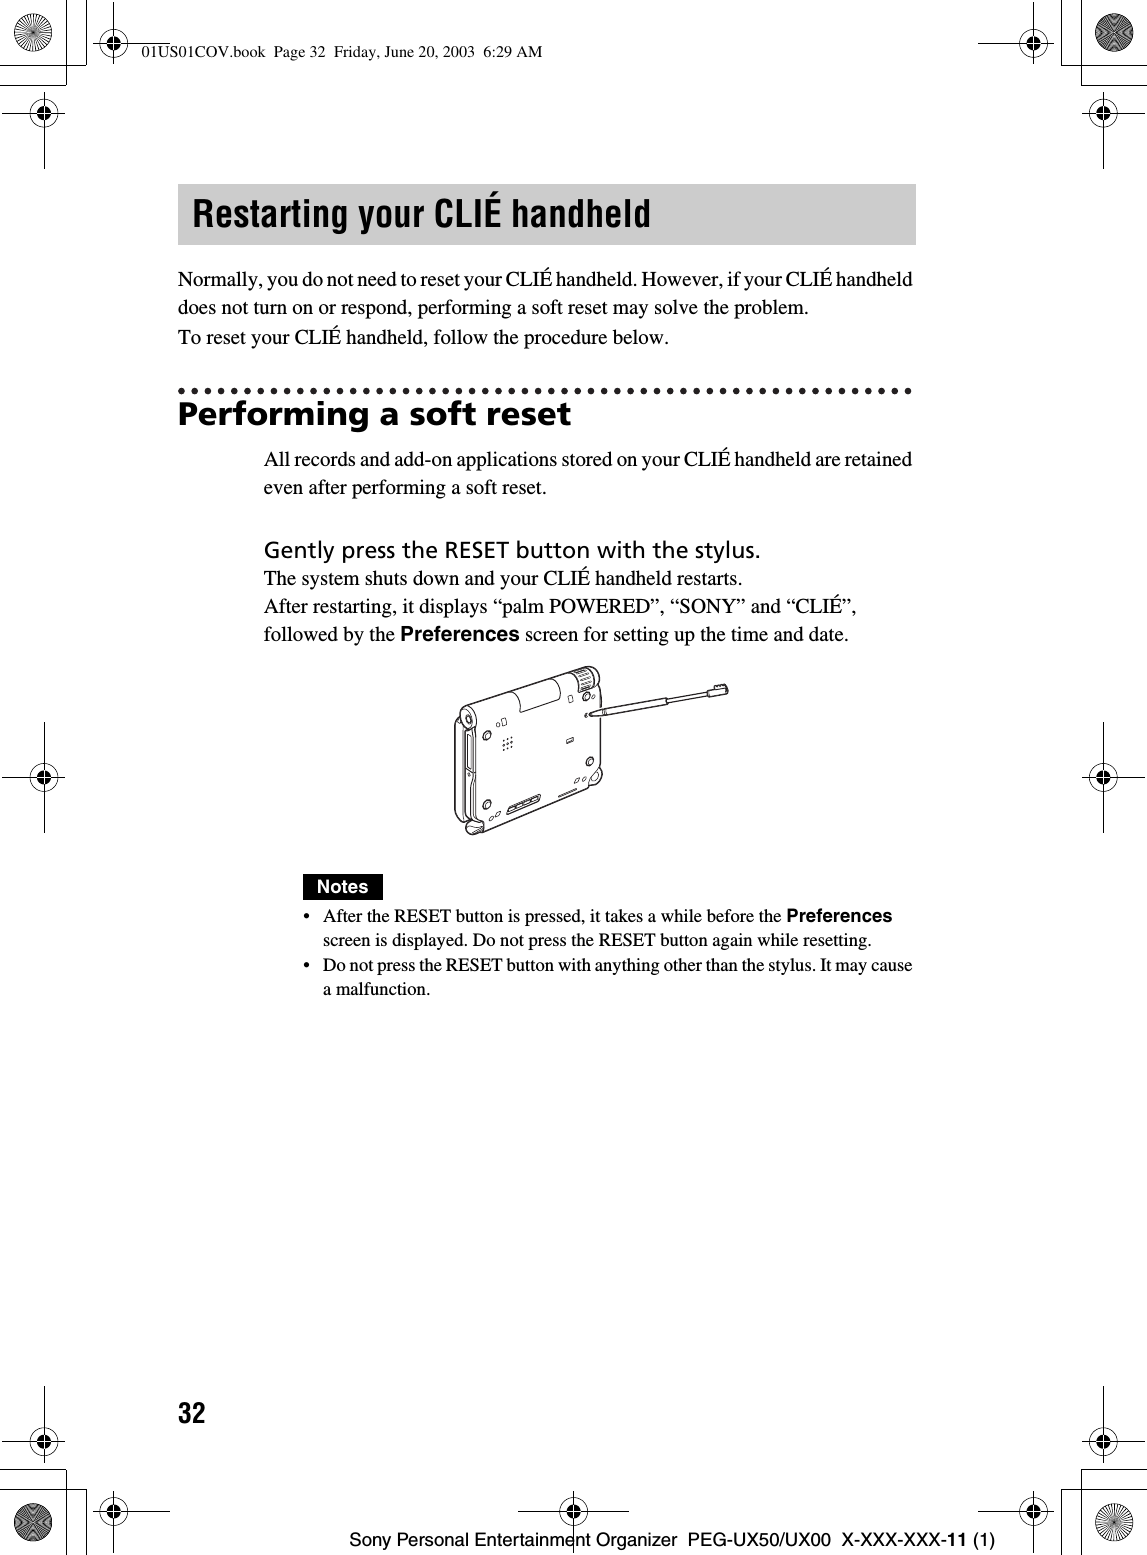
![31Sony Personal Entertainment Organizer PEG-UX50/UX00 X-XXX-XXX-11 (1)Basic operations of your CLIÉ™ handheldTo erase the saved data4Tap [Yes].The data of your CLIÉ handheld is saved in Power Saving mode.The data will be automatically restored next time you turn on your CLIÉ handheld.1Tap at the top right of the Preferences screen and select [Power Saving].The Power Saving screen is displayed.2Tap (Menu).The menu is displayed. 3Select [Erase backup] from [Option].The Erase Backup dialog box is displayed.4Tap [Yes].The saved data is erased.01US01COV.book Page 31 Friday, June 20, 2003 6:29 AM](https://usermanual.wiki/Sony-Group/PEGUX50.Users-Manual-1/User-Guide-343052-Page-32.png)

![34Sony Personal Entertainment Organizer PEG-UX50/UX00 X-XXX-XXX-11 (1)After restarting, your CLIÉ handheld displays “palm POWERED”, “SONY” and “CLIÉ”, followed by the SETUP screen. Refer to “Step 2: Performing the initial setup after turning on your CLIÉ handheld for the first time” on page 9 for the initial setup.After a hard reset, only the current date and time are retained. Formats, Preferences, and other controls revert to the factory settings.Notes• After the RESET button is pressed, it takes a while before the Setup screen is displayed. Do not press the RESET button again while resetting.• If (Page Up) is not pressed long enough, the hard reset may not be performed.4Press (Page Up) on the hardware keybord.TipIf you want to cancel the hard reset, press any key other than (Page Up).The Backup data dialog box is displayed.5Tap [No] after verifying the backup data. The hard reset is performed. (All records and add-on applications stored on Internal media will be retained.)TipWhen you tap [Yes], the last data you saved will be restored on your CLIÉ handheld.Press (Page Up)01US01COV.book Page 34 Friday, June 20, 2003 6:29 AM](https://usermanual.wiki/Sony-Group/PEGUX50.Users-Manual-1/User-Guide-343052-Page-35.png)
![37Sony Personal Entertainment Organizer PEG-UX50/UX00 X-XXX-XXX-11 (1)Connecting to the InternetStep 2: Using the check sheetYou can enter the value settings for the wireless LAN access point in this check sheet. The value settings you enter will be needed in “Setting up the wireless LAN function” (Page 38), “Setting up NetFront v3.0 for CLIE” (Page 40), and “Setting up CLIE Mail” (Page 43).TipWhen you select [DHCP], you do not need the value settings for 3 Primary DNS, 4 Secondary DNS, 5 IP address, 6 Netmask, and 7 Router.Check SheetNoteAsk the System Administrator of your wireless LAN network for value settings to connect to the wireless LAN access point, and ask your Internet Service Provider (ISP) for value settings to connect to the Internet.Requirement setting Your value setting1SSID2WEP Key3Primary DNS · · ·4Secondary DNS · · ·5IP Address · · ·6Netmask · · ·7Router · · ·When using proxy server8Address for proxy server(or Host name)Proxy port number9Mail address @0Incoming mail server (POP3)qa Outgoing mail server (SMTP)qs Mail account nameqd Mail password(POP account password)01US01COV.book Page 37 Friday, June 20, 2003 6:29 AM](https://usermanual.wiki/Sony-Group/PEGUX50.Users-Manual-1/User-Guide-343052-Page-38.png)
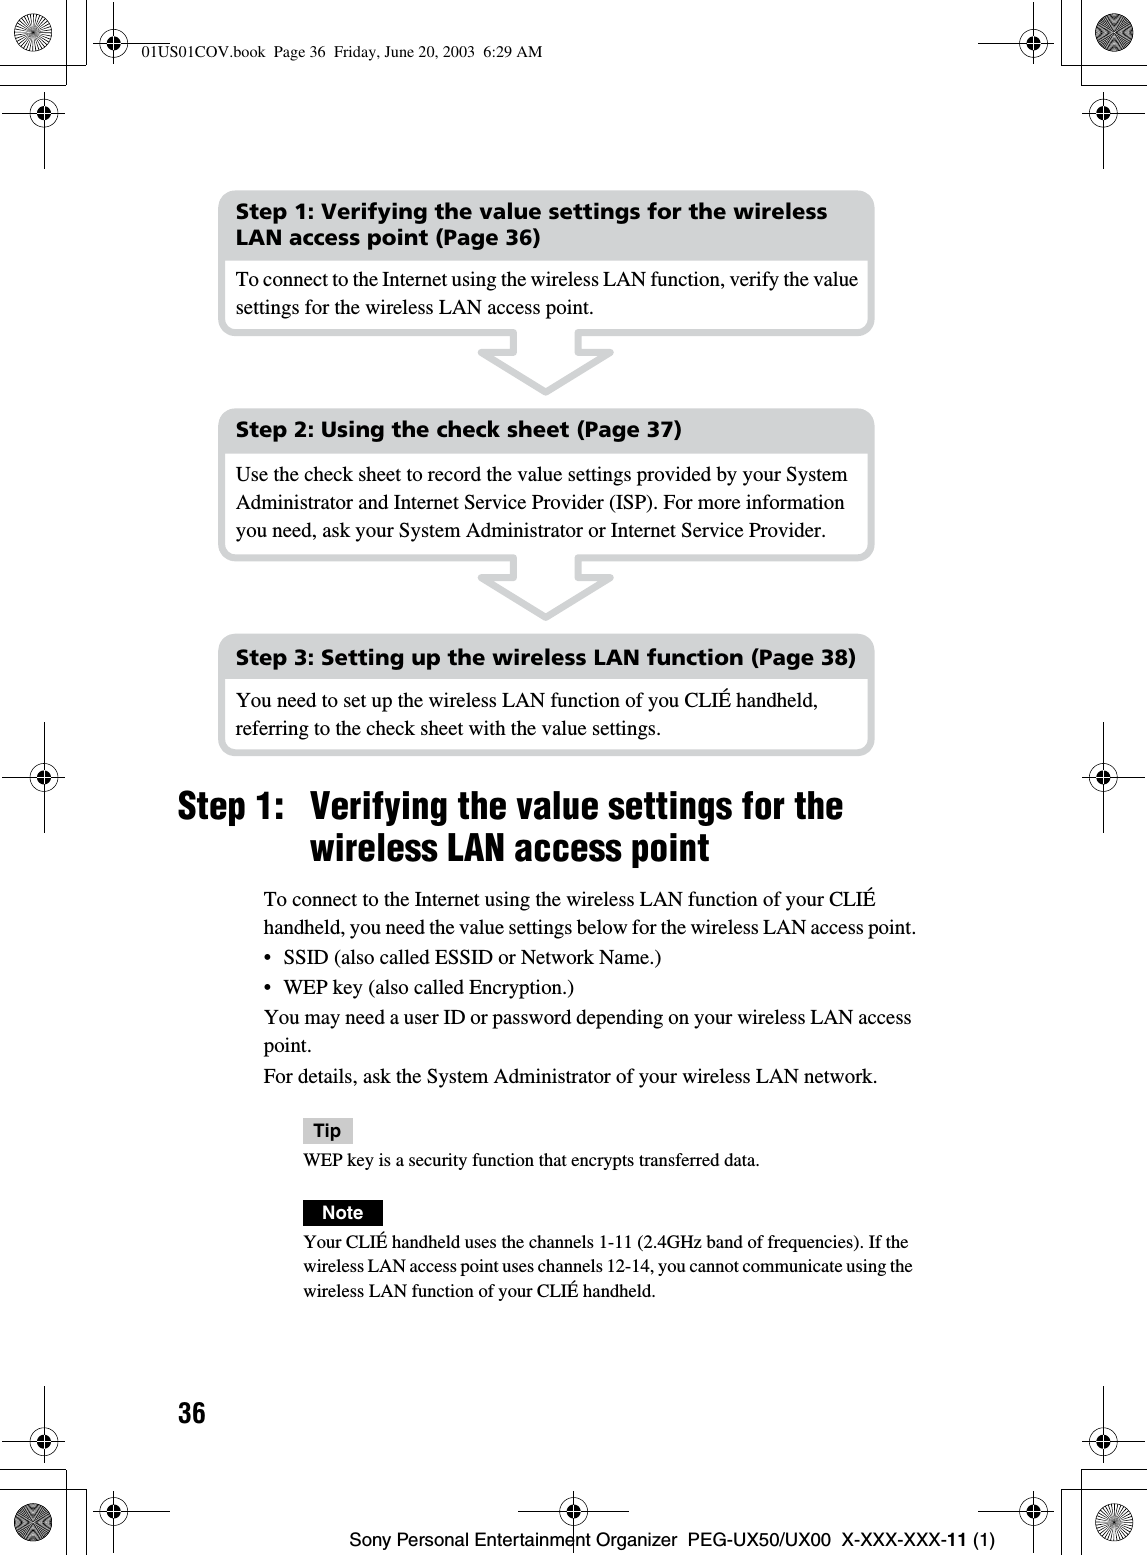
![38Sony Personal Entertainment Organizer PEG-UX50/UX00 X-XXX-XXX-11 (1)Step 3: Setting up the wireless LAN functionYou need to set up the wireless LAN function, referring to the value settings you recorded on the check sheet.1Tap (Prefs) in the CLIE 3D Launcher to start Preferences, then tap at the top right of the screen and [Network].The Network screen is displayed.2Tap next to [Service], then tap [Wireless LAN] and [Details...].The Wireless LAN Setup screen is displayed.3Tap (Menu).The menu is displayed.4Tap [New...] from [SSID].The SSID Setup screen is displayed.5Enter the value settings for the wireless LAN access point, referring to the check sheet.01US01COV.book Page 38 Friday, June 20, 2003 6:29 AM](https://usermanual.wiki/Sony-Group/PEGUX50.Users-Manual-1/User-Guide-343052-Page-39.png)
![39Sony Personal Entertainment Organizer PEG-UX50/UX00 X-XXX-XXX-11 (1)Connecting to the InternetASSIDEnter the value setting for 1 SSID on the check sheet.NoteAlphabet input is case sensitive.BWEP KeyEnter the value setting for 2 WEP Key on the check sheet.CAdhoc modeYou can communicate with other wireless LAN compatible devices without connecting to the wireless LAN access point when [Adhoc mode] is selected.DPower SaveYou can enable the power saving function when [Power Save] is selected.NoteYou cannot select [Power Save], when [Adhoc mode] is selected.TipYou can disable the power saving function for the maximum battery power when the communication reception of the wireless LAN is low. However, the battery power is quickly consumed.Select [Power Save] for normal use.EIP addressTap next to [IP address] to disable [DHCP], and you can enter the value settings for 3 Primary DNS, 4 Secondary DNS, 5 IP Address, 6 Netmask, and 7 Router in the following IP Address screen. FAuto ConnectWhen [Auto Connect] is selected, your CLIÉ handheld automatically connects to the wireless LAN access point when you access it.6Tap [OK].The Wireless LAN Setup screen is displayed.7Tap [OK].The Preferences screen is displayed.01US01COV.book Page 39 Friday, June 20, 2003 6:29 AM](https://usermanual.wiki/Sony-Group/PEGUX50.Users-Manual-1/User-Guide-343052-Page-40.png)
![40Sony Personal Entertainment Organizer PEG-UX50/UX00 X-XXX-XXX-11 (1)You can access the Internet via the wireless LAN access point using NetFront v3.0 for CLIE.Setting up NetFront v3.0 for CLIEBrowsing websites1Select (NetFront 3.0) in the CLIE 3D Launcher to start NetFrontv3.0 for CLIE.The browser screen is displayed.2Tap (Menu) and [NetFront Settings] from [Options].The first page of the NetFront Settings screen is displayed.3Tap at the bottom right of the screen to display the second page of the NetFront Settings screen.The NetFront Settings screen for [Connections] is displayed.01US01COV.book Page 40 Friday, June 20, 2003 6:29 AM](https://usermanual.wiki/Sony-Group/PEGUX50.Users-Manual-1/User-Guide-343052-Page-41.png)
![41Sony Personal Entertainment Organizer PEG-UX50/UX00 X-XXX-XXX-11 (1)Connecting to the InternetSetting up NetFront v3.0 for CLIE is complete.4Set up the connection method.AUse proxyThis setting is not needed for normal use.If your Internet Service Provider (ISP) provides you with proxy server address,select [Use proxy] and enter the proxy server address (or host name) and proxy port number.BEnable auto-dialingYou can access the Internet automatically without displaying the Prompt dialog box when [Enable auto-dialing] is selected.COn terminationYou can select how NetFront v3.0 for CLIE closes.[Never Disconnect]: keeps your connection to the Internet open for use with other applications.[Disconnect]: disconnects from the Internet when NetFront closes or another application is started.[Prompt]: displays the Prompt dialog box, whether you want to disconnect or stay connected.5Tap [OK].The browser screen is displayed.6Tap (Menu) and [Preferences] from [Options].The Network screen of Preferences is displayed. 7Verify that [Wireless LAN] is selected next to [Service].TipIf [Wireless LAN] is not selected, tap next to [Service] to select it.8Tap [Done].The browser screen is displayed.01US01COV.book Page 41 Friday, June 20, 2003 6:29 AM](https://usermanual.wiki/Sony-Group/PEGUX50.Users-Manual-1/User-Guide-343052-Page-42.png)
![42Sony Personal Entertainment Organizer PEG-UX50/UX00 X-XXX-XXX-11 (1)Browsing websites by connecting to the Internet via the wireless LAN access point.Browsing a website1Select (NetFront 3.0) in the CLIE 3D Launcher to start NetFront v3.0 for CLIE.The browser screen is displayed.2Tap (Off line) .The Prompt dialog box is displayed.TipWhen [Enable auto-dialing] is selected in the second page of the NetFront Settingsscreen, the connection automatically starts.3Tap [OK].When your CLIÉ handheld is connected to the Internet, (On line) is displayed.Tips• The Wireless LAN LED of your CLIÉ handheld lights.• You can check the reception level for the wireless LAN on the status bar (Page 109).1On the browser screen, tap (Menu) and [Enter Address] from [Open].The Enter Address screen is displayed.2Enter the URL for the website you want to view.TipYou can use shortcut entries by tapping next to [Assistant].3Tap [OK].The website page you entered is displayed.01US07INT.fm Page 42 Friday, June 20, 2003 1:21 PM](https://usermanual.wiki/Sony-Group/PEGUX50.Users-Manual-1/User-Guide-343052-Page-43.png)
![43Sony Personal Entertainment Organizer PEG-UX50/UX00 X-XXX-XXX-11 (1)Connecting to the InternetDisconnecting the connectionTap (On line) in the browser screen to disconnect the connection. (Off line) is displayed when your CLIÉ handheld is disconnected from the Internet.bFor details on the Internet connection, refer to “Internet/E-mail” in the “CLIÉ Application Manual” installed on your computer.You can send/receive e-mails using CLIE Mail.Setting up CLIE MailSending/Receiving e-mails1Select (CLIE Mail) in the CLIE 3D Launcher to start CLIE Mail.The CLIE Mail screen is displayed.2Tap (Menu) and [Accounts] from [Options].The Accounts screen is displayed.3Tap [New].The New Account screen for [Name] is displayed.4Enter your display name when you send e-mails and tap [Next].The New Account screen for [E-mail address] is displayed.01US01COV.book Page 43 Friday, June 20, 2003 6:29 AM](https://usermanual.wiki/Sony-Group/PEGUX50.Users-Manual-1/User-Guide-343052-Page-44.png)
![44Sony Personal Entertainment Organizer PEG-UX50/UX00 X-XXX-XXX-11 (1)Setting up CLIE Mail is complete.5Enter 9 Mail address on the check sheet, then tap [Next].The New Account screen for [E-mail Server Names] is displayed.6Enter 0 Incoming mail server (POP3) and qa Outgoing mail server (SMTP) on the check sheet, then tap [Next].The New Account screen for [Internet Mail Logon] is displayed.7Enter qs Mail account name and qd Mail password, and tap [Next].The New Account screen for [Congratulations] is displayed.8Tap [Finish].The Accounts screen is displayed.9Tap [OK].The CLIE Mail screen is displayed.10 Tap (Menu) and [Networks] from [Options].The Network screen of Preferences is displayed.11 Verify that [Wireless LAN] is selected next to [Service].TipIf [Wireless LAN] is not selected, tap next to [Service] to select it.12 Tap [Done].The CLIE Mail screen is displayed.01US01COV.book Page 44 Friday, June 20, 2003 6:29 AM](https://usermanual.wiki/Sony-Group/PEGUX50.Users-Manual-1/User-Guide-343052-Page-45.png)
![45Sony Personal Entertainment Organizer PEG-UX50/UX00 X-XXX-XXX-11 (1)Connecting to the InternetSending e-mailsYou can send e-mails with CLIE Mail.1Select (CLIE Mail) in the CLIE 3D Launcher to start CLIE Mail.The CLIE Mail screen is displayed.2Tap (New).The Edit screen is displayed.3Enter the e-mail address of receiver, a subject, and text.A[To:]Enter the mail address of the receiver.B[Subj:]Enter a subject for the e-mail.CEnter the e-mail text.4Tap [Send] and [Send Now].After connecting to the Internet, the Communication Status screen is displayed and the e-mail is sent.TipWhen you tap [Send Later], the e-mail is temporarily saved in [Outbox].The saved e-mail will be sent when you tap (Send).5Tap [OK].The CLIE Mail screen is displayed.6Tap (On line). (Off line) is displayed when disconnected.01US01COV.book Page 45 Friday, June 20, 2003 6:29 AM](https://usermanual.wiki/Sony-Group/PEGUX50.Users-Manual-1/User-Guide-343052-Page-46.png)