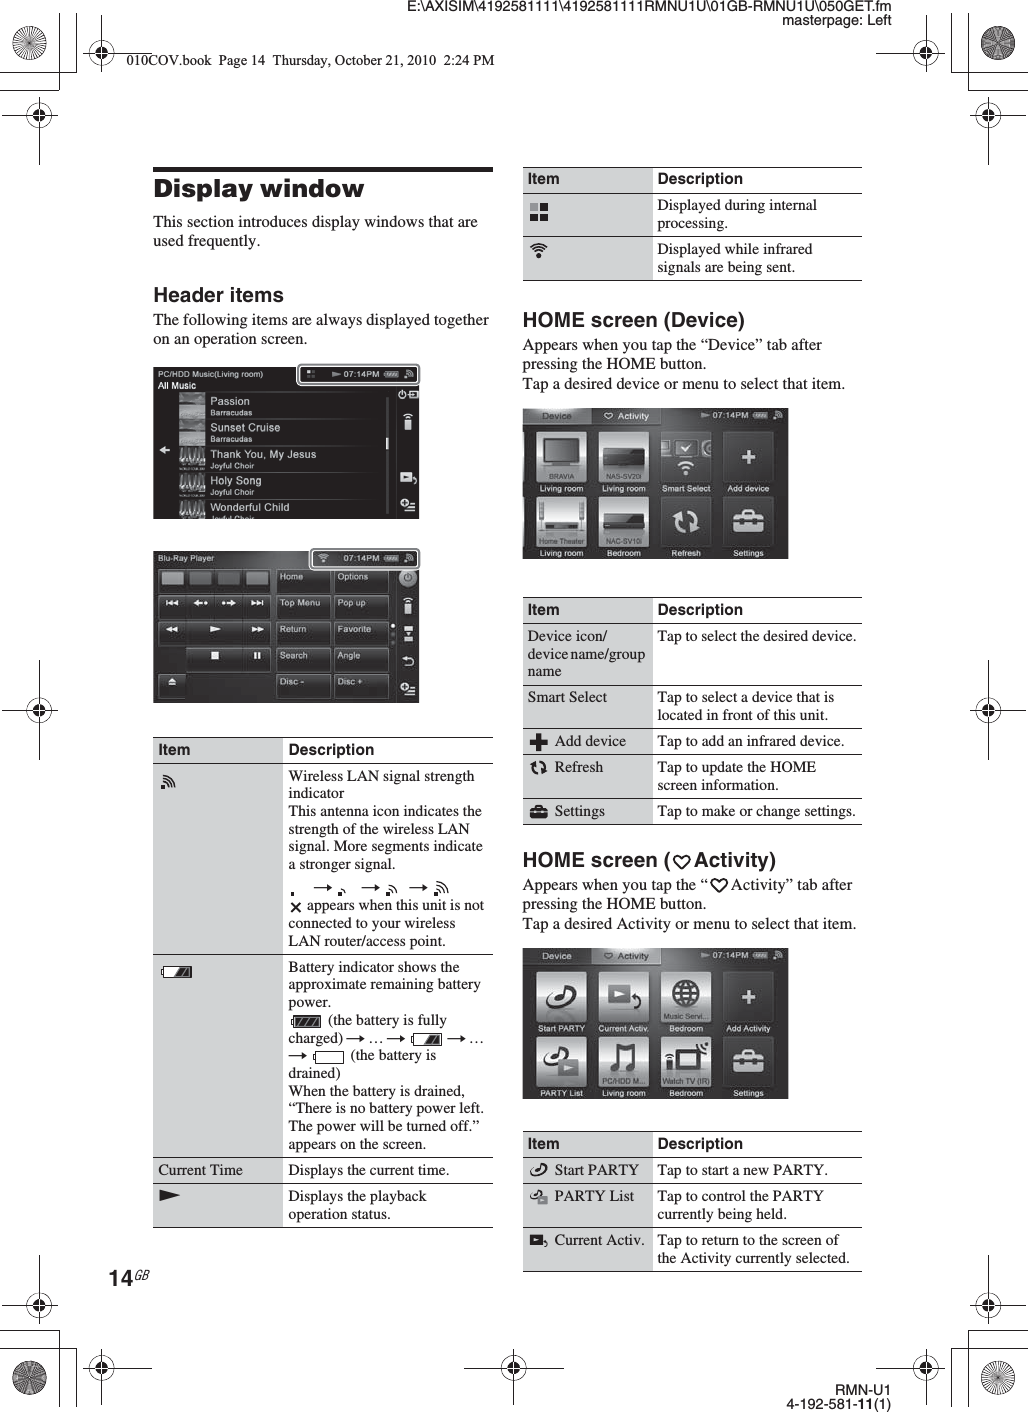
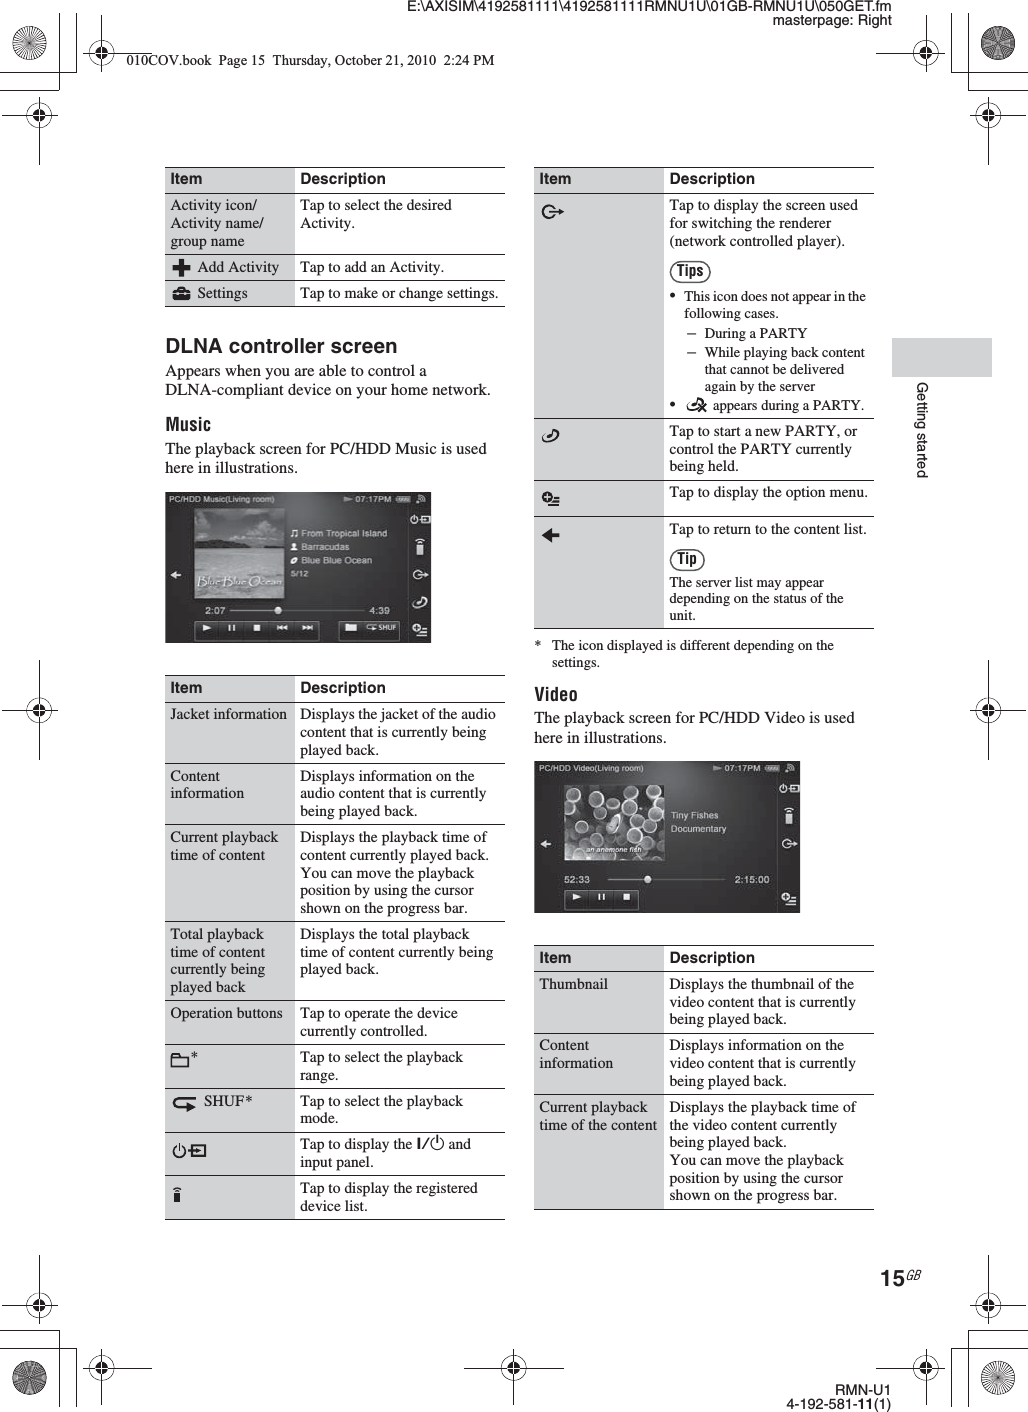
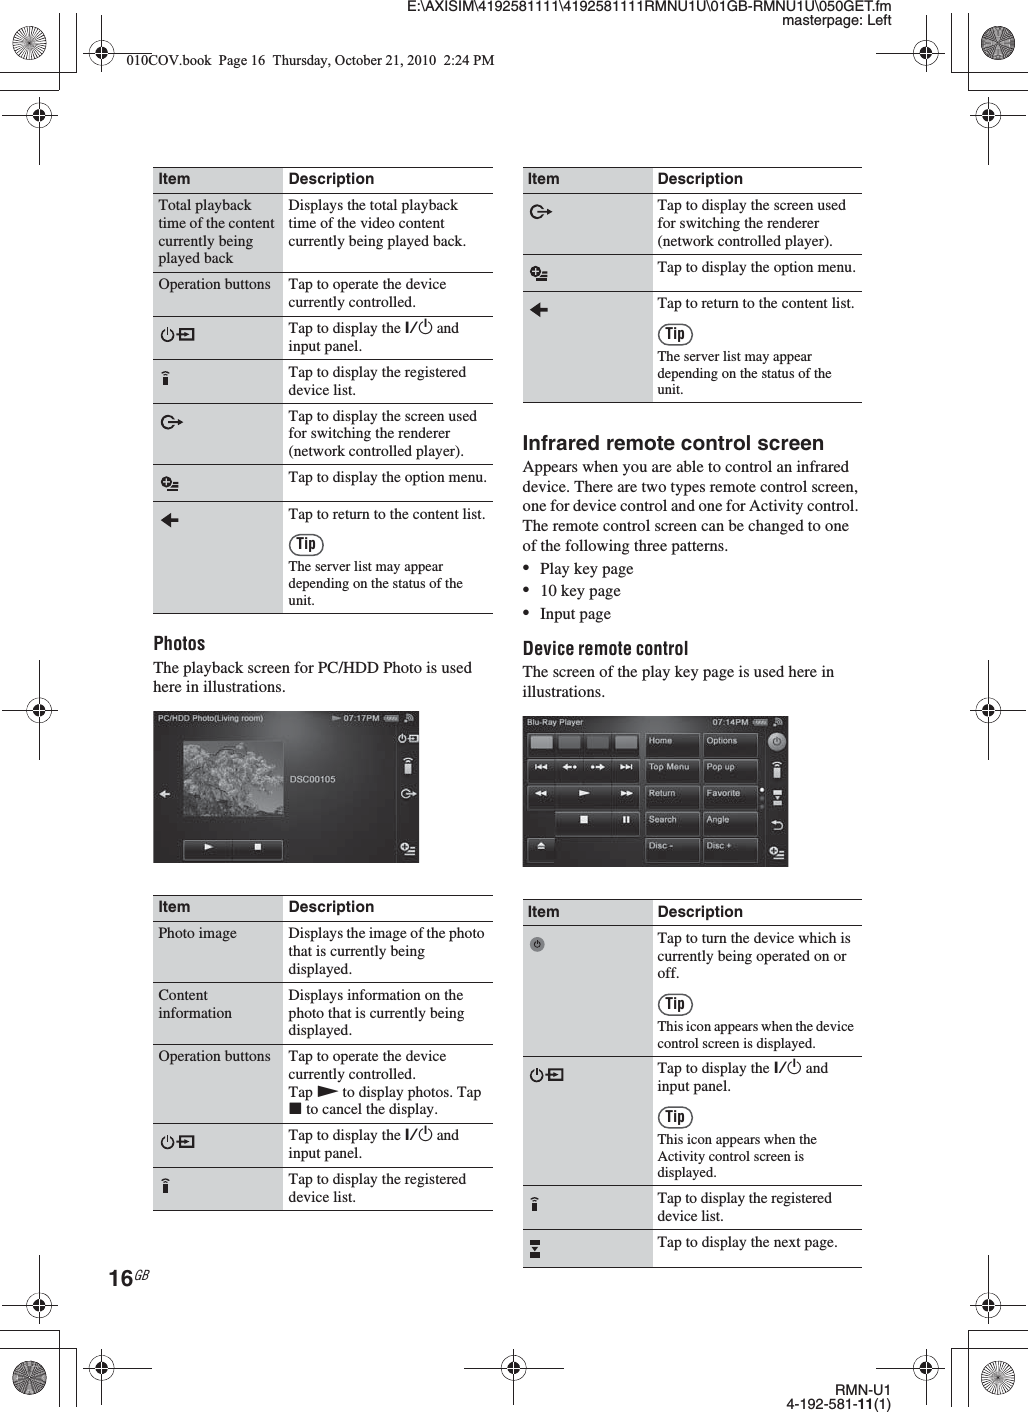
Sony Group RMNU1 NETWORK REMOTE CONTROLLER User Manual RMN U1
Sony Corporation NETWORK REMOTE CONTROLLER RMN U1
UserManual.wiki
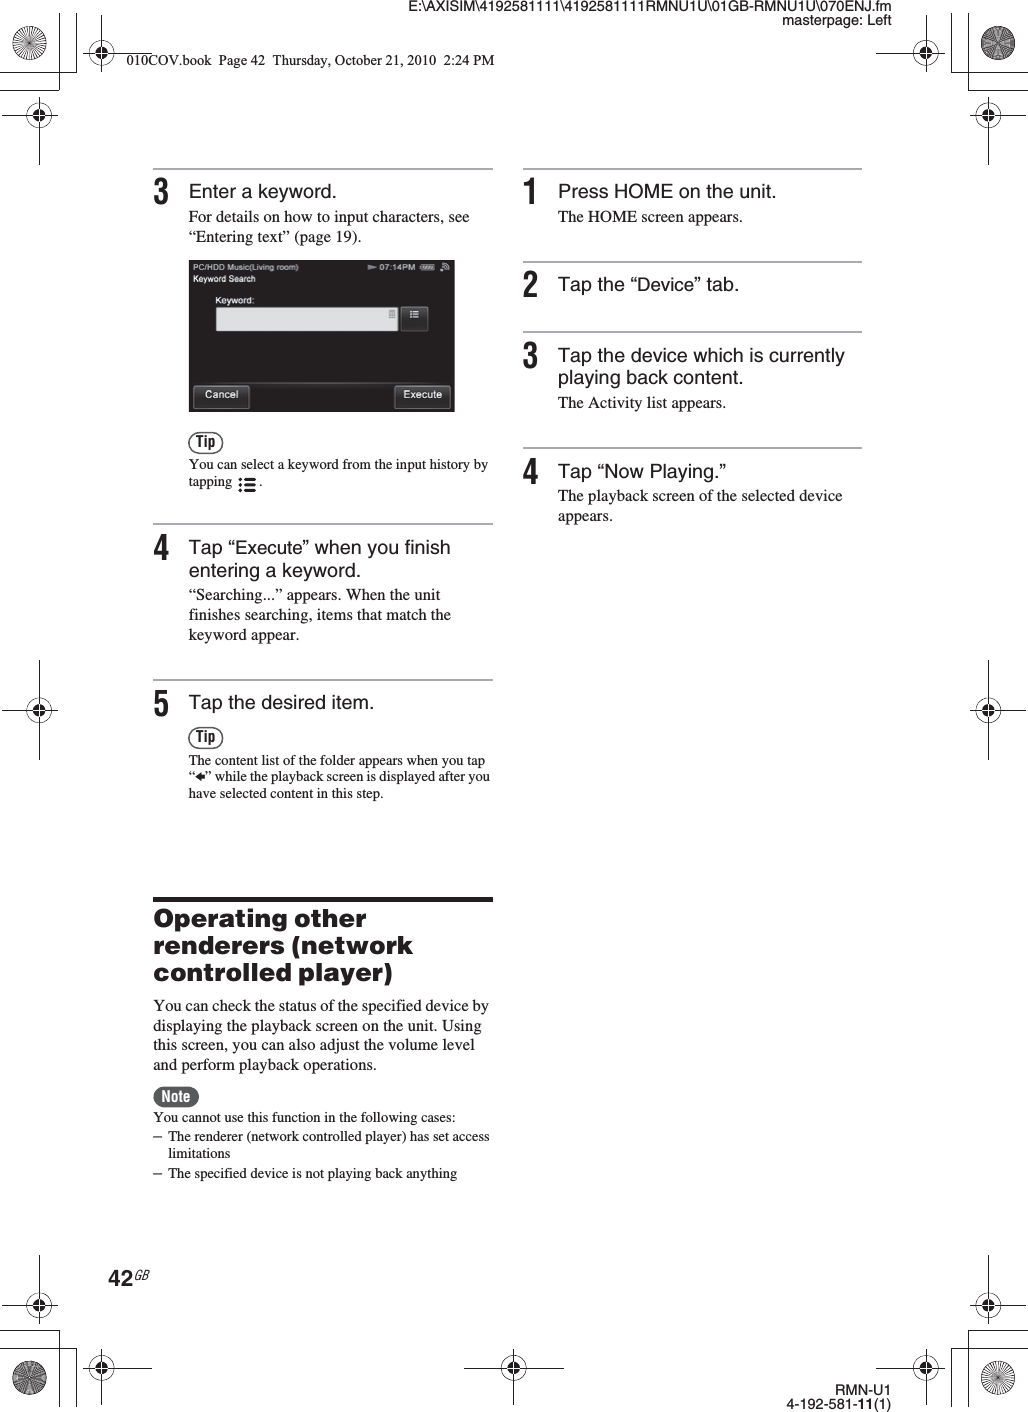
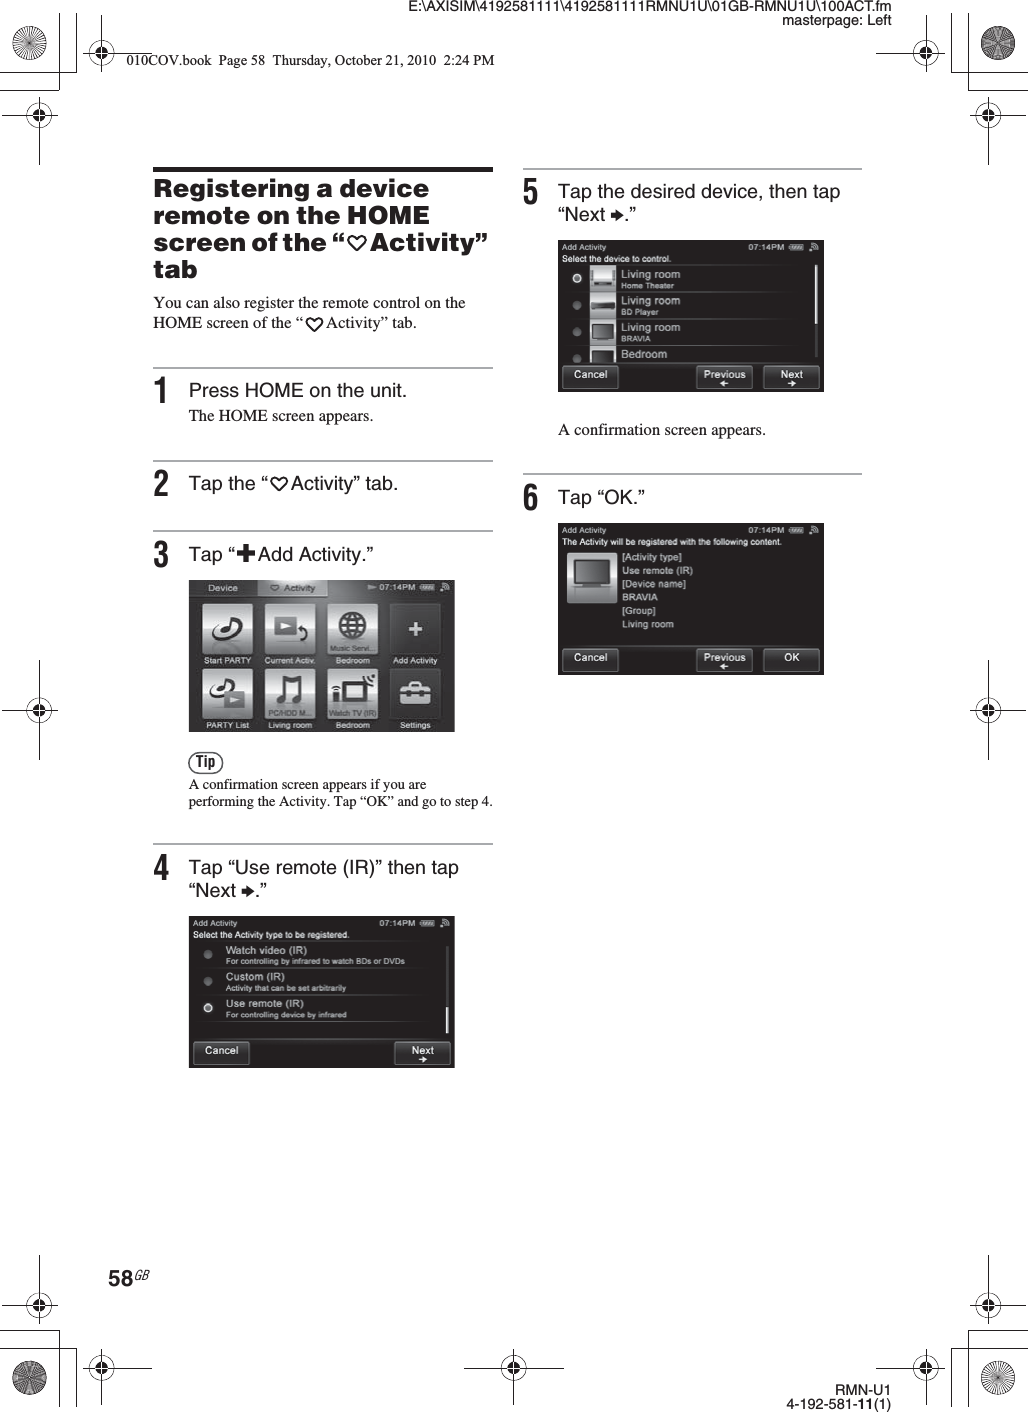
>
Sony Group
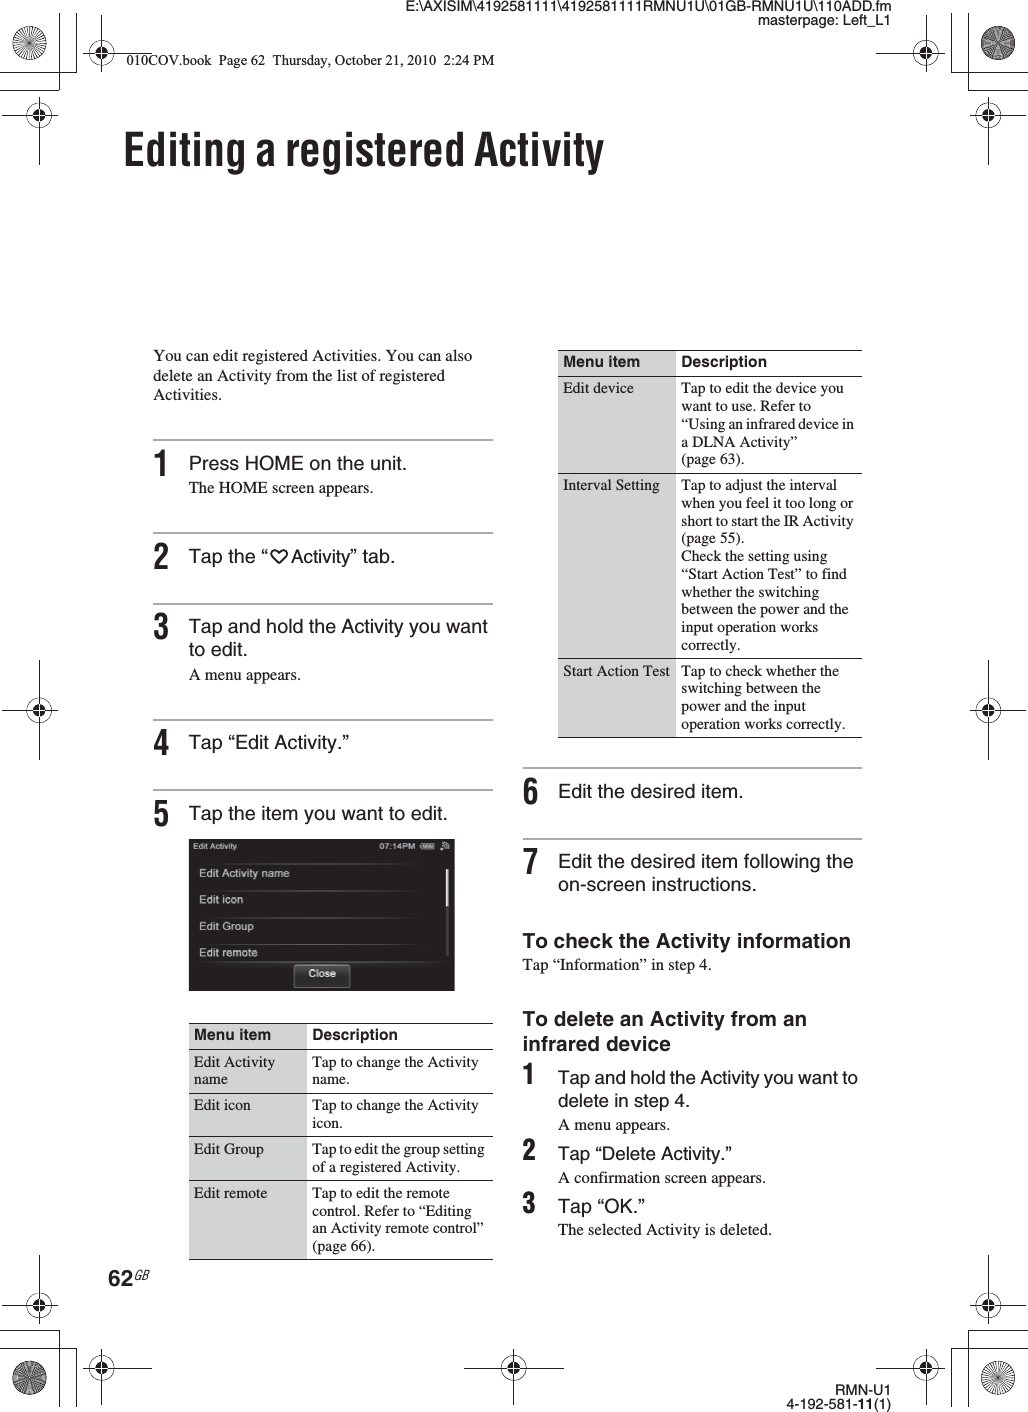
>
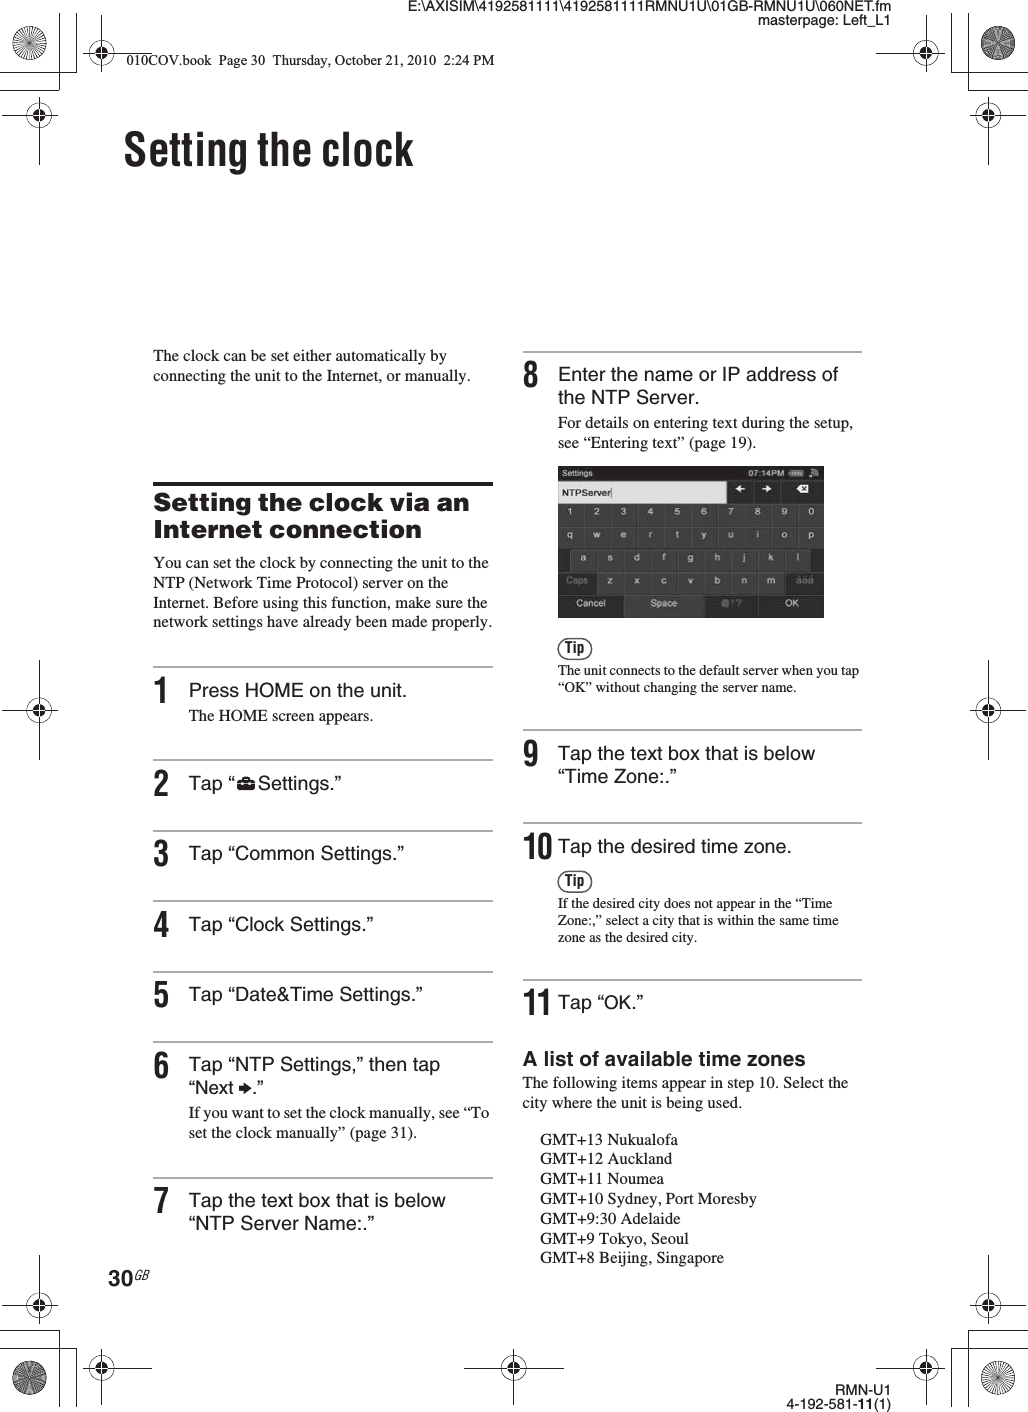
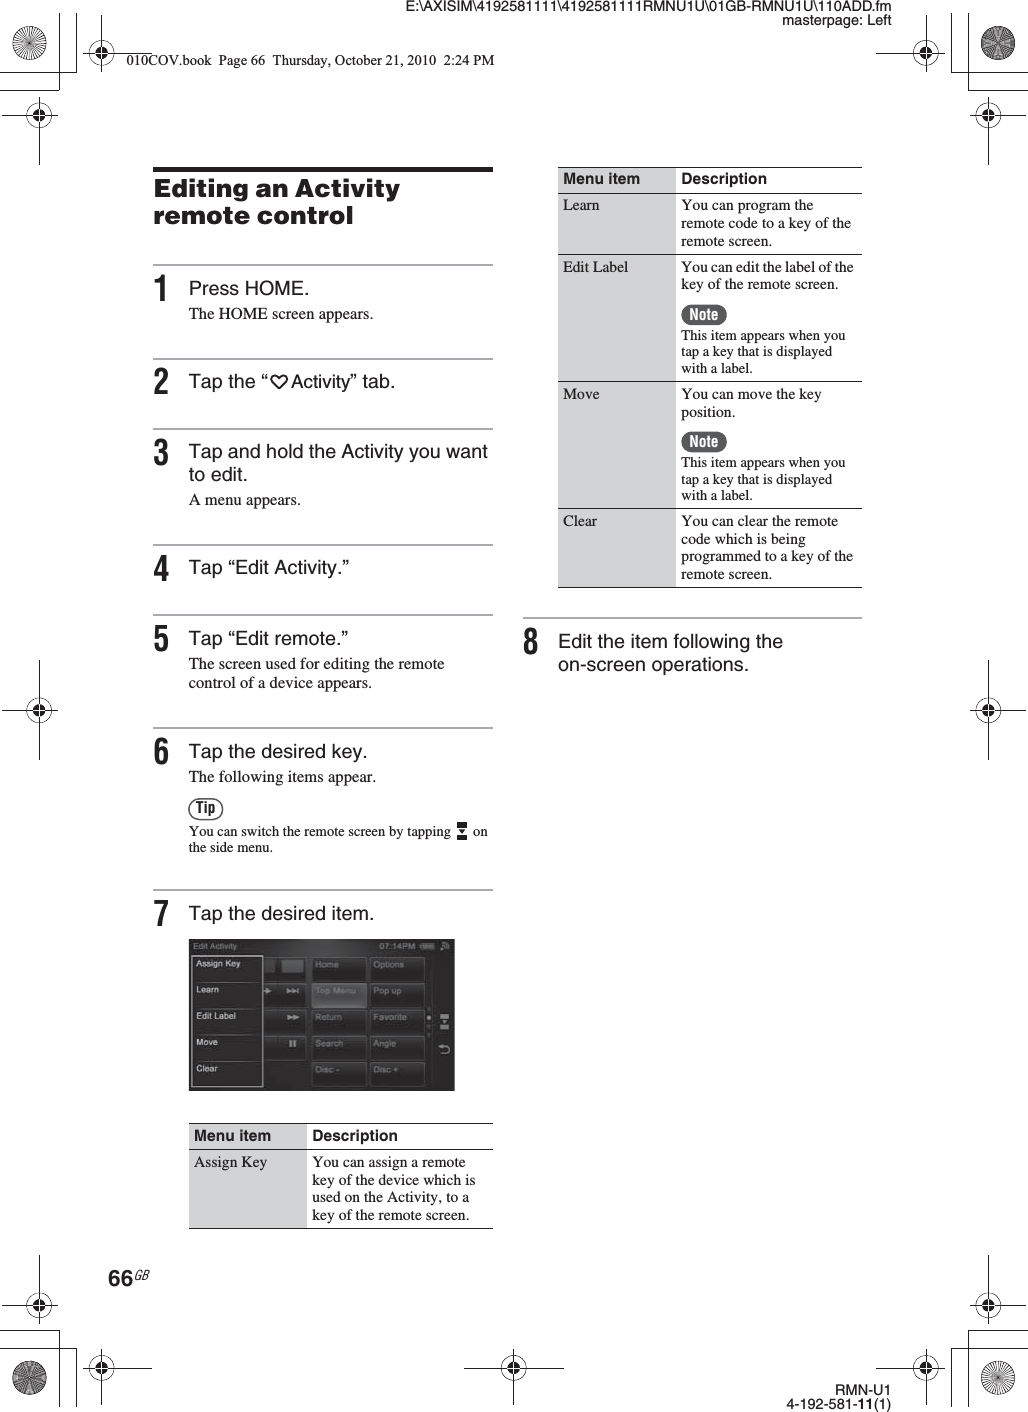
RMNU1 User Manual
User manual
Navigation menu
Upload a User Manual
Namespaces
Wiki Guide
HTML
PDF
Info
Views
User Manual
Discussion / Help
Navigation
![E:\AXISIM\4192581111\4192581111RMNU1U\01GB-RMNU1U\020REG.fmmasterpage: Right_3colRMN-U14-192-581-11(1)3GB–Connect the equipment into an outlet on a circuit different from that to which the receiver is connected.–Consult the dealer or an experienced radio/TV technician for help.CAUTIONYou are cautioned that any changes or modifications not expressly approved in this manual could void your authority to operate this equipment.This equipment must not be co-located or operated in conjunction with any other antenna or transmitter.The available scientific evidence does not show that any health problems are associated with using low power wireless devices.There is no proof, however, that these low power wireless devices are absolutely safe. Low power Wireless devices emit low levels of radio frequency energy (RF) in the microwave range while being used. Whereas high levels of RF can produce health effects (by heating tissue), exposure of low-level RF that does not produce heating effects causes no known adverse health effects. Many studies of low-level RF exposures have not found any biological effects. Some studies have suggested that some biological effects might occur, but such findings have not been confirmed by additional research. [Network Remote Controller (RMN-U1)] has been tested and found to comply with FCC radiation exposure limits set forth for an uncontrolled environment and meets the FCC radio frequency (RF) Exposure Guidelines in Supplement C to OET65.For customers in CanadaThis Class B digital apparatus complies with Canadian ICES-003.Operation is subject to the following two conditions:(1) this device may not cause interference, and (2) this device must accept any interference, including interference that may cause undesired operation of this device.The available scientific evidence does not show that any health problems are associated with using low power wireless devices.There is no proof, however, that these low power wireless devices are absolutely safe. Low power Wireless devices emit low levels of radio frequency energy (RF) in the microwave range while being used. Whereas high levels of RF can produce health effects (by heating tissue), exposure of low-level RF that does not produce heating effects causes no known adverse health effects. Many studies of low-level RF exposures have not found any biological effects. Some studies have suggested that some biological effects might occur, but such findings have not been confirmed by additional research. [Network Remote Controller (RMN-U1)] has been tested and found to comply with IC radiation exposure limits set forth for an uncontrolled environment and meets RSS-102 of the IC radio frequency (RF) Exposure rules.For customers in EuropeNotice for customers: the following information is only applicable to equipment sold in countries applying EU directives.The manufacturer of this product is Sony Corporation, 1-7-1 Konan Minato-ku, Tokyo, 108-0075 Japan.The Authorized Representative for EMC and product safety is Sony Deutschland GmbH, Hedelfinger Strasse 61, 70327 Stuttgart, Germany.For any service or guarantee matters, please refer to the addresses given in separate service or guarantee documents.Hereby, Sony Corp., declares that this equipment is in compliance with the essential requirements and other relevant provisions of Directive 1999/5/EC.For details, please access the following URL:http://www.compliance.sony.de/This product is intended to be used in the following countries.AT, BE, CH, CZ, DE, DK, ES, FI, FR, GB, GR, HU, IE, IT, NL, NO, PL, PT, RO, SE, SKFor customers who use this product in the following countries:Norway:Use of this radio equipment is not allowed in the geographical area within a radius of 20 km from the centre of Ny-Alesund, Svalbard.France:The WLAN feature of this Network Remote Controller shall exclusively be used inside buildings.Any use of the WLAN feature of this Network Remote Controller outside of the buildings is prohibited on the French territory. Please make sure that the WLAN feature of this Network Remote Controller is disabled before any use outside of the buildings. (ART Decision 2002-1009 as amended by ART Decision 03-908, relating to radio-frequencies use restrictions.)Italy:Use of the RLAN network is governed:•with respect to private use, by the Legislative Decree of 1.8.2003, no. 259 (“Code of Electronic Communications”). In particular Article 104 indicates when the prior obtainment of a general authorization is required and Art. 105 indicates when free use is permitted;•with respect to the supply to the public of the RLAN access to telecom networks and services, by the Ministerial Decree 28.5.2003, as amended, and Art. 25 (general authorization for electronic communications networks and services) of the Code of electronic communications.010COV.book Page 3 Thursday, October 21, 2010 2:24 PM](https://usermanual.wiki/Sony-Group/RMNU1/User-Guide-1385965-Page-3.png)

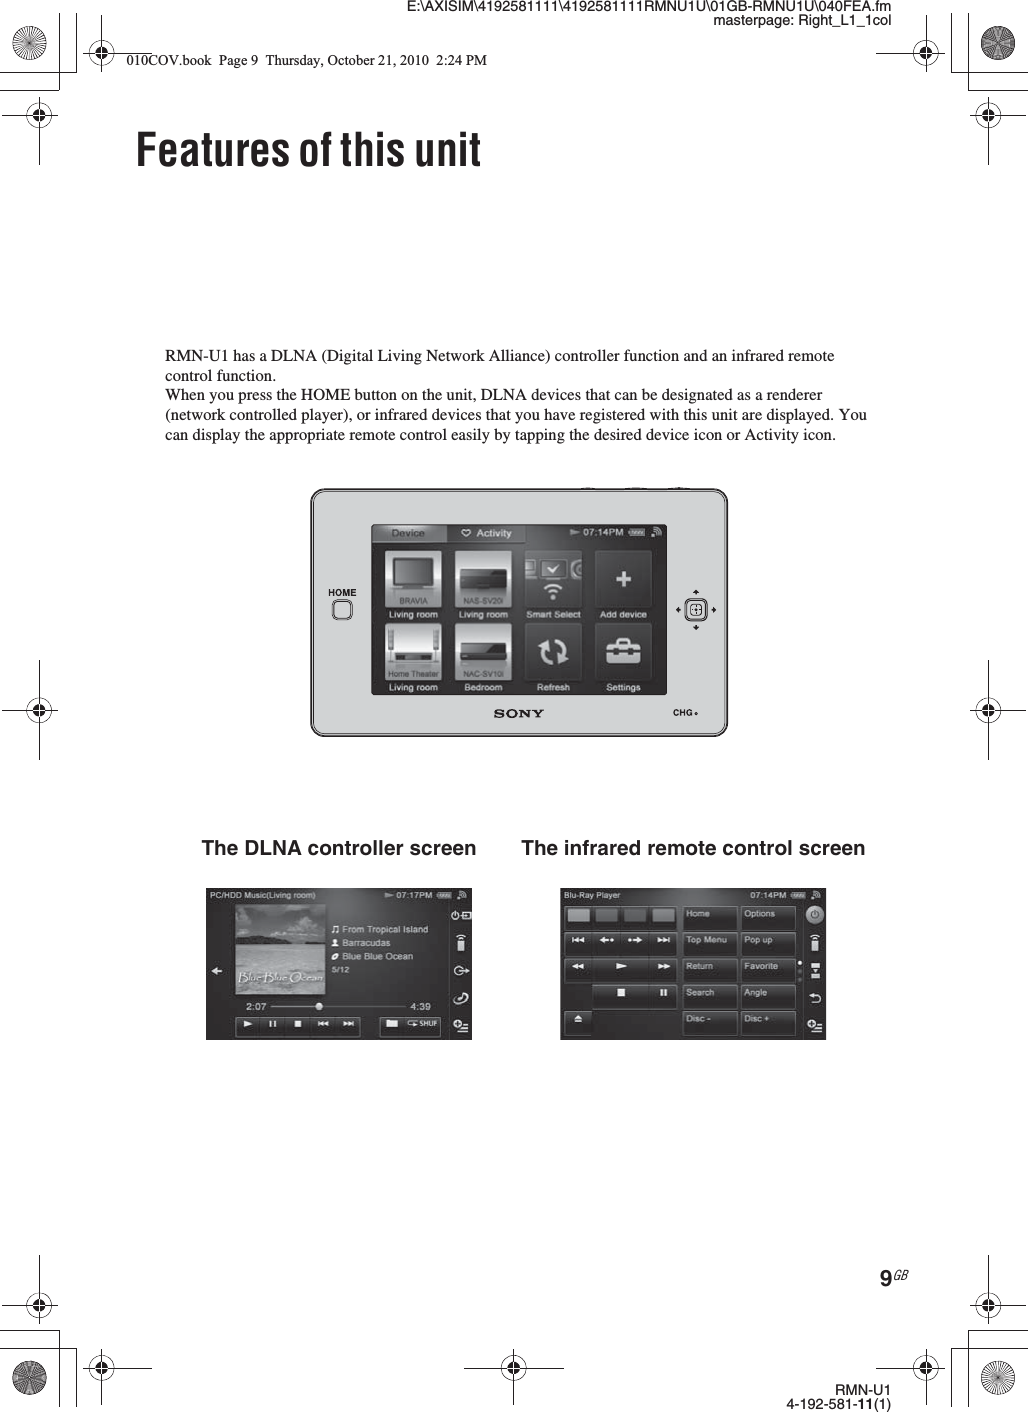

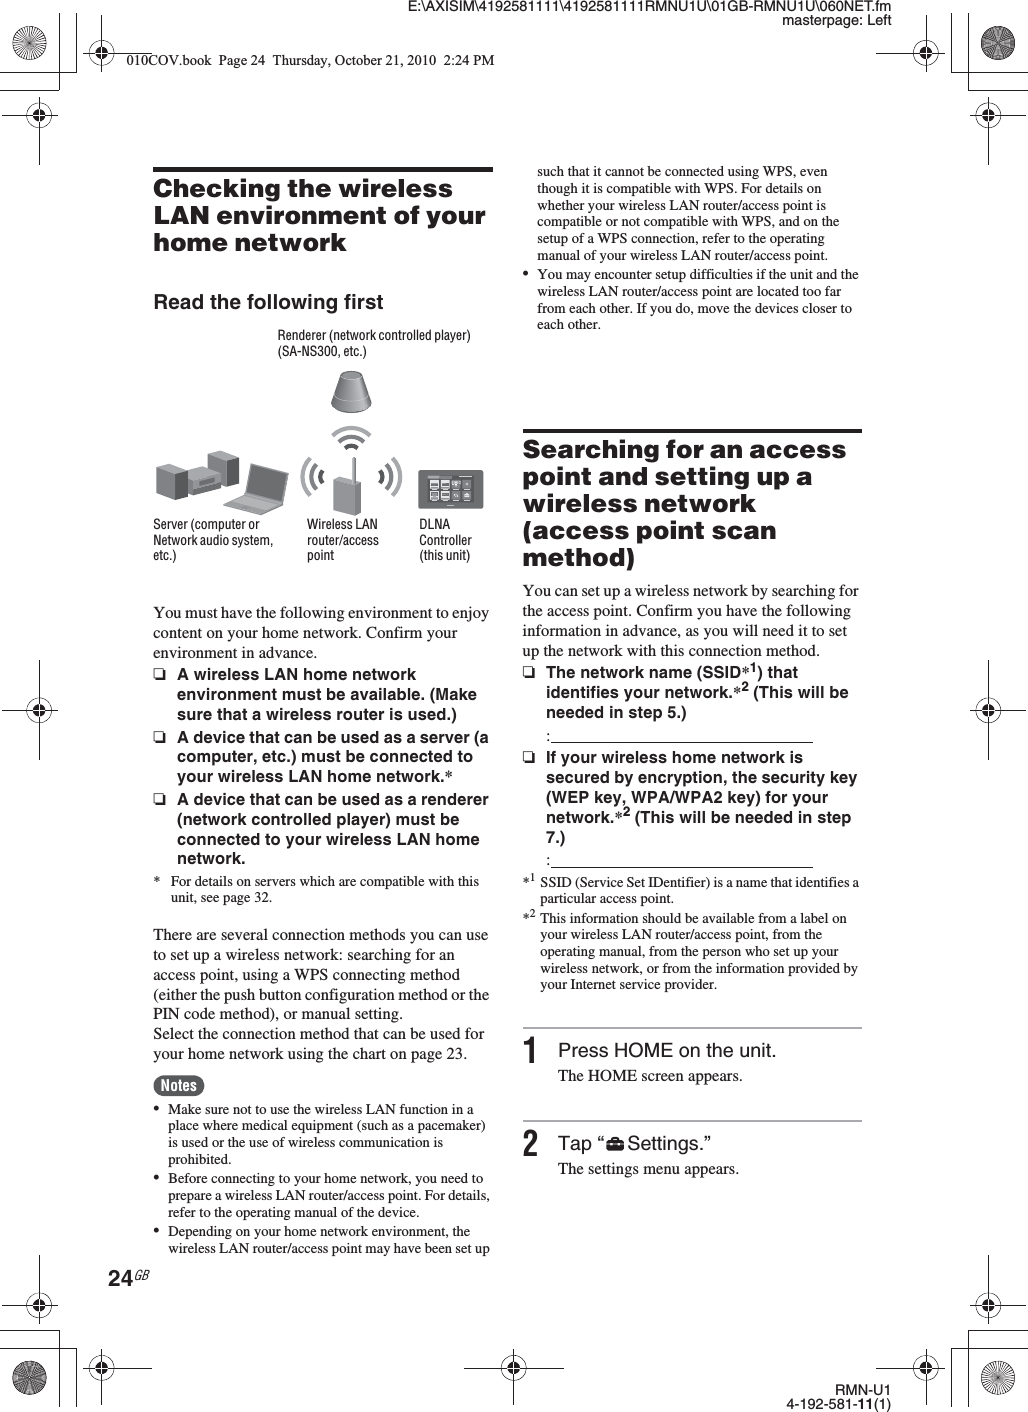
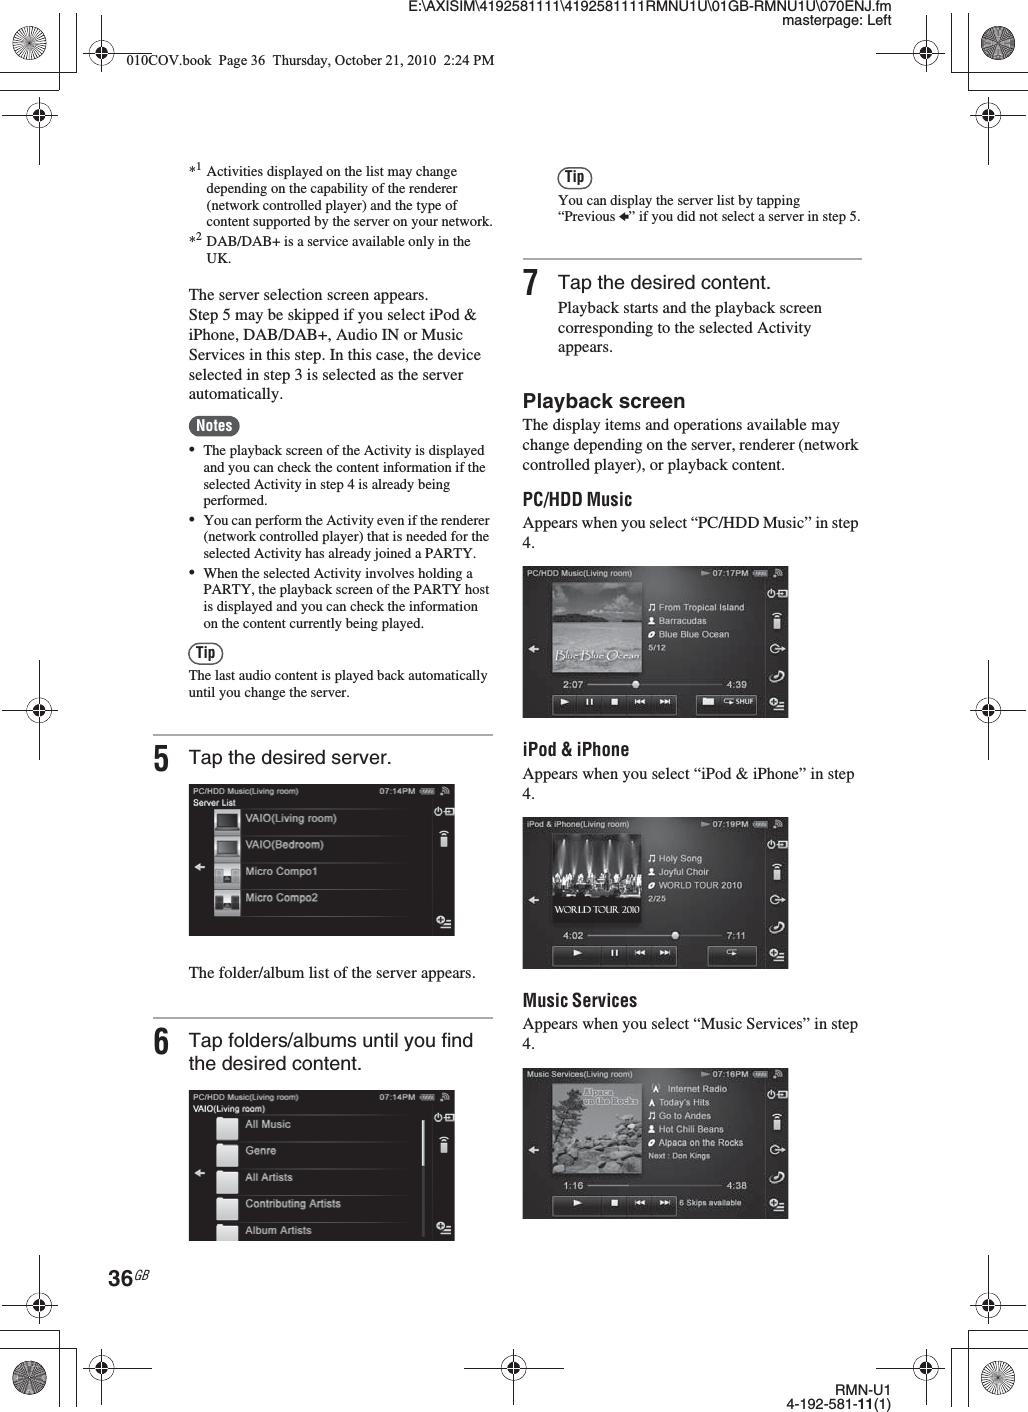
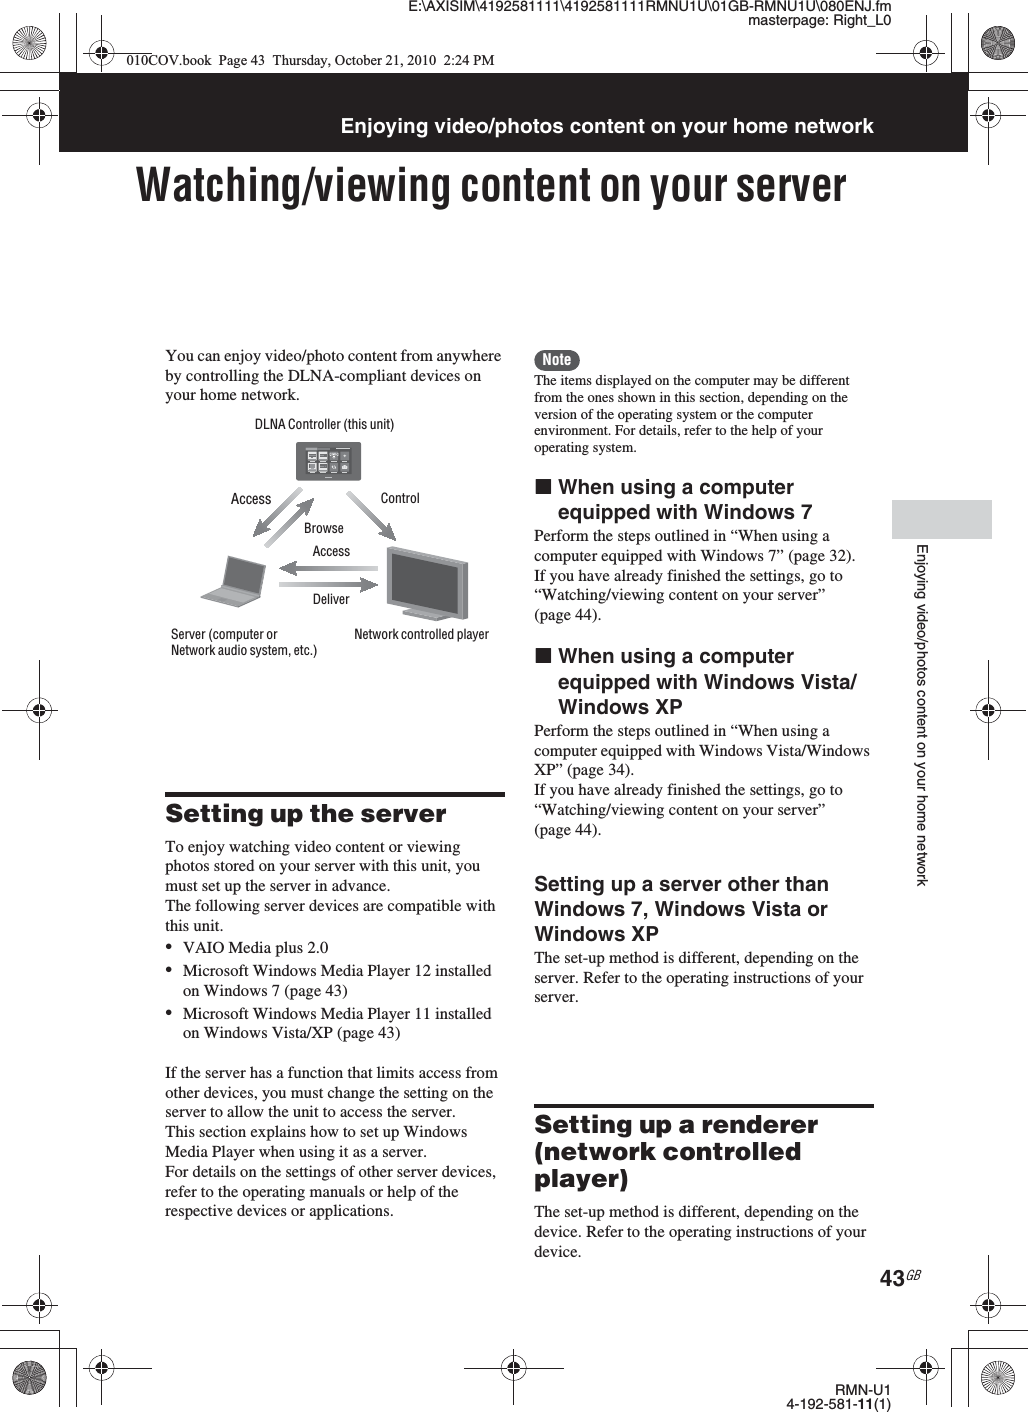
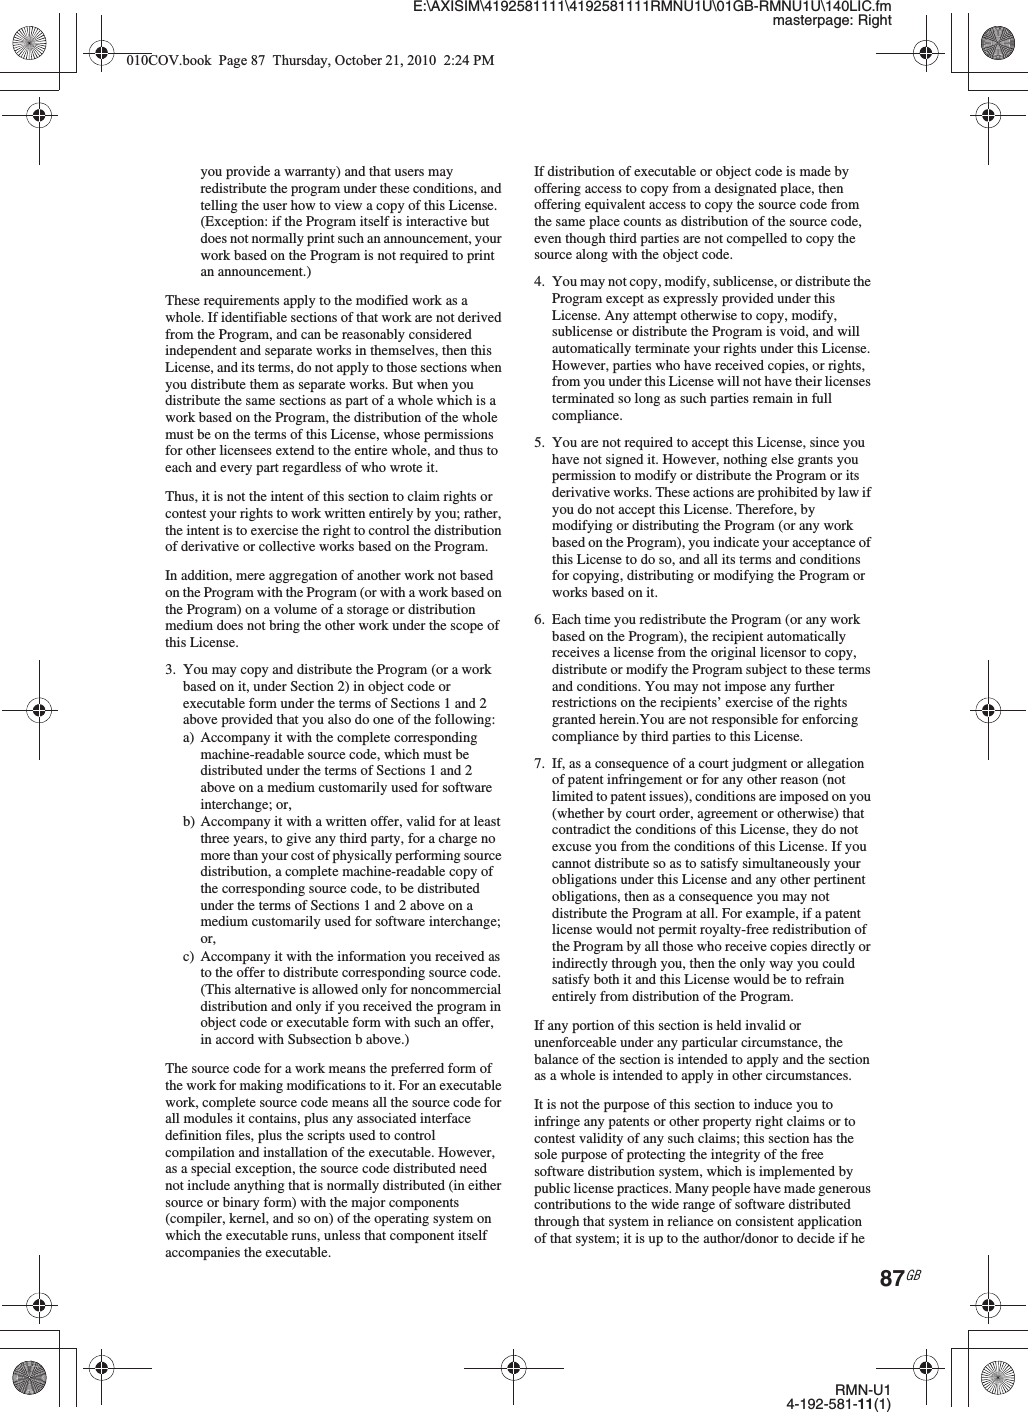
![E:\AXISIM\4192581111\4192581111RMNU1U\01GB-RMNU1U\070ENJ.fmmasterpage: Left_L0RMN-U14-192-581-11(1)32GBEnjoying music content on your home networkPlaying music content on your serverYou can enjoy audio content from anywhere by controlling the DLNA-compliant devices on your home network.Setting up the serverTo enjoy listening to audio content stored on your server with this unit, you must set up the server in advance.The following server devices are compatible with this unit.•VAIO Media plus 2.0•NAS-S500HDE, NAS-S55HDE* HDD Network Audio System•NAS-SV20i/SV20Di* Network Audio System/Server•NAC-SV10i* Network Audio Component/Server•Microsoft Windows Media Player 12 installed on Windows 7 (page 32)•Microsoft Windows Media Player 11 installed on Windows Vista/XP (page 34)* These models may not be available in some countries/areas.If the server has a function that limits access from other devices, you must change the setting on the server to allow the unit to access the server.This section explains how to set up Windows Media Player when using it as a server.For details on the settings of other server devices, refer to the operating manuals or help of the respective devices or applications.NoteThe items displayed on the computer may be different from the ones shown in this section, depending on the version of the operating system or the computer environment. For details, refer to the help of your operating system.xWhen using a computer equipped with Windows 7This section explains how to set up a manufacturer-installed version of Windows Media Player 12 for Windows 7 as a server to use with this unit.For details on how to operate Windows Media Player 12, refer to the help of Windows Media Player 12.1Go to [Start] - [Control Panel].2Select [View network status and tasks] under [Network and Internet].The [Network and Sharing Center] window appears.TipIf the desired item does not appear in the computer display, try to change the display type used by the Control Panel.DLNA Controller (this unit)ControlServer (computer or Network audio system, etc.)Network controlled player (SA-NS300, etc.)DeliverAccessAccessBrowse010COV.book Page 32 Thursday, October 21, 2010 2:24 PM](https://usermanual.wiki/Sony-Group/RMNU1/User-Guide-1385965-Page-32.png)
![E:\AXISIM\4192581111\4192581111RMNU1U\01GB-RMNU1U\070ENJ.fmmasterpage: RightRMN-U14-192-581-11(1)33GBEnjoying music content on your home network3Select [Public network] under [View your active networks].If it shows other than [Public network], go to step 6.The [Set Network Location] window appears.4Select [Home network] or [Work network] according to the environment in which the unit is being used.5Follow the instructions that appear on the computer display according to the environment in which the unit is being used.When the settings have been completed, confirm that the item under [View your active networks] has been changed to [Home network] or [Work network] in the [Network and Sharing Center] window.6Select [Change advanced sharing settings].7Select [Choose media streaming options...] from [Media streaming].8If [Media streaming is not turned on] appears in the Media streaming options window, select [Turn on media streaming].9Select [Allow All].The [Allow All Media Devices] window opens. If all the devices in the local network are set to [Allowed], select [OK] and close the window.10Select [Allow all computers and media devices].11Select [OK] to close the window.Refer to “Listening to audio content on your server” (page 35) or “Watching/viewing content on your server” (page 44) for instructions on how to select the server.010COV.book Page 33 Thursday, October 21, 2010 2:24 PM](https://usermanual.wiki/Sony-Group/RMNU1/User-Guide-1385965-Page-33.png)
![E:\AXISIM\4192581111\4192581111RMNU1U\01GB-RMNU1U\070ENJ.fmmasterpage: LeftRMN-U14-192-581-11(1)34GBxWhen using a computer equipped with Windows Vista/Windows XPThis section explains how to set up Windows Media Player 11 installed on Windows Vista/Windows XP*, as a server to connect with this unit.For details on how to operate Windows Media Player 11, refer to the help of Windows Media Player 11.* Windows Media Player 11 is not manufacturer-installed on Windows XP. Access the Microsoft web site, download the installer, and then install Windows Media Player 11 on your computer.1Go to [Start] - [All Programs].2Select [Windows Media Player].Windows Media Player 11 starts up.3Select [Media Sharing...] from the [Library] menu.If you are using Windows XP, go to step 9.4When is displayed, select [Networking...].The [Network and Sharing Center] window appears.5Select [Customize].The [Set Network Location] window appears.6Add a check mark next to [Private] and select [Next].7Confirm that the [Location type] has been changed to [Private] and select [Close].8Confirm that [(Private network)] is displayed in the [Network and Sharing Center] window and close the window.9If a check mark is not shown next to [Share my media] in the [Media Sharing] window that is displayed in step 3, add a check mark next to [Share my media], then select [OK].A list of connectable devices is displayed.10Select [Settings...] that appears beside [Share my media to:].010COV.book Page 34 Thursday, October 21, 2010 2:24 PM](https://usermanual.wiki/Sony-Group/RMNU1/User-Guide-1385965-Page-34.png)
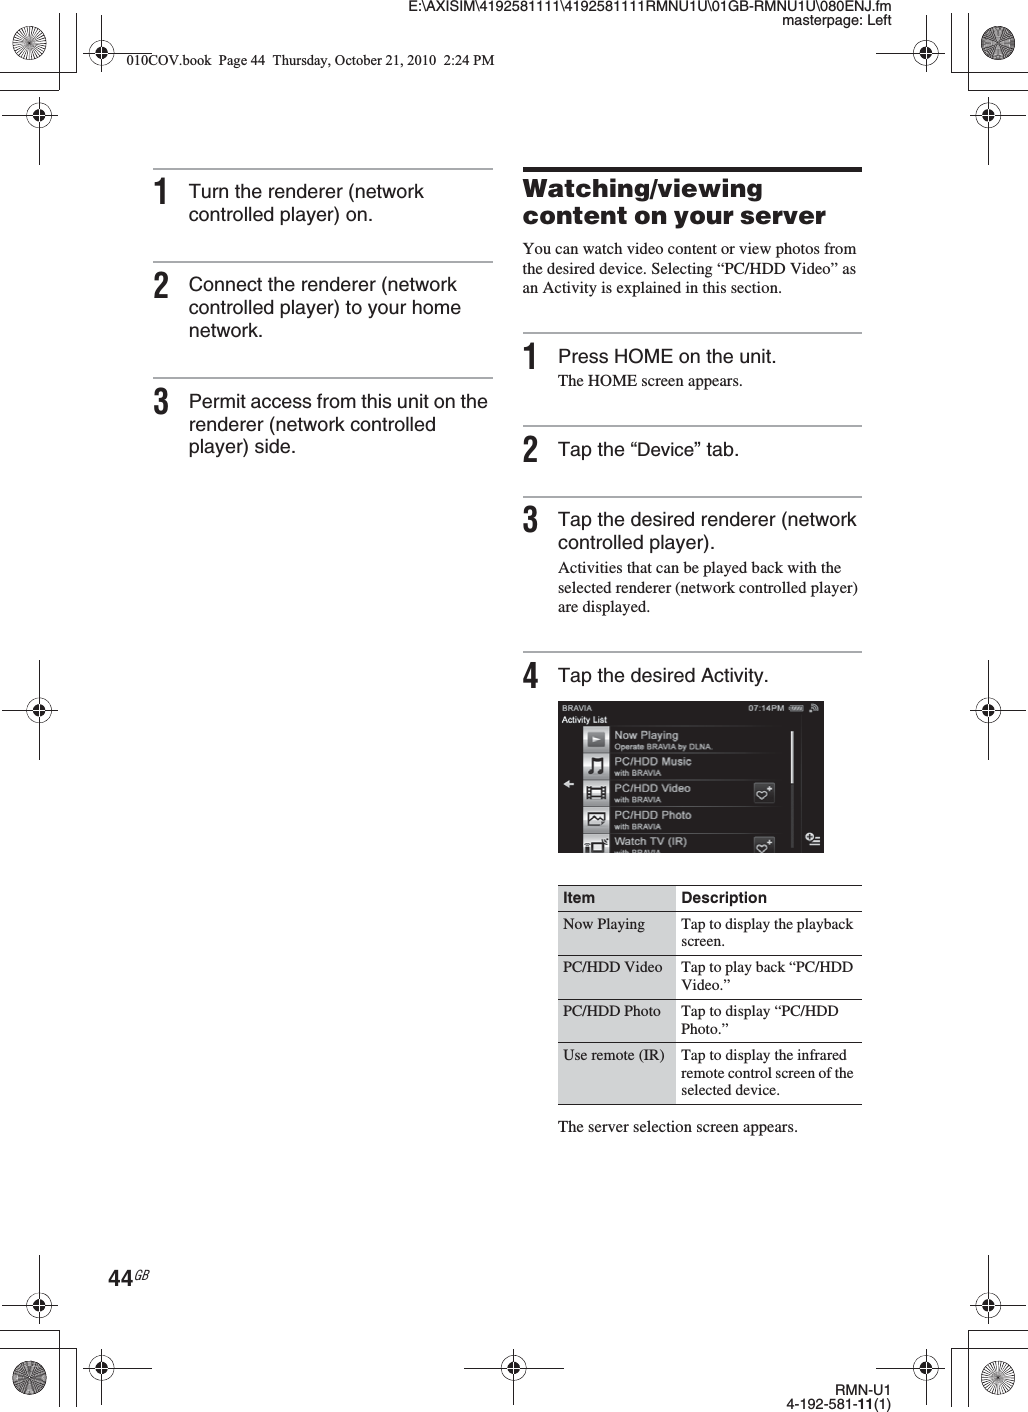
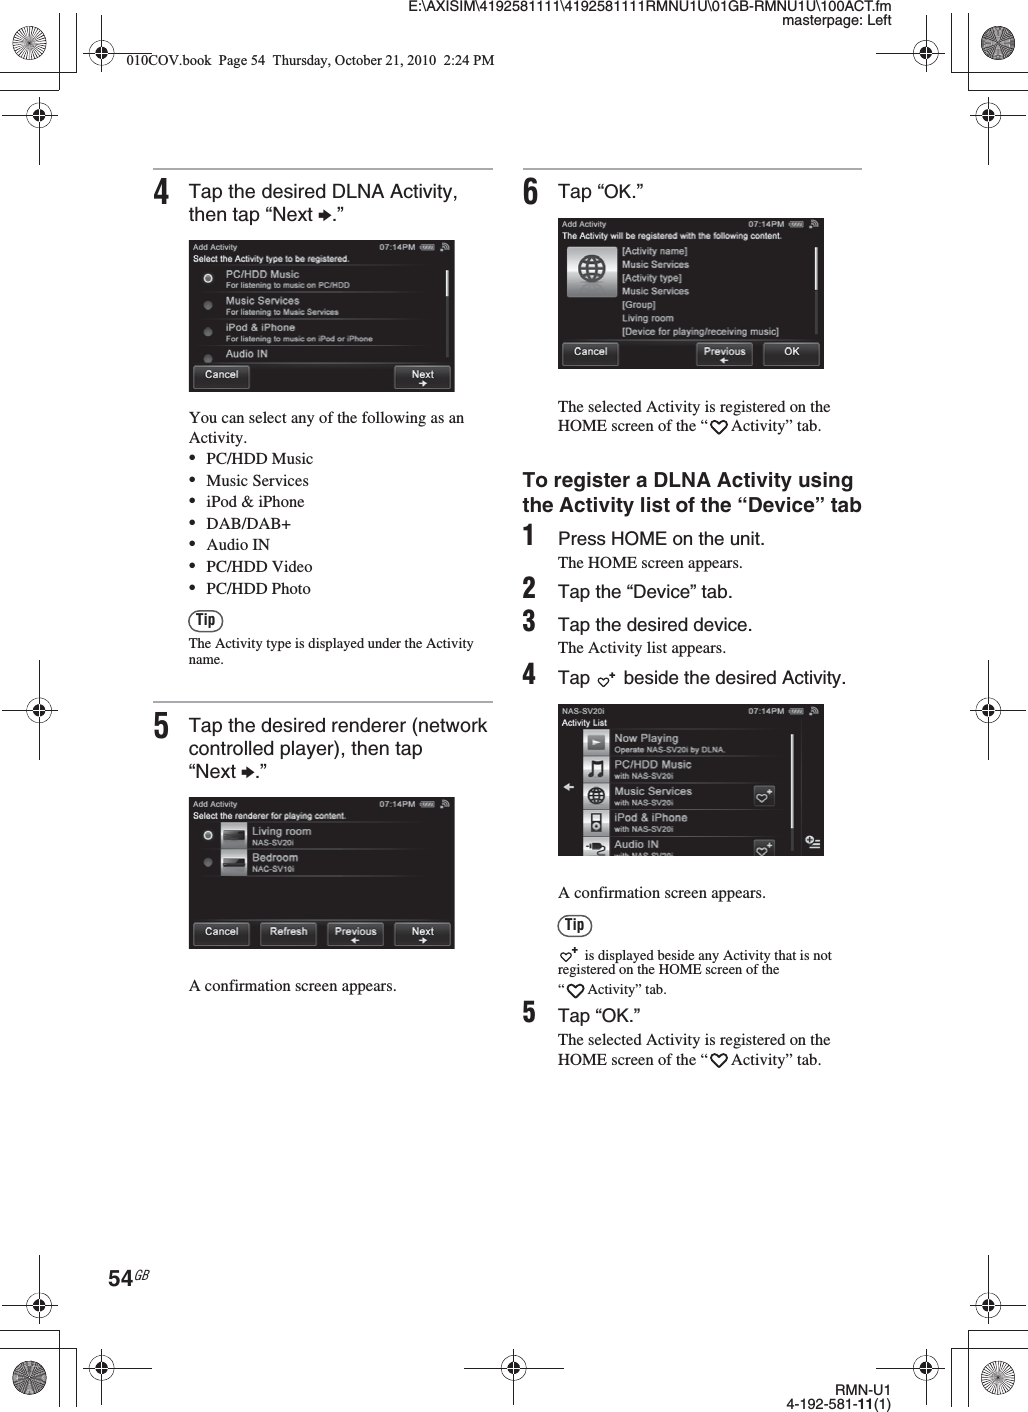
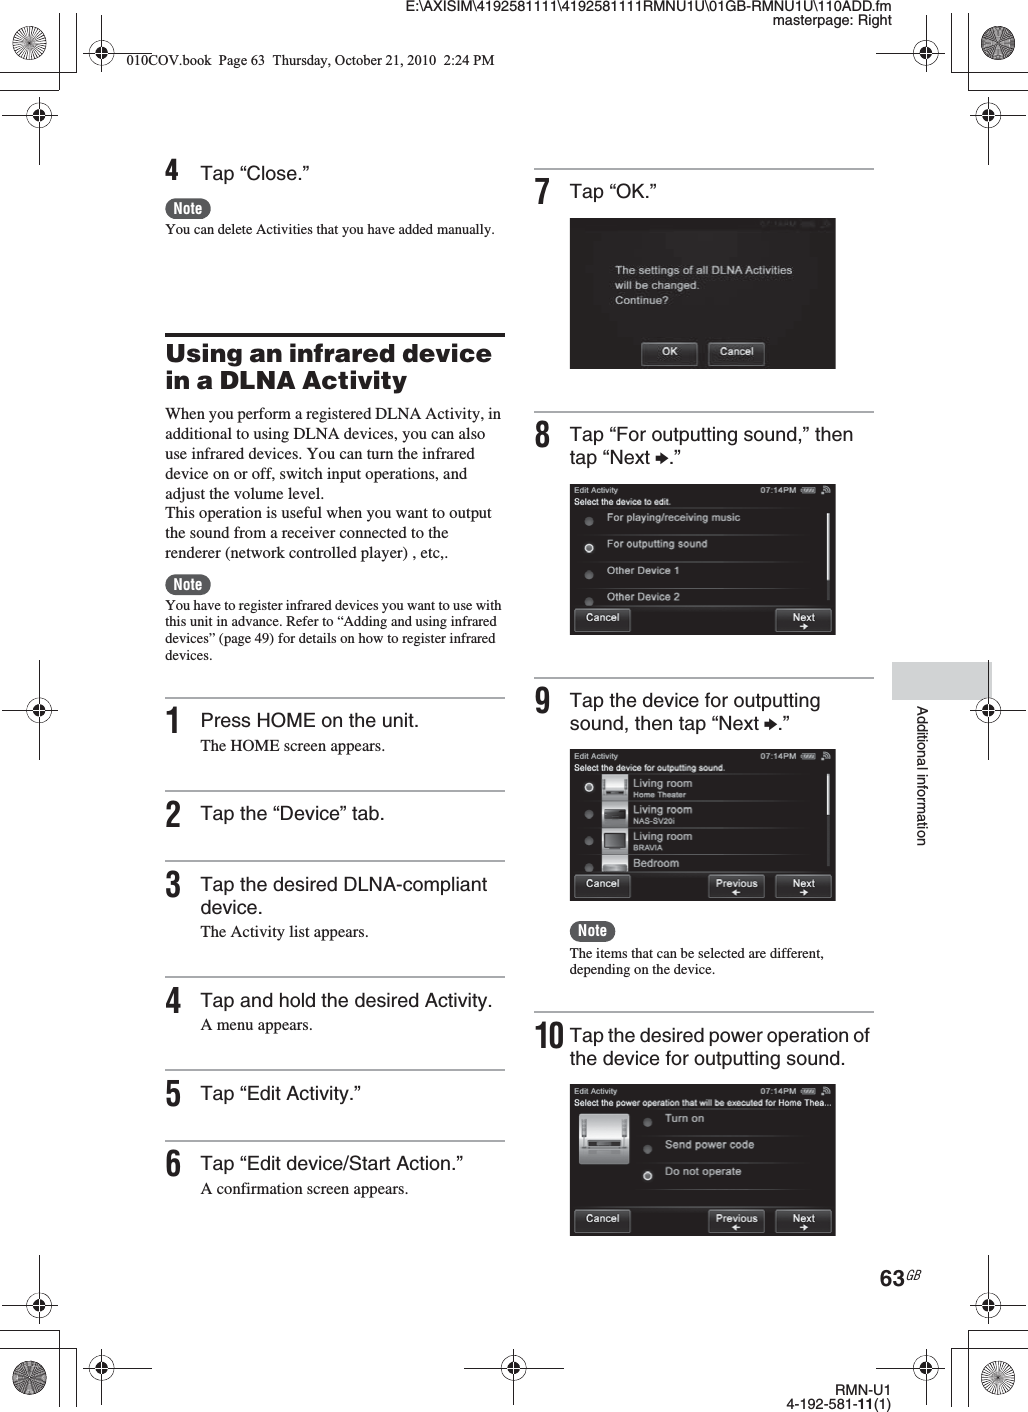
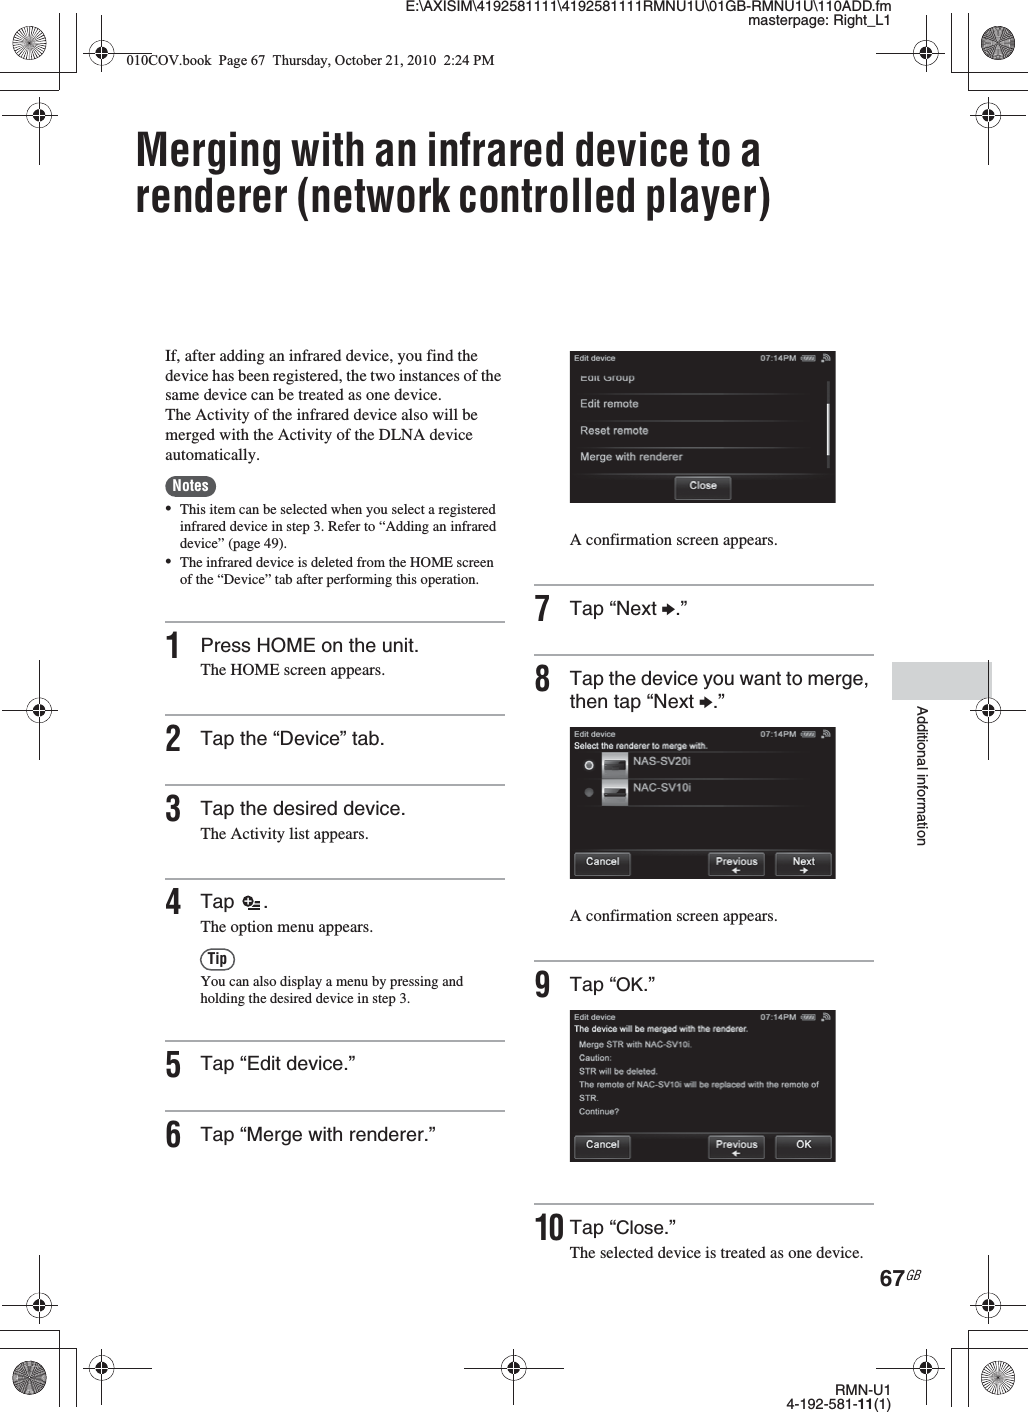
![E:\AXISIM\4192581111\4192581111RMNU1U\01GB-RMNU1U\070ENJ.fmmasterpage: RightRMN-U14-192-581-11(1)35GBEnjoying music content on your home network11Add a check mark next to [Allow new devices and computers automatically] and select [OK].Refer to “Listening to audio content on your server” (page 35) or “Watching/viewing content on your server” (page 44) for instructions on how to select the server.NoteUncheck this item after you confirm that the unit can connect to the server and audio content on the server.Setting up a server other than Windows 7, Windows Vista or Windows XPThe set-up method is different depending on the server. Refer to the operating instructions of your server.Setting up a renderer (network controlled player)The set-up method is different depending on the device. Refer to the operating instructions of your device.1Turn the renderer (network controlled player) on.2Connect the renderer (network controlled player) to your home network.3Permit access from this unit on the renderer (network controlled player) side.Listening to audio content on your serverYou can listen to audio content from the desired device. How to select “PC/HDD Music” as an Activity is explained in this section.1Press HOME on the unit.The HOME screen appears.2Tap the “Device” tab.3Tap the desired renderer (network controlled player).Activities that can be played back with the selected renderer (network controlled player) are displayed.4Tap “PC/HDD Music.”Item DescriptionNow Playing Tap to display the playback screen.PC/HDD Music*1Tap to listen to “PC/HDD Music.”Music Services*1Tap to listen to “Music Services.”iPod & iPhone*1Tap to listen to “iPod & iPhone.”DAB/DAB+*1*2Tap to listen to “DAB/DAB+.”Audio IN*1Tap to listen to “Audio IN.”Use remote (IR) Tap to display the infrared remote control screen of the selected device.010COV.book Page 35 Thursday, October 21, 2010 2:24 PM](https://usermanual.wiki/Sony-Group/RMNU1/User-Guide-1385965-Page-35.png)
![E:\AXISIM\4192581111\4192581111RMNU1U\01GB-RMNU1U\140LIC.fmmasterpage: RightRMN-U14-192-581-11(1)89GBLicense. Of course, the commands you use may be called something other than `show w’ and `show c’; they could even be mouse-clicks or menu items--whatever suits your program.You should also get your employer (if you work as a programmer) or your school, if any, to sign a “copyright disclaimer” for the program, if necessary. Here is a sample; alter the names:Yoyodyne, Inc., hereby disclaims all copyright interest in the program `Gnomovision’ (which makes passes at compilers) written by James Hacker.<signature of TyCoon>, 1 April 1989 Ty Coon, President of ViceThis General Public License does not permit incorporating your program into proprietary programs. If your program is a subroutine library, you may consider it more useful to permit linking proprietary applications with the library. If this is what you want to do, use the GNU Lesser General Public License instead of this License.GNU LESSER GENERAL PUBLIC LICENSE Version 2.1, February 1999 Copyright (C) 1991, 1999 Free Software Foundation, Inc. 51 Franklin Street, Fifth Floor, Boston, MA 02110-1301, USA Everyone is permitted to copy and distribute verbatim copies of this license document, but changing it is not allowed. [This is the first released version of the Lesser GPL. It also counts as the successor of the GNU Library Public License, version 2, hence the version number 2.1.] Preamble The licenses for most software are designed to take away your freedom to share and change it. By contrast, the GNU General Public Licenses are intended to guarantee your freedom to share and change free software--to make sure the software is free for all its users. This license, the Lesser General Public License, applies to some specially designated software packages--typically libraries--of the Free Software Foundation and other authors who decide to use it. You can use it too, but we suggest you first think carefully about whether this license or the ordinary General Public License is the better strategy to use in any particular case, based on the explanations below. When we speak of free software, we are referring to freedom of use, not price. Our General Public Licenses are designed to make sure that you have the freedom to distribute copies of free software (and charge for this service if you wish); that you receive source code or can get it if you want it; that you can change the software and use pieces of it in new free programs; and that you are informed that you can do these things. To protect your rights, we need to make restrictions that forbid distributors to deny you these rights or to ask you to surrender these rights. These restrictions translate to certain responsibilities for you if you distribute copies of the library or if you modify it. For example, if you distribute copies of the library, whether gratis or for a fee, you must give the recipients all the rights that we gave you. You must make sure that they, too, receive or can get the source code. If you link other code with the library, you must provide complete object files to the recipients, so that they can relink them with the library after making changes to the library and recompiling it. And you must show them these terms so they know their rights. We protect your rights with a two-step method: (1) we copyright the library, and (2) we offer you this license, which gives you legal permission to copy, distribute and/or modify the library.To protect each distributor, we want to make it very clear that there is no warranty for the free library. Also, if the library is modified by someone else and passed on, the 010COV.book Page 89 Thursday, October 21, 2010 2:24 PM](https://usermanual.wiki/Sony-Group/RMNU1/User-Guide-1385965-Page-89.png)